1
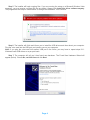
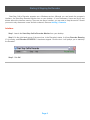
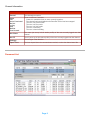
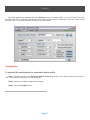
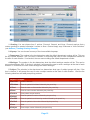
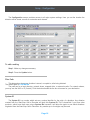
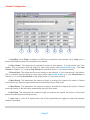
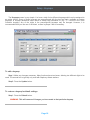
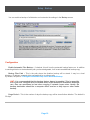
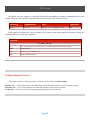
Start-Stop Call-in Recorder
- User Guide - Table of Contents -
Introduction.............................................................................................................
2
System Requirements...........................................................................................
2
Installation...............................................................................................................
3
Starting and Stopping the Recorder.....................................................................
6
The Recorder Service Information........................................................................
7
Activity.....................................................................................................................
8
Authors.................................................................................................................... 11
Setup
Configuration..................................................................................................... 16
Keymaps............................................................................................................. 18
Backup................................................................................................................ 19
Audio Format.......................................................................................................... 20
Troubleshooting..................................................................................................... 21
Page 1
Introduction
How does the Start-Stop Call-in Recorder work specifically? Up to four telephone/DID lines plug into the
external voice card, with a USB cable connecting to the desired host PC. The software is loaded and after a
few, brief configuration settings are made, the user may begin dictating from any landline or mobile phone.
Direct-wired telephony stations may also be used. As the user dictates, the data is written to the host PC.
Afterward, the file will automatically be sent to the directory you have designated.
What you will need to know before installation
➢
Which computer will you run the Start-Stop Call-in Recorder on?
(See System Requirements)
➢
Will this computer be near the necessary wiring?
➢
Will you be exporting the dictation? If so, is this computer on the network?
➢
Make sure you know the User Name and Password of the PC you are using.
Minimum System Requirements
Pentium 4 (or AMD equivalent)
512MB RAM
200MB Hard Drive space to store dictation (500MB recommended - 15MB for application itself) *
1 USB port (1.0 or higher)
CD-ROM drive (to run the installer)
Internet access (to activate Start-Stop Call-in Recorder)
Windows XP or Vista
* This is only needed if the program is configured to store the dictation files on the local computer, or has the
backup feature enabled. The minimum of 200 MB is determined by a user averaging 30 minutes of dictation a
day with a retention period of 14 days. A higher retention period or more than 30 minutes a day would require
more than the minimum stated here. You need 480K for every minute of dictation stored.
Page 2
Installation
This will walk you through the installation process. The directions at the end are for telephony lines. For
installation issues see Troubleshooting.
Software Installer
Step 1. Insert the CD. This will begin the setup.
Step 2. Accept the software agreement. Now select which model of the Start-Stop Call-in Recorder you
have: 2 or 4 ports.
Step 3. Enter the serial number. This is on the bottom of the voice card and is the last 5 numeric digits
(e.g. the sticker might read: SHT-2B/USB G0012345, with 12345 being the serial number).
Step 4. Enter a Windows administrative username and password. This can be the local account you are
logged into if it has administrative rights on the computer, or another user account. Click Next.
Note: If you don't know the administrative username and password, this information can be entered after the
installation is finished.
Page 3
Step 5. The installer will begin copying files. If you are running the setup on a Microsoft Windows Vista
computer, you may receive a prompt like the one below. Always click Install this driver software anyway.
The progress bar will stop for a while about ¾ through the installation. This is normal.
Step 6. The installer will finish and inform you to install the USB drivers and then reboot your computer.
Plug the voice card into the USB port you intend to use on your computer.
Note: If you plug the voice card into another USB port in the future, you may have to repeat steps 8-11.
Windows loads USB drivers on a per port basis.
Step 7. The computer will tell you it has found new hardware. The Found New Hardware Wizard will
appear (below). Choose No, not this time and click Next.
Page 4
Step 8. Choose Install the software automatically (Recommended) and click Next. Windows will install the
drivers. Click Finished when done. You may receive an error that says a problem occurred during the
installation, or that the drivers were not loaded successfully. If this happens, unplug the voice card and then
plug it back into the same USB port again and follow steps 7 & 8 again. The drivers should now load
successfully.
Step 10. You should now have a green light on the telephony card. Leaving the voice card plugged in,
reboot the computer. (If the light is not green, see Troubleshooting)
Step 11. Once Windows has loaded, the voice card's green light should be blinking (if the light is not
blinking, see Troubleshooting). This means the Recorder service is running (for more on this Windows
service, see Starting & Stopping the Recorder).
Step 11. Only one port will be active until the Start-Stop Call-in Recorder has verified the serial number
provided is valid. If the internet is currently not available on the computer, connect it to the internet and launch
the Start-Stop Recorder Monitor. If the serial is valid, all remaining ports will be activated.
Hardware Setup
Step 1. Plug your telephone line(s) into the appropriate jack on the voice card. Below is a picture of the
back of a 2 port voice card. Note that Line 1 = Port 1, Line 2 = Port 2, etc. Setup is complete!
Page 5
Starting & Stopping the Recorder
Start-Stop Call-in Recorder operates as a Windows service. Although you can launch the program's
interface - the Start-Stop Recorder Monitor icon on your desktop - it is not necessary. Users can log on and
dictate without the interface running. There are two ways, however, you can start or stop the service. Should
you want to only disconnect a user and idle a channel, then see Activity | Channels.
Interface
Step 1. Launch the Start-Stop Call-in Recorder Monitor from your desktop.
Step 2. On the right-hand corner of the menu bar, is the Recorder's status. It will say Recorder Running
if it is running, and Recorder STOPPED if it has been stopped. Click the text. It will prompt you to start/stop
the Recorder.
Step 3. Click OK.
Page 6
The Recorder runs as a Service: To insure the recorder will re-start automatically if the
computer ever reboots after a power outage, the recorder software run as a service.
Information about the service is shown below.
Step 1. Right-click My Computer >Manage. This will open the computer management screen.
Step 2. Expand the Services and Applications column. Click Services.
Step 3. In the list of services in the right pane, double-click CVRS Recorder.
Step 4. Under the General tab, you can Start or Stop the service.
Page 7
Activity
The Activity screen is the application's default screen. It allows you to view the status of all your channels
and disconnect a user if desired. In addition, you may view a list of dictation using a variety of filter criteria,
and listen to any of those dictations as well.
Channels
To disconnect a user and idle a channel
Step 1. Right-click the channel you wish to idle.
Step 2. Confirm you wish to place the channel on-hook.
WARNING: If you idle a channel with a user logged on, that user's dictation will be
stopped and cut off at that point. However if you have noticed that a user has been
logged on for a very long time chances are that the phone line did not disconnect
properly. In this case it is necessary to Idle the channel manually.
Page 8
Channel information
Channel
The channel/port number.
Status
There are different 7 statuses:
Channel is enabled but has no users currently logged on.
The channel has been disabled or the Recorder service has been stopped.
The user is in Record mode.
The user is in Play mode.
The user is in Stop mode.
The user is rewinding.
The user is fast forwarding.
Idle
Script Terminated
Record
In Play
Stop
Rewind
Fast Forward
User Name
The name (as set up in their author profile) of the user currently logged onto that
channel.
User ID
The ID (as set up in their author profile) of the user currently logged onto that channel.
Worktype
The worktype of that dictation.
Elapse Time
The time elapsed since the command was received, or since the channel went Idle.
Document List
Page 9
To create a list of dictation
Step 1. Using the Author ID, WT, and Dept fields, you can create a custom job criteria filter. You may set
specific criteria in each field, or leave them all blank to view all jobs.
Step 2. Press the Refresh Document List text in the menubar. You must hit this to create a new job list
based on any new filter criteria you select.
Note: Jobs in red text are “priority; jobs in black text are not.
Filter criteria
Author ID – This is the user ID for an author profile. This will only list jobs that match the author ID # you
provide.
WT – This stands for worktype. This will only list jobs that match the worktype # you provide.
Dept – This stands for department #. This will only list jobs that match the department # you provide.
Job Count
This is how many jobs (or dictations) there are in the list you created.
Dictation demographics
There are a total of 13 different columns of demographic data available for a dictation. Typically, only the
first 11 are visible. To view the additional columns, use the scroll bar or enlarge the window.
Columns
FileName
The name of the dictation file including its extension.
Author
The name (as set up in their author profile) of the user who created the dictation.
ID
The ID (as set up in their author profile) of the user who created the dictation.
Pri
(Priority) – Y=yes it is prioritized. N=no.
Subject
The dictation's subject #.
W
(Worktype) – The dictation's worktype #.
D
(Department) – The dictation's department #.
Length
The length of the dictation (hours:minutes:seconds).
AuthDate
The date the dictation was dictated.
AuthTime
The time of day (24h:m:sec) the dictation was dictated.
SysID
(System ID) – The System ID you have under Configuration will determine this.
SessionEvents
The digits received (in the order it was received) for that particular dictation.
Page 10
Authors
All author profiles are managed from the Authors screen. An author profile is a user ID used to log into
the Start-Stop Call-in Recorder and dictate. Each author profile can be customized to suit the needs of that
particular user. An unlimited number of profiles may be created.
Configuration
To view/edit the configuration for a particular author profile
Step 1. Click the arrow on the Select an Author Profile drop down menu. Select the profile you wish to
view. That profile's configuration is now displayed.
Step 2. Make any needed configuration changes.
Step 3. Press the Update button.
Page 11
1. Greeting. You can choose from 3 options: Personal, General, and None. Personal requires that a
custom greeting be created, otherwise it reverts to None. General simply says “Welcome to Voice Solutions”
(see Authors | Creating Greeting Prompts).
2. Keymap. You can choose from any of the nine available keymaps.
3. Department. The number in the box determines what the default department number will be. This can
be any number between 1-99. If the box is checked, it will prompt the user to enter a department number at
the start of each dictation. If unchecked, the user cannot change the default department number.
4. Worktype. The number in the box determines what the default worktype number will be. This can be
any number between 0-99. If the box is checked, it will prompt the user to enter a worktype at the start of each
dictation. If unchecked, the user cannot change the default worktype.
5. Subject. The selection in the drop down box determines what type of subject prompt will play. If the
box is checked, it will prompt the user to enter a subject number at the start of each dictation. Here are the
following selections and what prompt they produce:
Subject Prompts
EsBarcode
Scan the barcode
EsBirthdate
Enter the patient's birth date followed by the pound key
EsClient
Enter the case or client number followed by the pound key
EsExam
Enter the exam number followed by the pound key
EsPatAcct
Enter patient account number
EsPatient
Enter the patient ID number followed by the pound key
EsPatSSN
Enter the patient's social security number followed by the pound key
EsPatVisit
Enter the patient's visit number followed by the pound key
EsScan
Scan
EsSubject
Enter subject number followed by the pound key
Page 12
6. Record Gain. This determines the level at which audio is recorded with this profile. -4 represents the
quietest setting, and 3 the loudest. Adjusting the gain is a good way of compensating for exceptionally loud or
soft speakers, as well as dictation method (cellphone, landline). This is cumulative with the setting for each
channel under Configuration (e.g. If the Record Gain for channel 1 is 3, and the Record Gain for the author
profile is -3, the result will be 0 if dictated on that channel).
7. Play Volume. This determines the level at which audio is played back when reviewing. -4 represents
the quietest setting, and 3 the loudest. This is cumulative with the setting for each channel under
Configuration (e.g. If the Play Volume for Channel 1 is 3, and the Play Volume for the author profile is -3,
the result will be 0 if dictated on that channel).
8. Prompt Volume. This determines the level at which the prompts are played. -4 represents the quietest
setting, and 3 the loudest.
9. Rev/Play Increment. This determines how far the dictation will automatically rewind when the user
presses Play. This is also known as auto backspace. The number can be from 1-999, and is multiplied by
1/10th of a second. (Ex. 10 = 1 second, 25 = 2.5 seconds).
10. Rwd & F.Fwd Increment. This determines (in seconds) how far the dictation will rewind or fast
forward with each beep. The number can be from 1-99.
11. Auto Record. If the box is checked, the user will automatically go into record mode at the beginning
of a new dictation without pressing any digits. If unchecked, the user will have to press the record digit at the
start of each new dictation.
12. Ready Prompt. If the box is checked, the user will simply hear a “Ready” prompt when starting a new
dictation. If unchecked, the user will hear the standard “Press 2 to begin dictating” prompt.
13. Stop Tone. If the box is checked, the user will hear a soft beep when in stop mode. This reassures
the user that he has not been disconnected and reminds him that he is currently not recording. If unchecked,
the user will hear nothing when in stop mode.
14. Talkoff Suppression (TOS). Talkoff is when an author's voice sounds like a touch tone digit and
causes the system to stop recording or do and unwanted function. By Checking TOS it will restrict the valid
touch tone digits that can stop the recording and/or cause an unwanted function. Only use when necessary.
15. Alternate File Path. If the box is checked, all of that user's dictation will be saved to the path entered.
This can be a local directory or a network share. If unchecked, the dictation destination configured under the
Configuration tab applies to that author profile. (See Configuration | Files Path)
To duplicate an author profile's configuration
Step 1. Click the arrow on the Select an Author Profile drop down menu. Select the profile you wish to
duplicate. That profile's configuration is now displayed.
Step 2. Press the Copy button.
Step 3. Click the arrow on the Select an Author Profile drop down menu. Select the profile you wish to
duplicate the configuration to.
Step 4. Press the Paste button.
Page 13
To create a new author profile
Step 1. Press the + button. The screen below appears.
Step 2. Enter a unique UserID. This can be any number from 1-999999.
Step 3. Enter a unique Name. This can be any combination of alphanumerics up to 15 characters long.
Step 4. If you would like your new profile to have the same configuration as a previous profile, select it
from the Model drop down box. If you want your new profile to be created with a blank configuration, then
leave the field blank.
Step 5. Press the Add button.
HINT: Use the list of users on the left to see what user IDs and names have already been
created. This will assist you in creating a unique ID and name for your new profile.
To delete an author profile
Step 1. Click the arrow on the Select an Author Profile drop down menu. Select the profile you wish to
delete. That profile's configuration is now displayed.
Step 2. Press the - button.
Page 14
Creating Greeting Prompts: This is a great feature that lets the author know he/she has
entered the correct User ID Number. Usually you will record a greeting prompt saying the
following; “Thank you Dr. Jones” or “Thank you Joe” (or their last name).
To create a new personal greeting prompt
Step 1. Call the Start-Stop Call-in Recorder just like you would to dictate.
Step 2. At the “Please enter user ID” prompt, enter 990#. You will hear, “Welcome system administrator”.
Step 3. Enter the user ID of the author profile you wish to create a custom greeting for, followed by the
pound key.
Step 4. Follow the prompts, and press 2 to record your custom greeting. Press 33 when finished.
Step 5. To accept your personal greeting, press #. You may also review it by pressing 3, or re-record it by
pressing 2. Hang up when finished.
To edit a personal greeting prompt
Step 1. Call the Start-Stop Call-in Recorder just like you would to dictate.
Step 2. At the “Please enter user ID” prompt, enter 990#. You will hear, “Welcome system administrator”.
Step 3. Enter the user ID of the author profile you wish to edit, followed by the pound key.
Step 4. Follow the prompts, and press 2 to record your custom greeting. Press 33 when finished.
Step 5. To accept your personal greeting, press #. You may also review it by pressing 3, or rerecord it by
pressing 2. Hang up when finished.
Page 15
Setup - Configuration
The Configuration screen provides access to all major system settings. Here you set the location the
dictation will be stored, as well as customize each channel.
To edit a setting
Step 1. Make any changes necessary.
Step 2. Press the Update button.
Files Path
This determines where your dictation is stored, or copied to, after being dictated.
The default path is: C:\HTH\Files
The path can be a local directory, network share, mapped drive, or external media. For network shares,
you may use the UNC or IP (if static). Click the button beside the the box to browse for your destination.
System ID
The System ID is a number which acts as a unique identifier for the origin of a dictation. Any dictation
created from the Start-Stop Call-in Recorder will have this System ID. This is beneficial if you have other
products which have there own unique System IDs because it will allow the typist to see which dictations
originated from the Start-Stop Call-in Recorder. Any number up to four digits may be used.
Page 16
Channel Configuration
1. Loop/Ring. Set to Ring if a telephone or DID line is connected to that channel. Set to Loop only if a
direct-wired telephony station is connected to that channel.
2. Play Volume. This determines the playback volume on that channel. -3 is the quietest and 3 the
loudest. This is cumulative with the setting for each user's profile under Author Profile (e.g. If the Play
Volume for Channel 1 is 3, and the Play Volume for the author profile is -3, the result will be 0).
3. Record Gain. This determines the record volume on that channel. -3 is the quietest and 3 the loudest.
This is cumulative with the setting for each user's profile under Author Profile (e.g. If the Record Gain for
Channel 1 is 3, and the Record Gain for the author profile is -3, the result will be 0).
4. Max Record. This determines the maximum length (in minutes) the channel will remain in Record
mode without any digits being pressed before automatically going into Stop mode.
5. Max Silence. This determines the maximum length (in seconds) the channel will remain in Record
mode with silence on the line before automatically going into Stop mode.
6. Max Stop. This determines the maximum length (in minutes) the channel will remain in Stop mode
before automatically disconnecting the user.
7. Auto Log. If a user ID is entered here, that ID will automatically be logged on when that particular
channel is accessed.
Page 17
Setup - Keymaps
The Keymaps screen is very simple. You have a total of nine different keymaps which can be assigned to
an author profile. Seven of those keymaps are preconfigured with the last two blank, available as custom
keymaps. A keymap determines which action a certain digit translates to (e.g.. 2 = Record in the Voice
Solutions keymap). Any of the digits in the preconfigured keymaps may be changed. However, it is
recommended that you use one of the blank, custom keymaps if that is necessary.
To edit a keymap
Step 1. Make any changes necessary. Many functions have two boxes, allowing two different digits to be
used. The second box is typically only used with telephony dictate stations.
Step 2. Press the Update button.
To restore a keymap's default settings
Step 1. Press the Default button.
WARNING: This will remove all changes you have made to that particular keymap.
Page 18
Setup - Backup
You can enable a backup of all dictation and customize the settings in the Backup screen.
Configuration
Enable Automatic Files Backup – If checked, this will turn the automatic backup feature on. In addition
to sending dictation to the destination path you have designated, it will create an additional backup copy.
Backup Files Path – This is the path where the dictation backup will be stored. It may be a local
directory, IP address, mapped drive, removable drive, or other media.
By default, the path is: C:\Program Files\Start-Stop Call-in Recorder\Backup
HINT: It is recommended that the backup feature always be enabled. This is especially
true if you have a mapped drive or network share as the dictation's destination. Although
rare, files can sometimes be lost when copying if network issues arise. Ideally, the
backup destination should be a computer which receives a daily tape or other media
backup.
Purge Period – This is the number of days the backup copy will be stored before deletion. The default is
30 days.
Page 19
File Format
All dictation files are created in a wave file format with demographic information embedded into the file's
header. Below are some details about the file format Start-Stop Call-in Recorder uses.
Encoding
Compression
Size
Extension
Wave
8 bit 16k
480K per min – 28.8MB per 1 hour
.wav
Each dictation created has a unique filename that contains basic demographic information. Below is a
table describing what each part represents.
Filename
21_Smith_125.wav
21
This number goes up sequentially (up to 6 digits long) with each new dictation
Smith
Author's name
125
Author ID (up to 6 digits long)
.wav
Wave format extension
Software Versions Version
The current version of software you are runnings can be found under Menu>Help.
Monitor Ver. = This is the version of the Start-Stop Call-in Recorder interface you are currently using.
Recorder Ver. = This is the version of the Recorder system service you are running.
Scripts Ver. = This is the version of the programming scripts you are running.
Page 20
Troubleshooting
Problem: The green light on the voice card does not come on after the software and driver
installation.
Solution:
1. If you have not done so already, reboot your PC.
2. Did the voice cards drivers install correctly? If not, try repeating the installation steps on connecting
and installing the drivers. Is the voice card even being noticed by Windows? If not, try a different USB
port.
Problem: The green light on the voice card is not blinking (but is on).
Solution:
1. The Recorder service is not running. See the Starting & Stopping the Recorder section on how to
start the service.
2. An incorrect serial number entered during installation will produce this error. To verify it is not a serial
typo, uninstall and reinstall Start-Stop Call-in Recorder. Carefully verify you type the serial number
correctly.
Your Troubleshooting Notes go below:
Page 21