1
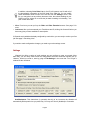
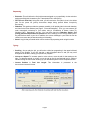
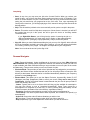
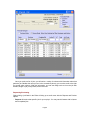
Introduction
iChannel Lite is a powerful and user friendly application that makes transcribing easy and
simple. It operates by using a shared network folder as its central file database (such as one on
your network server). To help make iChannel Lite an enjoyable experience, there is a thorough
FAQ at the end for common questions users have. Let's start by opening iChannel Lite.
Getting Started
First, you will want to type your name in the TransName box. You may change the name at any
time in the future, should you need to. Note: Do not include any non alphabetic characters or
numbers in your name (such as _ or - and etc). Use only A-Z.
Second, you need to enter the user ID that you were provided in the ID box. This will determine
what jobs you receive, as many jobs are often assigned to just one transcriptionist by exclusive
assignment.
Menubar
•
File: Here you can access the application's Settings and Help file, as well as Exit the
program.
Page 1
In addition, selecting Print PNav List (or Ctrl+P) will create a text file with all of
the demographic information of the files listed in the PNav list. You can modify
which information fields are sent to the text file from the Settings. Once a text
file, you may print it as any ordinary document. Also, the column headings in your
PNav list can be clicked on to resort the job data according to its heading – the
print out will reflect this.
•
View: From here you can pull up the PNav and PNav Extended screens. See page 5 for
more.
•
Job Count: After you have entered your TransName and ID, clicking Job Count will inform you
how many jobs you have available for transcription.
If iChannel was installed and already configured by a technician, you are ready to receive your first
job! See page 3 “Receiving Jobs”.
If you wish to make configuration changes, you need to go to the settings screen.
Settings
iChannel Lite offers a variety of audio settings you can configure to meet your needs. More
than likely, you will rarely need to alter the configuration which the technician originally set up.
However, should you need to, start by going to File>Settings in the menu bar. You will get a
window like the one below.
AutoBackspace: This determines (in seconds) how big of an increment the dictation will
automatically backup each time you press Play. You may set it from 0 (disabled) to 5 seconds.
Page 2
Wind Increment: This determines (in seconds) at what increment you will rewind or fast
forward through a file. You may set it from 0 to 20 seconds.
Always On Top: When selected, the iChannel Lite window will always remain on top of other
applications.
Minimize Upon Play: If checked, the iChannel Lite window will minimize to the taskbar when
you begin to play the dictation.
Transpose Pedal: This will switch the Rewind/FastForward buttons on your foot pedal, making
the right pedal FastForward, and the left pedal Rewind. Play is always the center pedal.
Auto Queue: If checked, iChannel Lite will automatically present you the next available job
(should there be one) after you have Signed Off (finished transcribing) the current one.
ServerName (UNC): The path to the shared dictation directory must be entered here. Contact
your system administrator for this information.
PNavSort Option: Pull Priority jobs first despite their list position: If checked, when using
the PNavSort request option, jobs marked Priority will be pulled first, ignoring their position in the
PNav list. When unchecked, jobs will be received exactly as they are shown in the list.
Exclusive Notification: This enables the worklight feature that runs on your taskbar.
•
Frequency - You can specify how often (in minutes) iChannel Lite checks for new jobs.
DS4000 Dss Import: Use WT Data for Exc Assignment: If dss files are being imported
directly to iChannel Lite's central files directory, the DS-4000's WT (worktype) information will be
used for the Exclusive Assignment field thereby entering a 0 for WT. Otherwise, the DS-4000's
WT would correspond to iChannel's WT field and no exclusive assignments would be designated.
Completed Purge: You may enter a number from 1-30 in the Elapsed Days box. This
determines the number of days a Completed job remains in the files directory before deletion.
Receiving Jobs
iChannel Lite offers a variety of criteria in which to receive jobs. Highlighted below are the 4
transcribe modes available. When you have decided which one to use, click Request.
Page 3
Requesting
•
Exclusive: This will deliver the first job that was assigned to you specifically via the exclusive
assignment field (this is based on your Transcription ID # in the ID box).
•
FIFO (First In First Out): Using this mode, you will receive the First jobs In, that is, the oldest
jobs on the queue list (priority documents always being queued before non-priority
documents).
•
PNavSort: This option provides the greatest versatility. It will provide jobs in the order that they
are listed in the PNav window (see page 5, “Personal Navigator”). Thus, you can create a job
order customized exclusively to your needs, using a combination of Status, Author ID,
Worktype (WT), Department, and etc. You may also check the PNavSort Option: Pull
priority jobs first despite their list position box in the Settings to force Priority status jobs to
be pulled before those in your list. In addition, the column headings in your PNav list can be
clicked on to resort the job data according to its heading.
•
Saved: Any job that you saved earlier can be retrieved by requesting work using this mode.
Typing •
Scrolling - As you play the job, you will notice a blue bar progressing in the upper-left hand
portion of the window. If you click that bar, a tab will appear above it and you may scroll
throughout the dictation, setting your position for playback.
•
Volume and Speed: To increase speed or raise volume, move the tab for that setting to the
right. To decrease speed or volume, move the tab to the left until desired level is reached.
Double-clicking the volume bar will bring up your Windows System Volume Properties screen.
•
Current Position & Total
hours:minutes'seconds' format.
Job
Length:
Page 4
This
information
is
presented
in
the
Completing
•
Save: At any time, you may save your job at the Current Position. When you retrieve your
saved file later, you will be at the same playing position as when you left off. Example: If you
had a 10 minute dictation, but your Current Position was 5:42 (or 5 minutes and 42 seconds),
saving the job would keep your progress bar at the 5:42 mark. Thus, upon requesting the
Saved job at a later time, you will begin playing at 5:42, instead of having to fast forward to the
desired position.
•
Skip: This will send the job back to the server and will provide you the next job in the queue.
•
Return: This works much like Skip does, except even if Auto Queue is checked, you will NOT
be provided the next job in the queue, but will be given the choice of choosing another
Transcribe Mode.
If you Right-Click Return, you will be given the option of returning the job to a
different transcriptionist (you must enter the ID number of that transcriptionist),
changing the WT (worktype), Dept (Department), Subject, and Priority status.
•
Sign Off: When you have finished transcribing the job, you may click SignOff, which will mark
the file as Completed, and take it out of the queue. However, you may still retrieve the dictation
for reviewing, until the job is purged. The length of time depends on your configuration.
Note: You must be at the end of a job to Sign it Off.
Personal Navigator
PNav (Personal Navigator). Under the View tab in the menu bar you have PNav View and
PNav Extended. Both of these options expand the iChannel Lite window to provide you with a list
of jobs available (with PNav Extended offering a longer window to see more jobs on the screen
simultaneously). There are two modes you can use to search for jobs.
•
Exclusive Mode: This provides you with a list of jobs that are only assigned to you exclusively.
Clicking the Refresh button located beneath the job list will prompt PNav to search the files
directory at that instant. Otherwise the list is refreshed automatically based on your Frequency
preference in the Settings menu.
•
Browse Mode: This allows you to use the Status, Exclusive, Accessed By, Author ID, WT
(Worktype) and Dept (Department) fields to refine your search. They can be used in any
combination. Clicking the Refresh button located beneath the jobs list will prompt PNav to
search the directory once more.
- Status: Typically this is set to In Queue which will bring up jobs available for transcription.
You may also choose to look at Completed (transcribed), Saved Trans (saved by a
transcriptionist for completion at a later time), In Trans (currently being transcribed), and All
Active Documents (all dictation files in the directory, regardless of status).
- Exclusive: Choose the transcriptionist you wish to view exclusive assignments for.
- Accessed By: This refers to jobs that have been requested, and “touched” so to speak, by a
transcriptionist.
- Author ID: Choose the author ID whose dictations you wish to view.
- WT (worktype): Type in the worktype number which you wish to search for.
- Dept (department): Type in the department number which you wish to search for.
Page 5
Once you receive a list of jobs, you will notice a variety of columns with information about that
particular job. Besides the ones you see in the screenshot (above), you can also scroll to the right
for several other columns. With this information, you can see things such as: time the job was
dictated, length of job, priority status, and much more.
Requesting/Previewing
Right-clicking a job listed in the PNav will bring up a small menu with the Request and Preview
options.
–
Request will retrieve that specific job for you to play it. You may use this feature with In Queue
and Completed jobs.
Page 6
–
Preview will play the first few seconds of a job. The length of the preview can be adjusted from
1-15 seconds via a sliding bar on the bottom right-hand section of the PNav screen.
Shortcuts
Alt+R (Refreshes the PNav list)
Alt+S (Signs a job off)
Ctrl+P (Prints a PNav list)
Double-click a job from the PNav list (Requests that particular job)
Page 7
Frequently Asked Questions
Q: Can I receive another transcriptionist's work?
A: Yes. You have two methods (see method #2 if you want to receive another transcriptionist's
saved jobs).
1.) Using Pnav (accessible from the View menubar), select Browse Mode to filter jobs. Under the
Exclusive field, you may select that particular transcriptionist's ID, or leave it at Any Secretary.
Upon refreshing, you will see that transcriptionist's jobs and be able to Right-Click>Request just
like you do when operating under the Exclusive Mode. The only limitation is that you may not
request another transcriptionist's Saved job. See method #2.
2.) At the main iChannel Lite window, in the ID box, enter the ID number of the transcriptionist you
want work from. Quit iChannel and reopen it. Now go about requesting work as usual. You will
receive all of the exclusive jobs assigned to the new ID you entered, as well as be able to load any
Saved jobs that the transcriptionist has from the past. When you want your work again, simply put
back your information in those fields, quit and reopen iChannel.
Q: I was assigned another transcriptionist's job by mistake or wish to change the job's
demographics (worktype, department, etc) . How do I do that?
A: When this happens, you must first request the job, then if you Right-click Return (to return the
job), you will be given the option of entering the ID number of the transcriptionist you want the job
to be reassigned to. For example, if that person's ID was 904, you could type 904 or simply 4 in
that field. You may also select a transcriptionist from the drop-down list.
Q: iChannel Lite left a job marked as In Transcription and it will not allow me to retrieve it
now. How can I put it back as In Queue to receive and transcribe it again?
A: Using the PNav view, and selecting Browse Mode, choose the In Trans option under the
Status filter field. Click Refresh, and you will see a list of jobs marked as In Trans (In
Transcription). Left-click the job which you wish to return to the queue and scroll all the way to the
right until you see the FileName column in the PNav list. In this column, Right-Click the highlighted
job (just as you would if you were going to choose the Request option) and select Return to
Queue. Click OK to the warning screen that appears. You may now go about retrieving that job.
Page 8