1
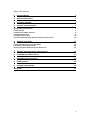
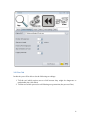
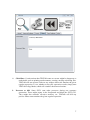
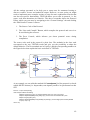
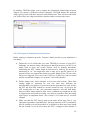
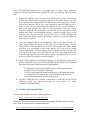
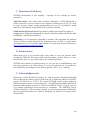
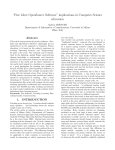
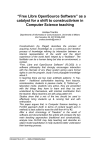
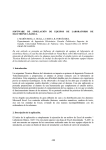
Test* TESTAR User Manual Version 1.1a Tanja E.J. Vos Urko Rueda Molina Mirella Martínez Francisco Almenar Anna I. Esparcia contact: [email protected] 1 Table of Contents 0. REQUIREMENTS 3 1. INSTALLING TESTAR 3 2. STARTING TESTAR 3 3. SETTING UP YOUR TESTS 4 3.1 GENERAL SETTINGS TAB 3.2 FILTER TAB 3.3 SPECIFYNG SIMPLE ORACLES 3.4 TIME SETTING TAB 3.5 MISCELLANEOUS TAB 3.6 SPECIFYING ADVANCED ORACLES AND ACTION SELECTION 4 6 8 9 10 11 4. RUNNING THE TOOL 14 4.1 ACTION VISUALIZATION IN SPY-‐MODE 4.2 WIDGET TREE VISUALIZATION 4.3 TEST SEQUENCE GENERATION AND EXECUTION 14 14 15 5. VIEWING AND REPLAYING THE RESULTS 16 6. FURTHER DOCUMENTATION 17 7. EXPERIMENTAL FEATURES 18 8. KNOWN ISSUES 18 9. ACKNOWLEDGEMENTS 18 APPENDIX 19 2 0. Requirements The current version of TESTAR runs on Windows 7 64 bit. To ensure that TESTAR runs on your system you need to install the Java Development Kit (JDK) x64 in version 1.8 (1.7 and 1.6 should also work). 1. Installing TESTAR TESTAR comes in a file called TESTAR_vX.X_win_x64.zip, which contains all files necessary for its execution. Just unzip this file into a directory with write-access. There is no setup routine. 2. Starting TESTAR Within the main directory you will find several files, which are crucial for the execution of TESTAR. The most important one is testar.bat. Double-click on it and TESTAR will start and display the main screen: 3 As shown in the picture above, the main screen contains four buttons, which start TESTAR into its four main modes: 1. Start in Spy-Mode: This mode does not execute any actions. It will start the System under Test (SUT) and allows you to inspect the GUI. You can use different commands in this mode to see more or less information: o Shift + 1 will show the set of actions that TESTAR recognizes, so you can see which ones will be executed during test. o Shift + 2 highlights the widget under cursor. Also, you will be able to see its role and an array that contains the path you need to follow in order to locate it inside the widget tree. o Shift + 3 displays information of the widget under cursor (see Section 4.2 for further information). 2. Start in Generation-Mode: This mode will start the SUT and execute a full test on the SUT. Switching to GenerateManual mode (Shift + Arrow Left) you will be able to take the control at any time. 3. Start in Replay-Mode: This mode replays a previously recorded sequence. TESTAR will ask you for the sequence to replay. 4. Start in View-Mode: The View-Mode allows you to inspect all steps of a previously recorded sequence. Contrary to the Replay-Mode, it will not execute any actions, but only show you the screenshots that were recorded during sequence generation. This is ideal if a sequence turns out not to be reproducible. 3. Setting up your tests 3.1 General Settings TaB The Screenshot below shows the tab with the general settings for TESTAR 1. Path to the SUT: Pick the executable of the SUT or insert a custom command line (p.e. java -jar "suts/calc.jar"). For web applications, follow the format <Path_to_your_Browser.exe> <URL of your SUT> in the field Path to the SUT. For API related problems, we recommend for now the use of Internet Explorer in order to get the correct identification of widgets. For example: "C:\Program Files\Internet Explorer\iexplore.exe" "http://www.youtube.es/" 4 2. Number of sequences to generate. A recommended value would be within the range 10 and 100. However, when you have a new SUT it is better to start using a lower value (e.g. 3) in order to be able to check if everything works as expected. 3. Sequence length: After having executed the given amount of actions, TESTAR will stop the SUT and proceed with the next sequence (a value within 15 and 500 is recommended). 4. Force the SUT to the foreground: During test generation, the SUT’s windows might get minimized or other processes might block its GUI. If you check this option, TESTAR will force the SUT to the foreground. 5. Stop sequence generation on fault: If TESTAR detects an error, it will immediately stop sequence generation. 6. Logging verbosity: The higher the value, the more information will be written to the log-file. The log-files of each run can be found in the output directory and contain information about the actions that were executed, the faults that were found and potential problems that occurred during the test (however, we do not recommend altering this number). 7. Edit the TESTAR Protocol: By clicking this button you will open the Protocol Editor. As we will see later on in this Manual, this editor allows you to override and extend the basic functionality in order to implement complex action sets and sophisticated oracles. 8. Load settings file. If you have a specific setup that you saved into a file, you can load it here. This is ideal for switching between different settings for the same SUT or between the settings of different SUTs. 9. Save the current settings to a file. Remark: TESTAR automatically saves all setting changes you make. Thus you do not explicitly have to save your settings to a file every time you make an adjustment. 5 3.2 Filter Tab In this tab you will be able to do the following two things: 1. Tell the tool which actions not to click because they might be dangerous or undesirable (the click-filter) 2. Tell the tool which processes to kill during test generation (the process filter) 6 1. Click-filter: Certain actions that TESTAR wants to execute might be dangerous or undesirable, such as printing out documents, creating, moving or deleting files. TESTAR will not execute clicks on any widget whose title matches the given regular expression. To see whether or not your expression works, simply start TESTAR in Spy-Mode, which will visualize the detected actions. 2. Processes to kill: Some SUTs start other processes during test sequence generation. These might popup in the foreground and block the SUTs GUI. They might also consume excessive memory, etc. TESTAR will kill any process whose name matches the given regular expression. 7 3.3 Specifyng Simple Oracles In order to detect faults, you need to tell TESTAR what to look for. In the “Oracle” tab you can specify a simple oracle, which analyzes each state of the GUI and reports errors. The screenshot below shows TESTAR’s oracle settings: 1. Suspicious Titles: In this text box you can enter a regular expression that describes those messages that you consider to be related to possible errors. TESTAR will apply this expression to each title of each widget on the screen. If it matches any widget’s title, TESTAR will report an error and save the sequence for later inspection. For example: Imagine you are looking for a critical message box with the title “A NullPointerException Exception has been thrown”. You could simply add the expression “.*NullPointerException.*” which will match any title that contains the word “NullPointerException” (the “.*” are placeholders for arbitrary characters). To learn more about Regular Expressions see http://en.wikipedia.org/wiki/Regular_Expression 8 2. Freeze Time: TESTAR is able to detect crashes automatically, because it realizes when the SUT is not running anymore. However, if the SUT does not really crash, but just freezes (is unresponsive) for a long time, then TESTAR does not know whether it is just carrying out heavy computations or hangs. If the SUT is unresponsive for more than the given amount of seconds, TESTAR will consider it to be crashed and mark the current sequence as erroneous (a value within 8 and 30 is recommended). 3.4 Time Setting Tab The time Settings tabs, allows the user to configure the following: 1. Action Duration: The higher this value, the longer the execution of actions will take. Mouse movements and typing become slower, so that it is easier to follow what TESTAR is doing. This can be useful during Replay-Mode, in order to replay a recorded sequence with less speed to better understand a fault. 9 2. Time to wait after execution of an action: This is the time that TESTAR pauses after having executed an action in Generation-Mode. Sometimes it can make sense to give the GUI of the SUT more time to react, before executing the next action. If this value is set to a value > 0, it can greatly enhance reproducibility of sequences at the expense of longer testing times (a value within 1 and 10 is recommended). 3. SUT startup time: This is the time that TESTAR waits for the SUT to load. Large and complex SUTs might need more time than small ones. Only after this time has expired, TESTAR will start sequence generation. To calculate this value you can start your SUT to find out how long it takes to boot. 4. Maximum test time (seconds): TESTAR will cease to generate any sequences after this time has elapsed. This is useful for specifying a test time out, e.g. “1 hour”, “one day”, “one week”. 5. Use Recorded Action Timing during Replay: This option only affects Replay-Mode. If checked, TESTAR will use the action duration and action wait time that was used during sequence generation. If you uncheck the option, you can specify your own values. 3.5 Miscellaneous Tab This tab contains some settings that are less frequently used. 1. Output directory: This determines the directory where TESTAR outputs recorded sequences, log-files and state snapshots. We do not recommend changing this. 2. Temporary Directory: TESTAR will use this directory to store temporary files during the execution of sequences. 3. Files to copy before SUT start. When you start the SUT, sometimes it can be useful to restore certain configuration files to their default, so that the SUT always starts in the same state. Therefore you can define pairs of paths (copy from / to). TESTAR will copy each specified file from the given source location to the given destination. Simply click the text-area and a file dialog will pop up. 4. Files to delete before SUT start: Certain SUTs generate configuration files, temporary files and files that save the system’s state. This might be problematic during sequence replay, when you want a system to always start in the same state. Therefore, you can specify these files, to be deleted before the SUT gets started. If you click the text-area, a file dialog will pop up which allows selecting files and directories to be deleted. 10 3.6 Specifying Advanced Oracles and action selection 11 All the settings presented so far help you to setup tests for automated testing to discover crashes, freezes and undesired output. However, at some point you might need to implement more complex actions or setup for more sophisticated oracles that can also test specific functionality. TESTAR allows you to edit its protocol, i.e. the source code that determines its behavior. The above screenshot shows the Protocol Editor, which you can enter by navigating to the “General Settings” tab and clicking the “Edit Protocol” button. It shows: 1. The Source Code of the Protocol 2. The “Save and Compile” Button, which compiles the protocol and saves it to be used during the next test. 3. The Error Console, which informs you about potential errors during compilation. The source code used in the protocol is plain Java. The methods in the class each correspond to the way TESTAR works and give you the possibility to adapt the default behavior. The Java methods are in Listing 1 and the corresponding numbers in the Figure below that explain the basic workflow of TESTAR. SCAN GUI + OBTAIN WIDGET TREE START 03 SUT Domain Experts DERIVE SET 06 OF USER ACTIONS optional instrumentation SUT Oracle 04 11 07 more sequences? SELECT ACTION Yes Action Definitions STOP10 SUT No 09 more actions? Replayable Erroneous Sequences EXECUTE 08 ACTION No Yes 05 FAULT? 05 ORACLE As an example you can edit the method SUT startSystem() of the protocol to check which INPUT actions (i.e. keystrokes, text inputs) need to be performed on the SUT. SUT sut = super.startSystem(); new CompoundAction.Builder() .add(new Type("user"),0.1) // assume keyboard focus is on the user field .add(new KeyDown(KBKeys.VK_TAB),0.5) // assume next focusable field is pass .add(new Type("pass"),0.1) .add(new KeyDown(KBKeys.VK_ENTER),0.5).build() // assume login performed by ENTER .run(sut, null, 0.1); return sut; 12 // initial setup before starting S UT test 01. void initialize(Settings settings) // clean-‐up tasks for new test runs 02. void beginSequence() // any action to be taken during SUT execution 03. SUT startSystem() // step-‐by-‐step STATE of the SUT, with an attached ORACLE 04. State getState(SUT system) // determines the STATE ORACLE verdict 05. Verdict getVerdict(State state) // the set of available ACTIONs from a SUT's STATE 06. Set<Action> deriveActions(SUT system, State state) // which ACTION should be PERFORMED next (i.e. random, Search-‐Based) 07. Action selectAction(State state, Set<Action> actions) // runs an ACTION from a SUT STATE, with return code (success?) 08. boolean executeAction(SUT system, S tate state, Action action) // determines the stopping criteria 09. boolean moreActions(State state) // finishing tasks for an ending test run 10. void finishSequence(File recordedSequence) // determines whether to continue SUT testing (additional runs) 11. boolean moreSequences() Listing 1: The Java Methods that can be customized 13 4. Running the tool 4.1 Action Visualization in Spy-‐Mode When in Spy-Mode, TESTAR displays the detected actions (Shift + 1 to toggle visualization). Each action type has a specific appearance, as described in the following table: Green dot Yellow circle Red circle Blue Arrow Blue Text Gold circle Left click Right click Left double click Drag & Drop Operation Click into text field and type some text Left click and right arrow 4.2 Widget Tree Visualization As shown in the following picture you can see several properties of the widget selected (Shift + 3 when in Spy mode). Note: This set of properties could be adapted to future needs. 14 In addition, TESTAR allows you to display the hierarchical relationships between widgets. By means of different colored rectangles, TESTAR frames the analyzed widget (green color) with their ancestors and predecessors. This will be useful when you wish to filter one widget and all the contents within it, among other cases. 4.3 Test Sequence Generation and Execution Before running a complete test in the ‘Generate’-Mode you have to pay attention to a few things: 1. Define the set of actions that you want TESTAR to execute on your SUT: Although, you want to setup a thorough test that fully stresses your SUT, you might want to spare out certain actions, such as printing documents, terminating the SUT (which might be detected as a crash by the oracle) or minimizing it, etc. You might also want to only test a specific subset of all actions because you suspect that faults in specific dialogs of the GUI are more likely to be triggered. You can use the ClickFilter in the Filters tab to exclude actions on particular widgets (see section 3.2 for further details). 2. Define startup time, action duration or wait time after actions. Those time settings might be important for your test, since they influence the reproducibility of sequences. If you start sequence generation too early (before the SUT has been fully loaded) or execute actions too fast / do not give the GUI enough time to react, your generated sequences will still find faults. However, these faults might be more exotic (a human user might not be able to trigger them at all) and are usually very hard to reproduce since the timing aspect plays an important factor. (See section 3.4 to learn how to set these settings) 3. Make sure that the SUT always starts in the same initial state. This is very important to guarantee reproducibility. The large majority of SUTs remembers specific settings or saves the position of its windows as they have been during the last session. If you do not restore the SUT’s settings to their defaults, a 15 previously recorded sequence might not be replayed properly, simply because the SUT starts in a different states during sequence generation and sequence replay (e.g. starts already with the last edited document opened). You can use the settings in the misc tab to delete or restore the SUT’s settings files. 4. In some cases it is necessary to perform certain actions soon after starting the SUT (p.e when you need to login). To do this, you can edit the method SUT startSystem() of CustomProtocol (see section 6 to find an example of this). 5. Define your oracle: TESTAR automatically detects certain faults, such as crashes. However, you might want to look for critical error messages or low responsiveness. Sections 3.3 and 3.6 describe how to set up oracles that help you find certain types of faults. 6. Stopping criteria: Depending on how long you want TESTAR to run, you have to adjust your stopping criteria. You might want to run it for 5 hours (then you can use the Maximum Time setting in the General Settings tab) or have it generate 1000 sequences, etc. (See section 3.1 to learn how to set these settings) 7. It can be difficult to verify whether TESTAR will do what you told him to and thus you have to test your settings. Therefore you may use the “View” mode in order to inspect the set of actions that TESTAR will execute later on (hit Shift + 1 to see the generated actions) or you can switch to the “GenerateDebug” mode using Shift + Left Arrow / Right Arrow. 8. You can also generate the sequence manually by switching to GenerateManual (Shift + Left Arrow) mode. This way you can force TESTAR to select certain actions that you might find interesting. Generally, it will take some time until you have everything set up for a full test. Make sure that you experiment with your settings in the View Mode and look for potential problems that might arise. Take a look at the appendix, which lists helpful keyboard shortcuts (e.g. stopping test generation etc.) that you can use once a test is running. 5. Viewing and Replaying the Results During test generation in the Generate Mode, TESTAR will save all the sequences into the output directory as you can see in the screenshot below (See appendix for further information) 16 Once TESTAR has finished a test, you might want to inspect those generated sequences to better understand faults or problems. There are basically four ways to do that: 1. Replay the sequence: Of course this is the preferred way, since it shows you directly what TESTAR has generated. When you start TESTAR you can click on the Replay Mode Button and TESTAR will ask you for the file to replay. Just select a sequence file of your choice and hit ok and TESTAR will try to replay it. You can even slow down the sequence in case it was recorded at a high speed (just increase the value for action duration). However, certain sequences might not be reproducible, because the SUT is not in the correct starting state (have you considered deleting / restoring settings files?) or the sequence was recorded too fast (increase the value of action duration and action wait time during sequence generation). In that case you can follow the steps shown on point 2. 2. View Screenshots of the Generated Sequence: Just hit the button for the View Mode. Again TESTAR will ask you for a file of a recorded sequence. Browse to the location of the file and hit ok. Now you will enter the View Mode, which will show you screenshots of each state that the SUT has been in during sequence generation. Just keep hitting “Next” to proceed to the next step. The View Mode will always work and it allows you to see what happened on the screen during sequence generation, which can be very helpful in case you are unable to replay a previously recorded sequence. 3. Graph: Three different test sequence graphs are generated in order to let you see which UI States were traversed and which actions were executed. Each one offers you a different level of information. 3.1 Minimal: Contains the number of times that each state and action have been visited or executed. 3.2 Tiny: Adds states/actions identificators to the minimal graph 3.3 Screenshoted: Contains the same information as the ones above plus screenshots of each state/action. 4. Log-files: TESTAR saves valuable information of each run on the log-file with the format yyyy_mm_dd_hour_min_sec. (See section 3.1: Login Verbosity for further details) 6. Further documentation For more infromation we have a FAQs page here: http://webtestar.dsic.upv.es/index.php/faq/ Moreover, the most recent overview paper explaining TESTAR and how it has been used in practice can be downloaded here: http://webtestar.dsic.upv.es/wp-‐content/uploads/2015/06/testar_pub_ijismd2015.pdf 17 7. Experimental Features TESTAR development is still ongoing. extensions. Currently we are working on various AdhocTest mode: This mode allows sending commands to TESTAR through a client. It activates a server to listen to test sequences (listening port: 47357). To send an order use the format <action_type(parameters*)>\r\n (i.e LC(500,420) would indicate to TESTAR that it should left click at position 500,420). ClickFilterLayerProtocol: Under Spy mode it enables you to add or remove a widget title to a filter list (displayed at console). Shortcuts: Shift+Left Click to add it and Shift + Left Click to remove it. QLearning: It is an alternative algorithm to random. This algorithm has different criteria to choose which should be the following action executed. It needs further investigation to see if it provides improvements. To learn more about QLearning see https://en.wikipedia.org/wiki/Q-learning 8. Known Issues When using Java 8, an exception takes place when we open the protocol editor provided by TESTAR. This error will be solved in further versions, however it does not affect the editor, so you will be able to use it without problems. TESTAR can consume too much memory, so you can get an OutOfMemory error with long sequences (e.g. 3000 actions). To solve this problem you can modify the file testar.bat by increasing the value of the argument “-Xmx” (e.g. –Xmx2g). 9. Acknowledgements Besides the current TESTAR developers, we want to mention Sebastian Bauersfeld who worked on the initial versions of the tool due to financing under the FITTEST project ICT-2009.1.2 no 257574. The current TESTAR team is being funded by different initiatives that we will mention here. The SHIP project (SMEs and HEIs in Innovation Partnerships) (reference: EACEA/A2/UHB/CL 554187), whose objective is to transfer technologies from university to companies. The PERTEST project (TIN2013-46928-C3-1-R) on software testing. A proof of concept project financed by the Universidad Politecnica de Valencia (Programa de Prueba de Concepto 2014, SP20141402). 18 APPENDIX Keyboard Shortcuts Within the various modes, TESTAR accepts several shortcuts: Shortcut Shift + Arrow Down Shift + Arrow Up Shift + Arrow Left / Arrow Right Shift + 1 Shift + 2 Shift + 3 Shift + Enter Ctrl Shift + Left Click Shift + Rigth Click Effect Quit Monkey Save snapshot of current state to output directory Switch Mode Toggle Action Visualization Toggle visualization of Widget under Cursor Toggle widget information Activates a server to listen to test sequences (port 47357) Show hierarchical relationship Add widget title to a filter list Remove widget title from a filter list Modes Spy, GenerateManual, Generate, Replay Spy, GenerateManual, Generate, Replay Spy, GenerateManual, Generate, GenerateDebug, Replay Spy Spy Spy GenerateManual,Generate, GenerateDebug, Spy Spy Spy (requirement: ClickFilterLayerProtocol) Spy (requirement: ClickFilterLayerProtocol) For a more visual representation of the switch mode see this flowchart 19 Directories ./temp ./output ./output/error_sequences ./output/graphs ./output/srcshots ./output/sequences ./resources Temporary files such as the currently recorded sequence TESTAR outputs log files, state snapshots and generated sequences into this directory Sequences on which TESTAR has found an error TESTAR generate different graphs for each sequence Screenshots of each sequence showing every state and the widgets that have been selected Generated sequences If you have files for your SUT that need to be restored through copying, you can put them in here. 20