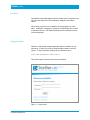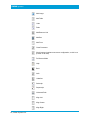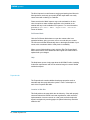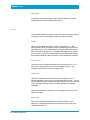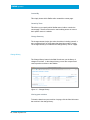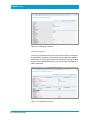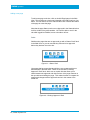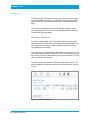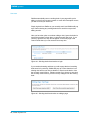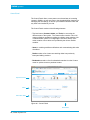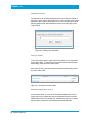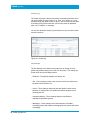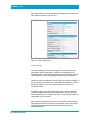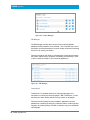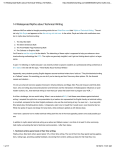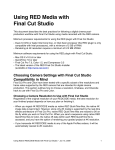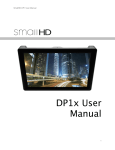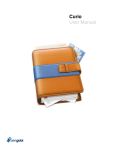
1
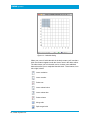
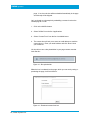
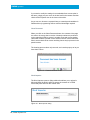
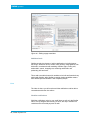
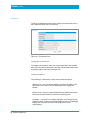
SIMIAN systems
Sitellite 5 User Manual
Sitellite Professional Edition
SIMIAN systems
Table of contents
1. Introduction
5
2. Logging into Sitellite
5
3. View modes
6
4. Web View
7
• Editing buttons
8
5. Editing a web page
9
6. Edit tab • Page Title
10
• Page ID
10
• Title in Navigation and Window Title
10
7. Page body
2 | Simian Systems Inc.
10
11
• Toolbar
11
• Content Guides
13
• Elements
13
• Footer
13
8. Toolbar functions
14
• Character Map 14
• Images
14
• Tables
15
• Links
17
• Boxes and Forms
18
• Clean Document
20
• Word Importer
20
• Full Screen Mode
21
• Help 21
9. Properties tab 21
SIMIAN systems
• Location in Web Site
21
• Display with Template
22
• Include in Site Navigation
22
• Include in Search
22
• Sorting Weight
22
• Is This a Section Index
22
• Forward to (URL)
22
• Keywords
22
• Description
23
10. State tab
• Status
23
• Access Level
23
• Publish On
23
• Archive On
23
• Created By
24
• Owned by Team
24
• Change Summary
24
11. Change History
24
• Viewing past revisions
24
• Compare to Current
25
• Highlight Changes
26
• Restore a past revision
26
12. Adding a new page
27
• Drafts
27
13. Deleting a page
28
• Recovering a deleted page
3 | Simian Systems Inc.
23
28
14. Auto-save
29
15. Control Panel
30
SIMIAN systems
16. Content Types
• Search parameters
31
• Bookmark searches
32
• Sort by columns
32
• Deleting multiple items at once
32
17. Admin Options
33
• Users, roles and teams
33
• Activity Log
35
• Site Settings
35
• Cache Settings
36
• Applications
37
• Workflow Services
38
18. Tools
38
• Image Manager
38
• DB Manager
39
• Translations
39
• Additional tools
40
19. Inbox
40
• Workflow notifications
40
• Compose Message
41
20. Preferences
4 | Simian Systems Inc.
31
42
• Changing your password
42
• Preference options
42
21. Log Out
43
22. Getting help 43
SIMIAN systems
Introduction
The Sitellite Content Management System (CMS) offers a complete set of
out-of-the-box features for web developers, designers and website
editors.
This manual covers the use of Sitellite from the perspective of a site
editor. Installation, configuration, design and customization are covered
in separate manuals. The Sitellite Desktop and other modules are also
covered separately.
Logging into Sitellite
Sitellite is a web-based software application which is installed on your
web server, so there is no need to install desktop software to use the
system. To log into Sitellite, simply point your web browser to:
http://www.yourwebsite.com/sitellite
This should load a screen that looks like the following:
Figure 1 – Login screen
5 | Simian Systems Inc.
SIMIAN systems
To begin using Sitellite to update your website, simply enter your
username and password here and click the Login button.
Please note: Make sure to change www.yourwebsite.com to your actual
website domain name for all of the examples in this manual.
Supported web browsers
Sitellite 5 works in the following web browsers:
• Firefox 2 or 3 (All Platforms)
• Safari 3 (Windows, Mac) or Google Chrome (Windows)
• Microsoft Internet Explorer 6 or 7 (Windows only)
View modes
The Sitellite user interface consists of a top control bar and a view mode
underneath.
Top Control Bar
View Mode
Figure 2 – View modes
6 | Simian Systems Inc.
SIMIAN systems
The top control bar has the following options:
• Web View
• Control Panel
• Preferences
• Help
• Log Out
Figure 3 – Top control bar
The default view mode when you first log into Sitellite is called the Web
View. The Web View shows you your website itself, with the addition of
editing buttons wherever content on the site can be edited. This makes it
very easy to use, since you can simply browse your site for the page you
want to edit and then click on the edit button for that page.
The Control Panel offers additional ways of accessing content and other
Sitellite features, which weʼll explore later on in the manual.
Preferences allows you to customize your Sitellite experience a little bit,
and also to change your password.
Help provides access to the help pages installed in the system, and Log
Out ends your Sitellite editing session.
Web View
The Web View is the standard way of editing your website in Sitellite, and
also the easiest to use. Simply surf to the web page you want to modify
and click the appropriate editing button.
7 | Simian Systems Inc.
SIMIAN systems
You can edit many types of content in the Web View, including web
pages, sidebar content, news, blog posts and more. Each of these types
of content can contain text, images, dynamic content, and multimedia files
as well.
Editing buttons
When youʼre logged into Sitellite and viewing your website through the
Web View, youʼll notice editing buttons wherever there is content that can
be edited. Hovering your mouse over a button will tell you what that
button does, so you can always see at a glance.
Here is a description of all of the different types of buttons in the Web
View:
Add – Adds a new item to the site, such as a new page, sidebar or
news story.
Edit – Modifies the current item.
Duplicate – Creates a new item using the contents of the old one,
useful for replicating similar pages such as employee profiles or job
postings.
Change history – Allows you to view the history of changes for an
item. In the change history you can also compare and restore
previous revisions to the website.
Delete – Deletes the associated content item from the site.
Locked – Shows that the associated content cannot be edited,
usually because of editing privileges or because another editor is
currently editing that content.
Move up – Moves the associated content up in the list of content
shown.
Move down – Moves the associated content down in the list of
content shown.
8 | Simian Systems Inc.
SIMIAN systems
Editing a web page
To edit a web page, browse to the page you want to edit and click the edit
button. This will open up the web page edit form.
Figure 4 – Web page edit form
Edit, Properties and State tabs
The web page edit form is split up into three tabs found on the top-right of
the form: Edit, Properties and State. The main page content is all in the
Edit tab, with additional properties such as metadata in the Properties tab,
and status and access control settings in the State tab.
Figure 5 – Edit, Properties and State tabs
Easy and Advanced modes
The edit form can also be viewed in Easy or Advanced modes. The
Advanced mode simply shows all available fields, while Easy mode hides
the fields that are non-essential. You can switch modes at any time by
clicking on the mode links in the top-right of the page. Sitellite
9 | Simian Systems Inc.
SIMIAN systems
remembers your mode preference on subsequent page edits as well, so if
you prefer one mode over another you only have to choose it once.
Figure 6 – Easy and Advanced modes
Edit tab
Page Title
The Edit tab begins with the Page Title. This would correspond to the toplevel heading of the page (in HTML, the <h1> tag).
Page ID
This is followed by the Page ID. The page ID is used to look up the page
by site visitors in the link to that page. When a visitor goes to http://
www.example.com/your-page, Sitellite uses the page ID “your-page” to
look up the appropriate page.
By default, page IDs are automatically filled out based on the page title,
however you can edit the page ID to be anything you want. You can even
include keywords for search engines in your page ID to help search
engines better index your pages.
Page IDs must be unique for the entire site, and Sitellite will warn you if
yours isnʼt so you can fix it. Page IDs must also only contain lowercase
letters, numbers and dashes instead of spaces.
Title in Navigation and Window Title
The Title in Navigation is visible in Advanced mode. It allows you to
specify an alternate page title for use in the site navigation. If this is left
blank, the main page title is used instead. This is useful for example
when you want a title like “Welcome to our site” for your homepage, but in
the navigation you would prefer the link to say “Home”.
The Window Title is also only visible in Advanced mode. It allows you to
specify an alternate title for use in the browser windowʼs top bar. If this is
left blank, the main title will be used instead. This is useful for being more
descriptive in your window title, which is often used by search engines,
without affecting the title shown in the text of the page itself.
10 | Simian Systems Inc.
SIMIAN systems
Page body
The page body contains HTML markup, which means it can have lots of
content with different styles applied to it, such as subheadings, lists and
links. But in Sitellite, you donʼt have to know HTML. Sitellite provides a
built-in editor that functions similarly to a standard word processor,
sometimes called a WYSIWYG editor (What You See Is What You Get).
The word processor consists of a toolbar of editing buttons, the content
area, and a footer.
Toolbar
Content Area
Footer
Figure 7 – Sitelliteʼs word processor
The toolbar contains all of the editing features of the word processor (e.g.,
bold, italics, etc.).
The content area contains the page body text to be edited.
The footer contains the HTML “tag path” of the currently highlighted
element in the content area.
Toolbar
The toolbar contains two rows of editing buttons for editing the page body
contents. The list of buttons from top left to bottom right area:
Character Map
11 | Simian Systems Inc.
SIMIAN systems
Add Image
Add Table
Undo
Redo
Add/Remove Link
Add Box
Add Form
Clean Document
Word Importer (requires extra server configuration, so this is not
present on all sites)
Full Screen Mode
Help
Bold
Italic
Underline
Subscript
Superscript
Horizontal Rule
Align Left
Align Center
Align Right
12 | Simian Systems Inc.
SIMIAN systems
Bulleted List
Numbered List
Indent
Outdent
Left-to-Right
Right-to-Left orients the text from right to left for languages such
as Hebrew and Arabic.
Content Guides
Content Guides allow you to save the contents of the editor into the
Content Guides drop down list, so they can be reused as a guide on
subsequent pages. This is useful for adding consistency across multiple
pages of the site. Simply create an outline of the format for the first page,
then select “Save as Guide” from the list. Youʼll be asked to give your
guide a name, which can then be selected on subsequent pages to
replicate the exact contents of the original.
Elements
The Elements drop down allows you to specify whether a block of text is a
paragraph, heading, subheading (H1 through H6), address, or
preformatted text. Simply move your cursor into that text block and select
the appropriate element from the list.
Footer
The footer contains the HTML “tag path”, which shows which HTML tags
are surrounding the element your cursor is placed on in the content area.
Clicking on any of the tags in the path selects it in the content area, and
you can then edit the properties of that tag such as its CSS style, or
remove the tag from the content area.
In the right side of the footer, there is also a link to edit the raw HTML
source behind the content area. This will open a new window with
Sitelliteʼs HTML source editor.
13 | Simian Systems Inc.
SIMIAN systems
Toolbar functions
Character Map
The Character Map allows you to insert special characters such as a
copyright or trademark symbol into the content area. Simply move the
cursor to where you want the character to be inserted, click the Character
Map button and select the character you wish to insert. The character will
be inserted into your web page where your text cursor was located.
Figure 8 – Character map
Images
The Add Image button opens an image browser that lets you insert
images into your page from the Sitellite Image Manager. In the image
browser, you can preview and select images, and also upload new ones
from your desktop computer as well. Simply click the ʻNew Imageʼ link
then browse for the image you want to add to the site.
14 | Simian Systems Inc.
SIMIAN systems
Figure 9 – Image browser
Once youʼve selected an image to add to the current page, you can then
add a description (also called “alt text”) and choose whether to align the
image right or left and have the text flow around it. When you click the
ʻDoneʼ button, the image will be inserted into the current page contents
wherever your cursor was in the content.
Tables
To create a table, click on the Add Table button. This will open a dialog
that will let you select the number of columns and rows to start with for
your table. You can always add or remove columns and rows after as
well.
15 | Simian Systems Inc.
SIMIAN systems
Figure 10 – Add table dialog
When your cursor is inside the table in the body content, youʼll see that a
third row of buttons appears under the first two rows in the editor toolbar.
The editor knows youʼre in the table, and so it shows some additional
buttons that allow you to manipulate the table itself. These buttons, from
left to right, include:
Insert row before
Insert row after
Delete row
Insert column before
Insert column after
Delete column
Merge cells
Split merged cells
16 | Simian Systems Inc.
SIMIAN systems
Links
Sitellite supports a number of different types of links, including internal
links to other pages in the site, external links to other sites, links to files
for download, email links, and anchor links that send users to a specific
subsection of the current page.
To make a link, select the link text in the content area then click on the
Add Link button to open the link dialog.
Figure 11 – Link dialog
From there, you can click Browse to browse for a page within the website
itself, paste an external link into the text box, or click on one of the other
link type buttons. From left to right, these include:
• Files – To link to a file, click on the file icon and a file browser will pop
up for you.
• Email – To make an email link, click on the email icon then paste in the
email address after the “mailto:” text thatʼs inserted into the text box.
• Bookmark – Bookmarks can be used to manage external links that you
use frequently on your site, such as a partner companyʼs site.
• Anchor – The anchor button will pop up a list of all of the headings and
subheadings in the current page. Select a heading to make a link to it.
You can also select whether you want the link to open in the current
window, the top frame (if your site uses frames), or in a new window. To
finish making the link, click OK and it will be inserted into your page.
17 | Simian Systems Inc.
SIMIAN systems
Boxes and Forms
Boxes are one of the most powerful features of Sitellite, because they put
so much capability into the hands of ordinary site editors without requiring
any technical knowledge to use them.
Boxes enable you to embed dynamic elements into ordinary pages, such
as contact forms, blogs, videos, event lists or calendars, and more. Each
module or application in Sitellite can publish any number of boxes for site
editors to use, and Sitellite developers can also add custom boxes for
your specific site using standard PHP code.
Figure 12 – Box Chooser
The steps to add a box to a page are as follows:
1. Click on the Add Box button, which will open the Box Chooser dialog.
2. Select the application (aka module) that has the appropriate box.
3. Select the box from the list of boxes available from that application.
4. Some boxes provide options for customizing their behaviour for your
particular page. If the box you choose has options, the Box Chooser
will present them as a form to fill out before including the box in your
18 | Simian Systems Inc.
SIMIAN systems
page. If not, then the box will be embedded immediately in the page
and this step will be skipped.
Letʼs go through a real example by embedding a contact form into the
contact page of our site:
1. Click on the Add Box button.
2. Select “Utilities” from the list of applications.
3. Select “Contact Form” from the list of available boxes.
4. The contact form will ask you to enter an email address to send the
contact form to. Enter your email address and click “Done” when
youʼre finished.
You should now see a box placeholder in your page content area that
looks like this:
Figure 13 – Box placeholder
When the box is rendered into the page, which you can see by saving or
previewing the page, it will look like this:
Figure 14 – Rendered contact form box
19 | Simian Systems Inc.
SIMIAN systems
If you need to modify the settings for an embedded box at some point in
the future, simply put your cursor in the box itself in the content area then
click the Edit Properties icon in the footer of the editor.
As you can see, boxes are a powerful way to create dynamic websites in
Sitellite with no programming skills or technical knowledge required.
Clean Document
When you click on the Clean Document button, the contents of the page
are sent to the server where a series of cleanup routines are performed
on the underlying HTML to ensure it contains clean and correct markup.
Often when content is pasted in from external sources such as Microsoft
Word, extra codes that can cause rendering issues may be present in the
pasted content.
The cleaning process takes only seconds, and a notice pops up to let you
know that itʼs done.
Figure 15 – Cleaned document notice
Word Importer
The Word Importer opens a dialog window that allows you to upload a
Microsoft Word file which it will then extract the contents of in HTML
format and place them into the content area.
Figure 16 – Word Importer dialog
20 | Simian Systems Inc.
SIMIAN systems
The Word Importer is useful because copying and pasting from Microsoft
Word produces notoriously poor quality HTML output which can easily
cause issues with rendering on a website.
Please note that the Word Importer may not be activated for all sites,
since it requires an extra software application to be installed on the
website that may not be available on all systems. For more information,
go to the Control Panel > Admin > Applications > Xed Editor
screen in Sitellite.
Full Screen Mode
Click the Full Screen Mode button to open the content editor in an
expanded window, giving you more room to see and edit your content.
The full screen window automatically sizes to the height and width of your
screen, with a maximum width of 1050 pixels for readability.
When you are finished editing, simply click the “Exit Full Screen Mode”
button at the bottom of the window and the original form window will be
updated with your changes.
Help
The Help button opens a help page about the WYSIWYG editor, including
its browser requirements and also its technical usage for custom Sitellite
module developers.
Properties tab
The Properties tab contains additional web page properties such as
metadata and other page behaviour options. Here is a description of
each of the Properties tab fields:
Location in Web Site
This field positions the page within the site hierarchy. Sites with properly
structured hierarchies benefit from better organization, which eases the
implementation of access controls as a site grows, and also helps with
dynamic navigation by ensuring pages are placed where they should be
within the site.
21 | Simian Systems Inc.
SIMIAN systems
Display with Template
This sets which template you want a page to be displayed with. The list
of available templates is taken from the default template set as defined in
the site settings.
Include in Site Navigation
This determines whether or not you want the page to appear in the web
site menus and site maps. Some minor pages may be excluded from site
menus to keep them concise and organized.
Include in Search
This determines whether or not you want the page to be indexed to
appear in search results.
Sorting Weight
This determines the position of the page within the web site menus and
site maps. Pages with a higher value appear closer to the top. Pages
with the same value are sorted alphabetically.
Is This a Section Index
Section indexed mark the root of the various sections of your website
hierarchy. Pages underneath them in the site tree will automatically
inherit the template settings from their section index, creating a consistent
design across entire sections of the site, but also allowing custom designs
for each section.
Forward to (URL)
If you provide a link to an external web page or file (ie. a PDF or Word
document), then the page will act as a placeholder or alias for that link
within your web site navigation.
Keywords
Keywords help target pages to their intended audience in search engines
and site searches performed by visitors. The keyword list is a commaseparated list and can also be managed at a site-wide level by clicking
the “Global Keyword List” link.
22 | Simian Systems Inc.
SIMIAN systems
Description
A description helps target pages to their intended audience in search
engines and site searches performed by visitors.
State tab
The State tab contains the status and access control and related settings
of the page. Here is a description of each of the State tab fields:
Status
The status determines what stage of its life cycle a page is in. New
pages default to Draft, and pages ready for publishing to the site can be
set to Approved to go live immediately, or to Pending which will notify an
editor to review the changes first. Only Approved pages can be viewed
on the live site. Pages set to Queued will be automatically approved on
the specified Publish On date (see below) via the Sitellite task scheduler.
Access Level
The access level of a page determines who is allowed to view it. This
allows you to make portions of your site completely private, or only
available to specific user roles (ie. members-only).
Publish On
This tells the Sitellite task scheduler that if this document is set to
Queued, publish it to the live site on the specified date and time. You can
use the publishing queue to publish multiple changes across an entire site
at the same date and time, which is useful for example in marketing
campaigns.
Please note that the task scheduler must be configured correctly or this
will have no effect.
Archive On
This tells the Sitellite task scheduler that if this document is set to
Approved, it should be Archived and removed from the live site on the
specified date and time.
23 | Simian Systems Inc.
SIMIAN systems
Created By
This simply shows which Sitellite editor created the current page.
Owned by Team
This allows you to specify which Sitellite team of editors controls the
current page. Teams can be used to restrict editing access of users to
their specific areas of a website.
Change Summary
The change summary helps give other site editors, including yourself, a
more complete history of the changes that have been made to a page.
The change summary is included in the Change History view of a page.
Change History
The Change History button in the Web View shows you the history of
changes for an item. In the change history you can also compare and
restore previous revisions to the website.
Figure 17 – Change History
Viewing past revisions
To view the data from a past revision of a page, click the View link next to
that revision in the change history.
24 | Simian Systems Inc.
SIMIAN systems
Figure 18 – Viewing past revision
Compare to Current
You can also compare a past revision to the current version of the page
by selecting the Compare to Current tab in the top-right while viewing a
past revision. The two versions will be shown side-by-side and the fields
that have been changed between the two versions will be highlighted for
easier comparison.
Figure 19 – Comparing to current
25 | Simian Systems Inc.
SIMIAN systems
Highlight Changes
You can also highlight the changes between the past revision and the
current version. Simply click on the Highlight Changes tab in the top-right
while viewing a past revision. The fields that have been changed will be
highlighted for easier comparison, with added to the current version lines
marked with a blue plus sign (+) and lines removed from the current
version marked with a red minus sign (–).
Figure 20 – Highlighting changes
Restore a past revision
To restore a past revision of a page, click on its Change History button
then find the revision you want to restore from the Change History listing
page. Click on the Restore link next to the revision to be restored.
Sitellite will confirm that you want to restore the selected revision, so click
OK to confirm.
Once the revision has been restored you will be taken to the restored
page on the website. If you view the Change History again, youʼll notice
that there is now a new current version in the history and that all of the
previous revisions, including the one just overwritten, are still available for
viewing and restoration.
26 | Simian Systems Inc.
SIMIAN systems
Adding a new page
To add a new page to the site, click on the Add Page button in the Web
View. This will bring up a form nearly identical to the Edit Page form, just
blank. You can enter in all of the data and then click Create at the bottom
of the page to create the page.
Note that the page Status must be set to Approved in the State tab before
it will be visible on the public website. Youʼll still be able to see it in the
site while logged into Sitellite, but non-site editors will not.
Drafts
Sitellite marks pages that are not approved yet with a “Status: Draft” label
in the Web View, so you can see that they still need to be approved
before they become live on the site.
Figure 21 – Status: Draft
Live pages that have new changes which are not yet approved have a
different label in the Web View. These are shown with a “Viewing:
Approved | Draft” label, which acts as a quick link that allows you to
switch between the approved and draft versions of the page contents on
the spot without reloading the page. This makes it easier to compare the
unapproved changes with the approved version in the context of the
actual site.
Figure 22 – Viewing: Approved | Draft
27 | Simian Systems Inc.
SIMIAN systems
Deleting a page
To delete a page in the Web View, browse to the page you wish to delete
and click the Delete Page button. A confirmation box will appear asking
you to confirm that you want to delete the page. Click OK to delete the
page.
Please note that Sitellite keeps track of all changes to pages, so even
your deleted page can be recovered if you mistakenly delete something
you want back again afterwards.
Recovering a deleted page
To recover a deleted page, click on the Control Panel in the top control
bar then under the Content menu in the top left choose Web Pages. This
is the other way of browsing for pages in Sitellite, which weʼll cover in
more detail in the next section.
From here, click on the Deleted Items link and this will bring up a list of all
of the pages that have been deleted from the site. Yours should be at the
top of the list if it was just deleted, but you may need to browse for it if the
page was deleted some time ago.
To restore a page, click the Restore link next to that page in the list. You
will be prompted to confirm the restoration of the deleted page. Click OK
to finish.
Figure 23 – Deleted web pages
28 | Simian Systems Inc.
SIMIAN systems
Auto-save
Sitellite automatically saves a working draft of your page while youʼre
editing, so that if your browser crashes or some other interruption occurs,
you wonʼt lose all your hard work.
Simply log back into Sitellite as you normally would, and Sitellite will pop
up a screen showing any working drafts that it saved from a previous
editing session.
Here you have the option to continue editing a draft, ignore the drafts for
now and come back to them later, or clear them and start fresh. If you
choose to ignore them, they will still appear on the main page of the
Control Panel where you can access them at any time.
Figure 24 – Working drafts found notice on login
If you continue browsing and then try to edit a page that had a working
draft saved of it previously, Sitellite will pop up a notice that there is an
existing draft and let you choose whether to start from the draft or from
the currently saved version. Please note that if you choose to start from
the currently saved version, you will lose any changes from the working
draft.
Figure 25 – Working draft found notice on editing a page
29 | Simian Systems Inc.
SIMIAN systems
Control Panel
The Control Panel offers a more power user-oriented way of accessing
content in Sitellite, as well as access to the site administrator functions for
managing the site settings, as well as your Sitellite notification inbox and
any other tools installed in your site.
The Control Panel consists of the following elements:
• Top-level menus (Content, Admin, and Tools) for accessing the
different areas of the system. The Content menu contains a list of all
content collections available for editing, the Admin menu contains a list
of administrative options for configuring the site itself, and the Tools
menu contains a list of editor tools provided by the various Sitellite
modules.
• Inbox for receiving workflow notifications and communicating with other
site editors.
• Drafts contains a list of auto-save working drafts from previously
interrupted editing sessions.
• Bookmarks contains a list of bookmarked searches from the Content
menu for quicker access to pertinent content.
Top-level menus
Inbox
Auto-save drafts
Figure 26 – Control Panel
Bookmarks
30 | Simian Systems Inc.
SIMIAN systems
Content Types
Under the Content menu in the Control Panel, youʼll find a list of all of the
editable content types for your site. This includes web pages, sidebars,
files, news and more.
Any Sitellite module can define additional content types, so the list can
vary depending on the installed modules as well as on the permissions of
the current Sitellite user. Sitellite allows you to choose which content
types can be edited by the different roles in the system.
To browse a content collection, select the content type from the list. The
browse screen shows a list of the items in that content collection, which
can be sorted and searched, and modified in the same ways as in the
Web View mode.
Figure 27 – Browsing Web Files content collection
Search parameters
The search parameters appear at the top of all content collection
browsing screens. These allow you to search the content collection
based on the various fields in that collection, and to build complex
searches based on multiple fields at one time.
Figure 28 – Search parameters with several values
31 | Simian Systems Inc.
SIMIAN systems
Bookmark searches
To bookmark a set of search parameters that you would like to repeat in
the future, simply click on the Bookmark icon in the top-right of the search
parameters box. Sitellite will prompt you to name your bookmark, which
will then appear under the Bookmarks section on the main page of the
Control Panel.
Figure 29 – Naming your bookmark
Sort by columns
To sort the search results, simply click on the header of one of the fields
in the results table. To switch the sorting order between ascending and
descending, simply click the header again.
An arrow icon tells you which field the results are currently being sorted
by, and in which order.
Figure 30 – Sorting the search results
Deleting multiple items at once
In the Control Panel, you can select and delete multiple items at once.
Simply click on the checkboxes next to the desired items then click the
Delete button above the checkboxes. Sitellite will prompt you to confirm
that you want to delete the selected items before deleting them.
32 | Simian Systems Inc.
SIMIAN systems
To select all of the visible items for deletion, click on the Select All button
with the checkmark next to Delete. To deselect all, click on the Select All
button again.
Figure 31 – Select all button
Admin Options
The Admin menu contains a list of administrative options for configuring
the siteʼs settings, including the global, cache and workflow settings,
individual application settings, user permissions, and the activity log.
Users, roles and teams
Sitellite has a very flexible and highly customizable user authentication
and privilege system, however for most websites the default roles found
out-of-the-box work well already.
On smaller sites that donʼt need team-level restrictions, simply making all
editors part of the same team is enough to ensure everything will run
smoothly.
Sitellite defines several default and example roles. The ones most sites
will want to use are:
• master – This role has unlimited access to everything. We recommend
you have one site admin as a master user who manages the site
settings and the other users.
• writer – A writer can contribute to the site, but canʼt publish their own
changes without the approval of an editor. When a writer makes a
33 | Simian Systems Inc.
SIMIAN systems
change and sets its status to Pending, the editor user from their team
will get an email asking them to review the change and give their
approval, at which point it will become visible on the live site.
• editor – An editor can make draft or live changes, and can also approve
changes from writers. If you donʼt need an approval process, making
all your content contributors editors works well.
• member – Member is a public user role that doesnʼt have any access to
the editing capabilities of Sitellite. Members include general site visitors
who register for additional members-only services and content areas
you may provide.
To add a user, go to Users under the Admin menu and click on the Add
User link. Here you can specify their username and password, their role
and team, and numerous fields of personal and contact information.
You can also specify whether a userʼs account is temporarily disabled,
and whether they should be included in any public user listings such as a
staff directory listing.
Figure 32 – Editing a user
In addition to adding, editing and removing user accounts, you can also
export users in CSV format for use in third party software such as a
newsletter or contact list.
34 | Simian Systems Inc.
SIMIAN systems
Activity Log
The activity log keeps a historical summary of activities performed on the
site, broken down by type of action (e.g., login, error, delete, etc.), user,
and date range (day, week, month, or year). You can view previous dates
by clicking on the previous date link, and sort the results by date/time,
type, user, IP address, or message.
You can also bookmark activity log searches just as you can with content
and user searches.
Figure 33 – Activity log
Site Settings
The Site Settings in the Admin menu enable you to change all of the
global configuration settings of the site from one place. The settings are
broken down into the following sections:
• Database – The MySQL database connection info.
• Site – These settings pertain to the site itself such as the domain and
the path to the document root.
• Server – These settings change the way the Sitellite content server
behaves, for example the error handler and default template set for
rendering the site.
• Internationalization – These settings affect the way Sitelliteʼs
multilingual capabilities operate.
• Messaging – These settings control the integration of Sitelliteʼs
messaging system with external messaging services (email and instant
messaging).
35 | Simian Systems Inc.
SIMIAN systems
Each setting also has a help message which explains what it means and
what options it has when you click on it.
Figure 34 – Site settings form
Cache Settings
The Cache Settings control how the page, query, and menu caching
should work when serving pages. Sitellite can cache pages for the
specified duration of time, and coupled with the cache workflow services,
can automatically refresh cached pages when theyʼve been updated.
Sitellite can also be configured to simply output the necessary headers for
a proxy caching service such as a Content Distribution Network (CDN) to
perform the cache for you, or for browser clients to properly store
cacheable content.
In addition to page-level caching, Sitellite can also cache the results of
individual database queries in custom applications, and can cache the
menu containing the tree of pages in the site so that it doesnʼt need to be
regenerated on every request.
Menu caching is probably the first level of caching we recommend sites
make when they want to increase the performance of their sites, since it
has the biggest immediate benefit and still keeps the site almost
completely dynamic.
36 | Simian Systems Inc.
SIMIAN systems
Page-level caching can also be limited based on matching URLs, so you
can specify individually or in groups which pages can safely be cached
and which should not be.
Figure 35 – Cache settings form
Applications
In addition to the global site settings, you can also modify the settings for
several of the installed applications from the Admin > Applications
screen. Simply select the application from the list of configurable apps,
and the settings that can be edited for it will be shown.
Figure 36 – News app settings
37 | Simian Systems Inc.
SIMIAN systems
Workflow Services
Workflow Services contains a list of services that can be triggered
automatically when certain actions occur in Sitellite, such as a user
saving an update to a page. Services include the ability to email the
appropriate user as part of the siteʼs approval process, resetting the
cache when content has been modified, notifying translators of changed
content in the original language, and even indexing new and updated
pages for the siteʼs search results.
To enable a workflow service, simply check the box next to it in the list
then click Save. Each service provides a name and description of itself
so you know what it does.
Figure 37 – Workflow service list
Tools
The Tools menu contains a list of editor tools provided by the various
Sitellite modules.
Image Manager
The Image Manager provides a way of managing all of the images used
on the site. Upload images from your desktop, add folders to organize
them, and even edit them through 3rd party image editing service
Snipshot.com through the Image Manager.
The Image Browser in the page editor is a stripped down version of the
Image Manager, restricted to uploading images and selecting them for
use in the current page.
38 | Simian Systems Inc.
SIMIAN systems
Figure 38 – Image Manager
DB Manager
The DB Manager provides direct access to the underlying MySQL
database used by Sitellite to store site data. This is a power-user tool for
developers and site administrators, and we usually recommend restricting
access to it to ordinary site editors.
Features include an SQL Shell for executing SQL commands and seeing
the results, table browsing, inspection and editing, and exporting in CSV
or SQL formats for backup or use in external applications.
Figure 39 – DB Manager
Translations
Translations is a complete interface for managing languages and
translations of content into those languages. With Translations, you can
translate your entire Sitellite website into any number of languages.
Features include indexing text from templates, applications and the
database for translating, browsing by translation status, content type and
language, and editing side-by-side with a reference copy from the default
site language.
39 | Simian Systems Inc.
SIMIAN systems
Figure 40 – Editing a page translation
Additional tools
Sitellite currently has dozens of add-on applications, including banner
ads, blogs, discussion forum, events, FAQ, glossary, image galleries, link
directories, newsletters/email marketing, member logins, news, polls,
testimonials, search, shopping cart, streaming audio/video and
podcasting, wiki and more.
These add-ons enable feature-rich websites to be built and launched very
quickly with Sitellite, while Sitelliteʼs powerful design capabilities means
each Sitellite-powered website is still completely unique.
Inbox
The inbox is where you will receive workflow notifications and be able to
communicate with other site editors.
Workflow notifications
Workflow notifications arrive in your email inbox as well as in the Sitellite
inbox, so they integrate with the way you work, but stay in Sitellite for a
reminder and for historical purposes as well.
40 | Simian Systems Inc.
SIMIAN systems
Figure 41 – A workflow notification
Compose Message
You can also send and reply to messages through Sitellite into their inbox,
which will automatically email the recipients as well. Simply click the
Compose Message link to send a new message, or Reply or Reply All to
reply to an existing message.
When composing a message, select the system user from the list and
click the Add button to add them to the recipient list. You can also CC
non-Sitellite users by including their email addresses as well.
Enter a subject and message body then click Send when youʼre ready to
send the message.
Figure 42 – Replying to a message
41 | Simian Systems Inc.
SIMIAN systems
Preferences
To edit your Sitellite preferences and to change your password, click on
the Preferences link in the top control bar.
Figure 43 – Preferences form
Changing your password
To change your password, enter your current password in the first field,
then enter your desired password in the New Password field and verify it
by typing it again in the Verify Password field.
Preference options
The following is a description of each of the preference options:
• Default View – Lets you choose whether you want to be taken to the
Web View or the Control Panel by default when first logging into
Sitellite.
• Browse Level – Lets you switch between Easy and Advanced modes.
These are the same modes as found in the Edit Page form.
• Language – If your site is in multiple languages, you can specify your
preference here. Please note that depending on how your multilingual
settings are configured, this value may be ignored in some
configurations.
42 | Simian Systems Inc.
SIMIAN systems
• Form Help – Whether to show form help tips when a form field is active
in the Add and Edit forms.
• Items Per Page – Lets you set how many items to show on a single
page of search results, used throughout the system wherever lists of
items are shown.
Log Out
When you are finished making changes to your website, itʼs always a
good idea to log out of the system. This clears your browser cookie and
Sitellite session data, which is a good practice for security.
To log out, simply click on the Log Out link in the top control bar.
Getting help
For further help with Sitellite and its modules, and to learn more about
using and customizing the software for your website, visit:
Documentation:
www.simian.ca/documentation
Support:
www.simian.ca/support
Community:
www.sitellite.org
Sitellite School:
simian.dojolearning.com
43 | Simian Systems Inc.