1
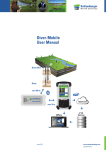
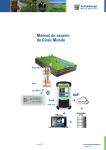
Diver-Mobile (Android)
Manual
June 2014
www.swstechnology.com
copyright of SLB
Version June 2014
All rights reserved. No part of this publication June be duplicated, stored in a
computerized data file or made public in any form or manner whatsoever,
be it electronic, mechanical, in photocopies, recordings or in any other way,
without prior written permission from
Schlumberger Water Services (Netherlands) BV
Schlumberger Water Services
PO Box 553
2600 AN Delft
The Netherlands
Tel.: +31 (0)15 275 5000
www.swstechnology.com
June 2014
www.swstechnology.com
copyright of SLB
Table of Contents
1.
1.1.
1.2.
1.3.
Introduction1
General1
List of Supported Devices
1
Software and hardware requirements
1
2.
2.1.
2.2.
2.3.
Diver-Mobile installation instructions
Installing Diver-Mobile from the Play Store
Installing Diver-Mobile using the apk file
Uninstalling Diver-Mobile
2
2
2
3
3.
3.1.
3.2.
3.3.
3.4.
3.5.
Getting Started with Diver-Mobile
Diver-Mobile symbols
Diver-Mobile Menu
Configuration settings
Connecting/pairing the Diver-Gate(M) to your device
Starting the barometric datalogger of the Diver-DXT datalogger
4
4
4
5
6
8
4.
4.1.
4.2.
Collecting and transferring data
Collecting data in the field
Transferring collected data
June 2014
11
11
13
www.swstechnology.com
copyright of SLB
1. Introduction
1.1. General
Diver-Mobile (Android) is a software package that can be used on a mobile device (with an Android operating
system) for collecting field data from a monitoring network. In combination with Diver-NETZ hardware, Diver-Mobile
constitutes a complete and flexible measurement system.
Diver-Mobile supports the following features:
• Start Diver-DXT to start the Diver-DXT baro datalogger.
• Download data from Diver-DXT and Diver dataloggers.
• Upload data files to a FTP server.
• Change settings to configure the monitoring network setup and to configure the system settings.
1.2. List of Supported Devices
Dataloggers
Cera-Diver DI701, DI702, DI705, DI710
Mini-Diver DI501, DI502, DI505, DI510
Micro-Diver DI601, DI602 DI605, DI610
Baro-Diver DI500
CTD-Diver DI271, DI272, DI273
Diver-DXT Baro datalogger AS338
Interface
Diver-Mobile supports the following Diver interfaces:
Diver-Gate(M) AS345
1.3. Software and hardware requirements
System requirements for a mobile device:
• Android Version 4.2 (Jelly Bean) or higher
• Bluetooth stack Blue Z
Diver-Mobile has been tested on the following mobile devices:
• Samsung Galaxy S3 with Android version 4.3 (Jelly Bean)
• Samsung Galaxy S4 with Android version 4.4.2 (KitKat)
• Google Nexus 7 with Android version 4.3 (Jelly Bean) and 4.4 (KitKat)
June 2014
www.swstechnology.com
copyright of SLB
Page 1
2. Diver-Mobile installation instructions
Before installing the latest version of Diver-Mobile, it is recommended to remove a previously installed version of
Diver-Mobile, see section 2.3 Uninstalling Diver-Mobile.
2.1. Installing Diver-Mobile from the Play Store
To install Diver-Mobile from the Google Play Store:
1. Open Play Store on your Android device and search for Diver-Mobile.
2. Select the Diver-Mobile app by clicking on it.
3. Install the application by clicking the Install button.
4. Accept the App permissions.
5. Close Play Store when installation is done or alternatively click the Open button.
Installation of Diver-Mobile is now successfully completed. A Diver-Mobile icon will be added to the device
(location apps).
2.2. Installing Diver-Mobile using the apk file
To install Diver-Mobile using the installation file (apk):
1. Allow installation of apps from sources other than the Play Store by checking the box “Unknown sources”
under “Device administrators” in “Settings”, “More” and “Security”.
2. Copy Diver-Mobile Android.apk to your Android device (by email or by copying the file to the Android device by
USB or Bluetooth port).
3. Click the installation file Diver-Mobile Android.apk file to launch the installation, click “Install” and follow
instruction.
June 2014
www.swstechnology.com
copyright of SLB
Page 2
Installation of Diver-Mobile is now successfully completed. A Diver-Mobile icon will be added to the device
(location apps).
2.3. Uninstalling Diver-Mobile
To uninstall Diver-Mobile:
1. Go to “Application manager” in the “Settings” menu
2. Open the More tab
3. Click on the Application Manager
4. Click on “Diver-Mobile” and choose “Uninstall”. Follow the instructions.
Diver-Mobile is now successfully removed.
June 2014
www.swstechnology.com
copyright of SLB
Page 3
3. Getting Started with Diver-Mobile
3.1. Diver-Mobile symbols
The picture below illustrates the symbols used in Diver-Mobile to indicate the performance of the equipment, status
of data collection and transfer.
Battery level Diver-Gate(M)
Battery level Diver-DXT
Battery level Diver-DXT not received
Signal strength
Low Bit Error Rate
Medium Bit Error Rate
High Bit Error Rate
Downloading
Downloaded in last 24 hours / Downloaded successfully /
Transferred successfully to export folder or FTP
Error downloading / Error transferring to export folder or FTP
3.2. Diver-Mobile Menu
After starting Diver-Mobile the opening screen appears.
June 2014
www.swstechnology.com
copyright of SLB
Page 4
The Main menu (click on menu button, the location of the menu button is dependent on the device used, usually it is
located in the bottom left of the screen ) will allow the user to select the following:
• Pairing menu to start pairing the Diver-Gate(M) to your Android device
• Settings menu to configure application parameters.
• About menu for general information (eg. software version).
3.3. Configuration settings
The Settings menu will allow the user to configure parameters like the network ID and the FTP server.
June 2014
www.swstechnology.com
copyright of SLB
Page 5
The following settings can be set.
General:
• Communication session duration (Comm. session duration). This duration indicates the available time
for transferring data between the Diver-DXT and the Diver-Gate(M). The default communication session
duration is 120 seconds, which is the recommended duration.
• Network ID. The Network ID secures your monitoring network. The default Network ID is 1234. The user
can program the Network ID in the Diver-DXT with Diver-Office. Within the settings menu of Diver-Mobile
you can setup the Diver-Gate(M) for a different Network ID.
• Wake-up session duration (Wakeup session duration). This duration indicates the available time for
scanning Diver-DXTs with the Diver-Gate(M). The default wake-up session duration is 29 seconds, which
is the recommended duration.
Local Storage:
• Destination folder of the data files on the standard Download folder. The default Folder is /DAT, which is
the recommended folder.
FTP:
•
•
•
•
•
IP address of the FTP server. The IP address should be in a numerical format (URL not supported).
Port. The port number to connect to.
Directory. File directory listing.
User name. A user name (user id) on the host.
Password. The password corresponding to the user name.
3.4. Connecting/pairing the Diver-Gate(M) to your device
Before being able to connect to the Diver-DXT, a Bluetooth connection between the mobile device and the DiverGate(M) needs to be established. First the Android device should be paired with the Diver-Gate(M). This pairing
needs to be done using the Pairing option from the settings menu in Diver-Mobile. Do not use the system pairing
procedure from Android.
Next step is to turn on Bluetooth and make your Android device visible for all nearby Bluetooth devices by checking
the box in the “Bluetooth” under “Settings”. Some devices have a default visibility time-out, to avoid connection
problems we recommend to disable the time-out (for more information see the manual of the device being used).
Connect the pairing dongle to the Diver-Gate(M) and turn on the Diver-Gate(M).
June 2014
www.swstechnology.com
copyright of SLB
Page 6
Start Diver-Mobile and choose “Pairing” (in settings menu). Wait until you see your Diver-Gate(M) name in “the
available devices” (check the serial number on the bottom side of the Diver-Gate(M)).
Remove the dongle before you enter the PIN code “1234” and click OK. Use the back button to return to the DiverMobile program. Wait unit Diver-Mobile is connected. The text “Listening..” will change in “SWSGW_141406….”
(the first time a Diver-Gate(M) is being paired to a device this can take anywhere between 30 seconds to 2 minutes).
Your Android device is now connected to the Diver-Gate(M).
Once the devices have been paired, the Diver-Gate(M) will automatically connect to the particular device when
turned on the next time. The Diver-Gate(M) can only be paired with one other device.
June 2014
www.swstechnology.com
copyright of SLB
Page 7
3.5. Starting the barometric datalogger of the Diver-DXT datalogger
In this section we assume that the configuration settings are set to the user’s preferences, see section 3.3
Configuration settings. Before using the start option within the Diver-Mobile application, there should be a
Bluetooth connection between the Diver-Gate(M) and a mobile device with the Bluetooth visibility on. A Bluetooth
connection is indicated when the Bluetooth LED flashes with a high frequency and the text in the top left part of the
screen indicates the serial number of the Diver-Gate(M), “SWSGW_141406...”. If this text shows “Listening..” there
is no connection (yet) between the device and the Diver-Gate(M). For more information see section 3.4 Connecting/
pairing the Diver-Gate(M) to your device.
Click the “Scan” button to make a connection to nearby Diver-DXTs. Diver-Mobile will scan for locations and a
second screen will display the number of scanned locations (default 30 seconds). See example in figure below:
June 2014
www.swstechnology.com
copyright of SLB
Page 8
After the scanning period ends the screen will display detailed information of the scanned locations.
All the locations are unselected by default.
By clicking (long click) the name the user can select the location(s) to indicate which Diver-DXT baro logger must
be started. By clicking the “Start” button, the selected Diver-DXT baro loggers will be started. The measuring
interval of the Diver-DXT baro logger is 60 minutes (full hour). See example in figures below:
June 2014
www.swstechnology.com
copyright of SLB
Page 9
It is also possible to select all baro loggers using the selection button. When Divers are selected the button “Start”
is not active anymore.
June 2014
www.swstechnology.com
copyright of SLB
Page 10
4. Collecting and transferring data
4.1. Collecting data in the field
In this section we assume that the configuration settings are set to the user’s preferences, see section 3.3
Configuration settings. Before using the download option in Diver-Mobile application, there should be a Bluetooth
connection between the Diver-Gate(M) and a mobile device with Bluetooth visibility on. A Bluetooth connection
is indicated when the Bluetooth LED flashes with a high frequency and the text in the top left part of the screen
indicates the serial number of the Diver-Gate(M), “SWSGW_141406...”. If this text shows “Listening..” there is no
connection (yet) between the device and the Diver-Gate(M). For more information see section 3.4 Connecting/
pairing the Diver-Gate(M) to your device.
Click the “Scan” button to make a connection to nearby Diver-DXTs. Diver-Mobile will scan for locations and a
second screen will display the number of scanned locations (default 30 seconds). See example in figure below:
After the scanning period ends the screen will display detailed information of the scanned locations. Furthermore,
previously downloaded locations (in the last 24 hours) are highlighted with a green checkmark.
June 2014
www.swstechnology.com
copyright of SLB
Page 11
All the locations are unselected by default.
By clicking (long click) the name the user can select the location(s) to indicate which datalogger must be read. It
is also possible to select Not yet downloaded (in the last 24 hours), All Divers, All baro sensors and All dataloggers
using the selection button.
June 2014
www.swstechnology.com
copyright of SLB
Page 12
By clicking the “Download” button, the data of the selected dataloggers will be read sequentially. It can take some
time before all data is collected (> 10 minutes for a Diver with full memory). Only data which is not present in the
database will be read. Furthermore, if during download the connection between the Diver-Gate(M) and the mobile
device is disrupted the already downloaded data will be present in the database and will not be readout during the
next download attempt. This increases the overall efficiency of downloading.
4.2. Collecting and transferring data
There are two ways to manage/export data (DAT files) collected by Diver-Mobile:
• via File Explorer
Data collected with Diver-Mobile is stored in the dat-folder of the mobile device. To access the collected
data, connect the Android device with a usb cable or Bluetooth (unlock the screen of the Android device
if locked) and open File Explorer. In the File Explorer window select Phone and open the DAT folder in the
Download folder. Collected data are stored in this folder. It is possible to copy these files and import them
into Diver-Office or Diver-Office Premium. Click on the EXPORT button, keep the FTP off and click on GO.
June 2014
www.swstechnology.com
copyright of SLB
Page 13
•
June 2014
via an FTP server (optional)
Important note: If a user chooses to send the data to the FTP server, the DAT files in the dat-file folder on
the mobile device will be removed after the data is successfully sent to the FTP server. However the data
is still present in the Diver-Mobile database. The files on the ftp server can be imported into Diver-Office or
Diver-Office Premium. Click on the EXPORT button, turn on the FTP and click on GO.
www.swstechnology.com
copyright of SLB
Page 14