1
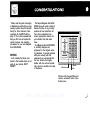
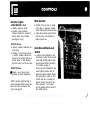
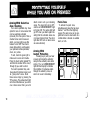
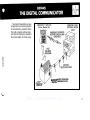
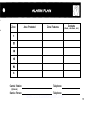
OPERATING
GUIDE
FOR YOUR
MAGNUM ALERT-825/
MAGNUM ALERT-825HS
SECURITY SYSTEM
0
1880,
NAPCO
WWW.DIYALARMFORUM.COM
N A P C O
Please read this guide thoroughly
to familiarize yourself with your new
security system. Keep this booklet
handy for future reference. Note
especially the ALARM PLAN on
page 15. Your alarm specialist will
help you fill it out and explain the
various features and operating
procedures for your new Magnum
Alert-825/825HS.
NOTICE
You’ll probably find items mentioned in this booklet which do not
apply to your system. DON’T
WORRY!
The Napco Magnum Alert-8254
825HS has such a wide variety of
features that few, if any, security
systems will ever need them all.
Your alarm professional has
chosen appropriate features for
your situation. Ask him about
them.
Your Magnum Alert-825/825HS
is carefully designed and
engineered to the highest industry standards. To provide optimum
safety and security with this
equipment, we recommend that
the user become thoroughly
familiar with the unit and periodically check its condition and state
of readiness.
Mini-Sounder
’ I
Shunt
Panic
The face of the keypad lifts up to
reveal a convenient index of protected zones.
WWW.DIYALARMFORUM.COM
Dlgltal Communicator
Abort Delay
A delay period that allows the system to be
reset before it reports to a central station.
Alarm Plan
ldentifies the areas of your premises protected by each zone of protection and lists
zone features. (See page 15)
Ambush Code
Reports burglary and emergencies directly
to the central station over telephone lines.
Napco’s Digit-key keypad puts Control
Center functions at your fingertips. It can
be mounted either at the Control Center or
anywhere in your premises.
Exlt/Entry Delay
A one or two-digit code used before an arm/
disarm code that causes a silent report to
be sent to a central station. (Optional)
Lets you exit and enter your premises without
setting off an alarm after the system is armed.
Arming/Disarming
Digit keys have secondary functions which
are activated by holding down a digit until
a beep is heard.
Turning your system ON or OFF. This can
be done by entering a code on the DigitKey keypad, or by turning an optional keySwitch.
Arm/Dlsarm (Personal) Codes
Up to 4 four-digit codes used to arm and
disarm the system from the keypad.
Battery
Hold Down Functlon
Fallback Code
A pre-programmed four-digit code that may
be used to disarm your system should all
user codes be erased (as after an extended
power failure).
Mlnl-Sounder
Central Station
Buzzer at each Napco Digit-Key keypad
warns that entry delay time has started. It
also sounds when you attempt to arm the
system if a particular zone is in “trouble”. It
also verifies contact with a central station
when a closing signal is sent (optional).
Monitors incoming burglary and emergency
messages from the Digital Communicator,
and alerts the proper authorities. (Optional
feature)
Two buttons (* and #) on the Digit-Key
keypad which will alert the central station
of an emergency.
Stand by battery Is placed in the Control
Center box to provide backup protection in
the event of a power loss.
Control Center
Panic Buttons
the security system (alarm, trouble, low
battery, etc.). (optional)
Shunt Button
Labelled "S" on the Digit-Key keypad. Lets
you manually remove one or more protective
zones from the system.
Report
WWW.DIYALARMFORUM.COM
The heart of the Magnum Alert-825 security
system: it controls all system functions.
A communication sent to a central station
indicating a specificchange in condition of
Zones
Independent, circuits that protect specific
areas of your premises.
Auto Shunted Zone: A zone capable of
being automatically bypassed (shunted)
out of the protection system if it is in
“trouble” (faulty) when you attempt
to arm the system.
Burglary Zones: Detect intrusion.
Day Zone: A zone programmed to cause
visual and audible ( optional) indication at
the Digit-Key keypad when it is in ”trouble”
during the disarmed period.
Exlt/Entry Follower Zone: Provides
exit and entry delay for interior devices.
Entry delay only occurs if re-entry takes
place through the normal exit/entry door.
Group Shunt Zones: A group of zones
programmed so they can be manually by
passed (shunted) all at once.
Priority Zones: When a zone selected
for the feature is in “trouble” it will be
impossible to arm the Control Center.
Selectlve Shunted Zones: Zones that
can be individually bypassed (shunted)
using the Shunt Button.
Trouble Zones: Zones that cannot be
armed becauseof an open window, door
or other problem in the area.
24 Hour Zone: Are always armed and
ready at all times to respond to an emergency situation.
3
lndicator Lights
Mint-Sounder
ARMED/MEMORY (Red)
l Steady- system is armed.
l Flashes - alarm condition.
Flashes indicate the number of
zone(s) which were violated.
(see page 5, Key 2)
l
STATUS (Green)
Steady - system is disarmed, all
zones okay.
l Flashes - a non-24 hour zone is
in trouble. Flashes indicate the
number of the zone(s) that are in
trouble. Note: to stop flashing
hold down Key 3 for two seconds,
l
SHUNT (Yellow)
,o Steady - one or more zones
manually shunted (bypassed).
NOTE: all three lights flashing together indicates that AC power has
been lost. Reset indication with
Key 9 (see page 5).
Steady Tone: day zone in trouble;
entry delay in progress; system
armed with a priority zone in trouble.
l Beep (2 seconds): system armed
with any zone auto shunted; or
battery power low.
Arm-Disarm/Run/Load
Switch
l
Used to load (program-in) user
arm/disarm codes. Slide switch
to the right (LOAD) position when
entering codes (refer to Selecting
Your Codes on page 7).
Be sure to return theswitch to the
center (RUN) position after all
codes have been entered. Setting
this spring-return switch to the
left will also arm or disarm the
system (unless this option has
been removed). Your system
will not operate with the switch in
the LOAD position.
WWW.DIYALARMFORUM.COM
Keys
NOTICE:Keys1,2,3,4,5,9 and S
must be held down for 2 seconds
(until mini-sounder beeps) to perform their desianated ‘Hold- Down "
(“Key”) functions.
Key 1: TEST
Momentarily sounds the burglar
alarm from the battery. If no alarm
is heard, or if it is weak, the battery
may need replacing. Use this test
weekly. (To perform this function
the key must be held down until a
beep is heard.)
Key 2: ALARM HISTORY
This will flash the red ARMED/
MEMORY light to indicate the last
alarm condition. Count the number
of flashes to determine the zones
violated. This feature does not
reset; after the system is rearmed,
the previous alarm history will remain
in alarm memory until automatically
reset by a new alarm condition. To
perform this function the key must
be held down until a beep is heard,
and then continued to be held down
until all information has been
displayed.
Key 3: STATUS INDICATION
RESET
This will stop the green STATUS
light flashing. To turn STATUS flashirig back on, hold down Key 3
aaain. (To oerform this function the
key must be held down until a beep
is heard.)
Key 4: INSTANT PROTECTION
Cancels the exit/entry delay
periods when arming. The delay is
restored after you disarm the system.
See page 10. (To perform this function the key must be held down until
a beep is heard.)
Key 5: DOOR CHIME
This will initiate a feature that
sounds a chime In the keypad each
time the entry door on zone 1 is
opened. This feature only works when
the alarm system is disarmed (off). To
eliminate the door chime feature,
press this key again. A lengthy
“chime” may be reset using Key 9
(MA-825HS only). (To perform these
functions, the key must be held down
until a beep is heard.)
Key 9: RESET
Used to reset a Dav Zone MiniSounder indication (MA-825HS only), a
lengthy door “chime” (MA-825HS
only). or the AC Failure indication (all
three indicatora flashing), and to ’
bypass a troubled zone deaignated as
a “Priority with Bypass Zone.” (To
reset any function, the key must be
held down until a beep is heard.)
Key S: SHUNT
This will flash the vellow SHUNT
light to indicate the zone(s)
shunted. Count the number of
flashes to determine the zone(s)
shunted.
To perform this function the key
must be held down until a beep is
heard, and continued to be held
down until all information has been
displayed. The key does not have
to be held down for either the
Selective Zone Shunting feature
(see page 10) or when selecting a
new code (see page 7).
Keys * and #: PANIC BUTTONS
Activates the panic zone. Refer to
“Panic Zone”, page 10 for more
information.
WWW.DIYALARMFORUM.COM
Your Magnum Alert-825/825HS Security System has three basic components:
1. Zones
2. The Dlglt-Key Keypad
3. The Alarm Output
Your system is capable of
monitoring up to six separate areas
of your premises, including Ambush/Panic and Auxiliary zones.
Each zone is an independent circuit that protects a specific area of
your premises. For example: your
alarm specialist may have set aside
a zone for window protection, exit/
entry delay, interior space protection, safe and valuables protection
or emergencies. Each zone can be
“programmed’ to react in aspecific
manner. Check and be certain that
you know what each zone protects.
Lets you program arm/disarm
codes; arm and disarm the system;
check the condition(status) of each
zone; temporarily bypass (shunt)
individual (or group of) zones; send
an ambush alarm; cancel exit/entry
delay; test the battery and alarm
devices; reset the AC-failure indication; and bypass a Priority-withBypass Zone.
Three lights and a Mini-Sounder
on the Digit-Key keypad monitor
the system.
When any zone is activated, the
Control Center responds by sounding an audible alarm and/or alerting
a central station (optional). Your
alarm specialist has programmed
your system to react in a specific
manner to each type of emergency.
Be sure you understand how your
system responds to these emergencies.
WWW.DIYALARMFORUM.COM
The Digit-Key Keypad
Selecting Your Codes
All security system operations are
carried out at the keypad. Each key
hasaspecialfunction of its own (see
“CONTROLS” page 5) plus the
ability to arm and disarm the system
when they are used in a preselected
combination (codes).
To program these codes, slide
the ARM-DISARM/RUN/LOAD
switch (upper left corner of the
Control Center, see page 4) to the
right (LOAD). The three lights on
the keypad will flash rapidly, and
the Mini-Sounder will beep. At the
keypad, enter any combination of
up to four digits (there is no zero)
as follows:
Press:
l S + 1 + Four digit First User’s
Personal Code
S + 2 + Four digit Second
User’s Personal Code
l S +3 + Four digit Third User’s
Personal Code
l S + 4 + Four digit Fourth
User’s Personal Code
After all user codes have been
entered, return the ARM-DISARM/
RUN/LOAD switch at the Control
Center to the center( RUN) position.
Remember: your system will not
operate with the switch in the LOAD
position.
NOTE: You need not assign all four
codes. Use only as many as you
Personal ( Arm/Disarm)
Codes
You can choose up to4 four-digit
codes which will allow you to arm
and disarm your system. Any of these
codes can easily be changed, thus
allowing temporary guests, babysitters, employees, etc., access to
the premises. When no longer needed, the codes can be changed or
removed from service.
Your security system cannot be
disarmed by unauthorized persons.
It will respond only when a code of
your choosing is entered through
the keypad.
need, and change them as often
as you feel necessary (refer to
Changing or Voiding a Code).
Easy Arming
(MA-825HS only)
If programmed, this feature
permits quick arming by momentarily pressing Key 8. Disarming,
however, will still require entry of
a complete code.
Changing or Voldlng
a Code
Changing any user’s code is
accomplished by using the foregoing procedure and simply changing the 4-digit combination. Thus.
to change User 3’s code:
1. Set the ARM-DISARM/RUN/
LOAD switch to LOAD.
2. Press S + 3 + Four new digits,
user 3’s new code.
3. Return the ARM-DISARM/
RUN/LOAD switch to RUN.
WWW.DIYALARMFORUM.COM
7
Checking AC Power
If the three lights of your keypad
are blinking slowly, you have lost
AC power. Check to see if there
has been a general power outage,
or if the Control Center’s transformer is disconnected. If you must
operate without AC power, press
Key9 to stop the lights from blinking. Next, test your standby
battery by pressing Key 1. If the
alarm doesn’t sound, or is weak,
replace the battery. Check your
battery weekly.
Armlng The System Before
You Leave
8
Before you attempt to arm the
system, check the STATUS light
on the keypad. If the light is on,
you may enter your code, but be
prepared to leave immediately.
Upon arming, the red ARMED/
MEMORY light will come on and
the green STATUS light will go out.
Leave immediatelythrough the exit/
entry door before the exit-delay
time runs out. If you take too long
to leave the premises, the Mini-
Sounder will warn you that exitdelay time has expired and entrydelay time has started. To avoid
causing an alarm, quickly return
to the keypad and enter your code
to disarm the Control Center. You
may then rearm and try to exit again.
System Does Not Respond
to Personal Code
If after an extended power failure
your personal codes do not work,
you can temporarily use the " Fallback” code to operate the system.
To restore personal codes, see page
7 “Selecting Your Codes”.
Arming With A Zone
In Trouble
If the green STATUS light is flashing, at least one’non-24 Hour Zone
is in trouble (in an open or shorted
condition) and incapable of being
armed. Count the number of flashes
to determine the zone(s) in trouble.
For example, if your back door is
open on Zone 1 and a window is
open on Zone 3, the STATUS lamp
will flash once for Zone 1; pause;
then flash three times for Zone 3.
Try to clear the troubled zone(s)
yourself. In this example you can
clear the zones by merely closing
the back door and the window.
If the zone cannot be fixed (green
light still flashing), it may still be
possible to arm the system without
the protection of that zone. Check
your Alarm Plan (see page 15). If
the zone in trouble is not designated
as a Priority Zone, you will be able
to arm your system anyway. A 2second beep at the keypad MiniSounder will alert you that the system was armed with a zone automatically bypassed (auto-shunted)
and no alarm will occur. Be sure to
have all zones in trouble repaired
as soon as possible! If you cannot
clear the zone yourself, call your
alarm specialist.
You cannot arm your system if a
zone programmed as a Priority Zone
is in trouble. The Mini-Sounder will
come on, but the ARMED/MEMORY
light will not. To silence the sounder,
re-enter your code to disarm.
WWW.DIYALARMFORUM.COM
If trouble is encountered on a
zone programmed as a Prioritywith-Bypass Zone however, enter
your code to silence the MiniSounder and disarm; hold down
Reset Key 9 until it beeps (this will
bypass the alarm condition); then
enter your code to rearm.
Disarming When
You Return
When you enter through the exit/
entry door, the Mini-Sounder will
come on during the entry period to
remind you to disarm. Check the
red ARMED/MEMORY light; if it is
flashing, an alarm occurred while
you were out. Using your code,
disarm the system immediately
during the entry period to prevent
an alarm and to silence the MiniSounder.
NOTE: If you enter the wrong code,
you must wait at least 2 seconds
before re-entering. If there was an
extended power failure and your
system does not respond to your
correct code, enter your preprogrammed “Fallback” code to
disarm. See page 8.
To identify which zone(s) were
violated, hold down Alarm History
Key 2 until it beeps. The red ARMED/
MEMORY light will flash to indicate
the last alarm condition. Count the
number of flashes to determine
which zone(s) require attention.
NOTE: If an alarm occurredand the
red light did not flash, a 24 Hour
Zone (see your Alarm Plan) was
violated. The cause of the alarm
must be determined and cleared
before you can rearm your Control
Center.
Ambush Code (optlonal)
If an intruder forces you to disarm
your system, enter your preprogrammed 1- or P-digit Ambush
Code before your disarm code. This
activates your Ambush Zone, which
is usually programmed to send a
silent alarm to a central station
(optional feature). If your system is
monitored by a central station, be
sure to memorize your ambush code.
WWW.DIYALARMFORUM.COM
9
Arming Wlth Selective
Zone Shunting
Your alarm specialist may have
opted for one or more zones that
can be selectively shunted
(removed) from the system. Since a
shunted zone cannot cause an
alarm, you may wish to use this
feature to turn OFF the interior
areas while arming, and keeping
your perimeter zones (windows,
doors, etc.) active.
To arm, check the green light to
make sure no zone is in trouble.
Press the shunt button ( labeled "S”),
and then the number of the zone (1
through 6) you wish to shunt
Your alarm specialist may also
have opted for interior zones to all
be “group shunt” zone-s Shunt
these zones simply by pressing the
"S" key twice. The yellow shunt light
will come ON whenever you shunt
one or more zones. Enter your arm/
10
disarm code to arm your remaining
zones. The green light will go OFF,
and the red ARMED/MEMORY light
will come ON. The yellow light will
go OFF when you disarm again indicating that the shunted zones are
no longer shunted.( Note: The shunt
light does NOT come on when zones
are auto-shunted.)
Arming With
Instant Protectlon
Panic Zone
To activate the panic zone,
simultaneously press the two keys
marked * and # on the Digit-Key
keypad. The panic zone can be programmed to send a silent alarm to a
central station. activate an audible
alarm, or both.
I’
Pressing key 4 (until you hear
a beep) will cancel the exit/entry
delay on the exit/entry zone when
arming. The red ARMED/MEMORY
light will flash rapidly to indicate
this condition. If someone enters
through the exit/entry zone, an
alarm will sound immediately.
WWW.DIYALARMFORUM.COM
Your Alarm Specialist may have
programmed your security system
to be monitored by a central station.
The built-in digital communicator
can transmit emergency signals to
the central station 24 hours a day.
EMERGENCY SERVICES
MONITORS YOUR
SYSTEM 24 HOURS
(Police, Medical Etc)
PR
PREMISES
ALERT-825/825HS
COMMUNICATOR
WWW.DIYALARMFORUM.COM
11
Abort Delay
Note which zones on your alarm
plan have abort delay. This is a
delay that enables you to reset the
system before a zone condition
report is sent to the central station.
Non-24 hour zone reports are
aborted by arming and then disarming. 24 hour zones, however, must
first be repaired.
12
Opening and Closing
Reporting
An optional feature that permits
the central station to receive a
signal each time the system is
armed, disarmed or both (up to 4
individual users can be identified).
Central Station Rlngback
The central station will acknowledge the fact that you have armed
your system by “ringing back” with
a short beep from the Mini-Sounder.
(This is an optional feature that responds to closing reports only.)
WWW.DIYALARMFORUM.COM
The following information is
applicable only where local
ordinance permits use of your alarm
Control Center for fire detection
Controlling Your
Fire Circuit
If your alarm specialist installed
smoke detectors or heat sensing
thermostats, you have 24 hour fire
protection. This optional Fire Protection Zone is always active, even
though your system may be disarmed. An optional Fire Supervision
and Indicator Station on the Control
Center provides the following fire
circuit controls.
AC Power Check
If the yellow AC light on the Fire
Supervision and Indicator Station is
off, the Control Center is not receiving AC power. Press the springloaded SILENCE & FIRE RESET
switch to shut off the Mini-Sounder.
Check lights to see if there is a
general power outage. If there is,
you will be operating from your
standby battery. When AC power is
restored. the Mini-Sounder will
come back on. Press the springloaded switch again to silence the
Mini-Sounder.
Fire-Zone Check
The Mini-Sounder on the Fire
Supervision and Indicator Station
signals a problem on the Fire Zone.
Press the spring-loaded SILENCE
8 FIRE RESET switch to shut off the
Mini-Sounder. The red TROUBLE
light will come on until the Fire
Zone is cleared. When the zone is
restored, the Mini-Sounder will
signal again to indicate that the
Fire Zone is functional. Press the
SILENCE & FIRE RESET switch
once again to turn off the MiniSounder.
Fire-Detector Reset
After a fire alarm, the red FIRE
ALARM light will be on. Press the
SILENCE & FIRE RESET switch to
clear the smoke detectors.
Alarm/Battery Test
The fire alarm bell/siren and
standby battery should be tested
weekly. Disarm the Control Center.
Push the BATTERY & BELL TEST
switch down and listen to the bell/
siren. If the alarm sounds weak,
the battery is faulty. Call for service.
Would You Like More
Safety Informatlon?
For information on home fire detection, burn safety, and home fire
safety, contact the National Fire
Protection Association, Public
Affairs Dept.05A, Battetymarch
Plaza, Quincy, MA 02269.
NOTE: If there is no Fire Supervision and Indicator Station on your Control
Center and your Fire Zone uses smoke detectors, have your alarm specialist
show you and explain the switch he has installed for resetting the smoke
detectors after an alarm.
WWW.DIYALARMFORUM.COM
13
Even with the most advanced fire
alarm system, adequate protection
requires an escape plan. To prepare your plan:
Draw floorplans of your building.
Show two exits - a front or back door
and a window from each room. (Make
sure the window works. You may
need a special fire escape ladder if
the window is high up.) Write down
your outside meeting place.
Family Rehearsal
Rehearse each of the following
activities:
1) Everyone in their room with the
doors closed.
2) One person sound the alarm.
3) Each person tests his door.
4) Pretend the door is hot and use
the alternate escape exit.
5) Everyone meet outdoors at the
assigned spot.
14
IMPORTANT - Read Carefully
Discuss these escape procedures
with those who use the building.
1) In a residence, sleep with the
bedroom doorclosed. A closed door
will hold back deadly smoke while
you escape.
2) When thefirealarm signals, escape quickly. Do not stop to pack
3) Test the door. If it is hot, use
your alternate route through the
window. If the door is cool, brace
your shoulder against it and open it
cautiously. Be ready to slam the door
if smoke or heat rush in. Crawl
through smoke, holding your breath.
Close the doors again on leaving to
helppreventthefirefromspreading
4) Go to your specific outdoor
meeting place so you can see that
everyone is safe.
5) Assign someone to make sure
nobody returns to the burning building.
6) Call the fire department from a
neighbor’s telephone.
WWW.DIYALARMFORUM.COM
Zone
Area Protected
Zone Features
Contacts
(doom, wlndows, etc.)
1
6
Central Station
(Optional)
Service Person
Telephone
Telephone
WWW.DIYALARMFORUM.COM
15