1
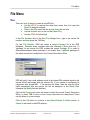
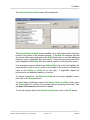
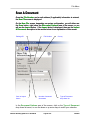
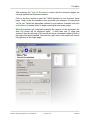
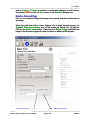
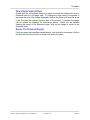
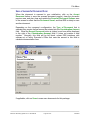
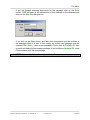
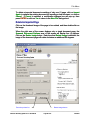
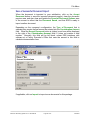
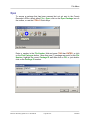
Phoenix
Fresno
Website
th
10835 N. 25 Avenue, Suite 350, Phoenix, AZ 85029
1941 N. Gateway Blvd, Ste 102, Fresno, CA 93727
www.digisolaz.com
Phone: (602) 866-8199
Phone: (559) 252-1090
───────────────────────────────────────────────────────
Introduction To The Electronic Recording System .................................................... 4
General Information And Helpful Hints ....................................................................... 5
Quick Keys.................................................................................................................. 6
ERS Entry Mode ......................................................................................................... 7
F4: .......................................................................................................................... 7
Tab: ........................................................................................................................ 7
Execute:.................................................................................................................. 7
Logon ............................................................................................................................. 8
The ERS Desktop .......................................................................................................... 9
Electronic Recording System Desktop........................................................................ 9
Tool Bar .................................................................................................................... 10
Tool Bar Icons And Quick Key Alternatives............................................................... 10
File Menu...................................................................................................................... 11
New........................................................................................................................... 11
Scan A Document................................................................................................. 14
Scanned Document Options................................................................................. 16
Delete a Scanned Page.................................................................................... 16
Rotate a Scanned Page ................................................................................... 17
View a Single Scanned Page ........................................................................... 18
Rescan The Document Page(s) ....................................................................... 18
Save a Successful Document Scan ................................................................. 19
Import A Document............................................................................................... 21
Imported Document Options................................................................................. 24
Delete An Imported Page ................................................................................. 24
Rotate An Imported Page ................................................................................. 25
View a Single Imported Page ........................................................................... 26
Import The Proper Document Page(s) ............................................................. 26
Save a Successful Document Import ............................................................... 27
Open ......................................................................................................................... 29
Exit............................................................................................................................ 31
Tools Menu .................................................................................................................. 32
Show Desktop........................................................................................................... 32
Change Queue.......................................................................................................... 32
Queues ..................................................................................................................... 34
View File Number Information .............................................................................. 36
Delete A Package............................................................................................. 36
View Thumbnail Image(s) Of Document ............................................................... 37
View Enlarged Thumbnail Image .......................................................................... 38
Move Document To Queue................................................................................... 40
Refresh The Queues Screen ................................................................................ 41
Address Book............................................................................................................ 42
New ...................................................................................................................... 43
───────────────────────────────────────────────────────
Electronic Recording System v4.0.1 User Manual
Page 2 of 53
1/25/2007
───────────────────────────────────────────────────────
Modify ................................................................................................................... 44
Delete ................................................................................................................... 45
Cancel .................................................................................................................. 45
Reprint Documents ................................................................................................... 46
Send To County Recorder ........................................................................................ 48
Recording Fees......................................................................................................... 51
Change My Password............................................................................................... 52
Error Log ................................................................................................................... 52
About Menu ................................................................................................................. 53
───────────────────────────────────────────────────────
Electronic Recording System v4.0.1 User Manual
Page 3 of 53
1/25/2007
Introduction To The Electronic Recording System
───────────────────────────────────────────────────────
Introduction To The Electronic Recording System
The Electronic Recording System (ERS) application directly interfaces with
software at the County Recorder’s Office, in order to electronically send
documents to be recorded, and also receive recorded documents.
ERS has options for customization and several user access levels. ERS enables
the scanning in of one or more documents that will be sent as a package and
recorded at the County Recorder’s Office. If appropriate, once a document is
scanned, pages can be deleted and rotated. ERS creates useful tracking and
other information associated with every document package. These document
packages can be easily organized and moved into various queues and are stored
there until ready to be sent electronically to the County Recorder’s Office. Then,
electronically, the County Recorder’s Office either sends back the recorded
package, or a memo if the package was unable to be recorded. Recorded
documents can then be printed.
This manual will explain all of the functionality contained within the ERS
application, and discuss how each tool might be used. As each company
functions in its own unique way, there are some functions that may not be
utilized, but you are encouraged to examine and consider all of them, to ensure
you are getting the most out of ERS.
There are a number of configuration options that can affect the functionality of
the system. These variations are discussed in the Electronic Recording System
Administrator Manual.
───────────────────────────────────────────────────────
Electronic Recording System v4.0.1 User Manual
Page 4 of 53
1/25/2007
General Information And Helpful Hints
───────────────────────────────────────────────────────
General Information And Helpful Hints
This manual will progress through the functions in the Electronic Recording
System (ERS) in the order that they appear on the menus within the application.
This will not be how you will work with the product, as that will depend on your
responsibilities and the structure of each individual business, as well as the
configuration of ERS at each business.
Before discussing the system
functionality in detail, there are some general features that you should be aware
of. These are discussed below.
Some formatting conventions used in this manual are:
• When you need to press the Enter key, you will see ENTER in this
manual.
• When you see text displayed on a menu or window such as the words
“File” or “Cancel”, you will see File or Cancel in this manual.
• File > Open means that you select File from the main menu and then
select Open from the next menu.
───────────────────────────────────────────────────────
Electronic Recording System v4.0.1 User Manual
Page 5 of 53
1/25/2007
General Information
on And Helpful Hints
───────────────────────────────────────────────────────
Quick Keys
Quick Keys can quickly accomplish tasks by using short cut keys instead of using
the mouse to click on selections. Quick Keys are one or more keys you press on
the keyboard to complete a task. For example, press and hold the Alt key and
also the F key. This ALT+F key combination opens the File menu, just as
clicking on the File menu at the top left of the Electronic Recording System
(ERS) screen opens the File menu.
To determine if a Quick Keys combination is available, press the ALT key to
have ERS underline the Quick Keys letter in all options that have a Quick Keys
combination available. You can use the Quick Keys alternative to using the
mouse, for example, use the ALT+T Quick Keys to drop down the Tools menu
is underlined. Pressing the ALT key to display the
because the “T” in Tools
T
underlined letter is a visual aide. These Quick Keys can be used at any time,
even when the option does not have a letter underlined.
ALT+T opens the Tools menu
───────────────────────────────────────────────────────
Electronic Recording System v4.0.1 User Manual
Page 6 of 53
1/25/2007
General Information
on And Helpful Hints
───────────────────────────────────────────────────────
ERS Entry Mode
F4:
You may use the function key F4 when accessing a drop down list box, or you
may click with the mouse on the down arrow.
Tab:
Use TAB to move forward from one entry field to the next entry field.
Use SHIFT+TAB to move backward from one entry field to the previous entry
field.
Execute:
When you see a button with dots on the face, you can press ENTER to execute
that command, rather than clicking on it with the mouse, as the button already
has “the focus”. Press TAB to move the focus to the other button(s).
Press ENTER to execute “OK”
Button with dots on the face
───────────────────────────────────────────────────────
Electronic Recording System v4.0.1 User Manual
Page 7 of 53
1/25/2007
Logon
───────────────────────────────────────────────────────
Logon
Access to the Electronic Recording System (ERS) application is controlled by a
user-rights table, administered by a limited set of user name’s that have sufficient
authority granted to them. This is a very important control, and should be
carefully managed. Depending on the access level assigned to a user, they will
have access to various pieces of the ERS application, but generally not complete
access.
ERS will require a user to logon, after the user double-clicks on the ERS icon on
their desktop.
Enter your User Name in the first field, and then TAB to the Password field.
Enter your password and click OK.
Alternatively, if you do not want to use the mouse to click OK, you can hit the
TAB key until OK is highlighted, and hit ENTER.
NOTE: When you enter your password, it will not display on the screen, but will
be represented by a series of asterisks “*” or other special characters.
If you don’t want to continue, click on Cancel instead. This will cause the Logon
dialogue box to close and the ERS application will not be opened.
KEEP YOUR PASSWORD PRIVATE. You should not share your password or
log on to the system and let someone else then operate under that session. The
initials of the user logged on to the system will attach to transactions entered,
and you will only want to be responsible for your own activity.
If you forget your password, the administrator of the ERS application must assign
a new one.
───────────────────────────────────────────────────────
Electronic Recording System v4.0.1 User Manual
Page 8 of 53
1/25/2007
The ERS Desktop
───────────────────────────────────────────────────────
The ERS Desktop
Electronic Recording System Desktop
The Electronic Recording System will display a desktop as shown below when a
user signs into the ERS application.
NOTE: Depending on your access level, not all of the menu options or tool bar
icons may be available to you.
For example, a user with the “Scanning Department” access level enabled, will
have access to the New File, Open Package and Address Book tool bar icons,
and the Tools menu will have available the Show Desktop, Address Book,
Reprint Documents, Change My Password, and Error Log options.
A user with the “Scanning Department” and “Send to County” access levels
enabled, for example, will have access to the New File, Open Package, Send to
County Recorder, Address Book, and Queues tool bar icons, and the Tools
menu will have available the Show Desktop, Change Queue, Queues,
Address Book, Reprint Documents, Send to County Recorder, Recording
Fees, Change My Password, and Error Log options.
───────────────────────────────────────────────────────
Electronic Recording System v4.0.1 User Manual
Page 9 of 53
1/25/2007
The ERS Desktop
───────────────────────────────────────────────────────
Tool Bar
The tool bar gives quick access to several commonly used ERS functions. Hold
the cursor over a icon on the ERS tool bar to see its description.
Tool Bar Icons And Quick Key Alternatives
The following table describes each of the tools that can be found on the ERS
toolbar; and the Quick Key alternatives – should you not want to use the mouse.
Button
Tool Name
New File
Quick Keys
CTRL+N
Open Package
CTRL+O
Options
CTRL+P
Send to County Recorder
CTRL+E
Address Book
CTRL+A
Queues
CTRL+Q
Reprint Documents
CTRL+R
───────────────────────────────────────────────────────
Electronic Recording System v4.0.1 User Manual
Page 10 of 53
1/25/2007
File Menu
───────────────────────────────────────────────────────
File Menu
New
There are four (4) ways to create a new ERS file:
• Use the ALT+F to activate the drop down menu, then N to open the
New File selection window
• Click on the File menu with the mouse, then click on New
• Use the shortcut icon on the tool bar (New File)
• Use the CTRL+N Quick Keys
In the File Number field of the New File dialogue box, type in an escrow file
number, and then press the TAB key.
For this File Number, ERS will create a unique Package ID in the ERS
database. Because some counties allow the submittal of more than one (1)
“package” for an escrow file, ERS creates this unique Package ID, in order to
differentiate between these packages, if, at another time, a different package for
the same escrow file is submitted to the County Recorder’s Office.
ERS will verify if an e-mail address exists in the Impact/SQL address book for the
escrow officer associated with the escrow file, if your system is configured for
integration with Impact/SQL. If the escrow file exists, then the escrow officer
name associated with the escrow file will be displayed in the Notify field,
otherwise the Notify field will be blank.
Click on the County drop down list arrow to select the correct County Recorder’s
Office, or press TAB to move to the County drop down list, then press F4 and
use the down or up arrow keys.
Click on the OK button to continue to the Select Parties to Notify screen, or
Cancel to exit back to the ERS desktop.
───────────────────────────────────────────────────────
Electronic Recording System v4.0.1 User Manual
Page 11 of 53
1/25/2007
File Menu
───────────────────────────────────────────────────────
The Select Parties to Notify screen will be displayed.
The Select Parties to Notify screen enables you to select names that should be
notified of the status of the scanned package. If the New File dialogue box had
the escrow officer name displayed in the Notify field, then you can add additional
names to notify, if applicable, from this screen. If there was not an escrow officer
name displayed in the Notify field, then add all names to notify from this screen.
If an appropriate name is listed in the Address Book list on the left, highlight the
name and then click on the >> button in the middle of the screen, to include the
name on the Parties to Notify list on the right. If applicable, repeat this
procedure for any additional name(s) to include.
To remove a name from the Parties to Notify list on the right, highlight a name,
then click on the Remove button.
To cancel without selecting a name in the Select Parties to Notify screen, press
the Cancel button to continue to the screen used for scanning a document. See
the Scan A Document section below for details.
To use the name(s) listed in the Parties to Notify area, click on the OK button.
───────────────────────────────────────────────────────
Electronic Recording System v4.0.1 User Manual
Page 12 of 53
1/25/2007
File Menu
───────────────────────────────────────────────────────
If an appropriate name is not listed in the Address Book list on the left, and you
wish to add the person to the Address Book, enter the appropriate e-mail
address in the Send Email To field at the top of the screen, and click on the Add
button. A confirmation dialogue box will pop up. Press ENTER or click on Yes to
add a new entry to the Address Book, alternatively, click on No to use the email address for only this package and not add it to the Address Book list.
If Yes was selected, enter the person’s name in the Name field, and then click on
Ok.
The person’s Name and Email Address will be added to the Address Book and
the Parties to Notify list on the right, but the Address Book list on the left side
of the screen will not be refreshed with the new entry until later.
───────────────────────────────────────────────────────
Electronic Recording System v4.0.1 User Manual
Page 13 of 53
1/25/2007
File Menu
───────────────────────────────────────────────────────
Scan A Document
Once the File Number and e-mail address (if applicable) information is entered,
the New File screen is displayed.
On the New File screen, depending on system configuration, you will either see
the Scan button, right below the Document Options area of the screen, or you
will see the Import button. If the Import button is displayed, then see the Import
A Document description in the section below for an explanation of this screen.
Package ID
Scan or Import
button
File Number
Number of scanned
documents
County
Type of Document
drop down list
In the Document Options area of the screen, click on the Type of Document
drop down list arrow, or use the down or up arrow keys to make your selection.
───────────────────────────────────────────────────────
Electronic Recording System v4.0.1 User Manual
Page 14 of 53
1/25/2007
File Menu
───────────────────────────────────────────────────────
After selecting the Type of Document, confirm that the document pages are
correctly inserted into document scanner.
Click on the Scan button to open the TWAIN interface to your scanner’s setup
page. Refer to the documentation that came with your scanner, for instructions
+on its use. Select the appropriate options for your scanner if needed, and click
on the Scan (or similar) button to begin scanning the document pages.
When the scanner has completed scanning the page(s) of the document, the
New File screen will be displayed again. If more than one (1) page was
scanned, then the right side of the screen will show a thumbnail image of each of
the pages that were scanned, otherwise the right side of the screen will show a
full page view of the single page.
───────────────────────────────────────────────────────
Electronic Recording System v4.0.1 User Manual
Page 15 of 53
1/25/2007
File Menu
───────────────────────────────────────────────────────
Scanned Document Options
After scanning the document page(s), you can delete, rotate, or view the page(s).
The document can also be rescanned if applicable.
When the document is satisfactorily scanned it can be saved.
Delete a Scanned Page
Click on the image of the page to be deleted, then right-click on the image to
display a menu with several options, and then select Delete Page.
A confirmation dialogue box will pop up. Press ENTER or click on Yes to
proceed, or click on No to return to the screen with the thumbnail images.
To delete a scanned document consisting of only one (1) page, click on Rescan
Document to replace the existing document by scanning a new document, or
───────────────────────────────────────────────────────
Electronic Recording System v4.0.1 User Manual
Page 16 of 53
1/25/2007
File Menu
───────────────────────────────────────────────────────
click on Cancel. If Cancel is selected, a confirmation dialogue box will pop up,
then press ENTER or click on Yes to return to the New File dialogue box.
Rotate a Scanned Page
Click on the thumbnail image of the page to be rotated, and then double-click on
the image.
When the right area of the screen displays only a single document page, the
Scanned Document Options area of the screen will display four (4) options.
Click on the Rotate Image button. Each time that Rotate Image is selected, the
image of the document page will rotate clockwise an additional 90 degrees.
Rotate Image button
Zoom drop down list
───────────────────────────────────────────────────────
Electronic Recording System v4.0.1 User Manual
Page 17 of 53
1/25/2007
File Menu
───────────────────────────────────────────────────────
View a Single Scanned Page
Double-click on a thumbnail image of a page to change the display size from a
thumbnail view to a full page view. To change the zoom factor (to increase or
decrease the size of the image displayed), click on the Zoom pull down list arrow
in the Scanned Document Options area of the screen. If needed, the image
can be rotated by following the instructions above. When you are finished
viewing the image of the document page, click on the image to return to the
thumbnail view.
Rescan The Document Page(s)
If the document was scanned unsatisfactorily, and should be rescanned, click on
the Rescan Document button to rescan the entire document.
───────────────────────────────────────────────────────
Electronic Recording System v4.0.1 User Manual
Page 18 of 53
1/25/2007
File Menu
───────────────────────────────────────────────────────
Save a Successful Document Scan
When the document is scanned to your satisfaction, click on the Accept
Document button to save the scanned document page(s), clear the document
preview area, and also clear and update the Scanned Document Options area
of the screen to reflect that the Document Saved, and that ERS is ready to scan
another document.
Depending on the company’s configuration, the Type of Document that is
selected may require that an amount be entered into the Consideration Amount
field. When the Accept Document button is clicked, a red icon will be displayed
to the right of the Consideration Amount field if it does not contain a valid
number. Normally, this field will be left blank, unless ERS interfaces with
software at a County Recorder’s Office that uses the amount in this field to
calculate documentation fees.
If applicable, click on Scan to scan more documents for this package.
───────────────────────────────────────────────────────
Electronic Recording System v4.0.1 User Manual
Page 19 of 53
1/25/2007
File Menu
───────────────────────────────────────────────────────
If you are finished scanning documents for this package, click on the Done
button. ERS will save all the documents for this package in the database and
return to the New File dialogue box.
If you click on the Done button, and later more documents must be included in
the package before it is sent to the county, an entirely new package must be
created (File > New). Once a new package is Done, note its Package ID, then
go back and delete the incomplete package (it has a different Package ID), since
it was replaced with the new package.
NOTE: All scanned documents are placed in the Scanned queue.
───────────────────────────────────────────────────────
Electronic Recording System v4.0.1 User Manual
Page 20 of 53
1/25/2007
File Menu
───────────────────────────────────────────────────────
Import A Document
Once the File Number and e-mail address (if applicable) information is entered,
the New File screen is displayed.
On the New File screen, depending on system configuration, you will either see
the Scan button, right below the Document Options area of the screen, or you
will see the Import button. If the Scan button is displayed, then see the Scan A
Document description in the section above for an explanation of this screen.
Package ID
Scan or Import
button
File Number
Number of scanned
documents
County
Type of Document
drop down list
In the Document Options area of the screen, click on the Type of Document
drop down list arrow, or use the down or up arrow keys to make your selection.
───────────────────────────────────────────────────────
Electronic Recording System v4.0.1 User Manual
Page 21 of 53
1/25/2007
File Menu
───────────────────────────────────────────────────────
Click on the Import button to open the Select Files to Import screen from which
you can browse the network or workstation drives and folders, and then select
the appropriate Tagged Image File (TIF) format file to import into ERS. Check
with your company on the policy for the TIF file naming conventions and file
location(s).
Highlight the appropriate TIF file, then click on Open, or simply double-click on
the file.
───────────────────────────────────────────────────────
Electronic Recording System v4.0.1 User Manual
Page 22 of 53
1/25/2007
File Menu
───────────────────────────────────────────────────────
When ERS has completed importing the page(s) of the document, the New File
screen will be displayed again. If the TIF file contains more than one (1) page,
then the right side of the screen will show a thumbnail image of each of the
pages, otherwise the right side of the screen will show a full page view of the
single page.
───────────────────────────────────────────────────────
Electronic Recording System v4.0.1 User Manual
Page 23 of 53
1/25/2007
File Menu
───────────────────────────────────────────────────────
Imported Document Options
After importing the document page(s) from the Tagged Image File (TIF) format
file, you can delete, rotate, or view the page(s).
If an incorrect document was imported, simply click on Import Again and select
a different TIF file.
After determining that the document is satisfactorily imported, it can then be
saved.
Delete An Imported Page
Click on the image of the page to be deleted, then right-click on the image to
display a menu with several options, and then select Delete Page.
A confirmation dialogue box will pop up. Press ENTER or click on Yes to
proceed, or click on No to return to the screen with the thumbnail images.
───────────────────────────────────────────────────────
Electronic Recording System v4.0.1 User Manual
Page 24 of 53
1/25/2007
File Menu
───────────────────────────────────────────────────────
To delete a imported document consisting of only one (1) page, click on Import
Again to replace the existing document by importing a new document, or click on
Cancel. If Cancel is selected, a confirmation dialogue box will pop up, then
press ENTER or click on Yes to return to the New File dialogue box.
Rotate An Imported Page
Click on the thumbnail image of the page to be rotated, and then double-click on
the image.
When the right area of the screen displays only a single document page, the
Scanned Document Options area of the screen will display four (4) options.
Click on the Rotate Image button. Each time that Rotate Image is selected, the
image of the document page will rotate clockwise an additional 90 degrees.
Rotate Image button
Zoom drop down list
───────────────────────────────────────────────────────
Electronic Recording System v4.0.1 User Manual
Page 25 of 53
1/25/2007
File Menu
───────────────────────────────────────────────────────
View a Single Imported Page
Double-click on a thumbnail image of a page to change the display size from a
thumbnail view to a full page view. To change the zoom factor (to increase or
decrease the size of the image displayed), click on the Zoom pull down list arrow
in the Scanned Document Options area of the screen. If needed, the image
can be rotated by following the instructions above. When you are finished
viewing the image of the document page, click on the image to return to the
thumbnail view.
Import The Proper Document Page(s)
If an incorrect document was imported, simply click on Import Again and select
a different TIF file.
───────────────────────────────────────────────────────
Electronic Recording System v4.0.1 User Manual
Page 26 of 53
1/25/2007
File Menu
───────────────────────────────────────────────────────
Save a Successful Document Import
When the document is imported to your satisfaction, click on the Accept
Document button to save the imported document page(s), clear the document
preview area, and also clear and update the Scanned Document Options area
of the screen to reflect that the Document Saved, and that ERS is ready to
import another document.
Depending on the company’s configuration, the Type of Document that is
selected may require that an amount be entered into the Consideration Amount
field. When the Accept Document button is clicked, a red icon will be displayed
to the right of the Consideration Amount field if it does not contain a valid
number. Normally, this field will be left blank, unless ERS interfaces with
software at a County Recorder’s Office that uses the amount in this field to
calculate documentation fees.
If applicable, click on Import to import more documents for this package.
───────────────────────────────────────────────────────
Electronic Recording System v4.0.1 User Manual
Page 27 of 53
1/25/2007
File Menu
───────────────────────────────────────────────────────
If you are finished importing documents for this package, click on the Done
button. ERS will save all the documents for this package in the database and
return to the New File dialogue box.
If you click on the Done button, and later more documents must be included in
the package before it is sent to the county, an entirely new package must be
created (File > New). Once a new package is Done, note its Package ID, then
go back and delete the incomplete package (it has a different Package ID), since
it was replaced with the new package.
NOTE: All imported documents are placed in the Scanned queue.
───────────────────────────────────────────────────────
Electronic Recording System v4.0.1 User Manual
Page 28 of 53
1/25/2007
File Menu
───────────────────────────────────────────────────────
Open
To access a package that has been scanned but not yet sent to the County
Recorder’s Office, select either File > Open, click on the Open Package icon on
the toolbar, or use the CTRL+O Quick Keys.
Enter a number in the File Number field and press TAB then ENTER, or click
on the Find Packages button. More than one (1) package may exist for this File
Number; highlight the correct Package ID and then click on OK, or just doubleclick on the Package ID number.
───────────────────────────────────────────────────────
Electronic Recording System v4.0.1 User Manual
Page 29 of 53
1/25/2007
File Menu
───────────────────────────────────────────────────────
Click on the plus sign or double-click on the File Number, to expand the listing to
show the names of the scanned documents directly below.
The right side of the screen will display various Information for Package No
associated with the File Number.
County that was selected from
the New File dialogue box
Date that the Package
was sent to the County
Recorder’s Office
Name of the User that
scanned the Package
If the Package is in the Rejected
queue, then any memo from the
County Recorder’s Office will be here
Total Number of pages
scanned for all of the
documents
Number of documents scanned
───────────────────────────────────────────────────────
Electronic Recording System v4.0.1 User Manual
Page 30 of 53
1/25/2007
File Menu
───────────────────────────────────────────────────────
Exit
Select either Exit from the File menu, or use the CTRL+X Quick Keys to close
the ERS application and return to the Windows desktop. You should Exit out of
ERS when you are leaving your desk for an extended period, or are going home
for the day. Always Exit out of ERS at the end of each day, before logging off of
your computer. If you leave your ERS session logged on, others will have
access to your “rights”, and this could raise security concerns.
───────────────────────────────────────────────────────
Electronic Recording System v4.0.1 User Manual
Page 31 of 53
1/25/2007
Tools Menu
───────────────────────────────────────────────────────
Tools Menu
Show Desktop
Select Show Desktop from the Tools menu to clear the screen and return to the
ERS desktop, or use the CTRL+D Quick Keys.
Change Queue
Select either Change Queue from the Tools menu or use the CTRL+C Quick
Keys to view the Change Queue screen.
All scanned document packages are placed in the Scanned queue. To move a
Package to another queue, use the Change Queue option as an alternative to
the Queues option. The Change Queue option is especially useful if a file
number has several packages that may not be located in the same queue, since
the Change Queue screen lists the queue in which each package is located.
To move a package to another queue, enter a file number in the File Number
field and then click on Find Packages.
Highlight the correct package from the resulting list displayed below the File
Number field. Click on the Move to Queue drop down list arrow to select the
correct destination queue, or press TAB to move to the Move to Queue drop
down list, then press F4 and use the down or up arrow keys. Click on the OK
button to move the package to the destination queue, or Cancel to exit back to
the ERS desktop. ERS will immediately update the list to reflect the new status
of the moved package. If appropriate, repeat this step for any listed package.
───────────────────────────────────────────────────────
Electronic Recording System v4.0.1 User Manual
Page 32 of 53
1/25/2007
Tools Menu
───────────────────────────────────────────────────────
If the destination of the package is the Hold queue, a reason for placing the
package on hold must be entered in the text entry field of the pop up dialogue
box. Press ENTER or click on OK to continue, alternatively, click on Cancel to
exit back to the queues screen.
If Cancel is clicked or the text entry field is left blank, ERS will display an Action
cancelled alert box.
If a File Number is moved from any queue to the To Be Sent to County queue,
these documents must then be reviewed and approved by a designated person
before ERS will send them to the County Recorder’s Office. See the Send Files
To County Recorder section below for details.
NOTE: If the ERS system option Auto Send to County is enabled, and a File
Number is moved from any queue to the To Be Sent to County queue, a
confirmation dialogue box will pop up. Press ENTER or click on Yes to proceed.
───────────────────────────────────────────────────────
Electronic Recording System v4.0.1 User Manual
Page 33 of 53
1/25/2007
Tools Menu
───────────────────────────────────────────────────────
Queues
Select either Queues from the Tools menu, the Queues icon on the tool bar, or
use the CTRL+Q Quick Keys to view the queues screen.
If a plus sign (+) is to the left of a queue name, click on the plus sign to expand
the queue listing to show the File Numbers within that queue, for example, if the
Scanned queue has a plus sign to the left of it, click on the plus sign to reveal
any File Numbers listed in the Scanned queue.
───────────────────────────────────────────────────────
Electronic Recording System v4.0.1 User Manual
Page 34 of 53
1/25/2007
Tools Menu
───────────────────────────────────────────────────────
The queue listing shows the File Numbers within that queue. Click on the plus
sign to the left of a File Number, to list the scanned document(s), for example, if
00123456 has a plus sign to the left of it, click on the plus sign to reveal any
scanned document files listed for the 00123456 File Number. If any File
Numbers are listed more than once, then remember that each has its own
unique Package ID.
───────────────────────────────────────────────────────
Electronic Recording System v4.0.1 User Manual
Page 35 of 53
1/25/2007
Tools Menu
───────────────────────────────────────────────────────
View File Number Information
To view information related to a File Number, click on the number to display this
information on the right side of the screen. ERS automatically assigns a
Package ID number that groups the scanned documents into a package that will
be sent to the County Recorder’s Office as a unit (package).
Delete A Package
Click on Delete Package on the lower right corner of the screen to delete the
package. A confirmation dialogue box will pop up. Press ENTER or click on
Yes to proceed.
───────────────────────────────────────────────────────
Electronic Recording System v4.0.1 User Manual
Page 36 of 53
1/25/2007
Tools Menu
───────────────────────────────────────────────────────
View Thumbnail Image(s) Of Document
To view a document file that was scanned, click on the title of the document, for
example, click on Agreement For Sale to display the thumbnail images of each
document page scanned to the Agreement For Sale document file.
───────────────────────────────────────────────────────
Electronic Recording System v4.0.1 User Manual
Page 37 of 53
1/25/2007
Tools Menu
───────────────────────────────────────────────────────
View Enlarged Thumbnail Image
To view an enlarged version of a thumbnail image, click on a thumbnail image of
a document page.
───────────────────────────────────────────────────────
Electronic Recording System v4.0.1 User Manual
Page 38 of 53
1/25/2007
Tools Menu
───────────────────────────────────────────────────────
To return to the thumbnail view of a enlarged image, click on the enlarged image.
───────────────────────────────────────────────────────
Electronic Recording System v4.0.1 User Manual
Page 39 of 53
1/25/2007
Tools Menu
───────────────────────────────────────────────────────
Move Document To Queue
All scanned document packages are placed in the Scanned queue. To move a
File Number to another queue, right-click on the File Number, click on Move to
Queue, and then click on the destination queue. For example, a File Number
can be moved to the Recording Desk or Date Downs queue if the Recording
Desk or Date Downs department is still working on the escrow file. Also, a File
Number can be moved to the Hold queue if the escrow is placed on hold for any
reason. The File Number will remain in that queue until moved by a designated
person to the To Be Sent to County queue. Check with your company on the
policy for queue assignment.
───────────────────────────────────────────────────────
Electronic Recording System v4.0.1 User Manual
Page 40 of 53
1/25/2007
Tools Menu
───────────────────────────────────────────────────────
If the destination of the package is the Hold queue, a reason for placing the
package on hold must be entered in the text entry field of the pop up dialogue
box. Press ENTER or click on OK to continue, alternatively, click on Cancel to
exit back to the queues screen.
If Cancel is clicked or the text entry field is left blank, ERS will display an Action
cancelled alert box.
If a File Number is moved from any queue to the To Be Sent to County queue,
these documents must then be reviewed and approved by a designated person
before ERS will send them to the County Recorder’s Office. See the Send Files
To County Recorder section below for details.
NOTE: If the ERS system option Auto Send to County is enabled, and a File
Number is moved from any queue to the To Be Sent to County queue, a
confirmation dialogue box will pop up. Press ENTER or click on Yes to proceed.
Refresh The Queues Screen
The queue screen can be refreshed manually by pressing the F5 key.
───────────────────────────────────────────────────────
Electronic Recording System v4.0.1 User Manual
Page 41 of 53
1/25/2007
Tools Menu
───────────────────────────────────────────────────────
Address Book
To access the address book, click on the Address Book icon on the tool bar, or
use the CTRL+A Quick Keys.
───────────────────────────────────────────────────────
Electronic Recording System v4.0.1 User Manual
Page 42 of 53
1/25/2007
Tools Menu
───────────────────────────────────────────────────────
New
Click on the New icon on the Address Book tool bar, to add a new name and an
e-mail address.
Enter a name in the Name field and a properly formatted e-mail address in the
Email Address field, then either click on OK to add the name to the Address
Book, or Cancel to cancel the entry. If an e-mail address is entered using an
incorrect format, a red icon will be displayed to the right of the Email Address
field.
───────────────────────────────────────────────────────
Electronic Recording System v4.0.1 User Manual
Page 43 of 53
1/25/2007
Tools Menu
───────────────────────────────────────────────────────
Modify
Highlight an name on the list, then click on the Modify icon on the Address
Book tool bar, to change a name and/or email address.
Enter a name in the Name field and a properly formatted e-mail address in the
Email Address field, then either click on OK to save these changes to the
Address Book, or Cancel to cancel the entry.
If an e-mail address is entered using an incorrect format, a red icon will be
displayed to the right of the Email Address field.
───────────────────────────────────────────────────────
Electronic Recording System v4.0.1 User Manual
Page 44 of 53
1/25/2007
Tools Menu
───────────────────────────────────────────────────────
Delete
Highlight an name on the list, then click on the Delete icon on the Address Book
tool bar, to delete an name from the Address Book.
A confirmation dialogue box will pop up.
proceed.
Press ENTER or click on Yes to
Cancel
Click on the Cancel button at the lower left corner of the Address Book to return
to the ERS desktop.
───────────────────────────────────────────────────────
Electronic Recording System v4.0.1 User Manual
Page 45 of 53
1/25/2007
Tools Menu
───────────────────────────────────────────────────────
Reprint Documents
To reprint a recorded document, click on the Reprint Documents icon on the
tool bar, or use the CTRL+R Quick Keys.
───────────────────────────────────────────────────────
Electronic Recording System v4.0.1 User Manual
Page 46 of 53
1/25/2007
Tools Menu
───────────────────────────────────────────────────────
To display a list of packages for a specific File Number, enter the number in the
File Number field, otherwise leave the field blank to retrieve a list of all
packages.
Click on the County drop down list arrow to make your selection, or press TAB
and then F4, then use the down or up arrow keys to make your selection.
Press TAB to have the documents listed below the County field.
Click on each document to be printed. A check mark will be displayed to the left
of each item selected. To unselect a checked item, click on the checked item
again.
A document selected for printing
will have a check mark next to it
Click on a document to select it for printing
The document name consists of the name of the county, a dash (-), the File
Number, a dash (-), the Package ID, a dash (-), and various other numbers
used by ERS.
Click on the OK button to print the selected documents.
───────────────────────────────────────────────────────
────────────────
Electronic Recording System v4.0.1 User Manual
Page 47 of 53
1/25/2007
Tools Menu
───────────────────────────────────────────────────────
Send To County Recorder
To send any ERS file which is listed in the To Be Sent to County queue, click on
the Send to County Recorder icon on the tool bar, or use the CTRL+E Quick
Keys.
NOTE: If the ERS system option Auto Send to County is enabled, then the
Send to County Recorder icon will not be displayed on the tool bar, and the To
Be Sent to County queue will never have a plus sign to the left of it as all files
put into the queue will be promptly sent.
Click on the County drop down list arrow to select the correct County Recorder’s
Office, or press F4 and use the down or up arrow keys.
Click on OK to continue to the Send to County Recorder screen. To cancel
click on Cancel, and then at the blank Send to County Recorder screen, click
on Cancel again.
───────────────────────────────────────────────────────
Electronic Recording System v4.0.1 User Manual
Page 48 of 53
1/25/2007
Tools Menu
───────────────────────────────────────────────────────
To select an ERS file on the Send to County Recorder screen, click on the file
number in the File-Package area of the screen. Because ERS automatically
assigns an ERS internal Package No identification number in order to group the
scanned documents into one package, the ERS file is listed on the screen below,
as the file number, a dash (-), and the Package No, for example, ERS file
number 00123456 with Package No 4 assigned to the ERS file will be listed as
00123456-4.
Click on each file to be sent to the County Recorder’s Office. A check mark will
be displayed to the left of each item selected. To unselect a checked item, click
on the checked item again.
Click on the OK button to send the selected files, or Cancel to return to the ERS
desktop.
A confirmation dialogue box will pop up. Press ENTER or click on Yes to send
the selected files, alternatively, click on No to return to the Send to County
Recorder screen.
───────────────────────────────────────────────────────
Electronic Recording System v4.0.1 User Manual
Page 49 of 53
1/25/2007
Tools Menu
───────────────────────────────────────────────────────
After a few minutes, depending on the number of files being sent, the system will
send a notification to the e-mail addresses selected in the Select Parties to
Notify dialogue box. See the New description in the File Menu section above
for details about the Select Parties to Notify dialogue box.
To check on the status of any package, select File > Open, then type in the
escrow number in the File Number field, press TAB, double-click on the
Package ID, and then view the Information for Package on the right side of the
screen. See the Open description in the File Menu section above for details
about the Information for Package No area of the screen.
───────────────────────────────────────────────────────
Electronic Recording System v4.0.1 User Manual
Page 50 of 53
1/25/2007
Tools Menu
───────────────────────────────────────────────────────
Recording Fees
Select Recording Fees to create a report that lists the County Recorder’s Office
fees that have been incurred for the recording of submitted documents, based on
the date range selected (including both dates) for the selected county.
To change the date in the Begin Date field, either click on the drop down list
arrow to display the calendar tool and then click on the desired date, or
alternatively, use the up and down arrow keys to increase or decrease the
highlighted month, date, or year value. Use the right and left arrow keys to move
between the month, date, and year areas of the Begin Date field.
If appropriate, change the date in the End Date field in the same manner as in
the previous step.
Depending on company configuration, the County field may be pre-filled with a
default County name and be deactivated (dimmed out). If not deactivated, to
select a County name use the function key F4 for accessing the drop down list
box, or you may click with the mouse on the down arrow.
NOTE: The only counties shown on the drop down list are those with ACH or
Draw Down selected as the Payment Type on the County Details screen. See
the Counties section in the Electronic Recording System Administrator Manual
for details.
Click on OK to print, or Cancel to abort any changes and return to the ERS
desktop.
───────────────────────────────────────────────────────
Electronic Recording System v4.0.1 User Manual
Page 51 of 53
1/25/2007
Tools Menu
───────────────────────────────────────────────────────
Change My Password
To change your password, type in a new password containing a least six (6)
characters in the Enter Password field. Retype the new password in the
Confirm Password field.
Click on the OK button to accept your new ERS password, or Cancel to abort the
password change.
Error Log
The Error Log opens a screen with a listing of critical errors that have occurred
in the ERS.
───────────────────────────────────────────────────────
Electronic Recording System v4.0.1 User Manual
Page 52 of 53
1/25/2007
About Menu
───────────────────────────────────────────────────────
About Menu
To determine the ERS application version and build number, select this menu
option. Please have this version number information available when calling the
Help Desk for assistance.
Version number information
NOTE: The version and build number for each USA Digital Solutions product
may be unique, for example, the Escrow module may not be the same version as
the ERS application.
───────────────────────────────────────────────────────
Electronic Recording System v4.0.1 User Manual
Page 53 of 53
Author: Nick Moeller
1/25/2007