1
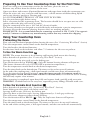
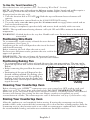
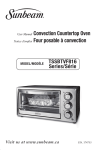
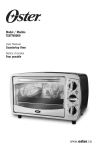
6-Slice Countertop Oven Notice d’emploi Four posable, 6 tranches User Manual MODELS/MODÈLES www.oster.ca TSSTTVSK01-033 TSSTTVSK01-31TG P.N. 173172 IMPORTANT SAFEGUARDS SAVE AND READ THESE INSTRUCTIONS When using electrical appliances, basic safety precautions should always be followed including the following: • READ ALL INSTRUCTIONS, PRODUCT LABELS AND WARNINGS BEFORE USING THE TOASTER OVEN. • Donottouchhotsurfaces.Alwaysuseovenmittswhenhandlinghotmaterialsandallow metal parts to cool before cleaning. Allow the unit to cool thoroughly before putting in or taking off parts. Always use the oven handles when moving the unit. • Whentheunitisnotinuseandbeforecleaning,unplugthecountertopovenfromthe wall outlet. Note: Make sure the oven is turned off before unplugging. • Toprotectagainstriskofelectricalshock,donotimmersetheapplianceinwater or any other liquids. • Closesupervisionisalwaysnecessarywhenthisoranyapplianceisusednearchildren. This appliance is not for use by children. • Donotoperatethisappliancewithafrayedordamagedcordorplugoraftertheappliance malfunctions or is dropped or has been damaged in any manner. Return appliance to the nearest authorized service facility for examination, repair, or adjustment. • Donotuseattachmentsnotrecommendedbythemanufacturer;theymaycausefire, electric shock or personal injury. • Donotuseoutdoorsorforcommercialpurposes. • Donotusethisapplianceforotherthanitsintendeduse. • Donotletthecorddangleovertheedgeofatabletoporcountertoportouchhotsurfaces. • Donotplacetheappliancenearahotgasorelectricburnerorinaheatedoven. • Extremecautionshouldbeusedwhenusingcontainersconstructedofmaterialotherthan metal or glass. • Afiremayoccurifthecountertopoveniscoveredortouchingflammablematerials, including curtains, draperies, walls, etc., when in operation. Do not store any items on top of the appliance when in operation. • Whenusingcountertopoven,pulltheunitoutaminimumof6inchesawayfromwallson all sides. Remove cords from other products from behind countertop oven. • Donotstoreanymaterials,otherthanmanufacturer’srecommendedaccessories,inthisunit when not in use. • Donotplaceanyflammablematerialsinoven,suchaspaper,cardboard, plastic or any materials that may catch fire or melt. • Do not cover the wire rack or trays with metal foil. This will cause overheating of the appliance. • Oversizedfoodsormetalutensilsmustnotbeinsertedintheapplianceastheymaycreate a fire or risk of electrical shock. • Donotcleanwithmetalscouringpads.Piecescanbreakoffthepadandtouchelectrical parts involving a risk of electrical shock. • Useextremecautionwhenremovingtrayordisposingofhotgrease. • Toturnthisapplianceoff,returnallcontrolstothe“OFF”position. • Todisconnect,turnallcontrolsto“OFF”,thenremoveplugfromwalloutlet. T his U niT i s for h oUsehold U se o nly shorT Power sUPPly Cord insTrUCTions A short power-supply cord is provided to reduce the risk resulting from becoming entangled in or tripping over a longer cord. An extension cord may be used if care is exercised in its use. If an extension cord is used, the electrical rating of the cord must be at least as great as the electrical rating of the appliance. The extension cord should be arranged so that it will not drape over the countertop or tabletop where it can be pulled on by children or tripped over unintentionally. English-1 For Products Purchased in the United States and Canada Only To reduce the risk of electrical shock, this appliance has a polarized plug (one blade is wider than the other).Thisplugfitsapolarizedoutletonlyoneway;iftheplugdoesnotfitfully into the outlet, reverse the plug. If it still does not fit, contact a qualified electrician. Do not attempt to modify the plug in any way. SAVE THESE INSTRUCTIONS Welcome Congratulations on your purchase of an OSTERTM Countertop Oven! If you require service on your OSTERTM Counter Top Oven, do not return to place of purchase. Please contact us at www.oster.ca or 1-800-667-8623. Features of Your Countertop Oven 1. 2. 3. 4. 5. 6. 7. 8. 9. 10. One Removable Wire Rack/Broil Rack Function Selector Knob Temperature Selector Knob 9 Timer Selector Knob Power Light External Crumb Tray Glass Door Easy Clean Interior Walls Baking Pan Two Rack Positions Learning About Your Countertop Oven 1 2 3 4 5 6 7 8 F igure 1 1. Removable Wire Rack/Broil Rack – To accommodate a wide variety of foods, use for all yourbroilingandgrillingneeds.See“Positioning Rack”section. 2. Function Selector Knob – Select cooking function by turning the knob to the desired setting. 3. Temperature Selector Knob – djust the dial thermostat to the desired temperature. 4. Timer Selector Knob – Adjust the dial to the desired time. 5. Power Light – Indicates that oven is plugged in and that the timer is set to begin warming. 6. External Crumb Tray – For crumbs or fallen food particles collection. Pulls out for easy cleaning. 7. Glass Door – Allows you to see food cooking. 8. Easy Clean Interior Walls – Allows for easy cleaning. 9. Baking Pan – Use for all your baking needs. 10. Two Rack Positions F igure 2 English-2 10 Preparing To Use Your Countertop Oven for the First Time If you are using your countertop oven for the first time, please be sure to: Remove any stickers from the surface of the oven. Open oven door and remove all printed documents and paper from inside the countertop oven. Clean the wire rack, tray, and pan with hot water, a small amount of dishwashing liquid and a non-abrasive sponge or cleaning pad. DO NOT IMMERSE THE BODY OF THE UNIT IN WATER. Dry the unit thoroughly before using. Select a location for the countertop oven. The location should be in an open area on a flat counter where the plug will reach an outlet. Plug the countertop oven into a 120 Volt AC electrical outlet. The heating elements are designed to work efficiently and maintain a precise temperature. You may not see the elements glowing, however they are working properly. PLEASE NOTE – It is recommended that the countertop oven heat at 230 °C/450 °F for approxi mately 15 minutes to eliminate any manufacturing residue that may remain after shipping. Using Your Countertop Oven Preheating the Oven Place rack into the desired position before heating the oven. (See “Positioning Wire Rack” Section) Turn the temperature control knob to the desired temperature. Turn the knob to the desired function. Set the timer knob to desired time and allow 7–9 minutes for the oven to preheat. To Use the Warm Function NOTE: The warm function is for warming and keeping food warm after heating. Select desired rack position. (See “Positioning Wire Rack” Section) Arrange food on the wire rack or in the baking pan. Turn the function dial to WARM ( ). Only the bottom heating element will operate. (The heater element will cycle ON and OFF to maintain temperature.) Turn the temperature control knob to the desired temperature. Turn the timer knob to the desired time. The timer can be set for up to 60 minutes. At the end of the cooking time, a bell signal sounds, and the oven turns off automatically. To set the timer for less than 20 minutes, turn the timer past the 20minute mark to engage timer switch and then turn it back to desired time; it can then be set for cooking that will only require a few minutes. When warming is completed, open door fully and remove food carefully with oven mitt. WARNING: Cooked food can be very hot, especially pastry fillings. Handle with care. To Use the Variable Broil Function Select desired rack position. (See “Positioning Wire Rack” Section) Insert baking pan into guide rails below wire rack. Arrange food on wire rack over the baking pan. Close the door to the first notch, leaving approximately a 3-inch gap at the top. This will ensure adequate airflow during broiling. Turn the function dial to BROIL ( ). Only the top heater element will operate. Turn the temperature control knob to the desired temperature. Turn the timer knob to the desired time. The timer can be set to for up to 60 minutes. At the end of the cooking time, a bell signal sounds, and the oven turns off automatically. English-3 To set the timer for less than 20 minutes, turn the timer past the 20minute mark to engage timer switch and then turn it back to desired time; it can then be set for cooking that will only require a few minutes. Turn food over about halfway through the broiling time. When broiling is completed, open door fully and remove food carefully with oven mitt. WARNING: Do not leave countertop oven unattended. To Use the Bake Function Select desired rack position. (See “Positioning Wire Rack” Section) Arrange food on the wire rack or in the baking pan. Turn the function dial to BAKE ( ). Both the top and bottom heater elements will operate. Turn the temperature control knob to the desired temperature. Turn the timer knob to the desired time. The timer can be set for up to 60 minutes. At the end of the cooking time, a bell signal sounds and the oven turns off automatically. To set the timer for less than 20 minutes, turn the timer past the 20minute mark to engage timer switch and then turn it back to desired time;itcanthenbesetforcookingthatwill only require a few minutes. NOTE – The top and bottom heating elements will cycle ON and OFF to maintain the desired temperature. To Use the Convection Bake Function Select desired rack position. (See “Positioning Wire Rack” Section) Arrange food on the wire rack or in the baking pan. Turn the function dial to CONVECTION BAKE ( ). Both the top and bottom heater elements will operate. Turn the temperature control knob to the desired temperature. Turn the timer knob to the desired time. The timer can be set for up to 60 minutes. At the end of the cooking time, a bell signal sounds and the oven turns off automatically. To set the timer for less than 20 minutes, turn the timer past the 20minute mark to engage timer switch and then turn it back to desired time;itcanthenbesetforcookingthatwill only require a few minutes. NOTE – The top and bottom heating elements will cycle ON and OFF to maintain the desired temperature. When baking is completed, open door fully and remove food carefully with oven mitt. WARNING: Cooked food can be very hot. Handle with care. Do not leave countertop oven unattended. Defrosting Tip – When defrosting, do not preheat oven. Turn Temperature Control to 250°F. Allow 15 to 20 minutes per side for meats or fish to defrost. Always cook food promptly after thawing. FAQs About Convection Baking What is Convection? Answer: In your Countertop Oven there is a built in fan that circulates the hot air in the oven chamber to better heat the food. How do I adjust the time for Convection? Answer: On average, convection will shorten the cooking time by 30% but it varies by food. It is suggested to go with a shorter cooking time to start with and then add time if it is needed. What are the best foods to use with Convection? Answer: While a shorter cook time is often desirable, bake goods in particular benefit from convection cooking as the circulating air keeps oven temperature consistent throughout. English-4 To Use the Toast Function Select desired wire rack position. (See “Positioning Wire Rack” Section) NOTE – Different types of bread require different settings. Lighter breads and waffles require a lighter setting. Darker breads, muffins, and English muffins require a darker setting. Arrange food on the wire rack. 1. Turn the function dial to TOAST ( ). Both the top and bottom heater elements will operate. 2. Turn the temperature control knob to the 230/450°F/TOAST setting. 3. To set the timer, turn the timer past the 20 minute mark to engage timer switch and set back to desired toast time. When toasting is completed, open door fully and remove food carefully with oven mitt. NOTE – The top and bottom heating elements will cycle ON and OFF to maintain the desired temperature. WARNING: Cooked food can be very hot. Handle with care. Do not leave countertop oven unattended. Positioning Wire Rack To accommodate a wide variety of foods the oven has two rack positions. (See Figure 3) Positioning of the rack will depend on the size of the food and desired browning. Before removing the rack allow the unit to cool. For best toast and pizza results, position the wire rack in the upper rack position. PLEASE NOTE – The wire rack may tilt downward causing food to shift when the rack is pulled out, proceed with caution. F igure 3 Positioning Baking Pan • Toaccommodateawidevarietyoffoodstheovenhastwopanpositions.Thepancanbe placed on top of the wire rack or inserted into the guide rails below the wire rack. (See Figure Below) • Beforeremovingthepanallowtheunitto cool. • Positioningofthepanwilldependonthe desired cooking method. For baking, place the pan on top of the rack. For grilling or broiling, insert the pan into the guide rails below the wire rack and place the food on For Grilling For Baking top of the rack. or Broiling Cleaning Your Countertop Oven Before cleaning your OSTERTM countertop oven, turn controls to OFF, unplug cord, and allow it to cool. To clean, wipe with damp cloth. DO NOT IMMERSE IN WATER! Make sure to use only mild, soapy water. Abrasive cleaners, scrubbing brushes and chemical cleaners will damage the coating on this unit. Empty crumb tray frequently to avoid accumulation of crumbs. The countertop wire racks is dishwasher safe (top of dishwasher only). Storing Your Countertop Oven Allow the appliance to cool completely before storing. If storing the countertop oven for long periods of time, make certain that the countertop oven is clean and free of food particles. Store the countertop oven in a dry location such as on a table or countertop or cupboard shelf. Other than the recommended cleaning, no further user maintenance should be necessary. English-5 H elpful T ips / T roublesHooTing P roblem •Overcooked/ Undercooked Foods Solution P otential C auSe •Incorrecttemperatureor •Youmayhavetoadjustthetimeand temperature to desired taste. time setting •Becauseyourcountertopovenissmaller than your regular oven, it will heat up faster and generally cook in shorter periods of time. •Rackplacement •Referto“PositioningWireRack”Section, Page English-5. Rack may need to be adjusted to accommodate food type. •BurntSmell •Referto“CleaningYourcountertop •Foodbuild-upinside oven”Section,PageEnglish-5. oven, on heating elements or in crumb tray. •Plugthecountertopovenintoa120-volt •Unitisunplugged AC electrical outlet. •Timerwasnotturned •Settimerknobandtemperatureknobto past 20 minute mark. desired setting. Both must be turned on to operate the countertop oven. •Ovendoesnot turn ON •Onlyoneheating element is heating up •Functionsetting selection determines which heating element will operate. •Whentoasting,makesuretheovenisnot set to broil setting. •Heatingelements do not stay ON •Heatingelementswill cycle ON and OFF to maintain proper heat. •Becertainthatfunctionisasdesired. English-6 1 Year Limited Warranty Sunbeam Products, Inc. doing business as Jarden Consumer Solutions or if in Canada, Sunbeam Corporation (Canada)LimiteddoingbusinessasJardenConsumerSolutions(collectively“JCS”)warrantsthatforaperiod of one year from the date of purchase, this product will be free from defects in material and workmanship. JCS, at its option, will repair or replace this product or any component of the product found to be defective during the warranty period. Replacement will be made with a new or remanufactured product or component. If the product is no longer available, replacement may be made with a similar product of equal or greater value. This is your exclusive warranty. Do NOT attempt to repair or adjust any electrical or mechanical functions on this product. Doing so will void this warranty. This warranty is valid for the original retail purchaser from the date of initial retail purchase and is not transferable. Keep the original sales receipt. Proof of purchase is required to obtain warranty performance. JCS dealers, service centers, or retail stores selling JCS products do not have the right to alter, modify or any way change the terms and conditions of this warranty. This warranty does not cover normal wear of parts or damage resulting from any of the following: negligent use or misuse of the product, use on improper voltage or current, use contrary to the operating instructions, disassembly, repair or alteration by anyone other than JCS or an authorized JCS service center. Further, the warranty does not cover: Acts of God, such as fire, flood, hurricanes and tornadoes. What are the limits on JCS’s Liability? JCS shall not be liable for any incidental or consequential damages caused by the breach of any express, implied or statutory warranty or condition. Except to the extent prohibited by applicable law, any implied warranty or condition of merchantability or fitness for a particular purpose is limited in duration to the duration of the above warranty. JCS disclaims all other warranties, conditions or representations, express, implied, statutory or otherwise. JCS shall not be liable for any damages of any kind resulting from the purchase, use or misuse of, or inability to use the product including incidental, special, consequential or similar damages or loss of profits, or for any breach of contract, fundamental or otherwise, or for any claim brought against purchaser by any other party. Some provinces, states or jurisdictions do not allow the exclusion or limitation of incidental or consequential damages or limitations on how long an implied warranty lasts, so the above limitations or exclusion may not apply to you. This warranty gives you specific legal rights, and you may also have other rights that vary from province to province, state to state or jurisdiction to jurisdiction. How To Obtain Warranty Service In the U.S.A. If you have any question regarding this warranty or would like to obtain warranty service, please call 1-800-334-0759 and a convenient service center address will be provided to you. In Canada If you have any question regarding this warranty or would like to obtain warranty service, please call 1.800.667.8623 and a convenient service center address will be provided to you. In the U.S.A., this warranty is offered by Sunbeam Products, Inc. doing business as Jarden Consumer Solutions located in Boca Raton, Florida 33431. In Canada, this warranty is offered by Sunbeam Corporation (Canada) Limited doing business as Jarden Consumer Solutions, located at 20 B Hereford Street, Brampton, Ontario L6Y 0M1. If you have any other problem or claim in connection with this product, please write our Consumer Service Department. PLEASE DO NOT RETURN THIS PRODUCT TO ANY OF THESE ADDRESSES OR TO THE PLACE OF PURCHASE. English-7 NOTES: English-8 For product questions contact: Sunbeam Consumer Service Canada : 1.800.667.8623 USA : 1-800-334-0759 www.oster.ca © 2013 Sunbeam Products, Inc. doing business as Jarden Consumer Solutions. All rights reserved. In the U.S.A., distributed by Sunbeam Products, Inc. doing business as Jarden Consumer Solutions, Boca Raton, FL 33431. In Canada, imported and distributed by Sunbeam Corporation (Canada) Limited, doing business as Jarden Consumer Solutions, 20B Hereford St., Brampton, Ontario L6Y 0M1. Pour toute question au sujet de ce produit, communiquez avec le Service à la clientèle de Sunbeam Canada : 1.800.667.8623 États-Unis : 1-800-334-0759 www.oster.ca © 2013 Sunbeam Products, Inc. faisant affaires sous le nom de Jarden Consumer Solutions. Tous droits réservés. Aux États-Unis, distribué par Sunbeam Products, Inc., faisant affaires sous le nom de Jarden Consumer Solutions, Boca Raton, FL 33431. Au Canada, importé et distribué par Sunbeam Corporation (Canada) Limited, faisant affaires sous le nom de Jarden Consumer Solutions, 20B Hereford St., Brampton (Ontario) L6Y 0M1. TSSTTVSK01-033_13EFM1 Printed in China GCDS-OST31916-JC Imprimé en Chine