1
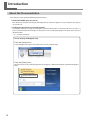
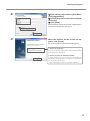
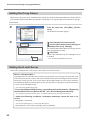
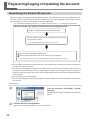
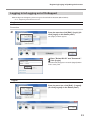
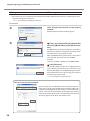
STARTUP GUIDE R1-100222 Thank you very much for purchasing this product. To ensure correct and safe usage with a full understanding of this product's performance, please be sure to read through this manual completely and store it in a safe location. Unauthorized copying or transferal of this manual, in whole or in part, is prohibited. The contents of this document and the specifications of this product are subject to change without notice. The documentation and the product have been prepared and tested as much as possible. If you find any misprint or error, please inform us. Roland DG Corp. assumes no responsibility for any direct or indirect loss or damage which may occur through use of this product, regardless of any failure to perform on the part of this product. Roland DG Corp. assumes no responsibility for any direct or indirect loss or damage which may occur with respect to any article made using this product. Contents Introduction....................................................................................................2 About the Documentation............................................................................................................ 2 Installing OnSupport.......................................................................................3 System Requirements...................................................................................................................... 3 Installing OnSupport........................................................................................................................ 3 Basic Operations............................................................................................6 Displaying OnSupport..................................................................................................................... 6 Exiting the OnSupport..................................................................................................................... 7 Updating the Contents of the Window..................................................................................... 7 Part Names........................................................................................................................................... 8 Environmental Settings (Language/Network).................................................9 Setting Your Language.................................................................................................................... 9 Checking the Network Connection............................................................................................ 9 Setting the Proxy Server...............................................................................................................10 Setting the E-mail Server..............................................................................................................10 Registering/Loging in/Updating the Account................................................12 Registering the Roland DG Account.........................................................................................12 Logging in to/Logging out of OnSupport..............................................................................13 Changing the Login Password....................................................................................................15 Checking and Updating the Version of OnSupport............................................................15 Connecting and Managing the Devices.......................................................17 Connecting the Devices................................................................................................................17 Making Management Settings for the Devices....................................................................18 Adding the Devices........................................................................................................................20 Deleting the Devices......................................................................................................................20 Company names and product names are trademarks or registered trademarks of their respective holders. Copyright © 2010 Roland DG Corporation http://www.rolanddg.com/ 1 Introduction About the Documentation This software comes with the following documentation. STARTUP GUIDE (this document) This document provides instructions including how to install On Support, set up networks, and register an account, etc. OnSupport Help (electronic-format manual) Descriptions from basic usage of OnSupport to detailed instructions are provided in this item. This is a user's manual intended for viewing on a computer screen. Installing the program enables you to view the documentation. P. 3, “Installing OnSupport” How to display OnSupport Help From the [Help] menu Start OnSupport, then go to the [Help] menu and click [Show Help]. From the [Start] menu From the [Start] menu, click [All programs (or Programs)] - [Roland OnSupport] - [Roland OnSupport Help]. 2 Installing OnSupport System Requirements Operating system (OS) Windows 7 Professional/Ultimate (32-bit edition) Windows Vista Business/Ultimate Service Pack 1 (32-bit edition) Windows Vista Business/Ultimate (32-bit edition) Windows XP Professional Service Pack 2 or later Processor 2.0 GHz or faster Pentium 4 (2.0-GHz or faster Core 2 Duo recommended) Memory (RAM) 512 MB of RAM (1 GB or more recommended) ( For Windows Vista/7, 1 GB ( 2 GB or more recommended) ) Video card and monitor A resolution of 1,280 x 1,024 or more recommended Free hard-disk space required as a working space 40 GB or more recommended Hard-disk file system NTFS format Optical drive CD-ROM drive Other requirements Ethernet port Internet connection and web browser Communication environment where you can send e-mails * For the latest information, see the Roland DG Corp. website (http://www.rolanddg.com). Installing OnSupport Procedure Log on to Windows as an “Administrator” (or a “Manager of the Computer,” or a member of “Administrators” group). Make sure that your computer is connected to the Internet. Insert the Roland OnSupport CD-ROM in the CD-ROM drive. Windows Vista/7: When the automatic playback window appears, click [Run OnSupportSetup.exe]. When [User Account Control] window appears on the screen, click [Yes] (or [Allow]). Select the language you use. Click [OK]. 3 Installing OnSupport If “Microsoft .NET Framework 3.5 SP1” is not installed in your computer, the window shown on the left will be displayed before Procedure “ .” If you see the window, click on [Install]. When the installation is complete, you will see a message to restart the computer. After restarting the computer, continue the installaion process as the window shown in Procedure “ .” Important Do not remove the installation CD from the computer until the installation of OnSupport is finished. 4 Click [Next]. Choose [I accept the terms in the license agreement]. Click [Next]. Installing OnSupport Enter arbitrary information in [User Name ] and [Organization]. Choose [Anyone who uses this computer (all users)]. Click [Next]. Proceed further with the installation as following the instructions displayed on the screen. When the window shown on the left appears, click [Finish]. This is the end of the installation of OnSupport. "Launch the program" If you check the box, OnSupport will be activate when the installation is complete. "Launch program at Windows startup" If you check the box, you can activate OnSupport automatically when Windows starts up. We reccommend you to put the check here. P. 6, "OnSupport serves as a resident software." 5 Basic Operations Displaying OnSupport Double-click (OnSupport icon) in the tasktray, or right-click the icon and then click [Open]. Tasktray OnSupport will be displayed on the screen. If you cannot find in the tasktray, activate it from the start menu of Windows. OnSupport serves as a resident software. OnSupport works as a resident software which is constantly working to manage the devices* and send OnSupport Mails, and so on. You are recommended to make settings to enable OnSupport to start automatically when the computer starts. (You can make the setting initially during the installation.) When you click (or ) on the bottom right corner of the screen, the window will disappear from the screen, but the program will not be terminated. While it is running, (OnSupport icon) is constantly displayed in the tasktray. * The devices mean our products including printing machines and cutting machines. See our website (http://www.rolanddg.com/) for the latest information about the devices which OnSupport supports. How to set the automatic start for OnSupport Settings can be made on the [Preference] window (by clicking [Preference] from [Edit] on the menu). Check the box for "Launch this application at Windows start up" under the [General] tab. How to start OnSupport from the [Start] menu of Windows From the [Start] menu, click [All programs (or Programs)] - [Roland OnSupport] [Roland OnSupport]. OnSupport will be activated. 6 Basic Operations Exiting the OnSupport From the menu bar, click [File] - [Exit]. You can exit the program by right-clicking in the tasktray. Tasktray Updating the Contents of the Window. From the menu bar, click [File] - [Update Latest Information]. The contents of the OnSupport window will be updated with the latest information. 7 Basic Operations Part Names Menu bar This lets you carry out the settings and operations for OnSupport from the each menus. Status panel This panel shows the connection status of the computer to the network as well as the device, and the login status Menu panel On this panel, you can select the menu to be displayed on the Contents panel. Contents panel This panel shows the contents of OnSupport. From the Menu panel, you can select contents to be displayed here. 8 Environmental Settings (Language/Network) Setting Your Language Procedure From the menu bar, click [Edit] - [Preference]. The [Preference] window appears. Click [General] tab. Choose your language from [Language]. Click [OK]. Checking the Network Connection To fully utilize OnSupport, you need to connect your computer to our OnSupport server via the Internet. If your computer is linked to the Internet, you will enable its connection to our OnSupport server only by installing OnSupport. Use the following method to see whether your computer is connected to the OnSupport server. If you cannot create the connection, consult your network administrator. To make settings for the proxy server p.10, “Setting Proxy Server” Connected Disconnected When the globe image linked to a computer is displayed, your computer is connected to the OnSupport server. When the image of “?” on the globe image or is displayed, your computer is not connected to the OnSupport server. 9 Environmental Settings (Language/Network) Setting the Proxy Server When you use the proxy server, make the proxy settings. For detailed information about the settings, consult your network administrator. When you do not use the proxy server, you do not have to make these settings. Procedure From the menu bar, click [Edit] - [Preference]. The [Preference] window appears. Click [Nertwork Connection] tab. Choose [Auto-detect proxy settings] or [Manually enter proxy settings]. For detailed information about the settings, consult your network administrator. Click [OK]. Check if the connection to the OnSupport Server is enabled. P. 9, "Checking the Network Connection" Setting the E-mail Server If you make settings for the e-mail server, it will enable e-mail transmissions. What is “OnSupport Mail”? ”OnSupport Mail” is a function which enables transmission of e-mail messages to report the status of the connected devices, such as “Job Started,” “Job Finished,” and “Remaining Ink.” For the destination of the e-mails, you can set an e-mail address of the mobile phone as well as of the computer. For information about the content of the e-mail message and the settings for the destination of the e-mails, refer to “OnSupport Help.” P. 2, “How to Display OnSupport Help” * To use the OnSupport Mail function, you need to perform the tasks for “Registering the Roland DG Account (Roland DG ID)” and “Device Management Setting.” P. 12, "Registering the Roland DG Account," p. 18,"Making Management Settings for the Devices" * Under the following conditions, OnSupport messages cannot be sent or received. OnSupport is terminated. P. 6, "Displaying OnSupport," p. 7 "Exiting the OnSupport" The computer is in the status of standby, sleep, or shutdown. 10 Environmental Settings (Language/Network) Procedure From the menu bar, click [Edit] - [Preference]. The [Preference] window appears. Click [Nertwork Connection] tab. Enter or set each item. * For details, consult your network administrator. Sender Mail Address Outgoing Mail Server (SMTP) Port This is the address of OnSupport Mail source. Please enter an arbitrary address available. Please follow the instructions provided to set the e-mail server for your e-mail program. Use SSL Connection Use Authentication If your e-mail program requires authentication, please enter an arbitrary [Account Name] and [Password]. Click [Test Server Connection]. When a message of "Connection test has been successful" appears, the connection is OK. If a message of “Cannot be connected to the server” appears, review the settings described in proxy settings (p.10, “Setting the Proxy Server”). or the Click [OK]. Note: Settings of your security software may prevent exchange of e-mail messages. If you cannot send or receive e-mails, please check your security software used for anti-virus measures and others. You may need to make special settings to enable the exchange of OnSupport Mail messages. For details of the settings, refer to the instruction manual or other documents for your security software. 11 Registering/Loging in/Updating the Account Registering the Roland DG Account When you register the Roland DG Account (Roland DG ID), you will become able to use OnSupport more effectively. As you are to communicate with our OnSupport server in registering your account, make sure that your computer can receive e-mails before starting the registration. P. 9, "Checking the Network Connection," p. 10, "Setting the Proxy Server," p. 10, "Setting the E-mail Server" What you can do if you register the Roland DG Account (Roland DG ID) Register the Roland DG Account (Roland DG ID). You can make the management settings for the device with the registered account. P. 18, "Making Management Settings for the Device" You can use the OnSupport Mail function. You can update the firmware for the device by using OnSupport. P. 10, "Setting the E-mail Server," p. 18, "Making Management Settings for the Device" You can register more than one account. However, the number of the account you can make management settings on is one for one device. For example, if OnSupport is installed in more than one PC in an intranet environment, you do not have to register the accounts for all the PCs. By registering one account and making management settings on the devices with the account, you can use the OnSupport Mail function with all the OnSupport programs on the intranet. You can register the account anytime. You can use OnSupport without registering the account, but your use of some OnSupport functions will be restricted. Procedure From the menu bar, click [Edit] - [Create Account]. The registration window is displayed on the contents panel. 12 Conduct the account registration. Register the account following the on-screen instructions. Registering/Loging in/Updating the Account Logging in to/Logging out of OnSupport NOTE: To login to OnSupport, you must register the Roland DG Account (Roland DG ID). P. 12, "Registering the Roland DG Account" Login Procedure From the menu bar, click [Edit] - [Login]. (Or click [Login] on the Status panel.) The [Login] window appears. Enter "Roland DG ID" and "Password." Click [Login]. [Roland DG ID] will appear next to the [Login] buttom in the status panel. Logout From the menu bar, click [Edit] - [Logout]. (Or click [Logout] on the Status panel.) 13 Registering/Loging in/Updating the Account When you cannot remember your password (Reissuing the password) * A password can be reissued only to the Roland DG Account (Roland DG ID) which is performing the management settings for the devices. P. 17, "Connecting and Managing the Devices" Procedure Click [Forget Password?] on the [Login] window. [Request New Password] window appears. Enter your [Roland DG ID] (Roland DG Account), [Model Name], and [Serial Number]. For [Model Name] and [Serial Number], enter those of the device which is managed by the ID for which you want to have a password reissued. Note: For [Model Name], do not enter a name of the series for your device (such as VersaCAMM). Example: <Correct> VS-640, <Wrong> VersaCAMM VS-640 Click [Request]. The window shown on the left is displayed on the screen. When you click [OK], an e-mail will be sent from the OnSupport server. By following the instructions provided in the e-mail message, you can have a tentative password issued. P. 15, "Changing the Login Password" How to check the Serial Number You can check the Serial Number under the [Connection Settings] tab in the [Device Management] window (which you can open by clicking [Edit] on the menu bar - [Device Management]). Select the device of which serial number you want to check, and click [Verify]. Then, the serial number of the selected device will appear at the lower part of the screen. 14 Registering/Loging in/Updating the Account Changing the Login Password Procedure From the menu bar, click [Edit] - [Change Password]. The [Change Passwaord] window appears. Enter [Current Password], [New Password], and [Confirm New Password]. Click [Change]. When the window on the left appears, click [OK]. The password will be changed. Checking and Updating the Version of OnSupport How to check the version of OnSupport From the menu bar, click [Help] - [About]. The [About Roland OnSupport] window appears. 15 Registering/Loging in/Updating the Account How to update OnSupport To update OnSupport, your computer must be connected to our OnSupport server. If you have not registered the Roland DG Account, you can update OnSupport. P. 9, "Checking the Network Connection," p. 10, "Setting the Proxy Server" Procedure Click [Update] on the Menu panel. Select [Roland OnSupport] from [Resource List]. Click [Execute Update]. The Contents panel will turn to show the update window. Click [Check for Update]. If there are any update programs, descriptions of contents to be updated will be displayed in the lower part of the screen. OnSupport will be updated. If there are any update program, is displayed here. If there are any updated items with OnSupport, this message appears on in the task tray. When you click the message, the OnSupport window will appear. 16 Connecting and Managing the Devices Connecting the Devices You can connect the computer to more than one device. The devices in this section mean our products including printing machines and cutting machines. The devices that can be connected are only devices supported by OnSupport. For the latest information, see the Roland DG Corp. website (http://www.rolanddg.com/) Procedure Connect the computer to which OnSupport is installed to the devices through the Ethernet. For information on the method to connect the computer to the devices, refer to the instruction manuals for your devices. Make sure the power to the printer is switched on. From the menu bar, click [Edit] - [Device Management]. The [Device Management] window appears. Enter the IP address asigned to the device. Click [Verify]. Information about the device connected to OnSupport appears in [Device List]. Enter a [Nick Name] for the device. If you do not set a nickname, the model name is displayed. To continue to connect another device to your computer, click , and repeat the procedures from to . You can add the device to connect later. P. 20, "Adding the Devices" Click [OK]. Information on the device used is displayed when connection is correct. 17 Connecting and Managing the Devices When the window on the left appears, click [Yes] (if you want to manage the connected device). Without making the management settings, you cannot use the OnSupport Mail function and the updating function for the firmware of the devices. If you want to do the management settings later, click [No]. P. 18, "Making Management Settings for the Devices" If the [Login] window appears, enter the Roland DG ID and the password to log in. P. 13, "Login" This is the end of the procedures to connect the devices. An image of the device appears on the Status panel. Making Management Settings for the Devices You are to make settings to manage the devices connected to OnSupport here. You can perform these settings when you connect the devices with your computer. However, in this section, you will be provided with the descriptions of how to make new management settings for the devices which has been connected. What you can do if you make the management settings When you make the management settings, you will become able to use “OnSupport Mail function” and the “Device Firmware Update function.” To update the firmware, you need to log in OnSupport with the computer with which you made the management settings. For information on how to update the firmware, refer to “OnSupport Help.” P. 2, "How to display OnSupport Help," p. 10, "Setting the E-mail Server," p. 13, "Logging in to/Logging out of OnSupport" Procedure Login to OnSupport. P. 13, "Login" From the menu bar, click [Edit] - [Device Management]. The [Device Management] window appears. 18 Connecting and Managing the Devices Click [Administrator Setting] tab. Select the device you want to make the management settings. Click [Change Administration]. If the management settings have already been made for the device, the Roland DG ID of the administrator and the computer name will be displayed here. To change the settings, you must log in with the Roland DG ID of the administrator. Choose [Manage form this computer], and then click [OK]. To disable the management settings, select [Do not manage]. However, make sure that you have logged in with the Roland DG ID of the administrator in order to cancel the settings. Click [OK]. This is the end of the process to make the management settings for the devices. The Roland DG ID of the administrator appears. 19 Connecting and Managing the Devices Adding the Devices You will be provided with the descriptions about how to add the devices to connect to OnSupport in this section. NOTE: The devices in this section mean our products including printing machines and cutting machines. Procedure From the menu bar, click [Edit] - [Device Management]. The [Device Management] window appears. Click displayed in the upper light of the screen. Connect the device. Connect the device as referring to Procedure “ ” in page 17, “Connecting the Devices.” This will enable you to connect additional devices. Deleting the Devices You will be provided with the descriptions on how to delete the devices connected to OnSupport in this section. NOTE: The devices in this section mean our products including printing machines and cutting machines. Procedure From the menu bar, click [Edit] - [Device Management]. The [Device Management] window appears. Select the device you want to delete, and click displayed in the upper right of the screen. When the window on the left appears, click [OK]. This will enable you to delete the devices. 20