1
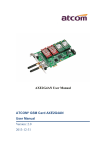
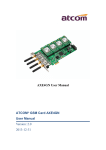
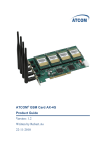
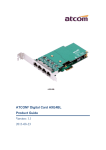
ATCOM® Hybrid Card AX2G4A
AX-2G4A
Product Guide
Version: 2.1
Written by Robert.Ao
July 7th, 2012
Content
......................................................................................................................................
2
......................................................................................................................................2
CONTACT ATCOM
ATCOM......................................................................................................................................
......................................................................................... 3
CHAPTER 1 THE INTRODUCTION OF AX-2G4A
AX-2G4A.........................................................................................
................................................................................................. 5
CHAPTER 2 HARDWARE INTRODUCTION
INTRODUCTION.................................................................................................
.....................................................................................................
7
.....................................................................................................7
CHAPTER 3 SOFTWARE INSTALLATION
INSTALLATION.....................................................................................................
................................................................................................ 9
CHAPTER 4 SOFTWARE CONFIGURATION
CONFIGURATION................................................................................................
......................................................................................................................................
13
......................................................................................................................................13
CHAPTER 5 TEST
TEST......................................................................................................................................
........................................................................................... 16
CHAPTER 6 SENDING AND RECEIVING SMS
SMS...........................................................................................
...........................................................................................................................
18
...........................................................................................................................18
CHAPTER 7 REFERENCE
REFERENCE...........................................................................................................................
www.atcom.cn
1
Contact ATCOM
The Introduction of ATCOM
Founded in 1998, ATCOM technology has been always endeavoring in the R&D and
manufacturing of the internet communication terminals. The product line of ATCOM includes IP
Phone, USB Phone, IP PBX, VoIP gateway and Asterisk Card.
Contact sales:
Address
District C, east of 2nd floor, #3, Crown industry buildings, Chegongmiao
Industry area, Futian district, Shenzhen, China
Tel
+(86)755-23487618
Fax
+(86)755-23485319
E-mail
[email protected]
Contact Technical Support:
Tel
+(86)755-23481119
E-mail
[email protected]
Website address:
http://www.atcom.cn/
ATCOM Wiki Website: http://www.openippbx.org/index.php?title=Main_Page
Download Center: http://www.atcom.cn/download.html
www.atcom.cn
2
Chapter 1 the Introduction of AX-2G4A
Overview of the AX-2G4A
AX-2G4A Asterisk card is a hybrid card, which support two GSM channels and 4 FXO/FXS
analog ports. Using AX-2G4A, open source Asterisk PBX and stand alone PC, users can create
their SOHO telephony solution which includes all the sophisticated features of traditional PBX,
and extended features in IP PBX, such as voicemail, call transfer, call park, call pick up, call
forward, bulk SMS sending, SMS receiving and so on.
Features
Two GSM channels and four analog ports
Bulk SMS sending
SMS receiving and storage
Multi-language for SMS content
IMEI changeable
PIN-Number unlock for the SIM card
Hardware echo cancellation embedded on the GSM module
Monitor GSM signal strength by command and LEDs
Monitor communication status by command line
Send SMS by Asterisk CLI, and dial-plan
Detect accurately when the called party answers the call
GSM quadband frequency(850/900/1800/1900MHz)
DTMF detection
Suitable for 3.3 volts and 5.0 volts 32 bit PCI slots
PCI slot or 4-pin connector for power feeding
Support Elastix 2.0.3, Trixbox 2.8.0.4
Applications
GSM and analog connectivity for PBX
Mobile and analog PBX
GSM and analog VoIP gateway
SMS gateway
GSM callback services
Billing system
Hardware Requirement
500-Mhz Pentium III
64MB RAM
3.3V or 5V PCI 2.2 slot
www.atcom.cn
3
Measurement and Weight
Inner box
G.W./unit
Card Size
221 * 142 * 62mm
0.25kg
174mm *104 mm
Package
Item
Quantity
AXAX-22G4A mother board
1
GSM module (GX01)
Dual ports analog module
1-2
www.atcom.cn
1-2
4
Chapter 2 Hardware Introduction
GX01: GSM module, one GX01 supports one GSM channel.
AX210S: FXS module, it supports two FXS ports.
AX210X: FXO module, it supports two FXO ports.
Slot1: A slot for plugging GX01, it is the first channel of the card.
Slot2: A slot for plugging GX01, it is the second channel of the card.
Slot3: A slot for plugging FXS/FXO module, it is the third and fourth channels of the card.
Slot4: A slot for plugging FXS/FXO module, it is the fifth and sixth channels of the card.
CON1: 4 pin power connector.
SW100: Used for selecting the way of power feeding, set it to 1 ON and 2 OFF, the CON1 provide
s the power for the card; set it to 1 OFF and 2 ON, the PCI slot provides the power for the
card. If the FXS port is used, the card must be provided power by the CON1. To ensure
the enough power feeding, user should choose the CON1 to provide power for the card,
and the SW100 is set to 1 ON and 2 OFF by default.
Hole: used for fixing the line which connect the GX01 to antenna.
Antenna: the antenna in the picture above is omnidirectional, the model is TS01
Attention: In order to enhance the GSM signal in some hard environment, except the Antenna in
the illustration above, ATCOM can also provide one other type of antenna(TL01)
which has long cable(about one meter long) and can be connected to outside.
RJ45: Used for connecting a splitter to the card, the splitter supports four RJ11 ports and one RJ45
port.
LED3: Used for checking if the FXS/FXO module is detected or not. When the FXS/FXO ports
are detected correctly, the LED3 will be on.
www.atcom.cn
5
LED11: When the channel 1 is in communication status, LED11 will be green steady.
LED12: Network status indicator of SIM card of the first channel. When the SIM card is searching
network, the LED12 will blink fast; when the SIM card has found the GSM network and
registered successfully, the LED12 will flip at lower frequency.
LED21: When the channel 2 is in communication status, LED21 will be green steady.
LED22: Network status indicator of SIM card of the second channel. When the SIM card is
searching network, the LED22 will blink fast; when the SIM card has found the GSM
network and registered successfully, the LED22 will flip at lower frequency.
Button: used for turning off the GX01.
www.atcom.cn
6
Chapter 3 Software Installation
Test Environment:
dahdi-linux-2.3.0.4 (download from ATCOM website)
dahdi-tools-2.3.0.4
asterisk-1.6.2.6.4 (download from ATCOM website)
centos 5.6 (kernel version: 2.6.18-238.el5)
AX-2G4A+2*GX01+1*AX210S+1*AX210X
After inserting the card into your PCI slot and boot your server, please use the “lspci” command to
check the PCI bus compatibility. From the correct output, you can see the following line:
---------------------------------------------------------------------------------------------------------------------01:01.0 Communication controller: Tiger Jet Network Inc. Tiger3XX Modem/ISDN interface
---------------------------------------------------------------------------------------------------------------------A Tiger Jet device will be found, if you can not see the Tiger Jet device, please poweroff your
server and try another PCI slot, if it still does not help, you have to check the compatibility issue
between the card and your PCI bus.
1.
To install asterisk and dahdi, we have to use “yum” command to install the following
prerequisite packages:
bison bison-devel zlib zlib-devel openssl openssl-devel gnutls-devel gcc gcc-c++
2.
Download dahdi-linux, dahdi-tools, and asterisk
Attention: please download dahdi-linux and asterisk from ATCOM website, because ATCOM
has modified the source code for AX-2G4A.
[root@localhost src]#
wget http://www.atcom.cn/cn/download/cards/ax4g/asterisk-1.6.2.6.9.tar.gz
[root@localhost src]#
wget http://www.atcom.cn/cn/download/cards/ax4g/dahdi-linux-2.3.0.9.tar.gz
[root@localhost src]#
wget http://www.atcom.cn/cn/download/cards/ax4g/dahdi-tools-2.3.0.9.tar.gz
3.
Install dahdi-linux and dahdi-tools
Install dahdi-linux
1) [root@localhost src]# tar -xvzf dahdi-linux-2.3.0.4.tar.gz
2) [root@localhost dahdi-linux-2.3.0]# make
3) [root@localhost dahdi-linux-2.3.0]# make install
www.atcom.cn
7
Install dahdi-tools
1) [root@localhost src]# tar -xvzf dahdi-tools-2.3.0.4.tar.gz
2) [root@localhost dahdi-tools-2.3.0]# ./configure
3) [root@localhost dahdi-tools-2.3.0]# make
4) [root@localhost dahdi-tools-2.3.0]# make install
5) [root@localhost dahdi-tools-2.3.0]# make config
4.
Install asterisk
1) [root@localhost src]# tar -xvzf asterisk-1.6.2.6.4.tar.gz
2) [root@localhost asterisk-1.6.2.6]# ./configure
3) [root@localhost asterisk-1.6.2.6]# make
4) [root@localhost asterisk-1.6.2.6]# make install
5) [root@localhost asterisk-1.6.2.6]# make samples
www.atcom.cn
8
Chapter 4 Software Configuration
1. Please check if the AX-2G4A driver has been loaded successfully, run cat /proc/interrupts
command and you should see one line with ax4g/ax2g4a:
20:
2310670
2218516
IO-APIC-fasteoi
ax4g/ax2g4a
If you can not see ax4g/ax2g4a, you can try to poweroff your server and replug AX-2G4A into
another PCI slot.
2. Please run the “dahdi_genconf” command to configure the /etc/dahdi/system.conf file and
generate /etc/asterisk/dahdi-channels.conf file.
[root@localhost ~]# dahdi_genconf
It does not show any output if dahdi_genconf runs successfully.
After running dahdi_genconf successfully, the system.conf file will get the following
configuration:
/etc/dahdi/system.conf:
# Autogenerated by /usr/sbin/dahdi_genconf on Thu Jul 1 11:33:13 2010
# If you edit this file and execute /usr/sbin/dahdi_genconf again,
# your manual changes will be LOST.
# Dahdi Configuration File
# This file is parsed by the Dahdi Configurator, dahdi_cfg
# Span 1: WCTDM/6 "ATCOM AX4G/AX2G4A Board 7" (MASTER)
fxsks=1
echocanceller=mg2,1
fxsks=2
echocanceller=mg2,2
fxsks=3
echocanceller=mg2,3
fxsks=4
echocanceller=mg2,4
fxoks=5
echocanceller=mg2,5
fxoks=6
echocanceller=mg2,6
# Global data
loadzone
defaultzone
www.atcom.cn
= us
= us
9
After running dahdi_genconf successfully, the dahdi-channels.conf file will get the following
configuration:
; Span 1: WCTDM/6 "ATCOM AX4G/AX2G4A Board 7" (MASTER)
;;; line="1 WCTDM/6/0 FXSKS (In use) (SWEC: MG2)"
signalling=fxs_ks
callerid=asreceived
group=0
context=from-pstn
channel => 1
callerid=
group=
context=default
;;; line="2 WCTDM/6/1 FXSKS
pinnum=1234
signalling=fxs_ks
callerid=asreceived
group=0
context=from-pstn
channel => 2
callerid=
group=
context=default
(In use) (SWEC: MG2)"
;;; line="3 WCTDM/6/2 FXSKS
signalling=fxs_ks
callerid=asreceived
group=0
context=from-pstn
channel => 3
callerid=
group=
context=default
(In use) (SWEC: MG2)"
;;; line="4 WCTDM/6/3 FXSKS
signalling=fxs_ks
callerid=asreceived
group=0
context=from-pstn
channel => 4
callerid=
group=
context=default
(In use) (SWEC: MG2)"
www.atcom.cn
10
;;; line="5 WCTDM/6/4 FXOKS
signalling=fxo_ks
callerid="Channel 5" <4005>
mailbox=4005
group=5
context=from-internal
channel => 5
callerid=
mailbox=
group=
context=default
(In use) (SWEC: MG2)"
;;; line="6 WCTDM/6/5 FXOKS
signalling=fxo_ks
callerid="Channel 6" <4006>
mailbox=4006
group=5
context=from-internal
channel => 6
callerid=
mailbox=
group=
context=default
(In use) (SWEC: MG2)"
www.atcom.cn
11
3. Please run dahdi_cfg –vv command.
[root@localhost asterisk]# dahdi_cfg -vvvvvvvvvv
DAHDI Tools Version - 2.3.0
DAHDI Version: 2.3.0
Echo Canceller(s): MG2
Configuration
======================
Channel map:
Channel 01: FXS Kewlstart (Default) (Echo Canceler: mg2) (Slaves: 01)
Channel 02: FXS Kewlstart (Default) (Echo Canceler: mg2) (Slaves: 02)
Channel 03: FXS Kewlstart (Default) (Echo Canceler: mg2) (Slaves: 03)
Channel 04: FXS Kewlstart (Default) (Echo Canceler: mg2) (Slaves: 04)
Channel 05: FXO Kewlstart (Default) (Echo Canceler: mg2) (Slaves: 05)
Channel 06: FXO Kewlstart (Default) (Echo Canceler: mg2) (Slaves: 06)
6 channels to configure.
Setting echocan for channel 1 to mg2
Setting echocan for channel 2 to mg2
Setting echocan for channel 3 to mg2
Setting echocan for channel 4 to mg2
Setting echocan for channel 5 to mg2
Setting echocan for channel 6 to mg2
4. Please add the following line at the bottom of the chan_dahdi.conf file:
#include dahdi-channels.conf
5. Please run asterisk with the following command:
asterisk –vvgc
reload
6. Please run dahdi show channels command
You should see 6 channels as the following:
localhost*CLI> dahdi show channels
Chan Extension Context
Language
pseudo
default
1
from-pstn
2
from-pstn
3
from-pstn
4
from-pstn
5
from-internal
6
from-internal
localhost*CLI>
www.atcom.cn
MOH Interpret
default
default
default
default
default
default
default
State
In Service
In Service
In Service
In Service
In Service
In Service
In Service
12
If you need your GSM send or receive messages, you can modify the following parameters.
7. Please add the coding for sending message in the chan_dahdi.conf file
[channels]
;
; Default language
;
;language=en
sms_language=en
For example, you can add three language system: weur, using for western Europe; eeur:
using for eastern Europe; cn: using for Chinese.
Modify the display language environment, please edit the file: /root/.bash_profile to change
the system language. For example, the system default language is English like this:
LANG=es_ES, you can change it to Chinese like this: LANG=zh_CN.
8. Set the billing function
If you would like to set the billing function, you can edit the file:
/etc/asterisk/dahdi-channels.conf, and enable the two parameters: answeronpolarityswitch=yes,
polarityonanswerdelay= 300
Then, you can open the CRBT(Color Ring Back Tone), after you enable the parameter:
prematuremedia=no in the file:/etc/asterisk/sip.conf
www.atcom.cn
13
Chapter 5 Test
1. Please check the status of the cell phone card plugged in the AX-2G4A.
Please type the following command three times, the result of the third time is correct:
cat /proc/dahdi/ax4g_sta_card_1
You can get one line with the following information:
S0:4, S1:4, S2:
S2:00, S3:
S3:00
The S0, S1 stand for the two modules on the AX-2G4A orderly, and different numbers behind
colon stand for different status of SIM card.
a: it means that the cell phone card is sending SMS.
1: it means that the module2 is powered off.
2: it means that the cell phone card is still searching for GSM network.
3: it means that the cell phone card has registered successfully before, but now it failed.
4: it means that the cell phone card has found GSM network successfully, and it is in idle
status (not used by calling or sending SMS).
5: it means that after a communication, one side hangs up the phone, but the other side has not
hang up.
6: it means that the cell phone card is dialing-out.
7: it means that somebody from outside is calling the channel, but no extension answers the
phone, the extension is ringing.
8: it means that an extension answers an incoming call, but the communication has not yet
established, at this moment, the called party hangs up, then the caller do not need to be paid
for this call, because this call has not been established really.
9: it means that the channel is in communication status, and the call has been established
really.
2. Please check the network signal of the cell phone card plugged in the AX-2G4A, type the
following command three times, the result of the third time is correct:
cat /proc/dahdi/GSM_signal_card_1
you can get one line with the following information:
SQ0 = 31, SQ1 = 30, SQ2 = 0, SQ3 = 0
The SQ0, SQ1 stand for the two modules on the AX-2G4A orderly, and different numbers
behind equality sign stand for the network signal of the cell phone card, the numbers 0 and 99
mean no signal, for other numbers, the bigger the number is, the stronger the signal is.
3. Check when the called party answers the call, when you dial-out through AX-2G4A.
Please use dmesg command to detect if the called party answers the call when you dail-out
through AX-2G/4A, if the called party has answered the call, after running dmesg command,
you can get one line with GX PR, X stands for the channel number. This feature will help
customer to do billing accurately.
www.atcom.cn
14
4. Use the dmesg command to check your GX01 version:
[root@localhost ~]# dmesg
wctdm_init_GSM CARD:0
VoiceGSM System:0a
Module 0: Installed -- AUTO GSM(version 0x46)
wctdm_init_GSM CARD:1
VoiceGSM System:0a
Module 1: Installed -- AUTO GSM(version 0x46)
Notice: only the GX01 0x41 and above version support bulk SMS sending, multi-language for
SMS content and Pin number unlock; only the GX01 0x46 and above version support SMS
receiving.
5. Input PIN-Number for the SIM card in /etc/asterisk/dahdi-channels.conf file, add the
following red line:
;;; line="2 WCTDM/6/1 FXSKS (In use) (SWEC: MG2)"
pinnum=1234
signalling=fxs_ks
callerid=asreceived
group=0
context=from-pstn
channel => 2
After setting, please restart asterisk to make the setting effective.
6. Please use the following command to read your IMEI number of GX01:
[root@localhost ~]# cat /proc/dahdi/imei_read_1
IMEI0: 355842020258444, IMEI1: 355842020187437, IMEI2: , IMEI3:
7. Please start asterisk, then use the following command to change IMEI, 1 stands for the
channel number, and 355842020257974 stands for the IMEI number which you want to use.
localhost*CLI> gsm set imei 1 355842020257974
gsm set imei cardnum=1 value=355842020257974
gsm set imei ok
Edit a dial-plan, and use AX-2G4A to make outgoing calls and get incoming calls.
8. Please edit a dial-plan in extensions.conf file, you can refer to the following dial-plan:
[from-internal]
exten=>_1.,1,Dial(dahdi/1/${EXTEN:1})
Dial-out via GSM channels
exten=>_1.,2,Hangup()
exten=>_2.,1,Dial(dahdi/2/${EXTEN:1})
exten=>_2.,2,Hangup()
exten=>_3.,1,Dial(dahdi/3/${EXTEN:1})
Dial-out via FXO ports
exten=>_3.,2,Hangup()
exten=>_4.,1,Dial(dahdi/4/${EXTEN:1})
exten=>_4.,2,Hangup()
www.atcom.cn
15
[from-pstn]
exten=>s,1,Answer()
exten=>s,2,Dial(sip/500)
exten=>s,3,hangup()
9. Use a registered sip phone to make an outgoing call, according to the dial-plan above, if you
want to make the outgoing call through the first channel, you have to add a prefix “1” when
you dial out, if you want to make the outgoing call through the second channel, you have to
add a prefix “2”. Here, the destination number is 15128731752, so dialing 115128731752,
then you can get the following output from asterisk CLI:
-----------------------------------------------------------------------------------------------------------------*CLI>
== Using SIP RTP CoS mark 5
--Executing [115128731752@from-internal:1] Dial("SIP/500-00000003",
"dahdi/1/15128731752") in new stack
-- Called 1/15128731752
-- DAHDI/1-1 answered SIP/500-00000003
-----------------------------------------------------------------------------------------------------------------The called party rings, and pick up the phone, so the call is successful.
10. Please use a phone to make an incoming call, here, the SIM card number for the first channel
is 15889587467, using a cell phone to dial 15889587467, the sip 500 rings, and you can get
the following output from asterisk CLI:
---------------------------------------------------------------------------------------------------------------------*CLI>
-- Starting simple switch on 'DAHDI/1-1'
[Jul 1 11:42:53] NOTICE[20678]: chan_dahdi.c:8734 ss_thread: Got event 18 (Ring Begin)...
-- Executing [s@from-pstn:1] Answer("DAHDI/1-1", "") in new stack
-- Executing [s@from-pstn:2] Dial("DAHDI/1-1", "sip/500") in new stack
== Using SIP RTP CoS mark 5
-- Called 500
-- SIP/500-00000004 is ringing
-- SIP/500-00000004 answered DAHDI/1-1
---------------------------------------------------------------------------------------------------------------------11. Plugging PSTN line into the FXO ports, customer can dial-out via FXO ports. Connecting
analog phone to FXS ports, customer can use analog phone to dial-out via FXO ports or via
GSM channels.
www.atcom.cn
16
Chapter 6 Sending and Receiving SMS
There are two ways for users to send SMS by ATCOM AX-2G4A.
1. Sending SMS by asterisk CLI command directly.
In the following example, it sends a message to 13728737752 using the first channel:
7752 Welcome to ATCOM
localhost*CLI> sendsms dahdi/1 1372873
13728737
== Using SIP RTP CoS mark 5
-Launching
Sendsms(dahdi/1,13728737752,Welcome
to
ATCOM)
on
SIP/600-0000002c
-- Launching DoSms(13728737752 Welcome to ATCOM) on DAHDI/1-1
[Apr 25 14:32:32] WARNING[22660]: chan_dahdi.c:5827 dahdi_handle_event: gsm send
sms sucess
-- Hungup 'DAHDI/1-1'
2. Sending bulk SMS
Before sending the SMS, please start Asterisk.
In /var/spool/asterisk directory, please edit a xml file like the following format, then copy the
content to outgoing file, after that the SMS will be send out.
bulksms.xml
--------------------------------------------------------------------------------------------------------------<?xml version="1.0" encoding="UTF-8"?>
<sms>
<receiver>15012871900</receiver>
<receiver>13728731752</receiver>
<channel>1</channel>
<content>
hello! welcom to ATCOM!
</content>
</sms>
----------------------------------------------------------------------------------------------------------------.xml
Please copy the bulksms.xml content to outgoing file, run the command: cp bulksms
bulksms.xml
outgoing/
www.atcom.cn
17
From asterisk CLI, you can get the following output, if you can see the red characters result=1,
it means that the SMS has been sent out successfully; If you get result=-1, it means that the
SMS fails to send out.
localhost*CLI>
[Sep 9 16:08:23] NOTICE[3593]: pbx_spool.c:166 apply_sms_outgoing: pbx_spool find
called name=15012871900
[Sep 9 16:08:23] NOTICE[3593]: pbx_spool.c:166 apply_sms_outgoing: pbx_spool find
called name=13728731752
-Attempting
call
on
sms/
for
application
queuesms(dahdi/1,15012871900&13728731752,hello! welcom to ATCOM!) (Retry 1)
-- Launching queuesms(dahdi/1,15012871900&13728731752,hello! welcom to ATCOM!)
on type/data-00000001
[Sep 9 16:08:23] NOTICE[3823]: pbx_spool.c:531 attempt_thread: Call completed to sms/
-- Launching DoSms(15012871900&13728731752 hello! welcom to ATCOM!) on
DAHDI/1-1
[Sep
9
16:08:27]
NOTICE[3825]:
chan_dahdi.c:18205
sms_queue_send:
sessionid=1315555703.3 channum=1 time=2011/09/09 16:08:27 send to called=15012871900
result=1
[Sep
9
16:08:31]
NOTICE[3825]:
chan_dahdi.c:18205
sms_queue_send:
sessionid=1315555703.3 channum=1 time=2011/09/09 16:08:31 send to called=13728731752
result=1
-- Hungup 'DAHDI/1-1'
User can also check if the SMS is sent successfully or not by checking the
/var/log/asterisk/sms/sendsms directory, the system will generate one log file each day for writing
down if the SMS is sent successfully or not, for example, sendsms_2011-12-02.log is generated on
Dec 02th, 2011, which writes down all the sent SMS results on Dec 02th, 2011.
The Format of the xml file
Xml file name: customer can name whatever name you want.
Receiver: add the destination phone number, one line for one destination phone number, the
example above add two destination phone numbers.
Channel: choose the GSM channel by which the system send the SMS out. For one
AX-2G4A, it should be 1 or 2.
Content: input or paste the SMS content that you need to send out.
3. Receiving SMS
When one SMS is received, the system will generate a file for storing the SMS, and the file is
under /var/log/asterisk/sms/recvsms directory.
The format of the file name: recvsms_channel number_time_+cell phone number.log
The format of SMS content: channo:channel >>date time|+cell phone number| SMS content
www.atcom.cn
18
Chapter 7 Reference
http://www.asteriskguru.com/
http://www.asterisk.org/downloads
http://www.openippbx.org/index.php?title=Main_Page
http://www.atcom.cn/
www.atcom.cn
19