1
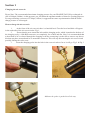
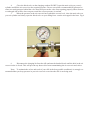
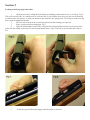
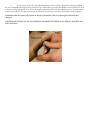
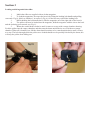
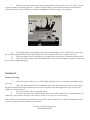
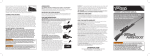
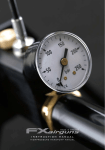
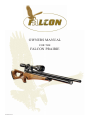
OWNERS MANUAL
FOR THE
FALCON PRAIRIE
PRAIRIE-ISS2-US2
Pneumatic Air Rifles
With proper care your Falcon air rifle will give you many years of fine reliable service.
PLEASE READ THIS HANDBOOK BEFORE OPERATING YOUR FALCON AIR RIFLE, IT IS AN IMPORTANT MAINTENANCE AND SAFETY GUIDE.
Remember
Always treat your rifle as if it is loaded.
Never point your rifle at anyone even if unloaded or not cocked.
Always be sure of what lies beyond your target.
Always conduct yourself in a sportsmen like manner.
Treat all airguns with care. They are not toys and can severely injure yourself or others and cause
damage to property.
Always be aware that your actions will be under the scrutiny of other members of the public who
may not share your enthusiasm for air guns.
Bad practises promote bad publicity. Do not jeopardise your future enjoyment by misusing this gun.
Warning. Pre-Compressed Pneumatic (PCP) air guns work under very high pressure and must NOT be tampered with in any way.
Falcon Airguns reserve the right to alter the construction, appearance or performance of any product without
prior notification. All illustrations are for information only and do not necessarily show the exact model that
was purchased.
THIS AIRGUN IS INTENDED FOR USE BY THOSE 18 YEARS OF AGE OR OLDER
WARNING!
Not a toy. Adult supervision required. Misuse or careless use may
cause serious injury or death. May be dangerous up to 1,000 yards.
WARNING!
Do not inhale dust from lead pellets or put lead pellets in the mouth.
Wash hands after handling lead. Lead pellets contain lead, a chemical known to the State of California to cause cancer and birth defects
(or other reproductive harm).
WARNING!
Keep the air rifle in the SAFE ON position until you’re ready to
shoot, then push the safety to the SAFE OFF position.
WARNING!
Keep your fingers off the trigger while cocking the air rifle or with
the barrel in the downwards position. Failure to do so may permanently damage your air rifle. Do not shoot without a pellet in the
chamber (dry fire). This may permanently damage your air rifle.
WARNING!
Use the correct pellet size according to your Falcon model. Never reuse pellets. The use of any other kind of ammunition can cause injury
to you or damage the air rifle.
WARNING!
Do Not assume that the gun is unloaded if it fails to fire properly.
WARNING!
Never leave your gun loaded. Do not store it loaded.
Section 1
Charging the air reservoir
Please Note: The recommended maximum charging pressure for your PRAIRIE FALCON pre-charged air
rifle is 2900psi (200bar). At this pressure you will attain the optimum number of shots for sporting purposes.
For target shooting a pressure of 2700psi (185bar) is suggested but some experimentation with the initial
charge pressure is encouraged.
How to charge the air reservoir
1.
At the front of the air reservoir there is a knurled bezel. Turn the bezel and hole will appear
in the underside of the air reservoir tube. Fig 1.
2.
Ensure that the area around the hole and the charging probe, which is attached to the hose of
the charging set by a 1/8th BSP connector, are completely free of dust and dirt. Note: It is recommended that
a short blast of air is released through the charging set before connecting it to the rifle to remove any dust or
dirt that may have accumulated in or around the connector. This will stop dirt entering the air reservoir and
possibly fouling the valve seats.
3.
Insert the charging probe into the hole in the reservoir tube as far as it will go. Fig 2. & Fig 3.
Maksure the probe is pushed in all the way.
4.
Close the bleed valve on the charging set then SLOWLY open the main valve on your air
cylinder and fill the air reservoir to the required pressure. Do not exceed the recommended fill pressure because too much pressure behind the valve head will prevent the valve from opening properly. Shots from an
overcharged rifle will be down on power until the correct pressure is reached.
5.
When the pressure in the air reservoir has reached the correct level, close the main valve on
your air cylinder and slowly open the bleed valve on your filling kit to vent the air trapped in the hose. Fig 4.
6.
Disconnect the charging kit from the rifle and turn the knurled bezel until the hole in the air
reservoir tube is closed. This will prevent any dust or dirt from contaminating the air reservoir and valves.
Note: To maintain the valves and seals of your rifle in the best possible condition it is strongly recommended that you keep pressure in your air reservoir even when the rifle is not being used.
Section 2
Loading and firing single shot rifles
1.
Open the breech by lifting the bolt handle and pulling it backwards as far as it will go. Fig 6.
This will cock the rifle. It is much easier to cock the rifle if you hold the bolt close in to the breech housing
as shown in the left picture, or with you thumb on the back like the right picture. This helps to make sure the
bolt is pulled straight backwards.
2.
The bolt will remain in the rearward position with the loading port exposed.
3.
Place a pellet into the loading port. Fig 7.
4.
Slide the bolt handle forward. This will push the bolt and pellet into the breech and seat the
pellet into the rifling in the barrel. Lock the bolt handle down. Fig 8. The rifle is now loaded and ready to
fire.
5.
To fire the gun pull back the trigger until the pellet is released.
6.
If you do not wish to fire the rifle immediately after cocking, engage the safety by pushing
the lever alongside the trigger blade forward. Fig 9. Alternatively, lift the bolt handle, pull it back as far as it
will go and keep a firm grip on it. Press the trigger and slowly allow the bolt handle to move forward until it
can be locked down. The gun will now be de-cocked. Do not try to cock the rifle with the safety engaged.
Remember that the pellet will remain in the breech until the rifle is cocked again and safely discharged.
NEVER POINT THE GUN AT ANY PERSON OR OBJECT ESPECIALLY WHEN LOADING OR
DE-COCKING.
Section 3
Loading and firing multi-shot rifles
1.
Multi-shot rifles are supplied with an 8 shot magazine.
2.
To load the magazines, first open the breech by lifting the loading bolt handle and pulling
rearwards. Fig 10. (Refer to Number 1 in section 2 (Fig 6.) for the best way to hold the loading bolt.
3.
Whilst holding the bolt handle back, slide the magazine out of the right side of the breech.
4.
The pellets can now be loaded into the magazine, hold the magazine with the slot to the back
and the indexing gear towards you. Fig 11.
5.
Rotate the central drum clockwise until it comes to a stop with a empty chamber showing.
Feed the pellets into the empty chambers and then turn the drum anticlockwise to reveal the next empty
chamber. When all 8 chambers are full the drum should continue to be rotated anticlockwise until it comes
to a stop. The hole through which the pellets were loaded should now be partially blocked by the drum, this
will stop the pellets from falling out.
Section 4
Trigger adjustment
The trigger release pressure of Falcon sporting air guns is factory set at approximately 1400 grams (3lbs).
1.
If further adjustment to the trigger is required, remove the action from the stock. This is
achieved by removing the safety button first then remove the stock fixing screw located on the underside of
the stock, Fig 16, and remove action from the stock.
2.
Place the action on a suitable surface with the trigger unit uppermost.
3.
Two adjusting screws with locking nuts are located one at the front of the trigger housing ‘A’,
and one at the rear ‘B’. The front screw adjusts the first stage pull and the rear screw controls the weight of
pull. Fig 17.
4.
Slacken the two locking nuts. Fig 17.
5.
After making sure that there are no pellets in the breech, cock the gun. Using the correct size
allen key (2.5mm), turn the rear adjusting screw ‘B’ clockwise until the gun fires. Now whined the screw
half a turn anti-clockwise and, with the allen key still in the screw to stop it from moving, tighten the locking
nut.
6.
Cock the action and try the setting by dry firing, (discharging the gun with no pellet in th
barrel). If there is ‘trigger creep’ the adjusting screw ‘B’ may need to be screwed in a fraction more until a
satisfactory discharge point is achieved. If the trigger is not holding and firing too soon, the adjusting screw
will need to be unscrewed until it does hold. When you are happy with the adjustment, pull the bolt back
sharply and let your finger slip off the bolt handle. The gun should remain cocked. Do this several times to
ensure that the trigger sears are engaging correctly. If the gun discharges at this point a further adjustment of
screw ‘B’ outwards will be required. Keep checking the adjustments in this way to make sure that the trigger
is operating correctly and safely.
7.
By screwing the front adjusting screw ‘A’ inwards (clockwise), you will shorten the first stage
pull and by unscrewing it (anti-clockwise), you will lengthen the pull. When you have set the pull to the
required point, tighten the locking nut.
8.
Your trigger is now set for weight and pull.
9.
Reach can be adjusted by removing the trigger blade (first remove screw ‘D’. Fig 18), loosening the locking nut on the trigger rod ‘C’ and screwing the trigger rod inwards to increase reach and outwards to decrease. The locking nut can then be retightened to lock the trigger rod into place.
10.
The trigger blade can be adjusted for cant by slackening the screw which holds it to the trigger rod and turning the blade left or right. When the correct angle has been set re-tighten the screw.
11.
Once the trigger has been adjusted to your satisfaction replace the action back into the stock.
12.
Dry firing will not harm your rifle and should be used after adjusting the trigger to ensure that
the sears are engaging properly.
Section 5
Routine Servicing
1.
Always keep the surface of your rifle lightly oiled and remove all moisture and finger marks
after use.
2.
If the rifle has been used in wet conditions remove the action from the stock by unscrewing
the allen headed bolts from the underside of the stock. Dry the action thoroughly and wipe it down with
WD40 or a similar light oil.
3.
Never put a damp rifle in a gun slip or bag.
4.
To ensure that your rifle is maintained in the best possible condition we recommend that it is
returned to your dealer or directly to the factory at least every two years for servicing.
Your rifle has been manufactured using the best materials and assembled by our skilled and dedicated staff
to give you many years of trouble free enjoyment.
All of us at FALCON wish you.
GOOD SHOOTING.
Section 6
Note on Prairie Bull Barrels
The shroud on the bull barrel rifle acts as a moderator, if further sound reduction is required a separate moderator can be fitted.
1.
Remove the thread protector that is screwed into the end of the shroud. This part is there to
protect the thread in the end of the shroud and also to reduce air turbulence when the pellet leaves the rifle.
This in turn can cause accuracy problems.
2.
Fit the standard Prairie moderator into this thread and hand tighten. DO NOT USE ANY
TOOLS TO TIGHTEN.
SAFETY
You and others with you should always wear shooting glasses to protect your eyes.
Always aim your air rifle in a SAFE DIRECTION. When you are sure of your target and backstop
and the area around the target is clear, take the air rifle OFF SAFE and squeeze the trigger to fire.
Do not shoot at hard surfaces or at the surface of water. The pellet may bounce off or ricochet and hit
someone or something you had not intended to hit.
Always choose your target carefully. It is best to shoot at paper bullseye targets attached to a safe
backstop. Your backstop should be checked for wear before and after each use. Replace your backstop if the
surface is worn or damaged or if a ricochet occurs.
Your rifle is suited for indoor and outdoor use. Always remember to place your target carefully.
THINK about what you will hit if you miss the target.
Do not attempt to disassemble or tamper with your air rifle. Contact Air Venturi at 216-292-2570 for
repair.
Do not put the air rifle away while it is loaded or cocked.
REPAIR SERVICE
If your rifle needs to be repaired,
contact Air Venturi at 216-292-2570.
WARRANTY
Limited One-Year Warranty
This product is warranted to the retail consumer for one year from date of retail purchase against defects in
material and workmanship and is transferable.
What is covered:
Replacement parts and labor. Transportation charges to consumer for repaired product.
What is NOT covered:
Transportation charges to Air Venturi for defective products. Damages caused by abuse or failure to perform
normal maintenance. Any other expense. CONSEQUENTIAL DAMAGES, INCIDENTAL DAMAGES OR
INCIDENTAL EXPENSES INCLUDING DAMAGE TO PROPERTY. SOME STATES DO NOT ALLOW
THE EXCLUSION OR LIMITATION OF INCIDENTAL OR CONSEQUENTIAL DAMAGES, SO THE
ABOVE LIMITATION OR EXCLUSION MAY NOT APPLY TO YOU.
Warranty claims:
Warranty claims for U.S. and Canadian Customers:
Please return product to Air Venturi. Call Air Venturi at 216-292-2570 before returning any product.
Implied warranties:
ANY IMPLIED WARRANTIES, INCLUDING THE IMPLIED WARRANTIES OF MERCHANTABILITY AND FITNESS FOR A PARTICULAR PURPOSE, ARE LIMITED IN DURATION TO ONE YEAR
FROM DATE OF RETAIL PURCHASE. SOME STATES DO NOT ALLOW LIMITATIONS ON HOW
LONG AN IMPLIED WARRANTY LASTS, SO THE ABOVE LIMITATION MAY NOT APPLY TO YOU.
To the extent any provision of this warranty is prohibited by federal, state or municipal law which cannot be
preempted, it shall not be applicable. This warranty gives you specific legal rights, and you may also have
other rights which vary from state to state and country to country.
Air Venturi
AirVenturi.com • 216-292-2570
WARNING!
DO NOT TRY TO DISASSEMBLE THE GUN. Your rifle needs special tools and Falcon parts in order to be repaired. If you disassemble
it, you may not be able to properly reassemble it. Falcon does not assume any warranty liability under such circumstances.