1
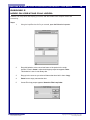
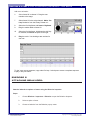
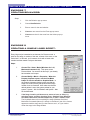
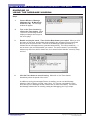
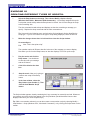
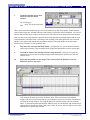
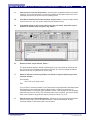
Multimedia Module
DIRECTOR 8.5 PART II:
INTRO TO INTERACTIVITY WITH DIRECTOR
USER MANUAL
For information and permission to use these training modules, please contact:
Limell Lawson - [email protected] - 520.621.6576
or
Joe Brabant - [email protected] - 520.621.9490
Modules available on-line at http://mll.arizona.edu/workshops.shtml?tutorialpdfs
director2_User.pmd
Last modified: 03/06/02
DIRECTOR 8.5 PART II: Intro to Interactivity with Director - User Manual
2
TABLE OF CONTENTS
Exercise 1: Film Loops ................................................................................................................. 3
Exercise 2: Tweening .................................................................................................................... 3
Exercise 3: Full Sequence with Reverse Path, Create Down Motion .......................................... 4
Exercise 4: To Create a Film Loop ............................................................................................... 5
Exercise 5: More on Creating Film Loops .................................................................................... 6
Exercise 6: Attaching Behaviors ................................................................................................... 7
Exercise 7: Creating Behaviors .................................................................................................... 8
Exercise 8: Creating a Simple Lingo Script .................................................................................. 8
Exercise 9: Testing a Script ........................................................................................................ 10
Exercise 10: Using the Message Window .................................................................................. 11
Exercise 11: Examining Lingo Elements .................................................................................... 12
Exercise 12: Creating Different Types of Scripts ........................................................................ 13
Criterion Test ............................................................................................................................... 17
Filename: director2_User.pmd
Last modified: 03/06/02
Copyright Arizona Board of Regents, 2002
University of Arizona
DIRECTOR 8.5 PART II: Intro to Interactivity with Director - User Manual
3
EXERCISE 1
FILM LOOPS:
Film Loops provide the following:
♦
♦
♦
♦
another level of animation
similar to Movie clips in Flash
help to simplify the score by combining sprites and channels
can have scripts attached to them.
Creating a Film Loop:
Create cast members and use of these commands: copy sprites, paste sprites, and reverse
sequence to create a bouncing ball animation that will be used to create a film loop.
Steps:
1
File > New > Movie
2
Window > Paint
3
With the paintbrush, draw a small ball appx. 20 pixels. Name the cast member
“smallBall” with out the quotes.
4
Click the New Cast Member “+” button in the upper left of the Paint Window to
create a new cast.
5
With the rectangle tool, draw a small gray box appx. 50 pixels wide. Name it
“grayBox”.
Your cast should now look like this:
Place them in the score and Tween an animation of a ball bouncing on the grayBox by:
EXERCISE 2
TWEENING:
Steps:
1
2
Drag the smallBall cast member to the middle of the stage. It should appear in the first
open sprite channel with a duration of 28 frames.
Select the final keyframe, and Insert > Keyframe.
Filename: director2_User.pmd
Last modified: 03/06/02
Copyright Arizona Board of Regents, 2002
University of Arizona
DIRECTOR 8.5 PART II: Intro to Interactivity with Director - User Manual
3
Holding the shift key down, move the smallBall sprite up 20 or 30 pixels to the top
of its bounce. It should look like this:
4
Rewind and Play the movie with the score still visible. The ball should appear to
bounce up and then start over at the bottom.
4
EXERCISE 3
FULL SEQUENCE WITH REVERSE PATH—CREATE
DOWN MOTION:
Steps:
1
Select and copy the sprite in the score.
2
Paste after the first sprite in frame 29.
3
While still selected, Modify > Reverse Sequence.
4
Play to test. It should first go up and then down.
5
In channel 2, frame 1, drag an instance of the grayBox cast member to the
score. Adjust it so that it just touches the smallBall at the bottom of the
bounce.
6
On its final keyframe in frame 28, Insert > Keyframe, and then extend the
sprite. Dragging the keyframe is one technique.
Filename: director2_User.pmd
Last modified: 03/06/02
Copyright Arizona Board of Regents, 2002
University of Arizona
DIRECTOR 8.5 PART II: Intro to Interactivity with Director - User Manual
7.
5
Play the movie with the score open.
♦
Demo the use of selected looping in score
♦
Demo the use of Center Current Frame button in the score window
♦
Demo score coloring of selected sprites
The score should look like this:
8.
Add a “Hold on Current Frame” behavior from the Library Palette to the last frame in
the behavior (script) channel.
9.
Play the movie again to see the result. Notice, in the Control Panel, that the movie is
still running, even though the animation stops. If you had sounds or script processes
running, they would continue even though the movie appears stopped.
10.
Save As “loopExercise.dir” to your computer drive. The dot dir (.dir) extension naming
allows cross platform work.
EXERCISE 4
TO CREATE A FILM LOOP:
Steps:
1.
In the Score, select the sprites you want to turn into a film loop.
Use sprites in as many channels as you need in film loops—-even in the
sound channel. Select sequences in all the channels you want to be part of
the film loop. You can select sprite fragments if you first select a sprite and
choose Edit > Edit Sprite Frames. Control-click (Windows) or Commandclick (Macintosh) to select sequences that aren’t in adjacent channels.
2
Choose Insert > Film Loop (you can also copy the selections to an empty
cast member slot). A dialog box appears asking you to name the film loop.
3
Enter a name for the film loop. Something descriptive.
Filename: director2_User.pmd
Last modified: 03/06/02
Copyright Arizona Board of Regents, 2002
University of Arizona
DIRECTOR 8.5 PART II: Intro to Interactivity with Director - User Manual
6
EXERCISE 5
MORE ON CREATING FILM LOOPS:
Create a Film Loop which will simplify your score, and also enable more complex motion and
interactivity.
Steps:
1.
Using the loopExercise.dir file you created, open the Behavior Inspector.
2.
Drag this behavior to the next to last frame of the sprites in the script
channel. Enter in frame 1 when the dialogue prompt box appears. Note:
This behavior is now in cast library also.
3.
Drag up in the score so you select all frames that have info in them. Copy.
4.
Paste into an empty cast member slot.
5.
Create Film loop prompt appears. Name the Film Loop fubar.
Filename: director2_User.pmd
Last modified: 03/06/02
Copyright Arizona Board of Regents, 2002
University of Arizona
DIRECTOR 8.5 PART II: Intro to Interactivity with Director - User Manual
7
Add more animation:
6
Select frame 60 in channel 1. Drag the cast
member to the stage.
7
Select frame 60 in the script channel. Add a “Go
Loop” behavior from the Library Palette to it.
8
9
Select the final keyframe and Insert > Keyframe.
Drag the marker label to frame 60.
10
Select the final keyframe, hold down the shift key
to constrain, and move the sprite to the right.
11
Play the movie. You should get two motions for
one now.
Try the “copy reverse sequence, copy make film loop “ techniques to create a complete sequence
to play in only one frame.
EXERCISE 6
ATTACHING BEHAVIORS:
Attach a behavior to sprites or frames using the Behavior Inspector:
Steps:
1.
Choose Window > Inspectors > Behavior to open the Behavior Inspector.
2.
Select a sprite or frame.
3.
Choose a behavior from the Behavior pop-up menu.
Filename: director2_User.pmd
Last modified: 03/06/02
Copyright Arizona Board of Regents, 2002
University of Arizona
DIRECTOR 8.5 PART II: Intro to Interactivity with Director - User Manual
8
EXERCISE 7
CREATING BEHAVIORS:
Steps:
1.
Click the Behavior pop-up menu.
2.
Choose New Behavior.
3.
Enter a name for the new behavior.
4.
Choose a new event from the Event pop-up menu.
5.
Choose an action for the event from the Actions pop-up
menu.
EXERCISE 8
CREATING A SIMPLE LINGO SCRIPT:
Every Lingo script is attached to an element of a Director movie: a
sprite on the stage, a member of the cast, a frame of the score, or the
movie itself. In this task, you’ll create a movie with a button cast
member and then attach a script to that button.
Steps:
1.
Choose File > New > Movie (Windows Ctrl + N,
Macintosh Command + N). This opens a new
Director Movie. You need to do this only if you already
have another movie open.
2.
Choose Modify > Movie > Properties. When the
Property Inspector opens, use the View Mode
button to view the window in Graphics Mode. In
the Property Inspector window, make sure that the
stage size is set to 640 by 480 pixels and the stage
location is set to Centered. Also make sure that the
default palette is set to the system palette for your
system: System - Win for Windows and System - Mac
for the Macintosh.
3.
If the Stage Location pull-down menu seems to have no effect, try
selecting Center and then choosing View > Standard View (Windows
Ctrl+Alt+0, Macintosh Command+Option+0) or View > Restore View.
The Keyboard shortcut for normalizing the stage (Windows Ctrl+Alt+0,
Macintosh Command+Option+0) is handy to remember if part of the canvas
appears around the stage and you don’t want to see it, or if you need to
center the stage in the Stage window.
Filename: director2_User.pmd
Last modified: 03/06/02
Copyright Arizona Board of Regents, 2002
University of Arizona
DIRECTOR 8.5 PART II: Intro to Interactivity with Director - User Manual
4.
Control > Loop Playback to make sure the Loop Playback command is
checked (Windows Ctrl+Alt+L, Macintosh Command+Option+L). When the
Loop Playback command is checked, the playback head returns to frame 1 when it
reaches the end of the last sprite in the score. The movie will continue to loop until
you stop it.
5.
Open the score and select Channel 1, Frame 1. If you don’t
see the sprite toolbar at the top of the Score window, choose
View > Sprite Toolbar (Windows Ctrl+Shift+H, Macintosh
Shift+Command+H).
6.
Open the tool palette by choosing Window > Tool Palette
(Windows Ctrl+7, Macintosh Command+7).
7.
Click the Button Tool in the tool palette.
8.
Click the Stage where you want to place the button. A
button appears where you click, with a blinking insertion point
indicating where you can type the button name. Remember
that you can reposition the button sprite later if you want.
9.
Type Beep in the Button Text field. This names the button.
9
Note: Director is preset to add new sprites to the score with a duration of 28
frames. The length of the sprite isn’t important in this task, so you need not worry if
your button spans a different number of frames. If you want to have your score
look the same as the illustrations, choose File > Preferences > Sprite and make
sure the span duration is set for 28 frames.
10.
Select the button sprite in Channel 1 of the score and choose New Behavior from
the Behavior pop-up menu in the sprite toolbar. You’re creating a Sprite Script,
which affects only this sprite.
Filename: director2_User.pmd
Last modified: 03/06/02
Copyright Arizona Board of Regents, 2002
University of Arizona
DIRECTOR 8.5 PART II: Intro to Interactivity with Director - User Manual
10
The Script Window appears, already containing the Lingo commands on mouseUp
me and end. Whenever you create a Sprite Script, these lines will already be entered
in the Script window by default.
11.
Type Beep in the Script window, at the insertion point, below on mouseUp.
Beep is a Lingo command that sounds a system beep on the computer. This is how
the script should look:
on mouseUp me———————————— EVERY HANDLER STARTS WITH THE
WORD ON
beep
end————————————————————- EVERY HANDLER ENDS WITH THE
WORD END
12.
Save your work as Button 1 in a Projects folder.
EXERCISE 9
TESTING A SCRIPT:
Any scripting language has certain elements you must use and rules you must follow. If you
follow the rules, you are rewarded when the script performs as you expect. If the script does
not work, you perform debugging to correct the syntax or change the elements to satisfy
Lingo’s rules. In this task, you will test the script you just created.
Steps:
1.
On the toolbar, click the Rewind and Play buttons to rewind and play the
movie. The movie loops because you turned on looping with the Control >
Loop Playback command.
2.
Click the button you created. You should hear a beep (or see the Menu bar
flash). If you don’t, repeat the steps for creating the script in the preceding
task. Make sure you type beep correctly and close the window when you’re
done. Also, make sure your speakers are turned on.
3.
Stop the movie.
Filename: director2_User.pmd
Last modified: 03/06/02
Copyright Arizona Board of Regents, 2002
University of Arizona
DIRECTOR 8.5 PART II: Intro to Interactivity with Director - User Manual
11
EXERCISE 10
USING THE MESSAGE WINDOW:
Steps:
1.
Choose Window > Message
(Windows Ctrl + M, Macintosh
Command + M). The message
window will appear.
2.
Turn on the Trace function by
clicking the Trace button. When
Trace is on, the Message window
displays messages and scripts as
the movie plays.
3.
Rewind and play the movie. Then click the Beep button you created. When you click
the button on the stage, the Message window displays the messages Director sends and
the lines of the script it executes. The lines in the Message window preceded by ==
indicate Director messages that are generated automatically. The lines preceded by - - >
are the lines in the mouseUp handler you created. The actual content in your Message
window may differ from what is shown here, but it should include Handler: mouseUp, beep,
and end.
4.
Click the Trace button to turn off tracing. When left on, the Trace feature
dramatically slows the speed of the movie.
In addition to seeing the messages Director is sending, you can use the Message
window to “talk” to Director yourself, using Lingo. You can test commands by typing
them directly in the Message window; Director will run them immediately. You will use
the Message window often for creating, testing and debugging your Lingo scripts.
Filename: director2_User.pmd
Last modified: 03/06/02
Copyright Arizona Board of Regents, 2002
University of Arizona
DIRECTOR 8.5 PART II: Intro to Interactivity with Director - User Manual
12
EXERCISE 11
EXAMINING LINGO ELEMENTS:
Steps:
1.
In the Message window, type put the
date and then press Enter. You should
see the date displayed in the Message
window.
The the time function returns the current
time according to the computer’s system
clock. Check it out.
2.
Type put the time in the Message window and then press Enter. You should see the time
displayed in the Message window.
Properties return information about specific items. For instance, you can use properties to get
information about the background color of a sprite, the cast member number of a sprite in a
particular channel, or the last frame of a movie. You will next try using the the colorDepth
property of the computer monitor, which returns the current color depth setting.
3.
Type put the colorDepth in the Message window and then press Enter. The result should
be 8 (Assuming your monitor is set to 8-bit color).
The the loc of sprite property determines the coordinates (loc is short for location) of the
specified sprite. The coordinate value is returned as appoint (X, Y), where X is the horizontal
location and Y is the vertical location. Earlier you created a button called Beep and placed it
in channel 1, frame 1. You can use the the loc of sprite property to get that button’s location.
4.
Type put the loc of sprite 1 in the Message window and then press Enter. The result is
the horizontal and vertical coordinates of the button - for example, the point (181,293). (Your
result will likely be different because your button is probably in a different location).
Operators compare or change values. The + operator adds two numbers together, as you will
see next.
5.
Type put 5 + 5 in the Message window and then press Enter. The result should be 10.
Try another operator.
6.
Type put 5 < 9 in the Message window and press Enter. The result is 1, or TRUE.
Remember that 1 represents True and 0 represents FALSE.
7.
Type put 5 > 9 in the Message window and press Enter. The result is 0, or FALSE.
Remember that TRUE and FALSE are constants, and their values never change.
8.
Type put TRUE in the Message window and press Enter. The result is 1 because TRUE is
a constant value and always equals 1.
9.
Close the message window.
You’ve just used the Message window to see how various Lingo elements work. This window is a great
tool for testing Lingo commands and functions to see how they work before you add them to your
scripts.
Filename: director2_User.pmd
Last modified: 03/06/02
Copyright Arizona Board of Regents, 2002
University of Arizona
DIRECTOR 8.5 PART II: Intro to Interactivity with Director - User Manual
13
EXERCISE 12
CREATING DIFFERENT TYPES OF SCRIPTS:
1.
Select the Beep button on the stage. Then choose Modify > Sprite > Script
(Windows Ctrl+Shift+’, Macintosh Shift+Command+’). You already assigned this sprite
a script that sounds a beep when the Beep button is clicked. You will now change the script
to do something else.
The alert command sounds a beep and displays an alert box containing a message you
specify. Replace the beep command with the alert command now.
Tip: Here and in the following steps, notice that the Script window’s title bar identifies the
script type. If you’re ever unsure of the type of script being displayed, check the title bar.
2.
Make the changes shown here in bold and then close the Script window.
On mouseUp me
Alert “This is the sprite script”
End
The quotation marks tell Director that this is the text of the message you want to display.
Now when you click on the Beep button, an alert box displays This is the sprite script.
3.
Play the movie and click the
Beep button. You should see
an alert box with you message
and an OK button.
4.
Click OK to dismiss the alert
box.
5.
Stop the movie. Now you’re going to
create a cast script for the Beep
button.
6.
In the Cast window, select the
Beep button (cast member 1), Then
click the Cast Member Script
button.
The Script window appears, already containing the Lingo command on mouseUp and end. Whenever
you create a cast script, these lines appear in the Script window. (Recall that these lines are also
displayed whenever you create a sprite script.)
Tip: With a cast member selected, you can also create a cast member script by choosing Modify >
Cast Member > Script (Windows Ctrl+’, Macintosh Command+’) or by clicking the Script button on the
toolbar.
Filename: director2_User.pmd
Last modified: 03/06/02
Copyright Arizona Board of Regents, 2002
University of Arizona
DIRECTOR 8.5 PART II: Intro to Interactivity with Director - User Manual
7.
14
Create the handler shown here
and then close the Script
window.
On mouseUp me
Alert “This is the cast script”
End
Take a look at the Cast window and you will see that there is no new cast member. That’s because
cast member scripts are included within the cast member to which the script is attached. You can tell
when a cast member has a script by the script icon at the lower left of the cast member’s thumbnail.
Now you have a mouseUp handler in both the sprite script attached to the Beep button and the cast
script attached to the Beep button. According to the message order listed previously, the mouseUp
handler in the sprite script should take precedence, and the mouseUp handler in the cast script
should not be executed. Try out the button now.
8.
Play the movie and click the Beep button. As Expected, you see the alert box with the
sprite script message. This is because sprite scripts take precedence over the cast scripts.
9.
Click OK to dismiss the alert box and then stop the movie. Next you’ll remove the
sprite script to se how the mouseUp message passes through the sprite level to the cast
member level.
10.
Select the Beep button on the stage. Then choose Clear All Behaviors from the
Behaviors menu in the score.
This removes the sprite script from the button sprite. Take a look at the Cast window,
though, and you’ll see that even though, you cleared the script from the sprite, the behavior
still exists as a cast member. The Clear All Behaviors selection affects only the selected
sprite - if other sprites have this behavior attached, they are not affected, and the behavior’s
cast member is not affected either. And nonce of this, of course, had any affect on the script
attached on the button cast member.
Filename: director2_User.pmd
Last modified: 03/06/02
Copyright Arizona Board of Regents, 2002
University of Arizona
DIRECTOR 8.5 PART II: Intro to Interactivity with Director - User Manual
11.
Play the movie, click the Beep button. Now an alert box appears with the cast script
message. This is because there is no mouseUp handler at the sprite script level, so the
message was sent to the next level in the message order.
12.
Click OK to dismiss the alert box and then stop the movie. Next you’ll add a frame
script to the movie, but you need to make a minor adjustment first.
13.
If the button sprite in your score spans more than one frame, adjust the sprite’s
duration so that the sprite occupies, only frame 1.
14.
Double-click the script channel, frame 1.
15
The Script window appears, already containing the Lingo commands on exitFrame and
end. To see how the message order works in this task, you need to change the default
handler name from on exitFrame to on mouseUp.
15.
Select all the text in the Script window and delete it. Type the following and then
close the window.
On mouseUp
Alert “This is the frame script”
End
You now have a mouseUp handler in the cast member script attached to the Beep button
that displays an alert message when the Beep button is clicked. You also have a
mouseUp handler in the frame script attached to frame 1 that displays an alert message
whenever the mouse is clicked. For the frame script to go into action, the mouse doesn’t
have to be clicked on any particular object (such as a button). Try it out.
16.
Play the movie and click the Beep button. Because the cast script takes precedence
over the frame script, you see an alert box with the cast script message, and the
mouseUp handler in the frame script is not executed.
Filename: director2_User.pmd
Last modified: 03/06/02
Copyright Arizona Board of Regents, 2002
University of Arizona
DIRECTOR 8.5 PART II: Intro to Interactivity with Director - User Manual
17.
Click OK to dismiss the alert box and then click anywhere except on the Beep button.
You see an alert box with the frame script message. This is because a mouseUp message
was generated by the mouse click. Even though the Beep button contains a handler for the
mouseUp message, you did not click the Beep button itself, so that cast script is not
executed because it never received the mouseUp message. Sprites ( and casts) receive the
mouseUp message only if the sprite (or cast member) is the object being clicked. Because
Director can't find a sprite or cast script to handle the mouseUp message, the message is
sent up to the next level in the message order, the frame script level. Because you have a
mouseUp handler in the frame script, that handler is executed here.
18.
Click OK to dismiss the alert box and then stop the movie.
19.
Press Ctrl+Shift+U (Windows) or Command+Shift+U ( Macintosh) to open a new
movie script. You can also open a new movie script by clicking an empty cast slot and then
clicking the script button on Director’s tool bar or choosing Window > Script. Notice that the
Script button for a movie script contains no default Lingo commands, and that the title bar
for the window identifies it as a movie script. This is different than when you create a sprite
script, cast script, or frame script.
20.
Type the following and then close the window:
16
on mouseUp
alert “This is the movie script”
end
You now have a mouseUp handler in the cast member script attached to the Beep button. You have a
mouseUp handler in the frame script attached to frame 1. You also have a mouseUp handler in the
movie script. Test the handlers.
21.
Play the movie and click the Beep button. As expected, the cast script message is
displayed in the dialog box.
22.
Click OK to dismiss the dialog box and then click anywhere except on the Beep
button. According to the message order, the frame script takes precedence over the movie
script, so the frame script message is displayed in the alert box, and the mouseUp handler in
the movie script is not executed.
23.
Stop the movie. You’re going to clear the frame script to see how the mouseUp message is
forwarded to the movies script.
24.
Select the behavior channel, frame 1. Then choose Clear All Behaviors from the
Behaviors menu in the movie script.
25.
Play the movie and click the Beep Button. The cast script messages is displayed in the
alert box.
26.
Click Ok to dismiss the alert box and then click anywhere except on the Beep button.
Because you removed the frame script, the mouseUp message is sent to the next level in
the message order, and you see the movie script message.
27.
Stop the movie
Filename: director2_User.pmd
Last modified: 03/06/02
Copyright Arizona Board of Regents, 2002
University of Arizona
DIRECTOR 8.5 PART II: Intro to Interactivity with Director - User Manual
17
CRITERION TEST
20 minutes
4 minutes:
Construct a Director movie where there are 4 labeled sections with marker labels on each. Put
text in each to identify it.
6 minutes:
The initial menu screen will have 4 choices. Create 4 simple buttons on this first screen. Put a
hold on current frame behavior in the script channel for this screen.
10 minutes:
Demonstrate the use of 3 of the 4 types of scripts to navigate to each section of the movie.
Provide a way to get back to the men (cast script, sprite script, frame script, and movie script).
Filename: director2_User.pmd
Last modified: 03/06/02
Copyright Arizona Board of Regents, 2002
University of Arizona