1
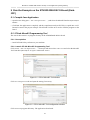
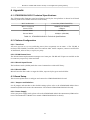
MicroEJ®
STM32F429I-DISCO: Develop a Java Application
Getting Started
Reference
Revision
Architecture
Board
Product Version
TLT-0713-MAN-JavaGettingStarted-STM32F429I-DISCO
B
ARM Cortex-M4
STM32F429I-DISCO
1.2.1
MicroEJ®: STM32F429I-DISCO: Develop a Java Application [Getting Started]
Confidentiality & Intellectual Property
All right reserved. Information, technical data and tutorials contained in this document are IS2T
S.A. Proprietary under Copyright Law. Without any written permission from IS2T S.A., copying or
sending parts of the document or the entire document by any means to third parties is not permitted
including but not limited to electronic communication, photocopies, mechanical reproduction systems.
Granted authorizations for using parts of the document or the entire document do not mean they give
public full access rights.
IceTea®, IS2T®, MicroJvm®, MicroEJ®, S3™, SNI™, SOAR®, Drag Emb'Drop™, IceOS®,
Shielded Plug™ and all associated logos are trademarks or registered trademarks of IS2T S.A. in
France, Europe, United States or others Countries.
Java™ is Sun Microsystems' trademark for a technology for developing application software and
deploying it in crossplatform, networked environments. When it is used in this documentation without
adding the ™ symbol, it includes implementations of the technology by companies other than Sun.
Java™, all Java-based marks and all related logos are trademarks or registered trademarks of Sun
Microsystems Inc, in the United States and other Countries.
Other trademarks are proprietary of their authors.
2
MicroEJ®: STM32F429I-DISCO: Develop a Java Application [Getting Started]
Table of Contents
1. Introduction ............................................................................................................................ 5
1.1. Intended Audience ....................................................................................................... 5
1.2. Scope .......................................................................................................................... 5
1.3. Prerequisites ................................................................................................................. 5
1.4. Terminology ................................................................................................................ 5
2. Product Registration ................................................................................................................ 7
3. Overview ................................................................................................................................ 8
3.1. Platforms ..................................................................................................................... 8
3.2. STM32F429I-DISCO KickStart .................................................................................... 8
4. Run an Example on the Simulated Java Platform (SimJPF) ....................................................... 9
4.1. Create Example ............................................................................................................ 9
4.2. Run Example ............................................................................................................. 10
5. Run the Example on the STM32F429I-DISCO Board (EmbJPF) ............................................. 12
5.1. Compile Java Application ........................................................................................... 12
5.2. STLink MicroEJ Programming Tool ........................................................................... 12
5.3. Launch Group ............................................................................................................ 13
6. Appendix .............................................................................................................................. 14
6.1. STM32F429I-DISCO Technical Specifications ............................................................ 14
6.2. Platform Configuration ............................................................................................... 14
6.3. Board Setup ............................................................................................................... 14
6.4. Demos Installation ...................................................................................................... 15
7. Document History ................................................................................................................. 16
3
MicroEJ®: STM32F429I-DISCO: Develop a Java Application [Getting Started]
List of Figures
1.1.
2.1.
3.1.
4.1.
4.2.
4.3.
5.1.
5.2.
6.1.
Platform Flow ...................................................................................................................... 6
MicroEJ Welcome Page ....................................................................................................... 7
Available Platforms .............................................................................................................. 8
New MicroEJ Example Project (page 1) ................................................................................ 9
New MicroEJ Example Project (page 2) .............................................................................. 10
MVC Example on the Simulator ......................................................................................... 11
STLink MicroEJ Tool window ............................................................................................ 12
STLink MicroEJ Tool configuration window ....................................................................... 12
Board configuration ............................................................................................................ 15
List of Tables
6.1. STM32F429I-DISCO Technical Specifications .................................................................... 14
4
MicroEJ®: STM32F429I-DISCO: Develop a Java Application [Getting Started]
1 Introduction
1.1 Intended Audience
The intended audience for this document are developers who wish to develop their first Java application
with MicroEJ. Notes:
• This document is for STM32F429I-DISCO board.
• This document is not a user guide for the C development environment used for the final application
link. Please consult the supplier of the C development environment for more information.
• Please visit the website http://www.is2t.com/get-started for more information about MicroEJ® products (platforms, videos, examples, application notes, etc.).
1.2 Scope
This document describes, step by step, how to start your development with MicroEJ:
• Register your product.
• Understand the package.
• Run a Java application on the simulation platform (SimJPF) and on the embedded platform (EmbJPF).
1.3 Prerequisites
• PC with Windows XP or later.
• The MicroEJ® environment must be installed.
• STM32F429I-DISCO board.
• The ST-LINK utility (normally installed as part of the MicroEJ installation).
1.4 Terminology
A Java platform (JPF) is a library that, at a minimum, embeds a JVM (the MicroJvm® virtual machine
from IS2T), some native libraries (also called firmware, or drivers, or BSP), and some Java libraries that
characterize an application domain. Depending on these libraries, some specific tools are provided too.
Every embedded JPF (EmbJPF) has a sibling platform that simulates it on a PC, called the SimJPF. The
SimJPF exactly mimics the semantics of the JPF. The SimJPF can be extended with Mocks to simulate
the native (C, Ada, asm, ...) code of the JPF, such as drivers, or to connect hardware to the workstation.
Mocks can feed the SimJPF with real external stimuli, so that the Java application can behave as if it
was running on the EmbJPF. SimJPF allows the design and functional testing of an embedded Java
application in a development environment.
MicroEJ provides a kickstart Java Platform Guide that ease starting with Java on a dedicated microcontroller. Directly out of the box, one can write Java code without needing to write any low-level code (such
as code to port the JPF to specific hardware). The supplied kickstart JPF uses the STM32F429I-DISCO
board , from which most peripherals are accessible, including display, touchscreen, LEDs, buttons.
The kickstart JPF comes with documented Java samples which newcomers may start from.
5
MicroEJ®: STM32F429I-DISCO: Develop a Java Application [Getting Started]
Figure 1.1. Platform Flow
6
MicroEJ®: STM32F429I-DISCO: Develop a Java Application [Getting Started]
2 Product Registration
The development version of MicroEJ uses hardware activation keys.
• Open MicroEJ.
• Open welcome page: Help > Welcome.
Figure 2.1. MicroEJ Welcome Page
• Insert your USB dongle.
• Press the Manage Licenses button. Hardware dongles are automatically detected when the MicroEJ
preferences main page is shown.
• Click on Refresh when a new hardware dongle is plugged in.
Note
The MicroEJ preferences page is also accessible from the menu Window > Preferences
> MicroEJ.
7
MicroEJ®: STM32F429I-DISCO: Develop a Java Application [Getting Started]
3 Overview
3.1 Platforms
Several Java platforms (JPF) are pre-installed in MicroEJ.
• Open MicroEJ.
• Open the welcome page: Help > Welcome.
• Press the Manage Platforms button.
Figure 3.1. Available Platforms
This Available Platforms page shows all platforms installed in MicroEJ. Each platform has its own
characteristics and specific behavior.
Note
• The Available Platforms page is automatically populated by the work-in-progress JPFs.
• The Available Platforms page is also accessible from the menu Window > Preferences
> MicroEJ > Available Platforms.
3.2 STM32F429I-DISCO KickStart
This Java platform has been designed to run on a specific microcontroller architecture and on a specific
board. Here the ARM Cortex-M4 architecture and the STM32F429I-DISCO board. The Section 5, “Run
the Example on the STM32F429I-DISCO Board (EmbJPF)” uses this platform to run your first Java
application.
8
MicroEJ®: STM32F429I-DISCO: Develop a Java Application [Getting Started]
4 Run an Example on the Simulated Java Platform (SimJPF)
The aim of this chapter is to create a simple Java application from a built-in example. This example
will initially be run on the simulator (SimJPF) of the platform created in the previous chapter. Then,
in the next chapter, this application will be compiled and deployed on the STM32F429I-DISCO board
using the EmbJPF.
4.1 Create Example
• Open MicroEJ.
• Open the welcome page: Help > Welcome.
• Press the Try out Java Examples button to open the New Java Example Project wizard.
• Select the Java platform STM32F429I-DISCO KickStart from the combo box.
• Select the example Examples > MicroUI > MVC.
Figure 4.1. New MicroEJ Example Project (page 1)
• Click on Next. The next page suggests a name for the new project.
9
MicroEJ®: STM32F429I-DISCO: Develop a Java Application [Getting Started]
Figure 4.2. New MicroEJ Example Project (page 2)
• Click on Finish. The selected example is imported into a project with the given name. The main class
(the Java class which contains the main() method, here: MVCDemo.java) is automatically opened.
Note
Note: The New Java Example Project wizard is also accessible from the menu File > New
> Java Example.
4.2 Run Example
• Open the run dialog (Run > Run configurations...) and select the MicroEJ launcher MyMVCSample SimJPF.
• Click on Run: the application starts. It is executed on the simulator (SimJPF) of the selected JPF
(STM32F429I-DISCO KickStart). A picture of the board appears. The result of the execution is shown
on the display of the board. The touchscreen can be used to adjust the division of the screen areas.
10
MicroEJ®: STM32F429I-DISCO: Develop a Java Application [Getting Started]
Figure 4.3. MVC Example on the Simulator
11
MicroEJ®: STM32F429I-DISCO: Develop a Java Application [Getting Started]
5 Run the Example on the STM32F429I-DISCO Board (EmbJPF)
5.1 Compile Java Application
• Open the run dialog (Run > Run configurations...) and select the MicroEJ launcher MyMVCSample
EmbJPF.
• Click Run: the application is compiled, and the compilation result (an ELF file) is copied into a wellknown location in the project example. The STLink Tool has to be used to load the program on the
board.
5.2 STLink MicroEJ Programming Tool
The aim of this section is to program a binary on the STM32F429I-DISCO board.
5.2.1 Prerequisites
• Install STLink Utility software on your machine.
5.2.2 Launch STLink MicroEJ Programming Tool
Click on Run > Run Configurations.... Then open sub menu of MicroEJ Tool and select the MicroEJ
Tool launcher MyMVCSample Program STM32F429I-DISCO.
Figure 5.1. STLink MicroEJ Tool window
Click on Configuration tab and ajust the setting if necessary.
Figure 5.2. STLink MicroEJ Tool configuration window
Click on Run to program the binary. The application downloads.
12
MicroEJ®: STM32F429I-DISCO: Develop a Java Application [Getting Started]
At the end of the execution the following message appeared:
Flash programming complete successfully.
5.3 Launch Group
To compile again the application and program it on STM32F429I-DISCO there are two possibilities:
• Launch again the steps described in previous chapters (Compile and Program)
• Or use a Launch Group launcher to perform the last two steps in one click.
A Launch Group launcher allows to call several launchers consequently. The idea is to create a new
Launch Group which will call the two last previous launchers.
The example already provides a Launch Group launcher which performs these calls: Click on Run >
Run Configurations.... Then open sub menu of Launch Group and select the MicroEJ Tool launcher
MyMVCSample Build and Program STM32F429I-DISCO.
Click on Run to compile and program the binary.
13
MicroEJ®: STM32F429I-DISCO: Develop a Java Application [Getting Started]
6 Appendix
6.1 STM32F429I-DISCO Technical Specifications
The following table illustrates some board features used by the Java platform. It doesn't list all board
features (such as all available memories on the board).
MCU architecture
Cortex-M4 (STM32F429ZIT6)
MCU Clock speed
180MHz (225 DMIPS)
Internal Flash
2 MBytes
Internal RAM
128 KBytes
External RAM
8 MBytes (SDRAM)
Table 6.1. STM32F429I-DISCO Technical Specifications
6.2 Platform Configuration
6.2.1 Trace Port
All traces (System.out.print) and debug traces (Java exceptions) out on USART 2. The TX (RX is
useless) of this USART is available on the P1 connector: PD5. On the computer, connect a serial sniffer:
115200 bauds, 8 bits of data, 1 stop bit, no parity.
6.2.2 ECOM Comm Ports
The ECOM Comm implementation manages one Comm port. The RX and TX pins are available on the
P1 connector, respectively PA10 and PA9.
6.2.3 MicroUI Input Events
The hardware switch (USER) sends the event Command ESC to MicroUI library.
6.2.4 MicroUI LEDs
MicroUI uses the IDs 0 and 1 to target the LEDs, respectively the green and red LEDs.
6.3 Board Setup
This section explains how to configure and connect the STM32F429I-DISCO board.
6.3.1 Jumpers and Switches
Set all jumpers and switches to their default settings: please refer to the STM32F429I-DISCO documentation (STMicroelectronics documentation: User manual STM32F429I-DISCO kit board).
6.3.2 Power Supply
Select your power supply mode: please refer to the STM32F429I-DISCO documentation (STMicroelectronics documentation: UM1662 User manual STM32F429I-DISCO kit board).
14
MicroEJ®: STM32F429I-DISCO: Develop a Java Application [Getting Started]
6.3.3 Summary
Figure 6.1. Board configuration
6.4 Demos Installation
This chapter explains how to install extra demos and application notes. They have to be imported as a
standard Eclipse project archive file:
• Go to the website http://www.is2t.com/download.
• Download zip files containing one or more demos.
• Open MicroEJ.
• Open the wizard Import: File > Import.
• Select the item General > Existing Projects into Workspace.
• Click on Next.
• Select the downloaded zip file.
15
MicroEJ®: STM32F429I-DISCO: Develop a Java Application [Getting Started]
7 Document History
Date
Revision
Description
November 4th 2013
A
First release
May 22th 2014
B
MicroEJ 3.0.0 compatibility
16