1
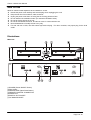
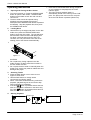
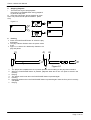
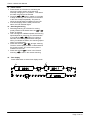
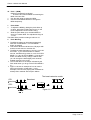
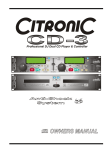
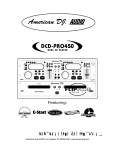
Citronic Limited User Manual
Table of Contents
About Citronic ........................................................ 3
WARNING........................................................................3
Important Safety Information................................. 4
Safety Warnings: ..............................................................4
Cautionary Notes: ............................................................4
Labels Explained ..............................................................4
Line Voltage Selection.....................................................4
Your Serial Number..........................................................4
Preparations ........................................................... 5
Note On Use ........................................................... 6
Illustrations............................................................. 6
Main Unit............................................................................6
Control Unit .......................................................................7
21
PLAY Indicator .....................................................9
22
PAUSE Indicator ..................................................9
23
CUE Indicator .......................................................9
24
ELAPSED Indicator..............................................9
25
TOTAL Indicator...................................................9
26
BAR Indicator .......................................................9
27
REMAIN Indicator.................................................9
28
SINGLE Indicator .................................................9
29
PROGRAM Indicator............................................9
30
PITCH Indicator ....................................................9
31
A-B Repeat (LOOP) Indicator .............................9
32~35
TRACK, MINUTE, SECOND and FRAME
Displays 9
36
PITCH Display.......................................................9
Operating Instructions......................................... 10
LCD Display.......................................................................7
1.
Opening and Closing the Disc Holder ................10
Main Features and Functions ................................ 8
2.
Loading Discs.........................................................10
Main Unit Front Panel......................................................8
3.
Selecting Tracks ....................................................10
1
POWER (Power ON/OFF Switch)...........................8
4.
Starting Playback...................................................10
2
Disc Holder ...............................................................8
5.
Stopping Playback.................................................11
3
OPEN/CLOSE Button ..............................................8
6.
Pausing....................................................................11
4
REMOTE CONTROL Connector.............................8
7.
Auto Cueing ............................................................12
5
AUDIO OUT 1 and 2 .................................................8
8.
Cue Recall ...............................................................12
6
DIGITAL OUT Socket...............................................8
9.
Cue Listen ...............................................................12
7
AC Mains Socket......................................................8
10.
Cue Editing .........................................................12
Control Unit ............................................................ 8
11.
Cue Edit Quick Reference ................................12
12.
Frame search .....................................................13
13.
Searching/Scanning .........................................13
14.
Time Display .......................................................13
15.
Pitch – (BPM)......................................................14
1
OPEN/CLOSE
2
TIME (Time Button)..................................................8
3
LCD Display ..............................................................8
4
A-B Repeat (Loop Button) ......................................8
5
PITCH - Button..........................................................8
6
PITCH + Button.........................................................8
7
PITCH (Pitch Button) ...............................................8
8
Pitch Slider................................................................8
9
RELAY........................................................................8
(Open/Close Button).................8
1
Pitch Slider..............................................................14
2
Pitch Bending .........................................................14
16.
Program play ......................................................15
17.
A-B Repeat..........................................................15
Switching Off........................................................ 15
14.
Relay ....................................................................15
10
PLAY/PAUSE Button ...........................................8
11
SGL/CTN (Single/Continuous Button)..............8
12
CUE (Cue Button).................................................8
Technical Specifications ..................................... 16
13
PROGRAM (Program Button).............................8
Your Guarantee of Satisfaction........................... 17
14
B. SKIP
CE Markings......................................................... 17
15/16
..........................................................8
SEARCH/SCAN
CD Care ................................................................ 16
..................................8
17
F. SKIP
...........................................................8
18
PITCH (Pitch Indicator) .......................................8
19
Control connector................................................8
20
Remote Start.........................................................9
Page 2 of 18
Citronic Limited User Manual
About Citronic
Thank you for choosing Citronic and the CD-1
Professional DJ Dual CD Player. You have joined a
discerning group of DJ’s and operators who value
design integrity, quality and state of the art facilities.
Established in Melksham, Wiltshire in 1972, Citronic
occupies prestigious purpose built factory
headquarters. The award winning product range
covers professional audio mixers, amplifiers and
signal processing.
Each unit is manufactured to the highest possible
standards and all have an enviable reputation for
reliability and value for money – the noted hallmark of
Citronic products.
Substantial investment has been made in high
technology CAD systems, manufacturing control and
testing techniques. This sophisticated
computerisation coupled with an extensive research
and development program, enables the company to
offer an exceptional degree of manufacturing
excellence and quality assurance.
Citronic has always listened carefully to the customer
and places tremendous emphasis on market
research. This ensures that the exacting
requirements of the DJ are complimented without
compromise, throughout the entire product range.
This unique approach, coupled with a strong input
from a highly qualified engineering team, ensures that
Citronic maintains its position as a respected leader,
in the industry’s development.
Citronic has a distribution network throughout Europe,
Asia and the Americas.
Enjoy your new purchase.
WARNING
In order to obtain the best service from the unit we
STRONGLY recommend that you read this manual
before you apply any power.
Page 3 of 18
Citronic Limited User Manual
Important Safety Information
Safety Warnings:
All the safety and operating instructions should be
read before the appliance is operated.
To prevent fire or shock hazard, do not expose this
appliance to rain or moisture.
To reduce the risk of electric shock, do not remove
the cover (or back). There are no serviceable parts
inside. Always refer servicing to qualified service
personnel.
Cautionary Notes:
Care must be taken not to damage the power supply
cord housing, which could expose line parts and
cause electric shock. When removing from wall
outlet, be sure to remove by holding the plug and not
by pulling the cord.
In order to prevent electric shock; do not open the top
cover. If a problem occurs, contact your dealer.
Do not place metal objects or spill liquid inside the
unit. Electric shock or malfunction may result.
Any use of the controls, or any adjustment, or the
performance of any procedure other than those
specified herein may result in serious damage to your
health including hazardous radiation exposure.
The unit should not be opened or repaired by anyone
except properly qualified service personnel.
Double insulated - when servicing, use only identical
replacement parts.
Labels Explained
CAUTION: TO REDUCE THE RISK OF ELECTRIC
SHOCK, DO NOT REMOVE THE COVER (OR
BACK). THERE ARE NO SERVICEABLE PARTS
INSIDE. REFER SERVICING TO QUALIFIED
SERVICE PERSONNEL.
CAUTION
TO PREVENT ELECTRIC SHOCK DO NOT USE
THIS (POLARIZED) PLUG WITH AN EXTENSION
CORD, RECEPTACLE OR OTHER OUTLET
UNLESS THE BLADES CAN BE FULLY INSERTED
TO PREVENT BLADE EXPOSURE.
NOTE:
This CD player uses the semiconductor laser. To
allow you to enjoy music at a stable operation, it is
recommended to use this in a room of 5ºC 41ºF 35ºC 95ºF.
DATE LABEL
MONTH YEAR
DATE LABEL
CLASS 1 LABEL
Line Voltage Selection
« The desired voltage may be set with the
VOLTAGE SELECTOR switch on the rear panel,
using a screwdriver.
« Do not twist the VOLTAGE SELECTOR switch
with excessive force as this may cause damage.
« If the VOLTAGE SELECTOR switch does not
move smoothly, please contact a qualified service
person.
Your Serial Number
Please, record and retain serial number of your CD-1
Dual CD Player shown on the rating label.
My Serial Number Is:
_______________________
The lightning flash with arrowhead symbol, within an
equilateral triangle, is intended to alert the user to the
presence of uninsulated "dangerous voltage" within
the product's enclosure that may be of sufficient
magnitude to constitute a risk of electric shock to
persons.
The exclamation point within an equilateral triangle is
intended to alert the user to the presence of important
operating and maintenance (servicing) instructions in
the literature accompanying the appliance.
Page 4 of 18
Citronic Limited User Manual
Preparations
1.
1)
2.
Checking the Contents
Check that the carton contains the following
items:
Main unit
2) Control unit
3) Operating instructions (this booklet)
4) Pair of RCA pin cord.
5) Control cords
Installing the Unit
Mount the unit onto your console or rack with 19"
EIA rack rails.
CAUTION:
The player will work normally when the main unit is
mounted with the front panel at within 15 degrees of the
vertical plane. If the unit is tilted excessively, discs may
not be loaded or unloaded properly. (Figure 1)
The control panel's LCD's are designed to be clearly
visible within the angles shown in Figure 2. Mount the
control unit so that the visual angle is within this range.
Max.
15º
45º
5º
Main unit
Figure 1
Control
panel Button
Figure 2
Connections
1) Turn off the POWER switch.
2) Connect the RCA pin cord to the input on your mixer.
3) Connect the control cords to the REMOTE connector on the main unit.
CAUTION:
• Be sure to use the supplied control cords. Using another type of cable may result in damage.
• Be sure the power is off when connecting the control cords, otherwise the units may not work properly.
Page 5 of 18
Citronic Limited User Manual
Note On Use
Allow for sufficient heat dispersion when installed on a rack.
« Handle the power cord carefully and hold the plug when unplugging the cord.
« Keep the set free from moisture, water, and dust.
« Unplug the power cord when not using the set for long periods of time.
« Do not obstruct the ventilation holes. (For sets with ventilation holes.)
« Do not let foreign objects in the set.
« Do not let insecticides, benzene, and thinner come in contact with the set.
« Never disassemble or modify the set in any way.
« For 220 volt use in USA, use USA nema style 220 volt plug. For other countries, use proper plug for the local
outlet.
Illustrations
Main Unit
(1)POWER (Power ON/OFF Switch)
(2)Disc Holder
(3)OPEN/CLOSE (Open/Close Button)
(4)REMOTE CONTROL CONNECTOR
(5)AUDIO OUT
(6)DIGITAL OUT SOCKET
(7)AC MAINS SOCKET
Page 6 of 18
Citronic Limited User Manual
Control Unit
(1) OPEN/CLOSE (Open/Close Button)
(2) TIME (Time Button)
(3) LCD (Liquid Crystal Display)
(4) A-B Repeat (Loop button)
(5) PITCH - (Pitch Bend - Button)
(6) PITCH +(Pitch Bend + Button)
(7) PITCH (Pitch Button)
(8) Pitch Slider
(9) RELAY
(10) PLAY/PAUSE / (Play/Pause Button)
(11) SGL/CTN (Single/Continuous Button)
(12) CUE (Cue Button)
(13) PROGRAM (Program Button)
(14) B.SKIP
(15) SEARCH/SCAN
(16) SEARCH/SCAN
(17) F.SKIP
(18) PITCH (Pitch Indicator)
(19) CONTROL CONNECTOR
(20) REMOTE START CONNECTOR
LCD Display
(21) PLAY Indicator
(22) PAUSE Indicator
(23) CUE Indicator
(24) ELAPSED Indicator
(25) TOTAL Indicator
(26) BAR Indicator
(27) REMAIN Indicator
(28) SINGLE Indicator
29) PROGRAM Indicator
(30) PITCH Indicator
(31) LOOP Indicator
(32) ~(35)TRACK,
MINUTE, SECOND and
FRAME Displays
(36) PITCH Displays
Page 7 of 18
Citronic Limited User Manual
Main Features and Functions
6
PITCH + Button
The CD speeds up while this button is pressed,
release the button to return to the original BPM.
7
PITCH (Pitch Button)
Use this button to enable or disable BPM
adjustment with the pitch sliders. BPM
adjustment with the pitch sliders is enabled when
the PITCH LED lights.
8
Pitch Slider
Use the slider to adjust the CD pitch. Slide up to
decrease the pitch, down to increase the pitch.
9
RELAY
Press the RELAY button to enable the Relay
function, the LED will be lit.
Note: The Remote start function is disabled when
in the Relay mode. (For full explanation see
page 15)
10
PLAY/PAUSE Button
Use this button to start playback. Press once to
start playback, once again to set the pause
mode, and once more to resume playback.
Main Unit Front Panel
1
POWER (Power ON/OFF Switch)
When the POWER switch is pressed, the power
turns on.
2
Disc Holder
Place the discs in the holder. Press the
OPEN/CLOSE button to open and close the disc
holder.
3
OPEN/CLOSE Button
Press it to open and close the disc holder. The
control unit also includes OPEN/CLOSE button.
The disc holder cannot be opened during
playback, so stop playback before pressing the
button.
4
REMOTE CONTROL Connector
Connect this connector to the control unit using
the included control cord.
5
AUDIO OUT 1 and 2
The audio signals from each player are outputted
from these jacks.
11
DIGITAL OUT Socket
The music-signal of this socket is digital.
Connect the output to the respective input of a
digital amplifier for example.
SGL/CTN (Single/Continuous Button)
Press it to switch between the single and
continuous play modes. The SINGLE indicator
on the LCD indicates the SINGLE mode.
12
CUE (Cue Button)
Press the CUE button during playback to return
to the position at which playback started.
13
PROGRAM (Program Button)
Press the PROGRAM button, the player will
enter the program mode and stop the CD
playback.
14
B. SKIP
Use these buttons to go back to the beginning of
the current track or select a previous track for
playing.
6
7
AC Mains Socket.
IEC socket.
Control Unit
1
2
OPEN/CLOSE
(Open/Close Button)
Press it to open and close the disc holder. The
main unit also includes OPEN/CLOSE buttons.
The disc holder cannot be opened during
playback, so stop playback before pressing the
button.
TIME (Time Button)
Press this button to switch the time display
between the elapsed time and remaining time
and total remain time. The selected mode is
indicated by the ELAPSED and REMAIN and
TOTAL REMAIN indicator on the LCD.
3
LCD Display
4
A-B Repeat (Loop Button)
Press the A-B button to set the loop start point,
press the A-B button again to set the loop end
point. (For full explanation see page 15)
5
PITCH - Button
The CD slows down while this button is pressed.
Release the button to return to the original BPM.
15/16 SEARCH/SCAN
Press these buttons to perform frame search
function during pause mode or to perform scan
function during play mode.
17
F. SKIP
Use these buttons to skip to the next CD track.
18
PITCH (Pitch Indicator)
Moving the pitch slider will change the pitch only
when the pitch LED is illuminated.
19
Control connector
Connect this connector to the REMOTE
connector on the main unit using the included
control cord.
Page 8 of 18
Citronic Limited User Manual
20
Remote Start
Via the Control socket, the respective CD player
can be remotely controlled. If you are using a
mixer with fader start-function connect the player
with the Control Out-socket. Please note that
these sockets must never be connected with any
voltage.
21
PLAY Indicator
The PLAY indicator lights during play mode.
22
PAUSE Indicator
The PAUSE indicator lights during pause mode.
23
CUE Indicator
The CUE indicator lights during CUE mode or
PAUSE mode, flashes when CUE point is
changed.
24
ELAPSED Indicator
It indicates that the time shown on the display is
the elapsed time.
25
TOTAL Indicator
It indicates that the time shown on the display is
the TOTAL REMAIN time of playing back.
26
BAR Indicator
These ten indicators provide a visual display of
the approximate position of the pickup within the
current track.
27
REMAIN Indicator
It indicates that the time shown on the display is
the remaining time of playing track.
28
SINGLE Indicator
When the indicator lights, playback will stop at
the beginning of the next track.
29
PROGRAM Indicator
The PROGRAM indicator lights when program
mode is set.
30
PITCH Indicator
When the indicator lights, The pitch adjustment is
enabled.
31
A-B Repeat (LOOP) Indicator
When in A-B Repeat mode, the indicator lights.
32~35 TRACK, MINUTE, SECOND and FRAME
Displays
These displays indicate information on the CD’s
current position and time.
36
PITCH Display
It shows the BPM change range, the BPM
changes within a range of +/-10%.
Page 9 of 18
Citronic Limited User Manual
Operating Instructions
1. Opening and Closing the Disc Holder
Ø Turn the unit power on. Press the OPEN/CLOSE
button to open the disc holder. OPEN/CLOSE
buttons are provided on both the main unit and
control unit.
Ø The disc holder cannot be opened during
playback to prevent playback from being
interrupted if the OPEN/CLOSE button is pressed
accidentally. Stop the playback first, then press
the OPEN/CLOSE button.
Ø
Ø
Press the PLAY/PAUSE button during the pause
or cue condition to start playback, the PLAY
indicator lights.
The point at which playback starts, is
automatically stored in the memory as the CUE
point. The pickup then returns to the cue point
when the CUE button is pressed. (Back Cue)
2. Loading Discs
Ø Hold the disc by the edges and place it in the disc
holder, then press the OPEN/CLOSE button
again to close the disc holder. The unit will show
the total track number and the total playing time
for about 2 seconds then enter the auto-cue
condition, the cue point will be set to the music
starting point of the first track automatically.
Ø
Figure 2-1
CAUTION:
Do not place any foreign objects in the disc
holder, and do not place more than one disc in
the disc holder at a time.
Ø Do not push the disc holder in manually when the
power is off, as this may result in malfunction and
damages the player.
Ø
3. Selecting Tracks
Ø Press the SKIP button once to move to next
higher or lower track.
Ø Hold the SKIP button to change tracks
continuously at a higher speed.
Ø When a new track is selected during continuous
playback, playback begins as soon as the skip
search operation is completed.
Ø If the skip
button is pressed while at the last
track, the first track is selected. In the same way,
if the skip
button is pressed while at the first
track, the last track is selected.
4.
Starting Playback
Figure 4-1
Page 10 of 18
Citronic Limited User Manual
5.
*
Stopping Playback
There are two ways to stop playback.
Press the PLAY/PAUSE button during playback
to pause at that point.
b) Press the CUE button during playback to return
to the cue point and enter pause condition. (Back
Cue)
Figure 5-1
6. Pausing
Ø Press the PLAY/PAUSE button to switch the play
and pause.
Ø The play indicator flashes when the pause mode
is set.
Ø Figure 6-1 shows the relationship between the
play and pause.
2)
4)
6)
3)
1)
1.
2.
3.
4.
5.
6.
7.
7)
5)
Figure 6-1
The player has completed the cue or pause operation and is waiting for the play start command.
When the PLAY/PAUSE button is pressed, playback starts and a new cue point is stored in the
memory.
Playing.
The pause mode is set when the PLAY/PAUSE button is pressed again
Pausing.
Playback resumes when the PLAY/PAUSE button is pressed again. Note the Cue point in memory
will update.
Playing.
Page 11 of 18
Citronic Limited User Manual
7. Auto Cueing
Ø The CD player will AUTO-CUE Track 1 and any
subsequent track skip, either in Single or
Continuous play mode
Ø AUTO-CUE finds the start of the sound on track 1
or subsequent track skip. This will be noticed in
the Time Elapsed display mode by the track cue
point being at a number of seconds and frames
instead of 00:00:00 time. This will be dependent
on the CD recording.
Ø The CUE indicator will flash for about 1 second
when the CUE point has been set.
8. Cue Recall
Ø Press CUE button, and the player will enter Cue
mode. The player will return to the Cue point and
Pause.
Ø When the PLAY is subsequently pressed, the
track will start from this Cue point.
9. Cue Listen
Ø Before playback is engaged, the start (CUE) point
of a track can be checked (monitored) by pressing
the CUE button.
Ø Press Cue button when the player is in PAUSE
mode. The playback will start when the Cue
button is released the player will return to the cue
point and PAUSE.
Note: the RED Cue indicator will flash for 1
second when the Cue point is set and continuous
subsequently.
10. Cue Editing
Ø The start point of any track can be set to any time
frame you desire.
Ø Firstly find the point by use of the PLAY - PAUSE
- F. Skip - B. Skip and finally JOG frame search.
Ø Once the point is identified the CUE point is
placed into memory by pressing PLAY.
Ø Press the Cue button to return to the new Cue
point and pause mode.
Ø To check the Cue point, press CUE and hold to
listen. Release the button to return to Cue point
and pause.
Ø If the Cue point is incorrect, use the JOG wheel to
frame advance or retard to the required point.
Ø To re-mark and then set the Cue point, press Play
and subsequently Cue.
11. Cue Edit Quick Reference
To edit, set Cue point into memory and set the
player in Pause.
Page 12 of 18
Citronic Limited User Manual
12. Frame search
Ø Frame search is a function for monitoring the
sound at a certain section of the disc and
manually changing the cue position. This allows
accurate cue points to be selected.
Ø Press the
or
while in pause or cue mode
to begin searching. The sound for one revolution
of the disc is output repeatedly. The point at
which the sound starts is indicated on the LCD.
Ø If the time display and the CUE point are the
same, the CUE indicator lights.
13. Searching/Scanning
Ø Searching/scanning is a function for moving
quickly forward or backward when the
or
button is pressed.
Ø This unit supports 3 different speed, the scanning
speed depends on how long you hold the button.
If you hold the
or
button for a about 3
seconds, the scanning speed will be changed,
when you release the button, the scanning speed
return to normal speed.
Ø Press and hold the
or
to begin scanning.
The disc moves rapidly forward or backward and
the sound is output. The current scan point is
indicated on the LCD.
Ø Press and hold the
to scan in the forward
scanning,
to scan in the reverse scanning.
14. Time display
Press TIME button to select time display mode:
A
B
ELAPSED
REMAIN
TIME
TIME
C
TOTAL REMAIN
TIME
Page 13 of 18
Citronic Limited User Manual
15. Pitch – (BPM)
(Matching the Beats Per Minute)
There are two tools available for matching the
BPM of the two CDs:
1. Use the pitch slider to adjust the BPM.
2. Use the PITCH BEND buttons to change the
BPM temporarily.
1
1.
Pitch Slider
To adjust the BPM by sliding the pitch slider up
or down, press the PITCH button to turn on the
PITCH adjustment function before using.
2. Slide the pitch slider up to decrease BPM, or
down to increase BPM. The adjustment range is
+/-10%.
The slider offers precision setting to within 0.1%.
2
Ø
Ø
Ø
Ø
Ø
Pitch Bending
The BPM increases or decreases respectively
while the PITCH BEND + or PITCH BEND button is pressed.
This feature allows the BPM of the CD player with
another sound source or another CD.
The BPM increase depends on how long you hold
the button. If you hold the button for about 1
second, the BPM will go either to +16% for PITCH
BEND + or -16% for PITCH BEND. If you tap the
button, the BPM will only change a little so that
you can change the beat slightly with minimum
audible changes in the music.
The CD will return to the tempo indicated by the
Pitch slider when you let go of the PITCH BEND +
or -.
Figure 11 shows an example of how to use the
pitch bend function, to Beat align. In this
example, both CD’s are playing and the BPM has
already been matched with the pitch sliders.
The bass beats also match
CD1
bass beat
Bass beat
PITCH BEND
CD2
bass beat
Bass beat
Figure 11-1
Page 14 of 18
Citronic Limited User Manual
16. Program play
1. Press the PROGRAM button, the player will
enter the program mode and the CD will stop
rotating.
2. Select the desired track by pressing the SKIP
button, then press the PROGRAM button again.
The selected track will be added to the program
sequence.
3. Repeat steps 2 operation. A maximum of 20
tracks can be programmed at one time.
Note – that the total program play time is
displayed, for reference.
4. Press the PLAY/PAUSE button to start the
program play from the first selection.
5. Press the program button momentarily during
program play to stop program play.
6. Press and hold the program button more than 2
seconds to cancel program mode and erase all
the current program contents.
Note – that program mode can be Continuous or
Single – Remember to select before starting
playback.
18.
1.
2.
3.
4.
Relay
Insert CDs into both sides of the unit.
Press the “RELAY” button to activate.
Put both sides in SINGLE play mode while
learning this function.
Press play on CD1 of the unit. When that CD1
has finished play it will send a signal to CD2 to
start play. You will see CD2 start play and CD1
pause and cue to the beginning of the next track.
When CD2 has completed play CD1 will start.
Note: The play command is sent at the end of
specified play. If the unit is in SINGLE mode the play
command will start at the end of the track. If the unit
is in CONTINUOUS mode the play command will be
sent at the end of the full CD. Two CD's will play
continuously, alternating from side to side. This
feature will also work in program mode; however, if
the sides are also in SINGLE mode the same number
of tracks programmed should be the same. Play will
stop at the end of the last track.
17. A-B Repeat
1. Press the A-B button to set the A start point, the
A-B indicator will flash.
2. Press the A-B button again to set the B end
point, After the B point is set, A-B repeat
playback engage, and the indicator will be ON
continuously.
3. Press the A-B button again, the function is
canceled, and the A-B indicator goes out.
Switching Off
(Before switching off the power)
When you have finished using the CD player,
before switching off the power, be sure that the
disc holder had been closed with the
OPEN/CLOSE button.
CAUTION: Do not forcibly close the disc holder
when the power is off.
POWER OFF
POWER OFF
û
Do not switch off the power when the disc holder
is open.
Switch off the power after the disc holder has
been closed with the OPEN/CLOSE button.
Page 15 of 18
Citronic Limited User Manual
CD Care
1. Precautions on handling compact discs
Ø Do not allow fingerprints, oil or dust to get on the
surface of the disc.
If the disc is dirty, wipe it off with a soft dry cloth.
Ø Do not use benzene, thinner, water, record
spray, electrostatic-proof chemicals, or siliconetreated cloths to clean discs.
Ø Always handle discs carefully to prevent
damaging the surface; in particular when removing a
disc from its case or returning it.
Ø Do not bend the disc.
Ø Do not apply heat.
Ø Do not enlarge the hole in the center of the disc.
Ø Do not write on the label (printed side) with a
hard-tipped implement such as a pencil or ball point
pen.
Ø Condensation will form if a disc is brought into a
warm area from a colder one, such as outdoors in
winter. Do not attempt to dry the disc with a hair dryer,
etc.
2. Precaution on storage
Ø After playing a disc, always unload it from the
player.
Ø Always store the disc in the jewel case protect
from dirt or damage.
Ø Do not place discs in the following areas:
Ø Areas exposed to direct sunlight for a
considerable time.
Ø Areas subject to accumulation of dust or high
humidity.
Ø Areas affected by heat from indoor heaters, etc.
The CD-1 Professional DJ Dual CD Player is
compatible with CD-R discs.
Note: All discs must be CLOSED and recorded on
a good quality branded disc.
Technical Specifications
Operating Temperature:
Pitch Slider Control:
Pitch Bend Control:
Dimensions:
Weight:
Power supply:
Power consumption:
5 to 35 °C
+/- 10%
+/- 10%
Main unit:
482(W) x 88.8(H) x 251(D) mm
Control unit:
482(W) x 88.8(H) x 60(D) mm
Player unit:
5 kgs
Control unit:
2 kgs
115 / 230V AC, 50 / 60Hz
25W
N.B. Citronic reserves the right to alter these specifications at any time and for any reason without liability.
Errors and Omissions Excepted.
Page 16 of 18
Citronic Limited User Manual
Your Guarantee of Satisfaction
This product is guaranteed to the original purchaser against defects in material and workmanship for
one year from the date of initial purchase. Activate this guarantee at the time of purchase by returning the
Guarantee Card to the address on the front page. Keep a copy of your sales receipt for proof of guarantee
status, should it be necessary.
If a malfunction occurs, the dealer who supplied the unit will be happy to handle the repair. When
returning a unit, use the original factory carton – do not chance inadequate packing materials. Simply tape a
note to the unit describing the malfunction.
If your unit is out of guarantee, we recommend that you return it to an authorised Citronic dealer for
repair or service. Experienced personnel, supported by specialist testing equipment, will be able to find and
correct the fault in the most efficient and cost effective way.
If you have need to contact us about the operation or servicing of your CD-1 Professional DJ Dual CD Player
please write, telephone or e-mail to the address on the back page: -
CE Markings
EMC Conformity
The CD-1 Professional DJ Dual CD Players have been tested to demonstrate compliance with the EMC
89/336/EEC directive, under which the following harmonised standards apply:
EN55020
Electromagnetic Immunity
EN55013
Electromagnetic Compatibility
EN61000-3-2
EN61000-3-3
EN61000-4-2
Electrical Equipment Safety Regulations (1994)
The CD-1 Dual CD Players have been designed and tested to demonstrate compliance the LVD 73/23/Eec
directive, using the following standard.
I) EN60065 Safety requirements for mains operated electronic equipment for household and similar
general use.
Page 17 of 18
Citronic Limited User Manual
Citronic Limited
Halifax Road
Bowerhill
Melksham
Wiltshire
England
SN12 6UB
Tel: +44 (0) 1225 705600
Fax: +44 (0) 1225 709639
Email: [email protected]
Web: www.citronic.com
9150-1
Page 18 of 18