1
Brugsanvisning
14kg +
x2
x1
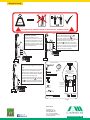
CAUTION! RISK OF TRAPPING FINGERS IN MOVING PARTS, DURING ASSEMBLY
fig 7 To ensure the correct working
fig 6 *** Fitting the attachment is a
b
two person operation.
Offer the attachment to the
bracket, and locate up to 3 screws
through the backing plate, into the
slots in the bracket. Place the nuts
and washers onto the screws and
hand tighten until the final working
position is determined.
c
a
c
fig 8 When the attachment is fitted to the
required height, tighten the screws
fully.
When manoeuvering on the pitch or
field, it is not necessary to fit the
retaining pin and lynch pin, the unit
will stay in the ‘UP’ position with the
tension of the springs only.
For moving from site to site, secure
with the retaining pin d and lynch
pin b to prevent accidental release
of the attachment during transport.
position, hand tighten the nuts a
and release the lynch pin ( b fig 6 )
securing the retaining pin ( d fig 9), to
allow the attachment to lower to ground
level.At this level, the arms of the
attachment c should be in a position
lower than horizontal, as shown. if this is
not the case, secure the arms again and
adjust the attachment position higher
on the bracket and re-tighten.
FITTINGS SUPPLIED
fig 9
d RETAINING PIN x1
x2
b LYNCH PIN x3
x4
30mm x M12
x5
Line width
adjustment plates
to adjust spray width,
from 4” to 3”
(75 to 100mm approx’)
120mm x M12
x5
a
M12
x10
NUTS
Fit in position
here on
both sides
of spray ‘shoe’
x12
M12
WASHERS
M12
x10
SPRING WASHERS
Auxiliary cable (2mtrs)
Pipe work extension
Page 2
Distribution:
E. Marker A/S
Okslundvej 8, Bov
DK-6330 Padborg
Tlf.: +45 74 67 08 08
E-mail: [email protected]
www.emarker.dk
www.emarker.dk