1
Brugsanvisning
CONNECTING THE EQUIPMENT PRIOR TO SPRAYING
The next stage is to make the necessary connections
to allow the spraying operation to take place.
STEP 1:
Connect the 2 sets of cables from the spray head
tube near the switch, to the extension cables. One of
the cables is colour coded to avoid errors in
connecting. There is an option to connect the power
unit direct to the battery on the vehicle. To do this,
use the auxiliary cable with the twin forked battery
connectors, and connection box plug connector.
Connect the cable to the battery using the forked
connectors first, then plug into the connection box.
Ensure the machine is turned OFF when connecting.
Step 2:
Connect the length of extension pipe work using the
black plastic push-fit adaptor supplied. Ensure that
the pipe work is inserted firmly into the adaptor and
the spray head outlet on the pump.
Check that all the connections are correct by
turning the machine on, using the switch at the
top of the spray head tube.
fig 10
Spray
Attachment
Power Unit
The spray head tube
The spray head tube is
complete and requires no
additional assembly. It can be
detached from the square tube
by lifting upwards slightly to
clear the height stop B, and
pulling forward out of the
plastic clips A. This will be
useful when marking
penalty spots and
corner quadrants.
A
Do not over-reach
with the tube causing
electrical connections
to dislodge or become
damaged. To prevent
this problem if used A
regularly, detach the
B
switch cable from the
other cables, and
refasten the remaining cables.
SPRAYING PAINT AND CLEANING THE RIDE ON EQUIPMENT
THE ATTACHMENT SHOULD BE IN THE FULLY DOWN POSITION WHEN THE SPRAYING OPERATION COMMENCES
Paint Filter
fig 11
FROM THE
PAINT
CONTAINER
TO THE SPRAYHEAD
BATTERY COVER
Position 1
1
Position 2
No Filter
FROM THE
WATER
CONTAINER
+
PUMP
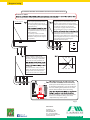
Spraying Paint:
To spray paint through the system, it is important to
ensure that the valve tap 1 is in the correct position
to draw the paint from the container. The paint probe
is fitted with a filter, and should not be used for the
water delivery at this stage. The valve tap should be
positioned so that it is in line with the paint tube as
shown in fig 11 position 1. Switch on the machine
using the switch on the top of the attachment, to start
the paint flow. As soon as the paint flows freely from
the spray head, spraying can begin. At any time
during the spraying operation, the flow can be
stopped or started using the switch.
To avoid any drying out of paint on the nozzle during
hot or warm weather, when moving from one
pitch / field to another pitch / field, move the valve
tap to position 2 and turn the switch on, to allow
water to flush through the spray nozzle. Then return
to position 1 to return to spraying paint.
Cleaning the Ride On:
To thoroughly clean the Ride On at the end of the day, place the paint delivery probe into the water container,
and turn on the machine. This will allow water to clean the paint probe and filter, the pump and the spray head.
Only perform this operation in an area which will not be affected by the paint in the system that will be
discharged onto the ground. Run water through the system until the spray from the nozzle is clear, or evident
that the system has been cleaned. Replace the cap on the paint container to avoid any spillage during the
transporting of the vehicle back to the storage area. (When familiar with the machines performance, it is
possible to move the paint probe to the water container, turning the valve tap to position 2, before
completing the last part of the marking out operation. This will use the paint already in the system to
complete the marking, before water starts to be dispensed through the spray nozzle. Experience will
determine the distance that can be covered by the remaining paint)
Page 3
Distribution:
E. Marker A/S
Okslundvej 8, Bov
DK-6330 Padborg
Tlf.: +45 74 67 08 08
E-mail: [email protected]
www.emarker.dk
www.emarker.dk