1
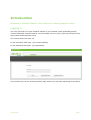
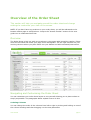
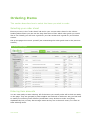
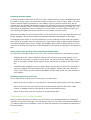
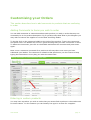
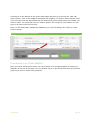
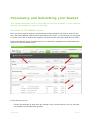
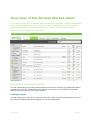
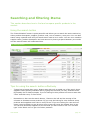
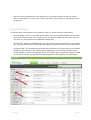
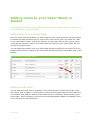
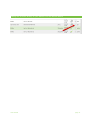
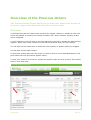
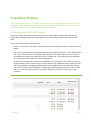
User Manual
Contents
Introduction ........................................................................................................... 3
Introduction .............................................................................................................. 4
Placing an Order ..................................................................................................... 5
Overview of the Order Sheet ....................................................................................... 6
Ordering Items .......................................................................................................... 9
Customising your Orders ........................................................................................... 11
Previewing and Submitting your Basket ....................................................................... 13
Browsing the Market ............................................................................................ 15
Overview of the Browse Market sheet ......................................................................... 16
Searching and filtering Items ..................................................................................... 18
Adding items to your Order Sheet or Basket ................................................................ 20
Tracking your Previous Orders ............................................................................. 22
Overview of the Previous Orders................................................................................. 23
Tracking Orders........................................................................................................ 24
Using Help and FAQs ............................................................................................ 26
Overview of the help sheet ........................................................................................ 27
FAQs ....................................................................................................................... 28
User Manual
page 2
Introduction
User Manual
page 3
Introduction
Welcome to Foodlink Market, your solution to ordering supplies online.
Logging in
The very first step is to open foodlink market in your browser. Open preferably google
chrome otherwise internet explorer on the browser you are using. Type into the top url bar
http://www.foodlinkmarket.co.za
The screen below will come up
In the Username field type: (your email address)
In the password field type: (your password)
Login Screen
This will take you to the “browse market” page where you can start searching for products.
User Manual
page 4
Placing an Order
User Manual
page 5
Overview of the Order Sheet
This section will help you navigate around the order sheet and change
settings to customise your view of the screen.
NOTE: If you don’t have any products in your order sheet, you will be redirected to the
browse market page to add products. Jump to the “browse market” section of this user
guide now to understand this first.
Overview
The Order Sheet is laid out with your products in the centre table sorted by supplier. Filters
down the left hand side make your page more manageable. The far right columns are your
working columns where you place items into your basket and add comments/instructions.
Overview
Navigating and Customising the Order Sheet
You can customise your order sheet layout to suit yourself allowing you to place orders as
simply as possible. The paragraphs below explain how to do this.
Ordering Columns
You can change the order of the columns from left to right by clicking and holding on one of
the column headings and then dragging it to the new placement.
User Manual
page 6
Column Widths
You can change any column’s width by hovering over the line between the column headings
and clicking and holding when the double arrow appears. Then drag the column wider or
narrower.
Ordering the products with a column
You can change the order of the product items within a column by clicking once on column
heading arrow. This will sort your products by that column heading eg if you want to sort
your products alphabetically then click on “description”, if you want to sort by price then
click on “price”. Note if you want to sort by two columns eg by supplier and then
alphabetically just click on the columns in reverse order ie “description” and then “supplier”.
Custom sequencing of your products
You can sequence your products in a user specific way eg if you wanted to sort your
products in the way they appear in your stockroom. Just click on a row and drag and drop it
where you want it.
Searching for products
You can search for any item by typing in the box in the description heading.
Filtering suppliers or specials
You can filter your products so as to have a more manageable selection on your page.
•
Click on the “special offers only” box and only products that are on special will be
displayed. Click again and all products appear
•
You can choose to only show products from specific suppliers by clicking and unclicking
both the “All/Clear Suppliers” and the individual suppliers names down the left. This will
help if you want to order from one supplier at a time or if you want to clear suppliers
away once you’ve ordered from them.
This is a useful tool for clearing up too many items appearing on your order sheet.
Moving/Tabbing between items
In the “Order Quantity” column by pressing the tab or enter button on your keyboard you
can move from one box to the next below it in the order guide while quickly typing in the
quantity of each product you wish to order for the day.
Viewing items on the next page
If you have a long list of items you can move to the ones further down the list in a number
of ways:
•
Collapse the supplier groups as described above in filtering fields. This will give you
more room on the front page to see items further down the list
•
Click on the page number at the bottom of the page if you scroll down to take you
directly to the next page or a page where your items may be.
User Manual
page 7
User Manual
page 8
Ordering Items
This section describes how to select the items you wish to order.
Selecting your order sheet
Ensure your are in the “order sheet” tab and in your correct order sheet. In the column
heading above filters you can use the drop down box to filter which order guide you would
like to use. Ideally you will have a guide for your bar section and a guide for your kitchen
section.
Set up the page view to suit yourself (see customising the order guide view in the previous
section).
The order guide page
Entering item amounts
You are now ready to start ordering. All of the items you usually order will be laid out neatly
on the page. They are grouped by each supplier and ordered in whichever way you feel best
to make your ordering most efficient (sometimes it may be best to order everything
alphabetically but you may also arrange items as they are in the stock room). It is time to
start ordering items.
User Manual
page 9
Selecting Product Items
To select a product item click on the box in the “order quantity” column alongside the item
you wish to order. Type in the box the number of items you wish to order. Note, you don’t
need to submit these to get them to your basket. As you type the number they will be
entered into your basket. Remember to pay close attention to the unit and packsize of each
item. If the unit says “each” it is the number of items you are ordering, if it says “kg” it is
the amount of kilograms you are ordering. If it says “pack” it is the number of packs you
are ordering (the packsize column will tell you how many items per pack).
Note the price tells you the cost per what’s in the unit field. Ie if the unit is KG the price will
be per kilogram. As you enter items the expected total price will appear to the right.
A word about item sizes. It can be confusing if you are ordering an item that isn’t exactly
the amount in the pack size. For example, you may wish to order a 2kg pumpkin however
the actual pumpkin may only be 1.9kgs. The supplier will be able to adjust for this in your
order by correcting the exact size of the pumpkin he will deliver and the price will adjust for
this.
Moving down the product sheet selecting multiple items
You can select as many items as you wish. You can move down the order sheet by either:
•
Tabbing down the “order quantity” column from one item to the next putting in the
quantity of each item you wish to order. When you get to the end of the page you can
click on the page number at the bottom of the order guide to move to the next page.
Or,
•
Collapsing each Supplier as you go down. Enter the amounts of each item you wish to
order per supplier and then click/unclick on the supplier names down the left. Don’t
worry if your items you are ordering disappear off the order sheet, they are already in
your basket.
Finding Products not in the list
If you cannot find an item you are looking for you can either:
•
Add it as a once off item. You can do this in the browse market sheet. See next section,
•
Add it as an item into your order guide so that it will be there for next time. (See
section on adding items to order guide in the browse market sheet),
•
Add a custom item. See next section on customising orders
Previewing your order/basket
Once you have selected your items you can preview your shopping basket by clicking on
“basket” at the top of the page. You can always return to the order sheet from the basket if
you want to select more products. You’ll see that the products in the basket are selected in
the order sheet.
User Manual
page 10
Customising your Orders
This section describes how to add comments to products that are confusing
to order
Adding Comments to items you wish to order
You can add comments or instructions about each product you wish to order that may not
necessarily be in the product description. Eg if a product says beef fillet by the kilogram you
may wish to instruct the supplier to cut the beef into 250g steaks.
To do this click on the comment bubble to the right of the product. Type in the instruction
and press enter. The bubble will now turn green showing that you have a comment in there.
To delete the instruction just click on the bubble and delete the comment and press enter
again.
Note: once a comment is entered for a product it will stay there even once you have
submitted your basket. The comment is related to that product so you don’t have to keep
typing the instruction in every day you order the same item.
Adding comments or instructions for each item
Entering in custom products
You may have a product you wish to order that you cannot find anywhere in the market site
for some reason. In this instance you can literally free type in an item for a supplier.
User Manual
page 11
Scroll down to the bottom of the order sheet page and there you will see the “add own
item” section. Click on the supplier and select the supplier you wish to order the item from.
Then free type into the description box the details and in the quantity box the number you
wish to order. You must then click on “add to basket” for it to go to your basket. You can
type in as many items as you wish.
Note, we will most likely update the database if you use this facility as it really is a last
resort function.
Adding Custom Items to your order
Previewing your Order/Basket
Once you have selected your items you can preview your shopping basket by clicking on
“Basket” at the top of the page. You can always return to the order sheet from the preview
page if you want to select more products.
User Manual
page 12
Previewing and Submitting your Basket
This section describes how to view and correct the products in your order as
well as submitting the order for the day.
Overview of the Basket screen
Once you have finished typing in the quantities of each product you wish to order for the
day, select the “Basket” tab to review and submit your order. In this screen you are going
to check your order to ensure the quantity and amounts are all correct and edit the order.
First check that the order is indeed from you or the person supposed to be submitting the
order in the top left hand corner.
The Basket Screen
In this screen you can:
•
Correct the quantity of each item. By clicking on the “order amount” box you can edit
the quantity of that particular product.
User Manual
page 13
•
Delete items by clicking on the delete dustbin next to each item. (Note is will not delete
this item from your order guide. It will only delete the item from today’s order)
•
Add or edit notes/comments (see below)
•
Save the order by clicking back to the browse market or order sheet.
•
Change the order number to a specific order number to match your systems.
Adding/Editing Notes/Comments
You can add/edit notes/instructions as free text that the supplier will see in the order. You
can either:
•
Add/edit item comments by clicking in the box under the comment column, next to the
item and typing in free text. It is here that you can specify to the supplier any specific
order requests for that item eg. please slice the ham.
•
Add supplier instructions. It is here you add notes to tell the supplier about his entire
delivery eg. please deliver before 15.00. This block is below the items next to the
subtotal.
Submitting your order
Once you have previewed your order and all your items look correct you can select “submit
order” at the top of the page. A confirmation box appears to which you click “OK” and your
orders will be sent to the various suppliers.
Each supplier will receive an email with the specific order relevant to them and they can
also view the specific order online.
You will be redirected to the previous orders screen where you will be able to track your
orders and print them off.
To place another order click on “order guide” and start again.
User Manual
page 14
Browsing the Market
User Manual
page 15
Overview of the Browse Market sheet
This sheet allows you to search and compare any product in the marketplace
from all the suppliers in your area. You can compare prices, check what a
given supplier sells, add products to your order sheet or add products
directly to your basket for purchase.
The Browse Market Sheet
Overview of the Browse Market
You can customise your browse market sheet layout to suit yourself. The paragraphs below
explain how to do this. Generally on the left are your filters, in the middle is the product
table and on the right are your action buttons.
Ordering Columns
You can change the order of the columns from left to right by clicking and holding on one of
the column headings and then dragging it to the new placement.
User Manual
page 16
Column Widths
You can change any column’s width by hovering over the line between the column headings
and clicking and holding when the double arrow appears. Then drag the column wider or
narrower.
Ordering the fields within a column
You can change the order of the product items within a column by clicking once on the
column heading. Eg. If you click description it will order the product items alphabetically.
Clicking again will order them in reverse order.
Searching products
You can search for any item in the table (see next section)
Filtering fields
You can also filter your fields to just show categories you want. (see next section)
Moving/Tabbing between items
Click on any of the rows and by pressing the tab or enter button on your keyboard you can
move from item to the next below it in the table.
Viewing items on the next page
If you have a long list of items you can move to the ones further down the list in a number
of ways:
•
Collapse the item groups as described above in filtering fields. This will give you more
room on the front page to see items further down the list
•
Click on the page number at the bottom of the page if you scroll down to take you
directly to the next page or a page where your items may be.
User Manual
page 17
Searching and filtering Items
This section describes how to find and compare specific products in the
market.
Using the search button
The “Search Market” button is quite powerful and allows you to search the entire market by
either product description, supplier, product code, unit of measure, even price. You can also
search using a partial word and your words don’t need to be in order. You can even combine
supplier name, product description and unit amount by leaving a space between your words
and the search button will understand this.
The search button
Tips for using the search button effectively
•
Typing less is better than more. Always start with only a partial use of the word. Some
suppliers make spelling mistakes and by typing the full word you may eliminate them.
Eg Drostdy Hof is always mispelt, if you’re looking for this product it’s best to start with
“dros” and then carry on from there.
•
Remember to also use the search button, filters on the left and the sorting of the
columns to eliminate excess products. Eg you may be looking for coke however many
products and suppliers stock coke in many forms. If you are looking for cans and not
cases it may be better to sort by price since a case will never be cheaper than a can.
You can also eliminate suppliers on the left that you don’t want to use. You can also
type “coke 330ml can” to get rid of other products.
User Manual
page 18
•
Note the site remembers all your settings so if you keep coming up with an empty
sheet, check that you haven’t got a filter switched on by mistake or something in the
search box.
Using the Filters
The filters down the left take a bit of getting used to. There are three main filters:
•
Pricing Filters: Here you can filter by specials to see only products that are on special.
Or you can filter by only your suppliers who you have a credit line open with. Or you
can filter by your prices vs the standard trade prices.
•
Brand Filter: Using the dropdown box you can select a particular brand you are looking
for. You can achieve the same effect somewhat by typing the brand in the search box.
•
Supplier Filter: The suppliers are grouped into categories. Ie Fruit & Veg or Dry Goods
Suppliers. By clicking on the various group headings you are effectively filtering by
those suppliers. Once in the groupings you can further filter by specific suppliers. Note
if you come unstuck just go back to Clear Suppliers or All Suppliers and start again.
The Filters
User Manual
page 19
Adding items to your Order Sheet or
Basket
This section describes how to add products to your Order Sheet or directly to
your Basket as a once off item.
Adding items to your Order Sheet
Once you have found the product you wish to place in your order sheet (by using the search
or browse and filter functions) all you need to do is click on the “plus” sign under the “Add
to my order sheet” column, next to the product. The plus sign will turn into a green tick to
verify that the product is now in your order sheet. By clicking on the “order sheet” tab you
will find the product there.
You can delete the product from your order sheet by either clicking on the green tick in the
browse market tab or by going to the order sheet tab and clicking on the dustbin next to the
product.
Adding items to your Order Sheet
Adding one off items
You can add items that weren’t originally in your order sheet by clicking on the box under
the column “add to basket”. You should only really use this functionality for those items you
very seldom order that you need to order today but don’t necesasrily want to keep in your
order sheet . Place a quantity in the box and it will automatically update your basket. There
is no need to click on anything else.
User Manual
page 20
Adding one off items directly to your basket from the Browse Market
User Manual
page 21
Tracking your Previous
Orders
User Manual
page 22
Overview of the Previous Orders
This Previous Orders Screen allows you to track your latest order as well as
go back to past orders and print them off or save to excel.
Overview
Your Orders are laid out in date order and then by supplier. When you submit an order the
screen will default to viewing your orders of today in the “open” position. All other orders
will be collapsed.
To view orders you need to click on the plus signs along the left to expand the date and the
supplier. Within each order number you will find the products that you have ordered.
You can also use the search box to search by order number or specific product or supplier.
You can also sort the Date column.
To print your orders make sure the order you wish to print is in the expanded position. The
print button will only print those specific orders.
To save your order as an excel file, expand the specific order and click on print. Then select
save to excel and enter.
Previous Orders Overview
User Manual
page 23
Tracking Orders
The system allows you to track how your order is being dealt with from the
supplier side. Note this system is only as good as the supplier user and you
will soon learn which suppliers keep it up to date.
Understanding the Traffic LIghts
We have tried to make the traffic light system as meaningful as possible as well as not
giving false readings especially with suppliers who may not be keeping the system up to
date.
There are three colours to be aware of
•
Green. This means your order is being processed normally and there is nothing to worry
about.
•
Red. This means that something has definitely gone wrong with your order. Either items
are out of stock or there is a problem with delivery. The traffic light will only go red if
something has gone wrong and will not give a false red. You should react immediately
to a red light or your order may not be processed.
•
Orange. This means that nothing has happened for a while and your order may not be
going smoothly but it could be fine. In this instance the meaningfulness of this light will
vary from supplier to supplier depending on how interactive they are with the system.
You will soon learn which suppliers’ orange lights means that eveything is still on track.
Note: you can change the coloour of a light manually yourself to ensure they read
correctly.
The Traffic Light System
User Manual
page 24
Traffic Light Timings
There are various stages to the traffic lights changing.
Verifying the order has been received by the supplier.
When you submit an order the system sends an email to the supplier, an email to you and
an electronic file to the supplier site.
If an email bounces the light will go red “email blocked”.
If the supplier opens the email the light will stay green and verify that it has been received
“order received”
The supplier accepting your order
Once the order has been received by the supplier, they will either accept or reject the order.
If the light goes red “order rejected” or red because “items out of stock” you should check
the order to see which items are going to be delivered and which will not.
If the order is accepted the light stays green and status reads “order processed”.
If the light changes to orange one of two things may have happened.
•
The supplier has replaced one of your items but has continued to process the order
normally. Or
•
The supplier has not responded to the order/email for over 2 hours after 8am. In both
these instances you can manually change the light back to green.
Delivery Status
The delivery status light stays blank until the order has been processed. It is expected that
you finally change the status of this light manually yourself once the order has been
received.
If the light is green it means the order is in picking and due to be delivered.
If the light goes to red it means the supplier has specifically changed the status of the
delivery and is experiencing delays. This may require action from yourself.
The light will naturally turn orange after 2 hours if you have not received the goods or the
supplier has not stated specifically that the delivery is on time or delayed.
User Manual
page 25
Using Help and FAQs
User Manual
page 26
Overview of the help sheet
User Manual
page 27
FAQs
User Manual
page 28