1
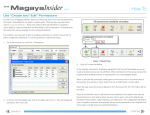
Billing Oracle FLEXCUBE Universal Banking Release 11.3.83.02.0 [April] [2014] Oracle Part Number E53607-01 Billing Table of Contents ORACLE FLEXCUBE UNIVERSAL BANKING ...................................................................................................1 RELEASE 11.3.0..........................................................................................................................................................1 1. ABOUT THIS MANUAL................................................................................................................................ 1-1 1.1 INTRODUCTION ........................................................................................................................................... 1-1 1.2 AUDIENCE .................................................................................................................................................. 1-1 1.3 ORGANIZATION .......................................................................................................................................... 1-1 1.4 GLOSSARY OF ICONS .................................................................................................................................. 1-1 1.4.1 Related documents ............................................................................................................................. 1-2 2. CONSOLIDATED BILLING......................................................................................................................... 2-1 2.1 INTRODUCTION ........................................................................................................................................... 2-1 2.1.1 Maintenance required for the sub-system.......................................................................................... 2-1 2.1.2 Who can create a billing product?..................................................................................................... 2-2 2.2 CREATING A BILLING PRODUCT ................................................................................................................. 2-2 2.2.1 Specifying your Preferences for the billing product .......................................................................... 2-4 2.2.2 Specifying Accounting Entries ........................................................................................................... 2-7 2.2.3 Maintaining details for adjustment entries ........................................................................................ 2-8 2.2.4 Triggering the invoice generation for contract-wise billing data.................................................... 2-10 2.2.5 Querying for billing details.............................................................................................................. 2-12 2.2.6 Defining parameters for settlement/liquidation of bill for an account ............................................ 2-13 2.2.7 Initiating manual liquidation for bills.............................................................................................. 2-15 2.2.8 Maintaining details for memo billing .............................................................................................. 2-18 3. SCREEN GLOSSARY .................................................................................................................................... 3-1 3.1 FUNCTION ID LIST...................................................................................................................................... 3-1 1. 1.1 About this Manual Introduction This manual is designed to help acquaint you with the Consolidated Billing module of Oracle FLEXCUBE. This manual provides answers to specific features and procedures that you need to be aware of for the module to function successfully. Besides this User Manual, while maintaining the interface related details, you can invoke the context sensitive help available for each field. This help encapsulates the purpose of each field within a screen. Placing the cursor on the relevant field and striking the <F1> key on the keyboard can obtain information specific to a particular field. 1.2 Audience This manual is intended for the following User/User Roles: 1.3 Role Function Back office data entry Clerks Input functions for maintenance related to the interface Back office Managers/Officers Authorization functions Organization This manual covers the following topics: 1.4 Maintenance for Billing Process Defining products for bill processing Processing charges for external transactions Processing charges for Oracle FLEXCUBE Transactions Entering a bulk check clearing transaction Glossary of Icons This User Manual may refer to all or some of the following icons: Icons Function New Copy Save Delete Unlock 1-1 Icons Function Print Close Re-open Reverse Template Roll-over Hold Authorize Liquidate Exit Sign-off Help Add row Delete row Option List Confirm Enter Query Execute Query Refer the Procedures User Manual for further details about the icons. 1.4.1 Related documents You may need to refer the following User Manuals while using this document: The Procedures User Manual The Products User Manual 1-2 The Charges User Manual The Tax User Manual 1-3 2. 2.1 Consolidated Billing Introduction Oracle FLEXCUBE provides the consolidated billing function to enable you to bill the customer through a single bill for various types of chargeable transactions carried in a charge cycle. Billing function gives you the option to group more than one account of the customer to send a consolidated billing invoice. You can also send individual billing invoice to each account. The Consolidated Billing sub-system is the channel through which charges that are applicable for a given charge period, on an account or group of accounts the customer holds, can be consolidated. This consolidated charge amount is billed to the customer as IC Billing Invoices. The system tracks the payments against this invoice and the overdue amount or overpaid amount under a billing invoice is carried forward to the next billing cycle. In addition, you have the option to collect Tax on the billing invoice amount and also to manually adjust the billing invoice amount. The customer can be billed under the following categories: Oracle FLEXCUBE transaction based charges YTD Basis Non - YTD Basis Maintenance based charges Non- Oracle FLEXCUBE (External) transaction based charges All the charges are consolidated and the system generates a billing statement based on the frequency you have maintained at the Billing Product level. The consolidated bill is sent to the customer and the customer can make the payment in various modes and the system tracks the payments for the respective bills. 2.1.1 Maintenance required for the sub-system For the Consolidated Billing sub-system to function effectively, firstly you need to set up Billing Products in Oracle FLEXCUBE. Billing products basically provide the infrastructure for the maintenance of the various transaction types, accounting entries and advices. You can choose to maintain billing products to cater to any types of charge basis types: Transaction Type: Oracle FLEXCUBE identifies the Financial Entry or Transaction to the account (e.g. FT, Check cleared) based on the specific Transactions codes used to pass the specified accounting entry. Maintenance Type: These are Non Financial Oracle FLEXCUBE entity (e.g. Check issued, stop pay etc) that is stored in Oracle FLEXCUBE database and is associated with an account and a date of occurrence. The system allows you to define a charge component that can be linked to these predefined lists of items. Non Oracle FLEXCUBE Entity: These are non Oracle FLEXCUBE entities (e.g faxes sent, concentrator charges etc) and the system does not track these items making it necessary to capture the details of these external transactions through the External Transaction screen. 2-1 The existing modules in Oracle FLEXCUBE interface with the Consolidated Billing sub-system for billing charges to the customer. The maintenance of Consolidated Billing Products and External Transactions and the processing of Billing Settlements have been dealt with in detail in the sections detailed below. 2.1.2 Who can create a billing product? A billing product is created in the Head Office branch of your bank. Any user in the head office, with the requisite rights, can create a product. 2.2 Creating a Billing Product A product is a specific service, facility, scheme or utility that you make available to customers of your bank. A product is characterized by its attributes. The attributes are options that you define that will apply to any actual contracts or transactions that will be processed against the product. You can capture information pertaining to billing product through the ‘Billing Product Definition’ screen. You can invoke this screen by typing ‘BLDPRMNT’ in the field at the top right corner of the Application tool bar and clicking the adjoining arrow button. For any product you create in Oracle FLEXCUBE, you can define generic attributes, such as branch, currency, and customer restrictions, interest details, tax details, etc., by clicking on the appropriate icon in the horizontal array of icons in this screen. For a billing product, in addition to these generic attributes, you can specifically define other attributes. These attributes are discussed in detail in this section. You can define the attributes specific to a billing product in the BL Product Definition Main screen and the Billing Product Preferences screen. In these screens, you can specify the product type and set the product preferences respectively. For further information on the generic attributes that you can define for a product, please refer the following Oracle FLEXCUBE User Manuals: Products Tax 2-2 User Defined Fields Through the Billing Product Definition screen, you can enter the basic details of the product. They are: the product code and module a description of the product the product type a slogan for the product the group to which the product belongs the Start Date of the product the End Date of the product the remarks, if any Product Code You can identify a product that you maintain with a unique Product Code, and a brief description. In the Product Code field, you must assign the product a unique code (which is unique across all the modules of Oracle FLEXCUBE). This code helps in identifying the product. You can briefly describe a product that you create in the Description field. The services that you offer in a module will be specific to the module. You can view the module in which you are creating a product in the Product Module field. Product Type An important detail in defining a product is to specify the type of product you are creating. The product type identifies the basic nature of a product. This helps to classify the product. The entries that are passed, the messages that are generated and the processing of contracts depend on the ‘Product Type’. The product categories are referred to as product types. When you create a product, you must specify its ‘type’. Slogan You can enter a slogan for the product that you are creating. In the Slogan field enter a slogan that suitably announces the product to your brokers/portfolio customers depending on the product type you are maintaining. Product Group Grouping products according to the common features they share, helps you organize information relating to the services you provide. This helps you retrieve information easily. You can invoke a list of all the product groups that you have maintained in your bank. Choose the product group to which the product you are creating belongs. Start Date and End Date When you create a product, you must also specify a date from which it can be offered. You may also specify the date up to which you would like to offer the product. Enter these dates in the Start Date and End Date fields. 2-3 You cannot offer a product beyond the specified end date. If you do not specify an end date for a product, you can offer it for an indefinite period. Remarks If you want to enter any remarks regarding the product, do so in the Remarks field. 2.2.1 Specifying your Preferences for the billing product Preferences are the options available to you for defining the attributes of a product. The attributes specific to a billing product are defined in the ‘Billing Product Preferences’ screen. You can invoke this screen from the ‘Billing Product Definition’ screen by clicking ‘Preferences’ button. Preferences are the options that are available to you for defining the attributes of a product. The options you choose, ultimately, shape the product. Billing Cycle Periodicity As part of the preferences you define for the product, you can indicate the frequency of the billing for the billing product. You can set the frequency to any one of the following: Monthly Quarterly Semi-Annual Annual 2-4 You can link various IC charge products to a Billing Product. However, you have to make sure that the Charge Liquidation Periodicity maintained for all such charge products is same as Billing Cycle Periodicity maintained in the Billing Product. Billing Cycle Liquidation Month Based on the frequency that you specify, you can also indicate the month for the liquidation of the billing. Thus, if you have set the billing frequency to Annual, Semi-Annual, or Quarterly, you have to indicate the month in which the first liquidation is to happen. Billing Liquidation General Ledger Select the bridge GL which will be used for liquidation process. You can identify the GL from the list of existing GLs. Retail Teller module uses the GL specified here for manually liquidating the bill amount through Cash. Billing Liquidation You can liquidate a bill invoice amount automatically or manually. Specify Auto liquidation if you want to liquidate the bill invoices generated under this product automatically on the billing invoice due date. If you do not specify Auto liquidation, you have to give specific instructions for liquidation through the Manual Liquidation screen, on the day you want to liquidate the bill. Invoice Details You can indicate the type of invoice that you want to have for the product. It could be any one of the following: Adhoc – The Invoice generation process has to be initiated manually Periodic – The Invoice generation will be done on a periodic basis and system initiates the process automatically Invoice Days – Indicate the number of days (on calendar basis) from billing period end cycle when invoice is to be generated. If you have opted for periodic generation of invoice, you need to indicate the day on which invoice should get generated. This field is enabled only for periodic type of invoice generation. Invoice generation will be initiated by Batch BOD process depending on the preference maintained for the Invoice day and Adhoc/Periodic option. Billing Due Days This date is used to calculate the due date of the bill. This period is defined as a specific number of days and will begin from the date the Invoice date generated. For example if you have specified the invoice day as 5 and the billing due date as 7, then the system will generate the invoice on the 5th of the month and the bill date will be Invoice + Bill date (5+7) so it will be the 12th day of the month. Demand Draft Product Category To raise Direct Debit instruction for billing invoice amount, you have to specify the product category that is to be used. All the valid product categories maintained in Oracle FLEXCUBE Payments and Collection Module will be displayed in the option list. 2-5 Retail Product To manually liquidate the billing invoice amount, through Cash, you need to specify a retail teller product in this field. All the valid products maintained in Oracle FLEXCUBE Retail Teller Module will be displayed in the option list. Choose the appropriate retail teller product from the available option list. Clearing Product To manually liquidate the billing invoice amount, through Outward Clearing Cheque, you need to specify a Clearing product here. All the valid products maintained in Oracle FLEXCUBE Clearing Module will be displayed in the option list. Choose the Clearing product from the option list. Account Class and Currency A Billing Product can be made applicable to customer accounts by linking Account Class and Currency combination in Billing Product Preference Screen. Once you link the account and currency, all the accounts belonging to the specified Account class and falling under the specified currency start generating Billing Invoices based on the attributes and parameters maintained in the Billing Product. To link the account class to the product, choose the account class from the option list available. The system will choose all the accounts falling under these account classes and with the same currency for bill processing. Additionally, you have to check the ‘Open’ box to be able to use the account class in billing process. You also have the option to disable the linkage of an account class and a currency combination from a Billing Product. For this you need to leave the ‘Open’ box unchecked. 2.2.1.1 Linking Charge Product to the Billing Product You should necessarily use a charge product to indicate the charge components applicable to the billing product. Select the appropriate charge product from the list of charge products defined specifically for the particular module of Oracle FLEXCUBE. The description of the charge product is displayed in the next field. You have the option to associate several charge products to suit the requirement of the billing product you are creating. To add to the list of products associated with the product click add icon. Conversely, click delete icon to disassociate a charge product from the option list that is displayed. To maintain common definition in the preference screen, you should make sure that the given billing product and all charge products linked to the billing product adhere to the following points: Charge liquidation periodicity and billing cycle periodicity should always be the same Account Class and Currency combination in the Billing Product should be a superset of Account Class and Currency combination specified in various charge products linked to it. 2-6 The IC charge products linked to a Billing product can be in ‘Charge Currency’ or ‘Account Currency’. However Billing Invoice will always be in ‘Account Currency’. And also, a charge product can be linked to only one Billing Product. 2.2.1.2 Parameters for Adjustment Entries The attributes you maintain for adjustment entries for a Billing product will be applied on all Billing Invoices generated under the Billing product: Adjustment Code and Description You must specify a unique code for adjustment entries. This user defined adjustment is a unique code used for capturing manual adjustment entries against billing invoices that are generated for the specified Billing Product. You must also specify a brief description for the code. Adjustment Type While maintaining the adjustment code, you can choose to define whether it is a positive adjustment or negative adjustment. In case of Positive adjustment, system will credit the adjustment GL and for Negative adjustment, the system will debit the adjustment GL. Adjustment GL By default, the adjustment GL that you define here will be used for all adjustment entries. The adjustment GL can be either income or expense GL for the adjustment entry. 2.2.2 Specifying Accounting Entries You have to identify accounting entries, which have to be posted when invoice generation (INIT) or liquidation of billing amount (LIQD) is initiated in Oracle FLEXCUBE. The system triggers INIT event at the time of invoice generation. Invoice generation is initiated automatically on Invoice generation date specified for Periodic option. In case Adhoc option, billing invoices are manually generated using Account Based or Product Based options. The mapping of accounting roles to respective account heads and the identification of life-cycle events at which they ought to be triggered automates the process of posting accounting entries. Dr/Cr Accounting Role Description Amount Tag Dr BILL_BRIDGE Bill Bridge GL ADJ_AMT Cr BILL_INCOME Adjustment GL ADJ_AMT Dr BILL_RECEIVALBLE Bill Receivable GL [TAX CLASS]_LIQD Cr [TAX CLASS]_PTA Tax Payable GL [TAX CALSS]_LIQD Dr BILL_BRIDGE Bill Bridge GL OVERDUE_AMT Cr BILL_RECEIVALBLE Bill Receivable GL OVERDUE_AMT Dr BILL_RECEIVALBLE Bill Receivable GL TOT_BILL_AMT Cr BILL_BRIDGE Bill Bridge GL TOT_BILL_AMT 2-7 The system uses bridge GL to bridge between IC and Billing. Billing ‘Invoice Generation’ batch triggers the IC liquidation using Bridge GL. This replaces customer leg with Bridge GL and once the IC liquidation batch is completed, the bridge GL is balanced with the billing receivable GL (INIT Event). Bill Amount is the sum of charges, adjustments (both positive and negative), previous overdue amount and the entire tax component linked to the billing product. This can be depicted in an equation as follows: In addition to maintaining accounting entries, you need to link the BL_INVOICE_GEN advice format to the INIT event for invoice generation. The system will use this advice format for generating Invoice for the bill. The system will trigger LIQD event in case the liquidation of bill amount is initiated for the customer account. The liquidation event is triggered based on the liquidation type you have maintained for the billing product. The system will trigger the LIQD event during the BLBALIQD processing if you have opted for auto liquidation. In case of manual liquidation, you need to trigger the event manually. Dr/Cr Accounting Role Description Amount Tag Dr CUSTOMER Customer Account TOT_BILL_AMT Cr BILL_RECEIVABLE Receivable GL TOT_BILL_AMT The system assembles the data collected during INIT event and arrives at the bill amount by applying the following formula: The amount tag TOT_BILL_AMT is created if the bill amount calculated is positive. If the bill amount is negative, the actual bill amount will display zero and the refunded amount will be rolled over to next period as overdue amount. The process of defining accounting entries for an event, for each product is explained in the Products Manual. 2.2.3 Maintaining details for adjustment entries You can capture the Adjustment entries through the Billing Adjustment screen. However the accounting entries are passed for billing adjustment amounts at the Billing invoice level, during the invoice generation at INIT event of the billing product. Invoke the ‘Billing Adjustment’ screen from the Application Browser to maintain the adjustment entries. You can invoke this screen by typing ‘BLDADJEN’ in the field at the top right corner of the Application tool bar and clicking the adjoining arrow button. During the INIT event in billing, the accounting entries will be passed based on the maintenance you have specified here. 2-8 Reference Number The system generates a unique reference number in a sequential order. Account Select the customer account number from the option list for which you want to pass the adjustment entries. The branch and the currency of the account are automatically displayed by the system. You cannot change these values. Adjustment code You can indicate the transaction code to which the adjustment entries pertaining to billing are to be passed. When maintaining adjustment entry details, you can identify the transaction code against which billing adjustment entries are posted. All entries tracked against the particular transaction code will be reflected in the bill that is generated. A customer account can be linked to more than one Billing Product. The option list displays all the adjustment codes maintained for Billing Products. You can select the appropriate adjustment code from the option list. An adjustment code can be linked to only one billing product. Booking date The system defaults the current system date and you will not be allowed to change this date. Value date Enter the value date of the transaction in DD/MM/YYYY format. The value date can not be less the last billing liquidation date. 2-9 Amount For passing adjustment accounting entries, you need to mention the amount for the adjustment entries that are to be posted individually. You are allowed to maintain only positive value in this field. The system determines whether the amount is positive or negative depending on the adjustment type you have maintained for the product in the Billing Product maintenance screen. Remarks You can specify any remarks you think necessary for the external transaction you have defined. This will be in free format text. 2.2.4 Triggering the invoice generation for contract-wise billing data You need to trigger Invoice generation differently for each of the following scenarios: Account Based Adhoc Batch Based 2.2.4.1 Adhoc To generate invoice for a product, invoke the ‘Adhoc - Invoice Generation’ screen. You can invoke this screen by typing ‘BLDAINGN’ in the field at the top right corner of the Application tool bar and clicking the adjoining arrow button. In this screen, you need to choose the billing product for which the invoice generation needs to be initiated. The invoice will be generated for the specified billing product. 2-10 2.2.4.2 Account based To generate invoice for accounts, invoke the ‘Account Invoice Generation’ screen. You can invoke this screen by typing ‘BLDUSINV’ in the field at the top right corner of the Application tool bar and clicking the adjoining arrow button. Choose the account from the option list for which the invoice has to be generated. The system generates the invoice for the specified account. 2.2.4.3 Batch Based Trigger the batch invoice generation through the ‘Memo Billing’ screen. You can invoke this screen by typing ‘BLDMEMBL’ in the field at the top right corner of the Application tool bar and clicking the adjoining arrow button. Processing of the billing batch will happen during BOD if you have maintained BLBAINGN program as mandatory program and have specified periodic option for the invoice generation at Billing Product level. 2-11 Validations carried out during EOTI During EOTI, the system verifies whether the invoice for the previous cycle is generated or not. This verification occurs at end of each cycle and every month. You must ensure that all the charge products defined for billing liquidation are linked to the related billing product. During EOTI, the system will raise an error if in case a given charge product is marked for billing liquidation and is not linked to any of the Billing Product. 2.2.5 Querying for billing details You may want to query on the details regarding billing. You can do so, through the ‘Invoice Details Query’ screen. You can invoke this screen by typing ‘BLSINTDT’ in the field at the top right corner of the Application tool bar and clicking the adjoining arrow button. To query for billing details for a specified account, choose the account number from the option list. The system displays the branch, account, currency, bill reference number, billing product, invoice date, bill amount, bill currency, bill due date, amount paid and outstanding amount details for each bill. 2.2.5.1 Viewing the billing details Double click on the individual bill in the Invoice Detail Query screen (previous screen), to invoke the Invoice Details screen which displays the summary details of the bill. 2-12 2.2.6 Defining parameters for settlement/liquidation of bill for an account You can maintain the settlement/liquidation preferences for a given customer through the ‘Billing Parameters’ screen invoked from the ‘Customer Account Maintenance’ screen by clicking ‘Billing Parameters’ button. You will have to maintain a set of parameters for the billing module. While settling or liquidating the bill, the default parameters that you have maintained for the account involved in this module will be used. The screen also displays the Product Code and Description of all Billing Products applicable to the account. Consolidating Account You can specify a consolidating account for the given account. From the option list you can choose: A different account number if you want to consolidate the charge under this account to a different account. The Consolidation account selected for this account should be in the same currency as this account. It also has to belong to the same branch as the specified account. The same account to indicate that there is no consolidation and an individual billing invoice is to be raised on this account 2-13 Billing Liquidation You have two modes of liquidation i.e. Auto or Manual. The preference you have maintained for the billing product will be defaulted here. You can choose to change the mode for the specified account under the following scenarios: If Auto is chosen, then you have to specify whether the settlement is through a settlement account or through Direct Debit Instruction In case you want to raise Direct Debit instruction for the billing invoice amount, irrespective of whether the liquidation mode is Auto or Manual, you have to maintain the details for Direct Debit details viz. Direct Debit Bank Code, Account, Name and Agreement ID fields. If you choose Manual option, then manual liquidation is possible only under the following four modes: By Cash – through retail teller product By Clearing – through outward clearing product By Transfer – debit account in CASA module By Direct Debit – through PC module If the consolidation account is different from the present account, then the system uses the liquidation parameters specified at the consolidation account level and liquidation parameters specified, if any, at this account level is ignored. Settlement Account As mentioned above, you need to specify the settlement account to enable automatic liquidation of billing. For liquidating the billing amount and also for collecting the bill amount, the system makes use of the account specified here. Maintaining direct debit details If you have maintained the mode of settlement for auto liquidation of bills as Direct Debit instructions, you need to specify the following details: Bank Code – Choose the bank code from the option list. This indicates the bank code of the settlement account Account Number – Specify the account number for the settlement account Name – Specify the name of the debtor Agreement ID – Specify the agreement id on which the DD is to be generated During liquidation, the direct debit contract is uploaded into the system in case you have maintained the settlement mode as direct debit transaction. The upload happens for both automatic liquidation and manual liquidation. 2.2.6.1 Closure of accounts with outstanding Billing Invoices In the event of account closure, the system allows closure only after all invoice are generated and payment of outstanding bill amount is made. Before closing the account, you need to: Manually liquidate the billing amount through the Manual Liquidation screen in case the payment is yet to be done. The system displays a message for the unpaid amount. 2-14 Generate the pending invoices for all Billing Products applicable to that account, using the Account Based Invoice Generation screen, and also liquidate the bill amounts under each of the Billing Products manually. Refund the amount if the overdue amount is in negative 2.2.7 Initiating manual liquidation for bills All the components of a bill can be liquidated automatically or manually. In the Product Preferences screen, you can indicate whether the mode of liquidation of bills is to be automatic or manual. The system automatically liquidates those bills marked for auto liquidation. If the bills are marked for manual liquidation, you have to liquidate them through the Billing Liquidation screen. The liquidation is triggered differently for each of the following scenarios: Account Based Adhoc Based Batch Based 2.2.7.1 Account Based You can invoke the ‘Billing Liquidation’ screen by typing ‘BLDCUSLQ’ in the field at the top right corner of the Application tool bar and clicking the adjoining arrow button. Account number Select the account number, for which you want to manual liquidate, from the option list. The branch and the currency of the account are automatically displayed by the system. You cannot change these values. Billing Product Choose the billing product for which the manual liquidation is being initiated. The option list displays all the valid product codes maintained under billing module. Amount Due The system displays the amount that is due for settlement. You can choose to pay the bill amount partially also. Enter the amount that you want to settle in the Amount Settled field. 2-15 Amount Settled While processing a specific bill, you can specify the amount that can be repaid as settlement amount in case of partial payment of the bill. Liquidation Mode As part of the preferences you define for the liquidation, you can indicate the mode of the liquidation for the billing product. You can set the mode to any one of the following: Settlement Account Cash – through Retail Teller Cheque – through Clearing DD – through PC contract The system passes the following liquidation entries depending on the mode of manual liquidation you have maintained for the billing product: Mode of liquidation - Account The following liquidation entries are passed to the settlement account: Dr/Cr Accounting Role Description Amount Tag Dr Settlement Account Settlement account BILL_AMT Cr BILL_RECEIVABLE Receivable GL BILL_AMT Mode of liquidation - Cash In case the mode of manual liquidation specified is Cash, the books a cash deposit transaction through Retail Teller product maintained linked to the billing product. Dr/Cr Accounting Role Description Amount Tag Dr Cash/Suspense Account Cash/Suspense Account TXN_AMT Cr BILL_LIQD Billing Liquidation GL TXN_AMT Dr BILL_LIQD Billing Liquidation GL BILL_AMT Cr BILL_RECEIVABLE Receivable GL BILL_AMT Mode of liquidation – Cheque Clearing You can also book a clearing transaction to credit the account for which the billing is done. For this you need to invoke the clearing transaction screen. Through this screen you can capture the cheque number and routing number. The system passes the liquidation entries and debits the billing account and credits the receivable GL only after the cheque is cleared. Dr/Cr Accounting Role Description Amount Tag 2-16 Dr/Cr Accounting Role Description Amount Tag Dr Clearing Suspense Clearing Suspense TXN_AMT Cr Settlement Account Consolidated account TXN_AMT On Clearing Dr/Cr Accounting Role Description Amount Tag Dr Settlement Account Consolidated Account BILL_AMT Cr BILL_RECEIVABLE Receivable GL BILL_AMT Mode of liquidation – Direct Debit In this case, the system books a direct debit transaction based on the DD parameters you have maintained for the Consolidated Account. The DD can be booked through the Local Payments module using the DD product category that is maintained for the Billing Product. Click ‘Submit Batch’ button to run the batch billing liquidation program. Processing of the billing batch will happen during BOD if you have specified periodic option for the liquidation. 2.2.7.2 Product Based Product Based liquidation option invokes the ‘Adhoc Liquidation’ screen from the Application Browser. You can invoke this screen by typing ‘BLDALIQD’ in the field at the top right corner of the Application tool bar and clicking the adjoining arrow button. In this screen, you need to choose the billing product for which you want to trigger liquidation. Liquidation will be triggered only for the specified billing product. 2-17 2.2.8 Maintaining details for memo billing You can create a memo which contains the details of the bill and the charges calculated for the account (s). To generate the memo invoice, invoke the ‘Memo Billing’ screen by typing ‘BLDMEMBL’ in the field at the top right corner of the Application tool bar and clicking the adjoining arrow button. Billing Product Choose the billing product for which the memo billing invoice has to be generated. Consolidating Account In case you want to print the memo for only a specific account you can choose the account from the option list. If you leave the account number field blank, the system generates the memo for all the consolidated accounts under the product selected. 2-18 3. Screen Glossary 3.1 Function ID List The following table lists the function id and the function description of the screens covered as part of this User Manual. Function ID Function Description BLDADJEN Billing Adjustment BLDAINGN Ad-hoc Invoice Generation BLDALIQD Ad-hoc Liquidation BLDCUSLQ Billing Liquidation BLDMEMBL Memo Billing BLDPRMNT Billing Product Definition BLDUSINV Account Invoice Generation BLSINTDT Invoice Details Query 3-1 Billing [April] [2014] Version 11.3.83.02.0 Oracle Financial Services Software Limited Oracle Park Off Western Express Highway Goregaon (East) Mumbai, Maharashtra 400 063 India Worldwide Inquiries: Phone: +91 22 6718 3000 Fax:+91 22 6718 3001 www.oracle.com/financialservices/ Copyright © 2005, 2014, Oracle and/or its affiliates. All rights reserved. Oracle and Java are registered trademarks of Oracle and/or its affiliates. Other names may be trademarks of their respective owners. U.S. GOVERNMENT END USERS: Oracle programs, including any operating system, integrated software, any programs installed on the hardware, and/or documentation, delivered to U.S. Government end users are ‘commercial computer software’ pursuant to the applicable Federal Acquisition Regulation and agency-specific supplemental regulations. As such, use, duplication, disclosure, modification, and adaptation of the programs, including any operating system, integrated software, any programs installed on the hardware, and/or documentation, shall be subject to license terms and license restrictions applicable to the programs. No other rights are granted to the U.S. Government. This software or hardware is developed for general use in a variety of information management applications. It is not developed or intended for use in any inherently dangerous applications, including applications that may create a risk of personal injury. If you use this software or hardware in dangerous applications, then you shall be responsible to take all appropriate failsafe, backup, redundancy, and other measures to ensure its safe use. Oracle Corporation and its affiliates disclaim any liability for any damages caused by use of this software or hardware in dangerous applications. This software and related documentation are provided under a license agreement containing restrictions on use and disclosure and are protected by intellectual property laws. Except as expressly permitted in your license agreement or allowed by law, you may not use, copy, reproduce, translate, broadcast, modify, license, transmit, distribute, exhibit, perform, publish or display any part, in any form, or by any means. Reverse engineering, disassembly, or decompilation of this software, unless required by law for interoperability, is prohibited. The information contained herein is subject to change without notice and is not warranted to be error-free. If you find any errors, please report them to us in writing. This software or hardware and documentation may provide access to or information on content, products and services from third parties. Oracle Corporation and its affiliates are not responsible for and expressly disclaim all warranties of any kind with respect to third-party content, products, and services. Oracle Corporation and its affiliates will not be responsible for any loss, costs, or damages incurred due to your access to or use of third-party content, products, or services.