1
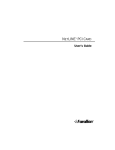
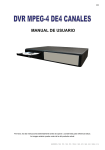
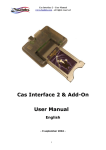
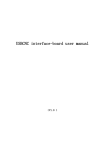
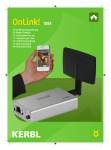
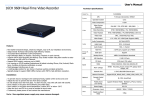
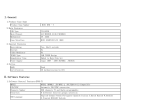
H.264 Network Camera
Quick Using Guide
1. Installation Notes
The H.264 network camera (hereinafter referred to as network
cameras)is not waterproof, installed in a dry environment to avoid
moisture, drip, sprinkler and other places.
¾ All installation screws and nuts or fixed part of the need to
tighten to prevent falling.
¾ When it is in the installation and operation of the network
camera, please abide by the norms of all electronic products, as
well as the requirements of network-connected devices.
¾ Network camera equipment power input range DC 5V, please
do not use the power adapter does not match.
¾ When handling and transfering the network camera, make sure
to gently. Falling may cause damage of the internal precision
components.
2. Check the packing list
2.1. Card Camera
Packing list
Items
Network camra
Quanlity
1 Pcs
Adapter
CD
netline
Quick using guid manual
Mounting brackets
DC 5V2A
1 pcs
1 pcs
1 pcs
1 Pcs
2.2. Cartoon machine (PT CAMERA)
Packing list
Items
Network camra
Adapter
CD
WIFI antenna
netline
Quick using guid manual
Mounting brackets
Quanlity
1 Pcs
DC 5V2A
1 pcs
1 pcs
1 pcs
1 pcs
1 Pcs
3. Device Interface
3.1. Card Camera
Wifi
ANT
hole
Aout
SD
RJ45
5V
Interface Description
Serial
interface
description
Remarks
1
Power Interface
5V2A,the inner “ + “outside
“ –“
2
RJ45
10/100 Ethernet
3
Aout
audio output interface
4
TF
TF card socket
3.2. Cartoon machine (PT CAMERA)
WIFI
RJ45
Audio
TF
5V
Interface Description
Serial
interface
description
1
Power Interface
DC 5V2A,the inner “ + “outside
“ –“
2
RJ45
10/100 Ethernet
3
Audio
audio input interface
4
TF
TF card socket
Remarks
4. Network Camera Connection
The network cameras using dynamic obtain IP (DHCP) by default,
before using the network camera, please make sure your router is
turned on the DHCP server (most routers default opens the DHCP
server).
Step 1: Use one end of the cable to connect the network camera
RJ45 connector;
Step 2: Use a network cable ( the other end) connected to the
switch or DSL router.
Step 3: with the power adapter is connected to the power outlet on
the network camera.
Step 4: Turn on the PC or laptop and connect to the switch or DSL
router.
5. Browser Quickly Configure
5.1. Search Camera
The search appliance, make sure your network has been turned on
the DHCP server (usually the router is turned on by default DHCP
server).
Under Windows, open the search tool (Unzip SearchTool.rar tarball,
execution SearchTool.exe program), click on "Search" button to
perform the device discovery, as shown.
Input in Browser: www.xcam.hk
download the latest software
and user manual:
SearchTool.rar
SmartClient.rar
H.264 Network Camera Quick using Guide.doc
H.264 Network Camera SmartPhone Quick using Quide.doc
SmartClient Video Monitor Client Use Guide. Doc
Search tool in Windows to open (unzip SearchTool.rar compressed
packets, execution SearchTool.exe program), this time SearchTool
start automatically search the LAN network camera, as shown in:
5.2. Browser Login
Double-click the device specified in the search list of devices
automatically use the Windows default browser, go to the device
login screen:
Select the language you want (Chinese or English), enter the user
name password (login device default user name: Admin, password:
888888), into the real-time video pre-recorded interface.
5.3. System Configuration
Click on the "System Settings" button, enter the device
Configuration interface:
5.4. Configuring the wireless network
Before configuring the wireless network, please verify that your
wireless router has open wireless network functionality and DHCP
server (wireless router, open and wireless AP configuration):
Wifi wireless network in the selected configuration directory
"Network Settings", enter the equipment Wifi configuration
interface:
5.4.1. Enable the Wifi device
Select a item and click "Save" can open the device's wireless
network, users can automatically search for the AP configuration or
manually enter the relevant parameters of Wifi configuration.
5.4.2. Search Wireless AP and Configure Wifi
Click "Search" button to search for wireless networks in your
surroundings:
Double-click the wireless network list, you need the AP, the Wifi
configuration will automatically refresh the relevant parameters,
and prompts you to enter the password for the wireless network (no
encryption and no password, leave the password parameters
blank):
Enter the wireless network password (no encryption and no
password the way, set the password parameters blank), click the
"Save" button to complete the wireless network settings.。
5.4.3. Manually Configure Wifi
You can also configure Wifi parameters manually enter the SSID of
the wireless network, wireless network mode, security type and
password parameters Click "Save" button to complete the wireless
network settings:
5.4.4. The Wifi function test
Wifi parameters setup is complete, unplug the RJ45 cable to
connect the network camera, use the search tool SearchTool.exe
Click "Search" button to perform a device search.
Note: The search appliance packet broadcast may be lost, you
perform several times the "SearchTool" operation. If you can
search for the device, double-click the device in the list, and
wireless network access device;
6. SmartPhone Application
6.1. Download and Run App
Download App “P2PCam264” from Google Play or AppStore for
Android and iOS SmartPhone. Run P2PCam264 application after
installation.
6.2. Add a Network Camera
Click to add the camera button
.
Support three different ways to add a network camera: LAN Search,
scan QR-Code and Manual input. After enter the network camera
20 Device ID and the password, the SmartPhoe user can connect
to the network camera.
6.2.1. LAN Search
Click the Search button
, SmartPhone can automatically list
all devices in the local network, Select one 20 UID and enter the
network camera default login password "888888".
Click OK to Save the Camera.
6.2.2. Scann QR-Code
Scan
Click the Search button
.
Automatically Identify the QRCode, After get the Camera’s UID and
enter the default login password "888888".
6.2.3. Manually enter
Click the UID edit box, manual input the Camera’s 20 UID (number
affixed to the machine housing), enter the network camera default
login password "888888".
Click OK to Save the Camera.
6.3. LiveView
Select and click one camera in the camera list, liveview the video:
7. Other
Please refer to the H.264 Network Camera Quick using Guide.doc
8. Troubleshooting
Failure phenomenon
possible reasons
The machine does not a. there is no any light a
start, and there is no any power input cord is not
light
plugged in
b. Network cable not
plugged in
How to do when forgot the
code
solution
a. as the correct method of
connecting
b. Re-plug the network cable
a. [Reset] button in the
bottom of the network
camera base in the power-on
state by 5-10 seconds, the
system will revert to the
default values, user name:
admin Password: 888888
9. Network Camera Maintenance
Unplug the power, turned off the camera , clean the camera.
If sand or dust on the lens, the quality of cameras’picture will
decline. To remove sand or dirt, wipe the lens with lens cleaning
paper.
Note: 1. Do not use alcohol, polishing powder, detergents, gasoline,
thinner, wax, petroleum products or hot water to clean the camera.
Should also avoid contact with the glass cleaner, insecticides or
hairspray. These substances can cause the shape or color change.
2. Do not touch the lens.λ The fingerprints will cause the image can
not focus.