1
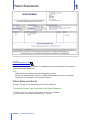
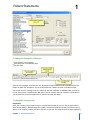
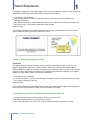
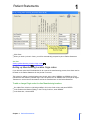
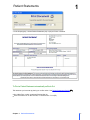
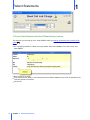
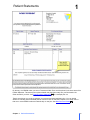
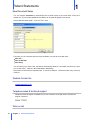
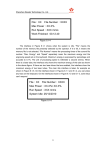
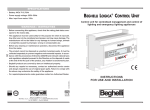
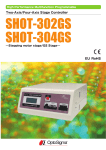
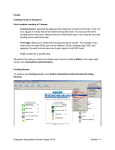
User's Guide
Using Transactor
Patient Statements
© 2010 Pearce & Robinson LTD, all rights reserved
Contents
Chapter 1
1 Patient Statements
2 Patient Statements Set Up
5 Setting up Manufacturing Location Origin codes
6 Printing Patient Statements
10 New Document Setup
Chapter 2
2
10 Contact Us
Patient Statements
1
Transactor has the ability to print a 'Patient Statement' which conforms with the MDD 93/42/EC with
minimum fuss.
If your system has already been configured for printing your labs Patient Statements, skip now to Printing
Patient Statements 6
If your jobs don't get outsourced to Non-EU labs, you don't need to do anything other than print the Patient
Statement. Just see Patient Statements Set Up 2 on how to make your template look the way you want
it. This 'default' Patient Statement will contain the simple declaration "..the complete appliance has been
wholly manufactured within the EU".
If some or all of your jobs get outsourced to Non-EU labs, then you need to setup manufacturing locations,
so that the appropriate ORIGIN code(s) can be added to Jobs. See Setting up Manufacturing Location
Origin codes 5
Origin of Manufacture
The statement must declare either "..the complete appliance has been wholly manufactured within the EU",
or "..not been.." in which case the manufacturing locations must be listed.
By default Transactor will print a Patient Statement with the simple "All within EU" declaration. However if
ORIGIN1 or ORIGIN2 codes are found on the job, Transactor will automatically replace this with the "non
EU" statement and print the list of manufacturers.
If a lab normally out-sources work to outside the EU then Transactor can be setup to include ORIGIN
codes automatically on each job thus saving tedious data entry. If a lab always needs to declare non-EU
manufacturing locations, then it may change the background image of the template to contain the required
information so that ORIGIN codes don't need to be used.
A4 and A5 Templates
There are 2 templates to choose from. A4 and A5. Both can cater for the simple case (All within EU) or
multiple non-EU manufacturing locations.
The A4 template has space for up to 3 manufacturing locations in the bottom area.
The A5 statement is more compact with space for up to 2 manufacturing locations.
The Origin Declaration text can be customised.
The background image for the form, the other form text, labels and the company logo, can be replaced
with the lab's own images.
Chapter 1 Patient Statements
1
Patient Statements
1
Also See:
Patient Statements Set Up 2
Printing Patient Statements 6
MHRA document "Guidance to Changes to the Medical Devices Directive 93/42/EC with respect to
custom-made devices statements"
Terms:
MHRA: Medicines and Healthcare products Regulatory Agency
MD Directive: Medical Devices Directive. The Medical Devices Directive covers the regulatory
requirements of the European Union for Medical Devices.
Patient Statements Set Up
This topic will guide you through setting up an A4 Patient Statement.
To invoke the Printout Type Properties for the Patient Statement
From the Tools menu, choose Printing Setup - Printout Type Properties
In Printout Type, choose Patient Statement (A4).. (or A5)
2
Chapter 1 Patient Statements
Patient Statements
1
To change the Declaration Statement
In the Printout Type Properties
Change the text in the Message area
Choose Close
There are two messages encoded in this box. By default a Patient Statement will be printed with the first
simple "All within EU" declaration. This is the text before the ^ Divider as shown in the above image.
The second "non-EU" message is the one Transactor will print if ORIGIN1 or ORIGIN2 codes are found on
the job, along the list of manufacturers. NB: even if your lab currently does not out-source outside the EU,
you can leave this second message intact, it just won't be used. See below.
To change the company logo
Preparation
place your company's logo image file into the C:\tran61\lab\exe folder on your PC. The file type must be
either bitmap (.BMP) or Windows Meta File (.WMF). The filename must be less than 8 characters with no
spaces so for simplicity rename your file to logo.bmp or logo.wmf. The image should have been supplied by
Chapter 1 Patient Statements
3
Patient Statements
1
your graphics designer as a high quality graphic to the correct intended size. With the correct logo file you
should have pin-sharp printouts indistinguishable from pre-printed stationery.
In the Printout Type Properties
In the Pictures group box, enter the logo's file name (eg. Logo.bmp) into the box below the one
containing PForm.wmf.
Enter approximate X and Y position pixel values (about 100 = 1CM) from the top left of the paper to the
top left of the logo. You will need to experiment to get this right.
Choose Close
Print a Patient statement to the Preview Window to see your logo's positioning and go back to Printout
Type Properties to adjust your X and Y values until correct.
To add or change the background image
Preparation
The default image (PForm.wmf) is already located in in the C:\tran61\lab\exe folder on your PC. Your
graphics designer may modify this or produce another. The file type must be either bitmap (.BMP) or
Windows Meta File (.WMF). The filename must be less than 8 characters with no spaces so for simplicity
rename your file to PForm2.bmp or PForm2.wmf. The image should have been supplied by your graphics
designer as a high quality graphic to the correct intended size.
In the Printout Type Properties
In the Pictures group box, enter the new background image file name (eg. PForm2.bmp) into the upper
box currently containing PForm.wmf.
Choose Close
Print a Patient statement to the Preview Window to see your new background image's positioning and go
back to Printout Type Properties to adjust your X and Y values until correct.
To configure printing a Patient Statement automatically on Book Out
From the Tools Menu, choose Printing Setup - Printing on Confirm Action
Add Patient Statement (A4 or A5) to the Printout Type list
On the required check boxes in the correct row and choose the Output and number of copies.
4
Chapter 1 Patient Statements
1
Patient Statements
Click Close
When you book a job out in future, you will be automatically prompted to print a Patient Statement
Also See:
Setting up Manufacturing Location Origin codes
Printing Patient Statements 6
5
Setting up Manufacturing Location Origin codes
If your lab uses other Non-EU laboratories for all or part of the manufacturing process, then these need to
be listed on the Patient Statement for the job that it concerns.
This is done by adding a product lineitem onto the job, with a code of ORIGIN1 or ORIGIN2 etc. Each
manufacturer must have an individual origin code. The presence of an ORIGIN code on the job will signal
Transactor to use the Non-EU declaration and list the manufacturers on the Patient Statement.
To add or change Origin codes for other Manufacturing locations
On a Main Form, blank or a job being modified, click in the Code column and press ENTER.
In the Products and Services dialog, in the 'Find by Code' box, enter ORIGIN1
In the State box, choose NOTE
Chapter 1 Patient Statements
5
Patient Statements
1
Note: If ORIGIN1 already exists this will be listed so just right click it, choose Properties and check the
details are correct, then skip the rest of this topic.
Click 'Add New'
Enter the manufacturing location (name and short address). There are limited characters so you may
need to abbreviate*
Choose OK and then Select Onto Form (to verify it looks ok on the form).
That's it. You now have the ability to 'register' other 'Non-EU' manufacturing locations involved with the Job
and your Patient Statement will reflect this fact.
Also see
Printing Patient Statements
6
Printing Patient Statements
To Print a Patient Statement
On a Main Form, select a previously Booked Out job
Click the Printer Icon on the Tool Bar, or choose Action - Print (F5)
6
Chapter 1 Patient Statements
1
Patient Statements
In the Output group, choose Patient Statement (A4) or (A5) to Printer or Preview.
To Print a Patient Statement automatically on Book Out
This assumes you have set up printing on confirm action. See Patient Statements Set Up
4
On a Main Form, select a previously Booked Out job
Click the Printer Icon on the Tool Bar, or choose Action - Print (F5)
Chapter 1 Patient Statements
7
Patient Statements
1
To Print a Patient Statement with Non-EU Manufacturing Locations
This assumes you have set up one or more ORIGIN codes. See Setting up Manufacturing Location Origin
codes 5
On a Job being modified, in a blank row in the lineitem area, enter ORIGIN1 in the code column and
press ENTER
Book out the job as usual
In the Confirm Action dialog, in the Output group ensure Patient Statement (A4 or A5) is selected as one
of the documents to be printed
Choose OK
8
Chapter 1 Patient Statements
Patient Statements
1
By the way, the ORIGIN codes you see on Transactor's Main Form won't be printed in the items area of the
Patient Statement. Transactor picks up these details and puts them neatly into your Declaration List.
Clever stuff don't you think. See Printing Patient Statements 6 for a example print out.
There's more things you can do to optimize your process and save repetitive typing. You can decide
whether to manually add the ORIGIN product code onto Jobs as and when required, or to setup Jobs so
that one or more ORIGIN codes are automatically on new jobs. See New Document Setup 10
Chapter 1 Patient Statements
9
Patient Statements
1
New Document Setup
You can configure Transactor to automatically have a certain layout on the screen when a new job is
started. Any of your existing predefined Line Notes can be made to appear in the new job.
Choose New Document Setup… from the Tools menu.
From here you can customise the level of pre-set details you want to record with each :
New Job
New Credit Note
New Query
You can specify up to 6 line notes that will be automatically added to a new blank document (ie. when
you choose Action... New Job, New Credit Note or New Query).
Select the line notes from the dropdown lists. To remove a selection, choose the blank entry at the top
of the list.
Website Contact Us
www.transactor.co.uk
Telephone sales & technical support
Telephone technical support is available only to new customers in the trial period, and Premium
Support customers.
01424 777877
Write or visit
10
Chapter 1 Patient Statements
Contact Us
2
Pearce & Robinson LTD
17 High Street, Battle, Sussex TN33 0AE
Tel: 01424 777877
NOTES
Sales & Support Telephone Mon-Fri 0900-1700hrs excl. Bank Holidays.
After your free Premium Support period is up you can purchase 12 months renewal from www.
transactor.co.uk
Chapter 2 Contact Us
11
© © 2010 Pearce & Robinson LTD, all rights
reserved.
All rights reserved.
Product and company names mentioned in this
manual may be trademarks or registered
trademarks of their respective companies.
Mention of third-party products is for
informational purposes only and constitutes
neither an endorsement nor a recommendation.
The author assumes no responsibility w ith
regard to the performance or use of these
products. All understandings, agreements, or
w arranties, if any, take place directly betw een
the vendors and the prospective users. Every
effort has been made to ensure that the
information in this manual is accurate. The author
is not responsible for printing or clerical errors.
The product described in this manual
incorporates copyright protection technology that
is protected by
method claims of certain U.S. patents and other
intellectual property rights.
This user manual w as created w ith Help &
Manual.
Index
Index
A
Automatically print patient statements
4
C
Configure Patient Statements
4
D
DAMAS
1
M
MD Directive
MDD 1
1
N
New Document Setup
10
O
Origin codes for other Manufacturing locations
5
P
Patient Statement 1
Patient Statements 2
Printing Patient Statements
6
13