1
Content Manager Explorer Basic User
Manual
SDL Tridion 2013 SP1
November 2013
About this user manual
This User Manual describes how to manage Web site content using the Content Manager
Explorer.
Audience
It provides instructions for Editors and Reviewers and Site Managers of content:
■
Editors write content and can create pages (including images, pictures, or
attachments). Editors can only publish to the Staging Presentation Server used for
preview and inline editing purposes (not accessible for visitors of intranet/
extranet Web sites).
■
Reviewers edit content, put content and binary content together, and can create
Pages. Reviewers can publish Pages to the Live Presentation Server (interacts with
visitors), as well as to the Staging Presentation Server.
■
Site Managers are primarily responsible for the overall management of their (local) publication and the coordination of the different editors and reviewers. Site
managers are the first point of contact for all local editors & reviewers.
As a user, you are assumed to be familiar with your operating system and with using an internet browser.
II
Content Manager Explorer Basic User Manual
Contents
1
Getting started ................................................................. 1
Basic Content Manager concepts . . . . . . . . . . . . . . . . . . . . . . . . . . . . . . . . . . . . . . . . . . . . . . . . 1
Publications . . . . . . . . . . . . . . . . . . . . . . . . . . . . . . . . . . . . . . . . . . . . . . . . . . . . . . . . . . . . . . . . . . . 4
Web site building blocks . . . . . . . . . . . . . . . . . . . . . . . . . . . . . . . . . . . . . . . . . . . . . . . . . . . . . . . . 4
Publication rights and permissions . . . . . . . . . . . . . . . . . . . . . . . . . . . . . . . . . . . . . . . . . . . . . . . 6
Additional features and functionality . . . . . . . . . . . . . . . . . . . . . . . . . . . . . . . . . . . . . . . . . . . . . 6
Configuring your browser . . . . . . . . . . . . . . . . . . . . . . . . . . . . . . . . . . . . . . . . . . . . . . . . . . . . . . 7
Configuring your Web browser for Content Manager Explorer . . . . . . . . . . . . . . . . . . . . . . . 8
Recommended system display properties . . . . . . . . . . . . . . . . . . . . . . . . . . . . . . . . . . . . . . . . 10
Content Manager Explorer troubleshooting reference . . . . . . . . . . . . . . . . . . . . . . . . . . . . . . 11
2
Content Manager Explorer ................................................. 13
Content Manager Explorer Ribbon . . . . . . . . . . . . . . . . . . . . . . . . . . . . . . . . . . . . . . . . . . . . . .
Ribbon tabs . . . . . . . . . . . . . . . . . . . . . . . . . . . . . . . . . . . . . . . . . . . . . . . . . . . . . . . . . . . . .
Ribbon controls . . . . . . . . . . . . . . . . . . . . . . . . . . . . . . . . . . . . . . . . . . . . . . . . . . . . . . . . .
Breadcrumb trail . . . . . . . . . . . . . . . . . . . . . . . . . . . . . . . . . . . . . . . . . . . . . . . . . . . . . . . . . . . . .
Info Bar . . . . . . . . . . . . . . . . . . . . . . . . . . . . . . . . . . . . . . . . . . . . . . . . . . . . . . . . . . . . . . . . . . . . .
Slide-out navigation . . . . . . . . . . . . . . . . . . . . . . . . . . . . . . . . . . . . . . . . . . . . . . . . . . . . . . . . . .
Slide-out navigation Home screen . . . . . . . . . . . . . . . . . . . . . . . . . . . . . . . . . . . . . . . . . .
Slide-out navigation Activities screen . . . . . . . . . . . . . . . . . . . . . . . . . . . . . . . . . . . . . .
Slide-out navigation Help screen . . . . . . . . . . . . . . . . . . . . . . . . . . . . . . . . . . . . . . . . . . .
Slide-out navigation Sites screen . . . . . . . . . . . . . . . . . . . . . . . . . . . . . . . . . . . . . . . . . . .
Slide-out navigation Editing Site option . . . . . . . . . . . . . . . . . . . . . . . . . . . . . . . . . . . .
Slide-out navigation Content Explorer option . . . . . . . . . . . . . . . . . . . . . . . . . . . . . . . .
Slide-out navigation Control Room screen . . . . . . . . . . . . . . . . . . . . . . . . . . . . . . . . . .
Slide-out navigation Settings screen . . . . . . . . . . . . . . . . . . . . . . . . . . . . . . . . . . . . . . . .
Slide-out navigation About screen . . . . . . . . . . . . . . . . . . . . . . . . . . . . . . . . . . . . . . . . . .
Content Manager Explorer options . . . . . . . . . . . . . . . . . . . . . . . . . . . . . . . . . . . . . . . . . . . . . .
Setting your user preferences . . . . . . . . . . . . . . . . . . . . . . . . . . . . . . . . . . . . . . . . . . . . . .
Viewing the User Manual online . . . . . . . . . . . . . . . . . . . . . . . . . . . . . . . . . . . . . . . . . . .
E-mailing a link to a Content Manager item . . . . . . . . . . . . . . . . . . . . . . . . . . . . . . . . .
Adding a Content Manager item to your favorites . . . . . . . . . . . . . . . . . . . . . . . . . . . .
Setting a start location . . . . . . . . . . . . . . . . . . . . . . . . . . . . . . . . . . . . . . . . . . . . . . . . . . . .
Navigation pane . . . . . . . . . . . . . . . . . . . . . . . . . . . . . . . . . . . . . . . . . . . . . . . . . . . . . . . . . . . . . .
List view . . . . . . . . . . . . . . . . . . . . . . . . . . . . . . . . . . . . . . . . . . . . . . . . . . . . . . . . . . . . . . . . . . . .
Opening an item from the list view . . . . . . . . . . . . . . . . . . . . . . . . . . . . . . . . . . . . . . . . .
Filtering the list view using list columns . . . . . . . . . . . . . . . . . . . . . . . . . . . . . . . . . . . .
Using context menus . . . . . . . . . . . . . . . . . . . . . . . . . . . . . . . . . . . . . . . . . . . . . . . . . . . . .
Content Manager Explorer Basic User Manual
14
14
16
20
21
21
21
21
22
23
23
23
23
25
25
26
26
27
27
27
28
28
29
29
29
30
III
Working with multiple items displayed in the list view . . . . . . . . . . . . . . . . . . . . . . . .
Moving an item . . . . . . . . . . . . . . . . . . . . . . . . . . . . . . . . . . . . . . . . . . . . . . . . . . . . . . . . .
Copying and pasting an item . . . . . . . . . . . . . . . . . . . . . . . . . . . . . . . . . . . . . . . . . . . . . .
Deleting an item . . . . . . . . . . . . . . . . . . . . . . . . . . . . . . . . . . . . . . . . . . . . . . . . . . . . . . . . .
Refreshing the list view . . . . . . . . . . . . . . . . . . . . . . . . . . . . . . . . . . . . . . . . . . . . . . . . . . .
Edit window . . . . . . . . . . . . . . . . . . . . . . . . . . . . . . . . . . . . . . . . . . . . . . . . . . . . . . . . . . . . . . . . .
Shortcut keys . . . . . . . . . . . . . . . . . . . . . . . . . . . . . . . . . . . . . . . . . . . . . . . . . . . . . . . . . . . . . . . .
Remembered settings . . . . . . . . . . . . . . . . . . . . . . . . . . . . . . . . . . . . . . . . . . . . . . . . . . . . . . . . .
3
BluePrinting ................................................................... 41
Shared items local copies and local items . . . . . . . . . . . . . . . . . . . . . . . . . . . . . . . . . . . . . . . .
Items affected by BluePrinting . . . . . . . . . . . . . . . . . . . . . . . . . . . . . . . . . . . . . . . . . . . . . . . . .
BluePrint example . . . . . . . . . . . . . . . . . . . . . . . . . . . . . . . . . . . . . . . . . . . . . . . . . . . . . . . . . . . .
Localizing or unlocalizing items . . . . . . . . . . . . . . . . . . . . . . . . . . . . . . . . . . . . . . . . . . . . . . . .
Where used . . . . . . . . . . . . . . . . . . . . . . . . . . . . . . . . . . . . . . . . . . . . . . . . . . . . . . . . . . . . . . . . . .
BluePrint Viewer . . . . . . . . . . . . . . . . . . . . . . . . . . . . . . . . . . . . . . . . . . . . . . . . . . . . . . . . . . . . .
4
31
32
32
33
34
35
36
39
42
43
44
44
45
46
Components .................................................................. 49
Creating a Component . . . . . . . . . . . . . . . . . . . . . . . . . . . . . . . . . . . . . . . . . . . . . . . . . . . . . . . . 50
Editing a Component . . . . . . . . . . . . . . . . . . . . . . . . . . . . . . . . . . . . . . . . . . . . . . . . . . . . . . . . . . 51
5
Component field types ...................................................... 53
Field characteristics . . . . . . . . . . . . . . . . . . . . . . . . . . . . . . . . . . . . . . . . . . . . . . . . . . . . . . . . . . .
Simple text fields . . . . . . . . . . . . . . . . . . . . . . . . . . . . . . . . . . . . . . . . . . . . . . . . . . . . . . . . . . . . .
Number fields . . . . . . . . . . . . . . . . . . . . . . . . . . . . . . . . . . . . . . . . . . . . . . . . . . . . . . . . . . . . . . . .
Date fields . . . . . . . . . . . . . . . . . . . . . . . . . . . . . . . . . . . . . . . . . . . . . . . . . . . . . . . . . . . . . . . . . . .
External link fields . . . . . . . . . . . . . . . . . . . . . . . . . . . . . . . . . . . . . . . . . . . . . . . . . . . . . . . . . . .
Multimedia link fields and Component link fields . . . . . . . . . . . . . . . . . . . . . . . . . . . . . . . . .
List fields . . . . . . . . . . . . . . . . . . . . . . . . . . . . . . . . . . . . . . . . . . . . . . . . . . . . . . . . . . . . . . . . . . .
Format area fields . . . . . . . . . . . . . . . . . . . . . . . . . . . . . . . . . . . . . . . . . . . . . . . . . . . . . . . . . . . .
Format area field controls . . . . . . . . . . . . . . . . . . . . . . . . . . . . . . . . . . . . . . . . . . . . . . . . .
Inserting hyperlinks in a format area . . . . . . . . . . . . . . . . . . . . . . . . . . . . . . . . . . . . . . .
Inserting an image in a format area . . . . . . . . . . . . . . . . . . . . . . . . . . . . . . . . . . . . . . . . .
Selecting fonts in a format area . . . . . . . . . . . . . . . . . . . . . . . . . . . . . . . . . . . . . . . . . . . .
Formatting tables in a Format Area . . . . . . . . . . . . . . . . . . . . . . . . . . . . . . . . . . . . . . . . . . . . .
Inserting a table in a format area . . . . . . . . . . . . . . . . . . . . . . . . . . . . . . . . . . . . . . . . . . .
Editing the formatting of an existing table . . . . . . . . . . . . . . . . . . . . . . . . . . . . . . . . . . .
Adding content to a table . . . . . . . . . . . . . . . . . . . . . . . . . . . . . . . . . . . . . . . . . . . . . . . . .
Table properties and formatting . . . . . . . . . . . . . . . . . . . . . . . . . . . . . . . . . . . . . . . . . . . .
Applying formatting to table cells rows or columns . . . . . . . . . . . . . . . . . . . . . . . . . . .
Inserting and removing rows and columns from a table . . . . . . . . . . . . . . . . . . . . . . .
Merging and splitting cells in a table . . . . . . . . . . . . . . . . . . . . . . . . . . . . . . . . . . . . . . .
6
Multimedia Components .................................................... 77
Default Multimedia Types . . . . . . . . . . . . . . . . . . . . . . . . . . . . . . . . . . . . . . . . . . . . . . . . . . . . .
Creating a Multimedia Component . . . . . . . . . . . . . . . . . . . . . . . . . . . . . . . . . . . . . . . . . . . . . .
Editing a Multimedia Component . . . . . . . . . . . . . . . . . . . . . . . . . . . . . . . . . . . . . . . . . . . . . . .
Viewing the contents of a Multimedia Component . . . . . . . . . . . . . . . . . . . . . . . . . . . . . . . .
IV
55
56
56
56
57
58
59
59
61
66
67
68
69
69
69
70
70
74
76
76
Content Manager Explorer Basic User Manual
78
79
80
82
7
Pages .......................................................................... 83
Creating a Page . . . . . . . . . . . . . . . . . . . . . . . . . . . . . . . . . . . . . . . . . . . . . . . . . . . . . . . . . . . . . .
Editing a Page . . . . . . . . . . . . . . . . . . . . . . . . . . . . . . . . . . . . . . . . . . . . . . . . . . . . . . . . . . . . . . . .
Previewing a Page . . . . . . . . . . . . . . . . . . . . . . . . . . . . . . . . . . . . . . . . . . . . . . . . . . . . . . . . . . . .
Publishing a Page . . . . . . . . . . . . . . . . . . . . . . . . . . . . . . . . . . . . . . . . . . . . . . . . . . . . . . . . . . . . .
8
83
86
87
88
Folders ......................................................................... 89
Folder settings . . . . . . . . . . . . . . . . . . . . . . . . . . . . . . . . . . . . . . . . . . . . . . . . . . . . . . . . . . . . . . . 89
Creating a Folder . . . . . . . . . . . . . . . . . . . . . . . . . . . . . . . . . . . . . . . . . . . . . . . . . . . . . . . . . . . . . 90
Editing a Folder . . . . . . . . . . . . . . . . . . . . . . . . . . . . . . . . . . . . . . . . . . . . . . . . . . . . . . . . . . . . . . 91
9
Structure Groups ............................................................. 93
Structure Group settings . . . . . . . . . . . . . . . . . . . . . . . . . . . . . . . . . . . . . . . . . . . . . . . . . . . . . . .
Creating a Structure Group . . . . . . . . . . . . . . . . . . . . . . . . . . . . . . . . . . . . . . . . . . . . . . . . . . . .
Editing a Structure Group . . . . . . . . . . . . . . . . . . . . . . . . . . . . . . . . . . . . . . . . . . . . . . . . . . . . . .
Publishing or unpublishing Structure Groups . . . . . . . . . . . . . . . . . . . . . . . . . . . . . . . . . . . . .
94
96
97
98
10 Bundles ........................................................................ 99
About Bundles . . . . . . . . . . . . . . . . . . . . . . . . . . . . . . . . . . . . . . . . . . . . . . . . . . . . . . . . . . . . . . . 99
Creating a Bundle . . . . . . . . . . . . . . . . . . . . . . . . . . . . . . . . . . . . . . . . . . . . . . . . . . . . . . . . . . . 101
Adding one item to a Bundle . . . . . . . . . . . . . . . . . . . . . . . . . . . . . . . . . . . . . . . . . . . . . . . . . . 101
Selecting items and adding them to a Bundle . . . . . . . . . . . . . . . . . . . . . . . . . . . . . . . . . . . . 102
Selecting a Bundle and adding items to it . . . . . . . . . . . . . . . . . . . . . . . . . . . . . . . . . . . . . . . 103
Removing an item from multiple Bundles . . . . . . . . . . . . . . . . . . . . . . . . . . . . . . . . . . . . . . . 104
Removing one or more items from a Bundle . . . . . . . . . . . . . . . . . . . . . . . . . . . . . . . . . . . . 105
Publishing or unpublishing a Bundle . . . . . . . . . . . . . . . . . . . . . . . . . . . . . . . . . . . . . . . . . . . 105
Viewing the properties of a Bundle . . . . . . . . . . . . . . . . . . . . . . . . . . . . . . . . . . . . . . . . . . . . 106
Starting Workflow on a Bundle . . . . . . . . . . . . . . . . . . . . . . . . . . . . . . . . . . . . . . . . . . . . . . . . 106
Workflow tab of a Bundle . . . . . . . . . . . . . . . . . . . . . . . . . . . . . . . . . . . . . . . . . . . . . . . . . . . . 108
11 Workflow ...................................................................... 111
Picking up a Workflow Activity assigned to your Group . . . . . . . . . . . . . . . . . . . . . . . . . .
Performing a Workflow Activity you have picked up . . . . . . . . . . . . . . . . . . . . . . . . . . . . .
Reassigning a Workflow Activity you have picked up . . . . . . . . . . . . . . . . . . . . . . . . . . . .
Finishing a Workflow Activity you have performed . . . . . . . . . . . . . . . . . . . . . . . . . . . . . .
Publishing items that are in Workflow . . . . . . . . . . . . . . . . . . . . . . . . . . . . . . . . . . . . . . . . . .
Creating a Task . . . . . . . . . . . . . . . . . . . . . . . . . . . . . . . . . . . . . . . . . . . . . . . . . . . . . . . . . . . . . .
Workflow Activity Details . . . . . . . . . . . . . . . . . . . . . . . . . . . . . . . . . . . . . . . . . . . . . . . . . . . .
Workflow tab of an item subject to workflow . . . . . . . . . . . . . . . . . . . . . . . . . . . . . . . . . . . .
111
112
112
113
114
114
115
116
12 Metadata and Keywords ................................................... 119
Defining metadata . . . . . . . . . . . . . . . . . . . . . . . . . . . . . . . . . . . . . . . . . . . . . . . . . . . . . . . . . . . 120
Adding Keywords to fields . . . . . . . . . . . . . . . . . . . . . . . . . . . . . . . . . . . . . . . . . . . . . . . . . . . 122
Viewing related content . . . . . . . . . . . . . . . . . . . . . . . . . . . . . . . . . . . . . . . . . . . . . . . . . . . . . . 125
13 Publishing .................................................................... 127
Publishing and republishing items from the Content Manager . . . . . . . . . . . . . . . . . . . . . 128
Advanced Publishing options . . . . . . . . . . . . . . . . . . . . . . . . . . . . . . . . . . . . . . . . . . . . . . . . . 130
Content Manager Explorer Basic User Manual
V
Unpublishing items from the Content Manager . . . . . . . . . . . . . . . . . . . . . . . . . . . . . . . . . . 131
Viewing the publish queue . . . . . . . . . . . . . . . . . . . . . . . . . . . . . . . . . . . . . . . . . . . . . . . . . . . . 132
Cancelling a publish transaction . . . . . . . . . . . . . . . . . . . . . . . . . . . . . . . . . . . . . . . . . . . . . . . 134
14 Versioning .................................................................... 135
Content Manager items that have versions . . . . . . . . . . . . . . . . . . . . . . . . . . . . . . . . . . . . . .
About version numbers . . . . . . . . . . . . . . . . . . . . . . . . . . . . . . . . . . . . . . . . . . . . . . . . . . . . . . .
Version history . . . . . . . . . . . . . . . . . . . . . . . . . . . . . . . . . . . . . . . . . . . . . . . . . . . . . . . . . . . . . .
Viewing the version history list . . . . . . . . . . . . . . . . . . . . . . . . . . . . . . . . . . . . . . . . . . .
Viewing a version . . . . . . . . . . . . . . . . . . . . . . . . . . . . . . . . . . . . . . . . . . . . . . . . . . . . . .
Comparing two versions . . . . . . . . . . . . . . . . . . . . . . . . . . . . . . . . . . . . . . . . . . . . . . . . .
Rolling back to a previous version . . . . . . . . . . . . . . . . . . . . . . . . . . . . . . . . . . . . . . . .
Deleting a version . . . . . . . . . . . . . . . . . . . . . . . . . . . . . . . . . . . . . . . . . . . . . . . . . . . . . .
Check-in and check-out . . . . . . . . . . . . . . . . . . . . . . . . . . . . . . . . . . . . . . . . . . . . . . . . . . . . . .
Checking out an item . . . . . . . . . . . . . . . . . . . . . . . . . . . . . . . . . . . . . . . . . . . . . . . . . . . .
Checking in an item . . . . . . . . . . . . . . . . . . . . . . . . . . . . . . . . . . . . . . . . . . . . . . . . . . . . .
Undoing check-out . . . . . . . . . . . . . . . . . . . . . . . . . . . . . . . . . . . . . . . . . . . . . . . . . . . . . .
Non-checked-in items . . . . . . . . . . . . . . . . . . . . . . . . . . . . . . . . . . . . . . . . . . . . . . . . . . . . . . . .
135
135
136
136
137
137
139
140
141
143
144
145
146
15 SpellChecker ................................................................ 147
Spell-checking items . . . . . . . . . . . . . . . . . . . . . . . . . . . . . . . . . . . . . . . . . . . . . . . . . . . . . . . . . 147
16 Search ........................................................................ 149
Basic search . . . . . . . . . . . . . . . . . . . . . . . . . . . . . . . . . . . . . . . . . . . . . . . . . . . . . . . . . . . . . . . .
Searching in Bundles and Search Folders . . . . . . . . . . . . . . . . . . . . . . . . . . . . . . . . . . . . . . .
Search input . . . . . . . . . . . . . . . . . . . . . . . . . . . . . . . . . . . . . . . . . . . . . . . . . . . . . . . . . . . . . . . .
Search based on a URI . . . . . . . . . . . . . . . . . . . . . . . . . . . . . . . . . . . . . . . . . . . . . . . . . .
Search operators . . . . . . . . . . . . . . . . . . . . . . . . . . . . . . . . . . . . . . . . . . . . . . . . . . . . . . . .
Search wildcards . . . . . . . . . . . . . . . . . . . . . . . . . . . . . . . . . . . . . . . . . . . . . . . . . . . . . . .
Special characters and reserved words . . . . . . . . . . . . . . . . . . . . . . . . . . . . . . . . . . . . .
Multimedia Components . . . . . . . . . . . . . . . . . . . . . . . . . . . . . . . . . . . . . . . . . . . . . . . . .
Advanced search . . . . . . . . . . . . . . . . . . . . . . . . . . . . . . . . . . . . . . . . . . . . . . . . . . . . . . . . . . . .
150
151
151
151
152
153
153
154
154
17 Search Folders .............................................................. 159
Creating a Search Folder . . . . . . . . . . . . . . . . . . . . . . . . . . . . . . . . . . . . . . . . . . . . . . . . . . . . .
Editing a Search Folder . . . . . . . . . . . . . . . . . . . . . . . . . . . . . . . . . . . . . . . . . . . . . . . . . . . . . .
Deleting a Search Folder . . . . . . . . . . . . . . . . . . . . . . . . . . . . . . . . . . . . . . . . . . . . . . . . . . . . .
Localizing or unlocalizing a Search Folder . . . . . . . . . . . . . . . . . . . . . . . . . . . . . . . . . . . . . .
Using items in a Search Folder . . . . . . . . . . . . . . . . . . . . . . . . . . . . . . . . . . . . . . . . . . . . . . . .
Search Folders and Content Manager functionality . . . . . . . . . . . . . . . . . . . . . . . . . . . . . . .
159
161
161
162
162
163
18 Translation Manager ....................................................... 165
Translations and BluePrinting . . . . . . . . . . . . . . . . . . . . . . . . . . . . . . . . . . . . . . . . . . . . . . . . .
Translation process . . . . . . . . . . . . . . . . . . . . . . . . . . . . . . . . . . . . . . . . . . . . . . . . . . . . . . . . . .
Translation information . . . . . . . . . . . . . . . . . . . . . . . . . . . . . . . . . . . . . . . . . . . . . . . . . . . . . .
Translatable content . . . . . . . . . . . . . . . . . . . . . . . . . . . . . . . . . . . . . . . . . . . . . . . . . . . . . . . . .
Recursive content . . . . . . . . . . . . . . . . . . . . . . . . . . . . . . . . . . . . . . . . . . . . . . . . . . . . . . . . . . .
Translation Jobs . . . . . . . . . . . . . . . . . . . . . . . . . . . . . . . . . . . . . . . . . . . . . . . . . . . . . . . . . . . . .
VI
Content Manager Explorer Basic User Manual
165
168
171
171
174
175
Creating a Translation Job for SDL TMS . . . . . . . . . . . . . . . . . . . . . . . . . . . . . . . . . . . . . . .
Creating a Translation Job for SDL WorldServer . . . . . . . . . . . . . . . . . . . . . . . . . . . . . . . . .
Creating a Translation Job for SDL BeGlobal . . . . . . . . . . . . . . . . . . . . . . . . . . . . . . . . . . .
Authorizing SDL BeGlobal Translation Jobs . . . . . . . . . . . . . . . . . . . . . . . . . . . . . . .
Adding items to a Translation Job . . . . . . . . . . . . . . . . . . . . . . . . . . . . . . . . . . . . . . . . . . . . .
Viewing a Translation Job . . . . . . . . . . . . . . . . . . . . . . . . . . . . . . . . . . . . . . . . . . . . . . . . . . . .
Sending a Translation Job . . . . . . . . . . . . . . . . . . . . . . . . . . . . . . . . . . . . . . . . . . . . . . . . . . . .
Resending a Translation Job (on send error) . . . . . . . . . . . . . . . . . . . . . . . . . . . . . . . . . . . . .
Retrieving a Translation Job (on retrieve error) . . . . . . . . . . . . . . . . . . . . . . . . . . . . . . . . . .
Deleting a Translation Job . . . . . . . . . . . . . . . . . . . . . . . . . . . . . . . . . . . . . . . . . . . . . . . . . . . .
Monitoring translation progress . . . . . . . . . . . . . . . . . . . . . . . . . . . . . . . . . . . . . . . . . . . . . . .
176
178
181
183
184
185
186
186
188
189
189
19 Audience Manager and Outbound E-mail .............................. 191
Audience Manager . . . . . . . . . . . . . . . . . . . . . . . . . . . . . . . . . . . . . . . . . . . . . . . . . . . . . . . . . .
Audience Manager user interface . . . . . . . . . . . . . . . . . . . . . . . . . . . . . . . . . . . . . . . . .
Audience Manager rights and permissions . . . . . . . . . . . . . . . . . . . . . . . . . . . . . . . . .
Outbound E-mail . . . . . . . . . . . . . . . . . . . . . . . . . . . . . . . . . . . . . . . . . . . . . . . . . . . . . . . . . . . .
Creating and sending e-mails . . . . . . . . . . . . . . . . . . . . . . . . . . . . . . . . . . . . . . . . . . . . .
Outbound E-mail user interface . . . . . . . . . . . . . . . . . . . . . . . . . . . . . . . . . . . . . . . . . . .
Content Manager Explorer interface . . . . . . . . . . . . . . . . . . . . . . . . . . . . . . . . . . . . . . .
Outbound E-mail rights and permissions . . . . . . . . . . . . . . . . . . . . . . . . . . . . . . . . . . .
Legal notice . . . . . . . . . . . . . . . . . . . . . . . . . . . . . . . . . . . . . . . . . . . . . . . . . . . . . . . . . . . .
Managing Contacts . . . . . . . . . . . . . . . . . . . . . . . . . . . . . . . . . . . . . . . . . . . . . . . . . . . . . . . . . .
Address Books . . . . . . . . . . . . . . . . . . . . . . . . . . . . . . . . . . . . . . . . . . . . . . . . . . . . . . . . .
Contacts . . . . . . . . . . . . . . . . . . . . . . . . . . . . . . . . . . . . . . . . . . . . . . . . . . . . . . . . . . . . . . .
Contact filtering . . . . . . . . . . . . . . . . . . . . . . . . . . . . . . . . . . . . . . . . . . . . . . . . . . . . . . . .
Creating a Contact . . . . . . . . . . . . . . . . . . . . . . . . . . . . . . . . . . . . . . . . . . . . . . . . . . . . . .
Updating a Contact . . . . . . . . . . . . . . . . . . . . . . . . . . . . . . . . . . . . . . . . . . . . . . . . . . . . .
Deactivating and deleting a Contact . . . . . . . . . . . . . . . . . . . . . . . . . . . . . . . . . . . . . . .
Searching Contacts . . . . . . . . . . . . . . . . . . . . . . . . . . . . . . . . . . . . . . . . . . . . . . . . . . . . .
Viewing Contact e-mails . . . . . . . . . . . . . . . . . . . . . . . . . . . . . . . . . . . . . . . . . . . . . . . . .
Creating a Local Address Book . . . . . . . . . . . . . . . . . . . . . . . . . . . . . . . . . . . . . . . . . . .
Importing Contacts and Keywords . . . . . . . . . . . . . . . . . . . . . . . . . . . . . . . . . . . . . . . .
Exporting Contacts and Keywords . . . . . . . . . . . . . . . . . . . . . . . . . . . . . . . . . . . . . . . .
Managing Segments . . . . . . . . . . . . . . . . . . . . . . . . . . . . . . . . . . . . . . . . . . . . . . . . . . . . . . . . .
Creating or updating Segments . . . . . . . . . . . . . . . . . . . . . . . . . . . . . . . . . . . . . . . . . . .
Creating a Segment from search . . . . . . . . . . . . . . . . . . . . . . . . . . . . . . . . . . . . . . . . . .
Copying or moving Segments . . . . . . . . . . . . . . . . . . . . . . . . . . . . . . . . . . . . . . . . . . . .
Editing Segments in Child Publications . . . . . . . . . . . . . . . . . . . . . . . . . . . . . . . . . . . .
Deleting Segments . . . . . . . . . . . . . . . . . . . . . . . . . . . . . . . . . . . . . . . . . . . . . . . . . . . . . .
Managing Distribution Lists . . . . . . . . . . . . . . . . . . . . . . . . . . . . . . . . . . . . . . . . . . . . . . . . . .
Distribution Lists . . . . . . . . . . . . . . . . . . . . . . . . . . . . . . . . . . . . . . . . . . . . . . . . . . . . . . .
Creating or modifying a Distribution List from search . . . . . . . . . . . . . . . . . . . . . . .
Adding Contacts to a Static Distribution List . . . . . . . . . . . . . . . . . . . . . . . . . . . . . . .
Removing Contacts from a Static Distribution List . . . . . . . . . . . . . . . . . . . . . . . . . .
Creating and modifying a Dynamic Distribution List . . . . . . . . . . . . . . . . . . . . . . . .
Creating a snapshot of a Dynamic Distribution List . . . . . . . . . . . . . . . . . . . . . . . . .
Managing e-mail content . . . . . . . . . . . . . . . . . . . . . . . . . . . . . . . . . . . . . . . . . . . . . . . . . . . . .
Creating Folders for Mailings Distribution Lists and Segments . . . . . . . . . . . . . . .
191
191
193
194
195
196
198
199
200
200
200
201
201
205
207
209
209
213
214
215
225
229
230
232
233
233
234
234
235
236
238
238
239
242
243
244
Content Manager Explorer Basic User Manual
VII
Creating Components . . . . . . . . . . . . . . . . . . . . . . . . . . . . . . . . . . . . . . . . . . . . . . . . . . .
Creating and previewing an e-mail Page . . . . . . . . . . . . . . . . . . . . . . . . . . . . . . . . . . .
Personalizing an e-mail Page . . . . . . . . . . . . . . . . . . . . . . . . . . . . . . . . . . . . . . . . . . . . .
Classifying Content and Contacts . . . . . . . . . . . . . . . . . . . . . . . . . . . . . . . . . . . . . . . . .
Managing Mailings . . . . . . . . . . . . . . . . . . . . . . . . . . . . . . . . . . . . . . . . . . . . . . . . . . . . . . . . . .
Creating a Mailing . . . . . . . . . . . . . . . . . . . . . . . . . . . . . . . . . . . . . . . . . . . . . . . . . . . . . .
Personalizing a Mailing . . . . . . . . . . . . . . . . . . . . . . . . . . . . . . . . . . . . . . . . . . . . . . . . .
Testing a Mailing . . . . . . . . . . . . . . . . . . . . . . . . . . . . . . . . . . . . . . . . . . . . . . . . . . . . . . .
Creating an E-mail Campaign . . . . . . . . . . . . . . . . . . . . . . . . . . . . . . . . . . . . . . . . . . . .
Sending all Mailings in an E-mail Campaign . . . . . . . . . . . . . . . . . . . . . . . . . . . . . . .
Sending a Mailing . . . . . . . . . . . . . . . . . . . . . . . . . . . . . . . . . . . . . . . . . . . . . . . . . . . . . .
Triggering a Mailing . . . . . . . . . . . . . . . . . . . . . . . . . . . . . . . . . . . . . . . . . . . . . . . . . . . .
Clearing the e-mail queue for a Mailing . . . . . . . . . . . . . . . . . . . . . . . . . . . . . . . . . . . .
Viewing Mailing statistics . . . . . . . . . . . . . . . . . . . . . . . . . . . . . . . . . . . . . . . . . . . . . . . . . . . .
Mailing statistics . . . . . . . . . . . . . . . . . . . . . . . . . . . . . . . . . . . . . . . . . . . . . . . . . . . . . . .
Viewing Mailing statistics . . . . . . . . . . . . . . . . . . . . . . . . . . . . . . . . . . . . . . . . . . . . . . .
Viewing Distribution List statistics . . . . . . . . . . . . . . . . . . . . . . . . . . . . . . . . . . . . . . . .
Viewing Contact details and Mailing details . . . . . . . . . . . . . . . . . . . . . . . . . . . . . . . .
Refreshing statistics . . . . . . . . . . . . . . . . . . . . . . . . . . . . . . . . . . . . . . . . . . . . . . . . . . . . .
244
245
248
249
250
251
254
257
259
261
263
264
267
267
268
269
271
274
275
20 User Generated Content .................................................. 277
Where to find comments and ratings . . . . . . . . . . . . . . . . . . . . . . . . . . . . . . . . . . . . . . . . . . .
Viewing and filtering all comments and ratings in Content Manager . . . . . . . . . . . . . . . .
Viewing and filtering all comments and ratings in a specific Publication . . . . . . . . . . . .
Viewing and filtering comments in the comments screen . . . . . . . . . . . . . . . . . . . . . . . . . .
Viewing and filtering ratings in the ratings screen . . . . . . . . . . . . . . . . . . . . . . . . . . . . . . . .
Comments tab for a Component or Page . . . . . . . . . . . . . . . . . . . . . . . . . . . . . . . . . . . . . . . .
Ratings tab for a Component or Page . . . . . . . . . . . . . . . . . . . . . . . . . . . . . . . . . . . . . . . . . . .
Viewing and filtering comments for a Contact . . . . . . . . . . . . . . . . . . . . . . . . . . . . . . . . . . .
Ratings tab for a Contact . . . . . . . . . . . . . . . . . . . . . . . . . . . . . . . . . . . . . . . . . . . . . . . . . . . . .
Moderating a comment . . . . . . . . . . . . . . . . . . . . . . . . . . . . . . . . . . . . . . . . . . . . . . . . . . . . . . .
Deleting a comment . . . . . . . . . . . . . . . . . . . . . . . . . . . . . . . . . . . . . . . . . . . . . . . . . . . . . . . . .
Enforcing comment moderation for a Component or Page . . . . . . . . . . . . . . . . . . . . . . . .
Hiding all comments for a Component or Page on the published Web page . . . . . . . . . .
Disallowing commenting on a Component or Page . . . . . . . . . . . . . . . . . . . . . . . . . . . . . . .
Disallowing rating of a Component or Page . . . . . . . . . . . . . . . . . . . . . . . . . . . . . . . . . . . . .
Adding a comment to a Component or Page . . . . . . . . . . . . . . . . . . . . . . . . . . . . . . . . . . . . .
Changing the appearance of comments on the published Web page . . . . . . . . . . . . . . . . .
Deleting or unpublishing items with comments or ratings . . . . . . . . . . . . . . . . . . . . . . . . .
277
279
279
280
283
285
285
286
288
289
290
291
291
292
292
293
293
294
21 WebDAV Connector ........................................................ 295
Viewing binary files in Multimedia Components using WebDAV . . . . . . . . . . . . . . . . . .
Accessing items from an external application using WebDAV . . . . . . . . . . . . . . . . . . . . .
File extensions for Content Manager items . . . . . . . . . . . . . . . . . . . . . . . . . . . . . . . . .
Allowed operations . . . . . . . . . . . . . . . . . . . . . . . . . . . . . . . . . . . . . . . . . . . . . . . . . . . . .
Opening existing items . . . . . . . . . . . . . . . . . . . . . . . . . . . . . . . . . . . . . . . . . . . . . . . . . .
Creating new items . . . . . . . . . . . . . . . . . . . . . . . . . . . . . . . . . . . . . . . . . . . . . . . . . . . . .
Editing items . . . . . . . . . . . . . . . . . . . . . . . . . . . . . . . . . . . . . . . . . . . . . . . . . . . . . . . . . . .
Viewing items . . . . . . . . . . . . . . . . . . . . . . . . . . . . . . . . . . . . . . . . . . . . . . . . . . . . . . . . . .
VIII
Content Manager Explorer Basic User Manual
295
296
296
297
298
300
301
302
Renaming items . . . . . . . . . . . . . . . . . . . . . . . . . . . . . . . . . . . . . . . . . . . . . . . . . . . . . . . .
Deleting items . . . . . . . . . . . . . . . . . . . . . . . . . . . . . . . . . . . . . . . . . . . . . . . . . . . . . . . . . .
Cutting copying and pasting items . . . . . . . . . . . . . . . . . . . . . . . . . . . . . . . . . . . . . . . .
Checking items in and checking items out . . . . . . . . . . . . . . . . . . . . . . . . . . . . . . . . . .
Troubleshooting Opening an item containing non-alphanumeric characters . . . . . . . . . .
302
302
302
302
303
Content Manager Explorer Basic User Manual
IX
X
Content Manager Explorer Basic User Manual
Chapter 1
Getting started
The Content Manager enables you to create, manage, and organize Web site content
easily and efficiently. Getting started explains the fundamental concepts involved in using
the Content Manager Explorer such as Publications, Web site building blocks, Publication
rights and permissions, various other features and functionality and how to configure your
browser.
You can create content using the Content Manager Explorer, a browser-based interface
that you can use to access, create, edit, and publish content. Multiple authors, editors
and designers can contribute, thereby allowing you to collaborate and align your content
objectives. You can maintain Web content throughout its entire life cycle: from adding new
content to publishing the content to your Web site. All versions of content are saved,
thereby allowing you to view and track changes.
Note: You can also interact with the Content Manager through WebDAV, an industry
standard interaction model that lets you browse through your Content Manager folders and
work with items from any WebDAV-compliant interaction, such as Windows Explorer.
Basic Content Manager concepts
For content authors, the most important building blocks for creating (Web) content are
Components and Pages and the most important concept is BluePrinting which manages
content sharing and localizing between Web site Publications.
Components
Components define text or multimedia content:
■
In the Content Manager Explorer, Components are displayed as forms with
fields that you can fill in.
■
In Experience Manager, Components are displayed within a Page.
Components are based on Schemas that define the kinds of fields you can specify.
Content Manager Explorer Basic User Manual
1
Getting started
Pages
Pages define Web content. When you have created Components, you need to add
them to Pages and publish these Pages to a Web site.
For each Component you add to a Page, you need to select a Component Template to
define what the Component should look like on the published Web page. (The
combination of a Component and Component Template on a Page is referred to as a
Component Presentation.)
When you create a Page you also need to define what the Page should look like. You
do this by selecting a Page Template that defines the overall layout of the Page and its
look & feel.
BluePrinting
A BluePrint is a hierarchy of Publications in which Parent Publications share content
with Child Publications. BluePrinting enables you to reuse structure, content, and
2
Content Manager Explorer Basic User Manual
Getting started
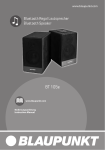
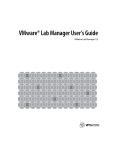
design between Publications. The BluePrint Viewer provides a visualization of the
Parent-Child relationships for an item within a BluePrint:
In this BluePrint, you can see the SDL Tridion 2011 Launch Component is shared
from the 00_Corporate Publication to its Child Publications. The following image
shows the 02_France Publication in the Content Manager Explorer. You can see that in
this Publication SDL Tridion 2011 Launch is a (Local Copy) which means the
shared item has been localized and is now editable:
Child Publications can contain a combination of:
■
Shared items from Parent Publications (read-only items)
■
Local copies of shared items (editable copies of shared items created by
localizing them)
■
Local items (items created in the Child Publication)
Content Manager Explorer Basic User Manual
3
Getting started
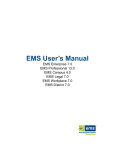
Publications
In the Content Manager, all building blocks are saved in Publications. A Publication is a
collection of content and layout items which are often combined to create a Web site or
content for other channels.
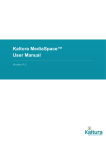
A Publication organizes content using Folders and Structure Groups. Folders store content
and design items, while Structure Groups store Pages. The following image shows a
Publication:
You use a Publication to:
■
Create, organize, and manage content, layout, and Pages
■
Manage user access using permissions and rights
■
Create and initiate Workflow processes so that users create and edit items following
a predefined set of activities
■
Share and reuse content
■
Create a site URL structure through Structure Groups
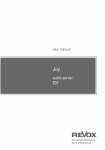
Web site building blocks
The main building blocks used to create Web sites are Schemas, Components, Component
Templates, Pages, and Page Templates.
The following diagram shows the relationship between the main Web site building blocks:
The Content Manager allows you to create content and layout items separately and then
to combine these items to create publishable Pages. As a result, teams in your organization
can accomplish what they do best. For example, authors can create content, designers
4
Content Manager Explorer Basic User Manual
Getting started
can design the look-and-feel of Pages, and editors can determine what content is published
where. Depending upon your role in your organization, you may participate in creating
or using any of these building blocks.
Schemas
Schemas define the structure of content and determine the type of content that authors
can create. For example, a Schema called "Press Release" could define the following
fields:
■
Headline
■
Date
■
Summary
■
Body
Components
Components based on this Schema share the structure defined by the Schema.
Components are text or multimedia content based on Schemas. In the Content Manager
Explorer, Components are often displayed as forms that content authors can fill in.
Component Templates
Component Templates display the contents of a Component using scripting and
HTML formatting.
Component Presentations
Component Presentations combine a Component (content) with a Component Template
(design). These Component Presentations are defined on a Page.
Page Templates
Page Templates determine which Component Presentations a Page displays and
determines the overall layout of the Page. Also, a Page Template often determines the
branding (the look-and-feel) of the Page.
Pages
Pages combine a Page Template and one or more Component Presentations.
Depending upon your role in your organization, you may participate in creating or using
any of these building blocks.
Content Manager Explorer Basic User Manual
5
Getting started
Publication rights and permissions
A right determines the type of building block that a Content Manager user can work with.
Permissions determine if you can view, create, delete, or localize the building blocks for
which you have rights.
Your system administrator assigns you with specific rights for each Publication that you
work in and Permission settings for each Folder or Structure Group in that Publication. For
example, if you have Component Management rights and Read and Write permissions
set on a Folder, you can create and edit Components but you cannot delete or localize them
Additional features and functionality
Additional features and functionality important to the management of content are:
BluePrinting, Versioning, Check-in and check-out items, Search and Workflow.
BluePrinting
A BluePrint is a relationship between Publications whereby Publications share structure,
content, and design from and with other Publications. You can view the BluePrint for an
item in the “BluePrint Viewer ” on page 46.
Versioning
The Content Manager creates a new version or an item every time you save changes. As a
result, you can track and compare versions of items using the Version History List,
which lists all the versions of a selected item including the current version.
Note: For more information using versions of items, see “Versioning ” on page 135.
Check-in and check-out items
You can check out an item that you are currently working on. This gives you exclusive
use of the current version and essentially blocks editing to all other users. The Content
Manager automatically checks out an item when you open it for edit. However, you can
also explicitly check out and then check it in when you have completed work on the
item.
After you have completed work on the item, you can check the item back in for use by
other users.
Note: For more information about checking-in and checking-out an item, see “Check-in
and check-out ” on page 141.
6
Content Manager Explorer Basic User Manual
Getting started
Search
Using the Search View you can search for specific items specifying search parameters on
a general or advanced level.
Note: For more information about searching for items in the Content Manager, see
“Search ” on page 149.
Bundles
A Bundle is a dynamic container that can contain any number of content items, including
other Bundles. The idea behind a Bundle is to collect items that are related in some way
(for example, all items related to a specific marketing campaign) in a single container, so
they can be used collectively.
Specifically, Bundles can be put in workflow by a user, which causes all of its items to go
through workflow too.
Workflow
You use Workflow to define a flow of activities that bring a task to completion. Activities
are assigned to users and when a user completes an activity, the Content Manager
automatically assigns the next activity until the task is complete. Workflow processes
may be associated with Components, Pages, Templates and Bundles.
In the Content Manager Explorer, you can view activities that are assigned to you in the
Assigned view in the Things to do panel.
Configuring your browser
The browser settings described in this section ensure that the Content Manager
Explorer—the interface to the Content Manager—displays correctly on your screen.
The Content Manager Explorer runs in a browser, so you can access the interface by
typing the address of the Content Manager in the address bar of your browser.
To access Content Manager Explorer easily, you can simply add the address of the Content
Manager to your browser favorites. If you do not know the address of the Content
Manager, please consult your system administrator.
You can access the Content Manager Explorer using the following browsers:
■
Microsoft Internet Explorer 11.0
■
Microsoft Internet Explorer 10.0
■
Microsoft Internet Explorer 9.0
■
The latest version of Mozilla Firefox
■
The latest version of Google Chrome
Content Manager Explorer Basic User Manual
7
Getting started
■
Safari 7.0 for the Mac
■
Safari 6.1 for the Mac
■
Safari 6.0 for the Mac
Configuring your Web browser for Content
Manager Explorer
This section explains how to configure your Web browser for use with Content Manager
Explorer.
About this task
Note: Depending on rights configured, not all users of the client system may be able to
perform these tasks.
Procedure
1. To configure the browser, on your client machine, start Internet Explorer (even if you
do not intend to use Internet Explorer as your browser).
2. In Internet Explorer, if you do not see the menu bar, press your left Alt key on the
keyboard to display it.
3. Select View > Encoding > Unicode from the menu. This sets the browser encoding
to Unicode.
4. Select Tools > Internet Options from the menu. The Internet Options dialog opens.
5. Access the Security tab, select the Local intranet zone and click Sites. The Local
intranet dialog with generic site settings opens.
6. Select Advanced to open a Local intranet dialog listing sites associated with this
zone.
7. Enter the URL of your Content Manager Explorer Web site and click Add. The site is
added to the list. Click Close to close this dialog, and OK to close the generic sites
dialog. The settings for the Local intranet zone reappear.
8. Click Custom Level. The Security Settings - Local intranet Zone dialog opens.
9. In the list of settings, find the following settings and set each to the value Enabled:
■
■
ActiveX:
■
Run ActiveX controls and plug-ins
■
Script ActiveX controls marked safe for scripting
Downloads:
■
■
Miscellaneous:
■
8
File downloads
Submit non-encrypted form data
Content Manager Explorer Basic User Manual
Getting started
■
Scripting:
■
Active scripting
■
Allow Programmatic clipboard access
Click OK to apply these settings and close the dialog. The Internet Options dialog
reappears, still showing the Security tab.
10. Select the Privacy tab and click Advanced. The Advanced Privacy Settings dialog
opens.
11. Select Override automatic cookie handling and then select Always allow session
cookies. Then click OK to close the Advanced Privacy Settings dialog. The Internet
Options dialog reappears, still showing the Privacy tab.
12. Click OK to close the Internet Options dialog.
13. If you intend to use Mozilla Firefox as your browser, do the following:
a. While logged in as an end user, launch Firefox and type about:support in
the address bar.
b. In the Application Basics area, check the Profile Directory property and
click Open Containing Folder next to it.
Result: Windows Explorer (Windows) or Finder (Mac) opens, showing
the Firefox profile folder.
c. Close Firefox.
d. In the folder, check for the presence of a file called user.js. If it exists, open
it in a plain-text editor; if it does not exist, create it in a plain-text editor.
e. Add the following lines anywhere in the user.js file:
user_pref("capability.policy.policynames", "allowclipb
oard");
user_pref("capability.policy.allowclipboard.sites",
"http://<cmsname>");
user_pref("capability.policy.allowclipboard.Clipboard.
cutcopy", "allAccess");
user_pref("capability.policy.allowclipboard.Clipboard.
paste", "allAccess");
user_pref("browser.link.open_newwindow", 2);
in which <cmsname> is the domain name of the Content Manager server
machine.
Note: You can also add comments on separate lines. Start these lines with a
double forward slash (//).
Content Manager Explorer Basic User Manual
9
Getting started
f. Save and close the user.js file.
g. If you are using Firefox on Mac OS X, also do the following:
■
In the Apple ® menu, select System Preferences, then Keyboard
and Mouse, then Keyboard Shortcuts
■
Under Full Keyboard Access, select All controls.
Result: Mozilla Firefox is now properly configured.
14. If you intend to use Google Chrome as your browser, SDL Tridion recommends to
disable the auto-update functionality of Chrome.
Result: By default, Google Chrome is configured to auto-update to its latest
version. Because this user interface cannot be guaranteed to work with a
newer version of Google Chrome,disabling auto-updating is recommended.
To disable auto-updating in Google Chrome, refer to this Web page:
“http://www.chromium.org/administrators/turning-off-auto-updates”.
15. If you want to have additional information available about the current state of its
window, enable the browser Status Bar (visible at the bottom of the screen):
■
In Mozilla Firefox, select View > Status Bar
■
In Microsoft Internet Explorer, select View > Toolbars > Status Bar
■
In Google Chrome, this feature is not available
16. For all browsers you intend to use, disable popup-blocking functionality.
Recommended system display properties
To optimize how your browser displays the Content Manager Explorer, set your screen
resolution to at least 1024x768 and your font size to small or 96 dpi.
Procedure
1. On a PC, on your desktop, right click and select Properties. The Display Properties
window appears.
2. On the Settings tab, set your screen resolution to 1024x768 or higher.
3. Click the Advanced button. A window appears in which you can change the font size.
4. On the General tab, set your font size to small or 96 dpi.
5. Click OK to return to the Display Properties window.
6. Click OK to save changes.
7. Alternatively, on a Mac, select System Preferences and in the dialog that opens,
select Displays in the hardware area.
8. Under Resolutions, select a resolution of 1024x768 or higher.
9. Close the dialog.
10
Content Manager Explorer Basic User Manual
Getting started
Content Manager Explorer troubleshooting
reference
This troubleshooting section describes how to fix the most common problems with the
Content Manager Explorer.
Problem
Diagnosis
Action
Your browser is using
Accessing the GUI pops up an
error with 'Object required' in the a pop-up blocker such
as the one included in
Details area.
the Google Toolbar.
Disable pop-up blocker(s)
for the Content Manager
Explorer Web site.
Your browser settings
are incorrect.
Configure your browser as
instructed.
One of the following happens:
■
Right-clicking pops up an
error with 'Object does
not support this property
or method' in the Details
area.
■
Trying to open a
dropdown list results in a
series of JavaScript
errors.
Content Manager Explorer Basic User Manual
11
Getting started
12
Content Manager Explorer Basic User Manual
Chapter 2
Content Manager Explorer
The Content Manager Explorer is the interface to the Content Manager. This section
describes the main navigation areas within the Content Manager Explorer.
1. “Browser ” on page 7
2. Address bar
3. Content Manager Explorer window
4. “Ribbon ” on page 14
5. “Navigation pane ” on page 28
6. “List view ” on page 29
7. “Edit window ” on page 35
Content Manager Explorer Basic User Manual
13
Content Manager Explorer
Content Manager Explorer Ribbon
The Content Manager Explorer displays buttons and controls in a Ribbon. The Ribbon is
a tabbed toolbar that contains controls for all the operations you can perform.
More frequently used operations have bigger buttons. The main screen has a Ribbon, and
individual dialogs can also have a Ribbon.
The Ribbon may not display all available controls, or may disable certain controls. What
the Ribbon looks like for you exactly depends on the following:
■
Your security settings
■
The currently selected item
■
The currently displayed item
Note also that the same control may appear in multiple tabs of the Ribbon.
When you create a new item or edit an item, the window in which you work also displays
a Ribbon, with its own tabs and controls. Here is an example of a Ribbon specific to a
dialog:
To save screen space, you can collapse the ribbon to a simple, icons-only toolbar by
clicking the collapse/expand button on the left hand side:
Click the collapse/expand button again to return the toolbar to its Ribbon appearance.
Content Manager Explorer remembers the collapsed or expanded state of your Ribbon
toolbars across sessions as a user preference.
Ribbon tabs
The tabs in the toolbar Ribbon contain controls grouped into functional areas.
The Home tab displays controls for editing, managing and publishing items.
The Create tab displays controls for creating new Content Manager items.
The following controls are active on a Folder:
The following controls are active on a Structure Groups:
14
Content Manager Explorer Basic User Manual
Content Manager Explorer
The following controls are active on a Category:
The Organize tab displays controls for managing BluePrinting and taxonomies, and
controls for viewing details about items.
The Workflow tab displays controls to perform actions on Workflow activities and
Workflow processes. The controls are active for Components, Pages, Component
Templates and Page Templates that are in Workflow.
The E-mail Management tab displays controls to manage Mailings and Mailing
Campaigns and view Mailing Statistics. The controls are active in the Outbound E-mail
node in a Publication.
The Audience Management tab displays controls for managing Contacts. The controls
Content Manager Explorer Basic User Manual
15
Content Manager Explorer
are active in the Audience Manager node in a Publication.
The Administration tab displays controls for System Administrators.
The Tools tab displays quick links to add ons.
Ribbon controls
The following controls appear in either the main screen Ribbon, in a Ribbon of one or
more dialogs, or in both.
Note: Depending on your security profile, not all of these controls may be available in
your user interface.
Icon
16
Label
Description
Abbreviation
Insert a piece of text and its abbreviation at the current
cursor location, or provide an abbreviation for the
selected text.
Add item to my
favorites
Add a bookmark pointing to the currently selected
item in the list, or the current item open in this dialog.
Anchor
Insert, edit or remove an anchor at the current cursor
position. For more information, refer to “Format area
fields ” on page 59
Blueprint
Hierarchy
Show the Blueprint hierarchy of which the current
Publication is a part, and the status of the currently
selected item in it (shared, localized or local item).
(Bold)
Make text bold.
Content Manager Explorer Basic User Manual
Content Manager Explorer
Icon
(none)
Label
Description
(Bullet list)
Make a bullet list.
(Center)
Center text.
Character
Insert a special character at the current cursor position.
Check in
Check in your changes to create a new version of the
current item.
Check out
Check out the current item for editing.
Check spelling
Check the spelling of text in the current dialog.
Classify
Add a Keyword association to one or more Content
Manager item(s).
Compare
Compare two versions of an item.
Copy
Copy the currently selected item(s) or content to the
clipboard, without removing.
Copy item link to
clipboard
Put a link to the currently selected item in the list, or
the item currently open in this dialog, in your
clipboard so that you can paste it in another
application or document.
Current elements
Select an HTML element that encloses the current
cursor position. This control is especially useful to
select tables.
Cut
Move the currently selected item(s) or content to the
clipboard, removing the item(s) or content from its
current position.
Delete
Delete the currently selected item in the content area.
Finish Activity
Release the current item, which you had previously
started activity on, so that it enters the next workflow
state.
History
Show all previous versions of the current item in a list.
Horizontal line
Insert a horizontal line at the current cursor position.
Hyperlink
Insert or edit a link to a Component or to an external
resource. For more information, refer to “Inserting
hyperlinks in a format area ” on page 66.
Image
Open a dialog to insert an image at the current cursor
position. For more information, see “Inserting an image in a format area ” on page 67.
(Indent)
Indent text.
(Italic)
Make text italic.
(Left-align)
Left-align text.
Content Manager Explorer Basic User Manual
17
Content Manager Explorer
Icon
Label
Description
Load images
Display images in a Format Area (they are not loaded
by default, in order to optimize performance).
Localize
Create a local copy of a shared BluePrint item.
New Category
Create a new Category. For more information, refer to
the implementer's documentation portal.
New Component
Create a new Component.
New Component
Template
Create a new Component Template. For more
information, refer to the implementer's documentation
portal.
New Custom Page Create a new Custom Page. For more information,
refer to the implementer's documentation portal.
New Folder
Create a new Folder.
New Group
Create a new Group of users. For more information,
refer to the implementer's documentation portal.
New Keyword
Create a new Keyword. For more information, refer to
the implementer's documentation portal.
New Multimedia
Component
Create a new Multimedia Component.
New Multimedia
Type
Add a new Multimedia Type. For more information,
refer to the implementer's documentation portal.
New Page
Create a new Page.
New Page
Template
Create a new Page Template.1
New Publication
Create a new Publication.1
New Publication
Target
Create a new Publication Target.1
New Schema
Create a new Schema. 1
New Structure
Group
Create a new Structure Groups.
New Target Group Create a new Target Group.
New Target Type
Create a new Target Type.
New Template
Building Block
Create a new Template Building Block.1
New User
Create a new User. 1
New Virtual Folder Create a new Virtual Folder. For more information,
refer to “Search Folders ” on page 159
18
Content Manager Explorer Basic User Manual
Content Manager Explorer
Icon
(none)
Label
Description
(Numbered list)
Create a numbered list.
Open
Open the currently selected item in the content area. If
the item is a Multimedia Component, this will show
the item's properties rather than its binary content.
Open approval
status list
Show the various approval statuses.1
Open with
WebDAV
Open the currently selected item as a WebDAV item. If
the item is a Multimedia Component, this will open
the binary item in the software application associated
with it. (Note that any changes you make in the
external application will not be reflected in SDL
Tridion.) If the item is not a Multimedia Component,
the XML of the item is displayed.
Paste
Paste the contents of the clipboard in the current list or
at the current cursor position.
Preview
Preview the currently selected item.
Properties
Show the properties of the current item.
Publishing queue
See the status of items that were submitted for
publishing.
Publish
Submit the current item to be published to one or more
destinations.
Reclassify
Replace a Keyword association in one or more
Content Manager items(s).
Redo
Redo the last undone edit action.
(Right-align)
Right-align text.
Save
Save the current item without closing the dialog.
Save and close
Save the current item and then close the dialog.
Save and new
Save the current item, close the dialog and open a new,
empty dialog to create a new item of the same type.
Section type
Insert a header, paragraph marker or HTML <div>
element.
Send item link by
e-mail
Open an e-mail using your default e-mail client
containing a link to the currently selected item in the
list, or the item currently open in this dialog.
Set language
Mark selected text as being in a specific language.
Start Activity
Place an exclusive lock on the current item, which has
been assigned to your user Group through workflow.
Content Manager Explorer Basic User Manual
19
Content Manager Explorer
Icon
Label
Description
Start Activity and
Open
Start Activity on the current item (see above) and open
it in a dialog for editing.
Table
Open a dialog to insert a new table at the current
cursor position, or to format the currently selected
table. For more information, refer to “Formatting tables in a Format Area ” on page 69.
Translate
Submit the current item to be translated.
Unclassify
Remove a Keyword association from one or more
Content Manager item(s).
(Underline)
Underline text.
Undo
Undo the last edit action
Undo check-out
Undo a previous check-out of the current item.
(Unindent)
Unindent text.
Unlocalize
Permanently delete a previously created local copy of
a shared BluePrint item.
Unpublish
Remove a previously published item from one or more
of the destinations to which it was published.
Validate
Validate the HTML in the current Format Area field.
Where Used
Show which dependencies this item has in relation to
other items: which items use it, which items it uses,
and so on.
Note: 1 for more information, refer to the implementer's documentation portal.
Breadcrumb trail
The breadcrumb trail shows the path to your current location in the navigation tree on the
left.
The breadcrumb trail is located directly under the Ribbon in the main screen of Content
Manager Explorer, on the left:
You can click on any of the node names in the breadcrumb trail to jump to the
corresponding node in the tree and load the contents of that node in the content area.
20
Content Manager Explorer Basic User Manual
Content Manager Explorer
Info Bar
The Info Bar, at the top right of your screen, displays your name, notifications, and
Workflow items.
The notification area of the Info Bar (the flag icon with the number next to it) gives you
access to all informational messages, warnings and errors that have occurred. Click this
area to see the notifications in a balloon popup. You can toggle between Show All and
Show Pending Only.
Slide-out navigation
Select the slide-out button at top left to access the slide-out navigation groups and items.
Slide-out navigation Home screen
In the slide-out navigation, select Home at the top to see a personalized welcome screen.
This screen contains a quick search interface, quick links to help topics to get you
started, and your personal favorites.
Search
To search the texts of items in the Content Manager, enter your search term at top
right and click the search button. Alternatively, to search user documentation, enter
your search term under Search for, select Documentation from the dropdown, and
click Search.
Favorites
In the main content area, you see a list of Content Manager items you have selected as
your personal favorites in Content Manager Explorer. Select Open under an item in
the list to go directly to that item, or Go to Location to go to the location that contains
the item (as displayed).
To add an item to this list, go to the list view in Content Manager Explorer, select the
item you want to add, and in the Ribbon Home tab, select Send to My Favorites.
Quick Links
At top right, below the search area, you see the heading Quick Links. Go here to
select basic help topics to get you started.
Slide-out navigation Activities screen
Select Activities in the slide-out navigation to see the Workflow Activities screen, which
shows you Workflow Activities assigned to your Group, started by you, and finished by
you. From this screen, you can also start and finish Activities you see.
Assigned Activities
Click Assigned Activities to see Activities assigned to the Group or Groups you
belong to, or to you personally. Click any item in the list to see details about the
Activity, such as the Content Manager items associated with this Activity, and to pick
Content Manager Explorer Basic User Manual
21
Content Manager Explorer
up or reassign this Activity (by clicking Start Activity or Reassign Activity,
respectively).
Started Activities
Click Started Activities to see Activities you picked up but did not yet finish. Click
any item in the list to see details about the Activity, such as the Content Manager items
associated with this Activity, and to finish or reassign this Activity (by clicking Finish
Activity or Reassign Activity, respectively).
Finished Activities
Click Finished Activities to see Activities you performed and finished. Click any
item to see details about the Activity, such as the Content Manager items associated
with this Activity.
The Related Items area shows the list of items associated with the current Activity.
Click the Open button at the right of an item to open the item in a dialog.
Slide-out navigation Help screen
Select Help in the slide-out navigation to see the Help & Community screen, which has
controls for accessing help and documentation, as well as a variety of options to connect
with other users of the product.
Help and Documentation
The following documentation deliverables help you use the product:
22
■
Topics for Authors and Editors - Content Manager opens help topics
specific to the Content Manager Explorer user interface. These topics are
intended for users who use this GUI to create and edit content.
■
Topics for Authors and Editors - Web site editing opens help topics specific
to the Experience Manager user interface. These topics are intended for users
who use this GUI to create and edit content.
■
Topics for Administrators and Implementers opens the help topics in the
documentation portal. These topics are intended for people who want to install,
implement and extend product functionality. These topics are hosted on an
online SDL LiveContent Reach Web site, so you need an active internet
connection. You also need a username and password to log on to the site. SDL
Customer Support can supply you with these credentials.
Content Manager Explorer Basic User Manual
Content Manager Explorer
Community
The following resources provide you with ways to connect with other implementers
of the product, as well as with the people who create SDL Tridion:
■
SDL Tridion World is a community Web site for implementers of SDL
Tridion and its add-on products. This is an online Web site, so you need an
active internet connection. You also need a username and password to log on
to the site. SDL Customer Support can supply you with these credentials.
■
SDL Tridion Ideas lets you submit ideas to improve or expand our product,
and vote on other people's ideas.
■
SDL Tridion Product Updates gives you access to the latest patches to your
current release.
Education
Select SDL Tridion Training to see when trainings are held, and how you can sign
up for trainings.
Slide-out navigation Sites screen
Select Sites in the slide-out navigation to see the Sites screen, which shows a list of SDL
Tridion-managed Web sites you can visit. Select one of the items on the screen to go to
the corresponding Web address displayed (opens in a new tab).
Slide-out navigation Editing Site option
Select Editing Site in the slide-out navigation to return to the Web page you were editing
in Experience Manager before switching to Content Manager Explorer. This option
only appears if you arrive at Content Manager Explorer from an editable Web site.
Slide-out navigation Content Explorer option
Select Content Explorer in the slide-out navigation to return to Content Manager
Explorer.
Slide-out navigation Control Room screen
The slide-out navigation Control Room screen displays information related to User
Generated Content (UGC) and to Online Marketing Explorer. For more information about
the latter, refer to the Online Marketing Explorer User Manual.
If you select to see information for UGC, you can filter the results displayed in the Control
Room screen by clicking Show filter options on the right. This lets you apply the
following filters:
Content Manager Explorer Basic User Manual
23
Content Manager Explorer
Filter by Publication
Select the Publication or Publications for which you want to see results. By default,
results for the Publication(s) you selected last time are displayed, or if you never did,
results for all Publications are displayed.
Filter by Date Range
Select Today, This Week or This Month to show results only for those periods.
Alternatively, select Set Date Range and use the two Select Date buttons to select the
start and end times of your date range to specify the period for which you want to
see results.
The results displayed are:
Interactive content breakdown
This area shows:
■
the percentage of commented or rated Pages or Components
■
the total number of comments submitted in the period you specified, and the
number of unique visitors who left them
■
the total number of ratings submitted in the period you specified, and their
average score
■
the percentage of users that are active on your Web site
User Engagement over Time
Shows trends in commenting, rating and both for the period you specified.
Comments awaiting moderation
A list of comments in need of moderation.
Content with the most comments
The top 10 Pages and Components, ranked by the number of comments they received
(most comments at the top).
Highest rated content
The first 10 Pages and Components, ranked by the ratings they received (highest
rating at the top).
Lowest rated content
The first 10 Pages and Components, ranked by the ratings they received (lowest rating
at the top).
You can use the Show All Comments and Show All Ratings buttons to see all comments
or ratings submitted.
24
Content Manager Explorer Basic User Manual
Content Manager Explorer
Slide-out navigation Settings screen
The slide-out navigation Settings screen shows options to configure the slide-out
navigation Sites screen, and to configure Experience Manager.
Sites
Select Sites to configure the Sites screen in the slide-out navigation. You see a list of
all Publications that are associated with at least one Publication Target.
1. Select a Publication from the list to specify which Web sites corresponds to that
Publication. The Site properties settings appear.
2. Under Site URL, provide the Web address of the Web site that corresponds to this
Publication.
3. Under Site Description, give a description of the Web site.
4. Select Apply Changes to add this site to the Sites screen in the slide-out
navigation.
Inline Editing
Select Inline Editing to configure Experience Manager.
■
The General Borders Settings option opens your border settings on the right.
■
The Session Preview Settings option lets you disable the Session Preview
feature on the right, and set a maximum for binary files to upload to preview.
■
The Content Type Settings option lets you specify on which sets of Pages
you want to allow which Content Types to be used.
■
The BluePrint Context Settings option lets you specify an alternative
BluePrint structure.
Slide-out navigation About screen
The About screen in the slide-out navigation shows you the version of SDL Tridion you
are using, the versions of the various user interfaces, and a legal notice. Refer to the version
numbers shown when you submit a problem or question to SDL Customer Support.
The screen shows:
■
the version of the Content Manager Explorer user interface
■
the version of the Experience Manager user interface
■
the version of the underlying Content Manager system
■
the update version, indicating which product update is running. SDL periodically
releases product updates.
Content Manager Explorer Basic User Manual
25
Content Manager Explorer
Content Manager Explorer options
The Content Manager Explorer options bar allows you to set your Content Manager
Explorer user preferences; access the User Manual online; e-mail a link to a Content
Manager item; add a Content Manager item to your favorites; and create shortcuts to
Content Manager items.
Setting your user preferences
Use the Info Bar at top right to configure your personal preferences: user interface
language and regional settings (locale).
Procedure
1. To change your user interface language, click on your name or profile picture at the
top right part of the screen and in the dialog that opens, select your preferred language
from the Language dropdown. The change is applied when you click elsewhere on
the screen.
2. To change your regional settings, such as how dates, numbers and currencies are
displayed, click on your name or profile picture at the top right part of the screen and
in the dialog that opens, select your preferred language and country from the
Regional Settings dropdown. The change is applied when you click elsewhere on the
screen.
3. To change your profile picture, do the following:
a. Click on your name or profile picture at the top right part of the screen.
b. In the dialog that opens, click Edit under the profile picture.
c. In the Profile picture screen that slides into view, select Upload profile
picture to open a file selection dialog.
d. Navigate to a folder (on a local or network drive) that contains a picture of
yourself you would like to use, and select it. The picture is uploaded and
appears with a rectangle over it.
e. If needed, move and resize the rectangle that appears, in order to select which
part of the image you want to show. Then click Apply.
Note that you can revert to the original picture at any time by selecting Reset
profile picture.
Results
Your preferences are updated and affect both Content Manager Explorer and Experience Manager.
26
Content Manager Explorer Basic User Manual
Content Manager Explorer
Viewing the User Manual online
To view the User Manual for Content Manager Explorer online, access the slide-out
navigation on the left, select Help, and click Topics for Authors and Editors - Content
Manager Explorer in the screen that appears.
E-mailing a link to a Content Manager item
You can e-mail a link to any item in the Content Manager.
Procedure
1. In the main screen, select an item for which you want to send a link, or open the item
in a dialog.
2. Access the Home tab of your Ribbon and select the button Send by e-mail, located
on the right.
Result: Your standard e-mail client opens a new e-mail containing the link to
the current item.
3. Fill in an e-mail address and, if you like, a subject and additional body text. Then
send the e-mail.
Adding a Content Manager item to your favorites
If you access an item (for example a Component) or location (for example a Folder) in
the Content Manager frequently, you can add the item to your browser favorites or
bookmarks.
About this task
Note: If you use the standard Add to favorites or Add to bookmarks option, your
browser will add only the Content Manager Explorer window to your favorites or
bookmarks, not the individual item.
Procedure
1. In the main screen, select an item for which you want to create a bookmark or favorite,
or open the item in a dialog.
2. Access the Home tab of your Ribbon and select the button Send to my favorites,
located on the right.
The link appears in the Shortcuts > Favorites pane, and in the Home screen of your
slide-out navigation.
Content Manager Explorer Basic User Manual
27
Content Manager Explorer
Setting a start location
By default, after logging on to SDL Tridion, the content area shows a standard landing
page. You can configure SDL Tridion to start at a location of your choice.
Procedure
1. If you want to know what your current start location is, right-click any container
(such as a Folder, a Structure Group or a Keyword), either in the tree or in the content
area, and select Start Location > Go to Start Location in the context menu that
opens.
2. To display the contents of any container in the tree (such as a Folder, a Structure
Group or a Keyword) after you log in, right-click that container in the tree or in the
content area, and in the context menu that opens, select Start Location > Use Current
Location.
3. Verify by selecting Start Location > Go to Start Location. The content area displays
the contents of the container, applying the view (list view or icon view) that was
showing when you set the start location.
4. To reset the start location to the system default, right-click any container and in the
context menu that opens, select Start Location > Reset to Default.
Navigation pane
The navigation pane located on the left-hand side of the screen is the area is where you
navigate to the various areas of the application.
The lower half of the navigation pane shows you the Publications you have access to.
You can resize this area by grabbing it with your mouse:
You can open each Publication to see the items inside.
Use the area called Shortcuts at the top of the navigation pane for quick access to locations
or items you visit most often, such as Custom Pages. You can hide or show your
Shortcuts area by clicking the expand/collapse button
.
If the Web address of your Content Manager Explorer start with https://, selecting a
Custom Page may not show the contents of that Custom Page. Instead, one of the following
may happen:
28
■
In Chrome, a shield icon appears on the right hand side of the browser address
bar. To show the Custom Page, click the shield and select Load anyway.
■
In Firefox, a shield icon appears on the left hand side of the browser address bar.
To show the Custom Page, click the shield and select Disable Protection on This
Page.
■
In Internet Explorer, a message appears on the bottom of the Web page: "Only
secure content is displayed." To show the Custom Page, select Show all content.
Content Manager Explorer Basic User Manual
Content Manager Explorer
List view
The list view displays the items within a Folder or Structure Group or the results of a
search. This section describes how to filter, open, move, copy and paste, and delete items
in the list view.
Opening an item from the list view
You can open an item from the list view by double-clicking the item, using the Open icon
in the main toolbar, or using a context menu.
A window displays the item you selected. If another user has opened the item in edit-mode,
you will view the item as read-only.
Filtering the list view using list columns
When viewing items in the list view, you can filter the items that are displayed by filtering
the columns.
To filter a column, click the filter icon on the right hand corner of a column header:
When you click this icon, the filtering options that appear depend on the type of column
you are filtering:
Open set of values
If the number of values in the column is open-ended, clicking the filter icon displays
up to seven value ranges to pick from (for example, A-F, G-M, N-S and T-Z). You can
clear or select each range to hide or show those values.
Closed set of values
If the number of values in the column is closed (that is, if it has only a fixed set of
possible values), clicking the filter icon displays each value as a separate option. You
can clear or select each range to hide or show those items.
Date and time values
If the values are moments in time, clicking the filter icon displays a custom set of
options to select typical time ranges, including the option to set a custom date/time
range. If you select this option, use the Select date buttons to pick a date and time for
the beginning and end of your date/time range.
After you select a filter, the filter icon turns blue, indicating that your current list view is
filtered.
Content Manager Explorer Basic User Manual
29
Content Manager Explorer
Using context menus
You can access a context menu for items in the navigation pane or list view by right
clicking on the item.
The menu will display commands that are commonly associated with the item that you
have selected.
The following image shows a context menu for a Component:
The following image shows a context menu for a Folder:
30
Content Manager Explorer Basic User Manual
Content Manager Explorer
Working with multiple items displayed in the list
view
You can perform some actions on more than one item at a time.
Procedure
1. To perform an action on multiple items, in the list view, select the items you want to
work with. To select non-sequential items, press Ctrl and then click on each item
individually.
2. Do one of the following:
■
Click a Ribbon icon
■
Right-click and select an option from the context menu
Content Manager Explorer Basic User Manual
31
Content Manager Explorer
Moving an item
You can perform Cut & Paste actions to restructure your content. You move items in the
list view to a different Folder or Structure Group within the same Publication, or for
Keywords to a different location in the same Category.
Before you begin
You require the rights that allow you to modify that object as well as the following
permissions:
■
Delete permission for the containing Folder, Structure Group, or Category
■
Write permission for the Folder, Structure Group to which you want to paste the
item
You will not be able to cut and paste an item if:
■
The item is a local copy or a shared item.
■
The item is checked-out, in Workflow, or published.
It is not possible to move items between different Publications, or between Folders,
Structure Group and Categories, or between one Category and another Category.
About this task
To move items, you cut and paste selected items. If you move a Folder, Structure Group,
or Keyword you also move all items that are contained within it.
Procedure
1. Navigate to the Publication and Folder or Structure Group that contains the item you
want to move.
2. From the list view, select one or more items.
3. Click Cut on the Home tab of the Ribbon.
4. From the navigation pane, select the Folder, Structure Group to which you want to
move the item(s).
5. Click Paste on the Home tab of the Ribbon.
Results
The Content Manager moves the item to a different location in the Publication.
Copying and pasting an item
You can create a copy of an item within the same Publication.
Before you begin
You require the rights that allow you to modify that object as well as the following
permissions:
32
Content Manager Explorer Basic User Manual
Content Manager Explorer
■
Read permission for the containing Folder, Structure Group, or Category
■
Write permissions for the Folder, Structure Group, or Category to which you want
to paste the item
About this task
If you create a copy of a Folder, Structure Group, or Keyword, you create a copy of all
items that are contained within it as well. If an item is in Workflow or if a different user has
it checked out, you can only create a copy of the last checked-in version of the item.
Procedure
1. Navigate to the Publication and Folder, Structure Group, or Keyword that contains
the item(s) you want to copy.
2. From the list view, select the item(s) you want to copy.
3. Click the Copy icon on the Home tab of your Ribbon.
4. Select the Folder, Structure Group, Category or Keyword to which you want to copy
the item(s) and click the Paste on the Home tab of your Ribbon.
Results
The Content Manager creates a copy of the item. If you paste the item in an Organizational Item (Folder, or
Structure Group, or Category) that already has an item of the same name, the item is renamed with the prefix
"Copy <x> of ...", where <x> is a number. For example "Copy 2 of Article". The Cont
ent Manager gives the copy a version number "1.0". The copy has no version history.
Deleting an item
You can delete an item to remove it from the Content Manager. If you delete a Folder,
Structure Group, or Category you delete all items contained within it as well.
Before you begin
To delete an item, you must have delete permissions for the Folder, Structure Group or
Category in which the item is stored as well as rights for that item. You cannot delete an
item if:
■
The item is used:
■
The Component is embedded on a Page.
■
The Component is used as a Component link or a Multimedia Component
link in another Component or metadata field.
■
The Keyword is used in a Component field or Metadata field
■
The item is localized in a Child Publication
■
The item is published
■
The item is in Workflow
Content Manager Explorer Basic User Manual
33
Content Manager Explorer
■
The item is checked out
■
The item is not a local item (that is, the item is a local copy or a shared item)
About this task
Note: To see if the item is used, open the item and click the Show Where Used icon in
the toolbar. For information about the Where Used functionality, see “Where used ” on
page 45.
Procedure
1. To delete an item, in the Content Management view, navigate to the Publication and
Folder, Structure Group, or Category that contains the item(s) you want to delete.
2. From the list view, select the item(s) you want to delete.
Note: For information about selecting multiple items, see “Working with multiple
items displayed in the list view ” on page 31
3. Click the Delete icon on the Home tab of the Ribbon.
Note: If you selected a Keyword, your are prompted whether to delete just the
Keyword or the Keyword Branch (all its child Keywords). If you just delete the
Keyword, the child Keywords are moved up one level in the tree structure.
Results
The Content Manager deletes the item or items. You cannot retrieve items after you delete them. If your
select multiple items for deletion, the Content Manager only deletes the items that meet the prerequisites.
Refreshing the list view
The contents of the list view are normally up-to-date. However, if you do not see an item
you would expect to find, click the Refresh button in the bar above the list to manually
refresh the list.
34
Content Manager Explorer Basic User Manual
Content Manager Explorer
Edit window
When you open or create an item, an edit window opens. The edit window displays the
fields you use to edit or create an item.
Edit windows also have their own Ribbons, giving you access to the actions you can
perform on the item. See “Ribbon controls ” on page 16 for a description of the controls
available on the Ribbon.
Saving an item
When you have completed work on an item, you can save the item using one of three
options in the Home tab of the Ribbon:
■
Save saves the current changes you made to the item, the window remains open.
■
Save and close saves the changes you made to the item and closes the item.
■
Save and new saves the changes you made to the item, closes the item, and opens
a window in which you can create a new item of the same type.
Content Manager Explorer Basic User Manual
35
Content Manager Explorer
Shortcut keys
You can use the following keyboard shortcuts to navigate and use items in Content
Manager Explorer:
Refresh
As a general rule, pressing F5 will refresh any list displayed in the currently active
window.
Input field shortcut keys
The following table describes the shortcut keys that can be used in input fields:
Key
Field types
Ctrl+X or
+X
Cut
Plain text, Format Area, Number
Ctrl+C or
+C
Copy
Plain text, Format Area, Number
Ctrl+V or
+V
Paste
Plain text, Format Area, Number
Ctrl+Z or
+Z
Undo
Plain text, Format Area, Number
Ctrl+Y or
+Y
Redo
Plain text, Format Area, Number
Ctrl+A or
+A
Select All
Plain text, Format Area, Number
Ctrl+B or
+B
Bold
Format Area
Italic
Format Area
Ctrl+I or
36
Action
+I
Ctrl+U or
+U
Underline
Format Area
Ctrl+L or
+L
Align left
Format Area
Ctrl+R or
+R
Align right
Format Area
Ctrl+E or
+E
Align centered
Format Area
Ctrl+K or
+K
Insert Link (not in
Chrome)
Format Area
Content Manager Explorer Basic User Manual
Content Manager Explorer
Key
Action
Field types
Create bulleted list
(Format Area only)
Format Area
Ctrl+Left
Move one word to
the left
Plain text, Format Area, Number
Ctrl+Right or
Move one word to
the right
Plain text, Format Area, Number
Ctrl+Home
Move to start of
input field
(Windows only)
(not in Firefox)
Plain text, Format Area, Number
+Left
Go to start of line
Plain text, Format Area, Number
+Right
Go to end of line
Plain text, Format Area, Number
Ctrl+End
Move to end of
input field
(Windows only)
Plain text, Format Area, Number
Ctrl+Delete
Remove current
word from current
cursor position
(Windows only)
Plain text, Format Area, Number
Ctrl+. or
+.
Content Manager Ribbon shortcut keys
You can use a number of shortcut keys to navigate through the items in the Ribbon:
+F6
■
To start navigating through the Ribbon controls, first press Ctrl+F6 or
to set keyboard focus to the Ribbon toolbar tab that is currently open.
■
You can now select other tabs using the Left and Right arrow keys on your
keyboard.
■
To open a tab and show its controls, select it and press Enter.
■
You now selected the first button in the Ribbon tab. Again, use the Left and
Right arrows to navigate to the button you want to use and do one of the
following:
■
If you have selected a normal button, press Enter to execute the
command.
■
If you have selected a button that always opens a dropdown menu,
press Enter or the Down arrow to open the dropdown menu.
■
If you have selected a button that has a primary command, plus a
number of special commands in a dropdown menu, press Enter to
execute the primary command, or the Down arrow to open the
dropdown menu.
Content Manager Explorer Basic User Manual
37
Content Manager Explorer
■
If you opened a dropdown menu, use the Up and Down arrow keys to navigate
through the menu options, and Enter to select one.
■
Use the Escape button to go back up a level in the Ribbon (from dropdown
menu to a tab, or from a specific tab to the list of tabs).
Content Manager navigation pane shortcut keys
The following table describes the shortcut keys that you can use to navigate between
items in the Content Manager Explorer navigation pane:
Key
Result
Up
Move up one node.
Down
Move down one node.
Left
Close an expanded node or go to Parent node.
Right
Expand a closed node or go to first Child in the node.
Home
Go to the root of the navigation pane.
End
Go to the last node in the tree.
Enter
If you selected another node, go to the selected node.
Page Up
Go to the first node on the Page.
Page Down
Go to the last node on the Page.
Backspace
Go to the Parent.
Ctrl+X or
+X
Cuts the selected node.
Ctrl+C or
+C
Copies the selected node.
Ctrl+V or
+V
Pastes a copied or cut node.
Delete
Deletes the selected node.
Content Manager list view shortcut key
The following table describes the shortcut keys that you can use to navigate between
items in the list view:
38
Key
Action
Home
Select the first item in the list
End
Select the last item in the list
Up
Select the previous item in the list
Down
Select the next item in the list
Page Up
Scroll up one page, select the first item
Page Down
Scroll down one page, select the last item
Enter
Execute default action
Escape
Clear selection
Content Manager Explorer Basic User Manual
Content Manager Explorer
Key
Action
Shift
Select a range of items
Ctrl
Add or remove an item from the selection
Space
Left mouse click
Ctrl+X or
+X
Cut
Ctrl+C or
+C
Copy
Ctrl+V or
+V
Paste
Delete
Delete currently selected item(s)
The default action for the list view is one of the following:
■
Open the item
■
If the user checked out the item, edit the item
■
If the item is a Folder, Structure Group, or Publication, show the list of items
contained within it.
Remembered settings
When you close your browser the Content Manager Explorer remembers a number of
settings implicitly.
Content Manager Explorer remebers the following settings across sessions:
■
the last visited location in the Publication tree
■
whether the toolbar Ribbon was collapsed or expanded
■
your Paste Special settings
■
your page size for search results
■
the Target Types selected when you last published content
■
your Publish Settings (but not your Unpublish Settings or Advanced publish
settings).
Content Manager Explorer Basic User Manual
39
Content Manager Explorer
40
Content Manager Explorer Basic User Manual
Chapter 3
BluePrinting
A BluePrint is a hierarchy of Publications in which Parent Publications share content with
Child Publications. BluePrinting enables you to reuse structure, content, and design
between Publications.
The key terms used in BluePrinting are:
■
BluePrint — A BluePrint establishes the relationships between Publications and
enables your organization to share and manage items within multiple Publications.
■
Root Parent — A Root Parent Publication is the first Publication in a BluePrint.
It contains only items created within that Publication. A Content Manager system
can contain multiple BluePrints. When you create a BluePrint, all Publications in
the BluePrint share the Root Structure Group from the Primary Parent.
■
Parent — A Parent Publication shares items to one or more Publications called
Child Publications. A Parent Publication can also be a Child Publication.
■
Child — A Child Publication mirrors the Parent Publication. A Child Publication
can also contain local content that you can combine with shared content.
The BluePrint Viewer provides a visualization of the Parent-Child relationships within a
BluePrint and the BluePrint relationship between items:
Content Manager Explorer Basic User Manual
41
BluePrinting
Shared items local copies and local items
Child Publications can contain a combination of shared items, local copies and local
items.
Shared items
Shared items are items inherited from Parent Publications. These items are read-only
items unless you create a local copy.
Local copies
Local copies are shared items that have been localized. Localizing is the process of
creating a local copy of a shared item which can then be modified locally.
Local items
Local items are items that have been created in the Child Publication.
42
Content Manager Explorer Basic User Manual
BluePrinting
Items affected by BluePrinting
Performing actions on a BluePrint item may affect other Publications in the BluePrint due
the relationship between BluePrint Publications.
Items shared in a BluePrint
The following Content Manager items are shared from Parent Publications to Child
Publications.
■
Folders and Structure Groups that define how content is organized
■
Schemas, Components and Pages that define content
■
Component Templates, Page Templates and Template Building Blocks that
define the look-and-feel and behavior of content
■
Target Groups that define types of users (for personalization)
■
Process Definitions that define Workflow
■
Categories and Keywords used for classification and metadata
■
Search Folders that contain search results
Actions affecting items in a BluePrint
The following table describes the general rules that apply when performing certain
actions on an item in a BluePrint:
Action
General rule
create
An item created in a Publication is a local item. If the Publication is a
Parent Publication, this item is shared to any Child Publications. You
can create a local item in a Parent or in a Child.
edit
You can edit local items or local copies. Any changes made to these
items are shared to Child Publications unless the Child Publication
contains local copies of these items.
cut/paste
You can cut and paste any local item within a Publication. You cannot
cut and paste between Publications. You must have write and delete
permissions to cut and paste an item.
copy/paste
You can copy and paste any local item within a Publication.
delete
You can only delete unused local items.
localize
You can create a local copy (localize) any shared item in a Publication.
This permits you to edit the item.
unlocalize
You can unlocalize a local copy to use the original shared item.
publish
You can publish a Component, Page, Structure Group, or Publication.
Only items within active Structure Groups are published.
unpublish
You can unpublish a Component, Page, Structure Group, or Publication
to remove the item from the Published site.
Content Manager Explorer Basic User Manual
43
BluePrinting
BluePrint example
A corporate Web site may have local sites in multiple countries, all of which have specific
language and local content requirements. The following BluePrint shows a corporation
which has Web sites for the following countries:
■
A site for Belgium that requires French and Dutch content
■
A site for the Netherlands that requires Dutch and English content
■
A site for Germany that requires English and German content
All the sites share the same design. Therefore, they share the same Page Templates and
Component Templates. They also share the same content structure of Folders and Structure
Groups. In this scenario, users at the corporate level create some of the content. They
share this content, and translators translate it into the four languages. Language specific
country Publications can share the translated information and can add local content. When
users create Pages in these Publications and publish them, the resulting Web sites can
include multilingual and region-specific information.
Localizing or unlocalizing items
If you are working in a Child Publication, to modify the content of shared items you must
create a local copy which then becomes editable. If you do not want to use the local
copy of an item, you can also unlocalize the item. If you unlocalize, you will again use
the shared item.
Before you begin
To localize or unlocalize an item, you must have Localize permissions for the Folder or
Structure Group in which the item is stored.
44
Content Manager Explorer Basic User Manual
BluePrinting
Procedure
1. To localize or unlocalize an item, navigate to the location in the tree that contains the
item you want to localize.
2. In the list view, select the item you wish to localize or unlocalize and in the Organize
tab of the Ribbon, do one of the following:
■
Click Localize to create a local copy.
■
Click Unlocalize to go back to the original shared item.
Important: If you unlocalize, the local copy is irretrievable. All changes are lost.
Results
You have localized or unlocalized an item.
Where used
Where used functionality allows you to view the relationship between Content Manager
items.
About this task
Content Manager items are used together to create Web site content or content for other
channels. For example, a Page uses a combination of Components and Component
Templates, a Page Template and Keywords.
In the Content Manager you can use the Where Used feature on an item to view:
■
Which other items use the item
■
Which other items the item uses
■
To which Publication Targets the item has been published
Note: Similar functionality is also provided by the Related Items List View, available
when you select a Keyword. The view displays the Components, Pages, and other Content
Manager items that have been tagged with the selected Keyword, or Keyword branch,
allowing you to see related content. For more information, see “Viewing related content ”
on page 125.
Content Manager Explorer Basic User Manual
45
BluePrinting
Procedure
1. Open the Content Manager Explorer.
2. Do one of the following:
■
Select an item and choose Where Used in the context menu.
Select an item and choose BluePrinting > BluePrint Hierarchy in the
context menu to open the BluePrint Viewer. Select the item in one of the
Publications in the BluePrint hierarchy and click Where used.
The Where used dialog opens.
■
3. To view where an item is used, click the Used In tab. The tab displays a list of items
that use the item you selected:
■
To edit an item in the list, select the item and click Open.
■
To view the location of an item in the list, select the item and click Go To
Location.
4. To view a list of items this item uses, click the Uses tab:
■
To edit an item in the list, select the item and click Open.
■
To view the location of an item, select the item and click Go To Location.
5. To view Published to information for a Page, Component, Component Template, or
Page Template, click the Published to tab.
6. Click Close to exit Where used.
BluePrint Viewer
The BluePrint Viewer provides a visualization of the Parent-Child relationships within a
BluePrint and the BluePrint relationship between items:.
About this task
The BluePrint Viewer consists of:
46
■
The Home tab in which you can perform actions on a selected item in the BluePrint
hierarchy diagram (these actions are also available in context menus)
■
The View tab in which you can change the view of BluePrint relationships
■
The BluePrint hierarchy diagram displayed in the BluePrint Viewer and the
information displayed in it.
Content Manager Explorer Basic User Manual
BluePrinting
Procedure
1. In the Content Manager Explorer, right-click an item and in the context menu that
opens, choose BluePrinting > BluePrint Hierarchy.
2. In the Home tab of the BluePrint Viewer you can perform the following actions on
the selected item:
■
Open—allows you to navigate to open an item displayed in the BluePrint
hierarchy for editing.
■
Where Used—allows you to see where an item is used (for more information,
refer to “Where used ” on page 45).
■
Delete—allows you to delete an item provided you have the necessary rights
and permissions for that item and the item is not being used. For more
information, see “Deleting an item ” on page 33.
■
Preview—allows you to Preview an item.
■
Compare —allows you to compare two different versions of Components,
Component Templates, Page Templates, Pages, or Schemas. For more
information, see “Comparing two versions ” on page 137.
■
History —lists all versions of a Component, Component Template, Page
Template, Page, or Schema. For more information, see “Version history ” on
page 136.
Content Manager Explorer Basic User Manual
47
BluePrinting
■
Localize —allows you to create a local copy of a shared item.
■
Unlocalize —allows you to unlocalize the local copy of an item in a Child
Publication and use the shared item from the Parent Publication.
Important: Unlocalizing an item deletes the localized version entirely from
the system.
3. In the View tab of the BluePrint Viewer, you can Zoom in and Zoom Out of the
diagram and perform the following actions:
■
Show Parents—select an item/Publication and click Show Parents to
highlight the selected Publication's Parents (the Publications that are not
Parents of the selected Publication are dimmed out).
■
Show Children—select an item/Publication and click Show Children to
highlight the selected Publication's Children (the Publications that are not
Children of the selected Publication are dimmed out).
■
Show Used in—click Show Used in to view the items the item is Used in.
■
Show Inheritance Path—select an item and click Show Inheritance Path to
highlight where the item shares its content from.
4. In the BluePrint hierarchy diagram displayed in the BluePrint Viewer, the following
visual indicators are used:
■
A solid blue background indicates the Publication from which BluePrint
Viewer was invoked.
■
A blue border indicates the current item (the context item) selected in the
BluePrint.
■
Information about the item from which the BluePrint Viewer was invoked
(the context item) and the currently selected context item is displayed at the
bottom of the viewer.
■
The name of shared items are displayed in italics.
■
Publications which do not contain a copy of the selected item are dimmed.
■
If an item has been localized in a Child Publication, the line to the Parent
Publication is dotted.
5. Click Close to exit the BluePrint Viewer.
48
Content Manager Explorer Basic User Manual
Chapter 4
Components
You define all content in the Content Manager in Components. To ensure that content is
consistent, the Content Manager bases all content on Schemas. Schemas define fields and
field types for specific types of content.
For example, you may need to create a press release. Your SDL Tridion system
administrator created a Schema that defines what types of content the press release can
contain. This example Schema may contain the following fields:
Title
a text field in which you type text
Summary
a text field in which you type text
Date
a date selection field
Body
a text field in which you can type and format text
Company Information
a Component Link field in which you select an existing Component that contains
company information
Logo
a multimedia link field in which you can link to an existing multimedia Component
that contains an image
You enter content into these predefined fields, and thereby ensure that all press releases
have consistent structure and content types. This section describes how to create and use
Components in the Content Manager Explorer. Multimedia content is saved in multimedia
Components. For information about multimedia Components, see “Multimedia
Components ” on page 77.
Content Manager Explorer Basic User Manual
49
Components
Creating a Component
You create a Component by selecting a Schema that defines the type of Component that
you want to create. You can then fill in the fields for the Component as defined by the
Schema.
Before you begin
To create a Component you must have Component Management rights and Write
permissions for the containing Folder.
About this task
For example, your organization may have a Schema called "Press Release" upon which
all press release content is based. You create Components in Folders within a Publication.
Procedure
1. Navigate to the Publication and Folder in which you want to create the Component.
2. On the Home tab or the Create tab of the Ribbon, click New Component. A New
Component window appears:
3. On the General tab, modify the following fields:
■
Name—fill in the name of the Component
■
Schema—select the Schema on which this Component will be based. (If your
SDL Tridion system administrator defined a mandatory Schema for the
Folder in which you create a Component, then you see no Schema field,
because the Content Manager already selected the Schema for you.)
Result: A series of fields appears.
4. Fill in all mandatory fields and optional fields as necessary. Mandatory fields have a
red asterisk (*) beside them.
Note: For more information on Component field types, see “Component field types
” on page 53.
5. A Component may also use Metadata fields. If so, a Metadata tab appears. Select the
Metadata tab (if applicable) and fill in the mandatory fields and, if applicable, the
optional fields.
6. On the Home tab of the Ribbon, click Save and Close.
7. Depending on the Schema you selected, you may now be prompted to add this
Component to a Bundle. You can choose to skip this step, but if you do, the Component
remains checked out to you.
50
Content Manager Explorer Basic User Manual
Components
8. If this item must be added to a Bundle, a dialog opens asking you if you would like to
do so now. You can choose Not Now to close the dialog, but you see a warning
informing you that your item is not in a Bundle, and the same dialog will appear every
time you save changes to the item. Alternatively, if you select Add, a Bundle selection
dialog appears.
9. In the tree structure on the left, navigate to a Publication and Folder that contains a
Bundle to which you want to add the item, and add it to that Bundle by selecting the
Bundle and clicking Add. This adds the item to the selected Bundle and closes the
dialog. If the Bundle is already in workflow, the item will be too. You can also select
Close, which has the same effect as clicking Not Now in the previous dialog.
Results
You have created a Component.
Note: For information about creating Pages and using Component on Pages, see “Pages
” on page 83.
Editing a Component
You can edit a Component to modify the content of the Component.
Before you begin
To edit a Component, you must have Component Management rights and Write
permissions.
It is not possible to edit a Component if the following conditions apply:
■
The Component is shared from another Publication
■
A different user already checked out the Component
■
The Content Manager assigned the Component to a different user through a
Workflow Process
Procedure
1. Navigate to the Publication and Folder that contains the Component you want to edit.
2. To open the Component, select the Component in the list view and click Open on the
Home tab of the Ribbon.
3. Edit the fields in the Component as required. (See “Component field types ” on page
53 for more information about the different field types).
4. Click Save and close in the Home tab of the Ribbon.
5. Depending on the Schema you selected, you may now be prompted to add this
Component to a Bundle. You can choose to skip this step, but if you do, the Component
remains checked out to you.
Content Manager Explorer Basic User Manual
51
Components
6. If this item must be added to a Bundle, a dialog opens asking you if you would like to
do so now. You can choose Not Now to close the dialog, but you see a warning
informing you that your item is not in a Bundle, and the same dialog will appear every
time you save changes to the item. Alternatively, if you select Add, a Bundle selection
dialog appears.
7. In the tree structure on the left, navigate to a Publication and Folder that contains a
Bundle to which you want to add the item, and add it to that Bundle by selecting the
Bundle and clicking Add. This adds the item to the selected Bundle and closes the
dialog. If the Bundle is already in workflow, the item will be too. You can also select
Close, which has the same effect as clicking Not Now in the previous dialog.
Results
The Content Manager saves a modified version of the Component. Any of the following
items that use the Component will now use the modified version of the Component:
52
■
Pages
■
Component Links in other Components
■
Child Publications that share from this Publication
Content Manager Explorer Basic User Manual
Chapter 5
Component field types
Components are based on Schemas that define what fields you can define for that
Component. The types of fields you need to fill in differ depending on the definition of
the Schema.
The following table describes the field types that you may encounter when filling in a
Component:
Field type
Accepted values
Text
Alpha-numeric characters
Number
Numbers, negative symbol, and one
decimal point
Date
Date and time
External link
External link to any URL address
Multimedia link
Link to a multimedia Component
Component link
Link to a Component
Format area
Alpha-numeric characters and formatting
The following image displays different field types in a Component:
Content Manager Explorer Basic User Manual
53
Component field types
54
Content Manager Explorer Basic User Manual
Component field types
Field characteristics
In addition to the general classification of field types (text, number and so on), a field
type can have a number of other characteristics.
■
The field can be mandatory or optional. Mandatory fields are indicated with a *
next to the label of the field.
■
You can select values from predefined lists. See also “List fields ” on page 59.
■
Fields may accept one value only or multiple values. Multiple value fields are
displayed with two buttons to the left of the field. Use the Add button to add an
addition value to the field. Use the Delete button to delete a value from the field.
■
You can reorder the values in multiple-value fields as follows:
■
Place your cursor over the icons to the right of the field. The arrow will
turn into a Move icon.
■
Drag and drop the field to another location for the same field.
Content Manager Explorer Basic User Manual
55
Component field types
Simple text fields
Simple text fields accept any characters. To fill in these fields, you simply type text into
the field.
Text fields may have the following characteristics:
■
The field may accept more than one value. This may be used to distinguish
between different paragraphs.
■
The field may be mandatory. This is indicated with a *.
Format areas also allow you to format text. This field type is described in “Format area
fields ” on page 59.
Number fields
Number fields accept one decimal point and a positive or negative sign. Type a number in
the field, for example: 100000.00 and -1.23.
A number field may have the following characteristics:
■
The field may accept more than one value. This may be used to create a list or
sequence of numbers.
■
The field may be mandatory. This is indicated with a *.
Date fields
A date field allows you to select a date and time using a date select button.
Date fields may have the following characteristics:
56
■
The field may accept more than one value. This may be used to create a list of
dates.
■
The field may be mandatory. This is indicated with a *.
Content Manager Explorer Basic User Manual
Component field types
External link fields
An external link field allows you to create a link to an external URL, an e-mail address or
another URL addressable type such as FTP.
About this task
External link fields may have the following characteristics:
■
The field may accept more than one value.
■
The field may be mandatory—this is indicated with a *.
Procedure
1. Click the Add button to the left of the link field. A Hyperlink window opens.
2. In the Type field, select one of the following options:
■
Select http:// to create a hyperlink to a Web page.
■
Select mailto: to create a link to an e-mail address.
■
Select Other to create a link to another type of internet resource such as an
HTTPS, FTP or other resource.
3. In the URL field, do one of the following:
■
If you are creating a link to a Web page, paste or type the URL of the page
you want to link to.
■
If you are creating a link to an e-mail address, type the e-mail address that
you want the visitor to send mail to, after the mailto: prefix.
■
If you are creating a link to another type of internet resource, type the address
of the internet resource that you want to link to.
4. Click OK.
5. If the field specifies more than one link, you can use the area to the left of the link
field to further format the links for this field:
■
Drag-and-drop — hold your mouse down over a value and drag to move the
value to another position
■
Add button — insert another link
■
Remove button — remove the current link
Content Manager Explorer Basic User Manual
57
Component field types
Multimedia link fields and Component link
fields
Multimedia links allow you to create one or more links to Multimedia Components;
Component links allow you to create one or more links to Components, which may include
Multimedia Components if the field is configured to allow them.
About this task
Component link fields and multimedia link fields may each have the following characteristics:
■
The field may accept more than one value.
■
The field may be mandatory—this is indicated with a *.
You can add a link to a (Multimedia) Component if the target Component is in the same
Publication as the Component that you are creating.
Note: The Component you want to link to must exist before you can create a link to it.
Procedure
1. In the Component you are creating or editing, click the Insert button next to the link
field.
2. In the window that appears, you can select a Component to link to in one of the
following ways:
■
In your Building Blocks Folder structure, navigate to the location of the
Component or Multimedia Component for which you want to create a link.
The List View displays Components filtered based on the allowed Schema (or
Schemas) configured for this field.
■
In your Categories and Keywords, select a Keyword. The List View displays
Components that have been classified with this Keyword, or a child Keyword,
and filtered based on the allowed Schema (or Schemas) configured for this
field.
3. Select a Component and click Insert. The dialog closes and you have added a link to
the Component you selected.
Results
The Content Manager creates a Component link or a multimedia link.
58
Content Manager Explorer Basic User Manual
Component field types
List fields
Components may contain drop-down lists, select boxes, radio buttons, check-boxes, and
trees as list field types. Depending upon the list field, you may be able to select text,
numbers, or date values.
The type of list determines whether the list is seen as a single-value or multivalue field:
List type
Result
Drop-down list
You can select one item
Select box
You can select one or more items
Radio buttons
You can select one item
Check-boxes
You can select one or more items
Tree
You can select one or more Keywords in a taxonomy tree
Format area fields
Format areas accept alpha-numeric characters and also allow you to apply formatting to
the field.
A format area fields may have the following characteristics:
■
The field may accept more than one value. This may be used to distinguish
between different paragraphs.
■
The field may be mandatory. This is indicated with a *.
The formatting options available for the field appear in the Format tab of the Ribbon of
the Component dialog (this tab is automatically displayed when you select the field). In
addition, you may also be able edit the raw HTML. The HTML edit setting is
configurable, therefore you may not be able to edit HTML source in all format areas.
Format areas may consist of three tabs:
Tab name
Description
Design
Edit formatted text using the formatting controls in the Ribbon
toolbar.
Source
Edit formatted text by editing raw HTML. Content Manager
Explorer performs a validation of your HTML when you switch to
another tab or save the Component. Your operation fails if the
validation raises an error. It succeeds otherwise, even if the
validation raises warnings. You can check for warnings explicitly
by selecting Validate in the Format Ribbon tab.
Content Manager Explorer Basic User Manual
59
Component field types
Tab name
Description
Preview
View a preview of your formatted text. By default, any styles are
disabled. You can enable them by clearing the Disable styles
checkbox.
The following image shows the Design tab:
The following image shows the Source tab:
The following image shows the Preview tab:
60
Content Manager Explorer Basic User Manual
Component field types
Format area field controls
The following table describes the formatting options that may be available when entering
content in a format area field.
Note: Not all of the options described in the table are available in all format areas.
Icon
Name
Description
Cut
Cut copies content to your clipboard and removes the
content from the Component. To cut text:
Copy
■
Select the text you want to move.
■
Click Cut.
Copies content to your clipboard. To copy content:
■
Select content you want to copy.
■
Click Copy.
Content Manager Explorer Basic User Manual
61
Component field types
Icon
Name
Paste
Description
Places content from your clipboard to the location of your
cursor in the Component. To paste content:
■
Place your cursor where you would like the cut or
copied content to appear.
■
Click Paste.
Note that your browser may not grant you the
authorization to perform this action.
Click on the lower half of the button to see the following
suboptions:
Paste
Pastes content including formatting.
Paste Special
Reveals a number of paste options:
■
Remove non-HTML markup removes only
non-HTML markup
■
Remove Unknown Class Names removes class
attributes that are not defined in the configuration
file
■
Remove All Styles removes style and class
attributes that are not known
■
Paste as Text removes all markup and non-textual
content and pastes plain text.
Select Use as default option to continue to use this setting
(it is remembered as a user preference). You can then use
the Paste button to reapply the setting you have selected.
Undo
Undoes the last change made. You can undo the following
types of changes:
■
cut/copy/paste
■
typed or deleted characters
■
formatting changes
■
XHTML conversion
To undo changes, click Undo.
Redo
62
Reapplies the action from the last undo. You can redo the
same changes as listed for Undo. To redo changes, click
Redo.
Content Manager Explorer Basic User Manual
Component field types
Icon
Name
Description
Bold
Applies bold, italic or underline formatting to selected
text. To apply bold, italic, or underline formatting, either
select the text to which you want to apply formatting or
place your cursor in the paragraph in which you would like
to apply formatting and click the bold, italic, or underline
button.
Left align
Use these buttons to apply alignment formatting to text. To
align text, Place your cursor in the paragraph to which you
want to apply alignment and click Left align, Center or
Right align
Center
Right align
Bullets
Numbering
Use these buttons to create lists. To create a list, place your
cursor in the paragraph to which you want to apply list
formatting and click the Bullets button to create a bulleted
list or the Numbers button to create a numbered list.
Decrease Indent Changes the indent of a paragraph. To change the indent of
Increase Indent a paragraph, place your cursor in the paragraph that you
want to indent and click the Increase Indent button or
Decrease Indent button.
Insert Character Inserts special characters into text. Special characters
include copyright (©), trademark (™), Euro signs (€) and
other unique characters. You may also use this feature to
insert standard text, for example, names of products and so
on. Available characters depend upon your system
configuration. To insert a special character:
Anchor
■
Place your cursor where you would like the special
text to appear.
■
Click the Special Character button.
■
Select a character from the list and click OK.
Creates an anchor to which you can link within the same
format area. To create an anchor:
■
Place your cursor in the location at which you
would like to create an anchor.
■
Click the Insert Anchor button.
■
In the window that appears type the name of the
anchor and click OK.
You can now create a hyperlink to this anchor using the
Hyperlink button.
Hyperlink
Creates hyperlinks to Components, HTTP pages, e-mail
addresses, anchors, or other resources. See “Inserting hyperlinks in a format area ” on page 66.
Content Manager Explorer Basic User Manual
63
Component field types
Icon
Name
Description
Table
See “Formatting tables in a Format Area ” on page 69.
Image
See “Inserting an image in a format area ” on page 67.
Horizontal line
Inserts a horizontal line. To insert a horizontal line, place
your cursor in the position in which you would like to
insert a horizontal line and click the Horizontal Line
button.
Load images
By default, when you open a Component that contains an
image, a placeholder is displayed. Click the Load images
button to view images.
Validate
The validate button converts the content of the format area
into XHTML and validates the content according to
accessibility standards. If the format area contains any
errors, warnings or accessibility messages, the messages
are shown in a dialog that gives you one of two options:
■
You can correct the errors manually.
■
You can allow the Content Manager to create valid
markup.
Language
Sets a language attribute for selected text. Select the text
for which you would like to set a language attribute and
click the Language button. In the Language pop-up that
appears, select a language from the displayed list.
Abbreviation
Defines the full or expanded form of a selected
abbreviated expression or acronym. A description is
inserted as a tool tip. To insert an abbreviated expression
or acronym:
Spell-check
■
Select the text for which you would like to define
an abbreviation or acronym.
■
Click the Abbreviation button.
■
In the popup that opens, fill in the following fields:
■
Type—select abbreviation or acronym
■
Text—type the text that you would like to appear
in the format area
■
Description—type the description you would like
to appear as a pop-up
This options will spell check the entire Component.
The following controls are not icons:
64
Content Manager Explorer Basic User Manual
Component field types
Font face selection
See “Selecting fonts in a format area ” on page 68.
Font size selection
See “Selecting fonts in a format area ” on page 68.
Current elements
The "Current Elements" drop-down contains the currently selected element and
previous elements. You can use this to select any element and view its properties. If
an element has an associated style or class attributes, these elements are displayed with
an asterisk character. The formatting options on the toolbar display the options
available for the currently selected element.
Section type
You can apply a header level to text within a format area. To apply a header level to
text, place your cursor in the line that you want to add a header level to and select an
option from the Header selection list:
■
Paragraph—<p>
■
Generic container—<div>
■
Body text—no surround tag
■
Headings—<h1> - <h6>
Style
If defined, you can apply a Style to a current selection. The Styles define predefined
formatting. These styles are predefined for the entire system. To apply a style to text:
■
Select the element to which you want to apply a style.
■
Select the style from the Style drop-down.
For more information about configuring styles for text, refer to the implementer's
documentation portal.
Content Manager Explorer Basic User Manual
65
Component field types
Inserting hyperlinks in a format area
In a format area, you can create the hyperlinks to the items: Components, HTTP, E-mail
address, Anchor, and Other.
About this task
Procedure
1. To create a hyperlink, select the text that you want to display as a hyperlink.
2. Click Insert Hyperlink on the toolbar. A Hyperlink window opens.
3. In the Type field, select one the following options:
■
Select Component to create a Component hyperlink.
■
Select HTTP:// to create a hyperlink to an HTTP resource.
■
Select mailto: to create a link to an e-mail address.
■
Select Anchor to create a link to an anchor within the same format area.
■
Select Other to create a link to another type of internet resource.
4. In the URL field, do one of the following:
■
To create a link to a Component, click the Browse To button, and select the
Component that you want to link to.
■
To create a link to an HTTP accessible resource, type the URL of the resource
you want to link to.
Note: Do not use this option if you want to link to a different kind of resource
such as an FTP, mail or other resource. The URL must begin with HTTP.
66
■
To create a link to an e-mail address, type the e-mail address that you want the
visitor to send mail to.
■
To create a link to an anchor, select the name of the anchor that you want to
link to.
■
To create a link to another type of internet resource, type the address of the
internet resource that you want to link to.
Content Manager Explorer Basic User Manual
Component field types
5. (Optional) In the Title field, describe the contents of the link. When published this
text is rendered as a tooltip by most browsers.
6. (Optional) Target — Target controls where the new document will be displayed when
the user follows a link. By default, clicking on a link simply loads a new document
in the same window where the link was. Target allows you to specify the following
options:
■
New window—the link will open in a new window.
■
Same frame—the link will open within the same frame as the link tag.
■
Parent frame—the link will load in the immediate Parent of the frame.
■
Top frame—the link will load in the top frame of the window.
■
Named—the name of the target window. If you select named, you must also
provide the name of the target window.
Inserting an image in a format area
You can insert a Multimedia Component that is an image file into a format area.
About this task
Procedure
1. To insert an image into a format area, in the format area, insert your cursor in the
location in which you would like the image to appear.
2. Click Image button in the Format tab of the Component Ribbon.
3. In the dialog that opens, click the Browse button.
Result: A browse dialog opens.
4. Navigate to the folder containing the image you wish to insert, select it and click OK
to return to the Image dialog.
Result: The Image dialog shows the selected image.
5. In the Image window dialog, click Advanced to expand the dialog and show advanced
options. In the expanded area, fill in the following fields:
■
Text—(optional) type the tooltip text that will appear when a visitor places
their cursor over image.
■
Description URL —(optional) type the URL of a Web page that describes
this image.
■
Width—(optional) enter the desired display width of the image
■
Height—(optional) enter the desired display height of the image
■
Proportion—(optional) if you do not want the image to be rendered using the
width and height proportions, uncheck this box before you modify the width
and height of the image.
Content Manager Explorer Basic User Manual
67
Component field types
6. Click OK to close the Image dialog.
7. By default, images are shown with a placeholder in the format area. You can view
images in the format area using the Load Images button. To view images in the format
area:
a. Place your cursor in the format area in which you want to view images.
b. From the Format tab of the Ribbon, select Load images.
Result: Images are now displayed in this Format Area.
Selecting fonts in a format area
You can specify how you want text to appear by selecting options in the Font dialog box.
Procedure
1. To select font properties, do one of the following:
■
select the text to which you want to apply text formatting
■
place your cursor in the paragraph in which you would like to apply formatting
2. In the Font selection area, you can select the following properties:
■
Font— the font face
■
Size—the size of the font
■
Color—the color of the text
■
Background—the color of the background
■
Style—italic, bold, and underline
■
Effects—strikethrough, superscript, and subscript
Note: The superscript and subscript effects are mutually exclusive. You may only
select one of the two.
68
Content Manager Explorer Basic User Manual
Component field types
Formatting tables in a Format Area
You can create and format tables in format areas.
Inserting a table in a format area
When editing or creating a Component, you can insert tables in format areas. (You can
identify a format area by the Design, Source, and Preview tabs that appear above the
field.)
Procedure
1. To insert a table in a format area, in the format area of the Component, place your
cursor at the location in which you wish to insert the table.
2. In the Format tab of the Component Ribbon, click Table. The Insert Table window
appears.
3. Enter the number of columns and rows and press OK. The Table Editor window
appears.
4. You can edit the following table characteristics:
■
Table properties and formatting
■
Row formatting
■
Column formatting
■
Cell properties and formatting
Note: See “Table properties and formatting ” on page 70 for information about
each of these options.
5. Click OK to insert the table with the selected formatting.
Results
The Content Manager inserts the table in the format area with the selected formatting options.
Editing the formatting of an existing table
You can reformat an existing table in the format area of a Component.
Procedure
1. To format an existing table, in the format area of a Component, do one of the following:
■
Click on the border of the table you want to format. (In Firefox, this operation
may not work.)
■
Select the table element from the Current Elements dropdown.
2. On the Format tab of the Component Ribbon, click Table.
Result: The Table Editor opens.
Content Manager Explorer Basic User Manual
69
Component field types
3. Format the table, row, column and cell options. See “Table properties and formatting
” on page 70 for more information about these options.
4. Click OK to update the table formatting.
Adding content to a table
After you have added a table, you can add content to the table in the format area, and can
format the content using the formatting options available in the Component toolbar. To
move between cells in the table, use the arrow keys on your keyboard: up, down, left, right.
You can also enter text into cells using the Cell tab of the Table Editor.
Table properties and formatting
You can format an entire table using table formatting options.
When you create or edit a table, the Table Editor displays table editing options:
Title
The text that is shown as a tooltip when the mouse hovers over the table.
■
Table: Yes
■
Row: No
■
Column: No
■
Cell: No
Caption
The caption displayed above the table.
■
Table: Yes
■
Row: No
■
Column: No
■
Cell: No
Summary
A longer description of the table.
70
■
Table: Yes
■
Row: No
■
Column: No
■
Cell: No
Content Manager Explorer Basic User Manual
Component field types
Width
The width of the table, column or cell:
■
For a table, this is a percentage (e.g. 60%) of the width of the page. For a
column or cell, this is a percentage of the width of the table.
■
A specific number of pixels (e.g. 250). To specify a number of pixels, select
the Other setting.
■
Leave blank for auto sizing.
■
Table: Yes
■
Row: No
■
Column: Yes
■
Cell: Yes
Height
The height of the table, row, or cell:
■
For a table, this is a percentage of the format area (e.g. 60%). For a row, or
cell, this is a percentage of the table
■
A specific number of pixels (e.g. 250). To specify a number of pixels, select
the Other setting.
■
Leave blank for auto sizing. If you leave this field blank, your browser will
adjust the height to the contents of the cell/table.
■
Table: Yes
■
Row: No
■
Column: Yes
■
Cell: Yes
Cell spacing
The spacing around the table cells.
■
Table: Yes
■
Row: No
■
Column: No
■
Cell: No
Cell padding
The padding between cell contents and cell borders.
■
Table: Yes
■
Row: No
■
Column: No
■
Cell: No
Content Manager Explorer Basic User Manual
71
Component field types
Horizontal alignment
This is the alignment of the contents of cells in the table (left, right, center)
■
Table: Yes
■
Row: Yes
■
Column: Yes
■
Cell: Yes
Border size
The size of the table border. To remove the table border, set the size to "0".
■
Table: Yes
■
Row: No
■
Column: No
■
Cell: No
Border style
The style of the table border.
■
Table: Yes
■
Row: No
■
Column: No
■
Cell: No
Border color
The color of the border. Select Custom color to select a color other than the listed
colors.
■
Table: Yes
■
Row: No
■
Column: No
■
Cell: No
Background color
The background color of the table, row, column or cell. Select Custom color to select
a color other than the listed colors.
72
■
Table: Yes
■
Row: Yes
■
Column: Yes
■
Cell: Yes
Content Manager Explorer Basic User Manual
Component field types
Style
If the SDL Tridion system administrator has predefined styles for your system, you
can select a predefined style for the table, row, column or cell.
■
Table: Yes
■
Row: No
■
Column: No
■
Cell: No
Body/Header/Footer
This is a row setting that allows you to apply a body, header or footer setting to a row
in the table.
■
Table: No
■
Row: Yes
■
Column: No
■
Cell: No
Vertical alignment
The vertical alignment of the contents of a column, row, or cell (top, middle, bottom).
■
Table: No
■
Row: Yes
■
Column: Yes
■
Cell: Yes
Type of information
Select the type of information contained in the selected cell(s):
■
Header is for heading text
■
Data is for content
■
Table: No
■
Row: No
■
Column: No
■
Cell: Yes
ID
If the Type of information is "Header" you can add an ID attribute to a single selected
cell.
■
Table: No
■
Row: No
■
Column: No
■
Cell: Yes
Content Manager Explorer Basic User Manual
73
Component field types
Text
The text contained in a single selected cell.
■
Table: No
■
Row: No
■
Column: No
■
Cell: Yes
Abbreviation
If the Type of information is "Header" you can add an abbreviation attribute to a
single selected cell.
■
Table: No
■
Row: No
■
Column: No
■
Cell: Yes
Scope
If the Type of information is "Header" for one or more cells you can select whether
the header is for a row or for a column.
■
Table: No
■
Row: No
■
Column: No
■
Cell: Yes
Axis
If the Type of information is "Header" for one or more cells you can categorize cell
information.
■
Table: No
■
Row: No
■
Column: No
■
Cell: Yes
Applying formatting to table cells rows or
columns
When formatting a table in a format area, you can format specific cells, rows or columns.
In the Table Editor, you can select or deselect one or more cells in the table preview
area. You can then apply the table formatting options that are available for the selected
cells, rows, or columns.
About this task
Select or deselect a single cell, select multiple adjoining cells, or select non-adjoining
74
Content Manager Explorer Basic User Manual
Component field types
cells as follows:
To select a single cell:
Click on the cell.
To select multiple adjoining cells:
Click on a cell.
Press Shift and click on another cell.
All cells between the first and last cell are selected.
To select multiple, non-adjoining cells
Click on a cell.
Press Ctrl and click on the other cells you want to select.
To deselect a single cell
Press Ctrl.
Click on a cell you wish to deselect.
Procedure
1. To format cells in a table, in the Format Area, select the table for which you would
like to format table cells. Click the Table button on the toolbar.
2. In the Table Editor, select the tab for the type of table properties you want to edit:
■
Table
■
Row
■
Column
■
Cell
3. Select one or more cells that you want to format as described above.
Note: If you have selected the Row or Column tab, the properties you select will be
applied to the entire row or column. If you selected the Cell tab, the properties you
select will be applied only to the individual cells that you have selected.
4. Select or define the properties of the selected cells, rows, or columns using the options
provided in the left-hand pane. For more information about the properties and
formatting options available for cells, rows and columns, see “Table properties and
formatting ” on page 70.
5. Click OK to apply the changes to your table.
Content Manager Explorer Basic User Manual
75
Component field types
Inserting and removing rows and columns from a
table
The following table describes how to insert and remove rows and columns from a table.
Icon
Action
Description
Insert a row above a
selected cell
Click on a cell. Click the Insert row above icon. The
Content Manager inserts a row above the selected
cell.
Insert a row below a
selected cell
Click on a cell. Click the Insert row below icon.
The Content Manager inserts a row below the
selected cell.
Insert a column to the left Click on a cell. Click the Insert column to the left
of a selected cell
icon. The Content Manager inserts a column to the
left of the selected cell.
Insert a column to the
right of a selected cell
Click on a cell. Click the Insert column to the right
icon. The Content Manager inserts a column to the
right of the selected cell.
Remove a row
Click on a cell in the row you want to remove.
Click the Remove row icon. The Content Manager
removes the row and the contents of the row.
Remove a column
Click on a cell in the column you want to remove.
Click the Remove column icon. The Content
Manager removes the column and the contents of
the column.
Merging and splitting cells in a table
The following table describes how to merge and split cells in a table.
Icon
Action
Description
Merging cells in In the table preview area, click on a cell you want to merge
a table
with another cell. Press the Shift key and select the area of
cells you want to merge. Click the Merge cells icon.
76
Splitting a cell
in a table into
columns
In the table preview area, click on a cell you want to split.
Click the Split into columns icon.
Splitting a cell
in a table into
rows
In the table preview area, click on a cell you want to split.
Click the Split into rows icon.
Content Manager Explorer Basic User Manual
Chapter 6
Multimedia Components
Multimedia Components store multimedia information such as images and common file
formats such as Microsoft Word documents.
The following image shows a Multimedia Component:
A Multimedia Schema defines the type of binary and other information (metadata
associated with the binary).
Content Manager Explorer Basic User Manual
77
Multimedia Components
Default Multimedia Types
By default, Content Manager provides a number of Multimedia Types from which you
can create Multimedia Components.
Note: A SDL Tridion system administrator can add additional Multimedia Types to the
Content Manager.
78
Title
Possible extensions
Access Database
mdb
PDF Document
pdf
Bitmap Image
bmp
Plain Text
txt
Excel Sheet
xls
Png Image
png
Executable
exe
PowerPoint Presentation
ppt
Flash File
swf
QuickTime Movie
mov, qt
Gif Image
gif
Real Player
rm, ram, ra, rv
Jpeg Image
jpg, jpeg, jpe
Rich Text
rtf
MP3 Music
mp3
Sound File
wav
Mpeg Video
mpg
Word Document
doc
Content Manager Explorer Basic User Manual
Multimedia Components
Creating a Multimedia Component
You create a Multimedia Component by uploading a local or network file to the Content
Manager or creating a reference to an external resource, such as an image on your server.
Before you begin
To create a Multimedia Component, you must have Component Management rights and
Write permissions for the containing Folder.
Note: Non-ASCII characters in the file name of a Multimedia Component may result in
previewing and publishing issues. Therefore, ensure that the filename of the Multimedia
file you want to upload or reference does not contain non-ASCII characters.
About this task
You can create a Multimedia Component that identifies a specific binary file. You can
then use the Multimedia Component directly on a Page or as a Component link within
another Component. For more information about this, see “Multimedia link fields and
Component link fields ” on page 58.
Important: Certain settings of the Content Manager, such as timeout setting and
database size may cause problems when you try to upload very large binary files. If you
experience these problems, you may want to consider creating a Multimedia Component
that references a binary file that is on your network.
Procedure
1. To create a Multimedia Component, navigate to the Publication and Folder in which
you want to create the Multimedia Component.
2. In the Create tab of the Ribbon, click New Component > New Multimedia
Component.
A New Component window appears.
3. In the Name field, type the name of the Component.
4. In the Schema field, select a Multimedia Schema. A series of fields appear that you
can use to select a multimedia item.
5. In the Multimedia Type field, select a multimedia type and do one of the following:
■
Upload a local or network file—go to step 6
■
Reference an external resource—go to step 7
6. To upload a local or network file:
a. In the Resource Type field, select Uploaded
b. Click the Load From Disk button.
Content Manager Explorer Basic User Manual
79
Multimedia Components
c. In the dialog that appears, click the Browse button and select the file you
want to upload and click OK.
d. Go to step 8.
7. To reference an external resource:
a. In the Resource Type field, select External.
b. In the URL address field that appears, type the URL address of the file you
want to use.
c. Go to step 8.
8. If a Metadata tab appears, select the metadata tab and fill in fields as required. You
must fill in all mandatory metadata fields before you can save the Multimedia
Component.
9. Click Save and Close.
10. Depending on the Schema you selected, you may now be prompted to add this
Multimedia Component to a Bundle so that it can enter workflow. You can choose to
skip this step, but until you add it to a Bundle, your changes will not be checked in.
11. If this item must be added to a Bundle, a dialog opens asking you if you would like to
do so now. You can choose Not Now to close the dialog, but you see a warning
informing you that your item is not in a Bundle, and the same dialog will appear every
time you save changes to the item. Alternatively, if you select Add, a Bundle selection
dialog appears.
12. In the tree structure on the left, navigate to a Publication and Folder that contains a
Bundle to which you want to add the item, and add it to that Bundle by selecting the
Bundle and clicking Add. This adds the item to the selected Bundle and closes the
dialog. If the Bundle is already in workflow, the item will be too. You can also select
Close, which has the same effect as clicking Not Now in the previous dialog.
Results
You have created a Multimedia Component
Editing a Multimedia Component
You can edit a Multimedia Component to modify the name of the Component, to change
the multimedia type, or to modify any associated metadata.
Before you begin
80
■
To edit a Multimedia Component, you must have Component Management rights,
and write permissions for the containing Folder.
■
In a BluePrint, the Multimedia Component must be a local item or a local copy.
Content Manager Explorer Basic User Manual
Multimedia Components
Procedure
1. To edit a Multimedia Component, navigate to the Folder that contains the Multimedia
Component you want to edit.
2. Select the Multimedia Component and click Open on the Home tab of the Ribbon.
Content Manager Explorer displays the properties of the Multimedia Component in a
dialog.
3. As required, edit the following fields on the General tab:
■
Name — The name of the Multimedia Component must be unique within the
Folder in which you create it. In a BluePrint, this naming constraint extends
to any Parent or Child Publications in the BluePrint.
Note: Non-ASCII characters in the file name of a Multimedia Component
may result in previewing and publishing issues. Therefore, ensure that the
filename of the Multimedia file you want to upload or reference does not
contain non-ASCII characters.
■
Schema — You must base the Component on a Multimedia Schema. If the
Folder in which you create the Component has a mandatory linked Schema, the
Content Manager selects the Schema automatically, and the Component
must use it.
■
Multimedia type — The type of binary file that you will store in this
Multimedia Component.
■
Resource type — You can either Upload the binary file or you can supply an
External URL.
4. If the Metadata tab appears, you may see metadata fields, which you can modify if
you wish. If any mandatory metadata fields exist, you must fill in these fields before
you can save the Multimedia Component.
5. Click Save and Close.
6. Depending on the Schema you selected, you may now be prompted to add this
Multimedia Component to a Bundle so that it can enter workflow. You can choose to
skip this step, but until you add it to a Bundle, your changes will not be checked in.
7. If this item must be added to a Bundle, a dialog opens asking you if you would like to
do so now. You can choose Not Now to close the dialog, but you see a warning
informing you that your item is not in a Bundle, and the same dialog will appear every
time you save changes to the item. Alternatively, if you select Add, a Bundle selection
dialog appears.
8. In the tree structure on the left, navigate to a Publication and Folder that contains a
Bundle to which you want to add the item, and add it to that Bundle by selecting the
Bundle and clicking Add. This adds the item to the selected Bundle and closes the
dialog. If the Bundle is already in workflow, the item will be too. You can also select
Close, which has the same effect as clicking Not Now in the previous dialog.
Results
The Content Manager saves a modified version of the Multimedia Component. If the Content Manager
Content Manager Explorer Basic User Manual
81
Multimedia Components
checks in the Multimedia Component, any Pages or Components that use the Multimedia Component will
now use the new version.
Viewing the contents of a Multimedia
Component
You can view the contents of Multimedia Components by double-clicking the image in
the Multimedia Component dialog. The item will open in the associated program using its
file extension. If the binary file was uploaded, you can also click Save to disk.
Note: This task is useful for viewing the binary file only, not for modifying. If you open
the binary file in this way, any changes made to the file will be lost. If you do want to
change the binary file, save your changes locally, then upload the resulting new file using
Load from disk. Alternatively, you can use WebDAV to edit the file.
82
Content Manager Explorer Basic User Manual
Chapter 7
Pages
Pages combine Components that define content with templates that define how the
content is displayed in the Web page.
The following diagram shows how Pages combine different Content Manager building
blocks to create a Page that you can publish to a Web site:
■
Schemas define the structure of content stored in Components.
■
Components contain content and are based on Schemas that define what fields
you can define.
■
Component Templates define how Components are displayed in a Web page.
■
A Page combines a Component and a Component Template to create a
Component Presentation.
■
A Page Template defines the site navigation and the look-and-feel of a Page.
Page Templates usually define the header, footer, and content frames as well.
Creating a Page
A Page defines the layout and content of a publishable Page. You create Pages within the
Structure Groups of Publications.
Before you begin
To create a Page, you must have Page Management rights and write permissions for the
containing Structure Group.
About this task
When you create a Page, you specify the building blocks that the Page uses:
■
Component Presentations, which are the combination of Components and
Component Templates
■
A Page Template
■
Optionally, a metadata Schema and metadata values
Content Manager Explorer Basic User Manual
83
Pages
Procedure
1. To create a Page, navigate to the Publication and Structure Group in which you want
to create the Page.
2. In the Create tab of the Ribbon, click New Page.
Result:
A New Page window appears.
3. On the General tab, fill in the following fields:
■
Name—the name of the Page must be unique within the Structure Group in
which you create it. Content Manager Explorer displays this name in the list
view.
■
File name—you must make the file name unique within the Structure Group
in which you create it. This is the name of the Page as it will appear on the Web
site.
■
Page Template—the Page Template that the Content Manager will use to
render the Page. If you click the Inherit From Parent option, the Page uses the
default Page Template specified for the Publication.
■
Metadata Schema—(optional) you can select a metadata schema to create
metadata values for the Page. You must fill in any mandatory metadata fields
before you can save the Page.
4. Select the Component Presentation tab.
5. In this tab, click Insert. The following dialog appears:
84
Content Manager Explorer Basic User Manual
Pages
6. To add a Component Presentation to the Page, first find the Component you want to
add. You can do this in two ways:
■
In your Building Blocks Folder structure, navigate to the location of the
Component you want to add.
In your Categories and Keywords, select a Keyword. The List View displays
Components that have been classified with this Keyword or a child Keyword.
When you have located the Component(s) you want to add, do the following
■
a. In the list view, select one or more Components.
b. Select a Component Template. If you select more than one Component, the
Component Template is applied to all of the selected Components.
c. Click Insert. A message appears at the bottom of the pane which confirms
that you have added one or more Component Presentations to the Page.
d. Repeat this step to add additional Components.
e. After you finish adding Component Presentations, click Close to close the
Component Presentations dialog.
f. In the Component Presentations tab, use the Move up and Move down
buttons to adjust the ordering of the Component Presentations on the Page.
7. To edit a Component Presentation, double-click the Component to open it for editing:
8. To preview the Component using the selected Component Template, select the
Component in the list and click Preview on the right.
9. To restrict which Web site visitors can see a Component Presentation, select the
Component Presentation and click the Target Group subtab, then select the Target
Group(s) to which you want to show this Component Presentation.
10. Click the Save and Close button on the toolbar.
11. Depending on the Structure Group in which you created this Page, you may now be
prompted to add this Page to a Bundle so that it can enter workflow. You can choose to
skip this step, but until you add it to a Bundle, your changes will not be checked in.
12. If this item must be added to a Bundle, a dialog opens asking you if you would like to
do so now. You can choose Not Now to close the dialog, but you see a warning
informing you that your item is not in a Bundle, and the same dialog will appear every
time you save changes to the item. Alternatively, if you select Add, a Bundle selection
dialog appears.
13. In the tree structure on the left, navigate to a Publication and Folder that contains a
Bundle to which you want to add the item, and add it to that Bundle by selecting the
Bundle and clicking Add. This adds the item to the selected Bundle and closes the
dialog. If the Bundle is already in workflow, the item will be too. You can also select
Close, which has the same effect as clicking Not Now in the previous dialog.
Results
You have created a Page.
Content Manager Explorer Basic User Manual
85
Pages
Note: You cannot delete any items used on the Page (Components, Component
Templates, Page Templates, and Metadata Schema).
Editing a Page
You can edit an existing Page to change general information, Component Presentations
and Metadata.
Before you begin
■
To edit a Page, you must have Page Management rights and Write permissions for
the containing Structure Group.
■
You cannot edit the Page if the Content Manager assigned the Page to a different
user in a Workflow Process. Only the assignee can edit the Page.
■
You can edit a Page if it is a local item or a local copy. You cannot edit a shared
Page. For information about localizing a Page, see “BluePrinting ” on page 41.
Procedure
1. To edit a Page, navigate to the Publication and Structure Group in which the Page you
want to edit is located.
2. In the list view, select the Page you want to edit.
3. Click the Open icon in the Home tab of the Ribbon.
4. If required, edit general Page information in the fields on the General tab.
5. To edit Component Presentations, select the Component Presentation tab.
Double-click the Component to open it for editing.
6. To remove a Component Presentation, select a listed Component Presentation and
click Remove.
7. To add a Component Presentation to the Page, first find the Component you want to
add. You can do this in two ways:
■
In your Building Blocks Folder structure, navigate to the location of the
Component you want to add.
In your Categories and Keywords, select a Keyword. The List View displays
Components that have been classified with this Keyword or a child Keyword.
When you have located the Component(s) you want to add, do the following
■
a. In the list view, select one or more Components.
b. Select a Component Template. If you select more than one Component, the
Component Template is applied to all of the selected Components.
c. Click the Insert button. A message appears at the bottom of the pane which
confirms that you have added one or more Component Presentations to the
Page.
d. Repeat this step to add additional Components.
86
Content Manager Explorer Basic User Manual
Pages
e. After you finish adding Component Presentations, click Close to close the
Component Presentations dialog.
f. Click the Move up button or the Move down button to adjust the ordering of
the Component Presentations on the Page.
8. On the toolbar, click Save and Close.
9. Depending on the Structure Group that contains this Page, you may now be prompted
to add this Page to a Bundle so that it can enter workflow. You can choose to skip
this step, but until you add it to a Bundle, your changes will not be checked in.
10. If this item must be added to a Bundle, a dialog opens asking you if you would like to
do so now. You can choose Not Now to close the dialog, but you see a warning
informing you that your item is not in a Bundle, and the same dialog will appear every
time you save changes to the item. Alternatively, if you select Add, a Bundle selection
dialog appears.
11. In the tree structure on the left, navigate to a Publication and Folder that contains a
Bundle to which you want to add the item, and add it to that Bundle by selecting the
Bundle and clicking Add. This adds the item to the selected Bundle and closes the
dialog. If the Bundle is already in workflow, the item will be too. You can also select
Close, which has the same effect as clicking Not Now in the previous dialog.
Results
The Content Manager stores a modified version of the Page.
Note: You cannot delete any items used on the Page (Components, Component
Templates, Page Templates, Metadata Schema).
Previewing a Page
You can preview a Page from an open Page in edit mode, the open Page in view mode,
and directly from the list view.
Content Manager Explorer Basic User Manual
87
Pages
Before you begin
To preview a Page, you must have Page Management rights and read permissions for the containing Structure
Group.
Procedure
1. To preview a Page open in Edit or View mode, click the Preview icon in the Home
tab of the Ribbon toolbar.
2. To preview a Page from the list view:
a. Navigate to the Publication and Structure Group in which the Page you want
to preview is located.
b. In the list view, select the Page you want to preview.
c. Click the Preview icon in the Home tab of the Ribbon.
Results
A Preview window appears which displays the Page.
Publishing a Page
You can publish Pages by publishing the Publication or Structure Group in which they
reside or by Publishing the Pages themselves.
About this task
■
A Publication—the Content Manager publishes all Pages in publishable Structure
Groups
■
A Structure Group—the Content Manager publishes all nested Pages in publishable
Structure Groups
■
Pages—the Content Manager publishes the Page
Procedure
1. Select one or more items in the navigation pane or list view and select Publish in the
Home tab of the Ribbon.
Result: The Publish dialog appears, showing the Publish settings tab.
2. Select the Target Types to which you want to publish content to.
3. In Publish Settings, select when you want the publishing to start.
4. Click Publish to start the publishing process.
What to do next
For more information, see “Publishing and republishing items from the Content Manager ” on page 128.
88
Content Manager Explorer Basic User Manual
Chapter 8
Folders
In a Publication, you use Folders to organize content building blocks such as Schemas,
Components, Component Templates, Page Templates, Folders, and Virtual Folders.
You can find Folders in the Building Blocks of a Publication.
Folder settings
Folders have general settings and security settings for Folder permissions.
Folders have the following settings:
General settings
■
Name — you must make the name of the Folder unique within the Folder in
which you create it. In a BluePrint, this naming constraint extends to any Parent
or Child Publications in the BluePrint.
■
Linked Schema — (optional) the default Schema for Components created in
this Folder.
Content Manager Explorer Basic User Manual
89
Folders
■
Linked Schema is mandatory — (optional) Components created in this
Folder can only use the Linked Schema.
■
Metadata Schema — (optional) allows you to specify data in metadata fields
that can contain values for the Folder. If these fields are mandatory, you
must fill the fields in before you can save the Folder.
Folder permissions
By default, a new Folder inherits security settings from the Folder in which you create
it.
■
Inherit security settings from Parent — the Folder inherits security settings
from the Folder in which you nest this Folder. You can only change User
and Group permissions or Exceptions if you clear this value. If you select this
setting, the Content Manager removes any previous settings.
■
Users and Group permissions — you can set Read, Write, Localize, and
Delete permissions for this Folder for each User or Group that has access to
this Publication. If you modify them, the Folder will no longer inherit security
settings from the Parent Folder.
■
■
Read — the user or group can view items in the Folder
■
Write — the user or group can create or edit the items for which they
have rights
■
Delete — the user or group can delete items for which they have
rights
■
Localize — the user or group can create a local copy of a shared
BluePrint items for which they have rights
Exceptions — exceptions override other permission settings and deny
specified user or group read, write, localize and/or delete permissions.
Creating a Folder
Create a Folder in the Building Blocks of a Publication to organize Schemas, Components,
Component Templates, Page Templates, Template Building Blocks, Folders, and Virtual
Folders.
Before you begin
To create a Folder you must have Folder Management rights and Write permissions for
the containing Folder.
Procedure
1. To create a Folder, navigate to the Building Blocks of a Publication and the location
in which you want to add the Folder.
2. In the Create tab of the Ribbon, click New Folder.
Result:
A New Folder window opens.
90
Content Manager Explorer Basic User Manual
Folders
3. On the General tab, fill in the following fields:
■
Name — you must make the name of the Folder unique within the Folder in
which you create it. In a BluePrint, this naming constraint extends to any Parent
or Child Publications in the BluePrint.
■
Linked Schema — (optional) the default Schema for Components created in
this Folder.
■
Linked Schema is mandatory — (optional) Components created in this
Folder can only use the Linked Schema.
■
Metadata Schema — (optional) allows you to specify data in metadata fields
that can contain values for the Folder. If these fields are mandatory, you
must fill the fields in before you can save the Folder.
4. Click Save and close in the Home tab of the Ribbon.
Results
The Content Manager creates a Folder.
What to do next
To modify security settings for a Folder, you must first save and close the Folder. Then you can edit the
Folder in order to modify security settings.
Editing a Folder
You can edit a Folder to modify the properties of the Folder.
Before you begin
■
To edit a Folder you must have Folder Management rights.
■
If you want to modify Folder permissions, you must also have Permission
Management rights and write permissions for the containing Folder.
■
If this Folder is a shared item, you must localize the Folder before you can edit
the Folder.
Procedure
1. To edit a Folder, navigate to the Folder you want to edit.
2. Right-click the Folder in the tree view or list view, and in the context menu that
opens, select Properties.
Result: A dialog opens for the Folder.
3. On the General tab, edit the following fields as required:
■
Name — you must make the name of the Folder unique within the Folder in
which you create it. In a BluePrint, this naming constraint extends to any Parent
or Child Publications in the BluePrint.
■
Linked Schema — (optional) the default Schema for Components created in
this Folder.
Content Manager Explorer Basic User Manual
91
Folders
■
Mandatory — (appears only if Linked Schema is set) Components created
in this Folder can only use the Linked Schema.
■
Metadata Schema — (optional) allows you to specify data in metadata fields
that can contain values for the Folder. If these fields are mandatory, you
must fill the fields in before you can save the Folder.
Note: If Component Templates and Page Templates interact with the metadata of
the Folder, you may need to modify the Templates
4. If you want to modify Folder permissions, select the Security tab, and grant or deny
users Read, Write, Localize, or Delete permissions as necessary:
■
Inherit security settings from Parent — the Folder inherits security settings
from the Folder in which you nest this Folder. You can only change User
and Group permissions or Exceptions if you clear this value. If you select this
setting, the Content Manager removes any previous settings.
■
Users and Group permissions — you can set Read, Write, Localize, and
Delete permissions for this Folder for each User or Group that has access to
this Publication. If you modify them, the Folder will no longer inherit security
settings from the Parent Folder.
■
■
Read — the user or group can view items in the Folder
■
Write — the user or group can create or edit the items for which they
have rights
■
Delete — the user or group can delete items for which they have
rights
■
Localize — the user or group can create a local copy of a shared
BluePrint items for which they have rights
Exceptions — exceptions override other permission settings and deny
specified user or group read, write, localize and/or delete permissions.
5. Click the Save and Close button on the toolbar.
Results
The Content Manager modifies the Folder settings.
92
Content Manager Explorer Basic User Manual
Chapter 9
Structure Groups
In a Publication, you use Structure Groups to organize, manage, and provide a URL
structure for Pages. Each Structure Group represents a separate (sub)section of the
resulting Web site.
You can add Pages to each level of a Structure Group and then publish either the entire
Structure Group or parts of the Structure Group. For example, the following image depicts
the Structure Group of a newspaper. In this example, the News Structure Group contains
Careers, Company Information, News, and Products Structure Groups.
You can also use Structure Groups to:
■
Manage user and group read, write, localize, and delete permissions for nested
items (Pages and other Structure Groups).
■
Capture metadata using metadata fields.
■
Create a Workflow Process Association so that any Pages created or edited in the
Structure Group will follow a Workflow Process.
Content Manager Explorer Basic User Manual
93
Structure Groups
Note: To create Pages in a Publication, you must create a root Structure Group. You can
create other Pages and Structure Groups in the root Structure Group.
Structure Group settings
You can define general settings, Metadata, default Page Template and Workflow settings
for Structure Groups.
General settings
The following table lists the Structure Group general settings.
Setting
Description
Name
You must provide a name for the Structure Group that is unique
within the Structure Group in which you create it. In a BluePrint,
this naming constraint extends to any Parent or Child
Publications in the BluePrint.
Directory location
The Content Manager determines this read-only field at a
Publication settings level. You cannot edit it in a Structure
Group.
Directory
The URL of the directory in which the Content Manager will
publish Pages created in this Structure Group. If this is a root
Structure Group, this field is optional.
Publishable
A yes/no setting that determines if the Content Manager can
publish Pages created in the Structure Group and Pages in nested
Structure Groups. This setting defaults to Yes.
The URL to which the Content Manager publishes Pages is a combination of the following:
■
Publication Target — the Publication Target is determined by the Target Type to
which the user published the item
■
Publication path — the Publication path is a property of a Publication
■
Structure Group directory settings:
■
for a Page, this is the concatenation of the directory properties of all
nesting Structure Groups starting with the root Structure Group. Each
directory is separated by a forward slash "/".
■
for a multimedia file, this is determined by the Page Template or the
Component Template. If the Templates fail to specify a Structure Group,
the location defaults to the location specified in the Images URL property
of a Publication
For example, the Target Type "Live" is associated with the Publication Target called Live,
which publishes to a specific location (in this example this is http://www.docs.com).
94
Content Manager Explorer Basic User Manual
Structure Groups
The Publication URL is "France". The Structure Group directory is /news/ press_
release. A Page published in this Structure Group is published to the following URL:
http://www.docs.com/France/News/press_release
Metadata
Structure Groups can also contain Metadata. These are based on Metadata Schemas and
appear below the Metadata Schema field.
These fields could, for example, store additional information about the colors of the
Pages in the Structure Group. These fields interact with the Page Templates and
Component Templates used on the Pages.
Default Page Template
You can specify a default Page Template for a Structure Group. The default Page Template
specifies the Template that an end user can use in any Pages created in the Structure
Group.
If a series of Pages use the default template, you can change the default template in the
Structure Group. As a result, all Pages that used the default automatically update to the
newly selected Default Page Template.
The Inherit from Parent setting determines if this Structure Group inherits the default
Page Template from the Structure Group in which this Structure Group is nested. If you
select this setting, end users cannot specify a default Page Template.
Workflow
If you have Workflow Management rights, and Workflow Process Definitions have been
created for the Publication, you can create a Process Association in a Structure Group.
When you associate a Workflow Process Definition with a Structure Group, all new or
edited Pages that end users store in the Structure Group enter a Workflow Process.
Content Manager Explorer Basic User Manual
95
Structure Groups
Creating a Structure Group
You create a Structure Group to organize Pages in a Publication and create a URL structure
used in a Web site. You can add metadata to a Structure Group and create Workflow
associations so that Pages created in the Structure Group follow the specified Workflow
Process
Before you begin
■
To create a Structure Group, you must have Structure Group Management rights
and Write Permissions for the containing Structure Group.
■
To add a Workflow association to the Structure Group, you must also have
Workflow Management rights.
About this task
A Structure Group may use the following items:
■
A metadata Schema, to add metadata values to the Structure Group
■
A Workflow Process Definition, to create a Workflow Association to add to the
Structure Group.
Note: You can create only one root Structure Group in a Publication.
Procedure
1. To create a Structure Group, navigate to the Structure Group in which you want to
create a new Structure Group.
2. In the Create tab of the Ribbon, click the New Structure Group button.
Result:
A New Structure Group window appears.
3. On the General tab, fill in the following fields:
■
Name — type the Name of the Structure Group as it will appear in Content
Manager Explorer
■
Directory — type the name of the Web site URL to which Pages created in
this Structure Group will be published. If this is a root Structure Group, this
field is optional.
■
Publishable — uncheck this option if you do not want the Content Manager
to publish this Structure Group or nested Structure Groups
■
Default Page Template — select a default Page Template or select Inherit
from Parent
4. (Optional) To add metadata to this Structure Group, select a Metadata schema and
fill in metadata fields are required.
5. If you want to specify that a Page in this Structure Group must enter a Workflow
Process whenever a user creates such a Page, in the Workflow tab, select a value for
Associated Page Process.
96
Content Manager Explorer Basic User Manual
Structure Groups
6. If you want to specify that all Pages in this Structure Group must be part of a Bundle,
in the Workflow tab, select When a user creates or modifies a Page in this
Structure Group, the Page must be in a Bundle. By selecting a value for Preferred
Workflow Process for this Bundle, you can make Bundles with that Workflow
Process more prominent for the user.
7. Click the Save and close button on the Home tab of the Ribbon.
Results
The Content Manager creates a Structure Group.
You can create Pages and other Structure Groups within this Structure Group. If you set
the Structure Group to Publishable, the Content Manager publishes Pages in this Structure
Group to the Structure Group Directory specified.
Editing a Structure Group
You can edit a Structure Group to change its general settings, permissions, or Workflow
association.
Before you begin
To edit a Structure Group, you must have Structure Group Management rights and write
permissions for the containing Structure Group.
To edit a Workflow association, you must also have Workflow Management rights.
To edit Structure Group permissions, you must also have Permission Management rights.
You cannot edit a shared Structure Group.
Procedure
1. To edit a Structure Group, navigate to the Structure Group you want to edit.
2. In the tree or in list view, right-click the Structure Group you want to edit and select
Properties from the context menu that opens.
Result: An edit window opens displaying the Structure Group you selected.
3. Edit the General information, Security settings, and Workflow as necessary.
4. Click the Save and close button on the Home tab of the Ribbon.
Results
You have modified the Structure Group settings:
■
If you changed the Directory location, you must republish any nested Pages for
this new location to take effect on your published site.
■
If the Publishable setting is on, and all other publishing settings are configured,
users can publish Pages created in the Structure Group. If the Publishable setting
is off, users cannot publish Pages and nested Structure Groups.
Content Manager Explorer Basic User Manual
97
Structure Groups
Publishing or unpublishing Structure
Groups
You can publish or unpublish any publishable Structure Group. When you Publish or
Unpublish a Structure Group, you publish or unpublish all publishable nested Structure
Groups and Pages.
98
Content Manager Explorer Basic User Manual
Chapter 10
Bundles
A Bundle is a container for grouping related content items that reside in different locations
in Content Manager so that you can apply Workflow to these items or export or import
them as a set.
About Bundles
Bundles have a number of specific properties and behaviors, described in this topic.
Bundle contents
You can add any type of content item in a Publication to a Bundle, including other
Bundles. Bundles can contain any number of items and an item can be in any number
of Bundles.
Bundle creation
You can create a Bundle and then add items to it, or you can create a content item and
create a Bundle for it on the fly. When created, a Bundle is stored in a default Folder
location, unless you choose a different location.
Bundles and search
You cannot search inside a Bundle's contents. You can however, successfully search
for a Bundle itself.
Bundles and BluePrinting
Bundles can be localized in a child Publication, but only their title and metadata can
then be changed. You cannot add items to the localized Bundle.
You can put items shared from a parent Publication in a Bundle. When a Bundle
containing a shared item is put in workflow in the current Publication, the following
rules apply:
■
The user who starts workflow must have at least read permissions on every
item in the Publication from which the shared item originates. (The user does
not need Publication Management rights to the Publication.)
■
The shared item cannot enter workflow in any other Publication until it finishes
workflow in the current Publication.
Content Manager Explorer Basic User Manual
99
Bundles
■
While the shared item is in workflow, it cannot be localized or unlocalized
(neither in any parent nor in any child of the current Publication).
■
While the shared item is in a Bundle in workflow, it is also not possible to
change the BluePrint Publication hierarchy or the priorities of BluePrint
Publications.
Bundles and workflow
A Bundle may be subject to a Workflow Process Definition. While a Bundle goes
through workflow, so do all of the items it contains. These items can have completely
separate Workflow Process Definitions associated with them. A Bundle's Workflow
Process can be started only when all of its items have completed their own Workflow
Processes (if applicable).
A Bundle may contain items that must be in a Bundle (it may also contain items that
do not need to be in a Bundle). Any changes to the mandatory items in a Bundle cannot
be checked in until the Bundle has started and finished its Workflow Process. That
means that even before the Bundle enters workflow, changes to the mandatory items
are not checked in.
To illustrate what this means, imagine the following sequence of events:
■
Alice opens a mandatory item that is in a Bundle. The Bundle is subject to
workflow but has not entered workflow yet.
■
Alice modifies the item and saves and closes the item to commit her changes.
The changes are committed but not checked in.
■
Boris opens the same item (or explicitly checks it out) and makes a change,
but halfway through editing, he changes his mind.
■
Boris selects Undo Checkout to discard his changes.
■
Content Manager discards all changes that were not checked in, including the
changes made by Alice.
To alert the user to this, Boris sees a prompt when he opens (or explicitly checks out)
the item, alerting him that he is taking ownership of other users' changes to the item,
in addition to the changes he will be making. If Boris explicitly checks out the item and
takes ownership, he is not prompted again.
When a Bundle that contains another Bundle enters a Workflow Process, the 'inner'
Bundle itself, as well as all items contained in it, are added to the 'outer' Bundle.
When a Bundle has entered a Workflow Process, you can perform certain tasks only if
the current Workflow Activity is configured to allow them: adding or removing
items in the Bundle; editing the items in the Bundle; or editing the metadata of the
Bundle.
Depending on configuration, Content Manager may dissolve the Bundle after the
Workflow Process is completed. This means that the Bundle is destroyed, but its items
remain. If the Bundle contains any Bundles, finishing the 'outer' Bundle's Workflow
Process may also cause any or all of those 'inner' Bundles to be dissolved, even if the
outer Bundle is not.
100 Content Manager Explorer Basic User Manual
Bundles
Creating a Bundle
You can create an empty Bundle from the Create tab.
Before you begin
To create a Bundle you need Bundle Management rights.
Procedure
1. Access the Content Manager Explorer Web site.
2. Navigate to the Folder in which you want to create a Bundle and in the Create tab of
the Ribbon toolbar, click the New Bundle button.
3. In the dialog that opens, fill in the following information:
Name
The name for the Bundle.
Description
A description for the Bundle.
Bundle Type
The type of Bundle determines whether your Bundle is subject to a Workflow
Process, and if so, which Workflow Process.
Metadata
Based on the Bundle type, you may also see one or more metadata fields.
4. Click Save and Close in the Ribbon toolbar of the dialog to create the Bundle.
Result: The Bundle is created. You can now add items to it.
Adding one item to a Bundle
Add an item to an existing Bundle from the item's context menu. (To add an item to a
new Bundle, create the empty Bundle first.) Note that you can add the same item to
multiple Bundles, and that you can also add a Bundle itself to a Bundle.
Before you begin
If a Bundle is subject to a Workflow Process and currently in workflow, you can only add
an item to it if all of the following are true:
■
The Bundle is currently in a Workflow state that allows the adding of items to it.
■
The item you intend to add is a Component, Page, Component Template, Page
Template, Template Building Block or another Bundle.
■
The item you intend to add is not currently in workflow.
Content Manager Explorer Basic User Manual 101
Bundles
Procedure
1. In the tree on the left, navigate to a location that contains the item you want to add to
a Bundle.
2. In the tree or in list view, right-click the item and from the context menu that opens,
select Add to a Bundle.
Result: A dialog opens showing a Folder tree on the left.
3. Navigate to the location of your Bundle in the Folder tree and open it, then select the
Bundle in the list view and select Add. The button is disabled if you cannot add the
item to this Bundle (for example, if the item is the Bundle itself).
Result: SDL Tridion adds the item to the Bundle and closes the dialog. If the
Bundle is currently in workflow, the item is assigned to the User Group
associated with the current Activity.
4. Repeat these steps as needed to add the item to more Bundles.
5. Close the item dialog.
Selecting items and adding them to a
Bundle
Add items to an existing Bundle from the Home tab of the Ribbon toolbar. (To add items
to a new Bundle, create the empty Bundle first.)
Before you begin
If a Bundle is subject to a Workflow Process and currently in workflow, you can only add
items to it if all of the following are true:
■
The Bundle is currently in a Workflow state that allows the adding of items to it.
■
The items you intend to add are all Components, Pages, Component Templates,
Page Templates, Template Building Blocks and/or other Bundles.
■
The items you intend to add are not currently in workflow.
102 Content Manager Explorer Basic User Manual
Bundles
Procedure
1. In the tree on the left, navigate to a location that contains one or more items you want
to add to a Bundle. Note that you can add the same item to multiple Bundles, and
that you can also add Bundles themselves to a Bundle.
2. Select the item(s) you want to add, and in the Home tab of the Ribbon toolbar, select
Add to Bundle.
Result: A dialog opens showing a Folder tree on the left.
3. Navigate to the location of your Bundle in the Folder tree and open it, then select the
Bundle in the list view and select Add. The button is disabled if you cannot add all the
selected items to this Bundle (for example, if one of the selected items is the Bundle
itself).
Result: SDL Tridion adds the selected item(s) to the Bundle and closes the
dialog. If the Bundle is currently in workflow, the selected item(s) are assigned
to the User Group associated with the current Activity.
Selecting a Bundle and adding items to it
Use the context-sensitive Bundle tab, which appears when you select a Bundle, to add
items to that Bundle.
Before you begin
If a Bundle is subject to a Workflow Process and currently in workflow, you can only add
items to it if all of the following are true:
■
The Bundle is currently in a Workflow state that allows the adding of items to it.
■
The items you intend to add are all Components, Pages, Component Templates,
Page Templates, Template Building Blocks and/or other Bundles.
■
The items you intend to add are not currently in workflow.
Procedure
1. From the tree on the left, navigate to the Folder than contains the Bundle to which
you want to add items.
2. Open the Bundle in the tree or in the list view and in the Bundle tab that appears in
the Ribbon toolbar, select Add Items to Bundle.
Result: A dialog opens showing a tree structure for the current Publication.
3. Navigate to a location containing one or more items that you want to add to the
Bundle, select the item(s) and click Add.
4. Repeat the previous step until you have added all items to the Bundle that you wanted
to add, and then click Close.
Result: SDL Tridion adds the selected item(s) to the Bundle and closes the
dialog. If the Bundle is currently in workflow, the selected item(s) are assigned
to the User Group associated with the current Activity.
Content Manager Explorer Basic User Manual 103
Bundles
Removing an item from multiple Bundles
Remove an item from multiple Bundles in the Bundles tab of the item dialog (it the item
has such a tab), or from the Bundles themselves.
Before you begin
If a Bundle is subject to a Workflow Process, you can only remove the item from it if all
of the following are true:
■
The Bundle is currently not in a Workflow state that prohibits the removing of
items from it.
■
The items you intend to remove is not currently being worked on by a User that is
not you.
Procedure
1. If the item you want to remove is not one of the following:
■
Component
■
Page
■
Page Template
■
Component Template
■
Template Building Block
then repeatedly perform the procedure for removing an item from one Bundle.
2. Alternatively, if the item you want to remove is one these types, navigate to the
Folder or Structure Group that contains the item, and double-click it in list view.
Result: The item opens in an item dialog, showing a Bundles tab.
3. Select the Bundles tab.
Result: You see a list of one or more Bundles that this item currently belongs
to.
4. Select a Bundle from which you want to remove this item and select Remove from
Bundle.
Result: The item is removed from the Bundle and the Bundle disappears
from the list. If the Bundle is in workflow, the item is taken out of workflow in
its current state. It retains its current Approval Status.
5. Repeat the previous step as needed to remove it from other Bundles.
6. If the selected item is required to be part of a Bundle, and you removed it from its
only Bundle, you must add it to at least one Bundle again, and complete that Bundle's
Workflow Process, if any, before you can check in any changes to the item.
7. Close the item dialog.
104 Content Manager Explorer Basic User Manual
Bundles
Removing one or more items from a Bundle
Remove one or more items from a Bundle in the context-sensitive Bundle tab that appears
when you select a Bundle.
Before you begin
If a Bundle is subject to a Workflow Process, you can only remove items from it if all of
the following are true:
■
The Bundle is currently not in a Workflow state that prohibits the removing of
items from it.
■
None of the items you intend to remove are currently being worked on by a User
that is not you.
Procedure
1. From the tree on the left, navigate to the Folder that contains the Bundle from which
you want to remove items.
2. Open the Bundle in the tree or in the list view.
Result: The Bundle shows its contents in the list view on the right, and a
Bundle tab appears in the Ribbon toolbar.
3. Select the item or items you want to remove in the list and select Remove from
Bundle in the Bundle tab.
Result: The selected items are removed from the Bundle. If the Bundle is in
workflow, the items are taken out of workflow in its current state. It retains its
current Approval Status.
4. If any of the selected items are required to be part of a Bundle, and are now no longer
in a Bundle, you must add them to at least one Bundle again, and complete that
Bundle's Workflow Process, before you can check in any changes to those items.
Publishing or unpublishing a Bundle
You can publish or unpublish a Bundle. This causes all publishable items in the Bundle to
be published or unpublished. Non-publishable items in the Bundle are ignored.
Content Manager Explorer Basic User Manual 105
Bundles
Viewing the properties of a Bundle
View the properties of a Bundle in a popup dialog. You can also start workflow on this
Bundle from this popup dialog.
Procedure
1. From the tree on the left, navigate to the Folder that contains the Bundle.
2. Select the Bundle in the list view, and in the Home tab of the Ribbon toolbar, click
Properties.
Result:
A dialog opens showing the properties of this Bundle:
3. Examine the Bundle properties:
Name
The name for the Bundle.
Description
A description for the Bundle.
Bundle Type
The type of Bundle determines whether your Bundle is subject to a Workflow
Process, and if so, which Workflow Process.
Metadata
Based on the Bundle type, you may also see one or more metadata fields.
4. If the Bundle is associated with a Workflow Process Definition and is currently not in
workflow, you can start workflow on the Bundle by selecting Start Workflow
Process in the Home tab.
Starting Workflow on a Bundle
Unlike other items, Bundles do not enter a Workflow Process automatically in response
to a trigger; instead, you must start workflow manually. This topic explains how. Starting
workflow on a Bundle places all items in that Bundle in workflow.
Before you begin
To be able to enter workflow, a Bundle must meet the following requirements:
■
The Bundle must be based on a Bundle Schema that has an Associated Bundle
Process configured in its Workflow tab.
■
The Bundle must either be empty, or only contain items that can enter workflow,
that is:
■
Components
■
Pages
■
Component Templates
106 Content Manager Explorer Basic User Manual
Bundles
■
■
Page Templates
■
Template Building Blocks
■
Bundles
None of the items in the Bundle is currently in a Workflow Process.
Procedure
1. Access the Content Manager Explorer Web site.
2. Navigate to the Publication and Folder that contains the Bundle on which you want to
start Workflow.
3. Select the Bundle in the tree on the left.
Result: The Bundle tab appears in the Ribbon, and is selected.
4. Select Start Workflow Process in the Bundle tab.
The Start Workflow Process button shows an error if one or both of the following is
true:
■
One or more of the items in the Bundle is itself still in workflow. To fix this
problem, find out to whom the item is currently assigned and follow the item
through to the end of its Process Instance.
■
One or more of the items in the Bundle cannot be subject to workflow. Only
Components, Pages, Component Templates, Page Templates, Template
Building Blocks and Bundles can be subject to workflow. To fix this problem,
remove all other types of items from the Bundle.
Result:
If no error appears, SDL Tridion places all items in the Bundle in workflow, and
triggers the first Activity in the Workflow Process Definition associated with the
Bundle Schema of this Bundle.
If this first Activity is an Automatic Activity, SDL Tridion performs it and any other
Automatic Activities that directly follow this one until it reaches a Manual Activity.
As soon as the first Manual Activity is reached, that Activity appears in the Assignment
List of all the members of the User Group associated with that Activity.
Content Manager Explorer Basic User Manual 107
Bundles
Workflow tab of a Bundle
If you open a Bundle in Content Manager Explorer, the Workflow tab gives you
information about the workflow properties of that Bundle.
If the Workflow tab shows only the text Approval Status: followed by a value, one of
the following is the case:
■
If the value is Undefined, the item is either not subject to Workflow at all, or it
has never entered a Workflow Process.
■
If the value is Unapproved, the item has completed at least one Workflow Process,
which did not assign any Approval Status to the item.
■
If the value is neither Undefined nor Unapproved, the item has completed at
least one Workflow Process, which last assigned the Approval Status you see to
the item.
If the Workflow tab shows a History of Activites area in the top half and an Activity
Details area in the bottom half, then the item is subject to workflow and currently in a
Workflow Process.
You see the following:
108 Content Manager Explorer Basic User Manual
Bundles
History of Activities
A list of the Activities of this Process. If the item has already gone through and finished
a Workflow Process in the past, you see a dropdown from which you can select
previous finished Workflow Processes.
The History of Activities area shows the following properties per Activity:
<Icon>
If the icon shows a green checkmark, the Activity has finished; if not, it has not
finished yet.
Name
The name of the Activity, preceded by a number of indicate which step in the Process
this is. (The number is useful to distinguish, say, a first review Activity from a second
review Activity.)
Owner
The User currently performing the Activity. If this is empty, the item has been assigned,
but not picked up yet.
Assigned To
The Group or User to whom this Activity is or was assigned.
Approval Status
The Approval Status of the item after this Activity has finished.
Activity <number> <name of Activity>
This area shows the properties of the currently selected Activity. The area label is the
word 'Activity', followed by a number to indicate which step in the Process this is,
followed by the Activity name. (The number is useful to distinguish, say, a first review
Activity from a second review Activity.)
You see the following Activity Details:
Description
A description of what this Activity entails.
Assigned to
The Group or User to which this Activity was assigned.
Performer
If the Activity has a Started or Finished state, the name of the User who is currently
performing (if Started) or has most recently performed (if Finished) the Activity.
Assigned on
A timestamp representing the moment at which the Activity was assigned, immediately
after the previous Activity finished.
Started on
If the Activity has a Started or Finished state, a timestamp representing the moment at
which a User picked up the Activity.
Time Spent
Content Manager Explorer Basic User Manual 109
Bundles
If the Activity has a Finished state, the amount of time that has passed from the
moment the Activity was first assigned, to the moment a User finished the Activity.
Finished on
If the Activity has a Finished state, a timestamp representing the moment at which a
User finished the Activity.
State
Only if the Activity failed or was suspended, its state.
State Message
Only if the Activity failed or was suspended, the reason for this failure or suspension.
Previous Activity Message
A message provided by the User who finished the previous Activity in this Workflow
Process, typically intended as instructions to the current Owner.
The Related Items area shows the list of items associated with the current Activity.
If you select an item, you can do the following:
Preview
Preview the item in a new dialog.
Open
Open the item for editing in a new dialog.
Compare
If you also select two Activities from the History of Activities list, Compare shows
you how the selected item changed between those two Activities. This button is
disabled if Content Manager is not configured to save snapshots of the item you
selected.
110
Content Manager Explorer Basic User Manual
Chapter 11
Workflow
This section explains how to pick up, start, perform and finish Workflow Activities, how
to create a Task, and how to check the workflow properties of items that are subject to
workflow.
Picking up a Workflow Activity assigned to
your Group
If a Workflow Activity is assigned to your Group, a notification appears in the top right
hand side of your screen. You can also see all Workflow Activities assigned to your Group
in the Things to do popup, also accessible from the top right hand side of your screen.
You can look at the Activity's details and decide to pick it up.
Procedure
1. You can pick up a Workflow Activity assigned to your Group in one of the following
ways:
■
Respond to a notification immediately: when a notification appears with the
message ITEM was assigned to your Group, where ITEM is the name of an
Activity, click Show Activity. A dialog opens with details about this Activity.
■
Respond to a notification later: when a notification appears, and then
disappears, with the message ITEM was assigned to you or ITEM was
assigned to your Group, where ITEM is the name of an Activity, click the
notifications area to see it again, then click Show Activity. A dialog opens with
details about this Activity.
Check Assigned Activities: click the Workflow area at top right and in the
dialog that opens, click Assigned to see a list of all Activities assigned to you
or your Group that are not yet picked up. Select an Activity to see its details.
You can now click Start Activity to take ownership and start working on the Activity.
■
Result: The Activity is added to your Started list, and you see its details
screen with a Finish Activity button. No other member of your Group can work
on this Activity. The number in your Workflow area goes up by 1.
Content Manager Explorer Basic User Manual
111
Workflow
Performing a Workflow Activity you have
picked up
View Workflow Activities you have picked up at the top right hand part of the screen, and
perform the Activity.
Procedure
1. Access the Content Manager Explorer Web site.
2. Click the Workflow area in the top right part of the screen and in the Things to do
dialog that opens, select Started.
Result: You see Activities that you started.
3. Select an Activity.
Result: A detail screen for this Activity appears.
4. Perform an Activity in one of the following ways:
a. If the Activity is a Task, that is, if it has no items associated with it, study the
title and description of the Task, and perform it.
b. If the Activity has one or more items associated with it, select each item in
turn to open it in a form-based dialog. Examine and, if need be, edit the item,
and save and close it. Repeat until you have dealt with all items.
Result: You are now done with your Activity and you can finish it.
Reassigning a Workflow Activity you have
picked up
After you have started an Activity, you can (and sometimes must) reassign it to another
User or Group.
About this task
In certain situations, you may find yourself wanting to reassign an Activity you started.
For example:
■
Your Activity is the creation of an article on the Web site. You have created the
text for the article, but in this specific case, you need a photo or graphic to go with
the text. In this case, you would want to reassign the Activity to someone in the
Graphics department, so you would assign it to that Group.
■
You started an Activity but you realize you will be too busy to finish it within the
time allotted. For that reason, you would like to assign it to another User in
your Group.
In addition, you sometimes must reassign an Activity you started because you have no
access to one or more of its related items. For example, you may have the right to edit the
contents and image of a product description, but not to edit the price. In this case, you
must reassign the item to another User or Group.
112
Content Manager Explorer Basic User Manual
Workflow
Procedure
1. Access the Content Manager Explorer Web site.
2. Click the Workflow area in the top right part of the screen and in the Things to do
dialog that opens, select Started.
Result: You see Activities that you started.
3. Select an Activity.
Result: A detail screen for this Activity appears.
4. Reassign the Activity in one of the following ways:
a. To reassign the Activity to a Group, select Assign to a Group, select a Group
from the dropdown list, and click Reassign.
Result: The Activity disappears from your list and appears in the
Assigned list of all members of the Group you selected.
b. To reassign the Activity to a User, select Assign to a User, select a User
(typically from your Group) from the dropdown list, and click Reassign.
Result: The Activity disappears from your list and appears in the
Started list of the User you selected.
Finishing a Workflow Activity you have
performed
When you have finished performing a Workflow Activity, indicate this by explicitly
finishing the Activity. If you find that you cannot finish the Activity, you must reassign it
to another User or Group.
Procedure
1. Access the Content Manager Explorer Web site.
2. Click the Workflow area in the top right part of the screen and in the Things to do
dialog that opens, select Started.
Result: You see Activities that you started.
3. Select the Activity you want to finish.
Result: A detail screen for this Activity appears.
4. Click Finish Activity.
Result: You see a Finish ITEM dialog, where ITEM is the Activity you have
finished working on.
5. Under Finish Activity Message, you can enter any comment you like about the
Activity you performed.
6. If finishing this Activity involves a decision (for example, to approve or reject
reviewed content), select the next Activity to be performed from the Next Activity
dropdown you see.
Content Manager Explorer Basic User Manual
113
Workflow
7. If you want, you can change the name of the next Activity in the Title field.
8. Click Done to finish this Activity.
Result: The Activity is finished and possibly gets assigned to another Group.
You see your Started Activities list again, now without the Activity you just
finished. The number in your Workflow area goes down by 1.
Publishing items that are in Workflow
If an item achieves a Workflow status known as minimum approval status for a
destination, you can publish it to that destination. If the item is in Workflow and does not
meet the minimum approval status, the Content Manager publishes the last checked-in
version of the item (if it exists and if it does have a minimum approval status that allows
it to be published).
Creating a Task
You can create a Workflow Process that does not involve any content items, and assign it
to a User or Group. Such a Process is called a Task.
Procedure
1. Access the Content Manager Explorer Web site.
2. Click the Workflow area in the top right part of the screen and in the Things to do
dialog that opens, click the Add button (labeled +).
Result: A New Task dialog opens.
3. Under Title, briefly describe the Task.
4. Select if you want to assign the Task to a Group or a User.
Result: The dropdown shows Groups or Users.
5. Select the Group or User from the dropdown.
6. If you want, select a Publication from the Publication dropdown. This is only
necessary if your implementation of SDL Tridion has different types of Tasks, and
you know which Publication is associated with which type of Task.
7. Click Assign Task.
Result: The User(s) to which you assigned the task see a notification that
this Task was assigned to them. The Task also appears alongside their other
Workflow Activities in the Assigned list of the Things to do dialog.
114
Content Manager Explorer Basic User Manual
Workflow
Workflow Activity Details
The details displayed for an Activity.
In your Assigned or Started screen, select any Activity to see its details.
You see the following Activity Details:
Name
The name of this Activity.
Task Name
If this Activity is applied to a type of item, the name of that item; if this Activity is a
Task, the name of the Task.
Assigned to
The Group or User to which this Activity was assigned.
Due date
If the Activity has a Started state, the moment at which the Activity is (or was) expected
to be finished. If the due date has already passed, a custom Expiration Script, if
implemented, will have been triggered, and the date and time are displayed in red.
If you select Show more, you also see the following details:
Description
A description of what this Activity entails.
Approval Status
The Approval Status determines whether or not the item(s) associated with this item
can be published to a specific Target Type.
Assigned on
A timestamp representing the moment at which the Activity was assigned, immediately
after the previous Activity finished.
Performer
If the Activity has a Started or Finished state, the name of the User who is currently
performing (if Started) or has most recently performed (if Finished) the Activity.
Started on
If the Activity has a Started or Finished state, a timestamp representing the moment at
which a User picked up the Activity.
Previous Activity Message
A message provided by the User who finished the previous Activity in this Workflow
Process, typically intended as instructions to the current Owner.
The Related Items area shows the list of items associated with the current Activity.
Click the Open button at the right of an item to open the item in a dialog.
Content Manager Explorer Basic User Manual
115
Workflow
Workflow tab of an item subject to workflow
If you open an item that is subject to workflow in Content Manager Explorer, the
Workflow tab of the item dialog gives you information about the workflow properties of
the item.
The following types of items have a Workflow tab:
■
Components
■
Pages
■
Component Templates
■
Page Templates
■
Template Building Blocks
■
Bundles
If the Workflow tab shows only the text Approval Status: followed by a value, one of
the following is the case:
■
If the value is Undefined, the item is either not subject to Workflow at all, or it
has never entered a Workflow Process.
■
If the value is Unapproved, the item has completed at least one Workflow Process,
which did not assign any Approval Status to the item.
■
If the value is neither Undefined nor Unapproved, the item has completed at
least one Workflow Process, which last assigned the Approval Status you see to
the item.
If the Workflow tab shows a History of Activites area in the top half and an Activity
Details area in the bottom half, then the item is subject to workflow and currently in a
Workflow Process.
You see the following:
116
Content Manager Explorer Basic User Manual
Workflow
History of Activities
A list of the Activities of this Process. If the item has already gone through and finished
a Workflow Process in the past, you see a dropdown from which you can select
previous finished Workflow Processes.
The History of Activities area shows the following properties per Activity:
<Icon>
If the icon shows a green checkmark, the Activity has finished; if not, it has not
finished yet.
Name
The name of the Activity, preceded by a number of indicate which step in the Process
this is. (The number is useful to distinguish, say, a first review Activity from a second
review Activity.)
Owner
The User currently performing the Activity. If this is empty, the item has been assigned,
but not picked up yet.
Assigned To
The Group or User to whom this Activity is or was assigned.
Approval Status
The Approval Status of the item after this Activity has finished.
Activity <number> <name of Activity>
This area shows the properties of the currently selected Activity. The area label is the
word 'Activity', followed by a number to indicate which step in the Process this is,
followed by the Activity name. (The number is useful to distinguish, say, a first review
Activity from a second review Activity.)
You see the following Activity Details:
Name
The name of this Activity.
Description
A description of what this Activity entails.
Task Name
If this Activity is applied to a type of item, the name of that item; if this Activity is a
Task, the name of the Task.
Process Definition
The name of the Workflow Process Definition that this Activity belongs to.
Approval Status
The Approval Status determines whether or not the item(s) associated with this item
can be published to a specific Target Type.
Assigned to
The Group or User to which this Activity was assigned.
Content Manager Explorer Basic User Manual
117
Workflow
Performer
If the Activity has a Started or Finished state, the name of the User who is currently
performing (if Started) or has most recently performed (if Finished) the Activity.
Assigned on
A timestamp representing the moment at which the Activity was assigned, immediately
after the previous Activity finished.
Started on
If the Activity has a Started or Finished state, a timestamp representing the moment at
which a User picked up the Activity.
Finished on
If the Activity has a Finished state, a timestamp representing the moment at which a
User finished the Activity.
Previous Activity Message
A message provided by the User who finished the previous Activity in this Workflow
Process, typically intended as instructions to the current Owner.
Time Spent
If the Activity has a Finished state, the amount of time that has passed from the
moment the Activity was first assigned, to the moment a User finished the Activity.
Publication
The Publication that contains the item(s) involved in this Activity.
State
The state that the Activity is in: Assigned, Started, Failed or Suspended.
The Related Items area shows the list of items associated with the current Activity.
If you select an item, you can do the following:
Preview
Preview the item in a new dialog.
Open
Open the item for editing in a new dialog.
Compare
If you also select two Activities from the History of Activities list, Compare shows
you how the selected item changed between those two Activities. This button is
disabled if Content Manager is not configured to save snapshots of the item you
selected.
118
Content Manager Explorer Basic User Manual
Chapter 12
Metadata and Keywords
You use Keywords and metadata to classify content.
Content retrieval and management of data depends on the effective classification and
tagging of your information.
Metadata
Metadata is data about data. You can add metadata to the following item types in the
Content Manager:
■
Components
■
Multimedia Components
■
Keywords
■
Publications
■
Folders and Virtual Folders
■
Structure Groups
■
Pages
Note: Implementers can also apply metadata to Component Templates, Page
Templates, and Template Building Blocks.
Keywords
Keywords—A Category is a general classification and a Keyword is a value in a
Category. Keywords define a classification scheme (a taxonomy tree) that provide a
knowledge map of your data. You can apply Keywords to the following content:
■
Component fields
■
Metadata fields
Note that Publications cannot be classified and do not appear as Related Items.
The following image shows how Categories and Keywords are used to define
Component fields and Metadata fields:
Content Manager Explorer Basic User Manual
119
Metadata and Keywords
Defining metadata
You can add metadata to Components and Multimedia Components, Publications, Folders
and Virtual Folders, Structure Groups, and Pages, and Categories and Keywords.
Before you begin
■
To allow users to add metadata to Components and Multimedia Components, the
Component Schema or Multimedia Schema must have metadata fields defined.
■
To allow users to add metadata to Publications, Folders and Virtual Folders,
Structure Groups, Pages and Keywords, you must have defined a Metadata
Schema.
Note: For more information about Schemas, see the implementer's documentation
portal.
About this task
Component metadata can include for example Author name, Author email, Publish date,
Offline date. Multimedia Component metadata, for a photographic image for example, can
include details such as the date the photograph was taken and details of the camera
settings such as lens, focal length, aperture, shutter timing.
120 Content Manager Explorer Basic User Manual
Metadata and Keywords
Procedure
1. Open a Component or Multimedia Component and define Metadata in the item's
Metadata tab.
2. Open a Publication, Folder, Virtual Folder, Structure Group, or Page. In the General
tab, select a Metadata Schema from the drop-down list. When you have selected a
Metadata Schema, the metadata fields defined by the schema appear. The following
image shows a Metadata Schema applied to a Page:
3. Open a Category. In the General tab, select a Default Metadata Schema from the
drop-down list and save the Category:
Open a Keyword in the Category. The default Metadata Schema is applied to child
Keywords when created, allowing you to define metadata (note that you may select a
different Metadata Schema):
Content Manager Explorer Basic User Manual 121
Metadata and Keywords
Note: For more information on defining taxonomies, see the implementer's
documentation portal.
Results
To define metadata fields using Keywords, see “Adding Keywords to fields ” on page 122.
Adding Keywords to fields
You use Keywords to classify your content. Keywords define a classification scheme
(visualized as a taxonomy tree) that provides a knowledge map of your data. Applying
these Keywords to Component fields or metadata fields allows you to define relationships
between content.
Before you begin
You can select the value for a field from a list of Keywords if the Schema field is associated
with a Category.
For more information on defining Schemas and Taxonomies (Categories and Keywords),
see the implementer's documentation portal.
About this task
The allowed fields in a Component, or the allowed Metadata fields in various Content
Manager items, are defined in a Schema. When you create a Component, for example, you
must first select a Schema after which the fields defined in the Schema are displayed for
that Component. If a Schema field is defined as a list field based on a Category, you can
choose one or more values from a list of Keywords. A list field may be presented as a
drop-down list, select box, radio buttons, check boxes, or tree list.
You can use Keywords to define Component fields or metadata fields for the following:
■
Component fields (in the General tab)
■
Component or Multimedia Component metadata fields (in the Metadata tab)
122 Content Manager Explorer Basic User Manual
Metadata and Keywords
■
Category and Keyword metadata fields (in the General tab)
■
Publication, Folder, Virtual Folder, Structure Group, and Page metadata fields (in
the General tab)
Procedure
1. Open a Component:
■
In the General tab you can define its fields.
■
In the Metadata tab you can define its metadata fields.
The following image shows a Component with fields displaying Keyword list fields
(the check boxes and drop-down list):
2. Select a value, or values, for the field from a list of Keywords depending on the type
of list displayed:
a. Drop-down list—select a Keyword from the list.
b. Select box—select a Keyword from the list, or if multiple values are allowed,
press Ctrl and select each Keyword you want to add.
Content Manager Explorer Basic User Manual 123
Metadata and Keywords
c. Radio buttons—select a radio button to choose a Keyword.
d. Check boxes—select a box (or boxes if multiple values are allowed) from the
list.
e. Tree—click the Browse button to add a Keyword.
In the Keyword picker window that opens:
■
Select a Keyword and click Insert to add the Keyword to the field.
Repeat the procedure to add more Keywords if multiple values are
allowed.
■
Click Close to close the window.
Use the area to the left to perform the following actions:
■
Drag and drop a field to move the selected Keyword to a new position.
■
Click Remove to remove the selected Keyword
Results
The Keyword value, or values, are added to the field.
124 Content Manager Explorer Basic User Manual
Metadata and Keywords
Viewing related content
You can select a Keyword to see in which Content Manager items it is being used. The
Classified Items List View displays the Components, Pages, and other Content Manager
items that have been tagged with the selected Keyword, or Keyword branch, allowing
you to see related content.
Procedure
1. Open a Publication.
2. Expand the Categories and Keywords node and select a Category or Keyword in the
navigation pane or list view.
Under the list view, a list of related content for the selected Keyword and selected
filters appears.
The list is dynamically updated when you select different Keywords.
3. Specify the following search criteria for related content:
■
Include sub Keywords—select the check box to retrieve items that contain
the selected Keyword and/or child Keywords in its branch; unselect to retrieve
items that contain only the selected Keyword.
■
Item types:—choose one of the following from the drop-down list:
■
Components—retrieves Components containing the Keyword
■
Components and Pages—retrieves Components and Pages contain
ing the Keyword
■
■
All—retrieves all Content Manager items that contain the Keyword
Click the Refresh button after changing the filters to refresh to displayed
results.
What to do next
You can perform most of the standard Content Manager actions on the Components and
Pages displayed in the result set:
■
Open and edit the item
■
Preview the item
■
Go to the item's location
■
Publish/Un-Publish
■
Localize/Un-Localize
■
Classify/Reclassify/Unclassify
Content Manager Explorer Basic User Manual 125
Metadata and Keywords
126 Content Manager Explorer Basic User Manual
Chapter 13
Publishing
You publish Content Manager items to make content available on a Web site. You need to
republish items when you update content, or unpublish content when you want to take it
offline.
You can publish the following Content Manager items:
■
Publications
■
Structure Groups
■
Pages
■
Components
■
Multimedia Components
■
Categories and Keywords
■
Component Templates
■
Page Templates
When you publish these items, the Content Manager publishes the following items:
■
One or more Pages
■
One or more dynamic Component Presentations
Published Pages combine the Page Template and Component Presentations:
■
A Page Template determines where, how, and which Component Presentations are
rendered and also often includes navigation and branding features
■
A Component Presentation combines a Component or Multimedia Component,
with a Component Template. The (Multimedia) Component contains the content,
while the Component Template determines how and which content from the
Component is rendered.
Content Manager Explorer Basic User Manual 127
Publishing
Note: Scripting in the Component Template and Page Template determines the design
and content that the Content Manager publishes. You can publish Pages if users created
them within publishable Structure Groups. Dynamic Component Presentations differ from
embedded Component Presentations in that the Content Manager publishes them to a
Content Repository rather than embedding them on a Page. To use dynamic Component
Templates, you must use Dynamic Content Delivery. See the implementer's documentation
portal for information about configuring publishing settings and Dynamic Content
Delivery.
Publishing and republishing items from the
Content Manager
You can publish, republish, and unpublish Pages, Components, Structure Groups, Bundles
and Publications.
About this task
When you publish a Structure Group, the Content Manager publishes all publishable,
nested Structure Groups and Pages.
When you publish a Publication, all items in the Publication that can be published are
published.
When you publish a Bundle, all items in the Bundle are published.
Procedure
1. Select one or more items in the navigation pane or list view and do one of the
following:
■
Click Publish in the Home tab of the Ribbon.
Right-click the selected items and select Publishing > Publish from the
context menu.
The Publish dialog appears, showing the Publish settings tab.
■
2. Select the Target Types to which you want to publish content to.
If you have Target Types for your staging site and for your live site, it makes sense to
publish to one but not to both—once content is good enough to go live, it no longer
needs to be published to staging.
128 Content Manager Explorer Basic User Manual
Publishing
3. In Publish Settings, select when you want the publishing to start.
You can improve the performance of your system by scheduling non-essential
publishing to occur at a later date (say, at night or during weekends).
■
To place your content online as soon as possible, select Publish content now.
■
To start the publishing process later, select Publish content later and click
the calendar button to pick a date and time.
■
To distinguish between the preparation for publishing and the actual placing
of content online, select Schedule the publish phases separately. This opens
a new set of options.
■
Select Generate publishable content later to start the publishing
process at a later date. For example, you may want to postpone this
phase because the Content Manager will not be so busy at that time.
■
Select Place content online later to schedule the time at which
content is placed online. For example, if you are publishing your
company’s quarterly results, you may not want them to go online until
a specific date.
4. If a Publication, Structure Group, Component Template and/or Page Template is
among the items you are publishing, you also see an option called Republish Only
(Do Not Publish New Content), which is selected by default. When selected, new
items in the Publication or Structure Group, and new Templates, are not published.
5. To see which items the Content Manager will publish, click the expand button next to
Show items to publish. The dialog expands to show the items you selected, as well
as any items that depend on it. Click Hide items to publish to hide this information
again.
6. To configure when this content should be unpublished, click Unpublish settings and
do one of the following:
■
To unpublish at a later date, select Do not unpublish.
■
To schedule unpublishing, select Schedule unpublish and click the calendar
to pick a date and time.
7. To configure Advanced Publishing options, select the Advanced tab.
8. Click Publish to start the publishing process.
Results
The content is published/republished.
Important: After you click OK, Content Manager remembers all your Unpublish
dialog settings for the remainder of your browser session; when you close the main Content
Manager browser window, all the Unpublish dialog settings are restored to their default
values. The Content Manager does, however, remember the Target Types selected when
you last published content and your Publish settings from your previous session.
Content Manager Explorer Basic User Manual 129
Publishing
Advanced Publishing options
The Advanced Publishing options provide you greater control over what and how content
is published.
Publish/Unpublish Scope
■
Publish/Unpublish Content Items (default)— (this is the default behavior)
■
Ignore failures while generating publishable content—to publish content,
the Content Manager performs two steps:
■
It generates publishable content (a process known as rendering)
■
It sends the publishable content to the various publish destinations
When you publish multiple items in one go, then by default, the Content
Manager considers the rendering of these items as one closed operation, which
fails if any of its parts fails. For example, if you publish a Structure Group
containing ten Pages and one of those Pages fails to render, nothing gets
rendered. This is not always what you want. For example, your Structure Group
may contain a Page that you know contains a mistake, but you may still want
to publish all the other Pages in the Structure Group regardless (without having
to publish them one by one).
Another example is the failure to publish a Component because one of the
Pages on which the Component appears fails to render. In this scenario, you
also do not want the failure of one Page to render to stand in the way of your
publishing of your Component.
To change this behavior of the Content Manager, select the option Ignore
failures while generating publishable content, then select the maximum
number of render failures you want to tolerate in the Limit number of failures
to option, or clear that option to allow an infinite number of render failures.
■
Publish/Unpublish Structure Group Information—select to publish/
unpublish the Structure Group hierarchy to the Content Delivery side where it
is stored as a taxonomy.
Advanced Publish/Unpublish Settings
■
Override Publish/Unpublish Priorities—the Target Types you select on the
left of the Publish dialog represent one or more Publication Targets. Each
Publication Target has a publish priority (low, normal, or high). The publish
priority determines how quickly an item is entered in the Publish Queue. Use
High priority for publish or unpublish actions that are so urgent that they need
to bypass the normal publishing queue; Use Low priority if you want to use
the available publishing time of your servers without getting in the way of
normal work. To change the publish priority of the item(s) you publish or
unpublish, select Override publish/unpublish priorities and set the publish
priority.
■
Also publish/unpublish in Child Publications—to publish or unpublish
items in the Child Publications of the current Publication, select Also
publish/unpublish in Child Publications. For more information about Child
Publications and BluePrinting in general, refer to “BluePrinting ” on page
41.
130 Content Manager Explorer Basic User Manual
Publishing
■
Abort publishing/unpublishing on all servers in case of errors—the Target
Types you select on the left of the Publish dialog represent one or more
Publication Targets. In its turn, each Publication Target represents one or more
destinations, that is, physical publish locations such as an FTP site, a URL or
a network folder. Very often, the destinations in a Publication Target represent a
cluster of machines, meaning that if one of the machines is unavailable or
slow, the Web site automatically switches to one of the other machines. For
this purpose, it is vital that all machines (destinations) within such a Publication
Target contain the exact same content. This means, in turn, that if publishing
to one machine in the cluster fails, you want the Content Manager to stop or
undo all publish actions to the other machines in the cluster. Select Abort
Publishing on all severs in case of errors to accomplish this. When in doubt,
ask your Publication Manager if you should switch this option on for the Target
Type(s) you selected.
Important: Selecting this option does not mean that failure to publish to
one Publication Target has any effect on any other Publication Target. Similarly,
selecting this option does not mean that failure to publish to one Target Type
has any effect on any other Target Type.
■
If possible, publish the in-workflow version of an item—one or more of the
items that you are publishing may be in workflow. If an item is in workflow,
it may have reached a point where it has become publishable to one or more of
the Publication Targets to which you are publishing. But by default, this
in-workflow version will not be published. Rather, the last major version of
the item will be published. By selecting this option, you override this default
behavior, and the in-workflow version will be published to a Publication Target
if it has become publishable to that Publication Target.
Unpublishing items from the Content
Manager
You need to unpublish content to take content offline. Visitors will no longer be able to
view the unpublished content.
Procedure
1. Select one or more items in the navigation pane or list view and select Unpublish in
the Home tab of the Ribbon toolbar.
The Unpublish dialog appears, showing the Unpublish settings tab.
2. Do one of the following:
■
If you want to unpublish the content now, leave the setting set to Unpublish
content now.
■
If you want the content to be unpublished later, select Unpublish content
later and use the calendar to pick a date and time.
Content Manager Explorer Basic User Manual 131
Publishing
3. To see which items the Content Manager will unpublish, click the expand button next
to Show items to unpublish. The dialog enlarges to reveal the items you selected,
as well as any items that depend on it.
4. If you want to configure advanced unpublishing settings, click Advanced. The
Advanced tab appears. For more information, see “Advanced Publishing options ”
on page 130.
5. Click OK to start the unpublishing process.
Results
The content is unpublished.
Important: After you click OK, Content Manager will remember all your Unpublish
dialog settings for the remainder of this session. This means that next time you open the
Unpublish dialog, it shows all the settings as you configured them the previous time.
When you close your main Content Manager browser window, all the Unpublish dialog
settings are restored to their default values.
Viewing the publish queue
The Publish Queue lists all publish transactions that users have scheduled for publishing
actions (publish or unpublish) and publish transactions that have been successfully
published and those that have failed. You can filter the items shown in the Publishing
Queue or view individual publish transactions.
Before you begin
To view the publish queue, you must have Publish rights for at least one Publication.
About this task
Note: The Publish Queue is purged on a regular basis, based on the configuration of the
Content Manager.
132 Content Manager Explorer Basic User Manual
Publishing
Procedure
1. To access the Publishing Queue, click the Publishing Queue button in the Home tab
of the Ribbon in the main screen or in any item dialog.
A Publishing Queue dialog opens.
2. Do one of the following:
■
To view all scheduled publish transactions, click Show Tasks.
■
To filter the results, set one or more parameters and then click the Show
Tasks button.
You can filter publish queue items on the following criteria:
Target
The Target Type to which the item has been submitted for publishing or
unpublishing
Publication
The Publication from which the Content Manager published the item
User
The User that performed the publish action
State
The publish state of the transaction
Priority
The priority of the transaction
Schedule
If selected, a date range within which the publish or unpublish action is
supposed to take place.
Results
The Content Manager Explorer displays a list of publish transactions. You can also filter the displayed list
using the arrow button that appears next to the columns in the list.
Content Manager Explorer Basic User Manual 133
Publishing
Cancelling a publish transaction
The Publish Queue lists all publish transactions that users have scheduled for publishing
actions (publish or unpublish) and publish transactions that have been successfully
published and those that have failed. You can cancel a scheduled publish transaction if the
transaction is not in progress. When you cancel a transaction, the Content Manager
removes it from the publish queue.
Before you begin
To cancel a publish transaction you must be either the system administrator or the initiator
of the transaction.
To cancel a publish transaction that is In Progress, you must have system administrator
privileges.
About this task
Note: The Publish Queue is purged on a regular basis, based on the configuration of the
Content Manager.
Procedure
1. From the Publish Queue, right-click the transaction you want to cancel and in the
context menu that opens, choose Remove from the Publish Queue.
Results
The Content Manager removes the transaction from the Publish Queue and cancels the transaction.
134 Content Manager Explorer Basic User Manual
Chapter 14
Versioning
When you modify and save an item of a certain type, Content Manager creates a new
version of the item. The "current version" of an item is the most recently checked-in
version. You can also explicitly check out the current version of an item for your exclusive
use. When you have an item checked out, other users can view the item, but they cannot
edit the item.
Content Manager items that have versions
Only some types of Content Manager items are versioned.
Content Manager keeps track of earlier versions of the following types of items:
■
Component
■
Component Template
■
Page
■
Page Template
■
Template Building Block
■
Schema
About version numbers
When you create an item, the Content Manager gives it a version number of 1.0 when
you check that item in. The Content Manager subsequently gives items a new version
number every time you save.
A version number can consist of a major version number and a minor version number:
Content Manager Explorer Basic User Manual 135
Versioning
■
major version—if a user saves an item, and the item is checked-in, the major
version number increases by 1.
■
minor version—if a user saves an item that is checked out or is in Workflow, the
version number increases by 0.1 each time it is saved. When a checked-out
item is checked in or when an item in Workflow completes a workflow process,
the version number increases to the next whole number. For example, if a
checked-out Component has a version number of 2.3, and the Component is
checked in, the version number increases to 3.0.
If, for example, an item has a version number of 2.3, "2" is the major version number and
".3" is the minor version of the item.
Version history
The Version History List lists all versions of a Component, Component Template, Page
Template, Page, or Schema. In the Version History List you can view a version, compare
two versions, roll back to a previous version, or delete a version.
Viewing the version history list
You can view the version history list of an item to view the list and to perform actions on
versions of items.
Before you begin
To view the version history list, you must have Read permissions to the Folder or Structure
Group that contains the item.
Procedure
1. To view the Version History list, navigate to the location of the item for which you
want to view the Version History list.
2. In the list view, select the item and click History in the Home tab of the Ribbon.
Result:
The Version History list appears.
Results
You can perform the following tasks from the Version History List:
■
Viewing a version
■
Comparing two versions
■
Rolling back to a previous version
■
Deleting a version
136 Content Manager Explorer Basic User Manual
Versioning
Viewing a version
You can view an item from the Version History list in read-only mode.
Procedure
1. Access the Version History List.
2. From the Version History list, do one of the following:
■
Double-click on an item
■
Right-click on an item and select Open from the context menu.
Results
The item opens in read-only mode.
Comparing two versions
You can compare two versions of an item to view the changes made.
Before you begin
To compare versions of an item you must have rights to view the item and read
permissions.
About this task
You can compare two different versions of the following types of items:
■
Components
■
Multimedia Components
■
Component Templates
■
Pages
■
Page Templates
■
Schemas
■
Template Building Blocks
When you compare versions, a Compare pane appears that highlights the differences
between the two versions:
■
New text appears in Blue.
■
Deleted text appears in Green Strikethrough.
■
Red underlined text is a changed Component or Multimedia Link.
■
You can compare any two versions.
Content Manager Explorer Basic User Manual 137
Versioning
Procedure
1. Access the Version History List.
2. In the Version History List, select two items. To select non-concurrent items, select
one item, press the Ctrl key on your keyboard, and select a second item.
3. Click the Compare icon from the toolbar, or right-click and select Compare from the
context menu.
4. Click the Compare Versions button. The Comparison pane displays a comparison of
the two versions.
138 Content Manager Explorer Basic User Manual
Versioning
Note: When you compare two versions of a Component, the Content Manager uses
the default Component Template for the current Publication to render the differences.
As a result, Component content that is not rendered by this template will not be
compared.
Results
You have compared two versions of a Content Manager item.
Rolling back to a previous version
Rollback allows you to create a new version based on a previous version, which then
becomes the current version, or select a previous version as the current version and delete
all versions created after it.
Before you begin
To rollback to a previous version of an item you must have rights for the item you want to
rollback (for example, Component Management rights) and write permissions for the
containing Folder or Structure Group. It is not possible to rollback if the following
conditions apply:
■
the item is a shared item
■
the item is checked-out
■
the item is in Workflow
■
only one version of the item exists
About this task
Note: If you select a previous version as the current item, all subsequent versions are
deleted and irretrievable.
Procedure
1. Access the Version History List.
2. In the Version History List, select the version to which you want to rollback.
3. Right-click the version and in the context menu that opens, select Versioning >
Rollback .
4. In the pop-up that appears, select one of the following choices:
■
To create a new version based on the selected item, select the first option and
click OK.
■
To delete all versions after the selected version, select the second option and
click OK.
Content Manager Explorer Basic User Manual 139
Versioning
Results
You have rolled back to a previous version of an item.
Note: If the item has an associated Workflow, rolling back to the item may start a
Workflow Process depending on the configuration of the Content Manager.
Deleting a version
You can delete one or more versions from the Version History list, but you cannot delete
the last version or the current version of an item.
Before you begin
To delete an item you must have rights for the item you want to delete, and you must
have delete permissions for the Folder or Structure Group in which the item is stored.
Procedure
1. Access the Version History List.
2. In the Version History List, select the version or versions you want to delete.
3. Right-click the version, and in the context menu that opens, select Delete.
Results
You have deleted a version of an item.
140 Content Manager Explorer Basic User Manual
Versioning
Check-in and check-out
Check-out allows users to lock an item so that it cannot be edited by anyone other than
the user who checked it out. You can check out and check in an item implicitly or explicitly.
When you (implicitly or explicitly) check out an item, the item is locked and appears in
your Checked-out Items. Only you can edit the item while it is checked out. When you
check in an item. It then becomes available to other users again.
If you publish an item, only the current related items (Page, Component, Page Template,
Component Template) are published. That is, if items are checked out, only the last
checked-in item (the Current item) is published.
Content Manager Explorer Basic User Manual 141
Versioning
Opening an item that is not subject to workflow
If you open and modify an item, the item is checked out to you, and locked, while you
modify it. Every time you save the item without closing it, you increase its minor
version number (for example, from 6.0 to 6.1). When you eventually close the item,
the system unlocks it and checks it back in, increasing its major version number (for
example, from 6.0 to 7.0).
Explicitly checking out an item that is not subject to workflow
If you explicitly check out an item, the item is checked out to you, and locked, until
you explicitly check it back in. Every time you save the item (whether you close the
item or not), you increase its minor version number (for example, from 6.0 to 6.1).
When you eventually explicitly check the item back in, the system unlocks it and its
major version number increases (for example, from 6.0 to 7.0).
Opening an item that is subject to workflow, but has not started its Workflow Process
yet
Items in a Bundle may be subject to workflow, but may at the same time not be in a
Workflow Process yet. Opening such an item checks it out to you and locks it in your
name. Saving it, with or without closing it, increases its minor version. Closing it
puts it in a reserved state: that is, it is still checked out but locked by no user.
Explicitly checking out an item that is subject to workflow, but has not started its
Workflow Process yet
Items in a Bundle may be subject to workflow, but may at the same time not be in a
Workflow Process yet. Explicitly checking out such an item locks it in your name.
Saving it, with or without closing it, increase its minor version. Explicitly checking it
back in puts it in a reserved state: that is, it is checked out but locked by no user.
Starting workflow on a single item by creating it, or editing it after the previous
Workflow Process has finished
A user can start workflow on an item by creating or reediting the item if it is subject
to a single-item Workflow Process. This action does not change the major or minor
version of the item in any way, but it does check the item out to the user who created
or reedited it, and locks it.
Starting workflow on an item that is part of a Bundle
A user can start workflow on an item in a Bundle by putting the Bundle that contains
it into workflow (if the Bundle is subject to a Bundle Workflow Process). This action
does not change the major or minor version of the item in any way, nor does it change
its checked-out status or lock status.
Starting a Workflow Activity
If a user starts an Activity, all items associated with that Activity are checked out to
that user, if the user has read access to all of those items. The user can now modify the
item(s) and finish the Activity. Alternatively, if the user does not have read access to
all of the items, that user cannot modify any of the items, nor finish the Activity, but can
only reassign the Activity.
Finishing a Workflow Activity
If a user finishes an Activity, all items associated with that Activity increase their
minor version and remain checked out, but they now become locked by no user. The
142 Content Manager Explorer Basic User Manual
Versioning
items are in a reserved state.
Finishing a Workflow Process
If an item exits workflow (that is, finishes its Workflow Process), it is checked in as a
new major version. Any locks on it are released.
While an item is checked out, the item icon is displayed with a small image of a lock over
it.
It also appears in the Checked-out items list of the User who (implicitly or explicitly)
checked it out.
Checking out an item
You can check out a checked-in item for your exclusive use.
Before you begin
To check out an item, you must have rights for the item and write permissions. It is not
possible to check out an item that is in Workflow, that is already checked out, or that is a
shared item.
Content Manager Explorer Basic User Manual 143
Versioning
Procedure
1. To check out an item, access the Folder or Structure Group in which the item is
stored.
2. Select the item you want to check out and in the Home tab of the Ribbon, click
Check out.
Results
The item is checked out. Only the user to whom the item is checked out can edit the item.
While an item is checked out, all items that use the item do not use the checked out
version. Instead, the last checked-in version is used. If an item is checked out through
Workflow, the in-workflow version can be published only if it meets minimum approval
status. When an item is checked out, it is not possible to perform the following actions on
the item:
■
Delete
■
Cut & paste
■
Unlocalize the item if it is a local copy
■
Rollback
BluePrinting—when an item is checked out in a Parent Publication, the Child Publication
shares the last checked-in version of the item.
Version number—while the item is checked out, the minor version number increases by
0.1 each time the item is edited and saved.
Workflow—if an item has an associated Workflow, the item will enter the Workflow
Process the first time it is edited and saved.
Publishing—if an item is checked out through an edit action or through an explicit
check-out, the current version, not the checked-out version of the item is published. If an
item is checked out through a Workflow process, it can only be published if it meets
minimum approval status, otherwise, the current version is published.
Checking in an item
You can check in an item that you have checked out.
Before you begin
To check in an item, you must have rights for the item and write permissions for the
containing Folder or Structure Group.
About this task
The check-in action does not apply to items that are checked out through a Workflow
Process. Items in Workflow are checked in after the last activity in the associated Workflow
Process is completed.
144 Content Manager Explorer Basic User Manual
Versioning
Procedure
1. To check in an item, access the Folder or Structure Group in which the item is stored.
2. Select the item you want to check in and in the Home tab of the Ribbon, click Check
in.
Results
The item is checked in and becomes the current version of the item. Other users can now
open and edit the item. All items that use this item now use the checked in version of the
item.
BluePrinting—in any Child Publications that use the shared item, the shared version is
the checked-in version.
Version number—the version number increases to the next whole number. For example,
if the checked-out version number was 1.8, the checked-in version number is 2.0.
Undoing check-out
You can perform undo check-out to discard the changes you have made to an item that
you have checked-out. The previous version of the item remains the current version.
Before you begin
You can undo check-out if you checked out the item. It is not possible to undo check-out
for an item that is in Workflow.
About this task
Important: If you undo check-out, you will lose any changes that you made to the
Component or Page after checking it out.
Procedure
1. To undo check-out on an item, access the Folder or Structure Group in which the item
is stored.
2. Select the item for which you want to undo the check-out and in the Home tab of the
Ribbon, click Undo check-out.
Content Manager Explorer Basic User Manual 145
Versioning
Non-checked-in items
A non-checked-in item is a new item that has been created but not yet checked in.
The status of a new item that has been created but not yet checked in is slightly different
to that of an item that has been checked in: when you create an item and check it in, the
Content Manager gives it a version number of 1.0. Only then is the item fully accessible
for linking, publishing, viewing, and editing purposes. Until then, only the owner can view
the content (by opening or previewing the item). For other users (and the owner) the
"non-checked-in" item, in workflow or otherwise, is visible in the following lists:
■
The Items List (the main dialog)
■
The Protocol Schemas
■
The Where used List
■
The Checked-Out Items List
■
The History List
■
The Started List (only for items in Workflow, and only for the owner)
Each time you save the item, a minor version number is applied, for example 0.1, 0.2, and
so on. The owner of an non-checked-in item can perform all the usual actions on the
item except cut/paste/copy and publish. Note also that you cannot publish newly created
items in workflow from Building Blocks until they are checked-in.
Other users can only view the non-checked-in items in the lists described above; lists in
the Content Manager Explorer that are used to link to other items do not show
non-checked-in items because data cannot be rendered.
A "non-checked-in item" is shown as translucent in the Content Manager Explorer. To
illustrate this, the following image shows three Components; a Component that has been
checked-in, a Component that has been checked out, and a non-checked-in Component:
Important: Non-checked-in items apply to items that support versioning, namely:
Schemas, Components, Component Templates, Page Templates, Pages, and Template
Building Blocks. Non-checked-in items are not visible in WebDAV.
146 Content Manager Explorer Basic User Manual
Chapter 15
SpellChecker
SpellChecker functionality allows you to spell-check the plain-text fields and format area
text fields of Components and of the metadata of any type of Content Manager item.
You can spell-check content in the following languages:
■
American, British and Canadian English
■
Brazilian Portuguese
■
Danish
■
Dutch
■
Finnish
■
European French and Canadian French
■
German
■
Italian
■
Norwegian (Bokmål dialect)
■
Iberian Portuguese
■
Spanish (all regional dialects)
■
Swedish
Spell-checking items
You can spell-check the text fields of Components and of many other types of content
items. You cannot spell-check values in date fields, number fields, link fields, or list fields.
You also cannot spell-check Folders, Structure Groups, Categories, Keywords or
Publications.
Content Manager Explorer Basic User Manual 147
SpellChecker
Procedure
1. Do one of the following:
■
To spell-check the data text fields of a Component or the text fields of a Page,
Page Template, Component Template, Template Building Block, Bundle or
Virtual Folder, open the item and select its General tab.
■
To spell-check the metadata text fields of a Component, open it and select its
Metadata tab.
2. Click the Check Spelling button on the Home Ribbon toolbar.
The SpellChecker pop-up opens. If errors are found, the word is highlighted in the
item dialog and SpellChecker offers one or more suggested alternate spellings.
If there are no errors, the popup displays a message indicating that the spell-check is
complete.
3. If necessary, you can change the default language of the spell-check using the
Language option.
Note: If you change the default language during a spell-check, SpellChecker
rechecks the spelling using the selected language, including any previously checked
words. SpellChecker also remembers the selected language for the duration of the
browser session. For example, if you spell-check a Component and check the spelling
of the Component in German, then open another Component and spell-check it, the
spell-check language will initially also be German. If you close your browser, the
language will be reset to the default spell-check language.
4. For each detected error, you can use one of the following options:
■
Ignore: ignore the detected error and continue checking
■
Ignore all: ignore the detected error every time it appears in a text field in this
item
■
Change: use the default suggestion in the Change To field, select the
suggestion that applies to the detected error, or type in your own spelling and
click the Change button to change the detected error
Change all: use the default suggestion in the Change To field, select the
suggestion that applies to the detected error, or type in your own spelling, and
click the Change button to change the detected error every time SpellChecker
finds the word
The word that appears in the Change To field is used to replace the spelling error.
■
5. Click the Close button.
Results
You have spell-checked a Component.
148 Content Manager Explorer Basic User Manual
Chapter 16
Search
Search for Content Manager items by entering search input. Your search input can contain
words that occur in the items; operators; or a Content Manager URI (a unique identifier
for a Content Manager item). You can also specify where to search, in which time period
to search, how many results to return, and so on.
You can search the Content Manager for the following types of items.
■
Folders
■
Structure Groups
■
Schemas
■
Keywords
■
Components
■
Multimedia Components
■
Component Templates
■
Pages
■
Page Templates
■
Categories
■
Template Building Blocks
■
Virtual Folders
■
Bundles
■
Target Groups
Content Manager Explorer Basic User Manual 149
Search
Basic search
You can use the basic search interface to quickly search Content Manager for a word of
phrase.
Procedure
1. Access Content Manager Explorer.
2. In the top right area of the screen, fill in a word or phrase in the input box that reads
"Enter a Keyword or URI" and click the magnifying glass to execute the search. To
search in a specific location (and in its subcontainers), you can select a search
location from the dropdown to the left of the input box.
Note: Note the following:
■
Instead of a simple phrase, you can add wildcards and operators to your
search input, or enter a Content Manager URI, that is, a unique identifier of an
item.
■
By default, search searches in the node that is currently displayed in the
content area below, and in all of its subnodes. You can pick a number of
different locations from the dropdown location to the left of the input box, or
select any location in the Advanced search area. Note, however, that if you
search across all Publications (the value All Publications in the dropdown),
shared items are not included in the search results.
Result: The search runs and shows results in the area below.
Results
If the list view reads, Loading..., the Content Manager is performing the search. During this time, search is
disabled. If it finds no results, the message There are no items in this view appears.
150 Content Manager Explorer Basic User Manual
Search
Important: If the search returns more than 10,000 items, the Content Manager raises
an error. To solve this problem, you must narrow the search request.
Searching in Bundles and Search Folders
If you perform a search in a location that contains Bundles or Search Folders, search
ignores the items in those Bundles or Search Folders (unless the actual items themselves
are also present in the search location).
Search input
Content Manager Explorer search lets you search for items which appear in the title,
description or content (fields) of an item. A search item can be a single word like
cheeseburger or a set of strings enclosed in double quotes like "hot dog". To expand
or narrow your search you can use multiple search items, operators, and wildcards in
your search input.
Search based on a URI
Every SDL Tridion item has a unique resource identifier (URI).
Procedure
1. Find out what the URI for any SDL Tridion item:
■
Place your cursor over an item in the Content Manager Explorer to see a tool
tip that shows the SDL Tridion URI of that item:
■
Open the item in its own dialog and access the Info tab of the item to see its
URI:
Content Manager Explorer Basic User Manual 151
Search
2. In the Content Manager Explorer, enter the Content Manager URI in the Search for
URI field displayed in the toolbar:
3. Click the magnifying glass button to search for the item.
Results
If the URI refers to a container, such as a Publication, Folder, Structure Group or Category, the main view
tree navigates to that container's node and the content area shows its contents. Otherwise, the Content Manager
item opens in a new window.
Search operators
You can use operators to expand or narrow your search.
The following table describes the search operators:
Operator
Function
Example
AND
Searches for items containing
both the search terms. If no
operator is used between
words, AND is assumed.
tortellini AND guacamole returns
OR
NOT
Searches for items containing
either (or both) of the search
terms.
Searches for items containing
the search terms before the
operator but not the search
terms after the operator.
152 Content Manager Explorer Basic User Manual
items containing both the words 'tortellini'
and 'guacamole', in any order and with any
words in between
car OR park returns items containing
the words car or park.
pizza NOT pasta returns items contain-
ing the words 'pizza' car but not 'pasta'.
Search
Operator
Function
Example
IN
Searches for items that have the car IN title returns items containing
search terms in the specified
the word 'car' in the 'title' XML element.
field (XML element).
You can search for an exact phrase simply by typing the phrase you are looking for
enclosed in quotes. For example, if you want to search for items that contain the exact
phrase "press release", enter "press release". This will not match the content We will
initially release the product to the press, but it will match More information in our latest
press release.
Search wildcards
You can use wildcards to define a wildcard string, which can be used to locate related
word matches.
The following table describes the wildcards you can use:
Character
Function
Example
*
Searches for items that
corp* returns items containing corcontain the entered text,
porate, corporation, corporal, and
allowing for any number of corpulent
characters to replace the
"*" wildcard
?
Searches for items that
contain the entered text,
allowing one character to
replace the "?" wildcard
?an returns items containing: ran,
pan, can, and ban
Special characters and reserved words
The Content Manager views special characters as separators and not as part of a word.
When it performs a search with special characters, the terms within the special characters
are used.
Along with numbers, the following characters have special meanings: + - ! ( ) { }
[ ] ^ " ~ * ? : \. To search for a string that contains one of these characters, precede
the character with a backslash (\). If the character is part of a phrase or term, enclose the
search text in double quotes.
In addition, you need to place a backslash in front of the following reserved words
(regardless of their capitalization):
■
CONTAINS
■
NEAR
■
SENTENCE
■
PARAGRAPH
Content Manager Explorer Basic User Manual 153
Search
■
PHRASE
■
IN
■
MATCHES
■
STARTS
■
SUBSTRING
■
ENDS
■
AND
■
OR
■
NOT
Multimedia Components
You can also search for content in certain binary resources.
The following document formats are supported:
■
HTML
■
XML and derived formats
■
Microsoft Office documents
■
OpenDocument documents
■
PDF documents
■
EPUB (Electronic Publication Format) documents
■
RTF (Rich Text Format) documents
Important: You cannot search for a Multimedia Component with its extension.
Advanced search
Advanced search allows you to define more specific search criteria to narrow or expand
your search.
To perform an advanced search, click the expand button (arrowhead) next to the search
input box:
154 Content Manager Explorer Basic User Manual
Search
In the Advanced search that is displayed, you see the most common advanced search
options. You can click Show more search options in this area to see the full range of
advanced search options.
This section describes all of the options in the fully expanded Advanced search area.
When using Advanced search, you can still use all of the operators described in “Search
operators ” on page 152 in the input box. All wildcards function as described in “Search
wildcards ” on page 153.
Search Parameter
Description
Search term
Your search input, which may include operators and wildcards,
and which may be a Content Manager URI. Refer to “Search
input ” on page 151 for details.
Search for item
names only
Limits search to search in the internal names of items only. You
cannot use wildcards.
Search in item
descriptions only
Limits search to search in the description fields of items only.
You cannot use wildcards.
Search in
Specify the node in which to search. Click Browse to open a
navigation dialog to pick a specific node in which to search.
Include subfolders
When checked, this option also searches in all subnodes of the
node in which you search.
Date modified
Check this box to limit your search to only items that were last
modified in a certain date/time range. There are predefined
options for searching in items that were last modified today, in
the last X days, or in the last X months, where X is a number you
set.
Author
Selected an author from the dropdown menu to search only for
items created or modified by that author.
Content Manager Explorer Basic User Manual 155
Search
Search Parameter
Description
Keyword
Select a keyword to limit your search to only items that use the
Keyword that you specify. To use this option, you must first
select a Publication, Folder, or Structure Group in which to
search. (You cannot use this option if you have selected the
entire Content Manager as a search location.) You can then
browse to and select one or more Keywords in the taxonomy
tree. The result shows the items that use the Keyword or
Keywords as metadata or as content in Components. For more
information about Categories and Keywords, see the
implementer's documentation portal.
Publish status
Select either Published or Not published from the dropdown
menu to limit your search to only items with that publish status.
If you select a publish status, search will return only
Components, Component Templates, and Pages.
BluePrinting
The BluePrinting option limits search to search only in local or
localized items, selected via a dropdown menu. You can also
search for shared items if you have chosen to search within one
Publication.
Types
If you select Types, you can select one or more item types (such
as Component, Keyword, Schema and so on) by selecting them
in the list that appears. Search will then only return items of the
type(s) you select.
Based on Schema
Select this option and select a Schema from the dropdown to
limit your search to only items that are based on the Schema you
select.
Workflow
Select this option searches and pick a Workflow Process, then
(optionally) an Activity from the second dropdown, to limit your
search to only items that are currently in the selected Workflow
Process (and, if selected, Workflow Activity) you selected. Note
that you can only find a new item that is in Workflow item after
the Workflow Process is complete. The completion of the
Workflow Process checks in the item and makes it available for
searching.
State
Select this item and select an item from the dropdown to limit
your search to only items that are checked in, or only items that
are checked out.
Show results
By default, search returns all matching results. Select one of the
predefined values (50 or 100, 250 or 500) to see at most that
many search results. Content Manager Explorer remembers this
setting as a user preference.
Save search
After you have completed a search, select this option to create a
Search Folder. Refer to “Search Folders ” on page 159 for details.
156 Content Manager Explorer Basic User Manual
Search
Search Parameter
Description
Reset
Select this option to return all advanced search parameters to
their default settings.
Search
Select this option to execute your advanced search.
Content Manager Explorer Basic User Manual 157
Search
158 Content Manager Explorer Basic User Manual
Chapter 17
Search Folders
Search Folders display the results of a search. When you open a Search Folder, the folder
lists all of the items that match your search. You can create a Search Folder in any Folder
in a Publication. You can create, delete, edit, localize and unlocalize Search Folders.
Creating a Search Folder
Create a Search Folder to access a list of items that match search criteria. The Content
Manager does not store items in the Search Folder; rather, the Search Folder references
them from other Folders and Structure Groups within a Publication. You create a Search
Folder by performing a Search and saving the query.
Before you begin
To create a Search Folder, you must have Virtual Folder Management rights and write
permissions for the containing Folder.
About this task
Depending on the search criteria, a Search Folder can display the following items: Folders,
Structure Groups, Schemas, Components, Component Templates, Template Building
Blocks, Bundles and other Search Folders. A Search Folder cannot reference itself.
To create a Search Folder from a search:
Procedure
1. Enter your search term(s) in the search input box above the List View and click the
search button next to it:
Content Manager Explorer Basic User Manual 159
Search Folders
Note: For more information, see “Search ” on page 149.
2. After results are returned, click the Advanced Search button (arrowhead) next to the
search input box or click Show Advanced Search:
3. In the expanded view, click Save search.
4. In the location popup, navigate to the Building Blocks Folder in which you want to
create the Search Folder and click Select.
5. In the Virtual Folder window that appears, fill in the following fields:
■
Name — the name of the Search Folder. This name must be unique.
■
Description (optional) — use this field if you want to describe the search
operation you are saving to the Search Folder.
■
Metadata Schema (optional) — you can select a metadata Schema for the
Search Folder in order to specify metadata.
6. Click Save and Close on the toolbar.
Results
You have created a Search Folder.
160 Content Manager Explorer Basic User Manual
Search Folders
Editing a Search Folder
Edit a Search Folder to modify its name, configuration, and metadata. You cannot change
the Virtual Folder type.
Before you begin
To edit a Search Folder you must have Virtual Folder Management rights and Write
permission for the containing Folder.
Procedure
1. Navigate to the Search Folder that you wish to edit and click the Open button on the
toolbar or context menu.
2. Modify the following fields as necessary:
■
Name
■
Metadata Schema
3. Click Save and Close on the toolbar.
Results
You have modified the Search Folder. The Search Folder will display the results of the configuration
information. BluePrint: If the Folder is edited in a BluePrint Parent Publication, Child Publications that use
the shared item now use the modified Folder.
In a BluePrint, you can only edit a local Folder or a local copy of a shared Folder. You
cannot edit a shared Search Folder. If the Search Folder is a local copy, you cannot edit the
configuration data.
Deleting a Search Folder
You can delete a Search Folder to remove the Folder from the Content Manager. Items in
a Search Folder are not deleted when you delete a Search Folder, and still exist in their
original Folder.
Before you begin
To delete a Search Folder you must have Virtual Folder Management rights and Delete
permissions for the containing Folder.
Procedure
1. Navigate to the Folder that contains the Search Folder you want to delete.
2. Select the Search Folder from the list view.
3. Click the Delete button on the toolbar or context menu.
4. You are prompted to confirm deletion. Click Yes.
Results
You have deleted the Folder from the Content Manager.
Content Manager Explorer Basic User Manual 161
Search Folders
Localizing or unlocalizing a Search Folder
If a Search Folder is shared to a BluePrint Child Publication, you can localize the Search
Folder to create a local copy. When you localize a Search Folder, you can edit the name and
metadata. You cannot edit the type or search criteria. You can also unlocalize a Search
Folder to use the shared Search Folder from a Parent Publication.
Note: The search results in a Search Folder are within one publication only. Therefore,
the unlocalized Search Folder contains only those items in the Parent Publication.
Using items in a Search Folder
When you access the list view of a Search Folder, you see items to which you have read,
write, localize, or delete permissions for the storage Folder or Structure Group and items
that meet the search criteria for the Search Folder.
The items in a Search Folder represent the items to which you have read, right, localize,
and/or delete permissions and rights. As a result, the Search Folder content may vary from
one user to the next.
You can perform the following actions on items in a Search Folder:
■
Check-in/-out and undo check-out
■
View an item’s History List
■
Rollback
■
Localize/Unlocalize
■
Publish/Unpublish
■
View
■
Copy
■
Edit (if you rename an item in a Search Folder and refresh the list view, the
changes do not appear immediately. To verify that the Content Manager has made
the changes, enter another Content Manager Folder, and then return to the Search
Folder.)
■
Cut (if you cut an item from a Search Folder, you can move the item from its
original position; however, if the item still falls within the search criteria, it will
still appear in the Search Folder.)
■
Delete (if you delete an item from a Search Folder, you also delete it from the
Content Manager.)
162 Content Manager Explorer Basic User Manual
Search Folders
Important: It is not possible to create items in or paste items into a Search Folder.
Search Folders and Content Manager
functionality
This concept describes Search Folders in relation to BluePrinting, Search and Content
Manager security.
BluePrinting
In a BluePrint, Search Folders are shared to Child Publications. You can localize a
Search Folder in a Child Publication to edit the name and the metadata.
Note: If a shared or local copy of a Search Folder uses a Workflow Process as Search
criteria, it will not yield results in a Child Publication since Process Definitions are
not BluePrinted.
The items displayed in a shared or localized Search Folder include local items, local
copies, and shared items within that Publication.
Search
Search Folders do not support indexing of their contents, since the contents exist by
reference only. As a result, an end user cannot search for an item within a Search Folder.
Search Folders are indexed, so it is possible to search for a Search Folder.
Security
Search Folders do not have security settings (Read, Write, Localize, Delete); instead,
the Folder that contains the actual items determines the security on the items in a Search
Folder. This means that different Content Manager users may view different content
in a Search Folder based on their own user rights and permissions.
At a Publication level, a user must have Virtual Folder Management permissions to
create, edit, or delete a Search Folder.
Content Manager Explorer Basic User Manual 163
Search Folders
164 Content Manager Explorer Basic User Manual
Chapter 18
Translation Manager
Translation Manager allows you to send content stored in the Content Manager of SDL
Tridion for translation to a translation management system so that you can effectively and
efficiently create and maintain multilingual content.
Translation Manager is the integration between:
■
Content Manager of SDL Tridion—manages Web content, controls user access to
content, and re-purposes content via BluePrinting
■
SDL Translation Management System (SDL TMS), SDL WorldServer or SDL
BeGlobal—manages the translation process, enforces terminology, and performs
translations based on a knowledge base of previous translations called a translation
memory
The following diagram provides an overview of the functionality provided by the
integration:
Translations and BluePrinting
To manage translations in the Content Manager, you need to have a basic understanding
of your translation BluePrint, how authorization affects the scope of a translation and how
the Content Manager handles localization. This section provides some background
information on how translating is set up in the Content Manager.
Translation BluePrint
Before you start initiating translations it is a good idea to have a sound understanding
of the Translation BluePrint used by your organization. A BluePrint is a hierarchy
of Publications which defines how content is shared and reused. The Translation
BluePrint models your localization and translation strategy—the structure defined by
your BluePrint drives translations and dictates the translation flow. It defines which
from source languages to which target languages you can translate to, and which
Publications contain content in a source language (Source Publications) and which
Publications can receive translated content (Target Publications).
The “BluePrint Viewer ” on page 46 provides a visualization of the Parent-Child
relationships within a BluePrint and the BluePrint relationship between items. Select
Content Manager Explorer Basic User Manual 165
Translation Manager
an item in the Content Manager Explorer and choose BluePrinting > BluePrint
Hierarchy in the context menu to view the BluePrint. The following image shows a
BluePrint displayed in the Tree View of the Content Manager Explorer and in the
BluePrint Viewer:
Translation BluePrint configuration
The configuration of the BluePrint determines which translations are possible: in
other words, from which source to target languages you can translate to and from. A
Publication containing content in a source language is referred to as a Source
Publication, and a Publication which can receive translated content a Target
Publication. For example, in the following BluePrint configured for translation (based
on the example shown above), you can translate from English to German, Dutch,
and French, and from German to Austrian-German:
166 Content Manager Explorer Basic User Manual
Translation Manager
Note: You can view the configuration of a Publication by going to Translation tab
in the Publication properties.
Authorization
When you log on to the Content Manager Explorer, the only Publications in the
BluePrint visible to you are the ones for which you have access permissions (as set by
the system administrator). To be able to initiate translations, you must have access
permissions to at least one or more configured Target Publications; these are
Publications which can receive translated content. If you have access permissions to
configured Source Publications as well as Target Publications, you can initiate
translations from one language to several targets. The scope of a translation initiated
from a Source Publication is therefore potentially larger than one initiated from a Target
Publication which will always have just one target (itself). For example, in the
BluePrint above:
■
If you have access to the English Publication, you can initiate translations
from English to German, Dutch, and French provided you have to these
Publications as well
■
If you have access to the German Publication, you can initiate translations
from English to German. You can also translate from German to Austrian
German, provided you also have to this Publication
■
If you have access to the Austrian German Publication, you can initiate
translations from German to Austrian German
Note: To be able to initiate translations, you must have Translation Management
rights and have access permissions to one or more configured Target Publications;
these are Publications which can received translated content. To change your access
permissions, contact your System Administrator.
Localization
The localization process (the process of translating content into different languages) is
handled automatically by Translation Manager when you send content for translation
to the translation management system.
When you send a Content Manager item for translation, the Content Manager localizes
and checks out the item in the Target Publication before sending it to the translation
management system. When the translation management system sends the translated
item back, the item is localized (if not done so already) and replaced by the translation.
The item is then checked in and is now a local copy, or localized version of a shared
item.
Content Manager Explorer Basic User Manual 167
Translation Manager
Translation process
A successful Translation Job process flow is Definition > Ready for Translation >
Sending for Translation > In Translation > Completed. In between these stages, the
state of a Translation Job can be: Error sending, Error retrieving, Cancelled, or Deleting
You can see the current stage of a Translation Job—the job status—in the Translation
Job Queue. The following diagram provides an overview of the translation process:
Translations are handled in the following stages by the Translation Manager:
168 Content Manager Explorer Basic User Manual
Translation Manager
1. Definition
The Translation Job has been defined and has been saved but has not been sent to the
translation management system. At this stage, you can still edit the Translation Job and
add or remove items. When you send the job for translation, the job status is set to
Ready for Translation.
2. Ready for Translation
The Translation Job has been defined and has been sent and is awaiting transferral to
the translation management system. In the Ready for Translation stage, the
Translation Jobs are waiting to be picked up by the Translation Manager Service. The
service polls the Translation Manager at configured intervals for Translation Jobs
submitted for translation. When the service picks up the job, the job status is set to
Sending for Translation.
2.a Awaiting Authorization
If you are sending content for translation to SDL BeGlobal, and you have
Authorization Required configured on your Publication, Folder, Structure Group, or
Category, you will need to authorize the Translation Job and the cost involved before
it is sent for translation.
3. Sending for Translation
The Translation Job is being processed for transferral to the translation management
system. In the Sending for Translation stage, the Translation Manager Service
retrieves Translation Jobs ready for translation from the Translation Manager and
does the following:
■
localizes and checks out the Content Manager items in the relevant Target
Publications.
■
splits the Translation Job into one or more jobs depending on settings in the
Translation Manager configuration file.
■
sends the jobs and source content to the translation management system when
polled (the translation management system polls the Translation Manager
Service at configured intervals to check for translations waiting for transferral).
■
sets the job status to In Translation, unless an error occurs in one of the
previous steps in which case the job status is set to Error sending and the
process is stopped.
If errors are encountered while processing the Translation Job for transferral to the
translation management system, the status is set to Error sending. You can view details
of the errors in the Translation Job Error tab. If you delete a Translation Job in
Error sending state, the state is set to Deleting while the Translation Job is being
processed for deletion.
4. In Translation
The Translation Job is being processed in the translation management system using
the specified translation workflow. During this stage, the Translation Manager Service
polls the translation management system at configured intervals to check for
translations that have been processed through workflow. You can derive information
about the state of the job in the translation management system from the workflow
Content Manager Explorer Basic User Manual 169
Translation Manager
status. You can see workflow stages in the Translation Progress tab of a Translation
Job.
Between the In Translation and Completed stages the Translation Manager Service
retrieves completed translations from the translation management system and does the
following:
■
copies over the translated items, one by one as they are completed, to the
relevant Target Publications.
■
checks in the checked out items.
■
sets the job status to Completed when all items in the Translation Job have
been translated and updated in the Content Manager, or to Error retrieving if
an error occurred.
In the Error retrieving state, Translation Manager continues to attempt to receive
items that have not yet been sent back from translation. If errors are related to specific
items, for example the returned XML is not valid, as opposed to be a generic error
for the job, for example unable to connect to the server, the Translation Manager does
the following:
■
Attempts to retrieve items previously failed every 24 hours ago. If
unsuccessful, it reverts to the Error retrieving state.
■
Attempts to retrieve items previously failed if you choose Retry retrieving. If
unsuccessful, it reverts to the Error retrieving state and retries fails items
every 24 hours.
■
Resets its list of failed items and will try to retrieve all of them again if you
restart the Translation Manager service.
If you delete a Translation Job in Retry retrieving state, the state is set to Deleting
while the Translation Job is being processed for deletion.
If the Translation Job is canceled on the translation management system, the state is
set to Canceled and the checked out items undone.
5. Completed
The items in the original Translation Job have been returned from the translation
management system and checked in.
170 Content Manager Explorer Basic User Manual
Translation Manager
Translation information
In the Component Info tab you can see whether the current version of the Component has
been translated or, if the item has been modified since it was last sent for translation,
which version of the item was last translated.
Depending on whether the Component was a source or target for a translation, the tab
also displays a link to the Component that was the source for the translation or links to
items that were the target for a translation. You can also see which Publication the source
or target content is located.
If the content is currently in translation, the tab displays a link to the Translation Job.
Translatable content
You can send Folders, Components, Multimedia Components, Structure Groups,
Categories and Keywords for translation. You can also send Bundles and Virtual Folders
that contain these items for translation. The following list describes the actual content
(Component fields, Metadata fields, and properties of these items) that are sent for
translation.
Translatable items
You send the following Content Manager items in a Translation Job:
Icon
Content Manager Item Description
Folders
Organize content building blocks such as
Components.
Components
Contain content.
Content Manager Explorer Basic User Manual 171
Translation Manager
Icon
Content Manager Item Description
Multimedia
Components
Contain multimedia content.
Structure Groups
Organize, manage, and provide a URL structure
for Pages.
Pages
Contain Component Presentations which
combine content (Components) and layout
(Component Templates).
Category
A Category is the root classification of a
taxonomic hierarchy defined using Keywords.
Keywords
A list of values which can be used in
Components and metadata. A Category contains
Keywords which in turn can contain nested
Keywords.
Bundles
A container that can hold multiple Content
Manager items from different folders.
Virtual Folders
A Virtual Folder is an item that can contain
different types of content items located in
different locations in Content Manager.
Translatable Component fields
You can send the following fields for translation in a Component:
■
Component Text fields, but not if the values are selected from a list
■
Component External Link fields, for example, if you want to translate a URL
such as google.co.uk to google.nl
■
Component Format Area fields, including attribute values for example
alt="System Architecture"
You need to select the Translatable check box in Schemas if you want to allow these
fields to be sent for translation.
Translatable Metadata fields
If the following Content Manager items have metadata fields of type Text field or
External Link field, you can send these fields for translation:
■
Components
■
Multimedia Components
■
Folders
■
Structure Groups
■
Pages
■
Keywords
■
Bundles
■
Virtual Folders
172 Content Manager Explorer Basic User Manual
Translation Manager
You need to select the Translatable check box in Schemas if you want to allow these
fields to be sent for translation.
Translatable properties
When you include Content Manager items in a Translation Job, the following item
properties are sent for translation:
■
Component Name
■
Multimedia Component Name
■
Folder Name
■
Structure Group Name
■
Structure Group Directory
■
Page Name
■
Page File name
■
Keyword Name
■
Keyword Description
■
Category Name
■
Category Description
■
Bundle Name
■
Bundle Description
■
Virtual Folder Name
■
Virtual Folder Description
You need to select Translate item options in a Publication if you want to allow these
properties to be sent for translation. For Component Name, you need to select an
option in the Component Schema.
Multimedia Component and ECL translation restrictions
The following restrictions apply to Multimedia Components:
■
Translation of Multimedia Component metadata is only supported for
translation management systems that support ITS
■
Only the name and metadata of a Multimedia Component is sent for translation,
not the binary content
■
Only SDL Tridion metadata is sent for External Content Library (ECL)
Multimedia Components
■
You cannot add ECL Multimedia Components directly to a Translation Job;
you need to add them to a Page or a Bundle and send that for translation
Content Manager Explorer Basic User Manual 173
Translation Manager
Recursive content
Recursive items are translatable Content Manager items that can contain nested items.
The following items can include nested items in a Translation Job:
■
Folders contain Components and nested Folders
■
Structure Groups contain Pages and nested Structure Groups
■
Pages contain Components
■
Categories contain Keywords which can contain nested Keywords
■
Bundles and Virtual Folders can contain all of the above
The following image shows these items and nested items:
When you add a recursive item to a Translation Job, in the Added Items tab you can
indicate whether you want to send item properties for translation and whether to add nested
items. When the item is sent for translation, it—and each of its nested items (to an
indefinite nesting level)—is evaluated and resolved individually to determine its inclusion,
or exclusion, from the Translation Job.
The following image shows the Added Items tab for a Page added to a Translation Job:
174 Content Manager Explorer Basic User Manual
Translation Manager
The following image shows the Added Items tab for a Category added to a Translation
Job:
Translation Jobs
You bundle content that you want to send for translation into a Translation Job which you
can then send for translation to the translation management system.
A Translation Job in the Content Manager may be split into several Translation Jobs on
the translation management system depending on the configuration of the Translation
Manager and whether you are translating from multiple source or target languages. When
a job has been translated on the translation management system and been processed
through workflow, it is sent back to the Content Manager Server where the item is copied
over and checked in. As the original job on the Translation Manager may have been
split into several jobs in the translation management system, the Translation Job is not set
to completed until all these jobs have been translated, returned, and checked in.
The translation management system is the owner of the translated content, therefore if
you modify a localized item in the Content Manager which has been translated by the
translation management system, these changes will be lost if the item you changed is sent
to translation again because the translation management system works on the basis of a
translation memory and it has no memory of these changes. The content will be translated
according to its memory and the translation items it sends back will overwrite the ones
in the Content Manager. Therefore, if you want to update the content of a translated item
implement a review stage in the workflow (or manually update the translation units stored
within the translation memory).
Content Manager Explorer Basic User Manual 175
Translation Manager
Creating a Translation Job for SDL TMS
Select one or more items you want to send for translation and choose
BluePrinting > Translate from the context menu to add these to a new or existing
Translation Job.
Before you begin
To create a Translation Job you must have Translation Management rights and one other
Content Manager right to a Publication (or Publications) that is a target for the translated
content.
Procedure
1. Open Content Manager Explorer.
2. Select one or more translatable items in a configured Publication and choose
BluePrinting > Translate from the context menu.
Result: The Translation Job dialog appears.
3. Specify how to send the items to translation:
■
Select Create New Translation Job and click OK.
■
Select Add to existing Translation Job, select one of the open Translation
Jobs from the list and click OK.
Note: The From/To column indicates whether you are creating a Translation Job
from a Source Publication (From) or from a Target Publication (To).
4. In the General tab, enter values in the Translation Job Details section:
■
Enter a Name.
■
The Configuration path displays the Publication, Folder, Structure Group,
Category that is configured for translation.
■
Set a Priority—Translation Jobs with higher priorities are sent sooner to the
SDL TMS than those with lower priorities and also have precedence for
translation on the SDL TMS. You can set priority levels:
■
■
High
■
Normal
■
Low
Select a Required Date—set a due date for when the translation should be
returned from the SDL TMS (if you do not specify a value, the default value
on the SDL TMS is used).
176 Content Manager Explorer Basic User Manual
Translation Manager
■
Select a Business Unit (if configured)—you can specify the Business Unit
billed for the translation.
■
Select a Include already translated items—by default, Translation Manager
does not send items included in a Translation Job to translation if the item
has not changed since it was last sent. You can override this behavior by
selecting the Include already translated items check box, for example if you
were not satisfied with the translation.
5. In Translation Targets section:
■
If you initiated a job from a Target Publication, you can specify the Workflow
to use; if the field is read-only, the Workflow has been configured for you.
■
If you initiated a job from a Source Publication, you can select the Languages
you want to translate to and specify the Workflow to use:
6. In the Added Items tab, you can see each item in the Translation Job. For items that
contain subitems, such as Folders and Pages that contain Components and Keywords
that contain nested Keyword, you can specify the following options:
■
Select Translate Item check box to add this Content Manager item to the
Translation Job.
Select Translate components check box (or Translate Keywords if you
selected a Category) to add all nested content to the Translation Job.
The following image shows an example of the Added Items tab:
■
7. Select an item and click the Open button to open the Content Manager item you want
to send to translation.
8. Select an item and click the Remove button to remove the Content Manager item
from the Translation Job.
Content Manager Explorer Basic User Manual 177
Translation Manager
9. In the Info tab, you can view information about the Translation Job.
10. When you are finished with the Translation Job, proceed by clicking one of the
following in the Ribbon toolbar:
■
Save—saves the Translation Job, which remains open for editing
■
Save and Close—saves and closes the Translation Job (the remains in an
editable state until it is sent)
■
Send to Translation—sends the Translation Job to your translation system
What to do next
If you saved the Translation Job, it is in the Definition state and you can view, modify, and add items to the
Translation Job, send it for translation, or delete it. Any user who is authorized to initiate translations and who
has access permissions to the Publication which is a target, or potential target, of translated content can
modify the Translation Job so long as it is in the Definition state. It is therefore important to realize that the
initiator of a Translation Job does not have sole ownership.
Creating a Translation Job for SDL
WorldServer
Select one or more items you want to send for translation and choose
BluePrinting > Translate from the context menu to add these to a new or existing
Translation Job.
Before you begin
To create a Translation Job you must have Translation Management rights and one other
Content Manager right to a Publication (or Publications) that is a target for the translated
content.
Procedure
1. Open Content Manager Explorer.
2. Select one or more translatable items in a configured Publication and choose
BluePrinting > Translate from the context menu.
Result: The Translation Job dialog appears.
3. Specify how to send the items to translation:
■
Select Create New Translation Job and click OK.
■
Select Add to existing Translation Job, select one of the open Translation
Jobs from the list and click OK.
Note: The From/To column indicates whether you are creating a Translation Job
from a Source Publication (From) or from a Target Publication (To).
4. Select one or more translatable items in a configured Publication and choose
BluePrinting > Translate from the context menu.
178 Content Manager Explorer Basic User Manual
Translation Manager
Result: The Translation Job dialog appears.
5. Specify how to send the items to translation:
■
Select Create New Translation Job and click OK.
■
Select Add to existing Translation Job, select one of the open Translation
Jobs from the list and click OK.
Note: The From/To column indicates whether you are creating a Translation Job
from a Source Publication (From) or from a Target Publication (To).
6. In the General tab, enter values in the Translation Job Details section:
■
Enter a Name.
■
The Configuration path displays the Publication, Folder, Structure Group,
Category that is configured for translation.
■
Select a Required Date—set a due date for when the translation should be
returned from the translation management system (if you do not specify a
value, the default value on the translation management system is used).
■
Select a Include already translated items—by default, Translation Manager
does not send items included in a Translation Job to translation if the item
has not changed since it was last sent. You can override this behavior by
selecting the Include already translated items check box, for example if you
were not satisfied with the translation.
7. In Translation Targets section:
■
If you initiated a job from a Target Publication, you can specify the Project
Type (if the field is read-only, the Project Type has been configured for you).
■
If you initiated a job from a Source Publication, you can select the Languages
you want to translate to and specify the Project Type to use.
8. In the Added Items tab, you can see each item in the Translation Job. For items that
contain subitems, such as Folders and Pages that contain Components and Keywords
that contain nested Keyword, you can specify the following options:
■
Select Translate Item check box to add this Content Manager item to the
Translation Job.
Select Translate components check box (or Translate Keywords if you
selected a Category) to add all nested content to the Translation Job.
The following image shows an example of the Added Items tab:
■
Content Manager Explorer Basic User Manual 179
Translation Manager
9. Select an item and click the Open button to open the Content Manager item you want
to send to translation.
10. Select an item and click the Remove button to remove the Content Manager item
from the Translation Job.
11. In the Info tab, you can view information about the Translation Job.
12. When you are finished with the Translation Job, proceed by clicking one of the
following in the Ribbon toolbar:
■
Save—saves the Translation Job, which remains open for editing
■
Save and Close—saves and closes the Translation Job (the remains in an
editable state until it is sent)
■
Send to Translation—sends the Translation Job to your translation system
What to do next
If you saved the Translation Job, it is in the Definition state and you can view, modify, and add items to the
Translation Job, send it for translation, or delete it. Any user who is authorized to initiate translations and who
has access permissions to the Publication which is a target, or potential target, of translated content can
modify the Translation Job so long as it is in the Definition state. It is therefore important to realize that the
initiator of a Translation Job does not have sole ownership.
180 Content Manager Explorer Basic User Manual
Translation Manager
Creating a Translation Job for SDL BeGlobal
Select one or more items you want to send for translation and choose
BluePrinting > Translate from the context menu to add these to a new or existing
Translation Job.
Before you begin
To create a Translation Job you must have Translation Management rights and one other
Content Manager right to a Publication (or Publications) that is a target for the translated
content.
Procedure
1. Open Content Manager Explorer.
2. Select one or more translatable items in a configured Publication and choose
BluePrinting > Translate from the context menu.
Result: The Translation Job dialog appears.
3. Specify how to send the items to translation:
■
Select Create New Translation Job and click OK.
■
Select Add to existing Translation Job, select one of the open Translation
Jobs from the list and click OK.
Note: The From/To column indicates whether you are creating a Translation Job
from a Source Publication (From) or from a Target Publication (To).
4. Select one or more translatable items in a configured Publication and choose
BluePrinting > Translate from the context menu.
Result: The Translation Job dialog appears.
5. Specify how to send the items to translation:
■
Select Create New Translation Job and click OK.
■
Select Add to existing Translation Job, select one of the open Translation
Jobs from the list and click OK.
Content Manager Explorer Basic User Manual 181
Translation Manager
Note: The From/To column indicates whether you are creating a Translation Job
from a Source Publication (From) or from a Target Publication (To).
6. In the General tab, enter values in the Translation Job Details section:
■
Enter a Name.
■
Configuration path—displays the Publication, Folder, Structure Group,
Category that is configured for translation.
■
Select a Include already translated items—by default, Translation Manager
does not send items included in a Translation Job to translation if the item
has not changed since it was last sent. You can override this behavior by
selecting the Include already translated items check box, for example if you
were not satisfied with the translation.
7. In the Translation Targets section, select the default quality level to apply to
Translation Jobs for each language.
Note: The quality level values available are derived from SDL BeGlobal.
8. Select an item and click the Open button to open the Content Manager item you want
to send to translation.
9. Select an item and click the Remove button to remove the Content Manager item
from the Translation Job.
10. In the Info tab, you can view information about the Translation Job.
11. When you are finished with the Translation Job, proceed by clicking one of the
following in the Ribbon toolbar:
■
Save—saves the Translation Job, which remains open for editing
■
Save and Close—saves and closes the Translation Job (the remains in an
editable state until it is sent)
■
Send to Translation—sends the Translation Job to your translation system
What to do next
If you saved the Translation Job, it is in the Definition state and you can view, modify, and add items to the
Translation Job, send it for translation, or delete it. Any user who is authorized to initiate translations and who
has access permissions to the Publication which is a target, or potential target, of translated content can
modify the Translation Job so long as it is in the Definition state. It is therefore important to realize that the
initiator of a Translation Job does not have sole ownership.
182 Content Manager Explorer Basic User Manual
Translation Manager
Authorizing SDL BeGlobal Translation Jobs
If authorization is required for a Translation Job before it is sent for translation, after you
have you clicked Send to Translation you need to open the Translation Job and
authorize it.
Before you begin
To view and modify a Translation Job you must have Translation Management rights and
one other Content Manager right to a Publication that is a target for the translated
content. The Translation Jobs displayed in the Translation Jobs queue is filtered depending
on the access permissions of the user.
Procedure
1. Open Content Manager Explorer.
2. Select the Translation Jobs node in the Shortcuts area.
A list of Translation Jobs is displayed in the list view.
3. Select a Translation Job from the list and choose Open from the context menu.
Result: The Translation Job dialog appears.
4. In the General tab Translation Targets section, review the Price and Quality Level
and select one of the following:
■
Authorize—select if you are happy with the price and quality.
■
Reject—select if you do not want to go ahead with the translation.
■
Leave Open (the default)—select if you do not want to make a decision just
yet.
5. After authorizing one or more jobs:
a. Scroll down to the bottom of the Translation Targets section.
b. Review the Total Amount Selected for Authorization (3) (the number of
authorized languages appears between brackets) and the total price in US
dollars.
c. Click Submit.
Results
The Translation Job is sent for translation to SDL BeGlobal.
Content Manager Explorer Basic User Manual 183
Translation Manager
Adding items to a Translation Job
You can add items to an existing Translation Job that has not yet been sent for translation
(whose status is Definition).
Before you begin
To add items to a Translation Job you must have Translation Management rights and one
other Content Manager right to a Publication that is a target for the translated content.
About this task
Any user who is authorized to initiate translations and who has access permissions to the
Publication which is a target, or potential target, of translated content can add items to an
existing Translation Job.
Procedure
1. Open Content Manager Explorer.
2. Select one or more translatable items in a configured Publication and choose
BluePrinting > Translate from the context menu.
Result: The Translation Job dialog appears.
3. In the Translation Job dialog, select Add Items to existing Translation Job.
4. Select a Translation Job from the displayed list and click OK.
Result: The Translation Job dialog appears for the Translation Job you
selected with the Content Manager items you selected added to the job.
5. Click Save or Save and Close in the Ribbon toolbar to commit the changes—the
Translation Job remains in an editable state until you send it for translation.
What to do next
If you have saved the Translation Job, you can view, modify, and add items to the Translation Job, send it for
translation, or delete it.
184 Content Manager Explorer Basic User Manual
Translation Manager
Viewing a Translation Job
You can view all existing Translation Jobs in the Translation Jobs queue. You can
modify Translation Jobs that have not yet been sent for translation (whose status is
Definition).
Before you begin
To view and modify a Translation Job you must have Translation Management rights and
one other Content Manager right to a Publication that is a target for the translated
content. The Translation Jobs displayed in the Translation Jobs queue is filtered depending
on the access permissions of the user.
Procedure
1. Open Content Manager Explorer.
2. Select the Translation Jobs node in the Shortcuts area.
A list of Translation Jobs is displayed in the list view.
3. Filter and sort the list based on the values in any one of the columns:
■
Name—specifies the name assigned to the Translation Job
■
Date/time—specifies when the Translation Job was created
■
To/From—specifies whether the job was initiated from a Source or Target
Publication
■
To—the job was initiated from a Target Publication
■
From—the job was initiated from a Source Publication (multiple
targets possible)
■
Language—specifies the language of the Publication where the job was
initiated
■
Publication—specifies the name of the Publication where the translation was
initiated
■
Status—specifies the current status of the translation
■
Completed—specifies the percentage completion
4. Select a Translation Job from the list and choose Open from the context menu.
Result: The Translation Job dialog appears.
5. Modify properties and settings in the Translation Job dialog.
What to do next
If you have saved the Translation Job, you can view, modify, and add items to the Translation Job, send it for
translation, or delete it.
Content Manager Explorer Basic User Manual 185
Translation Manager
Sending a Translation Job
You can send a translation to the translation management system in the Translation Job
dialog, or you can send an existing Translation Job (whose status is Definition) directly
from the Translation Jobs Queue.
Before you begin
To send an existing a Translation Job you must have Translation Management rights and
one other Content Manager right to a Publication that is a target for the translated content.
Procedure
1. Open Content Manager Explorer.
2. Go to the Translation Jobs node in the Shortcuts area.
Result: A list of Translation Jobs is displayed.
3. In the Translation Jobs node, select a Translation Job from the list and select Send to
Translation in the Translation Management tab of the Ribbon toolbar.
Results
You have sent the Translation Job to the translation management system for translation. The Translation Job
is now in the Ready for Translation state, meaning it is waiting to be transferred to the translation management
system.
What to do next
You can track the progress of the Translation Job in the Translation Jobs Queue in the Content Manager, or on
the translation management system.
Resending a Translation Job (on send error)
Errors can occur during the sending and retrieving of a Translation Job to or from the
translation management system. After fixing the errors, you can resend the Translation
Job to the translation management system.
Before you begin
To resend a Translation Job you must have Translation Management rights and one other
Content Manager right to a Publication that is a target for the translated content.
You can resend Translation Jobs that are in the Error Sending state.
About this task
When errors occur during the Sending for Translation state—while the Translation Job
is being processed for transferral to the translation management system—Translation
Manager sets the state of the Translation Job to Error sending.
186 Content Manager Explorer Basic User Manual
Translation Manager
When errors occur, Translation Manager does not send any of the items in the Translation
Job except when connection error occur, in which case Retry sending only sends items
the items that were waiting to be sent when the connection was lost.
Retry sending does not take versions into account. For example, if you send version 1 of
a Component for translation and sending fails, if in the meantime someone has created
version 2 of the Component and you Retry sending, version 1 will be sent for translation
and not version 2.
Note: If you want to send the latest versions of a Component, create a new Translation
Job. Alternatively, copy and paste a completed Translation Job containing items that you
want to send again for translation because newer versions exist, edit the job if necessary
while it is in the Definition state, then send the new job for translation.
Procedure
1. Open Content Manager Explorer.
2. Select the Translation Jobs node in the Shortcuts navigation pane.
3. Select a Translation Job that is in Error sending state:
a. Choose Open from the context menu.
b. Click the Error tab.
Result: Details are displayed in the Error Details section.
c. Fix the errors. For example:
■
Content Manager items does not exist
■
Folder is empty
■
Network connection error
■
Item is not valid according to its Schema
4. When you have fixed errors, go to the Translation Jobs Queue, select a Translation
Job and choose Retry sending from the context menu.
Results
You have resent the Translation Job. The Translation Job is now in the Ready for Translation state, in which
the items that Translation Manager had previously failed to send are awaiting transferral to the translation
management system.
What to do next
You can track the progress of the Translation Job in the Translation Progress tab of the Translation Job.
Content Manager Explorer Basic User Manual 187
Translation Manager
Retrieving a Translation Job (on retrieve
error)
Errors can occur during the sending and retrieving of a Translation Job to or from the
translation management system. The state of a Translation Job is set to Error retrieving
when an error is encountered returning Translation Jobs to the Content Manager.
Before you begin
To retry retrieving a Translation Job it must be in the Error retrieving state and you must
have Translation Management rights and one other Content Manager right to a
Publication that is a target for the translated content.
About this task
When errors occur during the In Translation state—while the Translation Jobs are being
received by the Content Manager—Translation Manager sets the state of the Translation
Job to Error retrieving.
Retrieve errors can be global errors concerning the Translation Job on the Content Manager
or the equivalent jobs on the translation management system, or validation errors
concerning individual Content Manager items.
The Translation Manager automatically tries to retrieve individual items that have failed
every 24 hours, or you can manually force the process using the Retry retrieving option.
Procedure
1. Open Content Manager Explorer.
2. Select the Translation Jobs node in the Shortcuts navigation pane.
3. Select a Translation Job from the list and choose Open from the context menu.
4. Click the Error tab. Details are displayed in the Error Details section.
5. Fix the errors, for example:
■
Translation Manager Job ID
■
The translation management system Job ID
■
Content Manager item ID
6. In the Translation Jobs node, select a Translation Job in the Error retrieving state
and choose Retry retrieving from the context menu.
Results
You have forced the Translation Manager to retry retrieving each individual item that has previously failed in
a Translation Job:
■
The state of the Translation Manager is set to In Translation.
■
If it fails to receive one or more items again, it sets the Translation Job to the
Error sending state. In this state, the Translation Manager will try to retrieve the
failed items every 24 hours. (It will also continue to try to receive items that
have not failed, that is, items that have not yet been sent back from translation.)
188 Content Manager Explorer Basic User Manual
Translation Manager
What to do next
You can track the progress of the Translation Job in the Translation Progress tab of the Translation Job.
Deleting a Translation Job
You can delete Translation Jobs whose status is Definition, Canceled, Error sending or
Error retrieving directly in the Translation Jobs Queue.
Before you begin
To delete a Translation Job you must have Translation Management rights and one other
Content Manager right to a Publication that is a target for the translated content.
About this task
Any user who is authorized to initiate translations and who has access permissions to the
Publication which is a target, or potential target, of translated content can delete an existing
Translation Job.
Procedure
1. Open Content Manager Explorer.
2. Go to the Translation Jobs node in the Shortcuts area.
Result: A list of Translation Jobs is displayed.
3. Right-click a Translation Job in the list and from the context menu that opens, choose
Delete.
Results
The Translation Job is deleted.
Monitoring translation progress
You can view the progress of items in translation in the Translation Progress tab of a
Translation Job. You can see the progress for each of the target languages and a breakdown
of what Content Manager items are in what (workflow) stage of the translation process
and the percentage completion.
Procedure
1. Open Content Manager Explorer.
2. Select the Translation Jobs node in the Shortcuts area.
Result: A list of Translation Jobs is displayed in the list view.
3. Select a Translation Job from the list and choose Open from the context menu.
Result: The Translation Job dialog appears.
4. Open the Translation Progress tab.
Content Manager Explorer Basic User Manual 189
Translation Manager
The Translation Progress tab displays:
■
rows for each stage in the process of translating an item in a Translation Job
■
columns for each language you chose to translate to (from a target language)
The percentage completion displayed for each stage and language is based on the
number of Content Manager items in that stage. When using aggregation—where
content from several XML files is merged into a single XML document—the
percentages do not match what you see in the translation management system.
The icon displayed next to the stage indicates whether it is an automated or manual
process:
Icon
Description
Automated process
Manual process
5. Click Compact View to view just the manual stages and stages which contain items.
6. Click Expanded View to view all stages involved in the translation process. An item
in a Translation Job can be in one of the following stages:
Sent for Translation
The item remains in this stage until the first time Translation Manager pulls the
actual status from the translation management system.
Translation Workflow stages
The item can be in any Workflow stage defined in the translation management
system, up to and including the Translated Content Retrieval stage. The
Workflow stages are configurable on your translation management system.
Translation Manager displays all Workflow stages merged into one list, therefore
some stages may be included in the list but are not used by all items. Note also that
a Workflow stage may also be placed out of sequence in the list.
Complete
The item is in a stage after the Translated Content Retrieval stage, including the
Completed stage. Translation Manager sets the (SDL Tridion) Translation Job
to Complete once all items have passed the Translated Content Retrieval stage,
even if there are additional Workflow stages in the translation management
system before they reach the Complete stage.
Exceptions
The item is in the Exception or Recovery stage in the translation management
system. The item can be retrieved when the error is corrected.
Terminated
The item has been canceled and will not be returned.
7. In the Compact View or Expanded View, select a stage from the list. The Details
window displays items that are currently in that stage of translation.
8. In the Details window, select an item and click Open to view the item.
190 Content Manager Explorer Basic User Manual
Chapter 19
Audience Manager and Outbound
E-mail
Audience Manager enables marketing departments to gather information about audiences,
such as interests and characteristics. Outbound E-mail is for marketing departments that
need to implement and manage e-mail communication campaigns.
Audience Manager
Audience Manager enables marketing departments to gather information about audiences,
such as interests, preferences, and characteristics and use this information to target
audiences.
Audience Manager consists of Contacts and Segments:
■
A Contact contains details of an actual person or organization. Contacts are stored
in Address Books.
■
A Segment defines Contact preferences, interests and characteristics that represent
a target audience of known Contacts accessing content on your Web sites.
The following diagram provides an overview of Audience Manager:
Audience Manager user interface
The Audience Manager node in a Publication contains Content Manager items specific
to Audience Manager. The node is accessible to users who have Audience Manager rights,
as defined by a Tridion system administrator.
Content Manager Explorer Basic User Manual 191
Audience Manager and Outbound E-mail
Audience Manager items
The Audience Manager node
Icon Item Type
contains the following items:
Description
Address Book
An Address Book contains a list of Contacts. If the
Publication contains two or more Address Books, an (All
Contacts) node is added which contains all Contacts in the
Publication. Address Books are added to a Publication by a
Tridion System Administrator.
Contact
A Contact contains a customer's personal details and
Mailing history.
Folder
Folders in the Audience Manager node are used to organize
Segments.
Segment
A Segment is a logical grouping of people that represent a
target audience.
192 Content Manager Explorer Basic User Manual
Audience Manager and Outbound E-mail
Audience Management ribbon toolbar
In the Content Manager Explorer, select Audience Management. The tab shows
tasks you can perform in the Audience Manager node in a Publication. Tasks are
enabled or disabled depending on your current context:
Search and List View
Select an Address Book in the navigation pane to view its Contacts. Define search
criteria and click Search to filter the list, in which case the list view displays the
Contacts is the list who meet the criteria. You can save a filtered list as a Distribution
List or export the Contacts:
Audience Manager rights and permissions
Rights determine the type of items (for example Contacts or Segments) you may work
with and Permissions determine what actions you can perform on the items for which you
have rights (for example, whether you may view, create, or delete Contacts or Segments).
Your system administrator assigns you with specific rights for each Publication that
you work in:
■
To work with Contacts, you need Contact Management rights and Read/Write/
Delete permissions set on the parent Address Book.
■
To work with Segments, you need Segmentation Management rights and
Read/Write/Delete permissions set on the parent Folder.
■
To work with Folders in the Audience Manager node, you need Outbound
E-mail Folder Management rights and Read/Write/Delete permissions set on the
parent Folder.
Content Manager Explorer Basic User Manual 193
Audience Manager and Outbound E-mail
Outbound E-mail
Outbound E-mail is for marketing departments that need to implement and manage
e-mail communication campaigns. It enables marketing departments to deliver
personalized e-mails to specific audiences and track the effectiveness of their
communication.
Outbound E-mail users need to perform the following tasks to manage e-mail
communication campaigns:
1. Creating and managing Contacts
2. Creating and classifying Content
3. Combining Contacts and Content into Mailings and optionally combine Mailings into
E-mail Campaigns
The following diagram provides an overview of user tasks for Outbound E-mail:
This chapter provides an overview of managing Contacts, creating Content and combining
these items into Mailings in the Content Manager user interface.
194 Content Manager Explorer Basic User Manual
Audience Manager and Outbound E-mail
Creating and sending e-mails
Creating and sending e-mails in Outbound E-mail involves managing Contacts, creating
Content and combining these into a Mailing:
1. Contacts are the people you send mailings to:
■
You add Contacts to Address Books. An Address Book represents a market
segment or interest group.
■
You target the intended audience of a mailing by creating Distribution Lists
that contain a subset (selection) of your Contacts.
2. Content involves the creation and classification of e-mail content:
■
■
You create an e-mail as follows:
■
Create Components—each Component defines a part of an e-mail (an
e-mail fragment)
■
Create a Page—a Page combines content (Components) with layout
(Page and Component Templates)
■
Specify Target Groups—when you add a Component to the Page,
you can also specify which Target Group(s) the content applies to
You classify content using Categories and Keywords. You create Categories
and Keywords to:
■
Classify Content—the primary purpose of Categories and Keywords
in Content Manager is to classify and tag content (Components).
Classifying your content helps you find related content.
■
Classify Contacts—the secondary purpose of Categories and
Keywords, which is most relevant to Outbound E-mail, is to specify
Contact preferences and interests which you can then use to create
Dynamic Distribution Lists and define Target Groups (categories of
users) to match Component Presentations to these Target Groups
3. Mailings combine Contacts and Content. You can also Personalize a Mailing by
adding personal details to the e-mail and tailoring the contents of an e-mail message
to specific categories of users:
■
Use Merge Fields (in template code or other text fields) to indicate where
Outbound E-mail should insert Contact specific information such as name and
surname.
■
Use Target Groups to define categories of users (mail recipients) which you
can then use to include or exclude certain parts of a Mailing (Component
Presentations on an E-mail Page) to. Target Groups allows you to personalize
the content of the Mailing to suit the Contact's profile: different versions of
the same Mailing are sent to different Contacts.
Content Manager Explorer Basic User Manual 195
Audience Manager and Outbound E-mail
4. An E-mail Campaign allows you to coordinate a Mailing campaign by grouping
several Mailings together and testing and sending them in one go. You can add
Mailings from multiple Publications in an E-mail Campaign. An E-mail Campaign
allows you to:
■
Coordinate the sending of a single e-mail across multiple Publications
■
Coordinate the sending of a series of e-mails consisting of, for example, a
Start Mailing, Scheduled Mailing, Triggered Mailing and Reminder Mailing
When you have sent a Mailing, you can view the response of your Contacts to the Mailing
and use this information to get an impression of who is interested in your e-mail and
what kind of content interests them. You can use this information to create Distribution
Lists, allowing you to send a more targeted Mailing.
Note: Address Books are created by Tridion System Administrators who then make
them available to users in Outbound E-mail Publications.
Outbound E-mail user interface
The Outbound E-mail node in a Publication contains Content Manager items specific to
Outbound E-mail. The node is accessible to users who have Outbound E-mail rights, as
defined by a Tridion system administrator.
E-mail Management ribbon toolbar
In the Content Manager Explorer, select E-mail Management. The tab shows tasks
you can perform tasks in the Outbound E-mail node
in a Publication. Tasks are
enabled or disabled depending on your current context:
Outbound E-mail node
The Content Management navigation pane on the left-hand side displays Publications
and Shortcuts:
■
Open a Publication to view the Outbound E-mail node in which you create
Mailings and Distribution Lists and organize them into Outbound E-mail
Folders.
■
Open E-mail Campaigns to view E-mail Campaigns.
196 Content Manager Explorer Basic User Manual
Audience Manager and Outbound E-mail
Search and List View
Select a Distribution List in the navigation pane to view its Contacts. Define search
criteria and click Search to filter the list, in which case the list view displays the
Contacts is the list who meet the criteria. You can save a filtered list as a Distribution
List or export the Contacts:
Content Manager Explorer Basic User Manual 197
Audience Manager and Outbound E-mail
Outbound E-mail icons
The Outbound E-mail node
Icon Item Type
contains the following items:
Description
Outbound
E-mail Folder
Outbound E-mail Folders are used to organize Mailings and
Distribution Lists.
Distribution
List
A Distribution List defines the recipients of a Mailing.
Mailing
A Mailing combines Content (an E-mail Page) and Contacts
(Distribution Lists).
At Publication level, the E-mail Campaigns node can contain the following items:
Icon Item Type
E-Mail
Campaign
Description
An E-mail Campaign allows you to group Mailings to
coordinate the sending and testing of Mailings across
Publications and/or to group a series of related Mailings that
comprise a campaign together.
Content Manager Explorer interface
Your interface to Outbound E-mail is the Content Manager Explorer.
The following image shows the top-level nodes in a Publication:
198 Content Manager Explorer Basic User Manual
Audience Manager and Outbound E-mail
The following table describes the top-level nodes in a Publication and explains how to
use them in Outbound E-mail:
Icon Item Type
Publication
Description
A Publication intended for the Mailing channel (contains
Outbound E-mail items as well as other Content Manager items)
Building Blocks Folders are organizational items that contain, amongst others,
(Folders)
Components which define the content for Mailings and Target
Groups which are used to personalize Mailing content
Structure
Groups
Organizational items that contain Pages to define the Content
(Components) and layout and functionality (Templates) used in
a Mailing
Categories &
Keywords
Keywords which are used to classify content (Components) and
Contacts
Outbound
E-mail
A Container node for all Outbound E-mail specific items. See
“Outbound E-mail user interface ” on page 196
E-Mail
Campaigns
A Container node for E-mail Campaigns.
Note: This manual describes the Content Manager items that are directly concerned
with Outbound E-mail. For more information on Content Manager functionality, see the
SDL Tridion documentation.
Outbound E-mail rights and permissions
Rights determine the type of items (for example Mailings or Distribution Lists) you may
work with and Permissions determine what actions you can perform on the items for
which you have rights (for example, whether you may view, create, or delete Mailings or
Distribution Lists.
Your system administrator assigns you with specific rights for each Publication that you
work in:
■
To work with Distribution Lists, you need Distribution List Management rights
and Read/Write/Delete permissions set on the parent Folder.
■
To work with Mailings, you need Mailing Management or Mailing Execution
rights and Read/Write/Delete permissions set on the parent Folder.
■
To work with Folders in the Outbound E-mail node, you need Outbound E-mail
Folder Management rights and Read/Write/Delete permissions set on the parent
Folder.
Content Manager Explorer Basic User Manual 199
Audience Manager and Outbound E-mail
Legal notice
Please note that use of the Outbound E-mail may require compliance with national,
European and/or international data protection laws and privacy laws.
It is the responsibility of the processor of the data to ensure compliance with any applicable
law. If you intend to perform any operations on personal data, whether electronically or
manually, these rules may apply to you. We advise you to investigate this issue thoroughly
before using Outbound E-mail in a live environment.
Managing Contacts
A Contact contains the details of a person or organization. You can use Contacts for
targeting and personalization.
In Outbound E-mail, you create Distribution Lists containing the Contacts you want to
target in a Mailing campaign. You manage Contacts in an Address Book.
Address Books
An Address Book contains a list of Contacts.
The following types of Address Books are created by system administrators and made
available to users in Publications:
200 Content Manager Explorer Basic User Manual
Audience Manager and Outbound E-mail
■
An Address Book contains a list of Contacts segmented according to ownership
where the owner is typically an organizational unit that manages communication
with these Contacts. For example, you may have Address Books for Sweden,
Denmark and Norway Contacts.
■
A Dynamic Address Book contains a list of Contacts segmented according to
Contact interest, characteristic, or preference. For example you may have a
Dynamic Address Book that filters Contacts based on the region Nordic.
In a Publication you can also create Local Address Books. A Local Address Book is a
temporary Address Book which users can create and which contains a collection of
Contacts imported from an external data source. A Local Address Book is intended for a
one-time marketing action and are not designed to be used to manage Contacts.
Contacts
A Contact contains the details of a person or organization. When you open a Contact, you
can see Mailing details in the General tab, Extended Details in the Details tab,
characteristics in the Keywords tab, and Mailings sent to the Contact in the E-mails tab.
A Contact contains the following information about a person or an organization:
■
General—mailing information such as a Contacts's e-mail address, the format the
e-mail should be sent in, the subscription status, e-mail error status, and whether
the Contact is active of not.
■
Details—specific information about a Contact, such as name, surname, phone
number, and so on.
■
Keywords—properties or attributes of a Contact that define a Contact's
preferences and interests, such as a preferred brand of car or hobbies. A Contact
may have multiple Keywords from one or more Categories.
■
E-mails—the Mailings sent to the Contact and the status of the Mailings.
Contact filtering
In Audience Manager and Outbound E-mail you can segment and target audiences (Contacts) using filters. A filter defines Outbound E-mail fields, extended detail fields, or
Keywords that you want to filter Contacts on.
You use the same filters to define Dynamic Address Books, Dynamic Distribution Lists
and Segments. You can base a Dynamic Address Book, Dynamic Distribution List or
Segment on another Dynamic Address Book, Dynamic Distribution List or Segment to
create a chain of filters. Each filter in a sequence further refines the filtered Contacts on
which it is based.
Chaining filters allows you to create generic filters and use these to create more specific
filters. You can create a chain of filters as follows:
Content Manager Explorer Basic User Manual 201
Audience Manager and Outbound E-mail
■
You can base a Dynamic Address Book on another Dynamic Address Book
■
You can base a Dynamic Distribution List on a Dynamic Address Book, on
another Dynamic Distribution List, or on a Segment
■
You can base a Segment on another Segment
Each filter in a chain of filters is applied sequentially. For example, if you apply the
following filters in a chain:
1. Filter A "Subscription status=Subscribed"
2. Filter B "Nationality=Italian"
3. Filter C "Gender=Women"
4. Filter D "Age=18-30"
5. Filter E "Preferred Clothing=Jeans"
Filter B is applied to the result set of Filter A, Filter C to the result set of Filter B and so
on down the chain. Filter E will therefore filter a list of Contacts on Italian women aged
between 18 and 30 who have subscribed to e-mails and who have stated a preference for
wearing jeans.
The following sections provide a detailed example of Contact filtering.
202 Content Manager Explorer Basic User Manual
Audience Manager and Outbound E-mail
Administration
A System Administrator adds Address Books in Administration. Address Books
contain Contacts, for example Denmark, Norway, Sweden. Dynamic Address Books
contain a subset of filtered Contacts and can be based on a single Address Books or
on All Contacts. For example, Nordic Dynamic Address Book filters (All Contacts) on
the Keyword Nordic. A Dynamic Address Book can also based on another Dynamic
Address Books to further refine the filter. For example, Nordic (subscribed)
Dynamic Address Book is based on Nordic and filters these Contacts on whether they
are subscribed to receive e-mails.
Publications
A System Administrator adds Address Books to Publications and defines rights and
permissions for users. For example, the Denmark Publication has Denmark and
Nordic (subscribed) Address Books assigned to it. Users with access to this
Publication and Contact Management rights are allowed to read, write and delete
Contacts within the Denmark Address Book, but do not have any permissions for the
Nordic (subscribed) Address Book and therefore cannot view Contacts within this
Address Book.
The (All Contacts) node "contains" all Contacts within the Publication but only
displays the Contacts (in the Publication) for which a user has read access (so therefore
in this case not Contacts in the Nordic (subscribed) Address Book:
Dynamic Distribution Lists
Users with Distribution List Management rights and Read and Write permissions can
create Distribution Lists. Distribution Lists filter Contacts in a single Address Book or
Content Manager Explorer Basic User Manual 203
Audience Manager and Outbound E-mail
All Address Books available within a Publication. You can create a Dynamic
Distribution List based on a Segment, Address Book or Dynamic Address Book:
■
If you select a Segment, the filters defined in the selected Segment are used in
addition to other filters you may define and act on all Contacts within the
Publication.
■
If you select a Dynamic Address Book, the filters defined in the selected
Dynamic Address Book are used in addition to other filters you may define
and act on Contacts within this Address Book.
■
If you select a regular Address Book, the filters you define act on Contacts
within this Address Book.
■
If you make no selection (none), the filters act on all Contacts within the
Publication.
For example, the Nordic Skiers Dynamic Distribution List is based on the Nordic
Subscribed Address Book and uses the Keyword Skiers to filter these Contacts. The
complete filter therefore filters Contacts on Nordic->Subscribed->Skier.
Additionally, the Nordic Skiers Downhill Dynamic Distribution List filters the Nordic
Skiers Dynamic Distribution List on the Keyword Downhill. The complete filter
therefore filters Contacts on Nordic->Subscribed->Skier->Downhill.
It is important to understand that when you select (All Contacts) and make a filter
using the Keyword Skiers you will only see Danish Skiers (subscribed and
unsubscribed) because you do not have read access to Nordic (subscribed). However,
if your create a Dynamic Address Book based on this search the Distribution List
will contain:
■
Swedish subscribed Skiers
■
Norwegian subscribed Skiers
■
Danish subscribed and unsubscribed Skiers
In other words, when you select a Distribution List you can see all Contacts that can
potentially receive the Mailing, regardless of whether you have permissions to read the
Contacts or not.
204 Content Manager Explorer Basic User Manual
Audience Manager and Outbound E-mail
Mailings
When you create a Mailing, you need to specify the Distribution Lists you want to
send the mailing to. You must also specify the Address Books to which the Contacts
in your Distribution Lists must belong (a Contact must therefore be in a selected
Distribution List and Address Book to receive a Mailing).
Creating a Contact
You can manually add a Contact to an Address Book in the context of one-on-one customer
contact.
Before you begin
To create or update Contacts, you need Contact Management rights and Write permissions
for the Address Book.
Procedure
1. Open the Content Manager Explorer.
2. Navigate to the Publication > Audience Manager node.
3. Select an Address Book and click the New Contact icon in the toolbar.
Result: The Contact window appears.
4. In the General tab, fill in or modify the Mailing details:
■
E-mail address—the person’s e-mail address
■
E-mail type—the Contact’s preferred e-mail format:
■
■
HTML—using HTML, you can format the text of your e-mail and
include images and clickable links. However, not all of your Contacts
may be able to see the HTML-format e-mail. This is the default
value.
■
Text—using plain text, you can be sure that the recipient of the e-mail
can read the message, but you lose the ability to format your e-mail
message.
■
Multi-part—HTML and plain text combined in a multi-part e-mail
message. The e-mail client of the recipient determines which format the
recipient will see.
Subscription status—indicates the status of a Contact's subscription:
■
Opted-in—the Contact registered as a subscriber and confirmed the
registration.
■
Subscribed—the Contact registered as a subscriber, but did not yet
confirm the registration.
■
Unsubscribed—the Contact would not like to receive e-mail.
Content Manager Explorer Basic User Manual 205
Audience Manager and Outbound E-mail
■
■
E-mail error status—indicates whether problems have been encountered
sending e-mails to the Contact:
■
No problems—e-mails sent to this Contact should arrive without
incident.
■
Temporary problems—e-mails sent to this Contact have encountered
temporary problems, for example, the Contact’s e-mail Inbox was
full.
■
Persistent problems—e-mails sent to this Contact have encountered
permanent problems, for example the e-mail address of the Contact
does not exist.
Active—clear this check box to prevent this Contact from receiving e-mails.
5. In the Details tab, fill in or modify the Contact's extended details.
Note: Mandatory extended details fields are marked with an asterisk. Extended
details are configurable and implementation specific.
6. In the Categories and Keywords tab, add or remove a Contact’s Keywords:
a. Click Add.
b. Browse to and select a Keyword.
c. Click Insert.
d. Repeat the procedure to add more Keywords.
e. Click Close when you have finished adding Keywords.
f. To remove a Keyword, select it click the Remove button.
Note: The list of Keywords displayed does not reflect Keyword hierarchy
(the Keywords are displayed in a flat list). You can use multiple Keywords,
from several Categories and in different Publications. A Contact can also have
multiple Keywords from the same Category, for example, if a Contact is
both a Business Contact and a Consumer Contact, both Keywords apply.
Note: If a Category and Keyword in the list are both marked ***DELETED
***, the Keyword has been deleted.
7. Click Save and Close.
Results
You have created a Contact.
206 Content Manager Explorer Basic User Manual
Audience Manager and Outbound E-mail
Updating a Contact
You can edit an existing Contact for example if you want to correct a mistake you find in
an individual Contact’s information or simply update the details.
Before you begin
To create or update Contacts, you need Contact Management rights and Write permissions
for the Address Book.
Procedure
1. Open the Content Manager Explorer.
2. Navigate to the Publication > Audience Manager node.
3. Select the Contact in an Address Book or Distribution List and choose Open from the
context menu,.
Result: The Contact window appears.
Note: Use the Contact search functionality in an Address Book or Distribution List
to locate a Contact.
4. In the General tab, fill in or modify the Mailing details:
■
E-mail address—the person’s e-mail address
■
E-mail type—the Contact’s preferred e-mail format:
■
■
HTML—using HTML, you can format the text of your e-mail and
include images and clickable links. However, not all of your Contacts
may be able to see the HTML-format e-mail. This is the default
value.
■
Text—using plain text, you can be sure that the recipient of the e-mail
can read the message, but you lose the ability to format your e-mail
message.
■
Multi-part—HTML and plain text combined in a multi-part e-mail
message. The e-mail client of the recipient determines which format the
recipient will see.
Subscription status—indicates the status of a Contact's subscription:
■
Opted-in—the Contact registered as a subscriber and confirmed the
registration.
■
Subscribed—the Contact registered as a subscriber, but did not yet
confirm the registration.
■
Unsubscribed—the Contact would not like to receive e-mail.
Content Manager Explorer Basic User Manual 207
Audience Manager and Outbound E-mail
■
■
E-mail error status—indicates whether problems have been encountered
sending e-mails to the Contact:
■
No problems—e-mails sent to this Contact should arrive without
incident.
■
Temporary problems—e-mails sent to this Contact have encountered
temporary problems, for example, the Contact’s e-mail Inbox was
full.
■
Persistent problems—e-mails sent to this Contact have encountered
permanent problems, for example the e-mail address of the Contact
does not exist.
Active—clear this check box to prevent this Contact from receiving e-mails.
5. In the Details tab, fill in or modify the Contact's extended details.
Note: Mandatory extended details fields are marked with an asterisk. Extended
details are configurable and implementation specific.
6. In the Categories and Keywords tab, add or remove a Contact’s Keywords:
a. Click Add.
b. Browse to and select a Keyword.
c. Click Insert.
d. Repeat the procedure to add more Keywords.
e. Click Close when you have finished adding Keywords.
f. To remove a Keyword, select it click the Remove button.
Note: The list of Keywords displayed does not reflect Keyword hierarchy
(the Keywords are displayed in a flat list). You can use multiple Keywords,
from several Categories and in different Publications. A Contact can also have
multiple Keywords from the same Category, for example, if a Contact is
both a Business Contact and a Consumer Contact, both Keywords apply.
Note: If a Category and Keyword in the list are both marked ***DELETED
***, the Keyword has been deleted.
7. Click Save and Close.
Results
You have updated a Contact.
208 Content Manager Explorer Basic User Manual
Audience Manager and Outbound E-mail
Note: Updating a Contact's details may result in changes to their membership of (dynamic) Distribution Lists.
Deactivating and deleting a Contact
You can deactivate or delete a Contact. Deactivation prevents a Contact from receiving
Mailings, but keeps the Contact in an Address Book so that you still have access to the
Contact’s profile and Mailing response history. Removal permanently deletes the Contact
from an Address Book (and the system).
Before you begin
To deactivate or delete a Contact, you need Contact Management rights and Write
permissions for the Address Book.
Procedure
1. Open the Content Manager Explorer.
2. Navigate to the Publication > Audience Manager node.
3. To deactivate a Contact:
a. Select an Address Book.
b. In the list view, select a Contact and choose Open from the context menu.
c. In the General tab, clear the Active check box to prevent this Contact from
receiving e-mails.
d. Click Save and Close.
4. To delete a Contact:
a. Select an Address Book.
b. In the list view, select one or more Contacts and choose Delete from the
context menu or click the Delete button in the toolbar.
c. When prompted to confirm deletion, click Yes to delete the Contact.
Results
The Contact is deactivated or removed. When you remove a Contact the Mailing statistics are unaffected,
although you cannot view statistical information for that particular Contact.
Searching Contacts
You can perform a search of Contacts in an Address Book or Distribution List to retrieve
a list of Contacts that meet a certain criteria. Search functionality allows you to check and
modify a customer’s contact details, check a Contact’s Mailing history and their response
to a Mailing, and target mailings by creating Distribution Lists.
Before you begin
To search Contacts in an Address Book, you need Contact Management rights and Read
Content Manager Explorer Basic User Manual 209
Audience Manager and Outbound E-mail
permissions for the Address book.
To search Contacts in a Distribution List, you need Distribution List Management rights
and Read permissions for the Outbound E-mail Folder.
About this task
You can search for Contacts using the following search filters which you can choose to
show or hide in the user interface:
Standard filters
General Contact Mailing information.
Contact details filters
Specific information about a person or organization.
Keyword filters
Specific Contact preferences, characteristics, or interests.
The result of a search is a list of Contacts that meet the criteria defined in the search
criteria. Search functionality allows you to perform the following tasks:
■
Check and modify a customer’s contact details
■
Check a Contact’s Mailing history and their response to a Mailing
■
Target mailings by creating Distribution Lists
Procedure
1. Open the Content Manager Explorer.
2. Select an Address Book or Distribution List to view the search filters:
■
Navigate to the Publication > Audience Manager node and select an Address
Book. Select the (All Contacts) node if you want to perform a search on all
Contacts in all Address Books in the Publication.
Navigate to the Publication > Outbound E-mail node, expand the Folders
and select a Distribution List.
The search filters appear.
■
3. Define Standard filter options:
■
E-mail address—fill in all or part (the first characters) of an e-mail address.
■
Based on—for Distribution Lists only, you can filter Contacts based on filters
defined in another Segment, Address Book or Dynamic Address Book (in
addition to other filters you may define).
■
E-mail type—specify the Contact’s preferred e-mail format. Select either
HTML, Text, or Multi-part.
210 Content Manager Explorer Basic User Manual
Audience Manager and Outbound E-mail
■
■
■
Subscription status—indicates the status of a Contact's subscription:
■
Opted-in—the Contact registered as a subscriber and confirmed the
registration.
■
Subscribed—the Contact registered as a subscriber, but did not yet
confirm the registration.
■
Unsubscribed—the Contact would not like to receive e-mail.
E-mail error status—indicates whether problems have been encountered
sending e-mails to the Contact:
■
No problems—e-mails sent to this Contact should arrive without
incident.
■
Temporary problems—e-mails sent to this Contact have encountered
temporary problems, for example, the Contact’s e-mail Inbox was
full.
■
Persistent problems—e-mails sent to this Contact have encountered
permanent problems, for example the e-mail address of the Contact
does not exist.
Active—Yes or No indicating Contacts who can or cannot receive e-mails.
4. Define Contact details filter options using “Filter operators ” on page 212.
Note: Extended details are configurable and implementation specific.
5. Define Categories and Keywords filters to filter Contacts on their assigned
Keywords:
a. Click Add.
b. Browse to and select a Keyword.
c. Click Insert.
d. Repeat the procedure to add more Keywords.
e. Click Close when you have finished adding Keywords.
f. To remove a Keyword, select it click the Remove button.
Note: The list of Keywords displayed does not reflect Keyword hierarchy
(the Keywords are displayed in a flat list). You can use multiple Keywords,
from several Categories and in different Publications. A Contact can also have
multiple Keywords from the same Category, for example, if a Contact is
both a Business Contact and a Consumer Contact, both Keywords apply.
Note: If a Category and Keyword in the list are both marked ***DELETED
***, the Keyword has been deleted.
6. When you finished defining search criteria, click the Search button.
Content Manager Explorer Basic User Manual
211
Audience Manager and Outbound E-mail
The list view shows a filtered list of Contacts whose details match the specified
search criteria:
■
Sort the results by a specific Contact field by clicking on the corresponding
column header.
■
Select a Contact and choose Open from the context menu to open the Contact
for editing
■
Select one or more Contacts in the list view and choose Add Contacts to
Distribution List from the context menu
Note: For performance reasons, the list view only displays 1000 Contacts. If you
are looking for specific Contacts you should enhance your search criteria. If you are
saving the results to a Distribution List, note that all the Contacts who meet the search
criteria will receive a mailing, not just the 1000 displayed.
Results
You have performed a search of Contacts in an Address Book or Distribution List and viewed the list of
Contacts that match the search parameters you entered.
What to do next
When you have performed a search, you can do the following:
■
Click Export to export the filtered Contacts in the list view
■
Click Save to create a Distribution List or Segment based on the filtered Contacts
in the list view.
■
Click Reset to view all Contacts and restart a search.
Filter operators
Contact extended detail fields have drop-down lists that allow you to filter Contacts using
operators depending on whether the fields are text strings or numeric or dates:
Operators for Strings fields
You can use the following operators to search for extended detail fields whose values
are strings:
■
starts with searches for Contacts whose value for this field begins with the
value specified.
■
is empty searches for Contacts who have no entry for this field.
■
is not searches for Contacts who do not have this value (excludes Contacts
with this value).
■
= searches for Contacts whose fields matches the value specified exactly.
212 Content Manager Explorer Basic User Manual
Audience Manager and Outbound E-mail
Operators for numeric or date fields
You can use the following operators to search for extended detail fields whose values
are numeric or dates:
■
= searches for Contacts whose fields matches the value specified exactly.
■
is empty searches for Contacts who have no entry for this field.
■
is not searches for Contacts who do not have this value (excludes Contacts
with this value).
■
< searches for Contacts whose value for this field is less than the value
specified.
■
<= searches for Contacts whose value for this field is less than or equal to the
value specified.
■
> searches for Contacts whose value for this field is more than the value
specified.
■
>= searches for Contacts whose value for this field is more than or equal to
the value specified.
When you chose <, <=, >, or >=, a second drop-down list appears that allows you to
define a range of values.
Note: Extended details are configurable and implementation specific.
Viewing Contact e-mails
For each Contact, Outbound E-mail tracks which e-mail messages the Contact receives,
whether the Contact opens such e-mail, and which links within the message the Contact
clicks. Outbound E-mail enables you to view these statistics for a specific Contact.
Before you begin
To view Contact statistics you need Contact Management rights and Read permissions for
the Address Book.
To enable the preview of a sent e-mail, you need to have selected the Archive
personalized e-mail check box in your Mailing.
About this task
Note: You can also view Contact statistics through Mailing statistics, for which you
need Mailing Execution or Mailing Management rights and Read permissions for the
Outbound E-mail Folder.
Content Manager Explorer Basic User Manual 213
Audience Manager and Outbound E-mail
Procedure
1. Open the Content Manager Explorer.
2. Navigate to the Publication > Audience Manager node.
3. Select the Contact in an Address Book or Distribution List and choose Open from the
context menu,.
Result: The Contact window appears.
Note: Use the Contact search functionality in an Address Book or Distribution List
to locate a Contact.
4. Select the E-mails tab to view the Mailing sent to the Contact and the status of the
Mailings:
■
Mailing—the name of the Mailing the Contact received
■
Last status update—the date when the Contact statistics were last updated
■
Status—whether the e-mail was Delivered, Read, Failed, or Action ta
ken (one or more links in the e-mail were clicked)
5. Select a Mailing and click E-mail Details to see what the actual e-mail of a Mailing
looked like for this Contact. The personalized e-mail is displayed in a new window:
6. Click Close to close the window.
Creating a Local Address Book
A Local Address Book contains a collection of Contacts imported from an external data
source and typically consists of a list of e-mail addresses used for a one-time marketing
action. Local Address Books are temporary and are not designed to be used to manage
Contacts.
Before you begin
To create a Local Address Book, you need Contact Management rights.
Note: Only Tridion System Administrators can edit or delete a Local Address Book.
Procedure
1. Open the Content Manager Explorer.
2. Navigate to the Publication > Audience Manager node.
3. Select the Address Books node and click the Create New Local Address Book icon
in the toolbar.
Result: A New Address Book window appears.
214 Content Manager Explorer Basic User Manual
Audience Manager and Outbound E-mail
4. On the General tab, enter:
■
The Name of the group—enter a logical name
■
The Key of the group—uniquely defines the Address Book at a database level
5. Click Save and Close.
Results
A Local Address Book is created and added to the Address Books node. All users with Contact Management
rights have Read/Write/Delete permissions on Contacts in the Address Book.
What to do next
When you have added a Local Address Book, you need to import Contacts into it. To
delete the Local Address Book again, contact your Tridion System Administrator.
Importing Contacts and Keywords
To keep your list of Contacts up-to-date you can add or update Contacts, or add and
update Keywords to Contacts, by importing data from a file. This file is usually an export
of your own database of Contacts and must be in Comma Separated Value (.CSV) file
format, or any other delimited file format that delimits the data using the supported
formats.
Creating the Contact import file
You can import Contacts contained in a delimited file format such as CSV file into an
Address Book. This section describes the requirements for the import file used to import
Contacts:
■
The data in the file must be delimited using the supported formatting (see below)
■
The file must be encoded using UTF-8, if it contains unicode characters
■
The first row of data in the file must contain the names of the various data columns:
■
■
At least one column must contain an identifier to uniquely identify
Contacts (see Contact identification below)
■
Other columns whose values you want to import must map to the extended
detail fields being used
■
To import Contacts into the (All Contacts) node at System Administration
level, the file must contain a column that you can map to the
GROUP_KEYVALUE field (the row value must specify the Key value of an
existing Address Book)
Configure logging for import in the OutboundEmail. xml configuration file
(see the SDL Tridion Installation Manual)
Contact identification
Contacts have a default set of extended detail fields in which the combination
IDENTIFICATION_KEY and IMPORT_SOURCE are used to uniquely identify individual
Contacts. The procedure for changing and configuring contact identification fields and
Content Manager Explorer Basic User Manual 215
Audience Manager and Outbound E-mail
adding Contact Extended Details (executed by a Database Administrator) is described in
the implementation documentation.
Specifying default mapping
In the <ContactDetails> section of the configuration file OutboundEmail. xml you
must specify extended detail fields for Contacts. These fields reflect the extended details as
defined in Audience Manager databases. To provide default mapping, specify the same
column names in the file as those specified for the extended detail fields. For more
information about configuration, see the SDL Tridion Installation Manual.
In addition to the extended detail fields, Contacts also come with a fixed set of fields for
each Contact which are assigned default values if not mapped. You can ensure that the
mapping works by default by creating columns with the names in the following table:
Field
Possible values
SUBSCRIBE_STATUS_ID
EMAIL_TYPE
BOUNCE_STATUS_ID
■
1 = Unsubscribed
■
2 = Subscribed
■
3 = Opted-In
■
1 = Html
■
2 = Text
■
3 = Multipart
■
1 = No problems
■
2 = Temporary problems
■
3 = Persistent problems
ENABLED
true or false
GROUP_KEYVALUE
The Key value of an existing Address Book
Default
value
2
1
1
true
File formatting
The following table describes how the data may be formatted in your Contact import
files:
216 Content Manager Explorer Basic User Manual
Audience Manager and Outbound E-mail
Format option
Description
Field separator
Specifies how fields/columns are
separated.
String delimiter
Supported Values
Specifies how fields that contain
commas, double-quotes, or
line-breaks are delimited.
■
, (comma)
■
; (semicolon)
■
: (colon)
■
(Tab) (tab)
■
| (vertical bar)
■
" (double quotation
marks)
■
’ (single quotation
marks)
Decimal
separator
Specifies the symbol used to
mark the boundary between the
integral and the fractional parts of
a decimal numeral.
Group separator Specifies the symbol used, before
or after the thousand separator (to
ease the reading of large
numbers).
Date format
Row separator
Specifies the date format.
■
. (decimal point)
■
, (decimal comma)
■
’ (apostrophe)
■
, (comma)
■
. (period)
■
(Space) (blank space)
Dates must be formatted
according to the data formats
supported by your Audience
Manager database:
■
MS SQL—date formats
supported by the .NET
framework
■
Oracle—date formats
supported by Oracle
Specifies how rows are separated
■
carriage return
Note: The import automatically
detects the row separator used.
■
line feed
■
carriage return/line feed
pair
Content Manager Explorer Basic User Manual 217
Audience Manager and Outbound E-mail
Note: The formatting used in the file needs to be communicated to all users who perform
import as these details need to be specified when you import.
Importing Contacts
You can import Contacts from a Comma Separated Value (CSV) file into an Address
Book. The import file contains rows of data: each row of data defines a Contact and
contains values for their Contact details and Contact extended details.
Before you begin
■
To import Contacts into an Address Book in a Publication, you need Contact
Management rights and Write permissions for the destination Address Book.
■
To import Contacts into the (All Contacts) node in System Administration—or
any other Address Book in System Administration—you need System
Administrator rights.
■
You need to know the formatting used in the CSV import file. For information,
see “Creating the Contact import file ” on page 215.
About this task
When you import Contacts, you can specify how values are assigned or mapped as
follows:
■
if you want to apply the same value to the Contacts Detail field for all imported
Contacts, select [set to a fixed value] and enter a value in the Value field
■
if the field contains values you do not want to import, select [skip this fie
ld]
■
if the values in the field correspond to those of the Contact Detail, map the import
field to an existing Contact Detail
Procedure
1. Open the Content Manager Explorer.
2. Do one of the following:
■
Navigate to the Publication > Audience Manager node.
■
In System Administration, navigate to the Audience Management node.
3. Select an Address Book and do one of the following:
■
Click the Import Contacts icon in the toolbar.
Choose Import Contacts from the context menu.
The Import Contacts screen opens in a new window.
■
4. In Step 1. Set import options:
a. Select Create new Contacts if your import file contains Contacts that do not
yet exist in Audience Manager, in which case records in the import file
containing existing IDs are ignored.
218 Content Manager Explorer Basic User Manual
Audience Manager and Outbound E-mail
b. Select Update existing Contacts if the import file contains Contacts already
in Audience Manager, in which case records in the import file containing new
IDs are ignored.
c. Select Update and insert Contacts to create new Contacts and update existing
ones (the default).
CSV is a delimited data format. As data can be formatted in several different ways,
you need to specify the formatting used in your source import file:
a. Field separator—specifies how fields/columns are separated.
b. String delimiter—specifies how fields that contain commas, double-quotes,
or line-breaks are delimited.
c. Decimal separator—specifies the symbol used to mark the boundary between
the integral and the fractional parts of a decimal numeral.
d. Group separator—specifies the symbol used to ease the reading of large
numbers (normally, the thousand separator).
e. Date format—specifies the date format.
Note: For more information on CSV file formatting, see “Creating the Contact
import file ” on page 215.
5. In Step 2. Select a file to import:
a. Click the Load from disk button.
b. In the File Upload dialog, navigate to the drive and folder that contains the
file you want to import into the Address Book, then select the file and click
Open.
c. Click OK to confirm the selection.
Important: The import loads the first row of the import file defining the column
names using the default formatting options. If you change the data formatting options,
click the Redo mapping button to reload the file.
6. When you change the data formatting options, click the Redo mapping button to
reload the file using these options.
7. In Step 3 Define column mapping, for each Contact Detail, you have the following
options in the Mapping field (note that mandatory fields are marked by an asterisk):
■
select a field from the drop-down list to map a column in the import file to a
Contact Detail
■
select [set to a fixed value] and enter a value in the Value field to ap
ply this value to the Contacts Detail for all imported Contacts
■
select [skip this field] to not import a field for this Contact Detail
Content Manager Explorer Basic User Manual 219
Audience Manager and Outbound E-mail
■
■
fields marked in bold indicate the field, or fields, used to uniquely identify
Contacts:
■
If one field is marked in bold, the value assigned in the import file for
each Contact must be unique
■
If more than one field is marked as bold, the combined value of the
fields must be unique.
For example, Contacts come with a default set of extended detail
fields. The fields IDENTIFICATION_KEY and IMPORT_SOURCE are
used to uniquely identify Contacts. In this default situation, you could
therefore map the IDENTIFICATION_KEY to a column in the CSV
file, and set IMPORT_SOURCE to a fixed value such as TRIDION to
identify where the Contacts come from.
For System Administrators only, when you import Contacts into the (All
Contacts) Address Book, you need to specify a value for the GROUP_
KEYVALUE field in one of the following ways:
■
map the GROUP_KEYVALUE to a column in the import CSV file: the
values for each column row must be a Key value of an existing Address
Book
■
map the GROUP_KEYVALUE to a [set to a fixed value] map:
the Value must be a Key value of an existing Address Book.
8. Click the Preview button. A preview of the data that will be imported is displayed for
the first ten Contacts (existing data is not displayed).
9. Click the Import button.
10. When the import is complete, a status message is displayed at the bottom of the
Import Contacts screen:
■
Click the log file link to view the import log files.
■
Click Close to exit the import dialog.
Results
Contacts are created and/or updated in the specified Address Books. Each row in the import file is evaluated
and resolved individually.
■
■
If you selected to update existing Contacts:
■
in the (All Contacts) node, the Contacts will be updated if the Address
Book specified in the CSV file exists and the specified Contact exists and
resides in this Address Book.
■
in a selected Address Book, the Contacts will be updated if they reside in
this Address Book.
If you selected to create new Contacts:
■
in the (All Contacts) node, the Contacts will be created in the specified
Address Book.
■
in a selected Address Book, Contacts will be created in this Address
Book.
■
the Contact is not created if the Contact identification is not unique
220 Content Manager Explorer Basic User Manual
Audience Manager and Outbound E-mail
Creating the Keyword import file
You can import Keywords contained in a delimited file format, such as a CSV file, and
add these Keywords to Contacts (note the import does not create Contacts or Categories).
This section describes the requirements for the import file used to import Keywords:
■
The data in the file must be delimited using the supported formatting
■
The file must be encoded using UTF-8, if it contains unicode characters
■
The first row of data in the file must contain the names of the various data columns:
■
■
At least one column must contain an identifier to uniquely identify
Contacts (see Contact identification below)
■
A Keyword column the values of which may or may not map to an existing
Keyword, depending on whether you want to create new Keywords or
just add them to Contacts
■
Optionally, a Category column the values of which map to an existing
Category
■
Optionally, a Publication column the values of which map to an existing
Publication
Configure logging for import in the OutboundEmail. xml configuration file
(see the SDL Tridion Installation Manual)
Contact identification
Contacts come with a default set of extended detail fields in which the combination
IDENTIFICATION_KEY and IMPORT_SOURCE are used to uniquely identify individual
Contacts. The procedure for changing and configuring contact identification fields and
adding Contact Extended Details (executed by a Database Administrator) is described in
the implementation documentation.
File formatting
The following table describes how the data may be formatted in your Keyword import
files:
Note: The formatting used in the file needs to be communicated to all users who perform
import as these details need to be specified when you import.
Content Manager Explorer Basic User Manual 221
Audience Manager and Outbound E-mail
Format option
Description
Field separator
Specifies how fields/columns are
separated.
Supported Values
■
, (comma)
■
; (semicolon)
■
: (colon)
■
(Tab) (tab)
■
| (vertical
bar)
String delimiter
Specifies how fields that contain commas,
double-quotes, or line-breaks are
delimited.
■
" (double
quotation
marks)
■
’ (single
quotation
marks)
Row separator
Specifies how rows are separated
■
carriage return
Note: The import automatically detects
the row separator used.
■
line feed
■
carriage
return/line
feed pair
Importing Keywords
Keywords are properties of a Contact defining Contact's preferences and interests. A
Contact may have multiple Keywords from one or more Categories. You can import
Keywords contained in a file and add them to Contacts.
Before you begin
To import Keywords into Contacts you need:
■
Contact Management rights and Write permissions for the Address Book.
■
Category Management rights and Write permissions for the destination Category
(if creating Keywords).
■
To import Keywords into Contacts contained in the (All Contacts) node, or in
any Address Book in System Administration, you need System Administrator
rights.
■
You need to know the formatting used in the import file. For more information,
see “Creating the Keyword import file ” on page 221.
About this task
The import allows you to do specify one of the following scenarios:
222 Content Manager Explorer Basic User Manual
Audience Manager and Outbound E-mail
■
Add new Keywords to a Category and add these Keywords to a Contact
■
Add new Keywords to a Category and add these Keywords to a Contact,
overwriting the Contact's current Keywords
■
Add existing Keywords to a Contact
■
Add existing Keywords to a Contact, overwriting the Contact's current Keywords
The import file contains rows of data: each row of data defines a Keyword and specifies a
Contact to assign the Keyword to. Optionally, the import file may contain values for the
Publication and Category in which you want to import the Keyword. In this case, you can
map these columns, otherwise you can select available the Publication and Category (a
fixed value).
Note: The import does not create Contacts or Categories.
Procedure
1. Open the Content Manager Explorer.
2. Do one of the following:
■
Navigate to the Publication > Audience Manager > Address Books node.
■
In the System Administration view, navigate to the Audience Management
node.
3. Select an Address Book (note that you cannot import Keywords into the (All Contacts)
node) and do one of the following:
■
Click the Import Keywords icon in the toolbar.
Choose Import Keywords from the context menu.
The Import Keywords screen opens in a new window.
■
4. In Step 1. Set import options:
a. Select Create new Keywords if your import file contains Keywords that do
not yet exist in the Content Manager.
b. Select Overwrite Keywords on Contacts if you want the import to remove
existing Contact's Keywords before adding Keywords.
c. Specify the Field separator used in the import file (how fields/columns are
separated).
d. Specify the String delimiter used in the import file (how fields that contain
commas, double-quotes, or line-breaks are delimited.)
Note: As data can be delimited in several different ways, you need to specify the
formatting used in your source import file. For more information on file formatting,
see “Creating the Keyword import file ” on page 221.
5. In Step 2. Select a file to import:
a. Click the Load from disk button.
Content Manager Explorer Basic User Manual 223
Audience Manager and Outbound E-mail
b. In the File Upload dialog, navigate to the drive and folder that contains the
file you want to import, then select the file and click Open.
c. Click OK to confirm the selection.
Important: The import loads the first row of the import file defining the column
names using the default formatting options. If you change the data formatting options,
click the Redo mapping button to reload the file.
6. When you change the data formatting options, click the Redo mapping button to
reload the file using these options.
7. In Step 3. Define column mapping:
a. Fields marked in bold indicate the field, or fields, used to uniquely identify
Contacts:
■
If one field is marked in bold, the value assigned in the import file for
each Contact must be unique
■
If more than one field is marked as bold, the combined value of the
fields must be unique.
For example, Contacts comes with a default set of extended detail
fields. The fields IDENTIFICATION_KEY and IMPORT_SOURCE are
used to uniquely identify Contacts. In this default situation, you could
therefore map the IDENTIFICATION_KEY to a column in the file,
and set IMPORT_SOURCE to a fixed value such as TRIDION to identify
where the Contacts come from.
b. Publication title—do one of the following:
■
to map all rows in the file to one Publication, set Mapping to [set
to a fixed value] and choose a Publication from the drop-down
list
■
to map each row in the file to different Publications, in the Mapping
drop-down list select the column in the file which maps to existing
Publication titles in the Content Manager
c. Category title—do one of the following:
■
to map all rows in the file to one Category, set Mapping to [set to
a fixed value] and choose a Category from the drop-down list
■
to map each row in the file to different Categories, in the Mapping
drop-down list select the column in the file which maps to existing
Category titles in the Content Manager
d. Keyword title—do one of the following:
■
in the Mapping drop-down list, map the column in the file which
contains values for Keywords
224 Content Manager Explorer Basic User Manual
Audience Manager and Outbound E-mail
Note: Fields marked in bold indicate the field, or fields, used to uniquely identify
Contacts, and mandatory fields are indicated by an asterisk.
8. Click the Preview button. A preview of the data that will be imported is displayed for
the first ten affected Contacts (existing data is not displayed).
9. Click the Import button.
10. When the import is complete, a status message is displayed at the bottom of the
Import Keywords screen:
■
Click the log file link to view the import log files.
■
Click Close to exit the import dialog.
Results
Depending on the options selected, Keywords are added to Categories in the specified Publication and/or to
Contacts. Each row in the import file is evaluated and resolved individually.
Keywords are not imported in the following circumstances:
■
if you did not select the option Create new Keywords
■
if a row in the import file does not specify a Keyword (the field is empty)
■
If you have mapped a column in the import file to a Publication and the Publication
does not exist, or you do not have access permissions for the Publication
■
If you have mapped a column in the import file to a Category and the Category
does not exist, or you do not have Category Management rights and write
permissions for the Category
Keywords are not added to Contacts in the following circumstances:
■
if the import file specifies Contacts that do not exist, or are not in the selected
Address Book
■
if you did not select the option Create new Keywords and the Keyword does not
exist
■
if the Contact already contains the Keyword
Adding or removing Keywords to or from Contacts can add or remove the Contact from
Dynamic Distribution Lists whose definition is based on Keywords.
Exporting Contacts and Keywords
When visitors of your Web site register themselves or change their Contact details, these
details are stored in the Audience Manager database. If your organization has its own
separate database of Contacts, you can update that database by exporting Contacts to a
Comma Separated Value (CSV) file.
Content Manager Explorer Basic User Manual 225
Audience Manager and Outbound E-mail
Exporting Contacts
You can export Contacts from the Content Management system into a Comma Separated
Value (CSV) file.
Before you begin
■
To export Contacts from an Address Book in a Publication, you need Contact
Management rights and Read permissions for the selected Address Book.
■
To export Contacts from the (All Contacts) node, or in any Address Book in
System Administration, you need System Administrator rights.
■
To export Contacts from a Distribution List, you need Distribution List
Management rights and Read permissions for the Outbound E-mail Folder.
About this task
The data in the exported Contacts file is formatted as follows:
■
a comma is used as field delimiter
■
double quote is used as text qualifier
■
carriage return line-feed (CrLf) is used as a row separator
■
the file is encoded in UTF-8.
You can export Contacts from any Address Book or Distribution List in the system. The
export can contain all Contacts in the Address Book or Distribution List, or you can filter
the list first before exporting.
A Tridion System Administrator can perform an export of all Contacts in the system from
the (All Contacts) node in System Administration.
Procedure
1. Open the Content Manager Explorer.
2. Navigate to the Publication > Audience Manager node.
3. To export Contacts to a .CSV file, do one of the following:
a. To export all members of a specific Distribution List or Address Book, select
the Distribution List or Address Book and either select Export Contacts
from the context menu or click the Export Contacts icon in the toolbar.
b. To export a filtered selection of members of a specific Distribution List or
Address Book, perform a Contacts search and click the Export Contacts
button. For more information, see “Searching Contacts ” on page 209.
c. To export a selection of members of a specific Distribution List or Address
Book, then multi-select Contacts you want to export and either select Export
Contacts from the context menu or click the Export Contacts icon in the
toolbar.
4. In the File Download dialog, click Save.
5. In the standard Windows Save File dialog that appears, select a location on your file
system, enter a name for the file and click Save.
226 Content Manager Explorer Basic User Manual
Audience Manager and Outbound E-mail
Results
The export file is saved to the location on your file system specified.
Columns and rows of data are created in the export file. The columns have the same
names as the corresponding Contact Details (user-defined) and the following hardcoded
columns:
■
SUBSCRIBE_STATUS_ID
■
EMAIL_TYPE
■
BOUNCE_STATUS_ID
■
ENABLED
■
GROUP_KEYVALUE
Each row in the export file stores data for a Contact.
Exporting Keywords
You can export Keywords contained in Contacts from the Content Management system
into a Comma Separated Value (CSV) file.
Before you begin
■
To export Keywords from Contacts in an Address Book in a Publication, you
need Contact Management rights and Read permissions for the selected Address
Book.
■
To export Keywords from the (All Contacts) node, or in any Address Book in
System Administration, you need System Administrator rights.
■
To export Keywords from Contacts in a Distribution List, you need Distribution
List Management rights and Read permissions for the Outbound E-mail Folder.
About this task
The data in the exported Keywords file is formatted as follows:
■
a comma is used as field delimiter
■
double quote is used as text qualifier
■
carriage return line-feed (CrLf) is used as a row separator
■
the file is encoded in UTF-8.
You can export Keywords contained in Contacts from any Address Book or Distribution
List in the system. The export can contain all Keywords in all Contacts in an Address Book
or Distribution List, or you can filter the Contact list first before exporting.
A Tridion System Administrator can perform an export of all Keywords used in Contacts
in the system from the (All Contacts) node in System Administration.
Content Manager Explorer Basic User Manual 227
Audience Manager and Outbound E-mail
Procedure
1. Open the Content Manager Explorer.
2. Navigate to the Publication > Audience Manager node.
3. To export Keywords used in Contacts to a .CSV file, do one of the following:
■
To export Keywords in all Contacts of a specific Distribution List or Address
Book, select the Distribution List or Address Book and either select Export
Keywords from the context menu or click the Export Keywords icon in the
toolbar.
■
To export Keywords in a filtered selection of members of a specific
Distribution List or Address Book, perform a Contacts search and click the
Export Keywords icon. For more information, see “Searching Contacts ” on
page 209.
4. In the File Download dialog, click Save.
5. In the standard Windows Save File dialog that appears, select a location on your file
system, enter a name for the file and click Save.
Results
The export file is saved to the location on your file system specified.
Columns and rows of data are created in the export file. The following columns are created:
■
KEYWORD
■
CATEGORY
■
PUBLICATION
■
Contact Identification fields
Each Keyword for a selected Contact is stored in a separate row.
Note: If the Contact identification field names already contains "PUBLICATION",
"CATEGORY", and/or "KEYWORD", the field containing the publication/category/
keyword name is made unique by adding a number. For example, field name
"CATEGORY1".
228 Content Manager Explorer Basic User Manual
Audience Manager and Outbound E-mail
Managing Segments
A Segment defines Contact preferences, interests and characteristics that represent a
target audience of known Contacts accessing content on your Web sites. You can base a
Segment on another Segment so that you can create generic Segments and progressively
more specific Segments to create a chain of filters whereby each filter in the chain further
refines the selection.
You can use Segments as follows:
■
In Outbound E-mail, you can create a Dynamic Distribution List based on a
Segment.
■
In Audience Manager, on the presentation server implementers can get the list of
available Segments through the Outbound E-mail Content Delivery APIs.
You define a Segment using filters. These filters are the same as those used to define
Dynamic Address Books and Dynamic Distribution Lists. Whereas Address Books and
Distribution Lists are used to manage groups of known Contacts and therefore contain a list
of Contacts that match the filter, Segments define content audiences and therefore do not
contain Contacts.
Content Manager Explorer Basic User Manual 229
Audience Manager and Outbound E-mail
Note: You organize Segments into Folders. For more information, refer to “Creating
Folders for Mailings Distribution Lists and Segments ” on page 244.
Creating or updating Segments
You create Segments by defining filters. You can use Outbound E-mail fields, Contact
details, and Keywords as filters. You create Segments in Folders in the Audience Manager
node.
Before you begin
To create or update a Segment, you need Segmentation Management rights and Write
permissions for the parent Folder.
Procedure
1. Open the Content Manager Explorer.
2. Navigate to the Publication > Audience Manager node.
3. Select a Folder and click the New Segment icon in the toolbar, or to modify a Segment,
select the Segment and choose Open from the context menu.
4. In the General tab:
■
Enter a Name and Description.
■
In the Based on drop-down list you can select a Segment to base your Segment
on, in which case filters defined in the parent Segment are included with the
filters defined in the child Segment.
Note: Segments based on other Segments allow you create generic Segments and
progressively more specific Segments. For information on how you create a chain of
filters to narrow down an audience you are targeting, refer to “Contact filtering ” on
page 201.
5. In the Outbound E-mail tab, enter:
■
E-mail address—fill in all or part (the first characters) of an e-mail address.
■
E-mail type—specify the Contact’s preferred e-mail format. Select either
HTML, Text, or Multi-part.
■
Subscription status—indicates the status of a Contact's subscription:
■
Opted-in—the Contact registered as a subscriber and confirmed the
registration.
■
Subscribed—the Contact registered as a subscriber, but did not yet
confirm the registration.
■
Unsubscribed—the Contact would not like to receive e-mail.
230 Content Manager Explorer Basic User Manual
Audience Manager and Outbound E-mail
■
■
E-mail error status—indicates whether problems have been encountered
sending e-mails to the Contact:
■
No problems—e-mails sent to this Contact should arrive without
incident.
■
Temporary problems—e-mails sent to this Contact have encountered
temporary problems, for example, the Contact’s e-mail Inbox was
full.
■
Persistent problems—e-mails sent to this Contact have encountered
permanent problems, for example the e-mail address of the Contact
does not exist.
Active—Yes or No indicating Contacts who can or cannot receive e-mails.
6. In the Details tab, you can specify Contact extended details to filter on filter operators.
Note: Extended details are configurable and implementation specific.
7. In the Categories and Keywords tab, you can specify Keyword criteria to filter
Contacts on their assigned Keywords:
a. Click Add.
b. Browse to and select a Keyword.
c. Click Insert.
d. Repeat the procedure to add more Keywords.
e. Click Close when you have finished adding Keywords.
f. To remove a Keyword, select it click the Remove button.
Note: The list of Keywords displayed does not reflect Keyword hierarchy
(the Keywords are displayed in a flat list). You can use multiple Keywords,
from several Categories and in different Publications. A Contact can also have
multiple Keywords from the same Category, for example, if a Contact is
both a Business Contact and a Consumer Contact, both Keywords apply.
Note: If a Category and Keyword in the list are both marked ***DELETED
***, the Keyword has been deleted.
8. Click Save and Close.
Results
You have created a Segment based on the specified filter criteria.
Content Manager Explorer Basic User Manual 231
Audience Manager and Outbound E-mail
Creating a Segment from search
A Contacts search allows you to define search criteria to filter a list of Contacts. When
you perform a search on the (All Contacts) node, you can save the filter (used to filter
these Contacts) as a Segment.
Before you begin
To create or update a Segment, you need Segmentation Management rights and Write
permissions for the parent Folder.
You can only create a Segment from search from the (All Contacts) node in a Publication
(not within System Administration).
About this task
Note: The (All Contacts) node contains all Contacts in a Publication.
Procedure
1. Open the Content Manager Explorer.
2. Navigate to the Publication > Audience Manager > Address Books node.
3. Select the (All Contacts) node.
4. In the Search window:
a. Define search criteria—for more information, see “Searching Contacts ” on
page 209.
b. Click the Search button. The list view shows Contacts filtered according to
the search criteria.
c. Click the Save button.
Note: The search window shows Standard, Details and Keyword filter
options and the list view the Contacts within the Address Book or Distribution
List.
Result: A dialog appears in which you can add the Contacts in the filtered list
to an existing Static Distribution List, or create a new a Dynamic Distribution
List or Static Distribution List.
5. Create a Segment as follows:
a. In Step 1, Choose the type of item to save by selecting New Segment from
the drop-down menu.
b. In Step 2, Enter title and description.
c. In Step 3, Select a Folder where you want to save the Segment then click
OK to save the Segment.
232 Content Manager Explorer Basic User Manual
Audience Manager and Outbound E-mail
Results
The Segment is created in the specified Folder.
Copying or moving Segments
You can only make copies or move Segments within Folders of the Audience Manager
node. You can paste multiple items at once, and copying a Folder copies all of the Segments
within it and any of its subfolders.
Before you begin
■
To cut and paste a Segment, you need Segmentation Management rights and
Delete permissions for the parent Folder and Write permissions on the destination
Folder (the paste location).
■
To copy and paste a Segment, you need Segmentation Management rights and
Read permissions for the parent Folder and Write permissions on the destination
Folder (the paste location).
Procedure
1. Open the Content Manager Explorer.
2. Navigate to the Publication > Audience Manager node.
3. Select one or more Segments in a Folder and choose Cut or Copy from the context
menu.
4. Select a Folder in the Audience Manager node and choose Paste from the context
menu.
Editing Segments in Child Publications
Although Segments are BluePrinted, you cannot localize Segments in Child Publications.
About this task
When you create Segments in a Parent Publication the Segment is shared to all Child
Publications in the BluePrint hierarchy following standard SDL Tridion functionality. You
cannot, however, localize Segments in Child Publications; you cannot create a “local
copy”. When you open a Segment in a Child Publication you are prompted to make the
following choice:
■
Edit the parent item.
■
Open the shared item in read only mode.
Content Manager Explorer Basic User Manual 233
Audience Manager and Outbound E-mail
Deleting Segments
You can delete a Segment, provided you have Segmentation Management rights and
Delete permissions for the parent Folder.
Procedure
1. Open the Content Manager Explorer.
2. Navigate to the Publication > Audience Manager node.
3. Select one or more Segments in a Folder and choose Delete or Copy from the context
menu.
Managing Distribution Lists
A Distribution List is a list of Contacts that define the recipients of a Mailing. When you
create a Mailing, you need to specify Distribution Lists and Address Books; to receive a
Mailing, a Contact must be in a selected Distribution List and Address Book.
Managing Distribution Lists describes how to perform the following tasks:
■
Create Static Distribution Lists—contains a fixed list of Contacts to send a mail
to.
■
Create Dynamic Distribution Lists—contains a dynamic list of Contacts to send
a mail to. The list changes dynamically when you modify the filters that define
the Distribution List or when a Contact's characteristics, interests or preferences
change.
Note: You can explore the response to a Mailing and turn a selection of Contacts into a
Distribution List. For more information, see “Viewing Distribution List statistics ” on
page 271.
234 Content Manager Explorer Basic User Manual
Audience Manager and Outbound E-mail
Distribution Lists
A Distribution List contains a list of Contacts that define the recipients of a Mailing. You
can create Static or Dynamic Distribution Lists.
Static Distribution List
A Static Distribution List contains a fixed list of Contacts to send a mail to. A Static
Distribution List only changes if you explicitly add or remove Contacts. You can add
Contacts to Static Distribution Lists manually, or from the results of a Contacts search.
The advantage of a Static Distribution List is that it has a high level of detail
containing very specific Contacts. The disadvantages are that the amount of effort
needed to create the list tends to be greater (than Dynamic Distribution Lists) as you
have to manually add Contacts to the list, and the maintenance effort needed to keep the
list up-to-date is high is as changes are not automated.
Static Distribution Lists are recommended for small lists that rarely change.
Dynamic Distribution List
A Dynamic Distribution List contains a dynamic list of Contacts to send a mail to.
The Contacts in a Dynamic Distribution List are derived from the Contacts in an
Address Book that meet the criteria defined by the Dynamic Distribution List filter.
The Contacts included in the list therefore change dynamically as and when you modify
the filters or a Contact’s details or Keywords change.
You can base a Dynamic Distribution List on a Segment, Address Book or Dynamic
Address Book (and on Dynamic Distribution Lists through search) to create a chain of
filters in which case each filter in the chain further refines the selection. For more
information, refer to “Contact filtering ” on page 201.
Content Manager Explorer Basic User Manual 235
Audience Manager and Outbound E-mail
A Dynamic Distribution List has the advantage that the development effort needed to
create the list is relatively low and the maintenance effort needed to keep it up-to-date is
minimal as changes to the Distribution List are automatic (although you may want to
change the filtering criteria). However, the level of detail is low because the selection
method is coarse (contains general Contacts).
For example, you can create a Dynamic Distribution List based on the Keyword filter
“Potential Customers”, in which case all Contacts tagged with this Keyword are
added to the list. If a Contact’s Keyword changes from “Potential Customers” to
“Customer” they are automatically removed from the list.
Creating or modifying a Distribution List from
search
A Contacts search allows you to define search criteria to filter Contacts in an Address
Book or Distribution List. The result of a search is a filtered list of Contacts who meet
specified criteria. You can add the Contacts in the filtered list to an existing Static
Distribution List, or create a new a Dynamic Distribution List or Static Distribution List.
Before you begin
To create a Distribution List, you need:
■
Distribution List Management rights and Write permissions for the destination
Outbound E-mail Folder
■
Category Management rights and Read permissions—needed to define filters
based on Categories and Keywords
About this task
Note: For information on how you create a chain of filters to narrow down an audience
you are targeting, refer to “Contact filtering ” on page 201.
Procedure
1. Open the Content Manager Explorer.
2. Navigate to a Publication and do one of the following:
■
In the Audience Manager node, select an Address Book.
■
In the Outbound E-mail node, select a Static or Dynamic Distribution List in
a Folder.
3. In the Search window:
a. Define search criteria—for more information, see “Searching Contacts ” on
page 209.
b. Click the Search button. The list view shows Contacts filtered according to
the search criteria.
c. Click the Save button.
236 Content Manager Explorer Basic User Manual
Audience Manager and Outbound E-mail
Note: The search window shows Standard, Details and Keyword filter
options and the list view the Contacts within the Address Book or Distribution
List.
Result: A dialog appears in which you can add the Contacts in the filtered list
to an existing Static Distribution List, or create a new a Dynamic Distribution
List or Static Distribution List.
4. Update a Static Distribution List as follows:
a. In Step 1, Choose the type of item to save by selecting Existing Static
Distribution List from the drop-down menu.
b. In Step 2, Select a Static Distribution List then click OK to update the
Distribution List.
5. Create a Distribution List as follows:
a. In Step 1, Choose the type of item to save by selecting one of the following
from the drop-down menu:
■
New Static Distribution List
■
New Dynamic Distribution List
b. In Step 2, Enter title and description.
c. In Step 3, Select a Folder where you want to save the Distribution List then
click OK to save the Distribution List.
Results
■
Outbound E-mail creates or updates a Static Distribution List and adds the Contacts
in the Search results to the list.
■
Outbound E-mail creates a Dynamic Distribution List. The list contains Contacts
in a Static Distribution List or Address Book which meet the specified criteria. The
list of Contacts is updated automatically to match the filter, for example when:
■
A Contact is added to the Address Book or Static Distribution List whose
personal details, mailing details, or Keywords meet the search criteria.
■
A Contact's extended details, mailing details, or Keyword in the Address
Book or Static Distribution List are modified so that these no longer meet
the search criteria.
■
You change the definition of the Dynamic Distribution List by modifying
the filters.
Note: By default, a new Distribution List is assigned a priority value of 1 (when a
Mailing is sent, e-mails are sent to Contacts in order of Distribution List priority—the
higher the value, the higher the priority).
Content Manager Explorer Basic User Manual 237
Audience Manager and Outbound E-mail
Adding Contacts to a Static Distribution List
You can add Contacts to a Static Distribution List from any Address Book, Static or
Dynamic Distribution List.
Before you begin
To update a Distribution List, you need Distribution List Management rights and Read
and Write permissions for the destination Outbound E-mail Folder.
To add Contacts to a Distribution List from an Address Book, you need Read permissions
for the Address book.
Procedure
1. Open the Content Manager Explorer.
2. Navigate to the Publication > Outbound E-mail node and do one of the following:
■
In the Audience Manager node, select an Address Book.
■
In the Outbound E-mail node, in a Folder select a Static or Dynamic
Distribution List.
3. In the list view, select one or more Contacts and choose Add Contacts to Distribution
List from the context menu.
Note: To select several Contacts from the list, use the Shift key to select sequential
Contacts and the Ctrl key to select non-sequential Contacts.
4. In the Add Contacts window:
■
Select New Distribution List and enter a Name and Description (Type is set
automatically to Static). Select a Folder where you want to save the Distri
bution List and click OK to save the Distribution List.
■
Select Existing Static Distribution List. Select a Static Distribution List in a
Folder and click OK to save the Distribution List.
Results
Outbound E-mail adds the selected Contact, or Contacts, to the Static Distribution List.
Removing Contacts from a Static Distribution List
You can remove Contacts from a Static Distribution List manually.
Before you begin
To remove Contacts from a Distribution List, you need Distribution List Management
rights and Write permissions for the destination Outbound E-mail Folder.
238 Content Manager Explorer Basic User Manual
Audience Manager and Outbound E-mail
About this task
Note: Removal removes the Contact from the Distribution List only—the Contact still
exists in an Address Book. To remove a Contact permanently, deactivate or delete the
Contact.
Procedure
1. Open the Content Manager Explorer.
2. Navigate to the Publication > Outbound E-mail node.
3. Browse to a Folder and select a Static Distribution List.
4. Select one or more Contacts in the Static Distribution List, or use the Contact search
functionality described in see “Searching Contacts ” on page 209 to locate specific
Contacts.
Note: To select several Contacts from the list, use the Shift key to select sequential
Contacts and the Ctrl key to select non-sequential Contacts.
5. Click the Remove Contacts from Distribution List icon in the toolbar, or choose
Remove Contacts from Distribution List from the context menu.
Results
Outbound E-mail removes the selected Contact, or Contacts, from the Static Distribution List.
Creating and modifying a Dynamic Distribution
List
You can create a Dynamic Distribution List directly in a Folder in the Outbound E-mail
node. You create a Dynamic Distribution List by defining filters in the same way as you
define a Contacts search.
Before you begin
To create a Dynamic Distribution List, you need:
■
Distribution List Management rights and Write permissions for the destination
Outbound E-mail Folder
■
Category Management rights and Read permissions—needed to define filters
based on Categories and Keywords
About this task
You use Outbound E-mail fields, Contact details, and Keywords as filters. You can
modify the filters defining the Dynamic Distribution List, in which case the Contacts it
contains will change accordingly to match the changed filters.
Content Manager Explorer Basic User Manual 239
Audience Manager and Outbound E-mail
Procedure
1. Open the Content Manager Explorer.
2. Navigate to the Publication > Outbound E-mail node.
3. Select a Folder in which your Dynamic Distribution Lists are stored:
■
■
To create a new Distribution List, do one of the following:
■
Click the New Distribution List icon in the toolbar.
■
Choose New > Distribution List in the context menu.
To modify a Distribution List, select the Dynamic Distribution List and
choose Properties in the context menu.
4. In the General tab:
a. Enter a unique Name.
b. Enter a Description (optional).
c. Enter a number in the Priority field to assign an importance value (when a
Mailing is sent to several Distribution Lists, the Mailing is sent first to Contacts
in Distribution Lists with higher priority, where 1 is the lowest priority)
d. Select Dynamic from the Type drop-down list.
e. Create a Dynamic Distribution List Based on a Segment, Address Book or
Dynamic Address Book:
■
If you select a Segment, the filters defined in the selected Segment are
used in addition to other filters you may define and act on all Contacts
within the Publication.
■
If you select a Dynamic Address Book, the filters defined in the
selected Dynamic Address Book are used in addition to other filters
you may define and act on Contacts within this Address Book.
■
If you select a regular Address Book, the filters you define act on
Contacts within this Address Book.
■
If you make no selection, the filters act on all Contacts within the
Publication.
240 Content Manager Explorer Basic User Manual
Audience Manager and Outbound E-mail
Note: For information on how you create a chain of filters to narrow down
an audience you are targeting, refer to “Contact filtering ” on page 201.
5. In the Outbound E-mail tab, enter:
■
E-mail address—fill in all or part (the first characters) of an e-mail address.
■
E-mail type—specify the Contact’s preferred e-mail format. Select either
HTML, Text, or Multi-part.
■
Subscription status—indicates the status of a Contact's subscription:
■
■
■
Opted-in—the Contact registered as a subscriber and confirmed the
registration.
■
Subscribed—the Contact registered as a subscriber, but did not yet
confirm the registration.
■
Unsubscribed—the Contact would not like to receive e-mail.
E-mail error status—indicates whether problems have been encountered
sending e-mails to the Contact:
■
No problems—e-mails sent to this Contact should arrive without
incident.
■
Temporary problems—e-mails sent to this Contact have encountered
temporary problems, for example, the Contact’s e-mail Inbox was
full.
■
Persistent problems—e-mails sent to this Contact have encountered
permanent problems, for example the e-mail address of the Contact
does not exist.
Active—Yes or No indicating Contacts who can or cannot receive e-mails.
6. In the Details tab, you can specify Contact extended details to filter on.
Note: Extended details are configurable and implementation specific.
7. In the Categories and Keywords tab, you can specify Keyword criteria to filter
Contacts on their assigned Keywords:
a. Click Add.
b. Browse to and select a Keyword.
c. Click Insert.
d. Repeat the procedure to add more Keywords.
e. Click Close when you have finished adding Keywords.
f. To remove a Keyword, select it click the Remove button.
Content Manager Explorer Basic User Manual 241
Audience Manager and Outbound E-mail
Note: The list of Keywords displayed does not reflect Keyword hierarchy
(the Keywords are displayed in a flat list). You can use multiple Keywords,
from several Categories and in different Publications. A Contact can also have
multiple Keywords from the same Category, for example, if a Contact is
both a Business Contact and a Consumer Contact, both Keywords apply.
Note: If a Category and Keyword in the list are both marked ***DELETED
***, the Keyword has been deleted.
8. Click Save and Close.
Results
■
Outbound E-mail creates a Dynamic Distribution List based on the specified filter
criteria. The Dynamic Distribution List contains Contacts who meet the search
criteria specified.
■
By default, a new Distribution List is assigned a priority value of 1 (when a
Mailing is sent, e-mails are sent to Contacts in order of Distribution List
priority—the higher the value, the higher the priority).
■
Outbound E-mail updates the Dynamic Distribution List. The Dynamic
Distribution List contains Contacts who meet the revised search criteria.
Creating a snapshot of a Dynamic Distribution
List
A Dynamic Distribution List changes constantly as Contact details change and Contacts
are added and removed from the Address Book. To make a record of what Contacts were
members of a Dynamic Distribution List at a specific moment in time, you can create a
static copy of a Dynamic Distribution List.
Before you begin
To create or update a Distribution List you need Distribution List Management rights and
Write permissions for the destination Outbound E-mail Folder.
Procedure
1. Open the Content Manager Explorer.
2. Navigate to the Publication > Outbound E-mail node.
3. Expand the Outbound E-mail Folder in which you have defined Distribution Lists.
4. Select a Dynamic Distribution List and choose Create Static Copy from the context
menu.
Results
Outbound E-mail creates a Static Distribution List from the Dynamic Distribution List. The static copy has
the same name as the Dynamic Distribution List appended with the creation date and time. The Static
242 Content Manager Explorer Basic User Manual
Audience Manager and Outbound E-mail
Distribution List contains the Contacts that were part of the Dynamic Distribution List at the moment it was
created.
What to do next
To rename the Static Distribution List:
■
Select the Static Distribution List and choose Properties from the context menu.
■
In the Name field, change the name to your liking and click Save and Close.
Managing e-mail content
Managing e-mail content involves creating and personalizing the content of an e-mail
used in an Outbound E-mail Mailing.
Creating E-mails involves performing the following tasks:
■
Create Components—an e-mail message consists of one or more Components,
each representing a piece of e-mail content.
■
Create E-mail Pages—an E-mail Page represents an e-mail message and specifies
the Components that are part of the e-mail message and how these Components,
and the Page as a whole, should be displayed.
■
Personalize an e-mail Page—when you create an E-mail page, you can specify
which Target Group(s) each Component Presentation is intended for (used to
personalize a Mailing).
■
Classify Content—you use Categories and Keywords to classify content (Components) and specify Contact preferences and interests which you can then use as a
basis for creating Distribution Lists.
■
Create Folders—Folders are used to organize your Mailings and Distribution
Lists (in the Outbound E-mail node) and Segments (in the Audience Manager
node).
Content Manager Explorer Basic User Manual 243
Audience Manager and Outbound E-mail
Creating Folders for Mailings Distribution Lists
and Segments
You use Folders to organize content: Mailings and Distribution Lists in the Outbound
E-mail node, and Segments in the Audience Manager node.
Before you begin
To create a Folder for Audience Manager or Outbound E-mail you must have Outbound
E-mail Folder Management rights and Write permissions for the containing Folder.
About this task
Note: To modify security settings for a Folder, you must first save the Folder. You can
then edit the Folder in order to modify security settings.
Procedure
1. Open the Content Manager Explorer.
2. Navigate to one of the following:
■
Publication > Outbound E-mail > Mailings and Distribution Lists root
Folder.
■
Publication > Audience Manager > Segments root Folder.
3. Select a Folder and click the New Folder icon on the toolbar.
A New Folder window opens.
4. In the New Folder window, enter:
■
A logical Name
■
A Description (used internally for other users of Outbound E-mail to
understand the Folder's purpose)
5. Click Save and Close.
Results
The Content Manager creates a Folder. You can edit the Folder to modify its properties by selecting the
Folder and choosing Properties from the context menu.
Creating Components
An e-mail message consists of one or more Components. A Component represents a piece
of e-mail content.
Before you begin
To create a Component you must have:
244 Content Manager Explorer Basic User Manual
Audience Manager and Outbound E-mail
■
Component Management rights and Write permissions for the containing Folder
■
Schemas available to you which define the structure of the Content
About this task
Components are based on Schemas, which define the structure of the content. When you
create a Component, you select a Schema that defines the type of Component that you want
to create. You create Components in Folders within a Publication.
Note: For more information on Components and Component field types, see the SDL
Tridion User Manual.
Procedure
1. Open the Content Manager Explorer.
2. Navigate to the Publication > Building Blocks Folder.
3. Select a Folder in which you want to create the Component and click the New
Component icon in the toolbar.
4. On the General tab, fill in the following fields:
■
Name — the name of the Component
■
Schema — the Schema on which this Component will be based (if your SDL
Tridion system administrator defined a mandatory Schema for the Folder in
which you create a Component, the Content Manager a selects a Schema for
you.)
After you have selected a Schema, a series of fields appears. Fill in all mandatory
fields and optional fields as necessary. Mandatory fields have a red * beside them.
5. A Component may also use Metadata fields. If so, a Metadata tab appears. Select the
Metadata tab (if applicable) and fill in the mandatory fields and, if applicable, the
optional fields.
6. Click Save and Close.
Results
You have created a Component.
Creating and previewing an e-mail Page
An E-mail Page in Outbound E-mail represents an e-mail message.
Before you begin
To create a Page you must have:
Content Manager Explorer Basic User Manual 245
Audience Manager and Outbound E-mail
■
Page Management rights and Write permissions for the containing Structure
Group
■
Page Templates and Component Templates available to you that define the
visualization of Components and Pages
About this task
Creating an E-mail Page involves the following tasks:
■
specifying how the Page as a whole should be displayed
■
specifying which Components are part of the e-mail message
■
specifying how these Components should be displayed
■
specifying which Target Group or Target Groups each Component is associated
with
■
previewing and saving the E-mail Page
Procedure
1. Open the Content Manager Explorer.
2. Navigate to the Publication and Structure Group in which you want to create the
Page.
3. Select a Structure Group and click the New Page icon in the toolbar.
Result: A New Page window appears.
4. On the General tab, fill in the following fields:
■
Name — the name of the Page must be unique within the Structure Group in
which you create it. Content Manager Explorer displays this name in the list
view.
■
File name — you must make the file name unique within the Structure Group
in which you create it. This is the name of the Page as it will appear on the
Web site.
■
Page Template — the Page Template that the Content Manager will use to
render the Page. If you click the Inherit From Parent option, the Page uses
the default Page Template specified for the parent Structure Group or
Publication.
Note: For information on templating, see the Outbound E-mail
Implementation Manual.
■
Metadata schema — (Optional) you can select a metadata schema to create
metadata values for the Page. You must fill in any mandatory metadata fields
before you can save the Page.
5. On the Component Presentation tab, click the Add button.
246 Content Manager Explorer Basic User Manual
Audience Manager and Outbound E-mail
6. Select the Component you want to add in one of the following ways:
■
In your Building Blocks Folder structure, navigate to the location of the
Component you want to add.
In your Categories and Keywords, select a Keyword. The List View displays
Components that have been classified with this Keyword or a child Keyword.
When you have located the Component(s) you want to add, do the following
■
a. In the list view, select one or more Components.
b. Select a Component Template. If you select more than one Component, the
Component Template is applied to all of the selected Components.
c. Click the Insert button. A message appears at the bottom of the pane which
confirms that you have added one or more Component Presentations to the
Page.
d. Repeat this step to add additional Components.
e. After you finish adding Component Presentations, click Close to close the
Component Presentations dialog.
f. Click the Move up button or the Move down button to adjust the ordering of
the Component Presentations on the Page.
7. On the Target Group tab, you can define which category of user the content is
intended for by selecting Target Groups. For more information, see the following
tasks:
a. “Creating Target Groups for Outbound E-mail ” on page 255
b. “Personalizing an e-mail Page ” on page 248
8. To preview the mailing for a specific Target Group or Target Groups, click Preview
on the Ribbon toolbar:
a. In the Preview tab, clear the check box marked Group-independent.
b. Select one or more Target Group check boxes in the list.
c. Click the Refresh Preview button to see the E-Mail Page as it will appear to
members of this Target Group (Merge Fields remain unresolved). If you
selected multiple Target Groups, the preview shows you the e-mail as it will
appear to a Contact who belongs to any of these groups.
If you select the Group-independent check box, the preview contains all content.
9. Click Save and Close.
Results
You now have an E-mail Page that you can send out as a Mailing. Note that when this E-mail Page is sent
out, Outbound E-mail:
■
Excludes or includes Component Presentations based on the Contact’s Keywords.
■
Replaces all Merge Fields with the appropriate values for each specific Contact
(see the “Adding Merge Fields ” on page 254).
What to do next
To test and send a Mailing, see “Managing Mailings ” on page 250.
Content Manager Explorer Basic User Manual 247
Audience Manager and Outbound E-mail
Personalizing an e-mail Page
You can personalize the content of a Mailing using Target Groups.
Before you begin
To associate Target Groups with Component Presentations on a Page you must have:
■
Page Management rights and Write permissions for the containing Structure
Group
■
Target Groups available—for more information, see “Creating Target Groups for
Outbound E-mail ” on page 255
About this task
A Target Group defines a category of user and in Outbound E-mail is defined using
Keywords. A Contact is a member of the Target Group if they have the Keyword specified
by the Target Group. Target Groups allows you to include or exclude parts of a Mailing
to certain groups of Contacts, depending on their Target Group membership. For each
Component Presentation on a Page (an e-mail fragment), you can specify the Target Group
it applies to.
Procedure
1. Open the Content Manager Explorer.
2. Navigate to the Publication > Structure Group where your e-mail Pages are located
and open an E-mail Page.
3. On the Component Presentation tab, click the Target Groups subtab. A series of
check boxes appears, one for (Everyone) and one for each Target Group in the
Publication.
4. Select a Component Presentation, clear the (Everyone) check box, and select one or
more Target Groups (the mailing recipients who match the profile defined in these
Target Groups will see this Component Presentation).
The following example shows Target Groups defined for Customers and Prospects,
allowing you to send different content in the Mailing to different mail recipients
depending on whether they are customers or prospective customers:
248 Content Manager Explorer Basic User Manual
Audience Manager and Outbound E-mail
Note: If you select multiple Target Groups, a visitor will see the Component
Presentation if they are a members of any of the selected Target Groups.
5. Repeat the process each Component Presentation for which you want to set Target
Groups.
6. On the Preview tab, preview the E-mail Page for each Target Group. For more
information, see “Creating and previewing an e-mail Page ” on page 245.
7. Click Save and Close.
Results
You have defined the Target Groups for content in an E-mail Page.
What to do next
To test and send a Mailing, see: “Managing Mailings ” on page 250.
Classifying Content and Contacts
You use Categories and Keywords to classify content and Contacts.
A Category is a general classification and a Keyword is a value in a Category. You can
use these Keywords to:
■
Classify Content—the primary purpose of Categories and Keywords in Content
Manager is to classify and tag content (Components). Classifying your content
helps you find related content.
■
Classify Contacts—the secondary purpose of Categories and Keywords is to
specify Contact preferences and interests which you can then use to define:
■
Dynamic Distribution Lists
■
Segments
■
Target Groups
The following image shows an example of a taxonomy (Categories and Keywords):
Content Manager Explorer Basic User Manual 249
Audience Manager and Outbound E-mail
Note: Categories or Keywords are usually created in a parent Publication by an
implementor and inherited down the BluePrint hierarchy. In other words, you do not
normally create Categories and Keywords as these are created for you. A possible
exception is if you import a file with Contacts that you only want to use within a specific
Publication, and these Contacts use different Categories and Keywords from those of
your regular Contacts (because you obtained them from an external source).
Managing Mailings
Mailings combine content (the e-mail) with Contacts (the recipients of a Mailing).
Managing Mailings involves performing the following tasks:
■
Create a Mailing
■
Personalize a Mailing using Merge Fields and Target Groups
■
Create an E-mail Campaign
■
Test a Mailing before sending it out
■
Send a Mailing (immediately or at a scheduled time)
■
Trigger a Mailing (sending an e-mail as a response to a specific event)
■
Clearing the e-mail queue
250 Content Manager Explorer Basic User Manual
Audience Manager and Outbound E-mail
Note: You organize Segments into Folders. For more information, refer to “Creating
Folders for Mailings Distribution Lists and Segments ” on page 244.
Creating a Mailing
A Mailing combines Contacts (the recipient or target audience of a Mailing) and Content
(the e-mail itself).
Before you begin
■
To create a Mailing, you need Mailing Management rights and Write permissions
for the Folder.
■
You must have created at least one Distribution List
■
You must have created an E-mail Page
■
You must have created Folders to organize your Mailing
About this task
Creating a Mailing involves:
■
Filling in general Mailing settings
■
Specifying an E-mail Page (content and design)
■
Specifying Distribution Lists containing the target audience of your Mailing (Contacts)
Content Manager Explorer Basic User Manual 251
Audience Manager and Outbound E-mail
■
Specifying the Address Books to which the Contacts in your Distribution Lists
must belong
■
Previewing and saving the Mailing
Procedure
1. Open the Content Manager Explorer.
2. Navigate to the Publication > Outbound E-mail node.
3. Select the Folder in which your Mailings are stored and click the New Mailing icon
in the toolbar.
Result: The New Mailing window appears.
4. In the top section of General tab, fill in the following:
a. Mailing title—enter a descriptive name that is unique across all Mailings
(this field is used internally only).
b. E-mail subject—enter the text displayed in the e-mail subject field.
c. Page—select the E-mail Page you want to send. Click the Browse button to
display the Page Picker in a separate window, then browse through the
available Pages to select an E-mail Page and click OK.
d. Publication Target—select a Publication Target that is used to render the
Mailing when you test it (when you send the Mailing it uses the rendered
content the last time the Mailing was tested).
e. From—enter the name of the sender you want to appear in your e-mail.
f. E-mail reply address—enter the e-mail address where replies to this e-mail
are sent, if different from the E-mail sender address.
g. E-mail sender address—enter the e-mail address from which the e-mail is
sent.
Note: You can use Merge Fields in the following fields:
■
E-mail Subject
■
From
■
E-mail Sender Address
■
E-mail Reply Address
For more information, see “Adding Merge Fields ” on page 254.
5. By default, e-mails are sent to all Contacts who have confirmed their subscription
(opted-in). In the Subscription Status field, you can also choose to send e-mails to
Contacts with a different subscription status:
■
Select the Have shown interest check box to send to Contacts who have
indicated interest (opted-in or subscribed but have not confirmed).
■
Select the Do not wish to receive e-mail check box to also send to Contacts
who do not wish to receive e-mails (opted-out or unsubscribed).
252 Content Manager Explorer Basic User Manual
Audience Manager and Outbound E-mail
Note: Selecting the Do not wish to receive e-mail check box is not recommended
and may have legal consequences.
6. By default, e-mails are sent to all addresses where there is no record of having
problems delivering the message. In the E-mail error status field, you can also
choose whether to send e-mails to addresses that have experienced problems:
■
Select the Temporary problems check box to send the e-mail to addresses
that encountered a temporary problem with delivery, for example because the
recipient's mailbox was full.
■
Select the Persistent problems check box to also send the e-mail to addresses
that have encountered persistent problems, for example the e-mail address
does not exist.
7. In the Advanced settings, select Archive personalized e-mail check box to have
Outbound E-mail save each e-mail message it sends out, which you can then view by
examining the Mailing statistics for a Contact. For more information, see “Viewing
Contact e-mails ” on page 213.
Note: The Archive personalized e-mail option is configurable and may not be
available. If you do select this check box, make sure that there is sufficient database
storage for all the e-mails that you will send out.
8. In the Advanced settings, select or deselect the Use maximum E-mails limit check
box:
■
selecting prevents the e-mail from being sent if the Contact has already
received the configured maximum number of e-mails within a designated
period of time
■
deselecting sends e-mails regardless of whether the maximum permitted for a
Contact has been reached
Note: The Use maximum E-mails limit option is designed to minimize Contact
irritation, for example when people are receiving too much mail. As a rule, subscribers
will want to receive e-mails to newsletters they have subscribed to and are less
interested in other marketing e-mails. For information on configuring the maximum
e-mails limit, see the SDL Tridion Installation Guide.
9. After you have tested the Mailing, you can select Triggered mailing:
■
Start Date—specify a start date
End Date—specify an end date
For more information, see “Triggering a Mailing ” on page 264.
■
10. In the Distribution List tab, select Distribution Lists from the Available Distribution
Lists and click Add to add them to the Selected Distribution Lists. Contacts in the
Content Manager Explorer Basic User Manual 253
Audience Manager and Outbound E-mail
selected Distribution Lists are the target recipients of a Mailing (if they are also a
member of a selected Address Book):
■
You can see how many members a Distribution List has by examining the
Total Contacts column.
■
The Refresh button will refresh the numbers displayed in the screen after you
have refreshed statistics. For more information, see “Refreshing statistics ”
on page 275.
■
The Priority column shows the order in which Distribution Lists are processed
when the Mailing is sent (the higher the number, the sooner the e-mails are
sent).
11. In the Address Books tab, select Address Books from the Available Address Books
and click Add to add them to the Selected Address Books:
To receive an e-mail, a Contact must fulfill the following criteria:
■
Must be a member of a selected Distribution List.
■
Must also be a member of a selected Address Book.
12. Click Save.
13. Click Preview (in the General tab) to verify that the e-mail message looks the way
you want it to look.
14. Click Save and Close.
Results
You have created and previewed a Mailing.
Personalizing a Mailing
Personalizing a Mailing involves adding personal details to a Mailing and sending different
versions of a Mailing tailored to specific characteristics and interests of an individual
Contact. This section describes how you can personalize a Mailing in Outbound E-mail
using Merge Fields to personalize fields and Target Groups to personalize content.
Adding Merge Fields
In Outbound E-mail, you can personalize an e-mail message to an individual Contact by
adding to it the Contact’s surname or telephone number in the text of the e-mail. Outbound
E-mail allows you to personalize individual fields through the use of Merge Fields.
A Merge Field is a piece of text that represents a specific Contact Detail, such as a
telephone number or the organization to which the Contact belongs. You can enter Merge
Fields wherever text may appear, but in most cases you will use Merge Fields in the
following places:
■
In the E-mail Subject, From, and E-mail Sender Address fields of a Mailing
■
In a Component field
■
In Component Templates or Page Templates
254 Content Manager Explorer Basic User Manual
Audience Manager and Outbound E-mail
To insert a Merge Field, you wrap the name of a Contact Detail in angled brackets and
asterisks as follows:
[* ContactDetail *]
where ContactDetail is the name of a Contact Extended Detail field. For example, if
your Contact's extended details consists of the fields described in the table below, you can
insert the following Merge Fields in a Mailing to create a Mailing personalized to each
individual who receives the Mailing:
[* Salutation *][* Prefix *][* Surname *]
The result would be, for example, personalized text inserted in the e-mail such as "Dear
Mr Moody" or "Dear Mrs Popova".
Contact Extended
Detail Name
Description
Salutation
A phrase preceding the name in a letter heading, for example
"Dear"
Prefix
The title of a person, such as "Ms", "Dr" or "Mr"
Name
The Contact’s first name, such as "Penelope" or "Federico"
Surname
The Contact’s surname, such as "Horowitz" or "Smithers"
EmailAddress
The Contact’s e-mail address
Company
The organization to which the Contact belongs.
Important: Contact Extended Details are configurable and therefore vary depending on
your implementation of Outbound E-mail.
Creating Target Groups for Outbound E-mail
A Target Group defines a category of user. In Outbound E-mail, you can personalize the
content of a Mailing using Target Groups.
Content Manager Explorer Basic User Manual 255
Audience Manager and Outbound E-mail
Before you begin
■
To create a Target Group you must have Customer Management rights and Write
permissions for the containing Folder.
■
You must have created a taxonomy for Outbound E-mail Contacts (the definition
of a Target Group in Outbound E-mail is based on Keywords).
About this task
Target Groups define a set of user characteristics (of mail recipients, in the case of
Outbound E-mail). You use Target Groups to display different content—of what is
essentially the same Mailing— to different Contacts depending on what Target Group(s)
the Contact is a member of.
For example, if you have a Mailing that you want to send to Customers and Prospects
because it is essentially the same, except with one small difference which is applicable for
Customers only, you can create a Target Group called Customer and associate the content
(the Component Presentation on a Page) with this Target Group. The result is that the
e-mail sent to a Contact marked as a Customer will be slightly different to the e-mail sent
to a Contact marked as a Prospect.
Keywords are properties or attributes of a Contact that define a Contact's preferences and
interests, such as a preferred brand of car or hobbies. A Contact may have multiple
Keywords from one or more Categories.
You create Target Groups in a Folder in the Building Blocks of a Publication.
Procedure
1. Open the Content Manager Explorer.
2. Navigate to the Publication > Building Blocks Folder.
3. Select a Folder in which you want to create the Target Group and Click the New
Target Group icon in the toolbar.
Result: The New Target Group window opens.
4. In the General tab, enter a unique Name and a Description for the Target Group.
5. In the Definition tab:
a. Select Tracking Keys.
b. Select a Keyword from the list of Keywords.
c. Select = as the comparison Operator.
d. Enter 1 in the Tracking value (number) text box.
e. Select Include (include Contacts with these Keywords) or Exclude (exclude
Contacts with these Keyword and include all others).
f. Click Add. The Keyword appears in the Target Group Definition.
256 Content Manager Explorer Basic User Manual
Audience Manager and Outbound E-mail
Important: The definition and implementation of Tracking Keys in Outbound
E-mail differs from the regular implementation in SDL Tridion. In Outbound E-mail,
you must use the construction <Keyword> = 1. Outbound E-mail then considers a
Contact to be a member of a Target Group if he or she has:
■
all the Keywords you selected (Include)
■
none of the Keywords you selected (Exclude)
6. Repeat this step to add multiple Keywords to include or exclude from the same
Category, or from other Categories.
7. Click Save and Close to save your new Target Group.
Results
You have created a Target Group.
What to do next
When you have created your Target Groups you can associate a Component Presentation in an E-mail Page
with one or more of these Target Groups to personalize the content of an e-mail.
Testing a Mailing
Before you can actually send out or schedule the Mailing, you must first test it.
Before you begin
■
To test a Mailing, you need Mailing Execution rights and Read permissions for
the Outbound E-mail Folder.
■
You need to have created a Mailing and have a valid test e-mail address to send
e-mail messages to.
About this task
You can send the test Mailing to a specific e-mail address (for example your own e-mail
address) or to a list of Contacts in a static Distribution List. It is recommended to create a
static Distribution List for testing purposes in which you add Contacts representing all
possible variations of e-mails. For example, add a Contact for each Target Group used, add
Contacts who prefer HTML or plain text, send to Contacts with different mail providers,
and so on.
It is important to realize that Outbound E-mail always sends the last tested Mailing: if
you make a change to a Mailing and send it out without testing it, the changes will not be
reflected in the sent e-mail.
Note: If you have created a Triggered Mailing, you can no longer test it. To test a
Triggered Mailing, you must first deactivate the trigger, test it, and then set the trigger
again. For more information, see “Triggering a Mailing ” on page 264.
Content Manager Explorer Basic User Manual 257
Audience Manager and Outbound E-mail
Procedure
1. Open the Content Manager Explorer.
2. Navigate to the Publication > Outbound E-mail node.
3. Select the Outbound E-mail Folder in which your Mailings are stored and in the list
view select the Mailing you want to test and click the Test Mailing icon in the toolbar.
Result: The Test Mailing window appears.
4. In Mailing details, you can click Preview to verify that the e-mail message looks the
way you want it to look.
5. In Send test Mailing to,
■
Select A specific e-mail address and follow the steps below.
Select All members of a Distribution List and follow the steps described in
step 6.
If you chose to send the test Mailing to a A specific e-mail address:
■
a. Enter an E-mail Address specifying to whom you want to send the test e-mail
(separate multiple e-mail addresses with a comma).
b. Specify the E-mail Formats you want to send the e-mails in Mailing
(Outbound E-mail sends a test e-mail for each format chosen):
■
Select HTML—to send an HTML version of the E-mail Page in your
message
■
Select Text—to send a plain text version of the E-mail Page.
■
Select Multi-part—to send a multi-part e-mail. A multi-part e-mail
appears as HTML if the recipient has an e-mail application that
supports HTML; otherwise, it appears as plain text.
6. If you chose to send the test Mailing to All members of a Distribution List:
a. Select a Distribution List from the list.
b. Click OK.
c. Click Test.
Note: A warning message is displayed if the selected Distribution List contains
more than 100 Contacts, or none.
7. In Profiling, you can test what the e-mail looks like to a member of a specific Target
Group:
Note: By default, the Profile an unpersonalized e-mail: option is selected in which
case a generic, all-inclusive e-mail message is sent.
a. Select the Profile the e-mail with a selection of Target Groups: option.
b. Select one or more Target Groups from the list (use the Shift key to select
multiple adjacent Target Groups, and the Ctrl key to select multiple
non-adjacent Target Groups).
258 Content Manager Explorer Basic User Manual
Audience Manager and Outbound E-mail
c. Select Include the Target Group selection in the e-mail subject if you want
the subject of the e-mail message to contain text specifying the Target Group
or Target Groups for whom this e-mail message is intended.
8. Click Test.
9. Review the sent e-mail.
Results
■
The Mailing is now tested and this is indicated by the icon which changes from
to
■
If you chose to test the Mailing by sending it to specific e-mail address, Outbound
E-mail sends a test e-mail for each format chosen to the address using the chosen
profile (Target Groups).
■
If you chose to test the Mailing by sending it to a Distribution List, Outbound
E-mail sends a personalized test e-mail to each Contact in the list in a format
specified in each Contacts details.
Creating an E-mail Campaign
An E-mail Campaign allows you to coordinate a Mailing campaign by grouping several
Mailings together and testing and sending them in one go. You can add Mailings from
multiple Publications in an E-mail Campaign.
Before you begin
■
To create or edit an E-mail Campaign, you need Mailing Execution rights.
■
You must have created Mailings to add to the E-mail Campaign—see “Creating a
Mailing ” on page 251.
About this task
An E-mail Campaign allows you to:
■
Coordinate the sending of a single e-mail across multiple Publications
■
Coordinate the sending of a series of e-mails consisting of, for example, a Start
Mailing, Scheduled Mailing, Triggered Mailing and Reminder Mailing
You can create an E-mail Campaign directly, or you can create one when you add a
Mailing to an E-mail Campaign.
Procedure
1. Open the Content Manager Explorer.
2. Create (or open) E-mail Campaigns in the Shortcuts view:
a. Select the E-mail Campaigns node and choose New > E-mail Campaign in
the context menu.
b. Enter a unique Name and optionally a Description.
Content Manager Explorer Basic User Manual 259
Audience Manager and Outbound E-mail
c. Click Save.
d. Add a Mailing to an E-mail Campaign by clicking Add, then navigate to and
select a Mailing and click OK.
3. Alternatively, create a new E-mail Campaign as follows:
a. Select a Mailing and click the Add to E-mail Campaign icon in the toolbar
or choose Add to E-mail Campaign in the context menu.
b. Select the option New E-mail Campaign.
c. Enter a unique Name and optionally a Description.
d. Click OK to create an E-mail Campaign and add the selected Mailing to it.
4. When you select Add Mailings to E-mail Campaign you can choose to create a new
E-mail Campaign (as described above) or add the Mailing to an existing E-mail
Campaign:
a. Select Existing E-mail Campaigns.
b. Select an E-mail Campaign from the list and click OK.
c. Open the E-mail Campaign: in the Shortcuts view select the E-mail
Campaigns node, select the E-mail Campaign in the list view and choose
Open in the context menu.
5. In the E-mail Campaign General tab, you can view the included Mailings and perform
the following actions:
■
Move up and Move down—arranges the list order of the Mailings displayed
in the E-mail Campaign (usually, you will want to display Mailings in a
chronological order, although the order in which e-mails themselves are sent
depends on the priority of each Distribution List in an individual Mailing.
■
Open—opens selected Mailings
■
Go to—goes to the Folder location of the selected Mailing
■
Add—allows you to add a Mailing to the E-mail Campaign
■
Remove—removes the selected Mailing from the E-mail Campaign
6. In the E-mail Campaign Ribbon toolbar you can perform the following actions:
Option
Description
sends all Mailings in the E-mail campaign (see“Sending all Mailings in an E-mail Campaign ” on page 261)
sends the selected Mailing (see “Sending a Mailing ”
on page 263)
tests the selected Mailing (“Testing a Mailing ” on page
257)
refreshes the last tested column and the statistics, if you
have performed a refresh of the statistics (see “Refreshing statistics ” on page 275)
260 Content Manager Explorer Basic User Manual
Audience Manager and Outbound E-mail
7. The E-mail Campaign General tab displays various columns for each Mailing:
■
Last tested—indicates when the Mailing was last tested, important because
this Mailing is the one which is sent irrespective of whether the Mailing has
since changed.
■
Start date and End date—indicates for Triggered Mailings the timeframe
when e-mails are sent.
■
Other columns display statistics for the Mailings—for more information, see
“Viewing Mailing statistics ” on page 267.
8. Click Save and Close.
Results
Outbound E-mail creates or updates an E-mail Campaign and adds the selected Mailing to the E-mail
Campaign. The E-mail Campaign is created in the E-mail Campaigns node, where users with Mailing
Execution rights can view, edit, test, and send the E-mail Campaign.
Sending all Mailings in an E-mail Campaign
When you group E-mails in an E-mail Campaign you can choose send all Mailings in one
go.
Before you begin
■
To send a Mailing, you need Mailing Execution rights and Read permissions for
the Outbound E-mail Folder.
■
You must have tested the Mailing—Outbound E-mail always sends the last tested
e-mail, therefore if you make a change and send the mail without testing the
change will not be reflected in the sent e-mail.
Procedure
1. Open an E-mail Campaign: in the Shortcuts view select the E-mail Campaigns
node, select the E-mail Campaign in the list view and choose Open in the context
menu.
2. Click Send All in the toolbar to send all Mailings in the E-mail campaign.
3. Specify Date and time of sending settings:
■
Select Send now.
■
Select Prepare the e-mails now, but send them later and click the Calendar
icon to select the date and time at which you want Outbound E-mail to start
sending e-mails. When you select this option, Outbound E-mail fixes the list of
Contacts in the Mailings, though Contact details and personalized fields are
resolved at the moment of sending therefore any changes will be reflected in
the sent e-mail.
Content Manager Explorer Basic User Manual 261
Audience Manager and Outbound E-mail
4. Specify Advanced settings:
■
Maximum number of e-mails to send (per Mailing)—enter the number of
Contacts you want to send the Mailing to (0 indicates unlimited).
■
Only send e-mail to Contacts with all required Merge Field data—select
this check box if you want the e-mail to be sent only if all Merge Fields can be
resolved. For example, if you specify a Merge Field "First Name" and the
Contact has not provided a first name the e-mail will not be sent to this Contact
when you select this check box.
■
Send in batches—fill in the Batch size, that is, the number of e-mails to send
in one go. If you are not sure about this number, consult your system
administrator to see how many e-mails your mail server can process at any
one time. Select the Time between each batch. You can specify an interval in
minutes, hours or days. For example, if you fill in 2 day(s) Outbound E-mail
sends a batch of e-mails every other day starting from the date and time
specified in the Prepare the e-mails now, but send them later field.
Note: Use the Send in batches settings to minimize the system load when you are
sending large volumes of e-mails and you do not need to send them immediately. For
example, sending a thousand e-mails at 4 AM every Sunday morning.
5. Click Send all to send the Mailings in the E-mail Campaign, then click Yes to
confirm.+
6. When you click Send all the Mailings are sent out sequentially. Outbound E-mail
indicates the Status of each Mailing:
■
Sending <number> e-mails—indicates the number of e-mails currently
being sent
■
Skipped (Triggered Mailing)—for Triggered Mailings as these cannot be
sent explicitly
■
Skipped (No e-mails to send)—there were no e-mails to send as part of the
Mailing
■
Sent—the Mailing was sent successfully
■
Aborted—the sending of the Mailing was cancelled
■
Failed—the sending of the Mailing was unsuccessful
7. Click Close.
262 Content Manager Explorer Basic User Manual
Audience Manager and Outbound E-mail
Sending a Mailing
When you have created and tested your Mailing, you can send the Mailing. You can send
your Mailing in batches to prevent your mail server from overloading, or to make sure
that Outbound E-mail sends e-mails only at a certain time of day.
Before you begin
■
To send a Mailing, you need Mailing Execution rights and Read permissions for
the Outbound E-mail Folder.
■
You must have tested the Mailing—Outbound E-mail renders the content of a
Mailing when you test it and not when you send it, therefore when you send the
Mailing it uses the rendered content the last time the Mailing was tested.
Procedure
1. Open the Content Manager Explorer.
2. Navigate to the Publication > Outbound E-mail node.
3. Select the Outbound E-mail Folder in which your Mailings are stored and in the list
view select the Mailing you want to send and click the Send Mailing icon in the
toolbar.
4. Specify Date and time of sending settings:
■
Select Send now.
■
Select Prepare the e-mails now, but send them later and click the Calendar
icon to select the date and time at which you want Outbound E-mail to start
sending e-mails. When you select this option, Outbound E-mail fixes the list of
Contacts in the Mailings, though Contact details and personalized fields are
resolved at the moment of sending therefore any changes will be reflected in
the sent e-mail.
5. Specify Advanced settings:
■
Number of e-mails to send—enter the number of Contacts you want to send
the Mailing to. The window displays the number of Contacts who have not yet
received this Mailing.
■
Only send e-mail to Contacts with all required Merge Field data—select
this check box if you want the e-mail to be sent only if all Merge Fields can be
resolved. For example, if you specify a Merge Field "First Name" and the
Contact has not provided a first name the e-mail will not be sent to this Contact
when you select this check box.
■
Send in batches—specify when you want Contacts to receive E-mails, for
example, you can send Mailings at a specific time such as 02.00 AM and send
them in batches of 10,000 e-mails per day.
■
Batch size—set a batch size in relation to the number of e-mails in the
Mailing. If you are not sure about what batch size to use, consult
your system administrator to see how many e-mails your mail server
can process at any one time.
Content Manager Explorer Basic User Manual 263
Audience Manager and Outbound E-mail
Important: Setting a batch size that is too small in relation to the
overall number of e-mails degrades performance significantly. For
example, if you send 1000 e-mails and you send them with a batch size
of 10, you are actually queuing 100 batches each containing 10
e-mails and it is the queuing process rather than the sending which
affects performance (queuing 10 e-mails or a 1000 e-mails takes
roughly the same amount of time). Therefore, sending a Mailing in
batches of 100 batches takes 100 times longer than sending 1 batch.
■
Time between each batch—specify an interval in minutes, hours or
days. For example, if you fill in 2 day(s) Outbound E-mail sends a
batch of e-mails every other day starting from the date and time
specified in the Prepare the e-mails now, but send them later field.
6. Click Send to activate the Mailing process.
Results
For each Contact in the Distribution List(s) associated with this Mailing, Outbound E-mail resolves the
Merge Fields in the e-mail message. Outbound E-mail also excludes Components from the e-mail message if
the Contact is not in the Target Group(s) specified for that Component. It then sends the resulting e-mail
message to the e-mail address of that Contact.
Contacts are filtered out from the Mailing depending on the E-mail error status,
Subscription Status and Use maximum E-mails limit settings.
Triggering a Mailing
A triggered Mailing allows you to set up a mailing to send e-mails in response to a specific
event.
When you send a regular Mailing, the e-mail is sent to a list of Contacts contained in the
Distribution List(s) you specified in the Mailing. At the moment the Mailing is sent, or
scheduled to be sent, the list of Contacts is fixed. A triggered Mailing allows you to set up
a mailing to send e-mails in response to a specific event. The event results in a Contact
being added to the Distribution List specified in the triggered Mailing, and this acts as the
trigger to send a Mailing.
While a triggered Mailing is active, Outbound E-mail regularly checks the Distribution
Lists specified in the triggered Mailing for members who have not yet received the Mailing
and sends the e-mail message to these members. Outbound E-mail therefore sends e-mails
as and when Contacts are added to the Distribution List. A triggered Mailing can remain
active indefinitely, or you can schedule the Mailing to send e-mails during a specified
period.
The following are examples of situations when you would use triggered Mailings:
264 Content Manager Explorer Basic User Manual
Audience Manager and Outbound E-mail
■
Contact registration—a typical example of a triggered Mailing is a welcome
e-mail. When a Contact registers on your Web site, they receive a welcome e-mail
confirming their registration.
■
Clicking a link—if a registered user receives a regular Mailing listing a new line
of products with links to the various product pages, clicking one of these links
triggers the sending out of a special e-mail for that product offering a discount.
These examples require implementation on the Presentation Server (Web site), or in the
templates used in your Mailings using the available Content Delivery APIs for Outbound
E-mail.
Creating a Triggered Mailing
A triggered Mailing allows you to set up a mailing to send e-mails in response to a specific
event. The event results in a Contact being added to the Distribution List specified in the
triggered Mailing, and this acts as the trigger to send a Mailing.
Before you begin
■
To set up a Triggered Mailing, you need Mailing Execution and Mailing
Management rights and Write permissions for the Outbound E-mail Folder.
■
You must have created and tested a Mailing.
■
Contacts are typically added to a Dynamic Distribution List when the Contact's
Keywords are updated—the mechanism that performs this update (outside of the
Content Management System) requires implementation (programming).
About this task
The following example describes how to set up a Triggered Mailing for sending Welcome
e-mails when someone registers on your Web site:
■
Identify a Contact detail, or create a new Keyword, whose value you want to use
as a filter for a Dynamic Distribution List—for example, create a new Keyword
Classic Car Fair.
■
Create an empty dynamic Distribution List that uses this Contact Detail or
Keyword—for example, create a new Dynamic Distribution List Classic Car
Fair which filters Contacts on the Keyword Classic Car Fair
■
Create a Mailing and specify the Dynamic Distribution List Classic Car Fair
■
Test the Mailing.
■
Select the Triggered Mailing check box and specify a start date.
■
Set up a Subscription Page on your Web site for customers to subscribe to Classic
Car Fair Mailing. When the customer subscribes, the Contact's Keywords are
updated resulting in the Contact being added to the Distribution List used in the
triggered Mailing.
Content Manager Explorer Basic User Manual 265
Audience Manager and Outbound E-mail
Procedure
1. Open the Content Manager Explorer.
2. Navigate to the Publication > Outbound E-mail node.
3. Select the Outbound E-mail Folder in which your Mailings are stored. In the list view,
select a tested Mailing you want to set up as a triggered Mailing and choose Open
from the context menu.
Note: A tested Mailing is indicated with a green check mark on the Mailing icon.
4. To turn the Mailing into a Triggered Mailing, at the bottom of the General tab select
theTriggered Mailing check box.
5. Specify the Start date and optionally an end date (to send the e-mail during a specified
period, or indefinitely).
■
Click the Calendar button next to Start date to select the date and time on
which you want the trigger to be activated (mandatory).
■
If you want the trigger to expire at some point in time, click the Calendar
button next to End date and select the date and time on which you want
Outbound E-mail to stop sending e-mails.
■
To leave the trigger activated indefinitely, for example for a welcome e-mail,
leave the End Date empty (click the Clear End Date button top empty the
field).
6. Click Save and Close to save your changes.
Results
From the time indicated by Start Date, Outbound E-mail sends an e-mail message to any Contact who sets off
the trigger. The trigger becomes inactive again at the time indicated by End Date (if any).
Important: After you have turned a Mailing into a Triggered Mailing, you can no
longer test it. To retest your mailing, you must first deactivate the trigger by clearing the
Triggered Mailing check box, test it, and then activate the trigger again.
What to do next
To trigger a Mailing being sent in response to a specific event taking place requires you
to implement an event on your Web site.
266 Content Manager Explorer Basic User Manual
Audience Manager and Outbound E-mail
Clearing the e-mail queue for a Mailing
After you have scheduled a Mailing, Outbound E-mail puts e-mail messages in the e-mail
queue and waits for the scheduled time to arrive. If you find that you want to undo the
scheduled Mailing before any e-mails have been sent, you can do so easily by clearing the
queue.
Before you begin
To clear the e-mail queue for a Mailing, you need Mailing Execution rights and Read
permissions for the Outbound E-mail Folder.
About this task
Note: Even if you are not scheduling but have specified a large volume of e-mails to
send, the mail queue can also become full in which case you may also want to clear the
e-mail queue.
Procedure
1. Open the Content Manager Explorer.
2. Navigate to the Publication > Outbound E-mail node.
3. Select the Outbound E-mail Folder in which your Mailings are stored. In the list view,
select the Mailing and click the Clear Queue icon in the toolbar.
4. Click Yes to confirm removal.
Results
Outbound E-mail clears the queue for this Mailing
Viewing Mailing statistics
Once you have sent out a Mailing, you may want to monitor the response of your Contacts
to the Mailing. Outbound E-mail makes it possible for you to zoom in from a general
overview of Mailing response, down to seeing what a Mailing looked like to one individual
Contact.
You can use Mailing statistics to form a clearer impression of who is interested in your
e-mail and what kind of content interests them. You can use this information to create
Distribution Lists, allowing you to send a more targeted Mailing.
Content Manager Explorer Basic User Manual 267
Audience Manager and Outbound E-mail
Outbound E-mail makes the following detail levels available:
■
Statistics shows you how the various Mailing results, such as whether the e-mail
was opened and whether it arrived or not, are distributed and what links were
clicked in the e-mail. You can also see result percentages per Distribution List.
■
Distribution List statistics details show you which Contacts in a specific
Distribution List shared the same Mailing result. For example, you can see which
members of the Male Adolescents Distribution List opened their Mailing. You
can turn such a selection into a new Distribution List, or export the Contacts to
CSV file.
■
Contact details show you which Mailings were sent to a specific Contact and
what action they took.
■
Mailing details show you what a Mailing looked like to a specific Contact; that
is, you see the specific e-mail message that arrived in this one Contact’s e-mail
inbox.
Number counts indicating the number of Contacts contained in Distribution Lists and
Address Books are not calculated automatically. To view and update the number counts,
you need to use the Refresh statistics functionality.
Mailing statistics
When a Mailing is sent, a snapshot is taken of the Mailing that provides you with statistics
of the Distribution Lists in the Mailing and Contacts in the Distribution Lists who are
the recipients of the Mailing. A snapshot is taken of all Mailings regardless of whether they
are sent manually, scheduled or triggered.
Mailing statistics show all Distribution Lists, and Contacts in the Distribution Lists, that
were part of the Mailing when it was queued. The Distribution Lists are shown in order of
their priority in the Mailing Status dialog (and also on the Mailing edit dialog). Contacts
that are a part of several Distribution Lists in the Mailing are counted in the statistics for the
Distribution List with the highest priority.
Mailing statistics are updated when:
268 Content Manager Explorer Basic User Manual
Audience Manager and Outbound E-mail
■
An associated Distribution List or Contact is deleted: you can see the Contacts in
the lists, but you cannot view the details.
■
The Mailing is sent again and the priority of the Distribution Lists that are still
related to the Mailing have changed: the statistics are updated to reflect the new
order.
■
The associated Mailing is deleted: the snapshots are also deleted.
Mailing statistics are not updated when:
■
A Contact is moved from one Address Book to another: the statistics gathered for
that Contact remain unaffected.
■
Distribution List membership changes: if, for example, a Dynamic Distribution
List is modified after the statistics have been gathered, these changes are not
reflected in the statistics.
■
The Mailing is sent again and Distribution Lists have been removed from the
Mailing: the Distribution Lists remain in the snapshot, therefore you can view all
Distribution Lists that have ever been part of the Mailing while it was being sent,
with the priority they had when they were part of the Mailing.
Viewing Mailing statistics
Mailing statistics provide information about Mailing response, for example which
percentage of Contacts opened the e-mail or not and whether they took action on the
e-mail, for example by clicking links.
Before you begin
To view Mailing statistics, you need Mailing Execution or Mailing Management rights
and Read permissions for the Outbound E-mail Folder.
Procedure
1. Open the Content Manager Explorer.
2. Navigate to the Publication > Outbound E-mail node.
3. Select the Folder in which your Mailings are stored.
4. In the list view, select the Mailing for which you want to examine statistics and click
the Explore Mailing Status icon in the toolbar.
The Mailing opens on the Statistics tab.
5. The Statistics tab displays the following information:
■
Pie chart—graphically displays the status distribution of a Mailing (hovering
over the pie chart shows you the status details in a tooltip):
■
Blue indicates Delivered
■
Green indicates Read
■
Yellow indicates Action taken
■
Red indicates Failed
Content Manager Explorer Basic User Manual 269
Audience Manager and Outbound E-mail
■
■
■
Status—view the response to the Mailing in percentages. The Amount
column shows for how many Contacts in the Mailing the status applies. A
Mailing can have the following statuses:
■
Delivered (unconfirmed)—shows how many of the total number of
e-mails have been sent but not yet opened by their recipients.
■
Read (confirmed)—shows how many of the e-mails that were
delivered were opened by its recipients, with none of the links clicked
yet.
■
Failed (and returned)—shows how many of the e-mails could not be
delivered.
■
Action taken—shows how many recipients of the e-mails clicked a
link in the e-mail message.
Action—view a list of clickable links in the e-mail message and how many
people clicked on these links:
■
Clicked on at least one link—shows how many recipients clicked a
trackable link in the e-mail
■
<name of link>—shows each individual trackable link in the e-mail
and how many recipients clicked the link
■
Unsubscribed—shows how many recipients clicked the unsubscribe
link in the e-mail
■
Profile changed—shows how many recipients clicked the link in the
e-mail to change his or her profile
Contact status for each Distribution List—the bottom section displays a list
of Distribution Lists in order of priority (the order in which they were sent)
and statistics on the Contacts in the lists.
When you select a response type in Status overview or Actions taken, the
Contact status for each Distribution List displays all Distribution Lists for
this Mailing and provides statistics on the number of Contacts for whom the
selected response type applies and the overall percentage of Contacts in a
Distribution List who responded as such. For more information, refer to
“Viewing Distribution List statistics ” on page 271.
Note: Note that the percentages in this table do not add up to 100, as they
are unrelated to each other.
Results
You have examined the Mailing response of a Mailing to see how the Mailing results are distributed.
270 Content Manager Explorer Basic User Manual
Audience Manager and Outbound E-mail
Viewing Distribution List statistics
To learn more about who responded to your Mailing and in what way, you can select a
type of Mailing result and then examine the members of each Distribution List within that
Mailing result.
Before you begin
To view Mailing statistics, you need Mailing Execution or Mailing Management rights
and Read permissions for the Outbound E-mail Folder.
About this task
You can also create a new Distribution List or update an existing one with the Contacts in
the Mailing result, For example, if you are examining all the members of a Distribution
List who read your Mailing, it can be worthwhile to isolate them as a responsive audience,
or to save the Contacts to an export CSV file.
Procedure
1. In the Publication > Outbound E-mail node, navigate to the Folder where your
Mailings are stored, select a Mailing and click the Explore Mailing Status icon in
the toolbar.
Result: The Mailing opens on the Statistics tab.
2. To see the statistics for Distribution List members:
a. Select a response type in the Status overview or Actions taken.
b. Select a Distribution List and click Show Contacts.
c. Outbound E-mail opens a window for the selected Distribution List detailing
the members of the Distribution List to whom the type of Mailing result
applies.
d. Click Filter Contacts to filter the displayed list—see “Searching Contacts ”
on page 209
Note: Outbound E-mail opens a new window for each selected Distribution List,
showing those members of the Distribution List to whom the type of Mailing result
applies. For example, if you select Read (confirmed) and a Distribution List called
Male Adolescents, the Details button shows you which male adolescents read the
Mailing.
Results
You have examined who responded to your Mailing and in what way.
What to do next
You can turn this set of Contacts into a Distribution List, or export this set of Contacts to a CSV file.
Content Manager Explorer Basic User Manual 271
Audience Manager and Outbound E-mail
Creating Distribution Lists from statistics
You can create Static or Dynamic Distribution Lists from statistics.
Before you begin
■
To create a Distribution List from statistics, you need Distribution List
Management rights and Write permissions for the destination Outbound E-mail
Folder.
■
To view Mailing statistics, you need Mailing Execution or Mailing Management
rights and Read permissions for the Outbound E-mail Folder.
About this task
Distribution Lists created from statistics differ from other Distribution Lists in that they
are based on Contact response criteria rather than Contact details criteria. For example, you
will frequently want to create Distribution Lists based on whether respondents have read
an e-mail or whether they have clicked a specific link in the e-mail.
You can create a Static or Dynamic Distribution List consisting of Contacts to whom a
selected Mailing status applies which:
■
includes all recipients in all Distribution Lists in a Mailing
■
includes all recipients in a single Distribution List in a Mailing
■
includes a manual selection (static) or filtered selection (dynamic) of the recipients
in a single Distribution List in a Mailing
Procedure
1. In the Publication > Outbound E-mail node, navigate to the Folder where your
Mailings are stored, select a Mailing and click the Explore Mailing Status icon in
the toolbar.
Result: The Mailing opens on the Statistics tab.
2. Select a Mailing response status, for example:
■
Select Read (confirmed) to add recipients who have opened the e-mail but
not yet clicked the links to a Distribution List.
■
Select Action taken to add recipients who have opened the e-mail and clicked
one or more of the links to a Distribution List.
■
Select a specific link clicked In the Details tab to add recipients who have
opened the e-mail and clicked this link to a Distribution List.
3. When you have selected a Mailing response status, do one of the following:
■
Click Add Contacts to Distribution List to add all the recipients to whom
the selected Mailing status applies, in all Distribution Lists, to a Distribution
List.
■
Select one Distribution List and click View Contacts to further refine the list
of recipients who you want to add to a Distribution List (and to whom the
selected Mailing status applies)—see step 4.
272 Content Manager Explorer Basic User Manual
Audience Manager and Outbound E-mail
Note: For detailed information on creating Distribution Lists, see “Managing
Distribution Lists ” on page 234.
4. When you select a Distribution List and click View Contacts, the Distribution List
details shows the Contacts in this Distribution List to whom the selected Mailing status
applies:
■
Click the Add Contacts to Distribution List in the toolbar to create a
Distribution List containing all the Contacts in the selected Distribution List
(to whom a Mailing status applies).
■
Define search criteria and click Search, then click the Add Contacts to
Distribution List to create a Distribution List containing all the Contacts that
meet the search criteria to whom a Mailing status applies.
Note: For more information, see “Searching Contacts ” on page 209.
Results
Outbound E-mail creates a Static or Dynamic Distribution List containing Contacts to
whom a selected Mailing status applies, depending on your choices.
When you open the Distribution List, the General tab indicates that the Distribution List
was created from statistics and on what Mailing and Mailing status it was based.
What to do next
You can edit the Distribution List to set Priority. For Dynamic Distribution Lists created
from statistics, you can also define additional criteria. For example, to filter Contacts
who have read an e-mail and who have indicated an interest in Sports cars (as defined in
a Contact's Keywords).
Exporting Contacts from statistics
You can export Contacts from statistics to a CSV file.
Before you begin
■
To export Contacts from statistics, you need Mailing Execution or Mailing
Management rights and Read permissions for the Outbound E-mail Folder.
About this task
You can export Contacts, to whom a selected Mailing status applies, and include:
■
all recipients in all Distribution Lists in the Mailing
■
all recipients, or a selection of recipients, in a single Distribution List in the
Mailing
Content Manager Explorer Basic User Manual 273
Audience Manager and Outbound E-mail
Procedure
1. In the Publication > Outbound E-mail node, navigate to the Folder where your
Mailings are stored, select a Mailing and click the Explore Mailing Status icon in
the toolbar.
Result: The Mailing opens on the Statistics tab.
2. Select a Mailing response status, for example:
■
Select Read (confirmed) to export recipients who have opened the e-mail but
not yet clicked the links.
■
Select Action taken to export recipients who have opened the e-mail and
clicked one or more of the links.
■
Select a specific link clicked in the Details tab to export recipients who have
opened the e-mail and clicked this link.
3. When you have selected a Mailing response status, do one of the following:
■
Click Export Contacts in the toolbar to export all the recipients to whom the
selected Mailing status applies (for all Distribution Lists in the Mailing).
■
Select one Distribution List and click View Contacts to further refine the list
of recipients who you want to export (and to whom the selected Mailing status
applies)—see step 4.
4. When you select a Distribution List and click View Contacts, the Distribution List
details shows the Contacts in this Distribution List to whom the selected Mailing status
applies:
a. Define search criteria and click Search—for more information, see “Searching
Contacts ” on page 209
b. Click the Export Contacts—for more information, see “Exporting Contacts
” on page 226.
Results
The export file is saved to the location on your file system specified. Outbound E-mail creates columns and
rows of data in the export file. The columns have the same names as the corresponding Contact Details, and
each row in the export file stores data for a Contact.
Viewing Contact details and Mailing details
You can go through the Mailing Status to see what a Mailing looked like to a specific
Contact (personalization).
Before you begin
To view Mailing statistics, you need Mailing Execution or Mailing Management rights
and Read permissions for the Outbound E-mail Folder.
274 Content Manager Explorer Basic User Manual
Audience Manager and Outbound E-mail
Procedure
1. In the Publication > Outbound E-mail node, navigate to the Folder where your
Mailings are stored, select a Mailing and click the Explore Mailing Status icon in
the toolbar.
Result: The Mailing opens on the Statistics tab.
2. Select a response type, for example Action taken or Read (confirmed).
3. Select a Distribution List.
4. Click Show Contacts to view the members of the Distribution List to whom the type
of Mailing result applies.
5. Select a Contact and choose Open in the context menu to see which Mailings are
associated with a specific Contact.
Contact details open.
Select a Mailing and click E-mail details to view the Mailing as it appeared to this
Contact (mailing history).
6. Select a Contact and click E-mail details in the context menu to view the Mailing
details.
Mailing details open:
■
The left-hand side of the window shows the Mailing and Contact details and
the actions taken on the Mailing by the Contact and when (date and time).
■
The right-hand side of the window displays the e-mail that was sent to this
Contact, including Contact Details of this specific Contact where Merge Fields
are used in the e-mail.
Results
You examined what a Mailing looked like to a specific Contact and viewed what action was taken by that
Contact.
Refreshing statistics
For performance reasons, the number counts for Distribution Lists, Address Books, and
Mailing statistics are not calculated automatically. To view the number counts you need to
use the Refresh statistics functionality.
About this task
Statistics are displayed in several places in the Content Manager Explorer for Outbound
E-mail to indicate the number of Contacts contained in Distribution Lists and Address
Books and to display various statistics concerning a Mailing.
When you refresh the number counts, the statistics are updated and cached for fast
retrieval. The number counts you see in the Content Manager Explorer therefore date
from the last time the counts were refreshed, as indicated by the Calculated column in
the List View.
Content Manager Explorer Basic User Manual 275
Audience Manager and Outbound E-mail
Note: Performing a Refresh statistics is not needed to see the latest Mailing Status.
Procedure
1. Open the Content Manager Explorer.
2. Navigate to:
■
the Publication > Outbound E-mail node and select the Folder in which
your Mailings or Distribution Lists are stored.
■
the Publication > Audience Manager > Address Books node.
3. Select a Mailing, Distribution List, or Address Book and click Refresh statistics icon
in the toolbar or choose Refresh statistics from the context menu.
Result: A progress window informs you of the status of the update.
Results
The statistics for the selected Outbound E-mail items are updated:
■
For Distribution Lists and Address Books, the Total Contacts are recalculated
■
For Mailings, the Delivered, Failed, Read, Action taken and Sent statistics are
recalculated
276 Content Manager Explorer Basic User Manual
Chapter 20
User Generated Content
User Generated Content (UGC) allows visitors to your Web site to rate content and read
and leave comments. Content Manager users can examine ratings and comments, and
authorized users can disallow rating and commenting for specific Components or Pages,
and edit, remove and moderate comments.
Note: On the published Web page, a Component or Page only shows ratings and
comments if you published the item using a template that adds UGC functionality during
publishing.
Where to find comments and ratings
Content Manager Explorer can show you comments and ratings in the entire Content
Manager, for a Publication, for a Component, for a Page, or for a Contact.
You can see the comments and ratings that visitors have submitted in the following ways:
Content Manager Explorer Basic User Manual 277
User Generated Content
All comments and ratings
The Shortcuts area of Content Manager Explorer contains a User Generated Content
node that lets you view and filter all comments and ratings submitted for any
Publications that you have access to. For more information, refer to “Viewing and
filtering all comments and ratings in Content Manager ” on page 279
Comments and ratings for a specific Publication
Each Publication has a root-level User Generated Content node that lets you view
and filter all comments and ratings submitted for any content item in that Publication.
For more information, refer to “Viewing and filtering all comments and ratings in a
specific Publication ” on page 279
Comments and ratings for a specific Component
Every Component has a Comments tab and a Ratings tab in which you can see
detailed comments and ratings, respectively.
For more information about the Comments tab, refer to “Comments tab for a
Component or Page ” on page 285.
For more information about the Ratings tab, refer to “Ratings tab for a Component
or Page ” on page 285.
Comments and ratings for a specific Page
Every Page has a Comments tab and a Ratings tab in which you can see detailed
comments and ratings, respectively.
For more information about the Comments tab, refer to “Comments tab for a
Component or Page ” on page 285.
For more information about the Ratings tab, refer to “Ratings tab for a Component
or Page ” on page 285.
Comments and ratings from a specific Contact
If your implementation of UGC identifies visitors as Audience Manager Contacts in
SDL Tridion, you can see the comments and ratings submitted by a Contact by opening
that Contact from an Address Book in the Audience Manager node of a Publication,
and selecting the Comments or Ratings tab, respectively.
■
For more information about the Comments tab for a Contact, refer to “Viewing
and filtering comments for a Contact ” on page 286.
■
For more information about the Ratings tab for a Contact, refer to “Ratings
tab for a Contact ” on page 288.
278 Content Manager Explorer Basic User Manual
User Generated Content
Viewing and filtering all comments and
ratings in Content Manager
View and filter all comments and ratings in Content Manager to check for new comments
and ratings, to identify comments in need of moderation, and to identify overall trends
and numbers with regard to commenting and rating.
Procedure
1. To examine all comments and ratings submitted for any content item anywhere in
Content Manager, access the Content Manager Explorer and in the Shortcuts area,
expand the User Generated Content node.
Result:
The following subnodes appear:
■
Latest Comments
■
Top Rated Content
■
Recently Rated Content
2. Now do one of the following:
■
To see comments ordered by date from newest to oldest, select Latest
Comments. Refer to “Viewing and filtering comments in the comments
screen ” on page 280 to learn more about the comments screen that appears.
■
To see ratings for content ordered from highest to lowest rating, select Top
Rated Content. Refer to “Viewing and filtering ratings in the ratings screen
” on page 283 to learn more about the ratings screen that appears.
■
To see ratings for content ordered in reverse chronological order (latest ratings
at the top), select Recently Rated Content. Refer to “Viewing and filtering
ratings in the ratings screen ” on page 283 to learn more about the ratings
screen that appears.
Viewing and filtering all comments and
ratings in a specific Publication
View and filter all comments and ratings in a Publication to check for new comments and
ratings, to identify comments in need of moderation, and to identify overall trends and
numbers with regard to commenting and rating.
Content Manager Explorer Basic User Manual 279
User Generated Content
Procedure
1. To examine all comments and ratings submitted for any content item in a specific
Publication, access the Content Manager Explorer and in the Publications area, select
a Publication and expand the User Generated Content node.
Result:
The following subnodes appear:
■
Comments
■
Rated Content
2. Now do one of the following:
■
To see comments submitted for content in this Publication, select Comments.
Refer to “Viewing and filtering comments in the comments screen ” on
page 280 to learn more about the comments screen that appears.
■
To see ratings submitted for content in this Publication, select Rated Content.
Refer to “Viewing and filtering ratings in the ratings screen ” on page 283
to learn more about the ratings screen that appears.
Viewing and filtering comments in the
comments screen
This topic explains what the comments screen looks like and what you can do to filter its
contents.
Procedure
1. To see a comments screen, do one of the following:
■
In the Shortcuts area, navigate to User Generated Content > Latest
Comments
■
In the Publications area, select a Publication and navigate to User Generated
Content > Comments
Result:
A number of filter options appears in the top of the content area, and the bottom of
the content area shows all comments submitted today. Click the Refresh icon at the top
at any time to see the most up-to-date list.
Each filter option has an equivalent filter control in the column header.
2. Apply any or all filters to change the comments displayed in the bottom half. The
filters available to you are:
280 Content Manager Explorer Basic User Manual
User Generated Content
Moderation status
Clear any of the status values to not see items with that moderation status in the
results; check a status value to see items with that moderation status. The status
values are:
■
Published to Web site indicates that the comment is currently available
for viewing on the published Web page.
■
Rejected by moderator indicates that a user has rejected the comment,
removing it from the published Web page.
■
Submitted, needs moderation indicates that the comment has been
submitted by a visitor and is pending moderation. The comment is not yet
available for viewing on the published Web page, and may never be.
■
Modified by visitor, needs moderation indicates that a visitor has
submitted this comment, and it has been made available for viewing on
the published Web page. Now, the same visitor who submitted the comment
has made changes to it and resubmitted it, and it is pending moderation.
The modified comment is not yet available for viewing on the published
Web page, and may never be.
■
Flagged, needs moderation indicates that a visitor or a Content Manager
user has flagged a comment for moderation that is currently available
for viewing on the published Web page. The comment is now subject to
moderation, the outcome of which may cause it to be removed from the
published Web page.
■
Flagged, deletion requested indicates that a visitor or a Content Manager
user has flagged a comment for deletion that is currently available for
viewing on the published Web page. The comment is now subject to
moderation, the outcome of which may cause it to be removed from the
published Web page.
Created by User
Select a specific user (that is, Web site visitor) to see only comments submitted by
that user.
Last modified by Moderator
Select a specific Content Manager user to see only comments that were last
modified by that moderator.
Associated Item Type
Select Component to see only comments submitted for Components, and Page to
see only comments submitted for Pages.
Content Manager Explorer Basic User Manual 281
User Generated Content
Date Created
Select a value to specify a time frame (or no time frame) within which comments
must have been submitted:
■
Select All to see comments submitted at any time.
■
Select Today to see comments submitted since midnight today.
■
Select This week to see comments submitted since Monday of the current
week.
■
Select This month to see comments submitted since the 1st of the current
month.
■
Select Select a date or date range to specify a start date and an end date,
and see comments submitted between those two dates, inclusive.
When you have configured all your filters, click Filter to see all comments that
match your filter.
Result:
The bottom half of the content area shows the filtered results. If you want, click Hide
filter options to stop displaying all the filter controls. The columns of the filtered
results have the following meanings:
■
Date Created shows when the comment was submitted.
■
Comment shows the first few words of the comment that was submitted.
Hover over this field to see more of the comment in a floating text box.
■
Created by User shows the name of the visitor that submitted this comment.
■
Associated Item Title shows the name of the Content Manager item (a
Component or a Page) that this comment was made for.
■
Associated Item Type shows the item type of the Content Manager item
(Component or Page) that this comment was made for.
■
Moderation Status shows the status of the comment (as explained above).
■
Comment Score shows how many visitors have voted in favor or against of
this comment. A vote in favor raises this value by 1; a vote against it lowers its
value by 1. If you have comment moderation switched on for the Component
or Page that this comment belongs to, and if the value reaches the configured
minimum value, the comment is automatically removed from the published
Web page and submitted for moderation.
■
Last Modified by Moderator shows the last Content Manager user who
modified this comment, if any.
3. To see the full details of a comment, do one of the following:
■
Double-click the comment's row
■
Select the comment's row and click Open in the Home tab of the Ribbon
toolbar.
■
Right-click the comment's row and select Open from the context menu that
opens.
282 Content Manager Explorer Basic User Manual
User Generated Content
Result:
The Component or Page that contains this comment opens in a new dialog, with the
Comments tab selected.Refer to “Comments tab for a Component or Page ” on page
285 for more details.
Viewing and filtering ratings in the ratings
screen
This topic explains what the ratings screen looks like and what you can do to filter its
contents.
Procedure
1. To see a ratings screen, do one of the following:
■
In the Shortcuts area, navigate to User Generated Content > Top Rated
Content
■
In the Shortcuts area, navigate to User Generated Content > Recently
Rated Content
■
In the Publications area, select a Publication and navigate to User Generated
Content > Rated Content
Result:
The content area shows the first page of rated items, ordered by rating (highest to
lowest) or reverse chronology of rating (last rated items at the top). Click the Refresh
icon at the top at any time to see the most up-to-date list.
2. Apply any or all filters to change the ratings displayed. The column headers of this
table give you the following ways of filtering the results displayed below:
Type
Select Component to see only comments submitted for Components, and Page to
see only comments submitted for Pages.
Date Last Rated and Date Last Commented
Select a value to specify a time frame (or no time frame) within which the last
rating or comment, respectively, must have been submitted:
■
Select Show all comments (or All in the column header) to see ratings or
comments submitted at any time.
■
Select Today to see ratings or comments submitted since midnight today.
■
Select This week to see ratings or comments submitted since Monday of
the current week.
■
Select This month to see ratings or comments submitted since the 1st of
the current month.
■
Select Select a date or date range to specify a start date and an end date,
and see ratings or comments submitted between those two dates,
inclusive.
Content Manager Explorer Basic User Manual 283
User Generated Content
Result:
The content area shows the filtered results. The columns of the filtered results have
the following meanings:
■
Name shows the name of the Component or Page that was rated.
■
Type shows the type of item for which a rating was submitted: either a Page
or a Component.
■
From Publication shows the root BluePrint Publication for the Page or
Component.
■
Average Rating shows the average rating (rounded to the nearest integer
value) represented as a number of stars (between 0 and 5 stars). Note that the
actual range of values may be different and has been mapped to a 0-5 scale. For
example, if the range of values a visitor can submit is a percentage, that is, a
value between 0 and 100, the stars represent the following value ranges:
Number of stars
Rating value range
0
0-9.99%
1
10-29.99%
2
30-49.99%
3
50-69.99%
4
70-89.99%
5
90-100%
■
Date Last Rated shows the date at which the piece of content received its
latest rating.
■
Date Last Commented shows the date at which the piece of content received
its latest comment.
3. To see the full details of a rating, do one of the following:
■
Double-click the rating's row.
■
Select the rating's row and click Open in the Home tab of the Ribbon toolbar.
■
Right-click the rating's row and select Open from the context menu that
opens.
Result: The Component or Page that contains this rating opens in a new
dialog, with the Ratings tab selected. In this tab, you can see the exact value
of the rating. Refer to “Ratings tab for a Component or Page ” on page 285 for
details.
284 Content Manager Explorer Basic User Manual
User Generated Content
Comments tab for a Component or Page
The Comments tab of a Component or Page shows all comments submitted for the item.
Note that not all comments shown here may be displayed on the published Web page.
If comments are subject to moderation, only Comments with the status Published to Web
site are shown on the published Web page. Click Refresh at any time to get the most
up-to-date list of comments.
Ratings tab for a Component or Page
A Component or Page has a Comments tab showing comments submitted for the item, and
a Ratings tab showing ratings submitted for the item. This topic explains the Ratings
tab.
The Ratings tab shows the following:
■
The rating average as a number and as a number of stars (0-5). The minimum and
maximum values as a number depend on your implementation; consult your
SDL Tridion administrator to find out what they are. The star value is the number
value mapped to a number between 0 and 5.
For example, if the range of values a visitor can submit is a value between 0 and
25, the stars represent the following value ranges:
Number of stars
Rating value range
0
0-2.49
1
2.5-7.49
2
7.5-12.49
3
12.5-17.49
4
17.5-22.49
5
22.5-25
■
Controls for this item. Refer to “Disallowing rating of a Component or Page ”
on page 292 for more information.
■
Individual ratings as submitted by users.
On this tab, you can do the following:
Content Manager Explorer Basic User Manual 285
User Generated Content
See rating averages
The average rating for this Component or Page is displayed at the top, as a number
(rounded off to 1 decimal) and as a number of stars (rounded off to a whole number).
Refresh the list of ratings
To see the most up-to-date list of ratings for this Component or Page, click Refresh.
Examine individual ratings
Below the header, you see the individual ratings as submitted by users, showing the
User name, Rating and Date Rated. Click any column header to sort or reverse sort
by that property. You can also click the filter icon in the User name column header to
narrow down your selection to ratings submitted by a specific user or range of users.
Viewing and filtering comments for a
Contact
You can see comments submitted by a specific Contact using the filters available in an
Address Book Comments tab.
Procedure
1. In the Publications area, select a Publication and navigate to Audience
Manager > Address Books.
2. Select an Address Book that contains the Contact you are looking for (or (All
Contacts) if you do not know which Address Book the Contact belongs to).
3. From the list of results, double-click the Contact to open it, and in the dialog that
opens, select the Comments tab.
Result:
A number of filter options appears in the top of the Comments tab, and the bottom of
the content area shows all comments submitted by this Contact.
4. Apply any or all filters to change the comments displayed in the bottom half. The
filters available to you are:
Moderation status
Clear any of the status values to not see items with that moderation status in the
results; check a status value to see items with that moderation status. The status
values are:
■
Published to Web site indicates that the comment is currently available
for viewing on the published Web page.
■
Rejected by moderator indicates that a user has rejected the comment,
removing it from the published Web page.
■
Submitted, needs moderation indicates that the comment has been
submitted by a visitor and is pending moderation. The comment is not yet
available for viewing on the published Web page, and may never be.
■
Modified by visitor, needs moderation indicates that a visitor has
286 Content Manager Explorer Basic User Manual
User Generated Content
submitted this comment, and it has been made available for viewing on
the published Web page. Now, the same visitor who submitted the comment
has made changes to it and resubmitted it, and it is pending moderation.
The modified comment is not yet available for viewing on the published
Web page, and may never be.
■
Flagged, needs moderation indicates that a visitor or a Content Manager
user has flagged a comment for moderation that is currently available
for viewing on the published Web page. The comment is now subject to
moderation, the outcome of which may cause it to be removed from the
published Web page.
■
Flagged, deletion requested indicates that a visitor or a Content Manager
user has flagged a comment for deletion that is currently available for
viewing on the published Web page. The comment is now subject to
moderation, the outcome of which may cause it to be removed from the
published Web page.
Associated Item Type
Select Component to see comments that this Contact submitted for Components
only, and Page to see comments that this Contact submitted for Pages only.
Date Created
Select a value to specify a time frame (or no time frame) within which this Contact
submitted comments:
■
Select All to see comments submitted at any time.
■
Select Today to see comments submitted since midnight today.
■
Select This week to see comments submitted since Monday of the current
week.
■
Select This month to see comments submitted since the 1st of the current
month.
■
Select Select a date or date range to specify a start date and an end date,
and see comments submitted between those two dates, inclusive.
When you have configured all your filters, click Filter to see all comments that
satisfy your filter.
Result:
The bottom half of the content area shows the filtered results. If you want, click Hide
filter options to stop displaying all the filter controls. You can perform the following
tasks on individual comments:
■
Examining the properties of a comment
■
“Moderating a comment ” on page 289
■
“Deleting a comment ” on page 290
■
“Changing the appearance of comments on the published Web page ” on
page 293
Content Manager Explorer Basic User Manual 287
User Generated Content
Ratings tab for a Contact
Explains what the Ratings tab for a Contact shows, and what you can do with it.
To view all ratings submitted by a specific Contact, do the following:
■
In the Publications area, select a Publication and navigate to Audience
Manager > Address Books.
■
Select an Address Book that contains the Contact you are looking for (or (All
Contacts) if you do not know which Address Book the Contact belongs to).
■
From the list of results, double-click the Contact to open it, and in the dialog that
opens, select the Ratings tab.
The Ratings tab shows:
■
The average of all the ratings submitted by this Contact.
■
A Refresh button, press this button at any time to see the most up-to-date list of
ratings.
■
A table showing all ratings submitted by this Contact, in reverse chronological
order (newest to oldest), showing the following properties:
■
Name shows the name of the Component or Page that was rated.
■
Type shows the type of item for which a rating was submitted: either a
Page or a Component.
■
From Publication shows the root BluePrint Publication for the Page or
Component.
■
Rating shows the average rating as a number of stars between 0 and 5.
The actual range of rating values may not be 0-5, but the actual value is
mapped to a 0-5 scale. For example, if the values are an integer value
between 0 and 2, then the value 0 is represented by 0 stars, the value 1 is 3
stars (2.5 rounded up) and the value 2 is represented by 5 stars.
■
Date Rated shows the date at which the piece of content received its
latest rating.
Apply any or all filters to change the ratings displayed. The column headers of this table
give you the following ways of filtering the results displayed:
288 Content Manager Explorer Basic User Manual
User Generated Content
Type
Select Component to see only comments submitted for Components, and Page to see
only comments submitted for Pages.
Date Last Rated and Date Last Commented
Select a value to specify a time frame (or no time frame) within which the last rating
or comment, respectively, must have been submitted:
■
Select Show all comments (or All in the column header) to see ratings or
comments submitted at any time.
■
Select Today to see ratings or comments submitted since midnight today.
■
Select This week to see ratings or comments submitted since Monday of the
current week.
■
Select This month to see ratings or comments submitted since the 1st of the
current month.
■
Select Show comments created in the time between (or Select a date or
date range) in the column header) to specify a start date and an end date, and
see ratings or comments submitted between those two dates, inclusive.
To see the full details of a rating, double-click its row. The Component or Page that
contains this rating opens in a new dialog, with the Ratings tab selected. In this tab, you
can see the exact value of the rating. Refer to “Ratings tab for a Component or Page ” on
page 285 for details.
Moderating a comment
Moderate comments to approve them for appearance of the published Web page, or to
reject them.
Procedure
1. Access Content Manager Explorer and do one of the following to see the comment
you want to moderate on the Comments tab of a Component or Page:
■
Double-click the comment in a comments screen. Refer to “Viewing and
filtering comments in the comments screen ” on page 280 for more
information. This opens a Component or Page, preselecting the Comments
tab that contains the comment you want to moderate.
■
If you know which Component or Page the comment was submitted to, and
where that Component or Page is located, navigate to the Component or Page
and open it, then select the Comments tab.
■
If you know which Contact submitted the comment and in which Publication
and Address Book to locate that Contact, navigate to that Contact and open it,
then select the Comments tab.
You now see the Comments tab that contains the comment you want to moderate.
2. If the Comments tab shows many comments, use the search function of your browser
to locate the one you want to moderate.
Content Manager Explorer Basic User Manual 289
User Generated Content
3. Above the comment you want to moderate, click Edit comment and do one of the
following:
■
To approve the comment 'as is', open the Status dropdown and select
Published to Web site.
■
To modify the comment and then approve it, edit the contents of the comment,
open the Status dropdown and select Published to Web site.
■
To reject the comment, open the Status dropdown and select Rejected by
moderator.
4. Click Apply to apply your moderation.
Deleting a comment
Delete a comment to completely remove it from the system.
Procedure
1. If you have found the comment you want to delete on a comments screen (refer to
“Viewing and filtering comments in the comments screen ” on page 280 for more
information), select the comment you want to delete and do one of the following:
■
Click Delete in the Home tab of the Ribbon toolbar.
■
Right-click the comment and select Delete from the context menu that opens.
■
Press Delete on your keyboard.
You are prompted to confirm the deletion. Click Yes to delete the comment.
2. Alternatively, if you know which Component or Page the comment was submitted to,
and where that Component or Page is located, navigate to the Component or Page
and open it, then select the Comments tab. Or if you know which Contact submitted
the comment, and which Publication and Address Book contains that Contact, navigate
to the Contact and open it, then select the Comments tab.
Result:
You now see the Comments tab that contains the comment you want to delete.
3. If the Comments tab shows many comments, use the search function of your browser
to locate the one you want to delete.
4. Above the comment you want to moderate, click the Delete button
.
Result: You are prompted to confirm the deletion.
5. Click Yes to delete the comment.
Results
The comment is deleted and no longer appears in Content Manager Explorer, nor on the published Web page.
290 Content Manager Explorer Basic User Manual
User Generated Content
Enforcing comment moderation for a
Component or Page
Enforce comment moderation to prevent unfiltered commenting.
Procedure
1. Access Content Manager and navigate to the Component or Page for which you want
to enforce comment moderation.
2. Open the Component or Page and select the Comments tab.
3. Clear the option Show unmoderated comments on this component or Show
unmoderated comments on this page at the top.
4. Click Save and Close to commit your change.
Results
Comments on this Component or Page will now only appear after a moderator has approved them. Refer to
“Moderating a comment ” on page 289 for more information.
Hiding all comments for a Component or
Page on the published Web page
To no longer make any comments for a Component or Page appear on the published Web
page, clear the option Show comments on this Component or Show comments on
this Page. If you do this, you very probably also want to disallow commenting.
About this task
Procedure
1. Access Content Manager and navigate to the Component or Page for which you want
to hide comments.
2. Open the Component or Page and select the Comments tab.
3. Clear the option Show comments on this Component or Show comments on this
Page at the top.
Note: If you do this, you very probably also want to disallow commenting, explained
in “Disallowing commenting on a Component or Page ” on page 292.
4. Click Save and Close to commit your change.
5. Republish the Component or Page to apply the change you made.
Content Manager Explorer Basic User Manual 291
User Generated Content
Disallowing commenting on a Component or
Page
Prevent a Component or Page from ever being commented on, even if rendered with a
Template that enables commenting.
Procedure
1. Access Content Manager and navigate to the Component or Page for which you want
to disallow commenting.
2. Open the Component or Page and select the Comments tab.
3. Clear the option Allow users to leave comments on this component or Allow users
to comment on this Page at the top.
Note: Disabling this functionality does not mean that existing comments that were
submitted before now will disappear. To make that happen, refer to “Hiding all
comments for a Component or Page on the published Web page ” on page 291.
4. Click Save and Close to commit your change.
5. Republish the Component or Page to apply the change you made.
Disallowing rating of a Component or Page
Stop new ratings from being submitted for a Component or Page.
Procedure
1. Access Content Manager and navigate to the Component or Page for which you want
to disallow rating.
2. Open the Component or Page and select the Ratings tab.
3. Clear the option Allow users to rate content on this Component or Allow users to
rate content on this Page. Note that by default, this also removes the display of other
rating information, such as the average rating or number of ratings submitted, on the
corresponding published Web page.
4. Click Save and Close to commit your change.
5. Republish the Component or Page to apply the change you made.
Results
Users can now no longer rate the Component or Page. The published Web page will continue to display the
average rating based on ratings submitted until now.
292 Content Manager Explorer Basic User Manual
User Generated Content
Adding a comment to a Component or Page
You can add a comment to a Component or Page in the Comments tab.
Procedure
1. Access Content Manager and navigate to the Component or Page to which you want
to add a comment.
2. Open the Component or Page and select the Comments tab.
3. Click Add a comment at the top.
Result:
An empty comment box appears below the controls, with a blue border indicating that
you can edit it.
4. Fill in the text, select a value for Status for this comment, and click Apply.
Result: You are prompted to confirm this submission. Click Yes to add this
comment.
Results
The comment is added to this Component or Page and, if you gave it the right status value, appears on the
published Web page.
Changing the appearance of comments on
the published Web page
Change the appearance of comments on the published Web page to offer different
renderings of the comments.
Procedure
1. Access Content Manager and navigate to the Component or Page for which you want
to enforce comment moderation.
2. Open the Component or Page and select the Comments tab.
3. Select the option Sort comments on page by ... in ... order.
4. Do one of the following:
■
To display comments on the Web page in reverse chronological order (newest
comments at the top), select date in the first dropdown, and descending in
the second dropdown.
■
To display comments on the Web page in chronological order (oldest comments
at the top), select date in the first dropdown, and ascending in the second
dropdown.
Content Manager Explorer Basic User Manual 293
User Generated Content
■
To display comments on the Web page sorted by the user name of the visitor
who submitted the comment, in alphabetical order (A-Z), select user name in
the first dropdown, and ascending in the second dropdown.
To display comments on the Web page sorted by the user name of the visitor
who submitted the comment, in reverse alphabetical order (Z-A), select user
name in the first dropdown, and descending in the second dropdown.
As you change these settings, note that the appearance of comments in this Comments
tab itself changes accordingly. However, your changes will also be applied to the
published Web page.
■
5. Click Save and Close to commit your change.
6. Republish the Component or Page to apply the change you made.
Deleting or unpublishing items with
comments or ratings
If you delete a Component or Page that has associated comments or ratings, those
comments and ratings are also deleted. Unpublishing a Component or Page does not
affect comments or ratings. They reappear if and when the item is republished.
294 Content Manager Explorer Basic User Manual
Chapter 21
WebDAV Connector
The WebDAV Connector enables you to access an instance of the Content Manager from
a client machine and to navigate and use Publications and folders in the Content Manager
as folders in a file system.
You can use WebDAV with Content Manager to view binary files contained inside
Multimedia Components, and you can use WebDAV in external applications that supports
WebDAV to access Publications, Folders and items contained in Folders such as
Components, Schemas, Multimedia Components and Templates.
For example, using WebDAV you can use Windows Explorer to access Content Manager
Publications and their Folder:
You can add, edit, delete, and move these items as if they were part of a normal Windows
file system. You can open them in external applications, edit content, and save the edited
items back to the Content Manager. You can also create new Multimedia Components by
dragging and dropping content to a Folder on the Content Manager WebDAV server.
In addition, you can use WebDAV from Content Manager Explorer, the Web interface to
the Content Manager, to open binary files inside Multimedia Components.
Note: If you are a Template implementer and you intend to create Dreamweaver
Templates, you also use WebDAV to access the Content Manager from Adobe®
Dreamweaver® on your client machine. Refer to the installation topics in the online
documentation portal to learn how to set up your client machine, and to the templating
topics in the portal to learn how to work with Content Manager items from Dreamweaver.
Viewing binary files in Multimedia
Components using WebDAV
Explains how WebDAV lets you view the contents of binary files contained in Multimedia
Components.
Content Manager Explorer Basic User Manual 295
WebDAV Connector
From Content Manager Explorer, the Web interface to the Content Manager, you can use
WebDAV to open the binary files contained in Multimedia Components. To do this, select
the Multimedia Component and in the Home tab of the Ribbon select Open > Open
with WebDAV.
Content Manager Explorer downloads the binary file to a temporary folder, and the
default application associated with this type of binary content opens the file. For example,
on a client machine that associates JPEG files with Adobe® Photoshop®, selecting
Open with WebDAV launches Adobe Photoshop and opens the file.
Note: Any changes you make to the file in an external application are not saved back to
Content Manager. The file you are editing is a copy of the file on your client machine. To
edit binary files in Multimedia Components, you must open them from an external
application using WebDAV.
You can also open other items, such as Schemas and Components, using the Open with
WebDAV button. This results in an attempt to open the XML source of the item.
Note: If you are experiencing problems opening a non-binary item with WebDAV from
Content Manager Explorer, upgrade your Microsoft XML Parser (MSXML) version 3.0 to
Service Pack 7 or higher. You can install this Service Pack from the Microsoft Web site.
Accessing items from an external
application using WebDAV
In a WebDAV-compliant application such as Windows Explorer, you can navigate through
Content Manager folders and create, open and edit files.
Content Manager Explorer, the Web interface for Content Manager, shows Publications
and Folders using specific icons.
A client application that uses the WebDAV Connector displays Publications and Folder as
Windows folders:
File extensions for Content Manager items
You can identify the type of Content Manager item by looking at the file extension.
An item of type...
...has the file extension
Component
xml
Multimedia Component
...of the associated binary files
Schema
xsd
Component Template
tctcmp
296 Content Manager Explorer Basic User Manual
WebDAV Connector
An item of type...
...has the file extension
Page Template
tptcmp
Template Building Block - Compound
tbbcmp
Template Building Block - .NET
Assembly
tbbasm
Template Building Block - Dreamweaver dwt
Template Building Block - C# fragment
tbbcs
Template Building Block - XSLT
xslt
Allowed operations
If you access Content Manager items through WebDAV, you cannot perform any action
on any type of content item, even if your rights and permissions allow it.
The following table shows the actions you can perform on Content Manager items via
WebDAV:
Item type
View
Create
Edit
Delete
Schema
yes
yes
yes
yes
Multimedia
Schema
yes
no
yes
yes
Metadata Schema yes
no
yes
yes
Parameter Schema yes
no
yes
yes
Embeddable
Schema
yes
no
yes
yes
Component
yes
yes
yes
yes
Multimedia
Component
yes
yes
yes
yes
Page Template
yes
yes
yes
yes
Component
Template
yes
yes
yes
yes
Template Building yes
Block
yes
yes
yes
Folder
yes
yes
no
yes
Publication
yes
no
no
no
Virtual Folder
yes
no
no
yes
Page
no
no
no
no
Structure Group
no
no
no
no
Content Manager Explorer Basic User Manual 297
WebDAV Connector
Item type
View
Create
Edit
Delete
Category
no
no
no
no
Keyword
no
no
no
no
Target Group
no
no
no
no
The following table shows exactly what actions you can and cannot do on Content
Manager items via WebDAV:
Item type
Rename
Cut/paste
Copy/paste
Check in and
check out
Schema
yes
yes
yes
yes
Multimedia Schema
yes
yes
yes
yes
Metadata Schema
yes
yes
yes
yes
Parameter Schema
yes
yes
yes
yes
Embeddable Schema
yes
yes
yes
yes
Component
yes
yes
yes
yes
Multimedia Component
yes
yes
yes
yes
Page Template
yes
yes
yes
yes
Component Template
yes
yes
yes
yes
Template Building Block yes
yes
yes
yes
Folder
yes
no
no
no
Publication
yes
no
no
no
Virtual Folder
no
yes
no
no
Page
no
no
no
no
Structure Group
no
no
no
no
Category
no
no
no
no
Keyword
no
no
no
no
Target Group
no
no
no
no
Opening existing items
You can open existing Content Manager items from a WebDAV-compliant interface
simply by accessing the Open functionality in your Windows application (typically
accessible from your application File menu).
Before you begin
You may experience problems browsing for, and opening, items with a name that contains
special characters. These problems are due to variations in the way that different windows
298 Content Manager Explorer Basic User Manual
WebDAV Connector
platforms and applications handle these characters. When naming Publications, Folders
or items that will be accessed from a client application using WebDAV, ensure that the
following reserved characters are not part of the name:
< & > # % * : ! ~ +
Note: Microsoft Knowledge Base article 826437 (found on the Microsoft support Web
site at http://support.microsoft.com/ kb/ 826437/ en-us/ ) describes
a manual fix for this problem for the characters * : % and &.
About this task
Filenames of path names may cause errors when you open an item from, or save an item
to, the Content Manager. If this happens, use the drag-and-drop feature to save the item to,
and open the item from, you client machine. Edit the item on your machine and then
drag-and-drop the file back to the Content Manager using Windows Explorer.
The following task describes accessing Content Manager items through Windows Explorer
and from Altova® XML Spy®.
Procedure
1. Access items from Windows Explorer: from the Windows start menu, start Windows
Explorer.
2. In the navigation tree on the left, select My Network Places and in this node, select
the WebDAV folder. At this point, Content Manager may prompt you for a valid user
name, password and domain. Provide valid credentials if this happens.
Result:
Windows Explorer displays a list of Windows folders representing Publications in
Content Manager. The following image shows one Publication opened to reveal its
Building Blocks folder.
3. Navigate through the folder tree as you would any Windows file system, and open a
file you want to view or edit.
4. Access items from Altova XML Spy: from the Windows start menu, start Altova
XML Spy.
Content Manager Explorer Basic User Manual 299
WebDAV Connector
5. Select File > Open from the menu bar and navigate to the WebDAV folder. At this
point, Content Manager may prompt you for a valid user name, password and domain.
Provide valid credentials if this happens.
Result:
The Open dialog displays a list of Windows folders representing Publications in
Content Manager.
6. Navigate through the folder tree as would any Windows file system, and open a file
you want to view or edit.
By default, XML Spy only displays files of a type that it can handle. Of the standard
SDL Tridion item types, these are:
■
XML files (Components)
■
XSD files (SDL Tridion Schemas)
■
XSL/XSLT files (XSLT stylesheet Template Building Blocks)
Creating new items
If authorized, you can create Schemas, Components, Multimedia Components,
PageTemplates, Component Templates, Template Building Blocks and Folders from an
external application that uses WebDAV.
Before you begin
Depending on the type of item you want to create, WebDAV imposes some additional
restrictions:
Schemas
You cannot create Embeddable Schemas, Multimedia Schemas, Parameter Schemas
or Metadata Schemas using WebDAV.
Components
Components are subject to the following restrictions:
■
If you Component contains Component links fields or Multimedia Component
link fields, these fields must contain the WebDAV URL of the target item.
■
Any Component you create must be based on an SDL Tridion Schema that is
located in the Publication in which you intend to save the Component.
Multimedia Components
The Publication in which you intend to create Multimedia Components must contain
a Multimedia Schema that supports the binary type of the item you are creating.
300 Content Manager Explorer Basic User Manual
WebDAV Connector
Procedure
1. Use your external application's Save As functionality, typically located in the File
menu of your application, to directly save it to the WebDAV folder location.
2. Alternatively, save the item locally, then drag-and-drop the item into the appropriate
WebDAV folder using Windows Explorer.
3. Save the file using the correct file extension—for more information, see “File
extensions for Content Manager items ” on page 296.
Editing items
If authorized, you can edit Schemas, Multimedia Schemas, Metadata Schemas,
Embeddable Schemas, Components, Multimedia Components, Page Templates,
Component Templates, and Template Building Blocks from an external application that
uses WebDAV:
Before you begin
Depending on the type of item you want to open, WebDAV imposes some additional
restrictions:
Components
After you have edited it, the Component must remain valid against its SDL Tridion
Schema.
■
If your Component contains Component links fields or Multimedia Component
link fields, these fields must contain the WebDAV URL of the target item.
■
Any mandatory (data or metadata) fields must have a default value set in the
Schema.
■
Any Component you create must be based on an SDL Tridion Schema that is
located in the Publication in which you intend to save the Component.
Multimedia Components
The Publication in which you intend to create Multimedia Components must contain
a Multimedia Schema that supports the binary type of the item you are creating. You
cannot edit the metadata of a Multimedia Component; any mandatory metadata
fields must have a default value set in the Schema.
About this task
Note: You cannot edit an item if another user has checked it out, or if it is assigned to
another user through Workflow.
Content Manager Explorer Basic User Manual 301
WebDAV Connector
Procedure
1. Use your external application's Open functionality, typically located in the File menu
of your application, to directly open it from the WebDAV folder location.
2. Alternatively, drag-and-drop the item from the appropriate WebDAV folder to a local
folder using Windows Explorer. Edit the item locally, then either save it locally and
drag-and-drop it into the WebDAV folder, or save it directly to the WebDAV folder
using the Save As functionality of your application.
Viewing items
To view an item without checking it out in Content Manager, you must open the item in
read-only mode in an external application, if the external application allows you to do so.
Renaming items
If authorized, you can rename any type of item displayed in the WebDAV server folder
tree from an external application using WebDAV.
Deleting items
If authorized, you can delete any type of item displayed in the WebDAV server folder
tree, except Publications, from an external application using WebDAV.
Cutting copying and pasting items
If authorized, you can use copy and paste to copy items between the Folders within a
Publication, but not across Publications. In Windows Explorer, use the context menu or
the Edit menu to select the necessary copy and paste options.
Although copy-paste always works, cut-paste raises an error, "Cannot read from source".
So to perform a cut-paste, that is, to move an item, perform a copy-paste, then delete
the item in the old location. This preserves the version history of your item. Better yet,
you can avoid all complications by performing these kinds of operations in the Content
Manager Explorer.
Checking items in and checking items out
When you open a Content Manager item from an external application using WebDAV, the
item is checked out automatically, unless you explicitly choose, and are able, to open
them in read-only mode.
If you external application lets you open an item in read-only mode, it often does so in
the Open dialog:
When you save a Content Manager item back to the Content Manager using WebDAV,
the item is checked in automatically.
302 Content Manager Explorer Basic User Manual
WebDAV Connector
Troubleshooting Opening an item
containing non-alphanumeric characters
This troubleshooting section explains how to open items in WebDAV that have certain
non-alphanumeric characters in the filename.
Problem description
You cannot browse to or open items using WebDAV if the name of the item contains
one of the following characters:
< & > # % * : | ~ +
Diagnosis
This problem is inherent to the way in which different Windows platforms and
applications handle these characters.
Solution
There are several solutions to this problem:
■
If the characters that cause problems are among the following: * : % & then
you can fix this problem manually as described in Microsoft Knowledge
Base article 826437 (find this article on the Microsoft support Web site at the
URLhttp://support.microsoft.com/kb/826437/en-us/.
■
If the characters that cause problems are other, you can do the following:
■
Use the Content Manager Explorer to interact with these items.
■
Rename the items in Content Manager Explorer to a name that contains
only supported characters, then access those items using WebDAV.
Content Manager Explorer Basic User Manual 303