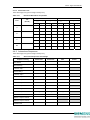
1
7SG11 Argus User Manual 7SG11 Argus Overcurrent Protection Relays Document Release History This document is issue 2010/02. The list of revisions up to and including this issue is: Pre release 2010/02 Document reformat due to rebrand 2006/08 Fourth issue: VA Tech references replaced by Siemens Protection Devices Ltd 2006/03 2004/05 Third issue: Additional modifications, software revision histories updates Second issue:- Improved CBF function, additional metering , Modbus protocol, extended timers added 2002/12 First issue Software Revision History Since introduction in 1995, Argus overcurrent relays have undergone a number of modifications to improve functionality and features provided. The content of this manual is directly applicable to the software versions listed below. When used with other versions minor variations may be noticed. A detailed release history for each type is given in the appropriate Diagrams and Parameters document. Argus 1 and Argus 2 2434H80023 R10 release date November 2005 Argus 2-500 2434H80040 R8 release date November 2005 Argus 4 and Argus 6 2716H80005 R5 release date March 2005 Hardware Release History Since introduction in 1995, Argus overcurrent relays have undergone a number of minor changes to hardware. The content of this manual is directly applicable to Argus hardware in Epsilon cases produced since March 2002. When used with earlier versions, minor variations may be noticed. A detailed release history for each type is given in the appropriate Diagrams and Parameters document. The copyright and other intellectual property rights in this document, and in any model or article produced from it (and including any registered or unregistered design rights) are the property of Siemens Protection Devices Limited. No part of this document shall be reproduced or modified or stored in another form, in any data retrieval system, without the permission of Siemens Protection Devices Limited, nor shall any model or article be reproduced from this document unless Siemens Protection Devices Limited consent. While the information and guidance given in this document is believed to be correct, no liability shall be accepted for any loss or damage caused by any error or omission, whether such error or omission is the result of negligence or any other cause. Any and all such liability is disclaimed. ©2010 Siemens Protection Devices Limited 7SG11 Argus User Manual Contents Section 1: Relay Description .................................................................................................................................... 4 1.1 Overview ................................................................................................................................................. 4 1.2 Hardware ................................................................................................................................................ 4 1.3 Functionality............................................................................................................................................ 6 Section 2: Operation Guide.................................................................................................................................... 12 2.1 User Interface Operation....................................................................................................................... 12 2.2 Operation using Reydisp Evolution (IEC 60870-5-103 comms only) .................................................... 15 Section 3: Installation............................................................................................................................................. 16 3.1 Unpacking, Storage and Handling ........................................................................................................ 16 3.2 Recommended Mounting Position ........................................................................................................ 16 3.3 Relay Dimensions ................................................................................................................................. 16 3.4 Wiring.................................................................................................................................................... 16 3.5 Fixings................................................................................................................................................... 17 3.6 Ancillary Equipment .............................................................................................................................. 17 Section 4: Commissioning ..................................................................................................................................... 18 4.1 Before Testing....................................................................................................................................... 18 4.2 Tests ..................................................................................................................................................... 19 4.3 Putting into Service ............................................................................................................................... 27 4.4 Commissioning Record Tables ............................................................................................................. 28 Section 5: Testing and Maintenance...................................................................................................................... 35 5.1 Periodic Tests ....................................................................................................................................... 35 5.2 Maintenance ......................................................................................................................................... 35 5.3 Troubleshooting .................................................................................................................................... 35 5.4 Defect Report........................................................................................................................................ 37 ©2010 Siemens Protection Devices Limited P20006 Page 2 of 37 7SG11 Argus User Manual List of Figures Figure 1-1 Figure 2-1 Figure 4-1 Figure 4-2 Figure 4-3 Figure 4-4 Figure 4-5 Figure 4-6 Figure 4-7 Figure 4-8 Overcurrent Characteristics............................................................................................................... 7 Menu Structure for Argus 1, 2, 4 and 6 Relays................................................................................ 13 Directional Earth Fault Boundary System Angles............................................................................ 23 Directional Phase Fault Boundary System Angles .......................................................................... 23 Secondary Injection Test Circuit...................................................................................................... 33 Directional Test Circuit .................................................................................................................... 33 Two-out-of-three Directional Test Circuit ......................................................................................... 33 Phase to Earth Primary Injection Test Circuit .................................................................................. 33 Phase to Phase Primary Injection Test Circuit ................................................................................ 33 Resultant Applied Voltages and Currents for a Simulated Earth Fault Condition using Load Current ................................................................................................................................... 34 List of Tables Table 3-1 Table 4-1 Table 4-2 Table 4-3 Table 4-4 Table 4-5 Table 4-6 Table 4-7 Table 4-8 Table 4-9 Table 4-10 Table 4-11 Table 4-12 Table 4-13 Table 4-14 Table 4-15 Table 4-16 Table 4-17 Table 4-18 Table 5-1 Wire crimp sizes .............................................................................................................................. 17 IDMTL Timing Characteristic (Time in Seconds) ............................................................................. 20 Connections for Directional Polarity ................................................................................................ 22 Limits of Operate Pick-up Relay Angle Boundaries ......................................................................... 23 Pick-up/Drop-off Results.................................................................................................................. 28 Timing Characteristic Results.......................................................................................................... 28 Lowset setting results ...................................................................................................................... 28 Highset 1 setting results .................................................................................................................. 29 Highset 2 setting results .................................................................................................................. 29 Lowset timing results ....................................................................................................................... 29 Highset 1 timing results ................................................................................................................... 29 Highset 2 timing results ................................................................................................................... 29 Pick-up/Drop-off Results for SEF/REF ............................................................................................ 30 SEF/REF Timing Results................................................................................................................. 30 Pick-up/Drop-off Results for CBF Level Detector ............................................................................ 30 Circuit Breaker Fail Timing Results ................................................................................................. 30 Directional Boundaries of Operation................................................................................................ 31 Auto-reclose Sequences and settings ............................................................................................. 31 Primary Injection Results................................................................................................................. 32 Troubleshooting Guide .................................................................................................................... 35 ©2010 Siemens Protection Devices Limited P20006 Page 3 of 37 7SG11 Argus User Manual Section 1: Relay Description 1.1 Overview The Argus range of overcurrent protection combines the power and flexibility of microprocessor technology with decades of experience in the field of overcurrent protection and auto-reclose. A wide range of protection elements are supplemented by advanced features such as control, metering, data storage and fibre-optic based communications. Features • • • • • • • • • • • • • • • • • • IDMTL phase overcurrent stage (50/51) 3 DTL phase overcurrent stages (50) IDMTL earth-fault stage (50N/51N) 3 DTL earth-fault stages (50N) 2 instantaneous and DTL SEF/REF stages with harmonic rejection (50N) Trip circuit supervision (74TC) Circuit breaker failure protection (50BF) Single pole, three pole and four pole variants True RMS measurement Status inputs with independent pick-up and drop-off timers and logic inversion to reduce scheme engineering Flexible supply voltage ranges Low AC/DC burden Eight independent settings groups Self, hand and electrical reset contacts Extensive fault, sequence of event and disturbance recorder IEC60870-5-103 fibre-optic communications Modbus RTU communications Continuous self-supervision of operation and power supply 1.2 Hardware 1.2.1 Case The Argus relay is housed in a drawout case designed for either panel mounting or modular 19” racking systems. The case is 4U (177 mm) high and will be of size 4, size 6 or size 8 width. The chassis of the Argus can be withdrawn from the case by pulling on the handles provided. Shorting contacts ensure that CT circuits and normally closed contacts remain short-circuited. All output contacts will be disconnected before any input contacts in order to prevent maloperation. The rear terminals are designed to take two wires terminated using ring crimps and are secured using M4 screws. 1.2.2 Front Cover After the Argus has been commissioned it is sealed by fixing a clear plastic cover over the front. This allows the user to see the entire front of the relay, but only allows access to the and buttons, allowing all of the menus to be viewed but not changed. The only ‘action’ which is permitted is to reset the Fault Data Display, latched output relays and the trip LED by using the TEST/RESET function of the button. 1.2.3 User Interface / Fascia The user interface is designed to provide a user friendly method of entering settings and retrieving data from the Argus relay. Relay Information The Reyrolle logo appears in the top left corner of the Argus. At the top right an information label is provided which contains the range name (Argus 1, Argus 2, Argus 4 or Argus 6), model number, serial number and nominal ratings of energising quantities. ©2010 Siemens Protection Devices Limited P20006 Page 4 of 37 7SG11 Argus User Manual Liquid Crystal Display A 2 line, 16 character backlit liquid crystal display (LCD) is used to present settings, instruments and fault data in a textual format. The display backlighting is turned off to conserve power if no pushbuttons are pressed for 5 minutes. After an hour, the whole display is de-activated, except in the case of the instruments, which remain visible permanently. ‘Protection Healthy’ LED This green LED indicates that DC volts have been applied to the Argus and that the relay is operating correctly. If a permanent fault is detected by the internal watchdog, then this LED will continuously flash. ‘Starter’ LED This self-resetting yellow LED indicates that any pole is measuring current above the IDMTL/DTL current setting. ‘Trip’ LED This latching red LED indicates that a trip, as defined by customer setting, has occurred. Such a trip may have been issued by any of the protection functions. The user will be given more detailed information concerning the trip from the LCD screen. After being energised the LED can be reset by pressing the TEST/RESET key, or by energising a status input which has been programmed to reset latched relays and the trip LED. ‘CB Open’ LED Argus 4 and Argus 6 only. This green LED indicates that the circuit breaker is open. ‘CB Closed’ LED Argus 4 and Argus 6 only. This red LED indicates that the circuit breaker is closed. Keypad Five keys are provided to control the functions of the Argus by moving around the menu display. They are labelled: , , ENTER, CANCEL and . The key is also labelled TEST/RESET. Only two push buttons are accessible when the front cover is in place. These are the and buttons which allow the user to view all displays, including settings, but not to change setting values. 1.2.4 Current and Voltage Inputs Current Inputs Two types of current input are incorporated within the Argus range. One type of input is used for phase fault and earth fault protection, while the other is used for sensitive earth fault and restricted earth fault protection. The current inputs can be configured for operation with either 1A or 5A transformers. The appropriate connections are required on the terminal blocks and the CT rating must be set as required. Voltage Inputs Argus 2 and Argus 6 only - Voltage inputs are used for setting the direction of the overcurrent elements and up to 4 voltage inputs are provided. In most models voltage inputs for the phase voltages must be connected phase-phase, while a separate opendelta VT must provide the neutral voltage. In some models, however, the option is given to connect 3 voltage inputs in a star configuration. Each voltage input is capable of being connected to VTs with a nominal 63.5V or 110V secondary voltage. 1.2.5 Status Inputs and Output Relays Four configurations of digital I/O are available: • • • 1 status input, 7 output relays (3 changeover, 4 normally open) 3 status inputs, 5 output relays (3 changeover, 2 normally open) 5 status inputs, 11 output relays (3 changeover, 8 normally open) ©2010 Siemens Protection Devices Limited P20006 Page 5 of 37 7SG11 Argus User Manual • 9 status inputs, 7 output relays (3 changeover, 4 normally open) Single pole Argus relays are only available with 1 status input and 7 output relays. Status Inputs Status inputs can be programmed to perform one or more of the following functions: • • • • • • • • • • • • Switch to an alternative settings group Trigger the storage of a waveform record Trigger a textual fault record Trigger operation of the I2 summation and trip count features Inhibit operation of any one or more protection functions Monitor the health of the tripping circuit Synchronise the real-time clock Reset of latched output contacts Reset of counter instruments Start an auto-reclose sequence Register a general alarm Initiate an external circuit breaker fail condition Additionally, each input can be independently programmed to operate with time delayed pick-up and/or time delayed drop-off. The status inputs have a default pick-up delay setting of 20ms which provides security against operation in the presence of an a.c. input voltage. If instantaneous operation is preferred then the pick-up delay should be set to zero. It is also possible to invert the operation of a status input. If an input is configured to be inverted, then any function assigned to that input becomes active upon de-energisation of the input. Output Relays Outputs are user programmable to operate from any or all of the protection characteristics. In addition they can be programmed to generate outputs from the I2 summation alarm, the trip counter alarm, the status inputs and the self-monitoring feature (watchdog). In their normal mode of operation, output contacts remain energised for the duration of fault current, but with a user programmable minimum time. Alternatively, outputs can be programmed to operate as latching contacts if required. Latched output relays can be reset either by pressing the TEST/RESET button, by sending an appropriate communications command or electrically via a status input. A trip test feature is provided to operate the output contacts. 1.2.6 Auxiliary Supply A d.c. voltage of the appropriate level must be supplied onto the correct terminals on the rear of the case. 1.2.7 Communications A pair of fibre-optic STTM (BFOC/2.5) bayonet connectors, optimised for glass-fibre, are fitted to the rear of the case – one transmit and one receive. These are used as the standard interface for all communications with the Argus. An alternative RS485 option is available. The Argus is supplied using IEC 60870-5-103 as its default communications. Modbus is available via a setting in the communications menu. 1.2.8 Terminals These are of a modular design. Depending on the model either 1, 2 or 3 terminal blocks will be fitted with 28 terminals per block. All inputs and outputs (except for the serial communications interface) are made through these connectors. 1.3 Functionality 1.3.1 Protection Argus provides comprehensive overcurrent protection with programmable input and output matrix. In addition 8 setting groups enable a flexible approach to protection settings. Up to four current measuring inputs are available in the Argus relays and these may be phase-fault overcurrent, earth-fault overcurrent or SEF/REF depending on the model. ©2010 Siemens Protection Devices Limited P20006 Page 6 of 37 7SG11 Argus User Manual 1.3.1.1 Phase-fault and Earth-fault Overcurrent Phase-fault and earth-fault inputs each have four independent overcurrent elements. Each has a current setting and timing characteristic as illustrated in Figure 1-1. The principal overcurrent element is selectable between IDMTL (inverse definite minimum time lag) and DTL (definite time lag) characteristics. Four IDMTL curves are available, namely normal inverse (NI), very inverse (VI), extremely inverse (EI) and long time inverse (LTI). The IDMTL algorithms operate correctly for developing faults where current varies with time. Two independent highsets and an independent lowset are included with shaped instantaneous characteristics and DTL. The instantaneous outputs are designed for transient free operation where high values of system X/R are experienced. Time IS IDMTL current setting tM time multiplier IHS1 highset 1 current setting tHS1 highset 1 time delay setting IHS2 highset 2 current setting tHS2 highset 2 time delay setting ILS lowset current setting tLS lowset time delay setting IS tM ILS IHS1 tHS1 IHS2 tHS2 tLS Current Figure 1-1 Overcurrent Characteristics 1.3.1.2 Sensitive Earth-fault/Restricted Earth-fault Sensitive earth-fault and restricted earth-fault protection schemes are achieved with identical internal functionality. They incorporate filtering for rejection of second, third and higher harmonics of the power system frequency. Two DTL timers and a lowset characteristic are provided. The lowset does not have an independent current setting in this case. The delayed reset function operates on the two DTL timers. 1.3.1.3 Directional Control Argus 2 and Argus 6 only. Directional elements are available for phase-fault and earth-fault as an ordering option. Bi-directional elements provide independent characteristic, current and time settings for each direction of each overcurrent stage. In models with three phase-fault directional elements, single-phase or two-out-of-three directional decisions are available. In most models, the phase fault characteristic angles are selectable from +30° and +45°; the earth-fault characteristic angle is selectable from 0°, -15°, -45° and -65°. In Argus 2 models with voltage and power measurement, the phase-fault and earth-fault characteristic angles are selectable to any angle between -90° and + 90° in 1° steps. ©2010 Siemens Protection Devices Limited P20006 Page 7 of 37 7SG11 Argus User Manual 1.3.1.4 Voltage Protection Certain Argus 2 models only. A three-phase voltage element with definite time delay is provided which can be used to provide a trip or alarm output, or can be set to block any of the overcurrent elements. The element can be set to undervoltage or overvoltage with variable hysteresis. Overcurrent blocking occurs from each phase independently, but a common trip output is provided. 1.3.1.5 Cold Load Pickup Argus 4 and Argus 6 only. The Argus can apply higher current settings with longer time delays, after the circuit breaker has been open for a programmable time. On closing of the circuit breaker these higher settings are applied for a programmable time or until the measured current has fallen to normal levels. 1.3.1.6 Circuit Breaker Fail The circuit breaker fail function operates by monitoring the current following a trip signal and issues an alarm if the current does not cease within a specified time interval. A two-stage time delayed output can be used to operate output contacts to retrip the same circuit breaker, using a second trip coil, or to backtrip an upstream circuit breaker. The CBF timer 1 starts to operate following a trip output from any one of the protection algorithms or an external input, providing there is current above the circuit breaker fail current setting. An output is issued after the CBF timer 1 delay. If current is still above the setting, CBF timer 2 then begins to operate and will issue a second output after the CBF timer 2 delay. 1.3.2 Control 1.3.2.1 Autoreclose Argus 4 and Argus 6 only. Integrated auto-reclose is available as an ordering option. The Argus incorporates a 5 trip/4 close auto-reclose sequence that can be initiated by an internal or external signal. For each type of protection trip - phase-fault, earth-fault, SEF or external - a separate sequence of instantaneous and delayed trips is available. Programmable dead times and reclaim times with a wide setting range and integrated sequence co-ordination enable virtually all distribution auto-reclose schemes to be achieved. 1.3.3 Plant Monitoring 1.3.3.1 Trip Circuit Supervision An Argus relay can monitor its associated trip circuit by configuring one of its status inputs using the ‘Trip Circuit Fail’ setting and connecting the input into the trip circuit (refer to the applications guide for details of how this is achieved). Indication is then given instantaneously of ‘Trip Circuit Failure’ should a fault be detected, this display also identifies which input has detected the fault. Since the status inputs can be programmed to operate output contacts, an alarm output can also be generated from the trip circuit supervision feature. 1.3.3.2 Circuit Breaker Maintenance The I2 summation feature and the trip counter provide circuit breaker condition monitoring. Alarm outputs with programmable settings are available for both features. This information is accessed either from the front panel or via the communications interface. The values of current used for the I2 summation are those measured at the time of issuing a trip signal. An I2 sum is generated for each phase element and the highest value is used for alarm and display purposes. It is also possible to initiate the I2 summation algorithm from an external tripping device via the status input if required. The trip count and the I2 summation count can be reset by either of two methods: • when viewing the appropriate instrument screen and pressing the TEST/RESET button • in the settings menu using appropriate reset setting 1.3.4 Measurements Analogue values can be displayed in primary or secondary quantities on the LCD screen. In addition the values can be obtained via the communications port. ©2010 Siemens Protection Devices Limited P20006 Page 8 of 37 7SG11 Argus User Manual Available Instruments • Primary current – RMS values on a phase-by-phase basis, indicated by upper case letters, e.g. A, B, C, E, SE (sensitive earth) • Secondary current – RMS values on a phase-by-phase basis, indicated by lower case letters, e.g. a, b, c, e, se • Primary phase voltages * • Primary phase-phase voltages * • Secondary voltages * • Apparent power and power factor * • Real and reactive power * • WHr forward and reverse * • VarHr forward and reverse * • Rolling and Max demand Ia, Ib, Ic • Rolling and Max demand W* • Rolling and Max demand Var* • Direction * • Autoreclose status * • Output contacts • Status inputs • Trip circuit healthy/failure • Trip counters • I2 summation • Number of waveform and event records stored • Time and date • Starters • Power on counter * Instruments marked * are not available in all models – consult ordering information and the appropriate ‘Diagrams and Parameters’ document. Note: The rolling demand measurements can be configured to measure over a rolling window with the following ranges: OFF, 0.25, 0.5… 1.0, 1.5... 5.0, 6.0... 12.0, 16.00... 24.0 hours General Alarm Screens The Argus has an independent display function that provides up to five General Alarm screens, each of which may be programmed by the user to display a message associated with an external alarm. Within the System Configuration Menu, each General Alarm message can be text edited by the user to display up to 13 characters. Also, each General Alarm can be user mapped to any status input, via the Status Configuration Menu, so that on energisation of that input the associated alarm message is automatically displayed. Where more than one General Alarm is raised then the display will scroll right to left to show all energised screens sequentially, with screens separated by a ‘+’ sign. If required, more than one alarm may be mapped to a single status input, allowing long messages to be displayed. Default Instrumentation Screens The menu presentation of the various instruments allows the user to view a single screen at a time. However, for in-service use, it is desirable that a small number, of high interest, user selectable, screens are presented automatically by default without user intervention e.g. Ammeter display of the Primary Load Currents and in addition the TRIP Count. The screens of interest to the user, e.g. those required to be presented to a visiting engineer for record purposes, can be selected by the user by pressing ENTER when viewing the required screen. A ‘Screen Set As Default’ message will be flashed up and ‘ ’ will appear at top right of that screen. To cancel a screen default, scroll to that screen and press ENTER, ‘Screen Cleared As Default’ will be flashed up and the ‘ ’ symbol will be cleared. If no button is pressed for the duration of the user set “Default Time Delay”, then each Default Screen is displayed in turn, for five seconds each. If any General Alarm is raised, then the General Alarm screen is presented in the Default Screen sequence. The General Alarm screen, which has a scrolling display will present one pass of its display. Any key press while in default screens will result in a return to the “Relay Identifier” screen at the top of the menu structure. 1.3.5 System Data Data records are available in three forms: fault records, waveform records and event records. ©2010 Siemens Protection Devices Limited P20006 Page 9 of 37 7SG11 Argus User Manual 1.3.5.1 Time Stamping All records are stamped with time and date using the Argus’ real-time clock feature. If the Argus is de-energised then a capacitor provides a back-up supply to the real-time clock for a limited period. Time and date can be set either via the fascia using appropriate commands in the System Configuration Menu, or via the communications interface. In the latter case, Argus relays connected in a communications network can be synchronised by a global command. Synchronising pulses can be received via a status input. To use this feature one of the status inputs must be assigned to the ‘Clock Sync’ feature in the Status Configuration Menu. Additionally the ‘Clock Sync Period’ setting in the System Configuration Menu should be set either to ‘Seconds’ or to ‘Minutes’ as appropriate, depending on the period of the synchronising signals expected from the controlling device. If ‘Seconds’ are selected then energisation of the selected status input will result in the clock being synchronised to the nearest second with milliseconds set to zero. If ‘Minutes’ are selected then the clock is synchronised to the nearest minute with seconds and milliseconds set to zero. 1.3.5.2 Fault Records The last 5 fault records are available from the Argus fascia with time and date of trip, measured quantities and type of fault. When issuing a trip output under fault conditions the Argus illuminates its TRIP LED, stores a fault record and displays the fault indication screen. The fault indication screen displays a summary of the fault record, giving immediate, simple information on what has occurred. It displays date (DD/MM), time (HH:MM:SS) and the poles which were picked up when the trip signal was issued, for example: 25/04 17:25:51 TRIP A E This display is held until the TEST/RESET button is pressed, upon which the LED turns off and any latched output relays are reset. The Argus enters ‘Fault Data Display Mode’ at which point the fault indication screen is replaced with a more detailed scrolling fault data display. Fault 1 <<<fault data>>> This shows date and time of fault, the active settings group at the point of trip, plus, for each pole the elements picked up and the current measured at the time of trip. The information scrolls along the bottom line of the display. External alarms are also shown in the fault record. e.g. 12/05/04 15:32:47.2525 G1 PHASE A LS <IDMTL> HS1 HS2 IA = 12.32xIn... The fault record is viewed in the ‘Fault Data Display Mode’ of the menu display system and can be viewed again at a later date. Fault records are stored for the previous five faults. The five displays are numbered from 1 to 5 with fault 1 indicating the most recent record. It is necessary to define a ‘fault’ for these purposes. Depending on the application, some of the protection outputs may be used for alarm purposes rather than for tripping. In such cases it would be undesirable for the Argus to light its TRIP LED and give fault indication. Therefore, a ‘Fault Trigger’ setting is included to allow the fault condition to be defined by selecting any combination of output relays as tripping outputs. The TRIP LED and the fault record storage will be triggered when any of the selected output relays are energised. Note that a trip output can still be generated even if the ‘fault trigger’ setting is not used, but no trip indication is given. Fault records are stored in non-volatile memory. 1.3.5.3 Disturbance Recorder The waveform record feature stores analogue and digital information for all current inputs, status inputs and output relays. On some relays voltage signals are also stored. The ‘Waveform Trigger’ setting is used to enable the waveform record feature. Waveform storage is triggered by operation of any function selected in the ‘waveform trigger’ setting. In addition, a record can be triggered remotely via a status input or via the serial communications interface. Waveforms are stored in a 1 second, rolling ‘time window’. The 1 second data window has a settable pre-fault triggering capability. There is capacity to store five waveform records, with any new record over-writing the oldest. All records are time and date stamped. Waveform records are stored in RAM with a capacitor providing back-up during breaks in auxiliary supply. The waveform record store can be erased when viewing the “waveforms” instrument screen and pressing the TEST/RESET button. 1.3.5.4 Sequence of Event Records The Argus event recorder feature allows the time tagging of any change of state. Each event is logged with the full date and time and actual event condition every 2.5msec. The following events are logged: ©2010 Siemens Protection Devices Limited P20006 Page 10 of 37 7SG11 Argus User Manual • • • • • • • • • Change of setting (though not the actual setting changes). Also indication of which group of settings is active Change of state of output relays Change of state of status inputs Change of state of any protection characteristic Trip indication reset Trip test Trip supply failure Circuit Breaker maintenance alarms Circuit breaker failure The event storage buffer holds 500 records. When the event buffer is full, then any new record overwrites the oldest. Event records are stored in RAM with a capacitor providing back-up during breaks in auxiliary supply. The event record store can be erased when viewing the “events stored” instrument screen and pressing the TEST/RESET button. 1.3.6 General Multiple Settings Groups Argus relays provide eight alternative settings groups, making it possible to edit one group while the protection algorithms operate using another ‘active’ group. The Argus can then be switched from one group of settings to another to suit alterations in the power system configuration. A change of group can be achieved either locally at the fascia, remotely via a communications interface command or by energisation of a status input. On models with a voltage element, this can also be used to change settings group. For setting group change by status input, the ‘Settings Group Select’ setting is used to configure any one (or more) of the status inputs to select a settings group. The selected group is then made active if the status input is energised and remains active for as long as the input remains energised. If multiple status inputs are energised, the lower (or lowest) number status input takes precedence. For instance, if status input 1 activates settings group 5 and status input 3 activates settings group 2, and both status inputs are energised, the Argus would operate in settings group 5. Self Monitoring The Argus incorporates a number of self-monitoring features listed below, each of which initiates a reset sequence that can be used to generate an alarm output. In addition, the Protection Healthy LED gives visual indication. • • • Power supply watchdog Microprocessor watchdog Program memory test using CRC Any failure is detected with sufficient time warning so that the microprocessor can be shut down in a safe and controlled manner. Password Feature The programmable password feature enables the user to enter a 4 character alpha-numeric code. As soon as the user attempts to change a setting the password is requested before any setting alterations are allowed. Once the password has been validated, the user is said to be “logged on” and any further changes can be made without reentering the password. If no more changes are made within I hour then the user will automatically be “logged out”, re-enabling the password feature. Note that the password validation screen also displays a numerical code. If the password is lost or forgotten, authorised personnel can communicate this code to Siemens Protection Devices Limited. and the password can be retrieved. The Argus is supplied with the password set to “NONE” which means the feature is de-activated. ©2010 Siemens Protection Devices Limited P20006 Page 11 of 37 7SG11 Argus User Manual Section 2: Operation Guide 2.1 User Interface Operation The basic settings/displays flow diagram is shown in Figure 2-1. This diagram shows the main modes of display: Linesman Mode (Argus 4 and 6 only), Settings Mode, Instrument Mode and Fault Data Mode. When the Argus leaves the factory all data storage areas are cleared and the settings set to default values as specified in the Argus Overcurrent Technical Reference document. When the Argus is first powered-on the screen will display the default relay identifier and ‘Factory Settings’. The identifier can be changed to a user definable identifier or code if the user prefers. Once any setting changes have been made the ‘Factory Settings’ text will be replaced by ‘Relay Settings’. On each subsequent power-on the screen that was showing before the last power-off will be displayed. The menu system is navigated as shown in Figure 2-1. Note, however that some sub-menus and screens are relevant to certain models only and will not always appear. This is indicated in the diagram. The exact list of settings and instruments available in each model is given in the appropriate Diagrams and Parameters document. The five keys have the following functions: Up (), down () and right () keys – used to navigate the menu system ENTER key – when a setting is being displayed this key will enter edit mode for the setting (see section 2.1.1). When in edit mode pressing ENTER will accept the setting change. When an instrument is being displayed pressing ENTER will toggle the instruments default screen status on and off (see section 2.1.2.1). CANCEL key – when a setting is being edited this key will cancel the edit without changing the setting. At all other positions CANCEL will move back up the menu system (in the direction of the main menu). TEST/RESET key – when the main menu is visible TEST/RESET will briefly light all LEDs in order to test their operation. After a trip occurs and the summary fault record is being displayed TEST/RESET will reset the trip LED and any hand reset contacts before displaying the scrolling fault display. When an instrument which records a count is being displayed (e.g. number of CB operations) pressing TEST/RESET will allow the count to be reset (see section 2.1.2.2). At all other times the right () function of this key is available for menu navigation. 2.1.1 Settings While a setting (or other editable value – e.g. in Linesman mode) is being displayed on the screen the ENTER key can be pressed to edit the setting value. If the Argus is password protected the user will be asked to enter the password as described below. If an incorrect password is entered editing will not be permitted. While a setting is being edited flashing characters indicate the edit field. Pressing the up () and down () keys will increment and decrement the value of the field within the valid limits of the setting. If the up and down keys are held on the rate of scrolling will increase. On a multi-field setting (e.g. text settings or CT ratios) pressing the right () key will move the edit point to the next field. Once editing is complete pressing ENTER stores the new setting value into the non-volatile memory. The setting change is effective immediately unless any protection element is operating (above setting) in which case the change becomes effective when no elements are operating. If during editing the CANCEL key is pressed the edit mode is exited, the setting change is discarded and the original value is redisplayed. ©2010 Siemens Protection Devices Limited P20006 Page 12 of 37 Figure 2-1 ©2010 Siemens Protection Devices Limited list of settings with multiple groups list of items on multiple screens Screen display as seen on relay Key Argus 4 and 6 models only Scada Control Hot Line Working Trip & Lockout Trip & Reclose Close & Reclaim ARC ALL Inst. LowSet ΔTrip Counter Reset SEF CANCEL ENTER Argus 4 and 6 Linesman Mode TEST/ RESET CB Maintenance menu. Ö to view Data Storage menu. Ö to view Comms Interface menu. Ö to view Status Config. menu. Ö to view O/P Relay Config menu. Ö to view Auto Reclose menu. Ö to view Voltage menu. Ö to view Directional menu. Ö to view Protection menu. Ö to view System Config. menu. Ö to view IEC 60870-5103 comm settings status input mappings output relay mappings auto-reclose settings voltage element settings directional elements settings overcurrent protection settings system configuration settings CB maintenance settings waveform, event and fault storage settings ** LED Test ** Relay type Software identity Settings Mode Argus 1 and 2 Relay Identifier + CANCEL CANCEL ENTER Argus 4 and 6 models only Certain Argus 2 models only Argus 2 and 6 models only TEST/ RESET ENTER Trip dd/mm/yy hh/ mm Trip X X X toggle default screen reset count meter 2. Instruments marked * appear in selected models only. Refer to appropriate Settings and Parameters document for definitive list. 1. For definitive lists of settings and instruments in each model, refer to the appropriate 'Diagrams and Parameters' document for that model. Notes. Primary currents Sec'y. currents * Primary phase voltages * Primary phase-phase voltages * Sec'y. phase voltages * Sec'y. phase-phase voltages * Apparent power & power factor * Real and reactive power * Whr (Fwd/Rev) * VArHr (Fwd/Rev) *Max demand I, W, VAr * Directional status Relay Status Status Inputs Trip Circuit Condition * Delta trip counter Trip Counters * Freq. Op Counter Sum I2 Num. of Waveforms Num. of Events Date and Time Starters General alarms * ARC Status & Alarms * ARC Inhibits * CB Status Power On Count Instrument Mode Fault 1 Fault 2 Fault 3 Fault 4 Fault 5 P300009 Menu Structure Argus Overcurrent TEST/ RESET Fault Data Mode 7SG11 Argus User Manual Menu Structure for Argus 1, 2, 4 and 6 Relays P20006 Page 13 of 37 7SG11 Argus User Manual Eight settings groups are stored within the Argus. Only one of these is active at a time and only one can be displayed at a time. Some settings have a common value across all groups. If a setting has different values across the groups this is indicated by Gn in the top left of the display while the setting is being displayed, where n is the number of the current display group. The active group can be switched from one to another using the ‘Active Group’ setting in the ‘System Config.’ sub-menu. Similarly, the current display group is controlled by the ‘Display Group’ setting. 2.1.1.1 Password Entry If, at any point, a password is required the screen will display ‘Enter password’ and a four-character field. The password is entered, as described for settings changes above. On pressing ENTER, if the password is correct, the user is “logged in” and editing will be allowed. The user will remain logged in for an hour after the last key press after which he/she will be “logged out” and the password must be re-entered for further changes. To change the password the ‘Change Password’ setting in the ‘System Config.’ sub-menu should be edited. If an attempt is made to change the password the user will first be logged out and will have to log in again (to prove authenticity). After changing the setting the user will be asked to confirm the password by re-entering it. If no password has been set, the text ‘NOT ACTIVE’ will be shown as the setting value of the ‘Change Password’ setting. If a password has been set the setting value will be shown as either a 7 or 8 digit number. If the password is forgotten, this 7 or 8 digit number can be communicated to Siemens Protection Devices Limited, by an authorised person and the password can be decoded. If a password has been set it can be removed by entering the text ‘NONE’ into the ‘Change Password’ setting. 2.1.1.2 Yes/No Confirmation Some settings require further confirmation of change using Yes/No confirmation. When the confirmation screen appears the edit field will be flashing ‘N’ (for ‘No’). Use the up () or down () key to change the field to ‘Y’ (for ‘Yes’) and then press ENTER to confirm the change. Pressing CANCEL, or pressing ENTER without changing the field to ‘Y’ will abort the change. 2.1.2 Instruments While an instrument is being displayed it will be updated regularly. 2.1.2.1 Default Instruments When an instrument is being displayed, pressing ENTER toggles its “default instrument” status on and off. A default instrument is one that is displayed automatically by the Argus after no keys have been pressed for a period. A number of default instruments can be set in which case they will be cycled in turn for 5 seconds each. The period before the default instruments are displayed is controlled by the ‘Default Screen Time’ setting in the ‘System Config.’ menu. If an instrument is set as a default instrument this is indicated by a ‘‘ in the top right corner of the display. While a default instrument is being displayed, pressing any key (except TEST/RESET) will revert the display to that being displayed before the default instrument was activated. 2.1.2.2 Resetting Counts Some instruments show count or summation values, e.g. Trip Count, Sum of I2. These can be reset using settings within the relevant sub-menus. Pressing the TEST/RESET key while the appropriate instrument is displayed will also reset them. You will be asked to confirm this using a Yes/No confirmation (as described in section 2.1.1.2 but TEST/RESET can also be used to confirm, rather than pressing ENTER). 2.1.3 Fault Displays As shown in Figure 2-1, the occurrence of a fault (as defined by the ‘Fault Trigger’ setting) will cause the red trip LED to be lit and the trip display will be shown. This gives the date (DD/MM) and time (HH:MM:SS) of fault and the poles that were active at the time of trip. Example: - 12/05 17:25:51 TRIP A E Pressing the TEST/RESET key will extinguish the trip LED, reset latched output relays and change the display to the scrolling fault display, giving a more detailed fault record. On the top line of this display the fault number (1 to 5) is displayed. The bottom line gives the date and time of trip (DD/MM/YY HH:MM:SS.ssss), the active group and then for each pole of the Argus relay: ©2010 Siemens Protection Devices Limited P20006 Page 14 of 37 7SG11 Argus User Manual • • • • • Current at time of trip The voltage at time of trip (certain Argus 2 models only) Forward or reverse direction of current flow (directional relays only) Elements which were active (above setting) at time of trip Elements that operated for the trip to occur are indicated by <…> around the element Example: - Fault 1 <<<fault data>>> where ‘fault data’ is: 25/02/01 17:25:51.2525 G1 PHASE A LS IDMTL <HS1> HS2 IA = 12.32xIn … This information scrolls along the bottom line of the display. This record can be viewed again later in the Fault Data displays. The five most recent faults are stored, with the oldest being lost when a new fault occurs. The five faults are numbered from 1 to 5 with fault 1 being the most recent. 2.1.4 Software Information The identity of the software present in the Argus can be displayed as follows: Ensure that the ‘Relay Identifier’ is displayed on the LCD (if necessary press the CANCEL key until it shows). Press and hold the CANCEL key, then press the TEST/RESET key, then release the CANCEL key and TEST/RESET key together. The software article numbers and revisions will now be displayed on the LCD. Press any key to return to the ‘Relay Identifier’. 2.1.5 Operation with Front Cover Fitted When the clear plastic cover is fitted only the down () and right ()/TEST/RESET keys are accessible using through-cover buttons. These buttons are recessed to prevent inadvertent operation of the keys. Referring to Figure 2-1, it can be seen that all areas of the menu can be accessed using the and keys but that settings cannot be changed since the ENTER key is not accessible. Counter instruments can be reset while viewing them by pressing RESET, then using and RESET to confirm. 2.2 Operation using Reydisp Evolution (IEC 60870-5-103 comms only) Reydisp Evolution provides the means to achieve the following: • Get (upload) a settings file from the Argus • Download a settings file to the Argus • Change individual settings • Get the active group number • Set the active group number • Monitor for events and display them spontaneously • Upload the complete events file from the Argus • Clear the events file • Upload waveform records from the Argus • Trigger waveform recording • Clear waveform records • Continuously display instruments i.e. meters, counters, relay status, ARC status etc. • Get system data (hardware and software details) from the relay • Reset all flags • Send commands to the relay. Allows user to access the command set of the Argus which includes synchronise the clock, change settings group, trip and close circuit breakers, enable and disable auto-reclose functions and protection elements The Reydisp Evolution software can be used with all Argus and Modular II protection relays supplied by Siemens Protection Devices Limited. Use of the Reydisp Evolution software is menu driven, with the settings, events, waveforms, instruments and commands all being available in separate menus. The settings are displayed in the same order as on the relay fascia. ©2010 Siemens Protection Devices Limited P20006 Page 15 of 37 7SG11 Argus User Manual Section 3: Installation 3.1 Unpacking, Storage and Handling On receipt, remove the Argus from the container in which it was received and inspect it for obvious damage. It is recommended that the Argus relay not be removed from the case. To prevent the possible ingress of dirt, the sealed polythene bag should not be opened until the Argus is to be used. If damage has been sustained, a claim should immediately be made against the carrier, also inform Siemens Protection Devices Limited. When not required for immediate use, the Argus should be returned to its original carton and stored in a clean, dry place. The Argus relay contains static sensitive devices. These devices are susceptible to damage due to static discharge and for this reason it is essential that the correct handling procedure is followed. The Argus relay’s electronic circuits are protected from damage by static discharge when it is housed in its case. When the relay has been withdrawn from the case static handling procedures should be observed as follows: • Before removing the Argus from its case the operator must first physically touch the case to ensure that he/she is at the same potential. • The Argus relay must not be handled by any of the terminals on the rear of the chassis • Argus relays must be packed for transport in an anti-static container • Ensure that anyone else handling the Argus is at the same potential As there are no user serviceable parts in the Argus relay, then there should be no requirement to remove any modules from the chassis. If any modules have been removed or tampered with, then the guarantee will be invalidated. Siemens Protection Devices Limited reserves the right to charge for any subsequent repairs. 3.2 Recommended Mounting Position The Argus uses a liquid crystal display (LCD) which is used in programming and for operation. The LCD has a viewing angle of ±70° and is back-lit. However, the best viewing position is at eye level and this is particularly important when using the built-in instrumentation features. The LCD contrast will normally be correct for all positions and environments, however it can be adjusted if required using the adjustment screw mounted through the fascia to the upper right of the LCD. The Argus relay should be mounted on the circuit breaker or panel to allow the operator the best access to the functions. 3.3 Relay Dimensions The following drawings are available which give panel cut out and mounting details. Refer to the appropriate Diagrams and Parameters part of the documentation for a cross-reference of case sizes and models. • • • 2995X10004 Overall Dimensions and Panel Drilling for Epsilon E4 Case 2995X10006 Overall Dimensions and Panel Drilling for Epsilon E6 Case 2995X10008 Overall Dimensions and Panel Drilling for Epsilon E8 Case 3.4 Wiring The Argus should be wired according to the scheme requirements, with reference to the appropriate wiring diagram. Refer to the appropriate Diagrams and Parameters part of the documentation for a cross-reference of wiring diagrams and models. 3.4.1 Communications Fibre-optic STTM (BFOC/2.5) bayonet connectors – 2 per Argus. Glass fibre is recommended for all but the shortest distances. When installing fibre ensure that the fibre’s bend radii comply with the recommended minimum for the fibre used – typically 50mm is acceptable for single fibres. ©2010 Siemens Protection Devices Limited P20006 Page 16 of 37 7SG11 Argus User Manual An option for RS485 electrical interface is available. A maximum of 256 devices can be connected using 120 ohm screened twisted pair wire ie Belden 3105A, or similar, terminated with a suitable flat blade or pin connector. The last device in the circuit must be terminated with the termination link as show in section P20008-Diagrams & Parameters, this connects the internal 120 ohm terminating resistor. 3.5 Fixings 3.5.1 Crimps Davico ring tongue with 90 deg bend Table 3-1 Wire crimp sizes Wire Size Davico 2 DVR1-4 (90deg) 2 DVR2-4 (90deg) 0.25 to 1.6 mm 1.0 to 2.6 mm 3.5.2 Panel Fixing Screws Kit ZA0005-062 comprising of: • • • Screw Pan Head M4x10mm (Black) ZB5364-101 2off Nut M4 2103F11040 2off Lock washer 2104F70040 2off Two kits are required for the R4, R6 and R8 case sizes. 3.6 Ancillary Equipment The Argus can be interrogated locally or remotely by making connection to the fibre optic terminals on the rear of the case. For local interrogation a portable PC with a fibre to RS232 modem is required. The PC must be capable of running Microsoft Windows 98 or greater, and it must have a standard RS232 port, a USB- RS232 adaptor, or a suitable PCMC1A RS232 adaptor can be used in order to drive the modem. The Reydisp communications package can then be used to interrogate the relay using the IEC 60870-5-103 protocol. For remote communications more specialised equipment is required see Section 4: Communications Interface in the Technical Reference section of this manual. ©2010 Siemens Protection Devices Limited P20006 Page 17 of 37 7SG11 Argus User Manual Section 4: Commissioning 4.1 Before Testing 4.1.1 Test Equipment 500V Insulation resistance test set. 1. Secondary injection current source rated 10A or greater 2. Time interval meter 3. Primary injection equipment 4. A d.c. supply with nominal voltage within the working range of the Argus d.c. auxiliary supply rating 5. A d.c. supply with nominal voltage within the working range of the Argus d.c. status input rating Additionally for Argus 2 and 6 relays, the following equipment is required Variable voltage source 6. Phase shifting transformer 7. Phase Sequence Indicator Alternatively, items 1, 2, 4, 5, 6 and 7 can be replaced by a computer programmable V & I source universal test set Additional equipment for general tests and for testing the communications channel:Portable PC with an RS232 to fibre-optic converter and suitable interface cable or via RS485 input. Printer to operate from the above PC (Optional). Use of PC to Facilitate Testing The functions of Reydisp Evolution (see section 2.2) can be used during the commissioning tests to assist with test procedures or to provide documentation recording the test and test parameters. One method is to clear both the waveform and event records before each test is started, then, after the tests, upload from the Argus the settings, events and waveform files generated as a result of application of the tests. These can then be saved off to retain a comprehensive record of all tests. This method is particularly useful when auto-reclose sequences are being checked. When testing is completed then the event and waveform records should be cleared and the settings file checked to ensure that the required in-service settings are being applied. 4.1.2 Precautions Before electrical testing commences the equipment should be isolated from the current transformers and the CTs should be short-circuited in line with the local site procedures. The tripping and alarm circuits should also be isolated where practical. The provision and use of secondary injection test sockets on the panel simplifies the test procedure. Ensure that the correct d.c. auxiliary supply voltage and polarity is applied. See the relevant scheme diagrams for the relay connections. Check that the nominal secondary current rating of the current transformers has been correctly set on the P/F Rating, E/F Rating and SEF Rating settings in the System Config. menu of the relay. 4.1.3 Applying Settings The settings for the particular application should be applied before any secondary testing occurs. If they are not available then the Argus has default settings that can be used for pre-commissioning tests. Refer to the appropriate Diagrams and Parameters document for the default settings. Note that the tripping and alarm contacts must be programmed correctly before any scheme tests are carried out. Argus relays feature eight alternative settings groups. In applications where more than one settings group is to be used then it may be necessary to test the Argus in more than one configuration. Note. One group may be used as a ‘Test’ group to hold test-only settings that can be used for regular maintenance testing, eliminating the need for the Test Engineer to interfere with the actual in-service settings in the normally active group. This Test group may also be used for functional testing where it is necessary to disable or change settings to facilitate testing. ©2010 Siemens Protection Devices Limited P20006 Page 18 of 37 7SG11 Argus User Manual When using settings groups it is important to remember that the Argus need not necessarily be operating according to the settings that are currently being displayed. There is an ‘Active Settings Group’ on which the Argus operates and an ‘Edit/View Group’ which is visible on the display and which can be altered. This allows the settings in one group to be altered while the protection continues to operate on a different unaffected group. The ‘Active Settings Group’ and the ‘Edit/View Group’ are selected in the ‘System Configuration Menu’. Elsewhere in the settings menu system, those settings that can be altered for different groups are indicated by the symbols G1, G2 etc. in the top left of the display. All other settings are common to all groups. 4.2 Tests 4.2.1 Inspection Ensure that all connections are tight and correct to the wiring diagram and the scheme diagram. Record any deviations. Check that the Argus is correctly programmed and that it is fully inserted into the case. Refer to Section 2: Operation Guide for information on programming the Argus. 4.2.2 Insulation Tests Connect together all of the C.T. terminals and measure the insulation resistance between these terminals and all other terminals connected together and to earth. Connect together the terminals of the DC auxiliary supply circuit and measure the insulation resistance between these terminals and all other terminals connected together and to earth. Connect together the terminals of the DC status input circuits and measure the insulation resistance between these terminals and all other terminals connected together and to earth. Connect together the terminals of the output relay circuits and measure the insulation resistance between these terminals and all other terminals connected together and to earth. Argus 2 and Argus 6 only: Connect together all of the V.T. terminals and measure the insulation resistance between these terminals and all other terminals connected together and to earth. Satisfactory values for the various readings depend upon the amount of wiring concerned. Where considerable multi-core wiring is involved a reading of 2.5 to 3.0 megohms can be considered satisfactory. For short lengths of wiring higher values can be expected. A value of 1.0 megohm should not be considered satisfactory and should be investigated. Remove temporary connections. 4.2.3 Secondary Injection Tests Select the required configuration and settings for the application. Note that the Argus may be connected as either a 1A or a 5A rated device. The user should check this before commencing secondary testing. For all high current tests it must be ensured that the test equipment has the required rating and stability and that the Argus is not stressed beyond its thermal limit. 4.2.3.1 IDMTL/DTL Characteristics Argus 2 and Argus 6 only: If the Argus is to be employed for directional protection then all ‘Directional Control’ settings should be set to ‘OFF’ during the following tests. Pick-up and Drop-off This test checks the accuracy of the current setting for the main overcurrent characteristic. Note that SEF/REF poles are considered later. Inject single phase current into one of the current inputs. Slowly increase the current until the I>Is LED (yellow) operates and record the pick-up current in Table 4-4. Reduce the current until the LED goes out and record this as the Drop-off level. Repeat this test for each pole. Check that all measured Pick-up current levels are within 105% ± 4% of the applied setting. Check that the Dropoff levels are ≥95% of the measured Pick-up value. ©2010 Siemens Protection Devices Limited P20006 Page 19 of 37 7SG11 Argus User Manual Note. Depending upon the applied settings a TRIP could occur if the current is on for longer than the operating time. This may be undesirable while measuring Pick-up and Drop-off levels. The ‘Fault Trigger’ setting (in the data storage menu) can be used to disable tripping indication temporarily during this test, also the Low and High Set elements may need to be temporarily turned ‘OFF’ in order to prevent unwanted instantaneous operations. Timing This test checks the accuracy of the main time delay characteristic (IDMTL/DTL). Select the current setting, characteristic type and time multiplier setting as required. Then inject current at multiples of the setting. The correct output contact must be programmed for the phase fault and earth fault elements. A time interval meter must be connected to the correct terminals. The timer should be started by the source and stopped by the trip contacts. Each pole should be tested. A secondary injection timing test circuit is illustrated in Figure 4-3. Table 4-1 shows theoretical values for each characteristic curve with a time multiplier of 1.0. Record the actual results in Table 4-5 and check that the measured times lie within ±5% or ±30ms of nominal time. Table 4-1 Curve IDMTL Timing Characteristic (Time in Seconds) 2 xIs 5 xIs NI 10.03 4.28 VI 13.50 3.38 EI 26.67 3.33 LTI 120.00 30.00 DTL - - 4.2.3.2 Lowset and Highsets Phase Fault poles can have up to two highsets and one lowset, also the Earth fault can have up to two highsets and one lowset. The following tests should be applied to each element in the scheme. The low/high set under test should be programmed to operate an output contact, which can then be monitored to detect operation of the element. Argus 2 and Argus 6 only: If the Argus is to be employed for directional protection then all ‘Directional Control’ settings should be set to ‘OFF’ during the following tests. Pick-up and Drop-off Programme the current setting for the low/high set characteristic to the required level and set its time delay to 0.00 sec. Inject a level of current below the setting and increase the current until the output contact operates. Record the Pick-up level for each pole in Table 4-6, Table 4-7 or Table 4-8 and confirm that in each case it occurs within ±5% of the applied setting. For high levels of current the thermal limit of the Argus must not be exceeded. Refer to the performance specification for the Argus, which defines the thermal limits. Manual testing runs the risk of exceeding the thermal limit. When manually testing a high setting it is not considered necessary to establish the exact pick-up level and the following procedure is recommended to ensure that the thermal limit is not exceeded:1. Switch on the test supply and quickly raise the current to just below 95% of the set value and then switch off the test supply immediately. Switch back on and then off in quick succession to prove non-operation. Do this five times with a delay between each test of about 10 seconds. Test similarly at 105% of setting to prove operation. Switch off, reset the trip indication and then switch on and off five times quickly to prove operation for each injection. If a computer test set is being used then the pick-up level and timing can be measured provided that the automatic test is set up to apply pulses of current to avoid exceeding the thermal limit. Timing The operating time should be tested with a current of 5 times setting applied and with the required time delay set. Output contacts for the Low/Highsets must be programmed and a time interval meter connected to the correct terminals. The timer should be started by the source and stopped by the Low/Highset contacts. Each phase should be tested. Record the results in Table 4-9, Table 4-10 and Table 4-11 and confirm that the measured delays are within ±5% of the set values. ©2010 Siemens Protection Devices Limited P20006 Page 20 of 37 7SG11 Argus User Manual 4.2.3.3 SEF/REF Pick-up and Drop-off For Argus relays with the SEF/REF element fitted then the current setting should be checked for this pole. This can be achieved in the same manner as the IDMTL/DTL Characteristic Pick-up/Drop-off tests. Record the results in Table 4-12. Confirm that the measured Pick-up level is within ±5% of the set value and that Drop-off occurs at ≥95% of the measured Pick-up value. Timing The timers used in the SEF/REF mode are operated sequentially. Separate contacts must be configured for timer 1 and timer 2 in order that operation of each timer is checked. Set the operating time on timer 1 to the required time and connect a time interval meter to the contact configured for timer 1. Inject a current at least three times the setting and record the time. Set the operating time on timer 2 to the required time and connect a time interval meter to the contact configured for timer 2. Inject a current at least three times the setting and record the time. The operating time is the addition of time 1 and time 2. Subtract time 1 from time 1+2 to get the operating time for timer 2. Note that the SEF/REF pole has an additional available timer that is referred to as the lowset delay, this should be tested if required by the application. Record the results in Table 4-13 and confirm that the measured delays are within ±5% of the set values. 4.2.3.4 Circuit Breaker Fail To measure the pick up level, temporarily set a status input to operate the external CBF function then invert the input, this enables the element. The delay time should be set to zero. Inject current and record the pick up level in Table 4-14. The 2-stage circuit breaker failure feature should be tested if required by the application. If only one of the stages is to be used then only CBF delay 1 need be tested. In order to test both stages of the CBF feature then the two CBF delays should be programmed to operate separate output contacts other than the main trip output. They should also be programmed with their appropriate delays and current level setting. CBF delay 1 is initiated by the main trip output and current above the setting, after timing out it generates a trip output of its own and also initiates the CBF delay 2 which subsequently generates a final trip output. Connect the main trip output to start a time interval meter. Connect the output from CBF delay 1 to stop both the timer and the current source. Inject current of 2x setting into any pole and record the first CBF time delay in Table 4-15. Connect the CBF delay 1 output to start the time interval meter. Connect the output from CBF delay 2 to stop both the timer and the current source. Inject current of 2x setting into any pole and record the second CBF time delay. Check that the measured delays are within ±5% of the set values. 4.2.3.5 Directional Tests This applies to Argus 2 and Argus 6 relays only The following tests deal specifically with directional functionality. Note that there are a number of variants of directional Argus relays with various combinations of directional and non-directional poles. These tests should only be applied to those poles that are directionalised. Note also that the directional response for each characteristic (eg IDMTL, highset, etc) is programmable and may be selected as either Non-directional, Forward, Reverse or TRI-state depending on the requirements of the scheme. For the following tests the ‘Directional Control’ settings should be set to the required settings. Directional Polarity Check This test checks for correct polarity of the directional circuits. In the Instruments menu display; indication is provided on the output states of the directional elements, i.e. whether they see forward current, reverse current or neither for each pole. This display is an aid to commissioning testing. If the Argus is allowed to trip during testing then this display will be interrupted and replaced by the fault data display screen. If this normal operation interferes with testing then temporarily change the ‘Fault Trigger’ setting so that no fault indication will be given if the Argus trips. ©2010 Siemens Protection Devices Limited P20006 Page 21 of 37 7SG11 Argus User Manual 1. Check the direction of each pole in turn by connecting to the appropriate terminals. Table 4-2 shows the polarising quantity for each pole. Figure 4-4 shows a directional test circuit for one type of Argus 2. Table 4-2 Connections for Directional Polarity Overcurrent pole Polarising voltage Phase A VBC Phase B VCA Phase C VAB Earth-fault 3V0 2. Inject rated current and apply rated voltage at the CA (MTA) phase angle setting. Then, for each pole, monitor the directional display in the instrument menu and check that indication of forward current (FWD) is displayed. 3. Repeat all of the above with the current connections reversed. reverse (REV) current flow. Indication should now be given of 4. To check the direction of the earth fault element on the Argus AG2xx series or the AG2xx-5xx series when connected Ph-Ph, the 3Vo must then be applied to the residual voltage input. To check the direction of the earth fault element on the AG2xx-5xx series of relays when connected Ph-N remove the voltage from the phase under test, keeping the voltage healthy on the other two phases. Where only single phase equipment is available then reverse voltage must be applied to the phase under test. For all of the above tests inject residual current at the MTA into the earth fault input to confirm correct directional operation. Boundary of Operation The purpose of this test is to ensure that the operating angles are correct for the forward and reverse zones of each pole. Note that if a pole is programmed to operate in one direction only then only the angles for that operating zone need be checked. Check that the required directional settings have been correctly applied, including the characteristic angles. Each directional operate zone has two boundaries of operation, at leading and lagging boundaries of I with respect to V. To find the boundaries of operation for a particular pole, inject current and volts at the characteristic angle and check that ‘FWD’ is indicated. Then adjust the phase angle to find the lagging drop-off boundary (ie I lags V giving a negative angle), the ‘FWD’ indicator disappears at the drop-off angle. Set the angle back until the ‘FWD’ indicator reappears and adjust the phase angle to find the leading drop-off angle (positive angle). To measure pick-up angles set the applied phase angle to be in the reverse zone and reduce the phase angle until ‘FWD’ is displayed. Do for both leading and lagging boundaries. The reverse zone boundaries can be found in a similar fashion. Initially inject at the characteristic angle plus 180° and check that ‘REV’ is indicated. Then find the pick-up and drop-off angles at the leading and lagging boundaries. Find the boundaries of the operate zones for each pole and record them in Table 4-16. If the test equipment is not accurate enough to measure the boundary then an all or nothing test could be applied to verify the correct direction indication. ©2010 Siemens Protection Devices Limited P20006 Page 22 of 37 7SG11 Argus User Manual VRES 00 a -300 A Apply residual voltage either directly to input or by reducing voltage of faulted phase. IRES FWD B -600 b Adjust the phase angle of the residual current relative to the voltage: C.A. +900 -900 Verify directional pick-up and drop off at points A, B, C and D c Alternatively, REV +1200 C D +1500 d 180 Figure 4-1 Verify correct directional indication at points a, b, c and d (C.A +800, +1000, -800, -1000) 0 Directional Earth Fault Boundary System Angles VA 00 a With balanced 3-phase system quantities: -300 A IA FWD B Adjust the phase angle of the currents relative to the voltages: -600 b Verify directional pick-up and drop off at points A, B, C and D 900 - C.A. +900 -900 Alternatively, Verify correct directional indication at points a, b, c and d (C.A +800, +1000, -800, -1000) c +1200 REV C VC D +1500 VB d 1800 Figure 4-2 Directional Phase Fault Boundary System Angles Table 4-3 Limits of Operate Pick-up Relay Angle Boundaries Pole CA A,B,C +45 +30 Direction Operate (PU) limits (I wrt V) forward lag -37.5 -47.5 forward lead 127.5 137.5 reverse lead -42.5 -52.5 reverse lag 132.5 142.5 forward lag -52.5 -62.5 forward lead 112.5 122.5 ©2010 Siemens Protection Devices Limited Pole CA E/F Direction forward lag -45 -65 Operate (PU) limits (I wrt V) -127.5 -137.5 forward lead 37.5 47.5 reverse lead -132.5 -142.5 reverse lag 42.5 52.5 forward lag -147.5 -157.5 17.5 27.5 forward lead P20006 Page 23 of 37 7SG11 Argus User Manual 0 E/F -15 reverse lead -57.5 -67.5 reverse lead reverse lag 117.5 127.5 reverse lag 22.5 32.5 forward lag -82.5 -92.5 forward lag -172.5 -182.5 forward lead 82.5 92.5 forward lead -7.5 2.5 reverse lead -87.5 -97.5 reverse lead -177.5 -187.5 -2.5 7.5 reverse lag 87.5 97.5 forward lag -97.5 -107.5 forward lead 67.5 77.5 reverse lead -102.5 -112.5 72.5 82.5 reverse lag -90 reverse lag -152.5 -162.5 General Tests Voltage sensitivity can be tested if required by injecting current of twice setting at the Characteristic Angle. The voltage should then be increased from zero until operation of the directional element is indicated. Operation should occur at less than 2V for phase fault and less than 3.3V for earth fault. In Argus relays where the two-out-of-three gate function is available and is enabled then this feature can be checked. Provide a reference voltage VBC and inject current at the characteristic angle into the A pole and check that no ‘FWD’ operation occurs. Repeat injecting ‘FWD’ operate currents into two poles simultaneously and the Argus should operate. (This test can be carried out as shown in Figure 4-5. A single phase voltage is applied across two inputs with the third in reverse, and a single phase current at characteristic angle is injected through all three poles in series,. This applies one pole ‘FWD’ and the other two poles ‘REV’; reverse the current direction to give two poles ‘FWD’ and one pole ‘REV’. Further tests may be required to check that the directional control settings have been correctly applied where these are complex. Similarly, if different threshold and delay settings have been applied for forward and reverse operation then these should be tested. Such additional tests should be specified according to the particular requirements of the scheme. 4.2.4 Auto Reclose Sequences These tests apply to Argus 4 and Argus 6 relays only The Auto Reclose sequences to be applied in-service should be set up and proved for each of the fault types. As detailed in section 4.1.1 it is suggested that a portable Personal Computer (PC), with Reydisp Evolution installed, be connected to the Argus via an RS232 to Fibre Optic Modem and Fibre optic cables. This will greatly facilitate the testing and documentation of the results of the various tests applied to the Scheme. Reydisp Evolution can display the complete chronological event record generated by a full multi-shot Auto Reclose sequence for post test analysis (it is often difficult on site to keep track of protection and circuit breaker operations during a sequence test). The analysis function provided on the event record display enables the user to make time difference comparisons between two events. This allows, for example, accurate measurement of the Reclose delay (Dead time), or the Reclaim delay, without external equipment. The following information can be easily measured from a single Sequence event record: • • • • • • • • • • • Instantaneous Protection element operate times Circuit Breaker first Trip time Protection Starter element reset time Reclose (Dead Time) delay Circuit Breaker Close time Delayed Protection operate times Subsequent Circuit Breaker Trip and Close times Subsequent Reclose delays Reclaim delay Overall sequence time Status Interlock timing Also the Waveform Record display for each trip enables time measurements to be made between the analogue waveforms and the digital (binary) traces of the Status inputs and output relays. Measurement of the relative timing of the a.c. current waveforms and the Circuit Breaker Status contacts provides valuable data on the condition of the Circuit Breaker operate times In addition the Instruments provided by the Argus can be continuously monitored via Reydisp during a test sequence providing information on the state of the Argus and Circuit Breaker during a test sequence. ©2010 Siemens Protection Devices Limited P20006 Page 24 of 37 7SG11 Argus User Manual The sequence provided by the Argus in response to a permanent fault should be checked to ensure that the programmed sequence is as given for a Phase Fault and is also applicable to Earth Fault and/or Sensitive Earth Fault. If the scheme requires the Argus to provide Auto Reclose initiated by a Status input then the SA Sequence should be checked. The response to a Transient fault should be checked. Record the results of the sequence test in Table 4-17. 4.2.5 Status Inputs The operation of the status input(s) can be monitored on the ‘Status Input’ display shown in ‘Instruments Mode’. Inject the required supply voltage into each status input and check for correct operation. Depending on the application, each status input may be programmed to perform a specific function; each status should be checked to prove that its mapping and functionality is as set. Where the pick-up and/or drop-off timers associated with a status input are set to user scheme required delays these delays should be checked either as part of the scheme logic or individually. To check a status pick-up time delay, temporarily map the status to an output relay that has a normally open contact. Use an external timer and time the interval between status energisation and closure of the output contacts. To measure the drop-off delay, map to an output relay that has a normally closed contact, time the interval between status de-energisation and closure of the output contacts. Note. The time measured will include an additional delay, typically less than 20ms, due to the response time of the status input and the operate time of the output relay. 4.2.6 Output Relays A minimum of five output relays is provided. Three of these have change over contacts; the remainder have normally open contacts. Each contact can be tested individually by the trip test feature, which causes each output relay to be pulsed for the user-programmable minimum dwell time, or they can be checked during commissioning by testing the feature to which they are assigned. Note. A quick method of energising an output relay permanently, so that wiring can be checked, is to temporarily map the output relay being tested to the ‘Protection Healthy’ signal – as this is permanently energised the mapped relay will be held energised and normally open contacts will be closed. Remember to deselect the output relays from the ‘Protection Healthy’ signal following the test. 4.2.7 Primary Injection Tests Primary injection tests are essential to check the ratio and polarity of the transformers as well as the secondary wiring. 4.2.7.1 Primary Current Tests Use the circuit shown in Figure 4-6 to check the current transformer ratio and the C.T. connections for phase to earth fault current. Inject a current of sufficient magnitude for the Argus relay ammeters to display. These levels should be compared with the ammeters connected in series with the Argus. The secondary current is:- Is = Primary current CT ratio Use the circuit shown in Figure 4-7 to check the current transformer ratio and the C.T. connections for phase to phase fault. Record the results in Table 4-18. 4.2.7.2 Primary Directional Tests This applies to Argus 2 and Argus 6 relays only General If the Argus being commissioned is directional then the voltage circuits should be tested to ensure correct polarity. It is recommended that the Argus be connected to the C.T.’s and V.T.’s with the polarity as shown in the Diagrams and Parameters section of this manual. With the polarity connections shown, Argus relays will indicate ‘FORWARD’ direction of current when power is flowing away from the switchboard busbar and ‘REVERSE’ when flowing into the busbar. For an outgoing feeder, ‘FORWARD’ is the normal direction of power flow and for an incoming circuit, ‘FORWARD’ is opposite to the normal direction of power. However, normal application of directional protection is ©2010 Siemens Protection Devices Limited P20006 Page 25 of 37 7SG11 Argus User Manual to initiate a trip when fault current flows away from the busbar. (For an incomer, this requires a parallel supply source). In both cases therefore, the ‘FORWARD’ direction is the trip direction for normal applications. Argus 2 and 6 protection elements can be programmed to trip either NON directional, FORWARD, REVERSE or both (TRI-STATE operation). The FWD and REV (TRI-STATE operation) settings can be user programmed independently to different sets of setting values. Phase Directional Element Using a phase-sequence indicator, first check that the phase sequence of the voltages at the Argus are correct i.e. A-B-C and see by inspection that the phasing of the connections to the Argus is correct. If system has reverse Phase rotation i.e. A-C-B this will affect the Phase Fault directional elements only. For correct phasing of Type 1 Directional Relays i.e. AG2 – XXX series, reverse Vbc i.e. connect voltage Vb to terminal 83 and Vc to terminal 82. For correct phasing of Type 2 Directional Relays i.e. AG –5XX series, connect as shown in figures 4 – 10 /11/12/13 for normal A-B-C rotation; no wiring changes are necessary as the required adjustment is performed internally by the Relay in response to the Phase rotation setting change given below. change the rotation setting in SystemConfig:Phase Rotation from A-B-C to A-C-B. Setting to A-C-B automatically changes ‘Forward’ to ‘Reverse’ and visa-versa. Earth Fault connections remain unchanged, i.e. connections as shown. Check the magnitudes of the voltage transformer voltages. Pass a three phase load current of 20% or more of the current transformer rating in a known direction. From the ‘Instruments Display Mode’ check that the Argus correctly indicates either ‘FORWARD’ or ‘REVERSE’, in line with the direction of flow of the primary current. If the flow of current is such that the Argus should operate, see that in fact it does operate. Note that it may be necessary to reduce the current setting to a level below the available three phase load current. Reverse the connections to the current coils and see that the Argus restrains. If the flow of current is such that the Argus should restrain, see that in fact it does restrain, then reverse the connections to the current coils and see that it operates. This test is based on the assumption that the load current has a normal power factor. If, however, the power factor is very low, leading or lagging, difficulties may be encountered. For example, a very low leading power factor with power in the forward direction may cause a quadrature connected protection to restrain. When the test is complete all connections must be restored to normal. If any settings have been changed in proving the direction restore them to the original settings and repeat secondary injection testing as considered necessary. Earth Directional Element If the application includes a directional earth element, polarised in the normal fashion from the open delta winding of a voltage transformer, then the following procedure should be followed:Disconnect the A phase primary input to the voltage transformer. Where primary fuses exist this can be done by removing the A phase fuse. Short circuit the A phase main secondary winding. This should be done on the load side of the V.T. secondary circuit protection (eg fuse or miniature circuit breaker - MCB). Short circuit and disconnect the current transformer secondary winding connections on the B and C phases. Energise the circuit with primary load current (eg ≥20% of In). If the load power is flowing away from the busbars, then the directional earth fault element should indicate operation in the forward zone. Check that this is the case. Reverse the connections either to the current or voltage input and check for operation in the reverse zone. If the load power is flowing toward the busbars, then the opposite results should be expected. Finally, de-energise the circuit, restore normal connections, replace the A phase primary fuse and remove the shorting connections from the A phase V.T. and from the B and C phase C.T. connections. Figure 4-8 shows the test set-up and the resultant applied voltages and currents for a simulated earth fault condition using load current. ©2010 Siemens Protection Devices Limited P20006 Page 26 of 37 7SG11 Argus User Manual 4.3 Putting into Service After tests have been performed satisfactorily the Argus should be put back into service as follows:Remove all test connections. Where possible the Argus settings should be down loaded to a computer and a printout of the settings produced. This should then be compared against the required settings. It is important that the correct settings group is active if more than one group has been programmed. Reset all event, waveform and fault records and reset all counters. Replace all secondary circuit fuses and links, or close m.c.b’s. ©2010 Siemens Protection Devices Limited P20006 Page 27 of 37 7SG11 Argus User Manual 4.4 Commissioning Record Tables These tables should be completed during commissioning as a record of the commissioning tests. Relay Type Serial Number Substation Feeder Identity Tester Date 4.4.1 Secondary Injection Tests 4.4.1.1 Overcurrent IDMTL/DTL Characteristic Table 4-4 Pole Pick-up/Drop-off Results Pick-up setting Measured pick-up Pick-up error (±4% of 105%) Measured drop-off Drop-off error (≥95% of pick-up) Phase A Phase B Phase C E/F Table 4-5 Pole Timing Characteristic Results Characteristic (NI, VI, EI, LTI, DTL) 2x Is Delay Error (±5% or ±30 ms) 5x Is Delay Error (±5% or ±30 ms) Phase A Phase B Phase C E/F Lowset and Highsets Table 4-6 Pole Lowset setting results Lowset setting Measured pick-up Error (±5% of setting) Phase A Phase B Phase C E/F ©2010 Siemens Protection Devices Limited P20006 Page 28 of 37 7SG11 Argus User Manual Table 4-7 Pole Highset 1 setting results Highset 1 setting Measured pick-up Error (±5% of setting) Measured pick-up Error (±5% of setting) Measured delay Error (±5% or ±30 ms of setting) Measured delay Error (±5% or ±30 ms of setting) Measured delay Error (±5% or ±30 ms of setting) Phase A Phase B Phase C E/F Table 4-8 Pole Highset 2 setting results Highset 2 setting Phase A Phase B Phase C E/F Table 4-9 Pole Lowset timing results Lowset delay setting Phase A Phase B Phase C E/F Table 4-10 Pole Highset 1 timing results Highset 1 delay setting Phase A Phase B Phase C E/F Table 4-11 Pole Highset 2 timing results Highset 2 delay setting Phase A Phase B Phase C E/F ©2010 Siemens Protection Devices Limited P20006 Page 29 of 37 7SG11 Argus User Manual SEF/REF Table 4-12 Pole Pick-up/Drop-off Results for SEF/REF Pick-up setting Measured pick-up Error (±5% of setting) Measured drop-off Error (≥95% of Pick-up) SEF/REF Table 4-13 Delay SEF/REF Timing Results Delay setting Measured delay Error (±5% or ±30 ms of setting) Timer 1 Timer 1+2 Timer 2 Lowset 4.4.1.2 Circuit Breaker Fail Table 4-14 Pole Pick-up/Drop-off Results for CBF Level Detector Pick-up setting Measured pick-up Error (±5% of setting) Measured drop-off Error (≥95% of Pick-up) Phase A Phase B Phase C E/F Table 4-15 CBF delay Circuit Breaker Fail Timing Results Delay setting Measured delay Error (±5% or ±30 ms of setting) Delay 1 Delay 2 ©2010 Siemens Protection Devices Limited P20006 Page 30 of 37 7SG11 Argus User Manual 4.4.1.3 Directional Tests These tests apply to Argus 2 and Argus 6 relays only Table 4-16 Directional Boundaries of Operation Forward Pole CA (M.T.A.) Lag (point C) Reverse Lead (point A) Lag (point B) Lead (point D) Pick-up Drop-off Pick-up Drop-off Pick-up Drop-off Pick-up Drop-off A B C E/F 4.4.2 Autoreclose Sequences These tests apply to Argus 4 and Argus 6 relays only Table 4-17 Auto-reclose Sequences and settings Sequence setting Phase-fault Earth-fault SEF Delayed Delayed Delayed Status ARC IN/OUT Line Check trip Protection Trip 1 Reclose delay 1 Protection Trip 2 Reclose delay 2 Protection Trip 3 Reclose delay 3 Protection Trip 4 Reclose delay 4 Protection Trip 5 Shots to Lockout Highset 1 Trips to Lockout Highset 2 Trips to Lockout Transient fault ©2010 Siemens Protection Devices Limited P20006 Page 31 of 37 7SG11 Argus User Manual 4.4.3 Primary Injection Tests Table 4-18 Phase injected Primary Injection Results Primary current Secondary current A B C E A-B B-C B-E ©2010 Siemens Protection Devices Limited P20006 Page 32 of 37 7SG11 Argus User Manual phase shifting transformer 240V a.c. supply 240V a.c. supply A C START - A STOP Figure 4-3 Secondary Injection Test Circuit Figure 4-4 A B 83 81 82 80 53 49 45 25 54 50 46 26 A VB E/F or SEF/REF VC A 79 C VA V E/F Directional Test Circuit phase shifting transformer 240V a.c. supply C 81 phase angle meter E/F or SEF/REF auxiliary + d.c. supply B 83 V A B or E/F time interval meter A 82 + - IA primary injection test source IB IC Figure 4-5 Test Circuit Two-out-of-three Directional A B Figure 4-6 Test Circuit Phase to Earth Primary Injection C A A E/F or SEF/REF + - primary injection test source Figure 4-7 Phase to Phase Primary Injection Test Circuit ©2010 Siemens Protection Devices Limited P20006 Page 33 of 37 7SG11 Argus User Manual Ia End 1 Direction of load power flow M P1 S1 test S/C test S/C L P2 Ia 3 pole directional phase-fault and directional earth-fault 53 54 49 50 45 46 25 26 A phase I/P B phase I/P C phase I/P A phase fuse removed 79 80 reverse phase-fault element Earth-fault I/P S2 dn da forward Ia Vref reverse forward Vpol Vpol = Vbn + Vcn Ia test S/C +ve 81 earth-fault element 82 83 -ve dn da A phase fuse removed test S/C 79 80 3 pole directional phase-fault and directional earth-fault Vpol = Vbn + Vcn +ve forward Vref 81 reverse 82 Ia phase-fault element 83 -ve L P2 S2 test S/C M P1 S1 Ia test S/C End 2 Direction of load power flow 26 25 46 45 50 49 54 53 reverse Earth-fault I/P C phase I/P Ia Vpol forward earth-fault element B phase I/P A phase I/P Ia Note that the terminal numbers in this diagram refer to an Argus AG2-4x5/4x6. The terminals available on other models may be different, however, the principle remains the same. LOAD Figure 4-8 Load Current Resultant Applied Voltages and Currents for a Simulated Earth Fault Condition using ©2010 Siemens Protection Devices Limited P20006 Page 34 of 37 7SG11 Argus User Manual Section 5: Testing and Maintenance Argus relays are maintenance free, with no user serviceable parts. 5.1 Periodic Tests During the life of the Argus, it should be checked for operation during the normal maintenance period for the site on which the product is installed. It is recommended the following checks/tests are carried out:1. Visual inspection of the metering display 2. Operation of output contacts 3. Secondary injection of each element 5.2 Maintenance Failure of the Argus will be indicated by the ‘Protection Healthy’ LED being off or flashing. A message may also be displayed on the LCD. In the event of failure Siemens Protection Devices Limited. (or one of its agents) should be contacted – see defect report sheet in section 0. If removal of the Argus from its case is required, the procedure described in section 3.1 should be followed. 5.3 Troubleshooting Table 5-1 Troubleshooting Guide Observation Action Relay does not power up. Check that the correct auxiliary DC voltage is applied and that the polarity is correct. Relay won’t accept the password. The Password being entered is wrong. Enter correct password. If correct password has been forgotten, note down the Numeric Code which is displayed at the Change Password screen e.g. Change password = 1234567 To retrieve the password communicate this code to a Siemens Protection Devices Limited Protection Healthy LED flashes General failure. Contact Siemens Protection Devices Limited. LCD screen flashes continuously. The LCD has many possible error messages which when displayed will flash continuously. These indicate various processor card faults. General failure. Contact Siemens Protection Devices Limited. Backlight is on but no text can be seen. Adjust the contrast. Scrolling text messages are unreadable. Adjust the contrast. Relay displays one instrument after another with no user intervention. Default instruments are enabled. Remove all instruments from the default list and only add those which are required. A= 120A B= 123A C= 108A E= 5A The ‘ ’ indicates that the instrument is a default instrument. Press ENTER to deselect it. (See section 2.1.2.1 Default Instruments). The LCD is stuck at the ‘General Alarms’ screen and is displaying ‘Trip Circuit Failure Sx’. (x = 1…5) ©2010 Siemens Protection Devices Limited The trip circuit failure feature is enabled and is expecting a healthy status input signal. Energise the correct Status Input, or disable the trip circuit feature if it is not required. P20006 Page 35 of 37 7SG11 Argus User Manual Observation Action Cannot communicate with the relay. Check that all of the communications settings match those used by Reydisp Evolution. E.g. Protocol set to IEC 60870-5-103 Check that the Tx and Rx fibre-optic cables are connected correctly. ( Tx –> Rx and Rx –> Tx ). Check that all cables, modems and fibre-optic cables work correctly. Set the line idle setting to Light On. Examine the Tx port on the back of the relay, with the fibre removed, and check that it is glowing red. If it is not then the communications board on the case may not be aligned correctly with the processor card socket. Contact a VA TECH representative. (WARNING : DO NOT LOOK AT THE FIBRE-OPTIC TRANSMITTER FOR A PROLONGED TIME). Relays will not communicate in a ring network. Check that the Data Echo setting on all relays is set to ON. Check that all relays are powered up. Check that all relays have unique addresses. Status inputs do not work. Check that the correct DC voltage is applied and that the polarity is correct. Check that the status input settings such as the Pick-up and Dropoff timers and the status inversion function are correctly set. Relay instrument displays show small currents or voltages even though the system is dead. This is normal. The relay is displaying calculation noise. This will not affect any accuracy claims for the relay. If the above checklist does not help in correcting the problem please contact Siemens Protection Devices Limited ©2010 Siemens Protection Devices Limited P20006 Page 36 of 37 7SG11 Argus User Manual DEFECT REPORT Please copy this sheet and use it to report any defect that may occur. Contact Name: Customers Name & Address: Telephone No: Fax No: Supplied by: Date when installed: Site: Circuit: Software Version: Article No: Date Found: During Maintenance: During Commissioning: Report Required: Y/N From a System Fault: Product Name: Other, please state: Serial No: Copy any message displayed by the relay: Describe Defect: Describe any other action taken: Signature: Please print name: For Siemens Protection Devices Limited use only: Date Received: Contact Name: Reference No: Date Acknowledged: Date: Date of Reply: Date Cleared: To report a problem, please return this completed form to: Siemens Protection Devices Limited PO Box 8, Hebburn, Tyne & Wear, NE31 1TZ. England. Telephone: +44 (0)191 401 7901 Fax: +44 (0)191 401 5575 ©2010 Siemens Protection Devices Limited P20006 Page 37 of 37