1
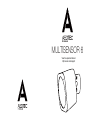
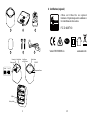
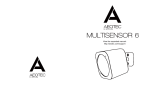
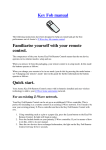
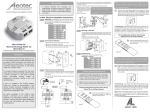
Aeon Labs MultiSensor 6
(Z-wave MultiSensor)
Change history
Revision
1
2
3
4
5
Date
9/23/2014
5/26/2015
7/01/2015
7/21/2015
8/11/2015
Change Description
Initial draft.
Update
Update
Update (V1.06)
Add more details for configuration parameters
Aeon Labs MultiSensor 6
Engineering Specifications and Advanced Functions for Developers
Aeon Labs MultiSensor is a routing binary sensor device based on Z-Wave routing slave library V6.51.06.
MultiSensor can be included and operated in any Z-wave network with other Z-wave certified devices
from other manufacturers and/or other applications. All non-battery operated nodes within the network
will act as repeaters regardless of vendor to increase reliability of the network.
It also supports Security Command Class and has the AES-128 bit security encryption built right in. While
a Security enabled Controller is needed in order to fully use the security feature.
If the MultiSensor is included into a SIS or SUC Z-wave network, it will be associated to SIS or SUC
automatically.
If PIR motion sensor is triggered, the MultiSensor will send a Basic set (0xFF) to associated devices. The
PIR motion sensor will then become inactive. After an interval time (configurable), the PIR motion
sensor will wake up and can detect motion again. The Multisensor will send basic set (0x00) if the PIR
motion sensor is not triggered for the interval time (configurable).
As soon as MultiSensor is removed from a z-wave network it will restore itself into factory settings.
1. Library and Command Classes
1.1 SDK: 6.51.06
1.2 Library
Basic Device Class: BASIC_TYPE_ROUTING_SLAVE
Generic Device class: GENERIC_TYPE_ SENSOR_MULTILEVEL
Specific Device Class: SPECIFIC_TYPE_ ROUTING_MULTILEVEL_SENSOR
1.3 Commands Class
Included Non-Secure
Included Secure
Node Info Frame
COMMAND_CLASS_ZWAVEPLUS_INFO V2,
COMMAND_CLASS_ZWAVEPLUS_INFO V2
COMMAND_CLASS_VERSION V2,
COMMAND_CLASS_VERSION V2
COMMAND_CLASS_MANUFACTURER_SPECIFIC,
COMMAND_CLASS_WAKE_UP V2
COMMAND_CLASS_ASSOCIATION_GRP_INFO,
COMMAND_CLASS_MANUFACTURER_SPECIFIC V2
COMMAND_CLASS_ASSOCIATION V2,
COMMAND_CLASS_SECURITY V1
COMMAND_CLASS_POWERLEVEL V1,
COMMAND_CLASS_DEVICE_RESET_LOCALLY V1
COMMAND_CLASS_NOTIFICATION_V3,
COMMAND_CLASS_MARK V1
COMMAND_CLASS_WAKE_UP V2,
COMMAND_CLASS_BATTERY V1,
COMMAND_CLASS_SENSOR_BINARY V1,
COMMAND_CLASS_SENSOR_MULTILEVEL_V5,
COMMAND_CLASS_CONFIGURATION V1,
COMMAND_CLASS_SECURITY V1,
COMMAND_CLASS_FIRMWARE_UPDATE_MD_V2,,
COMMAND_CLASS_MARK,
COMMAND_CLASS_DEVICE_RESET_LOCALLY,
Security
-
COMMAND_CLASS_ZWAVEPLUS_INFO,
Command
COMMAND_CLASS_VERSION,
Supported Report
COMMAND_CLASS_MANUFACTURER_SPECIFIC,
Frame
COMMAND_CLASS_WAKE_UP,
COMMAND_CLASS_ASSOCIATION_GRP_INFO,
COMMAND_CLASS_ASSOCIATION,
COMMAND_CLASS_POWERLEVEL,
COMMAND_CLASS_NOTIFICATION_V3,
COMMAND_CLASS_BATTERY,
COMMAND_CLASS_SENSOR_BINARY,
COMMAND_CLASS_SENSOR_MULTILEVEL_V5,
COMMAND_CLASS_CONFIGURATION,
COMMAND_CLASS_SECURITY,
COMMAND_CLASS_FIRMWARE_UPDATE_MD_V2
2. Technical Specifications
Operating distance: Up to 500 feet/150 metres outdoors.
Operating temperature: 0 to 40 .
Relative humidity: 8%RH to 80%RH.
℃
℃
3. Familiarize Yourself with Your MultiSensor
3.1 Interface
4. All Functions of Each Trigger
4.1 Function of Z-Wave Button
Trigger
Click one time
Description
1. Send non-security Node Info frame.
2. Add MultiSensor into z-wave network:
1. Power on MultiSensor. The MultiSensor’s LED will blink slowly when you short press the Action Button.
2. Let the primary controller into inclusion mode (If you don’t know how to do this, refer to its manual).
3. Press the Action Button.
4. If the inclusion is success, MultiSensor’s LED will be kept turning on for 8 seconds when you short press the
Action Button. If the LED is still in slow blink, in which you need to repeat the process from step 2.
3. Remove MultiSensor from Z-wave network:
1. Power on MultiSensor. The MultiSensor’s LED will be kept turning on for 8 seconds when you short press
the Action Button.
2. Let the primary controller into exclusion mode (If you don’t know how to do this, refer to its manual).
3. Press the Action Button.
4. If the exclusion is success, MultiSensor’s LED will blink slowly when you short press the Action Button. If
MultiSensor’s LED still keeps on status, in which you need to repeat the process from step 2.
Short press 2 times
1. Send Security Node Info frame.
within 1 second
2. Add MultiSensor into z-wave network:
1. Power on MultiSensor. The MultiSensor’s LED will blink slowly when you short press the Action Button.
2. Let the primary controller into inclusion mode (If you don’t know how to do this, refer to its manual).
3. Press the Action Button.
4. If the inclusion is success, MultiSensor’s LED will be kept turning on for 8 seconds when you short press the
Action Button. If the LED is still in slow blink, in which you need to repeat the process from step 2.
3. Remove MultiSensor from Z-wave network:
1. Power on MultiSensor. The MultiSensor’s LED will be kept turning on for 8 seconds when you short press
the Action Button.
2. Let the primary controller into exclusion mode (If you don’t know how to do this, refer to its manual).
3. Press the Action Button.
4. If the exclusion is success, MultiSensor’s LED will blink slowly when you short press the Action Button. If
MultiSensor’s LED still keeps on status, in which you need to repeat the process from step 2.
Press and hold for 3
Enable/disable wake up for 10 minutes.
seconds
(When it is enabled, the orange Led will fast blink)
Press and hold for
Reset MultiSensor to factory Default:
20 seconds
1. Press and hold the Action Button for 20 seconds.
2. If holding time more than one second, the LED will blink faster and faster. If holding time more than 20
seconds, the LED will be on for 2 seconds, which indicates reset is success, otherwise please repeat step 2.
Note:
1, This procedure should only be used when the primary controller is inoperable.
2, Reset MultiSensor to factory default settings, it will:
a ), let the MultiSensor to be excluded in Z-Wave network;
b), delete the Association setting, power measure value, Scene Configuration settings;
c), restore the Configuration settings to the default.
5. Special Rule of Each Command
5.1 Z-Wave Plus Info Report Command Class
Parameter
Value
Z-Wave Plus Version
1
Role Type
6(ZWAVEPLUS_INFO_REPORT_ROLE_TYPE_SLAVE_ALWAYS_ON)
Node Type
0 (ZWAVEPLUS_INFO_REPORT_NODE_TYPE_ZWAVEPLUS_NODE)
Installer Icon Type
0x0C07 (ICON_TYPE_SPECIFIC_SENSOR_NOTIFICATION_HOME_SECURITY)
User Icon Type
0x0C07 (ICON_TYPE_SPECIFIC_SENSOR_NOTIFICATION_HOME_SECURITY)
5.2 Association Command Class
MultiSensor supports 1 association group.
Group 1 is assigned to the Lifeline association group and can add max 5 association nodes.
When the PIR motion sensor is triggered, the MultiSensor will send Basic Set (0xFF) to the associated
nodes. If no any PIR motion on an interval time (configurable), the MultiSensor will send Basic Set (0x00)
to the associated nodes.
The automatically report of temperature, humidity, luminance and ultraviolet (configurable) also can be
sent to associated nodes.
5.3 Association Group Info Command Class
5.3.1 Association Group Info Report Command Class
Profile: General: NA (Profile MSB=0, Profile LSB=0)
5.3.2 Association Group Name Report Command Class
Group 1: Lifeline
5.3.3 Association Group Command List Report
Command List Report: 20 01 30 03 80 03 31 05 71 05 84 07.
COMMAND_CLASS_BASIC
BASIC_SET
COMMAND_CLASS_SENSOR_BINARY
SENSOR_BINARY_REPORT
COMMAND_CLASS_BATTERY
BATTERY_REPORT
COMMAND_CLASS_SENSOR_MULTILEVEL
SENSOR_MULTILEVEL_REPORT
COMMAND_CLASS_NOTIFICATION_V3
NOTIFICATION_REPORT_V3
COMMAND_CLASS_WAKE_UP
WAKE_UP_NOTIFICATION
5.4 Manufacturer Specific Report
Parameter
Value
Manufacturer ID 1
US/EU/AU=0x00 CN=0x01
Manufacturer ID 2
US/EU/AU=0x86 CN=0x6A
Product Type ID 1
EU=0x00, US=0x01, AU=0x02 CN=0x1D (29)
Product Type ID 2
0x03
Product ID 1
0x00
Product ID 2
0x64 (100)
5.6 Configuration Set Command Class
7
6
5
4
3
2
1
0
Command Class = COMMAND_CLASS_CONFIGURATION
Command = CONFIGURATION_SET
Parameter Number
Default
Reserved
Size
Configuration Value 1(MSB)
Configuration Value 2
………
Configuration Value n(LSB)
Parameter Number Definitions (8 bit):
Parameter
Description
Default Value
Size
Number
Hex / Decimal
2 (0x02)
Enable/Disable waking up for 10 minutes when re-power on (battery mode) the
0
1
240
2
5
1
1
1
20 (%)
1
0
1
20
2
10
2
MultiSensor.
1. Value = 0, disable.
2. Value =others, enable.
3 (0x03)
1. The default PIR time is 4 minutes. The Multisensor will send BASIC SET CC
(0x00) to the associated nodes if no motion is triggered again in 4 minutes.
2. Range: 10~3600.
Note:
(1), The time unit is second if the value range is in 10 to 255.
(2), If the value range is in 256 to 3600, the time unit will be minute and its value
should follow the below rules:
a), Interval time =Value/60, if the interval time can be divided by 60 and
without remainder.
b), Interval time= (Value/60) +1, if the interval time can be divided by 60 and
has remainder.
(3), Other values will be ignored.
4 (0x04)
Enable/disable the function of motion sensor.
1. Value=0, disable.
2. Value=1, enable, the current PIR sensitivity level=1. (minimum level)
Value=2, enable, the current PIR sensitivity level=2.
Value=3, enable, the current PIR sensitivity level=3.
Value=4, enable, the current PIR sensitivity level=4.
Value=5, enable, the current PIR sensitivity level=5. (maximum level)
5 (0x05)
Which command would be sent when the motion sensor triggered.
1. Value=1, send Basic Set CC.
2. Value=2, send Sensor Binary Report CC.
39 (0x27)
Configure low battery value.
Value=10 to 50.(10% to 50%)
40 (0x28)
Enable/disable the selective reporting only when measurements reach a certain
threshold or percentage set in 41-44 below. This is used to reduce network
traffic. (0 == disable, 1 == enable)
41 (0x29)
Threshold change in temperature to induce an automatic report.
Note:
1. The unit is Fahrenheit for US version, Celsius for EU/AU version.
2. The value contains one decimal point. E.g. if the value is set to 20, the
threshold value =2.0
℃ (EU/AU version) or 2.0 ℉ (US version). When the
current temperature gap is more then 2.0, which will induce a temperature
report to be sent out.
42 (0x2A)
Threshold change in humidity to induce an automatic report.
Note:
1.
The unit is %.
2.
The default value is 10, which means that if the current humidity gap is
more than 10%, it will send out a humidity report.
43 (0x2B)
Threshold change in luminance to induce an automatic report.
100 (LUX)
2
44 (0x2C)
Threshold change in battery level to induce an automatic report.
10 (%)
2
2
1
0
1
Note:
1.
The unit is %.
2.
The default value is 10, which means that if the current battery level gap is
more than 10%, it will send out a battery report.
45 (0x2D)
Threshold change in ultraviolet to induce an automatic report.
46 (0x2E)
Enable/disable to send the alarm report of low temperature(<-15 )
℃
Value=0, disable.
Value=1, enable (The MultiSensor will send a report of Multi Level Temperature
℃
CC to controller if the current temperature is less than -15 ).
Note: The battery activity will be reduced at low temperatures (-15 degrees
Celsius and below), which will lead to the product may not work normally. It is
recommended to use USB power at low temperatures.
100 (0x64)
Set 101-103 to default.
-
-
101 (0x65)
Which report needs to be sent in Report group 1 (See flags in table below).
241
4
102 (0x66)
Which report needs to be sent in Report group 2 (See flags in table below).
0
4
103 (0x67)
Which report needs to be sent in Report group 3 (See flags in table below).
0
4
110 (0x6E)
Set 111-113 to default.
-
-
111 (0x6F)
The interval time of sending reports in Report group 1 (Valid values 0x05-
3600 (seconds)
4
3600 (seconds)
4
0x28DE80).
1. The unit of interval time is second if USB power.
2. If battery power, the minimum interval time is 60 minutes by default, for
example, if the value is set to be more than 5 and less than 3600, the interval
time is 60 minutes, if the value is set to be more than 3600 and less than 7200,
the interval time is 120 minutes. You can also change the minimum interval time
to 4 minutes via setting the interval value(3 bytes) to 240 in Wake Up Interval Set
CC.
112 (0x70)
The interval time of sending reports in Report group 2 (Valid values 0x050x28DE80).
Note:
1. The unit of interval time is second if USB power.
2. If battery power, the minimum interval time is 60 minutes by default, for
example, if the value is set to be more than 5 and less than 3600, the interval
time is 60 minutes, if the value is set to be more than 3600 and less than 7200,
the interval time is 120 minutes. You can also change the minimum interval time
to 4 minutes via setting the interval value(3 bytes) to 240 in Wake Up Interval Set
CC.
113 (0x71)
The interval time of sending reports in Report group 3 (Valid values 0x05-
3600 (seconds)
4
0
1
0
1
0
2
0
1
0
1
N/A
4
N/A
1
0x28DE80).
1. The unit of interval time is second if USB power.
2. If battery power, the minimum interval time is 60 minutes by default, for
example, if the value is set to be more than 5 and less than 3600, the interval
time is 60 minutes, if the value is set to be more than 3600 and less than 7200,
the interval time is 120 minutes. You can also change the minimum interval time
to 4 minutes via setting the interval value(3 bytes) to 240 in Wake Up Interval Set
CC.
201 (0xC9)
Temperature calibration (the available value range is [-100,100] or [-
℃,10℃] ).
10.0
Note:
1. The value contains one decimal point. E.g. if the value is set to 20, the
calibration value is 2.0
℃ (EU/AU version) or 2.0 ℉(US version)
2. The calibration value = standard value - measure value.
℃ and the standard value = 23.2℃, so the
calibration value= 23.2℃ - 25.3℃= -2.1℃ (0xEB).
If the measure value =30.1℃ and the standard value = 33.2℃, so the calibration
value= 33.2℃ - 30.1℃=3.1℃ (0x1F).
E.g. If measure value =25.3
202 (0xCA)
Humidity sensor calibration (the available value range is [-50, 50]).
The calibration value = standard value - measure value.
E.g. If measure value =80RH and the standard value = 75RH, so the calibration
value= 75RH – 80RH= -5RH (0xFB).
If the measure value =85RH and the standard value = 90RH, so the calibration
value= 90RH – 85RH=5RH (0x05).
203 (0xCB)
Luminance sensor calibration (the available value range is [-1000, 1000]).
The calibration value = standard value - measure value.
E.g. If measure value =800Lux and the standard value = 750Lux, so the
calibration value= 750 – 800= -50 (0xFFCE).
If the measure value =850Lux and the standard value = 900Lux, so the calibration
value= 900 – 850=50 (0x0032).
204 (0xCC)
Ultraviolet sensor calibration (the available value range is [-10, 10]).
The calibration value = standard value - measure value.
E.g. If measure value =9 and the standard value = 8, so the calibration value= 8 –
9= -1 (0xFE).
If the measure value =7 and the standard value = 9, so the calibration value= 9 –
7=2 (0x02).
252 (0xFC)
255 (0xFF)
Enable/disable Configuration Locked (0 =disable, 1 = enable).
、
、
Value=0x55555555 Default=1 Size=4
Reset to factory default setting and removed from the z-wave network
2.Reset to factory default setting
:
Configuration Values for Parameter 101-103
7
6
5
4
3
2
1
0
configuration
Reserved
Value 1(MSB)
configuration
Reserved
Value 2
configuration
Reserved
Value 3
configuration
Value 4(LSB)
Luminance
Humidity
Reserved
Reserved bits or bytes must be set to zero.
Temperature
Ultraviolet
Reserved
Reserved
Reserved
Battery
MULTISENSOR 6
View the expanded manual:
http://aeotec.com/support
Aeotec by Aeon Labs MultiSensor.
Motion sensor. Humidity sensor. Thermometer. Light sensor.
Ultraviolet sensor. Vibration sensor.
The corner of your room just got smarter.
Aeotec by Aeon Labs’ MultiSensor looks like a motion sensor and it
acts like one too. But it’s also so much more. Installing this 1 piece
of Z-Wave® technology is the same as installing 6 pieces of Z-Wave
technology. Your home control network will immediately understand
motion, temperature, humidity, light, Ultraviolet and Vibration
readings wherever MultiSensor installed. Those intelligent readings
will equate to intelligence automation. And intelligent automation will
give you the perfect, smart home.
Familiarize yourself with your MultiSensor.
Your MultiSensor comes packaged with a number of accessories
that will help with its installation and operation.
Package Contents:
1. MultiSensor
2. Battery Cover
3. Back-Mount Arm
4. Double-Sided Tape
5. Screws (×2)
6. Micro USB Cable
1
Certifications (regional):
Z-Wave and Z-Wave Plus are registered
trademarks of Sigma Designs and its subsidiaries in
the United States and other countries
1
2
4
5
Screw hole
Battery cover
Unlock
Action Button
Light Sensor
and UV Sensor
Lock
3
6
FCC ID: XBAFT100
Version: 501010000001-AA
www.aeotec.com
Motion Sensor
RGB LED
Temperature Sensor
USB port
Battery Holder
2
23
generates, uses and can radiate radio frequency energy and, if
not installed and used in accordance with the instructions, may
cause harmful interference to radio communications. However,
there is no guarantee that interference will not occur in a particular
installation. If this equipment does cause harmful interference to
radio or television reception, which can be determined by turning
the equipment off and on, the user is encouraged to try to correct
the interference by one or more of the following measures:
Reorient or relocate the receiving antenna.
Increase the separation between the equipment and receiver.
Connect the equipment into an outlet on a circuit different
from that to which the receiver is connected.
Consul the dealer or an experienced radio/TV technician for
help.
Warning
Quick start.
Setup your power.
Your MultiSensor can be powered by battery or by USB with
an appropriate adaptor. For the purposes of installation and
setup, even if you intend to power your sensor with batteries, we
recommend utilizing the provided USB cable for setup. For this,
you’ll need an adaptor to plug your USB cable into, this can include
any USB port on a computer and most mobile phone chargers.
These steps can be performed in any location with your home, and
not necessarily in your MultiSensor’s final installation location.
For a USB powered installation;
1. Remove the Battery cover via sliding the Unlock button and
separating the two parts of your sensor.
Do not dispose of electrical appliances as unsorted municipal
waste, use separate collection facilities.
Contact your local government for information regarding the
collection systems available.
Unlock
22
2. Insert the appropriate end of the provided Micro USB cable into
your sensor’s USB port. Your MultiSensor is now powered on.
3
For a battery powered installation;
1. Remove the rear part of your sensor as shown in the previous
step 1.
2. Insert CR123A batteries oriented according to the picture below.
Your MultiSensor is now powered on.
Secondary battery
holder
Primary battery
holder
Note: If you just have only one CR123A battery, please insert the
battery into the primary battery holder.
Add your MultiSensor to your Z-Wave network.
It’s now time to sync your MultiSensor with a Z-Wave network. The
following instructions explain how to do this using a Z-Stick or a
Minimote from Aeotec. If you’re using an alternative controller for
your Z-Wave network, please refer to its user manual for network
inclusion instructions.
If you’re using a Z-Stick:
4
THAT PORTION OF PRODUCTS WITH RESPECT TO WHICH DAMAGES
ARE CLAIMED. ALL CLAIMS OF ANY KIND ARISING IN CONNECTION
WITH THIS AGREEMENT OR THE SALE OR USE OF PRODUCTS SHALL BE
DEEMED WAIVED UNLESS MADE IN WRITING WITHIN THIRTY (30) DAYS
FROM AEON LABS'S DELIVERY, OR THE DATE FIXED FOR DELIVERY IN
THE EVENT OF NONDELIVERY.
THE INDEMNITY AND WARRANTY IN ABOVE ARE EXCLUSIVE AND IN LIEU
OF ALL OTHER INDEMNITIES OR WARRANTIES, WHETHER EXPRESS OR
IMPLIED, INCLUDING THE IMPLIED WARRANTIES OF MERCHANTABILITY
AND FITNESS FOR A PARTICULAR PURPOSE.
FCC NOTICE (for USA)
THE MANUFACTURER IS NOT RESPONSIBLE FOR ANY RADIO OR TV
INTERFERENCE CAUSED BY UNAUTHORIZED MODIFICATIONS TO
THIS EQUIPMENT.SUCH MODIFICATIONS COULD VOID THE USER’S
AUTHORITY TO OPERATE THE EQUIPMENT.
STORE INDOORS WHEN NOT IN USE. SUITABLE FOR DRY LOCATIONS.
DO NOT IMMERSE IN WATER. NOT FOR USE WHERE DIRECTLY EXPOSED
TO WATER.
This device complies with Part 15 of the FCC Rules. Operation is
subject to the following two conditions:
1 This device may not cause harmful interference, and
2 This device must accept any interference received, including
interference that may cause undesired operation. This equipment
has been tested and found to comply with the limits for a Class
B digital device, pursuant to part 15 of the FCC Rules. These
limits are designed to provide reasonable protection against
harmful interference in a residential installation. This equipment
21
Labs' affiliates, shareholders, directors, officers, employees,
contractors, agents and other representatives harmless from all
demands, claims, actions, causes of action, proceedings, suits,
assessments, losses, damages, liabilities, settlements, judgments,
fines, penalties, interest, costs and expenses (including fees and
disbursements of counsel) of every kind (i) based upon personal
injury or death or injury to property to the extent any of the foregoing
is proximately caused either by a defective product (including strict
liability in tort) or by the negligent or willful acts or omissions of
Customer or its officers, employees, subcontractors or agents, and/
or (ii) arising from or relating to any actual or alleged infringement
or misappropriation of any patent, trademark, mask work, copyright,
trade secret or any actual or alleged violation of any other
intellectual property rights arising from or in connection with the
products, except to the extent that such infringement exists as a
result of Aeon Labs' manufacturing processes.
1. If your Z-Stick is plugged into a gateway or a computer, unplug it.
2. Take your Z-Stick to your MultiSensor.
3. Press the Action Button on your Z-Stick.
4. Press the Action Button on your MultiSensor.
5. You can test if your MultiSensor has been successfully included
into your Z-Wave network by pressing its Action Button. If you
press the button and your sensor’s green LED is solid for a
few seconds, then inclusion has been successful. If the green
LED blinks when the button is pressed, the inclusion has been
unsuccessful and you should repeat the above steps.
6. Press the Action Button on the Z-Stick to return it to inclusion
mode. Return it to your gateway or computer.
If you’re using a Minimote:
IN NO EVENT SHALL AEON LABS BE LIABLE FOR ANY INDIRECT,
INCIDENTAL, PUNITIVE, SPECIAL OR CONSEQUENTIAL DAMAGES, OR
DAMAGES FOR LOSS OF PROFITS, REVENUE, OR USE INCURRED
BY CUSTOMER OR ANY THIRD PARTY, WHETHER IN AN ACTION
IN CONTRACT, OR TORT, OR OTHERWISE EVEN IF ADVISED OF
THE POSSIBILITY OF SUCH DAMAGES. AEON LABS' LIABILITY AND
CUSTOMER'S EXCLUSIVE REMEDY FOR ANY CAUSE OF ACTION ARISING
IN CONNECTION WITH THIS AGREEMENT OR THE SALE OR USE OF THE
PRODUCTS, WHETHER BASED ON NEGLIGENCE, STRICT LIABILITY,
BREACH OF WARRANTY, BREACH OF AGREEMENT, OR EQUITABLE
PRINCIPLES, IS EXPRESSLY LIMITED TO, AT AEON LABS' OPTION,
REPLACEMENT OF, OR REPAYMENT OF THE PURCHASE PRICE FOR
1. Take your Minimote to your MultiSensor.
2. Press the Include button on your Minimote.
3. Press the Action Button on your MultiSensor.
4. You can test if your MultiSensor has been successfully included
into your Z-Wave network by pressing its Action Button. If you
press the Action Button and your sensor’s green LED is solid for
20
5
Include
a few seconds, then inclusion has been successful. If the green
LED blinks when the button is pressed, the inclusion has been
unsuccessful and you should repeat the above steps.
5. Press any button on your Minimote to return it to inclusion mode.
Selecting a location for your MultiSensor.
MultiSensor can bring its intelligent readings to many locations of
your home which includes outside of your home. Please note that
when installed outdoors of your home, your MultiSensor should only
be relied on for temperature, light, humidity, and ultraviolet readings,
where as the motion sensing capabilities should be disabled on
your gateway in order to avoid false readings.
Light can impact on the quality of motion readings, it’s also
important to understand environmental changes that may impact
on other readings within your home. Specifically, your MultiSensor
should not be installed in areas of artificial temperature change.
Thus, when selecting a location, avoid placing it beside or near
air conditioners, humidifiers, and heaters, and avoid positioning it
directly opposite a window or direct sunlight.
The "Warranty Period" begins on the date the Products is delivered
and continues for 12 months.
Any repairs under this warranty must be conducted by an
authorized Aeon Labs service representative and under Aeon Labs'
RMA policy. Any repairs conducted by unauthorized persons shall
void this warranty.
Excluded from the warranty are problems due to accidents, acts
of God, civil or military authority, civil disturbance, war, strikes,
fires, other catastrophes, misuse, misapplication, storage damage,
negligence, electrical power problems, or modification to the
Products or its components.
Aeon Labs does not authorize any person or party to assume or
create for it any other obligation or liability in connection with the
Products except as set forth herein.
Aeon Labs will pass on to Customer all manufacturers’ Material
warranties to the extent that they are transferable, but will not
independently warrant any Material.
Selecting a location for your MultiSensor to be installed depends on
the use case. Whatever the case or the installation location, please
ensure that it fits with your sensor’s effective motion sensing range
as described in these diagrams.
Customer must prepay shipping and transportation charges for
returned Products, and insure the shipment or accept the risk of
loss or damage during such shipment and transportation. Aeon
Labs will ship the repaired or replacement products to Customer
freight prepaid.
For ceiling mounting using the Back-Mount Arm:
Customer shall indemnify, defend, and hold Aeon Labs and Aeon
6
19
Technical specifications.
Model number: ZW100
Power supply: USB DC 5V or battery power(2×CR123A batteries,
3V, 1500mAh).
Operating temperature: 0 C to 40 C /32 F to 104 F.
Measured temperature range: -10 C to 50 C/14 F to 122 F. Accuracy:
±1 C/±1.8 F.
Measured humidity range: 20%RH to 90%RH. Accuracy: ±3%RH (at
25 C /77 F).
Lighting: 0 LUX to 30000 LUX.
Max motion sensitivity: 5 metres.
Water proofing: IP20.
Operating distance: Up to 492 feet/150 metres outdoors.
6
Warranty.
Aeon Labs warrants to the original purchaser of Products that
for the Warranty Period (as defined below), the Products will be
free from material defects in materials and workmanship. The
foregoing warranty is subject to the proper installation, operation
and maintenance of the Products in accordance with installation
instructions and the operating manual supplied to Customer.
Warranty claims must be made by Customer in writing within
thirty (30) days of the manifestation of a problem. Aeon Labs' sole
obligation under the foregoing warranty is, at Aeon Labs' option,
to repair, replace or correct any such defect that was present at
the time of delivery, or to remove the Products and to refund the
purchase price to Customer.
18
For wall mounting using the Back-Mount Arm:
7
For optimal performance, your MultiSensor should NOT be
mounted directly on or near metal framing or other large metallic
objects. Large metal objects may weaken the Z-Wave wireless
signal.
The MultiSensor contains a smart Vibration sensor in. When
someone attempts to disassemble your MultiSensor, it can detect
the vibration and send an alarm notification to the main controller
and let you know.
If selecting an outdoor location, it’s important to position your
MultiSensor in a sheltered location. It is best if your MultiSensor
is not directly exposed to rain, and is important that the humidity
venting on your MultiSensor never is.
Security or Non-security feature of your MultiSensor in
Z-wave network.
Physically install your MultiSensor.
With your MultiSensor now part of your Z-Wave network, it’s time to
finish its physical installation.
If you want your MultiSensor as a non-security device in your
Z-wave network, you just need to press the Action Button once on
MultiSensor when you use a controller/gateway to add/include your
MultiSensor.
To physically install your MultiSensor;
In order to take full advantage of all functionality the MultiSensor,
you may want your MultiSensor is a security device that uses
secure/encrypted message to communicate in Z-wave network, so
a security enabled controller/gateway is needed for the Multisensor
to be used as a security device.You need to press the MultiSensor’s
Action Button 2 times within 1 second when your security controller/
gateway starts the network inclusion.
1. Reattach the two parts of your MultiSensor to each other. To do
this, align the lock/unlock half-dimple markers that are under the
unlock symbol and then twist in a clockwise motion.
2. If USB is used to power your MultiSensor, ensure that power
can be provided to your desired installation location. Please note
that when installed in areas that where the temperature can drop
below -10°C, it is advised that USB power is used and battery
power is not.
At some stage or your primary controller is missing or inoperable,
you may also wish to reset all of your MultiSensor’s settings to their
factory defaults. To do this, press and hold the Z-Wave Button for
20 seconds and then release it. Your MultiSensor will now be reset
to its original settings, and the LED will stay solid for 2 seconds and
then turn off as a confirmation.
8
17
There are 2 ways that your MultiSensor can be mounted on on a
wall or ceiling. Using the Back-Mount Plate, you can mount it flat
against a wall or ceiling. Using the Back-Mount Arm you can mount
it on a surface or in a corner and angle it as desired.
Resetting your MultiSensor.
Parameter 111-113 [4 byte decimal] can be configured through your
gateway in case the default settings of your MultiSensor are not
what you desire.
Parameter 111 will set the interval for Group 1 (parameter 101),
parameter 112 will set the interval for Group 2 (parameter 102), and
parameter 113 will set the interval for Group 3 (parameter 103).
As an example, you have set parameter 101 to 241 which will report
all of the sensors, and you want to report it every 1800 seconds.
Set parameter 111 to 1800 to accomplish this.
Waking up your MultiSensor.
If your MultiSensor is battery powered, you will need to ensure
that it is active when configuring it. To do this, press the Action
Button once, which will trigger to send out a wake up notification
command. If you want it to wake up for 10 minutes, to do this, press
and hold its Action Button for 3 seconds and then release it. Your
MultiSensor’s LED will fast blink for 10 minutes to indicate that it is
active.
When you are done configuring or communicating with your
MultiSensor, you can put it back into sleep mode to conserve
battery power. To do this, press and hold its Action button for 3
seconds and then release it. Your MultiSensor’s LED should now
be off to indicate that it is asleep.
Tamper protection of your MultiSensor.
16
USB port
Battery Holder
3. Attach your desired mounting accessory. This can be the BackMount Arm. You can affix the Back-Mount Arm via using the
provided KA2.5×20mm screws or Double-Sided Tape.
Double-Sided Tape
Or
Tips: We suggest you choose the second method (using screws to
affix the Back-Mount Arm) would be more stable.
4. After you have completed the affixing of Back-Mount Arm, you
will need to lock the MultiSensor to the Back-Mount Arm via
turning the MultiSensor.
9
Setting automatic report flags.
Parameter 101-103 [4 byte dec] can be configured through your
gateway in case the default settings of your MultiSensor are not
what you desire.
Lock
Unlock
Screw hole
5. The Back-Mount Arm may be locked at various angles by turning
the Friction Lock clockwise and counter-clockwise to respectively
tighten or loosen the angle of the arm.
Decimal
128
64
32
16
1
Flag
Light Sensor
Humidity Sensor
Temperature Sensor
Ultraviolet Sensor
Battery Sensor
The table above shows a decimal representation of all flags that
can be set on parameter 101-103 to report specific data.
60°
Example use of the report table.
For example, if you want to report only the temperature and light
sensor you would add 32 + 64 and set the sum (96) to parameter
101, 102, or 103.
10
As another example, if you want to report only the light sensor and
battery, you would add 1 + 128, then set the sum (129) to parameter
101, 102, or 103.
And if you want to report all of the sensors, you would add the
whole table together and set the sum (241) to parameter 101, 102,
or 103.
Setting an automatic report interval.
15
Parameter 3 [2 byte decimal] can be configured through your
gateway in case the default settings of your MultiSensor are not
what you desire.
For example, this parameter setting is initially set to 240 which is the
delay time in 4 minutes or 240 seconds.You may set the value to
the desired Motion Sensor delay time to any amount of seconds as
you like. So if you want the time out to be 5 minutes after the Motion
Sensor is triggered, set this parameter to the value of 300.
Setting the sensitivity of your MultiSensor.
Parameter 6 [1 byte decimal] can be configured through your
gateway in case the default settings of your MultiSensor are not
what you desire.
For example, this parameter setting is initially set to 127 which is
the maximum sensitivity, if you set it to 64, the sensitivity will be the
normal sensitivity. If set it to 0, the sensitivity will be the minimum
sensitivity.
Monitoring temperature, humidity, luminance and ultraviolet.
Your MultiSensor can report temperature, humidity, luminance and
ultraviolet across a Z-Wave network when requested. If this function
is supported by a controller, generally a gateway, the data will be
displayed within its interface. The specific Z-Wave commands
for the support of monitoring is the Multilevel Sensor Command
Class. Automatic reports are sent to association group 1, which
is setup via the Association Command Class. Please consult the
controller’s operation manual for specific instructions on setting your
MultiSensor.
14
Advanced functions.
Changing batteries.
Your MultiSensor has built in battery level detection. It will
automatically report its battery level to the associated controller/
gateway throughout its life until the battery is fully drained and
needs replacing. The battery status will often be displayed in the
user interface of the controller/gateway.
When used properly in an optimised Z-Wave network, your
MultiSensor can be powered by batteries for 24 months before
battery replacement is necessary.
Recommendation: For networks which do not offer a method to
display the battery level of your MultiSensor, it is recommended that
the sensor be tested occasionally to ensure that the batteries still
hold enough charge to operate. Batteries naturally lose their charge
over time.
Removing your MultiSensor from a Z-Wave network.
Your MultiSensor can be removed from your Z-Wave network at
any time.You’ll need to use your Z-Wave network’s main controller
to do this and the following instructions tell you how to do this using
Aeotec by Aeon Labs’ Z-Stick and Minimote controllers. If you are
using other products as your main Z-Wave controller, please refer
to the part of their respective manuals that tells you how remove
devices from your network.
11
If you’re using a Z-Stick:
1. If your Z-Stick is plugged into a gateway or a computer, unplug it.
2. Take your Z-Stick to your MultiSensor.
3. Press and hold the Action Button on your Z-Stick for 3 seconds
and then release.
4. Press the Action Button on your MultiSensor.
5. If your MultiSensor has been successfully removed from your
network, the RGB LED will be active with a colourful gradient for
3 seconds. When you press the Action Button on the MultiSensor,
its green LED will blink. If the removal was unsuccessful, the
green LED will stay solid for a few seconds when you press the
Action Button.
6. Press the Action Button on the Z-Stick to take it out of removal
mode.
If you’re using a Minimote:
Remove
12
1. Take your Minimote to your MultiSensor.
2. Press the Remove Button on your Minimote.
3. Press the Action Button on your MultiSensor.
4. If your MultiSensor has been successfully removed from your
network, the RGB LED will be active with a colourful gradient for
3 seconds. When you press the Action Button on the MultiSensor,
its green LED will blink. If the removal was unsuccessful, the
green LED will stay solid for a few seconds when you press the
Action Button.
5. Press any button on your Minimote to take it out of removal
mode.
Monitoring motion.
The MultiSensor can send Basic Set Command to association
group 1, which is setup via the Association Command Class, when
the Motion Sensor detects movement to control the associated
devices to “OPEN” state. After 4 minutes by default, if the Motion
Sensor is not triggered again, the MultiSensor will send Basic Set
Command to these devices to set them to their “CLOSE” state.
However, if the Motion Sensor is triggered again within 4 minutes,
the MultiSensor will reset the timing and start timing again.
The 4 minutes delay time can be changed through the usage
of Z-Wave commands built into Z-Wave certified controllers/
gateways. (The specific Z-Wave command supporting this function
is Configuration Command Class) Please consult the operation
manual for these controllers/gateways for specific instructions on
configuringthe MultiSensor.
13