1
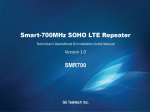
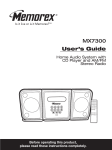
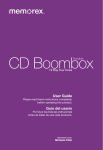
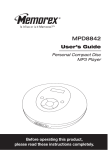
SAFETY PRECAUTIONS
CAUTION
RISK OF ELECTRIC SHOCK
DO NOT OPEN
CAUTION: TO REDUCE THE RISK OF ELECTRIC SHOCK,
DO NOT REMOVE COVER (OR BACK). NO USERSERVICEABLE PARTS INSIDE. REFER SERVICING TO
QUALIFIED SERVICE PERSONNEL.
DANGEROUS VOLTAGE:
The lightning flash with arrowhead symbol within an
equilateral triangle is intended to alert the user to the
presence of uninsulated dangerous voltage within the
product’s enclosure that may be of sufficient magnitude to
constitute a risk of electric shock to persons.
ATTENTION:
The exclamation point within an equilateral triangle is
intended to alert the user to the presence of important
operating and maintenance (servicing) instructions in the
literature accompanying the appliance.
FCC WARNING:
This equipment may generate or use radio frequency energy. Changes or
modifications to this equipment may cause harmful interference unless
the modifications are expressly approved in the instruction manual. The
user could lose the authority to operate this equipment if an unauthorized
change or modification is made.
ATTENTION:
POUR ÉVITER LES CHOC ÉLECTRIQUES, INTRODUIRE LA LAME LA
PLUS LARGE DE LA FICHE DANS LA BORNE CORRESPONDANTE DE
LA PRISES ET POUSSER JUSQU’AU FOND.
1
SAFETY PRECAUTIONS
INFORMATION:
This equipment complies with Class B digital device regulations.
This equipment generates, uses and can radiate radio frequency
energy and, if not installed and used in accordance with the
instructions, may cause harmful interference to radio
communications. However, there is no guarantee that interference
will not occur in a particular installation. If this equipment does
cause harmful interference to radio or television reception, which
can be determined by turning the equipment off and on, the user is
encouraged to try to correct the interference by one or more of the
following measures:
• Reorient or relocate the receiving antenna.
• Increase the separation between the equipment and receiver.
• Connect the equipment into an outlet on a circuit different from
that to which the receiver is connected.
• Consult the dealer or an experienced radio/TV technician for help.
WARNING: TO PREVENT FIRE OR SHOCK
HAZARD, DO NOT EXPOSE THIS UNIT TO RAIN
OR MOISTURE.
SURGE PROTECTORS:
It is recommended to use a surge protector for AC connection.
Lightning and power surges ARE NOT covered under warranty
for this product.
This Class B digital apparatus complies with Canadian
ICES-003.
Cet appareil numérique de la classe B est conforme à la
norme NMB-003 du Canada.
2
Dear Customer:
Selecting fine audio and video equipment such as the unit you’ve just purchased
is only the start of your musical enjoyment. Now it’s time to consider how you
can maximize the fun and excitement your equipment offers. This manufacturer
and the Electronic Industries Association’s Consumer Electronics Group want
you to get the most out of your equipment by playing it at a safe level. One that
lets the sound come through loud and clear without annoying blaring or
distortion-and, most importantly, without affecting your sensitive hearing.
Sound can be deceiving. Over time your hearing “comfort level” adapts to higher
volumes of sound. So what sounds “normal” can actually be loud and harmful to
your hearing. Guard against this by setting your equipment at a safe level
BEFORE your hearing adapts.
To establish a safe level:
• Start your volume control at a low setting.
• Slowly increase the sound until you can hear it comfortably and clearly, and
without distortion.
Once you have established a comfortable sound level:
• Set the dial and leave it there.
Taking a minute to do this now will help to prevent hearing damage or loss in the
future. After all, we want you listening for a lifetime.
We Want You Listening For A Lifetime
Used wisely, your new sound equipment will provide a lifetime of fun and
enjoyment. Since hearing damage from loud noise is often undetectable until it is
too late, this manufacturer and the Electronic Industries Association’s Consumer
Electronics Group recommend you avoid prolonged exposure to excessive noise.
This list of sound levels is included for your protection.
Decibel
Level
Example
30
Quiet library, soft whispers
40
Living room, refrigerator, bedroom away from traffic
50
Light traffic, normal conversation, quiet office
60
Air conditioner at 20 feet, sewing machine
70
Vacuum cleaner, hair dryer, noisy restaurant
80
Average city traffic, garbage disposals, alarm clock at
two feet
THE FOLLOWING NOISES CAN BE DANGEROUS UNDER
CONSTANT EXPOSURE:
90
Subway, motorcycle, truck traffic, lawn mower
100
Garbage truck, chain saw, pneumatic drill
120
Rock band concert in front of speakers, thunderclap
140
Gunshot blast, jet engine
180
Rocket launching pad
We
Want You
LISTENING
Information courtesy of the Deafness Research Foundation.
For A Lifetime
NI
C
IND
N
O
O C I A TI
IES
ELECT
TR
A
EST. 1924
S
S
3
U
S
R
O
EIA
MAIN UNIT
LOCATION OF CONTROLS
3
1
4
2
5
6
7
11
12
13
14
15
16
17
8
9
10
18
1. Screen
2. Remote Sensor
3. SD/MMC/MS/xD Card Slot
(Side of Unit)
4. CF Card Slot (Side of Unit)
5. Navigation † Button
6. Navigation π Button
7. ENTER/PLAY Button
8. Wall Mount Hole
9. Stand
10. Wall Mount Hole
11. Navigation ®/
VOLUME + Button
12. Navigation √/
VOLUME - Button
13. Power Button (Side of Unit)
14. USB Jack (Side of Unit)
(USB CABLE PART NO.
337-01000-E050*)
15. EXIT/CANCEL Button
16. Headphones Jack (Side of
Unit)
17. DC 12V IN Jack (Side of
Unit)
(AC ADAPTER PART NO.
295-04981-E000*)
18. Speakers
4
*Consumer Replaceable Part
(See page 21 to order.)
LOCATION OF CONTROLS (CONTINUED)
REMOTE
7
1
8
2
9
3
10
4
11
5
12
6
13
1. MUTE Button
2. Navigation √/VOLUME - Button
3. Navigation π Button
4. Navigation † Button
5. MENU Button
6. EXIT Button
7. Remote Transmitter (Top of Unit)
8. TIME Button
9. Navigation ®/ VOLUME + Button
10. ENTER/PLAY Button
11. ROTATE Button
12. ZOOM IN Button
13. ZOOM OUT Button
14. Battery Compartment (Rear of Unit)
REMOTE PART NO. 239-04421-E001*
14
*Consumer Replaceable Part (See page 21 to order.)
5
AC CONNECTION
POWER SOURCE
Insert the small end of the AC adapter into
the DC 12V IN jack (located under the left
cover on the side of this unit). Connect the
other end to a wall outlet having 120V AC,
60 Hz.
AC Adapter, DC 12V Z
NOTES:
•
Remove both the DC plug and the ACIN plug to disconnect the AC adapter
when not in use.
To DC 5V IN Jack
•
Only use the supplied AC adapter which has the following specs: DC 12V Z
REMOTE BATTERY INSTALLATION
1.
2.
3.
Remove the Battery Compartment by
pressing in on the tab and then sliding the
compartment out.
Install a CR2025 battery, paying attention
to the polarity diagram in the Battery
Compartment (positive side up).
Replace the Battery Compartment.
BATTERY PRECAUTIONS
Follow these precautions when using batteries in this device:
1. Warning–Danger of explosion if batteries are incorrectly replaced.
Replace only with the same or equivalent type.
2. Use only the size and type of batteries specified.
3. Be sure to follow the correct polarity when installing the batteries as
indicated next to the battery compartments. A reversed battery may
cause damage to the device.
4. If the device is not to be used for a long period of time, remove the
batteries to prevent damage or injury from possible battery leakage.
5. Do not try to recharge a battery not intended to be recharged; it can
overheat and rupture. (Follow battery manufacturer’s directions.)
6
OPTIONAL FEATURES
HEADPHONES JACK (SIDE OF UNIT)
For private listening, plug headphones into this jack. The speakers will be
disconnected when a plug is inserted into this jack.
WALL MOUNT HOLES (2) (REAR OF UNIT)
If desired, the digital frame can be mounted onto a wall. Simply hang
using the Wall Mount holes, as you would hang an ordinary photo frame
or painting.
STAND (REAR OF UNIT)
To use the stand, lift the stand up and then rotate counterclockwise until
it is in position. When viewing photos vertically, it is recommended that
you gently pull the stand back a little further to ensure that the frame
is stable.
7
GETTING STARTED
USING A MEMORY CARD
You can access media files from an external memory card as
described below. This unit accepts memory cards up to these sizes: SD up
to 2GB, MMC up to 1GB, MS up to 1GB, xD up to 1GB and CF up to 2GB.
1
TO INSERT A MEMORY
CARD: This unit can support
SD (Secure Digital), MMC
(MultiMedia
Card),
MS
(Memory Stick), xD or CF
(CompactFlash) memory cards.
Simply insert the SD, MMC, MS
or xD card into the top Card
Slot located at the right side of
the unit, with the card facing
towards the rear of the unit (as
shown).
Insert the CF card in the same
manner, but using the bottom
Card Slot.
2
TO REMOVE A MEMORY
CARD: Press the Power button
to the Off (out) position to turn it
off. With the power off, remove
the memory card by pulling it
out gently. You may need to
wiggle it back and forth to
dislodge it from the frame.
Please place under 300 photo files on the memory card, otherwise some
photos may not appear in the frame.
8
GETTING STARTED (CONTINUED)
COPYING MEDIA FILES FROM YOUR COMPUTER
You can also copy media files directly from your computer to this digital
frame using a USB cable.
USB cable
USB jack
Computer
1. Connect this unit to an AC power source, as shown on page 6, and
turn this unit on by pressing the Power button to the On (in) position.
This unit will either show the Main menu or automatically start showing
a photo Slideshow (if the Auto Play option in the Setup menu is set to
ON). If the unit is in Slideshow mode, press the EXIT button twice to
exit and access the Main menu.
2. Connect the USB cable to the USB jack located under the left cover of
this unit and connect the other end to your computer (as shown).
3. On your computer, double-click My Computer. This unit will appear as
a removable drive named “Memorex”.
4. Navigate to the media files that you want to copy. Then, drag and drop
them to the “Memorex” drive. (Refer to the owners manual
accompanying your computer for more information on copying files.)
NOTES:
• If a memory card is inserted (as shown on the previous page) and is
selected as the Select Card option in the Setup menu (as shown on
page 19), the memory card, not this unit, will appear as a removable
drive in Step 3.
• You can also copy files from the digital frame or external memory card
to your computer, if desired.
9
OPERATION
SETTING THE TIME AND DATE
1
2
2
1
3
Press the Power button to the On
(in) position to turn the unit on.
Press the ENTER/PLAY button 1 to
start setting the time and date.
Use the Navigation π, † buttons 2
to set the current hour (make sure
to set the correct AM/PM setting if
you selected the 12 Hour mode in
the Time Mode Setup option).
Press the Navigation ® button 2 to
select the minutes. Use the
Navigation π, † buttons 2 to set
the current minutes.
Repeat to set the month, day
and year.
To save your setting press ENTER/
PLAY button 1, then press EXIT
button 3 return to main menu.
This unit will either show the Main
menu or automatically start
1
1
showing a photo Slideshow (if the
Auto Play option in the Setup
menu is set to ON).
Press the TIME button to access
the clock/calendar page.
ACCESSING THE CLOCK/CALENDAR PAGE
1
2
The clock/calendar page will
automatically appear after one
minute of inactivity. You can also
press the TIME button at any time
to access the clock/calendar page.
1
1
To exit and return to the Main
menu, press the EXIT button.
1
10
1
OPERATION (Continued)
BASIC PHOTO PLAYBACK (Supported format: JPEG)
1
2
1
2
3
Press the Power button to the On
(in) position to turn the unit on.
Select Photo using the Navigation
√, ®, π, † buttons 1; then press
the ENTER/PLAY button 2 to
enter the Photo Thumbnail view.
1
This unit will either
show
1 the Main
menu or automatically start
showing a photo Slideshow (if the
Auto Play option in the Setup
menu is set to ON).
Select the desired photo, or page
of photos, to view using the
Navigation √, ®, π, † buttons
1; then press the ENTER/PLAY
button 2 again to playback the
selected photo. Press the
ENTER/PLAY button 2 again to
begin a Slideshow of all photos
from the selected media source.
If the unit is in Slideshow mode,
press the EXIT button twice to exit
and access the Main menu
To stop playback and return to the
Photo Thumbnail view, press the
EXIT button 3. Press again to exit
to the Main menu.
11
OPERATION (Continued)
ROTATE
ZOOM
1
2
2
1
4
3
While viewing a photo (see the
previous page), press the ZOOM
IN button 1; the unit will zoom x2.
Repeatedly press to zoom up
to x13.
Use the Navigation √,®,π,†
buttons 2 to move the photo on
the screen.
Press the ZOOM OUT button 3 to
zoom back out of the photo.
To exit Zoom mode and return to
normal photo playback, press the
EXIT button 4.
While viewing a photo (see the
previous page), press the ROTATE
button to rotate the photo 90
degrees clockwise. Repeat to
continue to rotate as desired.
1
SKIP
1
While viewing a photo (see the
previous page), press the
Navigation √ and/or ® button
to skip to the previous or
next picture.
12
1
OPERATION (Continued)
PHOTO “FAVORITES” PLAYBACK
1
2
1
Press the EXIT button 1 to exit to the
Main menu. Select Favorites using the
Navigation √, ®, π, † buttons 2; then
press the ENTER/PLAY button 3 to enter
the Favorites menu.
To change the favorite’s view (Single
photo or Double photos) on the screen,
select Play Mode using the Navigation π,
† buttons 2. Then, press the Navigation
√, ®, π, † buttons 2 to select between
Single or Double; then press the OK
button 3 again to confirm.
While in Photo Thumbnail view (see
page 11), select a photo to add to
your Favorites using the Navigation
√, ®, π, † buttons 1. Then press
the ZOOM IN button 2 to confirm; a
red frame will appear around the
selected photo.
NOTE: To deselect the photo,
simply press the ZOOM IN
button again.
2
3
1
2
3
2
4
1
1
2
Once you have chosen the viewing
mode (if desired), select Play using
the Navigation π, † buttons 1; then
press the ENTER/PLAY button 2 to
confirm and start playback of your
Favorites. OR To exit the Favorites
menu and return to the Main menu,
select Exit using the Navigation π,
† buttons 1; then press the
ENTER/PLAY button 2 to confirm.
NOTE: You can also press the EXIT
button to exit the Favorites menu.
In the Favorites menu, you have the
option of selecting to view your
Favorites in Landscape or
Portrait
mode.
Press
the
ENTER/PLAY button 1 to select
Direction. Then, press the Navigation
√, ®, π, † buttons 2 to select
between Landscape and Portrait;
then press the ENTER/PLAY button
1 again to confirm.
TO CLEAR THE FAVORITES PLAY LIST: In Photo Thumbnail view, press the
ROTATE button; a pop-up window will appear. Select “No” (to NOT clear the
Favorites) or “Yes” (to clear the Favorites) using the Navigation √, ® buttons; then
press the ENTER/PLAY button to confirm.
13
OPERATION (Continued)
BASIC MUSIC PLAYBACK (Supported format: MP3)
1
2
1
2
3
Press the Power button to the On
(in) position to turn the unit on.
This unit will either show the Main
1
1
menu or automatically
start
showing a photo Slideshow (if the
Auto Play option in the Setup
menu is set to ON).
If the unit is in Slideshow mode,
press the EXIT button twice to
exit and access the Main menu.
Select Music using the Navigation √,
®, π, † buttons 1; then press the
ENTER/PLAY button 2 to enter the
Music menu. Select the desired MP3
to listen to using the Navigation π,
† buttons 1; then press the
ENTER/PLAY button 2 again to
confirm. Playback will begin with the
MP3 that you selected. To stop
playback and return to the Main
menu, press the EXIT button 3.
ADJUSTING THE VOLUME
1
1
2
2
To adjust the main volume:
Press the Navigation √/VOLUME
- 1 and/or Navigation ®/VOLUME
+ 2 button to increase and/or
decrease the volume.
1
2
3
To mute the main volume:
Press the MUTE button 1. Press
this button again, or either of the
Navigation √/VOLUME - 2 and/or
Navigation ®/VOLUME + 3
buttons to unmute.
NOTES:
• See page 19 to select a Play Mode (i.e. Repeat All, etc.).
• You can pause playback at anytime by pressing the ENTER/PLAY button; the Pause
icon will appear on screen and the file will remain paused until the button is
pressed again.
• You can use the Navigation π, † buttons to skip to the previous or next MP3 file.
14
OPERATION (Continued)
BASIC VIDEO PLAYBACK (Supported format: MOV)
Video:
Audio:
1
Compress type: MPEG-4 Video
Dimensions: 352 x 288 CIF
µ-Law 2:1 or A-Law 2:1
2
If the unit is in Slideshow mode,
press the EXIT button twice to exit
and access the Main menu.
ADJUSTING THE VOLUME
2
2
To adjust the main volume:
Press the Navigation √/VOLUME
- 1 and/or Navigation ®/VOLUME
+ 2 button to increase and/or
decrease the volume.
2
Select Movie using the Navigation √,
®, π, † buttons 1; then press the
ENTER/PLAY button 2 to enter the
Movie menu. Select the desired video
to watch using the Navigation √, ®,
π, † buttons 1; then press the
ENTER/PLAY button 2 again to
confirm. Playback will begin with the
video file that you selected. Press
ENTER/PLAY button 2 to pause the
video, press again to resume
playback. To stop playback and return
to the Movie menu, press the EXIT
button 3. Press again to exit to the
Main menu.
This unit will either
show
1
1 the Main
menu or automatically start
showing a photo Slideshow (if the
Auto Play option in the Setup
menu is set to ON).
1
1
3
Press the Power button to the On
(in) position to turn the unit on.
1
Frame Rate: 30fps
15
1
2
3
To mute the main volume:
Press the MUTE button 1. Press this
button again, or either of the
Navigation √/VOLUME - 2 and/or
Navigation ®/VOLUME + 3 buttons
to unmute.
OPERATION (Continued)
DELETING A FILE
1
2
1
2
3
Press the Power button to the On
(in) position to turn the unit on.
Select Folder using the Navigation
√, ®, π, † buttons 1; then press
the ENTER/PLAY button 2 to
enter the Folder menu.
1
1 the Main
This unit will either
show
menu or automatically start
showing a photo Slideshow (if the
Auto Play option in the Setup
menu is set to ON).
Select the desired file to delete
using the Navigation π, † buttons
1. Then press the Navigation √
button 1; a pop-up menu
will appear.
If the unit is in Slideshow mode,
press the EXIT button twice to exit
and access the Main menu
Select “No” (to NOT delete the
file) or “Yes” (to delete the file)
using the Navigation √, ® buttons
1; then press the ENTER/PLAY
button 2 again to confirm.
To return to the Main menu, press
the EXIT button 3.
16
OPERATION (Continued)
COPYING A FILE
1
2
1
2
3
Press the Power button to the On
(in) position to turn the unit on.
Select Folder using the Navigation
√, ®, π, † buttons 1; then press
the ENTER/PLAY button 2 to
enter the Folder menu.
Select the desired file to copy
using the Navigation π, † buttons
1. Then press the Navigation ®
button 1; a pop-up menu
will appear.
Select “No” (to NOT copy the file)
or “Yes” (to copy the file) using the
Navigation √, ® buttons 1; then
press the ENTER/PLAY button 2
again to confirm.
To return to the Main menu, press
the EXIT button 3.
1
1 the Main
This unit will either
show
menu or automatically start
showing a photo Slideshow (if the
Auto Play option in the Setup
menu is set to ON).
If the unit is in Slideshow mode,
press the EXIT button twice to exit
and access the Main menu.
NOTES:
• While copying a file, if more than one target media (media to copy to) is
available, select the target media when prompted by the pop-up window
to do so.
• If the target media is full, "Disk is Full" will appear.
• While copying a file, if there is already a file with the same name on the
target media, a “Would you like to replace the existing file?” pop-up
window will appear. Select “No” (to NOT replace the file by cancelling the
copy request) or “Yes” (to replace the file) using the Navigation √, ®
buttons; then press the ENTER/PLAY button again to confirm.
• You can only delete or copy a file, not a folder. If you have selected a
folder, pressing the Navigation ® button will enter the directory and
pressing the Navigation √ button will exit the directory.
• Copying or deleting a file will also clear your Favorites play list.
17
SETUP MENU
OPERATION (Continued)
The Setup menu lets you customize this digital frame by allowing you to
select the source for your media files, set the effects between your photos,
adjust the speed of the Slideshow and more!
Use the following instructions to navigate and change the options which
are described on the following page.
1. Press the Power button to the On
(in) position to turn the unit on.
This unit will either show the Main
menu or automatically start showing
2
a photo Slideshow (if the Auto Play
3
option in the Setup menu is set
to ON).
If the unit is in Slideshow mode,
press the EXIT button 1 twice to
1
exit and access the Main menu.
2. Select Setup using the Navigation
√, ®, π, † buttons 2; then press
the ENTER/PLAY button 3 to enter
the Setup menu. (NOTE: You can also access the Setup menu at any
time by pressing the MENU button.)
3. Use the Navigation π,† buttons 2 to select one of the Setup
options (i.e. “Select Card”) on the two available pages of options,
then press the ENTER/PLAY button 3 to select it; the option will be
highlighted in blue.
4. Use the Navigation π,† buttons 2 to change the desired option
setting (i.e. choose between SD/MMC, Internal Flash, etc.), then
press the ENTER/PLAY button 3 to make the change.
5. Exit by pressing the EXIT button 1. (NOTE: You can also exit by
selecting the Exit Setup option.)
CONTINUED ON THE NEXT PAGE
18
OPERATION (Continued)
SETUP OPTIONS
Select Card: Use this Setup option to select the source for your media files.
Choose from Internal Flash, as well as any external media inserted (i.e.
SD/MMC).
Photo Mode: Use this Setup option to select the mode in which the photos
will be displayed. Choose from Full (which will stretch the picture to fill the
screen) or Normal (which will display the photo with its original proportions).
Slide Effect: Use this Setup option to select the transition effect between
your slides. Choose from Split Out, Split In, Cut Out, Cut In, Wrap Left, Wrap
Right, Wrap Up, Wrap Down or Random (will randomly select among the
other modes to transition between the photos).
Slide Speed: Use this Setup option to select the speed for your Slideshow.
Choose from Slow, Medium or Fast.
Auto Play: Use this Setup option to choose whether your frame will
automatically start showing a photo Slideshow after being turned on. Choose
to set Auto Play to ON or OFF.
Music Mode: Use this Setup option to select a Play mode when listening to
MP3s on this unit. Choose from Repeat All (will repeat all of the files from the
selected media source continuously until you exit the Music menu), Repeat
One (will repeat the selected file continuously until you exit the Music menu)
or Repeat Off (for Normal Music playback).
Background Music: Use this Setup option to choose whether your frame
will play background music while viewing a Slideshow. Choose to set
Background Music to ON or OFF. The volume of the Background music can
be adjusted in the same way as normal music playback (see page 14).
Brightness: Use this Setup option to adjust the brightness of the screen.
Choose from 00% to 100%.
Time Mode: Use this Setup option to set the internal clock to 12 or 24 hour
mode. Choose from 12 Hour or 24 Hour.
Language: Use this Setup option to select the desired language for the
menus. Choose from English, Spanish or French.
19
TROUBLESHOOTING GUIDE
If you experience a problem with this unit, check the chart below before
calling for service.
SYMPTOM
Main unit, no power.
Remote, no power.
No photos in frame.
Computer does not
recognize frame as a
Removable Disk.
CAUSE
SOLUTION
connected.
as shown on page 6.
inserted incorrectly.
as shown on page 6.
AC adapter is not
Battery not inserted or
No photos are present in
Internal Flash or external
Connect AC adapter
Insert battery correctly
Copy files onto the frame
or insert external media
media source.
source, see pages 8 & 9.
connected securely.
connection.
USB cable not
Frame is not turned on.
Secure USB cable
Turn on frame using
the Power switch on the
rear of the frame.
20
SPECIFICATIONS
GENERAL:
Power Source ...........................AC Adapter, DC 12V Z
Weight..........................................................................2 Lbs
Dimensions .........................8.5" (H) x 11.9" (W) x 1.75" (D)
Weight and dimensions are approximate.
Resolution .............................................................800 x 480
Internal Memory ........................................................128MB
Speaker .................................................................2 x 0.6 W
Specifications are subject to change without notice.
FOR ADDITIONAL SET-UP OR OPERATING ASSISTANCE, PLEASE VISIT
OUR WEBSITE AT:
WWW.MEMOREXELECTRONICS.COM
OR CONTACT CUSTOMER SERVICE AT 1-800-919-3647.
PLEASE KEEP ALL PACKAGING MATERIAL FOR AT LEAST 90 DAYS IN
CASE YOU NEED TO RETURN THIS PRODUCT TO YOUR PLACE OF
PURCHASE OR MEMOREX.
FOR CONSUMER REPLACEABLE PART(S), SEE PART NUMBER(S) ON
PAGES 4 AND 5 AND THEN CONTACT FOX INTERNATIONAL
AT 1-800-321-6993.
21