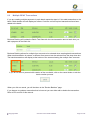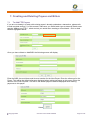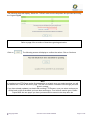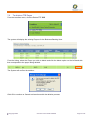
1
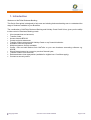
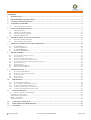
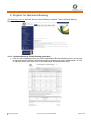
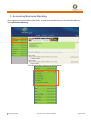
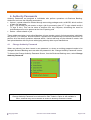
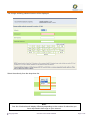
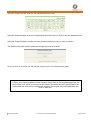
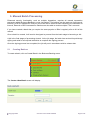
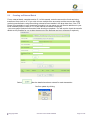
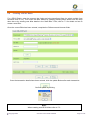
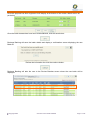
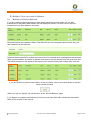
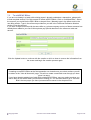
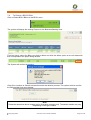
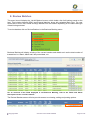
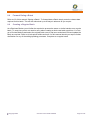
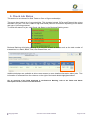
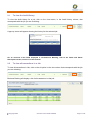
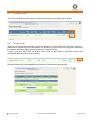
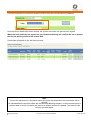
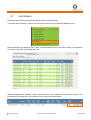
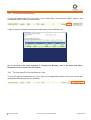
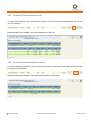
Business Banking User Guide 1. Introduction Welcome to NetTeller Business Banking. This Quick Start guide is designed to help new and existing business banking user to understand the range of features available to your Business. The combination of NetTeller Business Banking and Holiday Coast Credit Union, gives you the ability to take control of Business Banking needs. View transactions and accounts; Transfer funds; Access Internet BPAY® Create and print statements Transfer funds to accounts with Holiday Coast or any financial institution Schedule future bill payments Multiple signature security available; Create, view and edit batches from NetTeller or your own business accounting software e.g. MYOB; Check interest earned on current or previous financial year; Transfer funds to loan accounts; Redraw advance loan repayments (available for eligible loan. Conditions apply); Contact us securely online. Copyright 2008 Commercial in Confidence E&OE Page 2 of 58 CONTENTS 1. INTRODUCTION..................................................................................................................................................................... 2 2. REGISTER FOR BUSINESS BANKING ................................................................................................................................ 4 3. ACCESSING BUSINESS BANKING ....................................................................................................................................... 5 4. AUTHORITY PASSWORDS ................................................................................................................................................... 6 4.1 5. CHANGE AUTHORITY PASSWORD ......................................................................................................................................... 6 MANUAL BATCH PROCESSING .......................................................................................................................................... 9 5.1 5.2 5.3 5.4 6. CREATING BATCHES ............................................................................................................................................................ 9 CREATING AN INTERNAL BATCH......................................................................................................................................... 11 CREATING AN EXTERNAL BATCH........................................................................................................................................ 14 CREATING A BPAY BATCH................................................................................................................................................ 16 MULTIPLE ‘FROM’ ACCOUNTS IN BATCHES ................................................................................................................ 18 6.1 6.2 7. MULTIPLES IN ETERNAL BATCHES ...................................................................................................................................... 18 MULTIPLE BPAY TRANSACTIONS ...................................................................................................................................... 19 CREATING AND DELETING PAYEES AND BILLERS..................................................................................................... 20 7.1 7.2 7.3 7.4 8. TO ADD FTE PAYEES ........................................................................................................................................................ 20 TO DELETE A FTE PAYEE ................................................................................................................................................... 22 TO ADD BPAY BILLERS .................................................................................................................................................... 24 TO DELETE A BPAY BILLER .............................................................................................................................................. 25 REVIEW BATCHES .............................................................................................................................................................. 26 8.1 8.2 8.3 8.4 8.5 8.6 8.7 8.8 8.9 9. TO VIEW TRANSACTIONS IN A BATCH................................................................................................................................... 27 TO EDIT A BATCH .............................................................................................................................................................. 28 TO EDIT A TRANSACTION IN A BATCH: ................................................................................................................................. 29 TO DELETE A TRANSACTION FROM A BATCH: ........................................................................................................................ 30 TO INCLUDE OR EXCLUDE A TRANSACTION FROM A BATCH: ................................................................................................... 31 TO DELETE A BATCH .......................................................................................................................................................... 32 TO SIGN A BATCH .............................................................................................................................................................. 33 FORWARD DATING A BATCH .............................................................................................................................................. 35 CREATING A REGULAR BATCH ........................................................................................................................................... 35 CHECK JOB STATUS ........................................................................................................................................................... 36 9.1 9.2 9.3 9.4 9.5 10. 10.1 10.2 10.3 10.4 10.5 11. TO VIEW THE AUDIT HISTORY ............................................................................................................................................ 37 TO VIEW ALL TRANSACTIONS IN A J OB ................................................................................................................................. 37 TO ACTION A J OB .............................................................................................................................................................. 38 TO SIGN A J OB:.................................................................................................................................................................. 38 TO DELETE A J OB: ............................................................................................................................................................. 40 JOB HISTORY................................................................................................................................................................... 41 TO VIEW THE AUDIT HISTORY ............................................................................................................................................ 42 TO VIEW SPECIFIC TRANSACTIONS IN A JOB: ......................................................................................................................... 42 TO VIEW ALL TRANSACTIONS IN A J OB ............................................................................................................................... 43 TO LIST ALL FAILED TRANSACTIONS IN A JOB: ...................................................................................................................... 43 TO LIST ALL POSTED TRANSACTIONS IN A J OB: ..................................................................................................................... 44 UPLOAD BANK FILE....................................................................................................................................................... 45 11.1 CREATING THE UPLOAD ENVIRONMENT ............................................................................................................................... 45 Identifying the .NET version ...................................................................................................................................................... 45 Install the Security Permission................................................................................................................................................... 48 Browser Trusted sites ................................................................................................................................................................ 50 McAfee Site Advisor .................................................................................................................................................................. 51 12. UPLOADING A BANK FILE ............................................................................................................................................ 52 13. FIELD AND STATUS DESCRIPTIONS ........................................................................................................................... 56 14. GLOSSARY ....................................................................................................................................................................... 58 Copyright 2008 Commercial in Confidence E&OE Page 3 of 58 2. Register for Business Banking Visit www.hccu.com.au and click Access, Internet Banking, Register Today, Business Banking Registration Form. Select - Business Banking- Online Banking Application Click on online application Once you have completed the Business Banking form you will need to sign and return to Holiday Coast Credit Union by dropping into your nearest branch, or Post to Holiday Coast Credit Union Ltd, Private Mail Bag 9, Wauchope NSW 2446. Copyright 2008 Commercial in Confidence E&OE Page 4 of 58 3. Accessing Business Banking After logging into Online Banking (NetTeller), access Business Banking from the NetTeller Menu by clicking Business Banking The following Menu Options will be displayed: Copyright 2008 Commercial in Confidence E&OE Page 5 of 58 4. Authority Passwords Authority Passwords are assigned to individuals who perform operations via Business Banking. Authorities can have the following permissions: Upload – upload a bank file created through accounting packages such, as MYOB, which conform to bank file standards; Sign – sign a batch for job creation or sign a job for processing (see 8.7 To sign a batch and 9.4 To sign a Job:). This can be done at anytime from any computer, eliminating the need for authorised persons to be present at the time of posting; and Delete – delete a batch or job. These added permission levels allow Members to have greater control of what operations individuals can perform. For example, account holders / signatories to a Membership would have permission to perform all of the above operations whereas admin / clerical staff may only be allowed to create / edit and upload batches with only those with signing authority able to post transactions. 4.1 Change Authority Password Where an authority has been issued a new password, or where an existing password needs to be changed, Business Banking users can alter the password in the “Change Authority Password” screen To Access the Change Authority Password Screen, from the Business Banking menu, select Change Authority Password. Note: Change Authority Password is not relevant for Sole Trader’s. Option is still available in menu, however they will not be able to select an authority reference number. Copyright 2008 Commercial in Confidence E&OE Page 6 of 58 The change authority password screen will be displayed. Select the authority from the drop-down list: Note: Your list of Authorties will display differently depending on the number of authorities you have requested to have sign on your account. Copyright 2008 Commercial in Confidence E&OE Page 7 of 58 Using the Crypto KeyPad, enter the old password and click enter. Using the Crypto Keypad, enter the new password and click enter (or click on the next password box). Using the Crypto Keypad, reconfirm the new password and click enter (or click on submit). The system will confirm that the password change has been successful. Once you click on continue you will then be moved to your “view all accounts” page. Note: To move your Crypto keypad to another location simply click on the keypad background (not on the keys) once. Move your mouse to the location you would like the crypto keypad to be located and click once more to release the keypad. The Keypad will jump slightly after you click on each key. Copyright 2008 Commercial in Confidence E&OE Page 8 of 58 5. Manual Batch Processing Enhanced security functionality, such as multiple signatories, requires all manual transaction processing within Business Banking to occur via batches. The batches can be made up of all Internal, External, or BPAY transactions. But you will not be able to create a batch containing a combination of Internal, External or BPAY transactions. Batches are also able to contain multiple ‘From’ accounts. If you have created a batch that you require the same payee’s or Biller’s regularly refer to 8.8 of this manual Once a batch is created, it will need to be signed to proceed from the batch stage to becoming a Job. A job is the final stages of processing a batch. At the job stage, the batch has received its preliminary signing and waits for all required authorities to complete the signing process. Once the signing process has completed, the job will post in accordance with its release date. 5.1 Creating Batches To create a batch, click on Create Batch in the Business Banking menu: The Create a New Batch screen will display: Copyright 2008 Commercial in Confidence E&OE Page 9 of 58 Select the Batch Type: Enter a Name for the Batch: Click next to progress with the batch You can now start adding the batch transaction details: The previous steps will be the same for each batch type whether it be Internal, External or BPAY. For further details on Internal Batches refer to 5.2, External Batches refer to 5.3 and BPAY Batches refer to 5.4 of this manual. Note: When creating a batch you are only able to use the same type of transaction. For example you will not be able to create a batch that contains both internal and external transactions. Copyright 2008 Commercial in Confidence E&OE Page 10 of 58 5.2 Creating an Internal Batch Select the account you wish the funds to come from, multiple from accounts are allowed. You then select the account you wish the funds to be transferred to, from the drop down boxes provided. Note: The ‘From’ or ‘To’ account selection will also display accounts from other memberships that have been linked to your current Business Banking membership for internal transaction purposes. These additional accounts will not display on your view accounts page. Once you have checked the transaction details and amounts for that one payment are correct select Once this payment has been registered it will display at the bottom of the create a batch screen as per below image. Copyright 2008 Commercial in Confidence E&OE Page 11 of 58 If you are creating multiple payments in each batch repeat the previous steps to add transactions to the batch. Batch details will now display as follows. Continue until all required transactions have been added to the batch. Business Banking will update the Batch Total field with the new transaction amount each time you add a payment to the batch list list: Business Banking allows for multiple from accounts to be selected when creating batch transactions. When each transaction is entered, a different from account can be selected from the drop down box. When entering multiple transactions to a batch, you will need to reselect your ‘To’ and ‘From’ accounts for the next transaction. You will also need to type over the amount and reference details as these will stay populated from the previous transaction. The batch transactions will display at the bottom of the screen showing the multiple from accounts: If you do not wish to proceed with creation of the new batch, click on the cancel button to exit the batch creation process. If you happen to update a transaction that is incorrect you can either edit or delete the transaction, refer to 8.3 and 8.4 of this manual. Once the batch transactions have been entered/altered, click the save button: Copyright 2008 Commercial in Confidence E&OE Page 12 of 58 Business Banking will save the batch details and display a confirmation screen displaying the new Batch ID Review the information the click the continue button: Business Banking will take the user to the Review Batches screen where the new batch will be displayed: Note: Go to section 8 to find how to view, delete, sign or edit a batch Copyright 2008 Commercial in Confidence E&OE Page 13 of 58 5.3 Creating an External Batch For an external batch, complete section 5.1 of this manual, enter the account the funds are being transferred from (refer to 6.1 if you wish to have multiple from accounts) and the account the funds are being transferred to using the existing external account details in the drop down box. If the FTE Payee is not available in your drop down list and/or is a new payee you will need to add them to your list of available payee’s. Refer to 7.1 of this manual to create a new payee. (note once payee selected information fields should pre populate. You will need to check the transfer details as it is possible for you to alter the amount of the payment and your reference if required.) Select after the details have been entered for each transaction. Confirm update by clicking Copyright 2008 Commercial in Confidence E&OE Page 14 of 58 Once this payment has been registered it will display at the bottom of the create a batch screen as per below. Once the batch transactions have been entered/altered, click the save button: Business Banking will save the batch details and display a confirmation screen displaying the new Batch ID Review the information the click the continue button: Business Banking will take the user to the Review Batches screen where the new batch will be displayed: Copyright 2008 Commercial in Confidence E&OE Page 15 of 58 5.4 Creating a BPAY Batch For a BPAY Batch, enter the account the funds are being transferred from (to select multiple from accounts refer to 6.2). Then enter the Biller details by selecting existing Biller details from the drop down box or by entering new biller details in the “New Biller” Field, refer to 7.3 for details on how to create a new biller. Once the correct Biller has been entered, complete the Reference and Amount fields: Once the transaction details have been entered, click the update Button after each transaction: Confirm update by clicking Note: When creating new BPAY billers refer to 7.3. Copyright 2008 Commercial in Confidence E&OE Page 16 of 58 Once this payment has been registered it will display at the bottom of the create a batch screen as per below. Once the batch transactions have been entered/altered, click the save button: Business Banking will save the batch details and display a confirmation screen displaying the new Batch ID Review the information the click the continue button: Business Banking will take the user to the Review Batches screen where the new batch will be displayed: Copyright 2008 Commercial in Confidence E&OE Page 17 of 58 6. Multiple ‘From’ Accounts in Batches 6.1 Multiples in Eternal Batches If you are creating multiple payments in each batch repeat the previous steps in 5.3 to add transactions to the batch. Batch details will now display as follows. Continue until all required transactions have been added to the batch. Business Banking will update the Batch Total field with the new transaction amount each time you add a payment to the batch list: Business Banking allows for multiple from accounts to be selected when creating batch transactions. When each transaction is entered, a different from account can be selected from the drop down box. The batch transactions will display at the bottom of the screen showing the multiple from accounts: If you do not wish to proceed with creation of the new batch, click on the cancel button to exit the batch creation process. When you click on “Cancel” you will be taken to the “Review Batches” page. If you happen to update a transaction that is incorrect you can either edit or delete the transaction. Refer to 8.3 and 8.4 of this manual. Copyright 2008 Commercial in Confidence E&OE Page 18 of 58 6.2 Multiple BPAY Transactions If you are creating multiple payments in each batch repeat the steps in 5.4 to add transactions to the batch. Batch details will now display as follows. Continue until all required transactions have been added to the batch. Business Banking will update the Batch Total field with the new transaction amount each time you add a payment to the batch list: Business Banking allows for multiple from accounts to be selected when creating batch transactions. When each transaction is entered, a different from account can be selected from the drop down box. The batch transactions will display at the bottom of the screen showing the multiple from accounts: If you do not wish to proceed with creation of the new batch, click on the cancel button to exit the batch creation process. When you click on cancel, you will be taken to the “Review Batches” page. If you happen to update a transaction that is incorrect you can either edit or delete the transaction. Refer to 8.3 and 8.4 of this manual. Copyright 2008 Commercial in Confidence E&OE Page 19 of 58 7. Creating and Deleting Payees and Billers 7.1 To Add FTE Payees If you are not already in a batch with existing payee’s already updated as a transaction, please refer to and complete section 5.1 of this manual, make sure you select batch type as external. Batch name may be “Adding new FTE’s”, select next as you would when creating a normal batch . Click on Add BSB as highlighted below. Once you have clicked on Add BSB the following screen will display Enter the BSB, Account Name and Account number for the New Payee. Enter the reference for the Payee. This will be the default reference displayed when making payments to this payee. Enter the amount of the First Payment. This will be the default payment amount displayed when making payments to this payee. Select Copyright 2008 Commercial in Confidence E&OE Page 20 of 58 The following page will display. Select the “TAPwd” code from the dropdown box provided and using the Crypto keypad Note: Refer to page 8 for an outline of how the crypto keypad works. Click on . The following screen will display to confirm the action. Click on Continue Note: If creating a new FTD Payee as the first transaction on a batch once you select continue you will be taken to the “View all Accounts” page. This will not create a new batch even though you have given it a name. If you have already updated your batch with existing FTD Payees, once you select continue you will be back on the at the batch you have been working on. You will then need to go to ‘Select Payee BSB’ the new payee you have just saved will be saved in the drop down list. Copyright 2008 Commercial in Confidence E&OE Page 21 of 58 7.2 To delete a FTE Payee From the transfers menu, click the Delete FTE BSB The system will display the existing Payees for the Business Banking User. From the listing, select the Payee you wish to delete and click the delete option on the left hand side that corresponds to the payee being deleted. The System will confirm the deletion Click OK to continue or Cancel to discontinue with the deletion process. Copyright 2008 Commercial in Confidence E&OE Page 22 of 58 The system will confirm the Payee details have been deleted. You will come back to the home page Note: Please be aware that above images are for illustration purposes only. Transaction details may vary depending on the type of batch. Copyright 2008 Commercial in Confidence E&OE Page 23 of 58 7.3 To add BPAY Billers If you are not already in a batch with existing payee’s already updated as a transaction, please refer to and complete section 5.4 of this manual to create a BPAY Batch. Click on “Add New Biller”. Select the account you would like the BPAY Biller to be paid from. Manually type in the billers code in the new biller section. Type in the reference provided on your bill in the Customer Reference Number section. Enter the amount. If you have multiple accounts with the same biller e.g. phone company and one of these accounts has already been added to your list of billers please pay special attention to the reference code and amount. Click the Update button to continue with the creation or click on clear to remove the information from the screen and begin the creation process again. Note: If creating a new BPAY Biller as the first transaction on a batch once you select continue you will be taken to the “View all Accounts” page. This will not create a new batch even though you have given it a name. If you have already updated your batch with existing BPAY Billers, once you select continue you will be back on the at the batch you have been working on. You will then need to go to ‘Previous Biller’ the new payee you have just saved will be saved in the drop down list. Copyright 2008 Commercial in Confidence E&OE Page 24 of 58 7.4 To Delete a BPAY Biller Click on Delete BPAY Billers in the BPAY menu The system will display the existing Payees for the Business Banking User. From the listing, select the Biller you wish to delete and click the delete option on the left hand side that corresponds to the payee being deleted. The System will confirm the deletion Click OK to continue or Cancel to discontinue with the deletion process. The system will then confirm the Biller details have been deleted Note: Please be aware that above images are for illustration purposes only. Transaction details may vary depending on the type of batch. Copyright 2008 Commercial in Confidence E&OE Page 25 of 58 8. Review Batches This menu item will display the ‘List All Batches’ screen, which holds a list of all batches saved on the host. This includes Internal, BPAY and External batches, along with uploaded Bank Files. The user will be able to View, Edit, Delete and Sign batches from this screen depending on the status and type of batch being selected. To review batches click on Review Batches in the Business Banking menu: Business Banking will display a listing of the current batches and details such as the total number of transactions in a batch, batch total, last posted date, etc. For an overview of the fields displayed in the Business Banking, refer to the Fields and Status Description section 13 of this manual The Review Batches screen will also provide access to reviewing, editing and posting options. Copyright 2008 Commercial in Confidence E&OE Page 26 of 58 8.1 To view transactions in a batch Click on the view button that corresponds to the batch you are reviewing: Business Banking will display the batch and transactions details: For an overview of the fields displayed in the Business Banking, refer to the Fields and Status Description section 13 of this manual Copyright 2008 Commercial in Confidence E&OE Page 27 of 58 8.2 To edit a batch Click on the edit button that corresponds to the batch you are reviewing: An editing screen, the same as when loading new batch transactions, will be displayed: From the transaction listing at the bottom of the screen, click the edit option that corresponds to the transaction being reviewed: Copyright 2008 Commercial in Confidence E&OE Page 28 of 58 8.3 To edit a transaction in a batch: Locate the transaction in the listing then click the edit option The transaction will be removed from the transaction listing and the details will populate the transaction creation fields. This allows the user to edit any of the transaction details, as well as add new transactions to the Batch: Once the transaction details have been entered, click the update button: Business Banking will update the Batch Total with the new transaction details and the transaction will be again displayed in the Batch Transaction listing at the bottom of the screen. Click save to confirm the changes to the batch Note: Any changes that have been made and saved to a batch that has been signed by all or signed by one authority will then need to be signed again by all required authorities for the changed to take effect. Copyright 2008 Commercial in Confidence E&OE Page 29 of 58 8.4 To delete a transaction from a batch: Locate the transaction in the listing then click the delete option An advice will appear advising you will need to save the batch to permanently delete the transaction: Click OK to continue or Cancel to exit this function Once deleted, the transaction will be removed from the transaction listing at the bottom of the page: Click save to confirm the changes to the batch Copyright 2008 Commercial in Confidence E&OE Page 30 of 58 8.5 To include or exclude a transaction from a batch: Locate the transaction in the listing then click the Include check box to either include the transaction or exclude the transaction from the batch. Click save to confirm the changes to the batch To select all transactions for inclusion/exclusion from a batch, click the select/unselect button: The system will automatically update the Include check box for all transactions in the batch and adjust the Batch Total to reflect the new total value of the batch: Select Unselect To save changes to a batch, once the batch transactions have been entered/altered, click the save button: Copyright 2008 Commercial in Confidence E&OE Page 31 of 58 8.6 To delete a batch Click on the delete button that corresponds to the batch you are reviewing: Business Banking will request authorisation to perform the deletion: From the drop down box, select the Authority ID then enter the correct Authority Password: Once the device details and password have been entered, the system will confirm the deletion has been successful and the batch will no longer be visible in the review batches screen. You will then be back at the ‘Review all Batches’ page. Copyright 2008 Commercial in Confidence E&OE Page 32 of 58 8.7 To sign a batch Where the business banking action requires transactions to be authorised after being signed (or submitted for processing), the authorisation can be done at anytime from any computer, eliminating the need for authorised persons to be present at the time of posting. Click on the sign button that corresponds to the batch you are reviewing: Business Banking will request additional information to complete the signing step: Enter the Release Date for the batch being signed: NOTE: This option will only be available for the first authority to sign. This will not be an editable field for future authorities. Copyright 2008 Commercial in Confidence E&OE Page 33 of 58 From the drop down box, select the Authority ID then enter the correct Authority Password: Multiple Signatories Once the device details have been entered, the system will confirm the batch has been successfully signed. The batch will become a Job and will be visible in the “Check Job status Screen” ready for further authorisation. Refer to section 9 of this manual, the following alert will display when a job is waiting to be signed If an authority attempts to sign a batch they have already signed for the following message will display Any to sign Once the device details have been entered, the system will confirm the batch has been successfully signed. The batch will be posted. NOTE: If you are a sole trader you will only be required to enter the release date of the batch, then hit submit. Copyright 2008 Commercial in Confidence E&OE Page 34 of 58 8.8 Forward Dating a Batch Refer to 6.3 of this manual ‘Signing a Batch’. To forward date a Batch simply enter the release date required for this batch. This can be authorised up to 90 days in advance as you require. 8.9 Creating a Regular Batch As a Business Banker you will often be required to process the same or similar batches on a regular basis. To save time you do not need to worry about creating a whole new batch each time. You can go to Review Batches and select the original batch once it has been authorised. Edit and update the batch as required. Refer to all sub-points within section 8.2 of this manual should you require further clarification on any of the editing/updating processes. Complete as a regular batch. Copyright 2008 Commercial in Confidence E&OE Page 35 of 58 9. Check Job Status This section is not relevant for Sole Trader or One to Sign memberships. This menu item holds a list of un-posted jobs. This includes Internal, B-Pay and External jobs, along with Bank File jobs. The user is able to Sign and Delete jobs from this screen depending on the status and type of job being selected. To check the status of a job, click Check Job Status in the Business Banking menu: Business Banking will display a listing of all Job ID’s as well as details such as the total number of transactions in a batch, Batch Total, Last Posted Date, etc. Additional displays are available to allow users access to more detailed information about jobs. This information is accessed from the columns on the right of the batch details highlighted above. For an overview of the fields displayed in the Business Banking, refer to the Fields and Status Description section, section 13 of this manual Copyright 2008 Commercial in Confidence E&OE Page 36 of 58 9.1 To view the Audit History To view the Audit history for a job, click on the view button, in the Audit History column, that corresponds with the job you are reviewing: A pop-up screen will appear showing the history for the selected job: For an overview of the fields displayed in the Business Banking, refer to the Fields and Status Description section, section 11 of this manual 9.2 To view all transactions in a Job To view all transactions in Job, click on the all option in the view column that corresponds with the job you are reviewing. Business Banking will display a list of all transactions in that job: Copyright 2008 Commercial in Confidence E&OE Page 37 of 58 9.3 To Action a Job The Check Job Status screen allows for Jobs to be actioned in two ways, sign or delete: 9.4 To sign a Job: Where the business banking action requires transactions to be authorised after being signed (or submitted for processing), the authorisation can be done at anytime from any computer, eliminating the need for authorised persons to be present at the time of posting. To sign a job from the Check Job Status screen, click on sign option in the Action column that corresponds with the Job you are reviewing. Business Banking will request additional information to complete the signing step. Copyright 2008 Commercial in Confidence E&OE Page 38 of 58 From the drop down box, select the Authority ID then enter the correct Authority Password: Once the device details have been entered, the system will confirm the job has been signed. When the final Authority has signed the job, Business Banking will confirm the Job is posted and the job will be posted on the release date. Posted jobs will appear in the Job History screen Note: If one of the transactions in the batch rejects during the upload process, the entire batch will be rejected. An uploaded batch cannot be edited with the Business Banking software. In the event that there is incorrect data in the file, the batch will need to be deleted and the file updated. The bank file can then be uploaded again. Copyright 2008 Commercial in Confidence E&OE Page 39 of 58 9.5 To delete a Job: Enhanced security functionality through the batch creation process, requires transactions to be edited during the batch stage. Once the batch has been signed and becomes a job, users don’t have the option to delete transactions from a Job. In the event that a transaction in a job is incorrect, the Job will need to be deleted and the batch recreated. To delete a job from the Check Job Status screen, click on the delete option in the Action column that corresponds with the Job you are reviewing: Business Banking will request additional information to complete the deletion step: From the drop down box, select the Authority ID then enter the correct Authority Password: Once the device details have been entered, the system will confirm the Job has been successfully deleted. The Job will no longer be visible in the Check Job status screen Copyright 2008 Commercial in Confidence E&OE Page 40 of 58 10. Job History Business Banking allows users to display the history of Jobs created. To access this information, click on the Job History option from the Business Banking menu: Business Banking will display a list of Jobs, including details such as the total number of transactions in the Job, batch total, last posted date, etc. Additional displays are available to allow users access to more detailed information about Jobs. This information is accessed from the columns on the right of the batch details: Copyright 2008 Commercial in Confidence E&OE Page 41 of 58 10.1 To view the Audit History To view the Audit History for a job, click on the View button, from the Audit History column, that corresponds with the Job you are reviewing. A pop-up screen will appear showing the Audit History for the selected Job: For an overview of the fields displayed in the Business Banking, refer to the Fields and Status Description section, section 13 of this manual 10.2 To view specific transactions in a job: To view the specific transactions for a job, click on the appropriate option in the view column that corresponds with the Job you are reviewing. Copyright 2008 Commercial in Confidence E&OE Page 42 of 58 10.3 To View all Transactions in a Job To view all transactions in Job, click on the all option in the view column that corresponds with the Job you are reviewing. Business Banking will display a list of all transactions in that Job: 10.4 To list all failed transactions in a Job: To view all failed transactions in Job, click on the all option in the view column that corresponds with the Job you are reviewing: Business Banking will display a list of all failed transactions in that Job: Copyright 2008 Commercial in Confidence E&OE Page 43 of 58 10.5 To list all posted transactions in a Job: To view all posted transactions in Job, click on the posted option in the view column that corresponds with the Job you are reviewing: Business Banking will display a list of all posted transactions in that Job: Copyright 2008 Commercial in Confidence E&OE Page 44 of 58 11. Upload Bank File Business Banking allows users to upload bank files into the batch processing functions. The system accepts .aba files created through accounting packages, such as MYOB, which conform to bank file standards. This allows payroll and payment batches to be created through third party software and then processed through Business Banking. 11.1 Creating the Upload environment To utilise this functionality, the user’s environment needs to meet a set of credentials for the upload to work. These include: .NET 2.0 (or above) Framework (refer to 1.2) Specific Business Banking security policy installed on their PC, provided from the institution. (refer to 1.3) Browser settings identifying NetTeller as a trusted site (refer to 1.4) If installed, McAfee Security suite requires Site Advisor uninstalled. (refer to 1.5) Identifying the .NET version Microsoft® .NET 2.0 framework is required to utilise the bank file upload option. Framework versions may not always be easy to identify and further investigation may be required. Go to the Control Panel, either by going to My Computer on your desktop (Control Panel should display on left hand side menu) or Start then Settings then select Control Panel, click on Administrative tools Copyright 2008 Commercial in Confidence E&OE Page 45 of 58 The system will display the .NET configuration icon and the version number which will be displayed in the icon name If .NET version 2.0 is installed but the system doesn’t have the 2.0 configuration icon present, this may not be a true representation of the environment and additional confirmation is required. Confirm the presence of .NET 2.0 systems files in C:\WINDOWS\Microsoft.NET\Framework The information in this folder should reflect the information that is displayed in the “Add/Remove” programs screen. Copyright 2008 Commercial in Confidence E&OE Page 46 of 58 The Windows files identify a 2.0 folder however the Add/Remove software screen shows this as a Service Pack and not the Framework. To reconfirm this, go to the Windows 2.0 file and confirm that it holds a CONFIG folder. If the config folder for 2.0 cannot be found, the user will need to install Microsoft .NET Version 2.0 from a trusted site. The .NET Version 2.0 Configuration Wizard icon (GUI Interface) may also need to be installed. Note: There are multiple versions of the .NET2.0 framework available. These cater for different Operating System versions such as 64 bit Vista, etc. To identify the specific version required for your operating system, refer to the ‘System Requirements’ identified by the source of your upgrade software. Copyright 2008 Commercial in Confidence E&OE Page 47 of 58 Install the Security Permission Go to http://www.ge.tt/7jz6u2E/v/0?c, run the install program to install the Security Permissions. These are required to upload Bank Files in Business Banking. Once the installation begins, follow the screen prompts until the installation complete. 1 2 Note: Depending on the security settings on your computer, you may receive a security message requesting that you do not run this program. You may need to find more options to be able to proceed and complete the run. Copyright 2008 Commercial in Confidence E&OE Page 48 of 58 3 4 5 Copyright 2008 Commercial in Confidence E&OE Page 49 of 58 Browser Trusted sites The NetTeller internet banking site needs to be added as a trusted site in Internet Explorer. Open Internet Explorer, go to the Tools menu, access Internet Options and go to the Security tab. Click on the Trusted Sites option then click on the Sites button. In the sites listing click on the Add button to add NetTeller Internet Banking as a trusted site. Copyright 2008 Commercial in Confidence E&OE Page 50 of 58 McAfee Site Advisor McAfee Site Advisor / Site Advisor Plus is not supported by Business Banking McAfee Site Advisor is a free download from McAfee website designed to rate the risk level of websites as they are visited and reduce the risk of browsing the internet. McAfee Site Advisor Plus is an enhanced version of the product available as part of the McAfee Total Protection Suite. Both versions of Site Advisor cause issues with Business Banking, specifically affecting the ability to upload batches in Business Banking. In order to use all the features of Business Banking, McAfee Site advisor / Site Advisor Plus must be uninstalled. Adding the Business Banking website to the safe list or disabling the product still results in issues. The McAfee Site Advisor software is available for Internet Explorer and Firefox browsers only. To identify if you have McAfee installed you will need to go to the Control Panel, either by going to My Computer on your desktop (Control Panel should display on left hand side menu) or Start then Settings then select Control Panel, click on Administrative tools. The system will display McAfee if the software has been installed. NOTE: on some computers McAfee may display in the Control Panel before you select Administrative Tools. You will need to now uninstall this software go to Control Panel, select Add/Remove Programs or Windows Components. Highlight the McAfee symbol, button should appear for you to Change/Remove. Select this button. Screen will display Select Finish Copyright 2008 Commercial in Confidence E&OE Page 51 of 58 12. Uploading a bank file To upload a Bank File, from the Business Banking Menu, click on Upload Bank File from the Business Banking menu The system will confirm the user permissions and the account the payments are to be debited from: Select the From account from the drop down list. Select the Authority ID that relates to the user. Enter the Authority Password Copyright 2008 Commercial in Confidence E&OE Page 52 of 58 The system will display the upload page Use the select option to identify the ABA file to be uploaded Copyright 2008 Commercial in Confidence E&OE Page 53 of 58 The system will open an explorer window Select the file to be uploaded then click on the Open button. The system will populate the display with the batch information and the batch can now be uploaded. Copyright 2008 Commercial in Confidence E&OE Page 54 of 58 Click on the Confirm button to continue or the Cancel button to clear the upload file details. The system will confirm that the upload is complete and provide the user with the Batch ID. To exit this screen, click the Upload Another Bank File button to be returned to the start of the upload process. The Batch will now appear in the Review Batches screen Once the Batch has been successfully uploaded and can be viewed in the Review Batches screen, the process of signing the batch to create a job is the same as when processing a manually created Batch. Copyright 2008 Commercial in Confidence E&OE Page 55 of 58 13. Field and Status Descriptions Business Banking utilises a number of fields to identify information about batches and jobs. An overview of each of the permissions is as follows: Batch ID This is the batch or job Identification number issued by Business Banking. Description When a batch is created, the user specifies a description for the batch. The description for the batch is displayed in this field. No. in Batch Total number of transactions in the batch or job Batch Total The total combined transaction value of the batch or job Date Created The date the original batch or job was saved Date Last Saved The last date the batch or job was saved. Date Last Posted The last date the batch or job was posted Status Depending on the progress of the batch, the current status will be displayed in this field. The status indicates the status of the Batch and the Job status is displayed separately in the Check Job Status screen. Release Date Anticipated release date of the batch or job Transactions Total Number of Transactions Type Batch Type – Bank File, Internal, External or BPAY Sub Batch ID This field is not applicable to Business Banking and will always display 1 for the primary batch. Posted Date The date the Job was posted Activity The activity that was performed by the corresponding Authority Authority Copyright 2008 Commercial in Confidence E&OE Page 56 of 58 The authority performing an activity Token The Authority ID used to perform the activity An overview of each of the statuses displayed in this field is as follows: Upload in Progress Bank File Upload is currently in progress Upload Incomplete Bank File Upload has not completed Upload Aborted Bank File Upload has been cancelled prior to completion Upload Failed Bank File has failed to upload Duplicate Batch Bank File is a duplicate to one previously uploaded Awaiting Authorisation When a Batch is saved, or a Bank File is successfully uploaded, it will show this status to indicate it is waiting signing, to move it to the job phase. Expired Batch has not been Signed by the Posting date 9/3 Batch has been authorised and 3 Authorities are still to sign Authorised Batch has received its initial authorisation Batch Submitted for Job Authorisation Batch has received its initial authorisation and has progressed to the Job phase Copyright 2008 Commercial in Confidence E&OE Page 57 of 58 14. Glossary Authority An individual who performs operations via Business Banking Authority Password An individual user's password. Used to upload, sign and delete batches / jobs – Conditions apply. Bank File An .aba file created through third-party accounting packages e.g. MYOB. Batch BPAY Batch A template of one or more BPAY transactions. External Batch A template of one or many external transfer transactions. FTE BSB A record of Funds Transfer External recipients. Records BSB and account numbers, Account name, last payment amount and date and reference details. Internal Batch A template of one or many NICU internal transfer transactions. Job A batch that has been authorised for posting Multiple Signatories Applies to accounts that require more than one Authority to operate. MYOB (http://myob.com.au/) An acronym for "Mind Your Own Business". MYOB provide accounting and finance software including payroll solutions. Payroll files can be created in MYOB and imported into Business Banking as a batch. Copyright 2008 A template containing one or many individual transactions; A batch can only be of 1 type (Internal, External or BPAY); Can be edited to add or exclude individual transactions; When authorised (signed): o is posted immediately or on the release date (for one to sign); or o becomes a job pending authorisation by another Authority (for two or more to sign). Commercial in Confidence E&OE Page 58 of 58