1
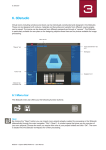
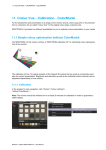
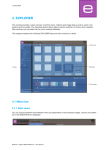
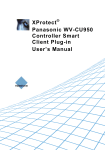
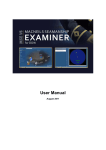
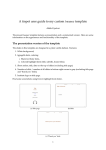
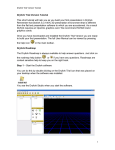
7. MATERIALstudio
7. MATERIALstudio
In the MATERIALstudio backgrounds with different coatings and surface techniques can be put together to
form your own sample combinations. These can be saved and then used like all other colours and materials in SPECTRUM 4.0 for design purposes in the PHOTO and/or 3Dstudio as well as for export to other
programs.
Menu bar 7.1
Tab
“Surface” 7.2.1
“Surface coating system” tab 7.2.2
7.1 Menu bar
The following options are available in the menu bar of the MATERIALstudio:
Create new project
You use this function to clear the MATERIALstudio workspace in order to begin surface selection again.
You can also select this function via the main navigation through “File”>“New”>“Material”.
Open
Click the “Open” button to open materials you have already created (or go to “File”>“Open” in the main
navigation). Then choose one of your individual samples from the project folder and confirm your choice
by clicking “OK”. The material is now loaded into the MATERIALstudio workspace for further processing.
Save
To save an individually created sample, click the “Save” button (or choose “File”>“Save as” in the main
navigation). Then choose a target folder in the dialogue window or create a new project folder. (See chapter 4.2.1 “Library” on how to create projects).
Enter an unambiguous variant name (e.g. FF_Tira_Pint 10 (for Fantastic Fleece_Design Tira_Colour 3D
Pink 10) and confirm by clicking “Save”.
09/2010 - Caparol SPECTRUM 4.0 - User Manual
66
7. MATERIALstudio
Print
If you would like to print your individual sample for viewing purposes or for a collage, choose the “Print”
button. The program creates a PDF file in DIN A4 size that you can then print or save. This function can
also be triggered under “File”>“Print”>“pdf” in the main navigation.
Note: Please note that the colours may deviate from the original depending on the printer and paper used.
We recommend that you create a sample area.
In addition, colour sheets can be ordered from Caparol for Caparol 3D system plus and CaparolColor.
7.2 Create individual samples
When creating an individual material sample, choose a surface first and then coat this according to your
requirements with the products available for the purpose.
7.2.1 “Surface” tab
Interior or exterior
Decide first whether the surface you require is to be used for the interior or façade area, and select the
“Interior” or “Exterior” field accordingly.
09/2010 - Caparol SPECTRUM 4.0 - User Manual
67
7. MATERIALstudio
Background
Choose a background in the second step. Selecting the type of background determines the selection of
surface coating products that are technical feasible and sensible for use on this background.
The sub-categories are opened by clicking the “+”. Load a surface by double-clicking the thumbnail pattern. The structure is then displayed filling the whole workspace. You can see the name of the background
you have chosen at the bottom left-hand edge of the surface sample.
Choice of colour
Choice of coating
Note: As soon as you click a further sub-item in the “Surface” tab, its contents are shown even if you had
selected a background for processing beforehand. Material combinations already created are lost unless
you have saved them.
7.2.2 “Surface coating system” tab
After you have selected a surface you can create an individual sample using the product and colour selection in the “Surface coating system” tab (underneath the workspace).
09/2010 - Caparol SPECTRUM 4.0 - User Manual
68
7. MATERIALstudio
Coating
Start with the “1st coating” and select the produce you want in the dropdown menu. Then click on the
grey field “Please choose a colour” (to the right of the dropdown menu) to open the ColorPicker where you
can choose a colour.
Note: Only those products and/or coatings are offered that are technically feasible and recommended. A
2nd coating can only be chosen if it makes sense for this material.
ColorPicker
A colour for the coating can be selected in the ColorPicker in the same way as components are coloured
in the PHOTOstudio.
The sample is coloured immediately when you click on a colour field. This preview remains visible in the
ColorPicker until another colour is selected. It is only actually used on the background after confirmation
through “OK”.
As in the EXPLORER and PHOTOstudio, the ColorPicker offers the following possibilities here, too: Limitation according to brightness reference value, page in colour kit, full text search and product feasibility (see
chapter 5.3.2 “Design tab” for explanation of the search possibilities).
Page number in original kit
Brightness reference value
Extended search
Product feasibility
Colour selection
Colour field
Colour preview
Colour trackbar
Note: Use product filters for all the coatings selected in the surface coating system in order to guarantee
the feasibility of the colour on the respective background.
09/2010 - Caparol SPECTRUM 4.0 - User Manual
69
7. MATERIALstudio
After you have selected a colour, the type of coating and colour description are shown in the grey field
next to the dropdown menu.
Note: Depending on the background chosen only certain coating possibilities are shown in the dropdown
menu. This is because the backgrounds can only be processed with a certain type and number of coatings. This way, SPECTRUM 4.0 ensures that your individual material combinations can actually be carried
out in reality.
Depending on the background and type of coating you can add a 2nd and 3rd coating, and then save your
individual sample and use it for design in the PHOTOstudio or 3Dstudio.
Change coatings
If you would like to change the colour of a coating later, click in the grey field next to the coating and
choose a new colour. If you change the type of coating in the dropdown menu, the colour has to be selected again as well.
Note: If you choose a new colour and retain the type of coating, your subsequent coatings remain unchanged. If you change a type of coating, however, the subsequent coatings are reset.
Remove coating
After you have coated your background, you can remove the last coating layer you added. To do this, click
the “X” symbol on the right of the colour description.
7.3 Use individual samples
In order to use individually created samples, they have to be placed in a set of favourites after saving in a
project folder. See chapter 4.3 “Add samples to a set of favourites” for details on how to do this.
09/2010 - Caparol SPECTRUM 4.0 - User Manual
70