1
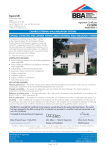
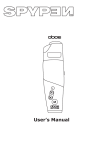
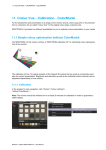
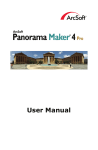
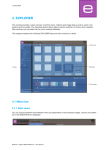
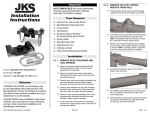
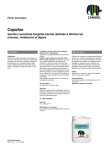
6. 3Dstudio
6. 3Dstudio
Virtual rooms including windows and doors can be individually constructed and designed in the 3Dstudio.
These can be designed with colours, materials and favourites and variants from different viewing angles
can be saved. The rooms can be observed from different perspectives through a “camera”. The 3Dstudio
is particularly suitable for new plans or for designing objects where there are no photos available for image
processing.
Menu bar 6.1
“Objects” tab
“Floor plan/element” tab
6.2.1
Workspace
“Colour” tab
Navigator 6.2.2
“Material” tab
“Favourites” tab
6.1 Menu bar
The 3Dstudio menu bar offers you the following function buttons:
Open
By clicking the “Open” button you can import room variants already created for processing in the 3Dstudio
(alternatively through the main navigation “File”>“Open”). A window opens that gives you an overview of
your own projects. Choose the room you require from one of your project folders and click “OK”. The room
is loaded into the 3Dstudio workspace for further processing.
09/2010 - Caparol SPECTRUM 4.0 - User Manual
59
6. 3Dstudio
Save
To save the current view of a 3D variant, click the “Save” button (or choose “File”>“Save as” in the main
navigation). Choose the respective target project folder or create a new project folder (see chapter 4.2.1
“Library” on how to create your own projects). Save the room variant under the name shown or enter a
new name in the text field and click “Save”.
Grid
The 3Dstudio workspace has a grid which is shown by default, you can hide or show this during the variant
phase by clicking the “Show grid” button.
6.2Create 3D elements
6.2.1 “Floor plan/element” tab
Select floor plan
In this tab, you can specify a floor plan shape, its alignment and the ceiling height of your
3D object. To design a new room, choose one of the five “Floor plan types” first. For the four asymmetrical
floor plan types, the position in the room can also be selected using the bottom right corner in the floor
plan symbol. Enter a customised ceiling height in centimetres if required - the default ceiling height is
250cm.
09/2010 - Caparol SPECTRUM 4.0 - User Manual
60
6. 3Dstudio
6.2.2 Navigator
The 3Dstudio navigator is in the bottom right-hand area of the program interface and shows the 3D room
as a 2D view from above. Use this view to change the camera angle and its distance to the room or to design the room shape manually. The room walls are shown as transparent in the navigator - the yellow figure
indicates your current viewing position in relation to the room.
Move camera
You can change your viewing angle to the room using the “Move camera” mode. Click the symbol (the active mode is accentuated white) and then move the yellow figure to the required position, keeping the left
mouse button pressed.
If you remove the figure from the floor plan, the 3D room changes accordingly in the workspace, if you
turn the figure to a different position in relation to the room, you will get a view of the room from a different viewing angle. This way, you can both look at your room from the outside and “stand” in the room or
simulate a 360° view by turning the figure continually. The yellow standpoint can be moved with the right
mouse button pressed.
09/2010 - Caparol SPECTRUM 4.0 - User Manual
61
6. 3Dstudio
Change/process floor plan
This mode allows you to customise the room after selection of a floor plan type (see chapter 6.2.1 “Floor
plan/element tab” on how to choose a floor plan). After selection of the “Change floor plan” button (active
mode is accentuated white) you can move individual walls to the desired new position by dragging them
with the left mouse button pressed - the walls are shown red during this. Corner points can also be moved
by dragging with the mouse button pressed. Adjacent walls are adapted accordingly in both cases. The
result can be seen directly in the workspace.
Add windows and doors
To add windows and doors to the walls, click the “Add door and window” button (active mode is accentuated white). Click on a wall that is to be given a door or window to activate it. Walls that can be selected
are shown red during mouse-over. After a wall has been clicked, the inactive walls are shown transparent
for better orientation.
The following dialogue offers a selection of several door and window variants. Place the selected element
where you want it by moving the trackbar. You can see the effect of moving the trackbar directly on your
3D object in the workspace. You can add one window and one door per wall.
Note: We recommend changing to the “Bird’s eye view” mode for adding door and window so that you
can see the elements in the wall better.
09/2010 - Caparol SPECTRUM 4.0 - User Manual
62
6. 3Dstudio
Remove windows and doors
If you would like to remove windows and doors from a wall again, choose the “Add door and window”
button again as before, and then choose the required wall in the navigator window. Now click the “Delete
element” button to remove the element. After confirmation through “OK” you have removed the element
from the wall.
Note: If the wall has both a door and a window, both are removed during the deletion process.
09/2010 - Caparol SPECTRUM 4.0 - User Manual
63
6. 3Dstudio
Perspectives
Worm’s eye view
You can choose between three different perspectives to view your 3D room. In the worm’s eye view, you
see the room from a position on the floor. You can also navigate through walls in this mode.
Standard perspective
Standard perspective allows you to see a frontal view of the room from the viewing height of a standing
human of average size. You can also navigate through walls in this mode.
Bird’s eye view
In the bird’s eye view you hover above the room. This is the default perspective when starting 3Dstudio.
On account of its good overview, it is recommended for changing the floor plan and adding doors and
windows.
09/2010 - Caparol SPECTRUM 4.0 - User Manual
64
6. 3Dstudio
6.3 3D room design
After selection and editing of a 3D object you can start with the room design, analogue to the PHOTOstudio. (See chapter 5.3.1 “Colour, material and favourites” and chapter 5.3.2 “Design tab” for information on
colour and material selection)
Note: The components of the 3D room were created automatically. For this reason, area masks and grids
do not have to be created - you can start designing with colour and material immediately.
To do this, click one of the “Colour”, “Material” or “Favourites” tabs. In the next step, choose a manufacturer and then the manufacturer’s collection. You can start with design as soon as you have chosen a
colour or a material (see chapter 5.3.1 “Colour, material and favourites” or chapter 5.3.2 “Design tab”).
After colour/material selection, click the mouse pointer onto one of the walls in your room in the 2D view
of the navigator to colour it, or directly in the small components square in the “Component” tab. You can
view ceiling and floor best when the figure is in the room and “Standard perspective” has been chosen.
Note: During design, remember to consider the feasibility of the respective products for the interior and
exterior, and have a look at the respective Technical Information sheets (TI) for the individual products (for
material details see chapter 4.2.3 “Material”).
Your “components”
have been created
automatically in the
3Dstudio.
Select a tab.
Materials
09/2010 - Caparol SPECTRUM 4.0 - User Manual
65