1
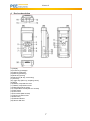
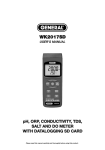
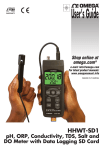
PCE Instruments UK Ltd.
Units 12/13
Southpoint Business Park
Ensign way
Southampton
Hampshire
United Kingdom, SO31 4RF
Tel: 02380 98703 0
Fax: 02380 98703 9
[email protected]
www.industrial-needs.com
www.pce-instruments.com/english
Manual
PH-EC-O2 pH meter PCE-PHD 1
Version 2.0
30.12.2014
Manual
Table of contents
1
1.1
2
Introduction ............................................................................................................. 3
Delivery contents ........................................................................................................................ 3
Safety information ................................................................................................... 3
2.1
Warning symbols ........................................................................................................................ 3
2.2
Safety precautions ...................................................................................................................... 3
3
Specifications .......................................................................................................... 4
4
Device description .................................................................................................. 7
5
Instructions.............................................................................................................. 8
5.1
Mode selection ........................................................................................................................... 8
5.2
pH / mV measurement................................................................................................................ 8
5.3
mV measurement ....................................................................................................................... 9
5.4
pH calibration .............................................................................................................................. 9
5.5
Conductivity measurement ....................................................................................................... 10
5.6
TDS measurement ................................................................................................................... 11
5.7
Conductivity calibration ............................................................................................................. 11
5.8
Salt content measurement........................................................................................................ 11
5.9
Calibration of the salt content measurement ............................................................................ 12
5.10
Dissolved oxygen measurement .............................................................................................. 12
5.11
Atmospheric oxygen content measurement ............................................................................. 12
5.12
Calibration of the atmospheric oxygen content measurement ................................................. 13
5.13
Maintenance of the oxygen probe ............................................................................................ 13
5.14
Other functions ......................................................................................................................... 14
5.15
Datalogger ................................................................................................................................ 14
5.16
SD card structure ...................................................................................................................... 16
5.17
To save the SD card data on the computer (EXCEL software)................................................ 16
5.18
Further settings ......................................................................................................................... 17
5.19
RS232 interface ........................................................................................................................ 19
6
Maintenance and cleaning.................................................................................... 21
6.1
Battery replacement ................................................................................................................. 21
6.2
System reset ............................................................................................................................. 21
7
Disposal ................................................................................................................. 21
8
Contact ................................................................................................................... 22
2
Manual
1
Introduction
Thank you for purchasing a PCE-PHD 1 meter from PCE Instruments.
This portable pH meter can test the pH value of water, as well as conductivity, temperature and the
oxygen content. The meter is delivered with an integrated conductivity sensor and a pH sensor. You can
store all values on an SD card (up to 16 GB) in Excel format and also transfer them to a computer using
the RS-232 interface. A three-point calibration and automatic temperature compensation guarantee a
high degree of accuracy even with variable temperature measurements.
1.1
Delivery contents
1 x pH meter PCE-PHD 1, 1 x pH electrode, 1 x conductivity electrode, 1 x SD memory card, 1 x card
reader, 6 x batteries and user's manual
2
2.1
Safety notes
Warning symbols
General warning. Urgently consult the documentation.
Operating voltage is under its set point. Change batteries to avoid faulty measurements.
2.2
Safety precautions
Please read this user's manual carefully and completely before you use it for the first time. The device
may only be used by qualified personnel. There is no warranty of damage caused by non-observance of
the manual.
- Non-observance of the manual may be dangerous for the user or cause destruction of the device.
- The device may only be used in approved temperature and humidity range. Direct exposure to sunlight
or moisture (e. g. wet hands) must be avoided.
- The opening of the case should only be done by qualified personnel of PCE Instruments.
- The instrument should never be placed with the user interface facing an object (e.g. keyboard side on a
table).
- You must not make any technical changes to the device.
- The appliance should only be cleaned with a damp cloth / use only pH-neutral cleaner, no abrasives or
solvents.
- The meter may only be used with the accessories offered by PCE Instruments or equivalent.
- Before using the device, check the case and the test leads for visible damage. If you find damage, do
not use the device.
- The appliance must not be used in potentially explosive atmospheres.
- If the battery is flat (which is indicated by the battery indicator), do not use the meter as faulty
measurements can cause life-threatening situations. You can carry on after replacing the batteries.
- Check for proper functionality by measuring a known quantity.
- It is very urgent that you do not exceed the set points stated in the specifications.
- Before opening the case in order to replace the battery or fuse, remove all test leads to avoid an electric
shock.
- When you do not use the device for a long time, remove the batteries to avoid damage caused by
leakage of the battery.
This user's manual is published by PCE Instruments without any guarantee.
We expressly refer to our general guarantee terms, they can be found in our general terms of business.
If you have any questions please contact PCE Instruments.
3
Manual
3
Specifications
PH measurement
Measurement ranges
Resolution
Accuracy
Calibration
Temperature compensation
Conductivity
Measurement ranges
0.00 ... 14.00 pH
0.01 pH
±0.02 pH + 2 digits
3 points (pH 4, pH 7 y pH 10)
automatic with additional temperature sensor (0
... 60ºC) or manual (0 ... 100 ºC)
0 ... 200.0 µS/cm
0.2 ... 2.000 mS/cm
2 ... 20.00 mS/cm
20 ... 200 mS/cm
Resolution
0.01 µS/cm
0.001 mS/cm
0.01 mS/cm
0.1 mS/cm
Accuracy
Calibration
Temperature compensation
±2 % of the measurement range + 1 digit
1413 mS/cm
automatic (0 ... 60 ºC)
Total dissolved solids (TDS)
Measurement range
0 ... 132 ppm
132 ... 1,320 ppm
1,320 ... 13,200 ppm
13,200 ... 132,000 ppm
Resolution
0.1 ppm
1 ppm
10 ppm
100 ppm
Accuracy
Temperature compensation
±2 % of the measurement range + 1 digit
automatic (0 ... 60 ºC)
Salt content
Measurement range
Resolution
Accuracy
Temperature compensation
0 ... 12 % (of weight)
0.01 %
±0.5 % of the measurement range
automatic (0 ... 60 ºC)
Oxygen
Measurement range
0 ... 20 mg/l (in water)
0 ... 100 % (in air)
0 ... 50 ºC
Resolution
0.1 mg/l
0.1 %
0.1 ºC
Accuracy
±0.4 mg/l
±0.7 %
±0.8 ºC
Calibration
in the air
4
Manual
Temperature compensation
automatic (0 ... 50 ºC)
Temperature
Measurement range
Resolution
Accuracy
Temperature compensation
0 ... 60 ºC
0.1 ºC
±0.8 ºC
automatic (0 ... 60 ºC)
Technical specifications
Measurement rate
1 second up to 9 hours
Display
LCD
Memory
an SD card (up to 16 GB)
a 2 GB card included in the delivery
Interface
RS-232
Software
optional
Power supply
6 x 1.5 V AA batteries
(optional mains adapter)
Operating conditions
0 ... +50 ºC / <85 % RH
Dimensions
177 x 68 x 45 mm
Weight
490 g
Board
one-chip micro computer / LSI circuit
Data logger
Sampling time / sampling range
Auto
1 sec to 8 hrs 59 min
59 sec
(with a sampling time
of 1sec, automatic
saving may not work)
Manual
Press the data logger
key
to save data once.
(sampling time target =
0 sec)
Advanced
settings
* formatting of the SD memory card
* clock time setting ( year / month / date,
hour / minute / second )
* sampling time setting
* auto power OFF setting
* beep sound ON/OFF
* selection of decimal point for the SD card
* selection of temperature unit (°C or °F)
* compensation values setting
Power consumption
normal operation (with no saving in process and
when display light is OFF) : approx. 14 mA
with saving in process and when display light is
OFF: approx. 37 mA
5
Manual
(when display light is on, the power
consumption will increase by approx. 12 mA)
Data Hold
data on display can be held / “frozen“
Memory recall
minimum and maximum values
Conditions to achieve the stated accuracies
field strength ‹ 3 V/m and frequency ‹ 30 MHz
6
Manual
4
Device description
(1) Display
(2) Power key (backlight)
(3) Hold key (ESC key)
(4) REC key (Enterkey)
(5) Mode key (▲ key)
(6) Range key (▼ key, control key)
(7) Time key
(8) Logger key (SET key, sampling check)
(9) Stand
(10) Battery compartment cover
(11) Battery comparment screw
(12) Mounting hole for tripod
(13) Temperature socket (PH ATC socket)
(14) DO socket
(15) CD socket
(16) PH socket (BNC socket)
(17) DC 9V socket for PSU
(18) Reset key
(19) RS232 interface
(20) Slot for SD card
7
Manual
5
Instructions
5.1
Mode selection
1. Switch on the meter by pressing and holding the power key (2) for a few seconds.
(Pressing and holding the key again for more than two seconds switches off the device.)
2. You can choose from four modes. After pressing the mode key (5), the display will show the following
options in sequence:
PH
Do
Cd
SALt
5.2
pH, mV ( ORP ) measurement
dissolved oxygen measurement
conductivity, TDS measurement
salt measurement
pH / mV measurement
Note: The default settings of the meter are:
displayed unit = pH
temperature unit = °C
manual temperature compensation (when the probe is not connected)
automatic power off deactivated
sampling time of the data logger = 2 seconds
CAUTION!
WHEN FIRST USING THE PROBE ALONG WITH THE METER, URGENTLY CALIBRATE BEFORE
STARTING WITH THE MEASUREMENT.
pH measurement (manual temperature compensation):
1. Switch on the device.
2. Select the “PH“ measurement mode.
3. Put the plug of the probe into the BNC socket (16).
4. Adapt the temperature manually to the temperature of the solution to be measured
5. Hold the handle of the probe and dip the complete probe head into the solution.
6. Stir slightly.
7. The display will show the pH value and the set temperature value.
pH measurement (automatic temperature compensation - ATC):
1. Switch on the device.
2. Select the “PH“ measurement mode.
3. Insert the plug of the probe into the BNC socket (16).
4. Insert the plug of the temperature probe into the temperature socket (13).
5. Hold the handles of the probes and dip the complete probe heads into the solution.
6. Stir slightly.
7. The display will show the pH value and the measured temperature value.
Note:
When the pH probe is not in use, the probe head must be in the protective bottle.
8
Manual
5.3
mV measurement
The device has an mV (millivolt) measurig function wich allows the user to make ORP and other precise
mV measurement.
To measure the mV value:
1. Switch on the device.
2. Select the “PH“ measurement mode.
3. Press the control key (6). The display switches from pH to mV (if you press the key again, the display
switches back from mV to pH).
4. Put the plug of the ORP probe into the BNC socket (16).
5. The display will show the mV value.
5.4
pH calibration
Background:
An ideal pH electrode generates a voltage value of zero millivolts when the pH value is seven. The device
was calibrated with signals which indicate this optimum value at an ambient temperature of 25 °C. Not all
electrodes come up to these optimum values. That is why a calibration must be carried out before first
use. Additionally, occasional calibrations of a used probe makes sense in order to ensure precise
measurements.
For calibration, a pH electrode and a pH standard solution are necessary.
To carry out a pH calibration:
1. Put the plug of the pH probe into the BNC socket (16).
2. Switch on the device.
3 .Select the “PH“ measurement mode.
4. Adapt the temperature manually to the temperature of the standard solution or put the plug of the
temperature probe into the temperature socket (13). If you want to use the temperature probe, you must
dip it into the the standard solution.
5. Dip the tip oft he pH probe into the standard solution
6. Stir slightly.
7. The display will show the pH value and the set / measured temperature value.
8. Press the REC key and the Hold key at the same time until the following is displayed:
9.Use the arrow keys to choose one of the following indications:
for calibration by means of a solution with a pH value of 4
for calibration by means of a solution with a pH value of 7
9
Manual
for calibration by means of a solution with a pH value of 10
deleting the existing calibration
10. By pressing the Enter key you can finish the calibration.
Note: You should make at least a two-point calibration (i. e. pH 7 and pH 4 calibration or pH 7 and pH
10 calibration). First calibrate with pH7 and afterwards with pH 4 / pH10. Between the processes, clean
the electrode with distilled water. Carry out the two-point calibration at least twice.
5.5
Conductivity measurement
Note: The default settings of the meter are:
displayed unit = µS, mS
temperature unit = °C
temperature compensation factor = 2 % per °C
automatic range selection
automatic power off deactivated
sampling time of the data logger = 2 seconds
CAUTION!
WHEN FIRST USING THE PROBE ALONG WITH THE METER, URGENTLY CALIBRATE BEFORE
STARTING WITH THE MEASUREMENT.
To measure conductivity:
1. Put the plug of the conductivity probe into the CD socket (15)
2. Switch on the device.
3. Select the “Cd“ measurement mode.
4. Hold the handle of the probe and dip the complete probe head into the solution.
5. Shake the probe to make sure that the air bubble escapes from the probe head.
6. The display will show the conductivity value and the measured temperature value.
Manual range selection
Automatic range selection is set as default for measuring conductivity, but by means of the Range key
you can switch between the two ranges.
Zero adjustment
When the probe is not in the solution to be measured and the display still does not indicate “Zero“, you
can force “Zero“ to be displayed by pressing the zero key (5) for at least 10 seconds.
Note: Zero adjustment is only possible in the range of 200 µS and with a deviation of < 2 µS.
10
Manual
5.6
TDS measurement
The procedure is as in conductivity measurement. The only difference is that the unit most be switched
from µS/mS to ppm.
5.7
Conductivity calibration
For calibration, a conductivity standard solution is necessary, e. g. 1.413mS standard solution for a
measurement range of 2 mS, 80 µS standard solution for a measurement range of 200 µS and 12.88 mS
for a measurement range of 20mS.
To carry out a conductivity calibration:
1. Put the plug of the conductivity probe into the CD socket (15)
2. Switch on the device.
3. Select the “Cd“ measurement mode.
4. Hold the handle of the probe and dip the complete probe head into the solution.
6. Shake the probe to make sure that the air bubble escapes from the probe head.
6. The display will show the conductivity value.
7. Press the REC key anad the Hold key at the same time until the following is displayed:
8. Press the Enter key. The measurement value will be shown on the upper and on the lower side of the
display.
9. Use the arrow keys to set the upper value exactly to the value of the standard solution.
value of the stadard solution
10. Press the Enter key so that the data are saved and the calibration is finished.
Note: If you only want to carry out a one-point calibration, it is sufficient to calibrate the measurement
range of 2 mS. If you make a calibration with several points, you must first calibrate the range of 2 mS
and afterwards the other ranges.
5.8
Salt content measurement
To measure the salt content:
1. Put the plug of the conductivity probe into the CD socket (15)
2. Switch on the device.
3. Select the “SALt“ measurement mode.
4. Hold the handle of the probe and dip the complete probe head into the solution.
6. Shake the probe to make sure that the air bubble escapes from the probe head.
6. The display will show the salt content in % (1 % is equivalent to 10 g/kg).
11
Manual
5.9
Calibration of the salt content measurement
If you have already carried out a calibration of the conductivity measurement, a calibration oft he salt
content measurement is not necessary.
5.10 Dissolved oxygen measurement
CAUTION!
WHEN FIRST USING THE PROBE ALONG WITH THE METER, URGENTLY CALIBRATE BEFORE
STARTING WITH THE MEASUREMENT. IN ORDER TO ENSURE EXACT MEASUREMENTS, IT IS
RECOMMENDED TO CARRY OUT A CALIBRATION BEFORE EVERY MEASUREMENT.
To measure dissolved oxygen:
1.Put the plug oft he oxygen probe into the DO socket (14).
2. Switch on the device.
3. Select the “do“ measurement mode.
4. Hold the handle of the probe and dip the probe head at least 10 cm deep into the solution to be
measured so that the probe takes over the temperature of the liquid, which enables automatic
temperature compensation. If the difference in temperature between the probe and the solution is only a
few degrees, a few minutes for temperature compensation are sufficient.
5. For the measurement, it is enough to dip the tip of the probe into the liquid. However, the flow velocity
of the medium must be at least 0.2 – 0.3 m/s. This can also be achieved by shaking the probe.
6. The display will show the value of dissolved oxygen in mg/l as well as the temperature oft he solution.
7. Clean the probe with ordinary tap water after each series of measurements.
Note: Under laboratory conditions it is recommended to use a blendet or stirrer to ensure a consistent
flow velocity. In this way, the diffusion of ambient air oxygen into the solution can be reduced to the
minimum.
5.11 Atmospheric oxygen content measurement
When the device is in “do“ mode, press the control key (6) in order to switch from mg/l to %O2. The
atmospheric oxygen content is now displayed as a reference value.
12
Manual
5.12 Calibration of the atmospheric oxygen content measurement
CAUTION!
TO ENSURE THE BEST POSSIBLE CALIBRATION RESULT, MAKE SURE THAT THE
CALIBRATION IS CARRIED OUT IN A WELL-VENTILATED ENVIRONMENT. THE VOLUME SHARE
OF OXYGEN IN THE AMBIENT AIR IS NORMALLY 20.9 %. THAT IS WHY THIS VALUE SERVES AS
THE REFERENCE VALUE.
To carry out an oxygen calibration:
1. Put the plug oft he oxygen probe into the DO socket (14).
2. Switch on the device.
3. Select the “do“ measurement mode.
4. Use the control key (6) to switch from mg/l to %O2.
5. Wait until the measurement value has stabilised. This will take at least five minutes.
6. Press the REC key and the Hold key at the same time until the following is displayed (for example):
7. Press the Enter key. The device counts from 30 to 0, then returns to normal measuring operation and
finishes the calibration. The calibration process takes 30 seconds.
5.13 Maintenance of the oxygen probe
First use of the probe
In order to keep the probe in good condition from the beginning, first fill the electrolyte oft he probe.
After longer use of the probe
Whenever an exact device calibration fails or no stable measurement value can be determined, check
whether the level of electrolytes in the probe head is too low or whether the membrane is dirty (in case
the probe contains a membrane).
Background information on a probe with a membrane in the measurement head: This is a thin
membrane made of Teflon® which can be found in the probe tip. Oxygen molecules can pass through the
membrane whereas the substantially bigger molecules contained in the electrolyt cannot. This feature
enables the oxygen to spread out in the electrolyte of the probe and ist concentration can be measured.
To fill the electrolyte
1. Unscrew the probe head (3).
2. Remove the old electrolyte from the probe head.
3. Put the new electrolyte (OXEL-3) into the probe head.
4. Screw the probe head back together with the case.
Note: When the probe is not in use, the probe head must be in the protective bottle.
13
Manual
(1) Case
(2) Temperature sensor
(3) Probe head
5.14 Other functions
Data Hold
If you press the Hold key (3) once during the measurement, the values on the display are held (“frozen“)
and the HOLD symbol is displayed. This function can be cancelled by pressing the Hold key again.
Data record
The “data record“ function allows you to save the maximum and minimum values. Press the REC key (4)
once to activate the memory function. The REC symbol is displayed. Das REC-Symbol wird angezeigt.
When the REC function is switched on:
-If you press the REC key once, the maximum value and the “REC MAX“ symbol are displayed. If you
want to delete the maximum value, press the Hold key (3) once. Only the “REC“ symbol is displayed and
the memory function is continued.
-Pressing the REC key again causes the minimum value to be displayed again. At the same time, “REC.
MIN“ is displayed. If you want to delete the minimum value, press the Hold key (3) once. Only the “REC“
symbol is displayed and the memory function is continued.
-To finish the memory function, press the REC key for at least two seconds. The display shows the
current measurement.
Backlight
After switching on the device, the backlight is automatically on. You can switch it off by pressing the
power key (2) once. You can switch it back on by pressing the key again.
5.15 Datalogger
Preparation before logging:
1. Insert the SD card.
Put the SD card (1 Gb to 16 GB) correctly into the slot (20).
2. Format the SD card.
If the memory card is used for this meter the first time, it is recommended to format it.
3. Set the time.
When you use the device for the first time, the time must be set.
4. Set the decimal point.
The default setting for the decimal point is a dot (e. g. 3.14). However, in Europe a comma is more
common (e. g. 3,14). To avoid misunderstandings / reading errors, the desired decimal point should be
set.
Using the automatic datalogger (set the sampling time ≥ 1 second)
To start logging
1. Press the REC key (4) once. The display shows “REC“.
2. Press the Logger key (8). “DATALOGGER“ flashes on the display. At the same time, the measurement
values are time stamped and saved.
14
Manual
To pause during logging
You can pause recording by pressing the Logger key (8). The word “DATALOGGER“ stops flashing. To
continue logging, press the Logger key again.
To stop logging
To stop the logging process, press the REC key (4) for more than two seconds during pause, until the
word “REC“ disappears. The process is stopped as soon as you release the key.
CAUTION!
BEFORE REMOVING THE SD CARD FROM THE METER, THE LOGGING PROCESS SHOULD
URGENTLY HAVE BEEN FINISHED AS DESCRIBED ABOVE TO AVOID DATA LOSS
Using the automatic datalogger (set the sampling time = 0 seconds)
To start logging
1. Press the REC key (4) once. The display shows “REC“.
2. Press the Logger key (8). “DATALOGGER“ flashes on the display once and the beeper chimes. At the
same time, the measurement values are time stamped and saved.
3. On the lower side of the display, you can see where the data is saved. This information is also saved
on the SD card.
If you want to save the data somewhere else, press the ▲ key (5). The position number will flash now.
Use the arrow keys to determine the desired position between 1-99 (e. g. space 1 to space 99.
To stop logging
To stop the logging process, press the REC key (4) for more than two seconds, until the word “REC“
disappears. The process is stopped as soon as you release the key.
To check the time stamp
Press the Time key (7) once when you are in the normal measurement mode, however not during
logging. The display will show hour / minute / second. If you press the key again, it will show year / month
/ day. To return to normal measurement mode, press the Time key again.
To check sampling time
Press the Sampling key (8) once when you are in the normal measurement mode, however not during
logging. The display will show the time in seconds.
15
Manual
5.16 SD card structure
-When first using the SD card in the meter, a directory called “WAA01“ will be created.
- When first using the data logging, the data are saved in a subdirectory called “WAA01001.xls“ until there
are 30000 value pairs. After that, a new subdirectory is created, e. g. “WAA01002.xls“.
-When the WAA01 directory contains more than 99 subdirectories, a new directory called “WAA02“ is
created.
-This means that the data paths correspond to the following schema:
WAA01\
WAA01001.xls
WAA01002.xls
........................
WAA01099.xls
WAA02\
WAA02001.xls
WAA02002.xls
........................
WAA02099.xls
WAAXX\
........................
........................
Note: The maximum value for “XX“ is 10.
5.17 To save the SD card data on the computer (EXCEL software)
1. After closing the logging function properly, remove the SD card from the meter.
2. Put the SD card into the corresponding card reader of the computer.
3. Start the EXCEL software.
4. Call up the desired file (with .xls at the end) from the SD card. The data appear as a chart and can be
presented as practical diagrams by means of the software.
The following is an example hereof:
16
Manual
5.18 Further settings
To enter further settings of the device, hold the SET key (8) for more than two seconds. It is important
that during this process, the datalogger function is not active. Release the key now. You can switch
between the adjustment ranges by pressing the SET key again. The display will show:
Sd F:Formatting the memory card
dAtE:Setting time / date
SP-t:Setting sampling time
PoFF:Setting automatic power-off
bEEP:Switching beeper on or off
dEC:Setting the decimal point fort he SD card
t-CF:Selection of unit (°C or °F)
SAlt:Setting the DO salinity compensation, only in “do“ mode
High-:Setting the DO height compensation (meters), only in “do“ mode
Highf: Setting the DO height compensation (feet), only in “do“ mode
PEr C:Setting the CD temperature compensation factor, only in “Cd“ mode
tdS:Selection of CD or TDS, only in “Cd“ mode
t-Set:Manually setting the temperature compensation value, only in “PH“ mode
ESC: Leaving further settings
To format the memory card
Note: If you format the memory card, all data saved on it will get lost! When the display shows “Sd F“:
1. Use the arrow keys to set to “yES“ or “no“.
yES = Format the memory card
no = Do not format the memory card
2. If you have chosen “yES“, press the Enter key (4). The display shows “yES Enter“.
3. You can format the SD card by pressing the Enter key again.
To format the time / date (year / month / day, hour / minute / second)
When the display shows “dAtE“:
1. Use the arrow keys to change the flashing value.
2. To get to the next value, press the Enter key (4).
3. After making the desired settings, press the SET key to save the changes. The display switches
automatically to the setting of the sampling time.
Note:Once the time has been set, it goes on even when you switch off the device, provided that the
batteries are flawless.
To set the sampling time (hour / minute / second)
When the display shows “SP-t“:
1. Use the arrow keys to change the flashing value.
2. To get to the next value, press the Enter key (4).
3. After making the desired settings, press the SET key to save the changes. The display switches
automatically to the setting of Auto power OFF.
To set Auto power OFF
When the display shows “PoFF“:
1. Use the arrow keys to set to “yes“ or “no“.
yes = Auto power OFF active
17
Manual
no = Auto power OFF inactive
2. After choosing, press the Enter key to confirm your selection
To switch the beeper on and off
When the display shows “beep“:
1.Use the arrow keys to set to “yes“ or “no“.
yes = the beeper chimes
no = the beeper does not chime
2. Press the Enter key to confirm your selection.
To set the decimal point for the SD card
When the display shows “dEC“:
1. Use the arrow keys to set to “bASIC“ or “Euro“.
basic = A dot (.) is used as decimal point
Euro = A comma (,) is used as decimal point
2. Press the Enter key to confirm your selection.
To choose a unit (°C or °F)
When the display shows “t-CF“:
1. Use the arrow keys to set to “C“ or „F“.
C = temperature unit is °C
F = temperature unit is °F
2. Press the Enter key to confirm your selection.
To set the DO salinity compensation
This function can only be used in “do“ mode (dissolved oxygen) to set the compensation of the probe.
The default setting is 0 % salinity.
When the display shows “SAlt“:
1. Use the arrow keys to set the desired value.
2. Press the Enter key to confirm your selection. The setting is saved temporarily.
To set the DO height compensation
This function can only be used in “do“ mode (dissolved oxygen) to set the compensation of the probe.
The default setting is 0 meters or feet.
When the display shows “High-“ or “Highf“:
1. Use the arrow keys to set the desired value.
2. Press the Enter key to confirm your selection. The setting is saved temporarily.
To set th eCD temperature compensation factor
This function can only be used in “Cd“ mode to set the compensation per degree of the probe. The default
setting is 2 % per °C.
When the display shows “PEr C“:
1. Use the arrow keys to set the desired value.
2. Press the Enter key to confirm your selection. The setting is saved temporarily.
18
Manual
To choose between TDS and conductivity
This function can only be used in “Cd“ mode to switch between conductivity (µS, mS) and TDS (ppm).
When the display shows “tdS“:
tdS = TDS (ppm)
Cd= conductivity (µS, mS)
1. Use the arrow keys to set the desired value.
2. Press the Enter key to confirm your selection.
To set the temperature compensation value manually
This function can only be used in “PH“ mode to set the compensation of the probe. The default setting is
25 °C or 77 °F.
1. Use the arrow keys to set the desired value.
2. Press the Enter key to confirm your selection.
To leave further settings
When the display shows “ESC”:
Press the Enter key to leave further settings and to return to the normal measurement function.
Note: You can leave further settings by pressing the ESC key (3).
5.19 RS232 interface
The device is equipped with an RS232 interface via a 3.5 mm socket. The output is a 16-digit stream
which can be set in line with the user-specific requirements. An RS232 cable with the following features is
necessary to connect the device to a computer:
19
Manual
20
Manual
6
6.1
Maintenance and cleaning
Battery replacement
WARNING!
TO PREVENT FAULTY MEASUREMENTS AND RESULTING INJURIES, REPLACE THE BATTERY
AS SOON AS THE BATTERY SYMBOL APPEARS. MAKE SURE THAT THE TEST LEADS ARE
NEITHER CONNECTED TO THE CIRCUIT TO BE CHECKED, NOR TO THE DEVICE BEFORE YOU
OPEN THE CASE.
To replace the battery, remove the screws (11) from the battery compartment cover (10) and remove the
cover from the battery compartment. Replace the batteries by batteries of the same type and mount the
cover back on.
6.2
System reset
In case of a severe system error, a system reset can solve the problem. To do so, press the Reset key
with a thin object during switch-on. Note that this causes furher settings to be reset to factory defaults.
7
Disposal
For the disposal of batteries, the 2006/66/EC directive of the European Parliament applies. Due to the
contained pollutants, batteries must not be disposed of as household waste. They must be given to
collection points designed for that purpose.
In order to comply with the EU directive 2012/19/EU we take our devices back. We either re-use them or
give them to a recycling company which disposes of the devices in line with law.
If you have any questions, please contact PCE Instruments.
All products are CE and RoHs approved.
21
Manual
8
Contact
If you have any questions about our range of products or measuring instruments please contact PCE
Instruments.
By post:
PCE Instruments UK Ltd.
Units 12/13 Southpoint Business Park
Ensign Way, Southampton
Hampshire
United Kingdom, SO31 4RF
By phone:
Support: 02380 987 035
Sales: 02380 987 030
You can find an overview of our measuring instruments here: http://www.industrial-needs.com/measuring-instruments.htm
You can find an overview of our scales here http://www.industrial-needs.com/balances.htm
22