1
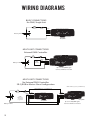
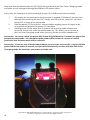
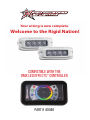
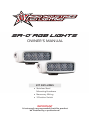
®
SR-Q RGB Lights
®
OWNER'S MANUAL
KIT INCLUDES
• Stainless Steel
Mounting Hardware
• Necessary Wiring
• 3 Position Switch
IMPORTANT
It is strongly recommended that this product
be installed by a professional.
wiring diagrams
BASIC CONNECTIONS
No DMX, Single Unit
Circuit
Breaker
Toggle
Switch
Red
Yellow
Green
White
Black
Battery 12VDC
SR-Q RGB
MULTI-UNIT CONNECTIONS
External DMX Controller
Circuit
Breaker
Toggle
Switch
DMX
Controller
Battery 12VDC
DMX+
DMX-
Red
Yellow
Green
White
Black
UWL
Up to 32 SR-Q RGB Lights
Connect All Wires in Parallel
MULTI-UNIT CONNECTIONS
No External DMX Controller
SR-Q RGB in Master-Slave Configuration
DMX SLAVES (up to 32 per DMX Zone)
DMX MASTER (only 1 per DMX Zone)
Circuit
Breaker
NOTE:
White wire
connected
to ground
Battery 12VDC
2
Toggle
Switch
Red
DMX+ Yellow
DMX- Green
White
Black
Red
Yellow
Green
White
Black
SR-Q RGB
SR-Q RGB
Up to 32 SR-Q RGB Lights
Connect All Wires in Parallel
Congratulations on the purchase of your new Rigid Industries SR-Q RGB that utilizes
Red-Green-Blue-White (RGBW) LEDs. This LED light is like no other user controlled LED light, since
it features total control of what color light is emitted from the unit with the simple toggle of the
power switch. The SR-Q RGB supports either DMX slave or master universe connection for
complete remote control of the color emitted from the RGBW LEDs.
The SR-Q RGB features a 5 conductor, 16 and 20 gauges, stranded wire that is 15 feet in length. The
following chart defines the wire colors and their connections to the SR-Q RGB.
WIRE COLOR
FUNCTION
Red
12-28VDC input positive lead (16 gauge)
Black
12-28VDC negative lead (ground, 16 gauge)
Yellow
DMX+
Green
DMX-
White
DMX Master Selection
Note: If Rigid Industries DMX LED Effects controller is not used, be sure to cut
and tape off wire ends of the yellow, green and white wires to keep them from
electrically connecting to each other or any other surface.
Controlling Output Color
The Rigid Industries SR-Q RGB utilizes our Patent Pending Power Toggling Mode® (PTM®) control
that allows for selecting from eight pre-programmed color output conditions. The basic operation
of the SR-Q RGB is to simply turn the power switch on and off within a 5 second time period to
increment through the modes. The following table illustrates the pre-programmed modes:
MODE
DESCRIPTION
Slow Color Changing
Slow Red, Green and Blue colors ramping up and down to
a generated selection of the colors on the rainbow
User Programmed Color
Outputs the user “saved” color (see Saving Your Favor Color.)
The factory saved color is magenta
Fast Color Changing
Faster Red, Green and Blue colors ramping up and down to
generate a selection of the colors on the rainbow
All colors (Red Green Blue White)
All of the colored LEDs (Red, Green, Blue, White) are
on at the same time. This generates a bright white
Red
All red LEDs on at the same time
Green
All green LEDs on at the same time
Blue
All blue LEDs on at the same time
White
All pure white LEDs on at the same time
Rigid Industries®, DMX LED Effects™ and SR-Q® are registered and/or unregistered
trademarks of JST Performance, Inc. d/b/a Rigid Industries.
3
Note that after the White mode, the SR-Q RGB will cycle back to the Slow Color Changing mode
and allow you to step again through the different LED output colors.
A few rules are important in understanding how your SR-Q RGB can best be controlled:
1.
2.
3.
The modes are incremented as long as power is toggled OFF before 5 seconds have
elapsed after powering the unit ON. Simply turn the unit ON, count to 2, and then
power OFF to jump to the next mode.
Hold the power OFF for at least 2 seconds before toggling power ON again to be
assured the unit detects the power OFF condition.
Holding power ON for more than 5 seconds will reset the mode rotation and
cause the unit to start at the top of the mode list. This allows you to resume at
the Fast Color Changing mode when you turn ON the unit after extended use.
Remember: You must switch the power OFF to the SR-Q RGB before 5 seconds has elapsed to
jump to the next mode. You should keep the power off for at least 2 seconds as well to
guarantee that the next mode will be selected.
Remember: If you are ever in doubt about where you are in the color modes, simply hold the
power ON for more than 5 seconds, and you will automatically resume with the Slow Color
Changing mode the next time you power cycle the unit.
4
Rigid Industries®, DMX LED Effects™ and SR-Q® are registered and/or unregistered
trademarks of JST Performance, Inc. d/b/a Rigid Industries.
Saving Your Favorite Color
A great feature of the SR-Q RGB is saving your favorite color. Storing the color is easy, simply put
the DMX controller into the Slow Color Changing or Fast Color Changing mode, and wait for the
second color cycle to start. Note that the color cycle starts with Red, meaning that once Red is
seen on the second cycle, simply remove power by toggling the power OFF, and the color is now
stored. The next time the unit powers ON, your stored favorite color will be showing.
You do not need to store or reselect your favorite color every time you use the SR-Q RGB. Your
color remains stored until the next time you store a color, meaning that if you do not power cycle
(Off then ON) during the second color cycle, your previously saved color will remain intact.
A few rules are important in understanding how your SR-Q RGB stores your favorite color:
1. Only the Fast and Slow Color Changing modes allow for selecting and saving your favorite color.
2. Your favorite color can only be stored during the second color cycle, and before the start of the
third color cycle. A color cycle starts with Red and ends when the next cycle Red is seen again.
This allows you to wait until the second cycle to “find” your color.
3. If you miss your color, simply power OFF the unit (After the unit remains ON for at least 5
seconds) and then the slow color changing mode will be selected. Wait for the second cycle,
and simply toggle power OFF to save the color.
4. You can save colors more than 1 million times throughout the life of the SR-Q RGB, so
please play with this feature!
Remember: Color changing modes allow for color saving to your favorite color setting only on the
second color varying cycle only. The first cycle starts when the unit is first powered on, and the second
starts when Red cycles again. Color cycles start on Red and end on the next Red LED output. At the end
of the second cycle, color saving mode ends and you must power off the unit to start over again.
Remember: Simply power OFF the unit during the second color changing cycle to save your favorite
color. The next time you turn the unit on, your color will be displayed.
DMX Connection (Master or Slave)
DMX or DMX512 is a networked communication feature that connects high speed data
communications to your SR-Q RGB. The SR-Q RGB supports both DMX slave and DMX mastering,
which means that you can use Rigid Industries DMX LED Effects controller to generate color
change commands, or allow a single SR-Q RGB to be the DMX master to all other SR-Q RGB units
connected to the same DMX+ and DMX- wires.
Rigid Industries®, DMX LED Effects™ and SR-Q® are registered and/or unregistered
trademarks of JST Performance, Inc. d/b/a Rigid Industries.
5
DMX Master Selection
If you do not plan to use a commercially available DMX controller, you can allow one SR-Q RGB as
the DMX master, and all other SR-Q RGB units will follow in sync what the DMX master commands.
The master will also follow the same Power Toggling Mode® (PTM®) operation that was detailed
earlier in this user manual. This means that all SR-Q RGB units connected to the same DMX
connections will operate in sync.
Choose a single master unit, and ground the WHITE wire (connect white and black together). This 1
unit will now be the DMX master and generate DMX signals to all of the other units connected to
the same DMX wires. Be sure that no other SR-Q RGB unit has the white wire connected to ground
on the same DMX wire connections. This is important because if 2 SR-Q RGB units are connected
as masters, unknown color results will occur!
DMX Slave from a Remote Panel
If you want to use DMX controlled from a remote panel, it is as simple as purchasing a marine grade
Rigid Industries DMX LED Effects controller and wiring that to the SR-Q RGB with 2 wires. In
addition, the SR-Q RGB supports generating DMX from a single unit, which would transmit to all
other DMX slaves for a coordinated DMX lighting system. In this instance, do not connect the
white wire to the black wire.
Be sure to follow the Rigid Industries DMX LED Effects controller installation instructions. The
connections between the DMX control and the SR-Q RGB is a polarity sensitive two-wire connection, meaning that you need to be certain that the DMX+ and DMX- are connected correctly.
Failure to do so will yield unknown color control on your SR-Q RGB unit!
The SR-Q RGB is unique in that it automatically senses if there is a DMX signal present on the DMX+
and DMX- wires. If there is no signal present, the Power Toggling Mode® will automatically be
engaged and the unit will run colors without any outside interaction other than the power switch
toggling.
Note that the SR-Q RGB uses channels 1-4 to control the RGBW colors as follows:
6
DMX Channel (or slot)
LED Color
1
Red
2
Green
3
Blue
4
White
Rigid Industries®, DMX LED Effects™ and SR-Q® are registered and/or unregistered
trademarks of JST Performance, Inc. d/b/a Rigid Industries.
®
Your wiring is now complete.
Welcome to the Rigid Nation!
Compatible with the
DMX LED EFFECTS™ controller
pART # 40040
Warranty Information
Rigid Industries warrants that this product will be free from defects in material and workmanship. If you believe your
Rigid Industries product is defective, it must be returned to Rigid Industries for inspection by our warranty claims
department. If, after inspection, Rigid Industries verifies that the defect was not caused by negligence, abuse,
unauthorized repair or disassembly, Rigid Industries will determine whether the product will be repaired or replaced
in accordance with Rigid Industries Limited Lifetime Warranty*.
Warranty Periods:
• All LED Lights – Limited Lifetime
• Accessories and Mounts – 2 years
• Flashlights – 1 year
• Batteries – 90 days
Warranty Coverage:
To begin your warranty claim, you must have a Return Merchandise Authorization (RMA) number. To get
your RMA number, please contact our warranty department by phone at 480-655-0100 ext. 1008, or by
filling out the Return Merchandise Authorization Form on our website.
All of the following will immediately void all warranties:
• Customer negligence – The customer has modified the light and/or is not using it for the recommend application.
• Customer abuse – Damage to the light beyond normal wear and tear.
• Repair work done by unauthorized personnel without Rigid Industries’ approval.
• If the light has been opened or any screws have been removed.
All warranties are non-transferable. Warranty terms and policies are subject to change without notice.
*For all information regarding the Rigid Industries’ Limited Lifetime Warranty please call 855-760-5337 ext. 1008,
email [email protected], or visit our warranty page online at RigidIndustries.com/Warranty.
PLEASE Contact us FOR TECHNICAL AND SALES SUPPORT
779 N Colorado St., Gilbert, AZ 85233 • 866 760 5337 • www.RigidIndustries.com
IS-028 Rev1