1
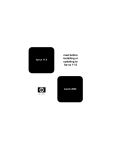
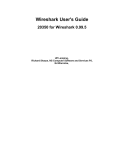
HP-PB 10/100Base-TX/9000 Quick Installation Guide
The 10/100Base-TX combination card supports both 10Mbit/s and 100Mbit/s full- and half-duplex operations. HP recommends installing the
10/100Base-TX/9000 software before installing the hardware card. For detailed information about each of the steps below and for declarations of
conformity, refer to the online manual Using HP-PB 10/100Base-TX/9000 available in www.docs.hp.com or on the Instant Information CDROM.
View the latest release notes either in /opt/networkdocs or on the Instant Information CDROM.
❏ Record the card serial number from the card.
Step 1: Prepare to install the 10/100Base-TX
software
❏ Log in as root.
❏ Check that the /usr/bin, /usr/sbin and /sbin directories are in your
PATH using the command: echo $PATH.
❏ Check that the HP-UX version is 10.20 or later using the command:
uname -a .
❏ Install the appropriate patches for your system as described in the
“Required Patches” section of the online Release Notes or the online
README. View the online files either in Instant Information or in
/opt/networkdocs. Release notes are in hppb100bt_relno.pdf.
❏ Fill out the configuration worksheet for each card you are installing.
Refer to the other side of this card for the network configuration
worksheet.
❏ Grasp the card by its edges or faceplate with both hands, insert the card
into the slot, and press the card firmly into place.
❏ Secure the card by folding in the extractor levers and securing the
retaining screws and reassemble the system.
Step 5: Attach the system to the network
❏ Attach the 8-pin (RJ-45) plug on your twisted-pair LAN cable into the
RJ-45 connector on the card. The same RJ-45 connector is used for
either 10 or 100 Mbit/s operation.
❏ Attach the free end of the cable to any unused port on the appropriate
hub or switch (or into a wall jack that is connected to a hub or switch).
Connect power cable to system. Set the hub or switch speed and
duplex mode. Both full duplex and half-duplex operation are
supported.
❏ Determine whether the connection is to be 10 Mbits/s or 100 Mbits/s. ❏ Power up the system. The 10/100Base-TX card will run a self-test
automatically. Any error messages will appear on the terminal display
or system console. You can also use the dmesg command to retrieve
Step 2: Install the 10/100Base-TX software (skip this
startup messages later.
step if you ordered option 0D1--pre-installation)
❏ Verify that the LEDs on the card reflect the correct mode of operation.
Refer to the illustration on the next page for the LED pattern for
normal 10 Mbit/s and 100 Mbit/s operation. Verify that the Test LED is
Run the swinstall program to install the software using the command:
OFF.
swinstall.
❏ When the system is up, log in as root and verify that the card and its
Change the host name after “Source Host Name,” if necessary.
hardware path are displayed by executing the command: ioscan.
Click on the Source Depot Path to identify the registered depot for the
appropriate source depot path and activate the OK button to return to Step 6: Configure the card using SAM
the Software Selection Window.
❏ Run the System Administration Manager: sam.
Highlight the10/100Base-TX software (A3495A).
❏ Load the software media (CDROM) into the appropriate drive.
❏
❏
❏
❏
❏ Double click Networking and Communications.
❏ Choose Mark for Install from the “Actions” menu to choose the
product to be installed.
❏ Double click Network Interface Cards.
❏ Choose Install from the “Actions” menu to begin product installation
and open the Install Analysis Window.
❏ Highlight the HP-PB 10/100Base-TX card and choose Configure from
the Actions menu.
❏ Activate the OK button in the Install Analysis Window when the Status ❏ Fill in the form according to the instructions using the Network Card
field displays a “Ready” message.
Configuration Worksheet.
❏ Activate the YES button at the Confirmation Window to confirm that ❏ Activate the OK button to activate the card and then select exit from the
you want to install the software. swinstall loads the fileset, runs the
“File” menu until you exit SAM.
control scripts for the filesets, and builds the kernel. Estimated time for
processing: 3 to 5 minutes. When the status field indicates “Ready,” a
Note Window opens. Activate the OK button on the Note Window to Step 7: Verify the installation
reboot the system.
❏ Obtain the PPA (HP-UX 11.x) or the NMID (HP-UX 10.x) and the
station address of your card by executing the command: lanscan.
❏ After the system reboots, login as root, and execute the command:
shutdown -h. Make sure the system is halted before you
❏ Verify that no errors have occurred during installation by running the
continue.
following command:
linkloop -i <PPA> <station address>
Step 3: Access the system card bay
for HP-UX 11.0 and above or
linkloop -i <NMID> <station address>
❏ Wait for the system to shutdown completely, and then power off the
for HP-UX 10.20.
system by pressing the system off button. Unplug the system.
❏ Verify connectivity with a remote system by executing the command:
❏ Open the system to gain access to the HP-PB backplane, if applicable.
ping <Remote_IP_Address> and netstat -in.
❏ Select the lowest empty HP-PB slot and remove the slot cover.
Step 4: Install the HP-PB10/100Base-TX card
❏ Observe the antistatic precautions.
HP-PB 10/100Base-TX/9000 installation is complete when you have
successfully run linkloop and ping. If you want to verify the installation
further, go to “Verifying the Installation” in chapter 1 of the online Using
HP-PB 10/100Base-TX/9000 manual.
To configure remote systems, go to “Configuring Network Connectivity” in chapter 2 of the online user’s manual. Do this step only if remote systems
have not been previously configured.
Network Card Configuration Worksheet
Fill out one worksheet for each card you are installing.
Data Type
Required/Optional
Default
Where to Configure
Example
Internet address
Required
0.0.0.0
SAM, ifconfig
192.6.20.2
Subnet mask
Required if using
subnetting
Subnet mask not
used
SAM, ifconfig
255.255.248.0
Station address
Required
As shown on card
lanadmin -A, SAM
0x0060b0c4012f
Host name alias for
this network
interface (card)
Required if system is
connected to more
than 1 network
None
SAM
abcde
Link speed
Required
None
Hub or switch*
100-MBit/s Hub
Your System
*The speed configuration of the 10/100Base-TX card is determined by the speed setting of the hub or switch port to which the card is connected.
The card automatically senses this speed. The card only runs at one speed at a time. To verify the speed selection, use the LED indicators on the
front of the 10/100Base-TX card as shown below or run lanadmin and check the link speed and duplex mode at the LAN Interface Status Display.
HP-PB 10 Mbit/s or 100-Mbit/s
LAN Card
= LED ON
= LED OFF
Test (On=fail;Off=pass)
Power
RJ-45 Connector (TX)
100-Mbit/s Indicator
Activity
(On=Data transmitted/received)
10-Mbit/s Indicator
Link Status (On=link established)
10 or 100 Mbit/s
HP-PB 10/100Base-TX/9000 Quick Troubleshooting Guide
Follow the steps below in sequence to quickly isolate10/100Base-TX/9000 problems on your system. The flowcharts referred to in the procedures are
in the online Using HP-PB 10/100Base-TX/9000 manual available in www.docs.hp.com or on the Instant Information CDROM.
Check the HP-UX 10.20 (or later) Directory Path
Step 5: Link Level Loopback Test
Prior to completing the steps below, check that the /usr/bin, /usr/sbin, and ❏ Check the link layer connectivity using the linkloop(1M) command
sbin directories are in your PATH using the command: echo $PATH.
with the NMID (or PPA) of your 10/100Base-TX card and the station
address of the remote host. Command syntax:
linkloop
-i <NMID> <Station Address>
Step 1: Network Level Loopback Test
(for HP-UX 10.20) and
linkloop -i <PPA> <Station Address>
❏ Check the IP network level connection with the remote host using the
(for HP-UX 11.0 and above).
ping(1M) command. Example: ping 192.6.20.2.
Successful? If packets are being returned, your system has network
level connectivity to the remote host. If not, refer to flowchart 1. Press
Ctrl C to stop the ping output.
Step 2: Connections/LED Test
Use lanscan on the local system to obtain the NMID and station
address.
Successful? Yes, if an OK status is returned. If not, refer to flowchart 7.
Step 6: Subnet Test
❏ Check that the RJ-45 cable is connected to the 10/100Base-TX
connector on the HP-PB card and to a 10/100Base-TX hub or switch. ❏ Check the host name, subnet number, and subnet mask of the interface
using the ifconfig(1M) command. Example: ifconfig lan1
❏ Check that the card LEDs indicate normal operation. Refer to the
Successful? Yes, if the host portion of the IP address and subnet
illustration on the second page of this card and the table on the last
number part of the IP address are not all 0s or all 1s and the subnet
page of this card for the LED pattern for normal operation.
mask is what you expect. If not, use SAM to enter the mask or IP
address.
Successful? If the LED pattern indicates normal operation. If not,
refer to flowchart 2.
❏ Check that all the hosts on the network are using the same subnet mask
and that the mask has been set on all interfaces by executing the
Step 3: Configuration Test
ifconfig(1M) command on each node in the network. Example:
ifconfig lan1
❏ Check that the10/100Base-TX/9000 interface is configured by
Successful? Yes, if the subnet masks are all the same. If not, use SAM
displaying information about all 10/100Base-TX cards that are
to connect the mask or IP address. Refer to the Installing and
successfully bound to the system using the command: lanscan.
Administering LAN/9000 Software manual for additional information
Successful? Yes, if lanscan indicates the interface and hardware are
about subnet masks.
‘up.’ If not, refer to flowchart 3.
❏ If the Base-TX switch cannot autonegotiate, run lanadmin and ensure Step 7: Transport Level Loopback Test Using ARPA
that the duplex mode is set the same as at the hub or switch (it can be
half- or full-duplex mode).
❏ Check the transport level connection with the remote host using the
telnet(1) command. For example: telnet abcde.
❏ Check the log data (error and disaster messages) for10/100Base-TX
using the netfmt command. Example: netfmt -v -f
Successful? Yes, if you have transport level connectivity to the remote
/var/adm/nettl.LOG00 | more.
host. If not, refer to flowchart 8.
Successful? Yes, if the problem stated in the log file is fixed. If not,
refer to flowchart 4.
❏ Check the route tables on the source and destination nodes using the
command: netstat -r.
❏ Display IP information about the interface you want to test using the
ifconfig(1M) command. Example: ifconfig lan1.
Successful? If the routing tables are not correct, refer to the route man
page.
Successful? Yes, if the output shows the correct Internet address and
the flag: UP. If not, refer to flowchart 5.
Refer to the on-line manual pages for more detailed information about the
commands listed in the above steps.
Step 4: Network Level Loopback Test
For the Gateway Remote Loopback Test, refer to flowchart 9 in the online
Using HP-PB 10/100Base-TX/9000 manual.
❏ Check that a correct entry exists for the remote system in your system's If you are still having problems connecting your system to the network,
ARP cache using the arp(1M) command. Example: arp
contact your HP support representative.
192.6.20.2.
Successful? Yes, if there is an ARP cache entry for the remote host. If
not, refer to flowchart 6.
In the following HP-PB 10/100Base-TX LED Matrix:
X = LED ON, and
O = Flashing
HP-PB 10/100Base-TX LED Matrix
Power
10
100
Link
Activity
Test
X
X
X
X
X
X
X
X
X
X
X
X
HP Part No.
J1627-90004
X
X
X
X
X
X
X
X
X
X
O
X
O
Description
Improperly seated card or
defective card.
Driver has not initialized card.
Link cable is not connected either to card or
to hub or switch.
Same as above but is for 100Base-TX.
Driver couldn’t complete the initialization
of the card because an error has been
detected. Card may be defective.
Same as above but is for the 100Base-TX
mode.
Normal quiescent state for 10Base-T.
Normal quiescent state for 100Base-TX.
Normal state during transfer of 10Base-T
data. This state is also seen when the card is
connected to a switch and the card is
quiescent. Switch is sending link pulses.
Same as above but is for the 100Base-TX
mode.
Copyright © 1997-1999
Hewlett-Packard Company
Printed in USA E0699