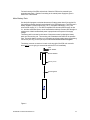
1
I c e Pr o f i l e r
Operators Manual
for
Model IPS4
© 2004 ASL Environmental Sciences Inc.
I
© 2004 ASL Environmental Sciences Inc.
II
Overview .......................................................................... 1
1.1
Overview ........................................................................... 1
Warranty................................................................................ 1
1.2 Principles of Operation ........................................................ 2
Functional Description.......................................................... 2
Instrument Operation............................................................ 3
1.3 Application in Sea Ice Environments............................... 4
Typical Installation............................................................... 4
Modes of Operation ............................................................ 4
Planning a Measurement Program ..................................... 5
Installation....................................................................... 7
2.1 Equipment Inspection .......................................................... 7
Unpacking............................................................................. 7
Inventory ............................................................................... 7
Visual Inspection................................................................... 8
2.2 Opening the Pressure Case .............................................. 9
2.3 Battery Installation............................................................... 10
Main Battery Pack .............................................................. 11
Clock Battery....................................................................... 12
2.4 Closing the Pressure Case ...................................................... 12
2.5 Anode Installation................................................................ 13
Operation ....................................................................... 17
3.1 Starting the IPS4 ................................................................. 17
Preparing the IPS4 ........................................................... 17
3.2 Communicating with the IPS4 ......................................... 19
© 2004 ASL Environmental Sciences Inc.
III
Set IPS4 Date/Time .......................................................... 19
Sensor Utility and Bench testing........................................ 19
Checking Data Memory ..................................................... 20
Data Memory Test.............................................................. 20
RAM Check......................................................................... 20
3.3 Planning for Instrument Deployment............................. 21
3.4 Deploying the IPS4................................................................... 22
Setting the IPS4 for Operation During Ocean Deployment22
Preparing the Instrument for Deployment in the Ocean... 22
3.5 Mooring The IPS4 ............................................................... 23
3.6 Recovering the Data .......................................................... 24
Retrieving Data................................................................... 24
Decoding Data.................................................................... 24
Demobilizing the IPS4 ....................................... 27
4.1 Cleaning................................................................................ 27
4.2 Removing the Battery Packs ........................................... 27
Terminal Deployment ..................................................... 29
IPS4 Deployment Using A Terminal..................................... 29
Connecting Communications .......................................... 29
Powering Up ....................................................................... 29
Battery Power .................................................................... 29
Deployment........................................................................ 30
Trouble Shooting ........................................................................ 33
ASL Parts...................................................................................... 35
Deployment Parameters .................................................................................. 37
© 2004 ASL Environmental Sciences Inc.
IV
Calibrations..................................................................................... 39
Calibration Coefficients and Methods................................ 39
1. Paroscientific Digiquartz Pressure Transducer Model 2200A-101..... 39
2. Speed of Sound (m/s) ........................................................................... 39
3. Eclock (sec)............................................................................................ 40
4. Battery Coefficients ............................................................................... 40
5. Tilt Coefficients ...................................................................................... 40
Calibration Sheets for this IPS4 Unit ................................. 41
Technical Information Notes ................................ 43
A. Reducing the Numbers of Null or False Target Records
43
B. Sound Speed values for Lockout and Max Range .... 44
C. Year 2000 Issues for the IPS4......................................... 45
Installation Instructions for Connectors................................ 46
Maintenance Instructions for Connectors ........................... 46
Non Standard Features for ASL River IPS......................... 47
Gain Selection ............................................................................. 48
Modified Burst Sampling .......................................................... 49
Null Targets and the River IPS............................................... 50
Index.................................................................................................................. 49
© 2004 ASL Environmental Sciences Inc.
V
© 2004 ASL Environmental Sciences Inc.
VI
Chapter
Overview
1.1 Overview
Thank you for purchasing an "Ice Profiler" from ASL Environmental Sciences.
This instrument has been thoroughly tested at the factory prior to shipment. The sensors
have been individually calibrated (see Calibration Sheets in Appendix E and the calibration
coefficients are given on the supplied Coefficients File Disk ).
The purpose of this manual is to provide the user with the technical information required to
successfully operate the ASL Ice Profiler, Model IPS4. To help you get started on using
the ASL IPS4, the manual provides a concise step by step approach to each required
task.
This manual is designed for use in conjunction with the IpsLink Users Guide. For further
details on a given topic please consult the IpsLink manual or the Help section of the
IpsLink program.
Warranty
ASL Environmental Sciences Inc. (ASL) warrants all new products of its manufacture to be
free from defects in material and workmanship under normal usage for a period of one
year. This warranty is solely for the benefit of the original buyer. ASL will replace or repair
free of charge, F.O.B. at its factory in Sidney, BC, Canada, any part or parts returned
within one year of original delivery, which ASL s examination shall show to have failed
under normal use and service. This warranty does not apply to any defects or improper
functioning caused by negligence, misuse, tampering, accidents, improper installation, or
work performed by unauthorized personnel.
This warranty is the only warranty given for the sale of ASL products. No warranties
implied in law, including but not limited to the implied warranties of merchantability and
fitness for a particular purpose, shall apply. In no event will ASL be liable for any direct,
indirect, consequential or incidental damages resulting from the purchase or use of ASL
products, or resulting from any delays or failure of performance of ASL under agreement,
or resulting from any services furnished by ASL. Equipment not manufactured by ASL is
supported only to the extent of the original manufacturer s warranty.
This warranty may not be modified, amended, or otherwise changed except in writing as
properly executed by an officer of ASL. All software programs and documentation are
copyright by ASL Environmental Sciences Inc. Materials may not be reproduced or
disseminated without the prior written consent of ASL.
© 2004 ASL Environmental Sciences Inc.
1
1.2 Principles of Operation
Functional Description
The Ice Profiler Model 4 (or IPS4) is a self-contained instrument designed to measure and
record the underwater depth of floating ice moving through its field of view from the
seabed during long unattended deployments1. The Ice Profiling Sonar is deployed as
much as 150 m beneath the surface, looking upward2. It transmits an acoustic pulse of
programmable duration, and then listens for the echo from the bottom of the ice. The IPS4
examines the returned echoes and decides which part of the signal is returned from the
bottom of the sea ice, or in the absence of ice, from the sea surface. The interval between
transmission and receipt of this echo is referred to as the Travel Time. It is the main
parameter measured and recorded internally in the IPS4 solid-state data memory. The
IPS4 will optionally record the maximum Amplitude and the duration (Persistence) of the
selected surface echo along with its Travel Time.
The Ice Profiling Sonar also contains sensors for measuring:
beam tilt from vertical on two axes
pressure
temperature
real time clock
The sampling interval for recording these auxiliary variables may be controlled by the user.
The tilt data allows the calculation of zenith distance from echo range, if the drag forces,
exerted by local ocean currents, affects the IPS4 orientation. The pressure sensor allows
for calculation of the actual depth of the IPS4 beneath the (unseen) sea level, as the
instrument's depth below sea level changes in response to storms, tides and mooring
motions. To complete this calculation, atmospheric pressure must be determined by
means of independent instrumentation at the surface, usually from the nearest weather
station. Temperature values are used in the precise calibration of pressure.
The IPS4 may be programmed to start data collection immediately, or to wake up at a
future time. It stores acquired data within its non-volatile FLASH memory. Communication
with the IPS4, and downloading of data, occurs via an RS232 interface through a
bulkhead connector on the pressure housing.
1
More information on the general principles of operation of the IPS unit can be found in a scientific
paper: see Melling, H., P.H. Johnston and D.A. Riedel (1995) Measurements of the underside
topography of sea ice by moored subsea sonar. J. Atmospheric and Oceanic Technology 13,
589-602.
2
Extended range operation of the IPS4, to 200 m or more, can be achieved. Consult ASL
Environmental Sciences Inc. for more information.
© 2004 ASL Environmental Sciences Inc.
2
Instrument Operation
(Note: The names of control parameters are denoted as words in italic fonts. The control
parameters can be set in the Deploy Panel of the ASL IpsLInk software see ASL IpsLink
Users Guide.)
The IPS4 is capable of operating with up to 8 different settings, or phases, over a single
deployment. A phase is a data collection sequence with a unique set of operating
parameters. This means the instrument can, at predetermined times, change its operating
parameters to optimize data collection for a particular target. The data collection sequence
for each phase is as follows:
At times separated by the Ping Interval, the internal echo sounder is turned on, a traveltime counter is started, and a sound pulse is transmitted for the length of time chosen via
the Ping-Length parameter. Following transmission, the instrument sits idle for the length
of time corresponding to the Lockout Range. The lockout is entered as meters and an
assumed sound speed of about 1465 m s-1 is used to convert distance into time (see
application note IPS-AN2, Appendix D, for more details). When the lockout time expires,
the IPS4 waits for an echo amplitude that exceeds the value specified for Start Amplitude.
When this occurs, the travel time is recorded and a persistence counter is started. When
the echo amplitude drops to the level specified for Stop Amplitude, the persistence counter
is stopped and compared to the desired Minimum Persistence. If the echo duration is less
than this minimum, the target in question is rejected. If the echo is larger than the
minimum required, the travel time, persistence, and maximum amplitude of the echo are
saved in temporary registers. This process is repeated for all echoes which exceed the
Start-Amplitude value, but the saved numbers are replaced only if the newest echo is
more persistent than the saved value. When the specified Maximum Range is reached,
data collection stops, and the travel time, persistence, and amplitude of the most
persistent echo are recorded permanently. To minimize memory use, the operator can
choose to disable the permanent recording of the echo persistence and/or amplitude. Note
that although maximum range is entered in meters, IPS4 converts this to delay time using
a sound speed of 1460 m s-1 (see application note IPS-AN2, Appendix D, for more details).
The IPS4 then goes to sleep during the remainder of the ping interval, waking to repeat
the process at the next ping interrupt.
Two other recording cycles are synchronized with the fundamental ping cycle. Pressure,
temperature and pitch/roll are sampled and recorded every Pressure Interval. For
example, if the Ping Interval is 1 second, and the Pressure Interval is 60, then these
sensors are sampled every 1 x 60 seconds, or 1 minute. Bursts of rapid pinging can be
initiated every Burst Interval. Such bursts can be used to sample the surface-wave field.
During the burst, the IPS4 transmits pings at one-second intervals up to the value of the
Burst Count. Then, depending on the mode selected, it will remain quiescent until the next
burst is due, or will revert to the standard ping cycle. A ping-burst occurs every
BurstInterval x PressureInterval x PingInterval. For example, if PingInterval = 1,
PressureInterval = 60, and BurstInterval = 360, bursts will be started every 1 x 60 x 360
seconds, or 6 hours. In the data record, each Burst record is preceded by a header that
includes the deployment name, the current date/time, and battery voltages. Note that
should the Burst Count be set such that it is longer than a Pressure Interval (in this case
60 pings) it will not interfere with the sampling of the sensors, which will still occur at 1
second intervals for acoustic pings and 60 second intervals for pressure measurements.
To retrieve the data when the deployment is complete, the user connects a personal
computer (PC) through the serial port to the IPS4 via a custom interface cable and uses
the IpsLink software to upload the data to the PC. The IpsLink Users Guide and Section 3
of this manual describes the software, and its use, in more detail.
© 2004 ASL Environmental Sciences Inc.
3
1.3 Application in Sea Ice Environments
Typical Installation
Figure 1. IPS4 in (a) a mooring cage and (b) in a bottom frame
Modes of Operation
Because surface conditions in ice-covered seas can change dramatically over an annual
cycle, the IPS4 has been provided with the capability to operate in a sequence of phases
during a long deployment. During each phase it may operate in:
burst mode, wherein profiling pings at 1-second intervals are transmitted in
relatively infrequent bursts
standard mode, wherein a regular sequences of profiling pings is
synchronised with less frequent pressure, instrument tilt and temperature
measurements
hybrid mode which combines both these functions
The burst mode would be appropriate when no ice is present (a Wave Mode); the hybrid
would be suited to periods when both ice-covered and ice-free conditions could prevail (a
Hybrid Mode); and the standard mode would be optimal for periods when ice presence is
nearly certain (an Ice Mode). Although all conditions could be observed adequately if the
IPS4 were always operated in a hybrid mode, scheduling of different modes is desirable if
the storage capacity for data is to be optimized.
© 2004 ASL Environmental Sciences Inc.
4
Ice conditions in a seasonal sea ice zone display an annual cycle: in summer there is a
high likelihood of prolonged open-water conditions; in autumn and spring, conditions can
vary from ice free to ice covered; in winter, a high concentration of ice is certain. If the
IPS4 is to commence operation in the middle of a season, for example during ice-free
conditions in summer, then the can specify 4 dates on which mode transitions are to
occur, in addition to a date for wake-up. Each date will be associated with a mode number.
As an example, an IPS4 is to be deployed in the Beaufort Sea of the Arctic Ocean in mid
summer and recovered approximately one year later. The user designs the first mode as a
Wave Mode, the second as a Hybrid Mode and the third as an Ice Mode. The wake-up
time in August is linked to the burst mode setup. The date of the first mode transition
(perhaps in mid September) is linked to the hybrid mode setup, that of the second
transition (perhaps in mid October) to the standard mode setup, that of the third transition
(perhaps in early June) to the hybrid mode setup, and that of the fourth and final transition
(perhaps in mid July) to the burst mode setup.
Note that for a short term deployment of several months, but less than one year, the IPS4
comes equipped with enough memory and battery capacity to sample acoustic range at
the fastest sampling rate for acoustic range, i.e. at one second intervals. For these shortterm deployments, there is little advantage to using two or more modes or phases.
Planning a Measurement Program
The planning of a successful IPS4 deployment requires careful consideration of expected
environmental conditions. The length of the ice season, typical and maximum rates of ice
drift, expected mooring motion, ice hazard to the mooring, the surface-wave climate and
the design of the mooring must all be taken into account. After consideration of these
factors, a decision concerning the depth of deployment and the necessary intervals for
sampling ice draft, pressure/tilt/temperature, and bursts can be made.
An optimal observing schedule, sensitive to anticipated seasonal changes in ice and
ocean conditions may be designed within the constraints imposed by limited data storage
and battery capacities. The parameter set for any phase can be completely independent
of the other phases. Since planning within this framework is complex, the user software
provides the capability to accomplish this task within the PC Windows-based IpsLink
software (see Section 3 and the IpsLink Users Guide). This tool re-calculates battery and
memory use, on demand, as operating set-ups are changed interactively during the
planning process. The program also saves the final parameter set in a file, which may be
conveniently downloaded to the IPS4 instrument by the IPS4 program as the operating
parameter set.
© 2004 ASL Environmental Sciences Inc.
5
© 2004 ASL Environmental Sciences Inc.
6
Chapter
Installation
2.1 Equipment Inspection
Unpacking
When unpacking, use care to prevent physical damage to the transducer face and
connector. When handling any electronics modules, it is a good practice to follow
electrostatic discharge (ESD) prevention measures.
Inventory
The IPS4 should come with the following items:
1) IPS4 complete with: Transducer guard, Dummy Plug, locking Sleeve and Anode.
2) IpsLink Software envelope containing:
-
Software CD
Installation Instructions
Instruments Calibration Coefficient File
3) RS232 Interface Cable.
4) Warranty Card.
5) Spares Kit Containing:
-
2 # 358 O-rings
1 # 018 O-ring
2 # 113 O-rings
1 # 3/16 Hex Key
1 ½ Wrench
1 Purge Fitting
1 Bicycle Pump
3 Pressure Bladders
6) IPS4 Operators Manual. and IpsLink Software Manual
7) Jacking bracket Assembly including: 2 Brackets, nylon plugs, nylon strap,
8) 2 Quick Start Sheets: Recovery, Deployment
© 2004 ASL Environmental Sciences Inc.
7
Visual Inspection
To operate the ASL Ice Profiler IPS4, the user needs to locate the following components
on the exterior of the pressure case housing:
1) Acoustic transducer
2) Pressure sensor
3) Electrical bulkhead connector and dummy plug
4) Sensor or Transducer guard for protecting sensors
Operation of the IPS4 also requires:
5) Surface communication cable (RS-232 Serial)
6) IpsLink software package Installed on a Windows PC Computer
Transducer Guard
Acoustic Transducer
Pressure Port
Purge Hole
ASL
Electrical Bulkhead Connector
Figure 2.
© 2004 ASL Environmental Sciences Inc.
8
Note that the IPS4 can be supplied with a separate external battery housing, for
applications where a very low vertical profile of the instrument is required. If your
instrument was configured with an external battery housing, further information is supplied
separately.
2.2 Opening the Pressure Case
Before starting ensure that all of the following parts have been located (As shown in
diagram):
- Jacking Bracket
- Mount Plate
- Sensor Guard
- Nylon Strap
- 3 plastic bolts
- 5/16 nut and washer
With the IPS4 pressure case standing vertical on a level surface, undo the three bolts that
hold the sensor guard to the pressure case. Remove the purge plug from the side of the
end cap using the Allen key provided (See Figure 3 below). Remove the sensor guard,
anode and the three bolts that plug the mount holes in the upper section of the end cap.
5/16" SS Nut
Mount Plate
Sensor Guard
Plastic Bolts (3)
Jacking Bracket
5/16" x .75" SS Bolts (3)
Upper Sensor guard Holes (3)
Nylon Strap
Purge Plug
IPS4
Pressure Case
Figure 3
© 2004 ASL Environmental Sciences Inc.
9
Place the jacking Bracket over top of the transducer face and secure it with the 3 5/16 x
.75 bolts (Provided with jacking Bracket) (As per the drawing above). The bracket will
attach to the upper sensor guard holes on the transducer
Note: Make sure the bracket is tight and level. The center post of the bracket
should be level and in a straight line with the pressure case. Do not try to remove
the end cap if this bracket is not tight and on straight.
Place the Transducer/Sensor guard back into position and secure it to the pressure case
with 3 nylon bolts. Tighten the nylon strap over the plastic bolts to secure the guard to the
pressure case.
Place the mount plate (Also provided) on top of the Sensor/Transducer guard. Make sure
the hole in the center of the plate goes through the center bolt of the Jacking Bracket.
Attach a 5/16 nut and flat washer to the threaded section protruding from the jacking
bracket and use the ½ wrench provided to pull the transducer from the pressure case.
This particular IPS4 has been modified with spring plungers attached to the bottom
mounting plate of the IPS Chassis. The modification was added to reduce chassis
vibration during shipment and deployment. The following instructions list the methods
used to insert and remove the chassis from the pressure case. This is done so that the Oring surface of the pressure case is not damaged during deployment and recovery.
The unit is pulled directly out of the case until the bottom bracket approaches the o-ring
surface. It is then rotated at a 45-degree angle (See Diagram Below) in order for the
spring plungers to clear the O-ring surface.
IPS4 Chassis
IPS4 Chassis
Spring Plunger
IPS4 Pressure Case
IPS4 Pressure Case
Although the battery pack may be connected, there is enough wire to permit raising the
chassis sufficiently to unplug the orange, 4-pin battery connector from the main controller
board. Compressed air or nitrogen can also be used to purge the pressure case and
remove the end cap.
2.3 Battery Installation
Operation of the IPS4 for underwater data collection requires installation and connection of
an IPS4 battery pack, supplied with the instrument from the factory. Replacement battery
packs, in three sizes, can be ordered from ASL. Note that the IPS4 unit is shipped from
the factory with the battery pack not connected.
© 2004 ASL Environmental Sciences Inc.
10
For bench testing of the IPS4 and retrieval of data, the IPS4 can be powered by an
external power supply. Details of connecting to an external power supply are given in
Section 3.4 of this manual.
Main Battery Pack
Use the IpsLink program to calculate the amount of battery power that will be required for
the operating schedule that has been designed for the IPS4 deployment. The IPS4 uses 3
battery supplies: a positive main supply (+15 V), a negative main supply (-12 V), and
echo-sounder supply (15 V). The latter is separate from the main positive supply so that
VTX, and thus transmitted power, can be maintained at relatively constant value throughout
a deployment. Note that transmitted power is proportional to the square of the supply
voltage.
The battery pack is mounted to the bottom of the pressure case by slipping the battery
pack over the mounting rod. The mounting rod is threaded to the bottom of the pressure
case. Thread the battery mounting nut, lock washer and fender washer down the mounting
rod until they are snug on the top of the pack. Do not use excessive force to tighten.
The battery connector connects to its mate on the top right of the IPS4 main controller
board only if you are going to communicate with the IPS unit immediately.
Nut
Lock Washer
Fender Washer
Bat t ery Pac k
ASL
Mounting Rod
Figure 4
© 2004 ASL Environmental Sciences Inc.
11
Clock Battery
The IPS4 also has a small button style battery (3 volt type CR1220) located in a clip on the
middle right-hand side of the Digital Board. (See Figure 5)
Battery Header
Button Style Battery Clip
Figure 5. (Digital Board)
This provides battery back-up for the real time clock only when the main battery pack is
disconnected. The battery should be checked periodically and replaced when its voltage
has dropped below 2.2 volts.
2.4 Closing the Pressure Case
Remove and inspect the two O-rings on the sensor end cap. The O-rings must be free of
cuts, nicks, abrasions and foreign matter. If there is doubt as to their quality then they
should be replaced. Lubricate the O-rings with a thin coat of O-ring grease. The machined
surface of the pressure case must be inspected as well. This surface must be free of
scratches and nicks. After the O-rings have been cleaned and lightly greased, place a
new desiccant pack within the housing. Pull the battery cable through the hole in the base
of the chassis and plug it in to the orange header at the top of the digital board (see Figure
5). As mentioned previously spring plungers were added to reduce chassis vibration. The
reverse of the procedure shown above is now done to insert the chassis into the pressure
case. (see Diagram Below). The unit should be placed in the pressure case at a 45degree angle (See Diagram Below). Then straightened to a 90-degree angle once the
spring plungers have cleared the O-ring surface
© 2004 ASL Environmental Sciences Inc.
12
IPS4 Chassis
IPS4 Chassis
Spring Plungers
IPS4 Pressure Case
IPS4 Pressure Case
It can now be lowered into the pressure case. Align the end cap so that the holes on the
pressure case line up with the holes on the end cap. Slowly place the electronics chassis
into the pressure case. Push evenly on opposite sides of the end cap to seat it against the
upper portion of the pressure case. The anodes should be checked and replaced if
necessary to ensure adequate corrosion protection. See section 2.5 Anode Installation for
further instructions. Replace the sensor guard and insert and tighten the three retaining
bolts and hardware. Inspect the O-ring on the purge plug and place the plug back in to the
end cap. Note; The purge plug must be replaced before the instrument can be
placed in the water. See Figure 7 for a full assembly drawing.
Inspect the soft rubber isolator which separates the oil-filled capillary connection to the
pressure sensor from seawater. This should be in good condition, soft and limp. If it is stiff
or perforated, it should be replaced. If it is fully inflated, some oil should be bled from it. A
fully inflated isolator imposes an over-pressure above hydrostatic. The material of the
isolator shipped with the IPS4 has been selected above others for its desirable properties.
Replacements are supplied and can also be purchased from the manufacturer.
2.5 Anode Installation
A single anode is placed on the IPS for corrosion protection. The anode can be arbitrarily
placed in any hole configuration on the IPS4 transducer guard. An example of a typical
anode installation is shown in Figure 6.
The anode is held in place by a 5/16 x 18 stainless bolt. An internal toothed washer is
added to the back side of the transducer guard to assure proper electrical contact with the
end cap and pressure case. Figure 6 depicts how the anode attaches to the case.
Stainless Lock washers and flat washers are added to the bolts to secure them to the
chassis.
All of the bolts are tightened into place and an impedance test is performed. Use a multimeter to determine if there is any resistance between the bolt, sensor guard and anode. If
there is a large resistance between these points, a proper connection has not been made
and the anodes and washers must be repositioned. See Figure 6 for correct anode
positions.
© 2004 ASL Environmental Sciences Inc.
13
Transducer guard
5/16 x 18 Bolt
Int ern al Toot hed Washer
5/16" Lock Washer
Anode
5/16" Flat Washer
Figure 6
A full chassis assembly drawing follows: (Figure 7)
© 2004 ASL Environmental Sciences Inc.
14
Sensor Guard
Dummy Plug
Purge Plug
Locking Sleeve
Ex t ern al Toot hed Washer
Anode
Flat Washer
Lock Washer
5/16" SS Bolt
IPS4 Chassis
O-Rings
A SL
Pressure Case
Figure 7
© 2004 ASL Environmental Sciences Inc.
15
© 2004 ASL Environmental Sciences Inc.
16
Chapter
Operation
3.1 Starting the IPS4
Preparing the IPS4
With battery pack connected and a suitable computer running the IpsLink software, the
IPS4 is now ready to be tested and programmed for deployment. (see section 1.2 and
IpsLink Users Guide)
Connect the interface cable to the electrical bulkhead connector on the side of the
IPS4 end cap. Match the large pin on the bulkhead connector to the index knob on
the interface cable (see Fig 8).
Index Knob
Figure 8
Press the Utility (F1) button in the IpsLink Software.(Right side of the screen)
Plug the 25 pin D connector into the appropriate serial port on the computer. As
seen in Figure 9.
© 2004 ASL Environmental Sciences Inc.
17
Interface Cable
Reset Button
Figure 9
Ensure that the Com port setting in the IpsLink software matches that of the Com port
being used by the computer. The IpsLink setting is located in the lower left hand
section of the Utility (F1) panel.
Push the reset button on the interface cable.
Press the Detect Unit (Shift F3) button in the Utility panel.
The IpsLink software will now attempt to detect the IPS4.
If communication is established, a prompt will appear in the yellow status bar on the
lower portion of the screen stating that the IPS4 has been detected and at what baud
rate. If the unit is not detected immediately, the software will cycle through all
available baud rates in an attempt to initiate communications with the IPS4. If the
baud rate reaches 115200 and the IPS4 is not yet detected, an error message will
appear in the yellow status bar. At this point check the interface cable and Com ports,
then press the reset button to again initiate the procedure.
Press the Firmware Ver. (Shift F5) button in the Utility screen. This will cause the
program to display the instruments firmware version number in the yellow status bar
on the bottom of the screen. Only firmware version 4.26 and later can be detected in
this manner. If the correct firmware version is not detected, it must be obtained from
the manufacturer.
Alternatively, the IPS4 can be programmed for deployment directly by using any
terminal emulator program. For instructions on this see Appendix A. While this is a
less convenient way to program the IPS4, it provides an alternative approach if a PC
Windows computer, required to run the IpsLink program, is not available.
© 2004 ASL Environmental Sciences Inc.
18
3.2 Communicating with the IPS4
Set IPS4 Date/Time
Push the Date/Time (F7) button on the right of the screen.
Press the Continuously Acquire Date/Time (Shift F1) Button. The IPS present date
and time will now be visible at the prompt.
The program gives you several options as to how the Date/Time can be changed.
The computers date and time can be sent to the IPS or the date and time can be
manually entered.
When the desired Date/Time is entered press the Stop Acquiring IPS Date/Time
(Shift F2) button.
Sensor Utility and Bench testing
Press the Sensor (F6) button on the right of the screen.
Check the Save to File field in the upper left-hand corner of the panel. If a check
appears in the box and the Get Sensor Data (Shift F1) button is pressed, a dialog
box will ask where the file should be saved. If the user desires to only view the data,
the box should not be checked
In the Interval field (seconds) field, use the arrow keys to adjust the interval that the
IPS4 will acquire data.
Press the Get Sensor Data (Shift F1) button. The IPS4 will now start to acquire data
at the selected sampling interval.
The program will now receive the current sensor values from the IPS4.
At this point, check for correct operation of the IPS4. For example, are the
temperature and pressure values reasonable? Are the instrument tilt values near
zero when the IPS4 is in the upright position? Do they change in a reasonable way
when the instrument is tilted from the vertical? Are the battery voltages reasonable for
a new battery pack (they should be approximately 15 volts for Vmain and 15 volts Vtx)
Testing the acoustic sensor (travel time, persistence and amplitude) is not feasible in
air due to the low sensitivity of the acoustic transducer for operation in air rather than
water. Test that the acoustic transducer is operating by listening carefully to the
transducer (a stethoscope helps). Depending on the selected ping interval, you
should hear a low volume sound burst at one second intervals. The operation of the
acoustic time travel, amplitude and persistence functions have been carefully checked
at the factory prior to shipment of the instrument.
To stop receiving sensor data press the Stop (Esc) button and return to the Utility (F1)
Panel by pressing the Utility (F1) button.
© 2004 ASL Environmental Sciences Inc.
19
NOTE: The Calibration Coefficients panel must contain valid calibration values for
the particular IPS4 if the values are to be meaningful.
Checking Data Memory
Data Memory Test
Press the Utility (F1) button on the right hand section of the screen.
In the Utility panel press the Data Memory Test (Shift F1) button.
A warning dialog box will appear informing the user that a memory test will erase all
data. Press yes to continue with the memory test or press no if there is unsaved data
in the unit. (If there is unsaved data, recover the data, as per instructions in Section
3.6, then resume the Flash Check test.)
Press the Start Test Button (Shift F1).
The results will be shown on the display. The number of Bad blocks will be indicated
by a yellow LED.
More information on the Data Memory Test process is provided in section 2.3.2 of the
IpsLink Users Guide.
There are two levels of testing the Flash data storage. First perform a high level chip
test (without activating the W/R 0x00 and W/R 0xFF tests) Note: This test will take up
to 15 minutes and will erase all data.
If errors are detected in any of the Memory Chips (as indicated by a Yellow LED next
to the chip number), then further testing of the Memory data storage is required. To do
this, activate the check box controls under the Perform Test label. Press the Start
Test Button (Shift F1). This test will require 5 to 6 hours of time to complete.
Do not be alarmed by failure rates of up to 5 to 10 blocks per chip, as it is not unusual
for Flash Memory chips to have this many bad blocks. A bad block will still be used
during a deployment since, typically, the failure is caused by one or two bad bits. This
test simply gives the operator a rough feel for the quality of the chip. Should a chip
exceed the count of 10 bad blocks, it would be wise (though not essential) to have it
replaced at the factory, as the final data will be cleaner.
RAM Check
Press the RAM Check (Shift F2) button in the Utility Panel.
The IPS4 Ram data is checked for any locations that do not set correctly to a 1 or 0.
The number of bad locations is shown in the status bar on the bottom of the screen.
Should any locations be reported as bad, the IPS4 must be returned to the factory for
repairs. Do not deploy the IPS4 with RAM errors.
© 2004 ASL Environmental Sciences Inc.
20
3.3 Planning for Instrument Deployment
Press the Deploy (F3) button on the right of the screen. The deployment panel now
appears.
Type the deployment name and the serial number of the instrument into the proper
fields.
Determine the desired deployment parameters and place them in the appropriate
fields. A complete explanation of the various deployment parameters, along with
acceptable ranges for each parameter is given in the IpsLink User Guide (section 2.4).
When the deployment parameters are placed in the appropriate fields, calculate the
resources necessary for the deployment, by pressing the Calc. Resources (Shift F4)
button.
A warning message will appear if the required resources (for data storage capacity
and/or battery capacity) exceed those available on the IPS4. Should this occur,
change the deployment parameters, then press the Calc. Resources (Shift F4)
button again. It is good practice is to allow for approximately 10% of resources to be
held in reserve in case of an extended deployment. Note: The Battery capacity
checked is for that of a full battery pack. If the user is deploying the unit with a
reduced battery pack, the Amp-Hrs required for the deployment should be checked
against what can be accommodated by the smaller pack. See chart below for Amp
Hour battery capacity for ASL Packs:
Pack Size
ASL Part Number
Amp Hour Rating
TX Pack
Full Size Pack
7201000000
80
10
7201000001
80
0
¾ Pack
7301000000
60
0
½ Pack
7401000000
40
0
(With Transmit Pack)
Full Size Pack
(Without Transmit Pack)
Note: Instrument design supports operation with or without a separate Transmit
Pack. Without a separate Transmit pack, power is automatically drawn from the
main battery.
When acceptable deployment parameters are realized, save the values by pressing
the Save Plan (shift F3) button. These files are in ASCII format and can be printed.
© 2004 ASL Environmental Sciences Inc.
21
3.4 Deploying the IPS4
Setting the IPS4 for Operation During Ocean Deployment
From the Start Up panel, press the Deploy (F3) button. The deployment panel now
appears.
Press the Load Plan button (shift F2) to load the deployment plan that was previously
developed in Section 3.3 or redo Section 3.3 in creating and testing the deployment
parameters. Note that while the deployment plan file is an ASCII file, it should not be
edited manually or by any means other than the Loading the Plan buttons, making
changes, and the saving the Plan buttons on the Deploy Panel.
When ready to proceed with the deployment, press the Deploy Unit (Shift F1) Button.
The Start deployment dialog box will now appear stating that the deployment will
erase all data. Press yes to continue.
The program will now place all of the desired parameters into the IPS4.
When this is completed, another warning box will appear stating that all memory will be
erased. Press yes to continue. All memory will now be erased.
Upon completing this sequence, the term Deployment Started will now appear in the
status bar.
If the IPS4 was scheduled to turn on immediately there should be a faint ticking
coming from the top of the transducer.
DO NOT press the reset button on the interface cable after this time or you will wake the
instrument up and terminate the deployment.
Preparing the Instrument for Deployment in the Ocean
After preparing the instrument for deployment, the IPS4 unit can be prepared for
deployment in the water.
Unplug the Interface cable from the IPS4 and insert the Dummy Plug on to the
bulkhead connector. (See Figure 7) Note be sure to bleed all of the air from the
dummy plug before attaching the locking sleeve. Any trapped air will cause the plug
to release from the bulkhead connector. A light amount of Dow-Corning DC-111 (or
equivalent) lubricant on the bulkhead connector and dummy plug will make it easier to
connect and remove the plug. The lubricant will also help provide a water-tight seal
during deployment. Consult Appendix H for more information on connector
installation and maintenance. Improper connector maintenance may seriously
endanger a successful deployment.
The IPS4 is now ready for deployment. Considerations for deployment of the instrument
include:
© 2004 ASL Environmental Sciences Inc.
22
-
The pressure case needs to be properly secured (see section 2.5 Closing the
Pressure Case). A sacrificial anode should be fastened to the instrument and, as
required to the mooring system, to ensure adequate corrosion protection. A single
anode should be bolted to the upper end of the IPS4 case, (Figure 6 & 7). Optionally,
an additional anode can be fastened to the bottom end of the IPS-4 in the threaded
hole; otherwise, this threaded hole should be filled with silicone grease.
-
A suitable mounting arrangement or underwater mooring system is used to support
the instrument (see section 3.5 Mooring the IPS4).
-
Just prior to deployment of the IPS4 in the water, it is recommended that the unit be
tested to ensure that it is sending out acoustic pings. This test can be carried out by
using a portable AM radio tuned to frequencies between 600 and 900 Khz. The
acoustic ping will be detected by the radio circuitry and emit a distinct sound from the
radio. These sounds should be detected repetitively at the Ping Interval setting.
3.5 Mooring The IPS4
When mooring the IPS4 in shallow water, it should be positioned sufficiently far beneath
the water surface in order to minimize hazard from deep-reaching keels in drifting ice.
Depths greater than 150 m are to be avoided (unless factory modifications are made)
because of the large sound transmission loss associated with round-trip travel to the
surface, the large range uncertainty associated with the unknown sound-speed profile
above the IPS4, and the excessive size of the sonar s foot print on the underside of the
ice at long range.
The mooring is best kept short and well buoyed (e.g. 4 Viny floats with 20 kg net buoyancy
each), so that tilt of the instrument package in response to currents is small. If accurate
drafts, particularly of level ice, are to be obtained, vertical displacement of the IPS4 should
be reduced to the absolute minimum. Experience has shown that with the flotation
suggested, the IPS4 undergoes negligible vertical displacement in currents up to 0.5 m s-1,
and its tilt from the vertical remains within ±2°. Alternatively, a mooring frame can be used
to hold the IPS4 motionless on the seafloor.
More information and examples, on approaches to mooring the IPS4 are given in Section
1.3.
The IPS4 can be moored in conjunction with an ADCP (Acoustic Doppler Current Profiler)
which measures the velocity of the ice overhead. When velocity is known, the series of ice
draft versus time obtained by IPS4 can be transformed into a series of ice draft versus
displacement. This transformation is required for the calculation of certain ice draft
statistics, such as the mean thickness, the ridging frequency and the dimensions of leads
and floes. The occurrence of significant horizontal movement of the IPS4 with mooring
motion, such as might occur at the top of a deep-ocean mooring, should be minimized by
good mooring design. Such motion causes an unobservable meandering of the IPS4
sonar beam across the ice.
© 2004 ASL Environmental Sciences Inc.
23
3.6 Recovering the Data
Retrieving Data
Upon recovery, the raw data needs to be downloaded from the instrument. To do this, connect
the IPS4 to the computer as on deployment (Section3.1). If the battery packs are dead then an
external power source such as a laboratory power supply can be connected to the power wires
protruding from the interface cable connector.
Red:
+15 VDC
Black: -12 VDC
Green: GND
Supply voltage should be set in the range of ±12 to ±15 VDC.
Warning! Improperly connecting the power supplies or wires may
Damage the IPS. Care should be taken when wiring any external
power source.
With the IpsLink software running, press the reset button on the interface connector. Note:
Do not hold the reset button on for long intervals, as this will stop the clock for the duration
of time in which the button was held.
Re-establish communications with the IPS4 (see Section 3.1 above).
At this time, it is a good idea to note the IPS4 time as displayed in the Date/Time panel
(F7). This is useful for determining clock drift, if required during data processing.
In the Utility (Shift F1) panel, specify in which directory the file is to be placed by pressing
the Change PC Data Dir. (Shift F9) button.
Press the Recover (F3) button.
Retrieve the file directory from the IPS4 by pressing the Get File Directory from the Unit
(Shift F3) button.
The prompt on the status bar will now state the number of files contained in the IPS4.
Select the file that is to be downloaded.
Press the Upload Selected File (Shift F5) Button.
The file will now be placed in the desired directory. Note: If more than 1 phase has been
completed, repeat the above procedure for the balance of the phases.
Decoding Data
Load the proper Calibration Coefficients file by pressing the Coefficients (F5) button.
In the coefficients panel press the Load Coefficients (.CFG) File (Shift F1) Button.
© 2004 ASL Environmental Sciences Inc.
24
Locate and load the correct coefficients (.cfg) file for the instrument in use. The .cfg file is
located on the coefficients CD supplied with the IPS4.
Press the Decode (F4) button on the right hand side of the display.
Press the green Decode (Shift F1) button on the Decode panel.
Locate and load the desired data file.
Press the Yellow Pause/Go (Shift F2) button.
The program will now create five new files in the same directory. The files will have the
following extensions
-
.prs
-
.png
-
.brs
-
.syn
-
.log
For further information on the above-mentioned files, please consult the IpsLink User Guide on
CD or the hard copy supplied from the factory.
© 2004 ASL Environmental Sciences Inc.
25
© 2004 ASL Environmental Sciences Inc.
26
Chapter
Demobilizing the IPS4
4.1 Cleaning
It is recommended that the IPS4 be rinsed thoroughly with fresh water after a deployment.
It may also be an opportune time to remove any biological growth that may have
accumulated. The IPS4 can then be removed from the mooring frame and stored in the
supplied shipping case
4.2 Removing the Battery Packs
It is recommended that the IPS4 be stored with battery packs removed. This can be
accomplished by reversing the installation procedure. (Section 2.3)
© 2004 ASL Environmental Sciences Inc.
27
© 2004 ASL Environmental Sciences Inc.
28
Appendix
Terminal Deployment
IPS4 Deployment Using A Terminal
The procedure for setting up a single-phase deployment is shown below. Text from the
IPS4 is shown in italics
Connecting Communications
Connect the IPS4 RS232 Communication Interface cable to the IPS4
Start a terminal emulation program on the computer and set the communication parameters to
9600 N81.
Powering Up
Battery Power
Plug the orange battery plug into the mating jack on the main Digital card.
The IPS4 should power up and display the main menu on the computer.
If not then press the reset button on the interface cable.
External Power
Connect a dual power supply to the +12Vdc, -12Vdc and Common wires on the interface
connector.
Red:
Black:
Green
+12VDC
-12VDC
Common
Turn the power supply on with the DC supplied voltages set to 12-15 Volts. The IPS4 should
power up and display the main menu on the computer.
If not then, press the reset button on the interface cable.
IPS4 Main Menu
© 2004 ASL Environmental Sciences Inc.
29
ICE PROFILING SONAR
Version 4.26
ASL Environmental Sciences, Sidney, B.C.
TIME : 99/09/04 16:02:33
MAIN MENU
F = Files
I = Increase BAUD
L = Lower BAUD
D = Deploy instrument
S = Shutdown
U = Utilities
V = View setup
IPS4 :->
Setting the Clock
Choose U from the main menu, which will take you to the Utilities Menu:
IPS4 :-> u
UTILITIES:
TT = Travel Time
PR = Pressure and temperature
TI = Tilts
BA = Batteries
RA = RAM check
CC = Flash chip check
FZ = Flash zero
FE = Flash erase
FL = Flash format
SY = System check
CL = Set clock
[esc] = return to main menu
Type CL to set the clock.
The IPS4 will show the current date and time and show the format for entering the desired date
and time (usually GMT).
After setting the clock, you can perform tests on the IPS4 systems using the other commands
in the utilities menu or press [esc] to return to the main menu.
Deployment
Choose D from the main menu, which will start the deployment process:
The IPS4 first prompts you for the deployment name.
© 2004 ASL Environmental Sciences Inc.
30
IPS4 :-> d
DEPLOYMENT SEQUENCE
Enter deployment name (8 chars. max.) :-> test9801
The IPS4 next shows the current date and time and gives you the opportunity to change it.
If you have previously set it in the utility menu then there is no need to change it here. you
can hit <cr> for no change.
TIME : 97/09/10 17:17:20
Date/Time format:
YY/MM/DD/HH/MM/SS
Enter GMT (cr=no change) :->
TIME : 01/09/10 17:17:21
The IPS4 next asks for the number of phases in the deployment.
Enter # of PHASES :-> 1
The IPS4 will now ask for the Phase 1 start date and shows the format of the time to be
entered. If it is desired that the instrument start immediately, a date and time must be
entered that is earlier than the current time.
Time format: YY/MM/DD/HH
Enter Phase 1 start date :-> 01/01/01/01
The IPS4 will now require you to enter the deployment parameters. Even if the default
value (shown in the [box]) is the desired value it must still be typed in to move on to the
next parameter. The values shown below are values used in a typical deployment.
Ping Interval [001 seconds] :-> 1
Ping Width [00104 uS] :-> 68
Lockout [005 meters] :-> 5
Maximum Range [050 meters] :-> 50
Pressure Interval [00060 Pings] :-> 60
Burst Interval [00360 Pressure Readings] :-> 360
Burst Count [00001 Seconds] :-> 1
Record Persistence? (Y/N) :-> n
Record Amplitude? (Y/N) :-> y
Minimum Persistence [012 X 8.7uS] :-> 8
Start Amplitude [200 counts] :-> 200
Stop Amplitude [150 counts] :-> 150
Updating Setup; please wait...
After all deployment parameters are entered, the IPS4 will begin to erase the FLASH
memory. If you are sure that the memory is not full you can press <esc> when you are
sure that the IPS4 has gone far enough to erase all chips that had data in them. If you are
© 2004 ASL Environmental Sciences Inc.
31
not sure how many chips have data, then it is best to let the IPS4 continue to the end and
erase all the chips (approx 1-2 min).
Erasing Data Memory...
Number of Blocks/Chip that do not erase:
00:000
08:000
16:000
24:000
01:000
09:000
17:000
25:000
02:000
10:000
18:000
26:000
03:000
11:000
19:000
27:000
04:000
12:000
20:000
28:000
05:000
13:000
21:000
29:000
06:000
14:000
22:000
30:000
07:000
15:000
23:000
31:000
After the memory is erased you must hit enter to activate the deployment. If at this time
you wish to change a parameter or not deploy the instrument you can hit <esc> to abort
the deployment and go through the deployment procedure again from the start.
<Enter> to deploy, <Esc> to abort :->
Deployment Started :->
Press RESET to terminate deployment
DO NOT press the reset button on the interface cable after this time or you will wake the
instrument up and terminate the deployment.
Unplug the Interface cable from the IPS4 and insert the Dummy Plug on the bulkhead
connector.
The IPS4 is now ready for deployment.
© 2004 ASL Environmental Sciences Inc.
32
Appendix
Trouble Shooting
1.
Software will not communicate properly with IPS4.
-
2.
Battery Pack will not fit over the rod.
-
3.
Check to see if the correct calibration coefficients have been used.
Check all pressure sensor fittings for oil leaks, holes, air bubbles and abrasions.
Unit has been reset during the Ocean Deployment
-
7.
Make sure there are no wires protruding from the IPS4 Chassis.
Check for any nicks or blockages on the O-rings.
Ensure O-rings are properly coated with O-ring sealant.
After decoding the data, the pressure readings are not accurate.
-
6.
Make sure pins are not bent on the bulkhead connector.
Make sure the female pins on the interface cable are not blocked in any way.
Be sure to match the large pin on the bulkhead connector to the pin directly below the
Index knobs on the cable.
Instrument will not fit into the pressure case properly.
-
5.
Remove the rod and check to see if it is straight.
Determine if there is a blockage in the insertion hole of the battery pack.
Remove the rod from the pressure case. Place the battery pack in the case then
insert the rod into the battery pack. Try to twist the rod into place.
RS232 communication cable will not fit on to the bulkhead connector.
-
4.
Check Interface cable (RS232 Cable).
Check Com port setting in the software as well as the computer being used.
Press the reset switch on the Interface Cable.
If communication still does not exist, check all internal wire harnesses and connectors
on the IPS4. (then consult the factory)
Check the pins on the bulkhead connector for any shorts or corrosion.
Check the seated O-ring on the bulkhead connector to determine if there has been
any leaks.
During repeated bench tests, the clock on the IPS4 displays the incorrect time.
-
When the reset is held on for more than an instant, it will stop the clock from updating.
When the button is released the clock will again update the time. The clock will be
delayed by the interval that the rest button was held. It is important at this point to
reset the clock to the correct time.
© 2004 ASL Environmental Sciences Inc.
33
8.
Clock is reset to 1996
This occurs when:
The clock battery power has been interrupted, or
The Micro Controller is removed, or
The clock battery drops below 2.2 volts.
Note: If the clock power is interrupted for any reason, the IPS4 will revert to the
default setting of January 1st, 1996. If this occurs check for the above problems,
then reset the clock.
9.
No data is recorded for a given Phase.
-
-
If a programmed Burst Interval was scheduled to be completed after a given phase
change, the unit will wait for the burst interval to occur before starting the next
scheduled phase change.
0 has been placed in the ping interval field of the deployment file for this particular
phase. This will effectively put the IPS4 to sleep.
10. During a multi-phase deployment, the power was momentarily cut to the instrument.
-
-
This will cause the instrument to go into the auto deploy sequence. The unit will then
wait for a 1-hour time interval, then immediately start. A new file will then be created
called Timeoutx.001 and any successive phases will be named in the same manner,
only they will be numbered sequentially (Timeoutx.002).
Note: If the power interruption takes place less than an hour before a phase change is
scheduled to take place the unit will ignore this phase and start-up will begin at the
beginning of the next phase.
© 2004 ASL Environmental Sciences Inc.
34
Appendix
ASL Parts
Part
ASL Part Number
Assorted Parts
RS232 Communication Cable
Bulkhead Connector (Complete with Ribbon Cable)
Locking Sleeve
Sensor Guard
Dummy Plug Bulkhead Connector (Complete with Ribbon Cable)
Nylon Pressure Fitting
Pressure Fitting Cover
Anode
7601000000
7103030000
10201702
7105000001
10201701
15560100
15560201
15600103
Batteries
Full Pack
Full Pack without Transmit Pack
Three Quarter Pack
Half Pack
7201000000
7201000001
7301000000
7401000000
Spares
O- Ring Kit (IPS Chassis)
O-Ring Pressure Fitting
O-Ring Pressure Bladder
Pressure Bladder
Allen Key
Purge Plug
½ Wrench
Purge Fitting
Pump
Manuals
IPSLINK User Manual
IPSLINK Software on CD-ROM
IPS Technical Manual
© 2004 ASL Environmental Sciences Inc.
15570300
15570100
15570200
10370100
15590102
15500501
15590200
15560300
15590300
7605156000001
7603000000
7604000001
35
© 2004 ASL Environmental Sciences Inc.
36
Appendix
Deployment Parameters
Table 1: Control parameters that define an operating phase of an IPS4 deployment
PARAMETER
Unit
Minimum
Maximum
year/../hour
second
s
meter
meter
ping cycle
pressure
cycle
ping count
Now
0
0
0
1
2
2
n/a
255
1020
255
255
510
510
0
65535
0
255
Start Amplitude
8.7 s
[ 0.6 cm]
count
0
255
Stop Amplitude
count
0
255
n/a
n/a
Off
Off
On
On
Start Time
Ping Interval
Ping Length (or Width)
Lock-out Range
Maximum Range
Pressure Interval
Burst Interval
Burst Count
Minimum Persistence
Persistence
Amplitude
Description
Date and time to start this phase
Time between pings
Duration of ping
Lock out echoes in this much water
Furthest distance to look for echoes
Pressure is recorded every N pings
Burst starts every N pressure cycles
Number of 1 second ping intervals in
burst
Echo must persist for this length of
time to be considered as valid.
Echo level signifying the start of a
valid echo.
Echo level signifying the end of a valid
echo.
Persistence of echo is saved if on.
Amplitude of echo is saved if on.
Values from a typical deployment:
Ping Interval :->
Ping Width :->
Lockout :->
Maximum Range :->
Pressure Interval :->
Burst Interval :->
Burst Count :->
Record Persistence? (Y/N) :->
Record Amplitude? (Y/N) :->
Minimum Persistence :->
Start Amplitude :->
Stop Amplitude :->
© 2004 ASL Environmental Sciences Inc.
1
68
5
50
60
360
1
n
y
8
200
150
37
© 2004 ASL Environmental Sciences Inc.
38
Appendix
Calibrations
Calibration Coefficients and Methods
1. Paroscientific Digiquartz Pressure Transducer Model 2200A-101
Method: Testing and calibrations are carried out by Paroscientific Inc., as per their Certificate of
Calibration using Piston/Cylinder Dead Weight Tester traceable to Bell and Howell Primary Pressure
Standard.
A.1 Temperature
Calibration Coefficients:
U0 ( sec); Y1 (deg.C/ sec); Y2 (deg.C/ sec2); and Y3 (deg.C/ sec3);
Temperature (deg.C) = Y1(X-U0) + Y2(X-U0)2 + Y3(X-U0)3
Where X is temperature period ( sec) as output by sensor
A.2 Pressure
Calibration Coefficients:
U0 ( sec); C1 (dbar); C2 (dbar/ sec); and C3 (dbar/ sec2);
D1; D2 ( sec-1);
T1 ( sec); T2 ( sec / sec); T3 ( sec / sec2); T4 ( sec / sec3); and T5 ( sec / sec4);
C (dbar) = C1 + C2(X-U0) + C3(X-U0)2
D = D1 + D2(X-U0)
T0 ( sec) = T1 + T2(X-U0) + T3(X-U0)2 + T4(X-U0)3 + T5(X-U0)4
P (dbar) = C ( 1- (T0/T)2) (1
D(1
(T0/T)2))
Where T is pressure period ( sec) as output by sensor
Note: A pressure unit of one decibar is nearly equivalent to the pressure generated by water having a
head of 1 metre.
2. Speed of Sound (m/s)
Integrated speed of sound of the water column from the IPS4 to the ice or water target, as estimated by
the user.
© 2004 ASL Environmental Sciences Inc.
39
3. Eclock (sec)
Measured period of microprocessor clock (value provided by ASL)
4. Battery Coefficients
D.1 Transmit Portion of Main Battery Pack
Ah Ping Ampere hours per each ping (value provided by ASL in units .cfg file)
Ah Standby Hour Ampere hour for each standby hour (value provided by ASL in units .cfg file)
Voltage Conv. Voltage conversion (values provided by ASL in units .cfg file)
D.2 Main Battery Pack Positive Side
Ah Ping Ampere hours per each ping (value provided by ASL in units .cfg file )
Ah Unit Range Ampere hours per Unit Range (value provided by ASL in units .cfg file)
Ah Standby Hour Ampere hour for each standby hour (value provided by ASL in units .cfg file)
Ah Pressure - Ampere hours per Pressure reading (value provided by ASL in units .cfg file)
Voltage Conv. Voltage conversion (values provided by ASL in units .cfg file)
D.3 Main Battery Pack Negative Side
Ah Ping Ampere hours per each ping (value provided by ASL in units .cfg file)
Ah Unit Range Ampere hours per Unit Range (value provided by ASL in units .cfg file)
Ah Standby Hour Ampere hour for each standby hour (value provided by ASL in units .cfg file)
Note that the Ah values for ¾ or ½ size battery packs are reduced by this ratio from the full battery pack
(for the Main Battery portion only).
5. Tilt Coefficients
Tilt coefficients are measured by ASL by operating the IPS4 at 20 different tilt angles, ranging from 20
degrees to + 20 degrees, as independently measured using a high pressure digital tilt meter. The
calibration coefficients are computed using a least squares fitting method to a third order polynomial
equation.
E.1 Tilt X Coefficients
Calibration Coefficients:
X_a (degrees); X_b (degrees); X_c (degrees); and X_d (degrees)
Tilt_x (degrees) = X_a + X_b (NX) + X_c (NX)2 + X_d (NX)3
Where NX is the measured output count (0
255) from the IPS4 A/D output.
E.2 Tilt Y Coefficients
Calibration Coefficients:
Y_a (degrees); Y_b (degrees); Y_c (degrees); and Y_d (degrees)
Tilt_Y (degrees) = Y_a + Y_b (NY) + Y_c (NY)2 + Y_d (NY)3
Where NY is the measured output count (0
© 2004 ASL Environmental Sciences Inc.
255) from the IPS4 A/D output.
40
Calibration Sheets for this IPS4 Unit
© 2004 ASL Environmental Sciences Inc.
41
© 2004 ASL Environmental Sciences Inc.
42
Appendix
Technical Information Notes
A. Reducing the Numbers of Null or False Target Records
A null record in the IPS4 data file is a record in which the Range, Amplitude and Persistence
are each identically zero. A null record results when the target detection algorithm of the IPS4
fails to find any target that meets the selection criteria. The target selection is based on the
values of five parameters that must be chosen by the user when programming the IPS4 for
deployment. These parameters are:
1.
2.
3.
4.
5.
Minimum Range (m) (Lockout)
Maximum Range (m)
Start Amplitude
Stop Amplitude
Minimum Persistence
Note that the value of Maximum Range must exceed that of Minimum Range, and that of Start
Amplitude must exceed that of Stop Amplitude. Null records may result in any of the following
circumstances:
1.
The Minimum Range has been set to a value that exceeds the range of the sea surface.
Normally, the value of this parameter should exceed 5m (although values as low as 2-3m can
be used if there is a need to obtain ice profiles very close to the instrument). This choice of
minimum range values avoids near-field perturbations of the sonar beam pattern, avoids (or
reduces) effects from ringing of the transducer following pulse transmission, and avoids the
less-than-optimal region of the IPS4 time-variable gain. The Minimum Range should be less
than the range of the ice target whose draft is the deepest anticipated.
2.
The Maximum Range has been set to a value that is less than the range of the sea surface.
Normally the value of this parameter should exceed the range to the sea surface, but should be
less than twice the water depth at the site. The latter condition will eliminate the occasional
selection of the second return (reflected off the sea surface, bottom and sea surface) as the
target echo.
3.
The selected value of Start Amplitude is too large. This occurrence is unlikely in normal
operation, since the gain of the IPS4 is adjusted such that more than 95% of the echoes from
sea-ice targets saturate the receiver, and the IPS4 has time-variable gain to compensate for
transmission losses. However, the echo from the ice surface amplitude does fluctuate
stochastically over a very wide range because it is generated by incoherent scatter. Therefore,
it will occasionally be sufficiently weak that it will not exceed the Start Amplitude. Typically, this
happens less than 1% of the time for ice targets. The rate of occurrence will increase quickly at
ranges beyond 100 m, where progressively increasing transmission losses are no longer offset
by time-variable gain in the IPS4.
4.
The Minimum Persistence is too large. Echoes from ridged sea ice typically persist for times
long relative to the duration of the transmitted pulse. Those from level ice can, however, be very
short-lived, because the ice is a weak scatterer and because the sonar beam is so narrow (<
© 2004 ASL Environmental Sciences Inc.
43
2 ). A minimum persistence of 1.0 to 1.5 times the duration of the transmitted pulse is
recommended. With this range of values, the Minimum Persistence has little influence on target
selection, while at the same time eliminating targets which have shorter durations than the IPS4
pulse width.
5.
The Stop Amplitude is too small. In this case, an echo may be selected as its amplitude rises
above the Start threshold, but its Persistence may be too long because its amplitude has not
dropped below the Stop threshold before the maximum range is attained. Other distinct targets
may be embedded in the single very long duration target. The results is a single, possibly false
target, rather than another target which is not identified in itself. The effects of a low value of
Stop Amplitude are aggravated by:
a) High target strength over an extended duration (e.g. open water)
b) Persistent echoes (e.g. rough ice or open-water surfaces)
To minimize the occurrence of false records arising from this cause in normal IPS4 operation
for ice-profiling, it is recommended that the Stop Amplitude should be lower than the start
amplitude by typically 10 to 50 counts.
Note: Some noise targets such as zooplankton scatterers can have longer persistence values than ice
targets. To discriminate against false targets due to zooplankton scatterers, the start and stop amplitudes
must be set to admit ice targets but reject the (usually lower amplitude) zooplankton targets.
ASL will offer advice, and review proposed settings for minimum and maximum range start and stop
amplitudes and minimum persistence, prior to finalizing deployment plans, on request from customers.
Our advice cannot be guaranteed to produce the best results for every situation. However, we can
discuss various strategies based on our experience, and that of other users of the IPS4, in sea ice
applications carried out over the past several years.
B. Sound Speed values for Lockout and Max Range
The IPS4 interface has been designed to allow the user to enter the Lock-out Range and
Maximum Range values in metres. In order to implement this, a value had to be chosen for the
speed of sound to use in the instrument. This value used in the IPS4 is only for calculating the
Lockout Range and Maximum Range. The speed of sound used to convert the data collected
by the instrument is specified by the end user in the calibration file during the decoding process.
Due to limitations of the micro-controller with respect to integer numbers and timing loops the
actual speed of sound value used in calculating the ranges is different depending on the value
entered for each parameter such that:
Lockout Range:
Ranges <= 26m:
Ranges > 26m:
Speed of Sound
1467 m/s
1462 m/s
Maximum Range:
Ranges <= 26m:
Ranges > 26m:
Speed of Sound
1458 m/s
1461 m/s
© 2004 ASL Environmental Sciences Inc.
44
Appendix
C. Year 2000 Issues for the IPS4
The IPS4 has undergone a series of rigorous tests to check for year 2000 compliance.
The IPS4 uses a two-digit number system (99) to represent the present date. This fact
should be considered before any IPS4 deployment. The IPS4 will run, as expected, from
any date in the 1900 s into the year 2000. The IPS4 has also been thoroughly tested to
run successfully through any leap years that may occur in the next century.
In certain situations, it is necessary to start the IPS4 immediately. To do this, a date that
has already occurred is placed in the Start Date field of the deployment file. This will
cause the IPS4 to start immediately after it s deployment sequence has been completed.
However, if it is desired that the IPS4 is to start immediately in the year 2000 and a Start
Date of 1999 (99) is placed into the deployment file, the unit will sleep until the year 2099
occurs.
The simplest way to eliminate this problem so that it does not occur is to ensure that, if the
IPS4, is to be started immediately in the year 2000 (00), always place a previous year
2000 (00) date into the Start Date field of your deployment file. For example if the IPS4 is
set to start immediately in February of the year 2000, any start date that has already
occurred in the year 2000 is placed in the deployment file (e.g. January 1st,2000 (00)).
© 2004 ASL Environmental Sciences Inc.
45
Appendix
Installation Instructions for Connectors
1.
2.
3.
When mating the connectors, there may be some difficulty due to trapped air. A slight
wiggle of the connector back and forth while squeezing the air pocket with your index finger
and thumb will help to burp out the trapped air. This is a good sign, since the trapped air
indicates that the sealing faces of the connector are performing properly.
Be cautious that the back and forth motion is not too severe. This can lead to broken or
intermittent contact between the conductors and the contacts.
Use of a dummy connector is always recommended. This will aid in keeping sealing
surfaces clear of contamination and damage.
Maintenance Instructions for Connectors
A.. Visual Examination of Connectors before Mating
1.
2.
3.
Check for any debris that may be on any connector mating surfaces. This can
hinder mating and cause damage to the sealing surfaces. Debris must be
removed.
Check the connector sealing surfaces for any signs of scratches, nicks, cuts, or
tears which may lead to water intrusion. If any of these occur the connector
should be replaced before continuing.
Verify that the correct contact configuration is being mated together. Mating a 4
contact male connector into a 3 contact female connector with extreme force
could cause contact damage as well as punctures and tears along bond surfaces,
which may not be apparent to the eye.
B. Lubrication of Connectors before Mating
1.
2.
3.
4.
Lubricate the connectors with a Silicone Spray before mating. This will allow the
sealing surfaces to be matted without high friction forces, which may lead to damage
to the sealing surface.
Spraying will also possibly remove any excess contaminants that may be left on the
surfaces, which were not fully cleaned off.
Lubrication should be performed every time the connector is mated and unmated.
Do Not use WD-40 as a lubricant since it is made up of mineral spirits, which
destroy chemical bonds.
C. Sealing Mechanism of Neoprene Connectors
1. The sealing mechanism of these connectors is the inner diameter of the female
connector and the outer diameter of the male connector.
2. The ring and grove seen on the connectors does not provide the sealing, instead the
ring portion is a mechanical ring (m-ring) that helps to keep the connector mated. If
the locking sleeve is left off the assembly or had come unthreaded. The m-ring would
mechanically keep the connectors mated.
3. The m-ring also provides a visual indication as to whether the connector set is fully
mated or not. If the m-ring is not in the corresponding grove a lump will be visible on
the female connector surface. This makes it very easy to see that the connector is not
mated.
© 2004 ASL Environmental Sciences Inc.
46
Appendix
Non Standard Features for ASL River IPS
Note: Please read this section only if the IPS unit in question is a River IPS model. This
section does not apply for the standard IPS product. Any of the features described below
can be added to any IPS unit as an option.
Additional hardware, firmware and software were added to the IPS River to allow
additional communication and variable gain features. The IPS River works with a number
of different selectable gain settings and has the ability to provide real time output of IPS
data, when used with the IPS River version firmware and IpsLink River software. It also
has the ability use a number of user selectable bursts, which provide a view of the entire
water column.
Serial communication in ASL s River IPS is accomplished using a long cable attached to a
new 9-pin bulkhead connector. The standard RS232 communication interface has been
replaced with an RS422 interface requiring the addition of new hardware. This includes
the new bulkhead connector and an additional board called a driver board .
The bulkhead connector was changed to accommodate the extra pins needed for the
RS422 interface. The surface cable attaches to the 9-pin bulkhead connector in a slightly
different manner than the standard model. Instead of lining the large pin on the bulkhead
connector with the notch on the communication cable a key on the surface cable must
lined up with a notch in the bulkhead connector. Note: Care must be used when securing
the connector as tightening the locking sleeve when the key is not properly placed in the
notch will damage the pins on the bulkhead connector. See drawing below.
Bulkhead Connector
Surface Cable
Key
Notch
1
2
9
Face View of Connector
The driver board is located in the upper left hand side of the chassis, above the pressure
sensor. Header P2 on the driver board plugs into the existing external header
configuration on the IPS main board (P4). The other header on the driver board (P1)
plugs into the bulkhead connector (9-Pin).
See Diagram Below:
© 2004 ASL Environmental Sciences Inc.
47
Bulkhead Conn.
Driver Board
Main Board
Note: A requirement of both the RS422 driver and receiver chips chosen was to have a
shutdown mode to retain the low power features of the RS232 chip that was removed. For
this reason, terminating resistors were not used on the balanced lines to keep the DC
power dissipation down. It was felt that they were not needed due to the lower baud rates
and shorter cable length (relative to the RS422 specified max). Any reflections should die
out in the cable before the bit interval is sampled. However since the cable being used is
not a shielded twisted pair (as per the RS422 specification) it may subsequently be
determined that termination resistors are required. In this case a resistor of approx. 100
ohms can be added across each Tx/Rx pair at each end of the cable.
Gain Selection
To make the IPS River and other models more versatile with respect to target strength a
feature was added to allow the user to select one or more possible gain responses. Each
gain response corresponds to a different operating mode. The desired gain response for
each phase is selected by entering the number of the required gain in the appropriate box
within the IpsLink setup program. The gain selections are numbered from 1 to 4. Each
operating mode will correspond to a particular number of gain selection. For example gain
selection 4 being the standard IPS gain response for sea ice. Four resistors on the gain
board set the appropriate gain curve for the settings given in the software. All gain
selections are listed below:
Gain 1 (R=4.32M)
Gain 2 (R=931k)
4)
Gain 3 (R=475k)
gain 4)
Gain 4 (R=280k)
Lowest Gain (-25dB relative to gain 4)
Wave Sonar Gain (Target is the water surface. 18dB relative to gain
Mid-Way Gain (Between wave and sea ice values.
10dB relative to
Sea Ice Gain
The gain control circuitry is contained on a small board that is attached to the upper right
hand side of the sounder board. The board is simply slid over the small headers already
attached to the sounder board. Note older versions of IPS River will have the Gain board
attached to the back of the sounder board.
© 2004 ASL Environmental Sciences Inc.
48
Modified Burst Sampling
Burst Sampling has always been included in the standard IPS but has been limited to
sampling standard single targets for each ping. The River IPS firmware has the ability to
sample more than one target in the entire water column. A description of operating
parameters follows:
The modified IPS retains its operating modes and intervals with the exception that any
ping that is part of a burst now digitizes the complete water column. The water column is
sampled at a rate of 34.8 kS/S out to a distance specified by MAX RANGE. The
LOCKOUT parameter is ignored during burst pings so that the timing can be calculated
accurately from the transmitted pulse. A sample setup might be:
Ping Interval: 2 (sec)
Ping Width: 68 (uS)
Lockout: 1 (m)
Max Range: 100 (m)
Pressure Interval: 300 (300 ping intervals equivalent to 10 min)
Burst Interval: 2 (2 pressure intervals equivalent to 20 min)
Burst Count: 30
(In this case a regular IPS ping would be performed every 2 seconds. A regular ping saves
one target based on the selection procedure outlined in the IPS4 Operators Manual using
start amplitude, stop amplitude, and minimum persistence. Amplitude and persistence are
saved along with the range for these pings depending on the set up parameters. Every 10
minutes ( 300 pings ) a pressure reading is taken. Every 20 minutes ( 2 pressure readings
) thirty burst pings are taken, one second apart. Due to the large amount of data
generated by the water column sampling a compression algorithm has been added to the
data collection to reduce the affect on deployment times. Water tests with the instrument
showed compressions ranging from 77% to 96%, The 77% compression was with the
gain set at G=4 and an examination of the profile data from this showed that at the 80m
depth the large gain due to the TVG was bringing the noise floor up and causing random
fluctuations in the least significant bits. At shallower depths and at the lower gain settings a
higher compression would be expected (depending on the amount of targets in the water).
Due to the variability of compression ratios it makes it difficult to determine how the
deployment duration will be affected by storage limitations. As more data is collected a
better indication of compression ratios and file sizes will be evident. Shown below is a
sample calculation using the above parameters:
a) From the COMPUTE RESOURCES in the IpsLink River software with the End Date set
one day later than the phase start date:
44280 Pings
144 Pressures
72 Bursts
b) With persistence and amplitude set to Yes a regular ping is 4 bytes long ( no
Persistence or Amplitude is 2 bytes; either/or is 3 bytes):
(4968 Pings)*(4 bytes) = 19872 bytes
c) A pressure record is 10 bytes long:
© 2004 ASL Environmental Sciences Inc.
49
(144 pressures)*(10 bytes) = 1440 bytes
d) Number of samples per profile is approx.: (20 metres)/(0.021 metres) = 952 samples
(30 pings/burst)*(952 samples/ping)*(72 bursts) = 2,056,320 bytes
e) Assume a worst case compression of 77%:
(2,056,320 bytes)*(0.23) = 472,954 bytes
f) Therefore total bytes for a day:
(19872 bytes)+(1440 bytes)+(472,954 bytes) = 494,266 bytes
g) Total storage is 69,172,244 bytes
(69,172,244 bytes)/(494,266 bytes) = 139.9 Days
Null Targets and the River IPS
For the standard IPS gain setting (G=4) the default start and stop amplitude settings are
200 (start) and 150 (stop), respectively. If a lower gain setting is selected the amplitudes
of the received signal will be reduced and a lower setting for the start and stop amplitudes
should be considered. The equivalent values of start and stop amplitudes to those of the
standard IPS gain level (G=4) for other gain settings are as follows:
Relative
Gain
(dB)
0
-10
-18
-25
Gain
Setting
4
3
2
1
Start
Amplitude
200
63
25
11
Start
Amplitude
150
47
19
8
Note: Gain setting 4 is the suggested setting for sea ice detection
Further discussion on avoiding Null and false targets is given in Appendix F of the users
manual.
© 2004 ASL Environmental Sciences Inc.
50
Appendix
Index
#
E
echo, 2
echo range, 2
echo sounder, 3
# of Bins, 30
# of pings to average, 30
.
.brs, 21
.log, 21
.png, 20
.prs, 20
.syn, 21
F
Flash Check, 16
FLASH memory, 2
G
A
Get File Directory from the Unit, 20
Get Sensor Data, 15
acoustic ping, 19
acoustic pulse, 2
H
Acoustic transducer, 7
ADCP, 19
anodes, 10
Hybrid Mode, 4
I
B
ice draft, 5
Ice Mode, 4
impedance, 11
interface cable, 13
Ipslink. See
battery pack, 8
baud rate, 14
beam tilt, 2
bulkhead connector, 7, 13
Burst Count, 3
Burst Interval, 3
L
C
Calc. Resources, 17
Calibration Coefficients, 16
Change PC Data Dir., 20
Continuously Acquire Date/Time, 15
D
Date/Time, 15
Decode, 20
Deploy, 17
Deploy Unit, 18
desiccant pack, 10
Detect Unit, 14
Dummy Plug, 18
Load Coefficients (.CFG) File, 20
Lockout, 3, 30
M
main controller board, 8
main CPU card, 23
maximum Amplitude, 2
Maximum Depth, 3, 30
Minimum Persistence, 3
mooring frame, 19
mooring motion, 5
mounting rod, 9
P
Pause/Go, 20
© 2004 ASL Environmental Sciences Inc.
51
Persistence, 2
phase, 3
Ping Interval, 3, 30
Ping Width, 3, 30
Ping-Length, 3
pressure, 2
Pressure case, 7
Pressure Interval, 3
Pressure sensor, 7
prompt, 14
Surface communication cable, 7
T
temperature, 2
terminal emulator program, 14
The Coefficients, 20
tilt data, 2
Tilts, 24
Travel Time, 2, 24
R
U
RAM, 16
Upload Selected File, 20
Ram Check, 16
real time clock, 2
reset button, 14
RS232 interface, 2
rubber isolator, 11
Utility, 13, 16, 20
V
Viny floats, 19
S
Sensor, 15
sensor guard, 8
shipping case, 22
sleep, 3
standard mode, 4
Start Amplitude, 3
Start Flash Test Button, 16
Start Time, 30
Stop Acquiring IPS Date/Time, 15
Stop Amplitude, 3
© 2004 ASL Environmental Sciences Inc.
W
Wave Mode, 4
Z
zenith distance, 2
50
2