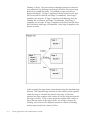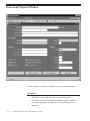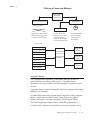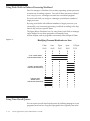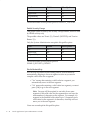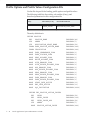
1
Oracle r Applications System Administrator’s Guide RELEASE 11i VOLUME 1 October 2002 Oracle Applications System Administrator’s Guide Release 11i The part number for this volume is A96155–02. To reorder this book, please use the set part number, A96154–02. Copyright E 1994, 2002 Oracle Corporation. All rights reserved. Primary Authors: Steve Carter, Mildred Wang Major Contributors: Dana Spradley, Leslie Studdard Contributors: Ahmed Alomari, Troy Anthony, Ram Bhoopalam, George Buzsaki, Anne Carlson, Steven Chan, Siu Chang, John Cordes, Mark Fisher, Hubert Ferst, Clara Jaeckel, Michael Mast, Tom Morrow, Emily Nordhagen, Muhannad Obeidat, Gursat Olgun, Richard Ou, Jan Smith, Seth Stafford, Susan Stratton, Raymond Tse, Mark Warren, Sara Woodhull The Programs (which include both the software and documentation) contain proprietary information; they are provided under a license agreement containing restrictions on use and disclosure and are also protected by copyright, patent and other intellectual and industrial property laws. Reverse engineering, disassembly, or decompilation of the Programs, except to the extent required to obtain interoperability with other independently created software or as specified by law, is prohibited. The information contained in this documentation is subject to change without notice. If you find any problems in the documentation, please report them to us in writing. This documentation is not warranted to be error–free. Except as may be expressly permitted in your license agreement for these Programs, no part of these Programs may be reproduced or transmitted in any form or by any means, electronic or mechanical, for any purpose. If the Programs are delivered to the United States Government or anyone licensing or using the Programs on behalf of the United States Government, the following notice is applicable: U.S. GOVERNMENT RIGHTS Programs, software, databases, and related documentation and technical data delivered to U.S. Government customers are ”commercial computer software” or ”commercial technical data” pursuant to the applicable Federal Acquisition Regulation, and agency–specific supplemental regulations. As such, use, duplication, disclosure, modification, and adaptation of the Programs, including documentation and technical data, shall be subject to the licensing restrictions set forth in the applicable Oracle license agreement, and, to the extent applicable, the additional rights set forth in FAR 52.227–19, Commercial Computer Software – Restricted Rights (June, 1987). Oracle Corporation, 500 Oracle Parkway, Redwood City, CA 94065. The Programs are not intended for use in any nuclear, aviation, mass transit, medical, or other inherently dangerous applications. It shall be the licensee’s responsibility to take all appropriate fail–safe, backup, redundancy, and other measures to ensure the safe use of such applications if the Programs are used for such purposes, and we disclaim liability for any damages caused by such use of the Programs. Oracle is a registered trademark of Oracle Corporation and/or its affiliates. Other names may be trademarks of their respective owners. Contents VOLUME 1 Preface . . . . . . . . . . . . . . . . . . . . . . . . . . . . . . . . . . . . . . . . . . . . . . . . . i Chapter 1 What Is System Administration? . . . . . . . . . . . . . . . . . . . . . . . . . . 1 – 1 What Is System Administration? . . . . . . . . . . . . . . . . . . . . . . . . . . . 1 – 2 Chapter 2 Managing Oracle Applications Security . . . . . . . . . . . . . . . . . . . Overview of Oracle Applications Security . . . . . . . . . . . . . . . . . . . Defining a Responsibility . . . . . . . . . . . . . . . . . . . . . . . . . . . . . . . . . Defining a Request Security Group . . . . . . . . . . . . . . . . . . . . . . . . . User Session Limits . . . . . . . . . . . . . . . . . . . . . . . . . . . . . . . . . . . . . . Responsibilities Window . . . . . . . . . . . . . . . . . . . . . . . . . . . . . . . . . . Overview of Security Groups . . . . . . . . . . . . . . . . . . . . . . . . . . . . . . Security Groups Window . . . . . . . . . . . . . . . . . . . . . . . . . . . . . . . . . Users Window . . . . . . . . . . . . . . . . . . . . . . . . . . . . . . . . . . . . . . . . . . . Overview of Function Security . . . . . . . . . . . . . . . . . . . . . . . . . . . . . Implementing Function Security . . . . . . . . . . . . . . . . . . . . . . . . . . . Form Functions Window . . . . . . . . . . . . . . . . . . . . . . . . . . . . . . . . . . Menus Window . . . . . . . . . . . . . . . . . . . . . . . . . . . . . . . . . . . . . . . . . . Menu Viewer . . . . . . . . . . . . . . . . . . . . . . . . . . . . . . . . . . . . . . . . . . . . Compile Security Concurrent Program . . . . . . . . . . . . . . . . . . . . . . Function Security Reports . . . . . . . . . . . . . . . . . . . . . . . . . . . . . . . . . Users of a Responsibility Report . . . . . . . . . . . . . . . . . . . . . . . . . . . 2–1 2–2 2–4 2–6 2–9 2 – 10 2 – 15 2 – 16 2 – 17 2 – 22 2 – 28 2 – 34 2 – 38 2 – 42 2 – 44 2 – 45 2 – 46 Contents iii Active Responsibilities Report . . . . . . . . . . . . . . . . . . . . . . . . . . . . . 2 – 47 Active Users Report . . . . . . . . . . . . . . . . . . . . . . . . . . . . . . . . . . . . . . 2 – 48 Reports and Sets by Responsibility Report . . . . . . . . . . . . . . . . . . . 2 – 49 Chapter 3 User and Data Auditing . . . . . . . . . . . . . . . . . . . . . . . . . . . . . . . . . . Overview of User and Data Auditing . . . . . . . . . . . . . . . . . . . . . . . Auditing User Activity . . . . . . . . . . . . . . . . . . . . . . . . . . . . . . . . . . . Monitor Users Window . . . . . . . . . . . . . . . . . . . . . . . . . . . . . . . . . . . Signon Audit Concurrent Requests Report . . . . . . . . . . . . . . . . . . Signon Audit Forms Report . . . . . . . . . . . . . . . . . . . . . . . . . . . . . . . Signon Audit Responsibilities Report . . . . . . . . . . . . . . . . . . . . . . . Signon Audit Unsuccessful Logins Report . . . . . . . . . . . . . . . . . . . Signon Audit Users Report . . . . . . . . . . . . . . . . . . . . . . . . . . . . . . . . Purge Signon Audit Data Program . . . . . . . . . . . . . . . . . . . . . . . . . Reporting On AuditTrail Data . . . . . . . . . . . . . . . . . . . . . . . . . . . . . Audit Installations Window . . . . . . . . . . . . . . . . . . . . . . . . . . . . . . . Audit Groups Window . . . . . . . . . . . . . . . . . . . . . . . . . . . . . . . . . . . Audit Tables Window . . . . . . . . . . . . . . . . . . . . . . . . . . . . . . . . . . . . 3–1 3–2 3–3 3–8 3 – 10 3 – 12 3 – 15 3 – 17 3 – 19 3 – 21 3 – 22 3 – 34 3 – 36 3 – 40 Chapter 4 Managing Concurrent Programs and Reports . . . . . . . . . . . . . . . Overview of Concurrent Programs and Requests . . . . . . . . . . . . . Multilingual Support for Concurrent Requests . . . . . . . . . . . . . . . Organizing Programs into Request Sets . . . . . . . . . . . . . . . . . . . . . Request Sets Report . . . . . . . . . . . . . . . . . . . . . . . . . . . . . . . . . . . . . . Organizing Programs into Request Groups . . . . . . . . . . . . . . . . . . Report Group Responsibilities Report . . . . . . . . . . . . . . . . . . . . . . Defining Program Incompatibility Rules . . . . . . . . . . . . . . . . . . . . Defining Data Groups . . . . . . . . . . . . . . . . . . . . . . . . . . . . . . . . . . . . Custom Concurrent Programs . . . . . . . . . . . . . . . . . . . . . . . . . . . . . Copying and Modifying Program Definitions . . . . . . . . . . . . . . . . Concurrent Program Details Report . . . . . . . . . . . . . . . . . . . . . . . . Concurrent Programs Report . . . . . . . . . . . . . . . . . . . . . . . . . . . . . . Request Groups Window . . . . . . . . . . . . . . . . . . . . . . . . . . . . . . . . . Concurrent Program Executable Window . . . . . . . . . . . . . . . . . . . Concurrent Programs Window . . . . . . . . . . . . . . . . . . . . . . . . . . . . Data Groups Window . . . . . . . . . . . . . . . . . . . . . . . . . . . . . . . . . . . . 4–1 4–2 4–4 4–6 4 – 18 4 – 19 4 – 24 4 – 25 4 – 30 4 – 35 4 – 47 4 – 57 4 – 58 4 – 59 4 – 61 4 – 66 4 – 81 Chapter 5 Managing Concurrent Processing . . . . . . . . . . . . . . . . . . . . . . . . . 5 – 1 Overview of Concurrent Processing . . . . . . . . . . . . . . . . . . . . . . . . 5 – 2 Service Management . . . . . . . . . . . . . . . . . . . . . . . . . . . . . . . . . . . . . 5 – 5 iv Oracle Applications System Administrator’s Guide Chapter 6 Managing Concurrent Processing with Oracle Applications Manager . . . . . . . . . . . . . . . . . . . . . . . . . . . . . . . . . . . . . . . . . . . . . . . . Reviewing Requests, Request Log Files, and Report Output Files . . . . . . . . . . . . . . . . . . . . . . . . . . . . . . . . . . . . . . . . . . . . . Changing the Status of Concurrent Requests . . . . . . . . . . . . . . . . . Managing Concurrent Processing Files and Tables . . . . . . . . . . . . Purge Concurrent Request and/or Manager Data Program . . . . Concurrent Processing User Profile Settings . . . . . . . . . . . . . . . . . Defining Managers and their Work Shifts . . . . . . . . . . . . . . . . . . . Completed Concurrent Requests Report . . . . . . . . . . . . . . . . . . . . Work Shift by Manager Report . . . . . . . . . . . . . . . . . . . . . . . . . . . . . Work Shifts Report . . . . . . . . . . . . . . . . . . . . . . . . . . . . . . . . . . . . . . . Specializing Managers to Run Only Certain Programs . . . . . . . . Grouping Programs by Request Type . . . . . . . . . . . . . . . . . . . . . . . Controlling Concurrent Managers . . . . . . . . . . . . . . . . . . . . . . . . . . Overview of Parallel Concurrent Processing . . . . . . . . . . . . . . . . . Managing Parallel Concurrent Processing . . . . . . . . . . . . . . . . . . . Concurrent Managers and Real Application Clusters (RAC) . . . Administer Concurrent Managers Window . . . . . . . . . . . . . . . . . . Concurrent Managers Window . . . . . . . . . . . . . . . . . . . . . . . . . . . . Work Shifts Window . . . . . . . . . . . . . . . . . . . . . . . . . . . . . . . . . . . . . Combined Specialization Rules Window . . . . . . . . . . . . . . . . . . . . Concurrent Request Types Window . . . . . . . . . . . . . . . . . . . . . . . . Viewer Options Window . . . . . . . . . . . . . . . . . . . . . . . . . . . . . . . . . . Nodes Window . . . . . . . . . . . . . . . . . . . . . . . . . . . . . . . . . . . . . . . . . . 5–9 5 – 16 5 – 18 5 – 20 5 – 24 5 – 26 5 – 34 5 – 35 5 – 36 5 – 37 5 – 53 5 – 55 5 – 64 5 – 68 5 – 76 5 – 80 5 – 89 5 – 98 5 – 100 5 – 103 5 – 105 5 – 107 Oracle Applications Manager . . . . . . . . . . . . . . . . . . . . . . . . . . . . . Oracle Applications Management Tools . . . . . . . . . . . . . . . . . . . . . Oracle Management Pack for Oracle Applications . . . . . . . . . . . . Overview of Oracle Applications Manager . . . . . . . . . . . . . . . . . . Oracle Applications Manager . . . . . . . . . . . . . . . . . . . . . . . . . . . . . . Configuration for an Oracle Applications System . . . . . . . . . . . . Services . . . . . . . . . . . . . . . . . . . . . . . . . . . . . . . . . . . . . . . . . . . . . . . . . Work Shifts . . . . . . . . . . . . . . . . . . . . . . . . . . . . . . . . . . . . . . . . . . . . . Oracle Workflow Manager . . . . . . . . . . . . . . . . . . . . . . . . . . . . . . . . Background Engines . . . . . . . . . . . . . . . . . . . . . . . . . . . . . . . . . . . . . Notification Mailer . . . . . . . . . . . . . . . . . . . . . . . . . . . . . . . . . . . . . . . Agent Listeners . . . . . . . . . . . . . . . . . . . . . . . . . . . . . . . . . . . . . . . . . . Queue Propagation . . . . . . . . . . . . . . . . . . . . . . . . . . . . . . . . . . . . . . 6–1 6–2 6–3 6–5 6–7 6–8 6 – 21 6 – 35 6 – 37 6 – 40 6 – 44 6 – 56 6 – 58 5–8 Contents v Purging Workflow Data . . . . . . . . . . . . . . . . . . . . . . . . . . . . . . . . . . . Active Work Items . . . . . . . . . . . . . . . . . . . . . . . . . . . . . . . . . . . . . . . Deferred Work Items . . . . . . . . . . . . . . . . . . . . . . . . . . . . . . . . . . . . . Suspended Work Items . . . . . . . . . . . . . . . . . . . . . . . . . . . . . . . . . . . Errored Work Items . . . . . . . . . . . . . . . . . . . . . . . . . . . . . . . . . . . . . . 6 – 61 6 – 67 6 – 70 6 – 73 6 – 76 Index VOLUME 2 Chapter 7 Printers . . . . . . . . . . . . . . . . . . . . . . . . . . . . . . . . . . . . . . . . . . . . . . . . . Printers and Printing . . . . . . . . . . . . . . . . . . . . . . . . . . . . . . . . . . . . . Setting Up Your Printers . . . . . . . . . . . . . . . . . . . . . . . . . . . . . . . . . . Printer Setup with Pasta . . . . . . . . . . . . . . . . . . . . . . . . . . . . . . . . . . Customizing Printing Support in Oracle Applications . . . . . . . . . Hierarchy of Printer and Print Style Assignments . . . . . . . . . . . . Postscript Printing in UNIX . . . . . . . . . . . . . . . . . . . . . . . . . . . . . . . Printer Types Window . . . . . . . . . . . . . . . . . . . . . . . . . . . . . . . . . . . . Printers Window . . . . . . . . . . . . . . . . . . . . . . . . . . . . . . . . . . . . . . . . . Print Styles Window . . . . . . . . . . . . . . . . . . . . . . . . . . . . . . . . . . . . . . Printer Drivers Window . . . . . . . . . . . . . . . . . . . . . . . . . . . . . . . . . . Chapter 8 Oracle Applications Help . . . . . . . . . . . . . . . . . . . . . . . . . . . . . . . . 8 – 1 Customizing Oracle Applications Help . . . . . . . . . . . . . . . . . . . . . 8 – 2 Chapter 9 Applications DBA Duties . . . . . . . . . . . . . . . . . . . . . . . . . . . . . . . . Overview of Applications DBA Duties . . . . . . . . . . . . . . . . . . . . . . Resource Consumer Groups in Oracle Applications . . . . . . . . . . Oracle Applications Schema Password Change Utility (FNDCPASS) . . . . . . . . . . . . . . . . . . . . . . . . . . . . . . . . . . . . . . . . . . . . ORACLE Users Window . . . . . . . . . . . . . . . . . . . . . . . . . . . . . . . . . . Concurrent Conflicts Domains Window . . . . . . . . . . . . . . . . . . . . . Applications Window . . . . . . . . . . . . . . . . . . . . . . . . . . . . . . . . . . . . Network Test Window . . . . . . . . . . . . . . . . . . . . . . . . . . . . . . . . . . . . Administering Folders . . . . . . . . . . . . . . . . . . . . . . . . . . . . . . . . . . . . Languages Window . . . . . . . . . . . . . . . . . . . . . . . . . . . . . . . . . . . . . . Territories Window . . . . . . . . . . . . . . . . . . . . . . . . . . . . . . . . . . . . . . . vi Oracle Applications System Administrator’s Guide 7–1 7–2 7 – 11 7 – 13 7 – 24 7 – 31 7 – 37 7 – 39 7 – 41 7 – 43 7 – 46 9–1 9–2 9–7 9–9 9 – 13 9 – 17 9 – 19 9 – 22 9 – 24 9 – 28 9 – 30 Chapter 10 Cost–Based Optimization in Oracle Applications . . . . . . . . . . . Oracle Applications and Cost–Based Optimization . . . . . . . . . . . Parameters for Cost–Based Optimization . . . . . . . . . . . . . . . . . . . . Concurrent Programs for CBO . . . . . . . . . . . . . . . . . . . . . . . . . . . . . Gather Table Statistics . . . . . . . . . . . . . . . . . . . . . . . . . . . . . . . . . . . . Backup Table Statistics . . . . . . . . . . . . . . . . . . . . . . . . . . . . . . . . . . . . Restore Table Statistics . . . . . . . . . . . . . . . . . . . . . . . . . . . . . . . . . . . . Gather Schema Statistics . . . . . . . . . . . . . . . . . . . . . . . . . . . . . . . . . . Gather Column Statistics . . . . . . . . . . . . . . . . . . . . . . . . . . . . . . . . . . Gather All Column Statistics . . . . . . . . . . . . . . . . . . . . . . . . . . . . . . FND_STATS Package . . . . . . . . . . . . . . . . . . . . . . . . . . . . . . . . . . . . . FND_CTL Package . . . . . . . . . . . . . . . . . . . . . . . . . . . . . . . . . . . . . . . 10 – 1 10 – 2 10 – 3 10 – 9 10 – 10 10 – 12 10 – 13 10 – 14 10 – 15 10 – 16 10 – 17 10 – 32 Chapter 11 User Profiles . . . . . . . . . . . . . . . . . . . . . . . . . . . . . . . . . . . . . . . . . . . . Overview of Setting User Profiles . . . . . . . . . . . . . . . . . . . . . . . . . . User Profile Option Values Report . . . . . . . . . . . . . . . . . . . . . . . . . . System Profile Values Window . . . . . . . . . . . . . . . . . . . . . . . . . . . . . 11 – 1 11 – 2 11 – 5 11 – 6 Chapter 12 Administering Process Navigation . . . . . . . . . . . . . . . . . . . . . . . . Overview of Process Navigation . . . . . . . . . . . . . . . . . . . . . . . . . . . Modifying Your Menu . . . . . . . . . . . . . . . . . . . . . . . . . . . . . . . . . . . . Creating Process Navigator Processes . . . . . . . . . . . . . . . . . . . . . . . 12 – 1 12 – 2 12 – 3 12 – 4 Chapter 13 Document Sequences . . . . . . . . . . . . . . . . . . . . . . . . . . . . . . . . . . . . Document Sequences Window . . . . . . . . . . . . . . . . . . . . . . . . . . . . . Document Categories Window . . . . . . . . . . . . . . . . . . . . . . . . . . . . Sequence Assignments Window . . . . . . . . . . . . . . . . . . . . . . . . . . . 13 – 1 13 – 9 13 – 12 13 – 14 Chapter 14 Developer Tools . . . . . . . . . . . . . . . . . . . . . . . . . . . . . . . . . . . . . . . . . Developer Tools . . . . . . . . . . . . . . . . . . . . . . . . . . . . . . . . . . . . . . . . . Work Directory . . . . . . . . . . . . . . . . . . . . . . . . . . . . . . . . . . . . . . . . . . Web Enabled PL/SQL Window . . . . . . . . . . . . . . . . . . . . . . . . . . . . 14 – 1 14 – 2 14 – 3 14 – 5 Appendix A Profile Options in Oracle Application Object Library . . . . . . . A – 1 Appendix B Using Predefined Alerts . . . . . . . . . . . . . . . . . . . . . . . . . . . . . . . . . . Overview of Oracle Alert . . . . . . . . . . . . . . . . . . . . . . . . . . . . . . . . . Predefined Alerts . . . . . . . . . . . . . . . . . . . . . . . . . . . . . . . . . . . . . . . . Oracle Alert Precoded Alerts . . . . . . . . . . . . . . . . . . . . . . . . . . . . . . B–1 B–2 B–5 B – 10 Contents vii Appendix C Loaders . . . . . . . . . . . . . . . . . . . . . . . . . . . . . . . . . . . . . . . . . . . . . . . . . Generic Loader . . . . . . . . . . . . . . . . . . . . . . . . . . . . . . . . . . . . . . . . . . Application Object Library Configuration Files . . . . . . . . . . . . . . Concurrent Program Configuration File . . . . . . . . . . . . . . . . . . . . . Request Groups Configuration File . . . . . . . . . . . . . . . . . . . . . . . . . Lookups Configuration File . . . . . . . . . . . . . . . . . . . . . . . . . . . . . . . Profile Options and Profile Values Configuration File . . . . . . . . . Flexfields Setup Data Configuration File . . . . . . . . . . . . . . . . . . . . Attachments Setup Data Configuration File . . . . . . . . . . . . . . . . . Messages Configuration File . . . . . . . . . . . . . . . . . . . . . . . . . . . . . . . Security Information Configuration File . . . . . . . . . . . . . . . . . . . . . Message Dictionary Generator . . . . . . . . . . . . . . . . . . . . . . . . . . . . . Generic File Manager Access Utility (FNDGFU) . . . . . . . . . . . . . . Purge Obsolete Generic File Manager Data . . . . . . . . . . . . . . . . . . Appendix D Multilingual External Documents . . . . . . . . . . . . . . . . . . . . . . . . . D – 1 Multilingual External Documents . . . . . . . . . . . . . . . . . . . . . . . . . . D – 2 Appendix E Character Mode to GUI Appendix . . . . . . . . . . . . . . . . . . . . . . . . . E – 1 Oracle Applications Character Mode Forms and Corresponding GUI Windows . . . . . . . . . . . . . . . . . . . . . . . . . . . . . E – 2 Appendix F Implementation Appendix . . . . . . . . . . . . . . . . . . . . . . . . . . . . . . . F – 1 Setting Up Oracle Applications System Administrator . . . . . . . . F – 2 Appendix G Setting Up and Maintaining Oracle Applications . . . . . . . . . . . Setting Up and Maintaining Your Oracle Applications Configuration . . . . . . . . . . . . . . . . . . . . . . . . . . . . . . . . . . . . . . . . . . . Administering Oracle HTTP Server Powered by Apache . . . . . . Administering the TCF SocketServer . . . . . . . . . . . . . . . . . . . . . . . AdminAppServer Utility . . . . . . . . . . . . . . . . . . . . . . . . . . . . . . . . . . Support for Encrypted Thin JDBC Connections . . . . . . . . . . . . . . Administering Server Security . . . . . . . . . . . . . . . . . . . . . . . . . . . . . Restricting Access to Responsibilities Based on User’s Web Server . . . . . . . . . . . . . . . . . . . . . . . . . . . . . . . . . . . . . . . Application Object Library AOL/J Setup Test Suite . . . . . . . . . . . Configuring the Self–Service Framework . . . . . . . . . . . . . . . . . . . . viii Oracle Applications System Administrator’s Guide C–1 C–2 C – 12 C – 13 C – 15 C – 16 C – 18 C – 20 C – 24 C – 27 C – 28 C – 30 C – 32 C – 36 G–1 G–2 G – 14 G – 41 G – 44 G – 50 G – 51 G – 55 G – 57 G – 59 Concurrent Managers . . . . . . . . . . . . . . . . . . . . . . . . . . . . . . . . . . . . G – 66 Migrating an Oracle Applications Single Instance to Real Application Clusters (RAC) . . . . . . . . . . . . . . . . . . . . . . . . . . . G – 85 Behavior of Date Formats in NLS Implementations . . . . . . . . . . . G – 92 Appendix H Technology Stack Enabled Features . . . . . . . . . . . . . . . . . . . . . . . Oracle9i Application Server (9iAS) and Oracle Applications . . . Oracle Applications with Oracle9iAS Portal . . . . . . . . . . . . . . . . . Implementing Single Sign–On for Oracle Applications 11i with Login Server Authentication Using Oracle Internet Directory . . . . . . . . . . . . . . . . . . . . . . . . . . . . . . . . . . Discoverer 4i with Oracle Applications 11i . . . . . . . . . . . . . . . . . . Oracle9i Applications Server (9iAS) with Oracle E–Business Suite Related Documentation . . . . . . . . . . . . . . . . . . . . . . . . . . . . . . H–1 H–2 H–3 H–4 H – 21 H – 50 Glossary Index Contents ix x Oracle Applications System Administrator’s Guide Preface Preface xi Audience for This Guide Welcome to Release 11i of the Oracle Applications System Administrator’s Guide. This guide assumes you have a working knowledge of the principles and customary practices of your business area. If you have never used Applications we suggest you attend one or more of the Oracle Applications System Administration training classes available through Oracle Education. (See Other Information Sources for more information about Oracle training.) This guide also assumes that you are familiar with the Oracle Applications graphical user interface. To learn more about the Oracle Applications graphical user interface, read the Oracle Applications User’s Guide. See Other Information Sources for more information about Oracle Applications product information. How To Use This Guide This guide contains the information you need to understand and use Oracle Applications system administration. • Chapter 1 describes the job of an Oracle Applications System Administrator, and contrasts it with the job of an Oracle Database Administrator. • Chapter 2 explains how to secure access to the data and functionality within your Oracle Applications. • Chapter 3 explains how to audit your application users and the changes they effect on your application’s data. • Chapters 4 and 5 explain concurrent processing in Oracle Applications, including how you can manage programs running concurrently in the background while your users continue to perform online tasks and how to manage your concurrent programs and organize those programs into groups and sets. • Chapter 6 explains using printers with Oracle Applications. • Chapter 7 describes the help architecture for HTML as well as explaining how to customize Oracle Applications help. • Chapter 8 explains Oracle Applications security tasks that require a database administrator to either explicitly perform, or assist by performing prerequisite tasks. xii Oracle Applications System Administrator’s Guide • Chapter 9 describes how Cost–Based Optimization (CBO) is implemented in Oracle Applications. • Chapter 10 explains the role of user profiles in Oracle Applications. • Chapter 11 describes how to administer process navigation. • Chapter 12 explains how you can use document sequences and dynamic currency with your Oracle Applications. • Chapter 13 describes some of the tools an Oracle Applications developer can use. The Appendixes provide a reference source about the default menus, user profile options, runtime Alerts, and loaders included with Oracle System Administration. Also, one appendix lists the supported multilingual external documents in Oracle Applications. Finally, there are also appendixes for setting up Oracle Applications and implementing Oracle System Administration. Documentation Accessibility Our goal is to make Oracle products, services, and supporting documentation accessible, with good usability, to the disabled community. To that end, our documentation includes features that make information available to users of assistive technology. This documentation is available in HTML format, and contains markup to facilitate access by the disabled community. Standards will continue to evolve over time, and Oracle Corporation is actively engaged with other market–leading technology vendors to address technical obstacles so that our documentation can be accessible to all of our customers. For additional information, visit the Oracle Accessibility Program Web site at http://www.oracle.com/accessibility/. Accessibility of Code Examples in Documentation JAWS, a Windows screen reader, may not always correctly read the code examples in this document. The conventions for writing code require that closing braces should appear on an otherwise empty line; however, JAWS may not always read a line of text that consists solely of a bracket or brace. Accessibility of Links to External Web Sites in Documentation This documentation may contain links to Web sites of other companies or organizations that Oracle Corporation does not own or control. Preface xiii Oracle Corporation neither evaluates nor makes any representations regarding the accessibility of these Web sites. Other Information Sources You can choose from many sources of information, including online documentation, training, and support services, to increase your knowledge and understanding of Oracle Applications system administration. If this guide refers you to other Oracle Applications documentation, use only the Release 11i versions of those guides. Online Documentation All Oracle Applications documentation is available online (HTML or PDF). • Online Help – The new features section in the HTML help describes new features in 11i. This information is updated for each new release of Oracle Applications. The new features section also includes information about any features that were not yet available when this guide was printed. For example, if your administrator has installed software from a mini–pack or an upgrade, this document describes the new features. Online help patches are available on OracleMetaLink. • 11i Features Matrix – This document lists new features available by patch and identifies any associated new documentation. The new features matrix document is available on OracleMetaLink. • Readme File – Refer to the readme file for patches that you have installed to learn about new documentation or documentation patches that you can download. Related User’s Guides You can read the guides online by choosing Library from the expandable menu on your HTML help window, by reading from the Oracle Applications Document Library CD included in your media pack, or by using a Web browser with a URL that your system administrator provides. If you require printed guides, you can purchase them from the Oracle Store at http://oraclestore.oracle.com. xiv Oracle Applications System Administrator’s Guide Guides Related to All Products Oracle Applications User’s Guide This guide explains how to enter data, query, run reports, and navigate using the graphical user interface (GUI) available with this release of Oracle Applications. This guide also includes information on setting user profiles, as well as running and reviewing reports and concurrent processes. You can access this user’s guide online by choosing ”Getting Started with Oracle Applications” from any Oracle Applications help file. Installation and System Administration Oracle Applications Concepts This guide provides an introduction to the concepts, features, technology stack, architecture, and terminology for Oracle Applications Release 11i. It provides a useful first book to read before an installation of Oracle Applications. This guide also introduces the concepts behind Applications–wide features such as Business Intelligence (BIS), languages and character sets, and Self–Service Web Applications. Installing Oracle Applications This guide provides instructions for managing the installation of Oracle Applications products. In Release 11i, much of the installation process is handled using Oracle Rapid Install, which minimizes the time to install Oracle Applications, the Oracle8 technology stack, and the Oracle8i Server technology stack by automating many of the required steps. This guide contains instructions for using Oracle Rapid Install and lists the tasks you need to perform to finish your installation. You should use this guide in conjunction with individual product user’s guides and implementation guides. Upgrading Oracle Applications Refer to this guide if you are upgrading your Oracle Applications Release 10.7 or Release 11.0 products to Release 11i. This guide describes the upgrade process and lists database and product–specific upgrade tasks. You must be either at Release 10.7 Preface xv (NCA, SmartClient, or character mode) or Release 11.0, to upgrade to Release 11i. You cannot upgrade to Release 11i directly from releases prior to 10.7. Maintaining Oracle Applications Use this guide to help you run the various AD utilities, such as AutoUpgrade, AutoPatch, AD Administration, AD Controller, AD Relink, License Manager, and others. It contains how–to steps, screenshots, and other information that you need to run the AD utilities. This guide also provides information on maintaining the Oracle applications file system and database. Oracle Alert User’s Guide This guide explains how to define periodic and event alerts to monitor the status of your Oracle Applications data. Oracle Applications Developer’s Guide This guide contains the coding standards followed by the Oracle Applications development staff. It describes the Oracle Application Object Library components needed to implement the Oracle Applications user interface described in the Oracle Applications User Interface Standards for Forms–Based Products. It also provides information to help you build your custom Oracle Forms Developer 6i forms so that they integrate with Oracle Applications. Other Implementation Documentation Oracle Applications Product Update Notes Use this guide as a reference for upgrading an installation of Oracle Applications. It provides a history of the changes to individual Oracle Applications products between Release 11.0 and Release 11i. It includes new features, enhancements, and changes made to database objects, profile options, and seed data for this interval. Multiple Reporting Currencies in Oracle Applications If you use the Multiple Reporting Currencies feature to record transactions in more than one currency, use this manual, which details additional steps and setup considerations for implementing multiple reporting currencies. xvi Oracle Applications System Administrator’s Guide Multiple Organizations in Oracle Applications This guide describes how to set up and use various Oracle Applications products with Oracle Applications’ Multiple Organization support feature, so you can define and support different organization structures when running a single installation of a product. Oracle Workflow Guide This guide explains how to define new workflow business processes as well as customize existing Oracle Applications–embedded workflow processes. You also use this guide to complete the setup steps necessary for any Oracle Applications product that includes workflow–enabled processes. Oracle Applications Flexfields Guide This guide provides flexfields planning, setup and reference information for the Oracle Applications implementation team, as well as for users responsible for the ongoing maintenance of Oracle Applications product data. This manual also provides information on creating custom reports on flexfields data. Oracle eTechnical Reference Manuals Each eTechnical Reference Manual (eTRM) contains database diagrams and a detailed description of database tables, forms, reports, and programs for a specific Oracle Applications product. This information helps you convert data from your existing applications, integrate Oracle Applications data with non–Oracle applications, and write custom reports for Oracle Applications products. Oracle eTRM is available on OracleMetalink. Oracle Applications User Interface Standards for Forms–Based Products This guide contains the user interface (UI) standards followed by the Oracle Applications development staff. It describes the UI for the Oracle Applications products and how to apply this UI to the design of an application built by using Oracle Forms. Preface xvii Oracle Applications Message Reference Manual This manual describes all Oracle Applications messages. This manual is available in HTML format on the documentation CD–ROM for Release 11i. Training and Support Training Oracle offers a complete set of training courses to help you and your staff master Oracle Applications and reach full productivity quickly. These courses are organized into functional learning paths, so you take only those courses appropriate to your job or area of responsibility. You have a choice of educational environments. You can attend courses offered by Oracle University at any one of our many Education Centers, you can arrange for our trainers to teach at your facility, or you can use Oracle Learning Network (OLN), Oracle University’s online education utility. In addition, Oracle training professionals can tailor standard courses or develop custom courses to meet your needs. For example, you may want to use your organization structure, terminology, and data as examples in a customized training session delivered at your own facility. Support From on–site support to central support, our team of experienced professionals provides the help and information you need to keep Oracle Applications working for you. This team includes your Technical Representative and Account Manager, and Oracle’s large staff of consultants and support specialists with expertise in your business area, managing an Oracle8i server, and your hardware and software environment. Do Not Use Database Tools to Modify Oracle Applications Data Oracle STRONGLY RECOMMENDS that you never use SQL*Plus, Oracle Data Browser, database triggers, or any other tool to modify Oracle Applications data unless otherwise instructed. Oracle provides powerful tools you can use to create, store, change, retrieve, and maintain information in an Oracle database. But if you use Oracle tools such as SQL*Plus to modify Oracle Applications data, you xviii Oracle Applications System Administrator’s Guide risk destroying the integrity of your data and you lose the ability to audit changes to your data. Because Oracle Applications tables are interrelated, any change you make using Oracle Applications can update many tables at once. But when you modify Oracle Applications data using anything other than Oracle Applications, you may change a row in one table without making corresponding changes in related tables. If your tables get out of synchronization with each other, you risk retrieving erroneous information and you risk unpredictable results throughout Oracle Applications. When you use Oracle Applications to modify your data, Oracle Applications automatically checks that your changes are valid. Oracle Applications also keeps track of who changes information. If you enter information into database tables using database tools, you may store invalid information. You also lose the ability to track who has changed your information because SQL*Plus and other database tools do not keep a record of changes. About Oracle Oracle Corporation develops and markets an integrated line of software products for database management, applications development, decision support, and office automation, as well as Oracle Applications, an integrated suite of more than 160 software modules for financial management, supply chain management, manufacturing, project systems, human resources and customer relationship management. Oracle products are available for mainframes, minicomputers, personal computers, network computers and personal digital assistants, allowing organizations to integrate different computers, different operating systems, different networks, and even different database management systems, into a single, unified computing and information resource. Oracle is the world’s leading supplier of software for information management, and the world’s second largest software company. Oracle offers its database, tools, and applications products, along with related consulting, education, and support services, in over 145 countries around the world. Preface xix Your Feedback Thank you for using Oracle Applications and this user’s guide. Oracle values your comments and feedback. At the end of this guide is a Reader’s Comment Form you can use to explain what you like or dislike about Oracle Applications system administration or this user’s guide. Mail your comments to the following address or call us directly at (650) 506–7000. Oracle Applications Documentation Manager Oracle Corporation 500 Oracle Parkway Redwood Shores, CA 94065 U.S.A. Or, send electronic mail to [email protected]. xx Oracle Applications System Administrator’s Guide CHAPTER 1 What Is System Administration? T his chapter briefly describes the job of an Oracle Applications System Administrator, and contrasts it with the job of an Oracle Database Administrator. What Is System Administration? 1–1 What Is System Administration? A System Administrator is a person responsible for controlling access to Oracle Applications and assuring smooth ongoing operation. Each site where Oracle Applications is installed needs a system administrator to perform tasks such as: • Managing and controlling security. Decide which users have access to each application, and within an application, which forms, functions, and reports a user can access. • Setting up new users. Register new Oracle Applications users, and give them access to only those forms, functions, and reports they need to do their jobs. • Auditing user activity. Monitor what users are doing and when they do it. Choose who to audit and what type of data to audit. • Setting user profiles. A user profile is a set of changeable options that affects the way Oracle Applications look and behave. A System Administrator can set user profile values at the site, application, responsibility, and user levels. • Managing concurrent processing. Concurrent Processing is an Oracle Applications facility that lets long–running, data–intensive tasks run simultaneously with online operations, taking full advantage of multitasking and parallel processing. A System Administrator can monitor and control concurrent processing using a few simple forms. System vs. Database Administrator You can think of Oracle Applications as having two sides: a front end that users see and work with, and a back end where data manipulation is performed. The natural division between user applications and the underlying database structures results in two separate job functions: system administrator, and database administrator. An Oracle Applications System Administrator administers the user interface or applications side of Oracle Applications. An Oracle Database Administrator (DBA) administers the data that users enter, update, and delete while using Oracle Applications. 1–2 Oracle Applications System Administrator’s Guide CHAPTER 2 Managing Oracle Applications Security T his chapter explains how to secure access to the data and functionality within your Oracle Applications. The key element in Oracle Applications security is the definition of a responsibility. A responsibility defines: • Application database privileges • An application’s functionality that is accessible • The concurrent programs and reports that are available As System Administrator you define application users, and assign one or more responsibilities to each user. This chapter begins with an essay explaining security in Oracle Applications. Afterwards, major topics are explained in greater detail, along with descriptions of the forms you use to implement security in Oracle Applications. Some topics will refer you to other chapters which contain more detailed information, as well as relevant form descriptions. Managing Oracle Applications Security 2–1 Overview of Oracle Applications Security As System Administrator, you define Oracle Applications users, and assign one or more responsibilities to each user. Defining Application Users You allow a new user to sign–on to Oracle Applications by defining an application user. An application user has a username and a password. You define an initial password, then the first time the application user signs on, they must enter a new (secret) password. When you define an application user, you assign to the user one or more responsibilities. If you assign only one responsibility, the user, after signing on, immediately enters an application. If you assign two or more responsibilities, the user, after signing on, sees a window listing available responsibilities. Responsibilities define Application Privileges A responsibility is a level of authority in Oracle Applications that lets users access only those Oracle Applications functions and data appropriate to their roles in an organization. Each responsibility allows access to: • A specific application or applications, such as Oracle General Ledger or Oracle Planning. • A set of books, such as U.S. Operations or German Sales or an organization, such as New York Manufacturing or New York Distribution. • A restricted list of windows that a user can navigate to; for example, a responsibility may allow certain Oracle Planning users to enter forecast items, but not enter master demand schedule items. • A restricted list of functions a user can perform. For example, two responsibilities may have access to the same window, but one responsibility’s window may have additional function buttons that the other responsibility’s window does not have. • Reports in a specific application; as system administrator, you can assign groups of reports to one or more responsibilities, so the responsibility a user choose determines the reports that can be submitted. Each user has at least one or more responsibilities and several users can share the same responsibility. A system administrator can assign users 2–2 Oracle Applications System Administrator’s Guide any of the standard responsibilities provided with Oracle Applications, or create new custom responsibilities. HRMS Security The Human Resources Management Systems (HRMS) products have an additional feature using Security Groups. For more information, see Setting up Security for Applications Using Some HRMS Windows. The Human Resources Management Systems (HRMS) products have an additional feature using Security Groups. For more information, see Customizing, Reporting, and System Administration in Oracle HRMS. Managing Oracle Applications Security 2–3 Defining a Responsibility When you define a responsibility, you assign to it some or all of the components described below: Data Group (required) A Data Group defines the mapping between Oracle Applications products and ORACLE IDs. A Data Group determines which Oracle database accounts a responsibility’s forms, concurrent programs, and reports connect to. See: Defining Data Groups: page 4 – 30. Request Security Group (optional) A request security group defines the concurrent programs, including requests and request sets, that may be run by an application user under a particular responsibility. See: Defining a Request Security Group: page 2 – 6. See: Organizing Programs into Request Groups: page 4 – 19. Menu (required) A menu is a hierarchical arrangement of application functions (forms) that displays in the Navigate window. Menus can also point to non–form functions (subfunctions) that do not display in the Navigate window, but that define the range of application functionality available for a responsibility. Each responsibility is associated with a menu. See: Overview of Function Security: page 2 – 22. Function and Menu Exclusions (optional) A responsibility may optionally have function and menu exclusion rules associated with it to restrict the application functionality enabled for that responsibility. See: Overview of Function Security: page 2 – 22. Additional Notes About Responsibilities Predefined Responsibilities All Oracle Applications products are installed with predefined responsibilities. Consult the reference guide for your Oracle Applications product for the names of those predefined responsibilities. Additionally, instances of the major components that help define a responsibility (data groups, request security groups, menus, and functions) are predefined for Oracle Applications. Responsibilities and Request Security Groups When a request group is assigned to a responsibility, it becomes a request security group. From a standard submission form, such as the Submit Requests form, users can run only the reports, concurrent programs, and request sets that are in their responsibility’s request security group. 2–4 Oracle Applications System Administrator’s Guide • If you do not include the Submit Requests form on the menu for a responsibility, then you do not need to assign a request security group to the responsibility. • If a request security group is not assigned to a responsibility, then users working under that responsibility cannot run any reports, request sets, or other concurrent programs from a standard submission form. Responsibilities and Function Security Oracle Applications GUI–based architecture aggregates several related business functions into a single form. Parts of an application’s functionality may be identified as individual Oracle Applications functions, which can then be secured (i.e., included or excluded from a responsibility). See: Overview of Function Security: page 2 – 22 Managing Oracle Applications Security 2–5 Defining a Request Security Group Beyond this short introduction, request groups and request security groups are discussed in greater detail, as part of a broader range of topics not necessarily limited to application security, in Chapter 7 – Managing Concurrent Programs and Reports. See: Organizing Programs into Request Groups: page 4 – 19 Request Groups: page 4 – 59 Using Request Security You use request security to specify the reports, request sets, and concurrent programs that your users can run from a standard submission form, such as the Submit Requests form. To set up request security, you define a request group using the Request Groups form. Using the Responsibilities form, you assign the request group to a responsibility. The request group is then referred to as a request security group. See: Request Security Groups: page 4 – 19. You can define a request group to contain single requests, request sets, or all the requests and request sets in an application. If you choose to include all the requests and requests sets in an application, the user has automatic access to any new requests and request sets (without owners) in the future. A request security group can contain requests and request sets from different applications. If you want to define request security groups that own requests from different applications, please refer to the discussion on Data Groups. See: Defining Data Groups: page 4 – 30. Note: A request security group or request group is not the same as a security group. Individual Requests and Request Sets Reports or concurrent programs that are not included in a request security group on an individual basis, but that do belong to a request set included in a request security group, have the following privileges: • Users cannot use the Submit Requests form to run single requests and request sets that are not in their responsibility’s request security group. • Users can, however, run request sets that contain requests that are not in their request security group, if the request set is in their request security group. 2–6 Oracle Applications System Administrator’s Guide If you assign a request set, but not the requests in the set, to a request security group, the user: • cannot edit request information in the request set definition • cannot stop specific requests in the set from running • can edit the request set by deleting requests from it or adding other requests to it, only if the user is the assigned owner of the request set The Request Security Groups figure illustrates the relationship between a request security group, application user, and a responsibility. Managing Oracle Applications Security 2–7 Request Security Groups Reports Request sets System Administrator groups reports, request sets, and concurrent programs together to create a Request Group. Request Group When the System Administrator assigns the Request Group to a responsibility, it becomes a Request Security Group. Responsibility Concurrent Programs System Administrator assigns the responsibility to a user. User Request Security Group User signs on and selects the responsibility. Reports Responsibility Request Sets Concurrent Programs The standard submission report form (e.g., Submit Requests) lists reports, request sets, and concurrent programs belonging to the responsibility’s Request Security Group. 2–8 Oracle Applications System Administrator’s Guide User Session Limits Using the following profile options you can specify limits on user sessions. ICX:Session Timeout Use this profile option to enforce an inactivity time–out. If a user performs no Oracle Applications operation for a time period longer than the time–out value (specified in minutes), the user’s session is disabled. The user is provided an opportunity to re–authenticate and re–enable a timed–out session. If re–authentication is successful, the session is re–enabled and no work is lost. Otherwise, Oracle Applications exits without saving pending work. If this profile option to 0 or NULL, then user sessions will never time out due to inactivity. ICX: Limit time Use this profile option to specify the absolute maximum length of time (in hours) of any user session, active or inactive. ICX: Limit connect Use this profile option to specify the absolute maximum number of connection requests a user can make in a single session. See Also Profile Options in Oracle Application Object Library: page A – 2 Managing Oracle Applications Security 2–9 Responsibilities Window Use this window to define a responsibility. Each application user is assigned at least one responsibility. A responsibility determines if the user accesses Oracle Applications or Oracle Self–Service Web Applications, which applications functions a user can use, which reports and concurrent programs the user can run, and which data those reports and concurrent programs can access. Note: Responsibilities cannot be deleted. To remove a responsibility from use, set the Effective Date’s To field to a past date. You must restart Oracle Applications to see the effect of your change. 2 – 10 Oracle Applications System Administrator’s Guide See: Overview of Function Security: page 2 – 22 Prerequisites • Use the Data Groups window to list the ORACLE username your responsibility’s concurrent programs reference on an application–by–application basis. • Use the Request Groups window to define the Request Group you wish to make available with this responsibility. • Use the Menus window to view the predefined Menu you could choose to assign to this responsibility. Responsibilities Block An application name and a responsibility name uniquely identify a responsibility. Responsibility Name If you have multiple responsibilities, a pop–up window includes this name after you sign on. Application This application name does not prevent the user of this responsibility from accessing other applications’ forms and functions if you define the menu to access other applications. Responsibility Key This is a unique name for a responsibility that is used by loader programs. Loaders are concurrent programs used to ”load” such information as messages, user profiles and user profile values into your Oracle Applications tables. To help ensure that your responsibility key is unique throughout your system, begin each Responsibility Key name with the application short name associated with this responsibility. Effective Dates From/To Enter the start/end dates on which the responsibility becomes active/inactive. The default value for the start date is the current date, Managing Oracle Applications Security 2 – 11 and if you do not enter an end date, the responsibility is valid indefinitely. You cannot delete a responsibility because its information helps to provide an audit trail. You can deactivate a responsibility at any time by setting the end date to the current date. If you wish to reactivate the responsibility, change the end date to a date after the current date, or clear the end date. Available From A responsibility may be associated with only one applications system. Select between Oracle Self–Service Web Applications or Oracle Applications. Data Group Name/Application The data group defines the pairing of application and ORACLE username. Select the application whose ORACLE username forms connect to when you choose this responsibility. The ORACLE username determines the database tables and table privileges accessible by your responsibility. Transaction managers can only process requests from responsibilities assigned the same data group as the transaction manager. Menu The menu whose name you enter must already be defined with Oracle Applications. See: Menus: page 2 – 38. Web Host Name If your Web Server resides on a different machine from your database, you must designate the host name (URL) here. Otherwise, the Web Host Name defaults to the current database host server. Web Agent Name Enter the PL/SQL Agent Name for the database used by this responsibility. If you do not specify an Agent Name, the responsibility defaults to the agent name current at log–on. 2 – 12 Oracle Applications System Administrator’s Guide Request Group Name/Application If you do not assign a request security group to this responsibility, a user with this responsibility cannot run requests, request sets, or concurrent programs from the Submit Requests window, except for request sets owned by the user. The user can access requests from a Submit Requests window you customize with a request group code through menu parameters. See: Overview of Oracle Applications Security: page 2 – 2 Customizing the Submit Requests Window Using Codes: page 4 – 20 Request Groups: page 4 – 59 Menu Exclusions Block Define function and menu exclusion rules to restrict the application functionality accessible to a responsibility. Type Select either Function or Menu as the type of exclusion rule to apply against this responsibility. • When you exclude a function from a responsibility, all occurrences of that function throughout the responsibility’s menu structure are excluded. • When you exclude a menu, all of its menu entries, that is, all the functions and menus of functions that it selects, are excluded. Name Select the name of the function or menu you wish to exclude from this responsibility. The function or menu you specify must already be defined in Oracle Applications. Managing Oracle Applications Security 2 – 13 Self–Service Applications Security Oracle Self–Service Web Applications uses columns, rows and values in database tables to define what information users can access. Table columns represent ”attributes” that can be assigned to a responsibility as Securing Attributes or Excluded Attributes. These attributes are defined in the Web Application Dictionary. See Also Data Security: (Oracle Self–Service Applications for the Web User’s Guide) Defining Attributes: (Oracle Self–Service Applications for the Web User’s Guide) Excluded Items Use the List of Values to select valid attributes. You can assign any number of Excluded Attributes to a responsibility. Securing Attributes Use the List of Values to select valid attributes. You may assign any number of securing attributes to the responsibility. 2 – 14 Oracle Applications System Administrator’s Guide Overview of Security Groups Security Groups are used by Oracle HRMS only. Security groups allows for data to be partitioned in a single installation. A single installation can use a particular set of configuration data, but store data for multiple clients, where the data is partitioned by security groups. A user with an assignment of one security group can only access data within that security group. A security group represents a distinct client or business entity. Data that must be distinct for each client in an installation is partitioned by security group. All other data is shared across all security groups. Security is maintained at the level of responsibility/security group pairs. That is, users are assigned specific responsibilities within each security group. A user may be assigned a global responsibility that is valid in all security groups. When signing on to Oracle Applications, a user, if assigned more than one responsibility, will be asked to choose a responsibility and security group pair. Partitioned data accessed through security group sensitive views will show only data assigned to the current security group. Defining Security Groups Every installation will have a single ”Standard” security group seeded in. If no other security groups are created, this single group will be hidden from users when they sign on. In the Users form, you assign a security group when you assign a responsibility. See Also Customizing, Reporting, and System Administration in Oracle HRMS Managing Oracle Applications Security 2 – 15 Security Groups Window This form is for HRMS security only. For more information on setting up system administration for the HRMS products, see Customizing, Reporting, and System Administration in Oracle HRMS. 2 – 16 Oracle Applications System Administrator’s Guide Users Window Use this window to define an application user. An application user is an authorized user of Oracle Applications and/or Oracle Self–Service Applications who is uniquely identified by an application username. Once defined, a new application user can sign on to Oracle Applications and access data through Oracle Applications windows. See: Overview of Oracle Applications Security: page 2 – 2. Managing Oracle Applications Security 2 – 17 Users Block User Name Enter the name of an application user. An application user enters this username to sign on to Oracle Applications. • The username must not contain more than one word. • You should use only alphanumeric characters (’A’ through ’Z’, and ’0’ through ’9’) in the username. Please note that you must limit your username to the set of characters that your operating system supports for filenames. Suggestion: We recommend that you define meaningful usernames, such as the employee’s first initial followed by their last name. Or, for a group account, you can define the application username so as to indicate the purpose or nature of the group account. Password Enter the initial password of an application user. An application user enters this password along with her or his username to sign on to Oracle Applications. • A password must be at least five (5) characters and can be up to thirty (30) characters. • All characters are allowed except control characters, which are non–printable. Oracle encourages the use of non–alphanumeric characters because they add complexity, making passwords harder to guess. This window does not display the password you enter. After you enter a password, you must re–enter it to ensure you did not make a typing error. If the application user already exists and the two entries do not match, the original password is NOT changed, and you navigate automatically to the next field. If you are defining a new application user and the two entries do not match, you are required to enter the password again. For a new user, you cannot navigate to the next field until the two entries match. The first time an application user signs on, they must change his or her password. If a user forgets their password, you can reassign a new password in this field. 2 – 18 Oracle Applications System Administrator’s Guide As System Administrator, you can set an initial password or change an existing password, but you cannot access the user’s chosen password. You can set the minimum length of Oracle Applications user passwords using the profile option Signon Password Length. If this profile option is left unset, the minimum length defaults to 5. You can set the minimum number of days that a user must wait before being allowed to reuse a password with the Signon Password No Reuse profile option. You can use the profile option Signon Password Hard to Guess to set rules for choosing passwords to ensure that they will be ”hard to guess.” A password is considered hard-to-guess if it follows these rules: • The password contains at least one letter and at least one number. • The password does not contain the username. • The password does not contain repeating characters. For more information on these profile options, see: Profile Options in Oracle Application Object Library page: A – 2. Person, Customer, and Supplier Use these fields to enter the name of an employee (person), customer, or supplier contact. Enter the last name and first name, separated by a comma, of the employee, customer, or supplier who is using this application username and password. Use the List of Values to select a valid name. E–Mail/Fax Enter the E–mail address and/or fax number for this user. Password Expiration Days Enter the maximum number of days between password changes. A pop–up window prompts an application user to change her or his password after the maximum number of days you specify has elapsed. Accesses Enter the maximum allowed number of sign–ons to Oracle Applications allowed between password changes. A pop–up window Managing Oracle Applications Security 2 – 19 prompts an application user to change her or his password after the maximum number of accesses you specify has elapsed. Suggestion: We recommend that you require application users to make frequent password changes. This reduces the likelihood of unauthorized access to Oracle Applications. Effective Dates From/To The user cannot sign onto Oracle Applications before the start date and after the end date. The default for the start date is the current date. If you do not enter an end date, the username is valid indefinitely. You cannot delete an application user from Oracle Applications because this information helps to provide an audit trail. You can deactivate an Oracle Applications user at any time by setting the End Date to the current date. If you wish to reactivate a user, change the End Date to a date after the current date, or clear the End Date field. Responsibilities Block Responsibility Select the name of a responsibility you wish to assign to this application user. A responsibility is uniquely identified by application name and responsibility name. Security Group This field is for HRMS security only. See: Customizing, Reporting, and System Administration in Oracle HRMS. From/To You cannot delete a responsibility because this information helps to provide an audit trail. You can deactivate a user’s responsibility at any time by setting the End Date to the current date. If you wish to reactivate the responsibility for the user, change the End Date to a date after the current date, or clear the End Date. 2 – 20 Oracle Applications System Administrator’s Guide Securing Attributes Securing attributes are used by Oracle Self–Service Web Applications to allow rows (records) of data to be visible to specified users or responsibilities based on the specific data (attribute values) contained in the row. You may assign one or more values for any of the securing attributes assigned to the user. If a securing attribute is assigned to both a responsibility and to a user, but the user does not have a value for that securing attribute, no information is returned for that attribute. For example, to allow a user in the ADMIN responsibility to see rows containing a CUSTOMER_ID value of 1000, assign the securing attribute of CUSTOMER_ID to the ADMIN responsibility. Then give the user a security attribute CUSTOMER_ID value of 1000. When the user logs into the Admin responsibility, the only customer data they have access to has a CUSTOMER_ID value of 1000. Attribute Select an attribute you want used to determine which records this user can access. You can select from any of the attributes assigned to the user’s responsibility. Value Enter the value for the attribute you want used to determine which records this user can access. Managing Oracle Applications Security 2 – 21 Overview of Function Security Function security is the mechanism by which user access to applications functionality is controlled. Oracle Applications GUI–based architecture aggregates several related business functions into a single form. Because all users should not have access to every business function in a form, Oracle Applications provides the ability to identify pieces of applications logic as functions. When part of an application’s functionality is identified as a function, it can be secured (i.e., included or excluded from a responsibility). Application developers register functions when they develop forms. A System Administrator administers function security by creating responsibilities that include or exclude particular functions. Terms Function A function is a part of an application’s functionality that is registered under a unique name for the purpose of assigning it to, or excluding it from, a responsibility. There are two types of functions: form functions, and non–form functions. For clarity, we refer to a form function as a form, and a non–form function as a subfunction, even though both are just instances of functions in the database. Form (Form Function) A form function (form) invokes an Oracle Forms form. Form functions have the unique property that you may navigate to them using the Navigate window. Subfunction (Non–Form Function) A non–form function (subfunction) is a securable subset of a form’s functionality: in other words, a function executed from within a form. A developer can write a form to test the availability of a particular subfunction, and then take some action based on whether the subfunction is available in the current responsibility. Subfunctions are frequently associated with buttons or other graphical elements on forms. For example, when a subfunction is enabled, the corresponding button is enabled. 2 – 22 Oracle Applications System Administrator’s Guide However, a subfunction may be tested and executed at any time during a form’s operation, and it need not have an explicit user interface impact. For example, if a subfunction corresponds to a form procedure not associated with a graphical element, its availability is not obvious to the form’s user. Figure 2 – 1 Subfunctions are executed from within a Form. Form Function Window Subfunction For example, logic executed by pressing a Button. Copy Menu A menu is a hierarchical arrangement of functions and menus of functions. Each responsibility has a menu assigned to it. Menu Entry A menu entry is a menu component that identifies a function or a menu of functions. In some cases, both a function and a menu of functions correspond to the same menu entry. For example, both a form and its menu of subfunctions can occupy the same menu entry. Responsibility A responsibility defines an application user’s current privileges while working with Oracle Applications. When an application user signs on, they select a responsibility that grants certain privileges, specifically: Managing Oracle Applications Security 2 – 23 • The functions that the user may access. Functions are determined by the menu assigned to the responsibility. • The concurrent programs, such as reports, that the user may run. • The application database accounts that forms, concurrent programs, and reports connect to. Forms and Subfunctions A form is a special class of function that differs from a subfunction in two ways: • Forms appear in the Navigate window and can be navigated to. Subfunctions do not appear in the Navigate window and cannot be navigated to. • Forms can exist on their own. Subfunctions can only be called by logic embodied within a form; they cannot exist on their own. A form as a whole, including all of its program logic, is always designated as a function. Subsets of a form’s program logic can optionally be designated as subfunctions if there is a need to secure those subsets. For example, suppose that a form contains three windows. The entire form is designated as a function that can be secured (included or excluded from a responsibility.) Each of the form’s three windows can be also be designated as functions (subfunctions), which means they can be individually secured. Thus, while different responsibilities may include this form, certain of the form’s windows may not be accessible from each of those responsibilities, depending on how function security rules are applied. Functions, Menus, and the Navigate Window Form functions or forms are selected using the Navigate window. The arrangement of form names in the Navigate window is defined by the menu structure assigned to the current responsibility. The following types of menu entries are not displayed by the Navigate window: • Subfunctions • Menus without Entries 2 – 24 Oracle Applications System Administrator’s Guide • Menu Entries without a Prompt If none of the entries on a menu are displayed by the Navigate window, the menu itself is not displayed. Menu Entries with a Submenu and Functions If a menu entry has both a submenu and a function defined on the same line, then the behavior depends on whether or not the function is executable. If it is executable, then the submenu on the same line is treated as content to be rendered by the function. The submenu will not appear on a navigation tree, but will be available in function security tests (FND_FUNCTION.TEST calls). If the function is not executable, then it is treated as a ”tag” for enforcing exclusion rules, and the submenu on the same line is displayed in the navigation tree. A function is considered executable if it can be executed directly from the current running user interface. For example, an Oracle Applications form using Oracle Forms is an executable function from within Oracle Forms, but not within the Self Service applications. How Function Security Works Developers Register Functions • Developers can require parts of their Oracle Forms code to look up a unique function name, and then take some action based on whether the function is available in the current responsibility. • Developers register functions. They can also register parameters that pass values to a function. For example, a form may support data entry only when a function parameter is passed to it. Warning: In general, System Administrators should not modify parameters passed to functions that are predefined as part of the Oracle Applications products. The few cases where function parameters may be modified by a System Administrator are documented in the relevant technical reference manual or product update notes. • Typically, developers define a menu including all the functions available in an application (i.e., all the forms and their securable subfunctions). For some applications, developers may define additional menus that restrict the application’s functionality by omitting specific forms and subfunctions. Managing Oracle Applications Security 2 – 25 • When developers define menus of functions, they typically group the subfunctions of a form on a subfunction menu they associate with the form. System Administrators Exclude Functions • Each Oracle Applications product is delivered with one or more predefined menu hierarchies. System Administrators can assign a predefined menu hierarchy to a responsibility. To tailor a responsibility, System Administrators exclude functions or menus of functions from that responsibility using exclusion rules. • If System Administrators cannot create the desired menu by applying exclusion rules to a predefined menu, they can define a new menu hierarchy. In this case, we recommend that they construct their menu hierarchy using forms and their associated menus of subfunctions. In other words, System Administrators should leave the developer–defined associations between forms and their menus intact. Available Functions Depend on the Current Responsibility • When a user first selects or changes their responsibility, a list of functions obtained from the responsibility’s menu structure is cached in memory. • Functions a System Administrator has excluded from the current responsibility are marked as unavailable. • Form functions in the function hierarchy (i.e., menu hierarchy) are displayed in the Navigate window. Available subfunctions are accessed by working with the application’s forms. Visibility of Excluded Functions Some subfunctions are associated with a graphical element, for example, a button, and their exclusion may result in: • the dimming of the button • the absence of the button. Other subfunctions may not correspond to a graphical element, and their exclusion may not be obvious to an end user. 2 – 26 Oracle Applications System Administrator’s Guide Figure 2 – 2 How Function Security Works Applications Code Developers design parts of an Application to look up and require a unique Function Name. System Administrators assign Functions to Menus to build a Function Hierarchy (Menu Structure). Function Security Function Name Parameters Function Name Parameters Function Name Parameters Function Name xyz Parameters Function Name Parameters Function Name Parameters Menu Menu Form Sub– function Menu Form Form Sub– function System Administrators assign the Menu Structure to a Responsibility, and may exclude Functions and Menus to customize the Responsibility. Sub– function Sub– function Users select a Responsibility and may access all of its Functions. However, non–form Functions do not appear in the Navigate window. Find Responsibilities Buyer Planner Manager Menu Form Form Menu Form Form Managing Oracle Applications Security 2 – 27 Implementing Function Security A ”full access” responsibility with a menu that includes all the functions in an application is predefined for each Oracle Applications product. Some applications may provide additional predefined responsibilities that include a smaller set of functions (i.e., fewer forms and subfunctions). As a System Administrator, you can restrict the functionality a responsibility provides by defining rules to exclude specific functions or menus of functions. In fact, we recommend that you use exclusion rules to customize a responsibility in preference to constructing a new menu hierarchy for that responsibility. For example, suppose you want to customize a responsibility to restrict the functionality of a form included in that responsibility. First, you examine the predefined menus that group the subfunctions associated with that form. Then, using exclusion rules, you can restrict the form’s functionality by excluding certain of the form’s subfunctions from the responsibility. If you cannot create the responsibility you need by applying exclusion rules, you may build a custom menu for that responsibility using predefined forms (i.e., form functions) and their associated menus of subfunctions. However, we recommend that you do not disassociate a form from its developer–defined menus of subfunctions. Securing Functions Using Predefined Menus Use the Responsibilities form to: • Limit a predefined responsibility’s functionality by excluding menus and functions from it. • Define a new responsibility and assign a predefined menu to it. Customize the new responsibility’s functionality by excluding menus and functions. • By assigning the same menu hierarchy to different responsibilities and excluding different functions and menus, you can easily customize an application’s functionality. Securing Functions Using New Menus Use the Menus form to define menus pointing to functions that you want to make available to a new responsibility. • Use forms and their associated menus of subfunctions to define new menus. 2 – 28 Oracle Applications System Administrator’s Guide Assign the menu structure to a new responsibility using the Responsibilities form. • For that responsibility, tailor a form’s functionality by excluding particular subfunctions. • By excluding a subfunction executed from within a form, the functionality of that form can be varied from one responsibility to another. • By applying exclusion rules to the predefined menus of subfunctions associated with a form, you can easily customize a form’s functionality. Excluding Functions from a Responsibility A system administrator may exclude functions or menus from the menu structure assigned to a responsibility. • When a menu is excluded, all of its menu entries, that is, all the functions and menus of functions that it selects, are excluded. • When you exclude a function from a responsibility, all occurrences of that function throughout the responsibility’s menu structure are excluded. Defining a New Menu Structure When defining a new menu structure: • Create a logical, hierarchical listing of functions. This allows for easy exclusion of functions when customizing the menu structure for different responsibilities. • Create a logical, hierarchical menu that guides users to their application forms. Tasks for Defining a Custom Menu Structure • Determine the application functionality required for different job responsibilities. • Identify predefined menus, forms, and form subfunctions to use as entries when defining a new menu. Understand predefined menus by printing Menu Reports using the Submit Requests window. Suggestion: To simplify your work, use predefined menus for your menu entries. You can exclude individual functions after a menu structure is assigned to a responsibility. Managing Oracle Applications Security 2 – 29 • Plan your menu structure. Sketch out your menu designs. • Define the lowest–level menus first. A menu must be defined before it can be selected as an entry on another menu. • Assign menus and functions to higher–level menus. • Assign menus and functions to a top–level menu (root menu). • Document your menu structure by printing a Menu Report. Warning: Start with a blank Menus form (blank screen). Menus cannot be copied. A menu saved under a different name overwrites the original menu (there is no “Save As” feature). Notes About Defining Menus Build Menus From Scratch • Menus cannot be copied. Menu definitions cannot be saved under a different name (i.e., there is no “Save As” capability). • When a menu name displays in the Menus form, be sure you are in Query mode before overwriting the menu’s name. Define Menus for Fast and Easy Keyboard Use • Design menu prompts with unique first letters, so typing the first letter automatically selects the form or menu • Design the sequence of menu prompts with the most frequently used functions first (i.e., lower sequence numbers). • Entries cannot be copied from one menu definition to another. Note when Changing Menu Names or Modifying Entries • When you change a menu’s name, the menu entries are not affected. The menu’s definition exists under the new name. • Other menus calling the menu by its old menu name automatically call the same menu by its new (revised) name. • When defining menus or selecting a ”root” menu to assign to a responsibility, the old menu name is not in a list of values. • When modifying a predefined menu, all other menus that call that menu display the menu’s modifications. • For example, if you modify GL_TOP by adding another prompt that calls a form function, all menus that call GL_TOP will display the additional prompt when GL_TOP displays. 2 – 30 Oracle Applications System Administrator’s Guide Menu Compilation The Compile Security (FNDSCMPI) concurrent program is used to compile menus so that the system can more quickly check if a particular function is available to a particular responsibility/menu. You should compile your menus after you make changes to your menu data. A request for this concurrent program is automatically submitted after you make changes using the Menus form. After you apply a patch that includes menu changes, you should also run this concurrent program. You can do this through the AD Administration utility. For more information, see: Maintaining Oracle Applications. See Also Menus Window: page 2 – 38 Compile Security Concurrent Program: page 2 – 44 Preserving Custom Menus Across Upgrades Preserve custom menus during upgrades of Oracle Applications by using unique names for your custom menus. For example, you can start the menu’s name with the application short name of a custom application. Define a custom application named Custom General Ledger, whose application short name is XXCGL. Define your custom menu names to start with XXCGL, for example, XXCGL_MY_MENU. Remember that the Oracle Applications standard menus may be overwritten with upgrade versions. Therefore, if you attached your custom menu as a submenu to one of the preseeded Oracle Applications menus, recreate the attachment to it following an upgrade. An alternative is to attach a standard Oracle Applications menu as a submenu to your custom menu; the link from your custom menu to the standard menu should survive the upgrade. Special Function for Oracle HRMS, Oracle Sales and Marketing In most Oracle Applications products, you can open multiple forms from the Navigator window without closing the form you already have open. However, when you define a new responsibility whose custom menu accesses Oracle Sales and Marketing forms, or Oracle HRMS task Managing Oracle Applications Security 2 – 31 flows, you must include the function Disable Multiform, Multisession as an entry on the responsibility’s top–level menu. You can identify an Oracle Sales and Marketing form by the OSM prefix contained in the form’s function name. In Oracle HRMS, a task flow is a method of linking windows so that you carry information from one window to the next, in sequence, to complete a task. You can identify an Oracle HRMS form that may be part of a task flow by the PER or PAY prefix in the form’s function name. For details on administering Oracle HRMS task flows, and on determining whether a form is part of a task flow, see: Linking Windows in Task Flows, Oracle Human Resources User’s Guide. ☞ Attention: You should not include the Disable Multiform, Multisession function on menus that do not include either Oracle Sales and Marketing or Oracle HRMS forms. To include the Disable Multiform, Multisession function on a menu: • Add a Function menu entry to the top–level menu (i.e., the menu referenced by your new responsibility). • Select the function whose User Function Name and Function Name are: – Disable Multiform, Multisession – FND_FNDSCSGN_DISABLE_MULTIFORM • Save your changes. Summary of Function Security Functions: • A function is a set of code in Oracle Applications that is executed only if the name of the function is present in a list maintained on a responsibility–by–responsibility basis. • Functions can be excluded from a responsibility by a System Administrator. • There are two types of function: a form function or form, and a non–form function or subfunction. A subfunction represents a securable subset of a form’s functionality. Form Functions: • A function that invokes a form. • Form functions appear in the Navigate window and can be navigated to. 2 – 32 Oracle Applications System Administrator’s Guide Subfunctions: • A function that is executed from within a form. Subfunctions can only be called by logic embodied within a Form Function. • Subfunctions do not appear in the Navigate window and cannot be navigated to. Menus: • Menus contain menu entries which point to a function, another menu, or a function and another menu. • Menus appear in the Navigate window. • Menus can be excluded from a responsibility by a System Administrator. See Also Function Security Reports: page 2 – 45 Managing Oracle Applications Security 2 – 33 Form Functions Window Define new functions. A function is a part of an application’s functionality that is registered under a unique name for the purpose of assigning it to, or excluding it from, a responsibility. There are two types of functions: form functions, and non–form functions. For clarity, we refer to a form function as a form, and a non–form function as a subfunction, even though both are just instances of functions in the database. Form Functions Block Function Users do not see this unique function name. However, you may use this name when calling your function programmatically. You should follow the naming conventions for functions. 2 – 34 Oracle Applications System Administrator’s Guide Description User Function Name Enter a unique name that describes your function. You see this name when assigning functions to menus. This name appears in the Top Ten List of the Navigator window. Type Type is a free-form description of the function’s use (function type will be validated in a future version of this form). A function’s type is passed back when a developer tests the availability of a function. The developer can write code that takes an action based on the function’s type. Standard function types include the following: FORM Oracle Applications form functions are registered with a type of FORM. Even if you do not register a form function with a type of FORM, Oracle Applications treats it as a form if you specify a valid Form Name/Application. SUBFUNCTION Subfunctions are added to menus (without prompts) to provide security functionality for forms or other functions. JSP Functions used for some products in the Oracle Self–Service Web Applications. These are typically JSP functions. WWW Functions used for some products in the Oracle Self–Service Web Applications. These are typically PL/SQL functions. WWK Functions used for some products in the Oracle Self–Service Web Applications. These are typically PL/SQL functions that open a new window. WWR or WWL Functions used for some products in the Oracle Self–Service Web Applications. WWJ OA Framework JSP portlet. SERVLET Servlet functions used for some products in the Oracle Self–Service Web Applications. DBPORTLET Database provider porlet. WEBPORTLET Web provider portlet. Managing Oracle Applications Security 2 – 35 Form Form /Application If you are defining a form function, select the name and application of your form. Parameters Enter the parameters you wish to pass to your function. Separate parameters with a space. For a form function, if you specify the parameter QUERY_ONLY=YES, the form opens in query–only mode. Oracle Application Object Library removes this parameter from the list of form parameters before opening the form in query–only mode. You can also specify a differnt form name to use when searching for help for a form in the appropriate help file. The syntax to use is: HELP_TARGET = ”alternative_form_name” Your form name overrides the name of the form. See: Help Targets in Oracle Applications: page 8 – 10. Some Oracle Applications forms are coded to accept particular form parameters. For example, the Submit Requests form accepts a TITLE parameter you can use to change the Submit Requests window title. The syntax you should use is: TITLE=”appl_short_name:message_name” where appl_shortname:message_name is the name of a Message Dictionary message. See: Customizing the Submit Requests Window using Codes: page 4 – 20. Warning: In general, System Administrators should not modify parameters passed to functions that are predefined as part of the Oracle Applications products. The few cases where function parameters may be modified by a System Administrator are documented in the relevant technical reference manual or product update notes. Web HTML and Web Host The fields in the Web HTML and Web Host are only required if your function will be accessed from Oracle Self–Service Web Applications. You do not need to enter any of these fields for functions based on Oracle Forms Developer forms. 2 – 36 Oracle Applications System Administrator’s Guide HTML Call The last section of your function URL is the HTML Call. The HTML Call is used to activate your function. The function may be either a static web page or a procedure. For functions used with Mobile Application Server, enter the full name of your your java class file, including <package name>.<class name>. The class name and package name are case sensitive. Mobile Application Server will try to load this class from the classpath as it is. For example, ’oracle.apps.mwa.demo.hello.HelloWorld’. Secured Secured is only required when your function is accessed by Oracle Workflow. Checking Secured enables recipients of a workflow E–Mail notification to respond using E–Mail. Encrypt Parameters Checking Encrypt Parameters adds a layer of security to your function to ensure that a user cannot access your function by altering the URL in their browser window. You must define Encryption Parameters when you define your function to take advantage of this feature. Host Name The URL (universal resource locator) or address required for your function consists of three sections: the Host Name, Agent Name, and the HTML Call. The Host name is the IP address or alias of the machine where the Webserver is running. Agent Name The second section of your function URL is the Oracle Web Agent. The Oracle Web Agent determines which database is used when running your function. Defaults to the last agent used. Icon Enter the name of the icon used for this function. Regions The fields on this page are for future use. Managing Oracle Applications Security 2 – 37 Menus Window Define a new menu or modify an existing menu. A menu is a hierarchical arrangement of functions and menus of functions. Each responsibility has a menu assigned to it. A ”full access” responsibility with a menu that includes all the functions in an application is predefined for each Oracle Applications product. As a System Administrator, you can restrict the functionality a responsibility provides by defining rules to exclude specific functions or menus of functions. In fact, we recommend that you use exclusion rules to customize a responsibility in preference to constructing a new menu hierarchy for that responsibility. If you cannot create the responsibility you need by applying exclusion rules, you may build a custom menu for that responsibility using predefined forms (i.e., form functions) and their associated menus of 2 – 38 Oracle Applications System Administrator’s Guide subfunctions. However, we recommend that you do not disassociate a form from its developer–defined menus of subfunctions. After you save your changes in this form, a request is submitted to compile the menu data. Prerequisites • Register your application with Oracle Application Object Library using the Applications window. • Define any menus that you intend to call from your menu. Define the lowest–level submenus first. A submenu must be defined before it can be called by another menu. Suggestion: By calling submenus from your menu, you can group related windows together under a single heading on your menu. You can reuse your menu on other menus. Menus Block Menu entries detail the options available from your menu. Menu Choose a name that describes the purpose of the menu. Users do not see this menu name. View Tree... Once you have defined a menu, you can see its hierarchical structure using the ”View Tree...” button. See: Menu Viewer: page 2 – 42. User Menu Name You use the user menu name when a responsibility calls a menu or when one menu calls another. Menu Type Optionally specify a menu type to describe the purpose of your menu. • Standard – for menus that would be used in the Navigator form • Tab – for menus used in self service applications tabs • Security – for menus that are used to aggregate functions for data security or specific function security purposes, but would not be used in the Navigator form Managing Oracle Applications Security 2 – 39 Menu Entries Block Sequence Enter a sequence number to specify where a menu entry appears relative to other menu entries in a menu. The default value for this field is the next whole sequence number. A menu entry with a lower sequence number appears before a menu entry with a higher sequence number. ☞ ☞ Attention: Use integers only as your sequence numbers. Attention: If you change sequence numbers or frequently insert and delete menu entries, carefully check the default value. This value may be a duplicate sequence number or an out of sequence number. Suggestion: You cannot replace a menu entry sequence number with another sequence number that already exists. If you want to add menu entries to a menu entry sequence, carefully renumber your menu entries to a sequence range well outside the sequence range you want, ensuring that you do not use existing sequence numbers. Once you save this work, you can go back and renumber each entry to have the final sequence number you want. Navigator Prompt Enter a user–friendly, intuitive prompt your menu displays for this menu entry. You see this menu prompt in the hierarchy list of the Navigator window. Suggestion: Enter menu prompts that have unique first letters so that power users can type the first letter of the menu prompt to choose a menu entry. Submenu Call another menu and allow your user to select menu entries from that menu. Function Call a function you wish to include in the menu. A form function (form) appears in the Navigate window and allows access to that form. Other non–form functions (subfunctions) allow access to a particular subset of form functionality from this menu. 2 – 40 Oracle Applications System Administrator’s Guide Description Descriptions appear in a field at the top of the Navigate window when a menu entry is highlighted. Grant The Grant check box should usually be checked. Checking this box indicates that this function is automatically enabled for the user. If this is not checked then the function must be enabled using additional data security rules. Managing Oracle Applications Security 2 – 41 Menu Viewer The Menu Viewer is a read–only window that provides a hierarchical view of the submenus and functions of a menu, and also lists properties of the menus and functions. You can launch the viewer from the Menus form by clicking on the ”View Tree...” button. The viewer will appear for the menu specified in the Menus form. Note: When you are creating or editing a new menu, your changes must be committed to the database before you will be able to see them in the Menu Viewer. Functionality Menu Tree To view the menu tree, click on the plus (+) sign next to the menu. You will see a hierarchical tree with a number of nodes. Each node represents a function or submenu of your main menu. Note: The menu tree displays the user menu name for the main menu, and displays the prompts from the Menus form for submenus and functions. If no prompt has been specified, then no label will appear for the node. To print a menu tree, choose Print from the File menu. Node Properties To view properties of a particular menu or function, highlight the node in the menu tree. The node properties will appear in the Properties pane. You can create a separate Properties page for a node by clicking the ”push pin” button at the top of the Properties pane. The entry’s sequence number, prompt, and description are shown. View Options The View menu provides options on how the viewer displays your menu. You can specify whether the Node Properties pane, the toolbar, or the status bar are displayed. You can also choose the display style in which you view your menu tree. 2 – 42 Oracle Applications System Administrator’s Guide Display Styles There are three styles for viewing your menu tree. You can select one from the View menu or from the buttons on the toolbar. Vertical Menu entries are displayed vertically, similar to how they appear in the Navigator window when you log on to Oracle Applications. Interleaved Menu entries are displayed horizontally and vertically. Org–Chart Menu entries are displayed horizontally as in an organizational chart. Edit Menu From the Edit menu you can bring up a Properties window for the node you have highlighted in the menu tree. Note: You can view the properties for your menu or function here, but you cannot edit them. You can view and edit your Preferences for the Menu Viewer. You can choose colors for your menu tree pane as well as the text font and size. Managing Oracle Applications Security 2 – 43 Compile Security Concurrent Program Use this concurrent program to compile your menu data. Compiling your menu data allows for the system to determine more quickly whether a function is available to a particular responsibility/menu. A request to run this program is automatically submitted when you make changes using the Menus form. Parameter Everything This parameter takes the value Yes or No. ”No” is used to recompile only those entities that are marked as needing recompilation. ”Yes” is used to recompile all entities, and can take a long time. ”No” is the default value. 2 – 44 Oracle Applications System Administrator’s Guide Function Security Reports Use the function security reports to document the structure of your 11i menus. You can use these reports as hardcopy to document your customized menu structures before upgrading your Oracle Applications software. The function security reports consist of the Function Security Functions Report, the Function Security Menu Report, and the Function Security Navigator Report. These reports are available through the Function Security Menu Reports request set. For each report, specify the responsibility whose function security you want to review. Function Security Function Report Specify a responsibility when submitting the report. The report output lists the functions accessible by the specified responsibility. The report does not include items excluded by function security rules. Function Security Menu Report Specify a responsibility when submitting the report. The report output lists the complete menu of the responsibility, including all submenus and functions. The report indicates any excluded menu items with the rule that excluded it. Function Security Navigator Report Specify a responsibility when submitting the report. The report output lists the menu as it appears in the navigator for the responsibility specified. This report does not include items excluded by function security rules, or non–form functions that do not appear in the navigator. Managing Oracle Applications Security 2 – 45 Users of a Responsibility Report This report documents who is using a given responsibility. Use this report when defining or editing application users. Report Parameters Application Name Choose the name of the application to which the responsibility you want in your report belongs. Responsibility Name Choose the name of the responsibility you want in your report. Report Heading The report heading indicates the application name and responsibility for which you requested a report. Column Headings User Name The name of the user who is assigned to the responsibility. Start Date The date the responsibility became active for the user. End Date The date the responsibility either becomes inactive or became inactive for the user. If no end date appears for a user, then this responsibility is always enabled for the user. Description The description of the user who is assigned to the responsibility. 2 – 46 Oracle Applications System Administrator’s Guide Active Responsibilities Report This report shows all the responsibilities that are currently active, the users who can currently access each responsibility, and the start and end dates when they can access the responsibility. Report Parameters None. Report Heading This displays the name of the report, the date and time the report was run, and the page number. Column Headings Application Name The name of the application associated with the responsibility. Responsibility Name The name of the currently active responsibility. User Name The name of the user who can currently access the responsibility. Start Date The date when the user can begin accessing the responsibility. End Date The date when the user can no longer access the responsibility. See: Overview of Oracle Applications Security: page 2 – 2. Managing Oracle Applications Security 2 – 47 Active Users Report This report shows all the usernames that are both currently active and have at least one active responsibility. It also displays all the responsibilities that users can access, and the start and end dates when they can access each responsibility. Report Parameters None. Report Heading The report heading displays the name of the report, the date that the report was run, and the page number. Column Headings User Name The Oracle Applications name of the currently active user. The start and end dates that you specify in the Users window determine whether a username is currently active. Application Name The name of the application associated with the responsibility. Responsibility Name The name of the currently active responsibility. Start Date The date when the user can begin accessing the responsibility. You can specify a start date when you assign the responsibility to the user in the Responsibilities block of the Users window. End Date The date when the user can no longer access the responsibility. You specify an end date when you assign the responsibility to the user in Responsibilities block of the Users window. 2 – 48 Oracle Applications System Administrator’s Guide Reports and Sets by Responsibility Report This report identifies which reports (and other concurrent programs) and report sets are included in the request security groups available to any given responsibility. Use this report when defining or editing responsibilities. Report Parameters If you enter no parameters, the report documents all reports and report sets accessible from each responsibility. Application Short Name Choose the application name associated with the responsibility whose available reports and report sets you wish to report on. If you do not choose an application name, the report documents all reports and report sets accessible from each responsibility. Responsibility Name Choose the name of a responsibility whose available reports and report sets you wish to report on. You must enter a value for Application Short Name before entering a value for Responsibility Name. Report Headings The report headings list the report parameters you specify, and provide you with general information about the contents of the report. Managing Oracle Applications Security 2 – 49 2 – 50 Oracle Applications System Administrator’s Guide CHAPTER 3 User and Data Auditing T his chapter explains how to audit your application users and the changes they effect on your application’s data. User and Data Auditing 3–1 Overview of User and Data Auditing There are two types of auditing in Oracle Applications: auditing users, and auditing database row changes. Auditing User Activity Auditing users is supported by: • Sign–On:Audit Level profile option setting • Audit Reports See: Signon Audit Concurrent Requests: page 3 – 10 Signon Audit Forms: page 3 – 12 Signon Audit Responsibilities: page 3 – 15 Signon Audit Unsuccessful Logins: page 3 – 17 Signon Audit Users: page 3 – 19 Sign–On Audit lets you track who signs on to your application and what they do. Based on the audit level you choose, Sign–On Audit records usernames, dates and times of users accessing the system, as well as what responsibilities, forms, and terminals users are using. Auditing Database Row Changes Auditing database row changes is supported by: • From the Help menu, About This Record ... • AuditTrail:Activate profile option setting • Audit forms – see below. See: Reporting on AuditTrail Data: page 3 – 22 Audit Installations: page 3 – 34 Audit Groups: page 3 – 36 Audit Tables: page 3 – 40 3–2 Oracle Applications System Administrator’s Guide Auditing User Activity Oracle Applications provides a Sign–On Audit feature that allows you to: • Track what your users are doing and when they do it. • Choose who to audit and what type of information to audit. • View quickly online what your users are doing. • Check the security of your application. With Sign–On Audit, you can record usernames, terminals, and the dates and times your users access Oracle Applications. Sign–On Audit can also track the responsibilities and forms your users use, as well as the concurrent processes they run. Major Features Selective Auditing Sign–On Audit lets you choose who to audit and what type of user information to track. You can selectively determine what audit information you need, to match your organization’s needs. Monitor Application Users The Monitor Users form gives you online, real–time information about who is using Oracle Applications and what they are doing. You can see what users are signed on (application username and operating system login name), what responsibilities, forms, and terminals they are using, how long they have been working on forms, and what ORACLE processes they are using. Sign–On Audit Reports Sign–On Audit Reports give you historical, detailed information on what your users do in your application. You can give search criteria to narrow your search for information. You can also sort your Sign–On Audit information to create easy–to–read reports. User and Data Auditing 3–3 Setting Up Sign–On Audit You use the Sign–On:Audit Level user profile option to control who Sign–On Audit tracks and the level at which they are audited. Use the Monitor Users form to view online what your users are doing. Use the Submit Reports form to submit Sign–On Audit Reports that give you detailed audit information. Enabling Sign–On Audit Use the System Profile Values form to enable Sign–On Audit. Choose the scope of your audit and who to audit by setting the user profile level at the user, responsibility, application, or site profile levels. Users cannot see nor change this profile option. After you set or change audit levels, the new audit levels for a user take effect the next time the user signs onto Oracle Applications from the operating system. Selecting Audit Levels The Sign–On:Audit Level profile option allows you to select a level at which to audit users who sign on to Oracle Applications. Four audit levels increase in functionality: None, User, Responsibility, and Form. None is the default value, and means do not audit any users who sign on to Oracle Applications. Auditing at the User level tracks: • who signs on to your system • the times users log on and off • the terminals in use Auditing at the Responsibility level performs the User level audit functions and tracks: • the responsibilities users choose • how much time users spend using each responsibility Auditing at the Form level performs the Responsibility level audit functions and tracks: • the forms users choose • how long users spend using each form Factoring in System Overhead In planning your organization’s Sign–On Audit implementation, you should consider the additional system overhead required to precisely 3–4 Oracle Applications System Administrator’s Guide monitor and audit your users as they access Oracle Applications. The more users you audit and the higher the level of auditing, the greater the likelihood of incurring additional system overhead. Example – Audit Users, Responsibilities, & Forms One example implementation of Sign–On Audit is to audit all of your users’ sign–ons, the responsibilities they select, and the forms they access. To set up this implementation, set ”Sign–On:Audit Level” to: • Form audit • At the Site profile level Example – Audit a specific responsibility, excepting one user Another example of using Sign–On Audit is for an organization to audit all users of the Personnel Manager responsibility, except for MJONES. In this example, you do not care to audit the forms the users access or the responsibilities they select. To set up this implementation, set ”Sign–On:Audit Level” to: • User audit • At the responsibility profile level for the Personnel Manager responsibility You also set ”Sign–On:Audit Level” to: • None • At the user profile level for the application user MJONES Using the Application Monitor Use the Monitor Users form to monitor who is using Oracle Applications and what they are doing. You can monitor your users at any time. The Application Monitor lets you see what users are signed on, what responsibilities, forms, and terminals they are using, how long they have been working on forms, and what ORACLE processes they are using. ☞ Attention: You can only monitor those users that are being audited by Sign–On Audit. The Application Monitor also reflects the level of auditing you define for your users. User and Data Auditing 3–5 About This Record Window You can display Sign–On Audit data by choosing from the Help menu, About This Record... Sign–On Audit can automatically tie in ”About This Record” information for records that are inserted or updated by audited users. This additional information appears in the ”About This Record” window when you set the Who:Display Type profile option to Extended. Extended information shows the Oracle Applications session number, the operating system login name, and the terminal that a user you are tracking with Sign–On Audit used to insert or update a row. As System Administrator, you can use the System Profile Values form to set “Who:Display Type” to let any user, responsibility, application, or site view Extended ”About This Record” information. Who: Display Type Profile Option The Who: Display Type profile option allows you to choose between two different displays in the About This Record window: ”Normal” displays the: • name of the user who created the row • date the user created the row • name of the table containing the row • name of the user who last updated the row ”Extended” displays Normal information, plus: • the user’s operating system logon • the user’s terminal identification Users cannot see nor change this profile option. This profile option is visible and updatable at all four levels. Notifying of Unsuccessful Logins Sign–On Audit can track user logins and provide users with a warning message if anyone has made an unsuccessful attempt to sign on with their application username since their last sign–on. This warning message appears after a user signs on. 3–6 Oracle Applications System Administrator’s Guide You or your users can activate this feature using the Personal Profile Values form by setting the ”Sign–On:Notification” user profile option to Yes. You do not have to audit the user with Sign–On Audit to use this notification feature. Sign–On Audit Reports Use the Submit Requests form to print standard audit reports. You can generate reports detailing what users are signing on, what responsibilities they are accessing, what forms they are using, what concurrent requests they are submitting, and who is attempting to log on to other users’ accounts. Oracle Applications provide the following Sign–On Audit reports: Signon Audit Concurrent Requests: page 3 – 10 (shows who submitted what requests) Signon Audit Forms: page 3 – 12 (shows who accessed what forms) Signon Audit Responsibilities: page 3 – 15 (shows who accessed what responsibilities) Signon Audit Unsuccessful Logins: page 3 – 17 (shows who unsuccessfully attempted to sign on as another user) Signon Audit Users: page 3 – 19 (shows who signed on to Oracle Applications) For each report, you can also specify search criteria that makes your report as brief as you need. User and Data Auditing 3–7 Monitor Users Window Use this window to monitor what your application users are currently doing. You can see which users are signed on and what responsibilities, forms (windows), and terminals they are using. You can also see how long they have been logged in and what ORACLE processes they are using. In addition, you can monitor all users at a site, all users accessing a specific application or a specific responsibility, or you can monitor individual users. You can only monitor those users for whom you have activated Sign–On Audit. See: Overview of User and Data Auditing: page 3 – 2. 3–8 Oracle Applications System Administrator’s Guide Prerequisites • Select a value for the Sign–On:Audit Level profile option, using the Update System Profile Options window. Monitor Users Block Responsibility The user’s responsibility only appears if you have enabled Sign–On Audit at either the Responsibility or Form audit level. Form The user’s form only appears if you have enabled Sign–On Audit at the Form audit level. Login The user’s login name. Time The length of time the user has been logged on to this application. ORACLE Process The ORACLE process of the user. Terminal Name The name of the terminal that the user is working on. User and Data Auditing 3–9 Signon Audit Concurrent Requests Report Use this report to view information about who is requesting what concurrent requests and from which responsibilities and forms. ☞ Attention: You can only generate Signon Audit Concurrent Requests Reports for those users you are auditing. Report Parameters Sort By Sort the information in your report by operating system login name, the requested start date, and/or application username. Login Name Search for a specific login name that meets your other search criteria. If you leave this parameter blank, your report contains all login names that meet your other search criteria. User Name Search for a specific application username that meets your other search criteria. If you leave this parameter blank, your report contains all application usernames that meet your other search criteria. From Request Start Time/To Request Start Time Search for concurrent requests that meet your other search criteria and have requested start times in a specific time period. Use these parameters to specify the start and end of your time period. If you leave these parameters blank, your report contains concurrent requests from any date that also meet your other search criteria to the current date for this parameter. Report Heading The report heading displays the search criteria you entered as parameter values. Column Headings Login Name The operating system login name of the user who submitted the concurrent request. 3 – 10 Oracle Applications System Administrator’s Guide Request ID The concurrent request ID of the submitted concurrent request. Use the Concurrent Requests form to view completion information for a concurrent request ID. Concurrent Program Name The name of the concurrent program the user submitted. Use the Concurrent Programs form to view detail information about a concurrent program. User Name The Oracle Applications username of the user who submitted the concurrent request. Use the Users form to view detail information about an application user. See: Users: page 2 – 17. Responsibility Name The name of the responsibility from which the user submitted the concurrent request. The responsibility displays only if you audited the user at the responsibility or form Sign–on Audit level. Use the Responsibilities form to view detailed information about a responsibility. See: Responsibilities: page 2 – 10. Form Name The name of the form from which the user submitted the concurrent request. The form name displays only if you audited the user at the form Sign–On Audit level. Requested Start Time The date and time the concurrent request started running. User and Data Auditing 3 – 11 Signon Audit Forms Report Use this report to view who is navigating to what form and when they do it. ☞ Attention: You can only generate a Signon Audit Forms Report for those users you are auditing. Report Parameters Sort By Sort the information in your report by the time users entered or left a form, the name of the form that users access, the operating system login name of the user, the responsibility users access, the terminal that users are on, and/or the application username. Login Name Search for information about a specific login name that meets your other search criteria. If you leave this parameter blank, your report contains all login names that meet your other search criteria. User Name Search for information about a specific application username that meets your other search criteria. If you leave this parameter blank, your report contains all application usernames that meet your other search criteria. Terminal Name Search for information about a specific terminal that meets your other search criteria. If you leave this parameter blank, your report contains all terminal names that meet your other search criteria. Responsibility Name Search for information about a specific responsibility that meets your other search criteria. If you leave this parameter blank, your report contains all responsibilities that meet your other search criteria. Form Name Search for information about a specific form that meets your other search criteria. If you leave this parameter blank, your report contains all forms that also meet your other search criteria. 3 – 12 Oracle Applications System Administrator’s Guide From Active Date/To Active Date Search for information about forms accessed by users within a specific time period and that meet your other search criteria. Use these parameters to specify the start and end of your time period. If you leave these parameters blank, your report contains forms accessed from any date that also meet your other search criteria to the current date for this parameter. Report Heading The report heading displays the search criteria you entered as parameter values. Column Headings Username The Oracle Applications username of the user who accessed the form. Use the Users form to view detailed information about an application user. See: Users: page 2 – 17. Login Name The operating system login name of the user who accessed the form. Terminal Name The operating system ID of the terminal from which the user accessed the form. Responsibility Name The name of the responsibility from which the user accessed the form. The responsibility displays only if you audited the user at the responsibility or form Sign–on Audit level. Use the Responsibilities form to view detailed information about a responsibility. See: Responsibilities: page 2 – 10. Start Active Time/End Active Time The dates and times when the user accessed/exited the form. The start active time and end active time display only if you audited the user at the form Sign–on Audit level. User and Data Auditing 3 – 13 Form Name The name of the form that the user accessed. The form name displays only if you audited the user at the form Sign–on Audit level. 3 – 14 Oracle Applications System Administrator’s Guide Signon Audit Responsibilities Report Use this report to view who is selecting what responsibility and when they do it. ☞ Attention: You can only generate Signon Audit Responsibilities Reports for those users you are auditing. Report Parameters Sort By Sort the information in your report by the time users entered or left a responsibility, the operating system login name of the user, the responsibility name, the terminal that users are on, and/or the application username. Login Name Search for information about a specific login name that meets your other search criteria. If you leave this parameter blank, your report contains all login names that meet your other search criteria. User Name Search for information about a specific application username that meets your other search criteria. If you leave this parameter blank, your report contains all application usernames that meet your other search criteria. Terminal Name Search for information about a specific terminal that meets your other search criteria. If you leave this parameter blank, your report contains all terminal names that meet your other search criteria. Responsibility Name Search for information about a specific responsibility that meets your other search criteria. If you leave this parameter blank, your report contains all responsibilities that meet your other search criteria. User and Data Auditing 3 – 15 From Active Date/To Active Date Search for information about responsibilities accessed by users within a specific time period and that meet your other search criteria. Use these parameters to specify the start and end of your time period. If you leave these parameters blank, your report contains responsibilities accessed from any date that also meet your other search criteria to the current date for this parameter. Report Heading The report heading displays the search criteria you entered as parameter values. Column Headings Username The Oracle Applications username of the user who selected the form. Use the Users form to view detail information about an application user. See: Users: page 2 – 17. Login Name The operating system login name of the user who selected the responsibility. Terminal Name The operating system ID of the terminal from which the user selected the responsibility. Responsibility Name The name of the responsibility the user used. The responsibility displays only if you audited the user at the responsibility or form Sign–on Audit level. Use the Responsibilities form to view detailed information about a responsibility. See: Responsibilities: page 2 – 10. Start Active Time/End Active Time The dates and times when the user selected/exited the responsibility. The start active time and end active time display only if you audited the user at the responsibility or form Sign–On Audit level. 3 – 16 Oracle Applications System Administrator’s Guide Signon Audit Unsuccessful Logins Report Use this report to view who unsuccessfully attempted to sign on to Oracle Applications as another user. An unsuccessful login occurs when a user enters a correct username but an incorrect password. You can generate Signon Audit Unsuccessful Logins Reports for any users, regardless of whom you are auditing. Report Parameters Sort By Sort the information in your report by the time users attempt to login, operating system login name of the user, the terminal that users are on, and/or the application username. Login Name Search for information about a specific login name that meets your other search criteria. If you leave this parameter blank, your report contains all login names that meet your other search criteria. User Name Search for information about a specific application username that meets your other search criteria. If you leave this parameter blank, your report contains all application usernames that meet your other search criteria. Terminal Name Search for information about a specific terminal that meets your other search criteria to make your report as brief as you need. If you leave this parameter blank, your report contains all terminal names that meet your other search criteria. From Attempt Date/To Attempt Date Search for information about unsuccessful logins within a specific time period and that meet your other search criteria. Use these parameters to specify the start and end of your time period. If you leave these parameters blank, your report contains unsuccessful logins from any date that also meet your other search criteria to the current date for this parameter. User and Data Auditing 3 – 17 Report Heading The report heading displays the search criteria you entered as parameter values. Column Headings Username The Oracle Applications username of the user who unsuccessfully signed on. Use the Users form to view detail information about an application user. See: Users: page 2 – 17. Login Name The operating system login name of the user who unsuccessfully tried to sign on. Terminal The operating system ID of the terminal from which the user unsuccessfully tried to sign on. Attempt Time The date and time when the user unsuccessfully tried to sign on. See: Monitor Users: page 3 – 8. 3 – 18 Oracle Applications System Administrator’s Guide Signon Audit Users Report Use this report to view who signs on and for how long. ☞ Attention: You can only generate Signon Audit Users Reports for those users you are auditing. Report Parameters Sort By Sort the information in your report by the time users start or finish using an application username, the operating system login name of the user, the terminal that users are on, and/or the application username. Login Name Search for information about a specific login name that meets your other search criteria to make your report as brief as you need. If you leave this parameter blank, your report contains all login names that meet your other search criteria. User Name Search for information about a specific application username that meets your other search criteria to make your report as brief as you need. If you leave this parameter blank, your report contains all application usernames that meet your other search criteria. Terminal Name Search for information about a specific terminal that meets your other search criteria to make your report as brief as you need. If you leave this parameter blank, your report contains all terminal names that meet your other search criteria. From Active Date/To Active Date You can search for information about users logged into Oracle Applications within a specific time period and that meet your other search criteria. Use these parameters to specify the start and end of your time period. If you leave these parameters blank, your report contains user information from the first date that also meets your other search criteria to the current date. User and Data Auditing 3 – 19 Report Heading The report heading displays the search criteria you entered as parameter values. Column Headings Session Number The Oracle Applications session number which uniquely identifies each application user sign–on. User Name The Oracle Applications username of the user who signed on. Use the Users form to view detailed information about an application user. See: Users: page 2 – 17. Login Name The operating system login name of the user who signed on. Terminal Name The operating system ID of the terminal from which the user signed on. Start Active Time/End Active Time The dates and times when the user signed/exited onto Oracle Applications. The start active time and end active time display only if you audited the user at the user Sign–On Audit level. ORACLE Process The ORACLE Process ID used during the user’s sign–on. Consult your Database Administrator for more information concerning ORACLE Processes. System Process The operating system process ID used during the user’s sign–on. Consult your operating system administrator for more information concerning your operating system process ID. 3 – 20 Oracle Applications System Administrator’s Guide Purge Signon Audit Data Program Use this program to purge Sign–On Audit information created before a specified date. The following data is deleted: • Data for who signs on and for how long • Data for who is selecting what responsibility and when they do it • Data for who uses which forms in an application and when Parameters Audit Date The Sign–On Audit information creation date. This program will delete all Sign–On Audit information created before this date. User and Data Auditing 3 – 21 Reporting On AuditTrail Data AuditTrail lets you keep a history of changes to your important data: what changed, who changed it, and when. With AuditTrail, you can easily determine how any data row or element obtained its current value. You can track information on most types of fields, including character, number and date fields. When you enter or update data in your forms, you change the database tables underlying those forms. AuditTrail tracks which rows in the database were updated at what time, and which user was logged in using the associated form(s). AuditTrail Oracle Applications Releases 10.4 and above provide a mechanism based on Oracle database triggers. AuditTrail stores change information in a ”shadow table” of the audited table. This mechanism saves audit data in an uncompressed but ”sparse” format, and you enable auditing for particular tables and groups of tables (”audit groups”). Setting Up Release 11i AuditTrail You can choose to store and retrieve a history of all changes users make on a given table. Auditing is accomplished using audit groups, which functionally group tables to be audited. For a table to be audited, it must be included in an enabled audit group. The steps for setting up AuditTrail include: Verify Select Privileges on SYS.DBA_TABLES Have your database administrator grant SELECT privileges on SYS.DBA_TABLES to the APPLSYS account. Normally, this step would already have been done as part of your installation or upgrade. Define Audit Groups These are groups of tables and columns, where you do not necessarily need to include all the columns in a given table. You enable auditing for audit groups rather than for individual tables. You would typically group together those tables that belong to the same business process (for example, purchase order tables). 3 – 22 Oracle Applications System Administrator’s Guide A given table can belong to more than one audit group. If so, the table is audited according to the highest ”state” of enabling for any of its groups, where Enabled is the highest, followed by Disable Dump Data, Disable No Growth, and Disable Purge Table, in that order. You can enable auditing for a maximum of 240 columns for a given table, and you can enable auditing for all types of table columns except LONG, RAW, or LONG RAW. Your audit group must include all columns that make up the primary key for a table; these columns are added to your audit group automatically. Once you have added a column to an audit group, you cannot remove it. See: Audit Groups: page 3 – 36. Define Audit Installations You choose the registered Oracle IDs at your site that you want to audit. This allows you to audit across multiple application installations. When a table is added to an audit group, auditing will automatically be enabled for all installations of the table for which audit is enabled. See: Audit Installations: page 3 – 34. Run the Audit Trail Update Tables Report to Enable Auditing Your AuditTrail definitions (and auditing) do not take effect until you run the Audit Trail Update Tables Report. If you change any of your definitions later, you must rerun this program. You run the Audit Trail Update Tables Report from the standard submission (Submit Reports) form. ☞ Attention: AuditTrail requires two database connections. If your operating platform does not automatically support two database connections (e.g., VMS or MPE/XL), then add to your environment file the environment variable FDATDB=<database connect string>. Audit Trail Update Tables Report This program creates database triggers on the tables in your audit groups for your installations. It also creates shadow tables, one for each audited table, to contain the audit information. If you have changed your audit definitions or disabled auditing for an audit group, the program drops or modifies the auditing triggers and shadow tables appropriately. The program also builds special views you can use to retrieve your audit data for reporting. User and Data Auditing 3 – 23 Release 11i AuditTrail Tables, Triggers and Views When auditing is enabled for the first time, a shadow table to the audited table is automatically created in the same Oracle ID as the audited table. The shadow table contains only the columns to be audited, and all columns in the shadow table are unconstrained, regardless of their status in the table to be audited. For example, NULLs are always permitted in the shadow table. All columns in the shadow table have the same data types and sizes as their counterparts in the audited table. The name of the shadow table is the first 26 characters of the original table name plus the suffix ”_A” (Audit). Shadow Table Columns All AuditTrail shadow tables contain certain special auditing columns. These columns include: • AUDIT_USER_NAME (the Application User ID, except when changes are applied using SQL*Plus, in which case it is the Oracle ID) • AUDIT_TIMESTAMP (the date/time when the insertion occurred) • AUDIT_TRANSACTION_TYPE (I for Insert, U for Update, D for Delete, L for Last, and C for Current) • AUDIT_TRUE_NULLS (VARCHAR2(250) column containing a delimited list of column names that have changed from NULL) • The Primary Key for the table. This is not a special column, but rather all the columns composing the primary key of the audited table. Note that, by convention, all audited columns are stored when a row is deleted. Likewise, an insert results in a row of NULL values in the shadow table. Changes to the primary key are marked as deletes, but new primary key values are inserted also. For example, suppose you have the following table: SQL> DESCRIBE AUDIT_DEMO NAME NULL? ––––––––––––––––––––––––––––––– –––––––– PRIMARY_KEY VALUE_ONE VALUE_TWO 3 – 24 Oracle Applications System Administrator’s Guide TYPE –––– NUMBER(5) VARCHAR2(5) VARCHAR2(5) VALUE_THREE VARCHAR2(5) Its shadow table is as the following (assuming you audit all of your table columns): SQL> DESCRIBE AUDIT_DEMO_A NAME –––––––––––––––––––––– AUDIT_TIMESTAMP AUDIT_TRANSACTION_TYPE AUDIT_USER_NAME AUDIT_TRUE_NULLS AUDIT_SESSION_ID AUDIT_SEQUENCE_ID AUDIT_COMMIT_ID PRIMARY_KEY VALUE_ONE VALUE_TWO VALUE_THREE NULL? –––––––– NOT NULL NOT NULL NOT NULL NOT NULL NOT NULL NOT NULL TYPE –––– DATE VARCHAR2(1) VARCHAR2(100) VARCHAR2(250) NUMBER NUMBER NUMBER NUMBER VARCHAR2(5) VARCHAR2(5) VARCHAR2(5) Auditing Triggers and Procedures When auditing is enabled, the automatically–generated database trigger in the ”After” event on the audited table performs the auditing. This trigger calls a stored procedure to compare each column being audited to see if its value is changing. If so, the procedure saves the previous (old) value to the shadow table. Auditing creates one row in the shadow table for each audited transaction against the table; thus, a single row in the shadow table represents all old values for all changed columns on that transaction. The data is not compressed, since a table uses only one byte for a NULL, and AuditTrail represents all unchanged values as NULLs in the shadow table (”sparse” format). The audit trigger names contain the first 26 characters of the audited table name plus ”_AI”, ”_AU” or ”_AD”, where one of I, U or D indicates Insert, Update or Delete, respectively. Likewise, the audit procedure names use the first 26 characters of the table name plus ”_AIP”, ”_AUP” or ”_ADP”. Your table names must be unique within the first 26 characters. Views After a shadow table is created, views onto the shadow table are created to allow easier access to the data in the ”sparse” rows. These User and Data Auditing 3 – 25 views simplify tasks such as querying a row/column’s value on a given date and tracking changes to a row/column over time. The view name contains the first 26 characters of the audited table name plus ”_AC#” or ”_AV#” where C or V indicates the type of view and # indicates a number. Due to limitations in creation size, the shadow table columns may need to be broken into multiple views, which are numbered sequentially. Each view allows slightly different access to the data. One allows the user to reconstruct the value for a row at a given time (_AC), while the other provides simple access to when a value was changed (_AV). For our example table, the _AV1 and _AC1 views are created as follows: SQL> DESCRIBE AUDIT_DEMO_AV1 NAME NULL? ––––––––––––––––––––––––––––––––––– PRIMARY_KEY AUDIT_TIMESTAMP AUDIT_SEQUENCE_ID AUDIT_SESSION_ID AUDIT_TRANSACTION_TYPE AUDIT_USER_NAME VALUE_ONE VALUE_TWO VALUE_THREE SQL> DESCRIBE AUDIT_DEMO_AC1 NAME ––––––––––––––––––––––––– PRIMARY_KEY AUDIT_TIMESTAMP AUDIT_SEQUENCE_ID AUDIT_SESSION_ID AUDIT_TRANSACTION_TYPE AUDIT_USER_NAME AUDIT_COMMIT_ID VALUE_ONE VALUE_TWO VALUE_THREE TYPE –––– NUMBER DATE NUMBER NUMBER VARCHAR2(1) VARCHAR2(100) VARCHAR2(5) VARCHAR2(5) VARCHAR2(5) NULL? TYPE ––––– –––– NUMBER DATE NUMBER NUMBER VARCHAR2(1) VARCHAR2(100) NUMBER VARCHAR2(5) VARCHAR2(5) VARCHAR2(5) How Data Appears in Tables and Views Here is an example of how data appears in your original table, your shadow table, and your audit views after a series of changes (starting with an empty AUDIT_DEMO table). 3 – 26 Oracle Applications System Administrator’s Guide SQL> INSERT INTO AUDIT_DEMO VALUES (1,’A’,’A’,’A’); SQL> INSERT INTO AUDIT_DEMO VALUES (2,’X’,’X’,’X’); SQL> SELECT PRIMARY_KEY KEY, VALUE_ONE VAL_1, VALUE_TWO VAL_2, VALUE_THREE VAL_3 FROM AUDIT_DEMO; KEY –––– 1 2 VAL_1 ––––– A X VAL_2 ––––– A X VAL_3 ––––– A X SQL> UPDATE AUDIT_DEMO SET VALUE_ONE =’B’ WHERE PRIMARY_KEY = 1; KEY –––– 1 2 VAL_1 ––––– B X VAL_2 ––––– A X VAL_3 ––––– A X SQL> UPDATE AUDIT_DEMO SET VALUE_TWO =’B’ WHERE PRIMARY_KEY = 1; KEY –––– 1 2 VAL_1 ––––– B X VAL_2 ––––– B X VAL_3 ––––– A X SQL> UPDATE AUDIT_DEMO WHERE PRIMARY_KEY SQL> UPDATE AUDIT_DEMO WHERE PRIMARY_KEY SQL> UPDATE AUDIT_DEMO WHERE PRIMARY_KEY SQL> UPDATE AUDIT_DEMO WHERE PRIMARY_KEY SET VALUE_THREE =’B’ = 1; SET VALUE_ONE =’Y’ = 2; SET VALUE_ONE = NULL = 1; SET VALUE_ONE =’C’ = 1; User and Data Auditing 3 – 27 After our two inserts and six updates, the final values in the audited table are: KEY –––– 1 2 VAL_1 ––––– C Y VAL_2 ––––– B X VAL_3 ––––– B X The final values in the corresponding shadow table are as follows. A row in the shadow table represents the state of the audited row before the audited row was changed. Note that if a value in a row doesn’t change during the transaction, the shadow table records a null for that value in that transaction. In our example, the first two rows in the shadow table represent the state where there was no data for our two audited rows before they were inserted. The ”prior values” are null values for the two insert transaction (type I) rows. Similarly, when we update the first value of row 1 to be the value B instead of A, the shadow table records the value A in its third row: SQL> SELECT TO_CHAR(AUDIT_TIMESTAMP, ’HH24:MI:SS’) TIME, AUDIT_TRANSACTION_TYPE TYPE, AUDIT_USER_NAME NAME, PRIMARY_KEY KEY, VALUE_ONE VAL_1, VALUE_TWO VAL_2, VALUE_THREE VAL_3, AUDIT_TRUE_NULLS FROM AUDIT_DEMO_A; TIME –––––––– 11:08:16 11:08:40 11:18:40 11:20:12 11:21:54 11:22:15 14:20:50 14:21:15 TYPE –––– I I U U U U U U NAME KEY VAL_1 VAL_2 VAL_3 AUDIT_TRUE_NULLS –––––– –––– ––––– ––––– ––––– –––––––––––––––– FND60 1 FND60 2 FND60 1 A FND60 1 A FND60 1 A FND60 2 X FND60 1 B FND60 1 NYNN 8 rows selected. Given the current values of the row in the audited table, you can trace the changes made to the row by backing up through the corresponding rows in the shadow table. In our example table, we made two insert and six update transactions, so we see those eight transactions in our shadow table. In the last row, the NYNN indicates that the value in the second table column (VALUE_ONE) has changed from an actual null value (the Y) rather 3 – 28 Oracle Applications System Administrator’s Guide than being an unchanged value (represented by null in the shadow table). The following two views provide further ways of examining your audited data. The rows with a transaction type of C in the view indicate the current value of the row when the data was selected (the view is a join between the shadow table and the audited table, so the current value row reflects the current state of the audited table). The _AC view provides a ”filled–in” version of the data, where unchanged values appear instead of being represented by null values. You can order this view by the primary key (rather than by timestamp), so all rows in the shadow table that correspond to a single audited row appear together, with a secondary ordering by timestamp. SQL> SELECT TO_CHAR(AUDIT_TIMESTAMP, ’HH24:MI:SS’) TIME, AUDIT_TRANSACTION_TYPE TYPE, AUDIT_USER_NAME NAME, PRIMARY_KEY KEY, VALUE_ONE VAL_1, VALUE_TWO VAL_2, VALUE_THREE VAL_3 FROM AUDIT_DEMO_AC1 ORDER BY PRIMARY_KEY, AUDIT_TIMESTAMP; TIME –––––––– 11:08:16 11:18:40 11:20:12 11:21:54 14:20:50 14:21:15 17:53:34 11:08:40 11:22:15 17:53:34 TYPE –––– I U U U U U C I U C NAME KEY VAL_1 –––––––––– –––– ––––– FND60 1 A FND60 1 B FND60 1 B FND60 1 B FND60 1 FND60 1 C 1 C FND60 2 X FND60 2 Y 2 Y VAL_2 ––––– A A B B B B B X X X VAL_3 ––––– A A A B B B B X X X 10 rows selected. ☞ Attention: If the changes to your audited table occur faster than one change per second (that is, more frequently than the one–second granularity provided by SYSDATE), you may see ”blurring” of records –– more than one record per transaction –– in the _AC view because of joins used in this view. However, the shadow table itself remains correct for your transactions, and you can resolve those transactions using the shadow table directly. The _AV1 view provides a more sparse view of the audit data, ordered by timestamp: User and Data Auditing 3 – 29 SQL> SELECT TO_CHAR(AUDIT_TIMESTAMP, ’HH24:MI:SS’) TIME, AUDIT_TRANSACTION_TYPE TYPE, AUDIT_USER_NAME NAME, PRIMARY_KEY KEY, VALUE_ONE VAL_1, VALUE_TWO VAL_2, VALUE_THREE VAL_3, AUDIT_TRUE_NULLS FROM AUDIT_DEMO_AV1; TIME –––––––– 11:08:16 11:08:40 11:18:40 11:20:12 11:21:54 11:22:15 14:20:50 14:21:15 17:58:31 17:58:31 TYPE –––– I I U U U U U U C C NAME KEY VAL_1 –––––– –––– ––––– FND60 1 FND60 2 FND60 1 A FND60 1 FND60 1 FND60 2 X FND60 1 B FND60 1 1 C 2 Y VAL_2 VAL_3 AUDIT_TRUE_NULLS ––––– ––––– –––––––––––––––– A A NYNN B X B X 10 rows selected. Here is an example of how you might use a view to determine who changed a particular value and when: SQL> SELECT TO_CHAR(AUDIT_TIMESTAMP, ’HH24:MI:SS’) TIME, AUDIT_TRANSACTION_TYPE TYPE, AUDIT_USER_NAME NAME FROM AUDIT_DEMO_AV1 WHERE PRIMARY_KEY = 1 AND VALUE_ONE = ’B’; TIME TYPE NAME –––––––– –––– –––––– 14:20:50 U FND60 Similarly, you might want to determine who changed a value to null and when: 3 – 30 Oracle Applications System Administrator’s Guide SQL> SELECT TO_CHAR(AUDIT_TIMESTAMP, ’HH24:MI:SS’) TIME, AUDIT_TRANSACTION_TYPE TYPE, AUDIT_USER_NAME NAME FROM AUDIT_DEMO_AV1 WHERE PRIMARY_KEY = 1 AND VALUE_ONE IS NULL AND SUBSTR(AUDIT_TRUE_NULLS,2,1) = ’Y’; TIME TYPE NAME –––––––– –––– –––––– 14:21:15 U FND60 Changing Your Audit Tables You may add columns to the shadow table after auditing has begun on a table. However, the shadow table does not track the column changes that occurred before the column was added. If you add must rerun the Audit Trail Update Tables Report to: • add the necessary column to the shadow table • regenerate the audit triggers and procedures for the table so that they now audit the additional column Reporting on Audit Information Report on Your Audit Data You should write audit reports as needed. AuditTrail provides the views of your shadow tables to make audit reporting easier; you can write your reports to use these views. You may want to create one or more indexes to your shadow table to speed up your reporting. However, such indexes decrease performance during actual auditing of transactions, so you should drop your indexes from the shadow table when you have finished reporting. ☞ Attention: Because the structure of the audited table may change between product versions, AuditTrail does not support upgrading existing shadow tables or audited data. Before an upgrade, you should archive the shadow tables and perform all necessary reporting on the audited data. User and Data Auditing 3 – 31 Disabling AuditTrail and Archiving Audit Data You may report on your audits or disable auditing at any time. When you disable auditing, you should do the following procedure: Stop Auditing New Transactions Disable auditing using either ”Disable – Prepare for Archive” or ”Disable – Interrupt Audit” and running the Audit Trail Update Tables report. Disable – Prepare for Archive Copies the current values of all rows in the audited table into the shadow table, and then disables the auditing triggers. There is no longer any recording of any changes. You should archive the shadow table before you purge it. Disable – Interrupt Audit Modifies the triggers to store one “final” row in the shadow table for each row that is modified in the audit table (remember that a given row in the shadow table represents the data in the audited row before an update). If a row in the table being audited is changed again (a second time), that change is not recorded. The shadow table grows slowly, until it contains one row for each row in the table being audited. Then there is no longer any recording of any changes. Archive Your Audit Data You should archive the information in the shadow tables according to your business needs. Clean Out the Shadow Table Before you restart auditing, you should clean out the shadow table. If there were transactions during the time auditing was disabled, and you did not clean out the shadow table, the data in the shadow table would be invalid because it would have a gap where transactions were not recorded. You purge the shadow table(s) by setting the audit group to Disable – Purge Table and running the Audit Trail Update Tables report. Disable – Purge Table Drops the auditing triggers and views and deletes all data from the shadow table. Restart Auditing (If Desired) You restart auditing by setting the audit group to Enable Requested and running the Audit Trail Update Tables report again. 3 – 32 Oracle Applications System Administrator’s Guide ☞ Attention: If you disable using Disable Purge Table and then reenable auditing for a table, AuditTrail flushes the contents of the shadow table when auditing is reenabled. You should archive any shadow table data that you want to keep before you reenable auditing. User and Data Auditing 3 – 33 Audit Installations Window Use this window to enable AuditTrail for an ORACLE username at your installation. An ORACLE username grants access privileges to an application’s tables and database objects. For auditing to take effect, you must also define one or more audit groups and run the Audit Trail Update Tables report. See: Reporting on AuditTrail Data: page 3 – 22. Prerequisites • Register your ORACLE username. See: ORACLE Users: page 9 – 13. 3 – 34 Oracle Applications System Administrator’s Guide Audit Installations Block Oracle Username Select the Oracle username that owns the tables you wish to audit. Audit Enabled Check the Audit Enabled check box to enable AuditTrail for an Oracle username. Before auditing takes effect you must define one or more audit groups and run the Audit Trail Update Tables report. User and Data Auditing 3 – 35 Audit Groups Window Use this window to select the tables that you wish to audit. You audit a table by defining an audit group, which may consist of one or more tables. First identify the tables you want to audit, then, using the Audit Tables window, select which columns in each table you wish to audit. Or, select which columns in a particular table you wish to audit (using the Audit Tables window), then define your audit group (using this window). To enable or disable auditing for the tables in your audit group, run the Audit Trail Update Tables program using the Submit Requests window. If you change the definition or audit state of your group later, you must rerun this program. 3 – 36 Oracle Applications System Administrator’s Guide Prerequisites • Define an audit installation using the Audit Installations window. ☞ Attention: Your tables and their primary key information must already be registered and defined for successful auditing. If the table you want to audit is a custom table (not shipped as part of Oracle Applications), you should also perform the following two steps: • Register your table and its primary key columns using Oracle Application Object Library’s Tables window (Application Developer Responsibility). • Run the Register Tables concurrent program from the Submit Requests window. Audit Groups Block Identify your audit group and enable or disable auditing for this group. Application Name Select the name of an application to associate with your audit group. The combination of application name and group name uniquely identifies your audit group. An audit group may be used to audit tables in additional applications. Audit Group Enter the name of the audit group. Group State Choose Enable Requested if you are defining a new audit group. When you run the Audit Trail Update Tables report, the concurrent program creates database triggers for the tables in your audit group. Once you have run the program, this field displays Enabled for audit groups where AuditTrail is active. ☞ Attention: All primary key columns in each table in an audit group are automatically selected for auditing, whether or not you use the Audit Tables window to select which columns you wish to audit. User and Data Auditing 3 – 37 To disable auditing for a group, choose one of the following options and then run the Audit Trail Update Tables report to have your changes take effect. Disable – Prepare for Archive Copies the current values of all rows in the audited table into the shadow table, and then disables the auditing triggers. This option requires the most space, since there is at least one row in the shadow table for every row in the audited table (and another row in the shadow table for each transaction on the original row in the audited table). You should then archive the table before you empty the shadow table. Disable – Interrupt Audit Modifies the triggers to store one final row in the shadow table as the audited row is modified in the audit table (remember that a given row in the shadow table represents the data in the audited row before an update). Inserts or further changes are no longer audited. The shadow table then grows slowly, and the data may be accessed by the existing audit views. Disable – Purge Table Drops the auditing triggers and views and deletes all data from the shadow table. Audit Tables Block Identify the application tables you want to audit in your audit group. User Table Select the end user table name (frequently the same name as the table name) for your database table. Once you choose a table, you see its table name and associated application. Table Name This field displays the actual name for the table you have selected to include in your audit group. Application This field displays the application name for the table you have selected to include in your audit group. 3 – 38 Oracle Applications System Administrator’s Guide Description This field displays the description for the table you have selected to include in your audit group. User and Data Auditing 3 – 39 Audit Tables Window Use this window to select which columns in a table you wish to audit. First identify the columns in a table you want to audit. Then, using the Audit Groups window, include the table as part of an audit group. Or, you may define your audit group first (using the Audit Groups window), and then select which columns in the table you want to audit (using this window). To enable or disable auditing for the tables in your audit group (i.e., the columns you have selected here), you must run the Audit Trail Update Tables program using the Submit Requests window. If you select additional columns to audit, or change the definition or audit state of your group later, you must rerun this program. 3 – 40 Oracle Applications System Administrator’s Guide Prerequisites • Define an audit installation using the Audit Installations window. ☞ Attention: Your tables and their primary key information must already be registered and defined for successful auditing. If the table you want to audit is a custom table (not shipped as part of Oracle Applications), you should also perform the following two steps: • Register your table and its primary key columns using Oracle Application Object Library’s Tables window (Application Developer Responsibility). • Run the Register Tables concurrent program from the Submit Requests window. Define Audit Tables Block Identify the application table you want to audit. Successively selecting Go – Next Record from the menu or toolbar displays, in alphabetical order, the name of each application table registered at your installation site. User Table Name Select the end user table name (frequently the same name as the table name) for your database table. Once you choose a table, you see its table name and associated application. Table Name This field displays the actual name for the table you have selected to include in your audit group. Application This field displays the application name for the table you have selected to include in your audit group. Audit Columns Block Select the columns you want to audit. Successively selecting Go – Next Record from the menu or toolbar displays, in alphabetical order, the name of each application table registered at your installation site. User and Data Auditing 3 – 41 • You cannot delete a column from auditing once it has been selected. • You may add additional columns to be audited. • Each time you select a column to be audited, that change affects every audit group that includes the table which owns the column. Column Name Enter the name of the database column you want to audit. You should not explicitly enter the names of your table’s primary key columns, since they are entered automatically, and you will get an error message if you try to save a duplicate column name. You can query to see which columns appear automatically. Note that once you have chosen a column, you cannot delete it from the audit set, though you may add other columns to the set later. Once you choose a column, you see its column type and whether it is part of the primary key for this table. Column Type This field describes the type of data the column stores, for example, varchar2. Primary Key This field displays Yes or No indicating whether the column you are auditing is a primary key column. Any primary key columns you do not select to audit are automatically included when you save your column selections. For example, if the table you are auditing has two primary key columns, and you choose to audit one of them, the second primary key column is automatically selected when you save your column selections. 3 – 42 Oracle Applications System Administrator’s Guide CHAPTER 4 Managing Concurrent Programs and Reports T his chapter explains how to manage concurrent programs and organize those programs into groups and sets. This chapter also explains how to modify concurrent program definitions, modify the behavior of parameters the programs refer to, and define incompatibility rules among different programs. The essays in this chapter are organized under the following topics: • Overview of concurrent programs and requests • Organizing programs into Request Sets • Organizing programs into Request Groups • Defining program incompatibility rules • Defining application database connections or Data Groups • Copying and modifying program definitions Form descriptions follow at the end of the chapter. Managing Concurrent Programs and Reports 4–1 Overview of Concurrent Programs and Requests A concurrent program is an executable file that runs simultaneously with other concurrent programs and with online operations, fully utilizing your hardware capacity. Typically, a concurrent program is a long–running, data–intensive task, such as posting a journal or generating a report. Request Groups and Request Sets Reports and concurrent programs can be assembled into request groups and request sets. • A request group is a collection of reports or concurrent programs. A System Administrator defines report groups in order to control user access to reports and concurrent programs. Only a System Administrator can create a request group. • Request sets define run and print options, and possibly, parameter values, for a collection of reports or concurrent program. End users and System Administrators can define request sets. A System Administrator has request set privileges beyond those of an end user. Standard Request Submission and Request Groups Standard Request Submission is an Oracle Applications feature that allows you to select and run all your reports and other concurrent programs from a single, standard form. The standard submission form is called Submit Request, although it can be customized to display a different title. • The reports and concurrent programs that may be selected from the Submit Requests form belong to a request security group, which is a request group assigned to a responsibility. • The reports and concurrent programs that may be selected from a customized Submit Request form belong to a request group that uses a code. In summary, request groups can be used to control access to reports and concurrent programs in two ways; according to a user’s responsibility, or according to a customized standard submission (Submit Request) form. See: Customizing the Submit Request Window using Codes: page 4 – 20. Additional Information: Running Oracle Applications Reports and Programs in the Oracle Applications User’s Guide 4–2 Oracle Applications System Administrator’s Guide Limiting Active Requests by User As System Administrator you can limit the number of requests that may be active (status of Running) for an individual user. This ensures that a user cannot monopolize the request queue. For example, if a user with an Active Request Limit of 5 submits 20 requests, only 5 requests will be run at the same time. The remaining requests will be run when the number of active requests for the user drops below 5. Use the Profile Options window to set the Concurrent: Active Request Limit profile. To set a global limit for all users, set this option at the site level. You can then modify limits for individual users by setting this profile option at the User level. Managing Concurrent Programs and Reports 4–3 Multilingual Support for Concurrent Requests Beginning with Release 11i, users are able to submit a single concurrent request that will cause a single concurrent program to run multiple times, each time in a different language. Any output that is produced can be routed to different printers based on language. Users can also route completion notifications based on the language of the output. For example, a user could submit a request for a Print Invoices program that would cause that program to run several times, each time in a different language, with each set of invoices printed on a different printer. Note: Multilingual requests cannot be run within request sets. See Also Oracle Applications User’s Guide Oracle Applications Concepts Guide Oracle Applications Developer’s Guide Request Submission A concurrent program can have a Multilingual Support (MLS) function associated with it. This function determines the set of languages over which the concurrent program will run. For example, the developer might associate a function with a Print Invoices program that would cause any request for that program to run in the preferred languages of the customers who have pending invoices. See Concurrent Programs Window: page 4 – 66. If the concurrent program does not have an MLS function associated with it, then a user can choose when submitting the request the list of languages in which the program should run. The language of the current session is the default language. If a concurrent program does have an MLS function associated with it, users will not be able to select languages for their requests. The associated MLS function determines the languages in which the request will run. Runtime Behavior Multilingual requests behave similarly to request sets. A user submits a single request. When that request runs, it submits a child request for 4–4 Oracle Applications System Administrator’s Guide each language in its list of languages. The parent request remains in the Running/Waiting state until its child requests are completed. If any child request completes with error status, then the parent request completes with error status. If no children complete with error status, but one or more completes with warning status, then the parent completes with warning status. Finally, if all children complete with normal status, then the parent completes with normal status. MLS Functions Developers can create an MLS function for concurrent programs. The MLS function determines in which of the installed languages a request should run. For example, an MLS function for a Print Invoices program could require that any request for that program to run only in the preferred languages of the customers who have pending invoices. This restriction saves system resources by assuring that the request does not run in languages for which no output will be produced. This restriction also prevents user error by automatically selecting the appropriate languages for a request. MLS functions are PL/SQL stored procedures, written to a specific API. When the concurrent manager processes a multilingual request for a concurrent program with an associated MLS function, it calls the MLS function to retrieve a list of languages and submits the appropriate child requests for each language. The concurrent program application short name, the concurrent program short name, and the concurrent request parameters are all available to the MLS function to determine the list of languages that the requesst should be run in. MLS functions are registered in the Concurrent Program Executable form. A registered MLS function can be assigned to one or more concurrent programs in the Concurrent Programs form. See Also Oracle Applications Developer’s Guide Managing Concurrent Programs and Reports 4–5 Organizing Programs into Request Sets Request sets are a quick and convenient way to run several reports and concurrent programs with predefined print options and parameter values. Request sets group requests into stages that are submitted by the set. The order in which the stages are submitted is determined by the status of previous stages. Request sets can also be used by a System Administrator to customize access to reports and concurrent programs. Using request sets, a System Administrator can: • grant users of a responsibility the ability to run selected reports and concurrent programs that are outside their request security group. • grant access to requests and other concurrent programs on a user–by–user basis. • guarantee that reports in the set run with print options and parameter values that cannot be edited by end users. Note: Multilingual requests cannot be run within request sets. As System Administrator, you have privileges beyond those of your application users, including a privileged version of the Request Set window. See: Request Set Windows, Oracle Applications User’s Guide. Defining Request Sets You can run the same set of concurrent requests regularly by defining a request set, and then submitting the request set from the Submit Requests form. As System Administrator, you can include any Standard Request Submission report or concurrent program in the request sets you define. When end users define a request set, they can only select from reports and programs that belong to their responsibility’s request security group. Use the Request Set form to create and edit request sets. See: Request Set Windows, Oracle Applications User’s Guide. Request Set Stages Organizing Request Sets into Stages Request sets are divided into one or more ”stages” which are linked to determine the sequence in which requests are run. Each stage consists 4–6 Oracle Applications System Administrator’s Guide of one or more requests that you want to run in parallel (at the same time in any order). For example, in the simplest request set structure, all requests are assigned to a single stage. This allows all of the requests to run in parallel. To run requests in sequence, you assign requests to different stages, and then link the stages in the order you want the requests to run. The concurrent manager allows only one stage in a request set to run at a time. When one stage is complete, the following stage is submitted. A stage is not considered to be complete until all of the requests in the stage are complete. One advantage of using stages is the ability to run several requests in parallel and then move sequentially to the next stage. This allows for a more versatile and efficient request set. Using Stage Status Like request sets and concurrent requests, stages can complete with different statuses. Each stage can complete with a status of Success, Managing Concurrent Programs and Reports 4–7 Warning, or Error. You can use these completion statuses to structure your request set, by defining which stage will follow the current stage based on its completion status. For example: a request set always begins with Stage 1. If Stage 1 completes with the status Success, then the Success link is followed, and Stage 2 is submitted. After Stage 2 completes, the set ends. If Stage 1 completes with Warning, then the Warning link is followed, and Stage 3 is submitted. After Stage 3 completes, the set ends. If Stage 1 completes with Error, then the Error link is followed, and Stage 4 is submitted. After Stage 4 completes, the request set ends. In this example, the stage status is determined using the Standard stage function. The Standard stage function uses the statuses of the requests within the stage to calculate the status for the stage. If all of the requests in a stage complete with a status of Success, then the status for the stage is Success. If one or more requests complete with a status of Error, then the status of the stage is Error. For a stage’s status to be Warning, one or more of the requests must have a status of Warning, and no request may have a status of Error. 4–8 Oracle Applications System Administrator’s Guide Linking of Stages There are no restrictions on linking stages within a request set. Any stage may be linked to any other stage, including itself. Two or more links can point to the same stage. For example, Stage 1 can link to Stage 2 if the completion status of Stage 1 is Success or Warning, and link to Stage 3 if the status is Error. You determine the end of a request set by not specifying a followup stage for each completion status. You can end a request set after any stage in the request set. When any stage completes with a status that does not link to another stage, the request set ends. Stage Evaluation Function The completion status of a stage is determined by a predefined function. The Oracle Applications Standard Stage Evaluation function uses the completion status of the requests it contains. Use this function to determine the status of a stage. Request Set Completion Status When a stage completes with a status for which there is no link defined, the request set ends. The completion status for the request set is determined by one of the following methods: Managing Concurrent Programs and Reports 4–9 • Using the completion status of the last stage run in the request set. This method is used by default. • The user can override the default behavior by defining a specific stage within the set to be ”critical”. If the request set runs a critical stage, then the completion status of the set will be the same as the completion status of the most recently run critical stage. This can be useful if the final stage of the set is a ”clean up” stage and is not considered important to the overall status of the set. Printing Request Sets On a report–by–report basis, you can select a different printer for each report in a request set. When you define a request set, print options, such as the printer a report is sent to, are saved so you do not have to specify them again when you run the request set. ☞ Attention: If a printer is defined for a concurrent program using the Concurrent Programs form, then that value cannot be updated, either by a user profile option setting, a request set definition, or when running the program or request set. Note: Defining a printer for a request set concurrent program (e.g., Request Set Payables Aging Reports) in the Concurrent Programs form has no effect; the printer definition is not referred to. Request Sets as Concurrent Programs When you define a request set or a stage within a request set that allows incompatibilities, a concurrent program is created to run the requests in your request set according to the instructions you enter. All concurrent programs that run request sets are titled Request Set <name of request set>, and programs that run request set stages are titled Request Set Stage <name of request set stage>. In the Concurrent Programs form, to query request set or request set stage concurrent programs on the basis of a program’s name, enter the following in the Name field: • ”Request Set” or ”Request Set Stage” before the name of the concurrent program • ”Request Set %” or ”Request Set Stage %” to perform a query on all request set programs Request set and request set stage concurrent programs create log files documenting the execution of the request set or stage. Each report or concurrent program within a request set or stage also creates its own log file. 4 – 10 Oracle Applications System Administrator’s Guide When you run a request set that allows incompatibilities, you submit a request to run the concurrent program that defines the request set. The request set concurrent program submits a request set stage concurrent program. The request set stage concurrent program submits the requests for the individual programs and reports within the stage. A request to run the request set concurrent program or the request set stage concurrent program is a Parent request, while the requests to run the programs and reports are Child requests. You can review the status of a request set and the programs it contains using the Concurrent Requests form. The following table displays request phase and status information that pertains to request sets. Phase Status Description RUNNING Paused Parent request pauses for all its Child requests to complete. For example, a request set stage pauses for all reports in the stage to complete. Resuming All requests submitted by the same Parent request have completed running. The Parent request resumes running. Table 4 – 1 (Page 1 of 1) Modifying Request Sets A request set can only be modified by its owner or by a System Administrator. To make modifications, query the request set you want to modify in the Request Set window. Note: If you wish to retain modifications to request sets provided by your Oracle application during upgrades, you must rename or recreate the request set using a different name before you upgrade. If you modify a predefined request set without changing the name, your modifications are overwritten when you upgrade your Oracle Applications. Request Sets and Owners There are significant differences between end user and System Administrator privileges when defining or editing request sets. End users own the request sets they create An end user can create a request set by selecting reports, other request sets, or concurrent programs that are part of the report security group assigned to his or her responsibility. Managing Concurrent Programs and Reports 4 – 11 When an end user creates a request set, the user automatically becomes the “owner” of the request set. Ownership is identified by the person’s application username. End users use the Request Set form to create a new request set, or to query and update any request sets they own. End users can only edit request sets they own. We sometimes refer to a request set that an end user owns as a private request set. Private request sets are not automatically added to a request security group. That is, other users cannot access your private request sets using the Submit Requests window unless the System Administrator assigns that request set to a request security group. Request sets owned by an end user are always available to that user, regardless of what responsibility the user is operating under. However, a standard submission form customized to display only reports in a request group using a code does not display private request sets. When a user signs on to Oracle Applications, the user can run requests, request sets, and concurrent programs included in: • their responsibility’s request security group • any request sets they own. End User Benefits from Private Request Sets Private request sets offer two main benefits to end users: 1. The request sets that users own are always available to them, regardless of which responsibility they are working under. 2. Users can create as many request sets as they want without adding request set choices to the list of standard submission concurrent programs that other users must select from. System Administrator Request Set Privileges As System Administrator, you can: • create request sets that include any reports or concurrent program. • query and edit all request sets using the Request Set form. • permit and define incompatibility rules for individual request sets. See: Request Set Incompatibilities: page 4 – 14. After you define a request set, you can assign a user to be its owner if you want the user to be able to run or edit this request set from any 4 – 12 Oracle Applications System Administrator’s Guide responsibility. Request sets without an owner cannot be edited or updated by any end users. In this way, you can guarantee print options and report parameters for a request set. You can also later edit the request set to remove or change its ownership properties. Other users can also run a request set if you, as System Administrator, assign the request set to their responsibility’s request security group. If you do not assign a request set to a request security group, then only the owner can run the request set. In this way, you can grant access to reports and concurrent programs on a user–by–user basis. Request Security Groups, Request Sets, and Reports As System Administrator you can add any request set, including private request sets, to a request security group. This allows you to provide members of a responsibility access to reports and programs outside their request security group. Request set editing and report viewing privileges are different for reports that belong to a user’s request security group than they are for reports that are not in the user’s request security group. User does not own request set All users can submit request sets that are added to a their request security group even if they contain requests that are not in the request security group. If the user does not own the request set, they: • cannot edit the request set. • cannot run an individual report by itself, but can only run the entire request set. User owns request set If the user owns the request set, they: • can add any other requests in their request security group to the request set. • can delete any request from the request set, regardless of whether that report is in their request security group. • can update print options or parameters for an individual report in the request set, if the report is in their request security group. • cannot run an individual report by itself, but can only run the entire request set. System Administrator Benefits from Request Sets Request sets offer three main benefits to System Administrators: 1. Request sets offer a means of controlling access to concurrent programs on a user–by–user basis. Managing Concurrent Programs and Reports 4 – 13 By defining a request set, assigning it an owner, and then not assigning the request set to any request security group, the reports and programs in the request set are only available to the owner. 2. By leaving the Owner field blank, System Administrators can create request sets whose individual programs and parameters cannot be edited or updated by end users. Only a System Administrator can edit a request set that has no owner. 3. System Administrators can provide members of a responsibility access to reports and programs outside their request security group. By defining a request set that contains reports or programs not in a request security group, and assigning that request set to the request security group, users can be granted run, but not edit privileges for selected reports or programs. Request Set Incompatibilities A request set is actually a concurrent program that submits requests to run each program in the request set. You can allow incompatibility rules to govern your request set so that the request set does not run at the same time as other reports or concurrent programs. You can also apply these rules to the stages that make up the request set. Use the Concurrent Programs form to query the request set concurrent program and list those programs, and/or stages you want to define as incompatible with your request set. See: Concurrent Programs: page 4 – 66. All concurrent programs that run request sets are titled Request Set <name of request set>. In the Concurrent Programs form, if you query a request set concurrent program on the basis of the program’s name, you must enter in the Name field the words: ”Request Set” before the name of a concurrent program ”Request Set %” to perform a query on all request set programs When you list a program as incompatible with your request set, the program will not run simultaneously within the same conflict domain as the request set or any of the reports within the set. See: Defining Program Incompatibility Rules: page 4 – 25 . 4 – 14 Oracle Applications System Administrator’s Guide Sharing Parameters in a Request Set Parameters, also referred to as arguments, are values that define aspects of a program’s execution. You can share a parameter and its entered value among some or all of the requests in your request set. You identify a parameter as shared by giving it a label. Then, for each concurrent program in your request set, you can assign the same label to a parameter for that program. Among the programs in your request set, the parameters for each program share or accept a common value. The first time you enter a value for any of the shared parameters, that value becomes the shared parameter’s value. This is useful, because you only have to enter a value once, rather than for each program in the request set. Behavior of Shared Parameters Selecting a value for a shared parameter provides a default for subsequent occurrences of the parameter. Changing a shared parameter’s value provides a new default for subsequent occurrences of the parameter, but does not affect prior requests in the set. Once all the shared parameters contain values, changing the value for a shared parameter has no effect on the other shared parameters. ☞ Attention: Do not hide shared parameters. Do not set shared parameters to Display = No (which prevents modifying the value) or Modify = No. This prevents updates to shared parameters, which are not propagated to other reports in the set, from generating unwanted inconsistencies. Managing Concurrent Programs and Reports 4 – 15 Figure 4 – 1 Example Settings for a Shared Parameter Report1 No Report 2 No Yes Report3 No Yes No Report 4 No Yes No 1 2 3 4 1 No 2 No No Yes Yes 3 No No Selecting “No” for the first report defaults “No” in subsequent reports. Selecting “Yes” for the second report, after selecting “No” for the first report, defaults “Yes” in subsequent reports, but does not change the first report (prior reports). Selecting “No” for the third report, after selecting “Yes” for the second report, after selecting “No” for the first report, defaults “No” in subsequent reports, but does not change the first or second reports (prior reports). Once all the reports parameters contain values, updating a shared parameter does not update the values in either subsequent or prior reports. For example, selecting “No” for the first report and navigating through all the parameter pop–up windows provides the “No” value for all of the shared parameters. Selecting “Yes” afterwards for the second report does not update the first, third, or fourth reports. Example – Shared Parameter Value We’ve created a request set containing two reports, a Concurrent Programs Report and the Concurrent Program Details Report. The two reports and their parameters are listed in the table below: REPORT PARAMETERS Concurrent Programs Report Application Name Concurrent Program Detail Report Application Name, Program Table 4 – 2 (Page 1 of 1) We identify the parameter Application Name as a parameter shared between the two reports. We want to enter a value only once, that is, 4 – 16 4 Oracle Applications System Administrator’s Guide when the Report Parameters window appears for the first report in the set, requiring us to enter Application Name. To identify a shared parameter, we give it a name, in this example, applname, and enter it as a Shared Parameter for each report. Figure 4 – 2 Report Parameters Sequence Prompt 1 2 3 Figure 4 – 3 Display Modify Main Menus Only Yes Application Name Yes Menu Name Yes Yes Yes Yes Shared Parameter Type Default Value Type Default Value applname Report Parameters Sequence Prompt 1 2 3 Display Modify Application Name Yes Responsibility Yes Yes Yes Shared Parameter applname Managing Concurrent Programs and Reports 4 – 17 Request Sets Report This report documents request set definitions, including the set’s owner, program incompatibilities, as well as printer and print style information. Use this report when defining or editing request set definitions. Report Parameters None. Report Headings The report headings provide you with general information about the contents of the report. 4 – 18 Oracle Applications System Administrator’s Guide Organizing Programs into Request Groups This essay explains how you can organize your applications programs and reports into request groups. It presents the following topics: • Request Security Groups • Using Codes with Request Groups • Customizing the Submit Requests Window using Codes • Report Group Responsibilities report Defining a Request Group When defining a request group, you can include: • all the reports and concurrent programs owned by an application • individual reports and concurrent programs • request sets, which are collections of reports and concurrent programs that may be selected from an application user’s request security groups • request set stage functions, which are used to calculate the status of stages within a request set. Two types of Request Group A request group is used by Oracle Applications at two different levels: 1. Responsibility level When a request group is assigned to a responsibility, it is referred to as a request security group, and it defines the reports, request sets, and concurrent programs that a user, operating under that responsibility, can select from the Submit Requests Window. 2. Form level When a request group is assigned a code, that code can be passed as a parameter to the Submit Requests Window. The code helps define the function that calls the Submit Requests Window. The list of values for that unique Submit Requests Window lists the reports, request sets, and concurrent programs in the request group. Request Security Groups When a request group is assigned to a responsibility, the request group is referred to as a request security group. Any user signed on under a Managing Concurrent Programs and Reports 4 – 19 responsibility can run the reports and concurrent programs contained in their responsibility’s request security group. The Submit Requests standard submission form displays a list of all the reports and programs in the current responsibility’s request security group. Using Codes with Request Groups Normally, when a menu calls the standard request submission form, that form can list the reports and concurrent programs contained in the report security group for the current responsibility. Alternatively, you can assign a code to a request group so that a customized standard submission form only displays a list of concurrent programs contained in that particular request group. A request group code is simply an argument that is passed from a menu to a customized standard submission form. To summarize: • Request group codes provide a form–based method of controlling user access to concurrent programs and reports. • A code can be assigned to a request group. • You can use the code as an argument passed from a menu to the standard submission form. • When a menu that calls the standard submission form uses the code, that form lists only those programs in the request group identified by the code. Customizing the Submit Requests Window using Codes You can give the Submit Requests Window a different title, and define the form so that it allows users to select only those reports or concurrent programs belonging to a request group that you have assigned a code to. To do this, you register a form function that references the Submit Requests Window, and you pass certain arguments to the function. Then you construct your menu to include this form function. See: Menus: page 2 – 38. Using a Request Group Code as an argument The following table describes the parameters passed to associate a request group with the Submit Requests Window and to customize the 4 – 20 Oracle Applications System Administrator’s Guide title of that form. Text is entered in the Parameters field of the Form Functions form. Parameter Syntax followed by Example Explanation REQUEST_GROUP_CODE =”Request Group Code” This parameter passes the request group’s code. (Required) REQUEST_GROUP_CODE = ”OE_CONC_PROGRAMS” REQUEST_GROUP_APPL_SHORT_NAME = ”Application short name” REQUEST_GROUP_APPL_SHORT_NAME = ”OE” TITLE =”Application_short_name:Message_Name” TITLE = ”FND:SRS_NEWTITLE” LOOKUP = ”Y|N” This parameter identifies the short name for the application associated with the request group. (Required) This parameter identifies a message whose contents define the title, as well as the application short name of that message. (Optional) This parameter indicates whether the TITLE parameter is a message name or a hardcoded string. The default value is ”Y”, which indicates that TITLE is a message name. (Optional) LOOKUP = ”Y” Table 4 – 3 (Page 1 of 1) Customizing the Submit Requests Window You can customize the Submit Request window in several ways. Rename the Window Title You can change the title to reflect the requests available in the window. See: Customizing the Submit Requests Window using Codes: page 4 – 20. Restrict Requests Available to A Request Group You can restrict the reports and programs available to those in a specified request group. See: Customizing the Submit Requests Window using Codes: page 4 – 20. Managing Concurrent Programs and Reports 4 – 21 Restrict Requests to a Single Request You can call Submit Requests form for a single request submission by passing the program/set name as parameters The parameters window pops up on navigation to the form when called with a program/report_set name. The form exits after the user acknowledges the displayed request ID for the submitted request. Restrict Requests To A List of Requests You can call Submit Requests form to submit one or more requests for a single program/set by passing the program/set name as parameters The parameters window pops up on navigation to the form and the user can submit one or more requests for the program that was passed as a parameter. Requests for other programs cannnot be submitted in this case. Pass Parameters Used in Value Set Parameters You can pass additional parameters to the Submit Requests form that can be referenced in the value sets to validate the request parameters. Pass Manufacturing ”ORG” Parameters You can pass 5 ORG related parameters and refer to them in the value set. Alternatively, you can bring up a ORG LOV on navigation to the Submit Requests form that populates the ORG parameters which can be referenced in the value sets. Complete List of All Submit Request Paramters Below is the comprehensive list of parameters supported by the ”Run Requests”/SRS form and additional information about their usage. • REQUEST_GROUP_CODE • REQUEST_GROUP_APPL_SHORT_NAME (used with REQUEST_GROUP_CODE) • CONCURRENT_PROGRAM_NAME • PROGRAM_APPL_SHORT_NAME (used with CONCURRENT_PROGRAM_NAME) • REQUEST_SET_NAME • SET_APPL_SHORT_NAME (used with REQUEST_SET_NAME) • SUBMIT_ONCE (default ’N’). 4 – 22 Oracle Applications System Administrator’s Guide SUBMIT_ONCE can be set to either Y or N ( N is the default). SUBMIT_ONCE is used in conjunction with CONCURRENT_PROGRAM_NAME or REQUEST_SET_NAME. If SUBMIT_ONCE is set to Y, then the form will exit after the Submit button is clicked. • TITLE • LOOKUP (default ’N’) • USE_ORG, ORG_ID, ORG_NAME, ORG_CODE, CHART_OF_ACCOUNTS_ID (five parameters) If USE_ORG is set to ’Y’ (default is ’N’) then the Submit Requests form checks to see if the other ORG parameters are set. If the parameters are not set, then it attempts to populate the parameters from the globals (GLOBAL.FND_ORG_ID, GLOBA L.FND_ORG_NAME, etc.). If the globals have not yet been set, the an ORG LOV shows, and both the parameters and the globals are populated from the LOV. Values sets should always reference the parameters, not the globals. • CHAR1, CHAR2, CHAR3, CHAR4, CHAR5 • DATE1, DATE2, DATE3, DATE4, DATE5 • NUMBER1, NUMBER2, NUMBER3, NUMBER4, NUMBER5 In your value sets, refer to these parameters as: :PARAMETER.CHAR1, :PARAMETER.DATE1, :PARAMETER.NUMBER1 etc. Managing Concurrent Programs and Reports 4 – 23 Report Group Responsibilities Report This report lists those responsibilities which have access to a report or a request set. Use this report when granting access privileges to reports and request sets, either by assigning reports and request sets to request security groups, or when assigning owners to a request set. Report Parameters Application Name Choose the application name associated with the report or request set. Report Name/Request Set Name Either choose the name of a report or request set. 4 – 24 Oracle Applications System Administrator’s Guide Defining Program Incompatibility Rules This essay explains how you can define incompatibility rules for your concurrent programs and reports. Incompatible and Run Alone Programs When a concurrent program is incompatible with another program, the two programs cannot access or update the same data simultaneously. When you define a concurrent program, you can list those programs you want it to be incompatible with. You can also list the program as incompatible with itself, which means that two instances of the program cannot run simultaneously. You can also make a program incompatible with all other concurrent programs by defining the program to be run–alone. There are two types of program incompatibilities, ”Global” incompatibilities, and ”Domain–specific” incompatibilities. You can define a concurrent program to be globally incompatible with another program –– that is, the two programs cannot be run simultaneously at all; or you can define a concurrent program to be incompatible with another program in a Conflict Domain. Conflict domains are abstract representations of groups of data. They can correspond to other group identifiers, such as sets of books, or they can be arbitrary. You define a concurrent program to be run–alone or to be incompatible with specific concurrent programs by editing the concurrent program’s definition using the Concurrent Programs window. See: Concurrent Programs: page 4 – 66. Program incompatibility and run–alone program definitions are enforced by the Conflict Resolution Manager (CRM). Note: The concept of ”Global” incompatibilities was introduced with Patch 2364876. With this patch, all pre–existing incompatibilities are converted to the type Global, unless both of the programs have a conflict domain parameter registered. This may mean that if you have been using the Concurrent:Conflicts Domain profile option for your custom programs, you may need to switch the incompatibility type to ”Domain–specific” to keep the expected behavior. Also, the two user–level constraints, set by the Concurrent:Active Request Limit and Concurrent:Sequential Managing Concurrent Programs and Reports 4 – 25 Requests profile options, are now enforced globally across all conflict domains. Request Sets – Incompatibilities Allowed When you define a request set or request set stage that allows incompatabilities, you create a concurrent program that runs the reports in your request set or stage according to the instructions you entered. Using the Concurrent Programs window, when you list programs as incompatible with a request set, those programs are prevented from starting until all the reports in the set or stage have completed running. To define incompatibility rules for a request set and request set stage: • For a request set check the Allow Incompatibility check box on the Request Set window. • For a request set stage check the Allow Incompatibility check box on the Stages window. • Navigate to the Incompatible Programs block in the Concurrent Programs form and list those programs that your request set or stage is incompatible with. All concurrent programs that run request sets are titled Request Set <name of request set> while all concurrent programs that run request set stages are titled Request Set Stage <name of stage>–Request Set <name of request set>. In the Concurrent Programs form, if you query a request set or stage concurrent program on the basis of the program’s name, you must enter in the Name field the words: • ”Request Set” or ”Request Set Stage” before the name of a concurrent program • ”Request Set %” to perform a query on all request set and stage programs Concurrent Conflict Domains If two programs are defined as incompatible with one another, the data these programs cannot access simultaneously must also be identified. In other words, to prevent two programs from concurrently accessing or updating the same data, you have to know where, in terms of data, they are incompatible. A Conflict Domain identifies the data where two incompatible programs cannot run simultaneously. 4 – 26 Oracle Applications System Administrator’s Guide Conflict Domains In Oracle Applications, data is stored in database tables that belong to a particular application. Each table may also contain information used to determine what conditions need to be met to access the individual records. These conditions may consist of one or more of the following data groupings: • SOB – based on the profile option GL_SET_OF_BOOKS • Multiple installations (referred to as MSOB) • Multiple Operating units (determined by profile option MO_OPERATING_UNIT) (referred as MULTIORG). • Multiple Orgs (determined by profile option INV_ORGANIZATION_ID, Used by Manufacturing Applications) • HR may use business group as a conflict resolution domain • FA may use FA book • etc... A conflict domain is an abstract representation of the groupings used to partition your data. There is no limit to the number of domains that can be defined, but excessive domains may hurt performance. All programs are assigned a conflict domain when they are submitted. If a domain is defined as part of a parameter the concurrent manager will use it to resolve incompatibilities. If the domain is not defined by a parameter the concurrent manager uses the value defined for the profile option Concurrent:Conflicts Domain. Lastly, if the domain is not provided by a program parameter and the Concurrent:Conflicts Domain profile option has not been defined the ’Standard’ domain is used. The Standard domain is the default for all requests. All programs use the Standard conflict domain unless a value is defined for the profile option Concurrent:Conflicts Domain or a conflict domain is defined through a program parameter. Each request submitted uses parameters which identify the records that it will access. For programs that are defined with incompatability rules an additional parameter (conflict domain parameter) is used. The conflict domain may be set automatically based on such variables as a login ID, set of books, or the organization the user is working in. The conflict domain parameter may in some cases be selected in the parameters field of the Submit Requests form. Once the parameter is determined the Conflict Resolution Manager (CRM) uses the domain to ensure that incompatible programs do not run simultaneously in the same domain. Managing Concurrent Programs and Reports 4 – 27 Enforcing Incompatibility Rules Concurrent managers read requests to start concurrent programs running. The Conflict Resolution Manager checks concurrent program definitions for incompatibility rules. If a program is identified as Run Alone, then the Conflict Resolution Manager prevents the concurrent managers from starting other programs in the same conflict domain. When a program lists other programs as being incompatible with it, the Conflict Resolution Manager prevents the program from starting until any incompatible programs in the same domain have completed running. The figure below illustrates the role of the Conflict Resolution Manager when enforcing program incompatibility rules. In a simple example without incompatibilities, a user submits a request to run a program. This request is then added to the request table which contains a list of requests. Managers then read requests from this table and start the associated concurrent programs. A more complex example users may have submitted one request with incompatibility rules and another request to run a program that must be run alone. In this case these requests are added to the request table, but the Conflict Resolution Manager then checks the statuses of the requests in the table and marks which requests are ready to be run. The concurrent managers then read only the ”ready” requests and start their concurrent programs. 4 – 28 Oracle Applications System Administrator’s Guide Figure 4 – 4 Conflict Resolution Manager enforces incompatibility rules User action requests a concurrent program to start Concurrent Managers read applicable requests and start concurrent programs System maintains list of requests to start concurrent programs REQUEST TABLE Request to run program Request to run Program X Managers read requests STANDARD CONCURRENT MANAGER Program X started SPECIALIZED CONCURRENT MANAGERS Conflict Resolution Manager identifies when incompatible and run–alone programs can be started REQUEST TABLE Request to run program with incompatibility rules Request to run Program Y Managers read ”ready” requests Checks status Request to run Run–Alone program Request to run Program Z CONFLICT RESOLUTION MANAGER Marks programs ready to run Program Y started STANDARD CONCURRENT MANAGER SPECIALIZED CONCURRENT MANAGERS Managers read ”ready” requests Program Z started Managing Concurrent Programs and Reports 4 – 29 Defining Data Groups This essay explains how you can define data groups, which specify your applications database connections. Introduction to Data Groups A data group is a list of Oracle Applications and the Oracle username assigned to each application. Each application in a data group must have a Oracle username assigned to it. An application may be listed only once in a data group. An application includes concurrent programs that execute commands on the application’s tables. An Oracle username and password allow access to an application’s tables in an Oracle database. Each Oracle username in a data group determines the database tables and table privileges accessible by the corresponding application or applications. Figure 4 – 5 Applications and ORACLE Usernames APPLICATION ORACLE USERNAME Application owns: Database Privileges: Concurrent Programs, which execute commands on the application’s tables. – Tables accessed – SELECT rows – UPDATE rows – DELETE rows DATABASE Data Group’s Purpose Each responsibility has a data group associated with it. A data group serves two purposes: 4 – 30 Oracle Applications System Administrator’s Guide 1. It identifies the Oracle username that forms connect to when you select the responsibility. 2. Concurrent managers use a data group to match the application that owns a report or concurrent program (submitted by a user of the responsibility) with a Oracle username. Using Data Groups Using Data Groups with multiple Sets of Books Use data groups to support multiple installations of an Oracle Applications product (for example, Oracle Payables) that supports multiple sets of books, where a different application is associated with each set of books. For example, with two installations of Oracle Payables supporting two Sets of Books, use data groups to indicate which Oracle Payables Oracle username to access from a certain General Ledger responsibility. Define a data group for each application installation (set of books). Define a responsibility for each application installation (set of books), and assign the appropriate data group to each responsibility. Using Data Groups to include custom applications Use data groups to include custom applications you develop using Oracle’s Application Object Library. To integrate a custom application with Oracle Applications, you must register the application using the Applications window. See: Applications Window: page 9 – 19. An example of using two Data Groups to support two installations of Oracle Payables, Oracle Purchasing, and Oracle Receivables is illustrated below. Managing Concurrent Programs and Reports 4 – 31 Figure 4 – 6 Using Data Groups with multiple product installations. Data Group ”Books 1” 1 General Ledger – GL Responsibility ”General Ledger User 1” General Ledger – GL Oracle Payables – AP1 2 Oracle Purchasing – PO1 2 Concurrent Manager Oracle Receivables – AR1 Oracle Receivables – AR1 Data Group ”Books 2” Responsibility ”General Ledger User 2” 3 General Ledger – GL General Ledger – GL Oracle Payables – AP2 Oracle Purchasing – PO2 Oracle Receivables – AR2 4 4 Concurrent Manager Oracle Receivables – AR2 1 Data Group Books 1 is assigned to Responsibility General Ledger User 1. 2 A user of responsibility General Ledger User 1 submits an Oracle Receivables report, which runs accessing data with ORACLE ID AR1 privileges. 3 Data Group Books 2 is assigned to Responsibility General Ledger User 2. Note: both responsibilities attach to the same set of forms (same ORACLE ID). 4 A user of responsibility General Ledger User 2 submits an Oracle Receivables report, which runs accessing data with ORACLE ID AR2 privileges. In this example a data group Books 1 is assigned to a responsibility called General Ledger User 1. A user with this responsibility can submit an Oracle Receivables report, which runs accessing data with ORACLE ID AR1 privileges. Another data group Books 2 is assigned to a responsibility called General Ledger User 2. Note: both 4 – 32 Oracle Applications System Administrator’s Guide responsibilities attach to the same set of forms, (same ORACLE ID). A user of responsibility General Ledger User 2 can submit an Oracle Receivables report which runs accessing data with ORACLE ID AR2 privileges. See: Defining Data Groups: page 4 – 30 Modifying Data Groups: page 4 – 33 Data Groups: page 4 – 81 ORACLE Users field help: page 9 – 13 Modifying Data Groups Predefined Standard Data Groups During installation or upgrade of Oracle Applications, a standard data group is defined that pairs each installed application with an ORACLE username (note: this occurs for each set of books). You cannot change or delete the predefined values for Application or ORACLE username in a Standard data group. However, you may modify the Tool ORACLE username and description, or add new Application–ORACLE username pairs to the group. Defining new Data Groups Since the installation process automatically defines Data Groups for Oracle Applications, you only need to define any additional data groups you wish to utilize. You can copy a data group and give it a new name, creating a new data group. Each application, its assigned Oracle username, and, if present, its Tool Oracle username and description, are copied to the new data group. Suggestion: Make a backup copy of your standard Data Group, and do not assign it to a responsibility. That way, if you ever inadvertently connect the wrong Oracle username to an application, or lose track of your applications’ configuration, you have an initial configuration you can revert to. Adding a custom application to a Data Group If a custom application is developed with Oracle Application Object Library, to include it in a Data Group, you: Managing Concurrent Programs and Reports 4 – 33 • Register the application with Oracle Applications using the Applications form • Assign an Oracle username to the application using the ORACLE Usernames form Registering an Oracle Username Registering an Oracle username with Oracle Applications sets up the privileges to the Oracle Application Object Library database tables (such as flexfield tables, menu tables, and so on) that are necessary to successfully use Oracle Applications. See: Overview of Applications DBA Duties: page 9 – 2. 4 – 34 Oracle Applications System Administrator’s Guide Custom Concurrent Programs This section provides information for system administrators on custom concurrent programs. It explains certain procedures and conventions for creating customized concurrent programs: • Log and Output Filenames • Oracle Tool Concurrent Programs • Pro*C Concurrent Programs • Submitting Concurrent Requests (CONCSUB) For information on creating custom concurrent programs, see the Oracle Applications Developer’s Guide. For information on setting up the development environment , see the Oracle Applications Concepts Guide. Log and Output Filenames Log and output files must have specific names and locations for users to review the files online. If you use the Oracle Application Object Library routine fdpwrt() to write to files, the concurrent managers automatically name the files according to the operating system’s naming conventions. This method of writing to files is completely portable. You do not have to rewrite your programs to name your log and output files differently if you port your application to another platform. Standard Names Standard names for log and output files are listed in the following table: File Type Location Filename Log Default: $<PROD>_TOP/$APPLLOG l<request ID>.req with Common Directory: $APPLCSF/$APPLLOG Output Default: $<PROD>_TOP/$APPLOUT Default: <USERNAME>.<request ID> with Common Directory: $APPLCSF/$APPLOUT or O<request ID>.out or user.out based on value of APPCPNAM Table 4 – 4 (Page 1 of 1) Managing Concurrent Programs and Reports 4 – 35 The variable parameters shown in this table have the following values: • <PROD>_TOP – The application’s top environment variable. • <Request ID> – The number that identifies the concurrent request. • <USERNAME> – Up to eight characters (uppercase) of the application username of the person who requested the concurrent process. Oracle Tool Concurrent Programs If you write concurrent programs in PL/SQL, SQL*Plus, or Oracle Reports, name the program exactly as you identified it in the Execution File field of the Concurrent Program Executable window, plus an extension if necessary. The following table lists the file extensions used for these programs and the directories where the programs should reside. (This does not apply to PL/SQL stored procedures, which are stored in the database.) The directories are under your custom application’s TOP directory, $<PROD>_TOP. If you use shared PL/SQL libraries with your Oracle Reports programs, and you want to include the libraries you write for your custom application, place the libraries in the $APPLPLS directory under your custom application’s TOP directory. Tool Extension Directory Comments SQL*Plus and PL/SQL .sql $APPLSQL The program name is case sensitive and must exactly match the Execution file you defined with Oracle Application Object Library. Oracle Reports .rdf $APPLREP Oracle Application Object Library looks for the .rdf file first. It uses the .rex file if it does not find the .rdf file. The program name is case sensitive and must exactly match the execution file name you defined with Oracle Application Object Library. SQL*Loader .ctl $APPLBIN Table 4 – 5 (Page 1 of 1) Pro*C Concurrent Programs When you write a concurrent program in Pro*C, copy the skeleton programs EXMAIN.c and EXPROG.c from the directory 4 – 36 Oracle Applications System Administrator’s Guide $FND_TOP/$APPLUSR. Rename the files and globally replace SUBROUTINE_NAME with the name of your subroutine. EXMAIN.c is the skeleton used for your spawned programs. EXPROG.c is the skeleton used for your program’s logic. This module can be used to create a spawned or an immediate program. For immediate programs, you must include your copy of EXPROG.c in a program library. See below for information on building a program library. You can use programs written with these skeleton programs as spawned or immediate concurrent programs. Spawned programs run as a separate process while immediate programs run linked in with a concurrent manager. ☞ Attention: Oracle Corporation provides information on immediate concurrent programs for backwards compatibility only. We strongly recommend that you do not create any new immediate concurrent programs. You should define your new Pro*C concurrent program executables as spawned. Naming Your Executable File Name your program’s executable file exactly as you identified it in the Execution File field of the Concurrent Program Executable window. Put your executable file in the $APPLBIN directory under your application’s TOP directory. Building Your Program Library Register a new program library with the Register Concurrent Program Library form and register all the programs you want to include in this library. Then enter ”Yes” in the Rebuild field and commit. This creates a request to build a new catalog file called <Library Name>.c under $<PROD>_TOP/$APPLLIB$ . You should compile the <Library Name>.c file after the request completes. Sample program libraries such as prgcat.c and prglib.c are located under $FND_TOP/$APPLUSR. Suggestion: For ease of maintenance, define your concurrent program executables as spawned. Compiling C and Pro*C Programs Your environment for compiling custom code depends on the file $FND_TOP/usrxit/devenv. If you change this file, you should reread it by logging in again so that the changes take effect. Managing Concurrent Programs and Reports 4 – 37 You compile your C or Pro*C programs into object modules using $FND_TOP/usrxit/Makefile. You then link your programs using adrelink. We do not support both compiling and linking executables using a single makefile or utility. To compile the C program example.c, use the following syntax. In all the examples, you should run the commands from the directory in which your files are located. $ make –f $FND_TOP/usrxit/Makefile example.o To compile the Pro*C program proexamp.pc, use the following syntax: $ make –f $FND_TOP/usrxit/Makefile proexamp.o To compile the four C and Pro*C programs a.c, b.c, c.pc, d.pc (all of which are in the current directory), use the following syntax: $ make –f $FND_TOP/usrxit/Makefile a.o b.o c.o d.o Linking Spawned Concurrent Programs as Stand–alone Programs If you want your spawned concurrent program to run as a stand–alone program, perform the following steps before compiling your stand–alone executable. For custom concurrent programs you define under your custom application (as recommended), you should copy the sample.mk file from $FND_TOP/usrxit to your $<PROD>_TOP/$APPLLIB directory. Modify your copy according to the instructions contained in the file. This is the file adrelink uses to link your stand–alone executables. Then enter the following commands. $ . $FND_TOP/fndenv Move to the directory in which your source files are kept. $ cd <source_directory> $ make –f $FND_TOP/$APPLLIB/Makefile <source file>.o Here, <source file> is the name of the file containing your program and <directory> is the directory where the source file is located. You can then link your stand–alone executable and place the executable in the $APPLBIN directory under the TOP directory for your custom application: $ adrelink force=y ”<appl_short_name> <program name>” In this relink command, <appl_short_name> is the application short name of the application your program belongs to, and <program name> is the program name. 4 – 38 Oracle Applications System Administrator’s Guide Linking your Immediate Concurrent Program To create a program library, you link your compiled library catalog with your program object files using an Oracle Application Object Library link procedure. ☞ Attention: Oracle Corporation provides information on immediate concurrent programs for backwards compatibility only. We strongly recommend that you do not create any new immediate concurrent programs. You should define your new Pro*C concurrent program executables as spawned. Make sure the environment variable $LUSRLIB includes the modules that define the functions for the immediate concurrent programs and your program library. Set the $LUSRPRG variable to include the object modules of your library catalog. The file devenv in the directory $FND_TOP/$APPLUSR defines the variables $LUSRLIB and $LUSRPRG. The file fndenv executes devenv. The files devenv and fndenv are UNIX shell scripts that set up the necessary environment variables. We recommend that you make a copy of the working program library before linking your new immediate concurrent program library in case your new program library does not function as expected. To link your program library, execute this command from the operating system: $ adrelink force=y ”fnd UFNDLIBR” This creates your new program library as UFNDLIBR. You can rename it, but the name of your new program library must be eight characters or less. Testing Pro*C Concurrent Programs You can use the following method to test your program. You must pass each argument needed by your program. To pass parameters, enter the following at the operating system prompt: $ <program name> <ORACLE username>/<ORACLE password> 0 Y \ [<parameter 1> <parameter 2>... ] The program name must be uppercase and the same name that you entered in the Execution File field of the Concurrent Program Executable window. The 0 and Y arguments are required. If any of your program–specific parameters includes spaces, enclose that parameter in double quotes. If a parameter contains a literal double quote, precede that mark with a backslash [\]. Managing Concurrent Programs and Reports 4 – 39 Host Language Concurrent Programs Name your program <name>.prog, where <name> is the value you enter in the Execution File field of the Concurrent Executable window. Then make a symbolic link using your execution file name (without an extension) to fndcpesr, which is located in the $FND_TOP/$APPLBIN directory. Put your executable file and the linked file in the $APPLBIN directory under your application’s TOP directory. For example, name your custom shell script CUSTOM.prog. Create a symbolic link to fndcpesr named CUSTOM. Place both files in your $APPLBIN directory. Create your concurrent program executable using the execution file CUSTOM. Host Program Parameters The concurrent manager running your program puts your program name in $0, the four arguments orauser/pwd, userid, username, and request_id in $1 to $4, and your program specific parameters in $5 and beyond. Each of these arguments can be at most 50 characters. For example, if you pass two parameters into your program, you use $5 to refer to the first parameter and $6 to refer to the second parameter. Protecting Your Oracle User Password In some cases, there are security concerns with passing your Oracle username and password directly to your HOST program. If you do not want the concurrent manager to pass your username/password to your program, you can have the manager pass it as an environment variable instead, or not pass it at all. First, define your concurrent program executable as a HOST program in the Concurrent Program Executable form. To have the username/password passed as an environment variable, enter the term ’ENCRYPT’ in the Execution Options field of the Concurrent Programs window when defining a concurrent program using this executable. ’ENCRYPT’ signals the concurrent manager to pass the username/password in the environment variable fcp_login. The argument $1 is left blank. If you do not want the username/password passed to the program at all, enter ’SECURE’ in the Execution Options field. The concurrent manager will not pass the username/password to the program. Success Codes By default, a shell script returns success (status code 0). If your script traps an error, use the UNIX exit command ”exit 1” to return failure (status code 1) to the concurrent manager running the program. 4 – 40 Oracle Applications System Administrator’s Guide Log and Out Files Use names in FCP_LOG and FCP_OUT. This way log and output/report files can be viewed online. Testing Your Program You should test using the <name>.prog file to make sure your script behaves correctly. Submitting Concurrent Requests (CONCSUB) You can test your concurrent program by submitting the program using the CONCSUB utility from the operating system. Syntax You can submit a concurrent request to run any concurrent program by running the CONCSUB program with the following syntax: $ CONCSUB <APPS username>/<APPS password> \ <responsibility application short name> \ <responsibility name> \ <username> \ [WAIT=N|Y|<n seconds>] \ CONCURRENT \ <program application short name> \ <program name> \ [PROGRAM_NAME=”<description>”] \ [REPEAT_TIME=<resubmission time>] \ [REPEAT_INTERVAL= <number>] \ [REPEAT_INTERVAL_UNIT=< resubmission unit>] \ [REPEAT_INTERVAL_TYPE=< resubmission type>] \ [REPEAT_END=<resubmission end date and time>] \ [START=<date>] \ [IMPLICIT=< type of concurrent request> \ [<parameter 1> ... <parameter n>] For parameters that follow the CONCURRENT parameter and include spaces, enclose the parameter argument in double quotes, then again in single quotes. Oracle Application Object Library requires this syntax because it parses the argument string twice. For example, to pass this argument to a program: Managing Concurrent Programs and Reports 4 – 41 This is an example pass this argument through CONCSUB: ’”This is an example”’ Example Here is an example of the command to run CONCSUB: $ CONCSUB APPS/APPS \ SYSADMIN \ ”System Administrator” \ SYSADMIN \ WAIT=N \ CONCURRENT \ FND \ FNDFMRTC \ PROGRAM_NAME=’”Register Custom Tables Weekly”’ \ REPEAT_INTERVAL=7 \ REPEAT_INTERVAL_UNIT=”DAYS” \ REPEAT_INTERVAL_TYPE=”START” \ START=’”08–JUN–96 23:55:00”’ CGL APPLSYS ALL CGL Parameters The following entries explain the required and optional parameters for submitting a concurrent program with CONCSUB. Default values are listed to the right. 4 – 42 username/ password Required. The ORACLE username and password that provides access to the data that your program uses. responsibility application short name Required. The application short name of the responsibility whose concurrent processing options you want to use. responsibility name Required. The name of your responsibility. If the name of your responsibility includes spaces, enclose that name in double quotes. username Required. The uppercase username of the application user whose concurrent processing options you want to use. Oracle Applications System Administrator’s Guide Optional. A flag that indicates whether to wait for the submitted request to complete. If you leave this parameter out, the default value of N makes CONCSUB return you to the operating system prompt without waiting for your request to complete. WAIT Set WAIT=Y to have CONCSUB check the request status every 60 seconds and return you to the operating system prompt when your request is completed. You can also enter an integer value for a number of seconds, as in WAIT=30, for CONCSUB to check for request completion every <number> seconds. ☞ Attention: Using WAIT=Y or WAIT=<number> requires that your request completes before CONCSUB returns you to the operating system. If the concurrent manager is down, your CONCSUB process waits indefinitely until the concurrent manager is started and the request completes. CONCURRENT Required. A flag that separates the program–specific parameters from the operating system parameters. program application short name Required. The application short name of your concurrent program. program name Required. The uppercase name of your program. It must be the short name that you enter in the Concurrent Programs window when defining a concurrent program. PROGRAM_ NAME Optional. A descriptive name for your program. The program field on the View Requests form displays this as the user–friendly program name. The concurrent program short name passed to CONCSUB is often hard for end users to understand, so the PROGRAM_NAME parameter allows you to pass a more easily remembered name for your concurrent program. If you do not specify a PROGRAM_NAME, the View Requests form displays the user–friendly program name specified in the Concurrent Programs window. You may also use the PROGRAM_NAME parameter to indicate the batch that your request processes for programs that process a set of data, Managing Concurrent Programs and Reports 4 – 43 where there could be several requests for a given program that are active at the same time. REPEAT_TIME ☞ Optional. The time of day to resubmit the request. The format for the time is HH24:MI or HH24:MI:SS. For example, REPEAT_TIME=14:30 resubmits your request daily at 2:30 p.m. Attention: Do not use REPEAT_TIME with other resubmission parameters except for the optional parameters REPEAT_END and START. REPEAT_ INTERVAL Optional. The interval between resubmission (a positive integer or real number). Use this parameter along with REPEAT_INTERVAL_UNIT to specify the time between resubmissions. REPEAT_ INTERVAL_ UNIT Optional. The unit of time used for the interval between resubmissions. The available units are MINUTES, HOURS, DAYS or MONTHS. Use this parameter along with REPEAT_INTERVAL to specify the time between resubmissions. For example, setting REPEAT_INTERVAL=12 and REPEAT_INTERVAL_UNIT=HOURS resubmits your request every twelve hours. The default value is DAYS. ☞ Attention: Do not use REPEAT_INTERVAL and REPEAT_INTERVAL_UNIT with REPEAT_TIME. ☞ Attention: Use REPEAT_INTERVAL_TYPE only if you use REPEAT_INTERVAL. REPEAT_ INTERVAL_ TYPE REPEAT_END Optional. Whether to time the resubmission interval from the requested start time of the request or from its completion. Set this parameter either to START or END. The default value is START. Optional. The date and time to stop resubmitting the concurrent request. Use one of the following for the format of the end date: ’”DD–MON–RR HH24:MI:SS”’ (as in ’”07–APR–02 18:32:05”’) or ’”DD–MON–RRRR HH24:MI:SS”’ (as in ’”07–APR–2002 18:32:05”’) Note that because this date format includes a space, you must enclose the date in double 4 – 44 Oracle Applications System Administrator’s Guide quotation marks and single quotation marks. You can also specify just the date: ’DD–MON–RR’ or ’DD–MON–RRRR’ Optional. A start date and time for your program in this format: START ’”DD–MON–RR HH24:MI:SS”’ (as in ’”07–APR–02 18:32:05”’) Because this date format includes a space, you must enclose the date in double quotation marks and single quotation marks. If you do not specify a start time, your program submits immediately and is processed by the next available concurrent manager. The default value is the current time. IMPLICIT Optional. Whether to show this concurrent request on the View Requests form. Specify NO, YES, ERROR or WARNING. The value IMPLICIT=NO allows the request to appear on the View Request form. The default value is NO. The value IMPLICIT=YES means that only the System Administrator’s privileged View Concurrent Requests form displays this request. Use this value if the request is not interesting to the user. Specify IMPLICIT=ERROR or IMPLICIT=WARNING, respectively, if you want the request to appear only if it fails or completes with warnings. REPEAT_DAYS ☞ Optional. The number of days after which to repeat the concurrent request, calculated from the last requested start date. The number can be a positive integer or real number. For example, REPEAT_DAYS=1.5 resubmits your request every 36 hours. Attention: Do not use REPEAT_DAYS with other resubmission parameters except for the optional parameters REPEAT_END and START. Suggestion: REPEAT_DAYS will become obsolete in a future release. You may therefore want to use REPEAT_INTERVAL, Managing Concurrent Programs and Reports 4 – 45 REPEAT_INTERVAL_TYPE and REPEAT_INTERVAL_UNIT instead of REPEAT_DAYS. parameter 1 ... parameter n 4 – 46 Optional. Your program–specific parameters. If a parameter includes spaces, enclose that parameter in double quotes, then in single quotes. If a parameter contains a double quotation mark as part of the argument, precede that mark with a backslash [\]. Oracle Applications System Administrator’s Guide Copying and Modifying Program Definitions These sections explain how you can copy and modify concurrent program definitions. Warning: Do not overwrite program definitions for existing concurrent programs. Copy the program, rename it, then make any desired modifications to the new program. Warnings for Modifying Program Definitions: page 4 – 53 Copying and Renaming a concurrent program You can copy your concurrent programs and modify them to create new programs with definitions that meet your needs. You can modify how a concurrent program operates by changing the program’s definition of: • incompatible programs • parameters (arguments) – parameter value sets • printer, print style, etc. Rather than overwrite a concurrent program’s definition, you should customize a program by copying and renaming an existing program, then modifying the new program to suit your needs. The figure below illustrates the basic steps in copying and modifying a new concurrent program. As the figure illustrates, you can copy parameters, and then modify the behavior of the parameters. Or you can copy the list of incompatible programs, and then modify the list. Finally , you can change the associated printer and/or print style. Managing Concurrent Programs and Reports 4 – 47 Figure 4 – 7 Modifying a Concurrent Program COPY AN EXISTING PROGRAM AND RENAME IT COPY ARGUMENTS – YES COPY INCOMPATIBLE PROGRAMS LISTING – YES MODIFY THE BEHAVIOR OF PARAMETERS MODIFY THE LIST OF INCOMPATIBLE PROGRAMS CHANGE PRINTER AND/OR PRINT STYLE Alter Program Priority You may wish to control the priority of some requests on a program level rather than at the user level. Setting the priority for a program allows any request to run that concurrent program to use your selected priority rather than the priority of the user submitting the request. For example, a user can submit a variety of requests at the standard priority determined by the value of the user profile Concurrent:Priority. However, when the user submits a request for a particular concurrent program, you want that request to have a higher priority. You assign that program a priority of 10. When the user requests that program to run, it receives the higher priority defined on the Concurrent Program window rather than the user’s standard priority and is processed ahead of other requests. When the users requests other concurrent programs that do not have a specified priority, those requests use the user’s Concurrent:Priority profile value. Modifying an Incompatible Programs list A concurrent program’s definition may include a list of incompatible programs. When a program is listed as incompatible with another 4 – 48 Oracle Applications System Administrator’s Guide program, the two programs cannot run simultaneously in the same conflict domain. See: Defining Program Incompatibility Rules: page 4 – 25. You can view which programs are incompatible with a concurrent program from the Incompatible Programs block on the Concurrent Programs window. The programs listed cannot run simultaneously within the same conflict domain as the concurrent program whose definition you are viewing. To modify the list of incompatible programs you can either: Add new programs to the list. The Scope field refers to whether you want the program by itself to be incompatible, or whether you want the program and all child requests, that is, concurrent programs started by the program as part of a request set, to be incompatible. • Delete programs from the list. ☞ Attention: To immediately effect any changes you make in the Incompatible Programs zone, you must navigate to the Administer Concurrent Managers window and choose Verify for the Internal Concurrent Manager. Concurrent Program Parameters Parameters, also referred to as arguments, are assigned to standard submission concurrent programs. To define a program as standard submission, set the value of the Standard Submission field in the Concurrent Programs form to Yes. ☞ Attention: All the mechanisms for parameter defaulting (including references to values of other parameters, user profiles, etc.) are evaluated only at submission time. There are two aspects to a parameter associated with a concurrent program: its value set and its behavior. Parameter value set The valid values the parameter can accept. The set of valid values is referred to as a value set. Parameter behavior How the parameter behaves within an application. For example, whether: – an entry value for the parameter is required in order for the program to work – the parameter is displayed to the end user Managing Concurrent Programs and Reports 4 – 49 – a default value is automatically provided for the parameter If you wish to define or modify a value set, you must first carefully plan your value set’s purpose and implementation. See: Planning and Defining Values and Value Sets (Oracle Applications Flexfields Guide.) Using the Concurrent Programs form, you can see a concurrent program’s parameters by choosing Parameters. Each parameter has a value set that defines what values are permissible for the parameter. To see the name of a parameter’s value set, look at the Value Set field in the Argument Details block. Control the Behavior of Request Parameters The behavior of parameters in programs running individually may differ from when those programs are run as part of a request set. See: Behavior of Program Parameters: page 4 – 52 Behavior of Parameters in Request Set: page 4 – 53 You define how a program’s parameters behave when you define the program using the Concurrent Programs form. Using the Request Set form, you can also define how a program’s parameters behave when the program is run as part of a request. In addition, you can define parameters in different programs in a request set to all share the same value by labeling them as Shared Parameters. See: Sharing Parameters in a Request Set: page 4 – 15. Warning: Modifying a concurrent program’s definition by adding new or deleting existing parameters, or changing a parameter’s value set can prevent the program from running. See: Warnings for Modifying Program Definitions: page 4 – 53. Not Displaying Parameters Using the Concurrent Programs form or the Request Set form, you can set a parameter so it does not display to an end user. Because parameters that do not display cannot be modified, setting a parameter to not display: • is a good security measure, guaranteeing a desired default value is used 4 – 50 Oracle Applications System Administrator’s Guide • means you should enter a valid default type and value at either the program’s definition, or if the program is part of a request set, at the request set’s definition. If you define a parameter to not display, then the parameter does not appear when the program is run using the Submit Requests form, nor does it appear in the Request Set form. If you define a parameter to not display, using the Request Set form, then the parameter does not appear on the Submit Requests form when the program is run as part of a request set. Viewing displayed parameters after a request is submitted After a request is submitted to run a concurrent program, the program’s parameters may be displayed in the Details block of the Concurrent Requests form. When a parameter is set to not display, it does not appear in the Details block of the Concurrent Requests form. These displayed parameter values exactly match the values that the concurrent manager passes to the concurrent program, and may or may not correspond to the displayed value that the user chose. For example, in the Submit Requests form, the user may choose ”Oracle General Ledger” as a parameter, but the corresponding application ID displays in the Concurrent Requests form. Suggestion: If your users encounter errors when running a program, you can look at the exact values that the concurrent program uses to help you diagnose the problem. Setting Default Values for Parameters Parameter default values can be changed by users when they submit a program or request set to run. You can set a default value for a parameter using the: • Default Type and Default Value fields in the Concurrent Programs form. These values cannot be changed on the Request Set form. • Default Type and Default Value fields in the Request Set form. This default definition applies only when the program is run as part of a request set. • Shared Parameter and Default Value fields in the Request Set form Managing Concurrent Programs and Reports 4 – 51 This default definition applies only when the program is run as part of a request set. All parameters labeled with the same shared parameter label default to the value you set in the Default Value field. Entering erroneous default values If the Default Type or Default Value for a parameter is incorrect, when the program is being set to run using the Submit Requests form, a window displays along with an error message. If the parameter is not displayed, you receive an error message. You cannot update a field that is not displayed. Warning: Be careful when entering the default type and default value, because these values are not validated with the value sets for your parameters. If you enter incorrect values, they do not appear as defaults when you run this request set using the Submit Requests form. Preventing modification of parameter values in a Request Set If a parameter is displayed in the Request Set form and there is no default value provided by the program’s definition, you can define a default value or have the parameter inherit a shared value, and then prevent end users from modifying that value. Changing responsibility to see changes take effect Modifying parameter behavior, for example, changing whether a parameter is displayed to the end user, takes effect immediately after you commit your change. However, some changes do not appear to you unless you change responsibility or select your current responsibility again. Behavior of Program Parameters The following table describes how a parameter’s details affect its behavior in the Concurrent Programs form and the Run Requests form. Parameter Details Concurrent Programs form Run Requests form Required Yes Parameter requires a value (entered by user or a default). Display Yes Parameter is displayed. Table 4 – 6 (Page 1 of 2) 4 – 52 Oracle Applications System Administrator’s Guide Parameter Details Default Type & Value Concurrent Programs form Run Requests form No Parameter is not displayed, and cannot be modified. Yes – Default Type and Value entered. A default value displays, and can be changed by the user. No default entered. No default value is displayed. Table 4 – 6 (Page 2 of 2) The following table describes how a parameter’s details affect its behavior in the Request Sets form and Run Requests form. Parameter Details Concurrent Programs form Required Display Modify Default Type & Value Request Set form Run Requests form Yes Parameter does not require a value. Parameter requires a value. Yes Parameter is displayed. – Display set to Yes. Parameter is displayed. Parameter is displayed. – Display set to No. Parameter is not displayed. No Parameter not displayed. Parameter not displayed. n/a Yes Value can be modified. n/a No Value cannot be modified. Yes – Default Type and Value entered. Default Type and Value cannot be modified. Default values can be changed by the user. No default entered. Yes – a Default Type and Value can be entered. Default values can be changed by the user. No – Default Type and Value are not entered. No default value is displayed. Table 4 – 7 (Page 1 of 1) Warnings for Modifying Program Definitions The following table lists warnings for modifying program definitions: Managing Concurrent Programs and Reports 4 – 53 Action Form Used Warning Changing the number of columns or rows in a report program. Concurrent Programs – Report Information region. Some report programs are written to produce a precise output. Changing the output definition could prevent the program from running, or produce poor results. Setting print style to Dynamic. Concurrent Programs – Report Information region – Style field. Dynamic print style informs the program to generate its output based on output dimensions that may vary. Special coding within a program is required to support the Dynamic print style. Changing the number of parameters in a program definition. Concurrent Programs – Parameters window. Programs are defined to expect x number of parameters. If you add a new parameter (x + 1), the program will ignore it. Deleting a parameter can cause a program not to run. Changing Value Sets. Concurrent Programs – Argument Details region – Value Set field. Programs expect values of a certain type and length. Programs may not operate if value set is changed. Changing tokens. Concurrent Programs – Argument Details region – Token field. Programs expect values of a certain type and length. Program may not operate if expected token is not received. Defining a concurrent executable or program’s execution method as Immediate. Concurrent Program Executables – Execution Method field. Concurrent programs whose execution method is Immediate must be registered with the program library FNDLIBR. Application developers can register programs with program libraries, System Administrators cannot. Concurrent Programs – Executable Information region – Method field. Table 4 – 8 (Page 1 of 1) Example of modifying a program’s parameters Consider the following example of when and how to modify a concurrent program’s parameters. If one user submits a large number of concurrent requests on a daily basis, for example, an Oracle Bill of Materials or Oracle Purchasing supervisor, you can create a streamlined purge program that only purges that user’s concurrent processing records. 4 – 54 Oracle Applications System Administrator’s Guide You can run this program as System Administrator and have it automatically resubmitted on a specific time interval. You could also create a request set containing this one program and define the user as the owner of the request set. Then, if you do not assign the request set to any report security group, only the user (owner) can run the program. This way, the user can be responsible for purging their own records. The System Administrator’s Purge Concurrent Request and/or Manager Data program contains twelve parameters. You can copy, rename, and modify the program so it displays only three parameters, with only one parameter requiring user entry. See: Purge Concurrent Request and/or Manager Data: page 5 – 20. The table below summarizes the steps to follow in our example. Form Used Task Concurrent Programs (Concurrent Programs Define) Query the Application Object Library program named ”Purge Concurrent Request and/or Manager Data” and press Copy. Select both Copy Arguments and Copy Incompatible Programs. Enter a new name for the program you are going to copy, for example, enter JSMITH PURGE. Concurrent Programs To modify the JSMITH PURGE program’s parameters, select the Parameters button. Table 4 – 9 (Page 1 of 2) Managing Concurrent Programs and Reports 4 – 55 Form Used Task Concurrent Programs, Parameter Window Modify the following seven parameters so they do not display (user JSMITH cannot see nor change the program’s default values). – Oracle ID – Program Application – Program – Manager Application – Manager – Responsibility Application – Responsibility Modify the following three parameters so they do not display (user JSMITH cannot see nor change the default values you set). Set the parameters to the following (Type=Constant) defaults: – Entity = Request – Mode = Age – User Name = JSMITH Leave the following two parameters unchanged so they display. Mode Value will require JSMITH to enter a value, and Report is set to a default value of ”Yes”. – Mode Value – Report Request Set (Reports Set) Create a request set with one program in it, the JSMITH PURGE program. Enter JSMITH in the Owner field. If this request set is not assigned to any report security group, only JSMITH will be able to run the JSMITH PURGE program. Standard Request Submission program form. For example, the Run Reports form (Reports Run) When first submitting the JSMITH PURGE program to run, navigate to the Resubmission Options region and enter, for example, ”5” and ”Days” in the Interval field. Table 4 – 9 (Page 2 of 2) 4 – 56 Oracle Applications System Administrator’s Guide Concurrent Program Details Report This report documents concurrent program definitions, including executable file information, execution method, incompatible program listings, and program parameters. If a concurrent program generates a report, column and row information, as well as print output and print style, are also documented. Use this report when considering concurrent program modifications, such as modifying program incompatibility rules. Report Parameters Caution: If you do not enter any parameters, the report returns values for all concurrent programs, and may be very lengthy. Application Name Choose the application name associated with the concurrent program whose program definition details you wish to report on. Choose only an application name, without a program name, if you wish to run a program definition details report on all concurrent programs associated with an application. Program Choose the name of a concurrent program whose program definition details you wish to report on. You must enter a value for Application Name before entering a value for Program. Report Headings The report headings display the specified report parameters and provide you with general information about the contents of the report. Managing Concurrent Programs and Reports 4 – 57 Concurrent Programs Report This report shows which concurrent programs are currently enabled nand which programs are disabled. Use this report to record the execution method, argument method, run alone status, standard submission status, request type, and print style information associated with your concurrent programs. Report Parameters Application Name Choose the application name associated with the concurrent programs whose program information you wish to report on. If you do not enter an application name, the report will return values for all concurrent programs. Report Headings The report headings display the specified report parameters and provide you with general information about the contents of the report. 4 – 58 Oracle Applications System Administrator’s Guide Request Groups Window Use this window to define a request group. A request security group is the collection of requests, request sets, and concurrent programs that a user, operating under a given responsibility, can select from the Submit Requests window. System Administrators: • Assign a request security group to a responsibility when defining that responsibility. A responsibility without a request security group cannot run any requests using the Submit Requests window. Managing Concurrent Programs and Reports 4 – 59 • Can add any request set to a request security group. Adding a private request set to a request security group allows other users to run that request set using the Submit Requests window. Users: • Can create their own private request sets using the Request Sets window. In a private request set, users can include only the requests you assign to their request security group. • Cannot update another user’s private request set using the Request Sets window. • Cannot delete a private request set if it is assigned to a request security group. Request Groups Block Group Use the request group’s name to assign the request group to a responsibility on the Responsibilities window. An application name and request group name uniquely identify a request group. Application Select the name of the application you wish to associate with your request group. An application name and a request security group name uniquely identify a request security group. This application name does not prevent you from assigning requests and request sets from other applications to this request group. Code Assign a code to this request group. Some products use the request group code as a parameter that identifies the requests a customized standard submission form can select. See: Customizing the Submit Requests Window using Codes: page 4 – 20. Requests Block Specify the requests and request sets in the request group. Type Choose program or set to add one item, or choose application to include all requests in an application 4 – 60 Oracle Applications System Administrator’s Guide Concurrent Program Executable Window Define a concurrent program executable for each executable source file you want to use with concurrent programs. The concurrent program executable links your source file logic with the concurrent requests you and your users submit to the concurrent manager. ☞ Attention: You cannot add new immediate programs to a concurrent manager program library. We recommend that you use spawned concurrent programs instead. Concurrent Program Executable Block The combination of application name plus program name uniquely identifies your concurrent program executable. See: Concurrent Programs Window: page 4 – 66 Executable Enter a name for your concurrent program executable. In the Concurrent Programs window, you assign this name to a concurrent Managing Concurrent Programs and Reports 4 – 61 program to associate your concurrent program with your executable logic. Short Name Enter a short name for your concurrent program executable. Application The concurrent managers use the application to determine in which directory structure to look for your execution file. Execution Method The execution method cannot be changed once the concurrent program executable has been assigned to one or more concurrent programs in the Concurrent Programs window. 4 – 62 Oracle Technical Documentation Handbook The possible execution methods are: Host The execution file is a host script. Oracle Reports The execution file is an Oracle Reports file. PL/SQL Stored Procedure The execution file is a PL/SQL stored procedure. Java Stored Procedure The execution file is a Java stored procedure. Java Concurrent Program The execution file is a program written in Java. Multi Language Function The execution file is a function (MLS function) that supports running concurrent programs in multiple languages. SQL*Loader The execution file is a SQL script. SQL*Plus The execution file is a SQL*Plus script. Spawned The execution file is a C or Pro*C program. Immediate The execution file is a program written to run as a subroutine of the concurrent manager. We recommend against defining new immediate concurrent programs, and suggest you use either a PL/SQL Stored Procedure or a Spawned C Program instead. Request Set Stage Function PL/SQL Stored Function that can be uesd to calculate the completion statuses of request set stages. Execution File Name Enter the operating system name of your execution file. Some operating systems are case sensitive, so the name entered here should match the file name exactly. Do not include spaces or periods (.) in the execution file name, unless the execution method is PL/SQL stored procedure or Request Set Stage Function. The maximum size of an execution file name is 60 characters. Subroutine Name Enter the name of your C or Pro*C program subroutine here. Do not use spaces or periods (.) in this field. Managing Concurrent Programs and Reports 4 – 63 Only immediate programs or spawned programs using the Unified C API use the subroutine field. We recommend against defining new immediate concurrent programs, and suggest you use either a PL/SQL Stored Procedure or a Spawned C Program instead. Stage Function Parameters The Stage Function Parameters button opens a window that allows you to enter parameters for the Request Set Stage Function. This button is only enabled when you select Request Set Stage Function as your Execution Method. Stage Function Parameters Window List the Parameters that your custom Stage Function uses. Parameter Enter a name for the Parameter. This name will be displayed in the Stage Functions Parameter window of the Request Set form. 4 – 64 Oracle Technical Documentation Handbook Short Name Enter a short name that will be used by the function to reference the parameter. Managing Concurrent Programs and Reports 4 – 65 Concurrent Programs Window Use this window to define and modify your concurrent programs. Prerequisites • Build the execution file for your concurrent program. • Use the Concurrent Program Executables window to define a concurrent program executable for your operating system program. 4 – 66 Oracle Applications System Administrator’s Guide Concurrent Programs Block The combination of application name plus program name uniquely identifies your concurrent program. Program You see this longer, more descriptive name when you view your requests in the Requests window. If this concurrent program runs through Standard Request Submission, you see this name in the Submit Requests window when you run this program. Short Name Enter a brief name that Oracle Applications can use to associate your concurrent program with a concurrent program executable. Application The program’s application determines what ORACLE username your program runs in and where to place the log and output files. Enabled Indicate whether users should be able to submit requests to run this program and the concurrent managers should be able to run your program. Disabled programs do not show up in users’ lists, and do not appear in any concurrent manager queues. You cannot delete a concurrent program because its information helps to provide an audit trail. Executable Executable: Name Select the concurrent program executable that can run your program. You define the executable using the Concurrent Program Executables window. You can define multiple concurrent programs using the same concurrent program executable. See: Concurrent Program Executables: page 4 – 61. Executable: Options Some execution methods, such as Oracle Reports, support additional execution options or parameters. You can enter such options in this field. The syntax varies depending on the execution method. If you define a concurrent program with the bitmapped version of Oracle Reports, you can control the orientation of the bitmapped report Managing Concurrent Programs and Reports 4 – 67 by passing the ORIENTATION parameter or token. For example, to generate a report with landscape orientation, specify the following option in the Options field: ORIENTATION=LANDSCAPE Do not put spaces before or after the execution options values. The parameters should be separated by only a single space. You can also specify an orientation of PORTRAIT. You can control the dimensions of the generated output with the PAGESIZE parameter. A specified <width>x<height> in the Options field overrides the values specified in the report definition. For example: ORIENTATION=LANDSCAPE PAGESIZE=8x11.5 The units for your width and height are determined by your Oracle Reports definition. You set the units in your Oracle Reports menu under Report => Global Properties => Unit of Measurement. If the page size you specify with the PAGESIZE parameter is smaller than what the report was designed for, your report fails with a ”REP–1212” error. Executable: Method The execution method your concurrent program uses appears here. Valid values are: 4 – 68 Spawned Your concurrent program is a stand–alone program in C or Pro*C. Host Your concurrent program is written in a script for your operating system. Immediate Your concurrent program is a subroutine written in C or Pro*C. Immediate programs are linked in with your concurrent manage and must be included in the manager’s program library. Oracle Reports Your concurrent program is an Oracle Reports script. Oracle Applications System Administrator’s Guide PL/SQL Stored Procedure Your concurrent program is a stored procedure written in PL/SQL. Java Stored Procedure Your concurrent program is a Java stored procedure. Java Concurrent Program Your concurrent program is a program written in Java. Multi Language Function A multi–language support function (MLS function) is a function that supports running concurrent programs in multiple languages. You should not choose a multi–language function in the Executable: Name field. If you have an MLS function for your program (in addition to an appropriate concurrent program executable), you specify it in the MLS Function field. SQL*Loader Your concurrent program is a SQL*Loader program. SQL*Plus Your concurrent program is a SQL*Plus or PL/SQL script. Request Set Stage Function PL/SQL Stored Function that can be used to calculate the completion statuses of request set stages. You can switch between Spawned and Immediate, overriding the execution method defined in the Concurrent Program Executable window, only if either method appears when the executable is selected and both an execution file name and subroutine name have already been specified in the Concurrent Program Executable window. See: Concurrent Program Executables: page 4 – 61. Priority You can assign this program its own priority. The concurrent managers process requests for this program at the priority you assign here. If you do not assign a priority, the user’s profile option Concurrent:Priority sets the request’s priority at submission time. Request Type If you want to associate your program with a predefined request type, enter the name of the request type here. The request type can limit which concurrent managers can run your concurrent program. Managing Concurrent Programs and Reports 4 – 69 Incrementor For use by Oracle Applications internal developers only. The incrementor function is shown here. MLS Function The MLS function, if any, used by the program. The Multilingual Concurrent Request feature allows a user to submit a request once to be run multiple times, each time in a different language. If this program utilizes this feature the MLS function determines which installed languages are needed for the request. See: Oracle Applications Developer’s Guide Use in SRS Check this box to indicate that users can submit a request to run this program from a Standard Request Submission window. If you check this box, you must register your program parameters, if any, in the Parameters window accessed from the button at the bottom of this window. Allow Disabled Values If you check the Use in SRS box, you can also check this box to allow a user to enter disabled or outdated values as parameter values. Many value sets use special table columns that indicate whether a particular value is enabled (using ENABLED_FLAG, START_DATE_ACTIVE, and END_DATE_ACTIVE columns). These value sets normally allow you to query disabled or outdated values but not enter them in new data. For Standard Request Submission, this means that a user would not normally be allowed to enter disabled values as report parameter values when submitting a report, even if the report is a query–only type report. Run Alone Indicate whether your program should run alone relative to all other programs in the same logical database. If the execution of your program interferes with the execution of all other programs in the same logical database (in other words, if your program is incompatible with all programs in its logical database, including itself), it should run alone. 4 – 70 Oracle Applications System Administrator’s Guide You can enter any specific incompatible programs in the Incompatible Programs windows. Enable Trace Turns on SQL tracing when program runs. Restart on System Failure Use this option to indicate that this concurrent program should automatically be restarted when the concurrent manager is restored after a system failure. NLS Compliant This box is checked if the program allows for a user to submit a request of this program that will reflect a language and territory that are different from the language and territory that the users are operating in. For example, users can enter orders in English in the United Kingdom, using the date and number formats appropriate in the United Kingdom, then generate invoices in German using the date and number formats appropriate to their German customers. If this box is left blank then a user can associate any installed language with the request, but the territory will default to the territory of the concurrent manager environment. Note that this option should be set only by the developer of the program. The program must be written as NLS Compliant to utilize this feature. See: the Oracle Applications Developer’s Guide. Note that this option should be set only by the developer of the program. The program must be written as NLS Compliant to utilize this feature. Output Format Select the output format from the following: • HTML • PCL (HP’s Printer Control Language) • PDF • PS (Post Script) • Text Managing Concurrent Programs and Reports 4 – 71 ☞ Attention: If you choose HTML or PDF as the output type with Oracle Report programs, you must use an appropriate printer driver that handles HTML or PDF files. Save Indicate whether to automatically save the output from this program to an operating system file when it is run. This value becomes the default for all requests submitted for this program. The output of programs with Save set to No is deleted after printing. If this is a Standard Request Submission program, users can override this value from the Submit Requests window. Print Enter Yes or No to indicate whether to allow the concurrent managers to print your program’s output to a printer. If you enter No, your concurrent program’s output is never sent to the printer. Columns / Rows Enter the minimum column and row length for this program’s report output. Oracle Applications uses this information to determine which print styles can accommodate your report. Style The print style you select depends on your system and printer setup. Print styles include: • 132 columns and 66 lines (Landscape) • 180 columns and 66 lines (Landwide) • 80 columns and 66 lines (Portrait) • 132 columns and 62 lines (A4) Your list is limited to those styles that meet your program’s columns and row length requirements. Style Required If your program requires a specific print style (for example, a checkwriting report), use this check box to enforce that print style. Printer If you want to restrict your program’s output to a single printer, enter the name of the printer to which you want to send your output. If your 4 – 72 Oracle Applications System Administrator’s Guide program has minimum or maximum columns or rows defined, your list of values is limited to those printers that can support your program’s requirements. Users cannot override your choice of printer from the Submit Requests or Requests windows. Concurrent Programs Use these buttons to open detail windows for program incompatibilities your program parameters. Buttons Copy to... Choose this button to create another concurrent program using the same executable, request and report information. You can elect to copy the incompatibility and parameter details as well. Session Control Choose this window to specify options for the database session of the concurrent program when it is executed. Incompatibilities Choose this button to open the Incompatible Programs window. Parameters Choose this button to open the Concurrent Program Parameters window. Copy to Window Create another concurrent program using the same executable, request and report information as the current program. You can optionally copy the incompatibility and parameter details information as well. See: Incompatible Programs Window: page 4 – 74 Session Control Window Use this window to specify options for the database session of the concurrent program when it is executed. Consumer Group Optionally specify the resource consumer group for the concurrent program. See: Resource Consumer Groups in Oracle Applications: page 9 – 7 Rollback Segment Optionally specify a rollback segment to be used with the concurrent program. This rollback segment will be used instead of the default and will be used up until the first commit. Managing Concurrent Programs and Reports 4 – 73 ☞ Attention: If you specify a rollback segment here, your concurrent program must use the APIs FND_CONCURRENT.AF_COMMIT and FND_CONCURRENT.AF_ROLLBACK to use the specified rollback segment. See: the Oracle Applications Developer’s Guide. Optimizer Mode Optionally specify an optimizer mode. You can choose ALL_ROWS, FIRST_ROWS, Rules, or Choose. You would specify an optimizer mode only for a custom program that may not perform well with the default cost–based optimizer (CBO) and needs tuning. You can use a different optimizer mode until your program is tuned for CBO. Incompatible Programs Window 4 – 74 Oracle Applications System Administrator’s Guide Identify programs that should not run simultaneously with your concurrent program because they might interfere with its execution. You can specify your program as being incompatible with itself. Application Although the default for this field is the application of your concurrent program, you can enter any valid application name. Name The program name and application you specify must uniquely identify a concurrent program. Your list displays the user–friendly name of the program, the short name, and the description of the program. Scope Enter Set or Program Only to specify whether your concurrent program is incompatible with this program and all its child requests (Set) or only with this program (Program Only). Type Enter Domain or Global. If you choose Domain, the incompatibility is resolved at a domain–specific level. If you choose Global, then this concurrent program will be considered globally incompatible with your concurrent program, regardless of which domain it is running in. Managing Concurrent Programs and Reports 4 – 75 Concurrent Program Parameters Window Enter and update the program parameters that you wish to pass to the program executable. Program parameters defined here should match the variables in your execution file. Conflicts Domain Parameter Enter the parameter which will hold the value of the conflict domain of the program. For information on conflict domain parameters, see Concurrent Conflict Domains: page 4 – 26. 4 – 76 Oracle Applications System Administrator’s Guide Security Group This field is for HRMS security only. See: Customizing, Reporting, and System Administration in Oracle HRMS. Sequence Choose the sequence numbers that specify the order in which your program receives parameter values from the concurrent manager. Parameter Enter the parameter name. The value is case insensitive. Enabled Disabled parameters do not display at request submission time and are not passed to your execution file. Argument Detail You specify information about your parameter almost exactly as you define a flexfield segment. Validation Information Value Set Enter the name of the value set you want your parameter to use for validation. You can only select from independent, table, and non–validated value sets. The maximum size of your value set is 240 characters. ☞ Attention: If you are using a value set of dates, this value set should have a format type of either Standard Date or Standard DateTime if you are using the Multilingual Request feature. Default Type If you want to set a default value for this parameter, identify the type of value you need. Valid types include: Constant The default value can be any literal value. Profile The default value is the current value in the user profile option defined in the Default Value field. Use the profile option name, not the end–user name. You do not need to include $PROFILE$. SQL Statement The default value is determined by the SQL statement you defined in the Default Value field. Managing Concurrent Programs and Reports 4 – 77 Segment The default value is the value entered in a prior segment of the same parameter window. Default Value You can enter a default value for the parameter. This default value for your parameter automatically appears when you enter your parameter window. You determine whether the default value is a constant or a context–dependent value by choosing the default type. Your default value should be a valid value for your value set. Otherwise you see an error message when you enter your parameter window on the Run Request window and your default value does not appear. Valid values for each default type include: Constant Enter any literal value for the default value. Profile The default value is the current value of the user profile option you specify here. Enter the profile option name, not the end–user name. Segment The default value is the value entered in a prior segment of the same flexfield window. Enter the name of the segment whose value you want to copy. SQL Statement The default value is determined by the SQL statement you enter here. Your SQL statement must return exactly one row and one column in all cases. Required If the program executable file requires an argument, you should require it for your concurrent program. Enable Security If the value set for this parameter does not allow security rules, then this field is display only. Otherwise you can elect to apply any security rules defined for this value set to affect your parameter list. Range Choose either Low or High if you want to validate your parameter value against the value of another parameter in this structure. Parameters with a range of Low must appear before parameters with a 4 – 78 Oracle Applications System Administrator’s Guide range of High (the low parameter must have a lower number than the high parameter). For example, if you plan two parameters named ”Start Date” and ”End Date,” you may want to force users to enter an end date later than the start date. You could assign ”Start Date” a range of Low and ”End Date” a range of High. In this example, the parameter you name ”Start Date” must appear before the parameter you name ”End Date.” If you choose Low for one parameter, you must also choose High for another parameter in that structure (and vice versa). Otherwise you cannot commit your changes. If your value set is of the type Pair, this field is display only. The value defaults to Pair. Window Information Display Indicate whether to display this parameter in the Parameters window when a user submits a request to run the program from the Submit Requests window. You should provide a default type and value for any non–displayed parameter. Display Size Enter the field length in characters for this parameter. The user sees and fills in the field in the Parameters window of the Submit Requests window. You should ensure that the total of the value set maximum sizes (not the display sizes) for all of your parameters, plus the number of separators you need (number of parameters minus one), does not add up to more than 240. If your program values’ concatenated length exceeds 240, you may experience truncation of your data in some forms. Description Size Enter the display length in characters for the parameter value description. Your window may show fewer characters of your description than you specify here if there is not enough room (determined by the sum of your longest prompt plus your display size for this parameter plus seven). However, your window does not display more characters of the description than you specify here. Prompt A user sees the prompt instead of the parameter name in the Parameters window of the Submit Requests window. Managing Concurrent Programs and Reports 4 – 79 The default is the name of the parameter. Concatenated Description Size Enter the display length in characters for the parameter value description. The user sees the parameter value in the Parameter Description field of the Submit Requests and View Requests forms. The Parameter Description field concatenates all the parameter values for the concurrent program. Suggestion: We recommend that you set the Concatenated Description Size for each of your parameters so that the total Concatenated Description Size for your program is 80 or less, since most video screens are 80 characters wide. Token For a parameter in an Oracle Reports program, the keyword or parameter appears here. The value is case insensitive. For other types of programs, you can skip this field. See: Incompatible Programs Window: page 4 – 74 4 – 80 Oracle Applications System Administrator’s Guide Data Groups Window Use this window to define data groups. A data group is a list of Oracle Applications and the ORACLE usernames assigned to each application. • If a custom application is developed with Oracle Application Object Library, it may be assigned an ORACLE username, registered with Oracle Applications, and included in a data group. Managing Concurrent Programs and Reports 4 – 81 An ORACLE username allows access to an application’s tables in an ORACLE database. All data groups automatically include an entry for Application Object Library. • A concurrent manager running reports or programs under Oracle Applications refers to a data group to identify the ORACLE username it uses to access an application’s tables in the database. • Transaction managers running synchrous programs can only run programs submitted from responsibilities assigned the same data group as the transaction manager. If you create custom data groups, you should create new transaction managers for the applications that use transaction managers. Consult your product documenation to determine if your application uses transaction managers. Each responsibility within Oracle Applications is assigned a data group. During installation or upgrading of Oracle Applications, a standard data group is defined, pairing each installed application with an ORACLE username (note: a standard data group is defined for each set of books). You cannot change or delete the predefined values for Application or ORACLE username in a Standard data group. However, you may: • Modify the Tool ORACLE username and description associated with an Application–ORACLE username pair. • Add new Application–ORACLE username pairs to the group. Data Groups Block Create a new data group, or modify an existing data group. You cannot change or delete the predefined values for Application or ORACLE username in a Standard data group. However, you may modify the Tool ORACLE username and description, or add new Application–ORACLE username pairs to a Standard group. Data Group A data group is uniquely identified by its name. You cannot create a data group with a name already in use. Once saved, data group names cannot be edited. Application–ORACLE ID Pairs Block Pair applications with ORACLE usernames. 4 – 82 Oracle Applications System Administrator’s Guide When you copy a data group, each application, its assigned ORACLE username, and, if present, its Tool ORACLE username and description, appear in this zone automatically. All data groups automatically include an entry for Application Object Library. Application Within each data group, an application can be listed only one time. Oracle ID Select the ORACLE ID you want to assign to an application. An application uses an ORACLE ID to access tables in the database. Each ORACLE ID allows access to a predefined set of tables in the database. Each responsibility within Oracle Applications is assigned to a data group. When you sign on to Oracle Applications under a given responsibility: • Each application’s programs and reports access application tables in the database using the ORACLE username assigned to it in the responsibility’s data group. Copy Applications From... Use this button to copy an existing data group, then add or delete application–ORACLE username pairs to create a new data group. Managing Concurrent Programs and Reports 4 – 83 4 – 84 Oracle Applications System Administrator’s Guide CHAPTER 5 Managing Concurrent Processing T his chapter explains concurrent processing in Oracle Applications and how you can manage programs running concurrently in the background while your users continue to perform online tasks. The essays in this chapter are organized under the following topics: • Overview of Concurrent Processing • Reviewing Requests and Log Files • Changing the Status of Concurrent Requests • Managing Concurrent Processing Files and Tables • Concurrent Processing User Profile Settings • Defining Managers and their Work Shifts • Specializing Managers to run only certain programs • Grouping Programs as a Request Type • Controlling Concurrent Managers • Overview of Parallel Concurrent Processing • Managing Parallel Concurrent Processing Form descriptions follow at the end of the chapter. Managing Concurrent Processing 5–1 Overview of Concurrent Processing This section explains how a request to run a concurrent program is handled by Oracle Applications, and what the life cycle of a concurrent request is. In Oracle Applications, concurrent processing simultaneously executes programs running in the background with online operations. As System Administrator, you can manage when programs are run and how many operating system processes Oracle Applications devotes to running programs in the background. Concurrent Requests, Programs, and Processes When a user runs a report, a request to run the report is generated. The command to run the report is a concurrent request. The program that generates the report is a concurrent program. Concurrent programs are started by a concurrent manager. Figure 5 – 1 User action requests concurrent program to start System maintains list of requests to start concurrent programs Concurrent Managers read applicable requests and start concurrent programs REQUEST TABLE Run Program ... Run Program ... Request to run program Run Program X CONCURRENT MANAGER Program X started Run Program ... Concurrent Managers start concurrent programs Every time your users request a concurrent program to be run, their request is inserted into a database table, and is uniquely identified by a request ID. Concurrent managers read requests from this table. Part of a manager’s definition is how many operating system processes it can devote to running requests. This number is referred to as the manager’s number of target processes. Running concurrent programs A concurrent program actually starts running based on: 5–2 Oracle Applications System Administrator’s Guide • When it is scheduled to start • Whether it is placed on hold • Whether it is incompatible (cannot run) with other programs • Its request priority Concurrent Request Priorities The priority of a concurrent request is determined by application username, and is set by the System Administrator using the Concurrent:Priority user profile option. The first available concurrent manager compares the request’s priority to other requests it is eligible to process, and runs the request with the highest priority. When choosing between requests of equal priority, the concurrent manager runs the oldest request first. Parent requests and Child requests Often, several programs may be grouped together, as in a request set. Submitting the request set as a whole generates a request ID, and as each member of the set is submitted it receives its own request ID. The set’s request ID identifies the Parent request, and each of the individual programs’ request ID identifies a Child request. Life cycle of a concurrent request A concurrent request proceeds through three, possibly four, life cycle stages or phases: Pending Request is waiting to be run Running Request is running Completed Request has finished Inactive Request cannot be run Within each phase, a request’s condition or status may change. The following table shows a listing of each phase and the various states that a concurrent request can go through. Phase Status Description PENDING Normal Request is waiting for the next available manager. PENDING Standby Program to run request is incompatible with other program(s) currently running. Table 5 – 1 (Page 1 of 2) Managing Concurrent Processing 5–3 Phase Status Description PENDING Scheduled Request is scheduled to start at a future time or date. PENDING Waiting A child request is waiting for its Parent request to mark it ready to run. For example, a report in a report set that runs sequentially must wait for a prior report to complete. RUNNING Normal Request is running normally. RUNNING Paused Parent request pauses for all its child requests to complete. For example, a report set pauses for all reports in the set to complete. RUNNING Resuming All requests submitted by the same parent request have completed running. The Parent request is waiting to be restarted. RUNNING Terminating Running request is terminated, by selecting Terminate in the Status field of the Request Details zone. COMPLETED Normal Request completes normally. COMPLETED Error Request failed to complete successfully. COMPLETED Warning Request completes with warnings. For example, a report is generated successfully but fails to print. COMPLETED Cancelled Pending or Inactive request is cancelled, by selecting Cancel in the Status field of the Request Details zone. COMPLETED Terminated Running request is terminated, by selecting Terminate in the Status field of the Request Details zone. INACTIVE Disabled Program to run request is not enabled. Contact your system administrator. INACTIVE On Hold Pending request is placed on hold, by selecting Hold in the Status field of the Request Details zone. INACTIVE No Manager No manager is defined to run the request. Check with your system administrator. Table 5 – 1 (Page 2 of 2) 5–4 Oracle Applications System Administrator’s Guide Service Management An Oracle Applications system depends on a variety of services such as Forms Listeners, HTTP Servers, Concurrent Managers, and Workflow Mailers. Such services are composed of one or more processes that must be kept running for the proper functioning of the applications. Previously many of these processes had to be individually started and monitored by system administrators. Management of these processes was complicated by the fact that these services could be distributed across multiple host machines. The new Service Management feature for Release 11i helps to greatly simplify the management of these processes by providing a fault tolerant service framework and a central management console built into Oracle Applications Manager 11i. Service Management is an extension of concurrent processing, which provides a powerful framework for managing processes on multiple host machines. With Service Management, virtually any application tier service can be integrated into this framework. Services such as the Oracle Forms Listener, Oracle Reports Server, Apache Web listener, and Oracle Workflow Mailer can be run under Service Management. With Service Management, the Internal Concurrent Manager (ICM) manages the various service processes across multiple hosts. On each host, a Service Manager acts on behalf of the ICM, allowing the ICM to monitor and control service processes on that host. System administrators can then configure, monitor, and control services though a management console which communicates with the ICM. Service Management provides a fault tolerant system. If a service process exits unexpectedly, the ICM will automatically attempt to Managing Concurrent Processing 5–5 restart the process. If a host fails, the ICM may start the affected service processes on a secondary host. The ICM itself is monitored and kept alive by Internal Monitor processes located on various hosts. Service Management provides significant improvements in the manageability of Oracle Applications. System administrators can now use the central console in Oracle Applications Manager 11i to manage a variety of services that formerly had to be managed independently on separate hosts. The entire set of system services may be started or stopped with a single action. Service Management also provides a great benefit by automatically compensating for certain system failures. Service processes are very much like concurrent manager and transaction manager processes. They must be kept running on a middle tier for the proper functioning of their respective products. The concurrent processing management feature has been built for concurrent managers and transaction managers, to provide fault tolerance, process distribution, and simplified configuration and control. Benefits of Service Management • The service processes will no longer need to be manually and individually started and monitored by Oracle Applications system administrators. • Services can take advantage of the process distribution and fault tolerance capabilities that have been developed for concurrent processing. • As with concurrent manager processes, system administrators can use work shifts to determine the number of processes that will be active for a service on a given node for a given time period. To extend process management support to the various Applications services, the Internal Concurrent Manager must be able to start, monitor, and control processes on all Applications tiers. Every node of every tier will have an Oracle RPC–based Service Controller installed. The ICM will use the Service Controller to manage processes. Concepts Service A service is a process or collection of processes that perform actions at the request of client processes. A concurrent manager is a type of 5–6 Oracle Applications System Administrator’s Guide service where the client submits a request for actions to be processed while the client continues to do other work. While active, a service must have one or more listener processes that wait to process requests from clients. An example of a listener is a concurrent manager process which periodically polls a queue for requests to process. Service Instance Each service controlled by service management may have multiple service instances. Each instance may consist of one or more processes. Concurrent:GSM Enabled Profile Option The Concurrent:GSM Enabled profile option should be set to Y to enable Service Management. Users cannot see nor change this profile option. This profile option is visible and updatable at the site level for the system administrator. The internal name for this profile option is CONC_GSM_ENABLED. Managing Concurrent Processing 5–7 Managing Concurrent Processing with Oracle Applications Manager The Oracle Applications Manager allows administrators to manage E–Business Suite systems from an HTML console. Oracle Applications Manager can be used for a wide variety of tasks such as administering services including concurrent managers, examining system configuration, managing Oracle Workflow, examining applied patches, and measuring system usage. Oracle Applications Manager provides diagnostic features for Applications systems. The console displays errors recently reported by system components such as transaction managers or concurrent requests. For running processes such as forms or concurrent requests, system administrators can examine the database session details, including any currently executing SQL. Oracle Applications Manager allows administrators to configure, monitor, and control concurrent processing. Combined with the Service Management feature, Oracle Applications Manager can be used to monitor and control concurrent managers, as well as other application tier services. Using the Oracle Applications Manager, you can: • view a summary of concurrent managers • view details of a concurrent manager • create or edit a concurrent manager • view a summary of concurrent requests • view details of a concurrent request • submit a concurrent request Also, the Oracle Management Pack for Oracle Applications extends Oracle Enterprise Manager to enable the monitoring, diagnosing, and capacity planning of the multi–tiered Oracle Applications environment. For more information, see: Oracle Applications Management Tools: page 6 – 2 5–8 Oracle Applications System Administrator’s Guide Reviewing Requests, Request Log Files, and Report Output Files This essay explains how you, as System Administrator, can view and change the status of concurrent requests, and how to view request log and report output files. How To View Request Status and Output Use any of the following methods to view the status and output of concurrent requests. Use the Requests Window Use the Requests window to view the status of concurrent requests, and to view request log and report output files. The System Administrator and Oracle Alert Manager have a privileged version of the Requests window that provides you with more capabilities than your end users. For example, using the Requests window, you can view the status of and log files for all concurrent requests (not just your own), including requests that completed unsuccessfully. On some platforms, you can even view the log files of running requests. Using the same window, you can view your own report output online. You cannot, however, view report output from other users’ requests. From the Requests window, you can also: • place and remove holds from any pending or inactive request • cancel a pending request, or terminate a running request • change the priority of any pending request • view the manager log file • determine where any pending request stands in the queue for each manager defined to accept the request • determine when the concurrent manager is inactive and needs to be restarted. Run the Completed Concurrent Requests Report You can run a report that lists parameters and any error messages associated with concurrent requests that have completed running. See: Completed Concurrent Requests Report: page 5 – 34. Managing Concurrent Processing 5–9 How to Modify Request Diagnostic Output The Request Diagnostics window provides the user with request status information. This information consists of messages that explain the request’s current status. Collect Runtime Data Set the profile option Concurrent:Collect Request Statistics to ”Yes” to collect runtime statistics. A concurrent request may be comprised of one or two processes: a Net8i shadow which consumes database server resources, and a front–end process such as a C executable. The time used by the CPU is collected for both of these types of processes. Summarize and View Runtime Statistics To review the statistics you must run the Purge Concurrent Request and/or Manager Data program to process the raw data and have it write the computed statistics to the FND_CONC_STAT_SUMMARY table. You can review the statistics on a request by request basis using the Diagnostics window from the Requests window. Setting End User Report and Log File Access Privileges The user profile option Concurrent:Report Access Level determines report output file and log file access privileges for your end users. As System Administrator, you can set this profile option to either ”User” or ”Responsibility.” All users can can review the log and report output files from requests that they submitted. If you set the Concurrent:Report Access Level option to ”Responsibility” at the User level, that user can also review the log and report output files from all requests submitted from the current responsibility. If you set the Concurrent:Report Access Level option to ”Responsibility” at the Responsibility level, any user of that responsibility can also view the log and report output files from all requests submitted by any other user of that responsibility. Enabling the Report Review Agent Oracle Applications uses a tool called the Report Review Agent to view concurrent request log and output files online. 5 – 10 Oracle Applications System Administrator’s Guide Using the Report Review Agent, you can copy an entire report or log file to your PC, subject to restrictions you, as the System Administrator, impose on file transfer size. You can view a report one page at a time. 1. To set up the Report Review Agent, a database or computer administrator must modify the Net8i configuration. See the Release 11i Installing Oracle Applications manual for details on modifying your Net8i configuration. 2. Optionally, you can set each APPL_TOP to have its own Report Review Agent service using the RRA: Server Prefix profile. For example, test and production instances of Oracle Applications installed on a single machine will not have to share a report review agent service. In previous releases, Report Review Agent services were always named using the ”FNDFS_nodename” convention. The RRA: Server Prefix profile allows system administrators to override the default server name prefix ”FNDFS_”. To override the default service name prefix of ”FNDFS_”, set the site level profile ”RRA: Service Prefix” to the desired prefix. For example, if the profile ”RRA: Service Prefix” is set to ”PROD_”, then the Report Review Agent services will be named ”PROD_nodename” instead of ”FNDFS_nodename”. The value of the profile ”RRA: Service Prefix” must be nine characters or fewer. We recommend that the last character be an underscore. Use only alphanumeric characters and underscores only. If the profile is null, then the prefix ”FNDFS_” will be used. 3. When using a custom editor to view a concurrent output or log file, the Report Review Agent will make a ”temporary” copy of the file on the client. Set the RRA:Delete Temporary Files profile to ”Yes” to automatically delete these files when the user exits Oracle Applications. See: Defining the Reports Editor: page 5 – 12, Profile Options in Oracle Application Object Library: page A – 2. 4. Set the RRA:Maximum Transfer Size profile option to specify, in bytes, the maximum allowable size of files transferred by the Report Review Agent, including those downloaded by a user with the ”Copy File...” menu option in the Oracle Applications Report File Viewer and those ”temporary” files which are automatically downloaded by custom editors. If this profile is null, there is no size limit. See: System Profile Values Window: page 11– 6. 5. Set up your directory tree so that the concurrent managers place all log and out file directories in the same parent directory. See the Managing Concurrent Processing 5 – 11 Release 11i Installing Oracle Applications manual for your server platform for details on setting the necessary environment variables. Briefly, you direct the concurrent managers to place log and report output files for all products in the same parent directory by setting the environment variable APPLCSF on the server to the directory where all log and output files should reside. Note: The APPLCSF environment variable is specific to your server. The APPLCSF variable is not used on the client. 6. Set the profile option Applications Web Agent to the base URL of the APPS schema’s Web Application Server Database Access Descriptor (DAD). See: Applications Web Agent: page A – 3. Defining the Reports Viewer The Oracle Applications Report File Viewer is used by default for viewing your text report files. You can also display text files in a browser or use another application such as Microsoft Word. You define your default viewer by setting a profile option. Set the Viewer:Text Profile Option If the Viewer:Text profile option is set to ”Browser” then reports are sent to a web browser. If this profile option is left blank, the Report File Viewer is used instead. If this profile option is left blank, a report or log file can still be viewed in a browser by first viewing it using the Report File Viewer, and then choosing ”Copy File...” from the Tools menu. See: Setting Your Personal User Profile (Oracle Applications User’s Guide) System Profile Values Window: page 11– 6 See: Viewing Request Output and Log Files (Oracle Application’s User’s Guide) Viewing HTML Report Output You can view your reports with HTML output in a browser. Once an HTML report has been sent to a browser, it can be saved to the desktop by using the Save As functionality of the browser. 5 – 12 Oracle Applications System Administrator’s Guide Note: HTML reports are displayed by the browser in the character set of the server. This character set may or may not match the character set on the client. Therefore, it may be necessary to convert the output to the client character set when saving the report. If the browser supports character set conversion with Save As, there will be a poplist in the Save As dialog box. The user can then choose an encoding which matches the client character set. Online Report Review using Other Applications You can set up your Online Report Review implementation to enable viewing output files in other applications, such as Microsoft Word or Excel. To do this you associate MIME types with file output formats. Users can then set their preferred MIME types for particular output formats using profile options, or the users may be prompted to choose the appropriate MIME type for a file at runtime. You can register more than one MIME type file format with each output format. In the Viewer Options window, you enter in the file format, the MIME type, and a description. The description is displayed to the user in the Profile Values window and the Submit Request form. See: Viewer Options Window: page 5 – 105. When the report is viewed, it must first be sent to a browser. The browser then uses the associated MIME type to display the report. ☞ Attention: For printing, if users choose either HTML or PDF as the output type with Oracle Report programs, they must use appropriate printer drivers to handle the PDF and HTML file for printing their output. See: Overview of Printers and Printing page: 7– 2. Types of Log Files Log files contain information about a concurrent program’s execution, or a concurrent manager’s activities. Log files are helpful when reviewing a problem request. Log files are generated for all Completed concurrent requests. There are three types of log files: 1. Request log files that document the execution of a concurrent program running as the result of a concurrent request. Every concurrent request generates a log file. Managing Concurrent Processing 5 – 13 2. Manager Log files that document the performance of a concurrent manager that is running a request. The Manager Log file lists requests processed by a concurrent manager. 3. The Internal Concurrent Manager Log file that documents the performance of the Internal Concurrent Manager. It displays parameter values that are loaded when the Internal Concurrent Manager is started. If a concurrent process ends in an error, you should review the log files to help diagnose the problem. You may also want to review the log files if a program’s performance is questionable. For example, if a report runs very slowly or if it prints out data that you didn’t expect. The Internal Concurrent Manager Log file also records the time that each concurrent manager is started, and when each process monitor session or pmon cycle is initiated. During each pmon cycle, the Internal Concurrent Manager verifies the correct operation of each defined concurrent manager. System Administrator Log File Privileges Both you and your end users can review request log files and manager log files online. Only the System Administrator can display the Internal Concurrent Manager log file. As System Administrator, you can use the Concurrent Requests and Administer Concurrent Program windows to view request and manager log files. Operating System Access to Log Files Log files are stored as standard operating system files in directories defined during the installation of Oracle Applications. For example, Oracle General Ledger files are located using a path variable called $GL_TOP/$APPLLOG, or $APPLCSF/$APPLLOG, if the APPLCSF variable is set. The complete path name to access an Oracle Applications log file depends on the operating system you are using. However, there are a number of file name conventions that are standard across all platforms. Example – Request Log File name For example, the log file naming convention in UNIX is the letter l, followed by the concurrent request ID, followed by the extension .req. In the example below, the concurrent request ID is 64225. UNIX l64225.req See: Concurrent Manager File Conventions (Installing Oracle Applications) 5 – 14 Oracle Applications System Administrator’s Guide Operating System Access to Concurrent Manager Log Files Concurrent manager log files are located in the log directory under FND_TOP, the variable that contains the path name to Application Object Library Files, or under $APPLTOP/$APPLLOG. For most platforms, n is the Concurrent Process ID number assigned to the concurrent manager by the Internal Concurrent Manager, and is found in the Internal Concurrent Manager log file. The log file name for the Internal Concurrent Manager is specified when you use the STARTMGR command from the operating system to start the concurrent managers. See Also Controlling the Internal Concurrent Manager from the Operating System: page 5 – 58 Setting Up Concurrent Managers: page G – 66 Operating System Access to Report Output Files Report output files generated by concurrent programs are stored as standard operating system files in directories defined during the installation of Oracle Applications. Path name to Output Files The complete path name to access an Oracle Applications report output file depends on the operating system you are using. However, there are a number of file name conventions that are standard across all platforms. • Each output file name includes the unique request ID assigned by the concurrent processing facility. Example – Report Output File name If APPCPNAM is set to USER then the naming convention used is Application Username.Request ID. If APPCPNAM is set to REQID then the naming convention used is 0Request ID.out. The default setting for APPCPNAM is REQID. For example: JSMITH.64225 Managing Concurrent Processing 5 – 15 Changing the Status of Concurrent Requests This essay explains how to change a request’s phase and status, and how to change the priority of a Pending or Inactive request. Changing a Request’s Phase and Status A request is in one of four phases: Pending (waiting to be run), Running, Completed, or Inactive (unable to run). Within each phase, a request’s condition is referred to as its status. You can change the phase of a Pending, Running, or Inactive request by changing its status. Pending and Inactive Requests You may cancel Pending and Inactive requests. The request’s phase and status becomes Completed – Cancelled. You may place on hold Pending and Inactive requests. The request’s phase and status becomes Inactive – On Hold. You can reverse this action by later selecting the request removing the hold. Running Requests You can terminate Running requests. The request’s phase and status becomes Completed – Terminated. Changing a Request’s Status You can change the status of a request, and its resulting phase, using the Requests window. Changing the Priority of a Pending or Inactive request Requests normally run according to start time, on “first–submitted, first–run” basis. However, a higher priority request starts before an earlier request. As System Administrator, you can change the priority of any Pending or Inactive request using the Requests window. Request Priority is associated with an application User The priority of a user’s requests defaults to the value you, as System Administrator, set for their Concurrent:Priority user profile option. Users cannot change the priority of their requests. 5 – 16 Oracle Applications System Administrator’s Guide If a concurrent program has a defined priority, that priority overrides the user’s profile option. • Priorities range from 1 (highest) to 99 (lowest). • The standard default is 50. • Concurrent programs submitted by the Internal Concurrent Manager have a priority of zero (0), and override all other requests. Suggestion: If you need to change the priority of a request frequently, you should consider assigning that concurrent program its own priority. Managing Concurrent Processing 5 – 17 Managing Concurrent Processing Files and Tables This section explains how to maintain the number of log and output files the operating system retains, and how to manage Application Object Library database tables that store information about concurrent requests and concurrent manager processes. The database tables that are affected by running the Purge Concurrent Request and/or Manager Data program are: FND_CONCURRENT_REQUESTS This table contains a complete history of all concurrent requests. FND_RUN_REQUESTS When a user submits a report set, this table stores information about the reports in the report set and the parameter values for each report. FND_CONC_REQUEST_ARGUMENTS This table records arguments passed by the concurrent manager to each program it starts running. FND_DUAL This table records when requests do not update database tables. FND_CONCURRENT_PROCESSES This table records information about Oracle Applications and operating system processes. FND_CONC_STAT_LIST This table collects runtime performance statistics for concurrent requests. FND_CONC_STAT_SUMMARY This table contains the concurrent program performance statistics generated by the Purge Concurrent Request and/or Manager Data program. The Purge Concurrent Request and/or Manager Data program uses the data in FND_CONC_STAT_LIST to compute these statistics. 5 – 18 Oracle Applications System Administrator’s Guide Maintenance Suggestions Your MIS department and application users should agree on an archiving and file retention policy that is appropriate for your organization. To avoid running out of space on your disk drives, you should periodically delete Oracle Applications log files and output files. Suggestion: You can run the program ”Purge Concurrent Request and/or Manager Data” once and automatically resubmit the program for you at specific time intervals. There are some sample guidelines for when to run the Purge Concurrent Requests and/or Manager Data program. Adopt these guidelines according to your user community’s usage of Oracle Applications. • every 30 days for normal usage • every two weeks (14 days) for heavy usage • if using the AGE mode, set the Mode Value to 5 to retain the five most recent days of concurrent request data, log files, and report output files. Purging removes Audit data When you purge concurrent request information, you lose audit details. The Signon Audit Concurrent Requests report uses this audit information. Managing Concurrent Processing 5 – 19 Purge Concurrent Request and/or Manager Data Program Use this program to delete: • request log files, concurrent manager log files, and report output files from your product directories maintained by the operating system • records (rows) from Application Object Library database tables that contain history information about concurrent requests and concurrent manager processes. Use this program to compute performance statistics for each of the concurrent programs, if the Concurrent: Collect Request Statistics profile option is set to ”Yes”. Report Options Entity All Purges records from database tables that record history information for concurrent requests, history information for concurrent managers, and purges request log files, manager log files, and report output files from the operating system. Manager Purges records from database tables that record history information for concurrent managers, and purges manager log files from the operating system. Request Purges records from database tables that record history information for concurrent requests, and purges request log files and report output files from the operating system. Mode Age Enter the number of days for which you want to save concurrent request history, log files, and report output files. The purge program deletes all records older (in days) than the number you enter. For example, if you enter ”5”, then all concurrent request history, log files, and report output files older than five days is purged. 5 – 20 Oracle Applications System Administrator’s Guide Count Enter the number of (most recent) records for which you want to save concurrent request history, log file, and report output files. The purge program starts from the most recent records, retains the number you enter, and purges all remaining records. For example, if you enter ”5”, then the five most recent concurrent request history records, request log files, manager log files, report output files are saved, and all remaining records are purged. Mode Value Enter a value to define the number of days for Mode=Age or the number of records for Mode=Count. The valid values are 1 – 9999999. Oracle ID Enter the Oracle ID that concurrent programs connect to for which you want to purge concurrent request records, and associated log files and report output files. Oracle ID has relevance when the Entity is either ”Request” or ”All”. For example, if you enter AP1, then the program purges all request records, log files, and report output files associated with requests to run programs that connect to the AP1 Oracle ID. User Name Enter the application username whose concurrent request records and associated log files and report output files you wish to purge. Username has relevance when the Entity is either ”Request” or ”All”. For example, if you enter JSMITH, then the program purges all request records, log files, and report output files associated with requests submitted by user JSMITH. Select the application associated with the responsibility for which you want to purge concurrent request records, and associated log files and report output files. Responsibility Application is used with the Responsibility option, and has relevance when the Entity is either ”Request” or ”All”. Responsibility Select the responsibility for which you want to purge concurrent request records, and associated log files and report output files. Managing Concurrent Processing 5 – 21 Responsibility has relevance when the Entity is either ”Request” or ”All”. For example, if you select the System Administrator responsibility, then the program purges all request records, log files, and report output files associated with requests submitted by users operating under the System Administrator responsibility. Program Application Select the application for which you want to purge concurrent request records, and associated log files and report output files. Program Application has relevance when the Entity is either ”Request” or ”All”. For example, if you select Oracle Payables, then the program purges all request records, log files, and report output files associated with requests to run Oracle Payables programs. Program Select the program for which you want to purge concurrent request records, and associated log files and report output files. Program has relevance when the Entity is either ”Request” or ”All”. For example, if you select Program X, then the purge program purges all request records, log files, and report output files associated with requests to run Program X. Manager Application Select the application associated with the concurrent manager for which you want to purge concurrent request records, and associated log files and report output files. Manager Application is used with the Manager option, and has different effects when Entity is set to ”Request, and when Entity is set to ”Manager” or ”All”. • When Entity is set to ”Request”, the program purges all request records, log files, and report output files associated with requests run by the concurrent manager named in the Manager option. • When Entity is set to either ”Manager” or ”All”, in addition to the above, the program also purges all manager log files associated with the concurrent manager named in the Manager option. Manager Select the concurrent manager for which you want to purge concurrent request records, and associated log files and report output files. 5 – 22 Oracle Applications System Administrator’s Guide Manager is used with the Manager Application option, and has different effects when Entity is set to ”Request,” and when Entity is set to ”Manager” or ”All”. • When Entity is set to ”Request”, the program purges all request records, log files, and report output files associated with requests run by the concurrent manager named in the Manager option. • When Entity is set to either ”Manager” or ”All”, in addition to the above, the program also purges all manager log files associated with the concurrent manager named in the Manager option. Report Select whether you want a report listing the number of records purged by the Purge Concurrent Request and/or Manager Data program. No Run the program but do not generate a report. Yes Run the program and generate a report. Purge Other Select whether you want to delete records from the FND_DUAL table. No .Do not delete records from FND_DUAL. Yes Delete records from FND_DUAL. Managing Concurrent Processing 5 – 23 Concurrent Processing User Profile Settings This essay explains the user profile option settings relevant to submitting concurrent requests. Setting Concurrent Processing Options End users can control certain runtime options for their concurrent requests. For example, you can choose a specific date on which to start a request. If a user does not explicitly enter these options at the time of the request, concurrent processing options default to their user profile values. As System Administrator, you set user profile values for your end users with the System Profile Values window. Both you and your end users can set some of your own profile values using the Personal Profile Values form. Changing Concurrent Processing Options for submitted requests You or your users can use the Requests window to change the concurrent processing options for a submitted request up until the time it starts running. • As System Administrator you can change all concurrent options for any request. • Your users can change most of their request’s concurrent options. End users cannot change (nor set) the priority of their request, or the report access level for viewing request log files and report output files online. See: Overview of Setting User Profiles: page 11– 2 The following table lists the concurrent processing user profile options and an explanation of each: User Profile Option Explanation Concurrent: Hold Requests ”Yes” places concurrent requests on hold. ”No” starts programs according to the request’s priority and start time. Concurrent: Multiple Time Zones ”Yes” ensures that requests are scheduled immediately regardless of the time zone your client is running in. Table 5 – 2 (Page 1 of 2) 5 – 24 Oracle Applications System Administrator’s Guide User Profile Option Explanation Concurrent: Report Access Level Viewing a request’s output/log files online and reprinting reports can be accessed according to: ”Responsibility” – by anyone using the responsibility that submitted the request ”User” – by only the user who submitted the request. Concurrent: Report Copies The number of output copies that print for each report. Concurrent: Request Priority Requests normally run according to start time, on a ”first– submitted, first–run” basis. Priority overrides request start time. A higher priority request starts before an earlier request. Priorities range from 1 (highest) to 99 (lowest). The standard default is 50. Concurrent: Request Start Time The date and time requests are available to start running. If the start date and time is at or before the current date and time, requests may be run immediately. Concurrent: Save Output ”Yes” saves concurrent program outputs in a standard file format. Some concurrent programs do not generate an output file. Concurrent: Sequential Requests ”Yes” forces requests to run one at a time (sequentially) according to the requests’ start dates and times. ”No” means requests can run concurrently when their concurrent programs are compatible. Concurrent: Wait for Available TM You can specify the maximum number of seconds that the client will wait for a given transaction manager (TM) to become available before moving on to try a different TM. Concurrent: URL Lifetime This profile option determines the length of time in minutes a URL for a request ouput is retained before it is deleted from the system. Printer The printer which prints your reports. Table 5 – 2 (Page 2 of 2) Updating Concurrent Request Profile Options Most concurrent user profile options may be set by the System Administrator at all four levels: site, application, responsibility, and user. The user profile Concurrent:Report Access Level may not be set at the application level. Your users can change the default values for most of the concurrent processing profile options. However, they cannot set Concurrent: Request Priority, or Concurrent: Report Access Level. Managing Concurrent Processing 5 – 25 Defining Managers and their Work Shifts This essay explains how you can define concurrent managers and specify when a manager is enabled. A concurrent manager is itself a concurrent program that starts other concurrent programs running. When an application user submits a request to run a program, the request is entered into a database table that lists all of the requests. Concurrent managers read requests from the table and start programs running. See: Concurrent Managers: page 5 – 89. In this essay, we explain how to specify when a manager is enabled, how to use managers to balance your applications processing workload across different time periods, and how to associate a library of immediate concurrent programs to be called by your manager. Defining new managers You can define as many concurrent managers as you want. When you define a manager, you: • Assign a predefined library of immediate concurrent programs to your manager. Immediate concurrent programs are subroutines associated with concurrent managers. All other concurrent programs are spawned as independent processes at run time. • Assign work shifts to your manager, which determines what days and times the manager works. • For each work shift, you define the maximum number of operating system processes the manager can run concurrently to read requests (start programs) during the work shift. • Specialize your manager to read only certain kinds of requests. Figure 5 – 2 illustrates the details of defining a concurrent manager. 5 – 26 Oracle Applications System Administrator’s Guide Figure 5 – 2 Defining a Concurrent Manager CONCURRENT MANAGER DEFINITION SPECIALIZATION RULES WORK SHIFTS Run Program A Run Program B Specialization Rules define which requests (programs) a manager can read (start). TARGET PROCESSES For each Work shift, Target Processes is the maximum number of programs the manager can run simultaneously. Work shifts define when a manager reads requests (is enabled). REQUEST TABLE Run Program ... Run Program X Run Program ... Run Program ... Run Program Y CONCURRENT MANAGER ”MONTH–END REPORTS” Program X started Program Y started Run Program ... Run Program ... Run Program Z Program Z started Run Program ... Program Libraries For a program that is spawned, a concurrent manager initiates or spawns another operating system process. A program that is immediate runs as part of the concurrent manager’s operating system process. A program library contains immediate concurrent programs that can be called by your manager. An immediate concurrent program must be registered with a program library. Application developers using Oracle Application Object Library can register concurrent programs with a program library. The Oracle Application Object Library FNDLIBR program library contains Oracle Applications immediate concurrent programs, and is Managing Concurrent Processing 5 – 27 assigned to the Standard concurrent manager. In most cases, you will include the FNDLIBR library with your manager’s definition. The Internal and the Standard concurrent managers Oracle System Administration predefines two managers for you: • The Internal Concurrent Manager, which functions as the “boss” of all the other managers. The Internal Concurrent Manager starts up, verifies the status of, resets, and shuts down the individual managers. You cannot alter the definition of the Internal Concurrent Manager. See: Defining Program Incompatibility Rules: page 4– 25 • A manager named Standard. The Standard manager accepts any and all requests; it has no specialization. The Standard manager is active all the time; it works 365 days a year, 24 hours a day. Warning: You should not alter the definition of the Standard concurrent manager. If you do, and you have not defined additional managers to accept your requests, some programs may not run. Use the Standard manager as a safety net, a manager who is always available to run any request. Define additional managers to handle your installation site’s specific needs. Transaction Managers While conventional concurrent managers let you execute long–running, data–intensive application programs asynchronously, transaction managers support synchronous processing of particular requests from client machines. A request from a client program to run a server–side program synchronously causes a transaction manager to run it immediately, and then to return a status to the client program. Transaction managers are implemented as immediate concurrent programs. At runtime, concurrent processing starts a number of these managers. Rather than polling the concurrent requests table to determine what to do, a transaction manager waits to be signalled by a client program. The execution of the requested transaction program takes place on the server, transparent to the client and with minimal time delay. At the end of program execution, the client program is notified of the outcome by a completion message and a set of return values. Communication with a transaction manager is automatic. The transaction manager mechanism does not establish an ongoing 5 – 28 Oracle Applications System Administrator’s Guide connection between the client and the transaction manager processes. The intent of the mechanism is for a small pool of server processes to service a large number of clients with real–time response. Each transaction manager can process only the programs contained in its program library. Oracle Applications developers using Oracle Application Object Library can register transaction programs with a program library. A transaction manager is associated with a particular data group, and uses that data group to connect to the database. Transaction managers can only process requests submitted from responsibilities associated with the same data group. If you create custom data groups, you should define new transaction managers (using the predefined program libraries associated with the seeded transaction managers) for each application in your data group that uses transaction managers. Work Shift Definitions When you define a concurrent manager, you assign one or more work shifts to it. Work shifts determine when the manager operates. You define work shifts using the Work Shifts form. See: Work Shifts: page 5 – 98 Work Shift by Manager Report: page 5 – 35 Work Shifts Report: page 5 – 36 For example, you can define work shifts such as: • 8:00am–5:00pm, Monday–Friday. • 11:00am–1:00pm, Wednesday(s). • 6:00pm–11:59pm, April 15, 2000. You can define a work shift to run during the night, when most or all of your employees are at home asleep, and are not using their terminals. For example, you can define a work shift as: • 2:00am–6:00am, Monday–Friday. You can define a work shift to run twenty–four hours a day on a certain day or days of the week, or on a specific date. For example, you can define a work shift as: • Monday–Friday. Managing Concurrent Processing 5 – 29 • Wednesday(s). • April 15, 2000. You can define work shifts to use only on special occasions. For example, you can define a work shift named ”Inventory” to use when your company is conducting an inventory. Disabling a work shift If you define a period of time as a work shift, but do not necessarily want to use the work shift, you can: • Not assign the work shift to a concurrent manager • Assign the number of target processes for the work shift as zero (0), on the Define Manager form. • Delete a work shift assignment using the Define Manager form. Work Shifts and Hours of the Day Work shifts can run twenty–four hours a day, from midnight till the next midnight. In military time this is defined as: • 12:00am 00:00:00 • 11:59:59pm 23:59:59 Using work shifts to run through midnight The military time clock for a twenty–four period starts and stops at midnight. If you do not want a work shift to run twenty–four hours a day, but you do want to run programs continuously past 12:00 am, you must define two work shifts: • The first work shift stops at 23:59 (11:59pm). • The second work shift starts at 00:00 (12:00 am). For example, you want to run some data–intensive programs during the night, when most of your employees are away from the job site. You define two work shifts which you assign to this manager. • The first work shift starts at 20:00 (8:00pm) and stops at 23:59 (11:59pm). • The second work shift starts at 00:00 (12:00am) and stops at 05:00 (5:00am). 5 – 30 Oracle Applications System Administrator’s Guide Overlapping Work Shifts – Priority Levels If you assign overlapping work shifts to a concurrent manager, the work shift with the more specific time period takes effect for the overlapping time period. For example, a work shift for July 4 overrides a work shift from 9:00 am to 5:00 pm on Monday through Friday. The following table presents a descending list of priority levels for overlapping work shifts. A work shift with a specific date and range of times has the highest priority. The ”Standard” work shift has the lowest priority. Priority Work Shift Definition Example 1 Specific date and range of times April 15, 2000 8:00am–5:00pm 2 Specific date and no range of times April 15, 2000 3 Range of days and range of times Monday–Friday 8:00am–5:00pm 4 Range of days and no range of times Monday–Friday 5 Range of times and no date and no range of days 8:00am–5:00pm 6 Standard work shift. No date, days, or time defined. Standard work shift is 365 days a year, 24 hours a day. Table 5 – 3 (Page 1 of 1) Overlapping Work Shifts with the same priority When you have overlapping work shifts that have the same level of priority, the work shift with the largest target processes takes effect. For example, you have two work shifts with a range of days and a range of times. You have a ”Weekday” work shift from 9:00 am to 5:00 pm on Monday through Friday with 4 target processes. You also have a ”Lunch” work shift from 11:00 am to 1:00 pm on Monday through Friday with 8 target processes. The ”Lunch” work shift takes effect from 11:00 am to 1:00 pm (Mon.–Fri.) because it has the larger number of target processes. Managing Concurrent Processing 5 – 31 Using Work Shifts to Balance Processing Workload Part of a manager’s definition is how many operating system processes it can devote to reading requests. For each of these processes, referred to as a target process, a manager can start one concurrent program. For each work shift you assign to a manager, you define a number of target processes. By using work shifts with different numbers of target processes, you can modify your concurrent processing workload according to the day, time of day, and even specific dates. The figure below illustrates how, by using three work shifts, a manager can be defined to run three programs concurrently from 6:00am–6:00pm, and six programs concurrently from 6:00pm–6:00am. Figure 5 – 3 Modifying Process Workload over time 12am 00:00 6am 06:00 12pm 12:00 6pm 18:00 11:59pm 23:59 ”DAY” WORK SHIFT TARGET PROCESSES (3) ”NIGHT” WORK SHIFT TARGET PROCESSES (6) ”GRAVEYARD” WORK SHIFT TARGET PROCESSES (6) Using Time–Based Queues You can create several time–based queues by defining managers to run programs based on how long those programs have typically run in the 5 – 32 Oracle Applications System Administrator’s Guide past. That is, you can specialize managers to segregate requests according to how long those requests take to run. To do this, use the Completed Concurrent Requests Report in the System Administrator’s report security group. This report lists the actual start date and time and actual completion date and time for concurrent programs that completed running. See: Completed Concurrent Requests Report: page 5 – 34. Suggestion: Run your concurrent programs at different times, perhaps, late at night and then again during the midafternoon, to determine processing time during different workload periods. For example, based on actual time–to–completion, you can specialize different managers to run the following types of programs: • inventory pick lists • payable check runs • postings • invoice imports Augment this approach by defining an ”overflow” manager, for example, a manager who can accommodate programs directed to one (or more) of the managers above, but whose work shift is restricted to say, 2:00am–4:00am (02:00–04:00). If some of your long–running programs have not started running before the ”overflow” work shift begins, then an additional manager is enabled to accommodate those programs. Further augment this approach with an ”exception” manager defined for must have requests. For example, a manager that can run: • certain programs that must complete by a certain time. The ”must–have” manager can be specialized to only read requests for certain programs. • programs submitted by a particular user, for example, the Company Controller. You can specialize a manager to only read requests from a single application user. You can even define a second, higher–priority, username for a user to sign on with. Managing Concurrent Processing 5 – 33 Completed Concurrent Requests Report This report displays how long concurrent programs actually run. Use this report to segregate requests, based on their typical time–to–complete, by specializing concurrent managers to only read requests for certain programs. Use this report to record parameters and error messages associated with concurrent programs that have been run. Report Parameters If you do not enter any parameters, the report returns values for all completed concurrent requests. Program Application Name Choose the application name associated with the program whose completed concurrent requests you wish to report on. Choose only an application name, without a program name, if you wish to run a report on all completed concurrent requests associated with an application. Program Name Choose the name of a program whose completed concurrent requests you wish to report on. You must enter a value for Program Application Name before entering a value for Program Name. User Name Choose the name of an application user whose completed concurrent requests you wish to report on. Start Date/End Date Enter the start date and end date for your report. Report Headings The report headings list the specified parameters and provide you with general information about the contents of the report. 5 – 34 Oracle Applications System Administrator’s Guide Work Shift by Manager Report This report documents the work shifts assigned to each concurrent manager. Use the report when defining or editing concurrent managers. Report Parameters None. Report Headings The report headings provide you with general information about the contents of the report. Managing Concurrent Processing 5 – 35 Work Shifts Report This report documents all of your work shift definitions. Use this report when defining or editing concurrent manager work shifts. Report Parameters None. Report Headings The report headings provide you with general information about the contents of the report. 5 – 36 Oracle Applications System Administrator’s Guide Specializing Managers to Run Only Certain Programs This essay explains how you can specialize managers to run only certain programs. Introduction to Specialization Rules Every time your users request a concurrent program to be run, their request is inserted into a database table. Concurrent managers read requests from this table, and start running programs if the manager is defined to read the particular request. Without specialization rules, a manager reads requests to start any concurrent program. Using specialization rules, you can specialize a manager to read only certain kinds of requests to start concurrent programs, for example, only requests to start Oracle General Ledger programs, or only requests to start programs requested by the user ”Fred”. See: Concurrent Managers: page 5 – 89. A special type of specialization rule is the combined specialization rule, that can combine more than one action to define a single rule. See: Combined Specialization Rules: page 5 – 100. Defining Specialization Rules A specialization rule associates an action with a type of request. There are two kinds of actions: Include and Exclude. • Include defines a manager to only read requests of the type specified. • Exclude defines a manager to read all requests except the type specified. Requests to run concurrent programs may be allowed or disallowed on the basis of: • the ORACLE ID of the request’s Set of Books (for multiple installs) or Organization if you are using multiple organizations. • the program itself or the program’s application • the request type of the program • the user who submitted the request Managing Concurrent Processing 5 – 37 • a combined rule, which combines more than one action to generate a single rule. The combined rule applies its actions to one or more types of request. For example, a combined rule can exclude an action from an Oracle ID and exclude another action from a specific program. Using more than one rule Each rule performs one action. When using more than one rule, the rules are evaluated as follows: • Include rules are evaluated together using ’OR’ statements as the binding logic. For example, If you use the rules: – Include X – Include Y The result of the rules allows the manager to run either X ’OR’ Y but does not require that both programs be run. • Exclude rules are evaluated together using ’AND’ statements as the binding logic. For example, If you use the rules: – Exclude 1 – Exclude 2. The result of the rules prohibits the manager from running programs 1 ’AND’ 2 together or separately. • Include rules are evaluated first, then Exclude rules are evaluated. Include rule(s) and Exclude rule(s) are evaluated together as an AND statement. For example, (Include X OR Y) AND (Exclude 1 AND 2). • An Exclude rule overrides an Include rule. Specialization rule actions, their binding logic, and examples are presented in the following two tables. See: Specialization Rule Logic – Examples: page 5 – 39. 5 – 38 Oracle Applications System Administrator’s Guide Specialization Rule Logic – Examples Include Rules Result Include X Run only program X Include X Run program X OR ...or Include User Sam Run requests by User Sam Net result: Run everyone’s requests for program X, and run all of Sam’s requests. Table 5 – 4 (Page 1 of 1) Exclude Rules Result Exclude 37 Do not run program 37 Exclude 37 Do not run program 37 AND ...and Exclude User Sam Do not run requests by User Sam Net result: Do not run anyone’s requests for program 37, and do not run any of Sam’s requests. Table 5 – 5 (Page 1 of 1) Managing Concurrent Processing 5 – 39 Include and Exclude Rules Result Include User Sam Run only requests by User Sam AND ...and Exclude 37 Do not run program 37 Net result: Run all of Sam’s requests except requests to run program 37. Include X ( Run program X OR ...or Include User Sam Run requests by User Sam ) –––––––––– ...and AND Exclude 37 ( Do not run program 37 AND ...and Exclude User Mary Do not run requests by User Mary ) Net result: Run program X except when requested by Mary, and run all of Sam’s requests except requests to run program 37. The following table gives examples of the action types associated with specialization rules. Rule Action Type Example Explanation INCLUDE Combined Rule Oracle Project Accounting – Tim’s Budgets Manager only reads requests to start programs defined by the Combined Rule ”Tim’s Budgets”. ORACLE ID APPS2 Manager only reads requests to start programs that connect to the APPS2 (a single install in a multiple install schema) Oracle ID. Table 5 – 6 (Page 1 of 2) 5 – 40 Oracle Applications System Administrator’s Guide Rule Action Type EXCLUDE Example Explanation Program Oracle Project Accounting – Sales Forecast Manager only reads requests to start the concurrent program named ”Sales Forecast”. Request Type Oracle Inventory – Overnight Reports Manager only reads requests to start programs belonging to the request type ”Overnight Reports”. User Tim Manager only reads requests to start programs submitted by the application user ”Tim”. Combined Rule Oracle General Ledger – Month End Reports Manager reads all requests to start programs except those defined by the Combined Rule ”Month End Reports”. ORACLE ID APPS2 Manager reads all requests to start programs except those that connect to the APPS2 Oracle ID. Program Application Object Library – Purge Audit Tables Manager reads all requests to start programs except requests for the program named ”Purge Audit Tables”. Request Type Oracle Purchasing – Weekend Programs Manager reads all requests to start programs except those belonging to the request type ”Weekend Programs”. User Margaret Manager reads all requests to start programs except those submitted by the application user ”Margaret”. Table 5 – 6 (Page 2 of 2) Examples – Using Specialization Rules Following are examples of using specialization rules to define what requests a concurrent manager can read. When multiple rules are used to specialize a manager, the words OR and AND appear between each rule to clarify the relationship among multiple specialization rules. Using Include and Exclude actions Include Program – Oracle Assets, No entry for Name field. Managing Concurrent Processing 5 – 41 Result The manager only reads requests to run concurrent programs for the application ”Oracle Assets”. Include Program – Oracle Assets, No entry for Name field. OR Include Program – Oracle Payables, No entry for Name field. Net Result The manager only reads requests to run concurrent programs for the application ”Oracle Assets”, or for the application ”Oracle Payables”. The use of multiple Include actions expands the manager’s ability to read requests beyond that of a single Program (single Include action). Exclude Oracle ID – APPS2 Result The manager reads requests to run concurrent programs that connect to any Oracle ID, except those programs that connect to Oracle ID “APPS2”. Exclude Oracle ID – APPS2 AND Exclude Program – Oracle Payables, No entry for Name field. Net Result The manager reads requests to run concurrent programs that connect to any Oracle ID, except programs that connect to Oracle ID “APPS2”, and programs for the application ”Oracle Payables”. Simplify your work Multiple rules may not always be necessary, or the number or complexity of rules can be simplified. Consider the example below. Include Program – Oracle Sales and Marketing, No entry for Name field. OR Include Request Type – Sales Forecasts Net Result The manager only reads requests to run concurrent programs for the application “Oracle Sales and Marketing”, or programs whose request type is “Sales Forecasts”. In this example, both rules are not necessary when programs belonging to the request type “Sales 5 – 42 Oracle Applications System Administrator’s Guide Forecasts” all connect to the Oracle ID “OSM”. There is no need for the second Type Include rule. Exclude rules override Include rules Include Program – Oracle Payables, No entry for Name field. AND Exclude Program – Oracle Payables Invoice Aging Report Net Result The manager reads all requests for concurrent programs for the application “Oracle Payables”, but does not read requests to run the Oracle Payables program “Invoice Aging Report”. Include Program – Signon Audit Forms AND Exclude Request Type – Signon Audit Reports Net Result If the System Administrator program Signon Audit Forms belongs to the Request Type “Signon Audit Reports”, the manager will not read requests to run the program, even though it has been specifically identified by an Include rule. The Exclude rule overrides the Include rule. Specializing to only run a Program against specific Oracle IDs In the following example, a manager can be specialized to only run a program against a specific Oracle ID. This is useful when there are multiple installations of an Oracle Application. Include Program – Oracle Payables Invoice Aging Report AND Exclude Oracle ID – APPS2 Net Result The manager only reads requests to run the Oracle Payables program “Invoice Aging Report” when the program does not connect to the Oracle ID “APPS2”. The Exclude action overrides the Include action. However, when the Invoice Aging Report runs against another Oracle ID, for example, “APPS”, then this manager will read requests to run the Managing Concurrent Processing 5 – 43 program. This is useful when working with multiple installations of an application and data groups. Distinguishing a Program from a Request Type You can specialize a manager to read requests to run all the programs belonging to a Request Type, except for individual programs you wish to identify. Include Request Type – Oracle General Ledger Reports AND Exclude Program – Oracle General Ledger Account Analysis Net Result If the Account Analysis program belongs to the request type Oracle General Ledger “Reports”, then this manager will run every program in the request type Oracle General Ledger Reports, except the program Account Analysis. Preventing specific programs from running You can use an Exclude action more than once. For example, suppose your manager reads all requests to run concurrent programs for a particular application, but you want to prevent your manager from running two specific programs. You can: Include Program – Oracle General Ledger, No entry for Name field. AND Exclude Program – Oracle General Ledger Consolidation Audit AND Exclude Program – Oracle General Ledger Consolidation Rules Net Result The manager reads requests for any concurrent programs for the application “Oracle General Ledger”, except for the programs ”Consolidation Audit” and “Consolidation Rules”. Specializing to run only specific programs at certain times Using multiple Include rules, you can specialize a manager to run only specific programs. Then, when you define the manager’s work shift, 5 – 44 Oracle Applications System Administrator’s Guide you can control when the manager reads requests to run the specific programs. Program – Oracle Payables Invoice Aging Report Include OR Include Program – Oracle Purchasing Receipt Accruals Net Result The manager only reads requests to run the Oracle Payables Invoice Aging Report, or the Oracle Purchasing Receipt Accruals program. Suggestion: If you only wanted these two reports run during the night you can define the manager’s work shift to run from 2:00am–6:00am (02:00–06:00). Suggestion: When you first submit the requests to run the programs, you can define a resubmission interval, for example, 1 month, to resubmit the programs to run every month. Specializing according to application User You can specialize managers to only read requests from specific users. Include User – Markus Kalkin Net Result The manager only reads requests submitted by the application user ”Markus Kalkin”. Include User – Markus Kalkin OR Program – Oracle Inventory Process Demand Interface Include OR Include Program – Oracle Inventory Summarize Demand Histories Net Result The manager reads both requests submitted by user Markus Kalkin and requests to run the Oracle Inventory programs ”Process Demand Interface” and ”Summarize Demand Histories”. Suggestion: If you want specific programs submitted by a specific user to ”jump ahead” of other requests waiting to be run, you can define and specialize a manager as in the example above, and set the user profile option Concurrent:Priority for the user to a high priority (Concurrent:Priority sets the priority of requests submitted by the user). Managing Concurrent Processing 5 – 45 – Define a manager and give it a descriptive name. – Specialize the manager as in the example above. – Set the user profile option Concurrent:Priority for user Markus to 10. Defining Combined Specialization Rules A combined specialization rule combines more than one action to generate a single rule. The actions are combined as AND statements so that the rule is defined as: Action 1 AND . . . Action 2 AND . . . Action 3 AND . . . so on. You can create combined rules and use them with several managers, instead of duplicating a complex rule each time. There are two kinds of Actions you may use to build a combined rule; Exclude and Include. Each action is defined by one line within the rule. Combining the specialization lines or individual actions defines the overall combined rule. An Exclude action overrides a Include action. For example, you can define an Exclude application program x action and a Include user Yvonne Jones action. Combining these two actions generates the combined rule ”read all requests from user Yvonne Jones except requests to run program x”. See: Combined Specialization Rules: page 5 – 100. Combined specialization rule actions, their binding logic, and examples are presented in the following table. 5 – 46 Oracle Applications System Administrator’s Guide Combination Rule Include Lines Result Include Program X Run only program X Include Program X Run program X AND ...and Include User Sam Run requests by User Sam Net result: Run only Sam’s requests for program X. Table 5 – 8 (Page 1 of 1) Combination Rule Exclude Lines Result Exclude Program 37 Do not run program 37 Exclude Program 37 Do not run program 37 AND ...and Exclude User Sam Do not run requests by User Sam Net result: Do not run anyone’s requests for program 37, and do not run Sam’s requests. Table 5 – 7 (Page 1 of 1) Managing Concurrent Processing 5 – 47 Combination Rule Include and Exclude Lines Result Include User Sam Run requests by User Sam AND ...and Exclude Program 37 Do not run program 37 Net result: Run all of Sam’s requests except requests to run program 37. Include Program ( Run General Ledger Programs Application General Ledger AND ...and Include User Sam Run requests by User Sam) –––––––––– ...and AND Exclude Program 37 ( Do not run program 37 AND ...and Exclude Program 38 Do not run program 38) Net result: Run Sam’s requests for programs from the application General Ledger, except programs 37 and 38. Table 5 – 8 (Page 1 of 1) Using Combined Rules Using combined rules you can precisely specialize a manager. A combined rule combines more than one action to generate a single rule. Each action is defined by one line within the rule. Combining the lines or individual actions defines the overall combined rule. Suggestion: You can use a combined specialization rule as one of many rules to specialize a manager. 5 – 48 Oracle Applications System Administrator’s Guide Using single Exclude and Include actions A single Exclude action within a combined rule acts the same way as a single Exclude action that defines a specialization rule. Both instruct a manager to read all requests to run concurrent programs except those identified by the action. Exclude Oracle ID – APPS Result The manager reads requests to run concurrent programs that connect to any Oracle ID, except those programs that connect to Oracle ID “APPS”. A single Include action within a combined rule acts the same way as a single Include action that defines a specialization rule. Both actions instruct a manager to read only the requests that satisfy the action. Include Oracle ID – APPS2 Result The manager only reads requests to run concurrent programs that connect to Oracle ID “APPS2”. Using multiple Exclude actions Using multiple Exclude actions as multiple lines within a combined rule is equivalent to using multiple Exclude actions as multiple specialization rules. You can exclude more kinds of requests by adding more Exclude lines to your combined rule. Exclude Program – Oracle Sales & Marketing, No entry for Name field. AND Exclude Program – Oracle Inventory, No entry for Name field. Net Result The manager reads all requests to run concurrent programs except requests for programs for the application “Oracle Sales & Marketing”, and requests for programs for the application “Oracle Inventory”. Using multiple Include actions Using multiple Include actions adds more requirements to a combined rule, and excludes more kinds of requests. You cannot use two Include actions for the same action type. Each Include action is an exclusive statement for a particular type of action. For example, you cannot require a request to be for a program that connects to two different Oracle IDs. Managing Concurrent Processing 5 – 49 Include Program – Oracle Payables, No entry for Name field. AND Include Program – Oracle Payables Confirm Receipt Batch Net Result The manager only reads requests to run a single program, Confirm Receipt Batch, and only if that program is from the application ”Oracle Payables”. Using Exclude and Include actions You cannot use Exclude and Include actions for the same type of action. Each Include action is an exclusive statement for a particular type of action. For example, it does not make sense to require a request to be for a program that connects to the Oracle ID “APPS” and disallow a request to connect to another Oracle ID. Exclude overrides Include When using multiple lines within a Combined Rule, the Exclude action always overrides a Include action. Include Program – Oracle Payables Invoice Import AND Exclude Oracle ID – APPS2 Net Result The manager reads requests to run the Oracle Payables Invoice Import program, but will not run the program when it connects to the Oracle ID “APPS2”. The Exclude action overrides the Include action. Specializing a manager to run one program submitted by one user You can define a combined rule that instructs a manager to only read requests to run a single program when submitted by a specific user. Include User – Sheryl AND 5 – 50 Include Program – Oracle Project Accounting Distribute Usage Costs Net Result The manager only reads requests submitted by Sheryl to run the Distribute Usage Costs program. Oracle Applications System Administrator’s Guide Restricting the programs a manager will run for a specific user You can define a combined rule that instructs a manager to ignore requests to run a certain programs when submitted by a specific user. Include User – Sheryl AND Exclude Program – Oracle Project Accounting Expenditure Status Net Result The manager only reads requests submitted by Sheryl, excluding requests to run the Oracle Project Accounting program Accounting Expenditure Status. Specifying Oracle ID and excluding a program from a request type Include Request Type – Oracle Project Accounting Expenditure Reports AND Include Oracle ID – APPS2 AND Exclude Program – Oracle Project Accounting Expenditure Status Net Result The manager only reads requests to run programs belonging to the Oracle Project Accounting request type “Reports”, run against the Oracle ID “APPS2”, excluding the program Expenditure Reports. Differences Between Specialization and Combined Rules The primary difference between a specialization rule and a combined specialization rule is in how the use of multiple actions affects the outcome of the rule, as described in the following table: Managing Concurrent Processing 5 – 51 Effect of Multiple Actions Relationship to Other Rules INCLUDE With each additional Include rule, the manager can read MORE REQUESTS. Each rule establishes an OR condition. OR...INCLUDE... EXCLUDE With each additional Exclude rule, the manager is excluded from, and reads, FEWER REQUESTS. Each rule establishes an AND condition. AND...EXCLUDE... EXCLUDE With each additional Exclude line, the manager is excluded from, and reads, FEWER REQUESTS. Each line within a rule establishes an AND condition. AND...EXCLUDE... INCLUDE With each additional Include line or additional requirement, the manager reads FEWER REQUESTS. Each line within a rule establishes an AND condition. AND...INCLUDE... Rule Action Specialization Rule Combined Rule Specialization Line Table 5 – 9 (Page 1 of 1) 5 – 52 Oracle Applications System Administrator’s Guide Grouping Programs by Request Type As System Administrator, you may want to group similar programs together. You do this by defining request types and assigning them to the programs that users request in Oracle Applications. You can define concurrent managers that only run programs that belong to a particular request type. Using request types to specialize concurrent managers can help optimize the processing of Oracle Applications, by letting certain types of programs run without having to wait for other types of programs to finish processing. Using request types saves you time when you create a concurrent manager’s specialization rules. Using Request Types Specializing a concurrent manage by request type involves three steps: 1. Define a Request Type using the Concurrent Request Types form. 2. Assign the Request Type to each concurrent program you want to identify as a member of this request type using the Concurrent Programs form. 3. Select the Request Type when you specialize a concurrent manager using the Concurrent Managers form. Examples of using Request Types Some example request types you may want to define are: Quick For concurrent programs that take a relatively short time to run. Overnight For concurrent programs that take a long time to run, which you typically schedule to run during the late night or early morning hours. Month–End Reports For concurrent programs that generate reports you run at the end of each month. For example, if you run ten report programs at the end of each month, you could define a request type called “Month–End Reports” and assign it to your ten report programs. Then you can use specialization rules to define a concurrent manager that only runs requests of type “Month–End Reports”. This way, you do not have to specify your ten different report programs when Managing Concurrent Processing 5 – 53 you define your concurrent manager. You can also easily assign the ten programs to more than one manager. 5 – 54 Oracle Applications System Administrator’s Guide Controlling Concurrent Managers This essay explains how to control your concurrent managers. Manager States Individual managers read requests to start concurrent programs and actually start programs running when certain conditions are satisfied, such as the manager’s work shift definition, number of target processes, and specialization rules. You can start, shut down, or reset the concurrent managers at any time. Oracle Applications provides an Internal Concurrent Manager that processes these commands. You can issue commands either to individual managers, or, by altering the state of the Internal Concurrent Manager, you can control every manager at once. Starting Individual Managers You can restart or activate managers on an individual basis. Restarting a concurrent manager forces the Internal Concurrent Manager to reread the definition for that concurrent manager. Activating a manager cancels a previous command to deactivate it, and allows the Internal Concurrent Manager to start that manager when its work shift starts. You should restart an individual manager when you: • modify its work shift assignments • modify a work shift’s target number of processes • modify its specialization rules • change a concurrent program’s incompatibility rules Deactivating Individual Managers When you shut down an individual manager, you can choose whether to abort all requests and deactivate the manager immediately, or to allow it to finish processing its current requests before deactivating. If you choose to Deactivate the manager, requests that are currently running are allowed to complete. When you terminate requests and deactivate an individual manager, requests that are currently running are immediately stopped and marked for resubmission (when the manager is activated). Oracle Applications concurrent programs are designed so that no data is lost or duplicated when a terminated request is resumed after a shut Managing Concurrent Processing 5 – 55 down. This applies for shutdowns that are normal (e.g., using the ”Deactivate concurrent manager” request) or abnormal (e.g., after a hardware failure). ☞ Attention: When a manager is selected and explicitly deactivated, it remains that way until you select and explicitly activate that manager. As a prerequisite, the Internal manager must be activated beforehand. Controlling the Internal Concurrent Manager When you activate the Internal Concurrent Manager, you activate all other managers as well, except those managers that were deactivated on an individual basis. When you deactivate the Internal Concurrent Manager, it issues commands to deactivate all active managers. Managers that were deactivated on an individual basis are not affected. If you terminate requests and deactivate the Internal Concurrent Manager, it issues commands to all other managers to terminate their requests and deactivate. Requests that are currently running are immediately stopped and marked for resubmission when the managers are activated. Verify Concurrent Manager Status The Internal Concurrent Manager continuously monitors each concurrent manager’s operating system process. This process monitoring is referred to as the Internal Concurrent Manager’s PMON cycle. The length of the PMON cycle is one of the arguments passed by the STARTMGR command, which starts up the Internal Concurrent Manager. You can instruct the Internal Concurrent Manager to immediately verify the operating status of your individual concurrent managers, or to perform a PMON check. Controlling Managers from the Administer Managers form Use the Administer Concurrent Managers form to issue commands to your concurrent managers. You can also have the Internal Concurrent Manager ”manually” verify the status of your individual managers, and restart individual managers. See: Administer Concurrent Managers: page 5 – 80. 5 – 56 Oracle Applications System Administrator’s Guide Control Function Description Activate concurrent manager Activates the Internal manager and all other managers, except managers that were deactivated individually using ”Deactivate concurrent manager”. Verify concurrent manager status Manually executes the process monitoring (PMON) cycle. Deactivate concurrent manager Deactivates the Internal manager and all other managers. Terminate requests and deactivate manager All running requests (running concurrent programs) are terminated, and all managers are deactivated. The following table describes control functions for any other manager. Control Function Description Activate concurrent manager If the manager is defined to work in the current work shift, it starts immediately. Cancels ”Deactivate concurrent manager” and ”Terminate requests and deactivate manager”. Restart concurrent manager Internal manager rereads the manager’s definition, and the rules for concurrent program incompatibilities. You should restart a manager when you: – Change work shift assignments – Modify the number of target processes – Modify specialization rules – Change concurrent program incompatibilities Managing Concurrent Processing 5 – 57 Control Function Description Deactivate concurrent manager Deactivates the manager. All requests (concurrent programs) currently running are allowed to complete before the manager shuts down. A manager will not restart until you select the manager and choose ”Activate concurrent manager”. Terminate requests and deactivate manager All running requests (running concurrent programs) handled by the manager are terminated. Once deactivated, a manager will not restart until you select the manager and choose ”Activate concurrent manager”. Controlling the Internal Concurrent Manager from the Operating System There are two commands you may use from the operating system to control the Internal Concurrent Manager: STARTMGR, which starts the Internal Concurrent Manager; and CONCSUB, which can be used to deactivate or abort the Internal Concurrent Manager, or to instruct the Internal Concurrent Manager to verify the operating system process for each individual manager. The following table compares the Internal manager control states displayed by the Administer Concurrent Managers form with their corresponding operating system command. Not all arguments are shown. From the Administer Concurrent Managers Form 5 – 58 From the Operating System (not all arguments shown) Activate concurrent manager STARTMGR (syntax may vary with platform) Verify concurrent manager status CONCSUB FND VERIFY Deactivate concurrent manager CONCSUB FND DEACTIVATE Terminate requests and deactivate manager CONCSUB FND ABORT Oracle Applications System Administrator’s Guide Starting the Internal Concurrent Manager from the Operating System To start the concurrent managers, you can invoke the STARTMGR command from your operating system prompt. This command starts the Internal Concurrent Manager, which in turn starts any concurrent managers you have defined. You must have write privileges to the ”out” and ”log” directories of every application so that the concurrent managers can write to these directories. You can start the concurrent managers with many different options. An option on some operating systems is to send an electronic mail note to a given user when the concurrent managers shut down. See your installation guide for a discussion of this command. See: Setting Up Concurrent Managers: page G – 66. Use the STARTMGR command: • during installation of Oracle Applications • after you shut down the concurrent managers • after MIS restarts the operating system • after the database administrator restarts the database The STARTMGR command takes up to ten optional parameters. • Each parameter except PRINTER has a default. • You can modify the STARTMGR command and your environment to set your own defaults. Enter the following command at your system prompt to start the Internal Concurrent Manager: $ startmgr <optional parameters> You can pass the parameters in any order. For example: $ startmgr sysmgr=”applsys/fnd” mgrname=”std” printer=”hqseq1” mailto=”jsmith” restart=”N” logfile=”mgrlog” sleep=”90” pmon=”5” quesiz=”10” Viewing the Internal Concurrent Manager startup parameters The Internal Concurrent Manager’s log file displays startup parameter values executed by the STARTMGR command. An example is shown below. You cannot change the parameter values. logfile=/fnddev/fnd/6.0/log/FND60.mgr port–specific) PRINTER=hqunx138 mailto=appldev (path is Managing Concurrent Processing 5 – 59 restart=N diag=N sleep=60 (default) pmon=20 (default) quesiz=1 (default) Shutting down the Internal Concurrent Manager from the Operating System From the operating system prompt, you can use the CONCSUB utility to submit a concurrent request, under the SYSADMIN username and the System Administrator responsibility. The CONCSUB utility submits a concurrent request and returns you to the operating system prompt. You must wait until the concurrent request completes. To check on the status of your concurrent request, use the Concurrent Requests form. CONCSUB applsys/pwd ’Responsibility application shortname’ ’Responsibility name’ ’Username’ [WAIT={Y|N|n}] CONCURRENT ’Program application shortname’ PROGRAM Parameters applsys/pwd The ORACLE username and password that connects to Oracle Application Object Library data. Responsibility application shortname The application shortname of the responsibility. For the System Administrator responsibility, the application shortname is SYSADMIN. Responsibility name The name of the responsibility. For the System Administrator responsibility, the responsibility name is System Administrator. Username The application username of the person who submits the request. For example, SYSADMIN is the username of the System Administrator. WAIT={Y|N|n} Set WAIT to Y if you want CONCSUB to wait until the request you submitted completes before CONCSUB returns you to the operating system prompt. Set WAIT to N (the default value) if you do not want CONCSUB to wait. You can also enter an integer value of n seconds for CONCSUB to wait before it exits. 5 – 60 Oracle Applications System Administrator’s Guide When used, WAIT must be entered before CONCURRENT. Program application shortname The application shortname of the program. For the DEACTIVATE, ABORT, and VERIFY programs, the application shortname is FND. PROGRAM To submit the Shutdown All Managers concurrent request, use the program DEACTIVATE. To submit the Shutdown Abort Managers concurrent request, use the program ABORT. To submit the Verify All Managers Status concurrent request, use the program VERIFY. Example Syntax using CONCSUB CONCSUB <Username/Password> SYSADMIN ’System Administrator’ SYSADMIN CONCURRENT FND DEACTIVATE CONCSUB <Username/Password> SYSADMIN ’System Administrator’ SYSADMIN CONCURRENT FND ABORT CONCSUB <Username/Password> SYSADMIN ’System Administrator’ SYSADMIN CONCURRENT FND VERIFY Using CONCSUB to shut down your managers Use CONCSUB to shut down the concurrent managers: • before MIS shuts down the operating system • before the database administrator shuts down the database • when you want concurrent manager and concurrent program definitions to take effect Then, use the STARTMGR command to restart the Internal Concurrent Manager, which starts the concurrent managers. Example – nightly shutdown using CONCSUB You can use the token WAIT with value Y ( WAIT=Y ) if you want to use CONCSUB to issue a concurrent request from within a shell script containing a sequence of steps. Using the token WAIT insures the managers deactivate, abort, or verify status before the shell script proceeds to the next step. Managing Concurrent Processing 5 – 61 Example Sequence For example, you can write a shell script for your particular operating system that deactivates the Internal manager (and all the other managers) before shutting down, backing up, and restarting the database. You can also incorporate the STARTMGR command into the shell script to start up the Internal manager. See: Controlling the Internal Concurrent Manager from the Operating System: page 5 – 58 1. Shell script customized for specific operating system starts. 2. CONCSUB applsys/pwd SYSADMIN ’System Administrator’ SYSADMIN WAIT=Y CONCURRENT FND DEACTIVATE When the shell script passes control to CONCSUB, CONCSUB waits until the program DEACTIVATE is complete before it returns control to the shell script. 3. Script issues the command to shut down the database. 4. Script issues the command to backup the database. 5. Script issues the command to startup the database. 6. $ startmgr sysmgr=”applsys/fnd” mgrname=”std” printer=”hqseq1” mailto=”jsmith” restart=”N” logfile=”mgrlog” sleep=”90” pmon=”5” quesiz=”10” The shell script passes control to STARTMGR, which starts up the Internal manager (and all the other managers). 7. Shell script completes. Hiding the password using CONCSUB If username/password are still supplied, the CONCSUB utility will work as usual. If username only is supplied (no ’/pwd’ in the first argument), it will prompt you for the password: ORACLE Password: The echo is turned off. For example, the command below does not include the ORACLE Password. CONCSUB applsys SYSADMIN ’System Administrator’ SYSADMIN CONCURRENT FND FNDMNRMT Y 0 20221 ORACLE Password: Submitted request 32157 for CONCURRENT FND FNDMNRMT Y 0 20221 5 – 62 Oracle Applications System Administrator’s Guide Now, the first argument has to be the application username as usual (for example, SYSADMIN). The user can put the password in a file, and then redirect it to standard input (stdin). In UNIX the command would be executed as follows: CONCSUB applsys SYSADMIN ’System Administrator’ SYSADMIN CONCURRENT FND FNDMNRMT Y 0 20221 < password.file where password.file is an ASCII file that contains the password. This method is recommended for use in shell scripts or batch processes. Managing Concurrent Processing 5 – 63 Overview of Parallel Concurrent Processing This essay explains what parallel concurrent processing is, describes the environments it runs in, and explains how it works. What is Parallel Concurrent Processing? Parallel concurrent processing allows you to distribute concurrent managers across multiple nodes in a cluster, massively parallel, or networked environment. Instead of operating concurrent processing on a single node while other nodes are idle, you can spread concurrent processing across all available nodes, fully utilizing hardware resources. Benefits of Parallel Concurrent Processing Parallel concurrent processing provides Oracle Applications users with the following benefits: • High performancethe ability to run concurrent processes on multiple nodes to improve concurrent processing throughput. • Fault Tolerancethe ability to continue running concurrent processes on available nodes even when one or more nodes fails. • Adaptabilitythe ability to integrate with platform–specific batch queue and load–balancing systems to maximize concurrent processing performance on a particular platform. • Single Point of Controlthe ability to administer concurrent managers running on multiple nodes from any node in a cluster, massively parallel, or networked environment. Parallel Concurrent Processing Environments Parallel concurrent processing runs in multi–node environments, such as cluster, massively parallel, and networked environments. In these environments, each node consists of one or more processors (CPUs) and their associated memory. Each node has its own memory that is not shared with other nodes And each node operates independently of other nodes, except when sharing a resource such as a disk. With parallel concurrent processing, one or more concurrent managers run on one or more nodes in a multi–node environment. You decide where concurrent managers run when configuring your system. 5 – 64 Oracle Applications System Administrator’s Guide You can define any set of concurrent manager specialization rules, and apply them across nodes in any way desired. For example, three “Oracle General Ledger” concurrent managers could be spread across three nodes. Or an “Oracle Payables” concurrent manager and an “Oracle General Ledger” concurrent manager could run simultaneously on the same node. The following are examples of environments in which parallel concurrent processing can run: Cluster Environments In a cluster environment, multiple computers, each representing a single node, share a common pool of disks. With parallel concurrent processing in a cluster environment, a single ORACLE database resides in the common disk pool, while multiple instances of Real Application Clusters (RAC) run simultaneously on multiple nodes in the cluster. Multiple concurrent managers are also distributed across the nodes in the cluster. Massively Parallel Environments In a massively parallel environment, multiple nodes are housed in a single computer. All nodes share access to a common pool of disks. The IBM SP/2, for example, is a massively parallel computer. With parallel concurrent processing in a massively parallel environment, separate RAC instances run simultaneously on multiple nodes, with multiple concurrent managers also distributed across nodes. Networked Environments In networked environments, multiple computers of the same type are connected via a local area network (LAN) to a single database server, or alternatively, to a cluster of database servers. For example, a simple networked environment could consist of multiple Sun SPARCstations connected via a LAN to a single Sequent server. In a more complex networked environment, multiple Sun SPARCstations could connect to a cluster of Sequent servers. With parallel concurrent processing in a networked environment, concurrent managers run on multiple workstations. A single database server runs a single instance of ORACLE; or, a cluster of database servers runs multiple ORACLE instances using RAC. Managing Concurrent Processing 5 – 65 How Parallel Concurrent Processing Works Concurrent Managers With parallel concurrent processing, each node with concurrent managers may or may not be running an ORACLE instance. On a node that is not running ORACLE, the concurrent manager(s) connect via Net8 to a node that is running ORACLE. To each concurrent manager, you assign a primary and a secondary node. Initially, a concurrent manager is started on its primary node. In case of node or ORACLE instance failure, all concurrent managers on that node migrate to their respective secondary nodes. A concurrent manager on its secondary node migrates back to its primary node once that node becomes available. During migration, the processes of a single concurrent manager may be spread across its primary and secondary nodes. Internal Concurrent Manager The Internal Concurrent Manager can run on any node, and can activate and deactivate concurrent managers on all nodes. Since the Internal Concurrent Manager must be active at all times, it needs high fault tolerance. To provide this fault tolerance, parallel concurrent processing uses Internal Monitor Processes. Internal Monitor Processes The sole job of an Internal Monitor Process is to monitor the Internal Concurrent Manager and to restart that manager should it fail. The first Internal Monitor Process to detect that the Internal Concurrent Manager has failed restarts that manager on its own node. Only one Internal Monitor Process can be active on a single node. You decide which nodes have an Internal Monitor Process when you configure your system. You can also assign each Internal Monitor Process a primary and a secondary node to ensure fail over protection. Internal Monitor Processes, like concurrent managers, can have assigned work shifts, and are activated and deactivated by the Internal Concurrent Manager. Log and Output File Access The concurrent log and output files from requests that run on any node are accessible on–line from any other node. Users need not log onto a 5 – 66 Oracle Applications System Administrator’s Guide node to view the log and output files from requests run on that node. See: Database Instances, Manager Location, and File Distribution: page 5 – 70. This capability relies on setup steps taken at install time. For more information, refer to the installation documentation for your platform. Integration with Platform–Specific Queuing and Load–Balancing Systems Some cluster or massively parallel systems have their own mechanisms for queuing batch processes or distributing process loadsfor example, IBM LoadLeveler. Because users may wish to manage all processing, not just Oracle Applications processing, using these mechanisms, parallel concurrent processing is designed to integrate with them. Thus, you can match your concurrent process management to the specific capabilities of your operating platform. For more information on integrating with platform–specific queuing and load–balancing systems, refer to the installation documentation for your platform. Managing Concurrent Processing 5 – 67 Managing Parallel Concurrent Processing This essay describes how to manage parallel concurrent processing from System Administration forms. It presents the following topics, each in the context of parallel concurrent processing: Defining Concurrent Managers You define concurrent managers using the Concurrent Managers window. When you define a manager, you specify the manager type, which may be either Concurrent Manager, Internal Monitor, or Transaction Manager. There are three other types of managers that Oracle Applications predefines for you: the Internal Concurrent Manager, which describes the Internal Concurrent Manager process, the Conflict Resolution Manager, and the Scheduler. For the CRM and Scheduler you can assign the primary and secondary nodes. For the Internal Concurrent Manager you assign the primary node only. To each concurrent manager and each Internal Monitor Process, you may assign a primary and a secondary node. You may also assign primary and secondary system queue names, if a platform–specific queue management system is available on your platform. See: Concurrent Managers: page 5 – 89. Administering Concurrent Managers Target Nodes Using the Administer Concurrent Managers form, you can view the target node for each concurrent manager in a parallel concurrent processing environment. The target node is the node on which the processes associated with a concurrent manager should run. When a manager’s primary node and ORACLE instance are available, the target node is set to the primary node. Otherwise, the target node is set to the manager’s secondary node (if that node and its ORACLE instance are available.) During process migration, processes migrate from their current node to the target node. 5 – 68 Oracle Applications System Administrator’s Guide Control Across Nodes Using the Administer Concurrent Managers form, you can start up, shut down, restart, and monitor concurrent managers and Internal Monitor Processes running on multiple nodes from any node in your parallel concurrent processing environment. You do not need to log onto a node to control concurrent processing on it. You can also terminate the Internal Concurrent Manager or any other concurrent manager from any node in your parallel concurrent processing environment. Starting Up Managers You start up parallel concurrent processing by invoking the STARTMGR command from the operating system prompt. Regardless of the node from which you activate the Internal Concurrent Manager, it starts up on its assigned node (assuming that you operate from a node whose platform supports remote process startup.) After the Internal Concurrent Manager starts up, it starts all the Internal Monitor Processes and all the concurrent managers. It attempts to start Internal Monitor Processes and concurrent managers on their primary nodes, and resorts to a secondary node only if a primary node is unavailable. Shutting Down Managers You shut down parallel concurrent processing by issuing a ”Deactivate” command against the Internal Concurrent Manager from the Administer Concurrent Managers form. All concurrent managers and Internal Monitor processes are shut down before the Internal Concurrent Manager shuts down. Terminating a Concurrent Process You can terminate a running concurrent process on the local node or on remote nodes by issuing a ”Terminate” command from the Administer Concurrent Managers form. Administer Concurrent Managers: page 5 – 80 Controlling the Internal Manager from the Operating System: page 5 – 58 Concurrent Managers: page 5 – 89 Migrating Managers Most process migration occurs automatically in response to the failure or subsequent availability of a primary node. However, you may Managing Concurrent Processing 5 – 69 migrate processes manually by changing the node assignments for a concurrent manager or Internal Monitor Process using the Concurrent Managers form. To effect your changes, you issue a ”Verify” command against the Internal Concurrent Manager from the Administer Concurrent Managers form. Database Instances, Manager Location, and File Distribution The following pages illustrate some example configurations for parallel concurrent processing. With parallel concurrent processing, each node with concurrent managers may or may not be running an ORACLE instance. On a node that is not running ORACLE, the concurrent manager(s) connect via Net8 to a node that is running ORACLE. The APPLTOP can be stored on a node’s local disk. Alternatively, these files can be stored in one central location, and read remotely from other nodes. Examples of Parallel Concurrent Processing Parallel Concurrent Processing – Single Database Instance with Centralized and Shared Log/Output/Executable File System: page 5 – 71 Parallel Concurrent Processing – RAC with Centralized and Shared Log/Output/Executable File System: page 5 – 72 Parallel Concurrent Processing – Single Database Instance with Distributed Log/Output/Executable Files: page 5 – 73 5 – 70 Oracle Applications System Administrator’s Guide Parallel Concurrent Processing – Single Database Instance with Centralized and Shared Log/Output/Executable File System Figure 5 – 4 NODE 1 Internal Concurrent Manager APPLTOP Concurrent Managers LOCAL DISK Net8 NODE 2 Internal Monitor Concurrent Managers Database Files ORACLE Database Instance LOCAL DISK Net8 NODE 3 Concurrent Managers LOCAL DISK NFS Mounts Read/Write Managing Concurrent Processing 5 – 71 Parallel Concurrent Processing – RAC with Distributed Log/Output/Executable File System Figure 5 – 5 NODE 1 NFS Mounts Read/Write Internal Concurrent Manager Database Files APPLTOP Concurrent Managers ORACLE RAC Instance LOCAL DISK NODE 2 APPLTOP Internal Monitor Communications Link Concurrent Managers ORACLE RAC Instance LOCAL DISK Net8 NODE 3 APPLTOP Concurrent Managers LOCAL DISK 5 – 72 Oracle Applications System Administrator’s Guide Parallel Concurrent Processing – Single Database Instance with Distributed Log/Output/Executable Files Figure 5 – 6 NODE 1 Internal Concurrent Manager Concurrent Managers APPLTOP Net8 Database Files LOCAL DISK NODE 2 Internal Monitor Concurrent Managers APPLTOP ORACLE Database Instance LOCAL DISK LOCAL DISK Net8 NODE 3 Concurrent Managers APPLTOP LOCAL DISK Managing Concurrent Processing 5 – 73 Implementing Parallel Concurrent Processing The following checklist summarizes the steps for implementing parallel concurrent processing. " Install Concurrent Processing Server on each node. " Configure GSM on each node. ❑ If using AutoConfig: Edit the context file. Find the line containing APPLDCP; it should look like this: <APPLDCP oa_var=”s_appldcp”> OFF </APPLDCP> Alter this line so it now reads: <APPLDCP oa_var=”s_appldcp”> ON </APPLDCP> and reinstantiate the environment files. ❑ If not using AutoConfig: Refer to OracleMetaLink for instructions on how to configure GSM on all nodes. Find the applications environment file on each node. In each of those files, find the line containing APPLDCP; it should look like this: APPLDCP=”OFF” alter this line so it now reads APPLDCP=”ON” " If implementing Parallel Concurrent Processing with Real Application Cluster in an environment with a local APPLTOP on each node: Each node in the system is assigned to a RAC instance. To achieve this correspondence: 1. Find the applications environment file on each node. At the end of the file add the lines, using the corresponding RAC instance name: TWO_TASK=”<InstanceName>” export TWO_TASK Note: In the apps listener.ora on each node there is an entry for ”FNDSM_<DB_SID>” that has an ENVS= string of variables. 5 – 74 Oracle Applications System Administrator’s Guide The MYAPPSORA variable is set to the applications environment file that should be edited in this step. 2. Remember that every time you run AutoConfig you will have to merge these changes back into the tnsnames.ora, listener.ora and applications environment files. See: Creating an Environment File (Maintaining Oracle Applications) " Define the concurrent managers. See: Managing Parallel Concurrent Processing: page 5 – 68 Managing Concurrent Processing 5 – 75 Concurrent Managers and Real Application Clusters (RAC) This section describes the implementation of concurrent managers with Real Application Clusters (RAC). For more information on RAC, see: Migrating an Oracle Applications Single Instance to Real Application Clusters (RAC): page G – 85. The implementation of concurrent managers in Release 11i changed to utilize RAC. These changes include: • Data model changes that partition several of the more heavily used concurrent manager tables: – FND_CONCURRENT_REQUESTS – FND_RUN_REQUESTS – FND_CONC_PP_ACTIONS – FND_RUN_REQ_PP_ACTIONS Additionally, several indexes were changed to be local prefixed indexes. This partitioning (with one partition per RAC instance) allows requests to be segregated according to which RAC instance on which they are to run. The new non–nullible column OPS_INSTANCE determines on which instance the request should run. • Changes in the code to make managers selective as to which requests they will run. For example, a manager whose primary instance is number 1 will not pick up a request assigned to instance 2., even if the manager has migrated to instance 2 because the primary instance is down. • Code changes to populate the OPS_INSTANCE column. • The FND_CP_OPS_MAINT package provides maintenance. – FND_CP_OPS_MAINT.Expand provides the ability to add partitions as new instances are installed. – FND_CP_OPS_MAINT.Migrate is used to move a request from one RAC instance/partition to another. This move should only be done with pending requests. While the API does allow the migration of completed requests, there is no performance related reason to do so. Oracle discourages performing this operation while requests are running, especially when trying to move request sets. – FND_CP_OPS_MAINT.Validate should only be used when prescribed by Oracle Support or development. – FND_CP_OPS_MAINT.Register_Instance is used to register an instance with the concurrent manager. 5 – 76 Oracle Applications System Administrator’s Guide – FND_CP_OPS_MAINT.Expand should normally be called after adding an instance, so that various partitioning can be performed. If several instances are being registered at one time, you may register all of them and then run FND_CP_OPS_MAINT.Expand once. How to Install Concurrent Manager RAC Support The following steps are involved in preparing your installation for the concurrent manager RAC support. 1. First, specify the instance number for each of your instances in their respective configuration files (init.ora). If you fail to do this Oracle will dynamically assign instance numbers as the various instances are started up, which will lead to unpredictable results. It is also important that you begin the numbering at 1 and do not leave gaps as this would result in extra partition creation that will degrade performance. Here is an example from an init.ora file: INSTANCE_NUMBER=1 2. Next, populate the table FND_OPS_INSTANCES using FND_CP_OPS_MAINT.Register_Instance: PROCEDURE Register_Instance (INSTANCE_NUMBER IN NUMBER, SERVICE_NAME IN VARCHAR2, DESCRIPTION in VARCHAR2) where: – INSTANCE_NUMBER is the RAC instance ID hardcoded in that instance’s configuration file. – SERVICE_NAME is the SQL*Net service name. – DESCRIPTION is a description of the instance for your reference. 3. If the patch containing the RAC infrastructure has not been applied, apply it now. Warning: It is extremely important that the concurrent managers be shutdown during this process. The operations performed in this patch are the renaming of the tables to be partitioned, the recreation of the tables as partitioned, the copying of the data from the original tables to the rebuilt tables, and finally the dropping of the indexes from the old tables and Managing Concurrent Processing 5 – 77 their recreation on the new tables. In the unlikely event of a problem occurring during this process the original tables can be found under the following new names: – FND_CONCURRENT_REQUESTS is renamed as FND_CP_OPSTMP_FCR – FND_CONC_PP_ACTIONS is renamed as FND_CP_OPSTMP_FCPA – FND_RUN_REQUESTS is renamed as FND_CP_OPSTMP_FRR – FND_RUN_REQ_PP_ACTIONS is renamed as FND_CP_OPSTMP_FRRPA The patching process leaves these renamed tables in the database. Oracle recommends that a sufficient amount of time elapse before dropping these tables in order to ensure that no data loss has occurred. It would not be unreasonable to wait months before dropping these tables. 4. Recompile invalid objects using ”Compile APPS Schema(s)” from the ”Maintain Applications Database Objects” menu in AD Administration. 5. The patching scripts will assign all requests in the database to the RAC instance that the patch is being run on. Individual requests may then be migrated using FND_CP_OPS_MAINT.Migrate(Req_ID, OPS_ID) where – Req_ID is the Request to be moved – OPS_ID is the Destination OPS Instance ID Alternatively, you may cancel the pending requests and resubmit them from the desired instance (which is the preferred method). At this point the RAC support should be fully functional. Adding RAC Instances This section describes adding RAC instances at a later time. Assuming the concurrent manager RAC support has already been installed, you will need to do the following: 5 – 78 1. Set the INSTANCE_NUMBER initialization parameter in the new instance’s configuration file (init.ora). 2. Populate the TABLE FND_OPS_INSTANCES using FND_CP_OPS_MAINT.Register_Instance: Oracle Applications System Administrator’s Guide PROCEDURE Register_Instance (INSTANCE_NUMBER IN NUMBER, SERVICE_NAME IN VARCHAR2, DESCRIPTION in VARCHAR2) where: – INSTANCE_NUMBER is the OPS instance ID specified in that instance’s configuration file. – SERVICE_NAME is the SQL*Net service name. – DESCRIPTION is a description of the instance for your reference. 3. Execute the PLSQL function FND_CP_OPS_MAINT.EXPAND. It should return TRUE. 4. Use FND_CP_OPS_MAINT.Migrate(Req_ID, OPS_ID) to migrate pending requests to the new instance as desired. Note: Running requests will not be moved, so you may wish to shut down the managers for this operation, or alternatively cancel the pending requests and resubmit them from the desired instance. Maintenance of Managers Because managers only pick up requests for their own instance, you should create new managers to support requests on additional instances. For example, if you have the standard manager running on Instance 1, but there will be requests submitted from Instance 2 that would normally run under the standard manager, you should create another manager similar to the standard manager, but with a primary node of Instance 2. This requirement can be managed to a certain extent via the profile option ”Database Instance”. This profile specifies which instance is used to log into the database at the time a user selects a responsibility. Since requests are assigned to the instance from which they are submitted, this can limit which instances will have certain programs running. For example, suppose you have a manager to run requests for application XYZ and these requests are only submitted from responsibilities XYZ and XYZ–Super–User. If the profile Database Instance is set to 1, the requests will only be submitted against instance 1, and there will be no need to duplicate this manager on the other instances. Obviously, there are other performance implications involved in using this profile. Managing Concurrent Processing 5 – 79 Administer Concurrent Managers Window View the status of your concurrent managers (including any transaction managers) and, if you wish, change the status of any manager by issuing a control command. For example, you can deactivate a manager that is currently active, then view its new status after the change takes effect. Administer Concurrent Managers Block Node In a parallel concurrent processing environment, a manager’s processes are targeted to run on this node. 5 – 80 Oracle Applications System Administrator’s Guide If a concurrent manager is defined to use a platform–specific system queue, this field displays the name of the queue which the manager submits its processes to. Processes Actual Each manager process can run one concurrent request (start one concurrent program). Typically, the number of actual processes equals the number of target processes (the maximum number of requests a manager can run). However, the number of actual processes may be less than the number of target processes due to lack of requests, manager deactivation, or manager migration. Processes Target This field displays the maximum number of manager processes that can be active for this manager. Requests Running/Requests Pending Typically, when there are requests pending, this number should be the same as the number of actual processes. However, if there are no pending requests, or requests were just submitted, the number of requests running may be less than the number of actual processes. Moreover, if a concurrent program is incompatible with another program currently running, it does not start until the incompatible program has completed. In this case, the number of requests running may be less than number of actual processes even when there are requests pending. Status This field displays the status of a manager after you have chosen a specific action for it using the top row of buttons near the bottom of the window. You can control concurrent managers individually or collectively by controlling the Internal Concurrent Manager. This field is blank when managers have been activated by the Internal Concurrent Manager. In a parallel processing environment, this field displays Target node/queue unavailable when the primary and secondary nodes (or system queues) are not available. Managing Concurrent Processing 5 – 81 Controlling a Specific Manager The actions you can choose for controlling a manager are: Terminate When you terminate requests and deactivate the Internal Concurrent Manager, all running requests (running concurrent programs) are terminated, and all managers are deactivated. Managers previously deactivated on an individual basis are not affected. You can terminate requests and deactivate individual managers. All running requests (running concurrent programs) handled by the manager are terminated. Once deactivated, a manager does not restart until you select the manager and choose the Activate button. Deactivate When you deactivate the Internal Concurrent Manager, all other managers are deactivated as well. Managers previously deactivated on an individual basis are not affected. You can deactivate individual managers. Once deactivated, a manager does not restart until you select the manager and choose the Activate button. When you deactivate a manager, including the Internal Concurrent Manager, all requests (concurrent programs) currently running are allowed to complete before the manager(s) shut down. Verify This choice appears only when you select the Internal Concurrent Manager. The Internal Concurrent Manager periodically monitors the processes of each concurrent manager. You can force this process monitoring or PMON activity to occur by choosing the Verify button. Another result of selecting this choice is that the Internal Concurrent Manager rereads concurrent program incompatibility rules. Restart This choice appears only when you select an individual manager. When you restart a concurrent manager, the manager rereads its definition. 5 – 82 Oracle Applications System Administrator’s Guide You should restart a manager when you have made the following changes using the Define Concurrent Manager form, and you wish those changes to take effect: – Change work shift assignments – Modify the number of Target Processes – In a parallel concurrent processing environment, change node or system queue information Activate When you activate the Internal Concurrent Manager, you activate all other managers as well, except those managers that were deactivated on an individual basis. You cannot activate the Internal Concurrent Manager from the PC client. The Internal Concurrent Manager is only activated from the server. You can also activate an individual concurrent manager that is currently deactivated, so long as the Internal manager is active. If the manager is defined to work in the current work shift, then the Internal manager starts it immediately. Reviewing a Specific Manager View details of a concurrent manager’s operation. Processes You can view the details of the processes of a given concurrent manager. Processes that are currently active, migrating, or terminating, as well as processes that have been terminated or deactivated, are displayed. Requests For a selected manager you can view all running and pending requests handled by the manager. The following actions are available only for certain services managed Generic Service Management. These services must be defined to accept commands to suspend their operations. Suspend Suspend the operations of the service. Resume Resume the operations of the service. Managing Concurrent Processing 5 – 83 Concurrent Processes Window View status information about the processes of a specific concurrent manager, whose name and node are identified near the top of the window. Displaying this window automatically queries all processes that are currently active, migrating, or terminating, as well as processes that have been terminated or deactivated. Display order is by status value (Active, Migrating, Terminating, Terminated, Deactivated) and within status, by the order in which processes were started. If you wish to reduce the number of displayed processes, you can delete records by submitting the ”Purge Concurrent Request and Managers” 5 – 84 Oracle Applications System Administrator’s Guide report from the Run Requests form. You can delete records according to the number of days since the processes were started. However, you cannot delete the records of currently active managers. Status This field cannot be updated. The following are valid status values: Active Currently running manager processes display as ”Active”. Deactivated Manager processes that are no longer running display as ”Deactivated”. These processes were deactivated by you choosing the Deactivate button in the Administer Concurrent Managers block, or by the Internal Concurrent Manager deactivating a concurrent manager at the end of that manager’s work shift. Migrating Managers that are migrating between primary and secondary nodes display as ”Migrating”. In a parallel concurrent processing environment, concurrent managers run on either the primary or secondary node assigned to them. Managers migrate to the secondary node if the primary node or the database instance on the primary node is unavailable. Managers migrate back to the primary node once it becomes available. Terminating Manager processes that are being terminated display as ”Terminating”. These processes were terminated by you choosing the Terminate button in the Administer Concurrent Managers block, or by a user selecting ”Terminate” in the Concurrent Requests form. Terminated Manager processes that have been terminated display as ”Terminated”. These processes were terminated by you choosing the Terminate button in the Administer Concurrent Managers block, or by a user selecting ”Terminate” in the Concurrent Requests form. Manager Identifiers Concurrent This field displays a number generated by the individual concurrent manager that identifies the process. This field cannot be updated. Managing Concurrent Processing 5 – 85 This number may be referenced if an operating system process ID is not available. You can use this number to view the log file associated with the process. (This is the same log file you view when you select Manager Log from the View field of the Concurrent Requests form): • At the operating system level, locate yourself in the log directory $FND_TOP/APPLLOG. • For concurrent managers, use W<number>.mgr. • For Internal Monitor processes, use I<number>.mgr. Manager Identifiers Oracle This field displays the ORACLE process ID associated with the manager process. This field cannot be updated. Manager Identifiers System This field displays the operating system process ID associated with the manager process. This field cannot be updated. Request Identifiers Running Please note the following about this field: • Normally this field is blank, as the run–time of a request is typically very short. • For a terminated manager, the ID of the request being processed at the time of termination is displayed. Request Identifiers System This field displays the operating system process ID for a spawned concurrent process. Viewing Log Files Use the three buttons near the bottom of the window to view log files. Log files record information that may be helpful when diagnosing problems. Request Log 5 – 86 Choose this button to view the log file of the process associated with the running request. Oracle Applications System Administrator’s Guide Internal Manager Log Choose this button to view the Internal Concurrent Manager’s log file. Manager Log Choose this button to view the log file of the concurrent manager who started running the request. Concurrent Requests Window View all running and pending requests for a selected manager, whose name and node are identified near the top of the window. Managing Concurrent Processing 5 – 87 Request Diagnostics Window This window informs you when the request completed or if it did not complete, shows you a diagnostic message indicating why. 5 – 88 Oracle Applications System Administrator’s Guide Concurrent Managers Window Use this window to define your concurrent managers. You can determine when a manager runs and how many programs a manager can start simultaneously when you assign workshifts to the manager. Determine which programs a manager can start by defining specialization rules. Concurrent Managers Block The combination of an application and the name you define for your manager uniquely identifies the manager. Application The application name does not prevent a manager from starting programs associated with other applications. To restrict a manager to Managing Concurrent Processing 5 – 89 only running programs associated with certain applications, go to the Specialization Rules window. Type Once you define a concurrent manager, you cannot update this field. There are several types of managers: Concurrent Manager Concurrent Managers start concurrent programs running. Internal Monitor Internal Monitors monitor the Internal concurrent manager in a parallel concurrent processing environment. If the Internal Concurrent Manager exits abnormally (for example, because its node or its database instance goes down), an Internal Monitor restarts it on another node. Transaction Manager Transaction managers handle synchronous requests from client machines. Cache Size (Concurrent Manager only) Enter the number of requests your manager remembers each time it reads which requests to run. For example, if a manager’s workshift has 1 target process and a cache value of 3, it will read three requests,, and will wait until these three requests have been run before reading new requests. In reading requests, the manager will only put requests it is allowed to run into its cache. For example, if you have defined your manager to run only Order Entry reports then the manager will put only Order Entry requests into its cache. If you enter 1, the concurrent manager must look at its requests list each time it is ready to process another request. By setting the cache size at a higher number, the concurrent manager does not have to read its requests list each time it runs a request. However, the manager does not recognizea nay priority changes you make for a particular request if it has already read that request into its cache. Further, even if you give a higher priority to a new request, that new request must wait until the buffer isempty and the manager returns to look at the requests list. That request may have to wait a long time if you set the buffer size to a high number. You should use cache size to tune your concurrent managers to work most efficiently for you site’s needs. If your organization tends to reprioritize jobs going to a certain manager, that manager should have its buffer size set fairly low. 5 – 90 Oracle Applications System Administrator’s Guide Suggestion: Enter a value of 1 when defining a manager that runs long, time–consuming jobs, and a value of 3 or 4 for managers that run small, quick jobs. Data Group (Transaction Manager only) The data group the transaction manager uses to connect to the database. Transaction managers only run programs submitted from responsibilities that use the same data group as the transaction manager. Resource Consumer Group The resource consumer group for the manager. For more information on resource consumer groups, see: Resource Consumer Groups in Oracle Applications page: 9– 7. Parallel Concurrent Processing Details Node If you are operating in a parallel concurrent processing environment and you want your manager to operate on a specific node, select the name of the node. The primary node, if available, is the node your concurrent manager operates on. If the primary node or the database instance on it goes down, your concurrent manager migrates to its secondary node. Your concurrent manager migrates back to its primary node when that node becomes available. Nodes must be previously registered with Oracle Applications, using the Nodes form. See: Nodes: page 5 – 107. System Queue If you are operating in a parallel concurrent processing environment and you want your manager to use a platform–specific queue management system instead of generic concurrent processing queue management, specify the queue or class name of that system. For example, you may choose a system queue name from a platform–specific queue management system like NQS or IBM Load Leveler. The primary system queue is the queue you associate with the primary node. The secondary system queue is the queue you associate with the secondary node. ☞ Attention: To ensure that your manager uses your platform–specific queue management system, you should start Managing Concurrent Processing 5 – 91 the concurrent managers in the proper mode (set APPLDCP = OSQ). Refer to platform–specific documentation to determine if your platform supports interfacing with system queues. For Unix platforms, refer to the appropriate Oracle Applications Installation Update. For all other platforms, refer to the appropriate Oracle Applications Installation Guide. Program Library Select a library of immediate concurrent programs to make available to your manager. Your manager can only run immediate concurrent programs that are registered in the selected program library. Immediate concurrent programs must be registered in a program library by an applications developer using Oracle Application Object Library. Program Library Concurrent managers can run only those immediate concurrent programs listed in their program library. They can also run concurrent programs that use any other type of concurrent program executable as long as the specialization rules include them. Transaction Managers can only run programs listed in their program library. Defining Manager Operations 5 – 92 The two buttons near the bottom of the window display additional windows for defining when your manager operates, and, if you wish, specializing your manager to run only certain kinds of programs. Oracle Applications System Administrator’s Guide Work Shifts Window Assign work shifts to a concurrent manager. A work shift defines the dates and times the manager is enabled. For each work shift you define the number of processes the manager starts running. Work shifts are defined using the Work Shifts form. See: Work Shifts: page 5 – 98. Work Shift Select the work shift(s) you want to assign to your manager. Processes Enter the number of operating system processes you want your work shift to run simultaneously. Each process can run a concurrent request. For example, if a work shift is defined with three (3) target processes, the manager can run up to three requests simultaneously. Managing Concurrent Processing 5 – 93 Parameter Enter the parameter string for a service under Generic Service Management. The value of this field is dependent on the service type definition. Sleep Seconds Enter the sleep time for your manager during this work shift. Sleep time is the number of seconds your manager waits between checking the list of pending concurrent requests (concurrent requests waiting to be started). The default value is 60 (seconds). Suggestion: Set the sleep time to be very brief during periods when the number of requests submitted is expected to be high. Describe your application–ORACLE username pair, if you wish. 5 – 94 Oracle Applications System Administrator’s Guide Specialization Rules Window Specialize your manager to run only certain kinds of requests. Without specialization rules, a manager accepts requests to start any concurrent program. Include/Exclude Select from the poplist whether or not to include or exclude those requests that are based on the rule to run. Type Select the type of specialization rule you want to assign to your manager. Based on the rule’s action you selected, allow or disallow, requests can be run by your manager according to a: Managing Concurrent Processing 5 – 95 • Combined Rule For example, only requests that satisfy the combined rule you select are allowed to be run by your manager. Or conversely, requests that satisfy a certain combined rule are excluded from running. Combined specialization rules, which combine more than one logical statement, are defined using the Combined Specialization Rules form. See: Combined Specialization Rules: page 5 – 100. • ORACLE ID For example, programs with a certain ORACLE ID are excluded from running. Or conversely, a concurrent manager only includes programs with a specific ORACLE ID. • Program For example, only the program you select is excluded from running. Or conversely, a concurrent manager only includes the programs you select. You can also include or exclude all programs belonging to a specific application using the Program type by entering the application in the Application field and leaving the Name field empty. • Request Type (of the program) For example, programs of a certain request type are excluded from running. Or conversely, a concurrent manager only includes programs with the request type you select. • User (application username at sign on) For example, all programs submitted by a certain user are excluded from running. Or conversely, a concurrent manager includes only programs submitted by the user you select. Application Select the application associated with your: • Combined Rule • Program • Request Type Name Select the name of your: • Combined Rule 5 – 96 Oracle Applications System Administrator’s Guide • ORACLE ID • Program • Request Type • User Managing Concurrent Processing 5 – 97 Work Shifts Window Use this window to name and define your concurrent manager work shifts. Define work shifts to specify when your concurrent managers can work. For each work shift, specify a time period covering a range of days or a particular date. See: Work Shifts Definitions: page 5 – 29. Name The name of your concurrent work shift should be intuitive, for instance ”Week Days”, ”Weeknights” or ”Weekends”. From/To Enter the times of day at which your concurrent shift begins/ends. The time format is HH24:MM. For example, if your work shift name is 5 – 98 Oracle Applications System Administrator’s Guide ”Week Days”, you could enter ”09:00” (9:00 am) as the start time and ”17:00” (5:00 pm) as the end time. Note that Oracle Applications uses a 24–hour clock. Days of Week From/Days of Week To Enter the first and last days of this shift. For instance, if your shift name is ”Week Days”, you could enter ”Monday” in the ”Days of Week From” field and ”Friday” in the ”Days of Week To” field. If you enter a value in the ”Days of Week From” field, you must enter a value in the ”Days of Week To field”. You may not use the Date field for this row. Date Enter a date here to create a date–specific workshift. For instance, you can name a workshift ”Memorial Day”, and enter the date in this field to enable this workshift only on the Memorial Day holiday. Date–specific workshifts override workshifts that do not specify a specific date. If you want to enter a value in this field (specify a date), you may not enter values for the Days of Week fields for this row. See: Overlapping Work Shifts – Priority Levels: page 5 – 31. Managing Concurrent Processing 5 – 99 Combined Specialization Rules Window Define rules identifying which requests a concurrent manager can read. With the rules you define here, you may specialize the function of a concurrent manager. Using this window, you can define several Include and Exclude statements, each referred to as a specialization line, and combine the lines into a single specialization rule referred to as a Combined Rule. Unlike the individual rules you define using the Specialization Rules window from within the Concurrent Managers window, the combined rules you define here differ in two ways: • You can combine Include and Exclude statements. This enables you to identify very specific requests for running concurrent programs. 5 – 100 Oracle Applications System Administrator’s Guide • Within a combined rule, using multiple Include statements restricts a concurrent manager more. With individual rules you define using the Specialization Rules window (within the Concurrent Managers window), the more ”Include” rules you define, the less restricted a manager becomes. See: Concurrent Managers: page 5 – 89 Combined Specialization Rules Block Together, the application name and the name you define for your combined specialization rule uniquely identifies the rule. Application The application name does not prevent a concurrent manager from starting programs associated with other applications. Specialization Rules Block Define the individual rules (statements) that make up your combined specialization rule. • Each rule in this block defines one statement. • The sum of all the specialization rules defines your combined specialization rule. Include/Exclude Select from the poplist whether to include or exclude those requests that are based on the rule to run. Type Select the type of specialization rule you want to enforce on a concurrent manager. You cannot combine two Include rules of the same type. • For example, you cannot include programs to be associated with an ORACLE ID, then, on another line, include programs to be associated with a second, different ORACLE ID. Managing Concurrent Processing 5 – 101 Based on a rule’s action, exclude or include, programs can be run by your manager according to a: • ORACLE ID For example, programs with a certain ORACLE ID are excluded from running. Or conversely, a concurrent manager only includes programs with a specific ORACLE ID. • Program For example, only the program you select is excluded from running. Or conversely, a concurrent manager only includes the programs you select. You can also include or exclude all programs belonging to a specific application using the Program type by entering the application in the Application field and leaving the Name field empty. • Request Type (of the program) For example, programs of a certain request type are excluded from running. Or conversely, a concurrent manager only includes programs with the request type you select. • User (application username at sign on) For example, all programs submitted by a certain user are excluded from running. Or conversely, a concurrent manager includes only programs submitted by the user you select. Application Select the application associated with your: • Program • Request Type Name Select the name of your: • ORACLE ID • Program • Request Type • User 5 – 102 Oracle Applications System Administrator’s Guide Concurrent Request Types Window Use this window to identify several concurrent programs as a group by assigning each program a common request type. You assign a request type defined here to a concurrent program using the Concurrent Programs window. Then, when you define a concurrent manager using the Define Concurrent Manager window, you can define the manager to run (Allow) or not run concurrent programs based on their request type. Managing Concurrent Processing 5 – 103 For example, you could define a request type as “end–of–month reports”, assign that request type to several concurrent programs, then define a concurrent manager to only run ”end–of–month” requests. Concurrent Request Types Block Name and describe each type of concurrent request you want to define. The combination of application name plus request type uniquely identifies your concurrent request type. This application name does not prevent you from assigning this request type to concurrent programs associated with other application names. 5 – 104 Oracle Applications System Administrator’s Guide Viewer Options Window Use this form to define the MIME types for the output formats of your concurrent requests. These MIME types are used in viewing reports. For each file format, you can associate one or more MIME types. A user can use one MIME type to view reports of a certain format. For example, a user can view all text format reports in Microsoft Word. The MIME types for supported formats for a particular user are set by several profile options. They are: • Viewer: Application for HTML • Viewer: Application for PCL • Viewer: Application for PDF • Viewer: Application for PostScript • Viewer: Application for Text This MIME type is sent to a browser window when the user views a report of that file format. Managing Concurrent Processing 5 – 105 Viewer Options Block Associate one or more MIME types with each supported file format. By defining viewer options, you can specify the application or applications that are available for displaying files of each format. File Format The file format. MIME Type The MIME type to use for the file output. See Also Defining the Reports Viewer: page 5 – 12 Profile Options in Oracle Application Object Library page: A – 2 Oracle Applications User’s Guide 5 – 106 Oracle Applications System Administrator’s Guide Nodes Window A node consists of one or more processors and their associated memory. In parallel concurrent processing environments (such as cluster, massively parallel, and homogeneous networked environments) each node operates independently of other nodes except when sharing resources, such as a disk. You can assign concurrent managers to different nodes to spread your concurrent processing workload and increase throughput. A concurrent manager runs its processes on the nodes to which it is assigned. Nodes Block Node Enter the operating system name of a node. Managing Concurrent Processing 5 – 107 Platform Select the operating system platform that your node resides on. Base Path Var. Consult your installation manual to determine the correct base path variable for your platform to determine the location of the concurrent managers’ log and out files for this node. 5 – 108 Oracle Applications System Administrator’s Guide CHAPTER 6 Oracle Applications Manager T his chapter describes these management tools for Oracle Applications: • Management Pack for Oracle Applications • Oracle Applications Manager Oracle Applications Manager 6–1 Oracle Applications Management Tools Oracle Applications provides a powerful set of management tools to help you manage your Oracle Applications installation. Oracle Management Pack for Oracle Applications The Oracle Management Pack for Oracle Applications (hereafter referred to as the Management Pack for Oracle Applications) extends Oracle Enterprise Manager to enable the monitoring, diagnosing, and capacity planning of the multi–tiered Oracle Applications environment. Oracle Applications Manager The new Oracle Applications Manager allows administrators to manage E–Business Suite systems from an HTML console. Oracle Applications Manager can be used for a wide variety of tasks such as administering services, examining system configuration, managing Oracle Workflow, examining applied patches, and measuring system usage. With Oracle Applications Manager, a system administrator can easily monitor the status of a system including the database, application tier services, concurrent requests, and Oracle Workflow processes. Administrators can also control application tier services and submit concurrent requests directly from the console. 6–2 Oracle Applications System Administrator’s Guide Oracle Management Pack for Oracle Applications The Management Pack for Oracle Applications extends Oracle Enterprise Manager to enable the monitoring, diagnosing, and capacity planning of the multitiered Oracle Applications environment. The Management Pack for Oracle Applications takes advantage of the following Oracle Enterprise Manager system management features: • Discovery and graphical representation of services to be monitored • Starting tools from the console in the context of a specific service • Automated data collection and management services • Central monitoring and administration of remote systems using intelligent agents The Management Pack for Oracle Applications extends the following tools to work with Oracle Applications: • Oracle Enterprise Manager console The console is extended to discover concurrent managers and to notify you should any of the servers go down. You can also define jobs for any of the Oracle Applications subsystems, allowing central administration of a distributed Oracle Applications system. • Oracle Applications Advanced Events A library of events specific to Oracle Applications are provided for lights–out event monitoring and problem detection of the Oracle Applications system. Additional lights–out problem resolution is provided with fix–it jobs that are configured to run automatically when an event triggers. These fix–it jobs are either custom–built or chosen from a small predefined set provided with the Management Pack for Oracle Applications. • Oracle Performance Manager A new Oracle Applications data gatherer cartridge feeds data to Oracle Performance Manager, providing you with an extensive array of real–time monitoring charts on all concurrent managers and Forms sessions that are used by your Oracle Applications instance. • Oracle Capacity Planner Concurrent manager performance data is gathered over time and fed to Oracle Capacity Planner for analysis of resource consumption and detection of performance anomalies. Oracle Applications Manager 6–3 • Concurrent Processing Tuning Assistant This utility allows you to examine historical processing information about Oracle Concurrent Processing requests and concurrent managers. For more information on the Management Pack for Oracle Applications, see Getting Started with the Oracle Management Pack for Oracle Applications. 6–4 Oracle Applications System Administrator’s Guide Overview of Oracle Applications Manager The new Oracle Applications Manager allows administrators to manage E–Business Suite systems from an HTML console. Oracle Applications Manager can be used for a wide variety of tasks such as administering services, examining system configuration, managing Oracle Workflow, examining applied patches, and measuring system usage. With Oracle Applications Manager, a system administrator can easily monitor the status of a system including the database, application tier services, concurrent requests, and Oracle Workflow processes. Administrators can also control application tier services and submit concurrent requests directly from the console. Charts and graphs provide more intuitive summaries, and allow the user to drill down for more detailed information. Oracle Applications Manager provides diagnostic features for Applications systems. The console displays errors recently reported by system components such as transaction managers or concurrent requests. For running processes such as forms or concurrent requests, system administrators can examine the database session details, including any currently executing SQL. Oracle Applications Manager provides access to configuration information for all of the tiers of an Oracle Applications system. The console provides tools to detect potential configuration problems such as recently altered site–level profile option settings or database initialization parameters that do not meet the requirements or recommendations of Oracle. Oracle Applications Manager allows administrators to configure, monitor, and control concurrent processing. Combined with the new Service Management feature of Release 11i, Oracle Applications Manager can be used to monitor and control Oracle Forms Listeners, Metrics Servers, Metrics Clients, Reports Servers, Apache Servers, and other application tier services. Oracle Workflow Manager can be used to control Oracle Workflow system services, such as background engines, notification mailers, agent listeners, and queue propagation. Administrators can monitor and analyze Oracle Workflow system activity, suspend and resume processes, retry activities that end in error, and purge obsolete Workflow data. With the Patch History Database feature, administrators can examine the patches applied to an Oracle Applications system. System administrators can easily determine which patches have been applied to a system, including the individual patches included in mini–packs, Oracle Applications Manager 6– 5 maintenance packs, and merged patches. Administrators can also examine the patched files on a system, and find all of the patches that altered a given file. For each patch applied, Oracle Applications Manager can show the individual actions taken by each patch driver. For more information on the Patch History Database feature, refer to the Maintaining Oracle Applications: AD Utilities Reference Manual. See Also Oracle Workflow Guide Maintaining Oracle Applications: AD Utilities Reference Manual 6– 6 Oracle Applications System Administrator’s Guide Oracle Applications Manager These sections describes the following features for Oracle Applications Manager: • Logging in • Configuration • Services, including request processing managers Login to Oracle Applications Manager Use this page to login in to the Oracle Applications Manager. Username Enter your Oracle Applications username. For example, ’sysman’. This user must have the System Administrator responsibility. Password Enter your password. For example, ’sysman’. Service Name Enter the <hostname:port:SID> for the service. This is the connect string for the Oracle Applications database. FNDNAM The base Oracle Applications user name. GWYUID The Gateway User ID. The GWYUID is the public ORACLE username and password that grants limited access to Oracle Applications. The default username/password is applsyspub/pub. Oracle Applications Manager 6–7 Configuration for an Oracle Applications System This page contains configuration information for the Applications system’s configuration. Navigation: Applications Systems > (B) Configuration Overview This section shows the System name, the version, the number of products installed, and the number of invalid objects By clicking on the number of products installed, you can see a listing of the products. By clicking on the number of invalid objects, you can see a listing of the invalid objects. Click on ”Show Site Level Profiles” to see a list of the site level profiles. The profile setting, last updated date, and the user name for who last updated the profile is also shown. Changes that were made in the last 24 hours are highlighted. A list of host servers is also shown in this section. Database The Database section shows a list of database instances for the Applications system. It also lists these Database Settings: the NLS Language, NLS Territory, and the NLS Character Set. Click on ”Show Initialization Parameters” to see a list of initialization parameters. Initialization Parameters This page has two sections: • Recommended/Mandatory Initialization Parameters – this section lists the parameter, its current value, its recommended value, and whether it is mandatory or not. Values that differ from the recommended or mandatory settings are highlighted. • Complete List of Initialization Parameters: this section lists the parameter, its name, and its description. 6–8 Oracle Applications System Administrator’s Guide Concurrent Processing This section lists general information related to concurrent processing for this Applications system and concurrent processing settings. The following concurrent processing profile option values are shown: • Host Name – the name of the server on which the Internal Concurrent Manager is running • Concurrent:GSM Enabled – This profile option indicates whether the Generic Service Management (GSM) feature is enabled. The default value is Yes. • Concurrent: Attach URL – If this profile option is set to Yes, a URL is attached to request completion notifications. When a user submits a request, and specifies people to be notified in the Defining Completion Options region, everyone specified is sent a notification when the request completes. If this profile option is set to Yes, a URL is appended to the notification that enables them to view the request results online. The Internal Concurrent Manager (ICM) Settings includes the following information: • Sleep Time – The duration of time in seconds that the ICM should wait before checking for new requests. • PMON Cycle Time – The duration of time in seconds between ”process monitor checks” (checks for failed workers). • Queue Sizing Interval – the duration of time in seconds between ”worker quantity checks” (checks for the number of active workers). Click on ”Show ICM Environment” to see the environment variables and their values. Forms This section shows the ICX: Forms Launcher profile option setting, which should be set to the base URL for launching Oracle Applications forms. A List of Forms Servers is also shown, with the Host Name, Port, and Log File location for each Oracle Forms server. Web This section shows the following profile option settings: Oracle Applications Manager 6–9 • Applications Web Agent – Provides the base URL for the APPS Schema’s WebServer DAD. This profile option must be set to the URL which identifies the mod_plsql PL/SQL Gateway Database Access Descriptor base URL for your Applications instance. Oracle Applications use the value of this profile option to construct URLs for ’WWW’ type functions, Attachments, Export, and other features. • Applications Servlet Agent – This profile option must be set to the URL base for the servlet execution engine on Apache. Oracle Applications uses the value of this profile option to construct URLs for JSP and SERVLET type functions. The syntax is: http://<hostname>:<port>/<servlet_zone> • Application Framework Agent – This profile option must point to the Quik Apache Server. A List of Web Servers is also shown, with the Host Name, Port, and Log File location for each web server. Other This section shows the following profile option settings: • TCF:HOST and TCF Port – These profile options identify the network location of the TCF Server. The TCF Server supports various parts of the Oracle Applications user interface by executing some of their associated server logic and providing access to the database. • ICX: Report Launcher, ICX: Report Server, ICX: Report Link – These profile options are used by the Oracle Business Intelligence System (BIS) reports. For more information on these, see the Oracle Business Intelligence System Implementation Guide. System Activity This region displays information on the system’s activity. Navigation: Applications Systems > (B) Activity or click on [System Name] or click on the ”check mark” icon under Concurrent Processing Status for a system, or Applications Systems > Site Map > Service Status (under Concurrent Managers) A Database Sessions graph displays the number of database sessions related to the following: 6 – 10 Oracle Applications System Administrator’s Guide • Login sessions • Oracle Applications forms sessions • Services • Requests When a user logs into Oracle Applications forms, a login session is created. Each form opened by the user has its own session (form session) in the database. A Concurrent Requests graph displays the number of requests with the following statuses: • Pending • Running • Waiting on a lock – these running requests are waiting for a lock on a database object that is currently held by another process • Inactive • Completed in the last hour Click on the bar for any status to drill down to more information on requests of each status. Related Links Click on Database Status to see information on the database. Click on System Exceptions to see information on any exceptions for the system. These are error conditions reported to the Oracle Applications Manager by various system processes. Click on Submit a New Request to submit a new concurrent request. Note: To submit a new request, you use the Schedule Request windows in the Self Service Framework. A new browser window opens for you to submit your request. Services This region displays a list of the system’s application tier services and their statuses. It also lists the number of active processes and target processes. From this region you can select a service and use the View Details button to view more information on that service, as well as perform certain actions on them. Oracle Applications Manager 6 – 11 See also: • Service Instances • Internal Concurrent Manager • Conflict Resolution Manager • Scheduler/Prerelease Manager • Request Processing Manager • Internal Monitor • Transaction Manager System Exceptions This page displays information on exceptions that have occurred in your system. These exceptions are reported by various Oracle Applications system processes. Navigation: Application Systems > System Activity > System Exceptions or Application Systems > Sitemap > System Exceptions (under Activity) You can search on exceptions using the following criteria: • Application name • User name • Severity (Fatal, Error, Warning, Any) • Processed (All, Yes, No) The following information is displayed: • Severity • Message • Module, if any • Application • User • Session ID • Time • Processed (Y or N) After the necessary corrective action has been taken, ( for example, extending the tablespaces for a ”could not extend tablespace” exception), you can select the exception and click ”Apply” to confirm 6 – 12 Oracle Applications System Administrator’s Guide that the exception has been processed. This will move the exception to a ”processed” status and will not appear in the exceptions list that requires the database administrator’s attention. Forms Sessions This page shows information on the current forms sessions. Every open form has its own database session, or ”form session.” Navigation: Application Systems > Site Map > Forms Sessions (under Activity) The following columns are shown for each session:: • Form Name – The name of the form. • User Name – The user associated with the form session. • Responsibility – The responsibility associated with the form session. • Application – The application associated with the form session. • LRs (Session Logical Reads) – Input/output (I/O) is one of the most expensive operations in a database system. SQL statements that are I/O intensive can monopolize memory and disk use and cause other database operations to compete for these resources. To prevent single sources of excessive I/O, Oracle lets you limit the logical data block reads per call and per session. Logical data block reads include data block reads from both memory and disk. The limits are set and measured in number of block reads performed by a call or during a session. • PRs (Session Physical Reads) – The total number of data blocks read from disk for the session. • CPU – The CPU used by this session. • PGA (Session PGA memory) – The Program Global Area (PGA) is a memory buffer that contains data and control information for a server process. A PGA is created by Oracle when a server process is started. The information in a PGA depends on the configuration of Oracle. • UGA (Session UGA memory) – The User Global Area for the session. • Duration – the duration of the session. Oracle Applications Manager 6 – 13 Database Status This window displays the details on the database session. Navigation: Applications Systems > click on the icon in the Database Status column for a system, or from System Activity > Database Status (under Related Links) For more information on the entities listed here, refer to the following documentation: • Oracle8i Administrator’s Guide • Oracle8i Concepts • Oracle8i Reference • Oracle8i Designing and Tuning for Performance Instance Status The following information is shown: • Name • Host • Version • Startup Time • State • Shutdown Pending • Status • Role • Sessions (number) Data is also shown for the following: • Wait Events • System Statistics • Table Space and Free Space • Rollback Segments and Extents Processes The Processes page shows information on the concurrent processes of a service instance. 6 – 14 Oracle Applications System Administrator’s Guide You navigate to this page from the Service Instances page for a service. Navigation: Applications Systems > System Activity > (Services region) [Service] > (B) View Processes The following information is given for each process: • Status – The status of the process. The following are valid statuses: – Active – Currently running service processes display as ”Active”. – Deactivated – Manager processes that were explicitly deactivated by a system administrator, either by deactivating the service or by shutting down the Internal Concurrent Manager. – Migrating – Services that are migrating between primary and secondary nodes display as ”Migrating”. In a parallel concurrent processing environment, services run on either the primary or secondary node assigned to them. Services migrate to the secondary node if the primary node or the database instance on the primary node is unavailable. Services migrate back to the primary node once it becomes available. – Terminating – service processes that are being terminated display as ”Terminating”. These processes were terminated by you choosing the Terminate button in the Administer Concurrent Managers form, by you choosing Abort in the Service Instances page, or by a user selecting ”Terminate” in the Concurrent Requests form. – Terminated – service processes that have been terminated display as ”Terminated”. These processes were terminated by you choosing the Terminate button in the Administer Concurrent Managers form, by you choosing Abort in the Service Instances page, or by a user selecting ”Terminate” in the Concurrent Requests form. • SPID – The operating system process ID associated with the service process. • AUDSID – The database session ID for the service process. • Oracle SPID – The ORACLE system process ID associated with the service process. • Start Date – The start date for the process. You can use the buttons to view the following: Oracle Applications Manager 6 – 15 • Environment – The environment variable values for this service instance. • Manager Log – The manager log. • ICM Log – The Internal Concurrent Manager log. Sitemap The site map lists the features and applications available in the Oracle Applications Manager. Navigation: Applications Systems > (B) Site Map Features are grouped into the following categories: Configuration • Overview • Site Level Profile Settings • Database Initialization Parameters • Internal Concurrent Manager (ICM) Environment • Products Installed Activity • Activity Monitors • Forms Sessions • System Exceptions Concurrent Requests • Pending Requests • Running Requests • Inactive Requests • Completed Requests • Advanced Search for Requests • Submit New Request Concurrent Managers • Request Processing Managers 6 – 16 Oracle Applications System Administrator’s Guide • Transaction Managers • Internal Monitors • Service Status • Workshift Library Patches • Simple Patches Search • Advanced Patches Search • Simple Files Search • Advanced Files Search Integrated Applications • Workflow Manager • Applications Usage • Service Fulfillment Feature Concurrent Requests Use the Requests page to review details of concurrent requests for an Oracle Applications system. You can navigate to this page via several ways, including: Applications Systems > (B) Activity or click on <System Name> > Concurrent Requests graph (click on <request type>) or Applications Systems > (B) Activity or click on <System Name > (Search on Requests at top of page) A list of requests is shown, with the following information, for all types of requests. • Request ID • Short Name • Program • Requestor Also, you can click on ”Show” under the Details column to see the details for a request, such as: Oracle Applications Manager 6 – 17 • Printing information • Notification recipients • Parameters • Language • Submission time • Schedule Inactive Requests For inactive requests, the following additional columns are displayed: • Priority – The priority of the concurrent program to be run. A concurrent program may be given a priority when it is initially defined. However, you can assign a new priority to a request here. • Requested Start – The requested start time. Pending Requests For pending requests, the following additional columns are displayed: • Priority – The priority of the concurrent program to be run. A concurrent program may be given a priority when it is initially defined. However, you can assign a new priority to a request here. • Wait Time – How long the request has been in Pending status. • Requested Start – The requested start time. Running Requests For running requests, you can also view a graph showing requests grouped by duration. Completed Requests For completed requests, the following additional columns are displayed: • Completion Status– The status in which the request completed. Valid statuses are Normal, Error, Warning, Cancelled, and Terminated. • Duration – How long the request took to run. • Started At – The time at which the request was started. 6 – 18 Oracle Applications System Administrator’s Guide For all requests, you can use the buttons to view the following: • Diagnostics • Request Log • Manager Log • Output Advanced Search for Requests This page allows you to search for requests according to various criteria including request attributes, request dates, and request duration and wait time. Attributes You can search on the following attributes: • Request ID • Program Short Name • Manager • Application • Requestor • Responsibility • Phase • Status • Description Date You can search for requests that are submitted within a specified date range, or completed within a specified date range. Duration/Wait Time You can search for requests according to specified parameters: • Waiting requests that have waited above a specified minimum wait time and below a specified maximum wait time • Short running requests of a specified maximum duration that have waited longer than a specified wait time Oracle Applications Manager 6 – 19 • Long running requests that have run longer than a specified duration 6 – 20 Oracle Applications System Administrator’s Guide Services Service Instances The Service Instances pages contain detailed information on the service instances for a particular service type, and display functions you can perform on the services. Service types include, but are not limited to, the following: • Internal Concurrent Manager • Conflict Resolution Manager • Scheduler/Prerelease Manager • Request Processing Manager • Internal Monitor • Transaction Manager The information and functionality available depends on the service type. Information may include the following: • Status • State – The current state of a service. If you perform an action on that service, the state column value is updated. • Node – In a parallel concurrent processing environment, a service’s processes are targeted to run on the node displayed here. If a service is defined to use a platform–specific system queue, this column displays the name of the queue to which the service submits its processes. • Number of Running Requests • Number of Pending Requests • Actual Processes – The number of operating system processes. Typically, the number of actual processes equals the number of target processes (the maximum number of requests a service can run). However, the number of actual processes may be less than the number of target processes due to lack of requests, service deactivation, or service migration. • Target Processes –This column displays the maximum number of service processes that can be active for this service. Service Instances for the Internal Concurrent Manager This page shows you information on the service instance for the Internal Concurrent Manager (ICM). Oracle Applications Manager 6 – 21 Navigation: Applications Systems > System Activity > (Services region) Internal Concurrent Manager The following information is displayed: • Status • State • Node • Number of Pending Requests – for the ICM, these are either service control requests (activate, deactivate, etc.) or requests marked for termination. You can use the buttons at the top to perform the following on the service instance: • View Status • View Processes • View Requests Controlling Service Instances You can select the service instance and use the drop down menu above the table to perform the actions below. Stop You can stop (deactivate) an individual service. When you stop the Internal Concurrent Manager, all other managers are deactivated as well. Managers previously deactivated on an individual basis are not affected. Any service that was active when the ICM was stopped will be restarted when the ICM is brought back up. Managers that were deactivated on an individual basis will not be brought back up with the ICM. Abort You can abort or terminate individual services. When you abort (terminate) requests and terminate the Internal Concurrent Manager, all running requests (running concurrent programs) are terminated, and all managers are terminated. Managers previously deactivated on an individual basis are not affected. Any service that was active when the ICM was aborted will be restarted when the ICM is brought back up. Managers that were 6 – 22 Oracle Applications System Administrator’s Guide deactivated on an individual basis will not be brought back up with the ICM. Verify The Internal Concurrent Manager periodically monitors the processes of each concurrent manager. You can force this process monitoring, or PMON activity, to occur by choosing the Verify action. Service Instances for the Conflict Resolution Manager This page shows you information on service instances for the Conflict Resolution Manager (CRM). Navigation: Applications Systems > System Activity > (Services region) Conflict Resolution Manager The following information is displayed: • Status • State • Node • Number of Pending Requests – the number of Pending/Standby requests. For each Pending/Standby request, the CRM will evaluate the constraints (such as incompatibilities, single thread, user limit, etc.) and change the request to Pending/Normal when appropriate. You can use the buttons at the top to perform the following on a selected service instance: • View Status • View Processes • View Concurrent Requests Controlling Service Instances You can select a service instance and use the drop down menu above the table to perform the actions below. Or you can use the drop down menu at the top right to perform a single action on all service instances. Verify You can use the Verify option for the Conflict Resolution Manager to force it to ”re–cache” its information on incompatibilities among Oracle Applications Manager 6 – 23 concurrent programs. Concurrent programs may be defined to be incompatible with other programs; that is, they should not run simultaneously with each other because they might interfere with each other’s execution. Forcing the Conflict Resolution Manager to re–cache its information on users. A user may be assigned a maximum number of requests that may be run simultaneously using the Concurrent:Active Requests Limit profile option. The Conflict Resolution Manager rebuilds its list of users when you choose Verify. Service Instances for a Scheduler/Prerelease Manager This page shows you information on service instances for a Scheduler/Prerelease Manager. The Scheduler checks for and manages requests with advanced schedules. Navigation: Applications Systems > System Activity > (Services region) Scheduler/Prerelease Manager The following information is displayed: • Status • State • Node • Actual Processes • Target Processes You can use the buttons at the top to perform the following on a selected service instance: • View Status • View Processes Service Instances of a Request Processing Manager This page shows you information on service instances for a request processing manager. This type of manager runs concurrent requests. Navigation: Applications Systems > System Activity > (Services region) Request Processing Manager The following information is displayed: 6 – 24 Oracle Applications System Administrator’s Guide • Status • State • Node • Number of Running Requests • Number of Pending Requests • Actual Processes • Target Processes You can use the buttons at the top to perform the following on a selected service instance: • Delete • Edit • View Status • View Processes • View Concurrent Requests To create a new service instance, use the Create New button. Controlling Service Instances You can select a service instance and use the drop down menu above the table to perform the actions listed below. Or you can use the drop down menu at the top right to perform a single action on all service instances. Start You can start (activate) a service instance. Stop You can deactivate individual services. Once deactivated, a service does not restart until you select the service and choose the Start button. When you deactivate a manager, all requests (concurrent programs) currently running are allowed to complete before the manager shuts down. Restart When you restart a manager, the processes are shut down and then brought back up. Oracle Applications Manager 6 – 25 Abort You can abort or terminate individual services. Service Instances of a Transaction Manager This page shows you information on service instances for a transaction manager. Navigation: Applications Systems > System Activity > (Services region) Transaction Manager The following information is displayed: • Status • State • Node • Actual Processes • Target Processes You can use the buttons at the top to perform the following on a selected service instance: • Delete • Edit • View Status • View Processes To create a new service instance, use the Create New button. Controlling Service Instances You can select a service instance and use the drop down menu above the table to perform the actions listed below. Or you can use the drop down menu at the top right to perform a single action on all service instances. Start You can start (activate) a service instance. Stop You can deactivate individual services. Once deactivated, a service does not restart until you select the service and choose the Start button. 6 – 26 Oracle Applications System Administrator’s Guide When you deactivate a manager, all transaction requests currently running are allowed to complete before the manager shuts down. Restart When you restart a transaction manager, its processes are shut down and then brought back up. Abort You can abort or terminate individual services. Service Instances of an Internal Monitor This page shows you information on service instances for an Internal Monitor. The purpose of an Internal Monitor is to monitor the Internal Concurrent Manager and restart it when it exits unexpectedly. Navigation: Applications Systems > System Activity > (Services region) Internal Monitor The following information is displayed: • Status • State • Node • Actual Processes • Target Processes You can use the buttons at the top to perform the following on a selected service instance: • Delete • Edit • View Status • View Processes To create a new service instance, use the Create New button. Controlling Service Instances You can select a service instance and use the drop down menu above the table to perform the actions below. Or you can use the drop down menu at the top right to perform a single action on all service instances. Oracle Applications Manager 6 – 27 Start You can start (activate) a service instance. Stop You can deactivate individual services. Once deactivated, a service does not restart until you select the service and choose the Start button. Abort You can abort or terminate individual services. Service Instances for a Service Manager This page shows you information on service instances for a service manager. Service managers perform actions on behalf of the Internal Concurrent Manager (ICM). They are controlled automatically by the ICM as needed and cannot be manually controlled. Navigation: Applications Systems > System Activity > (Services region) Service Manager The following information is displayed: • Status • State • Node You can use the buttons at the top to perform the following on a selected service instance: • View Status • View Processes Creating and Editing a Concurrent Manager Use this page to create a new concurrent manager. Navigation: Applications Systems > Sitemap > Request Processing Managers > (B) Create New or (B) Edit You can define when a manager runs and how many programs the manager can start simultaneously when you assign work shifts to the manager. Specify which programs a manager can start by defining specialization rules. 6 – 28 Oracle Applications System Administrator’s Guide General Enabled Check this box if the manager is enabled. Manager The name of the manager. Short Name The short name of the manager. Application The application name does not prevent a manager from starting programs associated with other applications. To restrict a manager to only running programs associated with certain applications, go to the Rules section. The combination of an application and the name you define for your manager uniquely identifies the manager. Cache Size Enter the number of requests your manager remembers each time it reads which requests to run. For example, if a manager’s work shift has 1 target process and a cache value of 3, it will read three requests, and try to run those three requests before reading any new requests. Suggestion: Enter a value of 1 when defining a manager that runs long, time–consuming jobs, and a value of 3 or 4 for managers that run small, quick jobs. Program Library Select a library of immediate concurrent programs to make available to your manager. Your manager can only run immediate concurrent programs that are registered in the selected program library. Concurrent managers can run only those immediate concurrent programs listed in their program library. They can also run concurrent programs that use any other type of concurrent program executable. Resources Group Optionally enter the resource consumer group for this manager. Oracle Applications Manager 6 – 29 Rules Use the Rules section to specialize your manager to run only certain kinds of requests. Without specialization rules, a manager accepts requests to start any concurrent program. A listing of available rules is displayed. Check the ”Include” checkbox for a rule to include it. The following information is also given for each rule: • Type • Application • Name • Description To edit any of this information, use the Edit button. Use the Remove button to remove a rule from the list. To create a new rule, use the Create New dropdown list and click Go. Work Shifts Use the Work Shifts section to assign work shifts to your manager. A work shift defines the dates and times the manager is enabled, as well as the number of processes the manager can start running during the work shift. To add a work shift, use the Add from Available Shifts button. For each work shift listed, the following is displayed: Sleep Seconds The sleep time for your manager during this work shift. Sleep time is the number of seconds your manager waits between checking the list of pending concurrent requests (concurrent requests waiting to be started). Suggestion: Set the sleep time to be very brief during periods when the number of requests submitted is expected to be high. Processes The number of operating system processes you want your work shift to run simultaneously. Each process can run a concurrent request. For example, if a work shift is defined with three (3) target processes, the manager can run up to three requests simultaneously. 6 – 30 Oracle Applications System Administrator’s Guide Nodes If you are operating in a parallel concurrent processing environment and you want your manager to operate on a specific node, select the name of the node. The primary node, if available, is the node your concurrent manager operates on. If the primary node or the database instance on it goes down, your concurrent manager migrates to its secondary node. Your concurrent manager migrates back to its primary node when that node becomes available. Nodes must be previously registered with Oracle Applications, using the Nodes form in Oracle Applications. Creating and Editing an Internal Monitor Use this page to create a new Internal Monitor. Navigation: Applications Systems > Sitemap > Internal Monitors > (B) Create New or (B) Edit Internal Monitors monitor the Internal Concurrent Manager in a parallel concurrent processing environment. If the Internal Concurrent Manager exits abnormally (for example, because its node or its database instance goes down), an Internal Monitor restarts it on another node. General Enabled Check this box if this internal monitor is enabled. Manager The name of the internal monitor. Short Name The short name for your internal monitor. Application The application associated with the internal monitor. Oracle Applications Manager 6 – 31 The combination of an application and the short name you define for your internal monitor uniquely identifies the monitor. Program Library For an Internal Monitor, the program library is FNDIMON. Work Shifts Use the Work Shifts section to assign work shifts. A work shift defines the dates and times the manager is enabled, as well as the number of processes the manager can start running during the work shift. To add a work shift, use the Add from Available Shifts button. For each work shift listed, the following is displayed: Sleep Seconds The sleep time for your manager during this work shift. Sleep time is the number of seconds your manager waits between checking the list of pending concurrent requests (concurrent requests waiting to be started). Suggestion: Set the sleep time to be very brief during periods when the number of requests submitted is expected to be high. Processes The number of operating system processes you want your work shift to run simultaneously. Each process can run a concurrent request. For example, if a work shift is defined with three (3) target processes, the manager can run up to three requests simultaneously. Nodes If you are operating in a parallel concurrent processing environment and you want your manager to operate on a specific node, select the name of the node. The primary node, if available, is the node your concurrent manager operates on. If the primary node or the database instance on it goes down, your concurrent manager migrates to its secondary node. Your concurrent manager migrates back to its primary node when that node becomes available. Nodes must be previously registered with Oracle Applications, using the Nodes form in Oracle Applications. 6 – 32 Oracle Applications System Administrator’s Guide Creating and Editing a Transaction Manager Use this page to create a new Transaction Manager. Transaction Managers handle synchronous requests from client machines. Navigation: Applications Systems > Sitemap > Transaction Managers > (B) Create New or (B) Edit General Enabled Check this box if this transaction manager is enabled. Manager The name of the transaction manager. Short Name The short name for your transaction manager. Application The application associated with the transaction manager. The combination of an application and the short name you specify here uniquely defines the transaction manager. Program Library Select a library of immediate transaction programs to make available to your manager. Your manager can only run immediate transaction programs that are registered in the selected program library. Transaction managers can run only those immediate transaction programs listed in their program library. They can also run transaction programs that use any other type of transaction program executable. Work Shifts Use the Work Shifts section to assign work shifts to your manager. A work shift defines the dates and times the manager is enabled, as well as the number of processes the manager can start running during the work shift. To add a work shift, use the Add from Available Shifts button. Oracle Applications Manager 6 – 33 For each work shift listed, the following is displayed: Sleep Seconds The sleep time for a transaction manager determines how often a manager will check to see if it should shut down. Suggestion: Set the sleep time to be very brief during periods when the number of requests submitted is expected to be high. Processes The number of operating system processes you want your work shift to run simultaneously. Each process can run a concurrent request. For example, if a work shift is defined with three (3) target processes, the manager can run up to three requests simultaneously. NOdes If you are operating in a parallel concurrent processing environment and you want your manager to operate on a specific node, select the name of the node. The primary node, if available, is the node your concurrent manager operates on. If the primary node or the database instance on it goes down, your concurrent manager migrates to its secondary node. Your concurrent manager migrates back to its primary node when that node becomes available. Nodes must be previously registered with Oracle Applications, using the Nodes form in Oracle Applications. 6 – 34 Oracle Applications System Administrator’s Guide Work Shifts Create a New Work Shift Use this page to define work shifts for your services. Define work shifts to specify when your services can work. Navigation: Applications Systems > System Activity > Service Instances > Create [Service] > Workshifts region, (B) Add from Available Shifts > (B) Create New or Applications Systems > (B) Sitemap > Work Shift Library > Create New Name The name of your work shift should be intuitive, for instance ”Week Days”, ”Weeknights” or ”Weekends”. Description Add a description for your work shift. Schedule For each work shift, specify a time period covering a range of days or a particular date. Specify if you are scheduling by day or by date. Day Enter the first and last days of this shift. For instance, if your shift name is ”Week Days”, you could enter ”Monday” in the ”Days of Week From” field and ”Friday” in the ”Days of Week To” field. If you enter a value in the ”Days of Week From” field, you must enter a value in the ”Days of Week To field”. Date Enter a date here to create a date–specific work shift. Date–specific work shifts override work shifts that do not specify a specific date. If you want to enter a value in this field (specify a date), you may not enter values for the Days of Week fields for this row. Time Enter the times of day at which your concurrent shift begins/ends. The time format is HH24:MM. For example, if your work shift name is Oracle Applications Manager 6 – 35 ”Week Days”, you could enter ”09:00” (9:00 am) as the start time and ”17:00” (5:00 pm) as the end time. Note that Oracle Applications uses a 24–hour clock. List of Work Shifts This page displays the available work shifts. Navigation: Applications Systems > System Activity > Service Instances > Create [Service] > Workshifts region, (B) Add from Available Shifts or Applications Systems > (B) Sitemap > Work Shift Library The following columns are shown: • Name • Start Day • End Day • Start Time • End Time • Date • Description You can use the buttons to edit or delete an existing work shift, or create a new one. 6 – 36 Oracle Applications System Administrator’s Guide Oracle Workflow Manager Oracle Workflow Manager is a component of Oracle Applications Manager that allows system administrators to manage Oracle Workflow for multiple Oracle Applications instances from a single console. Using Oracle Workflow Manager, administrators can control Workflow system services, such as background engines, the Notification Mailer, agent listeners, queue propagation, and purging obsolete Workflow data. Administrators can also monitor work item processing by viewing the distribution of all work items by status and drilling down to additional information. Additionally, they can monitor event message processing for local Business Event System agents by viewing the distribution of event messages by status. With this ability to monitor work items and event messages, a system administrator can identify possible bottlenecks easily. To access Oracle Workflow Manager, log into Oracle Applications Manager and select an applications system. Then, you can follow one of the following navigation paths: • Choose Workflow Manager from the pull–down menu in the Applications Systems page and click the Go button. • Click the Sitemap button in the Applications Systems page, and then click the Workflow Manager link in the Integrated Applications region of the Sitemap page. Navigation: Applications Systems > (pull–down menu) Workflow Manager > (B) Go Workflow System Status The Workflow System Status page provides a high–level view of the status of your Oracle Workflow instance. Oracle Workflow Manager shows the status of the following Workflow processes: • Background Engine • Notification Mailer • Agent Listener • Queue Propagation • Purge Oracle Applications Manager 6 – 37 For each kind of process, Oracle Workflow Manager displays the process name, the process type, an overall status, and the current number of processes of that kind. To view details for a process, either click the process link in the Process column, or select the process and click the View Details button. To submit a concurrent request through Oracle Self–Service Web Applications for a process that is a concurrent program, choose the process you want from the Submit Request For pull–down menu and click the Go button. You can submit requests for the following processes: • Background Engine • Agent Listener • Purge Workflow Metrics Work Items This graph displays the distribution of all work items with the following statuses: Active, Deferred, Suspended, and Error. • To view the distribution of item types within a status, either click the bar for that status in the graph, or click the status name link. • To view the number of work items with a particular status, position the mouse pointer over the bar for that status in the graph. Note: A work item can be counted in more than one status. For example, all work items that do not have an end date are counted as Active work items, including deferred, suspended, and errored work items as well as running work items. Also, if an activity within an item is deferred, and the work item as a whole is suspended, the work item is included in the count for both the Deferred and Suspended statuses. Consequently, the total of the counts for all the statuses is greater than the actual number of work items. Agent Activity This graph displays the distribution of all event messages on Business Event System agents with the following statuses: Ready, Waiting, Expired, Undeliverable, and Error. To view the number of event messages with a particular status, position the mouse pointer over the bar for that status in the graph. 6 – 38 Oracle Applications System Administrator’s Guide Related Metrics Completed Work Items Click the Completed Work Items link to view the distribution of completed work items across different item types. Oracle Applications Manager 6 – 39 Background Engines Background engine processes serve three purposes in Oracle Workflow: to handle activities deferred by the Workflow Engine, to handle timed out notification activities, and to handle stuck processes. When the Workflow Engine initiates and performs a process, it completes all necessary activities before continuing to the next eligible activity. In some cases, an activity can require a large amount of processing resource or time to complete. Oracle Workflow lets you manage the load on the Workflow Engine by setting up supplemental engines to run these costly activities as background tasks. In these cases, the costly activity is deferred by the Workflow Engine and run later by a background engine. The main Workflow Engine can then continue to the next available activity, which may occur on some other parallel branch of the process. A background engine must also be set up to handle timed out notification activities. When the Workflow Engine comes across a notification activity that requires a response, it calls the Notification System to send the notification to the appropriate performer, and then sets the notification activity to a status of ’NOTIFIED’ until the performer completes the notification activity. Meanwhile, a background engine set up to handle timed out activities periodically checks for ’NOTIFIED’ activities and whether these activities have time out values specified. If a ’NOTIFIED’ activity does have a time out value, and the current date and time exceeds that time out value, the background engine marks that activity as timed out and calls the Workflow Engine. The Workflow Engine then resumes by trying to execute a <timeout> transition activity. Additionally, a background engine must be set up to handle stuck processes. A process is identified as stuck when it has a status of ACTIVE, but cannot progress any further. For example, a process could become stuck in the following situations: • A thread within a process leads to an activity that is not defined as an End activity but has no other activity modeled after it, and no other activity is active. • A process with only one thread loops back, but the pivot activity of the loop has the On Revisit property set to Ignore. • An activity returns a result for which no eligible transition exists. For instance, if the function for a function activity returns an unexpected result value, and no default transition is modeled after that activity, the process cannot continue. The background engine sets the status of a stuck process to ERROR:#STUCK and executes the error process defined for it. 6 – 40 Oracle Applications System Administrator’s Guide You can define and start up as many background engines as you like to check for deferred and timed out activities. Background engines can be restricted to handle activities associated with specific item types, and within specific cost ranges. A background engine runs until it completes all eligible activities at the time it was initiated. Generally, you should set the background engine up to run periodically. Ensure that you have at least one background engine that can check for timed out activities, one that can process deferred activities, and one that can handle stuck processes. At a minimum, you need to set up one background engine that can handle both timed out and deferred activities as well as stuck processes. Generally, you should run a separate background engine to check for stuck processes at less frequent intervals than the background engine that you run for deferred activities, normally not more often than once a day. Run the background engine to check for stuck processes when the load on the system is low. Running Background Engines You run a background engine by submitting the Workflow Background Process concurrent program (FNDWFBG). When you start a new background engine, you can restrict the engine to handle activities associated with specific item types, and within specific cost ranges. • To submit a request for the Workflow Background Process concurrent program through Oracle Self–Service Web Applications, choose Background Engine from the Submit Request For pull–down menu in the Workflow System Status page and click the Go button. • To view Workflow Background Process concurrent requests, either click the Background Engine link in the Process column in the Workflow System Status page, or select the Background Engine process and click the View Details button. Navigation: Applications Systems > (pull–down menu) Workflow Manager > (B) Go Parameters When you submit the Workflow Background Process concurrent program, specify the following parameters. Oracle Applications Manager 6 – 41 Item Type Specify an item type to restrict this engine to activities associated with that item type. If you do not specify an item type, the engine processes any activity regardless of its item type. Minimum Threshold Specify the minimum cost that an activity must have for this background engine to execute it, in hundredths of a second. Maximum Threshold Specify the maximum cost that an activity can have for this background engine to execute it, in hundredths of a second. By using Minimum Threshold and Maximum Threshold you can create multiple background engines to handle very specific types of activities. The default values for these arguments are 0 and 100 so that the background engine runs activities regardless of cost. Process Deferred Specify whether this background engine checks for deferred activities. Setting this parameter to Yes allows the engine to check for deferred activities. Process Timeout Specify whether this background engine checks for activities that have timed out. Setting this parameter to Yes allows the engine to check for timed out activities. Process Stuck Specify whether this background engine checks for stuck processes. Setting this parameter to Yes allows the engine to check for stuck processes. Note: Make sure you have a least one background engine that can check for timed out activities, one that can process deferred activities, and one that can handle stuck processes. At a minimum, you need to set up one background engine that can handle both timed out and deferred activities as well as stuck processes. Schedule Specify the schedule options for your request. You can submit the Workflow Background Process concurrent program several times to schedule different background engines to run at different times. 6 – 42 Oracle Applications System Administrator’s Guide Viewing Concurrent Requests When you view the Workflow Background Process concurrent requests, the Search Results page shows standard request detail information for these requests. For each request, the list displays the request ID, program short name, application short name, phase, status, requester, duration, and wait time. Click any column heading to sort the list by that column. Navigation: Applications Systems > (pull–down menu) Workflow Manager > (B) Go > Background Engine • To show the details for a request if they are hidden, click the Show link in the Details column. Oracle Applications Manager displays details about the request depending on the status of the request. You can also perform actions, such as placing a hold on a request, canceling a request, viewing diagnostic information, viewing logs, or viewing request output, by clicking the corresponding button. The actions that are available depend on the status of the request. • To hide the details for a request if they are shown, click the Hide link in the Details column. • To search for concurrent requests with different criteria, click the New Search button. • To modify the search criteria from this search, click the Modify Search button. Oracle Applications Manager 6 – 43 Notification Mailer The Notification Mailer is a program that performs e–mail send and response processing for the Oracle Workflow Notification System. You need to implement the Notification Mailer only if you wish to have your workflow users receive their notifications via e–mail, as well as from the Notifications Worklist web page. The Notification Mailer polls the database for messages that have to be sent, dequeues these messages from the SMTP advanced queue, and performs the following action for each message: • Resolves the recipient role to a single e–mail address, which itself can be a mail list • Switches its database session to the role’s preferred language and territory as defined by the directory service. • Generates the message and any optional attachments using the appropriate message template. • Sends the message via UNIX Sendmail or any MAPI–compliant mail application on Windows NT. The Notification Mailer also processes responses by interpreting the text of messages mailed to its response mail account and calling the appropriate notification response function to complete the notification. The e–mail notifications are based on standard templates defined in the System: Mailer item type, which can be customized using the Oracle Workflow Builder. The templates describe the syntax the reply should follow and list the information needed to confirm the notification. The generated e–mail message also includes any custom site information, the due date, and any information necessary to process the response. Once you set up the Notification Mailer to run, it continually polls the database for messages to send and checks its response mail account for responses to process. You do not have to do anything else unless you have a need to reload the configuration parameters by either suspending and resuming, verifying, or stopping and restarting the Notification Mailer. Two Notification Mailer service instances are defined in Oracle Workflow Manager by default, a detail Notification Mailer and a summary Notification Mailer. • The detail Notification Mailer has a service name of WFMGSMD and has the Summary Only configuration parameter deselected. This Notification Mailer sends one e–mail message for each individual notification to users or roles with a notification preference of ’MAILTEXT’, ’MAILATTH’, or ’MAILHTML’. 6 – 44 Oracle Applications System Administrator’s Guide • The summary Notification Mailer has a service name of WFMGSMS and has the Summary Only configuration parameter selected. This Notification Mailer sends one summary e–mail message listing all notifications since the last summary message to users or roles with a notification preference of ’SUMMARY’. After completing the remaining configuration parameters, you can start these Notification Mailers to handle e–mail processing for your Workflow users. ☞ Attention: The Notification Mailer will shut itself down if a database failure is encountered or if the PL/SQL package state for the session is invalid due to dropping or replacing of package definitions. In Oracle Workflow Manager, you can restart the Notification Mailer program manually or schedule it to restart periodically using workshifts. Service Instances for Workflow Mailer This page shows the service instances for the Notification Mailer. For each service instance, the list displays the name, overall status, activated or deactivated state, node on which the Notification Mailer is running, number of actual processes, and number of target processes. Click any column heading to sort the list by that column. Navigation: Applications Systems > (pull–down menu) Workflow Manager > (B) Go > Notification Mailer • To view the status for a Notification Mailer service instance, select the service instance and click the View Status button. • To view process details for a Notification Mailer service instance, either click the service instance link in the Name column, or select the service instance and click the View Processes button. • To define or review the configuration for a Notification Mailer service instance, select the service instance and click the Configuration button. • To control the running of all the Notification Mailer service instances, choose the command you want from the All command pull–down menu and click the Go button. You can choose the following commands: – Start All – Stop All – Abort All Oracle Applications Manager 6 – 45 – Restart All – Suspend All – Resume All – Verify All • To control the running of a single Notification Mailer service instance, select the service instance, choose the command you want from the command pull–down menu, and click the Go button. You can choose the following commands: – Start – Stop – Abort – Restart – Suspend – Resume – Verify Notification Mailer Status This page displays status details for the selected Notification Mailer service instance. Navigation: Applications Systems > (pull–down menu) Workflow Manager > (B) Go > Notification Mailer > (B) Status General • Up/Down – The overall up or down status of the service instance. • Node – The node where the service instance is running. • Debug – A setting that indicates whether to print debugging information in the Notification Mailer log file. – If debugging is turned off, click the Set Debug On button to turn it on. – If debugging is turned on, click the Set Debug Off button to turn it off. Processes • Target – The number of target processes. 6 – 46 Oracle Applications System Administrator’s Guide • Active – The number of active processes. To control the running of the Notification Mailer service instance, click the button for the command you want to execute. Buttons are available for the following commands: • Start • Stop • Abort • Restart • Suspend • Resume • Verify Notification Mailer Processes This page shows details about the processes for the selected Notification Mailer service instance. For each process, the list displays the status, operating system process identifier (SPID), auditing session identifier (AUDSID), Oracle server process identifier (Oracle SPID), and start date and time. Click any column heading to sort the list by that column. Navigation: Applications Systems > (pull–down menu) Workflow Manager > (B) Go > Notification Mailer > (B) Processes • To view the log for the manager running a process, select the process and click the Manager Log button. • To view the internal log for a process, select the process and click the Internal Log button. • To view database session information for a process, click the session ID link in the AUDSID column. Note: The Environment button is reserved for future use. Notification Mailer Configuration This page lets you configure the selected Notification Mailer service instance by entering general, e–mail, send, and receive parameters. Navigation: Applications Systems > (pull–down menu) Workflow Manager > (B) Go > Notification Mailer > (B) Configuration Oracle Applications Manager 6 – 47 • To view the throughput for the Notification Mailer service instance, click the View Throughput button at the top of the page. • To reset all configuration parameters to their default values, click the Reset button at the bottom of the page. • To submit and save the configuration parameters that you entered, click the Submit button at the bottom of the page. General • Service Name – The name of the service instance. The service name is included with the outgoing notification ID. The service name for the detail Notification Mailer defaults to WFMGSMD, and the service name for the summary Notification Mailer defaults to WFMGSMS. • Log – The path and file name of a log file to record activity. • Fail Command – The command to run if the Notification Mailer encounters a fatal error. • Queue – The SMTP advanced queue used by the Notification Mailer. • Idle – The number of seconds to wait before checking for messages to send. The value must be an integer greater than or equal to zero. The default is 30 seconds. • Test Address – Enter a test e–mail address where you want to direct all outgoing e–mail notifications. The test address overrides each recipient’s e–mail address so that you can test a workflow process without having to change each recipient’s e–mail address to access the test notifications. • Summary Only – (Required) Indicate whether this Notification Mailer processes only notifications assigned to users or roles with a notification preference of ’SUMMARY’ or whether it processes only notifications for users or roles with a notification preference of ’MAILTEXT’, ’MAILATTH’, or ’MAILHTML’. The Summary Only parameter is deselected by default for the detail Notification Mailer (WFMGSMD) and selected by default for the Summary Notification Mailer (WFMGSMS). If any of your workflow users or roles have a notification preference of ’MAILTEXT’, ’MAILATTH’ or ’MAILHTML’, then you should ensure that the detail Notification Mailer is correctly configured for your site. If any of your workflow users or roles have a notification preference of ’SUMMARY’, then you should ensure that the summary Notification Mailer is correctly configured for 6 – 48 Oracle Applications System Administrator’s Guide your site. Ensure that the mailer with service name WFMGSMS has Summary Only selected and the mailer with service name WFMGSMD has Summary Only deselected. If you select Summary Only, then the Notification Mailer will shut itself down after it polls the database and delivers any appropriate notification summaries. You must therefore schedule the Notification Mailer to run at the frequency you want notification summaries to be delivered. We recommend you run the summary Notification Mailer once a day, since the summary includes all open notifications. • Debug – Indicate whether to print debugging information in the Notification Mailer log file. This parameter is deselected by default. • Reset Failed – Indicate whether this Notification Mailer should reset all notifications with a mail status of FAILED to a mail status of MAIL when the Notification Mailer is started. This parameter is deselected by default. If Reset Failed is selected, then the Notification Mailer will attempt to resend any notification e–mail messages that failed previously. • SQL Trace – Indicate whether to enable the SQL Trace facility to help assess the efficiency of the SQL statements the Notification Mailer runs. E–mail • Username – (Required) The information to connect to the mail account that the program uses to send notification messages. For MAPI–compliant mail programs, the account information is the mail account profile name and mail account password. For Sendmail, the account information is the full file path of the mail spool file where incoming messages are stored, such as /var/mail/applmgr3. Note that this should correspond to the account from which you start the Notification Mailer, in this example, applmgr3. To start the Sendmail version of the Notification Mailer, you must also specify the full path of the Sendmail executable directory in your PATH environment variable. Send • From: – The value that appears in the From: field of the message header when a notification message is delivered to a user. The default is Workflow Mailer – Detail for the detail Notification Mailer and Workflow Mailer – Summary for the summary Notification Mailer. Oracle Applications Manager 6 – 49 • Reply To: – (Required) A default e–mail address to reply to, if the e–mail account that processes responses is different from the e–mail account that sends outgoing notifications. • HTML Agent: – The base URL that identifies the HTML web agent that handles HTML notification responses. This URL is required to support e–mail notifications with HTML attachments. The default URL is derived from the Workflow Web Agent specified in the Global Preferences web page, but you can override this default by entering a different value for this parameter. • Response Template – Enter OPEN_MAIL_OUTLOOK to use the Workflow Open Mail for Outlook Express message as the template for e–mail notifications that require a response, for users with a notification preference of ’MAILHTML’ or ’MAILATTH’. You can select this message template if you use an e–mail application such as Microsoft Outlook Express as your e–mail client, in order to include a link to the Notification Details web page which lets users respond to the notification there. This template is provided to accommodate e–mail applications that cannot process the response links included in the Workflow Open Mail (Templated) and Workflow Open Mail (Direct) templates. If you want to use the normal Workflow Open Mail (Templated) and Workflow Open Mail (Direct) templates, leave the Response Template parameter blank to let the Notification Mailer use these templates by default. ☞ Attention: Attention: If you enter OPEN_MAIL_OUTLOOK in the Response Template parameter, the Notification Mailer will ignore the Direct Response parameter when sending messages to users with a notification preference of ’MAILATTH’. Instead, all users with this notification preference will receive the plain text message body defined for the Workflow Open Mail for Outlook Express template, which uses the templated response method. Consequently, if you do not need to use the Workflow Open Mail for Outlook Express template, you should leave the Response Template parameter blank to let the Direct Response parameter take effect. Note: The Response Template parameter does not apply to users with a notification preference of ’MAILTEXT’. • Sendmail Arguments – The arguments with which Sendmail should be executed, if you are using the Sendmail version of the Notification Mailer. The default value for the Sendmail arguments is %s –t –F”%s” < %s 6 – 50 Oracle Applications System Administrator’s Guide • Autoclose FYI – Indicate whether this Notification Mailer automatically closes notifications that do not require a response, such as FYI (For Your Information) notifications, after sending the notifications by electronic mail. This parameter is deselected by default. If Autoclose FYI is deselected, all FYI notifications will remain open in the Notifications Worklist until users manually close these notifications. • Direct Response – Clear this parameter to send plain text notifications requiring a templated response to users with a notification preference of ’MAILTEXT’ or ’MAILATTH’. Select this parameter to send plain text notifications requiring a direct response to users with these preferences. This parameter is deselected by default. For the templated response method, users must reply using a template of response prompts and enter their response values between the quotes following each prompt. For the direct response method, users must enter their response values directly as the first lines of a reply ☞ Attention: If you specify a value for the Response Template parameter, the Notification Mailer will ignore the Direct Response parameter when sending messages to users with a notification preference of ’MAILATTH’. Instead, all users with this notification preference will receive the plain text message body defined for the Workflow Open Mail for Outlook Express template, which uses the templated response method. Consequently, if you do not need to use the Workflow Open Mail for Outlook Express template, you should leave the Response Template parameter blank to let the Direct Response parameter take effect. • Send Access Key – Select this parameter to include an access key in the Notification Detail Link attachment that is sent with HTML e–mail notifications and with plain text e–mail notifications with HTML attachments. The access key allows users to access the Notification Details web page directly by clicking the Notification Detail Link. Clear this parameter to exclude the access key from the Notification Detail Link. When users click the link without the access key, they are prompted to log in, if they have not already done so, before they can access the Notification Details web page. The Send Access Key parameter is selected by default. • Reset NLS – Indicate whether the Notification Mailer should convert the NLS codeset for a notification message according to the notification recipient’s preferences before composing the message. This parameter is deselected by default. If Reset NLS is selected, the Notification Mailer will convert the message to the Oracle Applications Manager 6 – 51 codeset listed in the WF_LANGUAGES table for the language and territory specified in the recipient’s Workflow user preferences. If no preferred territory is specified, the Notification Mailer will use the codeset associated with the first entry it encounters for the user’s preferred language. If neither a language nor a territory is specified in the user preferences, the Notification Mailer will use the codeset seeded in WF_LANGUAGES for the language AMERICAN and territory AMERICA. This parameter is relevant when there are several languages installed in the database and the character set of the user’s e–mail client is not the same as the one specified for the database. For example, when a UTF8 database is used, the character set of e–mail clients used in Western Europe is generally ’Western (ISO–8859–1)’. In this case, selecting the Reset NLS means that the user will receive any e–mail notification messages in the correct character set for the e–mail client. Receive • Process – The name of the mail folder or full path name of the mail file where you want the Notification Mailer to put processed notification messages. Select the Truncate check box if you want the Notification Mailer to truncate the folder or file on startup. A hyphen (–) preceding the name also causes the Notification Mailer to truncate the folder or file on startup. The default is processed. For the UNIX Sendmail version of the Notification Mailer, the Process value must always be the full path name of a mail file. • Unprocess – The name of the mail folder or the full path name of the mail file where you want the Notification Mailer to put unprocessed notification messages. Select the Truncate check box if you want the Notification Mailer to truncate the folder or file on startup. A hyphen (–) preceding the name also causes the Notification Mailer to truncate the folder or file on startup. The default is unprocessed. For the UNIX Sendmail version of the Notification Mailer, the Unprocess value must always be the full path name of a mail file. • Discard – The name of the mail folder or full path name of the mail file where you want the Notification Mailer to put discarded messages. Select the Truncate check box if you want the Notification Mailer to truncate the folder or file on startup. A hyphen (–) preceding the name also causes the Notification Mailer to truncate the folder or file on startup. The default is –discard. For the UNIX Sendmail version of the Notification 6 – 52 Oracle Applications System Administrator’s Guide Mailer, the Discard value must always be the full path name of a mail file. • Tagfile – The full path and name of a tag file. The tag file lists strings of text found in unusual messages and the status you want to assign to a message response if it contains any of those strings. Unusual messages include bounced or returned messages and auto–reply messages such as those sent by vacation daemons, mass mailing lists, and so on. Since different mail systems vary in how they identify bounced, undeliverable, or otherwise invalid messages, you can use a tag file to specify how your mail system identifies those stray messages and how you want the Notification Mailer to handle those messages should it come across them. ☞ Attention: Only a message response that contains a notification ID is checked by the tag file. If the Notification Mailer receives a message response that does not contain a notification ID, it moves the message response to the discard folder and sends a ’Warning’ message to the sender that it received unsolicited mail. – The format used in the tag file is Status ”Matching string” where Status can be the value: ERROR, IGNORE, or UNAVAIL and ”Matching string” is the text to look for in the From: line, Subject: line, or body of the message. The Notification Mailer handles a message assigned one of these status values as follows: IGNORE – moves the message to the discard folder and continues waiting for a valid reply to the open notification. The notification’s status is still OPEN and its mail status is still SENT. ERROR – moves the message to the discard folder and initiates an error process, if one is defined. The notification’s status is still OPEN, but its mail status and activity status are updated to ERROR. Ideally, the workflow administrator corrects the problem and resends the notification by updating its mail status to MAIL. UNAVAIL (or any other user defined tag) – moves the message to the discard folder and continues waiting for a reply to the notification since the notification’s status is still OPEN, but its mail status is updated to UNAVAIL. This status is purely informative, as no further processing occurs with this notification. – The Notification Mailer can also assign an INVALID status to a message response, if the returned response value is not Oracle Applications Manager 6 – 53 a valid value in the assigned lookup (result) type. In this case, it moves the message to the discard folder, and sends an ’Invalid’ message but does not alter the notification’s status or mail status, so that it continues to wait for a valid reply. ☞ ☞ Attention: It is important that you uniquely identify bounced messages and auto–replies from normal responses in the tag file. If you do not identify bounced and auto–reply messages, the Notification Mailer can mistake these as invalid responses, send an ’Invalid’ message and continue to wait for a reply. In both cases a perpetual loop would occur where the Notification Mailer keeps sending out an ’Invalid’ message and the ’Invalid’ message bounces back or is auto–replied. As an example, if you want to mark all message responses that contain the string ”–Unsent message follows–” in the subject or body of the message as an error, you can include the following line in your tag file: ERROR ”–Unsent message follows–” Attention: If a message response matches more than one string in the tag file, it gets tagged with the status of the first string it matches in the file. That is, the Notification Mailer performs a top to bottom comparison against the tag file. Due to this behavior, you should prioritize your strings listing the ERROR tags first, followed by the UNAVAIL and then IGNORE tags. – Oracle Workflow provides an example tag file called wfmail.tag. For the version of Oracle Workflow embedded in Oracle Applications, the file resides on your server in the resource subdirectory under $FND_TOP. • Allow Forwarded Messages – Indicate whether to allow a user to respond to an e–mail notification that has been forwarded from another role. This parameter is selected by default. – If Allow Forwarded Messages is deselected, the Notification Mailer will check if the ”From:” e–mail address of the notification response exactly matches the e–mail address of the recorded recipient role (or the e–mail address of a user in that role). If the two e–mail addresses match exactly, meaning the notification was not forwarded or was forwarded according to a valid routing rule, the Notification Mailer treats the response as a valid response. If the two e–mail addresses do not match exactly, meaning the notification was simply forwarded using the e–mail Forward command, the Notification Mailer does not process the response and treats it as unsolicited mail. 6 – 54 Oracle Applications System Administrator’s Guide – If Allow Forwarded Messages is selected, the Notification Mailer never checks the ”From:” e–mail address of the notification response and always allows the response to be processed. ☞ Attention: Note that there are limitations when you clear Allow Forwarded Messages. For example, suppose a notification is sent to a distribution list mail alias that does not have a USER/ROLE relationship in the Oracle Workflow directory service. If any user from the distribution list responds to the notification, the Notification Mailer will always treat that notification response as unsolicited mail, because the ”From:” e–mail address, which is an individual user’s e–mail address, will never match the distribution list mail alias. Notification Mailer Throughput This graph shows the throughput of the Notification Mailer by displaying the distribution of notification messages with the following statuses: • Processed – Outbound notification messages for which an e–mail message has been sent. • Waiting – Outbound notification messages for which an e–mail message has not yet been sent. To view the number of notification messages with a particular status, position the mouse pointer over the bar for that status in the graph. Navigation: Applications Systems > (pull–down menu) Workflow Manager > (B) Go > Notification Mailer > (B) Configuration > (B) View Throughput Oracle Applications Manager 6 – 55 Agent Listeners The Oracle Workflow Business Event System requires agent listeners to be scheduled to receive inbound event messages. An agent listener monitors a Business Event System agent for incoming messages and dequeues messages using the agent’s queue handler. You should run agent listeners for your local inbound agents. When an event message is dequeued, the Event Manager begins subscription processing for the event. The Event Manager searches for and executes any active subscriptions by the local system to that event with a source type of External, and also any active subscriptions by the local system to the Any event with a source type of External. The agent listener exits after all event messages on the agent’s queue have been dequeued. You must schedule listeners for the standard WF_DEFERRED and WF_ERROR agents to enable deferred subscription processing and error handling for the Business Event System, respectively. Also, if you want to use the standard WF_IN agent for event message propagation, schedule a listener for that agent as well. Running Agent Listeners You run an agent listener for an agent by submitting the Workflow Agent Listener concurrent program (FNDWFLST). You must specify the agent that you want to monitor. • To submit a request for the Workflow Agent Listener concurrent program through Oracle Self–Service Web Applications, choose Agent Listener from the Submit Request For pull–down menu in the Workflow System Status page and click the Go button. • To view Workflow Agent Listener concurrent requests, either click the Agent Listener link in the Process column in the Workflow System Status page, or select the Agent Listener process and click the View Details button. Navigation: Applications Systems > (pull–down menu) Workflow Manager > (B) Go Parameters When you submit the Workflow Agent Listener concurrent program, specify the following parameter. 6 – 56 Oracle Applications System Administrator’s Guide Agent Name Specify the name of the agent that you want to monitor for inbound event messages. Schedule Specify the schedule options for your request. You can submit the Workflow Agent Listener concurrent program several times to schedule agent listeners for different agents. Viewing Concurrent Requests When you view the Workflow Agent Listener concurrent requests, the Search Results page shows standard request detail information for these requests. For each request, the list displays the request ID, program short name, application short name, phase, status, requestor, duration, and wait time. Click any column heading to sort the list by that column. Navigation: Applications Systems > (pull–down menu) Workflow Manager > (B) Go > Agent Listener • To show the details for a request if they are hidden, click the Show link in the Details column. Oracle Applications Manager displays details about the request depending on the status of the request. You can also perform actions, such as placing a hold on a request, canceling a request, viewing diagnostic information, viewing logs, or viewing request output, by clicking the corresponding button. The actions that are available depend on the status of the request. • To hide the details for a request if they are shown, click the Hide link in the Details column. • To search for concurrent requests with different criteria, click the New Search button. • To modify the search criteria from this search, click the Modify Search button. Oracle Applications Manager 6 – 57 Queue Propagation The Queue Propagation page shows a list of propagation schedules for Business Event System agents in your instance of Oracle Workflow. You should schedule propagation for your local outbound agents to send event messages to their destinations. Navigation: Applications Systems > (pull–down menu) Workflow Manager > (B) Go > Queue Propagation For each propagation schedule, the list displays the outbound queue, destination database link, job queue process executing the schedule, whether the schedule is enabled or disabled, and the error date and error message of the last unsuccessful execution. Click any column heading to sort the list by that column. If no process is allocated to execute the schedule, you may need to increase the JOB_QUEUE_PROCESSES database initialization parameter to ensure that processes are available for propagation. To view details for a propagation schedule, either click the queue link in the Queue column, or select the schedule and click the View Details button. Queue Propagation Details The Queue Details page displays the following details for a propagation schedule: Navigation: Applications Systems > (pull–down menu) Workflow Manager > (B) Go > Queue Propagation > (B) View Details • Destination – The destination database link. • Process Name – The name of the job queue process executing this schedule. • Enabled – Y if this schedule is enabled or N if the schedule is disabled. The schedule will not be executed if it is disabled. • Last Error Date – The date of the last unsuccessful execution. • Last Error Time – The time of the last unsuccessful execution. • Last Error Message – The error message of the last unsuccessful execution. • Schema – The schema that owns the queue. • Session ID – The session ID (SID, SERIAL#) of the job executing this schedule; NULL if not currently executing. 6 – 58 Oracle Applications System Administrator’s Guide • Propagation Window – The duration in seconds of the propagation window. • Maximum Bytes – The maximum number of bytes propagated during a propagation window. • Failures – The number of times that execution of the schedule failed. If the number of failures reaches 16, the schedule will be disabled. • Latency – The latency time in seconds that specifies how long to wait, after all messages have been propagated, before rechecking the queue for new messages to the destination. The latency represents the maximum wait time during the propagation window for a message to be propagated after it is enqueued. • Next Run Date – The date at which the next propagation window of this schedule will be started. • Next Run Time – The time at which the next propagation window of this schedule will be started, in HH:MI:SS format. • Current Start Date – The date at which the current propagation window of this schedule was started. • Current Start Time – The time at which the current propagation window of this schedule was started, in HH:MI:SS format. • Instance – The cluster database instance number executing the schedule. • Start Date – The date when propagation should be started, in the default date format. • Start Time – The time when propagation should be started, in HH:MI:SS format. • Last Run Date – The date of the last successful execution. • Last Run Time – The time of the last successful execution, in HH:MI:SS format. • Total Time – The total time, in seconds, spent by the system in executing this schedule. • Total Number – The total number of messages propagated in this schedule. • Total Bytes – The total number of bytes propagated in this schedule. • Maximum Number – The maximum number of messages propagated during a propagation window. • Average Number – The average number of messages propagated during a propagation window. Oracle Applications Manager 6 – 59 • Average Size – The average size of a propagated message, in bytes. • Average Time – The average time, in seconds, to propagate a message. 6 – 60 Oracle Applications System Administrator’s Guide Purging Workflow Data The Oracle Applications Manager console helps you easily maintain the Workflow database tables. Oracle Workflow accesses several tables that can grow quite large with obsolete workflow information that is stored for all completed workflow processes. The size of these tables and indexes can adversely affect performance. These tables should be purged on a regular basis, using the Purge Obsolete Workflow Runtime Data concurrent program. Workflow Purge The Workflow Purge page shows summary information about the next scheduled and last completed purge requests and about completed work items. Navigation: Applications Systems > (pull–down menu) Workflow Manager > (B) Go > Purge Navigation: Applications Systems > (pull–down menu) Workflow Manager > (B) Go > Related Metrics > Completed Work Items To view work items with a different status, choose the status you want from the View pull–down menu and click the Go button. You can view items with the following statuses: • Completed Work Items • Active Work Items • Deferred Work Items • Suspended Work Items • Errored Work Items Summary This region displays summary information about the next scheduled and last completed Purge Obsolete Workflow Runtime Data concurrent requests. • To show information in this region if it is hidden, click the Show link. • To hide information in this region if it is shown, click the Hide link. Next Scheduled For the next scheduled Purge Obsolete Workflow Runtime Data concurrent request, Oracle Workflow Manager displays the request ID, requestor, status, requested start time, wait time, and parameters. Oracle Applications Manager 6 – 61 To view detail information for Purge Obsolete Workflow Runtime Data concurrent requests, click the View Purge Requests link. Last Completed For the last completed Purge Obsolete Workflow Runtime Data concurrent request, Oracle Workflow Manager displays the request ID, requestor, status, completed time, duration, and parameters. To view the log file for the request, click the View Request Log button. Completed Work Items This region displays the distribution of completed work items across different item types. • To show information in this region if it is hidden, click the Show link. • To hide information in this region if it is shown, click the Hide link. For each item type in the Completed Work Items list, Oracle Workflow Manager displays the item type name, the persistence type, the retention period in days, the number of completed work items of that type, and the number of items of that type that are available for purging. Click any column heading to sort the list by that column. To view details for work items of a particular item type that ended within the last 30 days, either click the item type link in the Work Item Type column, or select the item type and click the View Details button. Submitting the Purge Program You perform purging by submitting the Purge Obsolete Workflow Runtime Data concurrent program (FNDWFPR). You can enter restrictions to specify the data that you want to purge. • To submit a request for the Purge Obsolete Workflow Runtime Data concurrent program through Oracle Self–Service Web Applications, either click the Purge button in the Completed Work Items region of the Workflow Purge page, or choose Purge from the Submit Request For pull–down menu in the Workflow System Status page and click the Go button. • To view Purge Obsolete Workflow Runtime Data concurrent requests, either click the View Purge Requests link in the 6 – 62 Oracle Applications System Administrator’s Guide Summary region of the Workflow Purge page, or click the View Purge Requests button in the Completed Work Items region of the Workflow Purge page. Parameters When you submit the Purge Obsolete Workflow Runtime Data concurrent program, specify the following parameters. Item Type Specify the item type to purge. Leave this field blank to purge the runtime data for all item types. Item Key Specify the item key to purge. The item key is a unique identifier for an item within an item type. Leave this field blank to purge the runtime data for all items of the specified item type. Age Specify the minimum age of data to purge, in days, if you are purging items with a Temporary persistence type. The default is 0 days. Persistence Type Specify the persistence type of the data you want to purge, either Permanent or Temporary. The default is Temporary. Schedule Specify the schedule options for your request. Viewing Concurrent Requests When you view the Purge Obsolete Workflow Runtime Data concurrent requests, the Search Results page shows standard request detail information for these requests. For each request, the list displays the request ID, program short name, application short name, phase, status, requestor, duration, and wait time. Click any column heading to sort the list by that column. Navigation: Applications Systems > (pull–down menu) Workflow Manager > (B) Go > Purge > (B) View Purge Requests Oracle Applications Manager 6 – 63 Navigation: Applications Systems > (pull–down menu) Workflow Manager > (B) Go > Related Metrics > Completed Work Items > (B) View Purge Requests • To show the details for a request if they are hidden, click the Show link in the Details column. Oracle Applications Manager displays details about the request depending on the status of the request. You can also perform actions, such as placing a hold on a request, canceling a request, viewing diagnostic information, viewing logs, or viewing request output, by clicking the corresponding button. The actions that are available depend on the status of the request. • To hide the details for a request if they are shown, click the Hide link in the Details column. • To search for concurrent requests with different criteria, click the New Search button. • To modify the search criteria from this search, click the Modify Search button. Completed Work Item Details This page shows details about completed work items of a particular item type that ended within the last 30 days. Navigation: Applications Systems > (pull–down menu) Workflow Manager > (B) Go > Purge > (B) View Details Navigation: Applications Systems > (pull–down menu) Workflow Manager > (B) Go > Related Metrics > Completed Work Items > (B) View Details To view work items with a different status, choose the status you want from the View pull–down menu and click the Go button. You can view items with the following statuses: • Completed Work Items • Active Work Items • Deferred Work Items • Suspended Work Items • Errored Work Items Completed Work Items Stage Summary This region displays the distribution of completed work items that ended at various activity stages within the workflow process, within 6 – 64 Oracle Applications System Administrator’s Guide the last 30 days. For each activity stage, the list displays the activity internal name and result, and the number of completed work items that ended at that stage. Click any column heading to sort the list by that column. To view details about the work items that ended at a particular activity stage, either click the activity stage link in the Work Item Activity Stage column, or select the activity stage and click the View Details button. Completed Work Items in All Stages This region displays a list of completed work items of the selected item type at all end activity stages, that ended within the last 30 days. For each work item, the list displays the internal name of the activity at which the work item ended, the start date, end date, user assigned to perform the activity, and item key. Click any column heading to sort the list by that column. To launch the Workflow Monitor for a work item, select the work item and click the Launch Workflow Monitor button. Note: If you perform an action in the Workflow Monitor that changes the status of the work item, then you must refresh your Oracle Workflow Manager web page in order to see the updated information. Completed Work Item Activity Details This page shows details about completed work items that ended at a particular activity stage within a particular item type and that ended within the last 30 days. Navigation: Applications Systems > (pull–down menu) Workflow Manager > (B) Go > Purge > (B) View Details > (B) View Details Navigation: Applications Systems > (pull–down menu) Workflow Manager > (B) Go > Related Metrics > Completed Work Items > (B) View Details > (B) View Details To view work items with a different status, choose the status you want from the View pull–down menu and click the Go button. You can view items with the following statuses: • Completed Work Items • Active Work Items • Deferred Work Items Oracle Applications Manager 6 – 65 • Suspended Work Items • Errored Work Items Oracle Workflow Manager displays a list of all completed work items of the selected item type that ended at the selected activity stage within the last 30 days. For each work item, the list displays the internal name of the activity at which the work item ended, the start date, end date, user assigned to perform the activity, and item key. Click any column heading to sort the list by that column. To launch the Workflow Monitor for a work item, select the work item and click the Launch Workflow Monitor button. Note: If you perform an action in the Workflow Monitor that changes the status of the work item, then you must refresh your Oracle Workflow Manager web page in order to see the updated information. 6 – 66 Oracle Applications System Administrator’s Guide Active Work Items The Active Work Items page shows the distribution of active work items across different item types. All work items that do not have an end date are counted as Active work items, including deferred, suspended, and errored work items as well as running work items. Navigation: Applications Systems > (pull–down menu) Workflow Manager > (B) Go > Workflow Metrics > Work Items > Active To view work items with a different status, choose the status you want from the View pull–down menu and click the Go button. You can view items with the following statuses: • Completed Work Items • Active Work Items • Deferred Work Items • Suspended Work Items • Errored Work Items For each item type, the Active Work Items page displays the item type name and the number of active work items of that type. Click any column heading to sort the list by that column. To view details about active work item activities within a particular item type, for work items that started within the last 30 days, either click the item type link in the Work Item Type column, or select the item type and click the View Details button. Active Work Item Activities This page shows details about active work item activities within a particular item type, for work items that started within the last 30 days. Active work item activities include only activities with a status of Active, Waiting, or Notified. Note: Only activities with a status of Active, Waiting, or Notified are included in this page. Activities with a status of Deferred, Suspended, or Error are not included in this page, although the work items to which they belong are counted as Active work items. You can use the View pull–down menu to view details for activities with a status of Deferred, Suspended, or Error. Navigation: Applications Systems > (pull–down menu) Workflow Manager > (B) Go > Workflow Metrics > Work Items > Active > (B) View Details Oracle Applications Manager 6 – 67 To view work items with a different status, choose the status you want from the View pull–down menu and click the Go button. You can view items with the following statuses: • Completed Work Items • Active Work Items • Deferred Work Items • Suspended Work Items • Errored Work Items Active Work Items Stage Summary This region displays the distribution of active work items that are currently at various activity stages within the workflow process, if the activity has a status of Active, Waiting, or Notified and the work item started within the last 30 days. For each activity stage, the list displays the activity internal name and the number of active work items at that stage. Click any column heading to sort the list by that column. To view details about the work items at a particular activity stage, either click the activity stage link in the Work Item Activity Stage column, or select the activity stage and click the View Details button. Active Work Items in All Stages This region displays a list of all active activities for work items of the selected item type that started within the last 30 days. Active work item activities include only activities with a status of Active, Waiting, or Notified. For each activity, the list displays the activity internal name, start date, end date, user assigned to perform the activity, and item key of the work item. Click any column heading to sort the list by that column. • To abort all work items in the list, click the Abort All button. • To suspend all activities in the list, click the Suspend All button. • To abort a single work item, select the activity you want and click the Abort button. • To suspend a single activity, select the activity you want and click the Suspend button. • To launch the Workflow Monitor for a work item, select the activity you want and click the Launch Workflow Monitor button. Note: If you perform an action in the Workflow Monitor that changes the status of the work item, such as aborting the work 6 – 68 Oracle Applications System Administrator’s Guide item, then you must refresh your Oracle Workflow Manager web page in order to see the updated information. Active Work Item Activity Details This page shows details about active work item activities of a particular activity stage within a particular item type, for work items that started within the last 30 days. Active work item activities include only activities with a status of Active, Waiting, or Notified. Navigation: Applications Systems > (pull–down menu) Workflow Manager > (B) Go > Workflow Metrics > Work Items > Active > (B) View Details > (B) View Details To view work items with a different status, choose the status you want from the View pull–down menu and click the Go button. You can view items with the following statuses: • Completed Work Items • Active Work Items • Deferred Work Items • Suspended Work Items • Errored Work Items Oracle Workflow Manager displays a list of all active activities of the selected stage for work items of the selected item type that started within the last 30 days. Active work item activities include only activities with a status of Active, Waiting, or Notified. For each activity, the list displays the activity internal name, start date, due date, user assigned to perform the activity, and item key of the work item. Click any column heading to sort the list by that column. • To abort a work item, select the activity you want and click the Abort button. • To suspend an activity, select the activity you want and click the Suspend button. • To launch the Workflow Monitor for a work item, select the activity you want and click the Launch Workflow Monitor button. Note: If you perform an action in the Workflow Monitor that changes the status of the work item, such as aborting the work item, then you must refresh your Oracle Workflow Manager web page in order to see the updated information. Oracle Applications Manager 6 – 69 Deferred Work Items The Deferred Work Items page shows the distribution of deferred work items across different item types. An abnormal number of activities with a deferred status may indicate that there are not enough background engines available. Navigation: Applications Systems > (pull–down menu) Workflow Manager > (B) Go > Workflow Metrics > Work Items > Deferred To view work items with a different status, choose the status you want from the View pull–down menu and click the Go button. You can view items with the following statuses: • Completed Work Items • Active Work Items • Deferred Work Items • Suspended Work Items • Errored Work Items For each item type, the Deferred Work Items page displays the item type name and the number of deferred work items of that type. Click any column heading to sort the list by that column. To view details for work items of a particular item type that started within the last 30 days, either click the item type link in the Work Item Type column, or select the item type and click the View Details button. Deferred Work Item Details This page shows details about deferred work items of a particular item type that started within the last 30 days. Navigation: Applications Systems > (pull–down menu) Workflow Manager > (B) Go > Workflow Metrics > Work Items > Deferred > (B) View Details To view work items with a different status, choose the status you want from the View pull–down menu and click the Go button. You can view items with the following statuses: • Completed Work Items • Active Work Items • Deferred Work Items • Suspended Work Items • Errored Work Items 6 – 70 Oracle Applications System Administrator’s Guide Deferred Work Items Stage Summary This region displays the distribution of deferred work items that are currently at various activity stages within the workflow process and that started within the last 30 days. For each activity stage, the list displays the activity internal name and the number of deferred work items at that stage. Click any column heading to sort the list by that column. To view details about the work items at a particular activity stage, either click the activity stage link in the Work Item Activity Stage column, or select the activity stage and click the View Details button. Deferred Work Items in All Stages This region displays a list of all deferred activities for work items of the selected item type that started within the last 30 days. For each activity, the list displays the activity internal name, start date, end date, user assigned to perform the activity, and item key of the work item. Click any column heading to sort the list by that column. • To abort all work items in the list, click the Abort All button. • To suspend all activities in the list, click the Suspend All button. • To abort a single work item, select the activity you want and click the Abort button. • To suspend a single activity, select the activity you want and click the Suspend button. • To launch the Workflow Monitor for a work item, select the activity you want and click the Launch Workflow Monitor button. Note: If you perform an action in the Workflow Monitor that changes the status of the work item, such as aborting the work item, then you must refresh your Oracle Workflow Manager web page in order to see the updated information. Deferred Work Item Activity Details This page shows details about deferred work items that are currently at a particular activity stage within a particular item type and that started within the last 30 days. Navigation: Applications Systems > (pull–down menu) Workflow Manager > (B) Go > Workflow Metrics > Work Items > Deferred > (B) View Details > (B) View Details Oracle Applications Manager 6 – 71 To view work items with a different status, choose the status you want from the View pull–down menu and click the Go button. You can view items with the following statuses: • Completed Work Items • Active Work Items • Deferred Work Items • Suspended Work Items • Errored Work Items Oracle Workflow Manager displays a list of all deferred activities of the selected stage for work items of the selected item type that started within the last 30 days. For each activity, the list displays the activity internal name, start date, due date, user assigned to perform the activity, and item key of the work item. Click any column heading to sort the list by that column. • To abort a work item, select the activity you want and click the Abort button. • To suspend an activity, select the activity you want and click the Suspend button. • To launch the Workflow Monitor for a work item, select the activity you want and click the Launch Workflow Monitor button. Note: If you perform an action in the Workflow Monitor that changes the status of the work item, such as aborting the work item, then you must refresh your Oracle Workflow Manager web page in order to see the updated information. 6 – 72 Oracle Applications System Administrator’s Guide Suspended Work Items The Suspended Work Items page shows the distribution of suspended work items across different item types. Navigation: Applications Systems > (pull–down menu) Workflow Manager > (B) Go > Workflow Metrics > Work Items > Suspended To view work items with a different status, choose the status you want from the View pull–down menu and click the Go button. You can view items with the following statuses: • Completed Work Items • Active Work Items • Deferred Work Items • Suspended Work Items • Errored Work Items For each item type, the Suspended Work Items page displays the item type name and the number of suspended work items of that type. Click any column heading to sort the list by that column. To view details for an item type, either click the item type link in the Work Item Type column, or select the item type and click the View Details button. Suspended Work Item Details This page shows details about all suspended work items of a particular item type. Navigation: Applications Systems > (pull–down menu) Workflow Manager > (B) Go > Workflow Metrics > Work Items > Suspended > (B) View Details To view work items with a different status, choose the status you want from the View pull–down menu and click the Go button. You can view items with the following statuses: • Completed Work Items • Active Work Items • Deferred Work Items • Suspended Work Items • Errored Work Items Oracle Applications Manager 6 – 73 Suspended Work Items Stage Summary This region displays the distribution of suspended work items that are currently at various activity stages within the workflow process. For each activity stage, the list displays the activity internal name and the number of suspended work items at that stage. Click any column heading to sort the list by that column. To view details about the work items at a particular activity stage, either click the activity stage link in the Work Item Activity Stage column, or select the activity stage and click the View Details button. Suspended Work Items in All Stages This region displays a list of all suspended activities for work items of the selected item type. For each activity, the list displays the activity internal name, start date, end date, user assigned to perform the activity, and item key of the work item. Click any column heading to sort the list by that column. • To abort all work items in the list, click the Abort All button. • To resume all activities in the list, click the Resume All button. • To abort a single work item, select the activity you want and click the Abort button. • To resume a single activity, select the activity you want and click the Resume button. • To launch the Workflow Monitor for a work item, select the activity you want and click the Launch Workflow Monitor button. Note: If you perform an action in the Workflow Monitor that changes the status of the work item, such as aborting the work item, then you must refresh your Oracle Workflow Manager web page in order to see the updated information. Suspended Work Item Activity Details This page shows details about all suspended work items at a particular activity stage within a particular item type. Navigation: Applications Systems > (pull–down menu) Workflow Manager > (B) Go > Workflow Metrics > Work Items > Suspended > (B) View Details > (B) View Details To view work items with a different status, choose the status you want from the View pull–down menu and click the Go button. You can view items with the following statuses: 6 – 74 Oracle Applications System Administrator’s Guide • Completed Work Items • Active Work Items • Deferred Work Items • Suspended Work Items • Errored Work Items Oracle Workflow Manager displays a list of all suspended activities of the selected stage for work items of the selected item type. For each activity, the list displays the activity internal name, start date, due date, user assigned to perform the activity, and item key of the work item. Click any column heading to sort the list by that column. • To abort a work item, select the activity you want and click the Abort button. • To resume an activity, select the activity you want and click the Resume button. • To launch the Workflow Monitor for a work item, select the activity you want and click the Launch Workflow Monitor button. Note: If you perform an action in the Workflow Monitor that changes the status of the work item, such as aborting the work item, then you must refresh your Oracle Workflow Manager web page in order to see the updated information. Oracle Applications Manager 6 – 75 Errored Work Items The Errored Work Items page shows the distribution of errored work items across different item types. Navigation: Applications Systems > (pull–down menu) Workflow Manager > (B) Go > Workflow Metrics > Work Items > Error To view work items with a different status, choose the status you want from the View pull–down menu and click the Go button. You can view items with the following statuses: • Completed Work Items • Active Work Items • Deferred Work Items • Suspended Work Items • Errored Work Items For each item type, the Errored Work Items page displays the item type name and the number of errored work items of that type. Click any column heading to sort the list by that column. To view details for an item type, either click the item type link in the Work Item Type column, or select the item type and click the View Details button. Errored Work Item Details This page shows details about all errored work items of a particular item type. Navigation: Applications Systems > (pull–down menu) Workflow Manager > (B) Go > Workflow Metrics > Work Items > Error > (B) View Details To view work items with a different status, choose the status you want from the View pull–down menu and click the Go button. You can view items with the following statuses: • Completed Work Items • Active Work Items • Deferred Work Items • Suspended Work Items • Errored Work Items 6 – 76 Oracle Applications System Administrator’s Guide Errored Work Items Stage Summary This region displays the distribution of errored work items that are currently at various activity stages within the workflow process. For each activity stage, the list displays the activity internal name and the number of errored work items at that stage. Click any column heading to sort the list by that column. To view details about the work items at a particular activity stage, either click the activity stage link in the Work Item Activity Stage column, or select the activity stage and click the View Details button. Errored Work Items in All Stages This region displays a list of all errored activities for work items of the selected item type. For each activity, the list displays the activity internal name, start date, end date, user assigned to perform the activity, and item key of the work item. Click any column heading to sort the list by that column. • To abort all work items in the list, click the Abort All button. • To retry all activities in the list, click the Retry All button. • To abort a single work item, select the activity you want and click the Abort button. • To retry a single activity, select the activity you want and click the Retry button. • To launch the Workflow Monitor for a work item, select the activity you want and click the Launch Workflow Monitor button. Note: If you perform an action in the Workflow Monitor that changes the status of the work item, such as aborting the work item, then you must refresh your Oracle Workflow Manager web page in order to see the updated information. Errored Work Item Activity Details This page shows details about all errored work items at a particular activity stage within a particular item type. Navigation: Applications Systems > (pull–down menu) Workflow Manager > (B) Go > Workflow Metrics > Work Items > Error > (B) View Details > (B) View Details To view work items with a different status, choose the status you want from the View pull–down menu and click the Go button. You can view items with the following statuses: Oracle Applications Manager 6 – 77 • Completed Work Items • Active Work Items • Deferred Work Items • Suspended Work Items • Errored Work Items Oracle Workflow Manager displays a list of all errored activities of the selected stage for work items of the selected item type. For each activity, the list displays the activity internal name, start date, due date, user assigned to perform the activity, and item key of the work item. Click any column heading to sort the list by that column. • To abort a work item, select the activity you want and click the Abort button. • To retry an activity, select the activity you want and click the Retry button. • To launch the Workflow Monitor for a work item, select the activity you want and click the Launch Workflow Monitor button. Note: If you perform an action in the Workflow Monitor that changes the status of the work item, such as aborting the work item, then you must refresh your Oracle Workflow Manager web page in order to see the updated information. 6 – 78 Oracle Applications System Administrator’s Guide Index A Active work items, 6 – 67 AdminAppServer utility, G – 44 Administer Folders, 9 – 24 Administering Oracle Applications security, G – 51 Agent listeners, 6 – 56 Apache Server, G – 14 Application, registering, 9 – 19 Application basepath, 9 – 20, 9 – 21 Application environment variable, 9 – 21 Application Server Security, G – 51 Application Server Trust Level, G – 56 Application users assigning one or more responsibilities, 2 – 2 changing passwords, 2 – 19 defining, 2 – 2, 2 – 17 disabling application password, 2 – 19 password characteristics, 2 – 18 password profile options, 2 – 19 reporting on active users, 2 – 48 start dates, 2 – 20 username characteristics, 2 – 18 username/password, 2 – 2 Applications security, defining a responsibility, 2 – 10 applsys. See ORACLE ID Applsys password, matching APPS accounts, 9 – 14 APPS accounts, password, 9 – 14 Assign default folders, 9 – 24 Audit reports brief explanation, 3 – 7 listing, 3 – 2 Auditing database row changes. See AuditTrail Auditing user activity. See Sign–On Audit AuditTrail archiving data, 3 – 32 audit groups, 3 – 22 audit set, 3 – 22 changing audit tables, 3 – 31 description, 3 – 22 introduction, 3 – 2 reporting, 3 – 31 setting up, 3 – 22 tables, 3 – 24 to 3 – 27 views, 3 – 25 B Background engines, 6 – 40 C character mode mapping to GUI windows, E–2 Completed work items, 6 – 39, 6 – 62 CONCSUB, 4 – 41 Index – 1 Concurrent managers See also Internal concurrent manager; Specializing managers activating a manager, 5 – 55 activating and other control states, 5 – 81 assigning work shifts, 5 – 93 controlling, 5 – 55 to 5 – 65, 5 – 80, G – 72 defining, 5 – 26 to 5 – 35, 5 – 89 to 5 – 98 defining combined specialization rules, 5 – 100 defining work shifts, 5 – 98 disabling a work shift, 5 – 30 Immediate program libraries, 5 – 92 migrating, 5 – 69 operating system process ID number, 5 – 86 Oracle process ID number, 5 – 86 PMON cycle, 5 – 56 program libraries, 5 – 27 reporting on work shifts, 5 – 35, 5 – 36 restarting a manager, 5 – 55 role of application name in combined rules, 5 – 101 role of application name when defining, 5 – 89 sleep time, 5 – 94 specializing – Define Managers form, 5 – 95 specializing managers, 5 – 37 to 5 – 62 Standard manager, 5 – 28 target processes, 5 – 2 time–based queues, 5 – 32 viewing actual number of processes, 5 – 81 viewing manager control processes, 5 – 84 viewing manager request queue, 5 – 87 viewing number of running requests, 5 – 81 viewing status of, 5 – 80 viewing target number of processes, 5 – 81 work shifts, 5 – 29 to 5 – 34 work shifts and target processes, 5 – 32, 5 – 93 work shifts hours, 5 – 30 work shifts overlap, 5 – 31 work shifts overlap – same priority, 5 – 31 work shifts past midnight, 5 – 30 Concurrent processing file purging guidelines, 5 – 19 lifecycle of a request, 5 – 3 to 5 – 6 managing files and tables, 5 – 18 to 5 – 26 overview, 5 – 2 to 5 – 7 Index – 2 Oracle Applications System Administrator’s Guide profile options, 5 – 24 to 5 – 27 programs, 4 – 66 purge files program, 5 – 20 purging and audit data, 5 – 19 purging request data, 5 – 18 to 5 – 26 System Administrator privileges, 5 – 9 viewing incompatible tasks, 4 – 66 when programs start, 5 – 2 Concurrent programs and requests, 5 – 2 behavior of program parameters, 4 – 52 behavior of report set parameters, 4 – 53 changing responsibility to see changed effects, 4 – 52 CONCSUB, 4 – 41 copying and modifying, 4 – 47 to 4 – 57 custom, 4 – 35 database session control, 4 – 73 defining incompatibility rules, 4 – 25 to 4 – 31 disabling, 4 – 66 displaying parameters – programs vs. report sets, 4 – 51 enforcement of incompatibility rules, 4 – 28 to 4 – 30 example – modifying program parameters, 4 – 54 to 4 – 56 execution method, 4 – 63, 4 – 66 grouping as a request type, 5 – 103 grouping as request types, 5 – 53 to 5 – 55 Immediate program libraries, 5 – 92 incompatible, 4 – 66, 4 – 75 modifying incompatible programs list, 4 – 48 to 4 – 50 modifying parameters, 4 – 49 to 4 – 57 multiple language support, 4 – 63, 4 – 69 not displaying parameters, 4 – 50 parameter sequence, 4 – 77 program libraries, 5 – 27 report set incompatibilities, 4 – 14 reporting on enabled programs, 4 – 58 reporting on incompatible programs, 4 – 57 reporting on program definitions, 4 – 57 role of application name in request types, 5 – 104 run alone programs, 4 – 25 to 4 – 27 running alone, 4 – 66, 4 – 70 setting default values, 4 – 51 to 4 – 53 spawned vs. immediate, 5 – 27 subroutines, 4 – 63 viewing, 4 – 66 warnings about modifying, 4 – 47, 4 – 53 Concurrent request type, 5 – 53 to 5 – 55 Concurrent requests changing phase and status, 5 – 16 changing priority of, 5 – 16 child requests, 5 – 3 explained, 5 – 2 file access privileges, 5 – 10 lifecycle of, 5 – 3 to 5 – 6 log file privileges, 5 – 14 multilingual support, 4 – 4 output file – path to, 5 – 15 output file access privileges, 5 – 10 parent requests, 5 – 3 phase and status, 5 – 3 to 5 – 6 phase/status listing, 5 – 3 priority of, 5 – 3 Report Review Agent, 5 – 10 request types, 5 – 103 role of application name in request types, 5 – 104 submitting using CONCSUB, 4 – 41 System Administrator privileges, 5 – 9 time taken to run, 5 – 34 viewing output, 5 – 105 viewing request parameters, 4 – 51 viewing status of, 5 – 9 to 5 – 12 Conflict Domain, defining, 9 – 18 Conflict domains defining, 9 – 17 explained, 4 – 27 Consumer groups. See Resource consumer groups Context–sensitive help, link syntax, 8 – 10 Controlling access to reports or programs. See Report Groups Cost–based optimization, 10 – 2 initialization parameters, 10 – 3 Custom concurrent programs, 4 – 35 Custom help, context–sensitive links, 8 – 10 CUSTOM library, 14 – 2 Custom reports, context–sensitive help, 8 – 10 D Data Groups Application Object Library requirement, 4 – 83 copying, 4 – 33 defining, 4 – 81 explained, 4 – 30 purposes of, 4 – 30 using, 4 – 30 to 4 – 36 using with custom applications, 4 – 31 using with multiple Set of Books, 4 – 31 Database Resource Manager, 9 – 7 DBC file, G – 7 DBC files, G – 46 Default folders, 9 – 24 Deferred activities, 6 – 40 Deferred work items, 6 – 70 Defining a Conflict Domain, 9 – 18 Detail Notification Mailer, 6 – 44 Discoverer 4i, H – 21 Document sequences active sequence definitions, 13 – 8 application, 13 – 7, 13 – 15 assigning sequences to document definitions, 13 – 6, 13 – 8 auditability, 13 – 2 automatic document numbering – initial value, 13 – 4 automatic numbering, 13 – 10 automatic vs manual, 13 – 8 category, 13 – 7, 13 – 15 category application, 13 – 13 category code, 13 – 13 category identifies database table, 13 – 12, 13 – 13 defining a sequence, 13 – 3 defining document categories, 13 – 12 defining documents to be numbered, 13 – 7 differences – document numbering vs. entry, 13 – 8 disabling a sequence assignment, 13 – 16 document categories explained, 13 – 6 document definition, 13 – 15 Document Flexfield, 13 – 7 Index – 3 enabling segments in the document flexfield, 13 – 16 end date – document definition, 13 – 16 end date – document flexfield, 13 – 16 entering documents, 13 – 1 entering transactions, 13 – 1 examples – document categories, 13 – 6 examples – sequence definitions, 13 – 4 initial value of sequence, 13 – 11 manual numbering, 13 – 10 message displayed by document, 13 – 10 method in document flexfield, 13 – 7, 13 – 16 segments and the document flexfield, 13 – 16 sequence names, 13 – 9 sequence start date, 13 – 10 sequence type, 13 – 10 sequences and audit records, 13 – 10 sequences explained, 13 – 2 set of books in document flexfield, 13 – 7, 13 – 16 start date – document definition, 13 – 15 start date – document flexfield, 13 – 15 type of document numbering, 13 – 10 type of sequence numbering, 13 – 4 E Employee, application user, 2 – 19 Environment variable, 9 – 20 Errored work items, 6 – 76 Event messages, 6 – 38 External documents, D – 2 F Flexfields Shared Table Lock profile, A – 21 Shorthand Entry profile option, A – 21 FND_CTL, 10 – 32 FND_SESS_CTL, 10 – 32 FND_STATS, 10 – 9 Index – 4 Oracle Applications System Administrator’s Guide FNDCPASS utility, 9 – 9 FNDLOAD, C – 2 FNDWFBG, 6 – 41 FNDWFLST, 6 – 56 FNDWFPR, 6 – 62 Folder Administration, 9 – 24 Folder Set, 9 – 24 Folders Changing ownership, 9 – 26 Private vs. Public, 9 – 26 Form, passing arguments to, 4 – 20 to 4 – 24 Forms Administer Concurrent Managers, 5 – 80 Applications, 9 – 19 Concurrent Conflicts Domains, 9 – 17 Concurrent Request Types, 5 – 103 Define Application User, 2 – 17 Define Combined Specialization Rules, 5 – 100 Define Concurrent Manager, 5 – 89 Define Data Group, 4 – 81 Define Menu, 2 – 34, 2 – 38 Define Print Style, 7 – 43 Define Printer Driver, 7 – 46 Define Printer Types, 7 – 39 Define Report Group, 4 – 59 Define Work Shifts, 5 – 98 Languages, 9 – 28 Monitor Application Users, 3 – 8 Register Nodes, 5 – 107 Register ORACLE IDs, 9 – 13 Register Printers, 7 – 41 Responsibility, 2 – 10 Security Group, 2 – 16 Territories, 9 – 30 Update System Profile Options, 11 – 6 Function Security Oracle HRMS, Special Function, 2 – 31 Oracle Sales and Marketing, Special Function, 2 – 31 Function Security Function Report, 2 – 45 Function Security Menu Report, 2 – 45 starting from operating system, 5 – 59 to 5 – 61 STARTMGR command, 5 – 58 to 5 – 60 when inactive, 5 – 9 Function Security Menu Viewer. See Menu Viewer Function Security Navigator Report, 2 – 45 G Generic Loader, C – 2 GSM. See Generic Service Management J JOB_QUEUE_PROCESSES, 6 – 58 H L Help system customizing Oracle Applications help, 8 – 2 Help System Utility, 8 – 2 downloading help files for editing, 8 - 4 File Name to Help Target Report, 8 - 6 Help Target to File Name Report, 8 - 6 profile options, 8 - 2, A - 29 Uploading help files, 8 - 5 HTTP Server, G – 14 HTTP Server Configuration Checklist, G – 64 LDAP integration, H – 4 Loaders, C – 2 Log files access level profile option, 5 – 10 Internal manager log file, 5 – 15 manager log files, 5 – 14 manager log files – path and name, 5 – 15 parallel processing on multiple nodes, 5 – 66 purge program, 5 – 20 request log – path to, 5 – 14 System Administrator privileges, 5 – 14 types of, 5 – 13 Logical databases define for custom applications, 9 – 5 example of program incompatibilities, 9 – 4 explained, 9 – 4 program incompatibility rules, 9 – 4 Standard logical database method, 9 – 5 I Incompatible programs. See Concurrent programs Internal concurrent manager CONCSUB – hiding password, 5 – 62 CONCSUB – using to shut down, 5 – 61 to 5 – 63 CONCSUB command, 5 – 58, 5 – 60 to 5 – 64 control states, 5 – 56 to 5 – 58 enforces incompatibility rules, 4 – 28 to 4 – 30 explained, 5 – 28 internal monitors, 5 – 66 log file – name and path, 5 – 15 operating system control, 5 – 58 to 5 – 64 parallel concurrent processing, 5 – 66 PMON cycle, 5 – 14, 5 – 56 shut down from operating system, 5 – 61 to 5 – 63 M Management Pack for Oracle Applications. See Oracle Management Pack for Oracle Applications Menu Paths, mapping Char mode to GUI, E–2 Menu Viewer, 2 – 42 Menus compiling, 2 – 31, 2 – 44 defining, 2 – 34 to 2 – 37, 2 – 38 to 2 – 43 defining a menu entry, 2 – 39 Index – 5 entering arguments, 2 – 36 menu prompts, 2 – 40 Menu Viewer, 2 – 42 role in function security, 2 – 2 sequence numbers, 2 – 40 MIME types, for viewing reports, 5 – 105 MLS. See Multilingual support MLS function, 4 – 63, 4 – 69 Monitoring users. See Sign–On Audit Multi–language function (MLS function), 4 – 63, 4 – 69 Multilingual external documents, D – 2 Multilingual support, concurrent requests, 4–4 N Navigation Paths, mapping Char mode to GUI, E–2 Network bandwidth, testing, 9 – 23 Network latency, testing, 9 – 23 Network Test window, 9 – 22 Node, explained, 5 – 107 Nodes explained, 5 – 64 manager’s target node, 5 – 68 primary and secondary, 5 – 66 Notification Mailer configuration, 6 – 47 overview, 6 – 44 processes, 6 – 47 service instances, 6 – 45 status, 6 – 46 throughput, 6 – 55 O Options. See User profiles Oracle Applications Manager, 5 – 8, 6 – 2 Oracle Enterprise Manager, 6 – 3 Oracle HTTP Server, G – 14 ORACLE ID applsys – password warning, 9 – 14 Index – 6 Oracle Applications System Administrator’s Guide applsys privileges, 9 – 16 assigning privileges, 9 – 15 assigning to responsibility, 2 – 12 create session privilege, 9 – 14 disabled privileges, 9 – 13, 9 – 15 enabled privileges, 9 – 13, 9 – 15 explained, 9 – 2 Oracle password, 9 – 15 Oracle username, 9 – 13 public privileges, 9 – 16 registering, 9 – 2, 9 – 13 requirement for database access, 9 – 3 reregistering, 9 – 3 restricted privileges, 9 – 3, 9 – 13, 9 – 15 Oracle Internet Directory, H – 4 Oracle Management Pack for Oracle Applications, 6 – 2, 6 – 3 Oracle Portal, H – 3 Oracle Reports, bitmapped, 4 – 67 Oracle Workflow agent activity, 6 – 38 purging, 6 – 61 submitting concurrent requests, 6 – 38 system status, 6 – 37 Oracle Workflow Manager, 6 – 37 Oracle*Mail, integration with Oracle Alert, B–6 Oracle9i Application Server, H – 2, H – 3 P Parallel concurrent processing examples implementing, 5 – 70 to 5 – 77 explained, 5 – 64 to 5 – 76 implementation checklist, 5 – 74 Internal manager, 5 – 66 introduced, 5 – 64 log files and multiple nodes, 5 – 66 managing, 5 – 68 to 5 – 76 migrating managers, 5 – 69 operating environments, 5 – 64 proprietary queuing systems, 5 – 67 Password See also Application user FNDCPASS utility, 9 – 9 PMON cycle, concurrent managers, 5 – 56 Predefined alerts action sets – definition of, B – 4 alert – definition of, B – 3 alert action – definition of, B – 3 customizing, B – 6 DBA alerts, B – 10 event alert – definition of, B – 3 explained, B – 2, B – 5 overview of Oracle Alert, B – 2 periodic alert – definition of, B – 3 precoded custom alerts, B – 10 purge mail alert, B – 15 purging alerts, B – 14 using, B – 5 vs. Oracle Alert, B – 1 Printer support arguments, 7 – 49 arguments for print command, 7 – 26 caching of definitions, 7 – 12 Command driver method, 7 – 25 concurrent managers – restarting, 7 – 12 concurrent program print definitions, 7 – 31 custom print programs – location, 7 – 26 drivers, styles, printer types and platforms, 7–5 end user settings, 7 – 36 header pages, 7 – 45 initialization, 7 – 49 initialization string, 7 – 28 initialization string – editing, 7 – 25 introduction to printing, 7 – 2 page break problems, 7 – 24 platform, 7 – 47 postscript printing, 7 – 37 predefined types, styles, drivers, 7 – 24 print command & arguments – example, 7 – 27 print style assignments, 7 – 33 print styles – columns, 7 – 44 print styles – defining, 7 – 43 print styles – explained, 7 – 4 print styles – introduction, 7 – 3 print styles – predefined, 7 – 43 print styles – rows, 7 – 44 printer / style assignments, 7 – 31 to 7 – 34 printer assignments, 7 – 32 printer driver method, 7 – 25, 7 – 48 printer drivers – assigning, 7 – 39 printer drivers – defining, 7 – 46 printer drivers – explained, 7 – 5 printer drivers – introduction, 7 – 3 printer drivers – predefined for printers, 7 – 46 printer drivers – predefined for styles, 7 – 46 printer drivers – when to define new drivers, 7 – 46 printer types – defining, 7 – 39 printer types – introduction, 7 – 3 printers – operating system name, 7 – 42 printers – registering, 7 – 41 Program driver method, 7 – 25 Program driver method – example, 7 – 26 program name, 7 – 48 reset, 7 – 49 reset string, 7 – 28 reset string – editing, 7 – 25 sequence of printing events, 7 – 5 setting up – forms used, 7 – 11 setting up printers, 7 – 11 shell scripts, 7 – 26 spool file, 7 – 28, 7 – 48 SRW driver, 7 – 47 SRW driver – customizing, 7 – 29 to 7 – 32 SRW drivers – how used, 7 – 30 SRW drivers – location, 7 – 29 standard input, 7 – 27, 7 – 48 Subroutine driver method, 7 – 25 System Administrator privileges, 7 – 34 verifying printer drivers, 7 – 24 Printers. See Printer support Printing, G – 76 Process Navigator, overview, 12 – 2 Profiles. See User profiles Propagation schedules, 6 – 58 Purge Obsolete Workflow Runtime Data concurrent program, 6 – 61, 6 – 62 Purging Workflow data, 6 – 61 Q Queue propagation, 6 – 58 Index – 7 R Real Application Clusters (RAC), 5 – 76, G – 85 to G – 91 Register application, 9 – 19 concurrent program, 4 – 66 Report Groups defining, 4 – 59 example – using a code, 4 – 20 may consist of, 4 – 19 Report Security Groups, 4 – 19 report security groups, report sets, reports, 4 – 13 responsibility–level vs. form–level, 4 – 19 using, 4 – 19 to 4 – 25 using a code to customize, 4 – 60 using a code with, 4 – 20 to 4 – 24 vs. report sets, 4 – 2 to 4 – 4 Report parameters, sharing in a report set, 4 – 15 to 4 – 18 Report Review Agent, 5 – 10 Report Security Groups See also Report Groups individual reports and report sets, 2 – 6 relationship with application user and responsibility, 2 – 7 using, 2 – 6 Report Sets as concurrent programs, 4 – 10 behavior of program parameters, 4 – 53 defining, 4 – 6 displaying parameters – programs vs. report sets, 4 – 51 example – shared parameters, 4 – 16 incompatibility rules, 4 – 14, 4 – 26 owners of, 4 – 11 to 4 – 17 preventing parameters from being changed, 4 – 52 printing, 4 – 10 querying in Define Concurrent programs form, 4 – 14 report security groups, report sets, reports, 4 – 13 reporting on, 4 – 24 reporting on definitions, 4 – 18 Index – 8 Oracle Applications System Administrator’s Guide request phase and status, 4 – 11 sharing parameters in a set, 4 – 15 to 4 – 18 System Administrator privileges, 4 – 12 vs. report groups, 4 – 2 to 4 – 4 Reports Active Responsibilities, 2 – 47 Active Users, 2 – 48 Completed Concurrent Requests, 5 – 34 Concurrent Program Details, 4 – 57 Concurrent Programs, 4 – 58 Purge Concurrent Request and/or Manager Data, 5 – 20 Report Group Responsibilities, 4 – 24 Report Sets, 4 – 18 Reports and Sets by Responsibility, 2 – 49 Signon Audit Concurrent Requests, 3 – 10 Signon Audit Forms, 3 – 12 Signon Audit Responsibilities, 3 – 15 Signon Audit Unsuccessful Logins, 3 – 17 Signon Audit Users, 3 – 19 User Profile Option Values, 11 – 5 Users of a Responsibility, 2 – 46 Work Shift by Manager, 5 – 35 Work Shifts, 5 – 36 Request type, 5 – 53 to 5 – 55 Resource consumer groups, 9 – 7 Responsibilities Application name, 2 – 11 changing, 2 – 2 deactivating, 2 – 12 defines application privileges, 2 – 2 defining, 2 – 10 description, 2 – 2 major components, 2 – 4 predefined, 2 – 4 Report Security Groups, 2 – 4 reporting on active responsibilities, 2 – 47 reporting on reports and report sets, 2 – 49, 4 – 24 reporting on users of, 2 – 46 standard, 2 – 2 Start date, 2 – 11 Responsibility, default folders, 9 – 25 Run Reports form, customizing using codes, 4 – 20 Run Requests form, example – customizing, 4 – 20 S Security server trust level, G – 55 server, administering, G – 51 Security Groups, defining (for HRMS only), 2 – 16 Self–Service Framework, configuration, G – 59 HTTP server configuration checklist, G – 64 Server security, G – 51, G – 55 Server trust level, G – 55 Service Management, 5 – 5 Session parameters, for optimization, 10 – 32 Session time–out, 2 – 9 Shared parameters, behavior of. See Report Sets Sign–On Audit audit levels, 3 – 4 examples using, 3 – 5 introduction, 3 – 2 monitoring users, 3 – 5, 3 – 8 purging obsolete data, 3 – 21 reporting on users, 3 – 19 reporting on users and forms, 3 – 12 reporting on users and requests, 3 – 10 reporting on users and responsibilities, 3 – 15 reporting on users and unsuccessful logins, 3 – 17 reports, 3 – 7 setting up, 3 – 4 using, 3 – 3 to 3 – 8 Single Sign–On, H – 4 Specializing managers action types, 5 – 37 to 5 – 39 actions, 5 – 37 to 5 – 39 defining combined rules, 5 – 46 to 5 – 49 defining specialization rules, 5 – 37 to 5 – 40 examples of action types, 5 – 40 to 5 – 42 examples of combined rules, 5 – 48 to 5 – 53 examples of rules, 5 – 41 to 5 – 48 explained, 5 – 37 to 5 – 62 introduction, 5 – 37 specialization vs. combined rules, 5 – 51 using more than one rule, 5 – 38 to 5 – 41 Standard Report Submission, explained, 4 – 2 Standard Submission form customizing, 4 – 2, 4 – 20 to 4 – 24 example – customizing, 4 – 20 explained, 4 – 2 list, 4 – 20 Stuck processes, 6 – 40 Summary Notification Mailer, 6 – 44 Suspended work items, 6 – 73 System Administrator report set privileges, 4 – 12 versus Database Administrator, 1 – 2 T Target processes. See Concurrent managers Timed out activities, 6 – 40 Transaction Managers, 5 – 28 U Upgrading, preserving custom menus, 2 – 31 User, default folders, 9 – 25 User profiles assigning Set of Books, 11 – 2 examples of, 11 – 4 reporting on, 11 – 5 setting options, 11 – 2 updating system profiles, 11 – 6 using site level as defaults, 11 – 3 when changes take effect, 11 – 2 User session limits, 2 – 9 Username. See Application user UTF8, G – 92 Index – 9 V Viewer Options window, 5 – 105 W WFMGSMD, 6 – 44 WFMGSMS, 6 – 45 Index – 10 Oracle Applications System Administrator’s Guide Windows, character mode mapping to GUI, E–2 Work Directory, 14 – 2, 14 – 3 Work items, 6 – 38 Work shifts. See Concurrent Managers Workflow Agent Listener concurrent program, 6 – 56 Workflow Background Process concurrent program, 6 – 41 Reader’s Comment Form Oracle Applications System Administrator’s Guide Volume 1, Release 11i A96155–02 Oracle Corporation welcomes your comments and suggestions on the quality and usefulness of this publication. Your input is an important part of the information we use for revision. • Did you find any errors? • Is the information clearly presented? • Do you need more information? If so, where? • Are the examples correct? Do you need more examples? • What features did you like most about this manual? What did you like least about it? If you find any errors or have any other suggestions for improvement, please indicate the topic, chapter, and page number below: Please send your comments to: Oracle Applications Documentation Manager Oracle Corporation 500 Oracle Parkway Redwood Shores, CA 94065 USA Phone: (650) 506–7000 Fax: (650) 506–7200 If you would like a reply, please give your name, address, and telephone number below: Thank you for helping us improve our documentation. Oracle r Applications System Administrator’s Guide RELEASE 11i VOLUME 2 October 2002 Oracle Applications System Administrator’s Guide Release 11i The part number for this volume is A96156–02. To reorder this book, please use the set part number, A96154–02. Copyright E 1994, 2002 Oracle Corporation. All rights reserved. Primary Authors: Steve Carter, Mildred Wang Major Contributors: Dana Spradley, Leslie Studdard Contributors: Ahmed Alomari, Troy Anthony, Ram Bhoopalam, George Buzsaki, Anne Carlson, Steven Chan, Siu Chang, John Cordes, Mark Fisher, Hubert Ferst, Clara Jaeckel, Michael Mast, Tom Morrow, Emily Nordhagen, Muhannad Obeidat, Gursat Olgun, Richard Ou, Jan Smith, Seth Stafford, Susan Stratton, Raymond Tse, Mark Warren, Sara Woodhull The Programs (which include both the software and documentation) contain proprietary information; they are provided under a license agreement containing restrictions on use and disclosure and are also protected by copyright, patent and other intellectual and industrial property laws. Reverse engineering, disassembly, or decompilation of the Programs, except to the extent required to obtain interoperability with other independently created software or as specified by law, is prohibited. The information contained in this documentation is subject to change without notice. If you find any problems in the documentation, please report them to us in writing. This documentation is not warranted to be error–free. Except as may be expressly permitted in your license agreement for these Programs, no part of these Programs may be reproduced or transmitted in any form or by any means, electronic or mechanical, for any purpose. If the Programs are delivered to the United States Government or anyone licensing or using the Programs on behalf of the United States Government, the following notice is applicable: U.S. GOVERNMENT RIGHTS Programs, software, databases, and related documentation and technical data delivered to U.S. Government customers are ”commercial computer software” or ”commercial technical data” pursuant to the applicable Federal Acquisition Regulation, and agency–specific supplemental regulations. As such, use, duplication, disclosure, modification, and adaptation of the Programs, including documentation and technical data, shall be subject to the licensing restrictions set forth in the applicable Oracle license agreement, and, to the extent applicable, the additional rights set forth in FAR 52.227–19, Commercial Computer Software – Restricted Rights (June, 1987). Oracle Corporation, 500 Oracle Parkway, Redwood City, CA 94065. The Programs are not intended for use in any nuclear, aviation, mass transit, medical, or other inherently dangerous applications. It shall be the licensee’s responsibility to take all appropriate fail–safe, backup, redundancy, and other measures to ensure the safe use of such applications if the Programs are used for such purposes, and we disclaim liability for any damages caused by such use of the Programs. Oracle is a registered trademark of Oracle Corporation and/or its affiliates. Other names may be trademarks of their respective owners. Contents VOLUME 1 Preface . . . . . . . . . . . . . . . . . . . . . . . . . . . . . . . . . . . . . . . . . . . . . . . . . i Chapter 1 What Is System Administration? . . . . . . . . . . . . . . . . . . . . . . . . . . 1 – 1 What Is System Administration? . . . . . . . . . . . . . . . . . . . . . . . . . . . 1 – 2 Chapter 2 Managing Oracle Applications Security . . . . . . . . . . . . . . . . . . . Overview of Oracle Applications Security . . . . . . . . . . . . . . . . . . . Defining a Responsibility . . . . . . . . . . . . . . . . . . . . . . . . . . . . . . . . . Defining a Request Security Group . . . . . . . . . . . . . . . . . . . . . . . . . User Session Limits . . . . . . . . . . . . . . . . . . . . . . . . . . . . . . . . . . . . . . Responsibilities Window . . . . . . . . . . . . . . . . . . . . . . . . . . . . . . . . . . Overview of Security Groups . . . . . . . . . . . . . . . . . . . . . . . . . . . . . . Security Groups Window . . . . . . . . . . . . . . . . . . . . . . . . . . . . . . . . . Users Window . . . . . . . . . . . . . . . . . . . . . . . . . . . . . . . . . . . . . . . . . . . Overview of Function Security . . . . . . . . . . . . . . . . . . . . . . . . . . . . . Implementing Function Security . . . . . . . . . . . . . . . . . . . . . . . . . . . Form Functions Window . . . . . . . . . . . . . . . . . . . . . . . . . . . . . . . . . . Menus Window . . . . . . . . . . . . . . . . . . . . . . . . . . . . . . . . . . . . . . . . . . Menu Viewer . . . . . . . . . . . . . . . . . . . . . . . . . . . . . . . . . . . . . . . . . . . . Compile Security Concurrent Program . . . . . . . . . . . . . . . . . . . . . . Function Security Reports . . . . . . . . . . . . . . . . . . . . . . . . . . . . . . . . . Users of a Responsibility Report . . . . . . . . . . . . . . . . . . . . . . . . . . . 2–1 2–2 2–4 2–6 2–9 2 – 10 2 – 15 2 – 16 2 – 17 2 – 22 2 – 28 2 – 34 2 – 38 2 – 42 2 – 44 2 – 45 2 – 46 Contents iii Active Responsibilities Report . . . . . . . . . . . . . . . . . . . . . . . . . . . . . 2 – 47 Active Users Report . . . . . . . . . . . . . . . . . . . . . . . . . . . . . . . . . . . . . . 2 – 48 Reports and Sets by Responsibility Report . . . . . . . . . . . . . . . . . . . 2 – 49 Chapter 3 User and Data Auditing . . . . . . . . . . . . . . . . . . . . . . . . . . . . . . . . . . Overview of User and Data Auditing . . . . . . . . . . . . . . . . . . . . . . . Auditing User Activity . . . . . . . . . . . . . . . . . . . . . . . . . . . . . . . . . . . Monitor Users Window . . . . . . . . . . . . . . . . . . . . . . . . . . . . . . . . . . . Signon Audit Concurrent Requests Report . . . . . . . . . . . . . . . . . . Signon Audit Forms Report . . . . . . . . . . . . . . . . . . . . . . . . . . . . . . . Signon Audit Responsibilities Report . . . . . . . . . . . . . . . . . . . . . . . Signon Audit Unsuccessful Logins Report . . . . . . . . . . . . . . . . . . . Signon Audit Users Report . . . . . . . . . . . . . . . . . . . . . . . . . . . . . . . . Purge Signon Audit Data Program . . . . . . . . . . . . . . . . . . . . . . . . . Reporting On AuditTrail Data . . . . . . . . . . . . . . . . . . . . . . . . . . . . . Audit Installations Window . . . . . . . . . . . . . . . . . . . . . . . . . . . . . . . Audit Groups Window . . . . . . . . . . . . . . . . . . . . . . . . . . . . . . . . . . . Audit Tables Window . . . . . . . . . . . . . . . . . . . . . . . . . . . . . . . . . . . . 3–1 3–2 3–3 3–8 3 – 10 3 – 12 3 – 15 3 – 17 3 – 19 3 – 21 3 – 22 3 – 34 3 – 36 3 – 40 Chapter 4 Managing Concurrent Programs and Reports . . . . . . . . . . . . . . . Overview of Concurrent Programs and Requests . . . . . . . . . . . . . Multilingual Support for Concurrent Requests . . . . . . . . . . . . . . . Organizing Programs into Request Sets . . . . . . . . . . . . . . . . . . . . . Request Sets Report . . . . . . . . . . . . . . . . . . . . . . . . . . . . . . . . . . . . . . Organizing Programs into Request Groups . . . . . . . . . . . . . . . . . . Report Group Responsibilities Report . . . . . . . . . . . . . . . . . . . . . . Defining Program Incompatibility Rules . . . . . . . . . . . . . . . . . . . . Defining Data Groups . . . . . . . . . . . . . . . . . . . . . . . . . . . . . . . . . . . . Custom Concurrent Programs . . . . . . . . . . . . . . . . . . . . . . . . . . . . . Copying and Modifying Program Definitions . . . . . . . . . . . . . . . . Concurrent Program Details Report . . . . . . . . . . . . . . . . . . . . . . . . Concurrent Programs Report . . . . . . . . . . . . . . . . . . . . . . . . . . . . . . Request Groups Window . . . . . . . . . . . . . . . . . . . . . . . . . . . . . . . . . Concurrent Program Executable Window . . . . . . . . . . . . . . . . . . . Concurrent Programs Window . . . . . . . . . . . . . . . . . . . . . . . . . . . . Data Groups Window . . . . . . . . . . . . . . . . . . . . . . . . . . . . . . . . . . . . 4–1 4–2 4–4 4–6 4 – 18 4 – 19 4 – 24 4 – 25 4 – 30 4 – 35 4 – 47 4 – 57 4 – 58 4 – 59 4 – 61 4 – 66 4 – 81 Chapter 5 Managing Concurrent Processing . . . . . . . . . . . . . . . . . . . . . . . . . 5 – 1 Overview of Concurrent Processing . . . . . . . . . . . . . . . . . . . . . . . . 5 – 2 Service Management . . . . . . . . . . . . . . . . . . . . . . . . . . . . . . . . . . . . . 5 – 5 iv Oracle Applications System Administrator’s Guide Chapter 6 Managing Concurrent Processing with Oracle Applications Manager . . . . . . . . . . . . . . . . . . . . . . . . . . . . . . . . . . . . . . . . . . . . . . . . Reviewing Requests, Request Log Files, and Report Output Files . . . . . . . . . . . . . . . . . . . . . . . . . . . . . . . . . . . . . . . . . . . . . Changing the Status of Concurrent Requests . . . . . . . . . . . . . . . . . Managing Concurrent Processing Files and Tables . . . . . . . . . . . . Purge Concurrent Request and/or Manager Data Program . . . . Concurrent Processing User Profile Settings . . . . . . . . . . . . . . . . . Defining Managers and their Work Shifts . . . . . . . . . . . . . . . . . . . Completed Concurrent Requests Report . . . . . . . . . . . . . . . . . . . . Work Shift by Manager Report . . . . . . . . . . . . . . . . . . . . . . . . . . . . . Work Shifts Report . . . . . . . . . . . . . . . . . . . . . . . . . . . . . . . . . . . . . . . Specializing Managers to Run Only Certain Programs . . . . . . . . Grouping Programs by Request Type . . . . . . . . . . . . . . . . . . . . . . . Controlling Concurrent Managers . . . . . . . . . . . . . . . . . . . . . . . . . . Overview of Parallel Concurrent Processing . . . . . . . . . . . . . . . . . Managing Parallel Concurrent Processing . . . . . . . . . . . . . . . . . . . Concurrent Managers and Real Application Clusters (RAC) . . . Administer Concurrent Managers Window . . . . . . . . . . . . . . . . . . Concurrent Managers Window . . . . . . . . . . . . . . . . . . . . . . . . . . . . Work Shifts Window . . . . . . . . . . . . . . . . . . . . . . . . . . . . . . . . . . . . . Combined Specialization Rules Window . . . . . . . . . . . . . . . . . . . . Concurrent Request Types Window . . . . . . . . . . . . . . . . . . . . . . . . Viewer Options Window . . . . . . . . . . . . . . . . . . . . . . . . . . . . . . . . . . Nodes Window . . . . . . . . . . . . . . . . . . . . . . . . . . . . . . . . . . . . . . . . . . 5–9 5 – 16 5 – 18 5 – 20 5 – 24 5 – 26 5 – 34 5 – 35 5 – 36 5 – 37 5 – 53 5 – 55 5 – 64 5 – 68 5 – 76 5 – 80 5 – 89 5 – 98 5 – 100 5 – 103 5 – 105 5 – 107 Oracle Applications Manager . . . . . . . . . . . . . . . . . . . . . . . . . . . . . Oracle Applications Management Tools . . . . . . . . . . . . . . . . . . . . . Oracle Management Pack for Oracle Applications . . . . . . . . . . . . Overview of Oracle Applications Manager . . . . . . . . . . . . . . . . . . Oracle Applications Manager . . . . . . . . . . . . . . . . . . . . . . . . . . . . . . Configuration for an Oracle Applications System . . . . . . . . . . . . Services . . . . . . . . . . . . . . . . . . . . . . . . . . . . . . . . . . . . . . . . . . . . . . . . . Work Shifts . . . . . . . . . . . . . . . . . . . . . . . . . . . . . . . . . . . . . . . . . . . . . Oracle Workflow Manager . . . . . . . . . . . . . . . . . . . . . . . . . . . . . . . . Background Engines . . . . . . . . . . . . . . . . . . . . . . . . . . . . . . . . . . . . . Notification Mailer . . . . . . . . . . . . . . . . . . . . . . . . . . . . . . . . . . . . . . . Agent Listeners . . . . . . . . . . . . . . . . . . . . . . . . . . . . . . . . . . . . . . . . . . Queue Propagation . . . . . . . . . . . . . . . . . . . . . . . . . . . . . . . . . . . . . . 6–1 6–2 6–3 6–5 6–7 6–8 6 – 21 6 – 35 6 – 37 6 – 40 6 – 44 6 – 56 6 – 58 5–8 Contents v Purging Workflow Data . . . . . . . . . . . . . . . . . . . . . . . . . . . . . . . . . . . Active Work Items . . . . . . . . . . . . . . . . . . . . . . . . . . . . . . . . . . . . . . . Deferred Work Items . . . . . . . . . . . . . . . . . . . . . . . . . . . . . . . . . . . . . Suspended Work Items . . . . . . . . . . . . . . . . . . . . . . . . . . . . . . . . . . . Errored Work Items . . . . . . . . . . . . . . . . . . . . . . . . . . . . . . . . . . . . . . 6 – 61 6 – 67 6 – 70 6 – 73 6 – 76 Index VOLUME 2 Chapter 7 Printers . . . . . . . . . . . . . . . . . . . . . . . . . . . . . . . . . . . . . . . . . . . . . . . . . Printers and Printing . . . . . . . . . . . . . . . . . . . . . . . . . . . . . . . . . . . . . Setting Up Your Printers . . . . . . . . . . . . . . . . . . . . . . . . . . . . . . . . . . Printer Setup with Pasta . . . . . . . . . . . . . . . . . . . . . . . . . . . . . . . . . . Customizing Printing Support in Oracle Applications . . . . . . . . . Hierarchy of Printer and Print Style Assignments . . . . . . . . . . . . Postscript Printing in UNIX . . . . . . . . . . . . . . . . . . . . . . . . . . . . . . . Printer Types Window . . . . . . . . . . . . . . . . . . . . . . . . . . . . . . . . . . . . Printers Window . . . . . . . . . . . . . . . . . . . . . . . . . . . . . . . . . . . . . . . . . Print Styles Window . . . . . . . . . . . . . . . . . . . . . . . . . . . . . . . . . . . . . . Printer Drivers Window . . . . . . . . . . . . . . . . . . . . . . . . . . . . . . . . . . Chapter 8 Oracle Applications Help . . . . . . . . . . . . . . . . . . . . . . . . . . . . . . . . 8 – 1 Customizing Oracle Applications Help . . . . . . . . . . . . . . . . . . . . . 8 – 2 Chapter 9 Applications DBA Duties . . . . . . . . . . . . . . . . . . . . . . . . . . . . . . . . Overview of Applications DBA Duties . . . . . . . . . . . . . . . . . . . . . . Resource Consumer Groups in Oracle Applications . . . . . . . . . . Oracle Applications Schema Password Change Utility (FNDCPASS) . . . . . . . . . . . . . . . . . . . . . . . . . . . . . . . . . . . . . . . . . . . . ORACLE Users Window . . . . . . . . . . . . . . . . . . . . . . . . . . . . . . . . . . Concurrent Conflicts Domains Window . . . . . . . . . . . . . . . . . . . . . Applications Window . . . . . . . . . . . . . . . . . . . . . . . . . . . . . . . . . . . . Network Test Window . . . . . . . . . . . . . . . . . . . . . . . . . . . . . . . . . . . . Administering Folders . . . . . . . . . . . . . . . . . . . . . . . . . . . . . . . . . . . . Languages Window . . . . . . . . . . . . . . . . . . . . . . . . . . . . . . . . . . . . . . Territories Window . . . . . . . . . . . . . . . . . . . . . . . . . . . . . . . . . . . . . . . vi Oracle Applications System Administrator’s Guide 7–1 7–2 7 – 11 7 – 13 7 – 24 7 – 31 7 – 37 7 – 39 7 – 41 7 – 43 7 – 46 9–1 9–2 9–7 9–9 9 – 13 9 – 17 9 – 19 9 – 22 9 – 24 9 – 28 9 – 30 Chapter 10 Cost–Based Optimization in Oracle Applications . . . . . . . . . . . Oracle Applications and Cost–Based Optimization . . . . . . . . . . . Parameters for Cost–Based Optimization . . . . . . . . . . . . . . . . . . . . Concurrent Programs for CBO . . . . . . . . . . . . . . . . . . . . . . . . . . . . . Gather Table Statistics . . . . . . . . . . . . . . . . . . . . . . . . . . . . . . . . . . . . Backup Table Statistics . . . . . . . . . . . . . . . . . . . . . . . . . . . . . . . . . . . . Restore Table Statistics . . . . . . . . . . . . . . . . . . . . . . . . . . . . . . . . . . . . Gather Schema Statistics . . . . . . . . . . . . . . . . . . . . . . . . . . . . . . . . . . Gather Column Statistics . . . . . . . . . . . . . . . . . . . . . . . . . . . . . . . . . . Gather All Column Statistics . . . . . . . . . . . . . . . . . . . . . . . . . . . . . . FND_STATS Package . . . . . . . . . . . . . . . . . . . . . . . . . . . . . . . . . . . . . FND_CTL Package . . . . . . . . . . . . . . . . . . . . . . . . . . . . . . . . . . . . . . . 10 – 1 10 – 2 10 – 3 10 – 9 10 – 10 10 – 12 10 – 13 10 – 14 10 – 15 10 – 16 10 – 17 10 – 32 Chapter 11 User Profiles . . . . . . . . . . . . . . . . . . . . . . . . . . . . . . . . . . . . . . . . . . . . Overview of Setting User Profiles . . . . . . . . . . . . . . . . . . . . . . . . . . User Profile Option Values Report . . . . . . . . . . . . . . . . . . . . . . . . . . System Profile Values Window . . . . . . . . . . . . . . . . . . . . . . . . . . . . . 11 – 1 11 – 2 11 – 5 11 – 6 Chapter 12 Administering Process Navigation . . . . . . . . . . . . . . . . . . . . . . . . Overview of Process Navigation . . . . . . . . . . . . . . . . . . . . . . . . . . . Modifying Your Menu . . . . . . . . . . . . . . . . . . . . . . . . . . . . . . . . . . . . Creating Process Navigator Processes . . . . . . . . . . . . . . . . . . . . . . . 12 – 1 12 – 2 12 – 3 12 – 4 Chapter 13 Document Sequences . . . . . . . . . . . . . . . . . . . . . . . . . . . . . . . . . . . . Document Sequences Window . . . . . . . . . . . . . . . . . . . . . . . . . . . . . Document Categories Window . . . . . . . . . . . . . . . . . . . . . . . . . . . . Sequence Assignments Window . . . . . . . . . . . . . . . . . . . . . . . . . . . 13 – 1 13 – 9 13 – 12 13 – 14 Chapter 14 Developer Tools . . . . . . . . . . . . . . . . . . . . . . . . . . . . . . . . . . . . . . . . . Developer Tools . . . . . . . . . . . . . . . . . . . . . . . . . . . . . . . . . . . . . . . . . Work Directory . . . . . . . . . . . . . . . . . . . . . . . . . . . . . . . . . . . . . . . . . . Web Enabled PL/SQL Window . . . . . . . . . . . . . . . . . . . . . . . . . . . . 14 – 1 14 – 2 14 – 3 14 – 5 Appendix A Profile Options in Oracle Application Object Library . . . . . . . A – 1 Appendix B Using Predefined Alerts . . . . . . . . . . . . . . . . . . . . . . . . . . . . . . . . . . Overview of Oracle Alert . . . . . . . . . . . . . . . . . . . . . . . . . . . . . . . . . Predefined Alerts . . . . . . . . . . . . . . . . . . . . . . . . . . . . . . . . . . . . . . . . Oracle Alert Precoded Alerts . . . . . . . . . . . . . . . . . . . . . . . . . . . . . . B–1 B–2 B–5 B – 10 Contents vii Appendix C Loaders . . . . . . . . . . . . . . . . . . . . . . . . . . . . . . . . . . . . . . . . . . . . . . . . . Generic Loader . . . . . . . . . . . . . . . . . . . . . . . . . . . . . . . . . . . . . . . . . . Application Object Library Configuration Files . . . . . . . . . . . . . . Concurrent Program Configuration File . . . . . . . . . . . . . . . . . . . . . Request Groups Configuration File . . . . . . . . . . . . . . . . . . . . . . . . . Lookups Configuration File . . . . . . . . . . . . . . . . . . . . . . . . . . . . . . . Profile Options and Profile Values Configuration File . . . . . . . . . Flexfields Setup Data Configuration File . . . . . . . . . . . . . . . . . . . . Attachments Setup Data Configuration File . . . . . . . . . . . . . . . . . Messages Configuration File . . . . . . . . . . . . . . . . . . . . . . . . . . . . . . . Security Information Configuration File . . . . . . . . . . . . . . . . . . . . . Message Dictionary Generator . . . . . . . . . . . . . . . . . . . . . . . . . . . . . Generic File Manager Access Utility (FNDGFU) . . . . . . . . . . . . . . Purge Obsolete Generic File Manager Data . . . . . . . . . . . . . . . . . . Appendix D Multilingual External Documents . . . . . . . . . . . . . . . . . . . . . . . . . D – 1 Multilingual External Documents . . . . . . . . . . . . . . . . . . . . . . . . . . D – 2 Appendix E Character Mode to GUI Appendix . . . . . . . . . . . . . . . . . . . . . . . . . E – 1 Oracle Applications Character Mode Forms and Corresponding GUI Windows . . . . . . . . . . . . . . . . . . . . . . . . . . . . . E – 2 Appendix F Implementation Appendix . . . . . . . . . . . . . . . . . . . . . . . . . . . . . . . F – 1 Setting Up Oracle Applications System Administrator . . . . . . . . F – 2 Appendix G Setting Up and Maintaining Oracle Applications . . . . . . . . . . . Setting Up and Maintaining Your Oracle Applications Configuration . . . . . . . . . . . . . . . . . . . . . . . . . . . . . . . . . . . . . . . . . . . Administering Oracle HTTP Server Powered by Apache . . . . . . Administering the TCF SocketServer . . . . . . . . . . . . . . . . . . . . . . . AdminAppServer Utility . . . . . . . . . . . . . . . . . . . . . . . . . . . . . . . . . . Support for Encrypted Thin JDBC Connections . . . . . . . . . . . . . . Administering Server Security . . . . . . . . . . . . . . . . . . . . . . . . . . . . . Restricting Access to Responsibilities Based on User’s Web Server . . . . . . . . . . . . . . . . . . . . . . . . . . . . . . . . . . . . . . . Application Object Library AOL/J Setup Test Suite . . . . . . . . . . . Configuring the Self–Service Framework . . . . . . . . . . . . . . . . . . . . viii Oracle Applications System Administrator’s Guide C–1 C–2 C – 12 C – 13 C – 15 C – 16 C – 18 C – 20 C – 24 C – 27 C – 28 C – 30 C – 32 C – 36 G–1 G–2 G – 14 G – 41 G – 44 G – 50 G – 51 G – 55 G – 57 G – 59 Concurrent Managers . . . . . . . . . . . . . . . . . . . . . . . . . . . . . . . . . . . . G – 66 Migrating an Oracle Applications Single Instance to Real Application Clusters (RAC) . . . . . . . . . . . . . . . . . . . . . . . . . . . G – 85 Behavior of Date Formats in NLS Implementations . . . . . . . . . . . G – 92 Appendix H Technology Stack Enabled Features . . . . . . . . . . . . . . . . . . . . . . . Oracle9i Application Server (9iAS) and Oracle Applications . . . Oracle Applications with Oracle9iAS Portal . . . . . . . . . . . . . . . . . Implementing Single Sign–On for Oracle Applications 11i with Login Server Authentication Using Oracle Internet Directory . . . . . . . . . . . . . . . . . . . . . . . . . . . . . . . . . . Discoverer 4i with Oracle Applications 11i . . . . . . . . . . . . . . . . . . Oracle9i Applications Server (9iAS) with Oracle E–Business Suite Related Documentation . . . . . . . . . . . . . . . . . . . . . . . . . . . . . . H–1 H–2 H–3 H–4 H – 21 H – 50 Glossary Index Contents ix x Oracle Applications System Administrator’s Guide CHAPTER 7 Printers T his chapter tells you everything you need to know about using printers with Oracle Applications. The essays in this chapter are organized under the following topics: • Overview of Printers and Printing • Setting Up Your Printers • Customizing Printing Support in Oracle Applications • Postscript Printing in UNIX • Hierarchy of Printer and Print Style Assignments • Upgrading Printer Files Form descriptions follow at the end of the chapter. Printers 7–1 Printers and Printing Oracle Applications offers two printing solutions to handle all your printing requirements. For most printing needs, the Pasta Utility offers quick setup and easy maintenance. For additional flexibility, Oracle Applications allows you to define your own printer drivers and print styles. • To set up your printers using Pasta, see Printer Setup with Pasta: page 7 – 13. Note: Pasta is required to print using UTF8. • To set up your printers using a custom solution, see Customizing Printing Support in Oracle Applications: page 7 – 24. Note: For updates on printing in Oracle Applications, please refer to OracleMetaLink. Overview When you run an Oracle Applications report, Oracle Reports generates and formats the output. A completed report is sent to the operating system by the concurrent manager, which issues an operating system print command, or calls a custom print program or subroutine that issues an operating system print command. Oracle Reports and Report Generation Oracle Reports includes page break, carriage return, line feed, text bold on/off, and text underline on/off instructions within the output file. The values are retrieved from a SQL*ReportWriter (SRW) driver file. When the report is generated for online viewing, Oracle Reports uses the SRW driver named by the print style in the Print Styles form. When the report is to be printed, Oracle Reports uses the SRW driver named by the Oracle Applications printer driver in the Printer Drivers form. The dimensions of a report are determined by the columns and rows values in the print style, defined using the Print Styles form. These values override the width and height values in an SRW driver file. Concurrent Manager Issues or Calls a Print Command When a report program finishes running, the concurrent manager prepends an initialization string, and appends a printer reset string to 7–2 Oracle Applications System Administrator’s Guide the output file. Both strings are defined using the Printer Drivers form. An Oracle Applications printer driver is invoked by issuing a print command or by calling a print program or subroutine. When the printer driver method is Command, the concurrent manager can issue an operating system print command and arguments, entered in the Arguments field of the Printer Drivers form. When the printer driver method is Program, the concurrent manager can call a custom print program, named (along with its path) in the Name field of the Printer Drivers form. Arguments to the program may be entered in the form’s Arguments field. When the printer driver method is Subroutine, the concurrent manager calls a predefined Oracle Applications subroutine that passes a print command and arguments to the printer via the operating system. The subroutine name is entered in the Program Name field of the Printer Drivers form. The concurrent manager may provide values for four arguments to an operating system print command or custom print program: • the name of the file to be printed • the operating system name of the target printer • the title of the file, which appears on a header page if it is printed • the number of copies to be printed Printer Types, Print Styles, and Printer Drivers The commands that a printer can understand vary from one type of printer to another. A printer type identifies a printer by manufacturer and model. A print style tells the printer how a printed output should look. A printer driver delivers commands that tell the printer how to output the specified print style. Printers 7–3 The ability to print a report in a particular print style depends on the type of printer the report file is sent to. For each print style that a particular type of printer can print, a printer driver specific to the printer type and the operating system is required. Figure 7 – 1 PRINTER TYPE Manufacturer Model PRINT STYLE Output format PRINTER DRIVER Commands specific to printer type and operating platform, to achieve print style. Printer Types The printer type is the printer manufacturer and model. Two examples are a DEC LN03 printer and an HP Laserjet III printer. Print Styles A Print style defines the page format for a printer, such as the number of lines per page, the width of each line, and whether a header page should be printed. Each printer type can have one or more associated print styles. Print styles allow you to set up report dimensions on a variety of printers. You can tailor your page setups while providing consistent–looking reports from printer to printer. For example, users may wish to print a menu report with a wider left margin to allow for hole punching the paper. As System Administrator, you register this new style, which users can then access if the printer type supports it. At report submission time, users select the style in which to output the report. 7–4 Oracle Applications System Administrator’s Guide • Only styles available on the destination printer are displayed. • Some concurrent programs predefine either the printer or the print style, and these values cannot be changed. Printer Drivers To print in a particular style from a particular printer type, you define a printer driver. A printer driver is the mechanism that delivers a report’s output along with its commands to the target printer. Concurrent managers determine what drivers to use depending on what the print style is and what printer type the report is to be sent to. You need to define a printer driver for each print style that you want to use with a specific printer type on a specific platform. Sequence of Printing Events The concurrent manager associates a print style and a printer driver with the destination printer’s printer type. This combination of print style and printer driver is defined in the Printer Types form. A printer driver tells the destination printer how to interpret the format. An SRW Driver formats text and sets page breaks within an Oracle Reports file. Sequence of Printing Events – Example The following is an example of the sequence of printing events. 1. A user submits a request to run a report from the Run Reports form. 2. A request to run the report is added to the requests table. 3. A concurrent manager reads the request. 4. The concurrent manager calls Oracle Reports to run the report, and passes the SRW Driver name. If Report Copies = 0 and the Printer field is blank, the Print Style’s SRW Driver is used. If Report Copies > 0 and Printer is required, then the Printer Driver’s SRW Driver is used. The concurrent manager passes Print Style information (Columns and Rows) to Oracle Reports (overrides SRW Driver width and height if the report is to be printed). 5. A report is created using Oracle Reports. The concurrent manager attaches Printer Driver information to the file. It prepends the initialization string and appends the reset string. Printers 7–5 The concurrent manager also passes suppress header option information from the Printe Styles form. 6. The concurrent manager issues an operating system print command with the arguments Destination Printer, Filename (including path), Number of Copies to print, and Filename for the Title on the banner page. Figure 7 – 2 Sequence of Printing Events – Simplified Summary REQUEST TABLE Run Report ... Run Report ... CONCURRENT MANAGER Run Report X Run Report ... Run Reports form Request to run report. Concurrent Manager passes Print Style information (Columns & Rows) to Oracle Reports (overrides SRW Driver width & height). Concurrent Manager reads request. Concurrent Manager calls Oracle Reports to run report, and passes SRW Driver name. Report Copies = 0 and Printer field blank, default to Print Style’s SRW Driver. Report Copies > 0, Printer required, use Printer Driver’s SRW Driver. Report Completed. ORACLE REPORTS 7–6 Concurrent Manager attaches Printer Driver information to file. Prepends Initialization String. Appends Reset String. Concurrent Manager issues operating system print command with arguments. Concurrent Manager passes Print Style – Suppress Header Page Yes/No. – Destination Printer – Filename (including path) – Number of Copies to print – Filename for Title on banner page Oracle Applications System Administrator’s Guide Figure 7 – 3 Summary of Oracle Applications Printing Oracle Reports refers to SRW driver when generating report output file Print Styles SRW driver used when not printing report Printer Drivers SRW driver used when printing report Concurrent Manager adds Initialization & Reset strings to output file ÉÉÉÉ ÉÉÉÉ ÉÉÉÉ Initialization string Reset string Driver method Command – enter print command & arguments in Arguments field Concurrent Manager issues print command or calls print program Driver method Program – enter name of program & path in Name field, and arguments in Arguments field Operating System Assign Printer Drivers For each printer type, you assign a printer driver to print a specific style Printer Type _ LaserwriterA _ LaserwriterA _ LaserwriterB _ Print Style _ Printer Driver Portrait _ LW_A_Portrait Landscape _ LW_A_Landscape Portrait _ LW_B_Portrait Fast–Track Printing with Pasta: 7 – 13 Printers 7–7 Setting Character–Mode vs. Bitmap Printing Running Character mode Oracle Reports Concurrent Programs After you create an Oracle Reports program, you create a corresponding concurrent program executable with the Oracle Reports execution method. You then define a concurrent program for that executable, registering any parameters and incompatible programs. You also enter the minimum column and row length, orientation, and print style. Figure 7 – 4 Running Character Mode Oracle Reports Programs Oracle Reports application System Administration application Oracle Reports program Define Executable Define Concurrent Program Define report program Enter name of execution file Register parameters and incompatible programs Set execution method to Oracle Reports Enter values for minimum and maximum columns and rows Request to Run Program Define report orientation Define Print Style Define units of measure and page size Enter number of columns and rows, and orientation Running Bitmap Oracle Reports Concurrent Programs Bitmap Oracle Reports programs are defined similarly in Oracle Reports and in the Concurrent Program Executable form. 7–8 Oracle Applications System Administrator’s Guide To run an Oracle Reports program in bitmap mode, query the concurrent program’s definition in the Concurrent Programs form, and choose PostScript in the Format field. Bitmap Oracle Reports programs take their page dimensions and orientation from the program’s definition (note: when printing a bitmap report, a print style is still required). If you wish to override the program’s definitions, you can enter values in the Execution Options field for ORIENTATION and PAGESIZE. When entering more than one execution option, each option should be separated by a single space. There should be no spaces before or after the options. For example: ORIENTATION=LANDSCAPE PAGESIZE=7.5x9 Figure 7 – 5 Running Bitmap Oracle Reports Programs Oracle Reports application System Administration application Oracle Reports program Define Executable Define Concurrent Program Define report program Enter name of execution file Register parameters and incompatible programs Execution Method = Oracle Reports Output Options Format field = PS Execution Options Define report orientation ORIENTATION=LANDSCAPE Define units of measure and page size PAGESIZE=7.5x9 overrides report definition overrides report definition Printers 7–9 Notes about PAGESIZE in the Execution Options field In Oracle Reports, when defining a report the units and size of the report are specified in the menu under Report–>Global Properties–>Unit of Measurement. For bitmapped reports, <width>x<height> for PAGESIZE is usually in inches; however, this depends on the particular report definition. You can enter the PAGESIZE parameter in the Execution Options field of the Concurrent Programs form (for bitmapped reports only) when you want to override the values specified in the report definition. For example: PAGESIZE=7.5x9 If the dimensions specified with the PAGESIZE parameter are smaller than what the report was designed for, you will generate a “REP–1212” error. 7 – 10 Oracle Applications System Administrator’s Guide Setting Up Your Printers Oracle Applications provides you with predefined printer types, print styles, and printer drivers. Use the Printer Types form to query the combinations of print style and printer driver that support each type of printer you have. Customize the predefined components as necessary. See: Customizing Printing Support in Oracle Applications: page 7 – 24. ☞ Attention: Predefined printing components may have to be modified for different printer types and/or operating platforms. Forms for Defining Printer Support You use four forms to define printer support. Printer Types You must define any printer types used at your site that are not shipped with Oracle Applications. It is on this form that you associate the print style with a printer driver for the particular printer type. Printers You register a printer so that Oracle Applications recognizes the printer and can forward to it the output from a report program. To register a printer you specify the printer’s operating system name, which uniquely identifies the printer, and select the printer type. The printer type must already be defined. For example, if you want users of Oracle Applications to be able to print to a newly purchased printer, you: • Register the operating system name of the new printer (for example, printer39), and select the printer type (for example, LN03). • If the correct printer type is not defined, you must define the new printer type before you can register the printer. Print Styles To generate a report, the print style values for columns and rows are passed by the concurrent manager to Oracle Reports. A print style determines the dimensions of your report, or the number of rows and columns per page. Printer Drivers A printer driver includes the initialization and reset strings that format and restart a printer. You need a defined printer driver for each print style that you plan to use with a specific printer type on a specific platform. Printers 7 – 11 Printing Setup Interrelationships • Many printers can be registered as the same printer type. • A printer type can support multiple print styles. • A printer driver must be assigned to a printer type for each print style. • Many printer drivers can support the same print style. • Many printer drivers can support the same printer type. See: Overview of Printers and Printing: page 7 – 2 Printer Setup Information Is Cached On Demand Printer setup information such as Printer Type definitions, Print Style definitions, and Printer Driver definitions, are read into memory (cached) the first time the information is required to print a program’s output. The cache area that holds printer setup information is private to the concurrent managers. Printer setup information remains cached in memory until the concurrent managers are restarted, when the values are erased and new values are cached. ☞ Attention: You should issue a Restart concurrent manager command for all currently active managers whenever you edit an existing Printer Type, Print Style, or Printer Driver (unless the type, style or driver has not been referred to or cached yet). See: Controlling Concurrent Managers: page 5 – 55 7 – 12 Oracle Applications System Administrator’s Guide Printer Setup with Pasta Overview Pasta is an Oracle Applications utility that converts text report files to Postscript and also enables the printing of custom Postscript reports from Oracle Applications. The reports can then be directed to any Postscript printer. Setting up your system to use Pasta is much simpler than the standard Oracle Applications printer setup procedure. The Printer Type, Printer Driver, and SRW driver files are provided. The only setup required to begin printing is the registration of the printer with Oracle E–Business Suite. Many printing options can be defined using the Pasta configuration file (pasta.cfg). You no longer need to maintain multiple drivers and styles for each printer. Pasta is provided as an executable named FNDPSTAX. For updates and more details, see OracleMetaLink. Setup for Basic Printing with Pasta The following setup can be used to enable any Postscript printer to print text or Postscript reports in the following styles: Landscape, Landwide, Portrait, or Dynamic. Use the Printers window to register your printer: 1. Enter your printer’s name as defined in the operating system and applications. 2. Select ”––Pasta Universal Printer” from the list of values for the printer Type. You are now ready to print text and Postscript reports from your Postscript printer using the default Pasta configuration. For more information on the Printers window, see Printers Window: page 7 – 41. For more information on setting options in the Pasta configuration file, see: Configuration File Options: page 7 – 19. Printers 7 – 13 Defining Configuration Files for Specific Printers The pasta.cfg file controls many printing options. You can use the default file for many printers for multiple languages. However, if you have printers that require special setup, you can customize these options by creating a configuration file for each printer. Copy the pasta.cfg file to pasta_<printer name>.cfg. Make the necessary changes to the file. Pasta automatically looks for a printer–specific file name. If it does not find one, Pasta then uses the default file, pasta.cfg. For example, suppose you have a printer named ”hqprinter” for which you want to set the page height and width to letter size: 1. Copy $FND_TOP/resource/pasta.cfg to $FND_TOP/resource/pasta_hqprinter.cfg where hqprinter is the name of the printer as defined on the operating system. 2. In the pasta_hqprinter.cfg file, edit the paper size options: Set pagewidth=8.5 Set pageheight=11 Pasta will now use the options as defined in the pasta_hqprinter.cfg file when printing to the hqprinter. For more information on setting options in the Pasta configuration file, see: Configuration File Options: page 7 – 19. Using a Different Configuration File as the Default You can change the file that is defined as the default configuration file for Pasta by using the –F command line parameter. For example, suppose you create a PCL print–specific configuration file named pcl.cfg. Set the FNDPSTAX command line option as follows: –Fpcl.cfg Pasta will look for pcl_<printer>.cfg first, and if it is not found, Pasta will use pcl.cfg as the default. These files must be placed under the $FND_TOP/resource directory. The –F command line parameter can be set in the Arguments field of the Printer Drivers window. See Printer Drivers Window: page 7 – 46. Setup for Basic Printing with Pasta: page 7 – 13 7 – 14 Oracle Applications System Administrator’s Guide Modify an Existing Printer Type to Use Pasta If your printer is already assigned to a printer type that contains styles and drivers that you want to maintain, you can add Pasta to the existing printer type. To add Pasta to an existing printer type, you must associate one of the Pasta printer drivers with a print style on the Printer Types window. The seeded Pasta printer drivers are: • PASTA_LANDSCAPE • PASTA_PORTRAIT • PASTA_LANDWIDE • PASTA_DYNAMIC You can associate a Pasta driver with an existing print style, or you can create a new print style. To create a new print style, use the Print Styles window. For more information on defining a print style, see Print Styles Window: page 7 – 43. 1. Query your existing printer type in the Printer Types window. 2. In the Style field, select the style to which you want to assign a Pasta driver. Or, if you are assigning Pasta to a style already defined for the printer type, delete the driver in the Driver Name field currently associated with the style. 3. In the Driver Name field, select the appropriate Pasta driver. For more information on the Printer Types window, see Printer Types Window: page 7 – 39. Add a New Printer Type to Use Pasta If you want to add a new Printer Type, you can also add Pasta to your new printer type. 1. Navigate to the Printer Types window. 2. Enter the Type of printer. 3. In the Style field use the list of values to select the style to which you want to assign a Pasta driver. 4. In the Driver Name field, select the appropriate Pasta driver from the list of values: Printers 7 – 15 • PASTA_LANDSCAPE • PASTA_PORTRAIT • PASTA_LANDWIDE • PASTA_DYNAMIC For more information on the Printer Types window, see Printer Types Window: page 7 – 39. Setup for Basic Printing with Pasta: page 7 – 13 Setting Margins The margins on your printed output are determined by the margin settings in the pasta.cfg file and the printable area defined by your printer. In order to set your margins properly you must know the printable area for your specific printer and adjust the margin parameter settings in the pasta.cfg file accordingly. The margin parameters are leftMargin, rightMargin, topMargin, and bottomMargin. For example, suppose you want to set the left margin to one inch. If the printable area for your printer begins at .25 inches from the left, then you must set the leftMargin option to .75 in the pasta.cfg file. For more information on setting options in the Pasta configuration file, see: Configuration File Options: page 7 – 19. Refer to your printer’s documentation for information on its printable area. Setup for Basic Printing with Pasta: page 7 – 13 Printing a Report Generated Using the noprint Option When you use the ”noprint” printer option to generate a report, you can still have the option of printing it later using Pasta. Before running the report, associate the noprint printer with the ”––Pasta Universal Printer Type” in the Printers form. Note: You must restart the concurrent manager for this to take effect. See Printer Setup Information is Cached on Demand: page 7 – 12. Setup for Basic Printing with Pasta: page 7 – 13 7 – 16 Oracle Applications System Administrator’s Guide Generating Other Formats Using the Preprocessing Option Pasta can use a preprocessing option to invoke any executable that supports an input file and an output file (filter program). Pasta will invoke the filter program to preprocess the Pasta output before passing it to the printing command. By using the preprocessing option, you can generate output formats other than the formats that Pasta currently supports. For example, by invoking products such as Adobe Acrobat Distiller Server or Ghostscript, you can generate PDF output or PCL output. ☞ Attention: Ensure that the executable for the preprocess program is placed in your path. The preprocessing command is a configuration file (pasta.cfg) option. This option uses {infile} and {outfile}. • {infile} is the file generated by Pasta to be used as input to the preprocessing command. It is a temporary file and will be deleted after it is passed to the preprocessing command. • {outfile} is the output file generated by the preprocessing command. Pasta names it temporarily and it will be deleted after it is passed to the printing command. If you want to keep the {outfile}, you can name it by using the ”outFile” pasta configuration file option (see Configuration File Options: page 7 – 19), or the ”–o” command line option (see Command Line Parameters: page 7 – 22). Pasta will copy {outfile} to the file you specify. Example for Generating PCL Output In this example, ”gs” is Ghostscript and ”pxlmono” is a device used with HP black and white PCL XL printers (Laserjet 5 and 6 family). In the pasta.cfg file, enter the following for the preprocess option: preprocess=gs –q –dNOPAUSE –dBATCH –sDEVICE=pxlmono –sOutputFile={outfile} {infile} To get a list of output devices available in Ghostscript go to http://www.gnu.org/software/ghostscript/devices.html Example for Generating PDF Output In this example, ”ps2pdf” is a shell script bundled with Ghostscript. The ps2pdf script can convert a Postscript file to a PDF file. In most cases you cannot send a PDF file to the printer command because the printer command cannot understand PDF. Set the noPrint Printers 7 – 17 option to ”y” or use the ”–np” (no print) command line option if you do not want Pasta to send the PDF file to the printer. Use the outFile option to define the destination on the middle tier for the output file. You can use {inputfile} in the outFile option. Pasta will replace it with the actual input file name (without the path) specified by the ”–f” (input file) command line option. 1. Using the basic Pasta setup procedure, define a printer in the Printers window called ”PDFfile”. Assign the ”––Pasta Universal Printer” type to the printer. For more information about defining a printer, see: Setup for Basic Printing with Pasta: page 7 – 13. 2. Create a configuration file for the PDFfile printer called ”pasta_PDFfile.cfg”. For more information about defining a configuration file, see: Defining Configuration Files for Specific Printers: page 7 – 14. 3. In the pasta_PDFfile.cfg file, enter the following for the preprocess option: preprocess=ps2pdf {infile} {outfile} noPrint=y outFile=<APPLTMP>/{inputfile}.pdf Font Source If your printer does not have the necessary fonts installed, Pasta embeds the required glyphs as a small font in your report from the font files. If you do not want to use the fonts provided by Oracle you can specify the font you want by using the font name option in the pasta.cfg file. You can use any TrueType fonts on your middle tier; or, if your printer has a font installed suitable for the language of your report, you can utilize the printer font. The form of the pasta.cfg option is: Font.Default.<Style>=<TrueType font file name> or Font.Default.<Style>=printer:<Printer font file name> Example using TrueType font file: 7 – 18 Oracle Applications System Administrator’s Guide Font.Default.Plain=<FND_TOP>/<APPLRSC>/ADUO.ttf Font.Default.Bold=<FND_TOP>/<APPLRSC>/ADUOB.ttf Example using Printer Font: Font.Default.Plain=printer:Courier Font.Default.Bold=printer:Courier–Bold Setup for Basic Printing with Pasta: page 7 – 13 Language–Specific Font Support The default pasta.cfg file contains font settings for languages. You override the default setting in the language–specific section of the pasta.cfg file. For example, if you want to override the default setting of Courier font for French language reports to use Helvetica instead, add the following to the end of the pasta.cfg file: [FRENCH] Font.Default.Plain = printer:Helvetica Font.Default.Bold = printer:Helvetica–Bold Setup for Basic Printing with Pasta: page 7 – 13 Configuration File Options The configuration file pasta.cfg governs many printing options. The file is a normal ASCII text file that has a simple format described below. The options are listed in the following two tables. They are divided into Generic Options and Arabic, Hebrew, and Thai options. For each option are listed the Key Name, the Default Value (if applicable), the Description, and the Equivalent Command Line Option (if applicable). Note: For options that also have command line equivalents, Oracle recommends that you set the value in the configuration file. Printers 7 – 19 Generic Options Key Name Default Value Description Command Line Equivalent outputFormat ps Two output formats are supported: Postscript (”ps”) and text (”text”). When the output format is text, you can specify the output character set by the Oracle character set name (for example, text.WE8ISO8859P1). If you use ”auto” as the output character set (text.auto), Pasta uses the appropriate character set according to the NLS_LANGUAGE value in the FND_LANGUAGES table. –x textAutoCharset The default value is taken from the FND_LANGUAG ES table. When the outputFormat is set to ”text.auto”, Pasta uses a default character set for each language based on the language and character set mappings in the FND_LANGUAGES table. To override the default setting for a language, use the textAutoCharset option in the Language–Specific section of the pasta.cfg file. For example, to override the default character set for Japanese to use JA16EUC instead, enter the following: [Japanese] textAutoCharset=JA16SJIS N/A preprocess N/A Use this option to convert the output file. Enter a preprocessing command to invoke any executable that supports an input file and an output file (filter program). Pasta will invoke the filter program before passing the file to the printing command. N/A printCommand N/A Specific print command for Unix platform. N/A ntPrintCommand N/A Specific print command for Windows platform. N/A outFile N/A If you want to save the output file, use this option to define the ouput file name and its destination on the middle tier. –o noPrint N/A Set this option to ”y” if you do not want Pasta to produce printed output. –np duplex default Specifies duplex printing. Options are ”y”, ”n”, or ”default” (uses the printer–side setting). N/A embednumcopies y Set this option to ”y” to embed the number of copies to be printed in a Postscript file. Using this option will eliminate the header page normally printed between reports. N/A Table 7 – 1 Pasta Configuration File Generic Options (Page 1 of 2) 7 – 20 Oracle Applications System Administrator’s Guide Key Name Default Value Description Command Line Equivalent copysort y If you set embednumcopies to ”y”, you can choose to have the copies collated, by setting this option to ”y”. N/A heightScaleRate 1.0 Adjusts the space between lines. –h widthScaleRate 1.0 Adjusts the space between characters. –w pagewidth 8.27 Adjusts the page width. –pw pageheight 11.64 Adjusts the page height. –ph topMargin .25 Adjusts the top margin. N/A bottomMargin .25 Adjusts the bottom margin. N/A rightMargin .25 Adjusts the right margin. N/A leftMargin .25 Adjusts the left margin. N/A Font.<Face>.<Style> N/A Specify the TrueType font file name. The <Face> must be either ”Default” or the actual font face name (such as Helvetica). The <Style> must be either ”Plain”, ”Bold”, ”Italic”, or ”BoldItalic”. N/A fontsize 10 Font size in points. If this is not set, the font size is calculated automatically. –s tabsize 8 Pasta replaces a tab with the number of spaces specified in this option. N/A errorlogfile (standard error output) Set this option to have Pasta create a log file. –el Table 7 – 1 Pasta Configuration File Generic Options (Page 2 of 2) Printers 7 – 21 Arabic, Hebrew and Thai Options Key Name Default Value Description Equivalent Command Line Option thai_space_compensation n In the Thai language, some characters are combined into one glyph. If this option is set to ”y”, Pasta will align your report by adding spaces at the end of any string that includes combined characters. N/A bidi_algorithm oracle If you set this option to ”unicode”, Pasta follows the Unicode BiDi algorithm. Setting the value to ”oracle” will use Oracle’s algorithm. N/A direction default Options are ”ltr” (left–to–right), ”rtl” (right–to–left), and ”default” (depends on NLS_LANGUAGE setting). N/A dolayout y To layout the text, set this option to ”y”. If not, set it to ”n”. N/A doshaping y To shape the text, set this option to ”y”. If not, set it to ”n”. This option is for Arabic only. N/A numerals context Possible values are ”arabic” for Arabic numerals, ”hindi” for Hindi numerals, or ”context” to use Arabic or Hindi depending on the context. Required for Arabic data only. N/A Setup for Basic Printing with Pasta: page 7 – 13 Command Line Parameters When using the Pasta utility from the command line, you can use the options below. FNDPSTAX [options] 7 – 22 –c<number> <number> specifies the number of copies to print. –el<logfile> Specifies the error log file’s path and name. The path is the absolute path to the error log file. –f<filename> <filename> specifies the input file name. Example: –fmyfile.txt –F<cfgfile> Specifies the configuration file’s path and name. –h<rate> Adjusts the space between lines. The default value is 1.0. If <rate> is larger than 1, the space between lines will be larger. Oracle Applications System Administrator’s Guide –w<rate> Adjusts the space between characters. The default value is 1.0. If <rate> is larger than 1.0, the space between characters will be larger. –l Print in landscape mode. (The default is portrait). –o<filename> <filename> specifies the output file name. –s<size> Overrides the font size option in pasta.cfg. –np No print option. –ph<height> <height> specifies the paper height in inches. –pw<width> <width> specifies the paper width in inches. –pn<printername> <printername> specifies the printer name. –t<banner title> Banner option for use with the Unix lp command. –v Displays the version number. –x<ps|text.[charset |auto]> Specifies the output format. Two output formats are supported: Postscript (”ps”) and text (”text”). Printers 7 – 23 Customizing Printing Support in Oracle Applications Oracle Applications provides numerous predefined printer types with which you can identify your printers, as well as print styles that define the dimensions of Oracle Reports output files, and printer drivers that instruct the various printer types how to output the selected print style. Use the Printer Types form to query the combinations of print style and printer driver that support each type of printer you have. ☞ Attention: Predefined printing components may have to be modified for different printer types and/or operating platforms. For example, if a blank page is being printed after each printed page, the number of rows defined for the print style may need to be reduced, or an escape sequence that is being interpreted differently, creating a page eject command, may have to be rewritten. Verify and, if necessary, Customize Printer Driver Definitions Upon installation for any printer type you are using, verify your printer driver definitions, particularly the following: • Initialization string Print a short report to verify the page’s printing orientation. If you want to change the printer’s default font for the report, you would include that information in the Initialization string. • Reset string Print two short reports with different printing orientations, for example, one that is landscape and another that is portrait, to verify the printer is resetting itself properly. • Arguments Print a short report to verify the arguments to the operating system’s print command or a custom print program are being interpreted correctly. If you need to define a new print style, verify the printer driver you assign to the new print style, for any printer type you use. Verify and, if necessary, Customize Oracle Reports SRW Drivers If you have a printer type that does not properly interpret the control characters in the SRW driver files that set page breaks, bold on/off and underline on/off attributes in your Oracle Reports files, you can copy the SRW driver file and modify it. 7 – 24 Oracle Applications System Administrator’s Guide Creating Custom Printer Drivers If necessary, edit the Initialization string and the Reset string for the printer type you are using. Refer to your printer’s user guide for instructions. The Initialization and Reset fields appear on the Printer Drivers form. Edit your Initialization string or Reset string if: • Your printer type requires different control characters. • The control characters have a different meaning due to your operating system and platform. • Language translation changes the meaning of the control characters. The printer needs special control characters to select different character sets. • You want to change the printer’s default font for the report (Initialization string only). Printer Driver Methods There are three methods to invoke a printer driver: Command The concurrent manager can issue an operating system print command and its arguments. An operating system print command, along with all its arguments, is entered in the Arguments field of the Printer Drivers form. Program The concurrent manager can call a custom print program and pass arguments to the program. The name of a custom print program is entered in the Program Name field and any arguments to be passed to the program are entered in the Arguments field of the Printer Drivers form. Subroutine The concurrent manager can call a predefined Oracle Applications subroutine that passes a print command and arguments to the printer via the operating system. A subroutine is predefined by Oracle Applications, and the name is entered in the Program Name field of the Printer Drivers form. The arguments field is disregarded when the driver method is Subroutine. However, the concurrent manager reads the Initialization and Reset escape sequences. Printers 7 – 25 On UNIX systems, the subroutine method, unlike the command method, does not start an operating system shell along with the print command. Example – Using the Program Driver Method The Program driver method allows customers to define their own custom print programs. For example, your company might want to write a custom program that opens a file, allows the file to be edited and saved under a second filename, then sends the second (edited) file on to the printer by issuing the print command. This method of issuing print commands is called a filter. Location for Custom Print Programs To call a custom print program using the Printer Drivers form, the program name, including the full path to the program, should be entered in the Program Name field. The path to the program name is not necessary if the program’s location can be identified by the operating system’s PATH environment variable (i.e., is in the $PATH variable name). For platforms where the equivalent of a $PATH variable doesn’t exist, then use the full path name. A path can be up to 255 characters. Custom print programs are not registered as concurrent programs with Oracle Application Object Library, but are called after the concurrent process has completed. Using Operating System Shell Scripts For operating system shell scripts, the printer driver method can be either command or program, as long as you populate the argument field correctly. The script for a command shell procedure should reside in: $FND_TOP/$APPLBIN. Arguments That a Concurrent Manager Can Supply Values For The concurrent manager can supply four different values as arguments to the operating system print command it issues, or to a custom print program that it calls. An example of using these values as arguments follows. 7 – 26 Oracle Applications System Administrator’s Guide Example – Entering a Print Command and Arguments In this example, the UNIX print command ”lp” is entered along with the arguments that a concurrent manager can supply values for. While print commands vary, the tokens for which values are retrieved are always the same. Because print commands are operating system dependent, please refer to Installing Oracle Applications. lp –d$PROFILES$.PRINTER –n$PROFILES$.CONC_COPIES –t”$PROFILES$.TITLE” $PROFILES$.FILENAME The following table lists arguments and their actions for the UNIX lp print command: Argument Syntax –d$PROFILES$.PRINTER –d calls out the destination printer. –n$PROFILES$.CONC_COPIES –n calls out the number of copies to print. –t”$PROFILES$.TITLE” –t calls out the report title to print on a banner or header page. Token and Value Retrieved $PROFILES$.PRINTER retrieves the operating system name of the printer associated with the request. $PROFILES$.CONC_COPIES retrieves the value of the profile option Concurrent:Report Copies, unless this value is updated at runtime. ”$PROFILES$.TITLE” retrieves the title of the output file, typically titled as Application username.Request ID. For example, if user John Smith ran a report whose concurrent request ID was 64225, the title would be JSMITH.64225. This is operating system dependent. $PROFILES$.FILENAME $PROFILES$.FILENAME calls out the filename of the report to be printed. The value retrieved is the output file name, including the path to the file. Table 7 – 2 (Page 1 of 1) Using Standard Input When Standard Input is set to Yes, the printer driver accepts standard input, so you can feed a report’s output directly to the printer from standard input. Two examples of using standard input are: • when you run a pipe in UNIX such as “cat myfile | lpr” rather than “lpr myfile”, the output file is sent to the stdin (standard input). • the UNIX command lpr, which accepts standard input when a filename is not specified. Printers 7 – 27 The Standard Input field should be set to No when the Driver Method is set to Program or Subroutine. Unless the program accepts standard input, the Standard Input field should always be set to No. ☞ Attention: When Standard Input is set to No, the print command issued by the concurrent manager runs asynchronously. That is, the concurrent manager issues the command, and does not wait for an operating system response. Using Initialization and Reset Strings Use the initialization and reset strings to set and reset the orientation, character set and line density for your printer. Initialization and reset strings consist of control characters and escape sequences. • A control character can be represented by “ ^ ” followed by another character. • An escape sequence can be identified by either “ /e ” or “ \e ”. ☞ Attention: You see “/e” for escape sequences defined using the Printer Drivers form (because you cannot enter the backslash ( \ ) character into a form when your terminal definition uses backslash as the [Menu] key). You see “\e” for escape sequences originally defined in .pdf files that were upgraded to release 11 printer drivers. For nonprintable characters, you may represent their value in octal mode. For example, 0x26 is represented as “ /046 ”. As an example, if you need to represent the escape sequence: ^ [ ^ L ^ [ l 6 D ( 0 x 26 ) you can represent it as: /e^L/el6D/046 Using a Spool File When Spool File is set to No, then a temporary file is created where the initialization and reset strings are inserted, and the file is sent to the print command or program. Set the Spool File to Yes only if the print program creates its own temporary file. This option is recommended when using the Program driver method and the print program creates its own temporary file. 7 – 28 Oracle Applications System Administrator’s Guide This option helps to reduce the creation of temoraryp files, since the concurrent manager will not create a temporary file when Spool File is set to Yes. When Spool File is set to Yes, it is recommended that the: • Standard Input be set to No • Initialization and reset fields are null. This option does not apply to the Subroutine driver method. Creating Custom SRW Drivers SRW drivers are read by Oracle Reports when a report is generated, and insert control characters that tell the destination printer where to set page breaks, and which characters to format as bold or underlined. SRW drivers only pertain to Oracle Reports output files. An SRW driver is used during the generation of a report. A printer driver is used when the completed output file is sent to the printer. SRW drivers are designed for the DEC LN03 printer, and all printers that understand the same control characters as the LN03. Location and Content of SRW Driver Files SRW driver files reside in $FND_TOP/$APPLREP, and have the file extension “.prt”. The predefined SRW file names are: • A.prt • P.prt • L.prt • PD.prt • W.prt Creating a Custom SRW Driver You can customize any of the SRW driver files to support a printer type that is not correctly interpreting the control characters used to set page breaks and format text as bold or underlined in Oracle Reports files. For example, you may need to change the control characters that instruct the printer to set a page break. on an LN03 on an XYZ LaserInk Printers 7 – 29 new page ... ^L ^[E If you need to change formatting control characters for page breaks, underlined text, or bold text in Oracle Reports: • Copy the .prt file (SRW driver) and rename the copy. • Modify the new file with new control characters. • Place the modified copy of the SRW driver file in $FND_TOP/$APPLREP. • Associate the new driver with a print style and/or printer driver definition. ☞ Attention: Copy the SRW driver (.prt file) and rename it before starting any text editing. SRW Drivers – Print Styles and Printer Drivers When the concurrent manager calls Oracle Reports to run a report, the SRW driver name is passed as a parameter to Oracle Reports. The SRW driver is not required because some customers might be using styles or printer drivers for non–Oracle Reports programs. The SRW driver name you enter in the Print Styles and Printer Drivers forms is used in slightly different ways depending on whether you are printing or simply viewing the report. If you run an Oracle Reports program without printing the output file, the SRW driver associated with the report’s print style is used. If you run an Oracle Reports program and print the output file, the SRW driver that is correct for the destination printer type is chosen by selecting the SRW driver associated with the printer driver. 7 – 30 Oracle Applications System Administrator’s Guide Hierarchy of Printer and Print Style Assignments A printer and a print style can be chosen and their identities can be included in a concurrent program’s definition. When a concurrent program is defined to send its output to a specific printer, or is required to generate its output in a specific print style, those values cannot be overridden by users, or by report set default settings, or by user profile default settings. Often, a default value can be set in more than one way. This leads to a hierarchical relationship among the various default settings, where one default takes precedence over another. The diagram below illustrates the order of how printer or print style values are read by the concurrent manager when submitting a report program to run. ☞ Attention: Defining a concurrent program with a default print style, or requiring a concurrent program to output a specific print style, does not make that style available at a printer. You must assign the print style, and its corresponding printer driver, to each printer type you wish to print from. The concurrent manager reads the printer value using the following hierarchy: concurrent program definition, report set definition, printer user profile option value, and value specified by user during report submission. The concurrent manager reads the print style value using the following hierarchy: concurrent program definition, report set definition, and value specified by user during report submission. Printers 7 – 31 Figure 7 – 6 Order of Reading Printer or Print Style Settings PRINTER PRINT STYLE CONCURRENT PROGRAM DEFINITION CONCURRENT PROGRAM DEFINITION REPORT SET DEFINITION REPORT SET DEFINITION PRINTER USER PROFILE OPTION VALUE USER SUBMITS REPORT TO RUN USER SUBMITS REPORT TO RUN Hierarchy of Printer Assignments As System Administrator, you can restrict concurrent programs and reports to direct their output to a specific printer. Restricting a program or report’s output to a specific printer overrides user profile option settings and prevents report set or user runtime printer choices. If a printer is not included as part of a concurrent program’s definition, then default printer settings may be entered, as indicated in the table below. Users can override any default setting at runtime. The following table describes the printer assignment hierarchy: Form Explanation Concurrent Programs System Administrator As System Administrator, you can define a concurrent program to always direct its output to only one specific printer. This setting cannot be overridden at runtime or when defining a report in a report set. Table 7 – 3 (Page 1 of 2) 7 – 32 Oracle Applications System Administrator’s Guide Form Explanation Request Set System Administrator As System Administrator, you can assign a default printer to a report within a report set. Request Set Application Users Users can assign a default printer to a report within a report set, when they own the report set. This default setting can be changed by the System Administrator. Personal Profile Values Application Users Users can assign a default printer for all their reports using their Personal Profile Values form. This assignment overrides the default Printer profile option set by the System Administrator. System Profile Values System Administrator As System Administrator, you can assign a default printer to an installation site, Oracle application, responsibility, or user. Users can override this setting at runtime. Table 7 – 3 (Page 2 of 2) Hierarchy of Print Style Assignments As System Administrator, you can require concurrent programs and reports to generate their output in a specific print style. Requiring a program’s or a report’s output to be in a specific print style prevents report set or user runtime print style choices. Requirements for alternate print styles All concurrent programs whose execution method is “Oracle Reports” require a print style to be selected when the program is defined. When the print style is not designated as a required print style, then other print styles may be selected, either as a default for a report in a report set, or at runtime when submitting the report, if two conditions are satisfied: • The print style complies with the concurrent program’s minimum values for columns and rows (entered on the Concurrent Programs form). • The print style has been assigned to the destination printer’s printer type (entered on the Printer Types form). Printers 7 – 33 The following table describes the print style assignment hierarchy: Form Explanation Concurrent Programs System Administrator As System Administrator, you can require a concurrent program to generate its output in a specific print style. This setting cannot be overridden at runtime or when defining a report in a report set. If a Print Style is entered in a program definition, but is not required, it serves as the first default setting to be read. Request Set System Administrator As System Administrator, you can assign a default print style to a report within a report set. Request Set Application Users Users can assign a default print style to a report within a report set, when they own the report set. This default setting can be changed by the System Administrator. Table 7 – 4 (Page 1 of 1) System Administrator Printer and Print Style Settings Program Definitions, Printers and Print Styles As System Administrator you can restrict programs to send their output files only to a specified printer, for example, a printer in a secure office, using the Concurrent Programs form. You can also require a report to generate its output in a specific print style. Assigning Default Printers and Print Styles to Reports in a Set As System Administrator you can identify a default printer for each report within a report set, and assign a default print style for each report, using the Request Set form. Assigning Default Printers Using Profile Options As System Administrator you can identify a printer as a default printer for your installation site, a specific Oracle Application, a specific 7 – 34 Oracle Applications System Administrator’s Guide responsibility, or any of your end users, by setting the “Printer” user profile option in the System Profile Values window. Users can override a default profile option value by: • Setting their own personal “Printer” profile option using their Personal Profile Values form. • Selecting another (available) printer at runtime when submitting a report. Printers 7 – 35 End User Printer and Print Style Settings End users may: • Set default print styles for reports in their report sets, using their Request Set form. • Identify a default printer of their own by using the Personal Profile Values form. Users may override the default profile option setting their System Administrator defines. • Choose any available printer and print style when running reports, when using the Run Reports form. If a default printer or print style displays, users may override the default if other printers or print styles are available. Printer Setup with Pasta: 7 – 13 7 – 36 Oracle Applications System Administrator’s Guide Postscript Printing in UNIX You can convert your report output files into postscript format when printing in some UNIX environments by using the enscript UNIX utility. ☞ Attention: Refer to your UNIX documentation before using enscript. Usage and the arguments employed by enscript may be specific to your platform. Concurrent Manager Arguments The concurrent manager can supply four different values as arguments to an operating system print command or custom print program. See the example of using all four values provided by the concurrent manager. See: Example – Entering a Print Command and Arguments: page 7 – 27 See the example of using the enscript UNIX utility and two of the values the concurrent manager supplies as arguments. See: Example – Using the UNIX Enscript Command: page 7 – 38. Enscript Arguments and Print Styles The following table lists some sample enscript arguments, using the Courier font, for converting a report’s output into postscript for the portrait, landscape, landwide, and A4 print styles. Print Style Enscript Arguments Explanation Result Portrait –fCourier10 Font is Courier 10 point. 80 characters portrait Landscape –r –fCourier8 –r rotates the printer’s output 90 degrees to print in landscape mode. Font is Courier 8 point. 132 characters landscape Landwide –r –fCourier6 –r rotates the printer’s output 90 degrees to print in landscape mode. Font is Courier 6 point. 180 characters landscape A4 –fCourier10 Font is Courier 10 point. 132 characters landscape (A4 paper) Table 7 – 5 (Page 1 of 1) Printers 7 – 37 Example – Using Enscript to Print Postscript In this example, the enscript command, followed by its arguments, is entered in the Arguments field of the Printer Drivers window, and the Driver Method is set to Command. Printer Drivers window Arguments field: enscript –r –fCourier8 –B –P$PROFILES$.PRINTER $PROFILES$.FILENAME The following table explains the syntax for the enscript command. Syntax Explanation –r Enscript argument. Rotates the printer’s output 90 degrees to print in landscape mode. –fCourier8 Enscript argument. –f selects the font, in this example the font is Courier with a point size of 8. –B Enscript argument. Omits page headings. –P$PROFILES$.PRINTER Enscript argument. –P precedes the name of the printer which the output is sent to. Concurrent manager token. $PROFILES$.PRINTER retrieves the operating system name of the printer associated with the request. $PROFILES$.FILENAME Concurrent manager token. $PROFILES$.FILENAME calls out the filename of the report to be printed. The value retrieved is the output file name, including the path to the file. Table 7 – 6 (Page 1 of 1) In this example, the UNIX enscript command is entered along with two of the four arguments that a concurrent manager can supply values for. • Since the argument “$PROFILE$.CONC_COPIES” is not used, the number of copies to be printed is set by the enscript default (which is usually one). • Since the argument “$PROFILE$.TITLE” is not used, the concurrent manager does not provide a value for printing the report title on a banner or header page. 7 – 38 Oracle Applications System Administrator’s Guide Printer Types Window Use this window to define a printer type and to assign print styles and their corresponding printer drivers to the printer type. Defining printer types allows you to assign print style and printer driver definitions to any number of printers by registering the printers as a specific “type”. When users choose a printer to send a report to, the available print styles are normally determined by the printer type. Printers 7 – 39 Concurrent programs, however, can be defined to require their report output in a specific print style. For example, some Oracle Reports programs may require a specific print style in order to print correctly. ☞ Attention: You should issue a Restart concurrent manager command for all currently active managers whenever you edit an existing Printer Type, Print Style, or Printer Driver. See: Controlling Concurrent Managers: page 5 – 55 Printer Types Block Type Enter a name for a printer type. Example printer types might be “LINE” for a line printer or “LN03” for an LN03 model printer. You select this printer type when you register a printer using the Printers window. Printer Drivers Block Use this block to assign print styles and printer drivers to your printer types. The Style button opens the Printer Styles window. The Driver button opens the Printer Drivers window. 7 – 40 Oracle Applications System Administrator’s Guide Printers Window • Register printers with Oracle Applications by entering the operating system’s name for the printer and assigning it a printer type. • You must register a printer before you can print reports from it, using Oracle Applications. • You can only register a printer with a previously defined printer type. Use the Printer Types window to define printer types. • You can specify the default printer to which a user submits reports by setting the “Printer” user profile option. Printers 7 – 41 Printers Block Printer Enter the name your operating system specifies for the printer. Type Select your printer type (i.e., manufacturer and model). Some reports require a printer of a specific type in order to print correctly. You can only select a previously defined printer type. Use the Printer Types button to open a window to define a printer type. 7 – 42 Oracle Applications System Administrator’s Guide Print Styles Window Use this window to define print styles. A print style describes how your report should be printed. For example, print style determines the: • Number of lines per page • Width of each line • Page orientation (e.g., portrait or landscape) Oracle Applications reports are designed to work with standard, shipped print styles. The following print styles are predefined: • Portrait • Landscape • Landwide • A4 • Dynamic Portrait Not all reports work with all print styles. You may define additional print styles to customize your reports. Printers 7 – 43 Once defined, a print style cannot be deleted. Print Styles Block Define a print style. The combination of Name and User Name uniquely identifies a print style. ☞ Attention: You should issue a Restart concurrent manager command for all currently active managers whenever you edit an existing Printer Type, Print Style, or Printer Driver. See: Controlling Concurrent Managers: page 5 – 55. Style Name Multiple print styles display alphabetically in a list window. You cannot update a print style’s name. Sequence Enter a number that determines the display sequence for your print style when performing a query in this window. A negative sequence number appears before zero, and zero appears before a positive sequence number. User Style This user name does not appear anywhere except this window. SRW Driver Enter the name of the Oracle Reports (SRW) driver to be called when printing an applications report generated by Oracle Reports. This field is used only by applications reports generated by Oracle Reports. Layout Block Columns Enter the number of columns your print style defines. Rows Enter the number of rows your print style defines. 7 – 44 Oracle Applications System Administrator’s Guide Suppress Header Reports may print with a header page that indicates who requested the report and when. Check the Supress Header check box to define a print style that suppresses printing of this header page. For example, suppressing the header page when printing checks prevents a check from being overwritten and maintains the orderly sequence of check numbers. Orientation Enter the orientation of your printed page, for example, portrait or landscape. Printers 7 – 45 Printer Drivers Window Use this window to define your printer driver and printer commands. ☞ Attention: You should issue a Restart concurrent manager command for all currently active managers whenever you edit an existing Printer Type, Print Style, or Printer Driver. Oracle Applications ships printer drivers for the following print styles: • Portrait • Landscape • Landwide • A4 • Dynamic Portrait Oracle Applications also ships printer drivers for specific printer types, including the following: 7 – 46 Oracle Applications System Administrator’s Guide • Apple • DEC LN03 • HP Laserjet II, HP Laserjet III, HP Laserjet 4 • HP line printer, HP 256X line printer • EPOCH • EPSON FX1050 and DMTX1 • QMS PS 825/925 Define additional printer drivers if you have different types of printers, or define additional print styles. Printer Drivers Block See: Controlling Concurrent Managers: page 5 – 55. Driver Name The printer driver name must be unique for a given platform. User Driver This user name is referenced by Oracle Applications and must be unique for a given platform. SRW Driver Enter the name of the Oracle Reports (SRW) printer driver, if any, that will be invoked by your printer driver. Only Oracle Reports programs require this information. Enter the entire path to the file, or just the file name. If you enter only the file name, Oracle Applications assumes the file is located in the $FND_TOP/$APPLREP directory. Platform Select the platform for which the printer driver is defined. Do not assign platform codes to printer drivers unless you have multiple drivers of the same name. If it cannot find a specific platform code associated with a driver, the concurrent manager will default to the driver with a null platform code. Printers 7 – 47 Driver Method Region Select one of three methods by which your printer driver is invoked. Command The printer driver executes within an operating system shell. An example is the lpr command in UNIX. Program The printer driver executes directly as a program, not through an operating system shell. • An example is a C standalone program for printing. • This method executes faster than the Command method, but cannot access shell commands like PRINT on MS–DOS. Subroutine The printer driver executes a predefined Oracle Applications routine. Subroutines are specific to operating platforms and are invoked directly by a system call from the concurrent manager. Driver Method Parameters Region Spool File Select whether the printer driver creates its own copy of a file for printing. If this check box is checked when the Driver Method is set to Program, the print program creates its own spool file. • An example of spool files is the UNIX lpr command, which creates its own copy of a file if you do not specify the –s option. Standard Input Select whether the printer driver accepts standard input. Uncheck this check box when the Driver Method is set to Program. Unless the program accepts standard input, this check box should always be unchecked. • An example is the UNIX command lpr, which accepts standard input when a filename is not specified. Program Name If the driver method is Program: • Enter the full path to the program that the driver invokes. The path is not necessary if the program’s location can be identified 7 – 48 Oracle Applications System Administrator’s Guide by the operating system’s PATH environment variable. See Location for Custom Print Programs: page 7 – 26. If the driver method is Subroutine: • Enter the subroutine name that the driver invokes. Arguments When the Driver Method is set to Program, enter any generic arguments that must be supplied to the print program. When the Driver Method is set to Command, enter the full command and its arguments. Initialization Enter the initialization string that must be sent to the printer before the printer driver can begin printing. Reset Enter the reset string that returns the printer to its ready state when printing is complete [ ] The double brackets ([ ]) identify a descriptive flexfield that you can use to add data fields to this form without programming. This descriptive flexfield allows you to define special commands specific to your printer driver and/or the platform it runs on. Printers 7 – 49 7 – 50 Oracle Applications System Administrator’s Guide CHAPTER 8 Oracle Applications Help T his chapter explains how to customize Oracle Applications help. Oracle Applications Help 8–1 Customizing Oracle Applications Help Oracle Applications help files are formatted as HTML allowing easy modification using commercial HTML text editors. You can also add customized files of your own to the help system. If you have licensed Oracle Tutor 11i, you can use it to edit your Oracle Applications help files. Oracle Tutor 11i additionally provides model business procedures, process documents, and courseware that you can customize to fit your company’s specific needs and link to the Oracle Applications help system. For more information, see Tutor Author User Manual and Tutor Publisher User Manual. Caution: With each new release of Oracle Applications and each patch you accept, you will need to reapply your changes to any updated help files you have modified, if you want access to the latest information. In addition, Oracle does not provide any mechanism for identifying changes between releases of Oracle Applications help files. Customizing Oracle Applications Help includes the following topics: • Downloading and Uploading Help Files (Help System Utility): page 8 – 2 • Linking Help Files: page 8 – 7 • Updating the Search Index: page 8 – 11 • Customizing Help Navigation Trees: page 8 – 12 • Customizing Help in a Global Environment: page 8 – 21 See Also Profile Options in Oracle Application Object Library: page A – 2 Downloading and Uploading Help Files Oracle Applications help files are stored in the database. The Oracle Applications Help System Utility is provided for retrieving and replacing them in the course of customization. Setting Help System Utility Profile Options Before using the Help System Utility you must define the upload and download directory paths. Oracle Applications provides profile options for you to set these paths. 8–2 Oracle Applications System Administrator’s Guide Use the profile option Help Utility Download Path to define the directory location to which the Help System Utility will download files. Use Help Utility Upload Path to define the directory location from which your customized files will be transferred back into the Oracle Applications Help System. Identifying Help Files for Customization Help files are downloaded by file name. To identify the specific file that you want to customize, open the document in the Oracle Applications Help System. Use the view source function of your browser to view the HTML source code. The source information will include the file name. For example, if you view the source for this help document you will see the file name identified as SYS00032663.htm. To identify the language and product of the help file, use the source document URL. The final three nodes of the source document URL are the language, the product name, and the anchor or target name. Using this document again as an example, you will see the final three nodes of the URL are /US/FND/@ht_updown#ht_updown. This identifies the language as US, the product group as FND (Applications Object Library), and the target name as ht_updown. Note: The syntax in the URL, @ht_updown#ht_updown, is an example of the Oracle Applications special syntax used to link documents by anchorname. For more information about this syntax see Linking Help Files: page 8 – 7. The Oracle Applications Help System Utility also provides reports to cross–reference target names and help file names. See Creating Reports: page 8 – 6. Oracle Applications Help 8–3 Downloading Help Files for Editing You download help files by language and by product. That is, you select the language (for example, US for U.S. English) and you select the product (for example, AR Oracle Receivables). It is important to note the two–letter code for the product (in this example, the two–letter code is AR) because the product code determines the download directory. Follow these steps to download help files: 1. Open the Oracle Applications Help System Utility. The Help System Utility is available from Oracle Self–Service Web Applications. Click on System Administration. Under Help Administration, click on Help Utility. 8–4 Oracle Applications System Administrator’s Guide 2. Select ”Download Files from Help System” from the Choose Action option group. 3. Select the language from the Choose Language pop list. 4. Select the product from the Choose Product pop list. You can only select one product at a time. 5. Click Finish. The Help System Utility downloads the help files for the product you selected. All files will be downloaded, including graphics. The files are downloaded, following the path defined in the profile option Help Utility Download Path, to a directory for the chosen language and product. For example, if you selected the language to be US and the product to be AR Accounts Receivable, the files will be downloaded to <server location>\<Help Utility Download Path>\US\AR. Uploading Help Files Once you have customized the help files, use the Help System Utility to upload the documents into the help system. Your files are uploaded from the upload directory specified in the profile option Help Utility Upload Path. Note: If you have created a new application with new help files that you are uploading for the first time, you must use the Generic File Manager Access Utility (FNDGFU) to upload these files. See Generic File Manager Access Utility: page C – 32. There are four types of files that can be uploaded to the help system. These are: • HTML files (all HTML files must have a .htm extension) • GIF graphics files (must have a .gif extension) • Adober Acrobat files (must have a .pdf extension) • Cascading Style Sheets (must have a .css extension) Follow these steps to upload your customized help files: 1. Copy the customized files to the appropriate product folder in the upload directory. For example, if you customized six help files for Accounts Receivable, copy the six files to the <server location>\<Help Utility Upload Path>\US\AR directory. It is critical that you copy the files to the correct product folder in order for the Oracle Applications Help Oracle Applications Help 8–5 System Utility to place the files in the correct location within the Oracle Applications Help System. 2. Open the Oracle Applications Help System Utility. The Help System Utility is available from Oracle Self–Service Web Applications. Click on System Administration. Under Help Administration, click on Help Utility. 3. Select ”Upload Files from Help System” from the Choose Action option group. 4. Select the language from the Choose Language pop list. 5. Select the product from the Choose Product pop list. You can only select one product at a time. 6. Click Finish. The Help Utility uploads the help files for the product you selected. All files located in the directory for the selected language and product will be uploaded. Creating Reports The Help System Utility provides two reports for you to cross–reference help targets and file names. Help Target to File Name Report This report lists by target, each file that contains the target, the document title of the file, and the product. File Name to Help Target Report This report lists every file name and document title by language and product and all the targets found within each file. Follow these steps to run these reports: 1. Open the Oracle Applications Help System Utility. The Help System Utility is available from Oracle Self–Service Web Applications. Click on System Administration. Under Help Administration, click on Help Utility. 8–6 2. Select ”Create Reports” from the Choose Action option group. 3. Select the appropriate report from the Create Reports pop list. 4. Select the language from the Choose Language pop list. 5. Select the product from the Choose Product pop list. You can build reports for all products by selecting ”All Products” from the list. 6. Click Finish. Oracle Applications System Administrator’s Guide Linking Help Files The Oracle Applications help system supports a special syntax for hypertext links that keeps them working even when files are renamed or split into parts. The special syntax, which is explained in detail below, looks like this: For more about widgets, see <A HREF=”@widgets#widgets”>All About Widgets</A>. Oracle Applications help files use this syntax, and you can use it too in your custom help files. Or if you prefer, you can always use conventional hypertext links based on filename. Linking Help Files includes the following topics: • Special Link Syntax: page 8 – 7 • Cross–Application Links: page 8 – 8 • Related–Topics Links: page 8 – 9 • Context–Sensitive Help: page 8 – 10 Special Link Syntax Links in Oracle Applications help files point, not at a particular filename, but rather at one of the named anchors contained in the file. The Oracle Applications help system resolves anchorname to file dynamically, every time a link is negotiated. Information on which files contain which anchornames is put into the help system automatically on upload. Authors must ensure that anchornames are unique across an application’s help files to prevent duplicate links. In return, they need never worry about a change in filename breaking their links. Named Anchors in Conventional HTML By named anchor is meant the following kind of HTML tag: <A NAME=”anchorname”></A> Named anchors can be placed anywhere in the body of an HTML file, and are typically used for links internal to the file in question. A pound sign (#) is placed before the anchorname in the link that points at it. For example, you would use HTML like the following to allow users to jump forward to a section with the anchorname of ”widgets”: For more about widgets, see <A HREF=”#widgets”>All About Widgets</A> below. Oracle Applications Help 8–7 <A NAME=”widgets”></A> <H2>All About Widgets</H2> Extended to Support Interdocument Links Oracle Applications help files extend this conventional HTML syntax to create links not only within, but also between help files. To link to a file that contains a particular named anchor, you simply place an at sign (@) before the anchorname. To link to the precise spot within the file where this anchor appears, you append a pound sign followed by the anchorname, just as you would in conventional HTML. This results in the following special syntax: <A HREF=”@anchorname#anchorname”>link text</A>. For example, to link to the file that contains the ”widgets” anchor illustrated above, at the point in the file that this anchor occurs, you would use HTML like the following: For more about widgets, see <A HREF=”@widgets#widgets”>All About Widgets</A>. If you simply want to link to the top of the file that contains this anchor, you can omit the pound–sign segment ”#widgets.” Links in Oracle Applications help files rarely omit the pound–sign segment. This means that however topics are rearranged within or among files, links to these topics from other files always go to the proper file, and to the precise spot within the file where the topic occurs. Caution: Do not use case to make distinctions between anchornames. Unlike most web browsers, the Oracle Applications help system treats anchornames in a case–insensitive fashion. Cross–Application Links In the Oracle Applications help system, all help files associated with a particular application exist in the same directory, as far as their URL is concerned. Help files associated with other applications exist in directories named after the application’s short name. All these application directories are at the same level in the help system. To create a link that goes to a help file associated with a different application, you create a relative link that goes up a level to the parent of all help application directories, and then back down through the other application’s directory, before concluding with Oracle 8–8 Oracle Applications System Administrator’s Guide Applications’ special link syntax. This results in the following cross–application link syntax: <A HREF=”../shortname/@anchorname#anchorname”> link text</A> For example, if the ”All About Widgets” topic illustrated above were an Oracle Payables help topic, and you wanted to link to it from an Oracle General Ledger help file, you would use a link like the following, where AP is Oracle Payables’ short name: For more about widgets in Oracle Payables, see <A HREF=”../AP/@widgets#widgets”>All About Widgets</A>. When used in this fashion, application short names are case insensitive. Note: These application help directories are merely ”virtual” directories recognized by the Oracle Applications help system when used in URLs. All files are actually stored in the database, with application short name being one attribute among many associated with them. Note: Oracle Payables’ official short name is SQLAP. This has been shortened to AP for the virtual directory used in the Oracle Applications help system. Similarly, Oracle General Ledger’s official short name of SQLGL has been shortened to GL, and Oracle Assets short name of OFA has been shortened to FA. These are the only exceptions. Related Topics Links Links are not limited to a single target in the Oracle Applications help system. You can point your links at multiple topics and files by using the following syntax: <A HREF = ”@anchorname1,anchorname2,anchorname3”> Related Topics</A> When a user negotiates the link, a page headed ”Related Topics” appears, containing a list of the page titles corresponding to these anchornames, with each title linked to the file in question. To include cross–application links, simply prefix the application short name and a colon to the anchorname: <A HREF = ”@anchorname1,shortname:anchorname2,anchorname3”> Related Topics</A> Oracle Applications Help 8–9 Context–Sensitive Help When you ask for help in Oracle Applications, the topic for your current window opens. If you ask for help from a report parameters window, your help file opens to a discussion of that report. Oracle Applications help files contain special anchornames to enable these context–sensitive links. When calling help from a window, Oracle Applications looks for an anchorname based on the form name and the window name combined as follows: <A NAME=”form_name_window_name”></A> You can override the form_name portion of the anchorname by specifying a HELP_TARGET parameter in the parameter field of the Form Functions window. Use the syntax HELP_TARGET = ”alternative_form_name”. See: Form Functions: page 2 – 34. When calling help from a report parameter window, Oracle Applications looks for an anchorname constructed as follows: <A NAME=”SRS_concurrent_program_shortname”></A> 8 – 10 Oracle Applications System Administrator’s Guide Updating the Search Index Oracle interMedia Text enables the search feature provided by the Oracle Applications help system. You run a script called aflobbld.sql to rebuild the search index after uploading customized documents. This ensures that they will be included in any searches your users perform. To rebuild the interMedia index, use the following command line: sqlplus <apps/pwd> @$FND_TOP/sql/aflobbld.sql where <apps/pwd> Example is the APPS schema username/password. To specify a particular database, append an @ sign and the database SID (@database). sqlplus apps/apps@devdb @$FND_TOP/sql/aflobbld.sql • connects to apps/apps@devdb using Oracle SQL*PLUS • rebuilds the search index for Oracle Applications help Oracle Applications Help 8 – 11 Customizing Help Navigation Trees You use the Help Builder applet to customize the help navigation trees that appear in your browser window’s navigation frame when help is invoked. Trees are composed of root, branch, and leaf nodes. The root of a help navigation tree is the top–most level. When expanded, it reveals a collection of first–level branches and leaves under it. A branch expands further, to reveal branches and leaves the next level down. In the Oracle Applications help system, some branches also link to documents. A leaf expands no further, but simply links to a document, terminating the hierarchy at this point. Caution: With each new release of Oracle Applications and each patch you accept, you will need to reapply your changes to any updated help navigation trees you have modified, if you want access to the latest information. In addition, Oracle does not provide any mechanism for identifying changes between releases of Oracle Applications help navigation trees. You can use the Help Builder to perform the following tasks: • open a tree for editing: page 8 – 15 • add new help files to a tree: page 8 – 16 • add new nodes to a tree: page 8 – 17 • add nodes to one tree from another: page 8 – 18 • change the organization of a tree: page 8 – 18 • create a new navigation tree: page 8 – 19 For help understanding the information associated with each of the Help Builder’s fields, see Help Builder Window Reference: page 8 – 19. Accessing the Help Builder To access the Help Builder, navigate from Oracle Self–Service Web Applications as follows: System Administration – Help Builder. 8 – 12 Oracle Applications System Administrator’s Guide The Help Builder User Interface The Help Builder window default view consists of three panes. The left pane displays the tree that is currently selected. Use this area to manipulate your tree by adding nodes, deleting nodes, and dragging nodes into the positions desired. The top right pane displays items matching the searches you have performed using the Find Documents or Find Trees functions. Click on the Trees or Documents Tab as appropriate. The bottom right pane is the Properties Pane. This area Oracle Applications Help 8 – 13 displays the properties of the item (root, node, or document) currently selected. Those properties with enabled fields can be updated. Help Builder Menus File Menu The File Menu provides the following functions: New Creates a new root node. Selecting this option will open the Root Node Properties window for you to enter the appropriate values for your new root node. Open Opens a tree. Selecting this option will open the Find Trees window for you to enter selection criteria to find the appropriate tree. Save Saves the current changes. Reload Reloads the current tree to apply all changes throughout the tree hierarchy. Print Prints the current tree pane. Exit Exits the Help Builder. Edit Menu The Edit Menu provides the following functions: 8 – 14 New Node Creates a new node beneath the selected node on the tree. If the selected node is a document, a document node is created. If the selected node is a branch node, a branch node is created. Cut Cuts the selected item (document or branch node). Copy Copies the selected item (document or branch node). Paste Pastes an item beneath the currently selected node on the tree. If the node selected is a document, the item will be pasted beneath it on the tree. If the node selected is a branch that has been expanded, the item will be pasted as a child of the selected node. If the node selected is a branch that has not been expanded, the item will be pasted as a sibling beneath the selected node. Delete Deletes the selected item. Oracle Applications System Administrator’s Guide Properties... Allows you to update the properties of the selected item via the Properties window. The Properties window is identical to the Properties Pane. See Help Builder Window Reference: page 8 – 19 for descriptions of the Properties fields. Preferences... Allows you to set interface preferences via the Preferences window. The preferences you can set are: Background Color Line and Box Color Default Node Color Default Node Text Color Font Name Font Size View Menu The View Menu provides the following functions Node Properties Enable the check box to display the Node Properties pane (enabled is the default). Toolbar Enable the check box to display the Toolbar (enabled is the default). Statusbar Enable the check box to display the Status Bar (enabled is the default). Find Documents Opens the Find Documents window. Find Trees Opens the Find Trees window. Help Menu The View Menu provides the following functions: About... Displays information about the Help Builder. Library Opens the Oracle Applications Help Library. Help Builder Tasks " To open a tree for editing: 1. Open the Find Trees window using one of the following menu options: Oracle Applications Help 8 – 15 (M) File > Open (M) View > Find Trees 2. Enter your search criteria in the Find Trees window, and click Find. For example, enter %Payables% in the Prompt field to find the Oracle Payables tree. See Help Builder Window Reference: page 8 – 19 for descriptions of the Find Trees search fields. 3. Trees matching your criteria will be displayed in the upper right pane of the Help Builder window on the Trees tab. Select a tree in the list to see its properties displayed in the Properties pane below. Double–click a tree to open it. The tree’s top–level node will appear in the left pane. Expand and contract nodes to display the part of the tree you want to edit. " To add new help files to a tree: 1. Upload the help files to the database: page 8 – 2. 2. Open the tree for editing: page 8 – 15. 3. Click the Find Documents icon on the toolbar, or select Find Documents from the View Menu. The Find Documents window appears. 8 – 16 Oracle Applications System Administrator’s Guide See Help Builder Window Reference: page 8 – 19 for descriptions of the Find Documents search fields. 4. Enter your search criteria, select Exclude documents already on a tree, and click Find. Files corresponding to the information you entered appear on the Documents tab of the upper right pane of the Help Builder window. Select a document to view its properties in the Properties Pane. 5. To add the file to the tree, drag it from the Documents tab and drop it on the tree in the the position desired. Note: Files containing multiple named anchors appear multiple times. Each Target will have its own listing. Choose the Target that corresponds to the topic you want to add. If the topic you want to add is not the header target of the file, but a target within the document, you must supply the special link syntax in the Data field of the Properties Pane. For example, the target name might appear in the Data field as @ht_updown. To link directly to this anchor you would add #ht_updown to the end of the anchorname. The resulting entry in the Data field will be @ht_updown#ht_updown. For more information about this syntax see Linking Help Files: page 8 – 7. " To add new nodes to a tree: 1. Open the tree for editing: page 8 – 15. Oracle Applications Help 8 – 17 2. Select the node beneath which you want to add a new node, and click New Node on the toolbar or select New Node from the Edit Menu. Note: The New Node feature will add a node that is like the node selected. For example, if a branch node is selected a branch node will be added beneath it. It a leaf node is selected, a leaf node will be added beneath it. When adding a branch node as a sibling to an existing branch node, be sure that the selected branch node is not expanded. If the existing branch node is expanded, the new node will be added as a child to the selected branch. " 3. Enter information for the new node in the Properties Pane, and click Apply. 4. Click Save to save your changes. To add nodes from one tree to another: 1. Open the tree for editing: page 8 – 15. 2. From the View menu select Find Trees. 3. In the Find Trees window select Node from the Type poplist and enter search criteria for the nodes you want to add. Click Find. Nodes corresponding to the information you enter appear on the Trees tab of the main Help Builder window. " 4. Drag nodes from the Trees tab and drop them on the tree. 5. Click Save to save your changes. To change the organization of a tree: Caution: Changes made to nodes added from another tree are reflected in the original tree and all other trees that include them. 1. Open the tree for editing: page 8 – 15. 2. To move a node, drag the node from its current location and drop it at its new location in the tree. 3. To delete a node, select it and click Delete on the toolbar or select Delete from the Edit Menu. 4. To change a prompt, select the node, enter the new prompt in the Prompt field of the Properties pane, and click Apply. Other node properties can be changed in a similar fashion. 8 – 18 Oracle Applications System Administrator’s Guide Note: If the same node appears elsewhere in the tree, your changes will not appear there until you click the Reload button on the toolbar. For one node to be the same as another, the Node Key and Node Application of their parent nodes must be the same, as well as all their own properties. Their grandparent nodes and above can be different. " To create a new navigation tree: 1. Choose File > New. The Root Node Properties window appears. 2. Enter information for the tree’s root node, and click Apply. 3. Add new nodes to the tree: page 8 – 17. 4. Add new help files to the tree: page 8 – 16. 5. Add nodes from other trees to the tree: page 8 – 18. 6. To view the new tree with context–sensitive help, enter its root as the Help Tree Root for some application, responsibility, or user: page A – 29. To view it stand alone, substitute its root in the root= parameter at the end of your site’s Oracle Applications Help URL. Include the application short name. For example, for a root named ROOT_INV belonging to the Oracle Inventory product, you would use root=INV:ROOT_INV in the URL. Help Builder Window Reference Field names and descriptions for the Help Builder window are given below. Application Application shortname of application that owns the help file. Custom Level Customization level of the node. 100 is the default for customer use. Levels under 100 are reserved for system use. Data If the node links to a help file, the file name or a target name preceded by an ”@” symbol, or an absolute URL. Description Longer description of the node, if the Prompt is terse. Otherwise may simply repeat the Prompt. Filename Pre–upload filename of the help file. Oracle Applications Help 8 – 19 Icon Not used. Language Language code of help files covered by the node. Node Application Application shortname of the application that owns this node. If different from the value given for the ROOT, this node and all the nodes it branches into have been grafted into the tree from another application. Node Key String that uniquely identifies the node in this Node Application. The node key can be generated automatically or typed into the field (for a new node). However, once references to the node exist, the node key cannot be changed. Prompt The text that appears on the tree for this node. Target Anchorname contained in the help file. Do not precede with an @ sign in the Find Documents window. Title Title of the help file. Type ROOT: Top–most node of a navigation tree. NODE: Node that branches into other nodes, but is not the ROOT. If Data is not null, it links to a help file as well. DOCUMENT: Node that does not branch into other nodes, but simply links to a help file. Version 8 – 20 Version identifier of the help file. Oracle Applications System Administrator’s Guide Customizing Help in a Global Environment The Oracle Applications help system contains files translated into many different languages, and localized for diverse countries and regions. If your enterprise crosses linguistic and cultural boundaries, or if you use Oracle Human Resources, the following information may apply when customizing your help files. Linking Between Different Languages One level up the virtual directory hierarchy used in Oracle Applications help URLs are the application directories used to construct cross–application links. Two levels up are the language directories, which you can use to construct cross–language links. To create a link that goes to a help file in a different language, use the following link syntax: <A HREF = ”../../language_code/shortname/@anchorname#anchorname”> link text</A> For example, to link to ”All About Widgets” in the French version of Oracle Payables help, you would use the following link, where AP is Oracle Payables’ short name and F is the French language code: For more about French widgets, see <A HREF=”../../F/AP/@widgets#widgets”>Qu’est–ce qu’un widget?</A>. When used in this fashion, language codes are case insensitive. Note: After following a link to a different language, users stay in that language until they follow a link back out to their original language. This can be either a link they encounter within a help file, or a link from the navigation tree, which remains in their original language throughout. Oracle Applications Help 8 – 21 8 – 22 Oracle Applications System Administrator’s Guide CHAPTER 9 Applications DBA Duties T his chapter explains Oracle Applications security tasks that require a database administrator to either explicitly perform, or assist by performing prerequisite tasks. Depending on the nature of the company and the installation site, these duties may sometimes belong to the System Administrator. As such, this “borderline” area of tasks, which encompasses forms from various locations on the System Administrator menu tree, is referred to as Applications DBA duties. Applications DBA Duties 9–1 Overview of Applications DBA Duties Applications database administration (DBA) combines the efforts of an Oracle Applications System Administrator and an ORACLE database administrator. ORACLE Usernames The database privileges of Oracle Applications products depend on their ORACLE usernames. ORACLE usernames are created by an ORACLE database administrator, and then are registered as ORACLE usernames by a System Administrator. An ORACLE username identifies you as an authorized ORACLE database user. • Each ORACLE username consists of a database username and password assigned by your database administrator. • Each ORACLE username accesses a set of data within the ORACLE database. • Usually each Oracle application has its own ORACLE username, in which application–specific data resides. That is, the tables and other database objects owned by the application are accessed by the ORACLE username. Note that database usernames and passwords connect to the ORACLE database, while application usernames and passwords access Oracle Applications. You access the ORACLE database through an Oracle Applications product, and the application’s ORACLE username is what grants access privileges. Registering an ORACLE username The installation process automatically registers Oracle Applications ORACLE usernames, so you only need to register any additional ORACLE usernames that you need using the ORACLE Users window. You must register an ORACLE username with Oracle Applications if: • you create a custom application using Oracle Application Object Library • you want to associate an additional ORACLE username with an Oracle Applications product 9–2 Oracle Applications System Administrator’s Guide ☞ Attention: Before you can register an ORACLE username, your database administrator must first create an ORACLE username that connects to the ORACLE database. You then use the ORACLE Users window to register your ORACLE username. Registering a new ORACLE username using the ORACLE Users window submits a concurrent request that sets up the necessary privileges to the Oracle Application Object Library database tables you need to run your application. These database tables contain information to allow your users access to Oracle Application Object Library features, such as menus and flexfields. Reregistering ORACLE usernames You should also reregister ORACLE usernames associated with custom applications built using Oracle Application Object Library each time you upgrade Oracle Application Object Library When you change the privileges that an already registered ORACLE username has to the Oracle Application Object Library database tables: • Oracle Applications then submits a concurrent request to create or recreate privileges to the Oracle Application Object Library database tables. • The concurrent request must complete successfully in order for your changes to take effect. Registering an ORACLE username as “Restricted” Oracle Applications let you register ORACLE usernames as Restricted ORACLE usernames. A restricted ORACLE username prevents users from modifying data in Oracle Application Object Library tables. Your database administrator can set up the ORACLE username to prevent users from modifying data in other Oracle Applications tables. You can register an ORACLE username as restricted using the ORACLE Users window. • When you register an ORACLE username as restricted, you submit a concurrent request that sets up read–only privileges to the Oracle Application Object Library database tables. • Users with responsibilities that access restricted ORACLE usernames have read–only privileges to the Oracle Application Object Library database tables, which prevents them from inserting, updating, or deleting data related to such Oracle Application Object Library features as menus, flexfields, and so on. Applications DBA Duties 9–3 Defining Data Groups A data group assigns an ORACLE username to an Oracle Applications product, and includes a list of the valid Application–ORACLE username pairs. The installation process automatically defines Data Groups for Oracle Applications, so you only need to define any additional data groups that you wish to utilize. See: Defining Data Groups: page 4 – 30. See: Data Groups: page 4 – 81. Conflict Domains A conflict domain is a set of related data stored in one or more ORACLE usernames and linked by grants and synonyms. Do not confuse logical databases with your ORACLE database. The ORACLE database contains all your Oracle Applications data, with each application’s data usually residing in one ORACLE username. You can think of a logical database as a line drawn around a set of related data for which you wish to define concurrent program incompatibilities. In other words, logical databases determine which concurrent programs cannot run at the same time. Logical Databases and Program Incompatibilities When an ORACLE username is identified as belonging to a logical database, concurrent program incompatibility rules are enforced when concurrent programs connect to the ORACLE username. By checking for incompatibilities between programs running concurrently, accessing the same data, Oracle Applications ensures that data retrieved by one program is not incorrect or adversely affected when retrieved by another program. Example – Program Incompatibilities An example of a concurrent program that is incompatible with other concurrent programs is Oracle General Ledger’s Posting program, used to post journal entries. If the Posting program’s incompatibility with other Oracle Applications concurrent programs were not enforced, other financial reports running simultaneously with the Posting program could contain incorrect account balance information. Logical databases ensure that this does not happen. 9–4 Oracle Applications System Administrator’s Guide Defining Logical Databases The installation process automatically defines logical databases and assigns ORACLE usernames to them. A Standard logical database can be assigned to every Oracle Applications product so that every concurrent program, if incompatible with any other program, does not run concurrently with that program, regardless of which ORACLE username those two programs connect to. Assigning every ORACLE username to the same (e.g., Standard) logical database is a fail–safe method of enforcing program incompatibility rules. You must define new logical databases only if you build a custom application whose data do not interact with data found in existing logical databases. As a general rule, you should define a logical database for each custom application, and assign that application’s ORACLE username(s) to the corresponding logical database. However, if a custom application’s data interacts with another application’s data, you should assign the two applications’ ORACLE usernames to the same logical database. Initialization Code You can now add in custom initialization SQL code to be executed at database session startup. You specify this code using a profile option. Oracle Applications products may also have application–specific initialization code specified. The code is executed by FND_GLOBAL.INITIALIZE and APPS_INITIALIZE immediately after initializing global variables, profiles, and the contents of client_info on session startup. The order of execution is: • FND_GLOBAL values initialized • Profiles initialized • CLIENT_INFO contents initialized • FND_APPS_INIT_SQL initialization code called (if a value is defined) • FND_INIT_SQL initialization code called (if a value is defined) Applications DBA Duties 9–5 Profile Option Initialization SQL Statement – Custom Using the profile option Initialization SQL Statement – Custom, you can add site–specific initialization code, such as optimizer settings. This profile value must be a valid SQL statement, or a PL/SQL block for more than one statement, that is to be executed once at the startup of every database session. This profile option can be set at any level by the System Administrator, and is reserved for use by customers. Profile Option Initialization SQL Statement – Oracle This profile option is used by Oracle Applications to add application–specific initialization code. This profile option is set at the application level only, and will only be executed for responsibilities owned by that application. This profile option and its value settings are delivered as seed data, and must not be modified. 9–6 Oracle Applications System Administrator’s Guide Resource Consumer Groups in Oracle Applications The Database Resource Manager in Oracle8i is used to allocate and manage resources among database users and applications. Resource consumer groups and resource plans provide a method for specifying how to partition processing resources among different users. A resource consumer group defines a set of users who have similar resource usage requirements. An overall resource plan specifies how resources are distributed among the different resource consumer groups. Oracle Applications allows the system administrator to assign individual Oracle Applications users to resource consumer groups. In addition, concurrent programs and concurrent managers can be assigned to resource consumer groups. Note: These resource consumer groups apply to CPU resources only. For additional information, see Oracle8i Concepts and Oracle8i Administrator’s Guide. Assigning Resource Consumer Groups The system administrator can assign a user to a resource consumer group by setting the value of the user profile option FND:Resource Consumer Group for that particular user. The user can see this profile option but cannot update it. See: User Profiles: page A – 26 . The system administrator can assign a concurrent program to a resource consumer group in the Parameters window of the Define Concurrent Program form. See: Concurrent Programs Parameters Window: page 4 – 76 . The system administrator can assign a concurrent manager to a resource consumer group in the Define Concurrent Manager form. See: Concurrent Managers Window: page 5 – 89. Hierarchy of Resource Consumer Group Assignments Conflicts can arise between the resource consumer groups associated with a single session. For example, a concurrent manager assigned to one resource consumer group may run a concurrent program assigned to another. A similar situation arises when a user performs a Applications DBA Duties 9–7 transaction managed by a transaction manager that has a different resource consumer group than the user. To resolve such conflicts, Oracle Applications uses a hierarchy. In the case of a concurrent program, the system first checks to see if the program has an assigned resource consumer group and if so, uses that. If not, the system checks the concurrent manager running the program and uses its resource consumer group. If the concurrent manager is not assigned to a resource consumer group the system uses the default group ”Default_Consumer_Group”. In the case of a transaction manager running a transaction program, the system once again checks the resource consumer group assigned to the program, if any, and if there is none, checks the transaction manager. If the transaction manager has no assigned resource consumer group the system then checks the profile option value for the user whose session began the transaction. If there is no resource consumer group defined the system uses the default resource consumer group. For a user running a form, the system first checks the profile option value for that user and uses that if it is defined. Otherwise the system uses the default resource consumer group. 9–8 Oracle Applications System Administrator’s Guide Oracle Applications Schema Password Change Utility (FNDCPASS) Changing passwords frequently helps ensure database security. Oracle Applications provides a command line utility, FNDCPASS, to set Oracle Applications schema passwords. This utility changes the password registered in Oracle Applications tables and changes the schema password in the database. This utility can also change user passwords. Note: You cannot change a schema name, such as APPLSYS or GL, after a product is installed. ☞ Attention: Ensure that all concurrent managers have been shut down before using FNDCPASS with the SYSTEM argument. All users should log out and the Applications system should be down before running this utility. ☞ Attention: Before changing any passwords, you should make a backup of the tables FND_USER and FND_ORACLE_USERID. FNDCPASS Command and Arguments To change the APPS and APPLSYS schema password: FNDCPASS <logon> 0 Y <system/password> SYSTEM \ <username> <new_password> Use the above command with the following arguments. When specifying the SYSTEM token, FNDCPASS expects the next arguments to be the APPLSYS username and the new password. logon The Oracle username/password. system/password The username and password for the SYSTEM DBA account. username The APPLSYS username. For example, ’applsys’. new_password The new password. This command does the following: 1. Validates APPLSYS. 2. Re–registers password in Oracle Applications. 3. Changes the schema password. Applications DBA Duties 9–9 4. Changes the APPLSYS and all APPS passwords (for multi–APPS schema installations) to the same password. Because everything with a read_only_flag in the FND_ORACLE_USERID table must always have the same password, FNDCPASS updates these passwords as well as APPLSYS’s password. For example, the APPS password will be updated when the APPLSYS password is changed. 5. ALTER USER is executed to change the oracle password for the above Oracle users. For example, the following command changes the APPLSYS password to ’WELCOME’. FNDCPASS apps/apps 0 Y system/manager SYSTEM APPLSYS WELCOME To change an Oracle Applications schema password (other than APPS/APPLSYS): FNDCPASS <logon> 0 Y <system/password> ORACLE \ <username> <new_password> Use the above command with the following arguments. When specifying the ORACLE token, FNDCPASS expects the next arguments to be an ORACLE username and the new password. logon The Oracle username/password. system/password The username and password for the SYSTEM DBA account. username The Oracle username. For example, ’GL’. new_password The new password. For example, the following command changes the GL user password to ’GL1’. FNDCPASS apps/apps 0 Y system/manager ORACLE GL GL1 To change an Oracle Applications user’s password: FNDCPASS <logon> 0 Y <system/password> USER \ <username> <new_password> Use the above command with the following arguments. When specifying the USER token, FNDCPASS expects the next arguments to be an Oracle Applications username and the new password. logon 9 – 10 The Oracle username/password. Oracle Applications System Administrator’s Guide system/password The username and password for the System DBA account. username The Oracle Applications username. For example, ’VISION’. new_password The new password. For example, if you were changing the password for the user VISION to ’WELCOME’, you would use the following command: FNDCPASS apps/apps 0 Y system/manager USER VISION WELCOME Using the FNDCPASS Utility Here is an example of changing an Oracle user’s password, where <username> is the Oracle schema name. " Step 1: Use the FNDCPASS utility to change the password. FNDCPASS <APPS username>/<APPS password> 0 Y \ <SYSTEM username>/<SYSTEM password> ORACLE \ <username>\<new_password> When changing the APPS or APPLSYS passwords, replace ORACLE with SYSTEM. ☞ " Attention: Passwords for APPLSYS and the APPS schemas –– including the MRC schema –– must be the same. If you change the password for one, FNDCPASS automatically changes the others. Step 2: Update configuration files If you changed the APPS schema password (and APPLSYS) or the APPLSYSPUB password, update the following configuration files. They are used when connecting to Oracle Applications. If you changed the APPS (and APPLSYS) password, update the password in these files: • iAS_TOP/Apache/modplsql/cfg/wdbsvr.app • ORACLE_HOME/reports60/server/CGIcmd.dat If you changed the APPLSYSPUB password, update the password in these files: Applications DBA Duties 9 – 11 • FND_TOP/resource/appsweb.cfg • OA_HTML/bin/appsweb.cfg • FND_TOP/secure/<host_name>_<dbname>.dbc Note: When changing APPS (or APPLSYS) and APPLSYSPUB passwords, new connection requests cannot be fulfilled successfully by the web server after Step 1 has been completed and until Step 2 is completed. " Step 3: Verify the new password If you changed the password for APPS (and APPLSYS), restart all concurrent managers, then log on to Oracle Applications to test the new password. 9 – 12 Oracle Applications System Administrator’s Guide ORACLE Users Window Register an ORACLE username with Oracle Applications. An ORACLE username grants access privileges to the ORACLE database. The installation process always registers your ORACLE username, so you need not register it unless you create a custom application using Oracle Application Object Library, or if you wish to associate an additional ORACLE username with Oracle Applications. If you register an ORACLE username as a “restricted” ORACLE username, you submit a concurrent request to set up read–only privileges to the Oracle Application Object Library tables. An “enabled” ORACLE username has all privileges to those tables. A “disabled” ORACLE username has no privileges to those tables. If you do not register and enable your ORACLE username or if you disable a registered ORACLE username, your user cannot use Oracle Application Object Library features such as menus and flexfields. You should not change the registration of any ORACLE usernames that the installation process registers, other than changing the passwords. Applications DBA Duties 9 – 13 If you are registering a change to an existing ORACLE password, make the password change in the database immediately AFTER you register the password change in Oracle Applications. Until you register the password changes in Oracle Applications and implement them in the database, responsibilities using this ORACLE username cannot connect to the database. Your password must follow the guidelines for creating passwords discussed in the Oracle 8i documentation. Remember that if you use non–character values in your password, you may need to use quotation marks around your password when changing it in the database. Warning: If you are changing the password to the applsys ORACLE username, which contains the Oracle Application Object Library tables, you must not change the passwords to any other ORACLE usernames at the same time. As soon as you change and save the password, you should immediately log out of the Oracle Applications, make the applsys password change in the database, and then sign on again before you do anything else. You should also ensure that no other users are logged on to the Oracle Applications while you are changing the applsys password. Passwords for the APPS Accounts The applsys password must be identical to the password for the APPS accounts (APPS, APPS2, APPS3). The uniform passwords enable the different sets of books to operate correctly. Prerequisites • Create an ORACLE username that matches your application needs (this function is usually performed by a database administrator). The ORACLE username must include the create session privilege. • Or, coordinate any change you intend to make to an existing ORACLE username password. You should register the password change in Oracle Applications and change the password in the database immediately afterwards. ☞ 9 – 14 Attention: Until you have both registered the changes in Oracle Applications and then implemented them in the database, responsibilities using your ORACLE username cannot connect to the database. Oracle Applications System Administrator’s Guide ORACLE Users Block Password Enter the password of your ORACLE username. Your password is not displayed. If you are registering a change to an existing ORACLE password, make the password change in the database immediately AFTER you register the password change in Oracle Applications. Until you register the password changes in Oracle Applications and implement them in the database, responsibilities using this ORACLE username cannot connect to the database. Warning: If you are changing the password to the applsys ORACLE username, which contains the Oracle Application Object Library tables), you must not change the passwords to any other ORACLE usernames at the same time. As soon as you change and save the password, you should immediately log out of the Oracle Applications, make the applsys password change in the database, and then sign on again before you do anything else. You should also ensure that no other users are logged on to the Oracle Applications while you are changing the applsys password. Privilege Enter the type of privilege to the Oracle Application Object Library database tables that you want this ORACLE username to have. The Oracle Application Object Library tables contain information for Oracle Application Object Library features such as menus, help text, and flexfields. If you do not have access to these tables, you cannot use these features. The default value for this field is Enabled. Enabled An enabled ORACLE username has full privileges (insert, query, update, and delete) to the Oracle Application Object Library database tables. Restricted A restricted ORACLE username has only query privileges to the Oracle Application Object Library database tables. This ORACLE username can view Oracle Application Object Library data, but cannot insert, update, or delete information. Disabled A disabled ORACLE username has no privileges to the Oracle Application Object Library database tables. This ORACLE username cannot insert, Applications DBA Duties 9 – 15 query, update, or delete Oracle Application Object Library information and cannot use Oracle Application Object Library features. Two additional privilege types appear, associated with ORACLE usernames configured at installation. However, these privilege types cannot be selected from your list of values. Public The installation process registered an ORACLE username with the Public privilege, allowing all users to access the Application Sign–On Security form where they must enter a valid Oracle Applications username and password. Applsys The installation process registered the Oracle Application Object Library ORACLE username with the Applsys privilege. See: Overview of Oracle Applications Security: page 2 – 2 Installing Oracle Applications Install Group Enter the value of the installation group associated with your ORACLE username. Install group numbers should be consecutive whole numbers, where 1 represents the first set of books (or first set of product installations), 2 is the second set of books, 3 is the third set of books, and so on. Install group number 0 represents products that need only single installations. ☞ Attention: Since the installation process does not affect ORACLE usernames (also known as ”schemas”) for custom applications, this value is for your reference only and is currently not used. See: Installing Oracle Applications 9 – 16 Oracle Applications System Administrator’s Guide Concurrent Conflicts Domains Window Concurrent conflicts domains ensure that incompatible concurrent programs are not allowed to run simultaneously using related information. For example, a conflict domain could be a range of numbers. Two concurrent programs could be incompatible if they used the same range of numbers, but compatible if they used different ranges of numbers. Concurrent managers use concurrent conflicts domains to determine which concurrent programs cannot run at the same time. For example: • When concurrent program A is defined as incompatible with concurrent program B, then A and B cannot run at the same time using the same concurrent conflict domain. • If, for example, the programs A and B are assigned to the concurrent conflicts domains Standard when they are submitted, then programs A and B will not run together at the same time. Applications DBA Duties 9 – 17 " 9 – 18 Defining a Conflict Domain 1. Enter a unique Domain name. The name you enter here may be used as a value for a parameter in the Submit Requests window. 2. Enter a unique Short Name for your domain. Limit the Short Name to 8 characters. 3. Optionally, you can provide a description for your domain. Oracle Applications System Administrator’s Guide Applications Window When you define a custom application, you supply several pieces of information to Oracle Applications. You must register your application name, application short name, application basepath, and application description with Oracle Application Object Library. Oracle Application Object Library uses this information to identify application objects such as responsibilities and forms as belonging to your application. This identification with your custom application allows Oracle Applications to preserve your application objects and customizations during upgrades. The application basepath tells Oracle Application Object Library where to find the files associated with your custom application. You can use your custom application to name your custom menus, concurrent programs, custom responsibilities, and many other custom components. For some objects, the application part of the name only ensures uniqueness across Oracle Applications. For other components, the application you choose has an effect on the functionality of your custom object. Applications DBA Duties 9 – 19 Prerequisites ❑ If you are creating a custom application: Define an environment variable that translates to your application’s basepath (see Oracle Applications Concepts for your operating system). ❑ If you are creating a custom application: Set up a directory structure for your application (see Oracle Applications Concepts for your operating system) ❑ If you are using this window with Oracle Alert: If your application resides in a database other than the database where Oracle Alert resides, you must create a database link. Applications Block When you register a custom application, you provide the information Oracle uses to identify it whenever you reference it. Although you can change the name of an application, doing so may cause a change in the application code where you hardcode your application name. For example, if you pass program arguments through the menu that have application name hardcoded, you will also have to update them. ☞ Attention: You should not change the name of any application that you did not develop, as you cannot be sure of the consequences. You should never change the name of any Oracle Applications application, because these applications may contain hardcoded references to the application name. Application This user–friendly name appears in lists seen by application users. Short Name Oracle Applications use the application short name when identifying forms, menus, concurrent programs and other application components. The short name is stored in hidden fields while the name displays for users. Your short name should not include spaces. You use an application short name when you request a concurrent process from a form, and when you invoke a subroutine from a menu. Suggestion: Although your short name can be up to 50 characters, we recommend that you use only four or five 9 – 20 Oracle Applications System Administrator’s Guide characters for ease in maintaining your application and in calling routines that use your short name. To reduce the risk that your custom application short name could conflict with a future Oracle Applications short name, we recommend that your custom application short name begins with ”XX”. Basepath Enter the name of an environment variable that represents the top directory of your application’s directory tree. Oracle Applications search specific directories beneath the basepath for your application’s executable files and scripts when defining actions that reside in external files. In general, your application’s basepath should be unique so that separate applications do not write to the same directories. However, you may define custom applications that will be used only for naming your custom responsibilities, menus and other data components. In this case, you can use the basepath of the Oracle application that uses the same forms as your application. For example, if you are defining a Custom_GL application, you could use the GL_TOP basepath for your custom application. In this case, however, you should not create custom components in the directory structure, such as custom forms and reports, because they will be difficult to isolate for maintenance and upgrading. See: Oracle Applications Concepts Applications DBA Duties 9 – 21 Network Test Window Use the Network Test window to evaluate the performance of your network with Oracle Applications. Knowing the latency and bandwidth available lets you plan and modify your machine setup for the best performance. The Network Test consists of a latency test and a bandwidth test. Latency is the time it takes for a single packet to make a round trip from your client side application to the server. The bandwidth test examines the data rate to see how many bytes per second your network can transfer from the server to the client. You can provide notes to indicate the conditions for each test you run. 9 – 22 Oracle Applications System Administrator’s Guide " To Test Latency On a Network Specify the number of Trials and the Iterations for each trial. For each iteration, a single packet is sent from the client application to the server and back. A trial consists of the specified number of iterations. The total time for all round trips in a trial is divided by the number of iterations to obtain the average latency that is that trial’s result. The default settings are 5 trials of 100 iterations each. Select the Run Test button to perform the test. " To Test Bandwidth On a Network Specify the number of Trials and the Iterations for each trial. For each iteration, several kilobytes of data are sent from the client to the server and back. The form measures the average rate at which the data travels. The default settings are 5 trials of 10 iterations each. Select the Run Test button to perform the test. Evaluating the Test Results The results of both the latency and bandwidth tests display in the Results block. Latency Results display the minimum, average, and maximum round trip time for a single round trip from a PC client to the server. Bandwidth Results display the minimum, average, and maximum data rate in kilobytes per second over the trials. For comparison, the sample data fields show the results of tests completed at the development headquarters in Redwood Shores. These tests were conducted under ideal conditions; it is unlikely that your results can match them. If one test result varies significantly from the other trials, discard that information. Purging Your Data Use the Clear Old Test Data button to purge previous test results from your database. Applications DBA Duties 9 – 23 Administering Folders Administer folders by assigning default folder definitions either to a specific user or to a responsibility. Manage folder definitions by assigning them to new owners, determining which folder definitions should be public (accessible by anyone), and setting the AutoQuery behavior of the folders. You can do different tasks depending on how you search for folders or folder assignments in the Find Default Folders window. Prerequisites ❑ Create default folders. See: Customizing the Presentation of Data in a Folder (Oracle Applications User’s Guide). 9 – 24 Oracle Applications System Administrator’s Guide " To Assign a Folder to a Responsibility: 1. Navigate to the Find Default Folders window. Use ”Default folder assignments by responsibility” to view the responsibilities for which to assign default folders. 2. You can assign default folders for each responsibility. When users of this responsibility navigate to this folder block, they see the default folder you specify, unless it is overridden by a user–level default. From the Folder field, enter the name of the default folder. The name of the folder set to which the folder belongs is filled in automatically. If you do not know the name of the folder, enter the folder set first, then view the folders that belong to that set. After you save a default folder definition for a folder set, that folder set no longer appears in the list of values. Folder Set: Every folder set is associated with a particular folder block, and a user or responsibility can have one default folder within each folder set. The folder set name generally describes the records shown in the block; some blocks may have multiple sets of folders associated with them. " To Assign a Folder to a User: 1. Navigate to the Find Default Folders window. Use ”Default folder assignments by user” to view a list of eligible users. 2. You can assign default folders for each responsibility. When users navigate to this folder block, they see the default folder you specify. From the Folder field, enter the name of the default folder. The name of the folder set to which the folder belongs is filled in automatically. If you do not know the name of the folder, enter the folder set first, then view the folders that belong to that set. After you save a default folder definition for a folder set, that folder set no longer appears in the list of values. Folder Set: Every folder set is associated with a particular folder block, and a user or responsibility can have one default folder within each folder set. The folder set name generally describes the records shown in the block; some blocks may have multiple sets of folders associated with them. Source Type: Either User or Responsibility. Records entered in this window use the source type of User. If one of the current user’s Applications DBA Duties 9 – 25 responsibilities has default folders defined, the default folders are listed with a source type of Responsibility. User defaults override Responsibility defaults. You cannot delete Responsibility default folders in this window. Responsibility: The responsibility which uses this default folder definition. " To Assign Ownership of a Folder: 1. Navigate to the Find Default Folders window. Use ”Folders” to view general information about folders. 2. Select the folder(s) that requires a change of ownership. 3. Choose ”Change Owner” and enter the new owner for the selected folders, or change the value in the Owner field to change the owner of a single folder. Folder Set: Every folder set is associated with a particular folder block, and a user or responsibility can have one default folder within each folder set. The folder set name generally describes the records shown in the block; some blocks may have multiple sets of folders associated with them. Public: Whether this folder definition is public; whether users besides the owner can use it. Use this field to determine whether to make folder definitions generally available. Anyone’s Default: Whether this folder definition is used as a default by a user or a responsibility. If it is a default definition, use Default Assignments to view the users and responsibilities for which it is the default folder definition. Default Assignments: The users and responsibilities that use this folder definition as a default. " To Delete a Folder Definition 1. Navigate to the Find Default Folders window. Use ”Folders” to view general information about folders. 2. If you queried up multiple folders, select the folder(s) to delete. 3. Delete the folder. Deleting folders deletes the folder definition along with any user and responsibility default assignments for the folder. See Also Customizing the Presentation of Data in a Folder (Oracle Applications User’s Guide) 9 – 26 Oracle Applications System Administrator’s Guide Querying Records in a Folder (Oracle Applications User’s Guide) Managing Folder Definitions (Oracle Applications User’s Guide) Applications DBA Duties 9 – 27 Languages Window Use the Languages window to review and modify information about the languages available for use in Oracle Applications. Languages Block Each record includes the primary language, such as ’en’ for English, the territory code where the dialect is spoken, such as ’US’ for U.S.A., the short name for the dialect, such as ’usaeng’, and the full name of the dialect, such as ’American English’. Each record also includes the internal language code and territory code, the ISO (International Standards Organization) language code and territory code, the code set for the dialect, and a status indicator for the dialect. Normally you would not want to update the seeded data that comes with your products, but you may wish to modify the way the Language Description is represented in the Translations window. 9 – 28 Oracle Applications System Administrator’s Guide Description You can update the description of the Language to change the field name displayed in the Translations window. Applications DBA Duties 9 – 29 Territories Window Use the Territories window to review and modify information for the country values used in Oracle Applications. Territories Block Each record includes the two–letter upper case territory Code such as ”US”, the Short Name for the territory such as ”United States”, the NLS Code, the ISO numeric entity code, an Alternate territory code, the EU Country Code, and a longer description (Description), such as ”United States of America”. Normally you would not want to update the seeded data that comes with your products, but you may wish to modify the way the country is represented in List of Values through out your applications. Description You can update the description of the Territory to change the territory value displayed in List of Values used in Oracle Application products. 9 – 30 Oracle Applications System Administrator’s Guide CHAPTER 10 Cost–Based Optimization in Oracle Applications T his chapter explains how you implement cost–based optimization in Oracle Applications. Cost–Based Optimization in Oracle Applications 10 – 1 Oracle Applications and Cost–Based Optimization Oracle Applications Release 11i uses the cost–based optimization (CBO) approach in choosing the most efficient way to execute SQL statements. Using this approach, the optimizer determines which execution plan is most efficient by considering available access paths and factoring information based on statistics for the schema objects accessed by the SQL statement. To use cost–based optimization effectively, you must keep your database statistics current. Oracle Applications provides a set of procedures in the FND_STATS package to help you collect these statistics. FND_STATS uses the DBMS_STATS package to gather statistics. Also, you can manipulate some of your session level parameters for testing optimization. These parameters can be controlled by the system profile option ”Initialization SQL Statement – Custom.” Use the FND_CTL procedures in this profile option’s value for an applications user’s session. For information on cost–based optimization, refer to Oracle 8i Concepts and Oracle 8i Tuning. 10 – 2 Oracle Applications System Administrator’s Guide Parameters for Cost–Based Optimization This section describes the mandatory parameters in the init.ora file related to cost–based optimization. Most of these parameters are dynamic and can be set at the session level. For online users, there are profile options to change the parameter values. For concurrent programs, the Define Concurrent Programs form allows the system administrator or application developer to specify an optimizer mode. Other parameters are set by profile options. optimizer_features_enable This parameter allows you to change the init.ora parameters which control the optimizer’s behavior. Set this parameter to the current release. For more information on this parameter, see Oracle 8i Reference. Example: optimizer_features_enable = 8.1.6 optimizer_mode This parameter specifies the behavior of the optimizer. Prior to Release 11i, optimizer_mode was always set to rule. For Release 11i, you must set optimizer_mode to choose. Although Oracle Applications modules will set the optimizer mode to either first_rows or all_rows, depending on whether the session is online or batch, an Oracle Applications database must be started with the optimizer mode set to choose. Many of the system dictionary views, in particular Export, still require rule–based optimization. In general, the profile options will ensure that online users use first_rows, and that batch jobs use all_rows. For more information on this parameter, see Oracle 8i Reference. Example: optimizer_mode = choose _optimizer_undo_changes This parameter is not dynamic and for rule–based optimization (RBO) compatibility must remain as TRUE. For Release 11i, it is recommended that this parameter be set to FALSE; but if custom code continues to Cost–Based Optimization in Oracle Applications 10 – 3 use RBO, and experiences performance problems, then setting this parameter to TRUE should not affect CBO queries. This parameter will be removed in a future release. Example: _optimizer_undo_changes = FALSE _optimizer_mode_force This parameter forces recursive SQL ( packaged SQL ) to use the optimizer_mode from the current environment. This paramater must be set to TRUE. Example: _optimizer_mode_force = TRUE db_file_multiblock_read_count This parameter is used for multi–block I/O and specifies the minimum number of blocks read in one I/O operation during a sequential scan. In previous releases, many Oracle Applications customers had multiblock read count set at 16 or 32 depending on block size. For Release 11i, the recommended value is now 8 because this provides the best value for CBO. This parameter can be set at the session level, so specific batch jobs, index rebuilds, and the analyze command can take full advantage of the maximum available multiblock I/O. For more information on this parameter, see Oracle 8i Reference. Example: db_file_multiblock_read_count = 8 optimizer_max_permutations This parameter lets the user limit the amount of work the optimizer expends on optimizing queries with large joins. The default (80000) can cause excessive parse times in some circumstances. If necessary, and if recommended to do so by Oracle Support, this value can be reduced to just under 80000 (79000). The parameter must be set to 79,000 or less in order to allow the optimizer to consider more than the starting table. The default of 80,000 limits the number of starting tables that the optimizer considers. For more information on this parameter, see Oracle 8i Reference. 10 – 4 Oracle Applications System Administrator’s Guide Example: optimizer_max_permutations = 79000 _complex_view_merging This parameter enables the complex view merging feature which allows certain types of complex views to be merged such as the Apps KFV views. This parameter is disabled by default, so it must be explicitly set. Example: _complex_view_merging = TRUE _push_join_predicate This parameter enables the push join predicate feature that allows the optimizer to push join predicates inside nonmergeable views. This helps eliminate full table scans against the adjoining table of a nonmergeable view. Pushing the join predicate allows the optimizer to promote an index on the table inside the view and utilize a nested loop join to the outer referencing table. Push join predicate is disabled by default, so it must be explicitly enabled. Example: _push_join_predicate = TRUE _sort_elimination_cost_ratio Setting this parameter to 5 forces the optimizer to only eliminate the sort when it is 1/5th the cost of the index probe (or conversely the index probe is 5 times as costly as the sort). Example: _sort_elimination_cost_ratio = 5 _use_column_stats_for_function This parameter allows the optimizer to utilize dictionary statistics for columns that are involved in no–op expressions such as [col + 0] and [col || ’’]. If this parameter is disabled (FALSE), the optimizer will employ internal default statistics for these complex expressions that can result in higher parse times and more expensive execution plans. Example: Cost–Based Optimization in Oracle Applications 10 – 5 _use_column_stats_for_function = TRUE _like_with_bind_as_equality This parameter forces the optimizer to treat expressions of the form [indexed–column like :b1] similarly to [index–column = :b1]. Oracle Applications have many queries which use the LIKE operator on indexed columns with binds. Since binds are involved, CBO assigns internal default selectivity estimates for the LIKE operator (5%), and hence does not consider the index selective. Example: _like_with_bind_as_equality = TRUE _or_expand_nvl_predicate This parameter allows the optimizer to probe an index for a column involved in an nvl() function as an r–value. If enabled, the optimizer transforms expressions of the form [p.project_id = nvl(:b1,p.project_id)] into an OR expanded UNION where one side of the UNION contains the predicate ((:b1 is not null) and (p.project_id =:b1)) and the second branch of the UNION contains the predicate (:b1 is null) Therefore, if a value for the project_id bind is supplied, the optimizer executes the first branch of the UNION and probes the project_id index. This improves performance for the Oracle Applications legacy code which employs the nvl() construct on indexed columns. Example: _or_expand_nvl_predicate = TRUE _push_join_union_view This parameter allows the optimizer to push join predicates inside nonmergeable views which contain UNION ALL set operators. This improves query execution performance for queries joining to views which contain UNION ALL operators. 10 – 6 Oracle Applications System Administrator’s Guide Example: _push_join_union_view = TRUE _table_scan_cost_plus_one This parameter increases the cost of a full table scan by one in order to eliminate ties between a full table scan on a small lookup table and the cost of a unique or range index scan on the lookup table. Example: _table_scan_cost_plus_one = TRUE _fast_full_scan_enabled This parameter is used to disable fast full scans. Example: _fast_full_scan_enabled = FALSE _ordered_nested_loop When set to TRUE, this parameter reduces the cost of a nested loop join/index probe when the left side of the join input is being satisfied via an index or sort row source. Example: _ordered_nested_loop = TRUE optimizer_percent_parallel This parameter specifies the amount of parallelism to include in the CBO cost function. The default is zero, and normally should not be changed. It is necessary to ensure that parallel query is not included in costing. For more information on this parameter, see Oracle 8i Reference. Example: optimizer_percent_parallel=0 query_rewrite_enabled This parameter allows you to enable or disable query rewriting. This parameter must be set to TRUE for materialized views and function Cost–Based Optimization in Oracle Applications 10 – 7 based indexes, which are used in some applications in Release 11i. The recommended value is TRUE. For more information on this parameter, see Oracle 8i Reference. Example: query_rewrite_enabled = TRUE compatible The Oracle 8i release for your Oracle Applications instance. Example: compatible = 8.1.6 10 – 8 Oracle Applications System Administrator’s Guide Concurrent Programs for CBO Oracle Applications provides concurrent programs that use the package FND_STATS to gather statistics for your applications database objects. See: FND_STATS Package: page 10 – 17 For information on DBMS_STATS see Oracle 8i Tuning. The following concurrent programs are available for collecting and maintaining statistics: • Gather Table Statistics • Backup Table Statistics • Restore Table Statistics • Gather Schema Statistics • Gather Column Statistics Cost–Based Optimization in Oracle Applications 10 – 9 Gather Table Statistics The Gather Table Statistics program gathers the table statistics for the specified table. This program keeps a backup of existing statistics in the FND_STATTAB table before gathering new statistics. This program also gathers the related index statistics by default. This concurrent program attempts to parallelize as much of the work as possible. This operation does not parallelize if the user does not have select privilege on the table being analyzed. If the value of backup_flag is BACKUP then it exports the old statistics using export_table_stats before gathering the new statistics. The exported data is stored in FND_STATTAB. If the value of backup_flag is anything other than BACKUP then the table statistics are not exported. For a detailed description of the procedure used by this concurrent program, see: GATHER_TABLE_STATS Procedure: page 10 – 24. Parameters Owner Name The owner of the table. Table Name The name of the table. Percent The percentage of the rows to use for the statistics using the estimation technique. NULL means to use exact computation. The valid range is from 0 to 99. Degree The degree of parallelism. NULL means to use the table default value. Partition Name The name of the partition. Backup Flag The backup flag indicates whether to backup statistics. Set this flag to BACKUP to back up your statistics. 10 – 10 Oracle Applications System Administrator’s Guide Granularity The granularity of statistics to collect (only relevant for tables that are partitioned). Valid values are: DEFAULT – Gather global and partition–level statistics. SUBPARTITION – Gather subpartition–level statistics. PARTITION – Gather partition–level statistics. GLOBAL – Gather global statistics. ALL – Gather all (subpartition, partition, and global) statistics. Cost–Based Optimization in Oracle Applications 10 – 11 Backup Table Statistics This concurrent program stores the statistics of the given table into the FND_STATTAB table. This program also backs up the related index and column statistics by default. You can assign the statistics an identifier that can be used with the Restore Table Statistics program. Statistics can be backed up with different statistics identifiers. The default identifier is BACKUP. You can keep different versions of the backup with different identifiers. For a detailed description of the procedure used by this concurrent program, see: BACKUP_TABLE_STATS Procedure: page 10 – 17. Parameters Schema Name The name of the schema. The value ALL means all Oracle Applications schemas. Table Name The name of the table. Statistics ID An optional identifier to associate with these statistics within FND_STATTAB. Partition Name Name of the table partition. If the table is partitioned and if the partition name is NULL, then global and partition table statistics are exported. 10 – 12 Oracle Applications System Administrator’s Guide Restore Table Statistics This concurrent program restores the previously backed up table statistics from a given statistics identifier. The default statistics identifier is BACKUP. All index and column statistics associated with the specified table are imported as well. For a detailed description of the procedure used by this concurrent program, see: RESTORE_TABLE_STATS Procedure: page 10 – 19. Parameters Owner Name The name of the schema. The value ALL means all Oracle Applications schemas. Table Name The name of the table. Statistics ID An optional identifier to associate with these statistics within FND_STATTAB. Partition Name Name of the table partition. If the table is partitioned and if the partition name is NULL, then global and partition table statistics are imported. Cost–Based Optimization in Oracle Applications 10 – 13 Gather Schema Statistics This concurrent program gathers the specified schema level statistics. Before gathering the statistics, this program also creates a backup of the existing statistics so that if the database slows down after gathering new statistics, you can restore the system to its previous status. The statistics ID used for this backup is NULL. After gathering the schema level statistics this program creates the histogram for the specified columns in the FND_HISTOGRAM_COLS tables. Also, this program populates default statistics for all the INTERFACE tables as specified in the FND_EXCLUDE_TABLE_STATS table. You should run this concurrent program periodically. For a detailed description of the procedure used by this concurrent program, see: GATHER_SCHEMA_STATS Procedure: page 10 – 21. Parameters Schema Name The name of the schema to analyze. Specify ALL for all Oracle Applications schemas (all schemas that have an entry in the FND_PRODUCT_INSTALLATIONS table). Percent The percentage of the rows to estimate. NULL means to use exact computation. The valid range is from 0 to 99. Degree The degree of parallelism. NULL means to use the table default value. Backup Flag If the value is NOBACKUP then the GATHER_SCHEMA_STATS procedure will not take a backup of the current statistics. This way the GATHER_SCHEMA_STATS procedure will run faster. If the Internal Flag is set to INTERNAL, the ANALYZE command will be used instead of DBMS_STATS. 10 – 14 Oracle Applications System Administrator’s Guide Gather Column Statistics This concurrent program is actually two procedures which gather column statistics. One procedure gathers the column statistics for all the columns specified in the SEED data table FND_HISTOGRAM_COLS. The second procedure gathers the column statistics for a specified column_name in a given table. The procedure takes a backup into the FND_STATTAB table before gathering the statistics. For a detailed description of the procedure used by this concurrent program, see: GATHER_COLUMN_STATS Procedure: page 10 – 26. Parameters Table Owner The owner of the table. Table Name The name of the table. Column Name The name of the column. Estimate Percent The percentage of the rows to use for the statistics using the estimation technique. NULL means to use exact computation. The valid range is from 0 to 99. Parallel Degree The degree of parallelism. NULL means to use the table default value. Bucket Size The number of buckets in the histogram. Backup Flag The backup flag indicates whether to backup statistics. Set this flag to BACKUP to back up your statistics. NULL means no backup will be taken. Cost–Based Optimization in Oracle Applications 10 – 15 Gather All Column Statistics This concurrent program is obsolete in Release 11i and should not be used. 10 – 16 Oracle Applications System Administrator’s Guide FND_STATS Package The FND_STATS package provides procedures for gathering statistics for Oracle Applications database objects. It also provides procedures for storing the current statistics in a table (FND_STATTAB) and restoring them back. This package also facilitates the gathering of some statistics in parallel. This package calls the DBMS_STATS package. The FND_STATS package also has procedures to populate the FND_STATS_HIST table to record the time taken for gathering the statistics for the different types of objects. For more information on DBMS_STATS, see Oracle 8i Tuning and Oracle 8i Supplied Packages Reference. CREATE_STAT_TABLE Procedure This procedure creates a table with the name FND_STATTAB in the APPLSYS schema to hold statistics. This table should be accessed only through the procedures in this package. The first procedure below creates the default table FND_STATTAB in the FND specific schema. The other procedure uses parameters for schema name, table name and tablespace name. Syntax FND_STATS.CREATE_STAT_TABLE ; FND_STATS.CREATE_STAT_TABLE ( schemaname IN VARCHAR2, tabname IN VARCHAR2, tblspcname IN VARCHAR2); Parameters schemaname Name of the schema. tabname Name of the table. tblspcname Tablespace in which to create the statistics tables. If none is specified, then the tables are created in the user’s default tablespace. BACKUP_TABLE_STATS This procedure stores the statistics for a particular table in the FND_STATTAB table. Setting cascade to TRUE results in all index and Cost–Based Optimization in Oracle Applications 10 – 17 column statistics associated with the specified table being stored as well. A different version can be stored by specifying a different statistics identifier (statid). Syntax FND_STATS.BACKUP_TABLE_STATS ( errbuf OUT VARCHAR2, retcode OUT VARCHAR2, schemaname VARCHAR2, tabname VARCHAR2, statid VARCHAR2 DEFAULT ’BACKUP’, partname VARCHAR2 DEFAULT NULL, cascade BOOLEAN DEFAULT TRUE); FND_STATS.BACKUP_TABLE_STATS ( schemaname VARCHAR2, tabname VARCHAR2, statid VARCHAR2 DEFAULT ’BACKUP’, partname VARCHAR2 DEFAULT NULL, cascade BOOLEAN DEFAULT TRUE); Parameters errbuf Required for running as a concurrent process. retcode Required for running as a concurrent process. schemaname Name of the schema. tabname Name of the table. statid Optional identifier to associate with these statistics within FND_STATTAB. partname Name of the table partition. If the table is partitioned and if partname is NULL, then global and partition table statistics are exported. cascade If TRUE, then column and index statistics for this table are also exported. BACKUP_SCHEMA_STATS Procedure This procedure stores the statistics for a schema in the FND_STATTAB table. A different version can be stored by specifying a different statid. 10 – 18 Oracle Applications System Administrator’s Guide Syntax FND_STATS.BACKUP_TABLE_STATS ( schemaname VARCHAR2, statid VARCHAR2 DEFAULT NULL ); Parameters schemaname Name of the schema. ALL means all Oracle Applications schemas. statid Optional identifier to associate with these statistics within FND_STATTAB. RESTORE_SCHEMA_STATS Procedure This procedure retrieves statistics for all objects in the schema identified by schemaname from the FND_STATTAB table for the given statid and stores them in the dictionary. Syntax FND_STATS.RESTORE_SCHEMA_STATS ( schemaname VARCHAR2, statid VARCHAR2 DEFAULT NULL ); Parameters schemaname Name of the schema. ALL means all Oracle Applications schemas. statid Optional identifier to associate with these statistics within FND_STATTAB. RESTORE_TABLE_STATS Procedure This procedure retrieves statistics for a particular table from the FND_STATTAB table for the given statid (optional) and stores them in the dictionary. Setting cascade to TRUE results in all index and column statistics associated with the specified table being imported also. Cost–Based Optimization in Oracle Applications 10 – 19 Syntax FND_STATS.RESTORE_TABLE_STATS ( errbuf VARCHAR2, retcode VARCHAR2, ownname VARCHAR2, tabname VARCHAR2, statid VARCHAR2 DEFAULT NULL, partname VARCHAR2 DEFAULT NULL, cascade BOOLEAN DEFAULT TRUE, ); FND_STATS.RESTORE_TABLE_STATS ( ownname VARCHAR2, tabname VARCHAR2, statid VARCHAR2 DEFAULT NULL, partname VARCHAR2 DEFAULT NULL, cascade BOOLEAN DEFAULT TRUE, ); Parameters errbuf Required for running as a concurrent process. retcode Required for running as a concurrent process. ownname Name of the schema. tabname Name of the table. statid Optional identifier to associate with these statistics within FND_STATTAB. partname Name of the table partition. If the table is partitioned and if partname is NULL, then global and partition table statistics are exported. cascade If TRUE, then column and index statistics for this table are also exported. RESTORE_COLUMN_STATS Procedure This procedure retrieves statistics for a particular column from the FND_STATTAB table for the given statid (optional) and stores them in the dictionary. There are two versions of this procedure. One uses 10 – 20 Oracle Applications System Administrator’s Guide specific input values for the owner/table and columns . The other version restores the statistics for all the columns as specified in the FND_HISTOGRAM_COLS table. Syntax FND_STATS.RESTORE_COLUMN_STATS ( ownname VARCHAR2, tabname VARCHAR2, colname VARCHAR2, partname VARCHAR2 DEFAULT NULL, statid VARCHAR2 DEFAULT NULL ); FND_STATS.RESTORE_COLUMN_STATS ( statid VARCHAR2 DEFAULT NULL ); Parameters ownname Name of the schema. tabname Name of the table. colname Name of the column. Optional identifier to associate with these statistics within FND_STATTAB. partname Name of the table partition. If the table is partitioned and if partname is NULL, then global and partition table statistics are exported. statid Optional identifier to associate with these statistics within FND_STATTAB. GATHER_SCHEMA_STATS Procedure This procedure gathers statistics for all objects in a schema. This procedure is also available through the concurrent program ”Gather Schema Statistics.” If this procedure fails at any time during operation, it can be restarted by supplying the request ID for the request that failed. The request ID can be captured when the program is started from concurrent manager. Cost–Based Optimization in Oracle Applications 10 – 21 Syntax FND_STATS.GATHER_SCHEMA_STATS ( schemaname VARCHAR2, estimate_percent NUMBER DEFAULT NULL, degree NUMBER DEFAULT NULL, internal_flag NUMBER DEFAULT NULL, Errors OUT Error_Out ); FND_STATS.GATHER_SCHEMA_STATS ( errbuf OUT VARCHAR2 , retcode OUT VARCHAR2 , schemaname VARCHAR2, estimate_percent NUMBER DEFAULT NULL, degree NUMBER DEFAULT NULL, ); This procedure has output parameters and cannot be used directly from the SQL*Plus prompt. An example SQL wrapper is shown below. Example set serveroutput on BEGIN DECLARE Error FND_STATS.Error_Out; BEGIN FND_STATS.GATHER_SCHEMA_STATS(’&schema’,&percent, °ree,’&flag’,Error); FOR i in 0..FND_STATS.MAX_ERRORS_PRINTED LOOP exit when Error(i) is null; dbms_output.put_line(’Error #’||i||’ ’||Error(i)); END LOOP; END; END; 10 – 22 Oracle Applications System Administrator’s Guide Parameters errbuf Required for running as a concurrent process. retcode Required for running as a concurrent process. schemaname Schema to analyze. ALL means all Oracle Applications schemas. estimate_percent Percentage of rows to use for the statistics using the estimation. If you enter NULL, the procedure will default to 10%. The valid range is [00,99]. degree Degree of parallelism. NULL will default to min(cpu_count, parallel_max_servers). internal_flag If the value is NOBACKUP then GATHER_SCHEMA_STATS will not create a backup of the current statistics. This way the GATHER_SCHEMA_STATS procedure will be completed faster. INTERNAL means that the ANALYZE command will be used instead of DBMS_STATS. errors Output errors. Exceptions ORA–20000: Schema does not exist or insufficient privileges. ORA–20001: Bad input value. GATHER_INDEX_STATS Procedure This procedure gathers index statistics. It is equivalent to running ANALYZE INDEX [ownname.]indname [PARTITION partname] COMPUTE STATISTICS | ESTIMATE STATISTICS SAMPLE estimate_percent PERCENT . It does not execute in parallel. If the value of backup_flag is BACKUP, then it executes the procedure EXPORT_TABLE_STATS before gathering the statistics. The exported data is stored in FND_STATTAB. If the value of backup_flag is not BACKUP then EXPORT_TABLE_STATS is not performed. Syntax FND_STATS.GATHER_INDEX_STATS ( ownname VARCHAR2, Cost–Based Optimization in Oracle Applications 10 – 23 indname percent partname backup_flag VARCHAR2, NUMBER DEFAULT NULL, VARCHAR2 DEFAULT NULL, VARCHAR2 DEFAULT NULL ); Parameters ownname Schema of index to analyze. indname Name of index. percent Percentage of rows to use for the statistics using the estimation. NULL means to use exact computation. The valid range is [00,99]. partname Partition name. backup_flag The value BACKUP indicates that the procedure EXPORT_TABLE_STATS is executed before gathering statistics. The default value is NULL. GATHER_TABLE_STATS Procedure This procedure gathers table and column (and index) statistics. It attempts to parallelize as much of the work as possible. This operation does not parallelize if the user does not have select privilege on the table being analyzed. If the value of backup_flag is BACKUP, then it executes the procedure EXPORT_TABLE_STATS before gathering the statistics. The exported data is stored in FND_STATTAB. If the value of backup_flag is not BACKUP then EXPORT_TABLE_STATS is not performed. Syntax FND_STATS.GATHER_TABLE_STATS ( errbuf OUT VARCHAR2, retcode OUT VARCHAR2, ownname VARCHAR2, tabname VARCHAR2, percent NUMBER DEFAULT degree NUMBER DEFAULT partname VARCHAR2 DEFAULT backup_flag VARCHAR2 DEFAULT 10 – 24 Oracle Applications System Administrator’s Guide NULL, NULL, NULL, NULL, cascade tmode granularity ); BOOLEAN DEFAULT TRUE, VARCHAR2 DEFAULT ’NORMAL’, VARCHAR2 DEFAULT ’DEFAULT’ FND_STATS.GATHER_TABLE_STATS ( ownname VARCHAR2, tabname VARCHAR2, percent NUMBER DEFAULT degree NUMBER DEFAULT partname VARCHAR2 DEFAULT backup_flag VARCHAR2 DEFAULT cascade BOOLEAN DEFAULT tmode VARCHAR2 DEFAULT ); NULL, NULL, NULL, NULL, TRUE, ’NORMAL’ Parameters errbuf Required for running as a concurrent process. retcode Required for running as a concurrent process. ownname Owner of the table. tabname Name of the table. percent Percentage of rows to use for the statistics using the estimation. NULL means to use exact computation. The valid range is [00,99]. degree Degree of parallelism. NULL means to use the table default value. partname Name of the partition. backup_flag The value BACKUP indicates that the procedure EXPORT_TABLE_STATS is executed before gathering statistics. The default value is NULL. cascade Gather statistics on the indexes for this table. Index statistics gathering is not parallelized. Using this option is equivalent to running the GATHER_INDEX_STATS procedure on each of the table’s indexes. tmode Table mode. Valid values are INTERFACE, NORMAL, and TEMPORARY. INTERFACE – GATHER_TABLE_STATS assumes that the statistics for this table are available in Cost–Based Optimization in Oracle Applications 10 – 25 FND_EXCLUDE_TABLE_STATS and populates the statistics from there. NORMAL – GATHER_TABLE_STATS gathers statistics for the table. TEMPORARY – should be used for interface tables that have transient data; that is, the table is populated but never commited within a transaction. In this case, because the data is not committed, calling ANALYZE does an implicit commit which is not desirable. Using the tmode=TEMPORARY option, GATHER_TABLE_STATS will gather the table_statistics (without the indexes) and set some artificial statistics for all the indexes based on the actual uncommitted data. granularity The granularity of statistics to collect (only relevant for tables that are partitioned). Valid values are DEFAULT, SUBPARTITION, GLOBAL, and ALL. DEFAULT – Gather global and partition–level statistics. SUBPARTITION – Gather subpartition–level statistics. PARTITION – Gather partition–level statistics. GLOBAL – Gather global statistics. ALL – Gather all (subpartition, partition, and global) statistics. GATHER_COLUMN_STATS Procedure This procedure gathers column statistics. One version of the procedure gathers the column statistics for those columns specified in the SEED data table FND_HISTOGRAM_COLS. The other procedure gathers the column statistics for the specified column. Syntax FND_STATS.GATHER_COLUMN_STATS ( appl_id NUMBER DEFAULT NULL, percent NUMBER DEFAULT NULL, degree NUMBER DEFAULT NULL, 10 – 26 Oracle Applications System Administrator’s Guide backup_flag Errors OUT ); VARCHAR2 DEFAULT NULL, Error_Out FND_STATS.GATHER_COLUMN_STATS ( ownname VARCHAR2, tabname VARCHAR2, colname VARCHAR2, percent NUMBER DEFAULT degree NUMBER DEFAULT hsize NUMBER DEFAULT backup_flag VARCHAR2 DEFAULT partname VARCHAR2 DEFAULT ); FND_STATS.GATHER_COLUMN_STATS ( errbuf OUT VARCHAR2, retcode OUT VARCHAR2, ownname VARCHAR2, tabname VARCHAR2, colname VARCHAR2, percent NUMBER DEFAULT degree NUMBER DEFAULT hsize NUMBER DEFAULT backup_flag VARCHAR2 DEFAULT partname VARCHAR2 DEFAULT ); NULL, NULL, 254, NULL, NULL NULL, NULL, 254, NULL, NULL Parameters errbuf Required for running as a concurrent process. retcode Required for running as a concurrent process. appl_id Application ID. ownname Owner of the table. colname Column name. tabname Table name. percent Percentage of rows to use for the statistics using the estimation. NULL means to use exact computation. The valid range is [00,99]. Cost–Based Optimization in Oracle Applications 10 – 27 degree Degree of parallelism. NULL means to use the table default value. hsize Number of buckets in the histogram. backup_flag The value BACKUP indicates that the procedure EXPORT_TABLE_STATS is executed before gathering statistics. The default value is NULL. partname Name of the partition. errors Error output. GATHER_ALL_COLUMN_STATS Procedure This procedure gathers column statistics for the given schema as listed in the FND_HISTOGRAM_COLS table. Syntax FND_STATS.GATHER_ALL_COLUMN_STATS ( ownname VARCHAR2 , percent NUMBER DEFAULT NULL, degree NUMBER DEFAULT NULL ); FND_STATS.GATHER_ALL_COLUMN_STATS ( errbuf OUT VARCHAR2, retcode OUT VARCHAR2, ownname VARCHAR2, percent NUMBER DEFAULT NULL, degree NUMBER DEFAULT NULL ); Parameters 10 – 28 errbuf Required for running as a concurrent process. retcode Required for running as a concurrent process. ownname Owner of the table. ALL means all Applications schemas. percent Percentage of rows to use for the statistics using the estimation. NULL means to use exact computation. The valid range is [00,99]. Oracle Applications System Administrator’s Guide degree Degree of parallelism. NULL means to use the table default value. ANALYZE_ALL_COLUMNS Procedure This procedure is obsolete in Release 11i. LOAD_XCLUD_STATS Procedure This procedure loads the default statistics as specified in the SEED data table FND_EXCLUDE_TABLE_STATS. There are two versions of this procedure. One version loads statistics for all the tables for a particular schema and the other version loads statistics for a given table in a given schema. Syntax FND_STATS.LOAD_XCLUD_STATS ( schemaname VARCHAR2 ); FND_STATS.LOAD_XCLUD_STATS ( schemaname VARCHAR2, tablename VARCHAR2 ); Parameters schemaname Name of the schema. tablename Name of the table. CHECK_HISTOGRAM_COLS Procedure For a given list of comma–separated tables, this procedure checks the data in all the leading columns of all the non–unique indexes of those tables and determines if histograms need to be created for those columns. The algorithm for this procedure is: select decode(floor(sum(tot)/(max(cnt)*FACTOR)),0,’YES’,’NO’) HIST Cost–Based Optimization in Oracle Applications 10 – 29 from (select count(col) cnt , count(*) tot from tab sample (PERCENT) where col is not null group by col); The decode statement determines whether a single value occupies 1/FACTOR or more of the sample PERCENT. If sum(cnt) is very small (a small non–null sample), the results may be inaccurate. A count(*) of at least 3000 is recommended. The procedure is run from a SQL prompt after setting the server output on. Syntax FND_STATS.CHECK_HISTOGRAM_COLS ( tablelist VARCHAR2, factor NUMBER DEFAULT 75, percent NUMBER DEFAULT 10, degree NUMBER DEFAULT NULL ); Parameters tablelist A comma separated list of tables. It should be of the form schema.tablename. A wildcard in the tablename is also allowed. For example, tablelist=>’oe.so%head% , pa.pa_exp% , ar.ra_customers’. The owner part is mandatory. factor The factor for calculating the histograms. percent Sample percent. degree Degree of parallelization. VERIFY_STATS Procedure For a given list of comma–separated tables, or for a given schema name, this procedure reports the statistics in the data dictionary tables for the tables, indexes, and histograms. Syntax FND_STATS.VERIFY_STATS ( schemaname VARCHAR2 DEFAULT NULL, 10 – 30 Oracle Applications System Administrator’s Guide tablelist days_old column_stat ); VARCHAR2 DEFAULT NULL, NUMBER DEFAULT NULL, BOOLEAN DEFAULT FALSE Parameters schemaname The name of a schema. If schemaname is NULL (which is the default), then the procedure reports on the given list of tables. tablelist A comma–separated list of tables. If the tablename is not of the form <schema>.<tablename> then the schema is the value of the schemaname parameter. If the tablelist is NULL (the default), then the procedure reports on all the tables for the specified schemaname. days_old Only reports those tables whose statistics are older than the days_old number of days. The default is NULL, which means the procedure will report on all the tables. column_stat If TRUE, the procedure reports column statistics for the export_table_stats table. The default is FALSE. Cost–Based Optimization in Oracle Applications 10 – 31 FND_CTL Package FND_CTL contains a single procedure FND_SESS_CTL which provides an easy way of manipulating some session level parameters. This is a database procedure that is invoked from the system profile option ”Initialization SQL Statement – Custom” to control the session level parameters for an application user’s session. See: ”Initialization SQL Statement – Custom” profile option in the Profiles appendix, page A – 32. Parameters for FND_SESS_CTL olpt_opt_mode Optimizer mode for all OLTP sessions (non–concurrent manager sessions). Valid values are ALL_ROWS, FIRST_ROWS, CHOOSE, and RULE. conc_opt_mode Optimizer mode for all concurrent sessions. Valid values are ALL_ROWS, FIRST_ROWS, CHOOSE, and RULE. trace_opt The SQL_TRACE option. Valid values are TRUE and FALSE. timestat The TIMED_STATISTICS option. Set to TRUE or FALSE. logmode Determines whether to log the session in the table FND_TRACE_LOG. Valid values are LOG or NULL. event_stmt Any other event settings or alter session commands. The value must be a valid SQL statement. For example, to get the bind values, set the event 10047 as follows: ’ALTER SESSION SET EVENTS =’||’’’’||’ 10046 TRACE NAME CONTEXT FOREVER, LEVEL 4 ’||’’’’ Examples The following examples illustrate controlling the session parameters using FND_SESS_CTL in conjunction with the system profile option ”Initialization SQL Statement– Custom.” 10 – 32 Oracle Applications System Administrator’s Guide The following statement uses FIRST_ROWS for OLTP sessions, ALL_ROWS for concurrent sessions, and turns the trace option on: BEGIN FND_CTL.FND_SESS_CTL(’FIRST_ROWS’, ’ALL_ROWS’,’TRUE’,’TRUE’,’’,’’); END; The following statement does the same as the above statement and includes an event statement: BEGIN FND_CTL.FND_SESS_CTL(’FIRST_ROWS’,’ALL_ROWS’, ’TRUE’,’TRUE’,’’,’ALTER SESSION SET EVENTS =’||’’’’||’ 10046 TRACE NAME CONTEXT FOREVER, LEVEL 4 ’||’’’’); END; The following statement sets the parameter complex_view_merging: BEGIN FND_CTL.FND_SESS_CTL(’’,’’,’’,’’,’’, ’ALTER SESSION SET ”_complex_view_merging” = true’); END; The following statement turns logging on: For this option the log table is FND_TRACE_LOG . BEGIN FND_CTL.FND_SESS_CTL(’’,’’,’’,’’,’LOG’,’’); END; FND_TRACE_LOG is a transaction table that contains the LOG information when the LOG mode is turned on. This table should be purged periodically. Cost–Based Optimization in Oracle Applications 10 – 33 10 – 34 Oracle Applications System Administrator’s Guide CHAPTER 11 User Profiles T his chapter tells you about the role of user profiles in Oracle Applications, including an overview of user profiles and a detailed description of the form you use to set user profile values for your user community. The Overview of User Profiles includes definitions of key concepts, and an explanation of how to set site, application, responsibility, and user profile options in Oracle Applications. User Profiles 11 – 1 Overview of Setting User Profiles A user profile is a set of changeable options that affect the way your application looks and behaves. As System Administrator, you control how Oracle Applications operate by setting user profile options to the values you want. You can set user profile options at four different levels: site, application, responsibility, and user. Major Features Set of Books You can further control security by assigning a set of books to a responsibility, application or site. A set of books is a company or group of companies within Oracle Applications that share a common account code, calendar, and functional currency. Setting User Profile Options As System Administrator, you use the System Profile Values window to set profile options for your user community. If you change a user profile option value, your change takes effect as soon as your users log on again or change responsibilities. See: System Profile Values Window: page 11 – 6. When you set a user profile, you provide Oracle Applications with standard information (such as printer) that describes a user, responsibility, application, or site. You can set values for user profile options at each profile level. Site Option settings pertain to all users at an installation site. Application Option settings pertain to all users of any responsibility associated with the application. Responsibility Option settings pertain to all users currently signed on under the responsibility. User Option settings pertain to an individual user, identified by their application username. The values you set at each level provide run–time values for each user’s profile options. An option’s run–time value becomes the highest–level setting for that option. 11 – 2 Oracle Applications System Administrator’s Guide When a profile option may be set at more than one level, site has the lowest priority, superseded by application, then responsibility, with user having the highest priority. For example, a value entered at the site level may be overridden by values entered at any other level. A value entered at the user level has the highest priority, and overrides values entered at any other level. For example, for a given user, assume the printer option is set only at the site and responsibility levels. When the user logs on, the printer option assumes the value set at the responsibility level, since it is the highest–level setting for the option. Suggestion: As System Administrator, you should set site–level option values before specifying profile options at the other three levels after the installation of Oracle Applications. The options specified at the site–level work as defaults until the same options are specified at the other levels. Application users may use the Personal Profile Values window to set their own personal profile options at the user level. Not all profile options are visible to users, and some profile options, while visible, may not be updated by end users. See Also Setting Your Personal User Profile, Oracle Applications User’s Guide Using Profile Options as a Parameter or Segment Default Value Profile option settings may be used as a default value for a concurrent program’s parameter or flexfield’s segment. The following table lists the forms you may use to enter a profile option whose setting serves as a default value. To use a profile option’s setting as a default value, navigate to the form’s Default Type field and select Profile. Then, enter the profile option’s internal name in the Default Value field. User Profiles 11 – 3 Form Window Field Concurrent Programs Request Set Parameters Report Parameters Parameter Detail region – Default Type/Default Value Default Type/Default Value Key Flexfield Segments Descriptive Flexfield Segments Segment Validation Information region – Default Type/Default Value Validation Information region – Default Type/Default Value Segment Table 11 – 1 (Page 1 of 1) Examples of User Profile Options Example #1 Your Accounts Payable department recently purchased a printer, and you want all the reports from that department to print on that new printer. You simply change the ”Printer” profile option for Oracle Payables to reflect the purchase of the new printer. Suggestion: Example #2 highlights the importance of default profile options. If an application user of Oracle Payables or a responsibility associated with Oracle Payables already has a value specified for the printer profile option, that value will override the value you set at the application level. We suggest you first set user profile options at the site level, and then work your way up the hierarchy to other levels when appropriate. User profile options not set at one level default to the user profile options set at the next lower level. Example #2 You can further control security within Oracle Applications by assigning a set of books to a responsibility, application or site using the GL Set of Books ID profile option. By assigning a set of books to a responsibility, you control not only the forms and functions that the responsibility can access, but the specific set of books as well. See your Oracle Applications product reference guide for information on how to define a set of books. 11 – 4 Oracle Applications System Administrator’s Guide User Profile Option Values Report This report documents user profile option settings. Use this report when defining different profile option values for several responsibilities, or users, or for different applications. Report Parameters Profile Option Name Choose the profile option name whose values you wish to report on. If you do not select a profile option name, then this report will document all profile options. User Name Choose the name of a user whose profile option values you wish to report on. Application Short Name Choose the name of an application whose profile option values you wish to report on. Responsibility Name Choose the name of a responsibility whose profile option values you wish to report on. Report Headings The report headings display the specified report parameters and provide you with general information about the contents of the report. User Profiles 11 – 5 System Profile Values Window Use this window to view and set profile option values. You can view and set profile options at the site, application, responsibility, and user levels. Your settings affect users as soon as they sign on or change responsibility. See: Overview of Setting User Profiles: page 11 – 2. Profile Values Block Set values for profile options at one or more levels. Each value overrides those set to its left. For example, a User Value setting overrides a Responsibility Value setting, which overrides an Application Value setting, which overrides a Site Value setting. If you have a profile option value that is no longer valid, you will see an LOV for the field instead of the value. 11 – 6 Oracle Applications System Administrator’s Guide Profile This field displays the name of a profile option. Site This field displays the current value, if set, for all users at the installation site. Application This field displays the current value, if set, for all users working under responsibilities owned by the application identified in the Find Profile Values block. Responsibility This field displays the current value, if set, for all users working under the responsibility identified in the Find Profile Values block. User This field displays the current value, if set, for the application user identified in the Find Profile Values block. Suggestion: You should set site–level default values for any required options after installation of an application. If you do not assign a particular profile option at any of the four levels, that option does not have a default value and may cause errors when you use forms, run reports, or run concurrent requests. User Profiles 11 – 7 Find System Profile Values Block Specify the level or levels at which you wish to view and set profile option values. Display You can view the values set for your installed profile options at each of four levels: • Site, which affects all users at an installation site. • Application, which affects all users working under responsibilities owned by a particular application. • Responsibility, which affects all users working under a specific responsibility. 11 – 8 Oracle Applications System Administrator’s Guide • User, which affects a unique application user. You can find the values for all profile options that include a specific character string, such as “OE:” for Oracle Order Entry. You can also display only profile options whose values are currently set. Site Check the Site check box if you wish to display the values for profile options at an installation site. Application Select an application if you wish to display profile option values for responsibilities owned by that application. Responsibility Select a responsibility if you wish to display profile option values for a specific responsibility. User Select an application user if you wish to display profile option values for a specific user. Profile Enter the name of the profile option whose values you wish to display. You may search for profile options using character strings and the wildcard symbol (%). For example, to find all the profile options prefixed by “Concurrent:”, you could enter “Conc%” and press the Find button. Profiles with No Values Select whether to display all profiles, including those without currently set values. If this check box is unselected, only profiles with current values are retrieved. Find Choose the Find button to display all profile options, or the profile options you are searching for, at the level or levels you specified. User Profiles 11 – 9 11 – 10 Oracle Applications System Administrator’s Guide CHAPTER 12 Administering Process Navigation T his chapter describes the Process Navigator, a feature which provides you with diagrams of each of your business processes as a whole and of the individual steps in each process. The Process Navigator also provides direct access to the form asssociated with each step in a process. The major topics include: • Modifying your Menu • Creating Process Navigator Processes Administering Process Navigation 12 – 1 Overview of Process Navigation A ”process” is a series of actions taken to achieve a specific result. The Process Navigator utilizes Oracle Workflow to depict each of your business processes with a workflow diagram. A process diagram contains an icon for each step in the process; each icon acts as a visual cue and as an access point for the actual form associated with each step. You can navigate to any form involved in the process simply by clicking on the appropriate icon. What is Oracle Workflow? Oracle Workflow allows you to define business processes using a drag–and–drop designer. You can route relevant information to decision makers, automate processes, deliver electronic notifications to users in a given workflow, and monitor your processes as they are implemented. You can display any workflow diagram as a process in the Process Navigator. See: Oracle Workflow Guide. What are Seeded Processes? A seeded process is one that is delivered to you ready to use. Oracle Applications Release 11i includes several seeded business processes which you can use as they are. 12 – 2 Oracle Applications System Administrator’s Guide Modifying Your Menu Before you begin, you should be aware that simply referencing a form from a process does not provide the required permissions for the responsibility to access the forms in the process. Form Functions for each form referenced from a process must be added to the Function Security Menu for the responsibility. If the Form Function is not accessible, the user will receive an error when attempting to access the form from the process in the Process Navigator. See: Form Functions Window See: Menus Window Administering Process Navigation 12 – 3 Creating Process Navigator Processes You must use Oracle Workflow Builder to create or customize any of the processes that are displayed in the Process Navigator. These instructions describe how to create new processes for the Process Navigator. The following table lists the terms/components of a Process Navigator process and the corresponding components in Oracle Workflow Builder that define them. Process Navigator Component Description Controlling Oracle Workflow Builder Component(s) Process The diagram that appears in the Process Navigator. Process activity and process diagram Process description A description of the displayed process. Process activity Step An icon in the process, which takes you directly to an Oracle Applications form when you double–click on it. Notification activity Step description A description of the selected process step. Message Form associated with a step. The Oracle Applications form that appears when you double click on a step in a Process Navigator process. Form–type Message attribute Table 12 – 1 (Page 1 of 1) Note: The following procedures do not address most of the functionality of Oracle Workflow Builder, but are tailored to creating processes for the Process Navigator. The Oracle Workflow Builder is a tool used to design workflow processes. Workflow processes can range from routing documents through an approval process to setting up your Oracle Applications. See: the Oracle Workflow Guide. Creating Process Navigator Processes To create a new process for the Process Navigator, you must first create the necessary components in Oracle Workflow Builder. The components you create make up the process definition, which is then saved to the database or to a flat file. The Process Navigator then reads the process definition from the database to display the process and its information and provide you access to the related Oracle Applications forms. 12 – 4 Oracle Applications System Administrator’s Guide " Creating a New Process Navigator Process 1. Open Oracle Workflow Builder. 2. Create an item type.—an item type is a repository that will contain all the components associated with the process you wish to build. See: To Create an Item Type: Oracle Workflow Guide. 3. Create an Item Attribute of type role, whose internal name is USER_NAME. See: To Define and Item Type or Activity Attribute: Oracle Workflow Guide. Note: Enter a new display name for the message using the format <Verb><Form Title>. If the form title already contains a verb, then simply use the form title as the display name. If the form title does not contain a verb, then consider using one of the following verbs: Define / Assign / Run / Load / Convert / Open / Set / Generate / Review 4. Create a message to describe the task that is to be accomplished by a Process Navigator process step. See: To Create a Message: Oracle Workflow Guide. 5. Create a form–type for the message. The seeded processes generally assign these message attributes an internal name of Open Form, but this is not required. See also: To Define a Message Attribute: Oracle Workflow Guide. 6. Create a notification activity to represent a Process Navigator process step. See: To Create a Notification Activity: Oracle Workflow Guide. 7. Create a process activity to represent a Process Navigator Process. See: To Create a Process Activity: Oracle Workflow Guide. Note: Enter a display name for your process. This name appears in the Process Navigator’s process list. The naming convention for the process should be a functional name followed by the word ”Process.” Enter a description for your process. The description appears when a user selects a process in the Process Navigator, For Oracle Workflow Builder Release 2.5 and higher, the description is limited to 240 characters. 8. Draw the Process Diagram. Once you create a process activity, you can draw the process diagram that is associated with it. The process diagram is what appears when you display a process in the Process Navigator. See: Diagramming a Process: Oracle Workflow Guide Administering Process Navigation 12 – 5 Note: The Performer type of the Notification Activity you include in a process diagram for the Process Navigator must be set to the item attribute USER_NAME.. 9. Save your changes. When you save your work to a database, you actually save everything in the current data store that has been modified. When you save your work to a flat file, you actually save everything in the current data store to the file. Note: It is highly recommended that for new processes created for the Process Navigator that you always save a copy of your workflow process definition as a flat file and check that file into a source control system to maintain a working version of your process definition. Then when you want to update your definition in the database, you can pull up the flat file and save it directly to the database. Avoid using the process definition stored in your database as your source controlled version, as others with access to the database can update the definition. 10. Enable access to your process Enable access to your process Before a process may be accessed in the Navigator you must complete the following two steps. Create a new function for your process in the Form Functions window, and add your process to a responsibility by adding the function you just created, to the responsibilities top menu in the Menus window. " Create a function for your Process 1. As the System Administrator navigate to the Form Functions window (Application–>Function). 2. Enter a Function Name for your process using the format: <app>_<processname> Where <app> can be any application short name and <processname> is the internal name you entered when you created your process activity. 3. Enter a User Function Name. The name you enter here appears in the Navigator. 4. Enter ”PROCESS” as your function type. 5. In the tabbed region ’Form’ use the following format to enter a value in the Parameters field: <itemtype>:<processname> 12 – 6 Oracle Applications System Administrator’s Guide 6. Save your work. No other fields are required to create your process function. See: Form Functions Window " Add your function to a menu In order for a user to access a process in the Navigator, the process must be added to a menu referenced by the user’s responsibility. To determine the menu referenced by a particular responsibility use the Responsibilities window (Security–>Responsibility–>Define). 1. As the System Administrator navigate to the Menus window (Application–>Menu). 2. Use the Find window to access the desired menu. 3. In a new row use the LOV to select the function you created for your process in the Functions field. You may optionally enter a description for the function. DO NOT enter any other fields. The Sequence field is automatically populated and the Navigator Prompt and Submenu fields must remain empty. 4. Save your work. See: Menus Window Access the Seeded Processes from the Database To access the seed processes from the database, you need to first install Oracle Applications production Release 11i and you need to install Oracle Workflow Builder Release 2.5 or greater on your client PC. " To access the seed processes 1. Run the Oracle Workflow Builder from you client. 2. Select Open from the File menu. 3. Choose Database. • For User, enter the FNDNAM of your database • For Password, enter the FNDNAM password of your database • For Connect, enter the alias for your database which should be entered in your tnsnames.ora file under the following directory on your client: Local drive (i.e. “C”):orant\network\admin Note: If you are using Windows 95, then the “orant” should be replaced with “orawin” in the directory structure above. Administering Process Navigation 12 – 7 4. " 12 – 8 In the Show Item Types window, select the item type(s) associated with the seeded processes you wish to view. To select more than one item type, hold down your control key as you select the item types. Choose Show, and then choose OK. Finding the Form Function Name 1. Log into Oracle Applications and navigate to the form of interest. 2. Choose About Oracle Applications... from the Help menu. Scroll down to Form Information and make note of the form name. 3. Now log into Oracle Applications using the Implementation System Administration responsibility and navigate to /Application/Form. Within the Form window, query for the form name you just made a note of in the Form field. 4. Make note of the value in the User Form Name field once your query completes. 5. Close the Form window and navigate to /Application/Function. Within the Function window, query for the User Form Name value that you just made a note of in the Form field. 6. The value that is returned in the Function field is the form function name that you need to associate a Process Navigator process step to a form. Oracle Applications System Administrator’s Guide CHAPTER 13 Document Sequences T his chapter explains how to assign unique numbers to documents you create using Oracle Applications. Each time you enter a transaction, you create a document. • For example, when you enter a payment, you create a payment document. Or when you enter an invoice, you create an invoice document. By assigning unique numbers to documents, you can account for each transaction you enter and the document that accompanies it. This chapter begins with an essay explaining what document sequences are and how they work in Oracle Applications. Following the essay are descriptions of the forms you use to: • Define sequences to number your documents. • Define document categories to group documents together. • Assign sequences to documents, defining which documents you will number using a particular sequence. Document Sequences 13 – 1 What is a Document Sequence? A document sequence uniquely numbers documents generated by an Oracle Applications product. Using Oracle Applications, you initiate a transaction by entering data through a form and generating a document, for example, an invoice. A document sequence generates an audit trail that identifies the application that created the transaction, for example, Oracle Receivables, and the original document that was generated, for example, invoice number 1234. Document sequences can provide proof of completeness. For example, document sequences can be used to account for every transaction, even transactions that fail. Document sequences can also provide an audit trail. For example, a document sequence can provide an audit trail from the general ledger into the subsidiary ledger, and to the document that originally affected the account balance. Document sequences generate audit data, so even if documents are deleted, their audit records remain. 13 – 2 Oracle Applications System Administrator’s Guide Figure 13 – 1 Transactions generate documents. For example, recording payments generates payment documents. FORM Enter data to effect a transaction. DATA Transaction inserts or updates records in database tables. DOCUMENT Document records a transaction. A sequence defines how documents are numbered; what the first number in the sequence is, and whether numbers are generated automatically or entered manually. Document 1 Sequence ”Payments” names Document 2 Document 3 Defining a Document Sequence To define a sequence, you select a sequence name and an application to “own” the sequence. • A sequence can number documents stored in database tables belonging to its owning application. • Audit records for a sequence are stored in the application’s audit table, titled Application Short Name_DOC_SEQUENCE_AUDIT. For example, the audit table for a sequence owned by Oracle Payables is AP_DOC_SEQUENCE_AUDIT. Document Sequences 13 – 3 ☞ Attention: Your database administrator must grant access to an application’s audit table for all ORACLE usernames associated with responsibilities that will use the sequence (responsibilities that access forms using the sequence). You can set start and end dates for when the sequence is available. The start date defaults to the current date. By default, there is no end date, so the sequence definition does not expire. You can choose whether a sequence numbers documents automatically, or accepts numbers manually entered by a user. Automatic, Gapless, and Manual Numbering Automatic numbering assigns a unique number to each document as it is generated. Automatic numbering is sequential by date and time of creation. Gapless numbering also automatically generates a unique number for each document, but ensures that the document was successfully generated before assigning the number. With Gapless numbering, no sequence numbers are lost due to incomplete or failed document creation. ☞ Attention: We recommend that you choose this type only when gapless numbering is essential, as it may affect the performance of your system. Manual numbering requires a user to assign a unique number to each document before it is generated. With manual numbering, numerical ordering and completeness is not enforced. Users can skip or omit numbers when entering the sequence value. Automatic Numbering – Initial Value and Message Display If you define a sequence to automatically number documents, you can: • Enter an initial value for your sequence. The default is ”1”. • Choose whether you want to display a message when a document is generated, telling the user the name of the sequence, and the sequence value (document number). Two examples of sequence definitions, one with automatic numbering and the other with manual numbering, are represented in the table below.. 13 – 4 Oracle Applications System Administrator’s Guide EXAMPLE 1 Sequence with Automatic Numbering Field in Document Sequences form EXAMPLE 2 Sequence with Manual Numbering (Sequence) NAME AUTOPAY ADJUSTMENTS (Owning) APPLICATION ORACLE PAYABLES – Sequence can number documents stored in an Oracle Payables database table. ORACLE RECEIVABLES – Sequence can number documents stored in an Oracle Receivables database table. EFFECTIVE DATE – START CURRENT DATE & TIME (Default value) OCT–01–94 User defines sequence “Adjustments” not to be available until Oct 1, 1994. EFFECTIVE DATE – END Field left blank. Sequence does not expire. DEC–31–94 User defines sequence “Adjustments” to no longer be available after Dec 31, 1994. (Numbering) TYPE AUTOMATIC – Unique numbers are automatically generated in sequence. MANUAL – User must enter a unique number before transaction can be completed, and document is generated. GAPLESS No omissions or gaps in numbers are possible, due to a rollback if the document creation is unsuccessful. User may skip or omit numbers. INITIAL VALUE 1 (Default value) User could enter their own initial value, for example, 5700. Not Available when numbering type is Manual. MESSAGE YES – When a document that is automatically numbered is created, a message displays the sequence name and the sequence value (document number). Not Available when numbering type is Manual. Table 13 – 1 (Page 1 of 1) Document Sequences 13 – 5 Defining Document Categories Document categories organize documents into logical groups. • A document category (also called a document type) is one of the rules you use to define which documents a sequence assigns numbers to. • You can separately number each document category by assigning a different sequence to each category. A document category identifies the database table that stores documents resulting from transactions your users enter. • When you assign a sequence to a category, the sequence numbers the documents that are stored in a particular table. Use categories to more precisely classify your documents. For example, you can categorize accounts receivable invoices into several different categories, such as: • Chargebacks • Deposits • Guarantees • Debit Memos • Credit Memos • Sales Invoices • Customer Service Invoices Similarly, you can categorize accounts payable or purchase invoices into several different categories, such as: • Standard • Expense Report • Prepayment • Interest • Credit Memo • Debit Memo Assigning a Document Sequence Before you can assign a sequence to number documents, you must define which documents are to be numbered. 13 – 6 Oracle Applications System Administrator’s Guide Sequences versus Assignments Defining a sequence is different from assigning a sequence to a series of documents. • A sequence’s definition determines whether a document’s number is automatically generated or manually entered by the user. • A sequence’s assignment, that is, the documents a sequence is assigned to, is defined in the Sequence Assignments form. Defining Documents for numbering by Assigned Sequences You specify a combination of four rules that define any given document for assignment to a specific sequence name. You can then assign a different (numbering) sequence to each document definition. The four rules, that when combined, define what documents a selected sequence assigns numbers to are: Application You select the application that generates the documents you wish to number. For example, to number sales invoices, you select Oracle Receivables. Category You select a document category to identify a logical subset of documents. For example, if you do not want to number all invoices in Oracle Receivables, you can choose to number only the category of sales invoices. A category identifies a table that stores transactions entered (documents generated) using an Oracle Application. The Category values you can choose from to define a document are dependent upon the application you select. Set of Books You select the chart of accounts for your business that is affected by the documents you wish to number. You may optionally enable this rule through the Document Flexfield. Method You select the method that your documents are entered, automatic or manual. You may optionally enable this rule through the Document Flexfield. Document Sequences 13 – 7 Automatic is when a concurrent process, such as an external program, is set up to enter transaction data into an Oracle Application. Manual is when a document is manually entered using a form in an application. Assignment of Sequences to Document Definitions For each unique document definition there can only be one active sequence assignment. A document definition consists of the Application, Category, and the optional Document Flexfield segments Set of Books and Method ☞ Attention: When assigning sequences to a document definition, each active sequence can be assigned to only one unique combination of application and category (i.e., application table). Active Assignments and Active Sequences An active sequence assignment does not have a post dated end date. That is, the assignment’s end date is not before the current date. • An active sequence assignment either has no end date, or an end date that is not before the current date. • A sequence assignment and its dates of effectivity are defined on the Sequence Assignments form. A sequence definition must be active as well. That is, the sequence definition’s end date (as opposed to its assignment’s end date) must not be before the current date. • A sequence definition and its dates of effectivity are defined on the Document Sequences form. When you define a document sequence, you give the sequence a name, and define how the sequence numbers each document by: • Choosing whether numbers are automatically generated in sequence, or entered manually by the user. • Entering the initial value or first number in the sequence. Document Numbering vs. Document Entry Do not confuse the type of document numbering a sequence employs, which can be automatic or manual, with the method of entering documents, which is also defined as either automatic or manual. 13 – 8 Oracle Applications System Administrator’s Guide Document Sequences Window Name a new document sequence and define how the sequence numbers each document. A document sequence uniquely numbers documents generated by an Oracle Applications product (for example, invoices generated by Oracle Receivables). Using the Sequence Assignments window, you assign your sequence to number only those documents that satisfy rules you define. Document sequences ensure that every document your users create can be accounted for. See: Sequences Assignments: page 13 – 14. Document Sequences Block Define the name, type of numbering scheme, effective dates, and initial value for your document sequence. Name Once entered, sequence names cannot be changed. Document Sequences 13 – 9 Application Once selected, the application associated with your sequence cannot be changed. Audit records for your sequence are stored in the application’s audit table, titled Application Short Name_DOC_SEQUENCE_AUDIT. For example, the audit table for a sequence owned by Oracle Payables is AP_DOC_SEQUENCE_AUDIT. Effective From/To Enter the dates on which your document sequence takes effect/is no longer enabled. The Start on field automatically defaults to the current date, and once a sequence is defined, the start date cannot be changed. If you leave the End on field blank, your document sequence does not expire; and if you enter an end date and define your sequence, the end date cannot be modified later. If there is no end date defined and there are no active assignments for a sequence, you can disable the sequence by entering the current date as the end date. Once disabled, a sequence cannot be reactivated. Type Once defined, you cannot change the type of document numbering sequence. Automatic Sequentially assigns, by date and time of creation, a unique number to each document as it is generated. Manual Manual numbering requires a user to assign a number to each document before it is generated. You must enter unique values. However, please note that numerical ordering and completeness is not enforced. ☞ Attention: The Automatic–By–User type is currently not supported, and is reserved for a future version of Oracle Applications. Warning: The Gapless Numbering type is valid only in the context of certain localizations. We recommend that you choose this type only after consulting with Worldwide Support, as it may affect the performance of your system. Message Check the Message check box if you want each document to display a message (in the message line near the bottom of the screen) informing the user of the sequence name and value (number). 13 – 10 Oracle Applications System Administrator’s Guide This check box only applies to sequences with the automatic type of numbering. Messages appear only on form displays, and are not written to a request’s log file. Once a sequence is defined, the message choice cannot be changed. Initial Value Enter a value for the first document in your sequence. This field only applies to sequences with automatic or gapless numbering type. The maximun sequence value is 1.0e+27. If you leave this field blank, the first document is automatically assigned a value of ”1”. Once a sequence is defined, this initial value cannot be changed. Document Sequences 13 – 11 Document Categories Window Define categories for your documents in order to divide your documents into logical groups, which you can number separately by assigning different sequences. A document sequence uniquely numbers each document the sequence is assigned to. • Using the Sequence Assignments form, you assign your sequence to number only documents that satisfy rules you define. • Document category, or type, as it may be titled on some forms, is one of the rules that define which documents a sequence assigns numbers to. Each category identifies a table that stores documents resulting from transactions your users generate. • When you assign a sequence to a category, the sequence numbers the documents that are stored in the table. Document Categories Block 13 – 12 Oracle Applications System Administrator’s Guide Name a document category and associate a table with the category. When you enter this block, Oracle automatically queries for any existing document categories. Application Once a category is defined, you cannot change the choice of application. Only tables belonging to the selected application can be assigned to a category. Code Category code must be unique within an application. Once a category is defined, you cannot update its code. Name You can update the name, if you wish. For example, if the category name is predefined, you can change the name to a more familiar value. Description You can update the description, if you wish. For example, if the category description is predefined, you can change the description to a more familiar value. Table Name Select the name of the table that stores the documents you want to identify by your category. • When the sequential numbering feature checks for completeness or generates a report, it locates the category’s documents in the table. • Only tables belonging to the application associated with the category can be chosen. • Once a category is defined, you cannot change the choice of table. Document Sequences 13 – 13 Sequence Assignments Window Define which documents a document sequence can number, and then assign the document sequence to your definition. A document sequence numbers documents generated by an Oracle Applications product (for example, invoices generated by Oracle Receivables). Documents can be defined by the application that generates them and their category (the table in which they are stored). Additional fields appear when the optional rules for defining documents (Set of Books and Method of document entry) are enabled. Besides entering a document definition and assigning a sequence to it, you can, if you wish, enter effective dates for the assignment. 13 – 14 Oracle Applications System Administrator’s Guide Prerequisites • Define the document sequence using the Document Sequences window. See: Document Sequences: page 13 – 9. Sequence Assignments Block Specify documents by the application that generates them and the category of the document (table where the documents are stored). You can also include in your document definition the set of books they affect, and the method by which the document is entered. Once a document definition is entered, you select a sequence to assign it to, and if you wish, enter effective dates for the assignment. There can only be one active sequence assigned to each unique combination of Application, Category, Set of Books, and Method. The last two criterion are optional, and are set in the Document Flexfield. However, the same sequence, the same numbering scheme, and initial value can be assigned to more than one combination of Application, Category, Set of Books, and Method as long as the Application and Category remain the same. Application Select the application that generates the documents you wish to number. For example, to number sales invoices, you select Oracle Receivables. Category Select a document category to identify a logical subset of documents. For example, if you do not want to number all invoices in Oracle Receivables, you can choose to number only the category of sales invoices. Assignment Region Since the effective dates for an assignment must fall within the sequence’s start and end dates, the list of available sequences depends on the start and end dates specified for the assignment. Start Date/End Date Enter the dates on which the sequence assignment to your document definition takes effect/is no longer enabled. The Start Date field automatically defaults to the current date, and once a sequence assignment is defined, the start date cannot be changed. Document Sequences 13 – 15 If you leave the End Date field blank, your sequence assignment does not expire; and if you enter an end date and define your sequence assignment, the end date cannot be modified later. If there is no end date defined and there are no active assignments for a sequence, you can disable the sequence assignment by entering the current date as the end date. Once disabled, a sequence assignment cannot be reactivated. Sequence Select a sequence to assign to your document definition. The sequence’s application and the document’s application must be the same. Once you define a sequence assignment, the sequence name cannot be updated later. If you want to disable the sequence assignment and assign a new sequence to the document definition (Document Flexfield combination), you must first, enter an End Date to disable the current sequence assignment, then, second, create a new record (row) for the new assignment. Document Flexfield The Document Flexfield may consist of none, one or two segments. Set of Books Select the chart of accounts for your business that is affected by the documents you wish to number. Method Select the method that your documents are entered, automatic or manual. Automatic is when a concurrent process (e.g., an external program) enters transaction data into an Oracle Application, which generates documents. Manual is when a document is manually entered using a form in an application. Once defined, a Document Flexfield definition cannot be updated. You may not define additional segments for the Document Flexfield. ☞ Attention: To enable this descriptive flexfield, use the Descriptive Flexfield Segments window. Select the application Application Object Library, and the title ”Document Flexfield”. Be sure to unfreeze the flexfield; then, navigate to the Segments window and enable the segments. Freeze your flexfield after you set it up, and save and compile the new definition. See: Defining Descriptive Flexfields Structures (Oracle Applications Flexfields Guide) 13 – 16 Oracle Applications System Administrator’s Guide CHAPTER 14 Developer Tools T his chapter provides information for a system administrator about tools applications developers can use in Oracle Applications. Developer Tools 14 – 1 Developer Tools There are several tools to help developers create and debug custom forms and programs. These include the Custom Library, Work Directory and the Log/Trace Service. This section provides an overview of these tools for the system administrator. The CUSTOM library allows extension of Oracle Applications without modification of Oracle Applications code. For information on the CUSTOM library, see the Oracle Applications Developer’s Guide. The Work Directory allows a developer to use a custom form from within Oracle Applications, while other users use the standard form. 14 – 2 Oracle Applications System Administrator’s Guide Work Directory The Work Directory feature enables a developer, support consultant, or other technical specialist to test modifications to forms and concurrent programs in Oracle Applications without affecting users of the same code tree. Using the Work Directory, a user can be logged into an Oracle Applications system but access a version of a form or concurrent program that is not within the standard $PROD_TOP directory. For example, an on–site developer can test out a new version of a custom form without affecting other testing on the system. You can use the Work Directory feature for alternate files of forms and concurrent programs only. Implementation To implement this feature, set up a directory to hold the alternate files for your forms or concurrent programs. To use an alternate file, set the profile option FND:Override Directory with the path for the directory containing the alternate file. ☞ Attention: This profile option should usually be set at the User level only. If you set FND:Override Directory at the Site level, for example, you will affect all users at that site using the particular forms. Using the Work Directory After you have created the alternate directory and set the profile option FND: Override Directory with the appropriate value, you can use files in that alternate directory. In searching for the appropriate file path for a form or concurrent program, Oracle Applications will first check to see if the profile option FND: Override Directory is set and if a given file exists in the specified directory. If the above two conditions are true then the alternate file is used. If the profile option is not set or if the necessary file does not exist in that directory, then the default (usual) file path is used. Note: The Oracle Applications Navigator caches the paths to files that have been successfully opened. If the standard form has been opened, then that form will be used for the remainder Developer Tools 14 – 3 of the session. To switch to a different file path, you must exit and restart Oracle Applications. To provide a visual indication that an alternate form is in use, the developer of the form should specify a different version number for the form in the PRE–FORM trigger. This version number appears during runtime using Help > About Oracle Applications. For more information, see: Oracle Applications Developer’s Guide. 14 – 4 Oracle Applications System Administrator’s Guide Web Enabled PL/SQL Window Use this form to maintain the FND_ENABLED_PLSQL runtime registry. PL/SQL Object Block Name The name of the PL/SQL object. Type The type of the PL/SQL object. The object may be a package, package procedure, or procedure. Enabled Check this box to enable the PL/SQL object. Developer Tools 14 – 5 14 – 6 Oracle Applications System Administrator’s Guide APPENDIX A Profile Options in Oracle Application Object Library T his appendix lists the profile options that the system administrator can set for the site, application, responsibility, or user. The profile descriptions include the internal name of the profile option used when defaulting values from a profile option. Profile Options in Oracle Application Object Library A–1 Profile Options in Oracle Application Object Library This section lists each profile option in Oracle Application Object Library. These profile options are available to every product in Oracle Applications. For each profile option, we give a brief overview of how Oracle Application Object Library uses the profile’s setting. A table is provided for most profile options that lists the access levels for the profile option. There are four possible levels at which system administrators can view and update a profile option value: site, application, responsibility, and user. This table lists whether the profile option’s value is visible at each of these levels, and whether it is updatable at each level. Account Generator:Debug Mode This profile option controls Oracle Workflow process modes for the Account Generator feature. This profile option should normally be set to ”No” to improve performance. If you are testing your Account Generator implementation and using the Oracle Workflow Monitor to see your results, set this profile option to ”Yes”. Level Visible Allow Update Site Yes Yes Application Yes Yes Responsibility Yes Yes User Yes Yes The internal name for this profile option is ACCOUNT_GENERATOR:DEBUG_MODE. Applications Help Web Agent Applications Help Web Agent is optional and should only be used if you want to launch online help on a web server different from the one specified by the Applications Servlet Agent. ☞ Attention: For most installations, this profile should be set to NULL. Only specify a value if you want to use a different web server than that for the Applications Servlet Agent. Specify the entire online help URL for this profile’s value: http://<host name of servlet agent>:<port number of servlet agent>/OA_HTML/jsp/fnd/fndhelp.jsp?dbc=<DBC file name> This new usage of HELP_WEB_AGENT provides one with the flexibility of reverting back to the previous Release 11i applet version of the tree navigator if desired. To do this, set this profile option to A–2 Oracle Applications System Administrator’s Guide http://<host name of PL/SQL agent>[:<portnumber of PL/SQL agent>]/<PL/SQL agent name>/fnd_help.launch?par_root= This is usually identical to the Applications Web Agent profile option but with the string ”/fnd_help.launch?par_root=” appended at the end. If this profile option is not set, the online help tree navigator will default to starting up at the host name and port number that is specified by the Applications Servlet Agent profile option. The DBC file used will be that of the database where online help was invoked. Users can see this profile option, but they cannot update it. This profile option is visible and updatable at all levels. Level Visible Allow Update Site Yes Yes Application Yes Yes Responsibility Yes Yes User Yes Yes The internal name for this profile option is HELP_WEB_AGENT. Applications Servlet Agent This profile option must be set to the URL base for the servlet execution engine on Apache. Oracle Applications uses the value of this profile option to construct URLs for JSP and SERVLET type functions. The syntax is: https://<hostname>:<port>/<servlet_zone> Example: https://ap523sun.us.oracle.com:8888/oa_servlets Users can see this profile option, but they cannot update it. This profile option is visible and updatable at all levels. Level Visible Allow Update Site Yes Yes Application Yes Yes Responsibility Yes Yes User Yes Yes The internal name for this profile option is APPS_SERVLET_AGENT. Applications Web Agent Provides the base URL for the Apps Schema’s WebServer DAD. You set this profile option during the install process. Profile Options in Oracle Application Object Library A–3 This profile option must be set to the URL which identifies the mod_plsql PL/SQL Gateway Database Access Descriptor base URL for your Applications instance. Oracle Applications use the value of this profile option to construct URLs for ’WWW’ type functions, Attachments, Export, and other features. Use the following syntax to enter your URL: https://<hostname>:<port>/pls/<dad_name> Users can see but not update this profile option. This profile option is visible and updatable at all levels. Level Visible Allow Update Site Yes Yes Application Yes Yes Responsibility Yes Yes User Yes Yes The internal name for this profile option is APPS_WEB_AGENT. Applications Web Authentication Server The web server used for authentication for Oracle Self–Service Web Applications. Users can see but not update this profile option. This profile option is visible and updatable at the site level. Level Visible Allow Update Site Yes Yes Application No No Responsibility No No User No No The internal name for this profile option is WEB_AUTHENTICATION_SERVER. Attachment File Directory The directory in which file type attachments data is stored. You set this profile option during the install process. Users can see but not update this profile option. This profile option is visible and updatable at all levels. A–4 Oracle Applications System Administrator’s Guide Level Visible Allow Update Site Yes Yes Application Yes Yes Responsibility Yes Yes User Yes Yes The internal name for this profile option is ATTACHMENT_FILE_DIRECTORY. AuditTrail:Activate You can turn AuditTrail on or off (Yes or No). The default setting is No (Off). When you enter or update data in your forms, you change the database tables underlying the forms you see and use. AuditTrail tracks which rows in a database table(s) were updated at what time and which user was logged in using the form(s). • Several updates can be tracked, establishing a trail of audit data that documents the database table changes. • AuditTrail is a feature enabled on a form–by–form basis by a developer using Oracle’s Application Object Library. • All the forms that support AuditTrail are referred to as an audit set. • Not all forms may be enabled to support AuditTrail. • To enable or disable AuditTrail for a particular form, you need access to Oracle Application Object Library’s Application Developer responsibility. Users cannot see nor change this profile option. This profile option is visible and updatable at the site and application levels. Level Visible Allow Update Site Yes Yes Application Yes Yes Responsibility No No User No No The internal name for this profile option is AUDITTRAIL:ACTIVATE. BIS/AOL:Debug Log Directory The directory for BIS debugging log files. Profile Options in Oracle Application Object Library A–5 Users can see and change this profile option. System administrators can see and update this profile option at the site level. Level Visible Allow Update Site Yes Yes Application No No Responsibility No No User No No The internal name for this profile option is BIS_DEBUG_LOG_DIRECTORY. Concurrent:Active Request Limit You can limit the number of requests that may be run simultaneously by each user. or for every user at a site. If you do not specify a limit, no limit is imposed. Users cannot see or update this profile option. This profile option is visible and updatable at all four levels. Level Visible Allow Update Site Yes Yes Application Yes No Responsibility Yes No User Yes Yes The internal name for this profile option is CONC_REQUEST_LIMIT. Concurrent:Attach URL Setting this option to ”Yes” causes a URL to be attached to request completion notifications. When a user submits a request, and specifies people to be notified in the Defining Completion Options region, everyone specified is sent a notification when the request completes. If this profile option is set to Yes, a URL is appended to the notification that enables them to view the request results on–line. Only the System Administrator can update this profile option. Users can see but not update this profile option. This profile options is visible at all levels but can only updated at the Site level. A–6 Oracle Applications System Administrator’s Guide Level Visible Allow Update Site Yes Yes Application Yes No Responsibility Yes No User Yes No The internal name for this profile option is CONC_ATTACH_URL. Concurrent:Conflicts Domain Specify a conflict domain for your data. A conflict domain identifies the data where two incompatible programs cannot run simultaneously. Users can see but not update this profile option. This profile option is visible and updatable at all four levels. Level Visible Allow Update Site Yes Yes Application Yes Yes Responsibility Yes Yes User Yes Yes The internal name for this profile option is CONC_CD_ID. Concurrent:Collect Request Statistics Set this profile option to ”Yes” to have statistics for your runtime concurrent processes collected. To review the statistics you must run the Purge Concurrent Request and/or Manager Data program to process the raw data and have it write the computed statistics to the FND_CONC_STAT_SUMMARY table. You can then retrieve your data from this table using SQL*PLUS or on a report by report basis using the Diagnostics window from the Requests window. Users cannot see nor change this profile option. This profile option is visible at all levels bu can only be updated at the Site level. Level Visible Allow Update Site Yes Yes Application Yes No Responsibility Yes No User Yes No Profile Options in Oracle Application Object Library A–7 The internal name for this profile option is CONC_REQUEST_STAT. Concurrent:Debug Flags Your Oracle support representative may access this profile option to debug Transaction Managers. Otherwise, it should be set to null. Users cannot see nor change this profile option. This profile option is visible and updatable at all four levels. Level Visible Allow Update Site Yes Yes Application Yes Yes Responsibility Yes Yes User Yes Yes The internal name for this profile option is CONC_DEBUG. Concurrent:Hold Requests You can automatically place your concurrent requests on hold when you submit them. The default is “No”. The concurrent managers run your requests according to the priority and start time specified for each. Changing this value does not affect requests you have already submitted. “Yes” means your concurrent requests and reports are automatically placed on hold. To take requests off hold, you: • Navigate to the Requests window to select a request • Select the Request Control tabbed region • Uncheck the Hold check box Users can see and update this profile option. This profile option is visible and updatable at all four levels. Level Visible Allow Update Site Yes Yes Application Yes Yes Responsibility Yes Yes User Yes Yes The internal name for this profile option is CONC_HOLD. A–8 Oracle Applications System Administrator’s Guide Concurrent:Multiple Time Zones ”Yes” sets the default value to ’Sysdate–1’ for the ’Schedules Start Date’ used by request submissions. Sysdate–1 ensures that you request is scheduled immediately regardless of which time zone your client session is running in. You should use this profile option when the client’s session is running in a different time zone than the concurrent manager’s session. Users cannot see nor change this profile option. This profile option is visible at all four levels and updatable at the Site level. Level Visible Allow Update Site Yes Yes Application Yes No Responsibility Yes No User Yes No The internal name for this profile option is CONC_MULTI_TZ. Concurrent:PMON method PMON refers to process monitor. The Internal Concurrent Manager monitors the individual concurrent managers’ processes to verify the managers are running. This profile option should always be set to LOCK. Using the LOCK method, the Internal Concurrent Manager tries to get a lock on the individual concurrent manager’s process. The name of the lock is determined by a sequence (which is the ID of the individual manager) and the program in question. If the Internal Concurrent Manager is able to get the lock, then it knows the process is no longer running. Users cannot see nor change this profile option. This profile option is neither visible nor updatable from the System Profile Options form. Level Visible Allow Update Site No No Application No No Responsibility No No User No No The internal name for this profile option is CONC_PMON_METHOD. Profile Options in Oracle Application Object Library A–9 Concurrent:Report Access Level Determines access privileges to report output files and log files generated by a concurrent program. This profile option can be set by a System Administrator to User or Responsibility. If your Concurrent:Report Access Level profile option is set to ”User” you may: • View the completed report output for your requests online • View the diagnostic log file for those requests online. (system administrator also has this privilege) • Reprint your completed reports, if the Concurrent:Save Output profile option is set to ”Yes”. • If you change responsibilities, then the reports and log files available for online review do not change. If your Concurrent:Report Access Level profile option is set to ”Responsibility”, access to reports and diagnostic log files is based on the your current responsibility. • If you change responsibilities, then the reports and log files available for online review change to match your new responsibility. You can always see the output and log files from reports you personally submit, but you also see reports and log files submitted by any user from the current responsibility. Users can see this profile option, but they cannot update it. This profile option is visible and updatable at the site, responsibility, and user levels. Level Visible Allow Update Site Yes Yes Application No No Responsibility Yes Yes User Yes Yes The internal name for this profile option is CONC_REPORT_ACCESS_LEVEL. Concurrent:Report Copies You can set the number of output copies that print for each concurrent request. The default is set to 1. • Changing this value does not affect requests that you have already submitted. A – 10 Oracle Applications System Administrator’s Guide Users can see and update this profile option. This profile option is visible and updatable at all four levels. Level Visible Allow Update Site Yes Yes Application Yes Yes Responsibility Yes Yes User Yes Yes The internal name for this profile option is CONC_COPIES. Concurrent:Request Priority This displays the default priority number for your concurrent requests. Only a system administrator can change your request priority. Requests normally run according to start time, on a “first–submitted, first–run” basis. Priority overrides request start time. A higher priority request starts before an earlier request. Priorities range from 1 (highest) to 99 (lowest). The standard default is 50. Users can see this profile option, but they cannot update it. This profile option is visible and updatable at all four levels. Level Visible Allow Update Site Yes Yes Application Yes Yes Responsibility Yes Yes User Yes Yes The internal name for this profile option is CONC_PRIORITY. Concurrent:Request Start Time You can set the date and time that your requests are available to start running. • If the start date and time is at or before the current date and time, requests are available to run immediately. • If you want to start a request in the future, for example, at 3:45 pm on June 12, 2002, you enter 2002/06/12 15:45:00 as the profile option value. ☞ Attention: You must ensure that this value is in canonical format (YYYY/MM/DD HH24:MI:SS) to use the Multilingual Concurrent Request feature. Profile Options in Oracle Application Object Library A – 11 • You must include both a date and a time. • Changing this value does not affect requests that you have already submitted. • Users can override the start time when they submit requests. Or, this profile option can be left blank and users will be prompted for a start time when they submit requests. Users can see and update this profile option. This profile option is visible and updatable at all four levels. Level Visible Allow Update Site Yes Yes Application Yes Yes Responsibility Yes Yes User Yes Yes The internal name for this profile option is CONC_REQ_START. Concurrent:Save Output The Concurrent: Save Output profile is used to determine whether the default behavior of certain concurrent programs should be to save or delete their output files. This only affects concurrent programs that were created in the character mode versions of Oracle Applications and that have a null value for ”Save Output”. • ”Yes” saves request outputs. • Some concurrent requests do not generate an output file. • If your request output is saved, you can reprint a request. This is useful when requests complete with an Error status, for example, the request runs successfully but a printer malfunctions. • Changing this value does not affect requests you have already submitted. Users can see and update this profile option. This profile option is visible and updatable at all four levels. A – 12 Level Visible Allow Update Site Yes Yes Application Yes Yes Responsibility Yes Yes User Yes Yes Oracle Applications System Administrator’s Guide The internal name for this profile option is CONC_SAVE_OUTPUT. Concurrent:Sequential Requests You can force your requests to run one at a time (sequentially) according to the requests’ start dates and times, or allow them to run concurrently, when their programs are compatible. • Concurrent programs are incompatible if simultaneously accessing the same database tables incorrectly affects the values each program retrieves. • When concurrent programs are defined as incompatible with one another, they cannot run at the same time. “Yes” prevents your requests from running concurrently. Requests run sequentially in the order they are submitted. “No” means your requests can run concurrently when their concurrent programs are compatible. Changing this value does not affect requests you have already submitted. Users can see and update this profile option. This profile option is visible and updatable at all four levels. Level Visible Allow Update Site Yes Yes Application Yes Yes Responsibility Yes Yes User Yes Yes The internal name for this profile option is CONC_SINGLE_THREAD. Concurrent: Show Requests Summary After Each Request Submission Using this new profile option, you can choose to either have the Requests Summary displayed each time you submit a request, or retain the request submission screen. The default is “Yes”. “Yes” means the Requests Summary screen is displayed each time you submit a request. If you choose ”No”, a decision window is opened asking you if you wish to submit another request. When you choose to submit another request you are returned to the submission window and the window is not cleared, allowing you to easily submit copies of the same request with minor changes. Profile Options in Oracle Application Object Library A – 13 Users can see and update this profile option. This profile option is visible and updatable at all four levels. Level Visible Allow Update Site Yes Yes Application Yes Yes Responsibility Yes Yes User Yes Yes The internal name for this profile option is CONC_REQ_SUMMARY. Concurrent:Wait for Available TM You can specify the maximum number of seconds that the client will wait for a given transaction manager (TM) to become available before moving on to try a different TM. Users can see and update this profile option. This profile option is visible and updatable at the site and application levels. Level Visible Allow Update Site Yes Yes Application Yes Yes Responsibility No No User No No The internal name for this profile option is CONC_TOKEN_TIMEOUT. Concurrent:URL Lifetime The numeric value you enter for this profile option determines the length of time in minutes a URL for a request ouput is maintained. After this time period the URL will be deleted from the system. This profile option only affects URLs created for requests where the user has entered values in the notify field of the Submit Request or Submit Request Set windows. ☞ Attention: All request ouput URLs are deleted when the Pruge Concurrent Requests and Manager... program is run even if the URL liftime has not expired. Users can see and update this profile option. This profile option is visible and updatable at the all levels. A – 14 Oracle Applications System Administrator’s Guide Level Visible Allow Update Site Yes Yes Application Yes Yes Responsibility Yes Yes User Yes Yes The internal name for this profile option is CONC_URL_LIFETIME. Currency:Mixed Precision Use Mixed Currency Precision to specify how many spaces are available to the right of the decimal point when displaying numbers representing different currencies. • Normally, currency numbers are right–justified. • Each currency has its own precision value that is the number of digits displayed to the right of a decimal point. For U.S. dollars the precision default is 2, so an example display is 345.70. • Set Mixed Currency Precision to be equal to or greater than the maximum precision value of the currencies you are displaying. For example, if you are reporting on rows displaying U.S. dollars (precision=2), Japanese yen (precision=0), and Bahraini dinar (precision=3), set Mixed Currency Precision=3. Users can see and update this profile option. This profile option is visible and updatable at all four levels. Level Visible Allow Update Site Yes Yes Application Yes Yes Responsibility Yes Yes User Yes Yes The internal name for this profile option is CURRENCY:MIXED_PRECISION. Currency:Negative Format You can use different formats to identify negative currency. The default identifier is a hyphen ( – ) preceding the currency amount, as in ”–xxx”. You can also select: Angle brackets < > < xxx > Profile Options in Oracle Application Object Library A – 15 Trailing hyphen – xxx – Parentheses () ( xxx ) Square Brackets [ ] [ xxx ] If you use the negative number formats of “(xxx)” or “[xxx],” in Oracle Applications Release 11, your negative numbers appear as “<xxx>”. Users can see and update this profile option. This profile option is visible and updatable at all four levels. Level Visible Allow Update Site Yes Yes Application Yes Yes Responsibility Yes Yes User Yes Yes The internal name for this profile option is CURRENCY:NEGATIVE_FORMAT. Note: Currency:Negative Format only affects the display currency. Non–currency negative numbers appear with a preceding hyphen regardless of the option selected here. Currency:Positive Format You can use different formats to identify positive currency values. The default condition is no special identifier. Users can see and update this profile option. This profile option is visible and updatable at all four levels. Level Visible Allow Update Site Yes Yes Application Yes Yes Responsibility Yes Yes User Yes Yes The internal name for this profile option is CURRENCY:POSITIVE_FORMAT. Currency:Thousands Separator You can separate your currency amounts in thousands by placing a thousands separator. For example, one million appears as 1,000,000. Users can see and update this profile option. A – 16 Oracle Applications System Administrator’s Guide This profile option is visible and updatable at all four levels. Level Visible Allow Update Site Yes Yes Application Yes Yes Responsibility Yes Yes User Yes Yes The internal name for this profile option is CURRENCY:THOUSANDS_SEPARATOR. Database Instance Entering a valid two_task connect string allows you to override the default two_task. This profile is specifically designed for use with Oracle Parallel Server, to allow different responsibilities and users to connect to different nodes of the server. Users can see this profile option, but they cannot update it. This profile option is visible and updatable at all four levels. Level Visible Allow Update Site Yes Yes Application Yes Yes Responsibility Yes Yes User Yes Yes The internal name for this profile option is INSTANCE_PATH. Default Country This is the default source for the Country field for all address zones and is used by the Flexible Address Formats feature, the Flexible Bank Structures feature and the Tax Registration Number and Taxpayer ID validation routines. The profile can be set to any valid country listed in the Maintain Countries and Territories form and can be set to a different value for each user. Users can see and update this profile option. This profile option is visible and updatable at all four levels. Profile Options in Oracle Application Object Library A – 17 Level Visible Allow Update Site Yes Yes Application Yes Yes Responsibility Yes Yes User Yes Yes The internal name for this profile option is DEFAULT_COUNTRY. Enable Security Groups This profile option is used by the Security Groups feature, which is used by HRMS security only. The possible values are ’None’ (N), ’Hosted’ (HOSTED), and ’Service Bureau’ (Y). Only the System Administrator can update this profile option. Level Visible Allow Update Site Yes Yes Application Yes Yes Responsibility No No User No No The internal name for this profile option is ENABLE_SECURITY_GROUPS. Flexfields:AutoSkip You can save keystrokes when entering data in your flexfields by automatically skipping to the next segment as soon as you enter a complete valid value into a segment. • “Yes” means after entering a valid value in a segment, you automatically move to the next segment. • “No” means after entering a valid value in a segment, you must press [Tab] to go to the next segment. Note: You may still be required to use tab to leave some segments if the valid value for the segment does not have the same number of characters as the segment. For example, if a segment in the flexfield holds values up to 5 characters and a valid value for the segment is 4 characters, AutoSkip will not move you to the next segment. Users can see and update this profile option. A – 18 Oracle Applications System Administrator’s Guide This profile option is visible and updatable at all four levels. Level Visible Allow Update Site Yes Yes Application Yes Yes Responsibility Yes Yes User Yes Yes The internal name for this profile option is FLEXFIELDS:AUTOSKIP. Flexfields:BiDi Direction This profile option controls the appearance of the flexfields window in Applications running in Semitic languages. Possible values are ”Left To Right” and ”Right To Left”. If the profile option is not defined on a particular installation, the default value is ”Right To Left”, where the window appears in a normal, left to right fashion, and the text and layout are reversed to accommodate the right–to–left nature of the Semitic language environment. Users can see and update this profile option. This profile option is visible and updatable at all four levels. Level Visible Allow Update Site Yes Yes Application Yes Yes Responsibility Yes Yes User Yes Yes The internal name for this profile option is FLEXFIELDS:BIDI_DIRECTION. Flexfields:LOV Warning Limit Use Flexfields:LOV Warning Limit to improve efficiency when retrieving a list of values. Sometimes, particularly when no reduction criteria has been specified, an LOV can take a very long time to run if there is a very significant amount of data in it. Set this profile option to the number of rows to be returned before the user is asked whether to continue retrieving the entire list. Users can see and update this profile option. This profile option is visible and updatable at all four levels. Profile Options in Oracle Application Object Library A – 19 Level Visible Allow Update Site Yes Yes Application Yes Yes Responsibility Yes Yes User Yes Yes The internal name for this profile option is QUICKPICK_ROWS_BEFORE_WARN. Flexfields:Open Descr Window You can control whether a descriptive flexfield window automatically opens when you navigate to a customized descriptive flexfield. • “Yes” means that the descriptive flexfield window automatically opens when you navigate to a customized descriptive flexfield. • “No” means that when you navigate to a customized descriptive flexfield, you must choose Edit Field from the Edit menu or use the List of Values to open the descriptive flexfield window. Users can see and update this profile option. This profile option is visible and updatable at all four levels. Level Visible Allow Update Site Yes Yes Application Yes Yes Responsibility Yes Yes User Yes Yes The internal name for this profile option is FLEXFIELDS:OPEN_DESCR_WINDOW. Note: This profile option does not apply to descriptive flexfields in folders. Flexfields:Open Key Window You can control whether a key flexfield window automatically opens when you navigate to a key flexfield. • “Yes” means that the key flexfield window automatically opens when you navigate to a key flexfield. • “No” means that when you navigate to a key flexfield, you must choose Edit Field from the Edit menu or use the List of Values to open the key flexfield window. A – 20 Oracle Applications System Administrator’s Guide Users can see and update this profile option. This profile option is visible and updatable at all four levels. Level Visible Allow Update Site Yes Yes Application Yes Yes Responsibility Yes Yes User Yes Yes The internal name for this profile option is FLEXFIELDS:OPEN_KEY_WINDOW. Flexfields:Shared Table Lock This profile option is used by the Oracle Applications flexfields internal code only. You should not alter the value of this profile option unless instructed to do so by an Oracle representative. The internal name for this profile option is FLEXFIELDS:SHARED_TABLE_LOCK. Flexfields:Shorthand Entry If shorthand flexfield entry is defined for your flexfield, you can use a shorthand alias to automatically fill in values for some or all of the segments in a flexfield. Not Enabled Shorthand Entry is not available for any flexfields for this user, regardless of whether shorthand aliases are defined. New Entries Only Shorthand Entry is available for entering new records in most foreign key forms. It is not available for combinations forms, updating existing records, or entering queries. Query and New Entry Shorthand Entry is available for entering new records or for entering queries. It is not available for updating existing records. All Entries Shorthand Entry is available for entering new records or updating old records. It is not available for entering queries. Always Shorthand Entry is available for inserting, updating, or querying flexfields for which shorthand aliases are defined. Profile Options in Oracle Application Object Library A – 21 Users can see and update this profile option. This profile option is visible and updatable at all four levels. Level Visible Allow Update Site Yes Yes Application Yes Yes Responsibility Yes Yes User Yes Yes The internal name for this profile option is FLEXFIELDS:SHORTHAND_ENTRY. Flexfields:Show Full Value If an alias defines valid values for all of the segments in a flexfield, and Flexfields: Shorthand Entry is enabled, when you enter the alias the flexfield window does not appear. ”Yes” displays the full flexfield window with the cursor resting on the last segment. Users can see and update this profile option. This profile option is visible and updatable at all four levels. Level Visible Allow Update Site Yes Yes Application Yes Yes Responsibility Yes Yes User Yes Yes The internal name for this profile option is FLEXFIELDS:SHOW_FULL_VALUE. Flexfields:Validate On Server This profile option is set to ”Yes” to enable server side, PL/SQL flexfields validation for Key Flexfields. This improves performance when using Key Flexfields over a wide area network by reducing the number of network round trips needed to validate the entered segment combinations. You may find, however, that your validation’s performance is better with client side validation. In this case, set this profile option to ”No”. Users can see and update this profile option. A – 22 Oracle Applications System Administrator’s Guide This profile option is visible and updatable at all four levels. Level Visible Allow Update Site Yes Yes Application Yes Yes Responsibility Yes Yes User Yes Yes The internal name for this profile option is FLEXFIELDS:VALIDATE_ON_SERVER. FND: Debug Log Filename The file name for the file to hold debugging messages used in the Log/Trace Service. If the value of this profile option is null, then the Log/Trace Service is turned off. Users can see and update this profile option. Level Visible Allow Update Site Yes Yes Application Yes Yes Responsibility Yes Yes User Yes Yes The internal name for this profile option is AFLOG_FILENAME. FND: Debug Log Level The Log/Trace Service can filter out debugging messages depending on their priority level.. There are five levels of the Debug/Trace Service:. In order from highest priority to lowest priority, they are: Errors, Exceptions, Events, Procedures, and Statements. The Debug Log Level is the lowest level that the user wants to see messages for.. The possible profile option values are Null (which means off), and the five priority levels above. For instance, if the ”FND: Debug Log Level” profile is set to ”EVENT”, then the file will get the messages that the programmer had marked as ”EVENT”, ”EXCEPTION”, or ”ERROR”. Users can see and update this profile option. Level Visible Allow Update Site Yes Yes Application Yes Yes Responsibility Yes Yes User Yes Yes Profile Options in Oracle Application Object Library A – 23 The internal name for this profile option is AFLOG_LEVEL. FND: Debug Log Module The Log/Trace Service can filter out debugging messages depending on their module. Module names are unique across applications and coding languages. If a module is specified for this profile option, then only messages for that module will be written to the log file. If this profile option is left blank then messages for all modules will be written to the log file. Users can see and update this profile option. Level Visible Allow Update Site Yes Yes Application Yes Yes Responsibility Yes Yes User Yes Yes The internal name for this profile option is AFLOG_MODULE. FND: Enable Cancel Query Oracle Applications allows end users to cancel certain long–running queries, such as retrieving data in a block. When these operations exceed a threshold of time, approximately ten seconds, a dialog will display that allows the user to cancel the query. Set the FND: Enable Cancel Query profile option to Yes if you wish to enable the ability to cancel a form query. This profile option may be set at the site, application, responsibility or the user level. Users can see but not update this profile option. Level Visible Allow Update Site Yes Yes Application Yes Yes Responsibility Yes Yes User Yes Yes The internal name for this profile option is FND_ENABLE_CANCEL_QUERY. FND: Indicator Colors The default for this profile option is null, which means ”Yes.” When this profile option is set to Yes: A – 24 Oracle Applications System Administrator’s Guide • Required fields are displayed in yellow. • Queryable fields are displayed in a different color while in enter–query mode. • Fields that cannot be entered (read–only) are rendered in dark gray. Users can see and update this profile option. Level Visible Allow Update Site No No Application No No Responsibility No No User Yes Yes The internal name for this profile option is FND_INDICATOR_COLORS. FND: Native Client Encoding FND: Native Client Encoding indicates the character set that a client machine uses as its native character set. The value must be one of the Oracle character sets and should correspond to the client native character set. The character set used in a client machine varies depending on language and platform. For example, if a user uses a Windows machine with Japanese, the value should be JA16SJIS. But if a user uses a Solaris machine with Japanese, the value should be JA16EUC. The value is normally set in the user level since each user uses different machine, but it can be set in every level for a default value. This profile option is used when storing text data. When a user uploads a text file to be stored in the FND_LOBS table, the current value of FND: Native Client Encoding is stored along with the text data. With the value of this profile option, the server can then convert the text data to another character set as necessary when the text data is downloaded. Users can see and update this profile option. Level Visible Allow Update Site Yes Yes Application Yes Yes Responsibility Yes Yes User Yes Yes The internal name for this profile option is FND_NATIVE_CLIENT_ENCODING. Profile Options in Oracle Application Object Library A – 25 FND: Override Directory The FND:Override Directory profile option is used by the Work Directory feature. The value of FND: Override Directory should be the directory containing your alternate files. Typically, this profile option should be set at the User level only. Users can see and update this profile option. Level Visible Allow Update Site Yes Yes Application Yes Yes Responsibility Yes Yes User Yes Yes The internal name for this profile option is APPLWRK. FND: Resource Consumer Group Resource consumer groups are used by the Oracle8i Database Resource Manager, which allocates CPU resources among database users and applications. Each form session is assigned to a resource consumer group. The system administrator can assign users to a resource consumer group for all of their forms sessions and transactions. If no resource consumer group is found for a process, the system uses the default group ”Default_Consumer_Group”. Users can see this profile option, but they cannot update it. Level Visible Allow Update Site Yes Yes Application Yes Yes Responsibility Yes Yes User Yes Yes The internal name for this profile option is FND_RESOURCE_CONSUMER_GROUP. Folders:Allow Customization Your system administrator controls whether you can create or customize a folder definition layout in folder block. • “Yes” means that you can create or customize a folder definition, that is, the entire Folder menu is enabled in the folder block. • “No” means that you can only open an existing folder definition in a folder block, that is, only the Open option is enabled in the Folder menu. A – 26 Oracle Applications System Administrator’s Guide Users can see this profile option, but they cannot update it. Level Visible Allow Update Site No No Application No No Responsibility No No User Yes Yes The internal name for this profile option is FLEXVIEW:CUSTOMIZATION. Forms Keyboard Mapping File Use this profile option to define the path of the Keyboard Mapping File. The ”Keys” window displays the keystrokes to perform standard Forms operations, such as ”Next Block” and ”Clear Record.” This window can be viewed at anytime by pressing Ctrl+k. The keyboard mappings can be customized as follows: • The System Administrator must locate the Oracle Forms resource file on the middle tier, typically called fmrweb.res. • Make a copy of the file, name it as desired, and locate it in the same directory as the original. • Open the new file in any text editor and make the desired keystroke mapping changes. Comments at the top of the file explain how the mappings are performed. • To run the new mapping file, specify the complete path and file name in this profile option. Users can see and update this profile option. This profile option is visible and updatable at all four levels. Level Visible Allow Update Site Yes Yes Application Yes Yes Responsibility Yes Yes User Yes Yes The internal name for this profile option is FND_FORMS_TERM. Forms Runtime Parameters Use this profile to specify certain forms runtime parameters. The profile value must be entered in as parameter=value. Each parameter–value pair must be separated by a single space. For example: Profile Options in Oracle Application Object Library A – 27 record=collect log=/tmp/frd.log debug_messages=yes In order for the parameters updated in this profile option to go into effect, you must exit and log back in to Oracle Applications. Users can see and update this profile option. This profile option is visible and updatable at all four levels. Level Visible Allow Update Site Yes Yes Application Yes Yes Responsibility Yes Yes User Yes Yes The internal name for this profile option is FND_MORE_FORM_PARAMS. Gateway User ID Oracle login for gateway account. This should be the same as the environment variable GWYUID. For example, applsyspub/pub. Users can see and but not update this profile option. This profile option is visible at all levels but may only be updated at the site level. Level Visible Allow Update Site Yes Yes Application Yes No Responsibility Yes No User Yes No The internal name for this profile option is GWYUID. Help Localization Code Localized context–sensitive help files are preferred when your System Administrator sets this profile option. Users can see this profile option, but they cannot update it. This profile option is visible and updatable at the responsibility and user levels. A – 28 Level Visible Allow Update Site Yes Yes Application Yes Yes Responsibility Yes Yes User Yes Yes Oracle Applications System Administrator’s Guide The internal name for this profile option is HELP_LOCALIZATION_CODE. Help Tree Root This profile option determines which tree is shown in the navigation frame when context–sensitive help is launched. Users can see this profile option, but they cannot update it. This profile option is visible and updatable at all levels. Level Visible Allow Update Site Yes Yes Application Yes Yes Responsibility Yes Yes User Yes Yes The internal name for this profile option is HELP_TREE_ROOT. Help Utility Download Path Use this profile option to define the directory into which the Help Utility downloads help files from the Oracle Applications Help System. Users can see this profile option, but they cannot update it. This profile option is visible and updatable at all levels. Level Visible Allow Update Site Yes Yes Application Yes Yes Responsibility Yes Yes User Yes Yes The internal name for this profile option is HELP_UTIL_DL_PATH. Help Utility Upload Path Use this profile option to define the directory from which the Help Utility uploads help files to the Oracle Applications Help System. Users can see this profile option, but they cannot update it. This profile option is visible and updatable at all levels. Level Visible Allow Update Site Yes Yes Application Yes Yes Responsibility Yes Yes User Yes Yes Profile Options in Oracle Application Object Library A – 29 The internal name for this profile option is HELP_UTIL_UL_PATH. Hide Diagnostics Menu Entry This profile option determines whether users can access the Diagnostics menu entry from the Help menu. If it is set to Yes, the Diagnostics menu entry is hidden. If it is set to No, the Diagnostics menu entry is visible. Users cannot see nor change this profile option. This profile option is visible and updatable at the all levels. Level Visible Allow Update Site Yes Yes Application Yes Yes Responsibility Yes Yes User Yes Yes The internal name for this profile option is FND_HIDE_DIAGNOSTICS. ICX: Client IANA Encoding This profile option is used to determine the character set of the text displayed by Java Server pages. This profile option must be set to the correct character set (that is, the character set of the Apache server on the Web tier) for the online help system to support character sets other than American English. The default setting is the US character set (ISO–8859–1). Users can see this profile option, but they cannot update it. This profile option is visible and updatable at the all levels. Level Visible Allow Update Site Yes Yes Application Yes Yes Responsibility Yes Yes User Yes Yes The internal name for this profile option is ICX_CLIENT_IANA_ENCODING. ICX: Discoverer Launcher, Forms Launcher, and Report Launcher These profile options are used by the Oracle Applications Personal Homepage. A – 30 Oracle Applications System Administrator’s Guide Set the site level value of each of these profile options to the base URL for launching each application. The profile option value should be sufficient to launch the application, but should not include any additional parameters which may be supplied by the Personal Homepage. Users can see these profile options, but they cannot update them. These profile options are visible and updatable at all levels. Level Visible Allow Update Site Yes Yes Application Yes Yes Responsibility Yes Yes User Yes Yes The internal name for these profile options are ICX_DISCOVERER_LAUNCHER, ICX_FORMS_LAUNCHER, and ICX_REPORT_LAUNCHER. ICX: Limit connect This profile option determines the maximum number of connection requests a user can make in a single session. Users cannot see or update this profile option. Level Visible Allow Update Site Yes Yes Application No No Responsibility No No User Yes Yes The internal name for this profile option is ICX_LIMIT_CONNECT. ICX: Limit time This profile option determines the absolute maximum duration (in hours) of a user’s session, regardless of activity. Users cannot see or update this profile option. Level Visible Allow Update Site Yes Yes Application No No Responsibility No No User Yes Yes Profile Options in Oracle Application Object Library A – 31 The internal name for this profile option is ICX_LIMIT_TIME. ICX: Session Timeout This profile option determines the length of time (in minutes) of inactivity in a user’s session before the session is disabled. If the user does not perform any operation in Oracle Applications for longer than this value, the session is disabled. The user is provided the opportunity to re–authenticate and re–enable a timed–out session. If re–authentication is successful, the session is re–enabled and no work is lost. Otherwise, Oracle Applications exit without saving pending work. If this profile option to 0 or NULL, then user sessions will never time out due to inactivity. Users can see this profile option, but they cannot update it. Level Visible Allow Update Site Yes Yes Application Yes Yes Responsibility Yes Yes User Yes Yes The internal name for this profile option is ICX_SESSION_TIMEOUT. Indicate Attachments This profile option allows you to turn off indication of attachments when querying records (for performance reasons). Users can see and update this profile option. This profile option is visible and updatable at all four levels. Level Visible Allow Update Site Yes Yes Application Yes Yes Responsibility Yes Yes User Yes Yes The internal name for this profile option is ATCHMT_SET_INDICATOR. Initialization SQL Statement – Custom This profile option allows you to add site–specific initialization code (such as optimizer settings) that will be executed at database session startup. The value of this profile option must be a valid SQL statement. A – 32 Oracle Applications System Administrator’s Guide The system administrator may set this profile option at any level. Level Visible Allow Update Site Yes Yes Application Yes Yes Responsibility Yes Yes User Yes Yes The internal name for this profile option is FND_INIT_SQL. Initialization SQL Statement – Oracle This profile option is used to add application–specific code. The value is a valid SQL statement (or a PL/SQL block for more than one statement), that is executed at startup of every database session. The value of this profile option is delivered as seed data and cannot be updated. ☞ Attention: Do not attempt to modify the value of this profile option. Use the profile option Initialization SQL Statement – Custom to add custom initialization code. This profile option is set at the application level only. The initialization code will be executed only for responsibilities owned by that application. Level Visible Allow Update Site Yes No Application Yes No Responsibility Yes No User Yes No The internal name for this profile option is FND_APPS_INIT_SQL. Java Color Scheme If the Java Look and Feel profile option is set to Oracle, the Java Color Scheme can be specified as follows: • Teal • Titanium • Red • Khaki • Blue Profile Options in Oracle Application Object Library A – 33 • Olive • Purple The Java Color Scheme profile has no effect if the Java Look and Feel is set to Generic. Level Visible Allow Update Site Yes Yes Application Yes Yes Responsibility Yes Yes User Yes Yes The internal name for this profile option is FND_COLOR_SCHEME. Java Look and Feel Oracle Applications Professional User Interface can be run with either the Oracle Look and Feel or the Generic Look and Feel. The Oracle Look and Feel consists of a new look and feel for each item, and a predefined set of color schemes. The Generic Look and Feel adheres to the native interface and color scheme of the current operating system. To specify the look and feel set this profile to ”generic” or ”oracle”. If the Oracle Look and Feel is used, the profile Java Color Scheme can be set. The Java Color Scheme profile has no effect if the Java Look and Feel is set to Generic. Level Visible Allow Update Site Yes Yes Application Yes Yes Responsibility Yes Yes User Yes Yes The internal name for this profile option is FND_LOOK_AND_FEEL. Maximum Page Length Determines the maximum number of lines per page in a report. Users can see and update this profile option. This profile option is visible and updatable at all four levels. A – 34 Level Visible Allow Update Site Yes Yes Application Yes Yes Responsibility Yes Yes User Yes Yes Oracle Applications System Administrator’s Guide The internal name for this profile option is MAX_PAGE_LENGTH. MO:Operating Unit Determines the Operating Unit the responsibility logs onto. Users can see and update this profile option. This profile option is visible and updatable at the responsibility level only. Level Visible Allow Update Site No No Application No No Responsibility Yes Yes User No No The internal name for this profile option is ORG_ID. Personnel Employee:Installed When enabled, ”Personnel Employee:Installed” allows you as System Administrator to link an application username and password to an employee name. • The ”Person” field is usable on the Define Application User form (\ Navigate Security User). Oracle Purchasing uses this capability to associate an employee in your organization with an Oracle Applications user. The installation process enables this profile option. You cannot change the value of ”Personnel Employee: Installed”. Users cannot see nor change this profile option. This profile option is visible at the site level, but cannot be updated. Level Visible Allow Update Site Yes No Application No No Responsibility No No User No No The internal name for this profile option is PER_EMPLOYEE:INSTALLED. Printer You can select the printer which prints your reports. If a printer cannot be selected, contact your system administrator. Printers must be registered with Oracle Applications. Profile Options in Oracle Application Object Library A – 35 Users can see and update this profile option. This profile option is visible and updatable at all four levels. Level Visible Allow Update Site Yes Yes Application Yes Yes Responsibility Yes Yes User Yes Yes The internal name for this profile option is PRINTER. RRA:Delete Temporary Files When using a custom editor to view a concurrent output or log file, the Report Review Agent will make a temporary copy of the file on the client. Set this profile to ”Yes” to automatically delete these files when the user exits Oracle Applications. Only the System Administrator can update this profile option. This profile option is visible and updatable at all four levels. Level Visible Allow Update Site Yes Yes Application Yes Yes Responsibility Yes Yes User Yes Yes The internal name for this profile option is FS_DELETE. RRA:Enabled Set this user profile to ”Yes” to use the Report Review Agent to access files on concurrent processing nodes. Only the System Administrator can update this profile option. This profile option is visible and updatable at all four levels. Level Visible Allow Update Site Yes Yes Application Yes Yes Responsibility Yes Yes User Yes Yes The internal name for this profile option is FS_ENABLED. A – 36 Oracle Applications System Administrator’s Guide RRA: Service Prefix Using this new profile option allows you to override the default service name prefix (FNDFS_) assigned to the Report Review Agent. By assigning a new prefix to the Report Review Agent you can avoid having multiple instances of the Applications share executables. Valid values for this option must be nine characters or less and use only alphanumeric characters or the underscore. We recommend using the underscore character as the last character of your value as in the default value ”FNDFS_”. Users cannot see or update this profile option. This profile option is visible and updatable at the site level only. Level Visible Allow Update Site Yes Yes Application No No Responsibility No No User No No The internal name for this profile option is FS_SVC_PREFIX. ☞ Attention: GLDI will not support the ”RRA: Service Prefix” profile until release 4.0 and so uses the default prefix ”FNDFS_” regardless of the value entered for the profile option. Consequently, you must ensure that at least one of your Report Review Agents maintains the default prefix in order for GLDI to access the application executables. RRA:Maximum Transfer Size Specify, in bytes, the maximum allowable size of files transferred by the Report Review Agent, including those downloaded by a user with the ”Copy File...” menu option in the Oracle Applications Report File Viewer and those ”temporary” files which are automatically downloaded by custom editors. For example, to set the size to 64K you enter 65536. If this profile is null, there is no size limit. Only the System Administrator can update this profile option. This profile option is visible and updatable at all four levels. Level Visible Allow Update Site Yes Yes Application Yes Yes Responsibility Yes Yes User Yes Yes Profile Options in Oracle Application Object Library A – 37 The internal name for this profile option is FS_MAX_TRANS. Sequential Numbering Sequential Numbering assigns numbers to documents created by forms in Oracle financial products. For example, when you are in a form that creates invoices, each invoice document can be numbered sequentially. Sequential numbering provides a method of checking whether documents have been posted or lost. Not all forms within an application may be selected to support sequential numbering. Sequential Numbering has the following profile option settings: Always Used You may not enter a document if no sequence exists for it. Not Used You may always enter a document. Partially Used You will be warned, but not prevented from entering a document, when no sequence exists. Users can see this profile option, but they cannot update it. This profile option is visible and updatable at the site, application, and responsibility levels. Note: If you need to control Sequential Numbering for each of your set of books, use the ’Responsibility’ level. Otherwise, we recommend that you use either the ’Site’ or ’Application’ level to set this option. Level Visible Allow Update Site Yes Yes Application Yes Yes Responsibility Yes Yes User No No The internal name for this profile option is UNIQUE:SEQ_NUMBERS. Session ID This runtime profile option contains the session ID number of the last database session that was created. Users can see this profile option, but they cannot update it. This profile option is neither visible nor updatable from the System Profile Options form. A – 38 Oracle Applications System Administrator’s Guide Level Visible Allow Update Site No No Application No No Responsibility No No User No No The internal name for this profile option is DB_SESSION_ID. Sign–On:Audit Level Sign–On:Audit Level allows you to select a level at which to audit users who sign on to Oracle Applications. Four audit levels increase in functionality: None, User, Responsibility, and Form. None is the default value, and means do not audit any users who sign on to Oracle Applications. Auditing at the User level tracks: • who signs on to your system • the times users log on and off • the terminals in use Auditing at the Responsibility level performs the User level audit functions and tracks: • the responsibilities users choose • how much time users spend using each responsibility Auditing at the Form level performs the Responsibility level audit functions and tracks: • the forms users choose • how long users spend using each form • System Administrator visible, updatable at all levels. Users cannot see nor change this profile option. This profile option is visible and updatable at all four levels. Level Visible Allow Update Site Yes Yes Application Yes Yes Responsibility Yes Yes User Yes Yes Profile Options in Oracle Application Object Library A – 39 The internal name for this profile option is SIGNONAUDIT:LEVEL. Sign–On:Notification ”Yes” displays a message at login that indicates: • If any concurrent requests failed since your last session, • How many times someone tried to log on to Oracle Applications with your username but an incorrect password, and • When the default printer identified in your user profile is unregistered or not specified. Users can see and update this profile option. This profile option is visible and updatable at all four levels. Level Visible Allow Update Site Yes Yes Application Yes Yes Responsibility Yes Yes User Yes Yes The internal name for this profile option is SIGNONAUDIT:NOTIFY. Signon Password Failure Limit The Signon Password Failure Limit profile option determines the maximum number of login attempts before the user’s account is disabled. Users cannot see or update this profile option. This profile option is visible and updatable at all four levels. Level Visible Allow Update Site Yes Yes Application Yes Yes Responsibility Yes Yes User Yes Yes The internal name for this profile option is SIGNON_PASSWORD_FAILURE_LIMIT. Signon Password Hard to Guess The Signon Password Hard to Guess profile option sets rules for choosing passwords to ensure that they will be ”hard to guess.” A password is considered hard–to–guess if it follows these rules: A – 40 Oracle Applications System Administrator’s Guide • The password contains at least one letter and at least one number. • The password does not contain the username. • The password does not contain repeating characters. Users can see but not update this profile option. This profile option is visible and updatable at all four levels. Level Visible Allow Update Site Yes Yes Application Yes Yes Responsibility Yes Yes User Yes Yes The internal name for this profile option is SIGNON_PASSWORD_HARD_TO_GUESS. Signon Password Length Signon Password Length sets the minimum length of an Applications signon password. If no value is entered the minimum length defaults to 5. Users can see but not update this profile option. This profile option is visible and updatable at all four levels. Level Visible Allow Update Site Yes Yes Application Yes Yes Responsibility Yes Yes User Yes Yes The internal name for this profile option is SIGNON_PASSWORD_LENGTH. Signon Password No Reuse This profile option specifies the number of days that a user must wait before being allowed to reuse a password. Users can see but not update this profile option. This profile option is visible and updatable at all four levels. Level Visible Allow Update Site Yes Yes Application Yes Yes Responsibility Yes Yes User Yes Yes Profile Options in Oracle Application Object Library A – 41 The internal name for this profile option is SIGNON_PASSWORD_NO_REUSE. Site Name Site Name identifies an installation of Oracle Applications. The installation process sets this to ”No Site Name Specified”. You should set a value for ”Site Name” after installation. The Site Name appears in the title of the MDI window. If you want additional information on your installation to appear in the title, for example, ”Test” or ”Production”, you can add that information here Users cannot see nor change this profile option. This profile option is visible and updatable at the site level. Level Visible Allow Update Site Yes Yes Application No No Responsibility No No User No No The internal name for this profile option is SITENAME. Socket Listener Activated This profile option is a flag that indicates whether the FormsClient Controller (Socket Listener) should be started by the signon form. Users can see but not update this profile option. This profile option is visible and updatable at all four levels. Level Visible Allow Update Site Yes Yes Application Yes Yes Responsibility Yes Yes User Yes Yes The internal name for this profile option is SOCKET_LISTENER_ACTIVATED. Socket Listener Port This profile option defines the port number used by the Forms Client Controller. A – 42 Oracle Applications System Administrator’s Guide This profile option is used by Oracle Workflow. When a user chooses to launch a form from a Workflow notification, Oracle Workflow will look for the value of this profile option and launch the form in the specified port. If the socket listener port is not set at user level, Oracle Workflow launches attached forms at the default port set for the site. However, if users have set different ports, Oracle Workflow launches the forms for each user at the specified port. By using different socket listener ports, two different users logged into Oracle Applications on the same machine can both launch attached forms at the same time without interference from each other. Users can see but not update this profile option. This profile option is visible and updatable at all four levels. Level Visible Allow Update Site Yes Yes Application Yes Yes Responsibility Yes Yes User Yes Yes The internal name for this profile option is SOCKET_LISTENER_PORT. Stored Procedure Log Directory Specifying a log directory enables stored procedures used with Oracle 7.3 to generate and store log files. You must also set this log directory in the init.ora file of the database. For example, if the Stored Procedure Log Directory is /rladev/rla/1.1/log and the Stored Procedure Output Directory is /rladev/rla/1.1/out, then the following entry should be made in the init.ora file of the database containing stored procedures that write to these directories: UTL_FILE_DIR = /rladev/rla/1.1/log, /rladev/rla/1.1/out Users cannot see nor change this profile option. This profile option is visible and updatable at the site level. Level Visible Allow Update Site Yes Yes Application No No Responsibility No No User No No Profile Options in Oracle Application Object Library A – 43 The internal name for this profile option is UTL_FILE_LOG. Stored Procedure Output Directory Specifying a output directory enables stored procedures used with Oracle 7.3 to generate and store output files. You must also set this output directory in the init.ora file of the database. For example, if the Stored Procedure Log Directory is /rladev/rla/1.1/log and the Stored Procedure Output Directory is /rladev/rla/1.1/out, then the following entry should be made in the init.ora file of the database containing stored procedures that write to these directories: UTL_FILE_DIR = /rladev/rla/1.1/log, /rladev/rla/1.1/out Users cannot see nor change this profile option. This profile option is visible and updatable at the site level. Level Visible Allow Update Site Yes Yes Application No No Responsibility No No User No No The internal name for this profile option is UTL_FILE_OUT. TCF: HOST Together with the TCF:PORT profile, this profile identifies the network location of the TCF Server. The TCF Server supports various parts of the Oracle Applications UI by executing some of their associated server logic and providing access to the database. In most configurations, these profiles will be set by the TCF Server’s administrative utility ’ServerControl’ at the same time the TCF Server is started up. ServerControl will set these two profiles (TCF:HOST, TCF:PORT) at the site level. For particularly complex environments, it may be appropriate to direct different users to separate TCF Servers by setting these profiles to distinct values at the Application level. Consult the post installation instructions for details on TCF Server configuration options. This profile option is visible at all levels and updatable at the site and application level only. A – 44 Oracle Applications System Administrator’s Guide Level Visible Allow Update Site Yes Yes Application Yes Yes Responsibility Yes No User Yes No The internal name for this profile option is TCF:HOST. See: Administering the TCF Server page G – 41 TCF: PORT Together with the TCF:HOST profile, this profile identifies the network location of the TCF Server. The TCF Server supports various parts of the Oracle Applications UI by executing some of their associated server logic and providing access to the database. In most configurations, these profiles will be set by the TCF Server’s administrative utility ’ServerControl’ at the same time the TCF Server is started up. ServerControl will set these two profiles (TCF:HOST, TCF:PORT) at the site level. For particularly complex environments, it may be appropriate to direct different users to separate TCF Servers by setting these profiles to distinct values at the Application level. Consult Installing Oracle Applications for details on the TCF Server configuration options. Users can see and but not update this profile option. This profile option is visible at all levels and updatable at the site and application level only. Level Visible Allow Update Site Yes Yes Application Yes Yes Responsibility Yes No User Yes No The internal name for this profile option is TCF:PORT. See: Administering the TCF Server page G – 41 Two Task TWO_TASK for the database. This profile is used in conjunction with the Gateway User ID profile to construct a connect string for use in creating dynamic URLs for the Web Server. This should be set to the SQL*NET. alias for the database. Profile Options in Oracle Application Object Library A – 45 Note: The TWO_TASK must be valid on the node upon which the WebServer is running Users can see and but not update this profile option. This profile option is visible at all levels but may only be updated at site level. Level Visible Allow Update Site Yes Yes Application Yes No Responsibility Yes No User Yes No The internal name for this profile option is TWO_TASK. Utilities: Diagnostics Utilities: Diagnostics determines whether a user can automatically use the Diagnostics features. If Utilities:Diagnostics is set to Yes, then users can automatically use these features. If Utilities:Diagnostics is set to No, then users must enter the password for the APPS schema to use the Diagnostics features. Users cannot see nor change this profile option. This profile option is visible and updatable at the all levels. Level Visible Allow Update Site Yes Yes Application Yes Yes Responsibility Yes Yes User Yes Yes The internal name for this profile option is DIAGNOSTICS. Utilities:SQL Trace SQL trace files can now be generated for individual concurrent programs. The trace can be enabled at the user level by setting the profile ”Utilities:SQL Trace” to ”Yes”. This profile can be enabled for a user only by System Administrator so that it is not accidentally turned on and disk usage can be monitored. For more information on SQL trace, see the ORACLE8i Server SQL Language Reference Manual. Users cannot see nor change this profile option. A – 46 Oracle Applications System Administrator’s Guide This profile option is visible and updatable at the all levels. Level Visible Allow Update Site Yes Yes Application Yes Yes Responsibility Yes Yes User Yes Yes Viewer: Application for HTML, PCL, PDF, Postscript, and Text These profile options determine the applications a user will use to view reports in the given output formats. For example, you could set Viewer: Application for Text to ’application/word’ to view a Text report in Microsoft Word. Valid values are defined by the system administrator in the Viewer Options form. Users can see and update these profile options. Level Visible Allow Update Site Yes Yes Application Yes Yes Responsibility Yes Yes User Yes Yes The internal names for these profile options are FS_MIME_HTML, FS_MIME_PCL, FS_MIME_PDF, FS_MIME_PS, and FS_MIME_TEXT. Viewer:Default Font Size Using this new profile option, you can set the default font size used when you display report output in the Report Viewer. The valid values for this option are 6, 8, 10, 12, and 14. Users can see and update this profile option. This profile option is visible and updatable at all four levels. Level Visible Allow Update Site Yes Yes Application Yes Yes Responsibility Yes Yes User Yes Yes Profile Options in Oracle Application Object Library A – 47 The internal name for this profile option is FNDCPVWR_FONT_SIZE.. Viewer: Text The Viewer: Text profile option allows you to send report output directly to a browser window rather than using the default Report Viewer. Enter ”Browser” in this profile option to enable this feature. Users can see and update the Viewer:Text profile option. This profile option is both visible and updatable at all four levels. Level Visible Allow Update Site Yes Yes Application Yes Yes Responsibility Yes Yes User Yes Yes The internal name for this profile option is EDITOR_CHAR. A – 48 Oracle Applications System Administrator’s Guide APPENDIX B Using Predefined Alerts T his chapter gives you an overview of Oracle Alert and how to use the predefined alerts that are packaged with your Oracle Applications product. Specifically, this chapter describes: • The business needs for Oracle Alert • How to run predefined alerts • How to modify the predefined alerts to fit your needs ☞ Attention: This chapter focuses on using and customizing the predefined alerts that are packaged with Oracle Applications products. If you have a license of the full Oracle Alert product, you should refer to the Oracle Alert Reference Manual for information on how to create and customize your own alerts. Using Predefined Alerts B–1 Overview of Oracle Alert Oracle Alert is your complete exception control solution. Oracle Alert gives you an immediate view of the critical activity in your database. It helps you keep on top of important or unusual business events you need to know about, as they happen. Oracle Alert gives you real–time measurements of staff and organization performance, so you can zero in on potential trouble spots immediately. You can automate routine transactions with Oracle Alert, saving your valuable time for more essential tasks. And, Oracle Alert does all this online, so you do not have to contend with a pile of paperwork. Oracle Alert gives you the flexibility you need to monitor your business information the way you want. Basic Business Needs Oracle Alert meets the following basic business needs: • Informs you of exception conditions as they occur • Lets you specify the exception conditions you want to know about, as often as you want to know about them • Informs you of exception conditions by sending alert messages through a single applicationyour electronic mail • Takes actions you specify, based upon your response to an alert message • Automatically performs routine database tasks, according to a schedule you define • Integrates fully with your electronic mail system Oracle Alert Runtime Features If you do not have a licensed copy of the full Oracle Alert product, you may still derive benefit from major Oracle Alert features by using the predefined alerts that are packaged with your Oracle Applications product. All Oracle Applications products are packaged with a runtime version of Oracle Alert. Although all the Oracle Alert windows are available in this runtime version, not all the features in those windows are enabled. With the runtime version of Oracle Alert, you can run only the B–2 Oracle Applications System Administrator’s Guide predefined alerts that are packaged with your product; you cannot create new alerts. Alert Definitions Alert A mechanism that checks your database for a specific exception condition. An alert is characterized by the SQL SELECT statement it contains. A SQL SELECT statement tells your application what database exception to identify, as well as what output to produce for that exception. For example, you can define an alert to flag purchase orders exceeding $10,000, and have that alert output the name of the individual who requested the purchase order, as well as the name of the individual’s manager. All predefined alerts are listed in the Alerts window of Oracle Alert. Event Alert An event alert monitors the occurrence of a specific exception or change in your database. An exception in your database results if you add or update information using your Oracle Applications windows. The event alert monitors the database for exceptions based on its SQL SELECT statement. Periodic Alert A periodic alert periodically reports key information according to a schedule that you define. Rather than notify you of immediate exceptions in the database like an event alert, a periodic alert scans for specific database information specified by its SQL SELECT statement at scheduled intervals. Alert Action An alert action is an action you want your alert to perform. An alert action can be dependent on the output from the alert. An alert action can fall under one of three categories: • Detail action—an action that represents one exception found in the database • Summary action—an action that represents multiple exceptions found in the database Using Predefined Alerts B–3 • No exception action—an action that represents no exceptions found in the database An action can include sending an electronic mail message to a mail ID, running an Oracle Applications program, running a program or script from your operating system, or running a SQL script to modify information in your database. You can have more than one action for an alert and an action can incorporate the output of the alert. For example, you may want a particular alert to send a message to a manager, as well as run an Oracle Applications program when an exception occurs. Action Sets An action set is a sequence of alert actions that are enabled for a particular alert. Each action that you include in an action set can be assigned a sequence number so that you can specify the order in which the actions are performed. Some predefined alerts may also have more than one action set. You can also assign a sequence number to each action set to specify the order in which each action set is performed. B–4 Oracle Applications System Administrator’s Guide Predefined Alerts There are two types of predefined alerts: • Event alerts—for example, the Receiving Notification alert for Oracle Purchasing notifies the requestor with a mail message when an item is received and entered in the Receipts window. • Periodic alerts—for example, the Forecast Over–Consumption alert for Oracle Material Planning checks every day for over–consumption of the forecast and sends you a mail message if the current forecast quantity listed in the Forecast Entries window goes below zero. Suggestion: See your product’s reference guide for a list of the predefined alerts that are packaged with your Oracle Applications product. Using Predefined Alerts All predefined alerts are initially disabled. You must enable the alerts you want to use. Select the Oracle Alert Manager responsibility when you start Oracle Applications to view or use a predefined alert. The Alert Manager responsibility gives you access to the Oracle Alert menu. Navigate to the Alerts window to enable or edit predefined alerts. To display the predefined alert(s) for your Oracle Applications product, execute a query with your Oracle Applications product name in the Application field. The Name field displays the name of the predefined alert. The Type field indicates if the alert is an event or a periodic alert. You can enable an alert to run by checking the Enabled check box. You can also enter an End Date to specify the date until you want this alert run. Choose the Alert Details button to open the Alert Details window. Choose the Alert Installations tabbed region to display the available Installations. Enter the Oracle ID of the application installation you want your alert to run against. You can select only the Oracle IDs that are associated with the application that owns your alert. You can disable an Oracle ID for the alert temporarily by unchecking the Enabled check box. Choose the Actions button to open the Actions window. Oracle Alert automatically displays the actions that are defined for the alert. Using Predefined Alerts B–5 In the Actions window, if the Action Type is Detail, choose the Action Details button to display details for that action. The alert action sends an alert action message to the mail ID listed in the To field of the Message Detail zone. If the mail ID is in the format &NAME, where Name is an output defined by your alert, you need not modify this field. If, however, the mail ID in the To field is not in the above format or if there is no value entered in the field, you must enter the mail ID(s) of the person(s) you wish to receive the alert action message. After modifying the contents of this window, save your work. Navigate to the Oracle Alert Options window. Use this window to specify the electronic mail application you wish to integrate with the predefined alerts. In the Alerts window, choose the Actions Sets button to navigate to the Action Sets window. Oracle Alert automatically displays the action sets defined for the alert. Check the Enabled check box for each action set you wish to use. You may also enter an End Date field to specify the date until you want this alert action set to be enabled. In addition, in the Action Set Members block, check the Enabled check box for each action set member you want to use in that action set. You may also enter an End Date to specify the date until you want this alert action set member to be enabled. When you finish, save your work. Your predefined alert is now ready to use. Customizing Predefined Alerts You can customize predefined alerts in the following ways to suit your business needs: Electronic Mail Integration Oracle Alert is fully integrated with Oracle Office and can use Oracle Office to send electronic mail messages to your users. Since Oracle Office has gateways to other electronic mail systems, Oracle Alert can send messages to users on those systems as well. Oracle Alert can also use UNIX mail, VMS mail, or a custom mail system to send electronic mail messages to your users. You open the Oracle Alert Options window and use the Mail Systems tabbed region to specify the electronic mail application you wish to use B–6 Oracle Applications System Administrator’s Guide with your predefined alerts. You enter the Name of your electronic mail application, the operating system Command you use to start the mail application, and any Parameters you wish to pass to the mail program. If you are using Oracle Office, you need not specify an operating system Command. Once you enter the information for your mail application, check the In Use check box, then save your work. You can have only one mail application enabled at any given time. Standard Alert Message Text You can customize the message header and footer text that appears in all your alert message actions. Navigate to the Message Elements tabbed region of the Oracle Alert Options window, and four message elements appear automatically. Each element represents a specific type of message text that appears in all your alert mail messages. In the runtime version of Oracle Alert, you need to edit only the Message Action Header and Message Action Footer elements. Simply customize the text that appears to alter the text at the beginning and end of every alert message. You may also leave the text blank if you do not want to display any standard text in your alert messages. Save your work when you are done making changes in this window. Alert Frequency You can schedule the frequency you wish to run each predefined periodic alert. You may want to check some alerts every day, some only once a month, still others only when you explicitly request them. You have the flexibility to monitor critical exceptions every day, or even multiple times during a 24–hour period. And, you can set less significant exceptions to a more infrequent schedule; for example, a monthly schedule. To change the frequency of a predefined alert, navigate to the Alerts window. Perform a query to display the predefined periodic alert you wish to modify, then alter the Frequency of the periodic alert. Alert History Oracle Alert can keep a history of exceptions and actions for a particular alert. Use the Alerts window to alter the number of days of history you wish to keep for an alert. Simply change the Keep N Days field to the number of days of history you wish to keep. Suppressing Duplicates If you do not want Oracle Alert to send repeated messages for the same alert exception, you can choose to suppress duplicate messages. If Using Predefined Alerts B–7 Oracle Alert finds a duplicate exception condition for the alert, it simply does not execute the action set members for that alert again. Use the Suppress Duplicates check box in the Action Sets block of the Alerts window to specify this option. The default for the Suppress Duplicates check box is unchecked. If you check the Suppress Duplicates check box, you must also make sure you keep history for the alert at least one day longer than the number of days between alert checks. Oracle Alert uses the history information to determine if an exception is a duplicate. Message Actions If a predefined alert involves a message action, you can customize certain aspects of that message action. Navigate to the Actions block in the Alerts window by choosing the Actions button. In this block, move your cursor to the row representing the message action you want to customize, then choose the Action Details button to open the Action Detail window for that message action. You can modify the following features of the message action: • Recipient list—you can add or delete mail IDs in the List, To, Cc, Bcc, or Print For User fields. You should not modify any mail IDs listed with the format &Name, as they represent mail ID’s defined by the alert output. • Printer—you can modify the name of the printer to which you want Oracle Alert to direct the message. • Text—you can modify the boilerplate text that you want your alert message to send. Do not edit any of the alert outputs (in the format &Name) used in the body of the text. For summary messages, edit only the opening and closing text within the summary message. Save your work when you finish making modifications. Summary Threshold Predefined alerts use one of three action types: detail action, summary action, and no exception action. A no exception action is straightforward in that Oracle Alert performs the defined action when no exceptions are found for the alert. But how does Oracle Alert know when to perform a detail or a summary action? Oracle Alert can perform a detail action for every exception it finds, regardless of the number of exceptions, or Oracle Alert can perform a summary action for a unique set of exceptions. For example, you can receive individual mail messages for each exception B–8 Oracle Applications System Administrator’s Guide found by an alert, or you can receive a single mail message summarizing all the exceptions found by the alert. In the Members tabbed region of the Action Sets block of the Alerts window, you can set a Summary Threshold to specify how many exceptions Oracle Alert can find before it should change the action from a detail action to a summary action. Using Predefined Alerts B–9 Oracle Alert Precoded Alerts Your Oracle Alert installation contains custom alerts that are designed to help you manage your database and the data you generate when you use Oracle Alert. Oracle Alert provides eight alerts that systematically monitor your system for potential tablespace, disk space, and allocation problems, making your Database Administrators more efficient, and increasing database performance. Occasionally, you will want to purge your database of obsolete concurrent requests, alert checks, and action set checks. Oracle Alert provides two alerts that let you periodically remove old files, freeing up valuable tablespace and increasing database performance. Oracle Alert also provides an alert that clears your Oracle Alert electronic mail folders of older messages, keeping your send mail and response mail accounts to a manageable size. This section gives you an overview of these eleven alerts, and suggestions on how to use them to enhance your system performance. Terms Before reading this discussion of precoded alerts, you may want to familiarize yourself with the following Glossary terms: • Periodic Alert • Exception • Action • Detail Action • Summary Action • No Exception Action • Input Oracle Alert DBA Alerts Oracle Alert DBA alerts help you manage your database by notifying you regularly of: • Tables and indexes unable to allocate another extent • Users who are nearing their tablespace quota B – 10 Oracle Applications System Administrator’s Guide • Tablespaces without adequate free space • Tables and indexes that are too large or are fragmented • Tables and indexes that are near their maximum extents Customizable Alert Frequencies Oracle Alert DBA alerts are periodic alerts, so you determine how often they check your database. Set them to run daily, weekly, or monthly, according to your database needs. Summary and No Exception Messages If Oracle Alert finds the database exceptions specified in a DBA alert, it sends you a message summarizing all exceptions found. If Oracle Alert finds no exceptions, it sends you a message reporting that no exceptions were found. Oracle Alert keeps you notified of the status of your database, even if it is unchanging. Customizable Alert Inputs Inputs let you customize your DBA alerts. You can specify the ORACLE username, table, or index you want your alerts to target, and you can specify the threshold number of extents, maximum extents, or blocks Oracle Alert should look for. You can also define your input values at the action set level, so you can create multiple action sets that target different usernames, tables, and indexes. You can create as many action sets as you need. Support for Multiple Database Instances The Applications DBA application owns the Oracle Alert DBA alerts. This lets Oracle Alert perform the DBA alerts for every database instance you create, even those that reside outside Oracle Alert’s database. Applications DBA Alerts Descriptions The following descriptions list the customizable frequency and inputs of each DBA alert. Tables Unable to Allocate Another Extent This alert looks for tables where the next extent is larger than the largest free extent. Using Predefined Alerts B – 11 Frequency Every N Calendar Days Inputs Table Name, ORACLE Username Indexes Unable to Allocate Another Extent This alert looks for indexes where the next extent is larger than the largest free extent. Frequency Every N Calendar Days Inputs Index Name, ORACLE Username Users Near Their Tablespace Quota This alert detects users that are near their tablespace quota. Frequency Every N Calendar Days Inputs ORACLE Username Tablespace Name Check minimum percent free space remaining Check maximum percent space use Minimum total free space remaining (in bytes) Maximum percent space used Tablespaces Without Adequate Free Space This alert looks for tablespaces without a specified minimum amount of free space. Frequency Every N Calendar Days Inputs Tablespace Name Check total free space remaining Check maximum size of free extents available Maximum size of free extents available (in bytes) Minimum total free space remaining (in bytes) Indexes Too Large or Fragmented This alert detects indexes that exceed a specified number of blocks or extents. Frequency B – 12 Every N Calendar Days Oracle Applications System Administrator’s Guide Inputs Index Name ORACLE Username Check maximum number of blocks Check maximum number of extents Maximum number of blocks Maximum number of extents Tables Too Large or Fragmented This alert detects tables that exceed a specified number of blocks or extents. Frequency Every N Calendar Days Inputs Table Name ORACLE Username Check maximum number of blocks Check maximum number of extents Maximum number of blocks Maximum number of extents Tables Near Maximum Extents This alert searches for tables and indexes that are within a specified number of extents of their maximum extents. Frequency Every N Calendar Days Inputs Table Name ORACLE Username Minimum number of extents remaining Indexes Near Maximum Extents This alert searches for tables and indexes that are within a specified number of extents of their maximum extents. Frequency Every N Calendar Days Inputs Index Name ORACLE Username Minimum number of extents remaining Using Predefined Alerts B – 13 Oracle Alert Purging Alerts Two of the Oracle Alert precoded alerts are designed to help you manage the data you generate when you use Oracle Alert. While using Oracle Alert you should be able to: • Automatically delete concurrent requests older than a specified number of days • Automatically clean out alert checks and action set checks that are older than a specified number of days Customizable Alert Frequencies You determine the schedule for running your purge alerts. On the schedule you define, Oracle Alert submits the purge alerts to the Concurrent Manager, and deletes all old concurrent requests. Customizable Alert Inputs Inputs let you customize your alerts. You specify which application and which concurrent program you want your purge alerts to target, and you decide when your data becomes unnecessary or ”old.” You define your input values at the action set level, so you can create multiple action sets that target different applications and different concurrent programs. You can create as many action sets as you need, so you can keep your system free from unnecessary files. Oracle Alert Purging Alerts Descriptions The following descriptions list the customizable frequency and inputs of each purging alert. Purge Alert and Action Set Checks This alert looks for alert and action set checks older than the number of days you specify, and runs a SQL statement script that deletes them. Alert Type Periodic Periodicity Every N Calendar Days Inputs Application Name, Number of days since alert check Note: Oracle Alert will not delete alert checks and/or action set checks for a response processing alert that has open responses. B – 14 Oracle Applications System Administrator’s Guide Purge Concurrent Requests This alert looks for concurrent requests and their log and out files that are older than the number of days you specify, and runs a concurrent program that deletes them. If you enter a concurrent program name input, you should use the program name (located in the column USER_CONCURRENT_PROGRAM_NAME in the table FND_CONCURRENT_REQUESTS), and not the optional description that may accompany the concurrent program name in the Requests window. Alert Type Periodic Periodicity Every N Calendar Days Inputs Application Name Concurrent Program Name Number of days since concurrent request was submitted to the Concurrent Manager Operating System Program Deletes log file, out file, and corresponding record of each concurrent request Arguments Concurrent request ID Oracle Alert Purge Mail Alert One of the Oracle Alert precoded alerts is designed to help you keep your Oracle Office folders to a manageable size. In particular, if you are using response processing, you will want to keep your response account(s) clear of old messages. While using Oracle Alert you should be able to: • Automatically delete old, obsolete mail messages from your defined Oracle Alert Oracle Office accounts • Specify which Oracle Office accounts and the Oracle Office folders you want to clear of old messages • Determine which messages you want to delete Customizable Alert Frequencies You determine the schedule for running your alert. On the schedule you define, Oracle Alert submits the purge mail alert to the Concurrent Manager. Customizable Alert Inputs Use inputs to tell Oracle Alert which Oracle Office account, which mail folders, and which messages to purge. You define your input values at Using Predefined Alerts B – 15 the action set level, so you can create multiple action sets that target different mail accounts and different mail folders. You can create as many action sets as you need to keep your mail accounts up–to–date. Oracle Alert Purge Mail Alert Description The following description provides the customizable frequency and inputs of the purge mail alert. Purge Oracle Office Messages Frequency Weekly Inputs Expiration Days Folder Oracle Office Account B – 16 Oracle Applications System Administrator’s Guide APPENDIX C Loaders T his appendix lists the loader programs that the system administrator can use. Loaders C–1 Generic Loader The Generic Loader (FNDLOAD) is a concurrent program that can move Oracle Applications data between database and text file representations. The loader reads a configuration file to determine what data to access. For information on specific configuration files consult the Open Interfaces Guide for your product group. The following sections describe the operation of the Generic Loader. Warning: Use only the loader files provided by Oracle Applications. If you use files not provided by Oracle Applications or modify the provided scripts you risk corrupting your database. Oracle does not support the use of custom loader files or modified Oracle Applications loader files. Overview The Generic Loader can download data from an application entity into a portable, editable text file. This file can then be uploaded into any other database to copy the data. Conversion between database store and file format is specified by a configuration file that is read by the loader. In the following diagram, the Generic Loader downloads data from a database according to a configuration (.lct) file, and converts the data into a data file (.ldt file). The Generic Loader can then upload this data to another database using a configuration file. The loader operates in one of two modes: download or upload. In the download mode, data is downloaded from the database to a text file; in the upload mode, data is uploaded from a text file to the database. C–2 Oracle Applications System Administrator’s Guide Data structures supported by the loader include master–detail relationships and foreign key reference relationships. In both downloading and uploading, the structure of the data involved is described by a configuration file. The configuration file describes the structure of the data and also the access methods to use to copy the data into or out of the database. The same configuration file may be used for both uploading and downloading. When downloading, the Generic Loader creates a second file, called the data file, that contains the structured data selected for downloading. The data file has a standard syntax for representing the data that has been downloaded. When uploading, the Generic Loader reads a data file to get the data that it is to upload. In most cases, the data file was produced by a previous download, but may have come from another source. The data file cannot be interpreted without the corresponding configuration file available. Download database information to a text file The text file is human–readable and portable, and can be examined and modified with any editor. Generally, a ”developer key” is used to identify records written out to text files. For example, the PROFILE_OPTION_NAME, not the PROFILE_OPTION_ID, is used to identify records in the Profiles configuration file. Upload (merge) the information in a text file to the database In uploading, if a row exists, but has different attributes, the row is updated. If a row does not exist, a new row is inserted. Depending on the configuration file, a row that exists in the database but not in the text file may or may not be deleted when the text file is uploaded. Refer to the configuration file to determine how such rows are handled. These download and upload capabilities allow profile value information that is defined in one database to be easily propagated to other databases. This is useful for delivering Oracle Applications seed data to customers, as well as for copying customer profile definitions from a primary site to other sites. The text file version of profile value data is also useful for bulk editing operations, which can be accomplished more efficiently with a text editor than with a form. Preservation of data FNDLOAD uses the OWNER and LAST_UPDATE_DATE attributes to determine whether to overwrite pre–existing data. The rules applied are: Loaders C–3 1. If the entity being uploaded is not present in the database, a new entity is always inserted. 2. Entities uploaded from a file with OWNER=SEED never overwrite entities with OWNER=CUSTOM in the database. 3. Entities with OWNER=CUSTOM uploaded from a file always update entities with OWNER=SEED in the database. 4. If the owner of the entity is the same in the file and database, the entity is updated only if the LAST_UPDATE_DATE in the file is later than the LAST_UPDATE_DATE in the database. FNDLOAD Executable The Generic Loader is a concurrent program named FNDLOAD. The concurrent executable takes the following parameters: FNDLOAD apps/pwd 0 Y mode configfile datafile entity [ param ... ] where C–4 <apps/pwd> The APPS schema and password in the form username/password[@connect_string]. If connect_string is omitted, it is taken in a platform–specific manner from the environment using the name TWO_TASK. <0Y> Concurrent program flags mode UPLOAD or DOWNLOAD. UPLOAD causes the datafile to be uploaded to the database. DOWNLOAD causes the loader to fetch rows and write them to the datafile. <configfile> The configuration file to use (usually with a suffix of .lct, but not enforced or supplied by the loader). <datafile> The data file to write (usually with a suffix of .ldt, but not enforced or supplied by the loader). If the data file already exists, it will be overwritten. <entity> The entity(ies) to upload or download. When uploading, you should always upload all entities, so specify a ”–” to upload all entities. < [param] > Zero or more additional parameters are used to provide bind values in the access SQL (both UPLOAD and DOWNLOAD). Each parameter is Oracle Applications System Administrator’s Guide in the form NAME=VALUE. NAME should not conflict with an attribute name for the entities being loaded. File Specifications The configuration file and data file parameters are specified in one of two ways: @<application_short_name>:[<dir>/.../]file.ext For example, @fnd/11i/loader/fndapp.lct @po:install/data/poreq.ldt Alternatively, the parameters can be specified as such: <native path> For example, mydata.ldt c:\loader\config\cfg102.lct Examples An example of downloading is: FNDLOAD apps/apps@devdb 0 Y DOWNLOAD testcfg.lct out.ldt FND_APPLICATION_TL APPSNAME=FND This command does the following: • connects to apps/apps@devd • downloads data using the configuration file testcfg.lct • writes data to data file out.ldt • downloads the FND_APPLICATION_TL entity with APPSNAME parameter defined as value ’FND’ An example of uploading is: FNDLOAD apps/apps@custdb 0 Y UPLOAD fndapp.lct fnd1234.ldt – This command does the following: • connects to apps/apps@custdb Loaders C–5 • uploads data using the configuration file in fndapp.lct from data file in fnd1234.ldt • The contents of the entire data file is uploaded. Configuration File Operation of the Generic Loader is controlled by the specified configuration file. The configuration file contains the following: • DEFINE block • DOWNLOAD block • UPLOAD block The contents of the configuration file specify the structure of the data and the access methods to use to move the data between the data file and a database. DEFINE Block The DEFINE block specifies the structure of the datafile records. The define block format is identical to that already generated by existing AOL loaders. The structure of this section is DEFINE <entity> KEY <key_attribute_name> <datatype> ... (BASE|TRANS|CTX) <attribute_name> <datatype> ... [DEFINE <child_entity> ...] END <entity> Example DEFINE FND_LOOKUP_TYPE KEY VIEW_APPSNAME VARCHAR2(50) KEY LOOKUP_TYPE VARCHAR2(30) BASE OWNER VARCHAR2(6) TRANS MEANING VARCHAR2(80) TRANS DESCRIPTION VARCHAR2(240) DEFINE FND_LOOKUP_VALUE KEY LOOKUP_CODE VARCHAR2(30) C–6 Oracle Applications System Administrator’s Guide BASE END_DATE_ACTIVE VARCHAR2(10) BASE OWNER VARCHAR2(6) TRANS MEANING VARCHAR2(80) TRANS DESCRIPTION VARCHAR2(240) CTX TAG VARCHAR2(30) END FND_LOOKUP_VALUE END FND_LOOKUP_TYPE VIEW_APPSNAME One or more KEY attributes defines the primary key of each entity. BASE and CTX attributes are those that do not require translation. TRANS attributes do. Note that BASE and CTX attributes are treated identically. That is, CTX is just a synonym for BASE. The CTX attribute type is provided merely to allow users to optionally differentiate between BASE attributes. For example, translators may wish to simplify their .ldt files by stripping out the BASE attributes. However, they may also want to keep some BASE attributes for context. By denoting some attributes as BASE and some as CTX, they can control which attributes to remove. Data types can be standard Oracle scalar types, except that only VARCHAR2 is currently supported. An attribute can also be defined as a foreign key reference to another entity in your configuration file The foreign key entity must be a ”top–level” entity and its download statement must include filter parameters in its WHERE clause for each of its key attributes. Also, the parameter names must match the key attribute names exactly. Note that entity definitions can be nested to indicate master–detail relationships. Nested entity definitions inherit the key attributes of their parent entities and should not redefine them. DOWNLOAD Statement The DOWNLOAD statement is a SQL statement that selects rows to download. The statement can join to other tables to resolve sequence generated ID numbers into developer keys where possible. The DOWNLOAD statement may also contain bind values of the form ’:NAME’ which are substituted with parameter values from the command line. DOWNLOAD statements have the form DOWNLOAD <entity> ”select <attribute expressions> from ...” Loaders C–7 Example DOWNLOAD FND_LOOKUP_TYPE ”select VA.APPLICATION_SHORT_NAME VIEW_APPSNAME, LT.LOOKUP_TYPE, OA.APPLICATION_SHORT_NAME, LT.CUSTOMIZATION_LEVEL, decode(LT.LAST_UPDATED_BY, 1, ’SEED’, ’CUSTOM’) OWNER, LT.MEANING, LT.DESCRIPTION from FND_LOOKUP_TYPES_VL LT, FND_APPLICATION VA, FND_APPLICATION OA, FND_SECURITY_GROUPS SG where VA.APPLICATION_ID = LT.VIEW_APPLICATION_ID and OA.APPLICATION_ID = LT.APPLICATION_ID and (:VIEW_APPSNAME is null or (:VIEW_APPSNAME is not null and VA.APPLICATION_SHORT_NAME like :VIEW_APPSNAME)) and (:LOOKUP_TYPE is null or (LOOKUP_TYPE is not null and LT.LOOKUP_TYPE like :LOOKUP_TYPE)) and SG.SECURITY_GROUP_ID = LT.SECURITY_GROUP_ID and ((:SECURITY_GROUP is null and SG.SECURITY_GROUP_KEY = ’STANDARD’) or (:SECURITY_GROUP is not null and SG.SECURITY_GROUP_KEY = :SECURITY_GROUP)) order by 1, 2 ” Download statements for child entities may reference any key attribute of the parent entity, or any command line parameter. UPLOAD Statement The UPLOAD statement is a SQL statement or PL/SQL anonymous block which accepts file data and applies it to the database. The statement is executed once for each record read from the data file. C–8 Oracle Applications System Administrator’s Guide Bind values in the statement are satisfied by attributes from the file data or command line parameters. Example UPLOAD FND_LOOKUP_TYPE BEGIN ” begin if (:UPLOAD_MODE = ’NLS’) then fnd_lookup_types_pkg.TRANSLATE_ROW( x_lookup_type => :LOOKUP_TYPE, x_security_group => :SECURITY_GROUP, x_view_application => :VIEW_APPSNAME, x_owner => :OWNER, x_meaning => :MEANING, x_description => :DESCRIPTION); else fnd_lookup_types_pkg.LOAD_ROW( x_lookup_type => :LOOKUP_TYPE, x_security_group => :SECURITY_GROUP, x_view_application => :VIEW_APPSNAME, x_owner => :OWNER, x_meaning => :MEANING, x_description => :DESCRIPTION); end if; end; ” As in the DOWNLOAD, the UPLOAD statement for child entities may reference any attributes from the parent record. Example UPLOAD FND_LOOKUP_VALUE ” begin if (:UPLOAD_MODE = ’NLS’) then fnd_lookup_values_pkg.TRANSLATE_ROW( x_lookup_type => :LOOKUP_TYPE, x_lookup_code => :LOOKUP_CODE, x_security_group => :SECURITY_GROUP, x_view_application => :VIEW_APPSNAME, x_owner => :OWNER, x_meaning => :MEANING, Loaders C–9 x_description => :DESCRIPTION); else fnd_lookup_values_pkg.LOAD_ROW( x_lookup_type => :LOOKUP_TYPE, x_lookup_code => :LOOKUP_CODE, x_security_group => :SECURITY_GROUP, x_view_application => :VIEW_APPSNAME, x_owner => :OWNER, x_meaning => :MEANING, x_description => :DESCRIPTION, x_tag => :TAG); end if; end;” Data File A data file is a portable text file. The data file created from a download using the above configuration file would include: # –– Begin Entity Definitions –– DEFINE FND_LOOKUP_TYPE KEY VIEW_APPSNAME VARCHAR2(50) KEY LOOKUP_TYPE VARCHAR2(30) BASE OWNER VARCHAR2(6) TRANS MEANING VARCHAR2(80) TRANS DESCRIPTION VARCHAR2(240) DEFINE FND_LOOKUP_VALUE KEY LOOKUP_CODE VARCHAR2(30) BASE END_DATE_ACTIVE VARCHAR2(10) BASE OWNER VARCHAR2(6) TRANS MEANING VARCHAR2(80) TRANS DESCRIPTION VARCHAR2(240) BASE TAG VARCHAR2(30) END FND_LOOKUP_VALUE END FND_LOOKUP_TYPE # –– End Entity Definitions –– BEGIN FND_LOOKUP_TYPE ”FND” ”YES_NO” C – 10 Oracle Applications System Administrator’s Guide OWNER = ”SEED” MEANING = ”Yes or No” BEGIN FND_LOOKUP_VALUE Y OWNER = ”SEED” MEANING = ”Yes” END FND_LOOKUP_VALUE BEGIN FND_LOOKUP_VALUE N OWNER = ”SEED” MEANING = ”No” END FND_LOOKUP_VALUE END FND_LOOKUP_TYPE Loaders C – 11 Application Object Library Configuration Files Oracle Application Object Library provides several configuration files for the Generic Loader that you can use with your setup data. These configuration files operate on the following data: • Concurrent program definitions • Request groups • Lookup types and lookup values • Profile options and profile option values • Flexfields setup data • Attachments definitions • Messages • Security information C – 12 Oracle Applications System Administrator’s Guide Concurrent Program Configuration File The concurrent program configuration file afcpprog.lct downloads and uploads concurrent program definitions. It takes as parameters program name and application name. The following table lists the entities, sub–entities (if any), and download parameters for this configuration file. Entity Sub–entities, if any Download Parameters PROGRAM INCOMPATIBILITY CONCURRENT_PROGRAM_NAME APPLICATION_SHORT_NAME EXECUTABLE EXECUTABLE_NAME The entity definition is: DEFINE PROGRAM KEY CONCURRENT_PROGRAM_NAME KEY APPLICATION CTX OWNER TRANS USER_CONCURRENT_PROGRAM_NAME BASE EXEC_APPLICATION BASE EXECUTABLE_NAME BASE EXECUTION_METHOD_CODE BASE ARGUMENT_METHOD_CODE BASE QUEUE_CONTROL_FLAG BASE QUEUE_METHOD_CODE BASE REQUEST_SET_FLAG BASE ENABLED_FLAG BASE PRINT_FLAG BASE RUN_ALONE_FLAG BASE SRS_FLAG TRANS DESCRIPTION BASE CLASS_APPLICATION BASE CONCURRENT_CLASS_NAME BASE EXECUTION_OPTIONS BASE SAVE_OUTPUT_FLAG BASE REQUIRED_STYLE BASE OUTPUT_PRINT_STYLE BASE PRINTER_NAME VARCHAR2(30) VARCHAR2(50) VARCHAR2(7) VARCHAR2(240) VARCHAR2(50) VARCHAR2(30) VARCHAR2(1) VARCHAR2(1) VARCHAR2(1) VARCHAR2(1) VARCHAR2(1) VARCHAR2(1) VARCHAR2(1) VARCHAR2(1) VARCHAR2(1) VARCHAR2(240) VARCHAR2(50) VARCHAR2(30) VARCHAR2(250) VARCHAR2(1) VARCHAR2(1) VARCHAR2(30) VARCHAR2(30) Loaders C – 13 BASE MINIMUM_WIDTH BASE MINIMUM_LENGTH BASE REQUEST_PRIORITY BASE ATTRIBUTE_CATEGORY BASE ATTRIBUTE1 BASE ATTRIBUTE2 BASE ATTRIBUTE3 BASE ATTRIBUTE4 BASE ATTRIBUTE5 BASE ATTRIBUTE6 BASE ATTRIBUTE7 BASE ATTRIBUTE8 BASE ATTRIBUTE9 BASE ATTRIBUTE10 BASE ATTRIBUTE11 BASE ATTRIBUTE12 BASE ATTRIBUTE13 BASE ATTRIBUTE14 BASE ATTRIBUTE15 BASE OUTPUT_FILE_TYPE BASE RESTART BASE NLS_COMPLIANT BASE CD_PARAMETER BASE INCREMENT_PROC BASE MLS_EXECUTABLE_APPLICATION BASE MLS_EXECUTABLE_NAME BASE ENABLE_TIME_STATISTICS BASE SECURITY_GROUP_NAME BASE RESOURCE_CONSUMER_GROUP BASE ROLLBACK_SEGMENT BASE OPTIMIZER_MODE END PROGRAM C – 14 Oracle Applications System Administrator’s Guide VARCHAR2(50) VARCHAR2(50) VARCHAR2(50) VARCHAR2(30) VARCHAR2(150) VARCHAR2(150) VARCHAR2(150) VARCHAR2(150) VARCHAR2(150) VARCHAR2(150) VARCHAR2(150) VARCHAR2(150) VARCHAR2(150) VARCHAR2(150) VARCHAR2(150) VARCHAR2(150) VARCHAR2(150) VARCHAR2(150) VARCHAR2(150) VARCHAR2(4) VARCHAR2(1) VARCHAR2(1) VARCHAR2(240) VARCHAR2(61) VARCHAR2(50) VARCHAR2(50) VARCHAR2(1) NUMBER VARCHAR2(30) VARCHAR2(30) VARCHAR2(30) Request Groups Configuration File Use the file afcpreqg.lct for loading request group data. The following table lists the entities, sub–entities (if any), and download parameters for this configuration file. Entity Sub–entities, if any Download Parameters REQUEST_GROUP REQUEST_GROUP_ UNIT REQUEST_GROUP_NAME APPLICATION_SHORT_NAME The entity definition is: DEFINE REQUEST_GROUP KEY REQUEST_GROUP_NAME KEY APPLICATION_SHORT_NAME CTX OWNER TRANS DESCRIPTION BASE REQUEST_GROUP_CODE END REQUEST_GROUP VARCHAR2(30) VARCHAR2(50) VARCHAR2(7) VARCHAR2(800) VARCHAR2(30) Loaders C – 15 Lookups Configuration File Use the file aflvmlu.lct for loading Lookup types and Lookups values. The following table lists the entities, sub–entities (if any), and download parameters for this configuration file. Entity Sub–entities, if any Download Parameters FND_LOOKUP_TYPE FND_LOOKUP_VALUE VIEW_APPSNAME LOOKUP_TYPE SECURITY_GROUP The entity definition is: DEFINE FND_LOOKUP_TYPE KEY VIEW_APPSNAME KEY LOOKUP_TYPE CTX APPLICATION_SHORT_NAME BASE CUSTOMIZATION_LEVEL CTX OWNER TRANS MEANING TRANS DESCRIPTION DEFINE FND_LOOKUP_VALUE KEY LOOKUP_CODE BASE ENABLED_FLAG BASE START_DATE_ACTIVE BASE END_DATE_ACTIVE BASE TERRITORY_CODE BASE TAG VARCHAR2(30) BASE ATTRIBUTE_CATEGORY BASE ATTRIBUTE1 BASE ATTRIBUTE2 BASE ATTRIBUTE3 BASE ATTRIBUTE4 BASE ATTRIBUTE5 BASE ATTRIBUTE6 BASE ATTRIBUTE7 BASE ATTRIBUTE8 BASE ATTRIBUTE9 C – 16 Oracle Applications System Administrator’s Guide VARCHAR2(50) VARCHAR2(30) VARCHAR2(50) VARCHAR2(1) VARCHAR2(6) VARCHAR2(80) VARCHAR2(240) VARCHAR2(30) VARCHAR2(1) VARCHAR2(10) VARCHAR2(10) VARCHAR2(2) VARCHAR2(30) VARCHAR2(150) VARCHAR2(150) VARCHAR2(150) VARCHAR2(150) VARCHAR2(150) VARCHAR2(150) VARCHAR2(150) VARCHAR2(150) VARCHAR2(150) BASE ATTRIBUTE10 BASE ATTRIBUTE11 BASE ATTRIBUTE12 BASE ATTRIBUTE13 BASE ATTRIBUTE14 BASE ATTRIBUTE15 CTX OWNER TRANS MEANING TRANS DESCRIPTION END FND_LOOKUP_VALUE END FND_LOOKUP_TYPE VARCHAR2(150) VARCHAR2(150) VARCHAR2(150) VARCHAR2(150) VARCHAR2(150) VARCHAR2(150) VARCHAR2(6) VARCHAR2(80) VARCHAR2(240) Loaders C – 17 Profile Options and Profile Values Configuration File Use the file afscprof.lct for loading profile options and profile values. The following table lists the entities, sub–entities (if any), and download parameters for this configuration file. Entity Sub–entities, if any Download Parameters PROFILE FND_PROFILE_ OPTION_VALUES PROFILE_NAME APPLICATION_SHORT_NAME The entity definition is: DEFINE PROFILE KEY PROFILE_NAME CTX OWNER CTX APPLICATION_SHORT_NAME TRANS USER_PROFILE_OPTION_NAME TRANS DESCRIPTION BASE USER_CHANGEABLE_FLAG BASE USER_VISIBLE_FLAG BASE READ_ALLOWED_FLAG BASE WRITE_ALLOWED_FLAG BASE SITE_ENABLED_FLAG BASE SITE_UPDATE_ALLOWED_FLAG BASE APP_ENABLED_FLAG BASE APP_UPDATE_ALLOWED_FLAG BASE RESP_ENABLED_FLAG BASE RESP_UPDATE_ALLOWED_FLAG BASE USER_ENABLED_FLAG BASE USER_UPDATE_ALLOWED_FLAG BASE START_DATE_ACTIVE BASE END_DATE_ACTIVE BASE SQL_VALIDATION DEFINE FND_PROFILE_OPTION_VALUES KEY LEVEL KEY LEVEL_VALUE KEY LEVEL_VALUE_APP CTX OWNER BASE PROFILE_OPTION_VALUE C – 18 Oracle Applications System Administrator’s Guide VARCHAR2(80) VARCHAR2(7) VARCHAR2(50) VARCHAR2(240) VARCHAR2(240) VARCHAR2(1) VARCHAR2(1) VARCHAR2(1) VARCHAR2(1) VARCHAR2(1) VARCHAR2(1) VARCHAR2(1) VARCHAR2(1) VARCHAR2(1) VARCHAR2(1) VARCHAR2(1) VARCHAR2(1) VARCHAR2(11) VARCHAR2(11) VARCHAR2(2000) VARCHAR2(50) VARCHAR2(100) VARCHAR2(50) VARCHAR2(7) VARCHAR2(240) END FND_PROFILE_OPTION_VALUES END PROFILE Loaders C – 19 Flexfields Setup Data Configuration File Use the file afffload.lct for loading flexfields data. Warning: Do not modify the data files you download using the flexfields configuration file. You risk corrupting your flexfields data. Oracle Applications does not support any changes you make to the data files. The configuration file includes the following entities: • Value sets • Descriptive flexfields • Key flexfield definitions • Security rules • Rollup groups • Value set values Flexfield Value Sets The entity VALUE_SET includes the following table details of table validated value sets, and user exit details of special/pair validated value sets. It does not include the values, security rules, rollup groups, or value hierarchies for the value set. These entities should be downloaded and uploaded separately. The key for this entity is FLEX_VALUE_SET_NAME. Example >FNDLOAD apps/apps 0 Y DOWNLOAD @FND:admin/import/afffload.lct out.ldt \ >VALUE_SET FLEX_VALUE_SET_NAME=”Loader_Test”>FNDLOAD apps/apps 0 Y UPLOAD @FND:admin/import/afffload.lct out.ldt – Descriptive Flexfields The entity DESC_FLEX includes context column, attribute columns, context, and segment details. This entity references the VALUE_SET for the value set used by a given SEGMENT. C – 20 Oracle Applications System Administrator’s Guide The key is composed of APPLICATION_SHORT_NAME and DESCRIPTIVE_FLEXFIELD_NAME. Example >FNDLOAD apps/apps 0 Y DOWNLOAD @FND:admin/import/afffload.lct out.ldt \ DESC_FLEX APPLICATION_SHORT_NAME=”FND” DESCRIPTIVE_FLEXFIELD_NAME=”FND_FLEX_TEST” >FNDLOAD apps/apps 0 Y UPLOAD @FND:admin/import/afffload.lct out.ldt – Key Flexfields The entity KEY_FLEX includes the unique ID column, structure column, segment columns, flexfield qualifier, segment qualifier, structure, Account Generator workflow process, shorthand alias, cross–validation rule, cross–validation rule line, segment, flexfield qualifier assignment, and segment qualifier assignment details. References VALUE_SET for the value set used by the given segment. The key is composed of APPLICATION_SHORT_NAME and ID_FLEX_CODE. Example >FNDLOAD apps/apps 0 Y DOWNLOAD @FND:admin/import/afffload.lct out.ldt \ KEY_FLEX APPLICATION_SHORT_NAME=”SQLGL” ID_FLEX_CODE=”GL#” >FNDLOAD apps/apps 0 Y UPLOAD @FND:admin/import/afffload.lct out.ldt – Flexfield Value Security Rules The entity VALUE_SECURITY_RULE includes security rules, security rule lines, and security rule usage details. Loaders C – 21 It references VALUE_SET for the value set. The key is composed of FLEX_VALUE_SET_NAME, FLEX_VALUE_RULE_NAME, and PARENT_FLEX_VALUE_LOW. Example >FNDLOAD apps/apps 0 Y DOWNLOAD @FND:admin/import/afffload.lct out.ldt \ VALUE_SECURITY_RULE FLEX_VALUE_SET_NAME=”Loader_Test” FLEX_VALUE_RULE_NAME=”%” \ PARENT_FLEX_VALUE_LOW=”%” >FNDLOAD apps/apps 0 Y UPLOAD @FND:admin/import/afffload.lct out.ldt – Flexfields Value Hierarchies (Rollup Groups) The entity VALUE_ROLLUP_GROUP contains rollup groups. It references VALUE_SET for the value set. The key is composed of FLEX_VALUE_SET_NAME and HIERARCHY_CODE. Example >FNDLOAD apps/apps 0 Y DOWNLOAD @FND:admin/import/afffload.lct out.ldt \ VALUE_ROLLUP_GROUP FLEX_VALUE_SET_NAME=”Loader_Test” HIERARCHY_CODE=”%” >FNDLOAD apps/apps 0 Y UPLOAD @FND:admin/import/afffload.lct out.ldt – Flexfields Values The entity VALUE_SET_VALUE includes the normalized value hierarchy and value qualifier value details. C – 22 Oracle Applications System Administrator’s Guide It references VALUE_SET for the value set. It references VALUE_ROLLUP_GROUP for the value hierarchy. The key is composed of FLEX_VALUE_SET_NAME and PARENT_FLEX_VALUE_LOW, FLEX_VALUE. Example >FNDLOAD apps/apps 0 Y DOWNLOAD @FND:admin/import/afffload.lct out.ldt \ VALUE_SET_VALUE FLEX_VALUE_SET_NAME=”Loader_Test” PARENT_FLEX_VALUE_LOW=”%” \ FLEX_VALUE=”%” >FNDLOAD apps/apps 0 Y UPLOAD @FND:admin/import/afffload.lct out.ldt – Loaders C – 23 Attachments Setup Data Configuration File Use the file afattach.lct for loading attachments setup data. The following table lists the entities, sub–entities (if any), and download parameters for this configuration file. Entity Sub–entities, if any Download Parameters FND_ATTACHMENT_ FUNCTIONS FND_ATTACHMENT_BLOCKS FND_ATTACHMENT_BLOCK_ ENTITIES APPLICATION_ SHORT_NAME FND_DOC_CATEGORY_USAGES FUNCTION_NAME FUNCTION_TYPE The entity definitions are: DEFINE FND_ATTACHMENT_FUNCTIONS KEY FUNCTION_NAME KEY FUNCTION_TYPE KEY APP_SHORT_NAME CTX OWNER BASE SESSION_CONTEXT_FIELD BASE ENABLED_FLAG DEFINE FND_ATTACHMENT_BLOCKS KEY BLOCK_NAME CTX OWNER BASE QUERY_FLAG BASE SECURITY_TYPE BASE ORG_CONTEXT_FIELD BASE SET_OF_BOOKS_CONTEXT_FIELD BASE BUSINESS_UNIT_CONTEXT_FIELD BASE CONTEXT1_FIELD BASE CONTEXT2_FIELD BASE CONTEXT3_FIELD VARCHAR2(30) VARCHAR2(1) VARCHAR2(50) VARCHAR2(7) VARCHAR2(61) VARCHAR2(1) VARCHAR2(30) VARCHAR2(7) VARCHAR2(1) VARCHAR2(50) VARCHAR2(61) VARCHAR2(61) VARCHAR2(61) VARCHAR2(61) VARCHAR2(61) VARCHAR2(61) DEFINE FND_ATTACHMENT_BLK_ENTITIES KEY BLK_ENTITY REFERENCES FND_DOCUMENT_ENTITIES BASE DISPLAY_METHOD VARCHAR2(1) BASE INCLUDE_IN_INDICATOR_FLAG VARCHAR2(1) CTX OWNER VARCHAR2(7) C – 24 Oracle Applications System Administrator’s Guide BASE BASE BASE BASE BASE BASE BASE BASE BASE BASE BASE BASE PK1_FIELD PK2_FIELD PK3_FIELD PK4_FIELD PK5_FIELD SQL_STATEMENT INDICATOR_IN_VIEW_FLAG QUERY_PERMISSION_TYPE INSERT_PERMISSION_TYPE UPDATE_PERMISSION_TYPE DELETE_PERMISSION_TYPE CONDITION_FIELD BASE CONDITION_OPERATOR BASE CONDITION_VALUE1 BASE CONDITION_VALUE2 END FND_ATTACHMENT_BLK_ENTITIES END FND_ATTACHMENT_BLOCKS VARCHAR2(61) VARCHAR2(61) VARCHAR2(61) VARCHAR2(61) VARCHAR2(61) VARCHAR2(2000) VARCHAR2(1) VARCHAR2(1) VARCHAR2(1) VARCHAR2(1) VARCHAR2(1) VARCHAR2(61) VARCHAR2(50) VARCHAR2(100) VARCHAR2(100) DEFINE FND_DOC_CATEGORY_USAGES KEY CATEGORY_USAGE REFERENCES FND_DOCUMENT_CATEGORIES BASE ENABLED_FLAG VARCHAR2(1) CTX OWNER VARCHAR2(7) END FND_DOC_CATEGORY_USAGES END FND_ATTACHMENT_FUNCTIONS DEFINE FND_DOCUMENT_ENTITIES KEY DATA_OBJECT_CODE BASE APP_SHORT_NAME BASE TABLE_NAME BASE ENTITY_NAME CTX OWNER BASE PK1_COLUMN BASE PK2_COLUMN BASE PK3_COLUMN BASE PK4_COLUMN BASE PK5_COLUMN TRANS USER_ENTITY_NAME TRANS USER_ENTITY_PROMPT VARCHAR2(30) VARCHAR2(50) VARCHAR2(30) VARCHAR2(40) VARCHAR2(7) VARCHAR2(30) VARCHAR2(30) VARCHAR2(30) VARCHAR2(30) VARCHAR2(30) VARCHAR2(240) VARCHAR2(40) Loaders C – 25 END FND_DOCUMENT_ENTITIES C – 26 DEFINE FND_DOCUMENT_CATEGORIES KEY CATEGORY_NAME BASE APP_SHORT_NAME CTX OWNER BASE START_DATE_ACTIVE BASE END_DATE_ACTIVE BASE ATTRIBUTE_CATEGORY BASE ATTRIBUTE1 BASE ATTRIBUTE2 BASE ATTRIBUTE3 BASE ATTRIBUTE4 BASE ATTRIBUTE5 BASE ATTRIBUTE6 BASE ATTRIBUTE7 BASE ATTRIBUTE8 BASE ATTRIBUTE9 BASE ATTRIBUTE10 BASE ATTRIBUTE11 BASE ATTRIBUTE12 BASE ATTRIBUTE13 BASE ATTRIBUTE14 BASE ATTRIBUTE15 BASE DEFAULT_DATATYPE_ID BASE APP_SOURCE_VERSION TRANS USER_NAME END FND_DOCUMENT_CATEGORIES VARCHAR2(30) VARCHAR2(50) VARCHAR2(7) VARCHAR2(11) VARCHAR2(11) VARCHAR2(30) VARCHAR2(150) VARCHAR2(150) VARCHAR2(150) VARCHAR2(150) VARCHAR2(150) VARCHAR2(150) VARCHAR2(150) VARCHAR2(150) VARCHAR2(150) VARCHAR2(150) VARCHAR2(150) VARCHAR2(150) VARCHAR2(150) VARCHAR2(150) VARCHAR2(150) VARCHAR2(50) VARCHAR2(255) VARCHAR2(255) DEFINE FND_DOCUMENT_DATATYPES KEY DATATYPE_ID KEY NAME CTX OWNER BASE START_DATE_ACTIVE BASE END_DATE_ACTIVE TRANS USER_NAME END FND_DOCUMENT_DATATYPES VARCHAR2(50) VARCHAR2(30) VARCHAR2(7) VARCHAR2(11) VARCHAR2(11) VARCHAR2(30) Oracle Applications System Administrator’s Guide Messages Configuration File Use the file afmdmsg.lct for uploading and downloading messages in a database. Use the Generic Loader and afmdmsg.lct for transferring messages between databases only. Use the Message Dictionary Generator for moving messages into binary runtime files and readable text files. See: Message Dictionary Generator: page C – 30. The following table lists the entities, sub–entities (if any), and download parameters for this configuration file. Entity Sub–entities, if any FND_NEW_MESSAGES Download Parameters APPLICATION_SHORT_NAME MESSAGE_NAME The entity definition is: Note: to change the language you are downloading, set the environment variable NLS_LANG before running the loader. DEFINE FND_NEW_MESSAGES KEY APPLICATION_SHORT_NAME KEY MESSAGE_NAME CTX OWNER CTX MESSAGE_NUMBER TRANS MESSAGE_TEXT CTX DESCRIPTION CTX TYPE CTX MAX_LENGTH END FND_NEW_MESSAGES VARCHAR2(50) VARCHAR2(30) VARCHAR2(7) VARCHAR2(50) VARCHAR2(2000) VARCHAR2(240) VARCHAR2(30) NUMBER Loaders C – 27 Security Information Configuration File Use the file afsload.lct for downloading and uploading forms, functions, menus, and menu entries. The following table lists the entities, sub–entities (if any), and download parameters for this configuration file. Entity Sub–entities, if any Download Parameters FORM FORM_APP_SHORT_NAME, FORM_NAME FUNCTION FUNC_APP_SHORT_NAME FUNCTION_NAME MENU ENTRY ENTRY MENU [None] The entity definition is: DEFINE FORM KEY APPLICATION_SHORT_NAME VARCHAR2(50) KEY FORM_NAME VARCHAR2(30) TRANS USER_FORM_NAME VARCHAR2(80) TRANS DESCRIPTION VARCHAR2(240) CTX OWNER VARCHAR2(7) END FORM DEFINE FUNCTION KEY FUNCTION_NAME VARCHAR2(30) BASE FORM REFERENCES FORM BASE TYPE VARCHAR2(30) BASE PARAMETERS VARCHAR2(2000) BASE WEB_HOST_NAME VARCHAR2(80) BASE WEB_AGENT_NAME VARCHAR2(80) BASE WEB_HTML_CALL VARCHAR2(240) BASE WEB_ENCRYPT_PARAMETERS VARCHAR2(1) BASE WEB_SECURED VARCHAR2(1) BASE WEB_ICON VARCHAR2(30) TRANS USER_FUNCTION_NAME VARCHAR2(80) TRANS DESCRIPTION VARCHAR2(240) CTX OWNER VARCHAR2(7) END FUNCTION C – 28 Oracle Applications System Administrator’s Guide DEFINE MENU KEY MENU_NAME VARCHAR2(30) TRANS USER_MENU_NAME VARCHAR2(80) TRANS DESCRIPTION VARCHAR2(240) CTX OWNER VARCHAR2(7) DEFINE ENTRY TRANS PROMPT VARCHAR2(60) TRANS DESCRIPTION VARCHAR2(240) CTX SUBMENU REFERENCES MENU CTX FUNCTION REFERENCES FUNCTION CTX OWNER VARCHAR2(7) END ENTRY END MENU Loaders C – 29 Message Dictionary Generator The Message Dictionary Generator (FNDMDGEN) is a concurrent program that generates binary runtime files from the database for Oracle Applications Message Dictionary messages. The following sections describe the operation of the Message Dictionary Generator. For more information on using the Message Dictionary and creating messages, see the Oracle Applications Developer’s Guide. Note: Use the Generic Loader and corresponding configuration file for uploading and downloading message text files into a database. Message Repositories Message information is stored in two different repositories, each of which has its own format and serves a specific need. Following is a description for each of the message repositories, including the message attributes they store. Database The FND_NEW_MESSAGES table in the database stores all Oracle Applications messages for all languages. Database messages are directly used only by the stored procedure Message Dictionary API. Database message data can be edited using the Messages form. Database Attributes: APPLICATION, LANGUAGE, NAME, NUMBER, TEXT, DESCRIPTION Runtime A runtime binary file stores the messages for a single application and a single language. The file is optimized for rapid lookup of individual messages by message NAME. A runtime file is located in: <APPL_TOP>/$APPLMSG/<LANGUAGE>.msb where <APPL_TOP> is the application basepath, APPLMSG is an environment variable whose usual value is ”mesg”, and <LANGUAGE> is the NLS language code (for example: ’US’, or ’F’.). A typical message file would be $FND_TOP/mesg/US.msb. Runtime Attributes: NAME, NUMBER, TEXT C – 30 Oracle Applications System Administrator’s Guide Usage The help that you get when you invoke the Message Dictionary Generator without any program arguments (i.e., FNDMDGEN dbuser/dbpassword 0 Y) is: FNDMDGEN <Oracle ID/password> 0 Y <language codename> [application shortname] [mode] [filename] where mode is: DB_TO_ RUNTIME From Database to Runtime file (.msb) Note: In Release 11i the mode DB_TO_RUNTIME only is supported, unlike in previous releases. Wildcards Either <language codename> or [application shortname] can be wildcarded by passing the value ”ALL”. The following describes how wildcards are used: From DB Messages come from the FND_NEW_MESSAGES table. Wildcards match all the messages in the database. To RUNTIME In the case of wildcards, separate runtime files are created for each combination of language and application. Loaders C – 31 Generic File Manager Access Utility (FNDGFU) The Generic File Manager (GFM) is a set of PL/SQL procedures that leverages Oracle HTTP Server functionality to provide generic upload and download capabilities of unstructured data between a client (usually a web browser) and a database. FNDGFU is an access utility that allows the upload of files from the local file system to the GFM database file system. It supports simple uploads of single files as well as bulk uploads of many files. FNDGFU also offers a download option that provides a convenient and quick means of retrieving the contents of large objects (LOBs) if the file identifier is known. To delete files loaded to the database run the Purge Obsolete Generic File Manager Data concurrent program. Usage FNDGFU is located in the $FND_TOP/bin directory. Putting this directory on your path will allow you to invoke FNDGFU easily. Upload files to the GFM To upload files using FNDGFU use the following syntax: FNDGFU <logon> [param] <filenames> where <logon> Specifies a standard Oracle logon string of the form username/password. To specify a particular database, append an @ sign and the database SID (@database). [param] Includes the following parameters (in any order) as appropriate: PROGRAM_NAME=<name> specifies the name of the program on whose behalf the LOB is to be maintained. PROGRAM_TAG=<name> specifies the program tag, which is a string used by the GFM client program to further categorize the LOB. LANGUAGE=<language_code> specifies the language of the file. C – 32 Oracle Applications System Administrator’s Guide PLS_CALLBACK=<plsql procedure> specifies the procedure to execute once for each uploaded file. The procedure must accept file_id as its only parameter. FNDGFU will call the specified procedure after each uploaded file, passing in the new file identifier, for example: PLS_CALLBACK=mypackage.myprocedure. CONTENT_TYPE=<mime_type> specifies the default mime type to use for uploaded files not qualified by a content map. CONTENT_MAP=<contentmapfile> specifies a text file that maps filename suffixes onto content types. The text file consists of lines of the form <suffix>=<mime_type> where suffix is any string matched against the end of the filename. For example: .txt = text/plain .html = text/html .ps = application/postscript <filenames> Specifies the files to upload. Any number of files may be uploaded. Download files from the GFM To download a file using the FNDGFU utility, use the following syntax: FNDGFU <logon> DOWNLOAD=<fileid> [LINE_BREAKS=<mode>] [filename] where <logon> Specifies a standard Oracle logon string of the form username/password. To specify a particular database, append an @ sign and the database SID (@database). <fileid> Specifies the identifier of the large object (LOB) to download. <mode> Specifies how to treat line breaks for a text document. This parameter is ignored for nontext content. The following values are valid: LF – Line breaks will be represented using ”/n” in the downloaded output. This is the default mode if the LINE_BREAK parameter is omitted. CRLF – Line breaks will be left in the canonical format. Loaders C – 33 [filename] Specifies the file into which to download. If omitted, downloaded contents are streamed to the standard output. Example of FNDGFU Upload The FNDGFU utility can be used to upload new or changed help files. Use the following arguments to upload help files: FNDGFU <apps/pwd> 0 Y PROGRAM_NAME=FND_HELP PROGRAM_TAG=<application>:<custom_level> CONTENT_TYPE=<mime_type> LANGUAGE=<language_code> <filenames> where <apps/pwd> is the APPS schema username/password. To specify a particular database, append an @ sign and the database SID (@database). <application> is the Application short name. <custom_level> is the files’customization level. Use the number 100 or above for customized help files. To replace previously uploaded files, use the same customization level when uploading the new files. To override previously uploaded files without deleting them from the database, use a higher customization level. <mime_type> is the files’ MIME type. <language_code> is the files’ language code. <filenames> is a space–separated list of files to upload, or a filename glob in the current directory. Enter all arguments on a single command line. They may appear on separate lines here and in the examples that follow depending on the display medium. Example 1 FNDGFU apps/apps@devdb 0 Y PROGRAM_NAME=FND_HELP PROGRAM_TAG=GL:100 CONTENT_TYPE=text/html LANGUAGE=US file1.htm file2.htm • connects to apps/apps@devdb • identifies uploaded files as part of Oracle General Ledger (GL) help C – 34 Oracle Applications System Administrator’s Guide • identifies the uploaded files’ customization level as 100 • identifies their MIME type as text/html • identifies their language as US English (US) • uploads the two specified .htm files in the current directory (in UNIX) Example 2 FNDGFU apps/apps@custdb 0 Y PROGRAM_NAME=FND_HELP PROGRAM_TAG=FND:100 CONTENT_TYPE=image/gif *.gif • connects to apps/apps@custdb • identifies uploaded files as part of Application Object Library (FND) help • identifies the uploaded files’ customization level as 100 • identifies their MIME type as image/gif • does not identify their language, which defaults to userenv(’LANG’) • uploads all .gif files in the current directory (in UNIX) Purging Generic File Manager Data To purge uploaded files from the Generic File Manager, run the concurrent program, Purge Obsolete Generic File Manager Data. This concurrent program should also be used to periodically expunge expired data. It is recommended that you schedule this program to run every day or so, using the default parameter values. See Also Purge Obsolete Generic File Manager Data: page C – 36 Loaders C – 35 Purge Obsolete Generic File Manager Data To purge uploaded files from the Generic File Manager, run the concurrent program, Purge Obsolete Generic File Manager Data. This concurrent program should also be used to periodically delete obsolete data. It is recommended that you schedule this program to run every day or so, using the default parameter values. Program Parameters Expired Enter ”Y” if you want to purge expired data only. Enter ”N” if you want the purge to include all data. The default is ”Y.” Program Name Enter the program name(s) to process. Leave blank to process all programs. Program Tag Enter the program tag(s) to process. Leave blank to process all program tags. C – 36 Oracle Applications System Administrator’s Guide APPENDIX D Multilingual External Documents Multilingual External Documents D–1 Multilingual External Documents Oracle Applications ship with a set of external documents, or those documents directed toward your customers and trading partners, for which we model the data multilingually. Any document for which the data model is multilingual can be submitted, through a single request, to run in one language or in any subset of the installed languages. Your Italian customer, for example, can receive invoices printed in Italian, while your Korean customer receives packing slips printed in Korean. Oracle Shipping • Bill of Lading • Commercial Invoice • Pack Slip Oracle Order Management • Price List • Sales Order Acknowledgment Oracle Receivables • Dunning Letter Print • Print Statements • Transaction Print Oracle Purchasing • Printed Change Order Report (Landscape) • Printed Change Order Report (Portrait) • Printed Purchase Order Report (Landscape) • Printed Purchase Order Report (Portrait) • Printed RFQ Report (Landscape) • Printed RFQ Report (Portrait) Oracle Payables • Invalid PO Supplier Notice • Prepayment Remittance Notice D–2 Oracle Applications System Administrator’s Guide • Print Invoice Notice • Supplier Open Balance Letter Oracle Human Resources • Full Person Details • Full Applicant Details • Full Assignment Details • Full Work Details Oracle Payroll • Check Writer • Deposit Advice • Third Party Checks Multilingual External Documents D–3 D–4 Oracle Applications System Administrator’s Guide APPENDIX E Character Mode to GUI Appendix Character Mode to GUI Appendix E–1 Oracle Applications Character Mode Forms and Corresponding GUI Windows This table shows you System Administration character mode forms and the windows or processes that have the same functionality in the GUI product. Most windows are accessible when you use the System Administrator responsibility. All Navigation paths below assume you are using that responsibility. Unless otherwise noted, refer to the Oracle Applications System Administrator’s Guide Release 11i for more information on GUI windows or processes. Character Mode Form and Menu Path GUI Window or Process, and Navigator Path Administer Concurrent Managers Administer Concurrent Managers window \ Navigate Concurrent Manager Administer See: Administer Concurrent Managers Navigator: Concurrent > Manager > Administer Administer Request Sets Request Set window \ Navigate Concurrent Sets \ Navigate Report Sets See: Request Set (Oracle Applications User’s Guide) Navigator: Concurrent > Set OR Navigator: Reports > Set Assign Descriptive Flexfield Security Rules Assign Security Rules window \ Navigate Security Responsibility Flexfield Descriptive Assign See: Assign Security Rules (Oracle Applications Flexfields Guide) Navigator: Security > Responsibility > ValueSet > Assign In the Find window choose: Descriptive Flexfield Assign Function Parameters \ Navigate Application Flexfield FlexBuilder Assign The FlexBuilder feature is replaced by the Account Generator feature using Oracle Workflow See: Account Generator (Oracle Applications Flexfields Guide) Assign Key Flexfield Security Rules Assign Security Rules window \ Navigate Security Responsibility Flexfield Key Assign See: Assign Security Rules (Oracle Applications Flexfields Guide) Navigator: Security > Responsibility > ValueSet > Assign In the Find window choose: Key Flexfield Table 14 – 1 (Page 1 of 7) E–2 Oracle Applications System Administrator’s Guide Character Mode Form and Menu Path GUI Window or Process, and Navigator Path Assign Parameter Security Rules Assign Security Rules window \ Navigate Security Responsibility Report Rules Assign See: Assign Security Rules (Oracle Applications Flexfields Guide) Navigator: Security > Responsibility > ValueSet > Assign In the Find window choose: Concurrent Program Assign Printer Drivers Printer Drivers window \ Navigate Install Printer Driver Assign See: Printer Drivers Navigator: Install > Printer > Driver Assign Security Rules Assign Security Rules window \ Navigate Security Responsibility ValueSet Assign See: Assign Security Rules (Oracle Applications Flexfields Guide) Navigator: Security > Responsibility > ValueSet > Assign Assign Terminal Security Obsolete in GUI \ Navigate Security Responsibility Terminal Assign Define Application User Users window \ Navigate Security User Define See: Users Navigator: Security > User > Define Define Combined Specialization Rules Combined Specialization Rules window \ Navigate Concurrent Manager Rule See: Combined Specialization Rules Navigator: Concurrent > Manager > Rule Define Concurrent Manager Concurrent Managers window \ Navigate Concurrent Manager Define See: Concurrent Managers Navigator: Concurrent > Manager > Define Define Concurrent Program Concurrent Programs window \ Navigate Concurrent Program Define See: Concurrent Programs Navigator: Concurrent > Program > Define Define Concurrent Program Executable Concurrent Program Executable window \ Navigate Concurrent Program Executable See: Concurrent Program Executable Navigator: Concurrent > Program > Executable Define Concurrent Request Types Concurrent Request Types window \ Navigate Concurrent Program Types See: Concurrent Request Types Navigator: Concurrent > Program > Types Table 14 – 1 (Page 2 of 7) Character Mode to GUI Appendix E–3 Character Mode Form and Menu Path GUI Window or Process, and Navigator Path Define Cross–Validation Rule Cross–Validation window \ Navigate Application Flexfield Key Cross Validation See: Cross–Validation Rules (Oracle Applications Flexfields Guide) Navigator: Application > Flexfield > Key > Cross Validation Define Currency Currencies window \ Navigate Application Currency See: Defining Currencies (Oracle Applications General Ledger User’s Guide) Navigator: Application > Currency Define Data Group Data Groups window \ Navigate Security ORACLE Data Group See: Data Groups Navigator: Security > ORACLE > DataGroup Define Descriptive Flexfield Security Rule Define Security Rules window \ Navigate Security Responsibility Flexfield Descriptive Define See: Assign Security Rules (Oracle Applications Flexfields Guide) Navigator: Security > Responsibility > ValueSet > Define In the Find window choose Descriptive Flexfield Define Descriptive Flexfield Segments Descriptive Flexfield Segments window \ Navigate Application Flexfield Descriptive Segments See: Descriptive Flexfield Segments (Oracle Applications Flexfields Guide) Navigator: Application > Flexfield > Descriptive > Segments Define Document Categories Document Categories window \ Navigate Application Document Categories See: Document Categories Navigator: Application > Document > Categories Define Document Sequences Document Sequences window \ Navigate Application Document Define See: Document Sequences Navigator: Application > Document > Define Define FlexBuilder Parameter \ Navigate Application Flexfield FlexBuilder Define The FlexBuilder feature is replaced by the Account Generator feature using Oracle Workflow See: Account Generator (Oracle Applications Flexfield Guide) Define Help Text \ Navigate Application Text Table 14 – 1 (Page 3 of 7) E–4 Oracle Applications System Administrator’s Guide Obsolete in GUI Character Mode Form and Menu Path GUI Window or Process, and Navigator Path Define Key Flexfield Security Rule Define Security Rules window \ Navigate Security Responsibility Flexfield Key Define See: Assign Security Rules (Oracle Applications Flexfields Guide) Navigator: Security > Responsibility > ValueSet > Define In the Find window choose Key Flexfield Define Key Flexfield Segments Key Flexfield Segments \ Navigate Application Flexfield Key Segments See: Key Flexfield Segments (Oracle Applications Flexfields Guide) Navigator: Application > Flexfield > Key > Segments Define Key Segment Values Segment Values window \ Navigate Application Flexfield Key Values See: Segment Values (Oracle Applications Flexfields Guide) Navigator: Application > Flexfield > Key > Values Define Logical Databases Obsolete in Release 11 \ Navigate Concurrent Databases Logical Databases have been replaced with Concurrent Conflicts Domains See: Concurrent Conflicts Domains Navigator: Concurrent > Conflicts Domains Define Menu Menus window \ Navigate Application Menu See: Menus Navigator: Application > Menu Define Parameter Security Rule Define Security Rules window \ Navigate Security Responsibility Report Rules Define See: Assign Security Rules (Oracle Applications Flexfields Guide) Navigator: Security > Responsibility > ValueSet > Define In the Find window choose Concurrent Program Define Parameter Values Define Value Set Values \ Navigate Application Validation Report See: Segment Values (Oracle Applications Flexfields Guide) Navigator: Application > Validation > Values In the Find window choose Value Set Define Print Style Print Styles window \ Navigate Install Printer Style See: Print Styles Navigator: Install > Printer > Style Table 14 – 1 (Page 4 of 7) Character Mode to GUI Appendix E–5 Character Mode Form and Menu Path GUI Window or Process, and Navigator Path Define Printer Driver Printer Drivers window \ Navigate Install Printer Driver See: Printer Drivers Navigator: Install > Printer > Driver Define Printer Types Printer Types window \ Navigate Install Printer Type See: Printer Types Navigator: Install > Printer > Types Define Report Group Request Groups window \ Navigate Security Responsibility Report Group See: Request Groups Navigator: Security > Responsibility > Request Define Responsibility Responsibilities window \ Navigate Security Responsibility Define See: Responsibilities Navigator: Security > Responsibility > Define Define Rollup Groups Rollup Groups window \ Navigate Application Flexfield Key Groups See: Rollup Groups (Oracle Applications Flexfields Guide) Navigator: Application > Flexfield > Key > Groups Define Segment Values Segment Values window \ Navigate Application Validation Values See: Segment Values (Oracle Applications Flexfields Guide) Navigator: Application > Validation > Values or Navigator: Application > Flexfield > Key > Values Define Shorthand Aliases Shorthand Aliases window \ Navigate Application Flexfield Key Aliases See: Shorthand Aliases (Oracle Applications Flexfields Guide) Navigator: Application > Flexfield > Key > Aliases Define Terminal Group Obsolete in GUI \ Navigate Security Responsibility Terminal Group Define Value Set Value Sets window \ Navigate Application Validation Set See: Value Sets (Oracle Applications Flexfields Guide) Navigator: Application > Validation > Set Define Work Shifts Work Shifts window \ Navigate Concurrent Manager Work Shifts See: Work Shifts Navigator: Concurrent > Manager > WorkShifts Table 14 – 1 (Page 5 of 7) E–6 Oracle Applications System Administrator’s Guide Character Mode Form and Menu Path GUI Window or Process, and Navigator Path Define Zoom Obsolete in GUI \ Navigate Application Zoom Flexbuilder Test Screen \ Navigate Application Flexfield FlexBuilder Test The FlexBuilder feature is replaced by the Account Generator feature using Oracle Workflow See: Account Generator (Oracle Applications Flexfield Guide) Monitor Application Users Monitor Users window \ Navigate Security User Monitor See: Monitor Users Navigator: Security > User > Monitor Register Applications Applications window \ Navigate Application Register See: Applications Navigator: Application > Register Register Nodes Nodes window \ Navigate Install Nodes See: Nodes Navigator: Install > Nodes Register Oracle IDs ORACLE Users window \ Navigate Security ORACLE Register See: ORACLE Users Navigator: Security > ORACLE > Register Register Printers Printers \ Navigate Install Printer Register See: Printers Navigator: Install > Printer > Register Register Terminals Obsolete in GUI \ Navigate Install Terminals Retrieve Audit Data Obsolete in GUI \ Navigate Security AuditTrail Run Reports Submit Requests window \ Navigate Report Run See: Submit Requests (Oracle Applications User’s Guide) Navigator: Reports > Run Update Installation Information Obsolete in GUI \ Navigate Install Information Update Personal Profile Options Personal Profile Values window \ Navigate Profile Personal See: Personal Profile Values (Oracle Applications Flexfields Guide) Navigator: Profile > Personal Table 14 – 1 (Page 6 of 7) Character Mode to GUI Appendix E–7 Character Mode Form and Menu Path GUI Window or Process, and Navigator Path Update System Profile Options System Profile Values window \ Navigate Profile System See: System Profile Values Navigator: Profile > System View Concurrent Requests Requests window \ Navigate Concurrent Requests See: Viewing Requests (Oracle Applications User’s Guide) Navigator: Concurrent > Requests Choose: View Output button – to view Request Output View Log button – to view Request Log Use the Menu to choose: Tools > Manager Log – to view Manager Log View Reports Requests window \ Navigate Report View See: Viewing Requests (Oracle Applications User’s Guide) Navigator: Concurrent > Requests Choose: View Output button – to view Request Output View Log button – to view Request Log Table 14 – 1 (Page 7 of 7) E–8 Oracle Applications System Administrator’s Guide APPENDIX F Implementation Appendix Implementation Appendix F–1 Setting Up Oracle Applications System Administrator This section contains an overview of each task you need to complete before you can use any Oracle Applications products. Oracle Applications Implementation Wizard If you are implementing more than one Oracle Applications product, you may want to use the Oracle Applications Implementation Wizard to coordinate your setup activities. The Implementation Wizard guides you through the setup steps for the applications you have installed, suggesting a logical sequence that satisfies cross–product implementation dependencies and reduces redundant setup steps. The Wizard also identifies steps that can be completed independently––by several teams working in parallel––to help you manage your implementation process most efficiently. You can use the Implementation Wizard as a resource center to see a graphical overview of setup steps, read online help for a setup activity, and open the appropriate setup window. You can also document your implementation, for further reference and review, by using the Wizard to record comments for each step. Oracle Enterprise Manager Tools Oracle Applications Manager and Oracle Management Pack for Oracle Applications are tools within the Oracle Enterprise Manager framework. These tools are set up separately. Setup Checklist After you log aon to Oracle System Administrator, complete the following steps to set up your Oracle Applications: ❑ Step 1: Create an Oracle Applications User to Complete Setting Up (Required) ❑ Step 2: Create New Responsibilities (Optional) ❑ Step 3: Implement Function Security (Optional) ❑ Step 4: Create Additional Users (Required) ❑ Step 5: Set Up Your Printers (Required) ❑ Step 6: Specify Your Site–level and Application–level Profile Options (Required with Defaults) F–2 Oracle Applications System Administrator’s Guide ❑ Step 7: Define Your Concurrent Managers (Optional) ❑ Step 8: Define Report Sets (Optional) ❑ Step 9: Set Up AuditTrail (Optional) ❑ Step 10: Modify Language Prompts (Optional) ❑ Step 11: Modify Territory LOV Values (Optional) Setup Flowchart While you can set up Oracle System Administration in many different ways, and defer optional set up steps until you are ready to use the corresponding functionality, we recommend you use the order suggested in the following flowchart: Figure 14 – 1 Oracle System Administrator Setup Oracle System Administrator Setup Step SYS–1 Step SYS–4 Create Super User Create Users Step SYS–2 Step SYS–5 New Responsibilities Set Up Printer Step SYS–7 Define Concurrent Managers Step SYS–10 Modify Language Prompts Step SYS–8 Step SYS–11 Define Report Sets Step SYS–3 Step SYS–6 Step SYS–9 Function Security Profile Options Audit Trail LEGEND Required Step Required Step With Defaults Modify Territory LOV Values Optional Step Setup Steps Step 1 Create an Oracle Applications User to Complete Setting Up You must create an Oracle Applications user to complete the setup of your applications. You can create one user to set up all of your Implementation Appendix F–3 applications, or you can define one for each product or group of products. To log on to Oracle Applications, double–click on the Oracle Applications icon. The sign–on window appears. Enter user name SYSADMIN and password SYSADMIN to access the system administrator responsibility and choose Connect. ☞ Attention: In some cases, a consultant installing your application may have changed the command, username and/or password to something appropriate to your organization. If so, please refer to your consultant for the correct logon instructions. To define your user, navigate to the Users window by choosing Security > User > Define from the navigation list. Enter a username (for example, INSTALL) in the User Name field and choose your own password. Oracle Applications asks you to change the password the first time you sign on as this new user. You should enter a description to remind yourself that this user is for the setting up of Oracle Applications. Set the end date to the current date for each of the users you create in this step. This ensures that no one can access your applications with these usernames later. Assign responsibilities to your new user. You should assign to your new user the full–function responsibility for each of the applications you install. See Also Users Window: page 2 – 17 Step 2 Create New Responsibilities (Optional) A responsibility in Oracle Applications is a level of authority that determines how much of an application’s functionality a user can use, what requests and concurrent programs the user can run, and which applications’ data those requests and concurrent programs can access. Oracle Applications provides a set of predefined responsibilities that you can use. You can also define your own responsibilities if the ones provided do not meet your needs. You associate each responsibility with a data group, request group, and a menu. The data group defines the pairing of application and ORACLE username. The ORACLE username determines the database F–4 Oracle Applications System Administrator’s Guide tables and table privileges accessible by your responsibility. The request group permits the user with this responsibility to run requests, request sets, or concurrent programs from the Submit Requests form. Select a predefined menu. A menu provides access to application functions through a hierarchical arrangement of functions and menus of functions Use the Responsibilities window to define a new responsibility. You can then assign your new responsibility to a user using the Users window. See Also Responsibilities Window: page 2 – 10 Users Window: page 2 – 17 Step 3 Implement Function Security (Optional) Function security is the mechanism by which user access to applications functionality is controlled. Use the Responsibilities form to limit a responsibility’s functionality by excluding menus and functions. Or Use the Menus form to create new menus that point to functions you want to make available to a responsibility. See Also Responsibilities Window: page 2 – 10 Menus Window: page 2 – 38 Step 4 Create Additional Users You should use the procedure outlined in Step 1 to create additional application users. When you define a new user, you assign one or more responsibilities and a password that the user changes after the initial logon. You can use the LOV in the Responsibility field to get a list of the standard responsibilities for each application you specify. You can assign multiple responsibilities to a user. See Also Users Window: page 2 – 17 Implementation Appendix F–5 Step 5 Set Up Your Printers Read the Setting Up Your Printers page to learn how to set up your printers. You must define any printer types used at your site that are not shipped with Oracle Applications, then register each printer with its name as determined by your operating system. For every custom printer type or specialized print style you define, use the Printer Drivers form to assign a printer driver to use with each print style used by a printer type. See Also Overview of Printers and Printing: page 7 – 2 Printer Types, Print Styles, and Printer Drivers: page 7 – 3 Setting Up Your Printers: page 7 – 11 If you need more information on how to find your printer operating system names, refer to the Printing section of Installing Oracle Applications. Step 6 Specify Your Site–level and Application–level Profile Options Navigate to the System Profile Values form (Profile > System). In the Find window check Site and Application as your Display levels. Enter System Administration for the Application field and enter Site Name in the Profile field. Oracle Applications displays ’Not Specified’ as the site name. Change Not Specified to your site name. To specify the remaining options, return to the find window, clear the Profile field and choose Find. You should also examine the values set by AutoInstall for the other profile options and determine which ones you want to change. The site–level profile options serve as the defaults for your system until you override them at other levels. A description for each of the System Administration profile options is available in the Common User Profile Options: page A – 2 Important profile options include: • Application Web Agent • Gateway User ID • TWO_TASK • Site Name F–6 Oracle Applications System Administrator’s Guide • Attachment File Directory • Help System Base URL • Help System Root • TCF:Host • TCF:Port ☞ Attention: This list is not a complete list of System Administration profile options. Use the Find window to find all System Administration profile options. See Also Overview of User Profiles: page 11 – 2 Setting User Profile Options: page 11 – 2 System Profile Values: page 11 – 6 Step 7 Define Your Concurrent Managers (Optional) Concurrent Processing is a feature of Oracle Applications that lets you perform multiple tasks simultaneously. Oracle Applications Concurrent Processing lets you run long, data–dependent functions at the same time as your users perform online operations. Concurrent managers are components of concurrent processing that monitor and run your time–consuming tasks without tying up your computers. Oracle Applications automatically installs one standard concurrent manager that can run every request. You may want to take advantage of the flexibility of concurrent managers to control throughput on your system. You can define as many concurrent managers as you need. Keep in mind, however, that each concurrent manager consumes additional memory. You can specialize each of your concurrent managers so that they run all requests, requests submitted by a particular user, requests submitted by a particular application, or other constraints, or any combination of these constraints. If you are using Parallel Concurrent Processing in a cluster, massively parallel, or homogeneous networked environment, you should register your Nodes and then assign your concurrent managers to primary and secondary nodes. You can spread your concurrent managers, and therefore your concurrent processing, across all available nodes to fully utilize hardware resources. Implementation Appendix F–7 Use the Define Concurrent Manager form to define new concurrent managers. See Also Memory Requirements (Installing Oracle Applications) Preparing to Install or Upgrade (Installing Oracle Applications) Defining Managers and their Work Shifts: page 5 – 26 Overview of Concurrent Processing: page 5 – 2 Step 8 Define Request Sets (Optional) A request set is a group of reports or programs which you submit with one request.. To define and maintain request sets, use the Request Sets form. Your users can also define their own report sets. See Also Define Request Sets (Oracle Applications User’s Guide) Step 9 Set Up AuditTrail (Optional) If you want to keep track of the changes made to your data by application users, you should set up AuditTrail for the relevant tables. Defining AuditTrail for your site involves defining Audit Groups, which are groups of tables and columns for which you intend to track changes. You then define Audit Installations to instruct AuditTrail which ORACLE IDs you want to audit. Finally, you run the Audit Trail Update Tables Report, which allows your AuditTrail definitions to take effect. See Also Define Audit Groups: page 3 – 36 Define Audit Installations: page 3 – 34 Overview of User and Data Auditing: page 3 – 2 Step 10 Modify Language Prompts (Optional) If you want to modify the field name displayed in the Translations window, you should change the Description value for the language you want to modify in the Languages window. F–8 Oracle Applications System Administrator’s Guide See Also Languages window: page 9 – 28 Step 11 Modify Territory LOV Values (Optional) If you want to modify the territory value displayed in LOVs, you should change the Description value for the territory you want to modify in the Territories window. See Also Territories window: page 9 – 30 Implementation Appendix F–9 F – 10 Oracle Applications System Administrator’s Guide APPENDIX G Setting Up and Maintaining Oracle Applications This appendix describes how to maintain your Oracle Applications installation. It includes information on Oracle HTTP Server, the TCF Server, concurrent managers, and RunDiscoverer. Setting Up and Maintaining Oracle Applications G–1 Setting Up and Maintaining Your Oracle Applications Configuration This appendix describes some of the recommended manual setup steps for Application Object Library in Release 11i. You can use this appendix as a reference for maintaining your Oracle Applications installation. For complete instructions on setting up a new installation, see Installing Oracle Applications. Proper setup is required before a number of Application Object Library features will operate correctly. Please follow the steps in this guide in their entirety when troubleshooting a Release 11i installation. The following steps are recommended in configuring Oracle Application Object Library in Release 11i: 1. Run Rapid Install 2. Test Web Listener Virtual Directories 3. Test the Oracle HTTP Server Configuration 4. Create DBC files 5. Test Java Servlet Setup 6. Set the Web Server Profile Options 7. Configure the TCF SocketServer The steps should be performed in the listed order, since later steps use functionality enabled by previous steps. Note: If you are using Oracle8i Parallel Server refer to OracleMetaLink for additional configuration steps. Run Rapid Install Rapid Install is the Release 11i installation process. Refer to Installing Oracle Applications for information on Rapid Install. The remainder of this section describes specific configuration and testing that should be done to ensure that all Applications Object Library features are operational. Oracle Applications Rapid Install delivers the standard Apache Single Listener configuration. Follow the instructions that come with the Rapid Install for basic Apache configuration. Rapid Install configures the HTTP Server automatically. For more information on configuring the HTTP Server, see Administering Oracle HTTP Server Powered by Apache: page G – 14. G–2 Oracle Applications System Administrator’s Guide For the remaining steps, you should be in the correct environment on the web server machine. To go to the correct environment, do the following: 1. Log into the host machine with your iAS installation. 2. Set the correct environment. Example for the Bourne shell: $ cd <your_appl_top_directory> $ . APPSORA.env Example for Windows platforms: cd <your APPL_TOP directory> APPSORA.cmd Test the Web Listener Virtual Directories Oracle Applications rely on a number for virtual directories to be configured in the Apache Listener for correct operation. The settings are stored in an Apache configuration file. Check the settings as follows: 1. Locate Apache configuration file directory. cd $ORACLE_HOME/../iAS/Apache/Apache/conf 2. View the apps.conf file. This will contain all Oracle Applications specific configurations for the standard Apache Listener. 3. Set or verify virtual directory mappings. The following table lists the virtual directories and examples for the physical directories. Virtual Directory Example Physical Directory /OA_HTML /dl/common/java/oracle/ apps/media /OA_MEDIA /dl/common/java/oracle/ apps/media /OA_JAVA /dl/common/java /OA_TEMP /tmp /OA_CGI /dl/common/java/oracle/ apps/media/bin /images /d1/oracle/iAS/ portal30/images Setting Up and Maintaining Oracle Applications G–3 You can use the Application Object Library AOL/J Setup Test Suite to verify that virtual directories are set properly. See: Application Object Library AOL/J Setup Test Suite: page G – 57 You can also use your browser to fetch the following URLs to test the setup of the virtual directories: http://<hostname>:<port>/OA_MEDIA/FNDLOGOL.gif should return the large Oracle Applications logo http://<hostname>:<port>/OA_JAVA/oracle/forms/registry/ Registry.dat should return a text file with forms registry settings http://<hostname>:<port>/OA_CGI/FNDWRR.exe should return ”Query String Parse Error.” For more information on the Apache configuration file, see Administering Oracle HTTP Server Powered by Apache: page G – 14. Test the HTTP Server Configuration " Use your web browser to load the Oracle WebDB PL/SQL Gateway Settings page. By default, this page is disabled for security reasons. You will be prompted for the system username/password. The default URL for this page is the following: http://<hostname>:<port>/pls/admin_/ Example: http://ap557sun.us.oracle.com:2002/pls/admin_/ Navigate to ”Gateway Database Access Descriptor Settings” and create or edit a Database Access Descriptor The settings for the Database Access Descriptor for your Oracle Applications database are: Database Access Descriptor Name Oracle User Name Oracle Password G–4 Oracle Applications System Administrator’s Guide <two_task> <apps_schema_name> <apps_schema_password> Oracle Connect String <two_task> Maximum Number of Worker Thread <tune this> Keep Database Connection Open... Yes Default (Home) Page fnd_web.ping Document Table apps.fnd_lobs_document Document Access Path docs Document Access Procedure <null> Extensions to be Uploaded as BLOB * Extensions to be Uploaded as LONG RAW <null> Path Alias fndgfm Path Alias Procedure fnd_gfm.dispatch Enable Single Signon Authentication No Custom Authentication CUSTOM Example: Database Access Descriptor Name R115 Oracle User Name apps Oracle Password apps Oracle Connect String R115 Maximum Number of Worker Thread 10 Keep Database Connection Open... Yes Default (Home) Page fnd_web.ping Document Table apps.fnd_lobs_document Document Access Path docs Document Access Procedure Extensions to be Uploaded as BLOB * Extensions to be Uploaded as LONG RAW Path Alias fndgfm Path Alias Procedure fnd_gfm.dispatch Enable Single Signon Authentication No Custom Authentication CUSTOM " Bounce the web server. " Test the Database Access Descriptor. You should now be able to use the PL/SQL Gateway to run authorized PL/SQL procedures on your Release 11i database server. To test this, use a web browser to fetch the following URL: http://<hostname>:<port>/pls/<dad_name>/FND_WEB.PING Example: http://ap523sun.us.oracle.com/pls/R115/FND_WEB.PING Setting Up and Maintaining Oracle Applications G–5 The FND_WEB.PING procedure is delivered with Release 11i and generates a response table with the following information: FND_WEB.PING SYSDATE: DATABASE_VERSION: DATABASE_ID: SCHEMA_NAME: AOL_VERSION: APPS_WEB_AGENT: <server system date> <database version banner> <database identifier> <oracle schema name> <AOL version number> <profile option site level value> This information should allow you to confirm that your PL/SQL Gateway is indeed pointing at the correct APPS schema. " Test that CUSTOM authentication is working. Warning: Failure to verify CUSTOM authentication will leave serious security holes open in your installation. This step is MANDATORY. The CUSTOM authentication flag directs WebDB to check access privileges using the OWA_CUSTOM.AUTHORIZE function. Oracle Application Object Library supplies an implementation of this function (AFOAUTHB.pls) which verifies requests are enabled for web execution via the FND_ENABLED_PLSQL table. You should verify that this access control is in place by running a function which is not authorized for web execution. For example: http://<hostname>:<port>/pls/<dad_name>/HTP.HR Example: http://ap523sun.us.oracle.com/pls/R115/HTP.HR You should see an access control error. If you get a page with a horizonal rule across it, then the web request actually executed the HTP.HR procedure even though this package is not listed in FND_ENABLED_PLSQL. To correct this problem, set the ”Custom Authentication” field to ”CUSTOM” as described in the beginning of this section. " Test the Generic File Manager service. Oracle WebDB is used by the Application Object Library Generic File Manager for file upload and download services. The Generic File Manager service is used to implement online help, attachments, and other file–based features. To test the Generic File Manager, try fetching an online help document with your browser: G–6 Oracle Applications System Administrator’s Guide http://<hostname>:<port>/pls/<dad_name>/ fndgfm/fnd_help.get/US/fnd/@search Example: http://ap523sun.us.oracle.com/pls/R115/ fndgfm/fnd_help.get/US/fnd/@search This should return an HTML page describe help search features of the online help system. Create DBC files A DBC (.dbc) file holds information used by application servers to identify and authenticate with an application database. DBC files must be created on all tiers if you run a multi–tier system. The files are located in $FND_TOP/secure of your Oracle Applications installation and are named as follows: $FND_TOP/secure/<db_host>_<db_sid>.dbc Example: /d1/appltop/fnd/11.5.8/secure/ap100sun_dev115.dbc " Locate the DBC file for your database (Rapid Install should have created one for you). Verify the settings are correct. " Test the DBC file by running the AdminAppServer STATUS check: Prior to running AdminAppServer you must ensure that the CLASSPATH environment variable contains • $JAVA_TOP (Oracle Applications java code) • $ORACLE_HOME/jdbc/lib/classes111.zip (jdbc drivers for UNIX) or %JAVA_TOP%\jdbc111.zip (jdbc drivers for Windows) Example for running the status check in UNIX: Run the utility using the following syntax: jre oracle.apps.fnd.security.AdminAppServer STATUS \ DBC=<full_path_to_dbc_file> Example: jre oracle.apps.fnd.security.AdminAppServer STATUS \ DBC=/d1/appltop/fnd/11.5/secure/ap100sun_dev115.dbc Setting Up and Maintaining Oracle Applications G–7 Example for running the status check in Windows: Run the utility using the following syntax: jre –classpath %CLASSPATH% \ oracle.apps.fnd.security.AdminAppServer \ <APPS username/password> STATUS \ DBC=<full_path_to _dbc_file> Example: jre –classpath %CLASSPATH% \ oracle.apps.fnd.security.AdminAppServer apps/apps STATUS \ DBC=/d1/appltop/fnd/11.5/secure/ap100sun_dev115.dbc If the utility returns with the APPL_SERVER_ID and other status information, the DBC file is good and you may proceed to the next section. If the utility fails to connect, then you must correct the DBC file or create a new one. DBC files can be created by copying the template, or by using the AdminAppServer utility. In addition to creating the DBC file, the utility registers the application server with the database for the Applications Server Security feature. To access additional databases from the same application server installation, you must run the AdminAppServer script once for each additional database. The command for UNIX is as follows: jre oracle.apps.fnd.security.AdminAppServer ADD \ SECURE_PATH=<$FND_TOP/secure> \ GWYUID=<gateway_schema_name>/<gateway_schema_pwd> \ FNDNAM=<apps_schema_name> \ APPS_JDBC_DRIVER_TYPE=THIN \ GUEST_USER_PWD=<guest_user>/<guest_pwd> \ DB_HOST=<database_hostname> \ DB_PORT=<database_port> \ DB_NAME=<database_sid> \ [SERVER_ADDRESS=<tcp.ip address>] \ [SERVER_DESCRIPTION=”Public web access server”] \ [env_name=env_value] Example for UNIX: jre oracle.apps.fnd.security.AdminAppServer ADD \ SECURE_PATH=”$FND_TOP/secure” \ GWYUID=applsyspub/pub \ FNDNAM=APPS \ APPS_JDBC_DRIVER_TYPE=THIN \ GUEST_USER_PWD=guest/guest \ G–8 Oracle Applications System Administrator’s Guide DB_HOST=ap100sun \ DB_PORT=1521 \ DB_NAME=r115 The command for Windows is as follows: jre –classpath %CLASSPATH% \ oracle.apps.fnd.security.AdminAppServer \ <APPS username/password> ADD \ SECURE_PATH=<$FND_TOP/secure> \ GWYUID=<gateway_schema_name>/<gateway_schema_pwd> \ FNDNAM=<apps_schema_name> \ APPS_JDBC_DRIVER_TYPE=THIN \ GUEST_USER_PWD=<guest_user>/<guest_pwd> \ DB_HOST=<database_hostname> \ DB_PORT=<database_port> \ DB_NAME=<database_sid> \ [SERVER_ADDRESS=<tcp.ip address>] \ [SERVER_DESCRIPTION=”Public web access server”] \ [env_name=env_value] Example for Windows: jre –classpath %CLASSPATH% \ oracle.apps.fnd.security.AdminAppServer \ <APPS username/password> ADD \ SECURE_PATH=”$FND_TOP/secure” \ GWYUID=applsyspub/pub \ FNDNAM=APPS \ APPS_JDBC_DRIVER_TYPE=THIN \ GUEST_USER_PWD=guest/guest \ DB_HOST=ap100sun \ DB_PORT=1521 \ DB_NAME=r115 Test Java Servlet Setup The Apache listener should already be configured to run Java Servlets and Java Server Pages (JSPs). " Test the JSP setup by executing the ”JSP Ping” page. Use your web browser to load the following URL: http://<hostname>:<port>/OA_HTML/jsp/fnd/fndping.jsp? dbc=<dbc_file_name> Setting Up and Maintaining Oracle Applications G–9 Example: http://ap523sun.oracle.com:2002/OA_HTML/jsp/fnd/fndping.jsp? dbc=ap100sun_test115 Set the Web Server Profile Options A number of profile options must be set to identify the base URL used to process various types of web requests. APPS_WEB_AGENT This profile option must be set to the URL which identifies the PL/SQL Gateway Database Access Descriptor base URL for your Applications instance. Oracle Applications use the value of this profile option to construct URLs for ’WWW’ type functions, Attachments, Export, and other features. Syntax: http://<hostname>:<port>/pls/<dad_name> Example: http://ap557sun:us.oracle.com/pls/R115 APPS_SERVLET_AGENT This profile option must be set to the URL base for the servlet execution engine on Apache. Oracle Applications uses the value of this profile option to construct URLs for JSP and SERVLET type functions. Syntax: http://<hostname>:<port>/<servlet_zone> Example: http://ap523sun.us.oracle.com:8888/oa_servlets HELP_WEB_AGENT Online help is launched by invoking the fndhelp.jsp Java Server Page. By default, online help will launch on the Web server specified by the APPS_SERVLET_AGENT profile option. To use the default option leave the HELP_WEB_AGENT profile option blank. Note: In the previous release of Oracle Applications Release 11i, online help was launched by invoking the fnd_help.launch PL/SQL procedure. G – 10 Oracle Applications System Administrator’s Guide If you wish to launch online help on a different Web server, you must specify the entire online help URL in the HELP_WEB_AGENT profile option. For example, http://ap523sun.us.oracle.com:7777/OA_HTML/jsp/fnd/ fndhelp.jsp?dbc=ap118sun_testdb " After setting these profile options, sign on again, to refresh the profile option cache. " Test the APPS_WEB_AGENT and web server configuration. Log onto Oracle Applications forms. From the Help menu, choose ”Diagnostics > Test Web Agent...”. This should launch a browser with the URL <APPS_WEB_AGENT>/FND_WEB.PING This should open a web page with the Ping response. Confirm that the response information is as expected. To test the Export feature, open a simple form with a multi row block. Query up a set of records, then select ”File / Export...” from the menu. A browser window should open and display the form data in tab–separated format. " Test the HELP_WEB_AGENT configuration. • System Help From the Help menu, select ”Oracle Applications Library.” A browser window should open up, displaying the online help system. The documentation portion should contain the top level Oracle Applications Help page. • Window Help: From the Help menu, select ”Window Help.” A browser window should open up, displaying the online help system. The documentation portion should contain the online help for the current form. GUEST_USER_PWD Use the System Profiles form to verify or set the value of the GUEST_USER_PWD profile option. The value should be the username/password of a valid applications user account (not an Oracle user). Any valid account will do, but we recommend that this account not be assigned any actual responsibilities. Example: Setting Up and Maintaining Oracle Applications G – 11 GUEST_USER_PWD = GUEST/GUEST Verify that the user/password works by signing on to Oracle Applications through forms. ICX: Client IANA Encoding This profile option is used to determine the character set of the text displayed by Java Server pages. This profile option must be set to the correct character set (that is, the character set of the Apache server on the Web tier) for the online help system to support character sets other than American English. The default setting is the US character set (ISO–8859–1). Users can see this profile option, but they cannot update it. ICX: Forms Launcher, ICX: Reports Launcher, ICX: Discoverer Launcher The Personal Homepage allows Forms, Reports and Discoverer sessions to be launched from a single web page. You must set these site–level profile options to identify the base URL to use when launching each of these applications. Set the Site level value of each option to the base URL to launch the appropriate application. The base URLs provided in these profiles should be sufficient to launch the application, but should not include additional parameters which may be supplied by the Personal Homepage. Examples are listed in the following table: Profile Value ICX: Forms Launcher http://myFormsServer/dev60cgi/f60cgi ICX: Report Launcher http://myReportsServer/dev60cgi/ rwcgi60 ICX: Discoverer Launcher http://myWebDiscovererServer/discwb33/ html/english/welcome.htm? Connect=[APPS_SECURE]apptest Configure the TCF SocketServer The TCF SocketServer is implemented as a servlet, running from within the Apache JServ engine framework. For information on G – 12 Oracle Applications System Administrator’s Guide recommended setup steps, see: Administering the TCF SocketServer: page G – 41. Launching Oracle Applications Forms Directly Typically, you should not start Oracle Applications forms directly, but rather from the Personal Homepage. However, if you need to launch the forms directly, you can do so by using the following URL in your browser: http://<Web Server Machine>:<Web Port>/dev60cgi/f60cgi Please note that if you made customizations in the appsweb.cfg file, the URL may be different from the above. Warning: If Forms are launched directly, then certain features and settings will not be honored, including: – all NLS settings including language, territory, date language, etc. – date format – timeout security – time zones Warning: This mechanism is supported for use by system administrators only, and only for ”bootstrapping” purposes. Setting Up and Maintaining Oracle Applications G – 13 Administering Oracle HTTP Server Powered by Apache Oracle HTTP Server Powered by Apache provides the communication services offered within the Oracle Internet Application Server. This arrangement allows users to deploy HTTP and HTML based applications within a multi tiered computing environment. Note: For updates and details on setting up your Oracle HTTP Server, please refer to OracleMetaLink. Oracle HTTP Server All incoming client requests to Oracle Internet Application Server (iAS) are handled by the Communication Services component of iAS. The Oracle HTTP Server, powered by Apache Web Server technology will accept and administer these requests. The Apache technology adopted by Oracle HTTP Server provides for an extremely stable, scalable, and extensible platform on which to deploy web based applications. The modular design of the Apache server allows for extension of the capabilities of the Oracle HTTP Server. In addition to the standard Apache modules (often referred to as modules), a number of Oracle specific modules are provided along with an extension to the functionality of several standard modules. These modules include: mod_ssl This module provides secure listener communications using an Oracle provided encryption mechanism using 128 bit Secure Sockets Layer. mod_plsql This module routes PL/SQL requests to the Oracle8i PL/SQL service, which in turn delegates to PL/SQL programs. mod_jserv This module routes all servlet requests to the Apache Jserv servlet engine embedded within Oracle HTTP Server. Servlets can be shared across multiple zones. mod_perl This module forwards Perl requests to the Perl Interpreter. The Perl Interpreter is embedded within the Oracle HTTP Server, removing the necessity to spawn an external interpreter as well as providing a caching mechanism such that modules and scripts need only be loaded or compiled once. Oracle Applications do not presently utilize mod_perl. Note: Please refer to the Oracle HTTP Server documentation for a more detailed description of the operation and G – 14 Oracle Applications System Administrator’s Guide configuration of the Oracle HTTP Server. The information in this section is supplementary to that provided in the Oracle HTTP Server manual. The manual Installing Oracle Applications should be consulted for additional information on directory structures and file locations referred to in this guide. Note: The Oracle HTTP Server is powered by a standard version of Apache. A number of books have been published describing the operation of the Apache server. To further add to your knowledge of the Apache server, consult one of these. Apache Configuration Files Apache is configured through directives contained in one or more configuration files. The directives necessary for operating Apache within the Oracle environment will be entered into the configuration files during the install process. It should not be necessary to modify these files unless the system is being re–configured. Warning: An invalid directive entered into a configuration file will prevent Apache from starting. An incorrect definition provided to a directive may cause Apache to behave in a fashion that was not intended. Location The Apache configuration files are installed as part of the Oracle Applications Rapid Install process. The files will be placed in a sub–directory of iAS_HOME (specified during the install process), Apache/Apache/conf. For example, if iAS_HOME is equal to UNIX Windows /d5/part/visora/iAS then the Apache configuration files will be in the directory /d5/part/visora/iAS/Apache/Apache/conf . C:\d5\part\visora\iAS then the Apache configuration files will be in the directory C:\d5\part\visora\iAS\Apache\Apache\conf . Configuration Files To determine which configuration file Apache is using, open the file $APACHE_TOP/Apache/bin/apachectl and check the parameter HTTPD. If HTTPD is pointing to the httpds executable, then httpds.conf is being used, if HTTPD is pointing to the httpd executable, then httpd.conf is being used. Setting Up and Maintaining Oracle Applications G – 15 This file contains those directives necessary to allow Apache to run. The syntax of the configuration file allows for one directive per line. Lines may be continued on to the next line by placing a backslash, ”\” as the last character in the line. Directives specified in any of the configuration files are case–insensitive, however arguments to directives may be case–sensitive. Lines beginning with a hash, ”#”, are considered comments and are ignored. Other files may be linked to the httpds.conf file through the addition of include directives. Rapid Install will have created two other configuration files in the conf directory, oracle_apache.conf, and apps.conf. The file oracle_apache.conf should also contain an include statement pointing to the file <iAS_HOME>/Apache/modplsql/cfg/plsql.conf. UNIX The configuration file to be used at startup can be specified using the –f option on the command line. To view all of the options that the httpds executable accepts, at the command line enter: $<iAS_HOME>/Apache/Apache/bin/httpds –h Windows Open a console window (DOS prompt), change directory to where the Apache executable is stored, and execute the command ”Apache.exe –h”. For example, at the DOS prompt enter: C:\> cd C:\<iAS_HOME>\Apache\Apache C:\> Apache.exe –h Note: Refer to the Apache documentation at http://www.apache.org/docs/windows.html for more information on the operation of Apache in the Windows environment. The default Apache configuration file Important directives specified in the file httpd.conf or httpds.conf: G – 16 ServerName A fully qualified domain name. For example, myserver.acme.com. This is the name with which Apache responds to HTTP requests. Port The port number on which Apache listens for HTTP requests. Set during Rapid Install. The default port number is 80. ServerRoot A fully qualified path, under which the Apache Server’s configuration, error and log files reside. Directives defined with relative paths will append to this path. Set to <iAS_HOME>/Apache/Apache by Rapid Install. Oracle Applications System Administrator’s Guide DocumentRoot The directory out of which document requests are served. Defaults to <COMMON_TOP>/portal. ErrorLog A fully qualified path to the error log file. The default entry is equal to <iAS_HOME>/Apache/Apache/logs/error_log on UNIX and <iAS_HOME>Apache/Apache/logs/error.log on Windows. CustomLog The location and format of the access log. The default entry is equal to logs/access_log common. This sets the file to be in the Common Logfile Format. PidFile The file in which the parent process is recorded on startup. Defaults to logs/httpds.pid Include Two include files should be specified in the default Apache configuration file. <iAS_HOME>/Apache/Jserv/etc/jserv.conf, and <iAS_HOME>/Apache/Apache/conf/oracle_apac he.conf. Warning: The order in which the include files are specified is important. jserv.conf should be placed before oracle_apache.conf. oracle_apache.conf The file oracle_apache.conf is ”included” in httpds.conf. This file is created by Rapid Install, and has include entries pointing to apps.conf, and plsql.conf at a minimum. There may also be entries pointing to other files including xml.conf, and ojsp.conf. As an example oracle_apache.conf should contain the lines: include /d5/ora/iAS/Apache/modplsql/cfg/plsql.conf include /d5/ora/iAS/Apache/Apache/conf/apps.conf plsql.conf The file plsql.conf has entries related to the handling of PL/SQL procedures. The directive LoadModule plsql_module has an argument that is a pointer to the shared library modplsql.so. An example specifying the default location would be: UNIX #Directives for mod_plsql LoadModule plsql_module \ /d5/ora/iAS/Apache/modplsql/bin/modplsql.so Setting Up and Maintaining Oracle Applications G – 17 Windows #Directives for mod_plsql LoadModule plsql_module \ D:\<iAS_HOME>\bin\modplsql.dll apps.conf This file contains Oracle Applications specific information for the Apache HTTP listener. A number of Alias directives for physical directories will be present in this file. Entries will exist for OA_HTML, OA_MEDIA, OA_JAVA, OA_TEMP, OA_SECURE, and OA_CGI amongst others. An example of the entries that may be present include: Alias /OA_JAVA/ ”/d5/part/common/java/” <Location /OA_JAVA/> Order allow,deny Allow from all </Location> Alias /OA_HTML/ ”/d5/part/common/html/” <Location /OA_HTML/> Order allow, deny Allow from all </Location> Alias /OA_MEDIA/ \ ”/d5/part/common/java/oracle apps/media/” <Location /OA_MEDIA/> Order allow, deny Allow from all </Location> Note: Ensure that trailing slashes, ”/”, are present in the physical directory definition. Omission of the trailing slash can result in errors such as broken images or files not being found. Controlling Apache Rapid Install will create a sub–directory under the common area with the path admin/scripts/<context_name>. Within this directory a number of control scripts are created. The control script adapcctl can be used to stop and start the Apache Web Listener. UNIX Windows Apache control file: admin/scripts/adapcctl.sh Apache control file: admin\scripts\adapcctl The Apache control file is a shell script that can accept the arguments either ”stop” or ”start”. At the command line enter the following: G – 18 Oracle Applications System Administrator’s Guide UNIX To start Apache: $ adapcctl.sh start To stop Apache: $ adapcctl.sh stop Windows To start Apache on Windows platforms, the command is: adapcctl.cmd start To stop Apache on Windows platforms, the command is: adapcctl.cmd stop Alternatively, you can use the Services tool from the Control Panel to start and stop the Apache service. Testing Apache Server Status In order to test the correct operation of the Oracle HTTP as a part of the overall application, it is necessary to ensure that the Oracle database, the Oracle database listener, and the concurrent manager are running, if required. Refer to earlier sections in this guide to determine applicable steps necessary to ensure these processes are available. To test the status of Apache, enter the following at the operating system prompt (from the <iAS_HOME>/Apache/Apache/bin directory): UNIX To test the status of the Apache Server– $apachectl status The return from this command is dependent on what the directive ”STATUSURL” is set to in the apachectl file as well as on the availability of the lynx command. For example, if the following line is entered in apachectl: STATUSURL=”http://myserver.acme.com:8002/pls/VIS/FND_ WEB.PING” then the status command will return: $ apachectl status FND_WEB.PING SYSDATE 08–DEC–2001 06:37:24 DATABASE VERSION Oracle8i Enterprise Edition – Production DATABASE ID:vision SCHEMA NAME APPS Setting Up and Maintaining Oracle Applications G – 19 AOL VERSION 11.5 APPS WEB AGENT http://myserver.acme.com:8002/pls/VIS To fully test the configuration of the Oracle HTTP Server, you can bring up the Rapid Installation Index Page , by requesting the following URL: http://<server>.<domain>:<port> for example, http://myserver.acme.com:8002, and then selecting ”Apps Logon Links” from this page. This launches the Oracle Application Login page from which you can login as an Oracle Applications User, such as SYSADMIN. Note: More information on the operation of apachectl can be found in the manual Oracle HTTP Server. Refer to the section titled ”Secure Sockets Layer Configuration” in this guide for more information on the operation of the ”startssl” argument. Windows To test the status of the Apache Server on Windows, point your browser at the server URL, for example: http://myserver.acme.com:8002/pls/VIS/FND_WEB.PING should result in the output FND_WEB.PING SYSDATE 08–DEC–2001 06:37:24 DATABASE VERSION Oracle8i Enterprise Edition – Production DATABASE ID:vision SCHEMA NAME APPS AOL VERSION 11.5 APPS WEB AGENT http://myserver.acme.com:8002/pls/VIS Secure Sockets Layer Configuration Secure Sockets Layer (SSL) allows the Apache listener to encrypt HTML pages and transmit them on the network using the HTTPS protocol for secure transmissions. SSL uses an encrypting method called public key cryptography, where the server provides the client with a public key for encrypting information. The server’s private key is required to decrypt this information. The client uses the public key to encrypt and send G – 20 Oracle Applications System Administrator’s Guide information to the server, including its own key which identifies it to the server. In order for the Oracle HTTP Server, powered by Apache, to function in secure mode it is also necessary to utilize certificates which validate the server’s identity. These certificates are used to ensure that the owner of a public key is who they say they are. Typically you will want to use a private key with an officially signed certificate, validated by a Certificate Authority (CA). The CA validates the company details, sets expiration dates on the certificates and may place policies on what information is contained within the certificate. A number of CAs exist, and include such authorities as Verisign, RSA, and GTE CyberTrust. To obtain a CA approved certificate it is necessary to generate a certificate request, which includes details of the organization applying as well as the public key to be distributed, this is then sent to the CA, validated and returned. Authorities may also require proof of ownership of the company applying for the certificate, as well as proof of ownership of the domain name specified in the certificate request. Note: The task of obtaining a signed certificate is beyond the scope of this guide. Refer to the Oracle Advanced Security Administrator’s Guide for more information on the use of certificates in an Oracle environment. Refer to http://www.modssl.org for more information on the SSL module for Apache. It is possible to generate a self–signed certificate that can be used to test SSL operation. Most browsers are configured to accept certificates from a number of recognized authorities. Receiving a certificate from an organization other than one of these will generate a warning, and the user will be prompted to accept or reject this certificate. A self–signed certificate will generate this warning. Creating a self–signed certificate The SSL module provides a utility called openssl which can be used to create a self–signed certificate. In order to generate a self–signed certificate perform the following steps: Temporary SSL Environment Setup Step 1: Create Random number file. Create a file containing a string of random numbers. The default path for this file is: Setting Up and Maintaining Oracle Applications G – 21 UNIX Windows $HOME/.rnd RANDFILE can be set with the Control Panel System Properties utility. The environment variable, RANDFILE, set in openssl.cnf can be used to specify the path to the file containing the random numbers. Step 2: Create a working directory to hold Apache’s private key, certificate request and test certificate. For example: $COMMON_TOP/admin/certs/apache Step 3: Create the private key (apache_1024.key). Set up a temporary environment variable OPENSSL_TOP, and set it to <iAS_Home>/Apache/open_ssl in UNIX and <iAS_Home>\Apache\open_ssl in Windows. From the working directory, type the following command to generate your RSA private key (apache_1024.key): $OPENSSL_TOP/bin/openssl genrsa –des3 –out apache_1024.key 1024 You will be prompted to enter the PEM pass phrase, which must be at least 4 characters in length. Remember this pass phrase; unless you decide to unencrypt your server key using step 4 below, you will be prompted to enter in the next step and each time you start up Apache in SSL mode. Step 4: Optionally, unencrypt the value of the server key. If this is done, you will not be prompted for the PEM pass phrase every time you start up the Apache web server (Note that if anyone gets this key they will be able to impersonate you on the net, so consider leaving it encrypted and entering the PEM pass phrase each time you start Apache). Copy the private key (apache_1024.key) that you created in step 3 above to a backup file (apache_1024.key.bak) then type the following command to invoke the RSA key processing tool: $ $OPENSSL_TOP/bin/openssl rsa –in apache_1024.key.bak –out \ apache_1024.key Note: On Windows, you must perform this step. This limitation will be fixed in Apache 2.0. G – 22 Oracle Applications System Administrator’s Guide Step 5: Edit the default openssl configuration file ($OPENSSL_CONF) so that it can be used to generate the certificate signing request. i. Locate the line that reads dir = ./demoCA and modify this line to point to the full directory path where the directory of your key and request file are located (the directory created in step 2 above). ii. On Windows, comment out the lines that set the RANDFILE, oid_file and oid_section variables: #RANDFILE =$ENV::HOME/.rnd #oid_file=$ENV::HOME/.oid #oid_section=new_oids Step 6: Set environment variable to point to openssl.cnf. In order for openssl to find the correct configuration file, an environment variable needs to be set. This variable is called OPENSSL_CONF and it should equal the path to the file openssl.cnf. For example: UNIX In a csh environment, the command could be % setenv OPENSSL_CONF /d5/part/ora/iAS/Apache/open_ssl/bin/openssl.cnf Windows OPENSSL_CONF can be set with the Control Panel Properties utility. If this variable is not set openssl will look for the file /usr/local/Apache/libexec/ssl/ssl/openssl.cnf on UNIX systems, or \usr\local\ssl\openssl.cnf on Windows systems. You will see an error stating that configuration information cannot be found if this file does not exist. Step 7: Generate the certificate signing request (CSR). From the working directory, type the following command to generate your CSR (apache_1024.csr) derived from the private key (apache_1024.key). $ $OPENSSL_TOP/bin/openssl req –config $OPENSSL_CONF \ –new –key apache_1024.key –out apache_1024.csr You will be prompted for the following: • Enter PEM pass phrase: Enter the pass phrase chosen in step 4. • Country Name (2 letter code) [AU] Setting Up and Maintaining Oracle Applications G – 23 State or Province Name (full name) [Some–State]: Locality Name (e.g., city) []: Organization Name (e.g., company) [Internet Widgets Pty Ltd]: Organizational Unit Name (e.g., section) []: • Common Name (e.g., YOUR name) []: Enter the fully qualified name of your server. For example: orl–sun.oracle.com • E–mail Address []: Enter your e–mail address. This is where the certificate will be sent. • Please enter the following ’extra’ attributes: These questions are optional. Now the working directory contains a private key (apache_1024.key) and a certificate request (apache_1024.csr). Both are text files containing encrypted information and can be viewed. The contents of certificate request be used in the next step. Step 8: Submit your certificate request (CSR) to your certificate authority(CA). The request process is generally explained in detail by your CA of choice. Go to the web site of your CA to follow their specific process for requesting a certificate. In the example here, a trial certificate is requested from Verisign. Go to www.verisign.com, to request a trial certificate. From Verisign’s home page, there should be a link for getting a trial certificate (if this is not obvious, search on ”trial certificate”) The Verisign web site will lead you through the steps of requesting your certificate. When asked to submit your CSR, paste the contents of your certificate request (apache_1024.csr) beginning with and including –––––BEGIN CERTIFICATE REQUEST––––– and ending with and including –––––END CERTIFICATE REQUEST––––– Click Submit, then enter the additional requested information, including your e–mail address again for the certificate. You should receive the certificate via e–mail within a couple of hours. Step 9: Create the certificate file. Once you have received your certificate, use your e–mail application to save the entire e–mail message to a text file. Name the file apache_1024. crt. It is very important to do this so that you do not corrupt your certificate by cutting and pasting from your e–mail G – 24 Oracle Applications System Administrator’s Guide application. In addition, you must use a text editor, rather than a word processing application for your editions to the resulting text file. If you have saved your e–mail message to a machine that is not your server, transfer the file over to the server and into the working directory ($COMMON_TOP/admin/certs/apache), for example, using ftp. In the working directory, open the file in a text editor and delete all the lines except for the certificate. The certificate consists of all lines beginning with and including –––––BEGIN CERTIFICATE––––– and ending with and including –––––END CERTIFICATE––––– Once your changes are made, save the file with the name apache_1024.crt. At this stage, if you are using a global server certificate, you will also have to retrieve the intermediate certificate which should be accessible via a URL in the e–mail that you receive containing your certificate. Transfer the file over to the server and into the working directory ($COMMON_TOP/admin/certs/apache), for example, using ftp. Save this intermediate certificate in a file named intermediate.crt. Configure Apache for SSL connections Configuring Apache for SSL connections using AutoConfig If you are AutoConfig enabled, run AutoConfig as described in OracleMetaLink Note 165195.1 after ensuring that the following parameters are correctly set in your context xml file: • set the %s_url_protocol variable to https • set the %s_local_url_protocol variable to https • set the %s_webssl_port variable to the Apache SSL port required • set the %s_web_ssl_directory variable to point to the full directory path of the directory that is to contain the .crt and .key files that you ar using for Apache, for example, <$COMMON_TOP>/admin/certs/apache Then perform the following steps: • create two directories in the s_web_ssl_directory, named ssl.crt and ssl.key Setting Up and Maintaining Oracle Applications G – 25 • copy your Apache .crt file in to the ssl.crt directory with a file name of server.crt • copy your Apache key file in to the ssl.key file with a file name of server.key Manual Steps for Apache configuration (for reference only) This section is for customers on Release 11.5.7 and earlier, who are not using AutoConfig. AutoConfig is required in Release 11.5.8. This section contains information on modifying configuration files and profiles that are maintained by the AutoConfig infrastructure. " Step 1: Determine which configuration file Apache is currently using. On UNIX, if you are not sure which configuration file Apache is currently using, open the file $APACHE_TOP/Apache/bin/apachectl and check the parameter HTTPD. If HTTPD is pointing to the httpds executable, then httpds.conf is being used, if HTTPD is pointing to the httpd executable, then httpd.conf is being used. Windows does not use the apachectl file. On these platforms, Apache is implemented through use of services. By default the apache service points to the httpd.conf file during startup. This is defined in an Oracle Applications environment through use of the adsvapc.cmd file in the admin\install directory in the Oracle Applications common top directory tree. If you are not sure which configuration file Apache is currently using, open the adsvapc.cmd file and check the value of the –f variable in the call to invoke Apache.exe. " Step 2: Back up the file httpds.conf before making any changes. Use the following commands: $ cd $APACHE_TOP/Apache/conf $ cp httpds.conf httpds.conf.BAK " Step 3: If Apache has up to now been using httpd.conf as the configuration file, copy httpd.conf as httpds.conf. Use the following command: $ cp httpd.conf httpds.conf " Step 4: Edit the SSL directives for Apache in httpds.conf. Decide on the port that you want Apache to use for SSL communication. Apache will listen both on the original non–SSL port G – 26 Oracle Applications System Administrator’s Guide that has already been configured as well as the new port you choose for SSL. The standard port for SSL communication is 443, but it need only be a free port on your server. Keep in mind that on UNIX, if you have chosen port 443 (or any port under 1024) for your SSL port, you will have to start Apache as root, otherwise you should connect as the oracle user. Open httpds.conf in an editor. a. Find the main section: ### Section 2: ’Main’ server configuration Find the subsection: ## SSL Support Ensure the <IfDefine SSL> block reflects your original non–SSL port for the first Listen directive and the chosen SSL port for the second Listen directive. For example: <IfDefine SSL> Listen 8800 Listen 443 </IfDefine> b. Find the main section: ### Section 3: Virtual Hosts Ignore the first (commented out) reference to ”VirtualHost_default_:”, but change the second reference to ensure your true choice for the SSL port is reflected in the line beneath the SSL Virtual Host Context Section: <VirtualHost_default_:443> Find the subsection: ## SSL Virtual Host Context Find and edit the DocumentRoot directive to point to your portal. For example (note the trailing slash): DocumentRoot ”/u08/app/oracle/viscomn/portal/” Find and edit the SSLCertificateFile directive to point to your server certificate (apache_1024.crt). For example: SSLCertificateFile /u08/app/oracle/viscomn/admin/certs/apache_1024.crt Setting Up and Maintaining Oracle Applications G – 27 Find and edit the SSLCertificateKeyFile directive to point to your private key (apache_1024.key). For example: SSLCertificateKeyFile /u08/app/oracle/viscomn/admin/certs/apache_1024.key If you are using global server certificates, find and edit the SSLCertificateChainFile directive to point to your intermediate certificate (intermediate.crt). For example: SSLCertificateChainFile /u08/app/oracle/viscomn/admin/certs/intermediate.key c. Save and close the file httpds.conf. " Step 5: Modify the Apache service to start up in SSL mode. On UNIX, to start Apache in SSL mode, the Apache control script (adapcctl.sh) in $COMMON_TOP/admin/scripts should be altered to invoke the httpdsctl script instead of the default apachectl script. Before this change can be made, it is necessary to customise and test the httpdsctl script as follows: Note: If AutoConfig has been used, then the Apache control script will be in the directory called $COMMON_TOP/admin/scripts/<context_name>. a. Backup the httpdsctl file before making any changes. $ cd $APACHE_TOP/Apache/bin $ cp httpdsctl httpdsctl.BAK b. Transfer the Oracle–specific environment that is set–up in the apachectl script to the httpdsctl script. The configuration section begins with the line: # |||||||||||||||||||| START CONFIGURATION SECTION|||||||||||||||||||| and ends with the line: # |||||||||||||||||||| END CONFIGURATION SECTION|||||||||||||||||||| Many of the lines in the configuration section can be copied from apachectl to httpdsctl, but there are also variables in this section that must be defined differently between starting in SSL vs. NonSSL mode, such as the variables PIDFILE (which should point to httpds.pid in the $APACHE_TOP/Apache/logs directory) and HTTPD (which should point to httpds in the $APACHE_TOP/Apache/bin directory, thus invoking the settings in the httpds.conf file). c. Save the changes that you have made to the httpdsctl script. G – 28 Oracle Applications System Administrator’s Guide Once you have transferred the necessary environment settings from apachectl to httpdsctl and checked your work carefully, save and close the file httpdsctl. d. Test the changes that you have made to the httpdsctl script file. Use the httpdsctl script to start Apache in SSL mode as follows: $APACHE_TOP/bin/httpdsctl startssl If your server key is encrypted, you will be prompted for the PEM pass phrase that you chose when creating your server’s private key. Also, if you have chosen the default port 443 (or any other port number less than 1024) for your SSL port, you will have to start Apache as root. Make sure that Apache can startup successfully before continuing. Ensure that there are spawned processes for Apache through use of the command ps –ef | grep util and that you successfully get an SSL connection to the default Apache banner screen using https:/<host.domain>:<SSL_port> where <host.domain> is the fully qualified name of the machine running Apache and <SSL_port> is the SSL port number defined in httpds.conf. e. Replace the call to apachectl with a call to httpdsctl in the control script that starts the Apache server. First, make a backup of $SCRIPT_TOP/adapcctl.sh $ cd $SCRIPT_TOP $ cp adapcctl.sh adapcctl.sh.BAK Then, edit the file adapcctl.sh in $COMMON_TOP/admin/scripts as follows: Find the line: $APACHE_TOP/Apache/bin/apachectl $control_code Change ”apachectl $control_code” to ”httpdsctl $control_code”, for example, $APACHE_TOP/Apache/bin/httpdsctl $control_code Save and close the file adapcctl.sh. On Windows, the Apache service should be configured to use SSL through use of the adsvapc.cmd file that is shipped with Oracle Applications in the admin\install directory in the Oracle Applications common top directory tree. Follow the instructions below to change the Apache service to run in SSL mode: a. Make a backup of the adsvapc.cmd file in your <CommonTopMountPoint>\admin\install directory. Setting Up and Maintaining Oracle Applications G – 29 b. Edit the adsvapc.cmd file as follows to use the httpds.conf file and the SSL definitions contained within it: Change: e:\oracle\prodcomn\util\OamkSvc.exe –si \ ”Oracle Apache Server PROD” –e –a –c ”e:\oracle\prodora\iAS\Apache\Apache\Apache.exe –f e:\oracle\prodora\iAS\Apache\Apache\conf\httpd.conf” to e:\oracle\prodcomn\util\OamkSvc.exe –si \ ”Oracle Apache Server PROD” –e –a –c ”e:\oracle\prodora\iAS\Apache\Apache\Apache.exe –D SSL –f e:\oracle\prodora\iAS\Apache\Apache\conf\httpds.conf” c. Deinstall the existing Apache service. From a command window run: adsvapc.cmd –deinstall (You may get an exiting with status 1 the first time this is run. Rerun it a second time and it should exit with status 0.) d. Install the modified Apache service. In the same command window run: adsvapc.cmd This should recreate the service with reference to httpds and will also use the SSL portions of that file. Test Startup of Apache and Oracle Applications Sign–On Start up the Apache server in SSL mode on UNIX by invoking adapcctl.sh (which will invoke the httpdsctl script) or on Windows NT/2000 by starting the Apache service. On UNIX, you can ensure that there are several spawned processes for Apache through use of the command ps –ef | grep util. On NT/2000, you should use the processes taskbar to check for Apache processes. If your server key is encrypted, you will be prompted for the PEM pass phrase that you chose when creating your server’s private key. Ensure that Apache can startup successfully before continuing and that you successfully get an SSL connection to the default Apache banner G – 30 Oracle Applications System Administrator’s Guide screen using https:/<host.domain>:<SSL_port> where <host.domain> is the fully qualified name of the machine running Apache and <SSL_port> is the SSL port number defined in httpds.conf. SSL Setup for Oracle Forms 6i Server (UNIX) Use Wallet Manager to create certificate In order for the forms server to run in https mode, you must use the Oracle Wallet Manager utility delivered with Developer 6i. Developer 6i is installed in the Oracle 8.0.6 Oracle Home on your server. All references to ORACLE_HOME in this section refer to the home for Oracle 8.0.6. " Create a working directory. Create a working directory to hold the Oracle Forms 6i Wallet, for example: $COMMON_TOP/admin/certs/forms " Start Wallet Manager. On UNIX, as the ORACLE user, 1. Change to the directory of your Oracle 8.0.6 $ORACLE_HOME. 2. Source the environment file [sid].env. 3. Set the DISPLAY variable to display to the IP address from where you are working. For example: $ export DISPLAY=192.168.0.x:0.0 where 192.168.0.x is the IP address of your workstation. 4. " Run owm, which is located in the 8.0.6 $ORACLE_HOME/bin directory. Create a new wallet and certificate request (CSR) Note: When you create a new wallet in Wallet Manager, this step of creating a CSR is the only way to enable the function of importing a User Certificate. (Operations > Import User Certificate). If a CSR has not been generated within a specific wallet, the option to import a User Certificate will remain disabled. (See comments in the OracleMetaLink note 123718.1 for additional details.) Setting Up and Maintaining Oracle Applications G – 31 1. Select Wallet > New. 2. Select No when prompted with the message: ”Your default directory doesn’t exist. Do you wish to create it now?” 3. In the New Wallet dialogue box, create a Wallet Password and click OK. Make sure you remember this password. You will be prompted for the password each time you open this wallet with Oracle Wallet Manager. 4. Select Yes when prompted with the message: ”A new empty wallet has been created. Do you wish to create a certificate request at this time?” 5. Fill out the fields in the Create Certificate Request dialogue box, for example: Common Name: <Fully qualified host name of your server> Organizational Unit: Organization: Locality/City: State/Province: Country: Key Size: 512 Note: If you are not on Oracle Forms version 6.0.8.10.3 or higher, the list of values for Key Size will only contain 512 bits. 6. Select OK when prompted with the message: ”A certificate was created. Please submit this to a Certificate Authority or you can use ’Export Certificate Request’ to export it into a file.” " Select Wallet and ensure that the Auto Login checkbox is checked. This ensures that the wallet is open to connect via SSL. " Select Wallet > Save As to save the new wallet. Save the wallet files to the working directory chosen for the wallet, for example: $COMMON_TOP/admin/certs/forms G – 32 Oracle Applications System Administrator’s Guide (Use the value of $COMMON_TOP, rather than the variable.) Two new files will be created in your wallet directory: • cwallet.sso –– Auto Login is checked; wallet is open • ewallet.der –– stores your certificate once imported " Submit your certificate request (CSR) to your certificate authority (CA) Within the Wallet Manager navigator window, highlight the Certificate: [Requested] branch of the Wallet. On the right hand side you will see your CSR in the Certificate Request window. This is the window you will cut and paste from when prompted by your CA. The request process is generally explained in detail by your CA of choice. Go to the web site of your CA to follow their specific process for requesting a certificate. The example described here uses a trial certificate from Verisign. Go to www.verisign.com, to request a trial certificate. From Verisign’s home page, there should be a link for getting a trial certificate (if this is not obvious, search on ”trial certificate”). The Verisign web site will lead you through the steps for requesting your certificate. When asked to submit your CSR, paste the contents of your CSR from Wallet Manager beginning with and including –––––BEGIN CERTIFICATE REQUEST––––– and ending with and including –––––END CERTIFICATE REQUEST––––– Click Submit. If you have created the certificate request with a 512 bit key size, Verisign will warn you that it has detected a 512 bit key size. As stated earlier, the 512 key size is the only option in Release 11i for Forms 6i versions below 6.0.8.10.3. Click Continue, then enter the additional requested information, including your e–mail address again for the certificate. You should receive the certificate via e–mail within several hours. " Create the certificate file. Once you have received your certificate, use your e–mail application to save the entire e–mail message to a text file. Based on the convention in this document, name the file forms_[key_size].crt, where [key_size] is the number of bits chosen in Wallet Manager when creating the Setting Up and Maintaining Oracle Applications G – 33 certificate request. For example, use forms_1024.crt if 1024–bit key size was chosen. It is very important to save the message as a text file so that you do not corrupt your certificate by cutting and pasting from your e–mail application. In addition, you must use a text editor, rather than a word processing application for your editions to the resulting text file. If you have saved your e–mail message to a machine that is not your server, transfer the file over to the server and into the working directory ($COMMON_TOP/admin/certs/forms), for example using binary ftp. In the working directory, open the file in a text editor (for example, vi) and delete all the lines except for the certificate. The certificate consists of all lines beginning with and including –––––BEGIN CERTIFICATE––––– and ending with and including –––––END CERTIFICATE––––– Once your editions are made, save the file, again with the name forms_[key_size].crt, for example, forms_1024.crt. " Import your User Certificate into Wallet Manager Back in Wallet Manager, Perform the following steps: 1. Navigate to Operations > Import User Certificate. 2. Select a file that contains the certificate and click OK. 3. Enter the full path of your working directory where you have stored your certificate file (forms_[key_size].crt), for example: $ COMMON_TOP/admin/certs/forms (Use the value of $COMMON_TOP, rather than the variable). 4. Highlight the certificate file (forms_[key_size].crt) and click OK. 5. The bottom status bar of Wallet Manager should display the message: ”Your certificate has been successfully imported.” 6. In the navigator window under Wallet, you can highlight the Certificate: [Ready] to see the unencrypted values of your certificate. G – 34 Oracle Applications System Administrator’s Guide Note: The following error message when attempting to import the User Certificate indicates that you are working with an unrecognized CA root certificate: ”User certificate import has failed because the CA certificate doesn’t exist. Do you want to import a CA certificate now?” This error occurs when Wallet Manager attempts to import your User Certificate, but does not recognize the digital signature of the CA who issued this certificate to you. Wallet Manager then offers you the option to import the CA certificate under the ”Trusted Certificates” branch of this Wallet, so that it can finish the proper import of your User Certificate. At this point, it is best to leave the error message above open on the terminal and continue with the installation of the CA root certificate that is a pre–requisite of importing the user certificate in Oracle Wallet Manager by following the certificate authority’s instructions to obtain an X.509 format *.cer file. then using it to import the digital certificate of your CA as trusted to successfully finish the import of your User Certificate. The bottom status bar of Wallet Manager should display the message: ”Your certificate has been successfully imported.” You should now be able to highlight Certificate: [Ready] in the navigator window under Wallet to see the unencrypted values of your certificate. Set up Forms Server environment Setting up the Forms Server environment using AutoConfig This section contains instructions to modify configuration files and profiles that are maintained by the AutoConfig infrastructure. Run AutoConfig as described in MetaLink Note 165195.1 or in the AD Utilities Reference Guide after ensuring that the variables that enable forms to connect in https mode are correctly set in your context XML file. No more steps are required in the current section. You can proceed with testing the startup of Oracle Forms 6i and Oracle Applications. Set the following SSL environment variables for Developer 6i Forms server by defining them somewhere below the setting of the ORACLE_HOME variable in the environment file for your 8.0.6 Oracle Home: $ORACLE_HOME/[sid].env: • FORMS60_WALLET: specifies the directory created for your wallet that holds the certificate used on the server, for example, $COMMON_TOP/admin/certs/forms Setting Up and Maintaining Oracle Applications G – 35 • FORMS60_HTTPS_NEGOTIATE_DOWN: specifies whether to allow the Forms Server to negotiate encryption down to the highest level supported by the client (TRUE) or to ensure that all encryption occurs at the level at which it is running (FALSE). This should be set to TRUE. On Windows NT/2000 platforms, these variables should also be set in the registry under \HK_LOCAL_MACHINE\SOFTWARE\ORACLE using the regedit or regedt32 command. Manual steps for setting the Forms Server environment The following steps are included for reference for customers on Release 11.5.7 and earlier. " Edit the FORMS60_WEB_CONFIG_FILE (appsweb.cfg) The FORMS60_WEB_CONFIG_FILE variable is defined in your $APACHE_TOP/Apache/conf/apps.conf file for Apache to use during the initial connection in order to spawn a forms session. It is defined for Release 11i to be $OA_HTML/bin/appsweb.cfg. This file must be edited to allow forms sessions in https mode. 1. Make a backup of the appsweb.cfg file in the Oracle Applications HTML bin ($OA_HTML/bin) directory tree. 2. Edit appsweb.cfg. 3. Find the connectMode parameter in the section: ; Forms Client–Server Communication Mode: socket, http, or https 4. Set the connectMode parameter to be https. For example: connectMode=https 5. Save and close the file appsweb.cfg. Note that this file should always be kept in synchronization with the version at $FND_TOP/resource/appsweb.cfg. Be sure any changes you make are reflected in both locations. " Amend the forms server process to startup in https mode For UNIX: In order for the forms server process to startup in https mode on UNIX, you must edit your forms server control script adfrmctl.sh under $SCRIPT_TOP directory. 1. G – 36 Make a backup of the forms startup script file in use ($SCRIPT_TOP/adfrmctl.sh). Oracle Applications System Administrator’s Guide For example, where <script_name> is the name of the forms startup script in use: $ cp $SCRIPT_TOP/<script_name> $SCRIPT_TOP/<script_name.BAK> 2. Edit the and change the command that invokes f60ctl to use mode https, for example: $ vi $SCRIPT_TOP/<script_name> Alter the line that starts with f60ctl start port=$FORMS_PORT mode=http exe=f60webmx to read f60ctl start port=$FORMS_PORT mode=https exe=f60webmx >> \ $FRMLOG 2>/dev/null 3. Save and close the forms startup script file. SSLLog/d5/part/ora/iAS/Apache/Apache/logs /ssl_engine_log For Windows NT/2000: On Windows NT/2000 platforms the forms server process is implemented through use of services. The forms service should be configured to use https through use of the adsvfrm.cmd file that is shipped with Oracle Applications in the admin\install directory in the Oracle Applications common top directory tree. Follow the instructions below to change the forms service to run in https mode: 1. Make a backup of the adsvfrm.cmd file in your <CommonTopMountPoint>\admin\install directory 2. Edit the adsvfrm.cmd file as follows to change the connect mode from socket to https: Change: <Applications COMMON_TOP>\util\OamkSvc.exe –si OracleFormsServer–Forms60<sid> –e –a –t –c ”<8.0.6 ORACLE_HOME>\bin\ifsrv60.exe –listen port=9000 mode=SOCKET log=<Applications COMMON_TOP>\admin\log\forms_server.log” to Applications COMMON_TOP>\util\OamkSvc.exe –si OracleFormsServer–Forms60<sid> –e –a –t –c ”<8.0.6 ORACLE_HOME>\bin\ifsrv60.exe –listen port=9000 mode=HTTPS log=<Applications COMMON_TOP>\admin\log\forms_server.log” 3. Deinstall the existing forms service. From a command window run: Setting Up and Maintaining Oracle Applications G – 37 adsvfrm.cmd –deinstall (You may get an exiting with status 1 the first time this is run. Rerun it a second time and it should exit with status 0.) 4. Install the modified forms service. In the same command window run: adsvfrm.cmd This should recreate the service using https. Note: Recreating the service in this way will reset the mode of the service in the registry. You can check the settings using the registry editor by running regedit or regedt32. 5. Change the ’Log on As’ property of the forms service from ’System’ to ’This Account’ with a Windows NT Administrator user on the host machine using Control Panel > Services. Then restart the service. Test Startup of Oracle Forms 6i Server and Oracle Applications For UNIX " Start up the forms servers. On UNIX, startup the forms metrics server (adfmsctl.sh) and forms metrics client (adfmcctl.sh) as usual. Use adfrmctl.sh to start up the forms server in https mode: $COMMON_TOP/admin/scripts/<context_name>/adfrmctl.sh start On Windows NT/2000, start the forms service using the control panel. " Make sure that the forms server has started successfully before continuing: On UNIX, check for a process for f60srvm and a process similar to f60webmx webfile= HTTPS9,4,PID20 which indicates that forms is running in HTTPS mode using the command: $ ps –ef | grep f60 On Windows NT/2000, check the services panel and task bar for forms server processes. " Test that you can connect to Forms (Core) Applications. Note: Using JInitiator 1.1.7.27 requires that the initial connection to the Web server must be via the non–SSL port to G – 38 Oracle Applications System Administrator’s Guide load the jar files. For more details, see OracleMetaLink Note 123718.1. " Step 4: Prepare the client for testing signon to Forms. 1. Refresh the client caches for the browser and JInitiator. The browser and JInitiator both have a mechanism for remembering activities that are performed repeatedly. In a production environment these mechanisms dramatically increase the performance of the client. However, when testing any changes made to the servers, we often want to start with a clean slate. For example, clean out the JInitiator cache files in c:\Program Files\Oracle\JInitiator 1.1.7.27 Export\jcache Exit your browser completely and start a new session. 2. Disable browser proxy settings. If your organization uses a firewall and the network administrator has not yet opened the necessary port in the firewall you will need to disable the browser proxy settings. 3. Enable JInitiator’s Java console Enabling JIniatitor’s Java console allows you to view all activity and errors for JInitiator for forms connections. " Test signon to Forms using one of the following URLs. For UNIX: http://[host.domain]:[port] /dev60cgi/f60cgi where [host.domain] is the fully qualified hostname of the machine running Apache and [port] is the non–SSL web listener port. Note: If the forms server is not starting successfully, or you cannot connect to Forms go over the above steps, checking for mistakes. Also, refer to OracleMetaLink Note 123718.1 ”A Guide to Understanding and Implementing SSL with Oracle Applications 11i” for more information. For Windows NT/2000: http://[host.domain]:[port] /dev60cgi/if60cgi Updating Profile options within Oracle Applications Once SSL has been enabled the Profile options within Oracle Applications can be configured to use https and the SSL port. Refer to other sections of this documentation on how to set Profile options. Setting Up and Maintaining Oracle Applications G – 39 Note: Any HTML files being served from this server can be modified to use the https protocol instead of http once Apache is operating in SSL mode. G – 40 Oracle Applications System Administrator’s Guide Administering the TCF SocketServer In Oracle Applications Release 11i (11.5.7 and higher) the TCF (Thin Client Framework) SocketServer is implemented as a servlet that runs within the Apache JServ engine framework. The TCF SocketServer enables certain Java components of the Oracle Applications user interface to communicate with the middle tier and database tier. These components include the AK Object Navigator, the Function Security Menu Viewer, BOM Flow Routing Network Designer, WIP Manufacturing Scheduling Workbench, and others. The TCF SocketServer process should always be running in a production installation. Prior to Release 11i (11.5.7 and higher) the TCF SocketServer was implemented as a standalone process. This new implementation does require that you have Apache and Apache Jserv installed. There are no additional manual steps required for the TCF SocketServer, assuming that the Apache installation is set up properly. However, there are some recommended steps related to the Apache configuration. First, you should check that the Apache JServ engine is configured properly to run servlets. Second, you should add the TCF SocketServer to the list of servlets that are started automatically when the Apache Jserv is started. For more details, see below. Check the Apache Jserv engine configuration If the AOL/J Setup Test is available you should run it to check that the Apache JServ engine is configured properly to run servlets. Assuming it is, the Applications Servlet Agent (APPS_SERVLET_AGENT) profile will already be set to point to a proper servlet zone. The TCF:HOST and TCF:PORT profile options should automatically be updated so that the TCF Socket Server uses the same zone. The profiles are only updated at the site level. If the Applications Servlet Agent profile is not set up to point to a servlet zone properly, check your Apache installation to see what servlet zones are defined. Typically, zones will be defined in the jserv.properties file; look also for ApJServMount calls in the jserv.conf file for zone aliases. The default zone for oracle servlets is expected to be called ’oa_servlets’. The Applications Servlet Agent profile (and the TCF:HOST profile) should look something like ’http://hostname:port/oa_servlets’. Setting Up and Maintaining Oracle Applications G – 41 See Also AOL/J Setup Test Suite: page G – 57 Profile Options in Oracle Application Object Library: page A – 2 Start the TCF SocketServer automatically One other recommended step is to add the TCF SocketServer to the list of servlets that are started up automatically when Apache Jserv is started. This prevents the first user of the Socket Server from having to incur the overhead of starting it up. To do this, find the <zone>.properties file corresponding to the servlet zone being used, and add the line: servlets.startup=oracle.apps.fnd.tcf.SocketServer to it. You will have to bounce your Apache server for any changes to Apache configuration files to take effect. If your setup is already correct, you may still need to bounce the server anyway depending on whether your Apache server is set up to load classes from the ’apps.zip’ file dynamically. Checking the status of the TCF SocketServer You can check the status of the TCF SocketServer using the TCF Status function on the AOL/J Diagnostics menu. To navigate to this menu, log in to Oracle Applications with the System Administration (Oracle Self–Service Web Applications) responsibility. The navigation path is Navigate region, Self–Service > System Administration > Diagnostics, AOL/J Diagnostics. Troubleshooting If you encounter the following issues when upgrading to the TCF servlet, you can make the appropriate changes in the Apache configuration files. • If you are getting an error message like ’Unable to establish a JDBC connection’, the issue most probably is that FND_TOP needs to be defined as an initial argument to the TCF servlet. Change the appropriate zone.properties file to include the line: G – 42 Oracle Applications System Administrator’s Guide servlets.default.initArgs=FND_TOP=<value of FND_TOP> • If you are running the Manufacturing Scheduling Workbench but are getting an ’Unexpected error java.lang.NullPointerException raised’ in the Jinitiator console, the problem is most likely that an ewt class used by the workbench needs to be available in the CLASSPATH of the servlet code. Make sure your jserv.properties file has a line like: wrapper.classpath=<8.0.6 oracle home>/forms60/java wrapper.classpath=<8.0.6 oracle \ home>/forms60/java/f60srv.jar Setting Up and Maintaining Oracle Applications G – 43 AdminAppServer Utility Because Release 11i is deployed in a multi–tier configuration, the security model includes authentication of application servers to the database servers they access. When this layer of security is activated, it uses ”server IDs” or passwords that the application server passes to the database server. If the database server recognizes the server ID, it grants access to the database. The server IDs are created using a Java script called AdminAppServer. The application server security system is initially not activated; you have to activate it after installation. The application servers are not assigned server IDs and the database servers do not check for server IDs. See Also Administering Server Security: page G – 51 Using the AdminAppServer utility The Java script AdminAppServer is used to create .dbc files and to enable or disable application server security. Prior to running AdminAppServer you must ensure that: • JDBC classes are in the CLASSPATH and LD_LIBRARY_PATH • $JAVA_TOP is in the classpath For UNIX platforms, the script is run as: java oracle.apps.fnd.security.AdminAppServer [parameters] For Windows platforms, the script is run as: jre –classpath %CLASSPATH% \ oracle.apps.fnd.security.AdminAppServer [parameters] The first parameter must be the connection string followed by the command string, for example: apps/apps@dbname ADD The following commands are supported: • ADD – create a new .dbc file • UPDATE – update an existing .dbc file • DELETE – delete an existing .dbc file G – 44 Oracle Applications System Administrator’s Guide • STATUS – check the serverID status for a database • AUTHENTICATION – toggle authentication mode Additional parameters depend on the operation. These include: • DBC – The .dbc file to modified, or used to connect to the database. Used with UPDATE, DELETE, STATUS, AND AUTHENTICATION. • SECURE_PATH – Used with ADD. This parameter specifies in which directory the .dbc file should be created, and defaults to the current directory if not provided. This parameter should always point to $FND_TOP/secure. • DB_HOST – Required in Release 11i. The host machine of database. • DB_PORT – Required in Release 11i. The port of database. The default is 1521. • DB_NAME – For thin drivers. The database SID. • APPS_JDBC_DRIVER_TYPE – THICK or THIN. This parameter must be set to THIN in Release 11i. • GUEST_USER_PWD – Any valid applications user. This parameter defaults to the value of GUEST_USER_PWD profile if not provided. If passed with no arguments to an UPDATE call, it will refresh with the value from database. • GWYUID – For thick drivers. • FNDNAM – For thick drivers. • TWO_TASK – For thick drivers. Name of database. • WALLET_PWD – Used with the TCF Socket Server in SSL mode. • SERVER_ADDRESS – Used with authentication. • SERVER_DESCRIPTION – Used with authentication. • FND_MAX_JDBC_CONNECTIONS – The maximum number of open connections in the JDBC connection cache. This number is dependent on the amount of memory available, number of processes specified in the init.ora file of the database and the per–processor file descriptor limit. • FND_IN_USE_CONNECTION_TIMEOUT – The maximum number of seconds a connection can be in use. In order to avoid connections being locked up for too long, the connection cache uses this parameter to forcibly close connections that have been locked for longer than this specified limit. If this parameter is Setting Up and Maintaining Oracle Applications G – 45 unspecified, connections in use will not be cleaned up. This should be set to a number larger than the time taken to complete the largest transaction. • FND_UNUSED_CONNECTION_TIMEOUT – The maximum number of seconds an unused connection can remain in the cache. The connection cache will close and remove from the cache any connection that has been idle for longer than this specified limit. ☞ Attention: In Release 11i, the following parameters are required: APPS_JDBC_DRIVER_TYPE (must be set to THIN), DB_HOST, and DB_PORT. Administering .dbc Files The .dbc file is contained on the web/applications server and holds information used by the database for authentication. The web/application server passes the information from the .dbc file, as well as login information, to the database server to authenticate the user. The authentication process is handled by the standard applications security feature. The .dbc files required by the application server security system are not part of the delivered product and must be created after installation. The Java utility AdminAppServer is used to create the .dbc files. Prior to running AdminAppServer you must ensure that: • JDBC classes are in the CLASSPATH and LD_LIBRARY_PATH • $JAVA_TOP is in the classpath Creating a .dbc file Use the AdminAppServer utility to create a .dbc file for the application server to access the database server. In addition to creating the .dbc file this utility registers the application server with the database for the Applications Server Security feature. To access additional database servers from the same application server, you must rerun the AdminAppServer utility for each additional database. You must run the AdminAppServer utility each time you create a .dbc file, and each .dbc file only allows access to one database. To create a .dbc file for an application server: 1. G – 46 You must set the username/password value for the GUEST_USER_PWD parameter. Create a valid username (”guest” Oracle Applications System Administrator’s Guide for example) in Oracle Applications. Then use the username/password combination as the value for GUEST_USER_PWD. The syntax is illustrated in the following example: GUEST_USER_PWD=guest/guest Oracle recommends that you do not assign any responsibilities for this user. 2. From the command line, enter the appropriate command for your platform: For UNIX platforms: java oracle.apps.fnd.security.AdminAppServer apps/apps@dbname \ ADD DB_HOST=database_host_name DB_PORT=database_port \ DB_NAME=database_sid \ [env_name=env_value] SECURE_PATH=$FND_TOP/secure For Windows platforms: jre –classpath %CLASSPATH% \ oracle.apps.fnd.security.AdminAppServer apps/apps@dbname \ ADD DB_HOST=database_host_name DB_PORT=database_port \ DB_NAME=database_sid \ [env_name=env_value] SECURE_PATH=$FND_TOP/secure GWYUID, FNDNAM, and GUEST_USER_PWD will be defaulted if not provided explicitly. dbc files should be located in $FND_TOP/secure, so SECURE_PATH should always be set to that, or this should be run directly out of of the $FND_TOP/secure area. Updating a .dbc file (or Server ID) When updating the .dbc file you can change as many parameters as you want, including the server ID, but you must enter at least one. Settings that you do not update retain their value. To update a .dbc file or server ID: Enter from the command line: UNIX java oracle.apps.fnd.security.AdminAppServer apps/apps@dbname \ UPDATE DBC=$FND_TOP/secure/file.dbc APPL_SERVER_ID \ [env_name=env_value] Windows jre –classpath %CLASSPATH% \ oracle.apps.fnd.security.AdminAppServer apps/apps@dbname \ UPDATE DBC=$FND_TOP/secure/file.dbc APPL_SERVER_ID \ [env_name=env_value] Setting Up and Maintaining Oracle Applications G – 47 If APPL_SERVER_ID is not passed, AdminAppServer will attempt to synchronize the current server ID value in the .dbc file and the database, generating a new one if neither contains a value at all. Passing in APPL_SERVER_ID by itself will force a brand new application server ID to be created always, overwriting any existing one. Note: You may need to run the AdminAppServer command if you are using a TCF SocketServer in SSL mode in an earlier release (11.5.5 or earlier). This command needs to be run specifying a wallet password, The command might look like (for UNIX): java oracle.apps.fnd.security.AdminAppServer apps/apps \ UPDATE DBC=$FND_TOP/secure/file.dbc WALLET_PWD=welcome Generating the wallet password is not required in 11.5.7 or later, as TCF runs in servlet mode and no longer requires it. Deleting a .dbc file To delete a .dbc file, enter on the command line: UNIX Windows java oracle.apps.fnd.security.AdminAppServer apps/apps@dbname \ DELETE DBC=$FND_TOP/secure/file.dbc jre –classpath %CLASSPATH% \ oracle.apps.fnd.security.AdminAppServer apps/apps@dbname \ DELETE DBC=$FND_TOP/secure/file.dbc This deletes the .dbc file and disallows access to the indicated database if Server Security is active. Troubleshooting The following are possible problems you may encounter and suggested solutions. " Database connection failed. Check to see if your JDBC environment is correct. See: AdminAppServer Utility: page G – 44. " File I/O error while adding the server. Check to see if the path you supplied as SECURE_PATH exists and that you have write permissions on it. G – 48 Oracle Applications System Administrator’s Guide " Unable to read environment file. A value for SECURE_PATH may not have been specified. If a value is not specified, the AdminAppServer utility assumes you are running from JAVA_TOP and looks for the file $JAVA_TOP/oracle/apps/env.html to find the value of FND_TOP. Retry the command specifying the value of SECURE_PATH. " Database error: Unique constraint violated. There can be only one entry for each application server per database. If you do not specify the value for SERVER_ADDRESS, the AdminAppServer utility will default the IP address of the machine from which you are running the command. To resolve this issue, run the STATUS command of AdminAppServer to ensure you are not trying to create a duplicate entry. Delete the old entry if you want to replace it. Retry, supplying the correct value for SERVER_ADDRESS. Setting Up and Maintaining Oracle Applications G – 49 Support for Encrypted Thin JDBC Connections Oracle Applications provides support for encrypted thin JDBC connections by allowing system administrators to set the thin driver client parameters described in the manual Oracle8i JDBC Developer’s Guide and Reference. Users can set these thin driver client parameters • oracle.net.encryption_client • oracle.net.encryption_types_client • oracle.net.crypto_checksum_client • oracle.net.crypto_checksum_types_client by setting their respective system properties in the jserv.properties file: • ENCRYPTION_CLIENT • ENCRYPTION_TYPES_CLIENT • CRYPTO_CHECKSUM_CLIENT • CRYPTO_CHECKSUM_TYPES_CLIENT Note that these parameters can also be set in the DBC file. If the values are set in the DBC file, they will override the jserv.properties settings. Valid values for the parameters are shown in the table below. Parameter Valid Values ENCRYPTION_CLIENT REJECTED, ACCEPTED, REQUESTED, REQUIRED ENCRYPTION_TYPES_CLIENT RC4_40, RC4_56, DEC40C, DEC56C CRYPTO_CHECKSUM_CLIENT REJECTED, ACCEPTED, REQUESTED, REQUIRED CRYPTO_CHECKSUM_TYPES_CLIENT MD5 Table 14 – 2 (Page 1 of 1) The following are example command lines to add to jserv.properties file: wrapper.bin.parameters=–DENCRYPTION_CLIENT=REQUESTED wrapper.bin.parameters=–DENCRYPTION_TYPES_CLIENT=RC4_40 wrapper.bin.parameters=–DCRYPTO_CHECKSUM_CLIENT=REQUESTED wrapper.bin.parameters=–DCRYPTO_CHECKSUM_TYPES_CLIENT=MD5 Please see the Oracle8i JDBC Developer’s Guide and Reference for more information about JDBC support for data encryption and integrity. G – 50 Oracle Applications System Administrator’s Guide Administering Server Security Oracle Applications Release 11i is deployed in a multi–tier configuration with one database server and many possible middle–tier application servers. The application servers include Apache JSP/Servlet, Forms, Discoverer and also some client programs such as Application Desktop Integrator. Any program which makes a SQL*Net connection to the Oracle Applications database needs to be trusted at some level. Oracle Applications uses the Server Security feature to ensure that such SQL*Net connections are coming from trusted machines and/or trusted programs. The Server Security feature of Application Object Library supports authentication of application server machines and code modules in order to access the database. When Server Security is activated, application servers are required to supply server IDs (like passwords) and/or code IDs to access a database server. Server IDs identify the machine from which the connection is originating. Code IDs identify the module and patch level from which the connection is originating. Code IDs are included in applications code by development. The database server can be set to allow access only from specific machines and/or by code at a desired patch level. The application server security feature is not initially activated. You should activate it by using the commands described in this section. Application Server Security can be OFF or in one of two active states: • OFF – Server security is not checked. Any application server machine can access the database. Code IDs are also not checked. Use this option on test systems or if you have full control over the software on all machines which can physically access your database. • ON – Some level of trust is required to access the database. Either the application server must be registered with the database or the code must pass a module and version ID known to be trusted. Use this option only if you wish to maintain compatibility with application servers that you cannot yet patch to the code level required for best security. • SECURE – Full trust is required for access to the database. Only registered application server machines may connect to the database, and only trusted code modules may connect to the database. Setting Up and Maintaining Oracle Applications G – 51 Server Security Status You can check the Server Security status for a particular database using the STATUS command in the AdminAppServer utility, and providing the dbc file corresponding to that database. The STATUS command will display whether server security is turned on and whether the server ID in the dbc file is currently valid. To check the Server Security status for a database: UNIX Windows java oracle.apps.fnd.security.AdminAppServer apps/apps \ STATUS DBC=<dbc file path> jre –classpath %CLASSPATH% \ oracle.apps.fnd.security.AdminAppServer apps/apps \ STATUS DBC=<dbc file path> ☞ Attention: Check the Server Security status of your databases before you activate server security and ensure that all desired application servers have been registered. Adding, Updating, or Deleting Server IDs Application servers can be registered as trusted machines with a