1
VirtualHub, User's guide
Table of contents
1. Introduction
..............................................................................................................................
1
2. Installation
................................................................................................................................ 3
2.1. Linux and USB ...................................................................................................................... 3
3. Configuring and testing the modules
........................................................................
3.1. Locating the modules ............................................................................................................
3.2. Testing the modules .............................................................................................................
3.3. Configuring modules .............................................................................................................
3.4. Upgrading firmware ..............................................................................................................
5
6
6
6
7
4. Using the VirtualHub as a gateway
............................................................................. 9
4.1. Limitations ............................................................................................................................. 9
5. Access control
..................................................................................................................... 11
5.1. Admin access ..................................................................................................................... 11
5.2. User access ........................................................................................................................ 12
5.3. Access control API .............................................................................................................. 12
6. Interaction with external services
............................................................................. 13
6.1. Configuration ...................................................................................................................... 13
6.2. User defined callback ......................................................................................................... 14
6.3. Yocto-API callback .............................................................................................................. 15
6.4. Cosm .................................................................................................................................. 15
7. Command line parameters
Index
............................................................................................
17
...............................................................................................................................................
19
1. Introduction
VirtualHub is a software destined mainly to manage USB modules conceived by Yoctopuce. It is a
kind of toolbox which aims at
• providing access to USB modules from languages, such as Javascript and PHP, which do not
allow you to control hardware layers of a computer.
• providing access to USB modules through a network connection, and this from all the available
languages.
• configuring and testing Yoctopuce USB modules.
• providing required connectivity for interaction between Yoctopuce devices and cloud-based
services.
The VirtualHub is not mandatory for driving Yoctopuce USB devices with programming languages
allowing to access to hardware layers, such as C++, Delphi, Python, Visual Basic, C#, Android, API ,
Command line API. With these languages Yoctopuce USB devices can be driven directly, you will
not even need a driver.
VirtualHub is available for Windows, Mac OS X, and Linux (both intel and ARM) operating systems. It
works in the same way on all three systems.
www.yoctopuce.com
1
2
www.yoctopuce.com
2. Installation
VirtualHub does not require a true installation. It is a simple executable file. Copy it wherever you
want, and run it from a command line. You do not need any driver.
Under Windows, if you do not wish to explicitly run VirtualHub each time you need it, you can install it
as a service: you only need to run it once with the -i option and VirtualHub launches itself
automatically each time the computer starts.
VirtualHub needs to save a few parameters, these parameters are saved in a .virtualhub.dat
file which located in the AppData directory of the user under Windows, in the homedir of the user
under Linux and Mac OS X. This behavior can be modified with the help of an option in the command
line.
2.1. Linux and USB
To work correctly under Linux, the VirtualHub needs to have write access to all the Yoctopuce USB
peripherals. However, by default under Linux, USB privileges of the non-root users are limited to read
access. To avoid having to run the VirtualHub as root, you need to create a new udev rule to
authorize one or several users to have write access to the Yoctopuce peripherals.
To add a new udev rule to your installation, you must add a file with a name following the "##arbitraryName.rules" format, in the "/etc/udev/rules.d" directory. When the system is
starting, udev reads all the files with a ".rules" extension in this directory, respecting the
alphabetical order (for example, the "51-custom.rules" file is interpreted AFTER the "50udev-default.rules" file).
The "50-udev-default" file contains the system default udev rules. To modify the default
behavior, you therefore need to create a file with a name that starts with a number larger than 50,
that will override the system default rules. Note that to add a rule, you need a root access on the
system.
In the udev_conf directory of the VirtualHub for Linux1 archive, there are two rule examples which
you can use as a basis.
Example 1: 51-yoctopuce.rules
This rule provides all the users with read and write access to the Yoctopuce USB peripherals. Access
rights for all other peripherals are not modified. If this scenario suits you, you only need to copy the
1 http://www.yoctopuce.com/FR/virtualhub.php
www.yoctopuce.com
3
2. Installation
"51-yoctopuce_all.rules" file into the "/etc/udev/rules.d" directory and to restart your
system.
# udev rules to allow write access to all users
# for Yoctopuce USB devices
SUBSYSTEM=="usb", ATTR{idVendor}=="24e0", MODE="0666"
Example 2: 51-yoctopuce_group.rules
This rule authorizes the "yoctogroup" group to have read and write access to Yoctopuce USB
peripherals. Access rights for all other peripherals are not modified. If this scenario suits you, you
only need to copy the "51-yoctopuce_group.rules" file into the "/etc/udev/rules.d"
directory and restart your system.
# udev rules to allow write access to all users of "yoctogroup"
# for Yoctopuce USB devices
SUBSYSTEM=="usb", ATTR{idVendor}=="24e0", MODE="0664", GROUP="yoctogroup"
4
www.yoctopuce.com
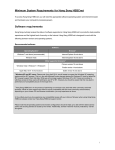
3. Configuring and testing the modules
VirtualHub allows you to test and configure your Yoctopuce modules. To do so, make sure that you
have VirtualHub running on the computer to which your modules are connected, then open your
favorite web browser1. Get an HTTP connection to port 4444 of the machine on which VirtualHub is
running. If it is the local machine, use the http://127.0.0.1:4444 address. The list of your
connected modules should appear.
VirtualHub web interface
1
The VirtualHub interface is regularly tested with Internet Explorer 6+, Firefox 3.5+, Chrome, and Safari. It does not work
with Opera.
www.yoctopuce.com
5
3. Configuring and testing the modules
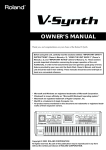
3.1. Locating the modules
The main interface displays a line per connected module; if you have several modules of the same
model, you can locate a specific module by clicking on the corresponding beacon button: it makes
the blue led of the module start blinking and displays a blue disk at the beginning of the
corresponding line in the interface. Pressing the Yocto-button of a connected module has the same
effect.
Yocto-button (1) and localization led (2) of the Yocto-Demo module. These two elements are always placed in the
same location, whatever the module.
3.2. Testing the modules
To test a module, simply click on the serial number of a module in the interface, a window specific to
the module opens. This window generally allows you to activate the main functions of the module.
Refer to the User's guide of the corresponding module for more details 2.
"Details" window of the Yocto-Demo module.
3.3. Configuring modules
You can configure a module by clicking on the corresponding Configure button in the main interface.
A window, specific to the module, then opens. This windows allows you minimally to assign a logical
name to the module and to update its firmware. Refer to the User's guide of the corresponding
module for more details.
2 VirtualHub
does not need to be more recent than the module you want to test and configure: all the elements specific to the
module interfaces are kept in the module ROM, and not in VirtualHub.
6
www.yoctopuce.com
3. Configuring and testing the modules
"Configuration" window of the Yocto-Demo module.
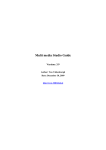
3.4. Upgrading firmware
The Yoctopuce modules are in fact real computers, they even contain a small web server. And, as all
computers, it is possible to update their control software (firmware). New firmware for each module
are regularly published, they generally allow you to add new functionalities to the module, and/or to
correct a hypothetical bug3.
Recommended method
To update a module firmware, you must first get the new firmware. It can be downloaded from the
module product page on the Yoctopuce web site4. The interface offers also a direct link if it detects
that the firmware is not up-to-date 5. Firmware is available as .byn files of a few tens of kilobytes.
Save the one you are interested in on your local disk.
Firmware update window.
Once the firmware file is locally available, open the module configuration window and click on the
upgrade button. The interface asks you to select the firmware file you wish to use. Enter the file
name and click on Upload. From then on, everything is automatically performed: VirtualHub restarts
the module in "update" mode, updates the firmware, then restarts the module in normal mode. The
module configuration settings are kept. Do not disconnect the module during the update process.
Alternative method 1
If a module update went wrong, in particular if the module was disconnected during the update
process, there is a strong risk that it does not work anymore and that it does not appear in the
module list. In this case, disconnect the module, wait a few seconds, and reconnect it while keeping
the yocto-button pressed. This starts the module in "update" mode. This working mode is protected
against corruptions and should always be accessible. When the module is reconnected, request a
refresh of the module list in the VirtualHub interface and your module should appear at the bottom of
the interface. Click on it to update its firmware. This update method is a recovery method, it does not
preserve the module settings.
3 Never trust people telling you that their software does not have
4 www.yoctopuce.com
5 On the condition that the interface could access the Yoctopuce
www.yoctopuce.com
bugs :-)
web site.
7
3. Configuring and testing the modules
The modules in "update" mode are listed in the interface.
Alternative method 2
You can also update a module firmware by using the VirtualHub in command line. Connect the
module while pressing its yocto-button and then run the following command line:
virtualhub -f serial_number firmware_file.byn
Note that this requires you to know the serial number of your module. This update method is a
recovery method, it does not preserve the module settings.
8
www.yoctopuce.com
4. Using the VirtualHub as a gateway
The less spectacular, but nevertheless the most useful function of VirtualHub consists in providing a
network gateway to control the modules. Firstly, it provides an access to languages such as
Javascript which, by nature, prevent you from accessing the physical resources of a machine.
Secondly, it provides access to the modules through the network for all languages: Yoctopuce
libraries are indeed able to connect themselves to VirtualHub through the network.
To use VirtualHub as a gateway, you need only to run it in a command line or as a service on the
machine on which the modules that you want to control are connected. Applications wanting to
connect themselves to VirtualHub must initialize the API by calling the yRegisterHub function with
the IP address of the machine running VirtualHub, the default port is 4444. For example:
yRegisterHub("http://192.168.1.6:4444",errmsg);
If the application and VirtualHub run on the same machine, use the 127.0.0.1 address. Refer to the
programming API documentation1 for more details.
4.1. Limitations
Yoctopuce USB modules have a limitation: on a given machine, you can have only one application at
a given time that natively controls them. And it so happens that VirtualHub counts as a native
application. Therefore, if you try to run an application which natively controls Yoctopuce USB
modules, make sure that VirtualHub is not running, neither in a command line, nor as a service.
Note that from a programming standpoint, you can easily work around this limitation by making sure
that your application uses VirtualHub as a gateway to control the modules, rather than controlling
them directly. To do so, you only need to change one parameter when calling yRegisterHub.
1 http://www.yoctopuce.com/EN/libraries
www.yoctopuce.com
9
10
www.yoctopuce.com
5. Access control
The VirtualHub is able to perform access control to protect your Yoctopuce devices. Click on the
Configure button on the line matching the VirtualHub in the user interface.
Click on the "configure" button on the first line
Then the configuration window for the VirtualHub will show up
The VirtualHub configuration window.
Access control is can be configured from the Incoming connections section. There are two levels of
access control
5.1. Admin access
The admin access locks write access to the yoctopuce devices. When the admin password is set,
only users using the admin login will be allowed to configure the devices seen by the VirtualHub.
www.yoctopuce.com
11
5. Access control
5.2. User access
The user access locks read access to the Yoctopuce devices. When set, the user password prevent
any user from consulting any device properties without the proper credentials.
If you configure an admin access, without configuring a user access, users will still be able to read
your devices values without any password, but they wont be able to change any device setting.
5.3. Access control API
Warning, the access control have an impact on Yoctopuce API behavior when trying to connect to a
VirtualHub with access control enabled. With Yoctopuce API, access control is handled at
RegisterHub() level. You need to to provide the VirtualHub address as follow:
login:password@adresse:port, here is an exemple:
yRegisterHub("admin:[email protected]:4444",errmsg);
If you forget your VirtualHub password, the only way to regain control of your VirtualHub is to delete
the VirtualHub configuration file (.virtualhub.dat).
12
www.yoctopuce.com
6. Interaction with external services
The VirtualHub software can publish the state of connected devices on any Web server, using an
HTTP POST. The values are posted on a regular basis and each time one of them changes
significantly. This feature will allow you to interface your Yoctopuce devices with many web service.
6.1. Configuration
To use this feature, just click on the configure button located on the line matching the VirtualHub on
the main user interface. Then look for the Outgoing calback section and click on the edit button.
Just click on the "configure" on the first line.
Then edit the "Outgoing callbacks" section.
The callback configuration window will show up. This window will allows you to define how your
virtual hub will interact with an external web site. Several interaction types are at your disposal.
www.yoctopuce.com
13
6. Interaction with external services
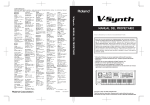
6.2. User defined callback
This is the most generic type. this allows to fully customize the way the VirtualHub will interact with
an external web site. You need to give the URL of the web server where you want the VirtualHub to
post data. Note that only HTTP protocol is supported (no HTTPS).
The callback configuration window.
If you want to secure access to your callback script, you can setup a standard HTTP authentication.
The VirtualHub knows how to handle standard HTTP authentication schemes: simply provide the
user and and password fields needed to access the URL. Both Basic and Digest authentication are
supported. However, Digest authentication is highly recommended, since it uses a challenge
mechanism that avoids sending the password itself over the Internet, and prevents replays.
The VirtualHub posts the advertised values1 on a regular basis, and each time one of these values
significantly change. You change change the default delay between callbacks calls.
Tests
The VirtualHub can help you to debug the scripts run by the web server each time a callback is sent.
Click on the test button (once all required fields are filled), and look at the output of your script as it is
run. When the result meets your expectations, close the debug window and then click on the "OK"
button.
Format
Values are posted with the following format:
1. If the function has been given a logical name:
FUNCTION_NAME = VALUE
2. If the module has been given a logical name, but not the function:
MODULE_NAME#HARDWARE_NAME = VALUE
3. If no logical name was set:
SERIAL_NUMBER#HARDWARE_NAME = VALUE
1 Advertised
14
values are the ones you can see on the VirtualHub main interface when you click on the show functions button.
www.yoctopuce.com
6. Interaction with external services
Here is a little PHP script allowing you to visualise the data posted by the call back and the result in
the debug window:
<?php
Print(Date('H:i:s')."\r\n");
foreach ($_POST as $key=>$value) {
Print("$key=$value\r\n");
}
?>
Callback results with a Yocto-PowerRelay and a Yocto-Temperature.
6.3. Yocto-API callback
The PHP yoctopuce API is able to work on callback mode. This way, a PHP script can gain control of
Yoctopuce devices installed behind a NAT filter without having to open any port. Typically, this allows
to control Yoctopuce devices from a public web site when the VirtualHub is running on a LAN behind
a private ADSL router. The VirtualHub will then act as a gateway. All you have to do is to define the
PHP script URL and, if applicable, the credentials needed to access it. You will find more information
about this callback mode in your Yoctopuce devices user manual.
6.4. Cosm
Cosm2 is a free cloud based service allowing to draw graphs. You can interface your Yoctopuce
sensors with Cosm without having to write a single line of code. To achieve that, You need to create
a Cosm account, then to define a feed ID and a Cosm API key. Then enter those two parameters in
the VirtualHub user interface. That's it. If needed you will find more informations about Cosm on
Yoctopuce's Blog3. Yoctopuce is not affiliated to Cosm.
2 www.cosm.com
3 http://http://www.yoctopuce.com/EN/article/connect-your-sensors-to-the-cloud
www.yoctopuce.com
15
16
www.yoctopuce.com
7. Command line parameters
VirtualHub accepts several parameters in the command line.
-h : help
Forces VirtualHub to display a short help.
-c : configuration file
By default, VirtualHub stores its configuration file in AppData under Windows, and in the Home
directory under Linux and Mac OS X. This option allows you to change this location. For example:
>virtualhub -c C:\tmp\mysetting.bin
-p : port modification
By default, VirtualHub uses TCP port 4444, this option allows you to use another one. For example:
>virtualhub -p 8889
-v : version
Displays the VirtualHub version number. For example:
>virtualhub -v
Version v1.0 (4237)
-i : service installation
Under Windows, VirtualHub can work as a service, this option installs the service and starts it. Thus,
VirtualHub is always available, even if the machine restarts.
-u : service uninstallation
Uninstalls the service previously installed with the -i option (Windows only).
-d : starting as a service/deamon
Under Linux starts VirtualHub in background mode.
www.yoctopuce.com
17
7. Command line parameters
-f : firmware update
Updates the firmware of a Yoctopuce module.To do so you need to know the serial number of the
module and to have a .byn file locally available. These firmware files are available in the product
pages on the Yoctopuce web site. Command line example:
>virtualhub -f serial_number firmware_file.byn
-o : osControl feature activation
Adds the osControl feature to the VirtualHub. This features allows to remotely shut down the
computer running the VirtualHub using the Yoctopuce API.
-A : automatic firmware update
Updates the firmware of all connected Yoctopuce module compatible with the firmware file given.
firmware files are available in the product pages on the Yoctopuce web site. Command line example:
>virtualhub -A firmware_file.byn
18
www.yoctopuce.com
Index
A
L
Access 11, 12
Admin 11
Limitations 9
Linux 3
Locating 6
C
Callback 14, 15
Command 17
Configuration 13
Configuring 5, 6
Cosm 15
D
Defined 14
E
External 13
F
Firmware 7
G
M
Modules 5, 6
P
Parameters 17
S
Services 13
T
Testing 5, 6
U
Upgrading 7
User 12, 14
Gateway 9
V
I
VirtualHub 9
Installation 3
Interaction 13
Introduction 1
Y
Yocto-API 15