1
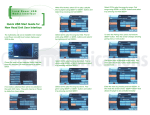
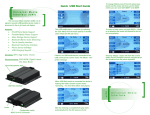
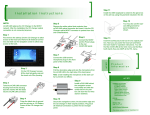
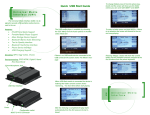
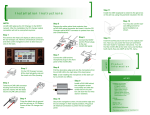
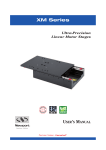
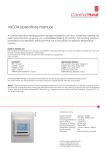
Step 11 Installation Instructions Install the USB receptacle to extend to the glove box or the ash tray using the grommet included in the kit. Step 12 NOTE: Step 5 mCar replaces the CD Changer in the MOST network. After the installation the CD changer optical connection will not be connected anymore. Remove the white optical dust protector from UMI optical connector and insert it into the CD Changer optical MOST connector to protect from dust and contaminations. You may also use the special USB grommet for panel installation as shown. Step 1 Step 6 First remove the head unit display to allow access to the CD changer unit. Remove all electrical connectors and slide out the navigation screen to allow easy access to the back. Connect the MOST and the Power plugs to the rear UMI panel. Step 13 Insert the ashtray back and lock it to its original position. Now you can power the head unit and follow the User Guide for operation instructions. You will find the UMI at the CDC menu and the Bluetooth hands free and A2DP at the TEL menu. Step 7 Connect the USB and the microphone plugs to the front panel of the UMI. Step 2 On the CD Changer harness lift the lock tab gently and pull the insert out of the housing. Product Information Step 8 Pull the decorative edge and wire the microphone from the UMI to the right side of the dash panel. Note: avoid installing the microphone in the dash cavity to prevent eco effects. Step 9 Step 3 Install UMI behind the navigation screen horizontally and slide the screen back to its position. Be sure that no wires stand in between. Take the UMI connector housing from the kit and plug back the inserts with the leads into the UMI connector. Step 4 Step 10 Crimp the black wire to ground and the red wire to 12V Battery Power off the CD changer harness. Secure the navigation screen, the decorative edge and the CD Changer in their original positions. Plug back all electrical connectors to power the CD Changer panel. Land Rover 0HGLD Installation Kit includes: UMI module 2+4 MOST Harness MOST inline connector Power Supply Harness USB Extension Cable Cigarette lighter grommet Microphone w/ 2.5mm jack Velcro/Adhesive Pad FCC ID: TQ6BTMDC751 Weight: 350g Size: 6” x 9” x 2” Product References This device contains FCC ID TQ6BTMDC751 Land Rover USB Media Interface OFF 1 DIP Switch Settings - Device Configuration Modes Find the configuration switch on the rear right side of the panel by the MOST optical plug. Ground ON 2 3 Battery Power 4 - USB Media Player and iPod/iPhone iAP interface - (A2DP) BT Audio Streaming and Media Controls - USB Accessory Charging ON OFF 1 2 3 4 MOST 4+2 FOT Connector Plug pinout is shown below looking from the rear side. Reserved - USB Media Player and iPod/iPhone iAP interface - (A2DP) BT Audio Streaming and Media Controls - Phone Menu Support and Phone Book Download Configuration switch Unplug the device and configure the settings when the unit is not powered. Then reconnect and power the unit. FOT RX line ON OFF 1 Battery Power 2 3 4 - (A2DP) BT Audio Streaming and Media Controls - Phone Menu Support and Phone Book Download - USB Accessory Charging ON FOT TX line Line Diagnostics OFF 1 The table above shows the configuration option applicable to the available hardware 2 3 Battery ground 4 - Phone Menu Support and Phone Book Download - USB Accessory Charging www.carcommunications.co.uk Quick USB Start Guide To change songs press SEEK+ or SEEK- from the head unit panel. The song name will update and the song will start playing immediately mCar.LR The mCar is an integrated iPod/ USB music and Bluetooth telephone device for Land Rover and Range Rover vehicles. mCar also allows for wireless music streaming to the vehicle head unit and sound system. The USB media player is available by selecting the Audio Video tab from the Home screen of the Land Rover Head Unit and the DC tab To change directories on the disk press < or > from the mid screen display. The directory will change and the first song name will display Features: iPod/iPhone Media Support Portable Media Player Support Mass Storage Device Support Bluetooth Stereo Audio Streaming Text to Speech interface Bluetooth Hands free Interface Phone Device Interface USB Charging Support If there is no USB media device connected to the USB connector the screen shows “No Media” Decoding: MP3, Ogg Vorbis, iTunes Pressing CD features button the screen will show options for playing the songs, random, repeat or scan 2.5mm Microphone Jack When USB flash media is connected the device is loading the content and the screen shows “Loading” before start playing USB Host Interface Power Configuration switch MOST 2+4 FO Connector When media is found the player is indexing the folders and the screen shows “Scanning ...” for short time before start playing www.carcommunications.co.uk To enter Phone menu press screen changes to phone menu button until the To write a message to another phone subscriber select the messaging button and type the message mCar.LR Quick Phone Pairing Guide To pair a phone to the HU select the CD6 button That will enter the Pairing menu as shown on the screen below When the phone is paired field strength bars are shown on the phone menu screen. The phone book downloads in approximately a minute, depending on how large the phonebook is To access the phone book select the phone book button. To call a number from the phone book select the name and press the dial button Press and hold SEEK+ to enter the Bluetooth pairing sub menu. Different pairing options are available as example “Pair new device” Select the messaging button to see the dialled, missed, received calls menu or to write instant message Shortcut to delete and pair command is available from the phone menu by typing **3 and then press the call button Scroll with SEEK+ or SEEK– to select the right action from the available choices to either pair new device or delete all and pair a device Selecting any of the buttons above including the phone book displays the phone numbers as shown below Shortcut to pair new phone command is available from the phone menu by typing **7 and then press the call button Land Rover USB Media Interface To enter the Pairing menu press and hold the SEEK+ button. Then the screen changes showing pairing menu in mid section To go to the next sub menu press SEEK+. The second sub menu of the settings menu is the Bluetooth software version Scroll the submenus with SEEK+ and SEEK– buttons. To select a sub function press and hold SEEK+, to exit SEEK- Scroll with SEEK+ to the next sub menu. The third menu is privacy mode. This menu allows turning the text to speech on and off Quick CD6 Menu Guide Power the head unit and selected Audio Video tab from the Welcome LR Head unit menu as shown below If no media is attached there will be no selection in the audio CDC menu. The audio may be on Pause by default as shown below The next high level menu after pairing is the settings menu. You can enter the settings by press and hold SEEK+ To turn the speech ON during incoming call and outgoing call scroll with SEEK+ to the Speech ON menu and press and hold SEEK+ Press CD6 button to switch to the functions available in the More menu. The pairing menu is the default top level menu when in CD6 mode The screen changes showing the settings in mid screen. First sub menu of the settings menu is the media player software version To turn the speech OFF during incoming call and outgoing call scroll with SEEK+ to the Speech OFF menu and press and hold SEEK+ Quick CD6 Menu (Continue) If already in CD6 (More) menu and screen shows settings menu, scroll with SEEK+/SEEK– between the service menus of the media player The fourth menu is Bluetooth audio menu. This menu sets the device in direct audio streaming control mode Enter the menu by pressing and hold SEEK+. In this mode the screen shows -SEEK<>SEEK+ that allows the player to be controlled remotely The fifth menu down is the iPod player mode menu. The screen of the iPod can be unlocked using those functions To lock the iPod screen select the player lock and press and hold SEEK+ Select CD2 to play the songs by Artist. Find an artist using SEEK+ or SEEK– buttons and select it by pressing and hold SEEK+ To unlock the iPod screen select the player unlock and press and hold SEEK+ Select CD3 to play the songs by Album. Find an album using SEEK+ or SEEK– buttons and select it by pressing and hold SEEK+ When the iPod is unlocked cannot be controlled anymore from the HU screen and the screen shows iPod audio streaming Select CD4 to play the songs by Genre. Find genre using SEEK+ or SEEK– buttons and select it by pressing and hold SEEK+ When iPod not locked, select CD1 to play a playlist. Find a playlist using SEEK+ or SEEK– buttons and select it by pressing and hold SEEK+ www.carcommunications.co.uk Land Rover USB Media Interface When iPod locked, select CD1 to play a playlist. Find a playlist using SEEK+ or SEEK– buttons and select it by pressing and hold SEEK+ Select CD5 to play the songs by songs. Find songs using SEEK+ or SEEK– buttons and select it by pressing and hold SEEK+ Select CD2 to play the songs by Artist. Find an artist using SEEK+ or SEEK– buttons and select it by pressing and hold SEEK+ To enter the Pairing menu press and hold the SEEK+ button. Then the screen changes showing pairing menu in mid section Select CD3 to play the songs by Album. Find an album using SEEK+ or SEEK– buttons and select it by pressing and hold SEEK+ The fourth menu is Bluetooth audio menu. This menu sets the device in direct audio streaming control mode Select CD4 to play the songs by Genre. Find genre using SEEK+ or SEEK– buttons and select it by pressing and hold SEEK+ Enter the menu by pressing and hold SEEK+. In this mode the screen shows -SEEK<>SEEK+ that allows the player to be controlled remotely Quick USB Start Guide for New Head Unit User Interface The multimedia unit can be installed in the newest Land Rover cars with touch screen display year 2009 to date Power the head unit and selected Audio Video tab from the Welcome LR Head unit menu as shown below If no media is attached there will be no selection in the audio CDC menu. The audio may be on Pause by default as shown below The fifth menu down is the iPod player mode menu. The screen of the iPod can be unlocked using those functions Enter the menu by pressing and hold SEEK+. In this mode the screen shows -SEEK<>SEEK+ that allows the player to be controlled remotely If already in CD6 (More) menu and screen shows settings menu, scroll with SEEK+/SEEK– between the service menus of the media player To turn the speech ON during incoming call and outgoing call scroll with SEEK+ to the Speech ON menu and press and hold SEEK+ Scroll with SEEK+ to the next sub menu. The third menu is privacy mode. This menu allows turning the text to speech on and off The screen changes showing the settings in mid screen. First sub menu of the settings menu is the media player software version To turn the speech OFF during incoming call and outgoing call scroll with SEEK+ to the Speech OFF menu and press and hold SEEK+ To lock the iPod screen select the player lock and press and hold SEEK+ Universal Media Interface Quick CD6 Menu Guide New Head Unit User Interface To go to the next sub menu press SEEK+. The second sub menu of the settings menu is the Bluetooth software version The fourth menu is Bluetooth audio menu. This menu sets the device in direct audio streaming control mode To unlock the iPod screen select the player unlock and press and hold SEEK+ To enter Phone menu press button until the screen changes to phone menu Shortcut to pair new phone command is available from the phone menu by typing **7 To pair a phone to the HU select the CD6 button That will enter the Pairing menu as shown on the screen below When the phone is paired field strength bars are shown on the phone menu screen. The phone book downloads in approximately a minute Shortcut to delete and pair command is available from the phone menu by typing **3 and then press the call button Press and hold SEEK+ to enter the Bluetooth pairing sub menu. Different pairing options are available as example “Pair new device” Select the messaging button to see the dialled, missed, received calls menu or to write instant message To pair a phone to the HU select the CD6 button That will enter the Pairing menu as shown on the screen below Scroll with SEEK+ or SEEK– to select the right action from the available choices to either pair new device or delete all and pair a device Selecting any of the buttons above including the phone book displays the phone numbers as shown below When there is an incoming call a menu screen pops up on the Head unit and speech confirmation announces the caller Universal Media Interface Phone Pairing Guide for New Head Unit Interface An update takes about 30 seconds. After the update is completed the head unit will refresh the screen and will show the initial screen The screen will show “BT Software Update” and the track timing will show the progress 0 to 99 on the minutes and 0 to 05 on the seconds Extract the umia2lr.bin file to the top directory of a USB flash drive. The file should appear as shown below To update the Bluetooth software insert a USB flash drive with umi.dfu update file in the USB connector and the update will start immediately An update takes about 7 minutes. After the update is completed the head unit will reset and the screen return to the initial CD screen Power the head unit and make sure that the media interface is running and is selected from the Audio CD menu as shown below: The screen will show “BT Software Update” and the track timing will show the progress 0 to 99 on the minutes and 0 to 05 on the seconds To check if the software is updated select CD6 and scroll with SEEK+ until see the Settings menu. Press and hold the SEEK+ to enter Plug the USB flash drive in the USB connector and the update will start immediately. A screen message will show “Updating Software” The screen will show “BT Software Update” and the track timing will show the progress 0 to 99 on the minutes and 0 to 05 on the seconds Initial screen will show media player software revision and the next SEEK+ press will show the Bluetooth software revision Land Rover USB Media Interface Quick Software Upgrade Procedure Configure the UMI module: Use configuration file to setup the unit in different modes Universal Multimedia Interface Hidden Features (Only for Installers) Manufacturing settings reset: To reset the unit to its manufacturing settings set the jumper 4 in ON position and reset the power to the unit. ON OFF 1 2 3 4 After the units restarts and available on the CDC menu tab return the jumper 4 to OFF position to prevent further initializations. The settings can be found in the Settings menu under CD6 (More) menu The default manufacturing settings are as follow: Feature Default Setting Bluetooth Device Name CarMedia World Region ANY Microphone Gain 1 Text to speech volume 4 To configure the unit a simple configuration file under the name config.txt needs to be created. There are 4 available options that can be configured with the configuration file: Bluetooth device name, Microphone gain, Text to speech volume and head unit region settings. An Example of simple configuration file that sets the unit to its default settings is given below: 1:CarMedia /Bluetooth Name 2:1 //Microphone Setting 3:4 //TTS Setting Unit name: Maximum of 10 characters. The 11th character onwards will be ignored. Format: 1:<BT Name> Loading the configuration file: Create blank text file on the top level of USB flash drive and name it config.txt. Open the file and write the parameter needed to be setup, as example to configure the unit for 26.5dB microphone gain write only: Debug the wireless interface: Use debug file to verify functionality of the module To debug the unit a debug file under the name debug.txt needs to be created. To perform a debug of the device an empty debug.txt file needs to be located on the top level of USB flash drive. To start the debug, turn off the power of the system insert the USB flash drive with the debug file and power up the system. From that point on every command executed will be recorded in the Reset Bluetooth Interface: To reset the Bluetooth module type 778 and Dial the number. Microphone Settings: Maximum 1 character after the colon. Valid parameter range is 1-4. 1 sets 23.5dB, 2 sets 26.5dB, 3 sets 29.5dB, 4 sets 32.5dB. Format: 2:<Mic Setting> Text to speech settings: Maximum 1 character after the colon. Valid range is 0-6. Format: 3:<TTS Setting> www.carcommunications.co.uk