1
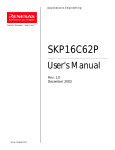
KSZ88XX-16 MQL Demo Board User’s Manual
1849 Fortune Drive, San Jose, CA 95131, USA • Tel: (408) 944-0800 • http://www.micrel.com
KSZ8841/42/61/62-16 MQL
Demo Board User’s Manual
Version 1.1
June 2005
Micrel Confidential
1
June 2005
This information is believed to be accurate and reliable, however no responsibility is assumed by Micrel for its use nor for any infringement of patents or other rights
KSZ88XX-16 MQL Demo Board User’s Manual
Content
1
INTRODUCTION..................................................................................................... 5
2
HARDWARE FEATURES ...................................................................................... 5
3
CONTENTS OF THE DEMO BOARD PACKAGE............................................. 5
3.1
4
CONTENTS OF THE KSZ88XX-16 MQL DEMO BOARD CD-ROM...................... 6
SYSTEM CONNECTIVITY.................................................................................... 6
4.1
HOST COMPUTER REQUIREMENTS ....................................................................... 8
4.2
DEMO BOARD ...................................................................................................... 8
4.3
ICD IN-CIRCUIT DEBUGGER (RTA-FOUSB-MON) ............................................ 8
4.4
SOFTWARE DEVELOPMENT TOOLS ....................................................................... 8
4.5
OTHER CONNECTIVITY ........................................................................................ 9
4.5.1
Power Supply .............................................................................................. 9
4.5.2
Serial Port Cable Connection..................................................................... 9
4.5.3
Console Port Speed Setting......................................................................... 9
5
HARDWARE .......................................................................................................... 10
5.1
DEMO BOARD .................................................................................................... 10
5.2
DEMO BOARD BLOCK DIAGRAM........................................................................ 11
5.3
DEMO BOARD JUMPER CONFIGURATION ........................................................... 12
5.3.1
Default Jumper Setting on the Demo Board ............................................. 13
5.4
LED DEFINITION ............................................................................................... 13
5.5
LCD (LIQUID CRYSTAL DISPLAY)..................................................................... 13
6
GETTING START FOR DEMONSTRATION................................................... 14
6.1
6.2
6.3
6.4
6.5
7
POWER ON THE DEMO BOARD ........................................................................... 14
SET UP IP ADDRESS FOR PC .............................................................................. 14
CONNECT THE ETHERNET CABLE BETWEEN PC AND DEMO BOARD .................. 15
SET THE GUI DEMO SOFTWARE ......................................................................... 15
USE THE TCP/UDP GUI DEMO SOFTWARE FOR DEMONSTRATION ................... 16
HARDWARE DESCRIPTION.............................................................................. 18
7.1
7.2
7.3
7.4
7.5
MEMORY MAP ................................................................................................... 18
BOARD RESET .................................................................................................... 19
CLOCK SCHEME ................................................................................................. 19
ESD PROTECTION CIRCUIT ................................................................................ 19
POT1 AND POT2............................................................................................... 20
8
BUS INTERFACE CONNECTION...................................................................... 21
9
EXTERNAL INTERFACES.................................................................................. 22
9.1
LAN INTERFACES .............................................................................................. 22
9.1.1
Two 10/100Base-TX Fast Ethernet Ports ................................................. 22
9.1.2
One 100Base-FX Fast Ethernet Port........................................................ 22
9.2
UART................................................................................................................ 22
9.3
ICD (IN-CIRCUIT DEBUGGER) ........................................................................... 22
Micrel Confidential
2
June 2005
KSZ88XX-16 MQL Demo Board User’s Manual
9.4
9.5
POWER JACK ...................................................................................................... 22
POWER SUPPLY AND TEST POINT ....................................................................... 22
List of Figures
Figure 1: System Connectivity with ICD for Program the OpenTCP Driver..................... 7
Figure 2: The Parameters Settings on Hyper Terminal ...................................................... 9
Figure 3: The KSZ88XX-16 MQL Demo Board with all Hardware Components Filled 10
Figure 4: The KSZ88XX-16 MQL Demo Board Block Diagram .................................... 11
Figure 5: Hyper Terminal Display after Power On the Demo Board ............................... 14
Figure 6: Set Up the PC for IP Address............................................................................ 15
Figure 7: Input IP Address and Establish Connection for TCP/UDP Demo .................... 16
Figure 8: Receive and Transmit TCP/UDP Packets for Demonstration........................... 17
Figure 9: KSZ88XX-16 MQL 16-Bit Asynchronous Interface Block Diagram .............. 21
List of Tables
Table 1: Demo Board CD-ROM Documentation list ......................................................... 6
Table 2: Demo Board Jumper Setting............................................................................... 12
Table 3: JP9 and JP10 Jumper Settings ............................................................................ 12
Table 4: Default Setting for KSZ8841/42 Chips .............................................................. 13
Table 5: Default Setting for KSZ8861/62 Chips .............................................................. 13
Table 6: LEDs Definition.................................................................................................. 13
Table 7:Three Different Modes for Port 1 and 2 LED Status........................................... 13
Table 8: Memory Map for The Demo Board.................................................................... 18
Table 9: EEPROM Format and Content ........................................................................... 18
Table 10: Format for The ConfigParam Word 6H............................................................ 18
Table 11: All Test Points Description............................................................................... 23
Micrel Confidential
3
June 2005
KSZ88XX-16 MQL Demo Board User’s Manual
Revision History
Revision Date
1.0
05-26-05
1.1
06-15-05
Micrel Confidential
Summary of Changes
Initial Release
Update for New Version A2 Silicon
4
June 2005
KSZ88XX-16 MQL Demo Board User’s Manual
1 Introduction
The KSZ88XX-16 MQL Demo Board is intended to provide a convenient way to
evaluate or demonstrate the functionality and performance of these new Ethernet
products from Micrel. There are four different chips with non-PCI 16-bit bus:
• KSZ8841MQL is a single copper port Ethernet MAC controller.
• KSZ8842MQL is two copper ports Ethernet Switch.
• KSZ8861MQL is a single either copper or fiber dual function port Ethernet MAC
controller.
• KSZ8862MQL is two copper ports or a single copper and fiber port Ethernet Switch.
These Ethernet chips interface with the M16C processor from Renesas to use the 16-bit
generic bus on the demo board.
Micrel provides a basic software driver based on the 16-bit bus solution with which to
evaluate the KSZ88XX-16 MQL functionality and feature. The software includes a
configuration utility to allow quick and easy device setup.
2 Hardware Features
•
•
•
•
•
•
•
•
•
•
•
KSZ8841-16 MQL demo board supports the single copper port Ethernet
MAC controller and 16-bit bus interface to M16C microcomputer.
KSZ8842-16 MQL demo board supports the dual copper ports Ethernet
Switch and 16-bit bus interface to M16C microcomputer.
KSZ8861-16 MQL demo board supports the single either fiber or copper
port Ethernet MAC controller and 16-bit bus interface to M16C
microcomputer.
KSZ8862-16 MQL demo board supports one copper port and one fiber
port Ethernet Switch and 16-bit bus interface to M16C microcomputer.
One 64K X 16 1-Mbit SRAM for further software code development.
UART DB-9 connector as a console serial port.
ICD connector for In-circuit debugger and programmer.
One LCD module to display status of the software running and demonstration
information.
Using the demo board can demonstrate WOL (Wake-on-LAN) functionality for
KSZ8841/61.
Management two ports switch or MAC controller.
Power LED and status LED’s.
3 Contents of The Demo Board Package
The KSZ88XX-16 MQL Demo Board Kit includes:
• One KSZ88XX-16 MQL Demo Board (without RS-232 cable and Ethernet cable)
• One 5.0V/4.0A output DC power supply with 100-240 AC input
• One CD-ROM for KSZ88XX-16 MQL Demo Board documentation (see Table 1)
Micrel Confidential
5
June 2005
KSZ88XX-16 MQL Demo Board User’s Manual
3.1 Contents of The KSZ88XX-16 MQL Demo Board CD-ROM
Table 1: Demo Board CD-ROM Documentation list
Items
1
2
3
4
Files
KSZ88XX-16 MQL Demo Board User’s Manual
KSZ884X 16-Bit Bus BSP User’s Manual
KSZ884X Programmer’s Guide
KSZ88XX-16 MQL Demo Board Design
5
6
7
8
9
10
11
12
13
14
15
16
KSZ88XX-16 MQL Demo Board BOM
KSZ884X OpenTCP/IP Driver Source Code
TCP_GUI.EXE
LinkMD.EXE
Wake on LAN (for KSZ8841 only)
PCB Layout and Gerber file
Datasheet for KSZ8841MQL
Datasheet for KSZ8842MQL
IBIS Models
Linux 2.6 Driver
Vxworks Driver
Renesas tool chain for ICD
Description
Hardware
Software
Software
Schematics (both OrCAD and
PDF Formats)
Bill of Material
Software
TCP/DUP Demo Software
LinkMD Demo Software
WOL Demo Software
Board Layout for all Layers
PDF Format
PDF Format
Hardware
Software
Software
Software
Note: These documents are preliminary.
4 System Connectivity
Figure 1 shows the connectivity for program OpenTCP driver or development. The
following lists the hardware and software products that are required by the Demo Board
to program OpenTCP driver or download the update OpenTCP driver.
• Host Computer
• KSZ88XX-16 MQL Demo Board
• +5V DC Power Supply
• RTA-FoUSB-MON In-Circuit Debugger (sold separately)
• Mini USB Cable (sold separately)
• Target Cable (sold separately)
• Software Tools (FoUSB Programmer and other development tools)
Note: RTA-FoUSB-MON ICD, Mini USB Cable and Target Cable are ordered and
manufactured from Renesas Technology America, Inc. (www.renesas.com)
Address: 450 Holger Way, San Jose, CA 95134-1368 USA
Phone: 408-382-7500, Fax: 408-382-7501
Micrel Confidential
6
June 2005
KSZ88XX-16 MQL Demo Board User’s Manual
Figure 1: System Connectivity with ICD for Program the OpenTCP Driver
After program the OpenTCP driver, the demo board will be a standard alone two-port
switch or a single port MAC controller with microprocessor and management function.
Micrel Confidential
7
June 2005
KSZ88XX-16 MQL Demo Board User’s Manual
4.1 Host Computer Requirements
The minimum PC requirement for running the software and the Demo Board is an USB
port, serial RS232 port and Microsoft Windows 98, ME, 2000, or XP.
4.2 Demo Board
The Demo Board provides an evaluation and development environment for KSZ88XX-16
MQL Ethernet switch or MAC controller with a 16-bit host bus interface. It has push
button switches, LED’s and LCD for user interfaces. Two 10/100Base-TX fast Ethernet
ports and one 100Base-FX port are available for different modes of Ethernet connection.
4.3 ICD In-Circuit Debugger (RTA-FoUSB-MON)
Micrel has programmed the OpenTCP device driver into the Demo Board for
demonstration purposes, so the user can use the Demo Board to run demo software
“TCP_GUI” or “LinkMD” on the Demo Board.
If you want to use the Demo Board as a development platform and program the flash in
the M16C Microcomputer, you need to order the part RTA-FoUSB-MON from Renesas
or its distributors. The part can perform debugging and programming of the Demo Board
by using the host computer’s Universal Serial Bus (USB). The Demo Board will provide
power to the RTA-FoUSB-MON. When connecting the ICD to the Demo Board ensure
that the power source switch on the RTA-FoUSB-MON is in the “TARGET” position. If
the switch is left at “USB” Powered Mode, some MCU pins may be driver to undesirable
levels.
4.4 Software Development Tools
For details of the software development tools and programs, please refer to “ Micrel
KSZ884X 16-Bit BSP User’s Manual ”.
Micrel Confidential
8
June 2005
KSZ88XX-16 MQL Demo Board User’s Manual
4.5 Other Connectivity
4.5.1
Power Supply
A single +5V DC power supply is used only from this demo kit and plugs into the power
jack J4 on the Demo Board.
4.5.2
Serial Port Cable Connection
A serial female to male cable is used in the demo kit. The cable is connected between the
RS-232 port of the PC and the serial port of the Demo Board. From the console port in
the PC, the user can read/write to registers, send packets and display MIB counters, etc.
4.5.3
Console Port Speed Setting
The serial port data transfer is set the speed at 38400 Bits/Second for normal display in
ether a Hyper Terminal or other tools. Figure 2 shows all parameters setting on the Hyper
Terminal.
Figure 2: The Parameters Settings on Hyper Terminal
Micrel Confidential
9
June 2005
KSZ88XX-16 MQL Demo Board User’s Manual
5 Hardware
5.1 Demo Board
The KSZ88XX-16 MQL Demo Board is shown in the Figure 3.
Figure 3: The KSZ88XX-16 MQL Demo Board with all Hardware Components
Filled
Micrel Confidential
10
June 2005
KSZ88XX-16 MQL Demo Board User’s Manual
5.2 Demo Board Block Diagram
The detail top view of the Demo Board block diagram is shown in Figure 4.
POT1
(LCD Contrast)
POT2
2 x Crystals
(32 KHz/12 MHz)
RS 232 (P1)
(MAX232)
S1
8 Characters
x 2 Lines LCD
M16C Family
Microcomputer
M30626FHPFP
MCU
(ACM0802B)
ICD Debug
Port (J3)
16-Bit Bus
D[15:0]
A[15:0]
LED4
(Red)
(CY7C1021CV33)
LED2
(Green)
RJ45
T2
(Pulse Transformer)
LAN-Port 1
T1
(Reset)
KSZ884116MQL
KSZ884216MQL
KSZ8861-
LED3
Power
(Red)
+3.3V
Power Supply
(MIC37152BR)
LED1
(Green)
EEPROM
Port 1 Status
100Base-FX
Fiber Module
(HFBR-5803)
LED5 LED6
LED7
(Yellow) (Green) (Green)
S4
Port 2 Status
LAN-Port 2
S3
(S 1-3 and LED 4-7 for Demo use)
16-Bit SRAM
RJ45
S2
(AT93C46)
J4
Crystal or OSC
(25 MHz)
+5V Input Jack
Figure 4: The KSZ88XX-16 MQL Demo Board Block Diagram
Micrel Confidential
11
June 2005
KSZ88XX-16 MQL Demo Board User’s Manual
5.3 Demo Board Jumper Configuration
The following Tables 2 and 3 show all the jumper settings for the Demo Board.
Table 2: Demo Board Jumper Setting
Jumper
JP1
(2-pin)
JP2
(2-pin)
JP3
(2-pin)
JP4
(3-pin)
JP5
(8-pin)
JP6
(8-pin)
JP7
(3-pin)
JP8
(3-pin)
Setting
KSZ8841
ON
Setting
KSZ8842
ON
Setting
KSZ8861
OFF
Setting
KSZ8862
OFF
Comment
ON
OFF
ON
OFF
OFF
OFF
OFF
OFF
OFF
OFF
1-2
1-2
CS2
CS2
CS2
CS2
This jumper is used to select copper or fiber for
port 1. ON: for KSZ884X, OFF: for KSZ886X
ON: with power management to use Wake up on
LAN for KSZ8841/61
OFF: without power management for
KSZ8842/62
ON: for full-chip power down
OFF: for normal operation
1-2 for 3.3V fiber module, 2-3 for 5V fiber
module. OFF: for KSZ884X
5-6 for KSZ88XX chip select (CS2)
CS0
CS0
CS0
CS0
1-2 for SRAM chip select (CS0)
OFF
OFF
OFF
OFF
OFF
OFF
OFF
OFF
No connect for normal operation
Connect 1-2 or 2-3 for test purpose
No connect for normal operation
Connect 1-2 or 2-3 for test purpose
Note: Pins 3-4 (CS1) and 7-8 (CS3) are no connect for both JP5/JP6
Table 3: JP9 and JP10 Jumper Settings
Jumper
Setting
KSZ8841
Setting
KSZ8842
Setting
KSZ8861
Setting
KSZ8862
Normal Operation with EEPROM
JP9
ON
ON
ON
(2-pin)
JP10
OFF
OFF
OFF
(2-pin)
8-bit or 16-bit Operation without EEPROM
JP9
OFF
OFF
OFF
JP10
ON
ON
ON
ON
OFF
OFF
ON
Comment
With EEPROM
(refer to Table 9/10 for bus selection)
OFF: Normal operation
ON: Illegal operation
Without EEPROM
ON: for 16-bit bus interface
Off: for 8-bit bus interface
(32-bit bus, KSZ88XX-32MQL, don’t
care this setting)
Note: Pin 1 of JP9 connects to EEEN (pin 26); pin 2 of JP9 connects to 10K pull up.
Pin 1 of JP10 connects to EEDI (pin 30); pin2 of JP10 connects to 10K pull up.
Micrel Confidential
12
June 2005
KSZ88XX-16 MQL Demo Board User’s Manual
5.3.1
Default Jumper Setting on the Demo Board
Table 4: Default Setting for KSZ8841/42 Chips
Jumper
Setting
JP1
Shorted for copper port
JP5
5-6 Shorted for CS2
Table 5: Default Setting for KSZ8861/62 Chips
Jumper
Setting
JP1
Opened for fiber
port
JP4
1-2 shorted for 3.3V
Fiber module
JP5
5-6 Shorted for CS2
5.4 LED Definition
Table 6 shows the Demo Board LED definition.
Table 6: LEDs Definition
LED
LED1
LED2
LED3
LED4
LED5
LED6
LED7
Color
Green
Green
Red
Red
Yellow
Green
Green
Description
Group of 4-LED for Port 1 Status
Group of 4-LED for Port 2 Status
+5V Power LED indicator
For HW/SW demo LED
For HW/SW demo LED
For HW/SW demo LED
Received WOL packet LED indicator
Port 1 and 2 status LED indicators are programmable via the register to three different
modes, as described in Table 7 below.
Table 7:Three Different Modes for Port 1 and 2 LED Status
Mode 0 (Default)
LED3= No define
LED2= Link/Act
LED1= Full duplex/Col
LED0= Speed (on 100/off 10)
Mode 1
LED3= No define
LED2= 100 Link/Act
LED1= 10 Link/Act
LED0= Full duplex
Mode 2
LED3= Act
LED2= Link
LED1= Full duplex/Col
LED0= Speed (on 100/off 10)
5.5 LCD (Liquid Crystal Display)
The LCD Module (ACM0802B) is a 2-line by 8-character display to use for demo
received packet or HW/SW status.
Micrel Confidential
13
June 2005
KSZ88XX-16 MQL Demo Board User’s Manual
6 Getting Start for Demonstration
6.1 Power on the Demo Board
If user needs to update the OpenTCP driver, they can read the Chapter 4 to download the
update driver, otherwise user just connects the RS-232 serial cable between the PC and
the Demo Board. On the PC, open the Hyper Terminal and configure the speed to 38400
Bits/Second as shown in Figure 2, then plug in the 5V DC jack to power on the Demo
Board. Normally the Hyper Terminal window will display as shown in Figure 5.
Figure 5: Hyper Terminal Display after Power On the Demo Board
In this window, press “Enter” and type “=>hwhelp” to show all commands and
parameters that can read/write to registers, configure the chip, display MIB counters and
send packets, etc.
From this window, the software has assigned the IP and MAC addresses in the Demo
Board. IP Address: 192.168.1.1
Switch Host MAC Address: 08-00-70-22-44-55
6.2 Set Up IP Address for PC
This section describes how to change IP address for your PC in order to run the
TCP_GUI demo software and the demonstration for KSZ88XX-16 MQL Ethernet
Micrel Confidential
14
June 2005
KSZ88XX-16 MQL Demo Board User’s Manual
chip. Due to the default value of IP address is 192.168.1.1 in the Demo Board. For the
PC, the user can set the IP address to 192.168.1.X (X: don’t care) and the Subnet
mask to 255.255.255.0 (see the Figure 6).
Figure 6: Set Up the PC for IP Address
6.3 Connect the Ethernet Cable between PC and Demo Board
Use an Ethernet cable to connect between the PC and the Demo Board 10/100Base-TX
Ethernet ports.
6.4 Set the GUI demo software
Double click the “TCP_GUI.EXE” demo software; the “TCP/DUP demo” window comes
up as shown in Figure 7. Type the IP address “192.168.1.1” in the “IP Address of Board”
area and click the “Establish connection” button. If “Connected” message is displayed
below the IP Address, the connection is successfully.
Micrel Confidential
15
June 2005
KSZ88XX-16 MQL Demo Board User’s Manual
Figure 7: Input IP Address and Establish Connection for TCP/UDP Demo
6.5 Use the TCP/UDP GUI Demo Software for Demonstration
Figure 8 shows the Send and Receive TCP/UDP packets GUI window.
For sending TCP packets from PC to Demo Board, type any 1 to 8 characters/numbers
into two blanks under “TCP Send Routine” and click the “Send” button. The
characters/numbers text will be displayed at the LCD module of the Demo Board.
For receiving TCP packets from Demo Board to PC, press any one of the three push
button switches (S1, S2 and S3) on the Demo Board. The “TCP Receive Routine” area
will display the action from the Demo Board.
For receiving UDP packets from Demo Board to PC, click the “Start Streaming” button
in the “UDP Receive Routine” area, then adjust POT2 (10K variable resistor) on the
Demo Board. The GUI demo window on the PC will display the current value.
For sending UDP packets from PC to Demo Board, use the mouse to slide the bar in
“UDP Send” area. The position of the slide bar will be displayed as a percentage on the
LCD module of the Demo Board.
Micrel Confidential
16
June 2005
KSZ88XX-16 MQL Demo Board User’s Manual
Figure 8: Receive and Transmit TCP/UDP Packets for Demonstration
Micrel Confidential
17
June 2005
KSZ88XX-16 MQL Demo Board User’s Manual
7 Hardware Description
7.1 Memory Map
The default base address for the KSZ88XX-16 MQL Demo Board is 0x300 without the
EEPROM. Due to CS2 is used for the chip select of KSZ88XX-16 MQL, the system base
address is 0x10300. If the EEPROM is used, the base address will download from the
first two bytes of the EEPROM to register of the Ethernet chip on power up.
Please refer to the Table 8 for memory map and Table 9 for EEPROM format/content.
Table 8: Memory Map for The Demo Board
Range (16)
00000 – 003FF
00400 – 09FFF
10000 – 26FFF
27000 – 27FFF
28000 – 2EFFF
30000 – 7FFFF
80000 - FFFFF
Size
Description
SFR
Internal RAM and reserved
CS2 for KSZ88XX-16 MQL
Reserved
CS1 (No use)
CS0 for SRAM (option)
Internal RAM and reserved
1K
39K
94K
4K
28K
327K
524K
Table 9: EEPROM Format and Content
WORD
15
0H
1H
2H
3H
4H
5H
6H
7H-3FH
8
7
0
Base Address
Host MAC Address Byte 2
Host MAC Address Byte 1
Host MAC Address Byte 4
Host MAC Address Byte 3
Host MAC Address Byte 6
Host MAC Address Byte 5
Reserved
Reserved
Reserved
Reserved
ConfigParam (see Table 10)
Not used for KSZ8842M (available for user to use)
Table 10: Format for The ConfigParam Word 6H
Bit
Bit Name
Description
15
NEW_CAP
Reserved.
14
NO_SRST
Reserved.
13
Reserved
Reserved.
12
PME_D2
Reserved.
11
PME_D1
Reserved.
Micrel Confidential
18
June 2005
KSZ88XX-16 MQL Demo Board User’s Manual
10
D2_SUP
Reserved.
9
D1_SUP
Reserved.
8-6
Reserved
Reserved.
5
DSI
Reserved.
4
Reserved
Reserved.
3
Reserved
Reserved.
2
Reserved
Reserved
1
Clock_Rate
Internal clock rate selection (Note 1)
0: 125 MHz
1: 25 MHz
0
ASYN_8bit
Async 8-bit or 16-bit bus selection
1= Async bus is configured for 16-bit width
0= Async bus is configured for 8-bit width
(32-bit bus, KSZ88xx-32MQL, don’t care this bit
setting)
Note 1: At power up, the Ethernet chip operates from the 125 MHz clock. The internal frequency can
be dropped to 25 MHz via the external EEPROM. This clock rate selection is for new chip Rev-A2
only.
7.2 Board Reset
The KSZ88XX-16 MQL Demo Board generates a reset signal from the reset circuitry
during power up. It also provides a push button S4 reset circuit to reset the whole Demo
Board. At power up, the board is automatically reset. User can also press reset button S4
on the board for a manual reset. After any reset, the LED1 and LED2 flash to indicate the
power on self-test, also the LCD module shows the HW/SW board status and system set
up result.
7.3 Clock Scheme
The Ethernet chip reference clock is provided from external 25 MHz crystal (Y1). The
crystal is connected to the X1 and X2 pins on the KSZ88XX-16 MQL. This 25 MHz
clock is specified as +3.3V tolerant, +/- 50 ppm. If an oscillator is used, X1 connects to a
3.3V tolerant oscillator and X2 is no connection.
The M16C microcomputer receives two references clocks, one is the 12 MHz crystal,
connected to Xout/Xin pins, the other is the 32 KHz crystal, connected to XCout/XCin
pins. Both clocks are specified as +5.0V tolerant, +/- 100 ppm.
7.4 ESD Protection circuit
The Demo Board contains two levels of ESD protection circuitry (Option).
Micrel Confidential
19
June 2005
KSZ88XX-16 MQL Demo Board User’s Manual
The first level of ESD protection uses D1/D2 (GBLC03C) for LAN port 1 RX/TX pairs
and D3/D4 (GBLC03C) for LAN port 2 RX/TX pairs before the T1/T2 transformers.
The second level of ESD protection uses U3 hybrid (SRV05-4) for LAN port 1 RX/TX
pairs and U4 hybrid (SRV05-4) for LAN port 2 RX/TX pairs after the T1/T2
transformers.
7.5 POT1 and POT2
Adjust POT1 to change the contrast of the LCD display module.
Adjust POT2 to change the UDP receive value when streaming from Demo Board to PC
on the demo software.
Micrel Confidential
20
June 2005
KSZ88XX-16 MQL Demo Board User’s Manual
8 Bus Interface Connection
The KSZ88XX-16 MQL Demo Board provides a 16-bit bus interface to the M16C
microcomputer. The external EEPROM is used to set up the bus width of the Demo
Board. Figure 9 shows the 16-Bit Asynchronous Interface.
Figure 9: KSZ88XX-16 MQL 16-Bit Asynchronous Interface Block Diagram
Micrel Confidential
21
June 2005
KSZ88XX-16 MQL Demo Board User’s Manual
9 External Interfaces
9.1 LAN Interfaces
9.1.1
Two 10/100Base-TX Fast Ethernet Ports
The LAN interfaces on the KSZ88XX-16 MQL are connected to a transformer (T1, T2)
with 50ohm differential termination resistors for each port. The line side of the
transformer is connected to the RJ-45 connectors (J1, J2) for LAN port 1 and port 2.
9.1.2
One 100Base-FX Fast Ethernet Port
With the additional circuitry, the LAN port 1 interface can also support 100Base-FX with
a fiber optic module (U5). The 100Base-FX fiber optic mode is supported by KSZ886X16 MQL only. To support fiber mode, 0 ohm resistors (R63, R65, R67, R69) need to be
populated and 0 ohm resistors (R64, R66, R68, R70) need to be removed.
There is a 3-pin jumper (JP4) to select either +3.3V (pin 1-2) or +5V (pin 2-3) for the
fiber optic module (U5) power.
9.2 UART
The KSZ88XX-16 MQL Demo Board provides an UART serial interface (P1) for serial
data communication between hyper terminal and Demo Board.
9.3 ICD (In-Circuit Debugger)
This In-Circuit Debugger interface (J3) is used for USB debugger and FoUSB
programmer downloading.
9.4 Power Jack
A +5V DC input is connected to the power jack J4 to supply the Demo Board.
9.5 Power Supply and Test Point
The Demo Board is supplied with +5.0V DC power through a jack (J4) and converted to
+3.3V with a Micrel +3.3V voltage regulator (U9, MIC37152BR). The KSZ88XX-16
MQL contains an internal +1.2V LDO, to provide its core, analog and PLL voltages.
The Table 11 shows all test points information.
Micrel Confidential
22
June 2005
KSZ88XX-16 MQL Demo Board User’s Manual
Table 11: All Test Points Description
Test Points
TP1
TP2
TP3
TP4
TP5
TP6
Micrel Confidential
Comment
Power supply for 1.2V Analog VDDA
(Not exist)
LDEVN signal from KSZ88XX-16 MQL
output
(Not exist)
Power supply for 3.3V digital VDDIO
Ground signal (GND)
23
June 2005
Mouser Electronics
Authorized Distributor
Click to View Pricing, Inventory, Delivery & Lifecycle Information:
Micrel:
KSZ8851-16MQL-EVAL