1
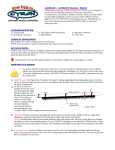
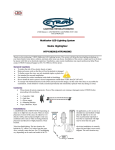
USER MANUAL
Media Highlighter™ PRO - HTP2402E/HTP1502E
Thank you for purchasing Cyron Media Highlighter™ PRO series.
Please follow all the steps to assure proper installation and optimum
usage of your system.
Please locate all the system components.
2 X Lightbars
1 X Controller Module
1 X Hub
1 X Power Supply
4 X Mounting Clips
10 X Mounting Screws
Several Sizes Two-Sided Tapes
Lightbar location For optimal backlighting and highlighting
install the lightbars so the lightbars are not directly visible.
1
The best location for television installations is usually behind the TV,
about 1-4 inches from the outer edges (left and right in most cases).
Center the bars for proper light dispersion. The exact location may vary
depending on make and model of TV.
Same general position works well for most objects. There are many
ways of illuminating objects using Media Highlighter . Try various
locations to achieve desired results.
a
Cleaning
Test a small area to make sure cleaning wipes
do not affect the mounting surfaces. Scrub the bottom of the clips,
controller, hub and the mounting surfaces with the cleaning wipes. Dry
the surfaces with a clean, lint free cloth.
Mounting clips Mounting clips can be secured using two-sided
tape or screws. DO NOT USE SCREWS FOR FASTENING TO
ELECTRONIC DEVICES AND SENSITIVE SURFACES.
Tapes may cause some discoloration to surfaces over time. Put tape on
the bottom of the clips and apply pressure for 5 seconds. Place clips on
the lightbars.
Place light bar Remove the second side of tape liner. Keep the
tape surface clean. Place the bars in the proper location by pressing on
the clips for 5 seconds. Never press on the clear lens of bars.
Lightbars will get damaged! Note the direction of the wires being
routed to the hub.
Hub Mount the hub using screws or tape. Choose a location for the
hub so it can be accessible for future upgrades. Plug the light bar
connectors into any of the hub outlets. Additional outlets are provided
for future expansion of your Cyron Media Highlighter PRO system.
Controller Using tapes mount the controller in a place easily
accessible. On the wall behind the TV, Back or sides of the TV are
good possible locations.
Power Up Plug the power supply into an AC outlet. Connect the
power jack into the controller wire.
2
Turn the unit on if it did not turn on automatically. The lights may be
blinking, depending on the last factory setting. Adjust light angle by
twisting the light bars in the clips. This will adjust light dispersion.
INDICATOR LIGHT
STOP COLOR SCAN OR
COLOR FADE
ON/OFF
SOUND
SENSITIVITY
CYCLES ALL
FUNCTIONS
The chart below shows the 14 functions of the MODE button. Pressing
buttons are indicated by a fast blink of the red Indicator Light.
PAUSE button will stop the lights in any of the color scan or fade
modes.
System ON when power is supplied With the system still plugged-in to
an outlet, turn the unit off using the POWER button. Press and hold the
MODE button for 3 seconds. Turn the controller on. The unit will turn
3
on automatically every time power is removed and restored. Plug the
power supply to a switched power source like the receiver’s “Switched
Power” or wall outlet that is controlled by a switch. The light system
will turn on every time the power is switched on. Note that Media
Highlighter is not compatible with dimmers.
System OFF when power is supplied In a similar process as above,
press and hold the PAUSE button for 3 seconds. The system will be off
every time power is removed and restored. In this mode the system can
only be turned on from the controller by pressing the POWER button.
[email protected]
818-772-1900 x106
Cyron warrants this product against any defects in materials or workmanship for a period of ONE (1) year from the
date of purchase. The warranty covers normal usage as intended by the factory and does not cover misuse, abuse,
accidents, or damages caused due to the acts of God. Proof of purchase is required.
ANY IMPLIED WARRANTIES, INCLUDING WITHOUT LIMITATION THE IMPLIED WARRANTIES OF
MERCHANTABILITY AND FITNESS FOR A PARTICULAR PURPOSE, SHALL BE LIMITED TO THE
DURATION OF THIS LIMITED WARRANTY, OTHERWISE THE REPAIR, REPLACEMENT, OR REFUND AS
PROVIDED UNDER THIS EXPRESS LIMITED WARRANTY IS THE EXCLUSIVE REMEDY OF THE
CONSUMER, AND IS PROVIDED IN LIEU OF ALL OTHER WARRANTIES, EXPRESS OF IMPLIED. IN NO
EVENT SHALL CYRON, INC. BE LIABLE, WHETHER IN CONTRACT OR TORT (INCLUDING
NEGLIGENCE) FOR DAMAGES IN EXCESS OF THE PURCHASE PRICE OF THE PRODUCT, ACCESSORY
OR FOR ANY INDIRECT, INCIDENTAL, SPECIAL OR CONSEQUENTIAL DAMAGES OF ANY KIND, OR
LOSS OF REVENUE OR PROFITS, LOSS OF BUSINESS, OR OTHER FINANCIAL LOSS ARISING OUT OF OR
IN CONNECTION WITH THE ABILITY OR INABILITY TO USE THE PRODUCTS OR ACCESSORIES TO THE
FULL EXTENT THESE DAMAGES MAY BE DISCLAIMED BY LAW.
Some states and jurisdictions do not allow the limitation or exclusion of incidental or consequential damages, or
limitation on the length of an implied warranty, so the above limitations or exclusions may not apply to you. This
warranty gives you specific legal rights, and you may also have other rights that vary from state to state or from one
jurisdiction to another.
Please mail all warranty claims to:
CYRON, Inc.
Warranty Claim
9439 Irondale Ave.
Chatsworth, CA 91311 USA
Further warranty inquiries:
[email protected]
4