1
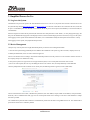
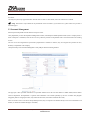
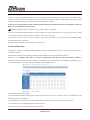
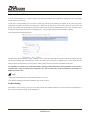
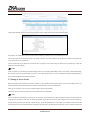
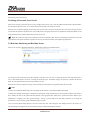
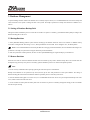
ZKAccess5.0 Quick Use Guide Version: V 1.0 Software Version: For ZKAccess 5.0.8 or above Version Date: July, 2011 This guide is a simplified version of the User Manual. It is intended to be a quick reference for the user to get the system up and running as soon as possible. For more details, please consult the User Manual. 201 Circle Drive N, Suite 116 Piscataway, NJ 08854 Tel: 732-412-6007 Fax: 732-412-6008 www.zkaccess.com Table of Contents 1. Overview of System Modules .............................................................................. 2 2. Simplified Process for Use ................................................................................... 3 2.1 Log in to the System .................................................................................... 3 2.2 Device Management .................................................................................... 3 2.3 Personnel Management ................................................................................ 5 2.4 Access Time Zone ........................................................................................ 6 2.5 Access Control Holidays .............................................................................. 7 2.6 Door Setting................................................................................................. 7 2.7 Setting of Access Levels .............................................................................. 8 2.8 Setting of Personnel Access Levels ............................................................. 9 2.9 Real-time Monitoring and Real-time Events ............................................... 9 2.10 Report ...................................................................................................... 10 3. Database Management ....................................................................................... 11 3.1 Setting of Database Backup Path ................................................................ 11 3.2 Backup Database ........................................................................................ 11 3.3 Restore Database ........................................................................................ 11 201 Circle Drive N, Suite 116 Piscataway, NJ 08854 Tel: 732-412-6007 Fax: 732-412-6008 www.zkaccess.com 1. Overview of System Modules Personnel Management: Personnel Management mainly contains the following three parts: [Department], [Personnel] and [Issue Card]. After personnel are categorized according to departments, privileges can be granted to the personnel of a department in batches in [Personnel Access Levels] conveniently. Device Management: Device Management is mainly used for adding, searching and deleting access control panel. The user can divide the device by using the areas reasonably. In this way the device can be filtered by areas in monitoring, and the user can also set the administrators to manage the device in some areas in [System Setting] - [User]. Door Setting: When the user adds an access control panel in the system, the system will add the doors of corresponding number according to the parameters of the access control panel automatically so the user does not need to add them manually. The user needs to modify the parameters of each door according to actual needs. Access Time Zone: After an access time zone is added, the user can select the time zone when an access level is added in [Access Levels]. At this time, the time zone will be used as the door opening time for the personnel within the scope of control privilege. Each time zone contains days from Sunday to Saturday with three holiday categories and each day contains three intervals. Access Control Holidays: After holidays are newly added and types of holidays are set, the user can set the interval for a specific type of holiday in a time zone. Access Level: Access Level is the core of the system. It is a combination of doors and access permissions containing and within access control intervals. After the combination is set up, besides allocating permissions in batches in [Personnel Access Levels], access permissions can be allocated to individuals in [Personnel] - [Personnel]. Personnel Access Levels Setting: Allocate the established access permissions to personnel. In short, it is to set who has access permission to open which doors in a time zone (containing several intervals). Real-time Monitoring: The current user in the monitoring system has the permission to manage and view the status of doors and real-time events contained in the access control panel, including normal and abnormal events (alarm events included). Report: The report contains records of real-time events and the setting of personnel access permissions. Historical records required by the users can be viewed and output through the report. System Setting: Administrators with different roles can be allocated, and a role refers to the operational permission of the user for the current system (nothing to do with access level). The user can perform backup and initialization of the database in Database Management. [Service Controller] on the server can only be used for restoration of database (click [Start] - [Program] - [ZKAccess5.0 Access Management System] - [Service Controller] on the server to open it). Note: In the Windows Vista operating system or above, right click the [Service Controller] icon and select [Open It as the Administrator] to access the function. Data Communication Center: After the user operates the system (including add, edit, delete or other functional settings), maintain normal communication between the server and the equipment and the system will synchronize relevant information to the device automatically. Under normal conditions, the user does not need to synchronize the data manually. In [Device Monitoring], the user can visually see if the device communicates normally and see the progress of data synchronization. [Synchronize All Data] in [Device] [Device] can only be used in special circumstances. During the operation the system will synchronize the data in the target device with the current system. 201 Circle Drive N, Suite 116 Piscataway, NJ 08854 Tel: 732-412-6007 Fax: 732-412-6008 www.zkaccess.com 2. Simplified Process for Use 2.1 Log in to the System The default access port for the system is 80. If the IP address of the server is 192.168.1.8, any client with a network connection can access the system directly through http://192.168.1.8:80 (or http://192.168.1.8) in a browser. If this URL is not accessible in the client, ensure the 80 port is not disabled by the server firewall. If it is disabled, add the 80 port to the exception (recommended), or close the firewall (not recommended). Enter the assigned user name and the password (the initial user name and password are both “admin”), or click [Fingerprint Login], and then press the administrator fingerprint on the fingerprint sensor (need to install the fingerprint sensor driver first) to log in to the system. After logging in to the system with the default account number, it is recommended to modify the initial password and ensure it is safety. After logging in to the system, enter [My Work Panel] interface. 2.2 Device Management Click [Device] on the top left corner of [My Work Panel] directly to enter the device management module. 1. Click the menu [Area Setting] and modify the area added in the initialization of the system (e.g. fill in the name, company and so on). To modify the default area, there is no need to select the upper area. The user can add other areas according to need and the relationship between areas only need to be set in accordance with the structure of the company, enterprise or institution at setting. 2. Click [Device] menu. Two types of device are supported in the system, access control panel and network video recorder. (1) For access control panel, there two ways for adding the device in the software. First, the newly added way will be illustrated. Click the [Add] button and select to add the access control panel, the following interface appears (such as TCP/IP mode): The user must fill in the device name, communication parameters (such as IP address, IP port number or 485 address, serial port number, baud rate), select a communication mode, type of access control panel and the area its belongs to. The device name should be as simple and clear as possible. The communication password must be filled in if communication password for the device being added has been set. The communication password for all new devices is blank by default. 201 Circle Drive N, Suite 116 Piscataway, NJ 08854 Tel: 732-412-6007 Fax: 732-412-6008 www.zkaccess.com After adding the device, to prevent the malicious access to the system, the user can use [Modify Communication Password] in [Access Control] - [Door Setting] - [Door Management] to set the communication password. Switch to two-door and two-way mode. This is only used when four-door and one-way access control panel is used as two-door and two-way access control panel. The user does not need to tick it in any other circumstance. It is suggested that the user tick auto synchronize device time to ensure the time on the access control panel is consistent with that on the server. Clear Data in the Device when Adding. By default it is ticked, specifically, it will clear the data in the device after you have added a device to the system. All access levels will be cleared but events logs will be left. If you add the device just for demonstration and testing of the system, do not tick it. Click the [OK] button. If a dialog box appears, continue by clicking [OK], and the system will attempt to connect the device. If the system prompts that the connection succeeds, click [OK] and the system starts to add the device. Now the newly device can be found on the devices list. Another way to add the device is by [Search Access Control Panel] (temporarily, only access control panel in Ethernet is supported). The result after searching is as follows: Click [Add Device] in [Operation] column to open a prompt box to modify the Device Name. By default, it is an IP address in the system. The user can modify it to a concise name as needed. After clicking [OK], the device is added successfully. (2) In the Add New Device interface, select to add a network video recorder and click [Next]. The following interface appears: 201 Circle Drive N, Suite 116 Piscataway, NJ 08854 Tel: 732-412-6007 Fax: 732-412-6008 www.zkaccess.com The user needs to fill in the following information, including IP address, IP port, Username, etc. After that, click [OK] to finish adding the new device. Currently, the system only supports Hikvision network video recorder. For more detail, refer to the software user’s manual. Note:This feature is only available for the professional version of software, if you need to use it, please contact our pre-sales or technical support. 2.3 Personnel Management Enter the [Personnel] module from the menu on the top left corner. Click [Department] to enter the Department Management interface, and modify the default department name (such as company name or name of enterprise or institution). Then the user can set up a directory structure for departments with a clear hierarchical level according to need. The user can use the categorization of personnel by departments as needed. For instance, they can categorize the personnel as class, dormitory or department of the company. Click [Personnel] to enter Personnel Management. Click [Add] to show the following interface: The upper part is basic personnel information. The personnel numbers can be the work card number or student number, but the number cannot be duplicated. The department is required. Other information can be filled optionally by the user as needed. The [Register Fingerprint] must use a fingerprint sensor (only used in the IE browser, and needs to install the driver first). If the user needs to issue a card for the newly added personnel, they can input the card number directly in the text box behind the card number (or read the card number through a card reader). 201 Circle Drive N, Suite 116 Piscataway, NJ 08854 Tel: 732-412-6007 Fax: 732-412-6008 www.zkaccess.com The lower part mainly involves setting of access permissions. If existing access level must be assigned for the user, select it directly here (If there is no access level added in the system, you can see the prompt of red words in the above figure). Setting of the effective time is essential for visitors and other occasions when personnel have permission to open doors. Multi-card Opening personnel group is used for the multi-card door opening function. If this function is not needed, just leave it blank. If cards are to be issued in batches to those enrolled personnel without cards, the function of [Issue Cards in Batches] can be used. Refer to the User Manual for specific directions. Notes: Two modes for setting of personnel access levels are available in the system. The first is to add personnel (without setting access level) in [Personnel] - [Personnel], add an access level in [Access Control] - [Access Levels] and set personnel access levels in [Access Control] - [Personnel Access Levels]. The second is to add an access level in [Access Control] - [Access levels] and select an access level directly when adding or editing personnel in [Personnel] - [Personnel]. The demonstration in the later part of the document is the first mode. 2.4 Access Time Zone The time zone of [24-hour Accessible] is added by default in the system. In this time zone, there is a time zone for every day and it is accessible for 24 hours. Each time zone contains days from Sunday to Saturday and three holiday types. Each day contains three intervals. Example 1: To set [Effective Time Zone] of a Door, the effective time within this time zone from Monday to Friday is 08:00-12:00,13:00-18:00,19:00-21:00, that on holidays as per [Holiday Type 1] is 08: 00-22:00, that on holidays as per [Holiday Type 2] is 12:00-23:00, and there is no holiday with type of holidays set as per [Holiday Type 3] . Note the following points when setting: 1. Three intervals are available for each day in the system. If the user only uses one or two of them, he can leave the default value for the remaining intervals as (00:00-00:00). 2. If the [Holiday Type 3] is not being set, keep the default value (00:00-00:00) for the three intervals within the time zone. 3. There cannot be any overlapping times between the three intervals. After the time zone is set, set it as the effective time zone of a door. 201 Circle Drive N, Suite 116 Piscataway, NJ 08854 Tel: 732-412-6007 Fax: 732-412-6008 www.zkaccess.com 2.5 Access Control Holidays If Access Control Holidays are not required, skip this part and keep the default value (00:00-00:00) unchanged for the corresponding intervals in the access time zone. To add Access Control Holidays, the user selects a holiday type from the three holiday types available in the system. Apart from categorization of holidays, the function of holiday types is mainly used for days that are set as holidays. When the system selects the interval of the holiday from the selected time zones as the effective time by priority (including effective door events and effective door opening time for personnel), the priority level of holiday types 1, 2 and 3 is higher than intervals from Sunday to Saturday. Click [Add] to show the following interface: The legal holiday of International Labor Day is added here. After combining it with [Time Zones Demo] in the above example, when the time is between Starting Date and Ending Date, because the holiday type of [Labor Day] is [Holiday Type 1], when the [Time Zones Demo] is used for the door effective time zone, and it is effective from 8: 00 to 22: 00, the door is forbidden at other times. Access Holidays in a broader sense contain other holidays requiring special treatment apart from legal holidays, such as the door remaining open as usual on weekends due to adjustment of rest. The user needs only to set these special dates as the holidays of a Holiday Type in the system. Notes: 1. Starting Time and Ending Time of the set holidays cannot be over a year. 2. The number of holidays contained in each Holiday Type cannot exceed 32. 2.6 Door Setting After adding a device in [Device], enter [Access Control], and the newly added information for control panel and corresponding list of doors can be seen in [Door Setting] - [Door Management]: 201 Circle Drive N, Suite 116 Piscataway, NJ 08854 Tel: 732-412-6007 Fax: 732-412-6008 www.zkaccess.com Click [Edit] in Related Operations and set door parameters for the control panel as shown in the following figure: Door Name is the combination of Device Name and Door Number by default and it can be modified by the user. Door Sensor Type can be selected according to the needs of the user. The other parameters can be filled in as needed. The default value can be used if there is no special need. The two check boxes on the bottom are used for the user to apply the current door settings to other doors to avoid having to repeat the operation for the same settings. Notes: If the user needs to use the function of normal opening with first card, opening with multiple cards, anti-pass back, interlock and linkage, they can enter from the relevant buttons on [Access] - [Door Setting]. Please refer to the User Manual for detailed setting methods as there is not a detailed description in this document. 2.7 Setting of Access Levels Before assigning access permission to personnel, add the access levels allocated for specific groups. Access Levels mainly consist of a combination of access time zones and doors to identify which time zone is set to open which doors. Enter [Access Control] - [Access Levels], and click [Add] to show the edit interface. The user needs only to select the time zone to be set and the door to be controlled. Notes: The access time zone selected here is preset in [Access Control] - [Access Time Zone], which means that the time zone selected here can be the same as the effective time zone for doors and normally open time zone for doors (also includes access time zone selected for normal opening with first card) selected in [Door Setting] - [Door Management] above. For instance, if the effective time zone for the control panel in the current system and door opening time for all people to be allocated are all day long, select the time zone [24 hours 201 Circle Drive N, Suite 116 Piscataway, NJ 08854 Tel: 732-412-6007 Fax: 732-412-6008 www.zkaccess.com accessible] by default in the system. If the user needs to use a special time zone in the access levels, the user needs to add specific access time zones in [Access Time Zone]. 2.8 Setting of Personnel Access Levels Enter [Access Control] - [Personnel Access Levels] - [Display with Access Levels] , click the [Add Personnel] button to add personnel to the currently selected access level, view or delete the personnel existing in the current access level. When the user is switched to [Display as Personnel], when the user clicks a person on the left side, the access level for the person can be seen. Perform the operation of [Add Access Level] to add persons to the group with more access permissions and perform [Delete Access Level] to delete persons on the left side from the specific access level. Notes: The system can assign access permissions in batches or separately. When the user is performing the operation, he can use the search function in the system to find the required access level or personnel to accurately and rapidly assign permissions. 2.9 Real-time Monitoring and Real-time Events Enter [Access Control] - [Real-time Monitoring] - [Monitor all] as shown in the following figure: The system provides monitoring of door status and that of real-time events. The user can change the options in the drop-down boxes in Area, Control Panel and Door to narrow or enlarge the monitoring scope. The default setting in the system is to monitor all the doors under the control panel that the current user has permission to view. When the user switches to [Alarm Event], the system will only monitor the alarm events generated after the current time. Notes: 1. Please refer to Real-time Monitoring in the User Manual for all real-time events and their detailed descriptions. 2. Remote door opening and closing are emergent door opening and closing operations and are not restricted by effective time zones of doors, namely, the door can be opened with this operation at any appropriate time. Make sure to operate with caution. When a super administrator is assigning a new user ([System Setting] - [User]), to prevent other users from faulty operations, do not assign the permissions in [Access Control] - [Real-time Monitoring] to new users. Users can use the [Electro-Map] function to view the current door state. After setting the video linkage function in the system, if a real-time linkage event happens, the preview interface will open in the Real-time Monitor interface. 201 Circle Drive N, Suite 116 Piscataway, NJ 08854 Tel: 732-412-6007 Fax: 732-412-6008 www.zkaccess.com Note:The Electro-Map and video linkage functions are only available for the professional version of software If you need to use Electro-Map and video linkage functions, please contact our pre-sales or technical support. 2.10 Report After entering the Report of [Access Control], the user can view [All Access Control Events] and [Personnel Access Levels] as needed. If the user wants to view [Access Control Exception Events], they can find relevant records rapidly using the search function. 201 Circle Drive N, Suite 116 Piscataway, NJ 08854 Tel: 732-412-6007 Fax: 732-412-6008 www.zkaccess.com 3. Database Management To prevent damage and loss of data in the database server caused by objective factors, it is recommended that the user use the backup and restore functions in the system to manage the data in the system. The simple operations for backup and restoration of database is as follows: 3.1 Setting of Database Backup Path During the software installation process or when the user needs to use [Service Controller] - [Set Database Backup Path] to configure the database backup path on the server. 3.2 Backup Database 1. Select [Immediate Backup] and the system will start backing up the database. When the value in the column of “Whether backup successful” is changed from “Processing” to “Yes”, backup of database was successful. If it is changed to “No”, the backup failed. Notes: It is recommended that the user backup the data after setting up personnel information, device information and setting access permissions. Currently, the system does not support the backup of Oracle databases. 2. After the system starts normal operations, the user can select [Scheduled Backup] for regular backup to prevent data loss. 3.3 Restore Database When the user needs to restore the database files that have been backed up, they need to find the backup files to be restored under the backup directory previously set in [Service Controller] - [Restore Database] on the server and click the [Restore] button. Notes: 1. Do not close any command window opening up during the restoration process of the database. Backup of the database can be operated at any client (browser) by the user with permission to back up the database. The setting of database backup path and restoration of databases shall be operated at [Service Controller] on the server. 2. After the database backup path is set on the server, it is recommended that the user do not set up several planned backups at the same server, which will increase load of the server. 3. In case of failure of backup and restoration please refer to directions in [Service Controller] and [System setting] in the User Manual and relevant parts in FAQ. 201 Circle Drive N, Suite 116 Piscataway, NJ 08854 Tel: 732-412-6007 Fax: 732-412-6008 www.zkaccess.com