1
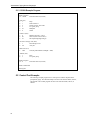
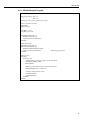
52202/52203
Tipping Bucket
Raingauge
User Manual
Issued 30.11.10
Copyright © 1998-2010 Campbell Scientific Ltd.
CSL 382
Guarantee
This equipment is guaranteed against defects in materials and workmanship.
This guarantee applies for twelve months from date of delivery. We will
repair or replace products which prove to be defective during the guarantee
period provided they are returned to us prepaid. The guarantee will not apply
to:
•
Equipment which has been modified or altered in any way without the
written permission of Campbell Scientific
•
Batteries
•
Any product which has been subjected to misuse, neglect, acts of God or
damage in transit.
Campbell Scientific will return guaranteed equipment by surface carrier
prepaid. Campbell Scientific will not reimburse the claimant for costs incurred
in removing and/or reinstalling equipment. This guarantee and the Company’s
obligation thereunder is in lieu of all other guarantees, expressed or implied,
including those of suitability and fitness for a particular purpose. Campbell
Scientific is not liable for consequential damage.
Please inform us before returning equipment and obtain a Repair Reference
Number whether the repair is under guarantee or not. Please state the faults as
clearly as possible, and if the product is out of the guarantee period it should
be accompanied by a purchase order. Quotations for repairs can be given on
request. It is the policy of Campbell Scientific to protect the health of its
employees and provide a safe working environment, in support of this policy a
“Declaration of Hazardous Material and Decontamination” form will be
issued for completion.
When returning equipment, the Repair Reference Number must be clearly
marked on the outside of the package. Complete the “Declaration of
Hazardous Material and Decontamination” form and ensure a completed copy
is returned with your goods. Please note your Repair may not be processed if
you do not include a copy of this form and Campbell Scientific Ltd reserves
the right to return goods at the customers’ expense.
Note that goods sent air freight are subject to Customs clearance fees which
Campbell Scientific will charge to customers. In many cases, these charges are
greater than the cost of the repair.
Campbell Scientific Ltd,
Campbell Park, 80 Hathern Road,
Shepshed, Loughborough, LE12 9GX, UK
Tel: +44 (0) 1509 601141
Fax: +44 (0) 1509 601091
Email: [email protected]
www.campbellsci.co.uk
PLEASE READ FIRST
About this manual
Please note that this manual was originally produced by Campbell Scientific Inc. primarily for the
North American market. Some spellings, weights and measures may reflect this origin.
Some useful conversion factors:
Area: 1 in2 (square inch) = 645 mm2
Length:
1 in. (inch) = 25.4 mm
1 ft (foot) = 304.8 mm
1 yard = 0.914 m
1 mile = 1.609 km
Mass:
1 oz. (ounce) = 28.35 g
1 lb (pound weight) = 0.454 kg
Pressure:
1 psi (lb/in2) = 68.95 mb
Volume:
1 UK pint = 568.3 ml
1 UK gallon = 4.546 litres
1 US gallon = 3.785 litres
In addition, while most of the information in the manual is correct for all countries, certain information
is specific to the North American market and so may not be applicable to European users.
Differences include the U.S standard external power supply details where some information (for
example the AC transformer input voltage) will not be applicable for British/European use. Please
note, however, that when a power supply adapter is ordered it will be suitable for use in your country.
Reference to some radio transmitters, digital cell phones and aerials may also not be applicable
according to your locality.
Some brackets, shields and enclosure options, including wiring, are not sold as standard items in the
European market; in some cases alternatives are offered. Details of the alternatives will be covered in
separate manuals.
Part numbers prefixed with a “#” symbol are special order parts for use with non-EU variants or for
special installations. Please quote the full part number with the # when ordering.
Recycling information
At the end of this product’s life it should not be put in commercial or domestic refuse
but sent for recycling. Any batteries contained within the product or used during the
products life should be removed from the product and also be sent to an appropriate
recycling facility.
Campbell Scientific Ltd can advise on the recycling of the equipment and in some cases
arrange collection and the correct disposal of it, although charges may apply for some
items or territories.
For further advice or support, please contact Campbell Scientific Ltd, or your local agent.
Campbell Scientific Ltd, Campbell Park, 80 Hathern Road, Shepshed, Loughborough, LE12 9GX, UK
Tel: +44 (0) 1509 601141 Fax: +44 (0) 1509 601091
Email: [email protected]
www.campbellsci.co.uk
Contents
PDF viewers note: These page numbers refer to the printed version of this document.
Use the Adobe Acrobat® bookmarks tab for links to specific sections.
1. Description ................................................................... 1
2. Specifications .............................................................. 1
3. Installation and Siting ................................................. 2
3.1 Choice of Site ........................................................................................... 2
3.2 Installation ................................................................................................ 2
3.2.1 Unpacking ...................................................................................... 2
3.2.2 Mounting ........................................................................................ 2
3.2.3 Levelling......................................................................................... 4
4. Wiring ........................................................................... 4
4.1 Wiring to a Pulse Channel ....................................................................... 5
4.2 Wiring to a Control Port.......................................................................... 5
4.3 Model 52202 Raingauge with Heater ...................................................... 5
5. Datalogger Programming............................................ 6
5.1 Pulse Channel Example Programs ........................................................... 6
5.1.1 CR1000 Example Program ............................................................. 6
5.1.2 CR200(X) Series Example Program .............................................. 7
5.1.3 CR10X Example Program .............................................................. 8
5.2 Control Port Example............................................................................... 8
5.2.1 CR1000 Example Program ............................................................. 9
5.2.2 CR10X Example Program ............................................................ 10
6. Maintenance ............................................................... 10
7. Calibration .................................................................. 11
8. Advantages and Limitations of a Tipping
Bucket Raingauge .................................................. 11
Figures
1. Dimensions of 52202/52203 Tipping Bucket Raingauge .......................... 3
2. Wiring Diagram for 52202/52203.............................................................. 4
Tables
4-1. Wiring for Pulse Channel Input .............................................................. 5
4-2. Wiring for Control Port Input ................................................................. 5
5-1. Multipliers............................................................................................... 6
i
52202/52203 Tipping Bucket Raingauges
The 522 range consists of two well-designed tipping bucket raingauges, manufactured by R M
Young, which meet the specifications of the WMO and combine durable construction with very
reasonable cost. The gauge construction makes extensive use of thermoplastic components to
give maximum performance with good resistance to corrosion. The 52202 incorporates a
heater for year-round use in all climates, while the 52203 is an unheated version of the same
gauge. The gauges can be mounted on a flat level surface or mounted on a 34 mm diameter
pole.
1. Description
Extensive use is made of thermoplastic components in the manufacture of the
gauges which helps to ensure maximum performance and value with minimal
maintenance. The gauges have built-in bullseye levelling devices for easy and
precise adjustment.
The design uses a proven tipping-bucket mechanism for simple and effective
rainfall measurement. The bucket geometry and material are specially selected for
maximum water release, thereby reducing contamination and errors. Measured
precipitation is discharged through a collection tube (which can then be collected
if required) for verification of total rainfall. The heated version should be used in
climates where snow and ice are expected.
2. Specifications
Gauge Catchment Area:
200 cm2
Resolution:
Accuracy:
0.1 mm per tip
2% up to 25 mm/hour
3% up to 50 mm/hour
Output:
Magnetic reed switch
Contact Rating;
Operating Temperature:
Heater (52202):
Power Req. (52202):
24V AC/DC, 500 mA max.
-20°C to +50°C (for 52202 heated version)
Rated 18W @ 24V AC
18-24V AC, 0.75A min.
1
52202/52203 Tipping Bucket Raingauges
3. Installation and Siting
3.1 Choice of Site
Site the gauge carefully, avoiding obvious sources of error such as nearby trees or
buildings. A useful ‘rule of thumb’ is that the distance between the gauge and any
obstruction should be at least as great as twice the height of the obstruction above
the ground. For standard meteorological sites in the UK, the Meteorological Office
specify the height at which the rim of a raingauge should be above a short grass
surface, and the 52202/52203 should be exposed similarly if measurements are
required for comparison with those from agrometeorological or synoptic sites.
In some countries it is common practice for the gauge to be mounted above the
ground – for example with the lip at a height of 1 metre. A suitable 34 mm
diameter pole can be used to achieve this requirement.
NOTE
No two raingauge designs are ever likely to produce identical
results, and identical raingauges can give slightly different catches
even when sited within a metre of each other.
While the 52202/52203 raingauges have been designed for pole mounting,
research has shown that a raingauge obstructs the flow of air and that the flow
accelerates and turbulence increases over the top of the funnel. This can cause less
rain to be collected in the funnel than otherwise would have fallen on the ground.
In most cases, this phenomenon is ignored but it may be corrected for
arithmetically, or overcome physically either using special wind deflection screens
around the gauge or by placing the gauge in a pit so that the rim of the funnel is
level with the ground. The pit is covered by a grating to simulate the aerodynamic
roughness of the ground surface while preventing any splash into the funnel. There
are obvious advantages with this method, but it is not always practical (for
example in sites subject to significant snowfall). Further details on the exposure of
raingauges are given in HMSO (1956, 1982) and by Rodda (1967). Another useful
text on exposure and associated errors is Painter (1976).
The gauge should also be sited to avoid possible contamination by falling leaves,
dirt or other debris.
3.2 Installation
3.2.1 Unpacking
Unpack the raingauge carefully. The model 52202/52203 is fully calibrated by the
manufacturer before despatch. The moveable bucket is fitted with a retainer to
prevent damage during shipping, and this retainer must be removed during
installation, as indicated below.
3.2.2 Mounting
The 52202 and 52203 raingauges are specifically designed for mounting on a pole
or tube of 34 mm outside diameter — see Figure 1, below. If required, the pole
mounting assembly can be removed and the gauge can be mounted directly to a
flat surface using appropriate securing bolts. The base mounting flange is provided
with three holes on a 160 mm pitch circle diameter for bolting purposes. The
raingauge is a light-weight instrument and it must therefore be bolted down
securely.
2
User Manual
If you need to mount the gauge on concrete, we recommend the use of Rawlbolts.
Alternatively, a concrete paving slab may be more convenient as a base, in which
case through-bolts or screws are suitable. Whichever is chosen, we recommend
the use of large washers to spread the load more evenly around the mounting holes
in the plastic base. You will also need to make provision to safely route the cable
from its exit beneath the raingauge to the datalogger/enclosure.
The raingauge should be mounted on your prepared site as follows:
1. Loosen the three screws that retain the housing to the base assembly, and
carefully lift the housing free of the base.
2. Remove the shipping retainer from the bucket and verify that the bucket tips
freely.
3a. If you are mounting the gauge on a pole, loosen the retaining clip and slide the
base assembly onto the pole. When in the required position tighten the clip to
secure the gauge.
3b. If you are mounting the gauge to a flat surface, remove the pole mounting
assembly to reveal the flat mounting base. Mount the gauge to the required
surface using three appropriate sized bolts.
4. When the gauge is securely mounted adjust the levelling screws until the
‘bulls-eye’ levelling device is centred.
5. Replace the housing and retighten the screws.
NOTE
If you are installing the 52202 heated version of the gauge, attach an
appropriate power supply (rated 0.75A min. at 18-24V) to terminals
C & D before the housing is fitted.
Figure 1 Dimensions of 52202/52203 Tipping Bucket Raingauge
3
52202/52203 Tipping Bucket Raingauges
3.2.3 Levelling
If the raingauge is tilted by more than a few degrees, the bucket mechanism may
be thrown out of balance, significantly affecting its calibration. Furthermore,
during wind-driven rain the response of a gauge with a tilted funnel collector will
vary with wind direction. Check that the raingauge is level frequently — see the
following sections on maintenance and calibration.
4. Wiring
The raingauge is supplied with a 6m 4-wire cable, which may be extended if
required using screened cable. For most applications the raingauge may be
connected directly to a pulse counting input on the datalogger as shown in Figure
2.
NOTE
The red and black wires are only used for the 52202 heated gauge.
For a very long cable, a significant capacitance can exist between the conductors,
which discharges across the reed switch as it closes. As well as shortening the life
of the switch, a voltage transient may be induced in any other wires which run
close to the raingauge cable each time the gauge tips. If you intend to use a long
cable (greater than 30 metres) you should fit a 100Ω series resistor in the cable as
close to the gauge as possible as shown in Figure 2, below, in order to protect the
reed switch from arcing and to prevent transients. It is best to fit this resistor inside
the raingauge to protect it from any possible contamination from rain or snow.
Figure 2 Wiring Diagram for 52202/52203
4
User Manual
4.1 Wiring to a Pulse Channel
NOTE
When Short Cut software is used to generate the datalogger
program, the sensor should be wired to the channels shown on the
wiring diagram created by Short Cut.
The 52202 is typically wired to a datalogger’s pulse channel (see Table 4-1).
Table 4-1. Wiring for Pulse Channel Input
Colour
Description
Green
Signal
White
Signal
Return
Shield
Clear
CR800
CR1000
CR3000
CR5000
Pulse
Channel
CR500
CR510
CR10X
21X
CR7
CR23X
Pulse
Channel
G
Pulse
Channel
CR200(X)
Series
P_SW
G
4.2 Wiring to a Control Port
Dataloggers listed in Table 4-2 have the capability of counting switch closures on
some of their control ports. When a control port is used, the return from the rain
gauge switch must be connected to +5 volts on the datalogger.
Table 4-2. Wiring for Control Port Input
Colour
Green
Description
Signal
White
Signal
Return
Shield
Clear
CR800
CR1000
CR3000
Control
Port
5V
CR500
CR510
C2/P3
5V
CR10X
Control
Port
5V
CR23X
Control
Port
5V
G
The CR10 does not support the use of control port inputs with the Pulse Count
instruction.
4.3 Model 52202 Raingauge with Heater
Model 52202 has a built-in heater to enable the raingauge to be used all year round
in cold climates. The heater can be powered from any 18-24V AC supply. Connect
the red wire to the positive and the black wire to the negative terminal. The heater
consumes up to 0.75 amps.
NOTE
The heater is not guaranteed to melt heavy ice concentrations or
snow which has filled the bucket area.
5
52202/52203 Tipping Bucket Raingauges
5. Datalogger Programming
This section is for users who write their own programs. A
datalogger program to measure this sensor can be generated
using Campbell Scientific’s Short Cut Program Builder
software. You do not need to read this section to use Short
Cut.
NOTE
Precipitation is measured using a Pulse Count with a switch closure configuration
code. The multiplier used in the Pulse Count instruction determines the units in
which rainfall is reported (see Table 5-1).
Table 5-1. Multipliers
Rain Gauge
0.01 in.
1 in.
0.1 mm
1 mm
52202
0.394
0.00394
1.0
0.1
5.1 Pulse Channel Example Programs
The following example programs use a pulse channel to read the output from the
precipitation gauge. The CR1000 example will also work with the CR800, CR850,
CR3000, and CR5000. CR9000(X) programming is similar to the CR1000 except
it has an additional parameter in the PulseCount instruction to specify the pulse
module’s slot.
The CR10X program will also work with the CR500, CR510, CR10, 21X or
CR23X. CR7 programming is similar to the CR10X but has an additional
parameter in the PulseCount instruction to specify the slot that the Pulse Card is in.
5.1.1 CR1000 Example Program
'CR1000
'RM_Young Tipping Blk > P1
'
Wht > ground
'Cabling for heater goes to 24VAC power supply
Public Rain_mm
Units Rain_mm=mm
DataTable(Rain,True,-1)
DataInterval(0,60,Min,0)
Totalize(1,Rain_mm,FP2,0)
EndTable
BeginProg
Scan(1,Sec,1,0)
PulseCount(Rain_mm,1,1,2,0,0.1,0)
CallTable(Rain)
NextScan
EndProg
6
User Manual
5.1.2 CR200(X) Series Example Program
'CR200(X) Series
'RM_Young Tipping Blk > P_SW
'
Wht > ground
'Cabling for heater goes to 24VAC power supply
'Declare Variables and Units
Public Rain_mm
Units Rain_mm=mm
'Define Data Tables
DataTable(Rain,True,-1)
DataInterval(0,60,Min)
Totalize(1,Rain_mm,0)
EndTable
'Main Program
BeginProg
Scan(1,Sec)
'52202 Rain Gauge measurement Rain_mm:
PulseCount(Rain_mm,P_SW,2,0,0.1,0)
'Call Data Tables and Store Data
CallTable(Rain)
NextScan
EndProg
7
52202/52203 Tipping Bucket Raingauges
5.1.3 CR10X Example Program
;{CR10X}
*Table 1 Program
01: 1.0000
Execution Interval (seconds)
1: Pulse (P3)
1: 1
2: 1
3: 2
4: 3
5: 0.1
6: 0
Reps
Pulse Channel 1
Switch Closure, All Counts
Loc [ Rain_mm ]
Multiplier
Offset
2: If time is (P92)
1: 0
Minutes (Seconds --) into a
2: 60
Interval (same units as above)
3: 10
Set Output Flag High (Flag 0)
3: Set Active Storage Area (P80)
1: 1
Final Storage Area 1
2: 101
Array ID
4: Real Time (P77)
1: 1220
Year,Day,Hour/Minute (midnight = 2400)
5: Totalize (P72)
1: 1
2: 3
Reps
Loc [ Rain_mm ]
*Table 2 Program
01: 0
Execution Interval (seconds)
*Table 3 Subroutines
End Program
5.2 Control Port Example
The following example programs use a control port to read the output from the
precipitation gauge. The CR1000 example will also work with the CR800, CR850,
and CR3000. The CR10X program will also work with the CR500, CR510, or
CR23X.
8
User Manual
5.2.1 CR1000 Example Program
'CR1000
'RM_Young Tipping Blk > C4
'
Wht > 5v
'Cabling for heater goes to 24VAC power supply
'Declare Variables and Units
Public BattV
Public Rain_mm
Units BattV = Volts
Units Rain_mm = mm
DataTable(OneMin,True,-1)
DataInterval(0,1,Min,10)
Totalize (1,Rain_mm,FP2,False)
EndTable
'Define Data Tables
DataTable(OneDay,True,-1)
DataInterval(0,1440,Min,10)
Minimum(1,BattV,FP2,False,False)
Totalize (1,Rain_mm,FP2,False)
EndTable
'RM Young tipping bucket
'Main Program
BeginProg
Scan(5,Sec,1,0)
'Default Datalogger Battery Voltage measurement BattV
PanelTemp (PTemp,_50Hz)
Battery(BattV)
'RM Young Heated Rain Gauge measurement Rain_mm
PulseCount(Rain_mm,1,14,2,0,0.1,0)
'Call Data Tables and Store Data
CallTable(OneMin)
CallTable(OneDay)
NextScan
EndProg
9
52202/52203 Tipping Bucket Raingauges
5.2.2 CR10X Example Program
;{CR10X}
;
*Table 1 Program
01: 1
Execution Interval (seconds)
1: Pulse (P3)
1: 1
2: 8
3: 2
4: 1
5. 0.1
6: 0
Reps
Control Port 8 (switch closure only) ;Black wire connect to C8
Switch Closure, All Counts
Loc [ Rain_mm ]
Multiplier
Offset
2: If time is (P92)
1: 0
Minutes (Seconds --) into a
2: 60
Interval (same units as above)
3: 10
Set Output Flag High (Flag 0)
3: Set Active Storage Area (P80)
1: 1
Final Storage Area 1
2: 101
Array ID
4: Real Time (P77)
1: 1220
Year,Day,Hour/Minute (midnight = 2400)
5: Totalize (P72)
1: 1
2: 1
Reps
Loc [ Rain_mm ]
*Table 2 Program
02: 0.0000
Execution Interval (seconds)
*Table 3 Subroutines
End Program
Output Instruction 72, Totalize, is used in the output section of the program to
output the total rainfall over the output interval. This section should be executed
every scan and not placed in a subroutine or conditional statement.
6. Maintenance
To ensure reliable and accurate measurements, we recommend that the following
checks be carried out every month if possible:
10
1.
Inspect the funnel for any damage or blockage and check the integrity of the
connecting cable. At certain times of the year, leaves may accumulate in the
bottom of the funnel, clogging the filter and preventing the flow to the buckets
beneath, or reducing the flow rate to a slow drip. The obstruction is best
cleared by inverting the funnel (after removal from the base) and pouring
water back through from the spout beneath the collecting surface.
2.
Check that the gauge is still level. It is surprisingly easy for an apparently
immovable gauge to become tilted as a result of small ground movements,
vandalism or just inquisitive fingers.
User Manual
3.
Check the movement of the tipping bucket and the functioning of the gauge.
This can be done by slowly pouring a measured quantity of water (say 100 ml)
through the gauge and counting the tips — see calibration section below. It is
worthwhile carrying this out at regular weekly intervals (for example, every
Monday at 0900) while leaving the gauge connected to the datalogger.
Providing a significant volume of water is used, these weekly checks can
easily be identified in the logged measurements. This simple procedure
confirms that the gauge is functioning, detects any marked change in the
calibration and (if carried out punctually) introduces an independent time
check into the records.
7. Calibration
To check or recalibrate the raingauge, the following steps are suggested:
1. With the raingauge properly levelled, slowly drip a measured volume of water
into the collection funnel at a rate of approximately 3.3 ml per minute. This is
equivalent to a rainfall of 10 mm/hour, as recommended in BS7843 Section 2.1
for calibration of tipping bucket raingauges.
2. Carefully count how many times the bucket tips — it should tip five times for
each 10 ml of water. For example, if you use 100 ml of water the bucket should
tip approximately 50 times. You can count the number of tips manually or
with a datalogger connected to the raingauge.
3. If the count shows an error of more than 2%, adjust the calibrating screws to
correct the error — raise the screws if the count is low, lower the screws if the
count is high. Always adjust both screws equally.
This type of dynamic calibration gives repeatable results in a test environment, but
it is not a true representation of the gauge’s sensitivity to natural precipitation.
When used in the UK useful results can be obtained by comparing the output from
the 52202/52203 with the catches from a standard ‘Snowdon pattern’ gauge
(HMSO, 1956) sited nearby. If this comparison is carried out with care, a
calibration factor for natural rainfall can be calculated from the slope of a
graphical plot of (number of tips) against (catch from Snowdon gauge in mm).
8. Advantages and Limitations of a Tipping Bucket
Raingauge
Gauges which operate on the tipping bucket principle provide a digital output,
which simplifies connection to a datalogger. The pulses returned during rainfall
may be counted over any time interval desired allowing accurate determination of
the rainfall rate (this variable, sometimes called ‘intensity’, is frequently used in
soil erosion studies and is relevant to some aspects of crop pathology).
A tipping bucket gauge responds to discrete quanta of rainfall, and the accuracy
and reproducibility of this quantum are determined not only by factors such as
friction in the bearings, etc. but also by the rate of fill of the buckets. When the
rainfall rate is high, a bucket may start to tip when the necessary volume of water
has been collected, but while the bucket is moving away from the funnel outlet, an
extra volume will have been collected and lost through spillage. The resulting
degradation in accuracy is of the order of 4% at rainfall rates of 25 mm/hr and 8%
at 133 mm/hr for most gauges (Parkin et al, 1982). This is important when results
from gauges of different designs are compared. These errors worsen when gauge
sensitivity is increased. It follows that gauge design is always a compromise
between the need for good resolution and good overall accuracy in rainfall totals.
11
52202/52203 Tipping Bucket Raingauges
References
HMSO (1956) Handbook of Meteorological Instruments, Part 1, Met.0. 577.
HMSO (1982) Observers Handbook, Met.0. 933.
Painter, R.D. (1976) in Methods of Plant Ecology pp 369-410. Ed. by
S.B.Chapman, Blackwell Scientific Press, Oxford
Parkin, D.A., King, W.D. and Shaw, D.E. (1982) An automatic raingauge
network for a cloud seeding experiment J.Appl.Meteorol. p 228.
Rodda, J.C., (1967) The rainfall measurement problem Proc. IAHS Gen. Ass.
Bern, IAHS Pub. No. 78, 215-231
12
CAMPBELL SCIENTIFIC COMPANIES
Campbell Scientific, Inc. (CSI)
815 West 1800 North
Logan, Utah 84321
UNITED STATES
www.campbellsci.com • [email protected]
Campbell Scientific Africa Pty. Ltd. (CSAf)
PO Box 2450
Somerset West 7129
SOUTH AFRICA
www.csafrica.co.za • [email protected]
Campbell Scientific Australia Pty. Ltd. (CSA)
PO Box 444
Thuringowa Central
QLD 4812 AUSTRALIA
www.campbellsci.com.au • [email protected]
Campbell Scientific do Brazil Ltda. (CSB)
Rua Luisa Crapsi Orsi, 15 Butantã
CEP: 005543-000 São Paulo SP BRAZIL
www.campbellsci.com.br • [email protected]
Campbell Scientific Canada Corp. (CSC)
11564 - 149th Street NW
Edmonton, Alberta T5M 1W7
CANADA
www.campbellsci.ca • [email protected]
Campbell Scientific Centro Caribe S.A. (CSCC)
300N Cementerio, Edificio Breller
Santo Domingo, Heredia 40305
COSTA RICA
www.campbellsci.cc • [email protected]
Campbell Scientific Ltd. (CSL)
Campbell Park
80 Hathern Road
Shepshed, Loughborough LE12 9GX
UNITED KINGDOM
www.campbellsci.co.uk • [email protected]
Campbell Scientific Ltd. (France)
3 Avenue de la Division Leclerc
92160 ANTONY
FRANCE
www.campbellsci.fr • [email protected]
Campbell Scientific Spain, S. L.
Avda. Pompeu Fabra 7-9
Local 1 - 08024 BARCELONA
SPAIN
www.campbellsci.es • [email protected]
Campbell Scientific Ltd. (Germany)
Fahrenheitstrasse13, D-28359 Bremen
GERMANY
www.campbellsci.de • [email protected]
Please visit www.campbellsci.com to obtain contact information for your local US or International representative.