1
digiXMAS Article Submitter 1.3.0
User’s Manual
DigiXMAS Article Submitter
INTRODUCTION
DigiXMAS Article Submitter is semi-automated article submission tool that quickly submits
your articles to hundreds of free article directories.
HOW IT WORKS?
According to user’s article data and manually confirmed category selection, DigiXMAS Article
Submitter sends submission request directly to directories and analyses response to report the
result. You don’t have to visit the directories.
KEY FEATURES
-
Automated account registration.
Automated article submission with smart, self-learning category selection algorithm
guaranties that your articles is submitted to most appropriate category.
Automated article listing check.
Support of Decaptcher service for image verifications.
Up to 50 concurrent connections that reduce your time to minimum.
Automatic rotation of unlimited number of titles, summaries, bodies, resources and
keywords.
Support of tokens randomization for generating multiple unique articles from one master
article.
Automatic record of submission status, submission date, error message and selected
category.
Import articles from text files.
Long list of free general article directories with Google Pagerank, updated regularly.
Colorful directory list that clearly shows the submission status of each article.
Support of online mode, so your directory list is always “fresh”.
Detailed submission reports in RTF and HTML format.
Support of multiple articles in single account.
Support of multiple user profiles in single account.
Flexible service packages.
STEP-BY-STEP GUIDE
1. Register a Free Account
You need an account to launch our tool. Go
http://www.digixmas.com/register.php to register a free account.
to
register
page
2. Download DigiXMAS Article Submitter
Go to download page in http://www.digixmas.com to download DigiXMAS Article
Submitter.
Copyright © 2010 – www.digixmas.com
All rights reserved.
digiXMAS Article Submitter 1.3.0
User’s Manual
3. Install
Double click to downloaded installer to install DigiXMAS Article Submitter.
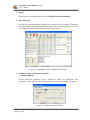
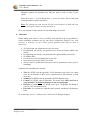
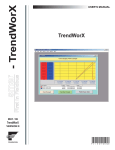
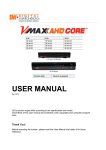
4. Start and Logon
Select the tool from Start Menu or double click to shortcut on your desktop to launch the
tool. Main window and logon dialog will be shown. Enter username and password to log
on. Software automatically downloads directory list from server.
Figure 4.1: DigiXMAS Article Submitter Main Window
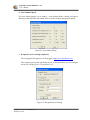
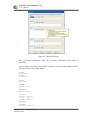
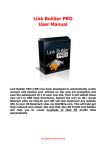
5. Common Settings and Submission Options
a. Common Options
Several submission parameters can be adjusted to make your submission most
comfortable. Select Submit->Options from main menu, the Options dialog will appears:
Figure 5.1: Submission Options Dialog
Copyright © 2010 – www.digixmas.com
All rights reserved.
digiXMAS Article Submitter 1.3.0
User’s Manual
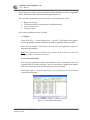
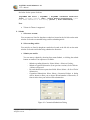
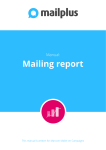
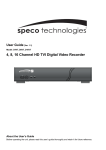
b. Auto Submit Options
For Auto Submit Options, go to Submit -> Auto Submit Mode, a dialog will appear,
allowing to enable/disable auto submit mode, as well as change appropriated settings.
Figure 5.2: Auto Submit Dialog
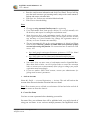
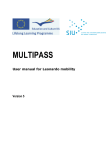
c. Decaptcher Service Settings (Optional)
The tool supports decaptcha service from guys at http://www.decaptcher.com .
After regitering an account, purchasing service credits from them, you can configure
the tool by selecting Tools > Decaptcha Service:
Figure 6.2: Decaptcha Service Dialog
Copyright © 2010 – www.digixmas.com
All rights reserved.
digiXMAS Article Submitter 1.3.0
User’s Manual
Choose My Decaptcher Account options, enter your Decaptcher account’s username
and password.
Enable this service by checking the Enable option.
If enabled, the tool will send CAPTCHA images to decaptcher.com and receives the
text on it. You won’t need to enter!
Also, there is an option for trying this service before purchasing. Just choose Test
Account option, enable the service and you are ready to enjoy the new comfort!
Note:
i. We are reseller of the decaptcha service from http://www.decaptcher.com.
Visit http://www.digixmas.com/tos.php for terms of service and detailed
service pricing.
ii. You have 20 test credits (decaptcha 20 images) for each run.By restarting
the tool you get new 20 credits, if you want to test more.
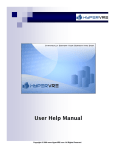
6. Add User Profiles
Go to menu My Profiles -> Add a profile, Add a profile dialog will appear.
Figure 6.1: Add a Profile Dialog
Enter your site information and click OK to continue. If successfully, the profile will be
added and shown at the left side of main window.
7. Account Registration
Copyright © 2010 – www.digixmas.com
All rights reserved.
digiXMAS Article Submitter 1.3.0
User’s Manual
Article directories require account registration before submitting an article. DigiXMAS
Article Submitter provides fully automated registration process.
There are four steps that have to be done before you can submit your article:
•
•
•
•
Register an account,
Get activation links from registration confirmation email,
Activate your account,
Create pen name.
Next sections explain these steps in details.
a. Register
Select My profiles -> Account Registration -> Register. The Register dialog appears
to allow choosing the number of directories that the registration will be processed.
After choosing number of directories, the tool will send registration requests to
directories automatically.
Note: The registration process takes several minutes. Sit back and relax until the In
Progress counter at status bar will show 0.
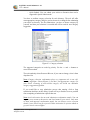
b. Get Activation Links
After receiving registration request, the directories send a confirmation email with
activation link for account activation. The tool can check the mailbox that supports
POP3 access and extracts the activation links from received emails.
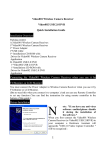
Select My Profiles -> Account Registration -> Get Activation Links. The Activation
Links dialog will appear.
Figure 7.1 Activation Links Dialog
Copyright © 2010 – www.digixmas.com
All rights reserved.
digiXMAS Article Submitter 1.3.0
User’s Manual
•
•
•
Enter the email account information and click Check Email. The tool will log
on to the email account to get incoming emails, analyzes the email content to
find out and extract activation links.
Click Save Act. Links to save activation links that found.
Click Close to close the dialog.
Note:
•
•
•
•
We suggest using separated Gmail account for registering.
If no confirmation email from specific directory is received, manually visit
the directory and request re-sending the confirmation email.
Some directories don’t send confirmation emails, but the owners activate
newly registered accounts manually. If that, you can bypass Activate Account
step and move to Create Penname step (change the registration status of
directory to Create Penname state manually).
The tool automatically fills up the setting parameters for Gmail and Yahoo
email accounts. However, you have to enable POP access function of email
account before using this function. For instructions how to enable the POP
access, visit:
•
•
http://mail.google.com/support/bin/answer.py?answer=13273 for Gmail
accounts (free service),
http://help.yahoo.com/l/us/yahoo/mail/yahoomail/mailplus/pop/pop35.html for Yahoo accounts (paid service).
Your email client can move some of confirmation email to Spam/Bulk Box.
Move them back to Inbox, run Get Activate Links to extract the activation
links, or activate your account manually (Don’t forget to change your profile
registration status accordingly).
If you use another POP3 email account, contact your administrator for
getting email account’s parameters.
c. Activate Account
Select My Profile -> Account Registration -> Activate. The tool will activate the
account at the directories that the activation links were found.
Note: The activation process will take several minutes. Sit back and relax until the In
Progress counter at status bar shows 0.
d. Create Pen Name
You have to create a penname before submitting your articles.
Pen name likes your nickname that will be published with your article instead of
using your real name. A user can have multiple pennames, but DigiXMAS Article
Copyright © 2010 – www.digixmas.com
All rights reserved.
digiXMAS Article Submitter 1.3.0
User’s Manual
Submitter registers one penname only. This pen name is same as name in your
profile.
Select My Profile -> Account Registration -> Create Pen Name. The tool will send
creating penname request to directories.
Note: The creating pen name process will take several minutes. Sit back and relax
until the In Progress counter at status bar shows 0.
Now, your account is ready and you can start submitting your articles.
8. Add Article
Before adding your article, be sure to carefully read and follow up next guidelines to
archive maximum acceptance rate for your article. (Submission guidelines vary from
directory to directory; we only collect general guidelines that valid for most of
directories).
•
•
•
•
•
•
•
The articles that you submit must be your own work.
By submitting your articles, you grant directory owners the right to publish your
articles.
By submitting your articles, you grant others the right to publish your articles.
No affiliate links!
Use the resource box for linking back to your site.
Please limit resource box links to 2 or fewer.
Articles must be spellchecked and proof read for grammatical errors prior to
submitting.
Guidelines for individual parts of article:
•
•
•
•
•
Title: No HTML code & hyperlinks, 50-100 characters long. Don’t use capital
letter for all characters in title, but use capital letter for first character of each
word only.
Summary: No HTML code & hyperlinks, 200-500 characters long.
Content: No HTML code & hyperlinks, 500 words long. Allow each line to
wrap naturally. Use double hard returns to start new paragraphs.
Resource (or author’s bio): No HTML code, up to 2 hyperlinks for linking to
your site, 150-700 characters long.
Keywords: Use commas for separating the keywords, maximum 150 characters
long.
Go to menu My Articles -> Add an Article, Add an Article dialog will appear.
Copyright © 2010 – www.digixmas.com
All rights reserved.
digiXMAS Article Submitter 1.3.0
User’s Manual
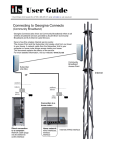
Figure 8.1: Add Article Dialog
Enter your article information. Add, edit or remove individual article’s parts as
neccessary.
You can import your article with multiple variations of each parts from single text file.
The article file has very simple format:
[TITLE]
Title Text 1
[TITLE]
Title Text 2
...
[TITLE]
Title Text n
[SUMMARY]
Summary text 1
....
[SUMMARY]
Summary text n
[CONTENT]
Content1 session 1
...bla ... bla ...
Content1 session n
[CONTENT]
..............
[CONTENT]
Content N session 1
Copyright © 2010 – www.digixmas.com
All rights reserved.
digiXMAS Article Submitter 1.3.0
User’s Manual
...bla ... bla ...
Content N session n
[RESOURCE]
Resource text 1
....
[RESOURCE]
Rersource text n
[KEYWORDS]
Keywords text 1
....
[KEYWORDS]
Keywords text n
[END]
Create your article file, select Import from Add Article dialog, select your article file and
click OK. The tool will automatically add your article.
There are several guidelines you have to follow when submitting your article to
directories. By moving the mouse pointer into text box areas, you can see general
guidelines for individual parts of article. They are basic guidelines that valid for all
directories in the list.
After filling up the information boxes, you can preview your article by clicking Preview
button. Make sure your article has correct format and the links to your sites in
Resource/Bio text are “live hyperlinks”.
Figure 8.2: Article Preview Dialog
Support of Tokens Randomization feature:
Title, Sumany, Content and Resource text can contain “Tokens” that will be randomly
selected when generating article before submission. Tokens randomization feature allows
to have multiple articles from one master article.
Copyright © 2010 – www.digixmas.com
All rights reserved.
digiXMAS Article Submitter 1.3.0
User’s Manual
See below for the syntax of tokens:
{DigiXMAS SEO Tools | digiXMAS | digiXMAS automated submission
tools} includes several {SEO | Search Engine Optimization} tools
that make webmaster’s life being {easier | more comfortable} …
Note :
•
Tokens-in-Tokens is supported.
9. Submit
a. Select user account:
Your accounts are listed in dropdown combo box located at the left side on the main
window. Select the account that being used for submitting article.
b. Select working article:
Your articles are listed in dropdown combo box located at the left side on the main
window. Select the article that being submitted to directories.
c. Submit your article:
You can start to submit by choosing from menu Submit, or clicking the submit
buttons on toolbar. Four options are available:
-
Submit to pending directories: Select Submit->Submit to Pending.
Submit to bypassed directories (from previous sessions): Select Submit>Submit to Bypassed.
Re-send submission requests that failed: Select Submit->Re-Send Failed
Submissions.
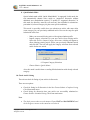
Customized Submission: Select Submit->Customized Submit. A dialog
will be shown to allow you to choose PR and number of directories, or
from/to index that your article will be submitted to.
Figure 9.1: Customized Submission Dialog
Copyright © 2010 – www.digixmas.com
All rights reserved.
digiXMAS Article Submitter 1.3.0
User’s Manual
-
Quick Submit: You can submit your article to directories that can be
supported in Quick Submit mode.
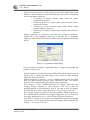
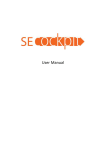
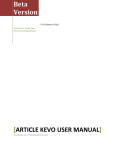
You have to confirm category selection for each directory. The tool will offer
most appropriate category and give you last chance it to change before submitting
your article to directory. For first submissions, you have to choose category by
yourself, and then your selection is recorded and will be used for next category
suggestion.
Figure 9.2: Category selection
The suggested categories are order by priority. Use the << and >> buttons to
move between them.
The tool randomly selects Resource/Bio text, if you want to change, select it from
dropdown list.
Note: Category selection confirmation plays very important role in our selflearning algorithm. Choose Bypass if you don’t find appropriate category for
your article. Choosing of non-relevant category will break our automatic
category suggestion algorithm.
If you would like to stop submission process that running, click to Stop
submission checkbox on this dialog. System will try to finish as soon as possible
after completing of submission requests that sent.
Note: Article directories do not send submission confirmation emails. You can
log in to your account at directories and check status of your article. Only some
of them send approval confirmation emails, but you always receive rejection
emails if your article has got rejected. Follow instruction in rejection emails to
get your article reviewed again.
Copyright © 2010 – www.digixmas.com
All rights reserved.
digiXMAS Article Submitter 1.3.0
User’s Manual
d. Quick Submit Mode:
Special submit mode called “Quick Submit Mode” is supported. In this mode, the
tool automatically submits active article to “supported” directories without
additional user manipulation required. To qualify as “supported directories” in
this mode, the directory must have all necessary data available for submission:
pen/author id, selected category id (plus some special conditions).
This mode is especially useful when you submit new article with same niche
(same category) as your previously submitted article. Here are the steps for quick
submission in this case:
-
Make your new article being active with registered author profile.
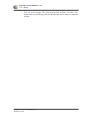
Import category selections for your new article from existing article.
Select My Articles->Import Category Selections. A dialog will appear to
allow choosing existing article. Select your previously submitted article
and click OK. The tool will apply the category selections from selected
article for the new article.
9.3: Import Category Selections
-
Choose Submit->Quick Submit.
Also, this mode is useful when re-sending failed submission with already selected
category.
10. Check Article Listing
The tool can check for listing of your articles in directories.
There are two options:
•
•
Check for listing in all directories in the list: Choose Submit->Complete Listing
Check from main menu.
Check listing for directories that your article was successfully submitted to:
Choose Submit->Standard Listing Check from main menu.
Note:
•
The check process takes several minutes. Please WAIT and DO NOTHING until
the In Progress counter on the status bar will show 0.
Copyright © 2010 – www.digixmas.com
All rights reserved.
digiXMAS Article Submitter 1.3.0
User’s Manual
•
The listing check function requires your article being listed with original title. If
the directory owner has changed or edited the title before accepting, the tool
can’t report correctly.
11. Session Log
DigiXMAS Article Submitter records submission activity for active session. You can
view the log by choosing File->View Session Log from main menu.
Figure 11.1: Session Log.
12. Logoff
You have to log off before leaving the tool. System will back up all information that
necessary for your next submission.
13. Additional Functions
a. Edit a profile
The profile that has been added can be edited whenever you want to change some
information. Choose My profiles -> Edit a Profile from main menu and a dialog will
appear. Edit the field that you want and click OK.
Copyright © 2010 – www.digixmas.com
All rights reserved.
digiXMAS Article Submitter 1.3.0
User’s Manual
Figure 13.1: Edit a Profile Dialog
Note: New user profile information will be used for next registration request
only.
b. Edit an article
The article that has been added can be edited whenever you want to change some
information. Choose My articles -> Edit an Article from main menu and a dialog will
appear. Edit the field that you want and click OK.
Figure 13.2: Edit Article Dialog
The Categories field contains the category information that you have selected. If you
made some mistakes when choosing category, you can clear Categories field to blank
and reset automatic category selection algorithm to achieve more accuracy.
c. Report Function
You can get detailed submission report for your individual article. Choose Submit>Submission Report from main menu. The report options dialog appears. Select the
submissions that you want to include in your report, and then click OK.
Copyright © 2010 – www.digixmas.com
All rights reserved.
digiXMAS Article Submitter 1.3.0
User’s Manual
Figure 13.3: Report Options
The report will be shown in RTF or HTML format as you choose. You can save to
file or print directly to printer.
Figure 13.4: Submission Report
d. Directory List Sort Function
The directory list can be sorted by several ways: URL, Pagerank, Registration Status,
Submission Status Submission Date and Message text. Simply double-click to the
header of appropriated column and the tool will sort the list at once.
Note: DO NOT perform sorting while In Progress counter located on status bar
shows some activity. Breaking this rule will cause reporting errors.
e. Submission Data Backup & Restore
Submission data is stored in server text files, located in the application folder:
•
•
•
•
OPTIONS.TXT: Contains settings for the tool.
PROFILES.TXT: Contains profile information.
ARTICLES.TXT: Contains the articles information.
/DATA/*.*: Contains the submission data.
Back up them regularly!!!
f. Additional Manual Manipulations:
Some manual manipulations are useful and can help during submission.
-
Double click to the directory’s index in directory list: Open directory in external
default browser.
Copyright © 2010 – www.digixmas.com
All rights reserved.
digiXMAS Article Submitter 1.3.0
User’s Manual
-
-
Double-click to the directory’s URL in directory list: If user double-clicks to the
directory’s URL in directory list, the tool will put to action a process, depending
on the actual status of directory:
o If directory in Register! register status: sends out register
information to directory.
o If directory in Activate! register status: opens Activation Link to
activate user account.
o If directory in Create Penname! register status: Sends creating
penname request to directory.
o If directory in Complete register status: Submits active article to
directory.
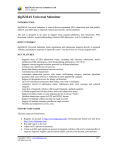
Manual assignment of registration status and edit registration infomarion:
Double-click to the registration status cell in directory list. A registration
submission status dialog will be shown to allow choosing registration status from
the list.
Figure13.5: Registration Status Dialog
You can change the directory’s registration status, or input activation link and
penname id, if necessary.
-
-
-
-
-
Manual assignment of submission status: Double-click to the directory’s status in
directory list. A submission status dialog will be shown to allow choosing
submission status from the list.
Manual assignment of directory’s activity: Double-clicking to the User Mark
field will switch directory between Active and Inactive State. The Inactive
directory will be automatically bypassed during mass-submission.
Reset category selection: Double-clicking to the Category field will cause
resetting category selection for active directory. This can be done for
pending/bypassed or failed directories only. If you want to clear all category
selections for active article, choose My Articles ->Reset Category Selections.
Reset category suggestion algorithm: The tool remembers which categories you
have selected and uses them for next category suggestion. You can reset these
records by choosing My Articles ->Reset Category Suggestion Algorithm.
Download pre-registered account data: Pre-registered accounts can be changed
time by time. You can download pre-registered account’s data by choosing My
Profiles -> Pre-registered account ...
Copyright © 2010 – www.digixmas.com
All rights reserved.
digiXMAS Article Submitter 1.3.0
User’s Manual
-
View the error message: The error message may be long. For better view,
double-click to Last Message field and the message will be shown on separated
window.
Copyright © 2010 – www.digixmas.com
All rights reserved.
digiXMAS Article Submitter 1.3.0
User’s Manual
HARDWARE AND SOFTWARE REQUIREMENT
DigiXMAS Article Submitter requires good PC with Windows XP Pro or compatible
OS, GDI+ (Microsoft Windows Graphics Device Interface +) plus Internet Explorer 6.0
(or higher).
END OF DOCUMENT.
Thank you for using DigiXMAS Article Submitter.
DigiXMAS Team.
Copyright © 2010 – www.digixmas.com
All rights reserved.