1
Link Builder PRO
User Manual
Link Builder PRO (LBP) has been developed to automatically create
account and posting your articles on top web 2.0 properties and
save the subsequent url's of each new site. Then it will submit those
new url's to RSS Feed directories, Submit the url's to 40+ Social
Network sites via Ping.fm and LBP will also bookmark any website
URL to over 30 Bookmark sites via OnlyWire.com. This will help get
them indexed and ranked. Not only that, the LBP Profile Link Builder
will help you to create hundreds of High PR profile links
automatically.
Link Builder PRO Manual
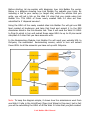
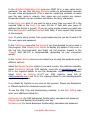
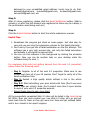
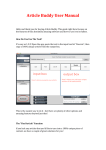
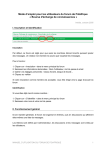
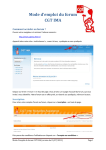
Before starting, let me explain with diagrams, how Link Builder Pro works.
Below is a diagram showing how Link Builder Pro submits your Links. By
including a link to your money (or target site) within the articles that you
write, you will get a link on the Web 2.0 sites that you create using Link
Builder Pro. The URL's of those newly created Web 2.0 sites are then
submitted to 2 'dispersal services'.
Using the URL's of the newly created sites Link Builder Pro will get one RSS
feed created at Hostmyrss and take that Feed and submit it to the RSS
directories listed in the Link Booster tab. Then it will send the Web 2.0 URL's
to Ping.fm which in turn will submit those same URL's to up to 40 plus social
sites/web 2.0 sites that you have accounts with.
In the Bookmarking Module, Link Builder Pro will send your website URL to
Onlywire, the automated bookmarking service, which in turn will submit
those URL's to all the accounts you have set up with Onlywire.
Note: To keep the diagram simple, it shows how the submissions work from
one Web 2.0 site in the Link Wheel (Open Link Wheel in this case), but in fact
you will be submitting the URL's of all the Web 2.0 sites that you just created.
Link Builder PRO Manual
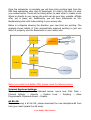
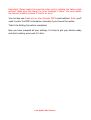
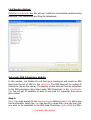
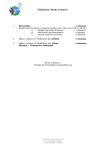
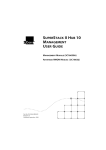
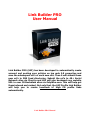
Once the submission is complete you will have links pointing back from the
RSS feed submission sites and 40 Social/web 2.0 sites to the Web 2.0 sites
you created earlier. These will be linking either to each other to create a Link
Wheel or directly to your money site which can be your blog, website, affiliate
offer, opt in page, etc. Additionally, you will have bookmarks on 30+
Bookmarking sites with links pointing to your money site.
Below is a diagram showing the direction your new links are pointing. The
example shows details of links automatically acquired pointing to just one
Web 2.0 property, plus the Bookmarks to your money site.
Before you install Link Builder PRO, please check the following items:
Internet Explorer Settings:
Please enable programmatic clipboard access, here's how: Click Tools →
Internet Options → Security → Custom Level → Scripting → Allow
Programmatic Clipboard Access → Enable.
64 Bit OS:
If you are using a 64 bit OS, please download the new decaptcher.dll from
here (you must replace the old ones):
Link Builder PRO Manual
http://www.linkbuilder-pro.com/decaptcherdll.zip
Win 7 & Vista User:
Please right click and select 'Run as Administrator' when running the
program.
Internet Explorer and .NET Framework:
This software requires the latest version of IE and .NET Framework,
Download IE 8 Here!
Download .NET Framework Here!
Antivirus Warning:
Don't panic if you get an antivirus warning when you are trying to run this
program. It is from decaptcher.dll (for automatic captcha solving purpose).
Just click 'add to exception' when you get that warning. This program is
100% virus-free!
IMPORTANT: Do not click 'ignore' in your AV program. But click 'add to
exception' or you will get errors when running the program. It is different for
each AV program, you can 'google' it for further instruction.
If You Get RPC Error:
- Make sure to NOT close the IE window when the program is running.
- If you're using Vista/7, please right click and select 'Run as Admin'.
- Did you use a firewall? Make sure to allow the connection for this program.
- This may be caused because you're using a Non-English windows.
- Please see this article.
Improving Success Rates:
1. Please run CCleaner before using this software.
2. Please install a fresh IE 8 and remove any 3rd party add-ons.
3. Use a US proxy or VPN.
If Your IP Is Not From US:
You won't get a high success rate if your IP is not from US (because some
web 2.0 properties have different layout, etc). Please use a US proxy to solve
this issue: http://www.yourprivateproxy.com/
Resetting Your License:
If you want to install this software on another computer, you must reset your
license here: http://www.linkbuilder-pro.com/reset_license.php
Link Builder PRO Manual
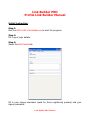
Initial Setup Instructions:
Step 1:
Download the program from here:
http://www.linkbuilder-pro.com/
Step 2:
Extract and double-click the LBP Link Wheel Builder .exe to start the program
(The Blue square with a white 'L'). Note: DO NOT close the IE browser or you
will get an error.
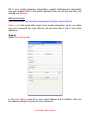
Step 3:
Fill in your login details if you have ordered the FULL version of the software
or just click Free Trial to test the trial version of the software.
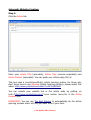
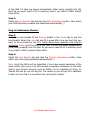
Step 4:
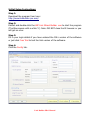
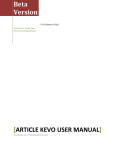
Click the Config tab.
Link Builder PRO Manual
In the Websites Registration Info area you MUST fill in a user name and a
password. You can click the Auto Generate button to automatically generate
the user name and password. (This is used for registering websites, so make
sure the user name is unique). User name can not contain any spaces.
Passwords should only use numbers and letters. No fancy characters.
In the Proxy Info area: If you want to use a proxy then you must fill in the
required fields in the Proxy Info area. Fill the IP field with your proxy IP
address (the format is ip:port). If you are using private proxies you must also
fill in the Username and the Password field. Note: It only support http proxies
at the moment.
Note: If you're using proxies from yourprivateproxy.com you don't need to fill
the user name and password.
In the Preferences area click Use Proxies if you have decided to use proxies in
this program. Click Display Error Details to display the details of any error in
the Log tab (recommended) and finally set the program timeout in the
Timeout field (60-120 is recommended, depending on your connection
speed).
In the Captcha Service area you can select how to solve the captchas using 3
different options:
Select the Manual Captcha option if you want to enter the captchas manually.
Select Decaptcher ($2 per 1000 captcha, more info at decaptcher.com) and
fill in the required details to use the decaptcher captcha solving service.
Select Death By Captcha ($1.75 per 1000 captcha, more info at
deathbycaptcha.com) and fill in the required details to use deathbycaptcha
captcha solving service.
Note: Death By Captcha is very slow at the moment. Please use Decaptcher
or Manual captcha for maximum success rate.
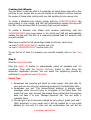
To use the RSS, Ping and Bookmarking modules, in the RSS Setting area
enter your additional details for:
Hostmyrss.com (for RSS Submission functionality) username and password.
Ping.fm (for Link Booster functionality) user key.
Onlywire.com (for Social Bookmark functionality) username and password.
Link Builder PRO Manual
Place the HostMyRSS and OnlyWire usernames in the boxes on the left and
passwords in the boxes on the right. The Ping.fm user key goes in the long
box.
Note: Click here to get your Ping.fm user key.
Additional Note: You must create HostMyRSS, OnlyWire and Ping.fm accounts
manually, but you can buy them from here if you are too lazy to do it
manually.
Click Save Changes!
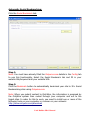
Step 5:
Click the Email tab.
Click the Generate Random Email Details button and then click the Auto
Create Yahoo Email button to automatically create a yahoo email account.
Link Builder PRO Manual
Important: Please watch the Logs tab when you're creating the Yahoo email
account. Make sure that there's no error message in there. You must restart
the account creation process if there's an error!
You can also use Gmail or Your Own Domain POP3 email address. Note: you'll
need to enter the POP3 information manually if you choose this option.
That is the Setting Up section completed.
Now you have prepared all your settings, it is time to get your articles ready
and start creating some web 2.0 sites.
Link Builder PRO Manual
Automatic Website Creation:
Step 1:
Click the Article tab
Enter your Article Title (spinnable), Article Tags (comma separated) and
Article Content (spinnable). You can paste your article using Ctrl+V.
This tool uses a {word1|word2|etc} article spinning syntax. For those who
don't know how to use Spyntax (Article Spinning Syntax), please watch this
video: http://www.youtube.com/watch?v=8F3z1DPfcLM
You can include your website link in the article body by putting <a
href=”http://www.yourlinkhere.com/”>your anchor here</a> in the Article
Content field.
IMPORTANT: You can use The Best Spinner to automatically do the article
spinning process which will help you save tons of your time.
Link Builder PRO Manual
Creating Link Wheels:
You can either create the Web 2.0 properties as stand alone sites with a link
pointing to your money site or you can create a Link Wheel to further harness
the power of these sites, ending with one link pointing to your money site.
To create a Standard Link Wheel, simply add the %PREVIOUSLINK% tag
some where in your article, and LBP will automatically replace this tag with
the URL of the previous Web 2.0 property that you just created.
To create a Random Link Wheel with random interlinking, add the
%RANDOMLINK% tag some where in the article and LBP will automatically
replace this tag with the URL of a randomly selected Web 2.0 property that
you just created.
Make sure to write the link wheel tags inside a html link, here's how:
<a href=”%PREVIOUSLINK%”>anchor text</a>
<a href=”%RANDOMLINK%”>anchor text</a>
To see the list of Web 2.0 property you recently created, click on the Links
tab.
Step 2:
Click the Select Sites tab.
Click the Select All button to automatically select all available web 2.0
properties. Then click the Register Websites button to start doing the
automatic registration process. You can watch the registering process by
switching to Logs tab or your IE Browser.
Useful Tips:
1. Sometimes the program got stuck on some pages. Just click skip for
now and you can retry the registering process for the failed sites later.
2. Sometimes you got 'This account/email address is already used'
messages when you are trying to re-register to the failed sites. This
mean that your user account has already been created but the program
does not save it to your 'Manage Accounts' tab. You can enter it
manually there.
3. You can get a lot of accounts created by only using 1 gmail, just add '.'
(dot) anywhere in your email and it will be treated as a new email
address by the web 2.0 sites but the confirmation link will still be
Link Builder PRO Manual
delivered to your unmodified gmail address, here's how to do that:
[email protected], [email protected], [email protected],
[email protected], etc
Step 3:
After it's done registering, please click the Email Verification button. (Wait a
minute or so after the last account was registered as there may be a delay in
the confirmation email being sent out.)
Step 4:
Click the Submit Articles button to start the article submission process.
Useful Tips:
1. Sometimes the program got stuck on some pages. Just click skip for
now and you can retry the submission process for the failed sites later.
2. Don't worry if you get lots of failed submission on the first attempt. This
software has a very high success rate, just retry the failed submission
and actually it will works the second time.
3. You can run this software in the background by clicking the minimize
button. Now you can do another task on your desktop while the
software doing it's work :)
For maximum stick rate (not getting banned from the web 2.0 properties)
please follow the following rules:
– Day 1: Register to all of the web 2.0 properties. Make sure to use
proxies and clear all of your IE cookies. Don't forget to verify all of the
email verification links.
– Day 3: Submit a high quality article without a link in the article
content.
– Day 5-7: Start submitting your spun article with links (Don't use more
than 3 links per article). Note: Don't submit more than 5 spun articles
to each of your web 2.0 properties account.
– Repeat these steps to gain more links!
All the successfully completed Web 2.0 sites will be listed in the Links tab as
full URL's. Now you have created your new Web 2.0 sites, let's go and get
some back links to them so they get more Link Juice and get indexed faster
and in turn ranked in the search engines.
Link Builder PRO Manual
Link Booster Method
Click the Link Booster tab. We will see 2 different Link Booster method being
displayed, RSS Submission and Ping.fm Submission:
Automatic RSS Submission Module:
In this module, Link Builder Pro will first go to Hostmyrss and create an RSS
feed from the list of URL's in the Links tab. The RSS Feed will be hosted at
Hostmyrss (Hence the name). The identity of that feed will then be submitted
to the RSS submission sites listed under 'RSS Directories' in the Link Booster
tab. You will get 10 backlinks to each of your web 2.0 properties that you've
just created.
Step 1:
Note: You must already fill the Hostmyrss.com details in the Config tab to use
this functionality. Select the Links tab and fill in some URLs (one per line) that
you want to be submitted to the RSS Feed Directories. Note: all of the URLs
Link Builder PRO Manual
of the Web 2.0 sites are saved automatically (after being created) into this
field. So you won't need to fill in anything more if you want to ONLY submit
these URLs.
Step 2:
Select the Link Booster tab and click the RSS Submissions button. Now watch
your RSS feed being created and submitted automatically :)
Ping.fm Submission Module:
Step 1:
Note: You must already fill the Ping.fm details in the Config tab to use this
functionality. Select the Links tab and fill in some URLs (one per line) that you
want to be promoted to the 40+ Social Networking websites that Ping.fm
submits to. Note: all of the URLs of the Web 2.0 sites are saved automatically
(after being created) into this field. So you won't need to fill in anything more
if you want to ONLY promote these URLs
Step 2:
Select the Link Booster tab and click the Ping.fm Submissions button. Now
watch your links being submitted automatically :)
Note: As all the URL's will be submitted, if you have several variations of the
same article, then every one will become a separate submission to the sites
held in your Ping.fm account, such as Twitter. So by submitting 10 links, 10
Tweets will also go out via Ping.fm. The results is you will get 40+ backlinks
to each of your web 2.0 properties that you've just created.
Link Builder PRO Manual
Automatic Social Bookmarking:
Click the Social Bookmark tab.
Step 1:
Note: You must have already filled the Onlywire.com details in the Config tab
to use this functionality. Select the Social Bookmark tab and fill in your
website title/keyword and your website URL.
Step 2:
Click the Bookmark button to automatically bookmark your site to 30+ Social
Bookmarking sites using Onlywire.com.
Note: When you submit content to OnlyWire, the information is prepared by
the OnlyWire system then routed through your computer and out to the
target sites. In order for this to work, you need to install one or more of the
following tools on your computer or a server on your network:
http://www.onlywire.com/download
Link Builder PRO Manual
Link Builder PRO
Profile Link Builder Manual
Initial Instruction:
Step 1:
Run the LBP Profile Link Builder.exe to start the program.
Step 2:
Fill in your login details.
Step 3:
Select the Edit Details tab
Fill in your signup username (used for forum registering process) and your
signup password.
Link Builder PRO Manual
Fill in your profile signature (spinnable), website title/keyword (spinnable)
and your website URL. In the profile signature box, do not use any html, but
instead use BBCode.
BBCode Example:
[url=http://www.yourwebsite.com/mypage.html]your keyword[/url]
Please note that some sites might have limited characters, so do not make
your url or keyword too long. Also do not put more than 1 link in the profile
signature.
Step 4:
Select the Settings tab.
In the Mail Settings area fill in your email address and it's details. Here are
the default settings for gmail for your reference:
Link Builder PRO Manual
Email: [email protected]
POP3 Server: pop.gmail.com
POP3 User: [email protected]
POP3 Password: your email password,
POP3 Port: 995
Enable the POP3 SSL Check Box
For Yahoo.co.uk:
Email: [email protected]
POP3 Server: pop.mail.yahoo.co.uk
POP3 User: [email protected]
POP3 Password: your email password,
POP3 Port: 995
Enable the POP3 SSL Check Box
Note: You can also use your own domain POP3 email address. Make sure to
input the correct value in each field.
In the Captcha Settings area you can select 3 captcha solving options.
Manual Captcha, Decaptcher and Death By Captcha. For the maximum
success rate it is recommended for you to use Decaptcher.
Please use this info when you use Decaptcher.
IP: api.decaptcher.com
Port: your decapcher port
Username: your decaptcher username
Password: your decaptcher password
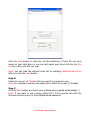
Step 5:
Select the Main tab.
Link Builder PRO Manual
Click the Load button to load any .txt file containing a forum list you have
saved on your hard drive or you can just paste your forum list into the Site
List box (note: one URL per line).
Note: You can load the default forum list by selecting default-forum-list.txt
after you click the Load button.
Step 6:
Select the amount of Threads that you want the program to use.
Note: For maximum success rate please don't select more than 10 threads.
Step 7:
Click the Start button and watch your profiles being created automatically :)
Note: If you want to use proxies, please fill it in the proxies tab with the
following format ip:port or ip:port@username:password.
Link Builder PRO Manual
Feedback & Bugs Reporting
Please send your feedback and report any bugs to our support forum:
http://www.linkbuilder-pro.com/forum/
Need Help?
Contact support at:
http://www.linkbuilder-pro.com/support/
To Your Success,
Maulana T
Link Builder PRO Manual