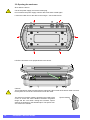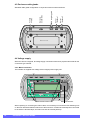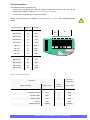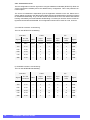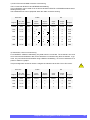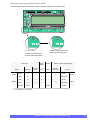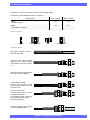
1
Indicator 82comfort
Service Guide
RHEWA–WAAGENFABRIK
August Freudewald GmbH & Co. KG
All rights reserved
Warranty
Trade marks
•
We reserve the right to make design changes or
technical modifications to the product under
description without prior notification.
•
We reserve the right to amend this operating
manual without prior notification.
The use of generic names, trade names and trade
marks etc. in this documentation cannot be taken to
mean that such names are not protected by trade mark
and brand protection legislation and therefore open to
use by anyone, even if this is not expressly stated.
•
RHEWA-WAAGENFABRIK can accept no liability
for any technical or printing errors or deficiencies
in this operating manual. In addition, RHEWA cannot be made liable for any damage directly or indirectly attributable to the use of the operating
manual.
Technical modifications
Rapidly advancing technological developments and
shorter product cycles prevent us from bringing this
documentation exactly into line with the device functions and properties. Should any deviations exist, the
device is to be used in the appropriate way.
Copying restriction
This operating manual and the examples provided for
the product under description constitute protected
information that is subject to the law of copyright. All
rights are protected under the law. This operating
manual may not be copied in whole or in part or otherwise reproduced without the prior consent of RHEWA.
RHEWA-WAAGENFABRIK
August Freudewald GmbH & Co. KG
Feldstrasse 17
D-40822 Mettmann
or
Postfach 10 01 29
D-40801 Mettmann
Tel.
Fax
+49 /(0)21 04/14 02 -0
+49 /(0)21 04/14 02 -88
E-mail
Internet
[email protected]
http://www.rhewa.com
Document number
Device:
74138
Software version: 1.01.26 and higher
Indicator 82comfort
Document designation
Indicator 82comfort
Service Guide
Language: English
2
Version:
3 dated 27.08.2008
Pages:
116
82comfort • Service Guide
Written by:
Andreas Hensel
Edited by:
Andreas Hensel
Reviewed by:
Friedhelm Lüling
Translated by: Stuart Dykes
1 Table of contents
Table of contents
Chapter 1
3
Document structure
Chapter 2
7
2.1
2.2
2.3
Opening the enclosure
Chapter 3
3.1
3.2
3.2.1
3.3
3.3.1
3.3.2
Pin assignment and connection
Automatic power-up
Mercury switch
33
Overview . . . . . . . . . . . . . . . . . . . . . . . . . . . . . . . . . . . . . . . . . . . . . . . 33
Jumper settings . . . . . . . . . . . . . . . . . . . . . . . . . . . . . . . . . . . . . . . . . . 33
Menu structure. . . . . . . . . . . . . . . . . . . . . . . . . . . . . . . . . . . . . . . . . . . 34
Menu table. . . . . . . . . . . . . . . . . . . . . . . . . . . . . . . . . . . . . . . . . . . . . . 34
Chapter 7
7.1
7.2
7.3
7.4
7.5
27
Strain gauge input . . . . . . . . . . . . . . . . . . . . . . . . . . . . . . . . . . . . . . . . 27
Connecting the strain gauge weighing platform . . . . . . . . . . . . . . . . . 28
Direct connection of a load cell . . . . . . . . . . . . . . . . . . . . . . . . . . . 28
Connection via terminal box . . . . . . . . . . . . . . . . . . . . . . . . . . . . . 28
Terminal box with 6-wire connection . . . . . . . . . . . . . . . . . . . . . . . 29
Connecting load cells in the terminal box . . . . . . . . . . . . . . . . . . . 30
Connection to the indicator . . . . . . . . . . . . . . . . . . . . . . . . . . . . . . . . . 31
Maximum cable length. . . . . . . . . . . . . . . . . . . . . . . . . . . . . . . . . . . . . 32
Chapter 6
6.1
6.2
6.3
6.4
13
Safety information . . . . . . . . . . . . . . . . . . . . . . . . . . . . . . . . . . . . . . . . 13
Connection position . . . . . . . . . . . . . . . . . . . . . . . . . . . . . . . . . . . . . . . 13
Main board. . . . . . . . . . . . . . . . . . . . . . . . . . . . . . . . . . . . . . . . . . . 13
Enclosure cable glands . . . . . . . . . . . . . . . . . . . . . . . . . . . . . . . . . . . . 14
Voltage supply . . . . . . . . . . . . . . . . . . . . . . . . . . . . . . . . . . . . . . . . . . . 14
Mains connection. . . . . . . . . . . . . . . . . . . . . . . . . . . . . . . . . . . . . . 14
Extra-low voltage supply . . . . . . . . . . . . . . . . . . . . . . . . . . . . . . . . 15
Battery operation . . . . . . . . . . . . . . . . . . . . . . . . . . . . . . . . . . . . . . 16
Serial interface. . . . . . . . . . . . . . . . . . . . . . . . . . . . . . . . . . . . . . . . . . . 17
Connection to a PC . . . . . . . . . . . . . . . . . . . . . . . . . . . . . . . . . . . . 18
TTY at interface 1 . . . . . . . . . . . . . . . . . . . . . . . . . . . . . . . . . . . . . 20
Service connector . . . . . . . . . . . . . . . . . . . . . . . . . . . . . . . . . . . . . . . . 24
Digital inputs and outputs . . . . . . . . . . . . . . . . . . . . . . . . . . . . . . . . . . 24
Inputs. . . . . . . . . . . . . . . . . . . . . . . . . . . . . . . . . . . . . . . . . . . . . . . 24
Outputs . . . . . . . . . . . . . . . . . . . . . . . . . . . . . . . . . . . . . . . . . . . . . 25
Chapter 5
5.1
5.2
5.2.1
5.2.2
5.2.3
5.2.4
5.3
5.4
9
Safety information . . . . . . . . . . . . . . . . . . . . . . . . . . . . . . . . . . . . . . . . . 9
Opening the enclosure . . . . . . . . . . . . . . . . . . . . . . . . . . . . . . . . . . . . 10
Disconnecting the keypad . . . . . . . . . . . . . . . . . . . . . . . . . . . . . . . 11
Closing the enclosure . . . . . . . . . . . . . . . . . . . . . . . . . . . . . . . . . . . . . 11
Connecting the keypad . . . . . . . . . . . . . . . . . . . . . . . . . . . . . . . . . 11
Replacing the enclosure cover . . . . . . . . . . . . . . . . . . . . . . . . . . . 12
Chapter 4
4.1
4.2
4.2.1
4.3
4.4
4.4.1
4.4.2
4.4.3
4.5
4.5.1
4.5.2
4.6
4.7
4.7.1
4.7.2
Connecting a weighing platform
Overview . . . . . . . . . . . . . . . . . . . . . . . . . . . . . . . . . . . . . . . . . . . . . . . . 7
Basic concept . . . . . . . . . . . . . . . . . . . . . . . . . . . . . . . . . . . . . . . . . . . . 7
Documents by target audience . . . . . . . . . . . . . . . . . . . . . . . . . . . . . . . 7
35
Overview . . . . . . . . . . . . . . . . . . . . . . . . . . . . . . . . . . . . . . . . . . . . . . . 35
Connection . . . . . . . . . . . . . . . . . . . . . . . . . . . . . . . . . . . . . . . . . . . . . 35
Menu structure. . . . . . . . . . . . . . . . . . . . . . . . . . . . . . . . . . . . . . . . . . . 36
Menu table. . . . . . . . . . . . . . . . . . . . . . . . . . . . . . . . . . . . . . . . . . . . . . 36
Additional function . . . . . . . . . . . . . . . . . . . . . . . . . . . . . . . . . . . . . . . . 36
Chapter 1 Table of contents
3
Cable gland assembly
Chapter 8
37
Circular connector assembly
Chapter 9
39
Equipotential bonding
Chapter 10
41
10.1
10.2
10.2.1
10.2.2
10.2.3
10.3
10.4
Device configuration
Chapter 11
11.1
11.2
Tare options
Animal weighing option
Digital inputs and outputs
Statistics function
Interfaces
Printing
4
82comfort • Service Guide
67
Overview . . . . . . . . . . . . . . . . . . . . . . . . . . . . . . . . . . . . . . . . . . . . . . . 67
Menu structure. . . . . . . . . . . . . . . . . . . . . . . . . . . . . . . . . . . . . . . . . . . 67
Menu table. . . . . . . . . . . . . . . . . . . . . . . . . . . . . . . . . . . . . . . . . . . . . . 68
Chapter 18
18.1
18.2
18.3
61
Characteristics. . . . . . . . . . . . . . . . . . . . . . . . . . . . . . . . . . . . . . . . . . . 61
Method of operation. . . . . . . . . . . . . . . . . . . . . . . . . . . . . . . . . . . . . . . 61
Target value and tolerance limits. . . . . . . . . . . . . . . . . . . . . . . . . . . . . 61
Menu structure. . . . . . . . . . . . . . . . . . . . . . . . . . . . . . . . . . . . . . . . . . . 62
Menu table. . . . . . . . . . . . . . . . . . . . . . . . . . . . . . . . . . . . . . . . . . . . . . 63
Required weighing instrument characteristics . . . . . . . . . . . . . . . . . . . 65
Nominal quantities to 10 kg . . . . . . . . . . . . . . . . . . . . . . . . . . . . . . 65
Nominal quantities above 10 kg . . . . . . . . . . . . . . . . . . . . . . . . . . 65
Chapter 17
17.1
17.2
17.3
51
Characteristics. . . . . . . . . . . . . . . . . . . . . . . . . . . . . . . . . . . . . . . . . . . 51
Inputs. . . . . . . . . . . . . . . . . . . . . . . . . . . . . . . . . . . . . . . . . . . . . . . 51
Outputs . . . . . . . . . . . . . . . . . . . . . . . . . . . . . . . . . . . . . . . . . . . . . 51
Signal level . . . . . . . . . . . . . . . . . . . . . . . . . . . . . . . . . . . . . . . . . . . . . 53
Defining inputs. . . . . . . . . . . . . . . . . . . . . . . . . . . . . . . . . . . . . . . . . . . 54
Menu structure. . . . . . . . . . . . . . . . . . . . . . . . . . . . . . . . . . . . . . . . 54
Menu table. . . . . . . . . . . . . . . . . . . . . . . . . . . . . . . . . . . . . . . . . . . 54
List of possible key assignments . . . . . . . . . . . . . . . . . . . . . . . . . . 55
Defining outputs. . . . . . . . . . . . . . . . . . . . . . . . . . . . . . . . . . . . . . . . . . 56
Menu structure. . . . . . . . . . . . . . . . . . . . . . . . . . . . . . . . . . . . . . . . 56
Menu tables . . . . . . . . . . . . . . . . . . . . . . . . . . . . . . . . . . . . . . . . . . 57
Chapter 16
16.1
16.2
16.3
16.4
16.5
16.6
16.6.1
16.6.2
49
Overview . . . . . . . . . . . . . . . . . . . . . . . . . . . . . . . . . . . . . . . . . . . . . . . 49
Menu structure. . . . . . . . . . . . . . . . . . . . . . . . . . . . . . . . . . . . . . . . . . . 49
Menu table. . . . . . . . . . . . . . . . . . . . . . . . . . . . . . . . . . . . . . . . . . . . . . 50
Chapter 15
15.1
15.1.1
15.1.2
15.2
15.3
15.3.1
15.3.2
15.3.3
15.4
15.4.1
15.4.2
47
Set accumulation memory options . . . . . . . . . . . . . . . . . . . . . . . . . . . 47
Menu structure. . . . . . . . . . . . . . . . . . . . . . . . . . . . . . . . . . . . . . . . . . . 47
Menu table. . . . . . . . . . . . . . . . . . . . . . . . . . . . . . . . . . . . . . . . . . . . . . 48
Chapter 14
14.1
14.2
14.3
45
Set tare options . . . . . . . . . . . . . . . . . . . . . . . . . . . . . . . . . . . . . . . . . . 45
Menu structure. . . . . . . . . . . . . . . . . . . . . . . . . . . . . . . . . . . . . . . . . . . 45
Menu table. . . . . . . . . . . . . . . . . . . . . . . . . . . . . . . . . . . . . . . . . . . . . . 46
Chapter 13
13.1
13.2
13.3
43
Menu levels . . . . . . . . . . . . . . . . . . . . . . . . . . . . . . . . . . . . . . . . . . . . . 43
Configuration using PC software . . . . . . . . . . . . . . . . . . . . . . . . . . . . . 43
Chapter 12
12.1
12.2
12.3
Memory accumulation options
Connection concept. . . . . . . . . . . . . . . . . . . . . . . . . . . . . . . . . . . . . . . 41
Weighing platform . . . . . . . . . . . . . . . . . . . . . . . . . . . . . . . . . . . . . . . . 41
Weighbridges. . . . . . . . . . . . . . . . . . . . . . . . . . . . . . . . . . . . . . . . . 41
Floor scales . . . . . . . . . . . . . . . . . . . . . . . . . . . . . . . . . . . . . . . . . . 42
Bench scales . . . . . . . . . . . . . . . . . . . . . . . . . . . . . . . . . . . . . . . . . 42
Indicator. . . . . . . . . . . . . . . . . . . . . . . . . . . . . . . . . . . . . . . . . . . . . . . . 42
Other devices . . . . . . . . . . . . . . . . . . . . . . . . . . . . . . . . . . . . . . . . . . . 42
71
Overview . . . . . . . . . . . . . . . . . . . . . . . . . . . . . . . . . . . . . . . . . . . . . . . 71
Menu structure. . . . . . . . . . . . . . . . . . . . . . . . . . . . . . . . . . . . . . . . . . . 71
Menu table. . . . . . . . . . . . . . . . . . . . . . . . . . . . . . . . . . . . . . . . . . . . . . 72
18.3.1
18.3.2
18.3.3
Default output formats
Chapter 19
19.1
19.2
19.3
19.4
19.5
19.6
19.7
19.8
19.9
Headers and footers
75
Overview . . . . . . . . . . . . . . . . . . . . . . . . . . . . . . . . . . . . . . . . . . . . . . . 75
Format 80-A (80 characters/line). . . . . . . . . . . . . . . . . . . . . . . . . . . . . 75
Format 40-A (40 characters/line). . . . . . . . . . . . . . . . . . . . . . . . . . . . . 76
Format 32-A (32 characters/line). . . . . . . . . . . . . . . . . . . . . . . . . . . . . 76
Format 24-A (24 characters/line). . . . . . . . . . . . . . . . . . . . . . . . . . . . . 77
Format Univer. (universal) . . . . . . . . . . . . . . . . . . . . . . . . . . . . . . . . . . 77
Format displ.1 (large or remote displays) . . . . . . . . . . . . . . . . . . . . . . 79
Format EDp 1 (connection to IT) . . . . . . . . . . . . . . . . . . . . . . . . . . . . . 80
Format EDp 2 (connection to IT) . . . . . . . . . . . . . . . . . . . . . . . . . . . . . 82
Chapter 20
20.1
20.2
20.3
20.3.1
20.3.2
20.4
20.4.1
20.4.2
Variables
Setting the standard print ticket . . . . . . . . . . . . . . . . . . . . . . . . . . . 72
Serial number . . . . . . . . . . . . . . . . . . . . . . . . . . . . . . . . . . . . . . . . 73
Decimal separator . . . . . . . . . . . . . . . . . . . . . . . . . . . . . . . . . . . . . 73
85
Overview . . . . . . . . . . . . . . . . . . . . . . . . . . . . . . . . . . . . . . . . . . . . . . . 85
Applications . . . . . . . . . . . . . . . . . . . . . . . . . . . . . . . . . . . . . . . . . . . . . 85
Characteristics. . . . . . . . . . . . . . . . . . . . . . . . . . . . . . . . . . . . . . . . . . . 85
Headers . . . . . . . . . . . . . . . . . . . . . . . . . . . . . . . . . . . . . . . . . . . . . 85
Footers . . . . . . . . . . . . . . . . . . . . . . . . . . . . . . . . . . . . . . . . . . . . . 85
Examples. . . . . . . . . . . . . . . . . . . . . . . . . . . . . . . . . . . . . . . . . . . . . . . 86
Header as text string . . . . . . . . . . . . . . . . . . . . . . . . . . . . . . . . . . . 86
Headers and footers as instruction blocks. . . . . . . . . . . . . . . . . . . 86
Chapter 21
87
21.1 Overview . . . . . . . . . . . . . . . . . . . . . . . . . . . . . . . . . . . . . . . . . . . . . . . 87
21.2 Applications . . . . . . . . . . . . . . . . . . . . . . . . . . . . . . . . . . . . . . . . . . . . . 87
21.3 Characteristics. . . . . . . . . . . . . . . . . . . . . . . . . . . . . . . . . . . . . . . . . . . 87
21.3.1
Number of variables . . . . . . . . . . . . . . . . . . . . . . . . . . . . . . . . . . . 87
21.3.2
Name on display . . . . . . . . . . . . . . . . . . . . . . . . . . . . . . . . . . . . . . 87
21.3.3
Text on printout . . . . . . . . . . . . . . . . . . . . . . . . . . . . . . . . . . . . . . . 87
21.3.4
Text after printout . . . . . . . . . . . . . . . . . . . . . . . . . . . . . . . . . . . . . 88
21.3.5
Auto prompt . . . . . . . . . . . . . . . . . . . . . . . . . . . . . . . . . . . . . . . . . . 88
21.3.6
Auto printout . . . . . . . . . . . . . . . . . . . . . . . . . . . . . . . . . . . . . . . . . 88
21.3.7
Display time (all variables). . . . . . . . . . . . . . . . . . . . . . . . . . . . . . . 88
21.3.8
Input source. . . . . . . . . . . . . . . . . . . . . . . . . . . . . . . . . . . . . . . . . . 88
21.3.9
Input end type . . . . . . . . . . . . . . . . . . . . . . . . . . . . . . . . . . . . . . . . 89
21.3.10
Preset type . . . . . . . . . . . . . . . . . . . . . . . . . . . . . . . . . . . . . . . . . . 89
21.3.11
Minimum length . . . . . . . . . . . . . . . . . . . . . . . . . . . . . . . . . . . . . . . 89
21.3.12
Maximum length . . . . . . . . . . . . . . . . . . . . . . . . . . . . . . . . . . . . . . 89
21.3.13
Output format. . . . . . . . . . . . . . . . . . . . . . . . . . . . . . . . . . . . . . . . . 90
21.3.14
Default value . . . . . . . . . . . . . . . . . . . . . . . . . . . . . . . . . . . . . . . . . 90
21.3.15
Entry overwrites default . . . . . . . . . . . . . . . . . . . . . . . . . . . . . . . . . 90
Instruction blocks
Chapter 22
22.1
22.2
22.3
22.3.1
22.3.2
22.3.3
22.3.4
22.4
22.5
22.5.1
22.5.2
Automatic output
Alibi memory
Overview . . . . . . . . . . . . . . . . . . . . . . . . . . . . . . . . . . . . . . . . . . . . . . . 91
Applications . . . . . . . . . . . . . . . . . . . . . . . . . . . . . . . . . . . . . . . . . . . . . 91
Characteristics. . . . . . . . . . . . . . . . . . . . . . . . . . . . . . . . . . . . . . . . . . . 91
Instruction block name. . . . . . . . . . . . . . . . . . . . . . . . . . . . . . . . . . 91
Reserved instruction blocks. . . . . . . . . . . . . . . . . . . . . . . . . . . . . . 91
Instruction block content . . . . . . . . . . . . . . . . . . . . . . . . . . . . . . . . 92
Execution of instruction blocks . . . . . . . . . . . . . . . . . . . . . . . . . . . 92
Sealed instruction blocks. . . . . . . . . . . . . . . . . . . . . . . . . . . . . . . . . . . 92
Examples. . . . . . . . . . . . . . . . . . . . . . . . . . . . . . . . . . . . . . . . . . . . . . . 93
Printout with gross, tare and net . . . . . . . . . . . . . . . . . . . . . . . . . . 93
Data record to computer . . . . . . . . . . . . . . . . . . . . . . . . . . . . . . . . 94
Chapter 23
23.1
23.2
23.3
23.4
23.5
95
Overview . . . . . . . . . . . . . . . . . . . . . . . . . . . . . . . . . . . . . . . . . . . . . . . 95
Menu structure. . . . . . . . . . . . . . . . . . . . . . . . . . . . . . . . . . . . . . . . . . . 95
Menu table. . . . . . . . . . . . . . . . . . . . . . . . . . . . . . . . . . . . . . . . . . . . . . 96
Particularities . . . . . . . . . . . . . . . . . . . . . . . . . . . . . . . . . . . . . . . . . . . . 97
Disabling automatic output . . . . . . . . . . . . . . . . . . . . . . . . . . . . . . . . . 97
Chapter 24
24.1
91
99
Prerequisites . . . . . . . . . . . . . . . . . . . . . . . . . . . . . . . . . . . . . . . . . . . . 99
Chapter 1 Table of contents
5
24.1.1
Standard . . . . . . . . . . . . . . . . . . . . . . . . . . . . . . . . . . . . . . . . . . . . 99
24.1.2
With memory expansion . . . . . . . . . . . . . . . . . . . . . . . . . . . . . . . . 99
24.2 Password. . . . . . . . . . . . . . . . . . . . . . . . . . . . . . . . . . . . . . . . . . . . . . . 99
24.3 Creating/clearing the alibi memory . . . . . . . . . . . . . . . . . . . . . . . . . . . 99
24.3.1
Menu structure. . . . . . . . . . . . . . . . . . . . . . . . . . . . . . . . . . . . . . . . 99
24.3.2
Menu table. . . . . . . . . . . . . . . . . . . . . . . . . . . . . . . . . . . . . . . . . . 100
24.4 Managing the alibi memory . . . . . . . . . . . . . . . . . . . . . . . . . . . . . . . . 102
24.4.1
Menu structure. . . . . . . . . . . . . . . . . . . . . . . . . . . . . . . . . . . . . . . 102
24.4.2
Menu table. . . . . . . . . . . . . . . . . . . . . . . . . . . . . . . . . . . . . . . . . . 102
Battery operation
Chapter 25
25.1
25.2
25.3
Display background light
Key lock
Device clock options
Password protection
82comfort • Service Guide
113
Setting the clock . . . . . . . . . . . . . . . . . . . . . . . . . . . . . . . . . . . . . . . . 113
Menu structure. . . . . . . . . . . . . . . . . . . . . . . . . . . . . . . . . . . . . . . . . . 113
Calculating the calibration factor . . . . . . . . . . . . . . . . . . . . . . . . . . . . 113
Menu table. . . . . . . . . . . . . . . . . . . . . . . . . . . . . . . . . . . . . . . . . . . . . 114
Chapter 29
29.1
29.2
29.3
109
Overview . . . . . . . . . . . . . . . . . . . . . . . . . . . . . . . . . . . . . . . . . . . . . . 109
Keys and groups . . . . . . . . . . . . . . . . . . . . . . . . . . . . . . . . . . . . . . . . 109
Menu structure. . . . . . . . . . . . . . . . . . . . . . . . . . . . . . . . . . . . . . . . . . 110
Menu table. . . . . . . . . . . . . . . . . . . . . . . . . . . . . . . . . . . . . . . . . . . . . 111
Disable all key locks . . . . . . . . . . . . . . . . . . . . . . . . . . . . . . . . . . . . . 112
Chapter 28
28.1
28.2
28.3
28.4
107
Function. . . . . . . . . . . . . . . . . . . . . . . . . . . . . . . . . . . . . . . . . . . . . . . 107
Menu structure. . . . . . . . . . . . . . . . . . . . . . . . . . . . . . . . . . . . . . . . . . 107
Menu table. . . . . . . . . . . . . . . . . . . . . . . . . . . . . . . . . . . . . . . . . . . . . 107
Chapter 27
27.1
27.2
27.3
27.4
27.5
6
Overview . . . . . . . . . . . . . . . . . . . . . . . . . . . . . . . . . . . . . . . . . . . . . . 105
Menu structure. . . . . . . . . . . . . . . . . . . . . . . . . . . . . . . . . . . . . . . . . . 105
Menu table. . . . . . . . . . . . . . . . . . . . . . . . . . . . . . . . . . . . . . . . . . . . . 106
Chapter 26
26.1
26.2
26.3
105
115
Overview . . . . . . . . . . . . . . . . . . . . . . . . . . . . . . . . . . . . . . . . . . . . . . 115
Menu structure. . . . . . . . . . . . . . . . . . . . . . . . . . . . . . . . . . . . . . . . . . 115
Menu table. . . . . . . . . . . . . . . . . . . . . . . . . . . . . . . . . . . . . . . . . . . . . 116
2 Document structure
2.1 Overview
The documentation for this indicator has been compiled with the target audience in mind. Essentially, we have distinguished between two user groups:
•
Operatives, users, weighing instrument operators
•
Service technicians, customer service, weighing instrument dealers
The various needs of these users have been taken into account.
Example:
This SERVICE GUIDE contains information on the connection and configuration of weighing instruments, peripherals and optional add-ons and is aimed at service technicians. Described here are
the various setting, connection and device options and related technical details.
This information is too extensive for the device operative, as the content goes far beyond the
knowledge required to operate the device. An OPERATING MANUAL that concentrates solely on how
to use the available functions has therefore been compiled for device operatives.
•
The process of setting up the alibi memory is described in this SERVICE GUIDE, while the steps
for displaying or outputting the stored values are documented in the OPERATING MANUAL.
•
The time and date can be set by the operative. Key features such as automatic summer-winter
changeover and the calculation or setting of the calibration factor should be left to the service
technician and are therefore included in the SERVICE GUIDE.
2.2 Basic concept
•
Each device function has its own chapter in the documentation.
•
Using the device functions is described in the OPERATING MANUAL.
•
Adapting functions to suit personal requirements or installing add-ons is included in the SERVICE GUIDE. How to use the functions is not described a second time in the SERVICE GUIDE.
2.3 Documents by target audience
The available documents were written for the following target audiences.
Audience
Operatives
Operating manual
Documents
Service technicians
Service guide
Adjustment guide
Instructions guide
Optional plug-in cards
Chapter 2 Document structure
7
8
82comfort • Service Guide
3 Opening the enclosure
3.1 Safety information
Personnel working on the electronics must discharge themselves beforehand and ensure they do
not become charged again while working.
An anti-static wristband must be used.
! Shut down the device.
! Remove the mains plug or cut off the power (switch, fuse) and safeguard against inadvertent
reconnection.
! Put on anti-static wristband.
! Connect anti-static wristband (e.g. to earthing contact of a socket outlet).
! Touch the indicator enclosure to place yourself at the same potential.
! Remove components to be retrofitted from the anti-static packaging.
! Perform the work on the electronics.
Make sure you comply with the safety information. Improper handling of electronic assemblies can
result in their being destroyed. No guarantee can be assumed for any defects that occur in this
case.
•
When working on the enclosure, the electronics or the wiring, always ensure that no metal residues whatsoever are left inside the enclosure.
•
Soldered or clamped wires must not protrude or be in contact with any components or the
board.
•
Ensure that the strands of the braided shield have no frayed ends and cannot come into contact with terminals or components. Enclose the braided shield in a protective jacket, if necessary.
STOP
STOP
All cables run into the enclosure must be round shielded cables. Please follow the instructions in
Chapter 8 “Cable gland assembly“ on page 37 when installing the cables.
The quoted EMC and noise immunity categories and IP65 protection apply only on correct installation in accordance with these instructions.
Chapter 3 Opening the enclosure
!
9
3.2 Opening the enclosure
Shut down the device.
!
Cut off the power supply, remove the mains plug.
Do not restore the power supply until the device has been closed again.
Loosen the 6 M4 nuts on the device rear using a 7 mm socket wrench.
Lift off the enclosure cover perpendicular to the device.
!
Caution!
The keypad ribbon cable is plugged into the main board. Do not tear off the ribbon cable or remove
forcibly from the connector. Do not bend or kink the cable.
The glued-in enclosure gasket is located on the inside of the
cover. To ensure the correct distance between the gasket
flange and the cover when closing the enclosure, spacer
sleeves are inserted on the threaded pins. The spacer sleeves must not be mislaid.
10
82comfort • Service Guide
Spacer sleeves
3.2.1 Disconnecting the keypad
Desktop setup
The plug-and-socket connection is situated to the bottom
right on the main board.
The ribbon cable is not clamped in the connector.
Lift the ribbon cable vertically out of the connector.
Wall setup
The plug-and-socket connection is situated to the top left
on the main board.
The ribbon cable is not clamped in the connector.
Lift the ribbon cable vertically out of the connector.
3.3 Closing the enclosure
On completion of the work carefully close the device.
Make sure no metal residues (i.e. swarf, cable residues or strands of the braided shield) are left
inside the indicator.
!
3.3.1 Connecting the keypad
Desktop setup
The plug-and-socket connection is situated at the bottom
right on the main board.
Insert the ribbon cable.
Wall setup
The plug-and-socket connection is situated at the top left on
the main board.
Insert the ribbon cable.
Chapter 3 Opening the enclosure
11
3.3.2 Replacing the enclosure cover
The keypad ribbon cable must lie freely in a loop between the enclosure cover and the main board.
Do not bend or kink the cable.
Place the cover on the enclosure base.
Slide the threaded pins on the cover through the drilled holes of the gasket flange.
Screw the 6 M4 nuts onto the threaded pins on the device rear and tighten crosswise using a
7 mm socket wrench.
12
82comfort • Service Guide
4 Pin assignment and connection
4.1 Safety information
To make the cable connections it is necessary to open the enclosure. Be sure to follow the instructions in Chapter 3 “Opening the enclosure“ on page 9.
!
4.2 Connection position
The indicator can be used in two different positions (wall-mounted or on the desktop).
•
When set up on the desktop, the terminals are located at the upper edge of the main board.
•
When wall mounted, the device is installed the other way round and the terminals are then
positioned at the lower edge of the board.
In this overview the positions of the terminals and plug-in connectors on the board refer to the
desktop setup. When wall mounted, the positions are as rotated through 180°.
Chapter 4 Pin assignment and connection
Fasteners
Voltage
supply
Keypad port
(desktop setup)
Inputs 1 and 2
Output 1
Output 2
SG input 1
(scale 1)
Serial
interfaces
Service connector
Fasteners
Keypad port
(wall setup)
4.2.1 Main board
13
4.3 Enclosure cable glands
Serial
interface 2
Serial
interface 1
SG weighing platf.
Optional
assemblies
Voltage
supply
Standard cable gland configuration in conjunction with two serial interfaces.
Device rear
4.4 Voltage supply
When the device is shipped, all voltage supply connections have been prepared and made for the
connection type ordered.
4.4.1 Mains connection
The indicator is supplied with voltage via an integral power supply unit.
Main board fasteners
Mains transformer
When replacing or connecting the mains cable, it is necessary to unscrew the four fastening nuts
on the main board and take the board out of the enclosure. If cables have already been connected
to the device's terminal strips, the board can also be carefully lifted up.
14
82comfort • Service Guide
Connect the power cable straight to the flat
connectors (2.8 x 0.8 mm) of the mains transformer using fully insulated quick disconnect
terminals.
Use a ring terminal to connect the protective
conductor to one of the threaded pins (M3) in
the enclosure base.
A shielded power cable must be used. The cable shield must have contact inside the gland.
See Chapter 8 “Cable gland assembly“ on page 37.
Mains transformer
secondary terminals
Operating voltage
Connect the stranded wires for the secondary
terminal of the mains transformer (12VAC/
12VA) to the operating voltage terminals on the
top right of the main board.
The third terminal there is reserved for optional
assemblies and remains unused.
4.4.2 Extra-low voltage supply
Alternatively, the voltage supply to the main board can come from an external extra-low voltage
source (12-15V AC or 12-24V DC, approx. 12 VA). For this the mains transformer must be removed and the mains cable replaced by a shielded voltage supply cable.
Operating voltage connection is reverse polarity protected. In conjunction with a direct current
supply, there is therefore no need to check the polarity of the + and - terminals.
Chapter 4 Pin assignment and connection
15
4.4.3 Battery operation
To operate the device with battery voltages from 10.5 V, it is possible to convert it to battery operation.
For this the mains transformer must be removed from the device and the mains cable replaced by
a shielded battery connection cable.
To connect the cable, remove the main board from the enclosure.
Solder the battery connection cables to the two solder points on the rear of the board beneath the
operating voltage terminals.
!
Ensure the polarity is correct!
The cable should be equipped with an external fuse (1A).
(indicated wire colours = original manufacturer’s connecting cable)
Connection cable
brown +
- white
Board rear
To obtain a long operating time in battery mode, power consumption can be reduced automatically
when the device is not in use or the device can be completely shut down. (See Chapter 25 “Battery
operation“ on page 105 and Chapter 26 “Display background light“ on page 107)
16
82comfort • Service Guide
4.5 Serial interface
The indicator has two serial interfaces.
•
Interface S1 is configured as an RS-232 interface as standard. Conversion to a TTY 20 mA
interface is described in Chapter 4.5.2 “TTY at interface 1“ on page 20.
•
Interface S2 is designed only an RS-232 interface.
Please note the instructions in Chapter 8 “Cable gland assembly“ on page 37 when installing shielded
cables.
Terminal
Signal
S1 RS 232
11
TXD
S1 RS 232
12
RTS
S1 RS 232
13
RXD
S1 RS 232
14
CTS
S1 RS 232
15
GND
S1 TTY
16
RXD +
S1 TTY
17
RXD -
S1 TTY
18
TXD +
S1 TTY
19
TXD -
S2 RS 232
21
TXD
S2 RS 232
22
RTS
S2 RS 232
23
RXD
S2 RS 232
24
CTS
S2 RS 232
25
GND
S1
S2
21
22
23
24
25
11
12
13
14
15
16
17
18
19
Serial interface
!
Signal designation RS232
Terminal
equipment
Indicator
Signal name
Signal
direction
Signal name
Transmitted data
TXD
⇒
RXD
Request to send
RTS
⇒
CTS
Received data
RXD
⇐
TXD
Clear to send
CTS
⇐
RTS
Ground
GND
GND
CHGND
CHGND
Signal meaning
Chassis ground
Chapter 4 Pin assignment and connection
17
4.5.1 Connection to a PC
The full configuration of all four signal lines using the hardware handshake (RTS/CTS) offers maximum transmission reliability and is the default factory configuration. This is the preferred connection option.
The choice of handshake is dependent upon the application software on the PC. Select the required cabling according to the data transfer setting options. Most applications use RTS/CTS lines
for hardware handshaking. They can also remain connected when not in use and the data transfer
is being controlled by Xon/Xoff software handshaking. If in doubt you can also use the mixed configuration RTS/CTS and DTR/DSR. This configuration should not be used as a rule, however.
a) RTS/CTS hardware handshaking
The PC uses RTS/CTS handshaking.
Indicator
Cable
PC
Signal
S1 / S2
Terminal
Wire
9-pin
female
25-pin
female
9-pin
male
25-pin
male
Signal
CHGND
Gland
Shield
Chassis
Chassis
Chassis
Chassis
CHGND
TXD
11 / 21
—
2
3
2
3
RXD
RTS
12 / 22
—
8
5
8
5
CTS
RXD
13 / 23
—
3
2
3
2
TXD
CTS
14 / 24
—
7
4
7
4
RTS
GND
15 / 25
—
5
7
5
7
GND
b) DTR/DSR hardware handshaking
The PC uses DTR/DSR handshaking.
Indicator
18
Cable
PC
Signal
S1 / S2
Terminal
Wire
9-pin
female
25-pin
female
9-pin
male
25-pin
male
Signal
CHGND
Gland
Shield
Chassis
Chassis
Chassis
Chassis
CHGND
TXD
11 / 21
—
2
3
2
3
RXD
RTS
12 / 22
—
6
6
6
6
DSR
RXD
13 / 23
—
3
2
3
2
TXD
CTS
14 / 24
—
4
20
4
20
DTR
GND
15 / 25
—
5
7
5
7
GND
82comfort • Service Guide
c) RTS/CTS and DTR/DSR hardware handshaking
The PC uses both RTS/CTS and DTR/DSR handshaking.
This configuration can be used if it is not known whether RTS/CTS or DTR/DSR hardware handshaking is being used.
The handshake lines can be jumpered within the cable connector housing.
Indicator
Cable
PC
Signal
S1 / S2
Terminal
Wire
9-pin
female
25-pin
female
9-pin
male
25-pin
male
Signal
CHGND
Gland
Shield
Chassis
Chassis
Chassis
Chassis
CHGND
TXD
11 / 21
—
2
3
2
3
RXD
RTS
12 / 22
—
8
6
5
6
CTS
DSR
RXD
13 / 23
—
3
2
TXD
CTS
14 / 24
—
7
4
4
20
RTS
DTR
GND
15 / 25
—
5
7
GND
8
6
5
6
3
7
4
2
4
20
5
7
d) XON/XOFF software handshaking
For XON/XOFF software handshaking only data lines are connected. The characters 0x11 and
0x13 cannot be transmitted as data, as the data flow is controlled using these characters. In general, only text should be transmitted using software handshaking, not control characters for a
printer or data for a graphic.
This pin assignment cannot be used to configure the indicator via the PC CONFIG-SOFTWARE.
Indicator
Cable
!
PC
Signal
S1 / S2
Terminal
Wire
9-pin
female
25-pin
female
9-pin
male
25-pin
male
Signal
CHGND
Gland
Shield
Chassis
Chassis
Chassis
Chassis
CHGND
TXD
11 / 21
—
2
3
2
3
RXD
RXD
13 / 23
—
3
2
3
2
TXD
GND
15 / 25
—
5
7
5
7
GND
Chapter 4 Pin assignment and connection
19
4.5.2 TTY at interface 1
Interface 1 can also be operated as a TTY interface.
In this case the interface cable is connected at terminals 16 to 19.
Serial interface
Terminal
Signal
Signal meaning
S1 GND
15
GND
Ground
S1 TTY
16
RXD +
Receive line + (received data)
S1 TTY
17
RXD -
Receive line - (received data)
S1 TTY
18
TXD +
Transmit line + (transmitted data)
S1 TTY
19
TXD -
Transmit line - (transmitted data)
To ensure data is transferred correctly a suitable handshake must be selected. As the TTY interface does not support signal lines for hardware handshaking, either Soft or no.hand must be
selected as the handshake.
Data terminal equipment (DTE) echo functions are not supported by the indicator. (If the echo
function is active, the DTE (e.g. a large display) sends the data record received back to the indicator.) See Chapter 17 “Interfaces“ on page 67 for information on setting interface properties.
When connecting two devices via the TTY interface, set one device to ACTIVE and the other to PASThe selection of ACTIVE or PASSIVE depends on the data direction. Connect the transmit lines
of the first device (TXD + and TXD -) to the receive lines of the second device (RXD + and RXD -).
SIVE.
The following pin assignments show the connection of both the transmit and receive lines in full.
Depending on the application, it is not necessary to connect all the lines (e.g. when sending data
to a large display: in this case only the indicator's TXD transmit lines need to be connected).
a) Indicator [transmit passive] and [receive passive]
This connection method is the standard interface configuration.
Indicator
Cable
Data terminal equipmenta
Terminal
Current
flow
Pin b
Wire
RXD +
16
←
7
-
RXD -
17
→
8
-
TXD +
18
←
5
-
TXD -
19
→
4
-
RXD return
CHGND
Gland
Shield
CHGND
Signal
Passive
9 pin
SubD
Passive
Signal
direction
Signal
TXD +
⇐
⇒
Active
TXD return
RXD +
Active
a. For connection and configuration of the data terminal equipment, see equipment documentation.
b. Standard factory configuration.
20
82comfort • Service Guide
b) Indicator [transmit active] and [receive active]
The connection type necessitates a change of jumper settings on the main board.
Default setting
J1 solder up (receive active)
J2 open (transmit passive)
J1 open (receive passive)
J2 open (transmit passive)
Indicator
Cable
Data terminal equipmenta
Terminal
Current
flow
Pin b
Wire
RXD −
17
→
7
-
GND
15
←
8
-
TXD +
18
←
5
-
TXD -
19
→
4
-
RXD return
CHGND
Gland
Shield
CHGND
Signal
Active
9 pin
SubD
Passive
Signal
direction
Signal
TXD +
⇐
⇒
Passive
TXD return
RXD +
Active
a. For connection and configuration of the data terminal equipment, see equipment documentation.
b. Standard factory configuration.
Chapter 4 Pin assignment and connection
21
c) Indicator [receive passive] and [transmit active]
The connection type necessitates a change of jumper settings on the main board.
Default setting
J1 open (receive passive)
J2 solder up (transmit active)
J1 open (receive passive)
J2 open (transmit passive)
Indicator
Cable
Data terminal equipmenta
Terminal
Current
flow
Pin b
Wire
RXD +
16
←
7
-
RXD -
17
→
8
-
TXD -
19
→
5
-
GND
15
←
4
-
RXD return
CHGND
Gland
Shield
CHGND
Signal
Passive
9 pin
SubD
Active
Signal
direction
Signal
TXD +
⇐
⇒
Active
TXD return
RXD +
Passive
a. For connection and configuration of the data terminal equipment, see equipment documentation.
b. Standard factory configuration.
22
82comfort • Service Guide
d) Indicator [receive active] and [transmit active]
The connection type necessitates a change of jumper settings on the main board.
Default setting
J1 solder up (receive active)
J2 solder up (transmit active)
J1 open (receive passive)
J2 open (transmit passive)
Indicator
Cable
Data terminal equipmenta
Terminal
Current
flow
Pin b
Wire
RXD −
17
→
7
-
GND
15
←
8
-
TXD -
19
→
5
-
GND
15
←
4
-
RXD return
CHGND
Gland
Shield
CHGND
Signal
Active
9 pin
SubD
Active
Signal
direction
Signal
TXD +
⇐
⇒
Passive
TXD return
RXD +
Passive
a. For connection and configuration of the data terminal equipment, see equipment documentation.
b. Standard factory configuration.
Chapter 4 Pin assignment and connection
23
4.6 Service connector
The service connector is used to configure the indicator. A direct connection to a
PC RS-232 interface can be made using a serial extension cable (9-pin, configuration 1:1). A special service cable is not required. Using the PC CONFIG-SOFTWARE the indicator settings can be read, edited and sent back.
Indicator
Cable
PC
Signal
Service
connector
9-pin
1:1
9-pin service
connectora
Signal
CHGND
Chassis
Shield
Chassis
CHGND
GND
5
-
5
GND
TXD
2
-
2
RXD
RTS
8
-
8
CTS
RXD
3
-
3
TXD
CTS
7
-
7
RTS
a. Socket on cable, plug on PC
!
i
The service connector is connected in parallel with interface S1 on the indicator. It can be used
only if RS-232 has been selected as the interface type, see 17 “Interfaces“ on page 67. If another device is connected to interface S1, it must be disconnected when using the service connector.
If either of the S1 or S2 interfaces is run out from the terminal strip with all the lines for hardware
handshaking (RTS/CTS), this connection may also be used instead of the service connector.
4.7 Digital inputs and outputs
4.7.1 Inputs
Connection example
The indicator has two digital inputs.
In1
In 2
= Input 1
= Input 2
+
-
In1
In2
Signal level for signal LOW = 0 - 2 VDC
Signal level for signal HIGH = 5 - 24 VDC
The ground for the inputs is GND on the main board,
terminal 15 (or 25) of the serial interfaces.
24
82comfort • Service Guide
15
(25)
Out11
Out10
Out12
= Output 1a
= Output 1com
= Output 1b
Out21
Out20
Out22
= Output 2a
= Output 2com
= Output 2b
Out21
Out20
Out22
The indicator has two digital outputs.
Out11
Out10
Out12
4.7.2 Outputs
Each output is designed as a twin electronic relay. Depending
on the method of connection, the voltage and current carrying
capacities can vary. An external voltage supply is required to
connect the outputs.
Connection options
Out11
Out10
Out12
The connection options under description relate to output 1. The same conditions apply for
output 2.
+
Switching voltage: max. 50VDC
Switching current: max. 2.5A
Internal resistance: max. 0.06 ohms when active.
Load
-
Load
-
Load
~
Attention: An external surge suppressor is required
in conjunction with inductive loads (free-wheeling diode, RC circuit, varistor).
Out11
Out10
Out12
+
Switching voltage: max 50VDC
Switching current: max 5.0A
Internal resistance:max. 0.03 ohms when active.
Achtung: An external surge suppressor is required in
conjunction with inductive loads (free-wheeling diode,
RC circuit, varistor).
Switching voltage: max 35VAC
Switching current: max 2.5A
Internal resistance: max. 0.12 ohms when active.
Out11
Out10
Out12
~
Achtung: An external surge suppressor is required in
conjunction with inductive loads (RC circuit, varistor).
Chapter 4 Pin assignment and connection
25
26
82comfort • Service Guide
5 Connecting a weighing platform
5.1 Strain gauge input
A weighing platform with strain gauge load cells can be connected at the A/D converter input.
Terminal
Signal
1
Dongle
2
Supply +
3
Sense +
4
Signal +
5
Signal -
6
Sense -
7
Supply -
1 2 3 4 5 6 7
Terminal 1 of the weighing platform is connected only if a terminal box with DONGLE is used (dongle = device with unique identification number in the terminal box).
If no terminal box is used, or a terminal box without a DONGLE, the terminal is left unused.
The weighing platform feed voltage is 5V.
The following voltage is measurable:
Supply - = PCB ground
(chassis)
Supply +
5V
In the event of a short circuit or supply voltage overload, an error message appears on the display
and the device switches itself off after a short delay. See "Messages and errors" chapter in the
Operating Manual.
Chapter 5 Connecting a weighing platform
27
5.2 Connecting the strain gauge weighing platform
5.2.1 Direct connection of a load cell
!
Please note the installation instructions for shielded cables in Chapter 8 “Cable gland assembly“ on
page 37.
Indicator
6-wire load cell
4-wire load cell
Wire colour
Wire colour
Signal
Terminal
Supply −
7
−
Sense −
6
−
Wire colour:
Signal −
5
−
according to the
−
according to the
Signal +
4
−
load cell type
−
load cell type
Sense +
3
−
Supply +
2
−
Dongle
1
free
Wire colour:
free
In conjunction with load cells with 4-wire connection, connect the SENSE + and SENSE - terminals on the terminal strip with the respective supply voltages SUPPLY + and SUPPLY -.
5.2.2 Connection via terminal box
i
The specified wire colours apply with respect to the original manufacturer cable between the indicator and the terminal box.
a) Terminal box with identification function
These terminal boxes are equipped with an electronic device (dongle). This device sends an ID
number to the indicator permitting authoritative identification of the terminal box.
!
For the ID number to be transmitted correctly, the shield of the measuring cable must have contact
in the gland both at the indicator and in the terminal box.
b) Terminal box without identification function
If older terminal boxes without a dongle or other makes are connected, terminal 1 at the strain gauge input of the indicator is left unused.
28
82comfort • Service Guide
5.2.3 Terminal box with 6-wire connection
Please note the installation instructions for shielded cables in Chapter 8 “Cable gland assembly“ on
page 37.
Indicator
Signal
Terminal box with
identification function
Wire colour
Terminal
Cable
black
6-way
Cable
grey
7-way
(no dongle)
(with dongle)
!
6-wire connection
Terminal strip DISPLAY
Supply −
7
Black
Yellow
Supply −
Sense −
6
Green
Pink
Sense −
Signal −
5
Orange
Brown
Signal −
Signal +
4
Brown
Green
Signal +
Sense +
3
Yellow
Grey
Sense +
Supply +
2
Red
White
Supply +
Dongle
1
−
Blue
Dongle
To include the weighing platform and the metal enclosure of the terminal box in the earthing system, the shield of the measuring cable must have contact inside the gland. If this connection is
not made, the input of the analogue-to-digital converter could be destroyed by static discharge or
overvoltage.
Chapter 5 Connecting a weighing platform
!
29
5.2.4 Connecting load cells in the terminal box
Please note the installation instructions for shielded cables in Chapter 8 “Cable gland assembly“ on
page 37.
Terminal box
6-wire load cell
4-wire load cell
Signal
(Terminal)
Wire colour
Wire colour
Supply +
-
Sense +
-
Wire colour:
Signal +
-
according to the
-
according to the
Signal -
-
load cell type
-
load cell type
Sense -
-
Supply -
-
Wire colour:
In conjunction with load cells with 4-wire connection, connect the SENSE + and SENSE - terminals on the terminal strip with the respective supply voltages SUPPLY + and SUPPLY -.
30
82comfort • Service Guide
Supply +
Sense +
Signal +
Signal Sense Supply -
Supply +
Signal +
Signal -
Load cell 2
(and others)
Supply +
Sense +
Signal +
Signal Sense Supply -
Supply -
Supply +
Signal +
Signal Supply -
Load cell 1
To avoid having to insert two cables in
one terminal when connecting load cells
with 4-wire connection, the cable jumpers can be configured according to the
adjacent wiring diagram.
In this case load cell 1 is the only one to
be connected at variance with the standard terminal designation.
As the terminals for the load cells in the
terminal box are all connected in parallel, it is sufficient to make the two connections between supply and sense
once.
5.3 Connection to the indicator
Load cells and terminal boxes can be connected to the indicator using circular connectors. The
table shows the wire colours and pin assignments of the original manufacturer cables and connectors.
Please note the assembly instructions for circular connectors in Chapter 9 “Circular connector assembly“ on page 39.
Indicator
Wire colour
!
Terminal box or
load cell
Connector
Signal
Terminal
Cable
black
6-way
Cable
grey
7-way
Pin no.
Female
Pin no.
Male
Signal
Supply −
7
Black
Yellow
4
4
Supply −
Sense −
6
Green
Pink
6
6
Sense −
Signal −
5
Orange
Brown
2
2
Signal −
Signal +
4
Brown
Green
3
3
Signal +
Sense +
3
Yellow
Grey
5
5
Sense +
Supply +
2
Red
White
1
1
Supply +
Dongle
1
—
Blue
7
7
Dongle a
CHGND
Gland
Shield
Shield
Chassis
Chassis
CHGND
a. Only when connecting a terminal box with identification function
Chapter 5 Connecting a weighing platform
31
5.4 Maximum cable length
i
The length of cable between the indicator and the terminal box or load cell depends upon the
cross-section of the cable employed. The maximum length is 54.2 m per mm2.
The maximum cable length for a cable cross-section of 0.25 mm2, for example, is calculated as
follows:
Cable length =
Cross section
x
54.2 m/mm2
Cable length =
0.25 mm2
x
54.2 m/mm2
Cable length =
13.55 m
The cable cross-section to be used for a stipulated length of 80 m, for example, is calculated according to the following equation:
Cross section ≥
Cross section ≥
Cross section ≥
Cable length
54.2 m/mm2
80 m
54.2 m/mm2
1.47 mm2
~ (1.5 mm2)
Table for conventional cable cross-sections
Cross section
32
Max. length
Cross section
Max. length
0.25 mm2
13.5 m
0.6 mm2
32.5 m
0.34 mm2
18.4 m
0.75 mm2
40.6 m
0.4 mm2
21.6 m
1.0 mm2
54.2 m
0.5 mm2
27.1 m
1.5 mm2
81.3 m
82comfort • Service Guide
6 Automatic power-up
6.1 Overview
The AUTOMATIC POWER-UP function powers up the indicator automatically when the supply voltage
(mains voltage or low voltage) is switched on. There is no need to press the ON/OFF key.
It is then no longer possible, however, to switch off the device using the ON/OFF key. The
ON/OFF key therefore has to be disabled by a menu setting.
6.2 Jumper settings
Always follow the safety and assembly instructions in Chapter 3 “Opening the enclosure“ on page 9
when opening the device.
!
The main board has a pluggable jumper for selection of the power-up mode.
Jumper in key position [Taste]
Power up via ON/OFF key
Jumper in "On" position
Device powers up automatically
Chapter 6 Automatic power-up
33
6.3 Menu structure
The ON/OFF key must be locked in the device configuration menu.
tw
td.konfg
Device configuration
Itw
Itkeylok
Key lock
IitOn.key
ON/OFF key
Iiiton/off key active
ON/OFF key active
Iiityes
ON/OFF key is active
IiilNo
ON/OFF key is not active (locked)
Iitw
Itw
tw
6.4 Menu table
Menu text
Default
Explanation
Enter menu with the M key, select, d.konfg and confirm.
d.konfg
Device configuration
******
Password
1
Manu-facturer’s number
keylok
Select menu item key.lok and confirm.
Key lock
2
On.key
3
on/off key
Active
Enter password and confirm by pressing N.
The password need only be entered once. The configuration level
can then be accessed until such time as the device is switched off
and back on again.
Select menu item On.key and confirm.
ON/OFF key
Ticker text "ON/OFF key active" followed by YES/NO prompt.
ON/OFF key
active
3
2
34
No
Select either yes or No using the T and P keys and confirm.
If yes is selected: ON/OFF key active
If No is selected: ON/OFF key not active (locked)
Select No and confirm.
On.key
Exit menu with the M key.
yes
yes
ON/OFF key
82comfort • Service Guide
7 Mercury switch
7.1 Overview
The MERCURY SWITCH function allows the indicator to be used in
legal-for-trade (verifiable) mobile weighing instruments (e.g. pallet trucks). The mercury switch is installed in the frame of the
weighing instrument and connected to an input on the indicator.
If the angle of tilt of the weighing instrument exceeds the permissible value, the mercury switch
switches off and a series of dashes ------È appear on the display instead of a weight value.
7.2 Connection
Always follow the safety and assembly instructions in Chapter 3 “Opening the enclosure“ on page 9
when opening the device.
!
The mercury switch must be closed in a vertical position. If the permitted angle is exceeded, the
switch opens (normally closed contact).
The mercury switch is connected at +6V and input 1 (terminal In2).
Mercury switch
2
Digital I/O
+6V
In2
560Ω
15
1
Voltage supply
Serial interface 1
1 From board number 070000 to 070999
To increase the current in the mercury switch, a 560Ω resistor must also be installed. Connect between input 1 (terminal In2) and ground (terminal 15). No solder connection is made at a jumper.
2 From board number 071000
No external resistor is required; simply make a solder connection at jumper J6.
Chapter 7 Mercury switch
35
7.3 Menu structure
The mercury switch has to be activated in the adjustment menu. The digital inputs and outputs do
not have to be enabled in order to use the 'Mercury switch' option.
The settings can be changed only once the verification seal has been destroyed.
tw
tadjust
Adjustment
Itw
Itgenl
General settings
Iitangle
Mercury switch
IiitNo
Mercury switch inactive
Iiilyes
Mercury switch active
Iitw
Itw
tw
7.4 Menu table
Menu text
Default
Explanation
Enter menu with the M key, select adjust and confirm.
adjust
Adjustment
1
genl
2
angle
3
No
2
Select menu item genl and confirm.
General
Select menu item angle and confirm.
Mercury switch
yes
Select either yes or No using the T and P keys and confirm.
If No is selected: mercury switch inactive
If yes is selected: mercury switch active
Select yes and confirm.
angle
Exit menu with the M key.
No
Mercury switch
7.5 Additional function
i
Mercury switches are often used in mobile devices that can be battery-operated. If a printer is also
connected to the indicator, it makes sense to shutdown the printer along with the indicator to extend the battery service life.
For this reason output 1 on the indicator is automatically set up as an auxiliary switch on activation
of the mercury switch. The output is switched on and off whenever the indicator is switched on and
off.
The output can be used to switch the printer operating voltage on and off automatically. See the
"Pin assignment and connection" chapter for information on connecting the output.
36
82comfort • Service Guide
8 Cable gland assembly
All cables run into the enclosure must be round shielded cables.
The following cable diameters must be observed:
Min. ∅ [mm]
Max. ∅ [mm]
M 12
(for data cables)
3.0
6.5
M 16
(for measuring cables)
4.0
8.0
Gland type
Individual parts
Locknut
Threaded nipple
Insert
Spring locknut
Assembly steps
Strip approx. 100mm of insulation from the cable.
Thread on the spring locknut
and the insert. Push the insert
with gasket up onto the insulation.
Spread out the braided shield a
little and push back slightly.
Cables with foil shield:
Remove foil and fold a small
loop of the bare filler core back
over the insert.
Thread on the nipple.
Push the nipple over the insert;
the shield is clamped.
The braided shield must have
contact all around the cable!
Push parts together.
Screw the spring locknut tightly
onto the threaded nipple.
Chapter 8 Cable gland assembly
37
Spread out the shield directly
behind the threaded nipple.
Cut off the spread-out shield or,
for cables with foil shield, the
bare filler core.
Remove protective foil, if any.
The cable shield is connected solely via contact in the gland.
38
82comfort • Service Guide
9 Circular connector assembly
IP67 rated circular connectors are used for making plug-in cable connections to the indicator. IP67
protection applies only on correct and careful assembly in accordance with the instructions given
below.
All cables fitted in the plug-in connection must be round shielded cables.
Cable diameter: min. 6 mm to max. 8 mm.
3
2
1
Clamping screw
4
Pinch ring
Spacer sleeve
5
Gasket
Connector insert
6
Coupling sleeve
7
Shield clamping ring
8
Shield ring
9
Threaded ring
Individual parts
Assembly steps
Strip approx. 20mm of insulation from the cable. Thread on parts 1-5.
5
4
3
2
1
Spread out the shield and thread on shield ring (6), put the shield over the shield ring.
Remove 4mm of insulation from the wires and solder to connector insert (8).
8
6
Chapter 9 Circular connector assembly
39
Clamp the shield to shield ring (6) using clamping ring (5).
The shield must have contact all around the cable!
Snap on spacer sleeve (7).
Cut off the excess shield.
7
8
6 5
Push threaded ring (9) over connector insert (8) and spacer sleeve (7).
The locking element in threaded ring (9) must be seated in the corresponding grooves on connector insert (8) and the spacer sleeve.
9
7
Screw threaded ring (9) tight on coupling sleeve (4).
9
4
3
2
1
Push gasket (3) and pinch ring (2) into coupling sleeve (4) and screw together with spring locknut
(4).
4
40
82comfort • Service Guide
1
10 Equipotential bonding
10.1 Connection concept
A weighing system connected to the indicator is protected against static discharge up to a peak
voltage of at least 6 kV / 8 kV in accordance with DIN 45501, Sheet 3.3. In addition, the indicator
complies with the immunity classes specified in the EU directives and European standards on
which the CE mark is based. This level of guaranteed protection is sufficient for most weighing
tasks.
If high static discharges occur in special
applications, e.g. when processing (plastic) granules and free-flowing materials
or when weighing plastics parts or filmwrapped packages, the weighing platform and the indicator must be provided
with equipotential bonding in a star configuration. Any conveyors or fixtures attached on or to the weighing platform
must be included in the equipotential
bonding system. This will prevent the
electronics from being destroyed by static discharges.
Weighing platform
Load cells
Equipotential bonding
Indicator
Other devices
10.2 Weighing platform
The equipotential bonding connection on the weighing instrument frame must have good conductivity (<100mΩ) and a sufficient cross-sectional area. Locating and foot screws present in the frame may be used for this purpose.
If the weighing platform pan or frame is included in the equipotential bonding system, be sure to
make a flexible connection. The equipotential bonding conductor must be laid in a loop. If this is
not done, weighing errors will result!
10.2.1 Weighbridges
Equipotential bonding should be done via a foundation earth electrode or the weighbridge foundations.
The potentially large distance between weighing platform, indicator and other components can result in a big potential difference, compared with the measurement signal, between the components.
i
Therefore:
•
Connect all components together using an equipotential bonding cable.
•
Use a star configuration to connect components.
•
Select a large cross-sectional area (min. 102 mm) for the equipotential bonding cable.
•
Ensure there is a good conductive connection to the individual components (max. 100 mΩ).
Chapter 10 Equipotential bonding
41
10.2.2 Floor scales
Equipotential bonding should be done via a foundation earth electrode. To this end drill a hole
through the foundations. Drive the foundation earth electrode into the soil.
The required length (insertion depth) of foundation earth electrode is dependent upon the local
ground conditions. An electrician can provide information on this.
If the weighing platform is to be installed flush with the floor, the foundation earth electrode should
be installed when the pit is made.
An existing protective conductor may be used only if equipotential bonding via a foundation earth
electrode is not possible.
10.2.3 Bench scales
Connect all the weighing system components together. In exceptional cases, equipotential bonding can be done via the protective conductor of the Schuko socket outlet being used.
10.3 Indicator
Connection to the equipotential bonding system is effected on
the rear of the indicator via the bolt and nut located there. Attention should be paid to making a low-ohm connection (<100
mΩ) with good conductivity and a large cross-section (e.g.
using earth straps).
Connect all the weighing system components together. In exceptional cases, the earth connection
can also be made via the protective conductor of the Schuko socket outlet being used.
10.4 Other devices
Printers and auxiliary devices often have correspondingly marked equipotential bonding terminals
next to the data socket. Depending on the make, various connection options exist.
42
82comfort • Service Guide
11 Device configuration
11.1 Menu levels
The device can be customised to the user's requirements in the d.confg menu (device configuration). The extensive setting options allow users to create operation sequences and assign and enter parameters for required functions.
Settings can be made only upon entry of a password. The standard password is the manufacturer's number for the indicator.
The device configuration menu includes the following settings:
tw
See
Td.confg
ItTARe
Set tare options
page 45
ItSum
Set memory accumulation options
page 47
Itanimal
Animal weighing
page 49
ItdIG.I/O
Set up digital signals (separate password)
page 51
ItANALoG
Set up analogue output (with option board only)
ItStatis
Set up statistics function (separate password)
page 61
ItIN.FACE
Configure interface
page 67
Itprint
Set print options
page 71
ItAUTo o
Set automatic output options
page 95
Itset.ALI
Create alibi memory
page 99
ItBAT.
Set up battery operation
page 105
ItLIgHT
Switch display background light on/off
page 107
Itkeylok
Set key lock options
page 109
Itclock
Change date and time
page 113
ItPASSWd
Change password
page 115
ItPC.conf
Activate default settings for configuration with PC software
ItHa.Test
Hardware test
Ilbas.set
Default settings (restore factory settings)
tw
11.2 Configuration using PC software
Device configuration parameters can be read out, edited and archived using PC configuration
software. The software also allows the user to set and activate additional device properties and
options that cannot be accessed via the indicator's device configuration menu.
The properties of these functions are described in this documentation.
Reference is made to the need for configuration using the PC software in the relevant chapters.
Chapter 11 Device configuration
43
44
82comfort • Service Guide
12 Tare options
12.1 Set tare options
Tare options, such as the number of tare memories and auto tare, are set here. The settings are
made in the TARE menu:
12.2 Menu structure
tw
td.confg
ItTARE
Set tare options
Iitnumber
Number of tare memories
Iiitnum.
1
Number of tare memories = 1
Iiilnum.
2
Number of tare memories = 2
IitAuto.CL
Clear tare automatically
Iiitno
Do not clear tare automatically on unloading the weighing instrument
Iiilyes
Clear tare automatically on unloading the weighing instrument
IitAuto.Ta
Tare automatically
Iiitno
Do not tare first load automatically
Iiilyes
Tare first load automatically
Itw
tw
Chapter 12 Tare options
45
12.3 Menu table
Menu text
Default
Enter menu with the M key, select d.confg and confirm.
d.confg
Device configuration
******
Password
Explanation
Manufacturer's
number
1 TARE
Enter the password and confirm by pressing N.
The password need only be entered once. The configuration level
can then be accessed until such time as the device is switched off
and back on again.
Select menu item TARE and confirm.
Tare
2 number
Number of tare memories can be set.
Number of tare
memories
3 num. 2
1
2 AUTo.CL
Select either '1' or '2' using the T and P keys and confirm.
If the number of tare memories is set to 2, the first tare value will be
stored in tare memory 1 and all subsequent values in tare memory
2.
Set options for automatic deletion of tare values
Clear tare
automatically
3 yes
No
No
2 AUTo.TA
If yes is selected: all tare memories are erased when the weight
value reaches zero (±5d).
If No is selected: the tare value is not deleted automatically.
Activates the auto tare function
Activate auto tare
3 yes
no
No
46
82comfort • Service Guide
If yes is selected: the first load placed on the weighing platform is
tared automatically as soon as the indication is stable. If a weight
value of 5d below the automatically tared weight value is obtained,
the auto tare is deleted.
If No is selected: auto tare is inactive.
13 Memory accumulation options
13.1 Set accumulation memory options
Accumulation memory parameters such as auto print and auto delete are entered here.
13.2 Menu structure
tw
Td.confg
Itw
Itsum
Add together
IitAuto.st
Automatic subtotal printout
IiitNo
No automatic subtotal printout
Iiilyes
Automatic subtotal printout
IitAuto.Cl
Automatic clear
IiitNo
No automatic clear on printout of total
Iiilyes
Automatic clear on printout of total
IitTar.mem
Save tare values
IiitNo
Tare values are not totalled and printed.
Iiilyes
Tare values are totalled and printed.
IilMode
Display mode after an addition
Ii
tNone
No display
Ii
taddns
Number of additions
Ii
tgross
Gross total
Ii
tNet
Net total
Ii
tpieces
Total quantity
Ii
lmemory
Memory name
Itw
tw
Chapter 13 Memory accumulation options
47
13.3 Menu table
Menu text
Default
Enter menu with the M key, select D.Confi and confirm.
d.confg
Device configuration
******
Password
Manufacturer’s
number
1 sum
no
3 yes
no
Automatic clear
3 yes
no
Save tare
Save tare values in the totals.
3 yes
If yes: the tare values are also added and printed.
If No: the tare values are not added and printed.
2 mode
After each addition, one of the following values from the accumulation memory can be displayed.
3 kein
The display remains unchanged.
No value is displayed.
No
Display mode
None
3 addns
addns
Additions
The number of additions performed in this memory is briefly displayed each time a value is added to the total.
3 gross
The gross total in this memory is briefly displayed each time a value
is added to the total.
3 net
The net total in this memory is briefly displayed each time a value is
added to the total.
3 pieces
The total quantity is briefly displayed each time a value is added to
the total.
3 memory
The memory name is briefly displayed each time a value is added to
the total.
Gross
Net
Quantity
Memory name
48
On printout of the final total the accumulation memory is erased
automatically
If yes: on printout of the final total the respective memory is erased.
All other memories remain intact.
If No: on printout of the final total the user can decide whether the
respective memory is to be erased or not.
No
2 tar.mem
Set automatic printout options
If yes: automatic ticket printout is activated. The subtotal is printed
out after each addition.
If no: automatic ticket printout is disabled.
no
2 AUTo.CL
Enter password and confirm by pressing N.
The password need only be entered once. The configuration level
can then be accessed until such time as the device is switched off
and back on again.
Select sum menu item using the T and P keys and confirm.
Add together
2 auto.st
Possible settings
82comfort • Service Guide
14 Animal weighing option
14.1 Overview
The animal weighing function permits the weighing of live animals.
The indicator switches to a special weighing mode to deliver a stable indication in spite of the instability caused by the movement of the animals. The measuring time is user-selectable and can
be adjusted to the period required for the animals to settle. Animals exhibiting agitated behaviour
necessitate a longer measuring time.
A print ticket can be output on completion of weighing.
14.2 Menu structure
Option settings are made in the animal menu in the device configuration menu.
tw
td.confg
Itw
Itanimal
Animal weighing
IitActive
Activate animal weighing
Iiityes
Animal weighing active
IiilNo
Animal weighing inactive
IitMe.Time
Measuring time
Iiil5
Time for one weighing operation (in seconds)
Iitdi.Time
Display time
Iiil5
Time for which the weighing result is displayed (in seconds)
Iilcust.pt
Custom animal weighing print ticket
Ii
Print ticket name (not specified = standard print ticket)
l_
Itw
tw
Chapter 14 Animal weighing option
49
14.3 Menu table
Menu text
Default
Explanation
Enter menu with the M key, select d.confg and confirm.
d.confg
Device configuration
******
Password
1
Manufacturer’s
number
animal
Select menu item animal and confirm.
Animal
2
Active
3
yes
Activation of animal weighing.
Confirm the display.
Active
No
No
2
Me.Time
3
20
2
di.Time
20
50
2
cust.pt
3
10
2
Active
Set measuring time between 2 and 40 seconds.
If a value greater than 40 is entered, the animal measuring time is
set to 40 seconds.
Display time
Confirm the display.
Display time
5
Select either yes or No using the T and P keys and confirm.
If yes is selected: animal weighing mode active.
If No is selected: animal weighing mode inactive.
Measuring time
Confirm the display.
Measuring time
3
Enter password and confirm by pressing N.
The password need only be entered once. The configuration level
can then be accessed until such time as the device is switched off
and back on again.
5
Set display time between 1 and 30 seconds.
If a value greater than 30 is entered, the display time is set to 30
seconds.
Custom animal weighing print ticket.
Custom print
ticket
Not specified
Active
82comfort • Service Guide
Enter and confirm the custom print ticket number (instruction
block). (The number indicated here ['10'] is just an example.)
The instruction block with the specified number must have been
created on the indicator.
If no number is specified, the standard ticket is printed out.
Exit menu with the M key.
15 Digital inputs and outputs
15.1 Characteristics
To use the digital inputs and outputs you must first enable them by entering a board-specific enabling code. This code can be purchased from the manufacturer, quoting the board number.
i
The enabling code must be entered once only when first accessing the configuration level for the
digital inputs and outputs. The functions thus enabled are then always available. The enabling
code does not have to be entered again when you next access the configuration level.
The indicator has two inputs and two outputs, to which different characteristics can be assigned.
Depending on the configuration, the outputs assume the switching status corresponding to the
current weighing instrument status or the current load immediately on device power up. Output
activation or deactivation by keypress is not available in the standard function. The selected output switching function is continuously active.
15.1.1 Inputs
The inputs can be assigned the following functions:
a) Key assignment
An input can be assigned the same function as one of the keys on the device keypad.
The change of signal at an input from low (signal 0) to high (signal 1) is equivalent to a keypress
on the device. If both inputs are connected, the function of the first incoming signal is executed. If
no additional key functions are allowed while a device function is being executed, the signals are
ignored.
The function of the ON/OFF key cannot be executed by an input.
15.1.2 Outputs
i
The digital outputs can be assigned the following functions:
a) Status output
The signal from an output is dependent upon the current weighing instrument operating condition.
A user-selectable switching behaviour (NC contact/NO contact) can reverse the output signals.
NO contact
Weighing instrument status not reached
Weighing instrument status reached
= output low (signal 0)
= output high (signal 1)
NC contact
Weighing instrument status not reached
Weighing instrument status reached
= output high (signal 1)
= output low (signal 0)
If the indicator detects a stable indication, for example, the signal is emitted at the output set up
for this status. Various status signals are possible.
Chapter 15 Digital inputs and outputs
51
b) Setpoint switch
The output signal changes when a user-selectable setpoint (target value) is reached.
A user-selectable switching behaviour (NC contact/NO contact) can reverse the output signals.
NO contact
Current load below the setpoint
Current load above the setpoint
= output low (signal 0)
= output high (signal 1)
NC contact
Current load below the setpoint
Current load above the setpoint
= output high (signal 1)
= output low (signal 0)
The setpoint reference (gross, net or quantity) can be selected.
Signal 1
Signal 1
Signal 0
Signal 0
Setpoint
NC contact
Output
NO contact
Output
Load
Setpoint
Load
c) Interval switch
The output signal changes when a user-selectable setpoint range is reached.
Unlike for the setpoint switch, two setpoints can be entered for a switching range (MIN and MAX).
The signal from an output is emitted only if the load is within the selected switching range (between MIN and MAX).
NO contact
Current load outside the range
Current load within the range
= output low (signal 0)
= output high (signal 1)
NC contact
Current load outside the range
Current load within the range
= output high (signal 1)
= output low (signal 0)
The setpoint reference (gross, net or quantity) can be selected.
Output
Output
NO contact
Signal 1
Signal 1
Signal 0
Signal 0
MIN
i
52
NC contact
MAX
Load
MIN
MAX
Load
Info: Setpoint or interval switches whose reference has been set to 'quantity' operate only if the
count function is active.
82comfort • Service Guide
d) Status link
The output functions SETPOINT SWITCH AND INTERVAL SWITCH can also be linked to a weighing instrument status. The output signal is emitted only if the load is within the selected switching range
and the linked weighing instrument status has occurred.
Example:
An output signal is to be emitted only if:
! the weight value on the weighing instrument is in a certain load range and
! the indication is stable.
The output is set as an INTERVAL SWITCH and linked to the status STABLE INDICATION.
This gives the following output signal:
Output
NO contact
Signal 1
Signal 0
Load
MIN
Unstable
MAX
Stable
Status
The output signal is emitted only if the weight value is in the specified load range and the indication
is stable.
Depending upon the switching task, various
linked to a weighing instrument status.
SETPOINT SWITCHES
and
INTERVAL SWITCHES
can be
Not all combinations produce expedient switching behaviour, however. Were the INTERVAL SWITCH
shown in the example to be linked to the status ZERO POSITION, the output would not be able to
switch. The specified load range cannot be achieved at the same time as the zero position.
15.2 Signal level
Voltage
Input
Output
Voltage
0-2V
=
Signal 0 (Low)
Signal 0 (Low)
=
GND
5 - 24 V
=
Signal 1 (High)
Signal 1 (High)
=
V+
Chapter 15 Digital inputs and outputs
53
15.3 Defining inputs
Input characteristics can be set on the menu level Dig.I/0 in the device configuration menu.
15.3.1 Menu structure
tw
Td.confg
Itw
Itdig.I/0
Digital I/O
Iitinput
Input
IiitNo. 1
Input 1
Iiiilkey Code
Code for key
IiilNo. 2
Input 2
Iii
Code for key
lkey Code
Iiloutput
Output
Itw
tw
15.3.2 Menu table
Menu text
Default
Explanation
Enter menu with the M key, select d.confg and confirm.
d.confg
Device configuration
******
Password
1
Dig.I/0
2
input
3
No. 1
4
key Code
Select menu item input and confirm
Input
Select the number of the input to be set and confirm.
Input no. 1
Code for key
Enter the manufacturer’s number as the password and confirm by
pressing N.
The password need only be entered once. The configuration level
can then be accessed until such time as the device is switched off
and back on again.
Select menu item Dig.I/0 and confirm.
Digital I/O
0
2
Manu-facturer’s number
0
(0 = no
function)
input
Input
Ticker text "Code for key"
Enter the code for the key whose function is to be assigned to this
input. Confirm the code entered.
See 15.3.3 “List of possible key assignments“ on page 55 for the key code
assignments.
Exit the menu by pressing the menu key M.
All key functions of the device keypad (with the exception of the ON/OFF key) can be assigned to
an input. Setting up a key lock in the device configuration menu will not affect the function of the
inputs. The key lock merely disables the keys on the device keypad.
54
82comfort • Service Guide
15.3.3 List of possible key assignments
Key
Code
Key function
None
0
No key function
M
36
Menu key
i
26
Information key
p
1
Print
t
19
Tare
n
25
Zero
Z
22
Count with known initial quantity
G
23
Count with known reference weight
S
16
Add together
H
13
Preset tare
0
3
Number key 0
1
9
Number key 1
2
10
Number key 2
3
11
Number key 3
4
18
Number key 4
5
28
Number key 5
6
29
Number key 6
7
24
Number key 7
8
34
Number key 8
9
35
Number key 9
,
4
Decimal point
.
5
Clear last entry
A
12
Clear entry or function
B
6
Enter or confirm key
Chapter 15 Digital inputs and outputs
55
15.4 Defining outputs
Output characteristics can be set on the menu level Dig.I/0 in the device configuration menu.
15.4.1 Menu structure
tw
Td.confg
Itw
Itdig.I/0
Digital I/O (enabling code must be entered on initial invocation)
Iitinput
Input
Iiloutput
Output
Ii
tNo. 1
Output 1
Ii
itoff
Off (output has no function)
Ii
itStatus
Status (output has function of status output)
Ii
iitbehvr
Behaviour
Ii
iiilnormally open
NO contact (Yes/No = NO contact/NC contact)
Ii
iilStat.id
Status number (status characteristic)
Ii
ittarget
Setpoint (output has function of setpoint switch)
Ii
iitbehVr
Behaviour
Ii
iiilnormally open
NO contact (Yes/No = NO contact/NC contact)
Ii
iitAbsolu.
Absolute (algebraic sign ignored)
Ii
iiityes
Yes (setpoint also refers to negative net values)
Ii
iiilNo
No (setpoint refers to positive net values only)
Ii
iitref
Reference (setpoint reference: net, gross, quantity)
Ii
iittarget
Setpoint
Ii
iilr.ship
Status link (additional switching condition)
Ii
ilrange
Interval (output has function of interval switch)
Ii
i
tbehvr
Behaviour
Ii
i
ilnormally open
NO contact (Yes/No = NO contact/NC contact)
Ii
i
tAbsolu.
Absolute (algebraic sign ignored)
Ii
i
ityes
Yes (setpoint also refers to negative net values)
Ii
i
ilNo
No (setpoint refers to positive values only)
Ii
i
tref
Reference (setpoint reference: net, gross, quantity)
Ii
i
tMin.
Min. setpoint (lower switching threshold)
Ii
i
tMax.
Max. setpoint (upper switching threshold)
Ii
i
lr.ship
Status link (additional switching condition)
Ii
lNo. 2
Ii
tw
Itw
tw
56
82comfort • Service Guide
Output 2
(menu levels as for output 1)
15.4.2 Menu tables
a) Output as status output
Menu text
Default
Explanation
Enter menu with the M key, select d.confg and confirm.
d.confg
Device configuration
******
Manu-facturer’s number
Password
Enter the manufacturer’s number as the password and confirm by
pressing N.
The password need only be entered once. The configuration level
can then be accessed until such time as the device is switched off
and back on again.
1
Dig.I/0
2
output
3
No. 1
4
Status
5
behvr
Behaviour
Output switching behaviour.
Confirm the display.
6
normally
open
Ticker text "NO contact"
followed by Yes/No prompt.
Select menu item Dig.I/0 and confirm.
Digital I/O
Select menu item output and confirm
Output
Select the number of the output to be set and confirm.
Output no. 1
off
Status
NO contact
yes
yes
no
5
Stat.id
6
0
5
behvr
Select function Status and confirm
yes
No
= NO contact
= NC contact
Number of the desired status output.
Confirm the display.
Status no.
0
Enter status number and confirm:
See “List of possible status outputs“ on page 57 for the status number
assignments.
Exit the menu by pressing the menu key M.
Behaviour
List of possible status outputs
Status
Code
Function
Zero
0
Weighing instrument is at zero
Stable
1
Weighing instrument is at rest
Tare
2
Weighing instrument has been tared
(active tare available)
Chapter 15 Digital inputs and outputs
57
b) Output as setpoint switch
Menu text
Default
Explanation
Enter menu with the M key, select d.confg and confirm.
d.confg
Device configuration
******
Password
Manu-facturer’s number
1
Dig.I/0
2
output
3
No. 1
4
target
5
behvr
Behaviour
Output switching behaviour.
Confirm the display.
6
normally
open
Ticker text "NO contact"
followed by Yes/No prompt.
Select menu item Dig.I/0 and confirm.
Digital I/O
Select menu item output and confirm
Output
Select the number of the output to be set and confirm.
Output no. 1
off
Setpoint
NO contact
yes
no
5
Absolu
6
yes
yes
Select function target and confirm.
yes
No
yes
yes
= Setpoint also refers to negative net values
(e.g. used for discharge weighing).
No
= Setpoint refers to positive values only
(negative net values do not trigger a signal change).
Yes
No
5
ref
6
1
5
target
6
1
5
r.ship
6
0
5
behvr
= NO contact
= NC contact
Absolute value not taking into account the algebraic sign.
Confirm the display.
Absolute
No
58
Enter the manufacturer’s number as the password and confirm by
pressing N.
The password need only be entered once. The configuration level
can then be accessed until such time as the device is switched off
and back on again.
Setpoint reference variable.
Confirm the display.
Reference
1
Enter reference number and confirm.
See “List of possible references“ on page 59 for the reference assignments.
Sets the setpoint.
Confirm the display.
Setpoint
1
Enter the setpoint and confirm (entry in the unit of the weighing platform when entering a weight value).
Assigns a link to a weighing instrument status.
Confirm the display.
Status link
0
Behaviour
82comfort • Service Guide
Enter link number and confirm.
See “List of possible status links“ on page 59 for assigning status links.
Exit the menu by pressing the menu key M.
List of possible references
Status
Code
Function
Net
0
Setpoint refers to the net weight
Gross
1
Setpoint refers to the gross weight
Quantity
2
Setpoint refers to the quantity (net)
List of possible status links
Status link
Code
Function
No status link
0
Not linked to a particular status
AND zero
1
Load in set switching range and instrument at zero
AND stable
2
Load in set switching range and indication stable
AND tare
3
Load in set switching range and instrument tared
AND NOT zero
4
Load in set switching range and instrument not at zero
AND NOT stable
5
Load in set switching range and indication not stable
AND NOT tare
6
Load in set switching range and instrument not tared
c) Output as interval switch
Menu text
Default
Explanation
Enter menu with the M key, select d.confg and confirm.
d.confg
Device configuration
******
Password
Manufacturer’s
number
Enter the manufacturer’s number as the password and confirm by
pressing N.
The password need only be entered once. The configuration level
can then be accessed until such time as the device is switched off
and back on again.
1
Dig.I/0
2
output
3
No. 1
4
range
5
behvr
Behaviour
Output switching behaviour.
Confirm the display.
6
normally
open
Ticker text "NO contact"
followed by Yes/No prompt.
Select menu item Dig.I/0 and confirm.
Digital I/O
Select menu item output and confirm
Output
Select the number of the output to be set and confirm.
Output no. 1
off
Interval
NO contact
yes
no
yes
Select function range and confirm
yes
No
= NO contact
= NC contact
Chapter 15 Digital inputs and outputs
59
Menu text
5
Absolu
6
yes
Default
Absolute value not taking into account the algebraic sign.
Confirm the display.
Absolute
yes
yes
= Setpoint also refers to negative net values
(e.g. used for discharge weighing)
No
= Setpoint refers to positive values only
(negative net values do not trigger a signal change).
Yes
No
No
60
Explanation
5
ref
6
1
5
MIN
6
1
5
MAX
6
10
5
r.ship
6
0
5
behvr
Setpoint reference variable.
Confirm the display.
Reference
1
Enter reference number and confirm.
See “List of possible references“ on page 59 for the reference assignments.
Sets the switching range lower limit.
Confirm the display.
MIN
1
Enter lower limit and confirm (entry in the unit of the weighing platform when entering a weight value).
Sets the switching range upper limit.
Confirm the display.
MAX
10
Enter upper limit and confirm (entry in the unit of the weighing platform when entering a weight value)
Assigns a link to a weighing instrument status.
Confirm the display.
Status link
0
Behaviour
82comfort • Service Guide
Enter status link number and confirm.
See “List of possible status links“ on page 59 for assigning links.
Exit the menu by pressing the menu key M.
16 Statistics function
16.1 Characteristics
To use the statistics function, you have to enable it by entering a board-specific enabling code.
This code can be purchased from the manufacturer, quoting the board number.
i
The enabling code must be entered once only when first accessing the configuration level for the
statistics function. The functions thus enabled are then always available. The enabling code does
not have to be entered again when you next access the configuration level.
16.2 Method of operation
Packaged products must comply with specific net quantity requirements. The permissible tolerance limits for the various sizes of container are laid down in the relevant weights and measures regulations for packaged goods.
The statistics function permits product weights to be measured and assessed in accordance with
the relevant weights and measures regulations for packaged goods. Monitoring and evidence of
compliance with the required tolerance limits is provided by statistical analysis.
•
The properties of the product to be checked are set on the indicator. The parameter set includes the nominal quantity, the tolerance limits and the product packaging weight (tare). The tolerance limits are automatically calculated with regard for the nominal quantity in accordance
with the weights and measures regulations.
•
Each sample weighed is compared with the parameters set to check whether the mandatory
limits are complied with. If the weight is above/below the set tolerance limits, it is indicated
accordingly and can also be printed.
•
During the final statistics memory analysis, the results of the check and the statistical values
calculated are printed out.
16.3 Target value and tolerance limits
On entry of the target value (nominal quantity), the tolerance limits are automatically recalculated according to the requirements of weights and
measures legislation.
If the setting 'Tolerance limits as per legislation' has been activated, the
tolerance limits may be modified only for the purpose of making them tighter (tolerance limit closer to the target value).
UT2
UT1
Target v.
LT1
LT2
If the setting 'Tolerance limits as per legislation' has not been activated,
the tolerance limits can be set as required.
In weighing mode, target values, tare and tolerance limits are also accessible in a separate settings menu, where they can be edited by the user (see Operating Manual).
Chapter 16 Statistics function
i
61
16.4 Menu structure
tw
Td.confg
Itw
ItStatis
Statistics
IitSum.key
Accumulate key for statistics function
IiiLActive
Active
Iii
tNo
Statistics function inactive
Iii
lyes
Statistics function active
IitAuto.Cl
Auto erase statistics memory
Iiityes
Auto erase after final statistical analysis
IiilNo
No auto erase after final statistical analysis
Iitsample
Print each sample
Iiityes
Samples are printed
Iiiil_
Custom print ticket for samples (optional specification)
IiilNo
Samples are not printed
IitEnd.tkt
Final statistical analysis print ticket
Iiil_
Custom print ticket for final statistical analysis (optional spec.)
Iittare
Set tare automatically
Iiityes
Product tare set automatically for each sample
IiilNo
Product tare is not set automatically
Iitgwm.act
Tolerance limits as per European pre-packaging legislation
Iiityes
Tolerance limits selectable only as per legislation
IiilNo
Tolerance limits user selectable
Iitweight
Target value refers to weight
Iiityes
Target value specified as weight
IiilNo
Target value specified as quantity
IitProd.
Product characteristics
Iiittarget
Target value (nominal quantity)
IiitTare
Tare (weight of packaging)
Iiitlt1
Tolerance limit LT1
Iiitlt2
Tolerance limit LT2
Iiitut1
Tolerance limit UT1
Iiilut2
Tolerance limit UT2
IilReset
Reset
Ii
tNo
Do not reset statistics function
Ii
lyes
Reset statistics function
Itw
tw
62
82comfort • Service Guide
16.5 Menu table
Menu text
Default
Enter menu with the M key, select D.Confi and confirm.
d.confg
Device configuration
******
Password
Possible settings
Manu-facturer’s number
Enter password and confirm by pressing N.
The password need only be entered once. The configuration level
can then be accessed until such time as the device is switched off
and back on again.
1 Statis
Select menu item STatis using the T and P keys and confirm.
2 Sum.key
Use accumulate key for statistics function.
Statistics
3 Active
Ticker text "Active"
No
4 yes
If yes is selected: the statistics function is activated.
The accumulate key S is used for entering an addition in the statistics memory.
If no is selected: the statistics function is disabled.
The accumulate key S executes the accumulation function.
no
2 AUTo.CL
Auto erase statistics memory on output of the final statistical analysis.
Automatic erase
3 yes
If yes is selected: the statistics memory is automatically erased on
output of the final statistical analysis.
If No is selected: the statistics memory can be erased after a prompt
on output of the final statistical analysis.
yes
No
2 sample
Print each individual sample.
Sample
3 yes
_
yes
If yes is selected: each sample is printed.
Not specified
If you select "Yes", you can then enter the name of an instruction
block to be used as a print ticket for the samples. Enter and confirm
the custom print ticket number (instruction block). The instruction
block with the specified number must have been created on the indicator.
If no name is specified, the standard ticket is printed out.
If No is selected: the individual samples are not printed.
No
2 End.tkt
Print ticket for the final statistical analysis.
Final statistical
analysis print ticket
3 _
Not specified
The name of an instruction block to be used as a print ticket for the
final statistical analysis can be entered. Enter and confirm the
custom print ticket number (instruction block). The instruction block
with the specified number must have been created on the indicator.
If no number is specified, the standard ticket is printed out.
2 Tare
Set tare automatically when weighing a sample.
Tare
3 yes
No
yes
If yes is selected: the tare value entered for the product is set automatically when weighing a sample.
If No is selected: the tare value entered for the product is not set
when weighing a sample.
Chapter 16 Statistics function
63
Menu text
Default
2 gwm.act
Tolerance limits in accordance with European pre-packaging legislation.
German Weights
and Measures Act
(Packaged Goods)
3 yes
yes
No
2 weight
If yes is selected: tolerance limits can be set only within the limits
permitted by European pre-packaging legislation.
If No is selected: tolerance limits are user-selectable.
Nominal quantity (target value) as a weight value.
Weight
3 yes
Possible settings
yes
No
If yes is selected: the nominal quantity is entered as a weight value
(in grams).
If No is selected: the nominal quantity is entered as a quantity.
2 Prod.
Settings for product characteristics.
3 target
Target value (nominal quantity)
Product
Target value
4 1000
1000
3 Tare
Tare value (weight of packaging)
Tare
4 0
0
3 lT1
985
3 lT2
970
3 uT1
1015
3 uT2
1030
2 Reset
Tolerance limit UT2 in grams.
Reset statistics function.
Reset
3 yes
Tolerance limit UT1in grams.
Tolerance limit UT2
UT2
4 0
Tolerance limit LT2 in grams.
Tolerance limit UT1
UT1
4 0
Tolerance limit LT1 in grams.
Tolerance limit LT2
LT2
4 0
Tare value in grams.
Tolerance limit LT1
LT1
4 0
Target value in grams.
yes
No
If yes is selected: reset is performed.
The statistics memory is erased and the following parameters are
set to default values:
target value, tare, LT1, LT2, UT1 and UT2.
If No is selected: reset is not performed.
64
82comfort • Service Guide
16.6 Required weighing instrument characteristics
Checks of prepackages must be carried out regularly in accordance with recognised statistical
quality assurance procedures. The provisions to be complied with are laid down in the relevant
weights and measures regulations for packaged goods.
The weighing instruments used must be verified as checkweighers and marked accordingly.
16.6.1 Nominal quantities to 10 kg
Random checks are to be performed for prepackages with nominal quantities to 10 kg.
The verification scale interval of the non-automatic checkweighers used may not be greater than:
Nominal quantity QN of the prepackages in g or ml
Maximum verification
scale interval in g
Less than 10
0.1
From 10 to less than 50
0.2
From 50 to less than 150
0.5
From 150 to less than 500
1.0
From 500 to less than 2500
2.0
2500 and more
5.0
16.6.2 Nominal quantities above 10 kg
A 100% check is to be performed for prepackages with nominal quantities above 10 kg.
The verification scale interval of the non-automatic checkweighers used may not be greater than:
Nominal quantity QN of the prepackages in kg or l
Maximum verification
scale interval in g
More than 10 to less than 15
10
15 to less than 25
20
25 to less than 100
50
Chapter 16 Statistics function
65
66
82comfort • Service Guide
17 Interfaces
17.1 Overview
The indicator has two interfaces that are operated as serial interfaces (RS232) as standard. Interface 1 can also be connected as a TTY interface. See Chapter 4.5.2 “TTY at interface 1“ on page 20.
Additional optional plug-in cards permit Ethernet or Profibus connectability via interface 1. Data
can thus be exchanged with a variety of terminals and systems.
17.2 Menu structure
The interfaces are configured on the menu level In.Face in the device configuration menu.
tw
td.confg
Device configuration
itin.face
Interfaces
Iitinter.1
Interface 1
iiitBaudra
Select baud rate
iiiit600
600 baud
iiiit1200
1200 baud
iiiit2400
2400 baud
iiiit4800
4800 baud
iiiit9600
9600 baud
iiiit19200
19200 baud
iiiil38400
38400 baud
iiitdat.len
Data length (number of data bits)
iiiitLgth=7
Length = 7 data bits
iiiilLgth=8
Length = 8 data bits
iiitparity
Parity (parity bit)
iiiitEven
Even
iiiitOdd
Odd
iiiilNone
None
iiitstopbi
Stop bits
iiiitStop.1
1 stop bit
iiiilStop.2
2 Stop bits
iiithandsh
Handshake (flow control)
iiiitHard
Hardware
iiiitno.hand
None
iiiilSoft
Software
Continued on page 68
Chapter 17 Interfaces
67
Continued from page 67
iiitver.int
Verifiable interface
iiiityes
Yes (interface is verifiable)
iiiilNo
No (interface is not verifiable)
iiitcom.typ
Interface type
iii
tRS 232
RS 232
iii
tTTY
TTY
iii
tNetwrk
Network (Ethernet or Profibus, via option board only)
iii
lInf.Red
Infrared (still without function, prepared for future option)
Iilinter.2
Interface 2
ii
(settings as for interface 1, but without COM-Typ)
tw
itw
tw
17.3 Menu table
Parameters must be entered separately for each interface.
Menu text
Default
Enter menu with the M key.
Select d.confg using the T and P keys and confirm.
d.confg
Device configuration
******
Password
68
Explanation
Manu-facturer’s number
Enter password and confirm by pressing N.
The password need only be entered once. The configuration level
can then be accessed until such time as the device is switched off
and back on again.
1
In.Face
2
inter.1
Interface 1
Select interface to be set (1 or 2) using the T and P keys and
confirm.
3
Baudra
Sets the baud rate.
4
9600
3
Dat.Len
4
Lgth=8
3
Parity
4
none
3
Stopbi
Select in.Face menu item using the T and P keys and confirm.
Interface
Baud rate
9600
Sets the data length (data bits).
Data length
Length = 8
8
Select data length and confirm.
Possible values: 7 or 8 data bits.
Sets the parity (parity bits).
Parity
None
Select baud rate and confirm. Possible values:
600, 1200, 2400, 4800, 9600, 19200, 38400 baud.
none
Stop bits
82comfort • Service Guide
Select parity scheme and confirm.
Possible values: even, odd, none.
Sets the stop bits.
Menu text
Default
Explanation
4
Stop.1
Stop bits 1
Select number of stop bits and confirm.
Possible values: 1 or 2 .
3
Handsh
Sets the handshake (flow control).
4
Hard
3
ver.int
4
No
3
Com.Typ
4
RS 232
1
Handshake
Hardware
Select handshake and confirm.
Possible values: Hardware, none, software.
Hard
Sets the verifiability.
Verifiable
No
Select characteristic and confirm (parameter can be changed only if
no verification seal has been attached).
If No is selected:
The interface has no verification seal protection.
Existing instruction blocks are not checked and not sealed on closure of the verification seal.
If yes is selected:
The interface has verification seal protection.
Existing instruction blocks are output for checking and then sealed
on closure of the verification seal.
Changes to instruction blocks are therefore restricted.
See Chapter 22.4 “Sealed instruction blocks“ on page 92 for details.
No
Sets the interface type (interface 1 only).
Com.Typ
(interface type)
RS 232
RS 232
Communications from interface 1 can be forwarded to other ports,
depending on the connection type or optional plug-in card.
RS 232 = RS 232 (standard connection serial interface)
TTY
= TTY (connection as TTY interface)
Netwrk = Network card (Ethernet or Profibus option board)
Inf.Red = Infrared (still without function, prepared for future options)
Info: The service connector can be used only if RS 232 has been
selected as the interface type.
3
Baudra
Baud rate
0.000
Once the setting for the final menu item has been entered, the first
menu item is displayed again.
Exit menu with the M key.
Indication of the weight.
Interface 2 cannot be forwarded to other ports. It is used solely as a serial RS 232 interface.
The menu item Com.Typ is therefore not displayed in the settings menu for interface 2.
Chapter 17 Interfaces
i
69
70
82comfort • Service Guide
18 Printing
18.1 Overview
•
The indicator allows the user to create standard outputs for different printer types or indicators.
Various formats are available for selection.
•
Each interface can be assigned its own output format.
•
The selected standard print ticket is output if the p key is pressed.
•
The individual formats for these standard print tickets are tailored to the specified printer types
or indicators and cannot be changed.
•
Headers and footers can be added to standard print tickets, however.
See Chapter 20 “Headers and footers“ on page 85.
•
Application-specific instruction blocks can also be created for special output formats or weighing procedures. See Chapter 22 “Instruction blocks“ on page 91.
18.2 Menu structure
The indicator is configured on the menu level print in the device configuration menu.
tw
td.confg
Itprint
Print
iIttkt.set
Print settings
iIItinter.1.
Interface 1
iIIitFormat.
Format (output format or printer type)
iIiiit80-A
Forms printer with 80 characters/line
iIiiit40-A
Roll printer with 40 characters/line
iIiiit32-A
Roll printer with 32 characters/line
iIiiit24-A
Roll printer with 24 characters/line
iIiiitUniver
Universal printer (settings via configuration software)
iIiiildispl.1
Large or remote display (permanent data output)
iIIitnumber
Number
iIiilnum.
Number 1 (number of outputs per keypress)
1
iIIlinterv
Queue time (only if number set to greater than 1)
iIi
Queue time between two outputs (in seconds)
l0
iIIiLref.qty
Reference quantity
iIii
No/Yes (also print reference quantity)
lNo
iIIlinter.2.
Interface 2
iII
Setting options as for interface 1
tw
iItser.nr.
Serial number
iIil123
Set number
iILpoint
Point as decimal separator
iI
Yes/No (Yes = point / No = comma)
lyes
iLw
Chapter 18 Printing
71
18.3 Menu table
18.3.1 Setting the standard print ticket
The standard print ticket can be set separately for each interface. Some examples of print tickets
are described in Chapter 19 “Default output formats“ on page 75.
Menu text
Default
Enter menu with the M.
Select d.confg using the T and P keys and confirm.
d.confg
Device configuration
******
Password
Possible settings
Manu-facturer’s number
Enter password and confirm by pressing N.
The password need only be entered once. The configuration level
can then be accessed until such time as the device is switched off
and back on again.
1
print
Print
Select menu item print using the T and P keys and confirm.
2
tkt.set
Selection of print settings.
3
inter.1
Interface 1
Select the interface for which the settings are to be made using the
T and P keys and confirm.
4
Format
Standard print ticket format.
4
80-A
4
number
5
num. 1
5
interv
6
waiting time 0
Print settings
Format
32-A
80-A
Number of print tickets (number of outputs per keypress).
Number
0
Number
Waiting time
10
ref.qty
5
print
reference
quantity
Select number of print tickets to be output.
0 = None
1 = One
2 to10 = Output is repeated the specified number of times.
Sets the queue time.
Menu item appears only if the number of tickets is set to greater
than 1.
Interval
4
Select the standard print ticket for the specified device type. The following settings are possible:
80-A
80-A = Forms printer with 80 characters/line
40-A
40-A = Roll printer with 40 characters/line
32-A
32-A = Roll printer with 32 characters/line
24-A
24-A = Roll printer with 24 characters/line
univer Univer = universal printer (configurable)
displ.1 Displ.1 = Large or remote display
See Chapter 19 “Default output formats“ on page 75 for format details.
Ticker text "Waiting time"
Enter queue time of between 0 and 64 seconds.
Setting determining whether the reference quantity should be included in the printout.
Reference quantity
yes
Ticker text "Print reference quantity"
yes = Reference quantity is printed
no = Reference quantity is not printed.
yes
No
0.000
72
82comfort • Service Guide
Exit menu with the M key.
Indication of the weight.
18.3.2 Serial number
Each print ticket is furnished with a serial number. The number specified is used for the next printout and then increased by 1.
If the alibi memory is used, the serial number cannot be changed to a lower value. Otherwise the
memory would contain a duplicate ticket number.
Menu text
Default
Enter menu with the M key.
Select d.confg using the T and P keys and confirm.
d.confg
Device configuration
******
Password
Possible settings
Manu-facturer’s number
Enter password and confirm by pressing N.
The password need only be entered once. The configuration level
can then be accessed until such time as the device is switched off
and back on again.
1
print
2
ser.No
Serial number
Select menu item ser.No using the T and P keys and confirm.
3
123
Enter new number and confirm with N.
Select menu item printand confirm.
Print
123
Exit menu with the M key.
Indication of the weight.
0.000
18.3.3 Decimal separator
A comma or a point can be selected as the decimal separator to be output on the print ticket.
The decimal separator selected is also taken into account when outputting values transmitted on
the basis of instructions in the instruction blocks. The character set here is used for the decimal
separator for these values.
Menu text
Default
Device configuration
Password
1
print
2
point
3
yes
Manu-facturer’s number
Select menu item point using the T and P keys and confirm.
Point
0.000
Enter password and confirm by pressing N.
The password need only be entered once. The configuration level
can then be accessed until such time as the device is switched off
and back on again.
Select menu item print and confirm.
Print
No
Possible settings
Enter menu with the M key.
Select d.confg using the T and P keys and confirm.
d.confg
******
i
yes
If yes is selected, a point is used as the decimal separator, if no is
selected, a comma.
Exit menu with the M key.
Indication of the weight.
Chapter 18 Printing
73
74
82comfort • Service Guide
19 Default output formats
19.1 Overview
•
Default output formats are stored on the indicator and can be used whenever custom output
formats are not required.
•
The output format is set in the DEVICE CONFIGURATION| PRINT menu.
19.2 Format 80-A (80 characters/line)
Output format for forms printers with 80 characters per line. This output format can be used for
printing logs in list form.
Printer properties
Format description
Printout on continuous stationery or singlesheet automatic feed
Individual values are output next to each other, 24 characters
per value, 3 values per row.
Print width:
80 characters standard type
No highlighting of individual values.
Blank line on printout, no paper advance.
As this default format does not use any printer-specific control commands, it should be possible
to print the ticket on any commercially available forms printer.
Initialisation of the printer is to be performed via the header. The form feed can be controlled via
the footer.
Example of a print ticket:
Number
248
16.01.2007
13:54
Gross
49.7 kg
Tare
9.6 kg
Net
40.1 kg
------------------------------------------------------------------------------Number
249
16.01.2007
14:04
Gross
33.9 kg
Tare
11.2 kg
Net
22.7 kg
-------------------------------------------------------------------------------
Chapter 19 Default output formats
75
19.3 Format 40-A (40 characters/line)
Output format for roll printers with 40 characters per line.
Printer properties
Format description
Thermal receipt printer
Individual values are printed out underneath each other.
Receipt width:
40 characters standard type
80 characters narrow type
Highlighting by bold print.
Broken line and paper feed on printout.
The print control commands correspond to EPSON ESC/P commands. Any printer compatible
with these commands can be used.
Example of a print ticket:
No.
Gross
Tare
249
16.01.2007
14:04
33.7 kg
11.2 kg
Net
22.5 kg
----------------------------------------
19.4 Format 32-A (32 characters/line)
Output format for roll printers with 32 characters per line.
Printer properties
Format description
Thermal receipt printer
Individual values are printed out underneath each other.
Receipt width: 32 characters standard type
Highlighting by double-height characters.
Broken line and paper feed on printout.
Example of a print ticket:
No.
Gross
Tare
249
16.01.2007 14:04
33.7 kg
11.2 kg
Net
22.5 kg
--------------------------------
76
82comfort • Service Guide
19.5 Format 24-A (24 characters/line)
Output format for roll printers with 24 characters per line.
Printer properties
Format description
Dot matrix receipt printer
Individual values are printed out underneath each other.
Receipt width: 24 characters standard type
No highlighting of individual values.
Broken line and paper feed on printout
Example of a print ticket:
Number
249
16.01.2007
14:04
Gross
33.7 kg
Tare
11.2 kg
Net
22.5 kg
- - - - - - - - - - - -
19.6 Format Univer. (universal)
Output format for connecting a random line printer with code page 437 character set (Epson compatible). The settings for formatting the print ticket can be adjusted to the printer or the paper format used.
Select the format type Univer. (universal) in the device configuration menu. The associated format settings (print width, print length, highlighting ON/OFF) must be made on the PC using the
configuration software.
i
Print width
The print width specifies the output width in characters (characters per line). The printout is formatted automatically so as to use the entire print width.
The designation for the values is left-justified, the values and associated unit right-justified. The
gap in between is filled with spaces.
The following print width values must be observed:
Minimum print width:
Default print width:
Maximum print width:
23 characters
40 characters
255 characters
The ticket number and date/time are printed underneath each other on two lines if the print width
is between 23 and 30 characters or next to each other on one line if over 31 characters.
Chapter 19 Default output formats
77
Print length
The minimum length of the printout is specified via the print length. This ensures that the receipt
is long enough to tear off and affix.
The print length is also used to create printouts of the same length even when the number of data
lines differs. This is necessary, for example, when printing onto labels created on continuous strips
without a special label printer.
The print length specifies the minimum number of lines to be printed. If, on printout of all the data,
the requisite number of lines has yet to be reached, blank lines are appended using CR LF =
\013\010. If the number of data lines is greater than the print length, the data is printed out regardless.
The print length can also be entered as a negative value. In this case lines are appended only if
the number of printed data lines is smaller than the print length (see also following table).
Print length
Number of lines printed is
smaller than the print length
Number of lines printed is greater
than the print length
Positive number
10
The remaining lines are appended as
blank lines
Blank lines are appended until the next multiple of the print length. This ensures compliance with the print length pattern (e.g. for
labels).
Example:
Print length: 10
Lines printed: 7
Lines appended: 3
Print length: 10
Lines printed: 14
Lines appended: 6
Negative number
- 10
The remaining lines are appended as
blank lines
All lines of data are output, no blank lines
are appended.
Example:
Print length: 10
Lines printed: 7
Lines appended: 3
Print length: 10
Lines printed: 14
Lines appended: 0
Each row of data counts as a line. Multi-line headers and footers as well as variables are taken
into account when counting the lines. The line count is calculated from the number of occurrences
of the control character string CR LF = \013\010.
The following print length values must be observed:
Minimum print length:
-127 lines
Default print length:
18 lines
Maximum print length:
127 lines
Highlighting On
Depending on the active weighing functions, some weighing results (e.g. gross or net) are highlighted on standard print tickets. The areas of the printout that are highlighted on the standard print
ticket are permanently set and cannot be changed. Only the type of highlighting can be changed.
Characters can, for example, be printed in double height or bold type.
The control codes for activating highlighting can be found in the printer manual.
If no highlighting is required, no entry needs to be made here.
Highlighting Off
The control codes for deactivating highlighting are entered here. They can be found in the printer
manual.
If no highlighting is required, no entry needs to be made here.
78
82comfort • Service Guide
19.7 Format displ.1 (large or remote displays)
The indication, i.e. the content thereof, is continuously output to a large display or another indicator being used as a remote display. A data record is output each time the indication is updated.
Structure of the data record
The data record consists of 22 bytes and is structured as follows:
Byte
no.
No. of
bytes
Value
Description
1
1
Start of text
STX
2-12
11
Indication
Content of the indication, left-justified. When the value on the display
switches, the value transmitted also changes. In other words, the value
displayed is not always a weight value.
The indicator display has 6 places and a decimal separator.
Text shown on the display such as ’unload’ is not output.
Empty fields on the display are transmitted as blank spaces.
The decimal separator is transmitted as a point (dec46 0x2E).
Blank spaces are used to fill up the 11 places.
13
1
Range, stable
indication
Current weighing range
0x23
Range 3, indication stable
0x25
Range 2, indication stable
0x26
Range 1, indication stable
0x27
Indication unstable
14
1
Unit
Current unit
0x28
0xA0
0xA8
Quantity
Weight in kg
Weight in g
Total present?
0
1
No total present
At least 1 addition has been made
15
16
17
18
1
1
1
1
Total
Count
Zero
Tare
Count status
0
1
Indication at zero?
0
1
Tare set?
0
1
dec002
0x02
Count function inactive
Count function active. When the count function is
active, either the quantity is transmitted or the
weight. The value transmitted can be identified by
the unit.
Indication not at zero.
Indication at zero, the deviation from exact zero is
less than 0.25d.
No tare set
A tare (T1, T2 or PT) has been set
19
1
Flashing
Flashing rhythm of main display
0
No flashing
20-21
2
Line feed
CR
LF
dec013
dec010
0x0D
0x0A
22
1
End of text
EOT
dec004
0x04
Chapter 19 Default output formats
79
Example data records (format displ.1)
Indication
Data record
Comments
STX ..0.000.... 0x26 0xA0 0 0 1
0 0 CR LF EOT
Range 1, indication stable,
weight in kg, indication at zero
STX ..2.060.... 0x27 0xA0 0 0 0
0 0 CR LF EOT
Indication unstable, weight in
kg
STX ..18.560... 0x25 0xA0 0 0 0
1 0 CR LF EOT
Range 2, indication stable,
weight in kg, tare set
0.000
2.060
18.560
19.8 Format EDp 1 (connection to IT)
On pressing a key a data record with the current weighing results is output. (The data record can
also be output by "automatic output" or by sending the instruction <FP> via the serial interface.)
Ten values are transmitted:
Serial no. ; date ; time ; weighing platform no. ; weighing range ; quantity ; unit of weight ; gross ;
tare ; net
The individual values are separated by a semicolon in the data record. Starting and terminating
characters are the ASCII characters STX (0x02) and ETX (0x03). CR LF (0x13 0x10) is output at
the end of the data record.
The complete data record is 79 characters long.
If a header (for "standard printout") has been created, this character string precedes the data record.
If a footer (for "standard printout") has been created, the end of data record (CR LF) is replaced
by the footer.
If the alibi memory has been set up on the indicator, an entry is stored in the memory automatically
each time a data record is issued.
Example data record in format EDp 1
0 000000001111111111222222222233333333334444444444555555555566666666667777777 7 7 7
1 234567890123456789012345678901234567890123456789012345678901234567890123456 7 8 9
S ;
15734;07.02.2007;09:35:43;1;1;
0;kg;
2.850;
1.300;
1.550; E C L
T
T R F
X
X
Ser.no;
Date; Time;W;B;
Nos.;Unit;
Gross;
Tare;
Net
If the device does not have a clock, the date and time are replaced by a corresponding number of
spaces.
80
82comfort • Service Guide
Data format of values
Byte
Value
Format
Preceding header (only if created)
1
STX
1 digit, ASCII value 2 (START OF TEXT)
2
;
1 digit, delimiter = semicolon ";"
3 - 12
Serial number
10 digits, numeric, right justified, with leading spaces
13
;
1 digit, delimiter = semicolon ";"
14 - 23
Date
10 digits, format DD.MM.YYYY (e.g. 07.02.2007)
(If the device has no clock, 10 spaces are output.)
24
;
1 digit, delimiter = semicolon ";"
25 - 32
Time
8 digits, format HH:MM:SS (e.g. 09:35:43)
(If the device has no clock, 8 spaces are output.)
33
;
1 digit, delimiter = semicolon ";"
34
Weighing platform no.
1 digit, (always 1)
35
;
1 digit, delimiter = semicolon ";"
36
Weighing range
1 digit, (1, 2 or 3)
37
;
1 digit, delimiter = semicolon ";"
38 - 45
Quantity
8 digits, numeric, right justified, with leading spaces
(only if count function is present and active, otherwise value = 0)
46
;
1 digit, delimiter = semicolon ";"
47 - 48
Unit of weight
2 digits, alphanumeric, left justified, with leading spaces
Unit of weight for the values gross, tare and net (kg or g)
49
;
1 digit, delimiter = semicolon ";"
50 - 57
Gross
8 digits, numeric, right justified, with leading spaces
Gross weight value
58
;
1 digit, delimiter = semicolon ";"
59 - 66
Tare
8 digits, numeric, right justified, with leading spaces
Total tare weight value = sum of tare and preset tare
67
;
1 digit, delimiter = semicolon ";"
68 - 75
Net
8 digits, numeric, right justified, with leading spaces
Net weight value
76
;
1 digit, delimiter = semicolon ";"
77
ETX
1 digit, ASCII value 3 (END OF TEXT)
78
CR
1 digit, ASCII value 13 (CARRIAGE RETURN)
79
LF
1 digit, ASCII value 10 (LINE FEED)
Or footer from byte 78 (only if created)
Chapter 19 Default output formats
81
19.9 Format EDp 2 (connection to IT)
On pressing a key a data record with the current weighing results is output. (The data record can
also be output by "automatic output" or by sending the instruction <FP> via the serial interface.)
Eight values are transmitted:
Stable condition status ; weighing platform no. ; weighing range ; quantity ;
unit of weight ; gross ; tare ; net
The individual values are separated by a semicolon in the data record. Starting and terminating
characters are the ASCII characters STX (0x02) and ETX (0x03). CR LF (0x13 0x10) is output at
the end of the data record.
The complete data record is 50 characters long.
If a header (for "standard printout") has been created, this character string precedes the data record.
If a footer (for "standard printout") has been created, the end of data record (CR LF) is replaced
by the footer.
No entry is created in the alibi memory for this data record.
Example data record in format EDp 2
0 0000000011111111112222222222333333333344444444 4 4 5
1 2345678901234567890123456789012345678901234567 8 9 0
S ;1;1;1;
0;kg;
2.850;
1.300;
1.550; E C L
T
T R F
X
X
R;W;B;
82
Nos.;Unit;
Gross;
82comfort • Service Guide
Tare;
Net
Data format of values
Byte
Value
Format
Preceding header (only if created)
1
STX
1 digit, ASCII value 2 (START OF TEXT)
2
;
1 digit, delimiter = semicolon ";"
3
Stable condition status
1 digit, numeric (1 = stable indication, 0 = unstable)
4
;
1 digit, delimiter = semicolon ";"
5
Weighing platform no.
1 digit, (always 1)
6
;
1 digit, delimiter = semicolon ";"
7
Weighing range
1 digit, (1, 2 or 3)
8
;
1 digit, delimiter = semicolon ";"
9 - 16
Quantity
8 digits, numeric, right justified, with leading spaces
(only if count function is present and active, otherwise value = 0)
17
;
1 digit, delimiter = semicolon ";"
18 - 19
Unit of weight
2 digits, alphanumeric, left justified, with leading spaces
Unit of weight for the values gross, tare and net (kg or g)
20
;
1 digit, delimiter = semicolon ";"
21 - 28
Gross
8 digits, numeric, right justified, with leading spaces
Gross weight value
29
;
1 digit, delimiter = semicolon ";"
30 - 37
Tare
8 digits, numeric, right justified, with leading spaces
Total tare weight value = sum of tare and preset tare
38
;
1 digit, delimiter = semicolon ";"
39 - 46
Net
8 digits, numeric, right justified, with leading spaces
Net weight value
47
;
1 digit, delimiter = semicolon ";"
48
ETX
1 digit, ASCII value 3 (END OF TEXT)
49
CR
1 digit, ASCII value 13 (CARRIAGE RETURN)
50
LF
1 digit, ASCII value 10 (LINE FEED)
Or footer from byte 49 (only if created)
Chapter 19 Default output formats
83
84
82comfort • Service Guide
20 Headers and footers
20.1 Overview
•
Custom headers and footers can be added to the indicator's standard print tickets.
•
Headers and footers can be created separately for the various standard print tickets.
•
Headers are placed in front of the selected standard print ticket.
•
Footers are appended to the selected standard print ticket.
•
Headers and footers are not taken into account when executing instruction blocks or outputting
the data records disply.1 (for large or remote displays) and EDp 1 (for IT connections).
•
Headers and footers can be created and edited only on a PC using the configuration software.
20.2 Applications
Headers and footers can be used if the available standard print tickets are sufficient and only require the addition of a few extra details.
20.3 Characteristics
20.3.1 Headers
Text string:
A maximum of 250 characters can be entered as a header. Apart from 'standard' characters such
as letters and numbers, extended characters for controlling printers (such as CR LF or ESC) may
also be used. Characters in headers appear on the print ticket as entered.
Instruction block:
Instead of text, the name of an instruction block to be performed on the indicator before the print
ticket is output can be specified.
20.3.2 Footers
The default footer comprises the broken line at the bottom of the ticket and the paper feed or eject
characters. If no footer is defined, the default footer is printed.
User-defined footers do not include the broken line or paper feed command. Instead, the text entered as the footer is printed. If you wish to retain the broken line and paper feed function, you
must include the necessary characters in the footer.
Text string:
A maximum of 250 characters can be entered as a footer. Apart from 'standard' characters such
as letters and numbers, extended characters for controlling printers (such as CR LF or ESC) may
also be used. Characters in the footer appear on the print ticket as entered.
Instruction block:
Instead of text, the name of an instruction block to be performed on the indicator on output of the
print ticket can be specified.
Chapter 20 Headers and footers
85
20.4 Examples
20.4.1 Header as text string
A header is to be added to the standard print ticket at interface 1 for the CBM 270 printer type with
a print width of 32 characters per line. The header is to include the name and location of a branch.
The following character string is entered as the header:
\027!\024MF Branch\027!\000\013\01040822 Mansfield\013\010\013\010
The printer control characters are integrated in the header and highlighted in the above example.
The following control characters were used in this example:
\027!\024 = Change of font
\027!\000 = Return to default font
\013\010 = Line break
The printout appears as follows:
MF Branch
Main Street, Mansfield
Three-line header
(2 lines of text + 1 blank line)
No.
25 03.01.2007 14:42
Gross
37,480 kg
Tare
9,060 kg
Net
28,420 kg
--------------------------------
Standard print ticket
20.4.2 Headers and footers as instruction blocks
The task described in the example given at 20.4.1 “Header as text string“ can also be solved using an
instruction block. In this case, the output of text and control characters is evoked by corresponding
instructions.
An instruction block containing the following instructions is created:
<EA1\027!\024><EA1MF Branch><EA1\027!\000\013\010><EA140822 Mansfield>
<EA1\013\010\013\010>
Next, the name of the instruction block is specified in the configuration software for the header of
the standard print ticket.
i
86
If an instruction block is used for the header or footer, instructions for controlling weighing instrument functions can be included in addition to the instructions for outputting data.
A "Delete tare" instruction can be included in the instruction block for a footer, for example. The
tare value is then deleted automatically on printout.
82comfort • Service Guide
21 Variables
21.1 Overview
•
Variables are memory cells that are available for a number of functions. They can contain
values used to add to a data output or as parameters for functions.
•
We distinguish between the definition and the content of a variable.
•
The definition of a variable describes the properties of the memory cell itself. Settings can be
entered for supplementary text to be displayed or printed out, the input source, permissible
input values, and the minimum and maximum length. These definitions can subsequently be
amended at any time.
•
The content of the variable is the value in the memory cell. The user is prompted to enter a
value that is stored as the content of the variable on confirmation of the entry.
•
When entering a value in a variable via the keypad, only numbers and the decimal point are
available.
•
When entering a value in a variable via the serial interface (e.g. using a barcode reader), alphanumeric entries are possible (letters and numbers).
•
The content of the variable is retained until it is overwritten by a new value or the device is switched off. On power up, the content of all variables is replaced with the values specified as the
default parameters.
•
Ten variables can be created on the indicator.
•
If required, the variables created can also be included in the standard print tickets permanently
stored on the indicator. When printing a standard print ticket, the relevant variable is thus automatically prompted and printed.
•
Variables can be created and edited only on a PC using the configuration software.
i
21.2 Applications
Variables can be used to add information to a print ticket or a data record sent to a computer that
renders the weighing operation uniquely identifiable or permits an assignment to a specific category (e.g. customer, product, order or traceability numbers, employee ID numbers, scanned barcodes).
Variables can also contain values used as function parameters.
21.3 Characteristics
21.3.1 Number of variables
A maximum of ten variables can be created on the indicator.
21.3.2 Name on display
The name of the variable is briefly displayed as an entry prompt when the variable is prompted. It
can be a maximum of six characters long.
21.3.3 Text on printout
Text to be inserted on the printout when the variable is output. It can be a maximum of 159 characters long. Letters and numbers can be entered as text as well as printer control characters (e.g.
for position control).
Chapter 21 Variables
87
21.3.4 Text after printout
Text to be output after the variable is printed. It can be a maximum of 159 characters long. Letters
and numbers can be entered as text as well as printer control characters (e.g. for position control).
21.3.5 Auto prompt
When this function is active, the variable is prompted automatically (entry prompt) when a standard print ticket is output.
21.3.6 Auto printout
When this function is active, the variable is printed automatically when a standard print ticket is
output.
21.3.7 Display time (all variables)
When a variable is prompted, its name (NAME ON DISPLAY) appears briefly on the display. The display time can be set in milliseconds.
Maximum display time = 9000 milliseconds
Default display time = 1500 milliseconds.
21.3.8 Input source
The input source indicates whether the value in the variable can be entered via the keypad and
also set via the serial interface (e.g. by a barcode reader).
Examples
Set input
source
88
Explanation
Action on entry
Keypad
Input via the indicator keypad.
The entry prompt appears on the display and an input
via the keypad is expected.
Keypad and Com1
Input via the indicator keypad or
interface 1.
The entry prompt appears on the display and input via
the keypad or the interface is accepted.
Com1
Input via serial interface 1.
The entry prompt appears on the display, but data is
accepted from the interface only.
No input
No entry prompt appears on the
display.
The variable value can be selected via the menu only.
The value entered remains available until changed.
82comfort • Service Guide
21.3.9 Input end type
The input end type must be set for entries made via the serial interface. This determines how the
indicator detects the end of an entry made via the interface. If entries are made solely via the keypad, the parameter 'input end type' cannot be set.
End after
Explanation
Max. length
The data is applied as a value in the variable on receipt of a specific number of characters.
The number of characters is set in the 'Maximum length' parameter. See Chapter 21.3.12
“Maximum length“ on page 89.
Terminating character
The data is applied as a value in the variable on receipt of a terminating character. The terminating character selected is not entered in the variable, but it has to be transmitted to terminate each data entry.
A maximum of two characters are permitted as terminating characters. Control characters
such as ETX = \003 or CR LF = \013\010 can also be entered as terminating characters.
21.3.10 Preset type
Preset value to be proposed when variables are prompted. A preset value can be applied, edited
or overwritten.
Preset type
Explanation
No preset
No value is proposed, the entry field is empty.
Default
The default value is always proposed.
See Chapter 21.3.14 “Default value“ on page 90.
Previous value
The value last entered is proposed. The default value is proposed the first time the variable
is prompted after the indicator has been switched on.
21.3.11 Minimum length
Minimum number of characters to be accepted as a valid entry. The value entered when the variable is prompted must be of at least the length specified here. Shorter values will not be accepted
and have to be re-entered.
The minimum length can be set between 0 and 30 characters. If the minimum length is 0 characters, a blank value (0 characters) can also be entered. The minimum length selected may not exceed the maximum length.
21.3.12 Maximum length
Maximum number of characters possible during an entry. The value in the variable may not exceed the length specified here. Longer variables cannot be entered.
The maximum length can be set between 1 and 30 characters. The maximum length selected may
not be smaller than the minimum length.
Chapter 21 Variables
89
21.3.13 Output format
The output format specifies how the value in the variable is to be output. The following settings
are available:
•
The number of places to be output (between 0 and 999)
•
Right- or left-justified output of the value in the number of places to be output.
– If the value is shorter than the number of places to be output, the missing characters are output
as spaces before or after the value.
– If the value is longer than the number of places to be output, it is not truncated, but rather output
in full with all additional characters.
– If output without any formatting, the value is output from the current position. Subsequent data
is output directly after the last character of the value. The position of subsequent data varies
according to the length of the value.
The output format is entered as follows:
Output format
Explanation
Positive number (e.g. 20)
Right-justified output in the specified width (i.e. 20 characters).
Negative number (e.g. -20)
Left-justified output in the specified width (i.e. 20 characters).
Examples:
In these examples the interpunct "·" is used for the visual representation of spaces. Decimal points
in the value are counted as characters to be output.
Text on
printout
Value in
variable
Text after
printout
Output
format
Output
Product:
1234.5
12
Product:······1234.5
Customer:
75942
-12
Customer:75942·······
Quantity:
253725
4
Quantity:253725
Quantity:
3000
units
-5
Quantity:3000·units
Quantity:
20
units
-5
Quantity:20···units
Quantity:
3000
·units
5
Quantity:·3000·units
Quantity:
20
·units
5
Quantity:···20·units
21.3.14 Default value
Value to be proposed when variables are prompted, if default has been set as the preset type. On
indicator power up the specified default value is set as the content of the variable.
The default value is also used when 'No input' is selected as the input source. The value entered
here remains available in the memory even when the indicator has been switched off.
The default value is specified on creation of the variable. The default value can be changed via
the menu during subsequent use (see Operating Manual).
21.3.15 Entry overwrites default
When this function is active, the default value is overwritten when a new value is entered in a variable. The default value thus changes with each new entry. On device power off the last entry is
thus retained as the default value. On device power up the default value is again set as the content
of the variable.
90
82comfort • Service Guide
22 Instruction blocks
22.1 Overview
•
Instruction blocks consist of a chain of instructions that can be put together with different functions according to the application.
•
The choice and order of the instructions determines the sequence of operations performed by
the instruction block.
•
Ten instruction blocks can be stored on the indicator.
•
Instruction blocks can be created and edited only on a PC using the configuration software.
22.2 Applications
Instruction blocks can be used to create custom tasks on a printer or transmit a special data format
to a computer. Operating sequences can also be created to permit user interaction or to put the
device into specific operating modes.
22.3 Characteristics
22.3.1 Instruction block name
Each instruction block is given a name comprising a number up to six digits long. The name is
user selectable.
22.3.2 Reserved instruction blocks
Some names, however, have been reserved for certain indicator functions. If the function is to be
used, the instruction block must be created with the name reserved for it on the device. If the function is not required, no instruction block is created.
Attention!
Reserved names may not be used for other applications.
Name
Function
Responses from the data logger
920010
Data record received
920020
Error in data record
920030
Data memory full
Response from DataLog
920110
Data sent successfully
920120
Data not sent successfully
920130
Prompt unsuccessful
or
Delete not successful
Autostart
930001
This instruction block is executed once on indicator power up.
Chapter 22 Instruction blocks
91
22.3.3 Instruction block content
The indicator has a host of functions that can be invoked by instructions. The relevant instructions
must be arranged in an instruction block according to the operations required and are then processed in the stipulated sequence when the instruction block is executed.
The instructions and their properties are described in a separate user manual.
An instruction block can have a maximum of 1800 characters.
22.3.4 Execution of instruction blocks
In the default configuration the print key is used to issue a standard print ticket. If an instruction
block is to be executed, the function of the print key has to be changed and the name of the instruction block specified. These configuration properties can be set only on a PC using the configuration software.
22.4 Sealed instruction blocks
If verification seal protection is activated for an interface, the instruction blocks are output for chekking on closure of the verification seal and then sealed.
The verification seal protection function checks the following instruction block properties:
Verification seal
92
Interface
Instruction block
Restrictions
Attached
With verification
seal protection
Sealed
Instructions for the output of data at
an interface with verification seal protection can be changed only in a limited way.
Attached
With verification
seal protection
Not sealed
Instructions for the output of data at
an interface with verification seal protection are not executed.
•
Instructions in a sealed instruction block that initiate the output of data at an interface with verification seal protection can be changed only in a limited way if the verification seal is closed.
A sealed instruction block can also contain instructions that initiate the output of data at an
interface without verification seal protection. These instructions can be changed without
restriction.
•
If the verification seal is closed, instructions initiating the output of data at an interface with verification seal protection are executed only if the instruction block has been sealed.
•
On destruction of the verification seal, the instruction blocks are unsealed. Changes can then
be made to the instructions without restriction.
•
On closure of the verification seal, all instruction blocks initiating the output of data at an interface with verification seal protection are output once for checking. The checker can satisfy himself that the output values are correct before sealing the instruction blocks. This prevents
unauthorised changes being made to the instruction blocks.
82comfort • Service Guide
22.5 Examples
For reasons of clarity the instructions are arranged underneath each other in the examples. In the
configuration software on the PC the instructions are represented as a continuous chain.
Character \010: The three-digit numbers with preceding backslash are control characters for forcing a line break in the printout or changing the printer font. They are used for ASCII characters
outside the normal character range for letters and numbers. The two control characters \013\010
force a line break, for example. Some control characters may vary depending on the printer type.
i
Spaces are represented by an interpunct " · “ in this documentation.
22.5.1 Printout with gross, tare and net
Printout is effected at interface 1 on a printer of the type CBM 270 with a print width of 32 characters per line.
Instruction
Remarks
<FA1>
(Additional function, if required)
Freeze weight values and wait for stable indication.
<GP11No.%11lu··><GD1><GE1%6s\013\010>
1st line : Ser.no., date and time
<GB1Gross%23.3f·kg\013\010>
2nd line: Gross
<GS1Tare%25.3f·kg\013\010>
3rd line: Tare
<EA1\027!\024>
Change font on printer
<GN1Net%24.3f·kg\013\010>
4th line: Net
<EA1\027!\000>
Return to default font
<EB132->
5th line: Broken line
<EB108\013\010>
8 blank lines (paper feed)
<Fa>
(Additional function, if required)
Enable weight values.
Print ticket on keypress
Name of the instruction block (in this example): 10
Print key assigned with instruction block 10
Pressing the print key triggers the output of a print ticket.
If the instruction block is sealed, the data record can be output only when the indication is stable.
If the instruction block is not sealed, the FREEZE WEIGHT VALUES WHEN STABLE instruction <FA1>
must be included as the first instruction in the block.
Output on printer
No.
41 08.10.2004 10:40
Gross
25.250 kg
Tare
5.000 kg
Net
20.250 kg
--------------------------------
Chapter 22 Instruction blocks
93
22.5.2 Data record to computer
The serial number and the current gross, tare and net weight values are sent to interface 2 in CSV
format. The output can be initiated both by keypress on the indicator and by transmission of an
instruction from the computer to the weighing instrument.
Instructions
Remarks
<FA1>
or
<FA0>
(Additional function, if required) Freeze weight values and wait for stable indication
or
Freeze weight values without waiting for stable indication
<GP11>
Serial no. (10 digits, value right justified with leading spaces)
<EA1;>
Delimiter (semicolon)
<GB1>
Gross (8 digits, value right justified with leading spaces)
<EA1;>
Delimiter (semicolon)
<GS1>
Tare (8 digits, value right justified with leading spaces)
<EA1;>
Delimiter (semicolon)
<GN1>
Net (8 digits, value right justified with leading spaces)
<EA1\013\010>
End of data record (line break, \013 = [CR], \010 = [LF] )
<Fa>
(Additional function, if required) Enable weight values.
Output to computer on keypress
Name of the instruction block (in this example): 10
Print key assigned with instruction block 10
Pressing the print key triggers the transmission of data.
If the instruction block is sealed, the data record can be output only when the indication is stable.
If the instruction block is not sealed, the data record is output immediately.
If a non-sealed instruction block is to be output only when the indication is stable, the FREEZE
WEIGHT VALUES WHEN STABLE instruction <FA1> must be included as the first instruction in the
block.
Data record: ······1234;··25,250;···5,000;··20,250[CR][LF]
Output to computer on request via instruction
The data record can also be requested from the computer by sending the <FP010> instruction via
the serial interface. The device responds with the data record described.
If the instruction block is sealed, the data record can be output only when the indication is stable.
If the instruction block is not sealed, the data record is output immediately.
If a non-sealed instruction block is to be output only when the indication is stable, the FREEZE
WEIGHT VALUES WHEN STABLE instruction <FA1> must be included as the first instruction in the
block.
The confirmation message <FP> is also output after the data record to indicate that the instruction
<FP010> was successfully executed.
Data record: ······1234;··25,250;···5,000;··20,250[CR][LF]<FP>
94
82comfort • Service Guide
23 Automatic output
23.1 Overview
•
The weight values obtained by the indicator can be sent automatically to external devices
(remote displays, printers or computers).
•
The data transfer can be tied to certain conditions by way of various parameters to ensure data
is output only in conjunction with defined weighing instrument states.
•
The interface used is user selectable.
•
Besides standard print tickets, instruction blocks that output application-related data records
with various bits of information and control characters or execute functions can also be invoked
(see Chapter 22 “Instruction blocks“ on page 91).
23.2 Menu structure
Automatic output characteristics can be set on the menu level Auto o in the device configuration
menu. Some menu items are displayed only when certain other characteristics are preselected.
The details are described in the menu table on the following pages.
tw
td.confg
Itauto o
Automatic output
iItprt.typ
Print type (output mode)
iIitPermanent Data output
Permanent data output
iIitNo
No (only when indication is stable)
iIilyes
Yes (with time interval)
iitno.stab
Number of outputs when indication is stable
iIil1
Specification of number
Iit§ load
Minimum load change
iIil5
Load change (weight value)
Iitinterv
Interval between 2 outputs
iIil2
Interval (in seconds)
Iitnet.>5d
Net greater than 5d
iIityes
Yes (output only if net load greater than 5d)
iIilNo
No (output even if net load smaller than 5d)
Iitnet.>0
Net greater than 0
iIityes
Yes (output only if net load positive)
iIilNo
No (output even if net load negative)
Iitcust.pt
Selection of custom print ticket
iIil10
Name of instruction block (e.g. 10)
Iilinter.
Interface
Ii
Interface 1 (output interface)
linter:1
itw
tw
Chapter 23 Automatic output
95
23.3 Menu table
Menu text
Default
Enter menu with the M key.
Select d.confg using the T and P keys and confirm.
d.confg
Device configuration
******
Password
1
auto o
2
prt.typ
Manu-facturer’s number
Automatic output mode.
Print type
outpute
Permanent data
output
Enter password and confirm by pressing N.
The password need only be entered once. The configuration level
can then be accessed until such time as the device is switched off
and back on again.
Select menu item auto o and confirm.
Auto output
3 permanent data
Possible settings
No
No
Ticker text "Permanent data output"
If no is selected, data can be output only when the indication is
stable.
If yes is selected, data is output continuously when the indication
is stable and when it is unstable.
yes
2
no.stab
3
1
2
§ load
3
1.5
Minimum load change that triggers a new data output cycle when
the indication is stable.
This parameter can be used to suppress an unwanted data output
caused by brief instability in conjunction with minor load changes or
weighing platform fluctuations below the set threshold.
The parameter is entered in the unit of the weighing instrument
(kg or g).
2
interv
Interval between two outputs.
Menu option appears only if PERMANENT DATA OUTPUT in MODE has
been set to YES or the NUMBER WHEN STABLE has been set to greater
than 1.
3
2.5
Interval between individual outputs (in seconds).
Possible values: 0.200 to 999999
2
net.>5d
Net greater than 5d.
3
yes
2
96
Number of outputs when indication is stable.
Menu option appears only if PERMANENT DATA OUTPUT in MODE has
been set to NO.
Number when stable
Number
0
Number of identical outputs to be executed when indication is
stable. Possible settings: 0 to 255
If 0 is selected, automatic output is disabled.
If 1 to 255 is selected, the output is effected the set number of times.
If the number is greater than 1, an interval between outputs can be
set.
Minimum load change.
Menu option appears only if PERMANENT DATA OUTPUT in MODE has
been set to NO.
Delta load
Interval
Net > 5d
No
If yes is selected, data is output only when the net weight value is
greater than 5 d (scale intervals).
If no is selected, data is also output when the net weight is smaller.
net.>0
Net greater than 0
yes
Net weight > 0
82comfort • Service Guide
Menu text
3
yes
Default
Possible settings
No
If yes is selected, data is output only when the weight value is
greater than 0 (positive).
If no is selected, data is also output when the net value is negative
(e.g. when discharge weighing).
2
cust.pt
Select menu item using the T and P keys and confirm.
3
10
2
inter
3
interv1
yes
Custom print ticket
If a standard print ticket is not to be used, the name of an instruction
block set up for the output of data can be entered here. If no instruction block name is entered, the standard print ticket is used.
Name of an
instruction block
Data output interface.
Menu option appears only if no instruction block NAME has been specified in conjunction with CUSTOM PRINT TICKET.
Interface
Interface
Select the interface at which the automatic output is to be effected.
The standard print ticket selected for this interface is then output.
(If, in conjunction with CUSTOM PRINT TICKET, the name of an instruction block has been specified, the output interface and the data format are defined by the instructions in the instruction block.)
1
Exit menu with the M key.
Indication of the weight.
0.000
23.4 Particularities
If the PERMANENT OUTPUT mode is set to YES, weighing results are output cyclically regardless of
whether the indication is stable or not. The pause between outputs can be set in the parameter
INTERVAL.
If the PERMANENT OUTPUT mode is set to NO, weighing results are output only when the indication
is stable. The number of outputs then executed can be set in the parameter NUMBER WHEN STABLE.
The indication remains unchanged, even when the load changes, until the specified number of
outputs have been completed.
If the NUMBER WHEN STABLE is set to a large value and, additionally, a pause between the individual
outputs has been selected in the parameter INTERVAL, the output process can take a very long time. The device generates identical copies of the first output and remains unchanged until the final
copy is output.
23.5 Disabling automatic output
To disable
AUTOMATIC OUTPUT,
WHEN STABLE
the
PERMANENT OUTPUT
mode must be set to
NO
and the
NUMBER
to 0.
Chapter 23 Automatic output
97
98
82comfort • Service Guide
24 Alibi memory
24.1 Prerequisites
24.1.1 Standard
The alibi memory is a standard function and can be created and configured on the indicator. Two
types of entry are available for selection:
Typ:Max = Typ:Max = Ser. No. - Date - Time - Range - Gross - Tare 1 - Tare 2 - PT - Net
Typ:Min = Typ:Min = Ser. No. - Range - Net
i
A total of 36,044 weighings can be stored using "Typ:Max", 135,168 with "Typ:Min".
As "Typ:Min" contains no date, the menu items for the retention period ("Period in days" and
"Overwrite old entries") are not available when this type is selected. When the alibi memory is full,
additional entries overwrite the existing entries, starting at the beginning.
24.1.2 With memory expansion
If an optional memory expansion card is used, the memory capacity increases to twice the number
of potential records. If the optional memory expansion card is fitted after the alibi memory was set
up, the alibi memory must be cleared in the menu and then set up again. The additional memory
chip on the expansion card is then included in the memory management system of the alibi memory.
With memory expansion the alibi memory can store 72,072 or 270,303 weighings.
The memory expansion card may not be removed or exchanged once the alibi memory has been
set up. This would destroy the memory management system and the data would be lost.
!
24.2 Password
When configuring the alibi memory it is necessary to enter a password on some menu levels. The
password should be kept confidential and disclosed only to a restricted group of people. It is the
same for all password-protected alibi memory menu levels.
The default password is 74979
24.3 Creating/clearing the alibi memory
24.3.1 Menu structure
The alibi memory is created and cleared in the device configuration menu.
tw
td.confg
itw
iIIf an alibi memory has yet to be created
ITset.Ali
Create alibi memory
iIIf an alibi memory has already been created
ITCl. ali
Clear alibi memory
ITw
TW
Chapter 24 Alibi memory
99
24.3.2 Menu table
Create alibi memory
The alibi memory can be set up in the device configuration menu.
Menu text
Default
Enter menu with the M key.
Select d.confg using the T and P keys and confirm.
d.confg
Device configuration
******
Password
1
Manu-facturer’s number
Create alibi memory
Typ:Max
record
Alibi data record
Typ:Max
Typ:Min
TYP:Min An entry in the alibi memory contains the following values:
Ser. No. - Range - Net
Typ:Min
space
Maximum storage
space
36044
or
135168
36044
2
time in days 90
Time in days
90
2 overwrite old
yes
entries
Overwrite old
entries
yes
No
Ticker text "Maximum storage space"
followed by the number of possible alibi memory entries.
The value is determined by the size of the memory chip and cannot
be changed (with memory expansion 72080 or 270303).
Confirm the display.
Ticker text "Time in days"
followed by the retention period for alibi memory entries (menu item
appears only on selection of data record: Typ:Max).
The period is entered in days and must be selected in accordance
with the applicable regulations or terms of business of the user.
Confirm the period entered.
Ticker text "Overwrite old entries"
followed by Yes/No prompt (menu item appears only on selection of
data record: Typ:Max)
If there is no available space in the alibi memory, entries that are
older than the set retention period can be overwritten.
On selection and confirmation of yes, older entries are overwritten
automatically.
On selection and confirmation of no, older entries are not overwritten.
No new alibi memory entries can be added. The alibi memory entries are to be erased on being secured (printout).
2 alibi memory
Ticker text "Alibi memory is active"
The alibi memory has been created.
1
The menu item set.Ali (Create alibi memory) changes to
cl. Ali (Alibi memory CL = clear)
is active
Alibi memory is
active
CL. ali
0.000
The alibi memory can now be used.
100
Ticker text "Alibi data record"
followed by a prompt of the data record type.
Select data record type and confirm.
TYP:Max An entry in the alibi memory contains the following values:
Ser. No. - Date - Time - Range - Gross - Tare 1 - Tare 2 - PT - Net
Typ:Max
2 Max. storage
Enter password and confirm by pressing N.
The password need only be entered once. The configuration level
can then be accessed until such time as the device is switched off
and back on again.
Select menu item set.Ali using the T and P keys and confirm (if the alibi memory already exists, CL. ali appears).
set.Ali
2 Alibi Data
Explanation
82comfort • Service Guide
Exit menu with the M key.
Indication of the weight.
Clear alibi memory
The alibi memory can be cleared in the device configuration menu. The alibi memory is disabled
with the function CLEAR ALIBI MEMORY and all entries are erased. If the alibi memory still contains
data that needs to be secured, its contents must first be output (e.g. printed out) in accordance
with the regulations applicable to verification. See Operating Manual, "Alibi memory".
Menu text
Default
Enter menu with the M key.
Select d.confg using the T and P keys and confirm.
d.confg
Device configuration
******
Password
1
cl. Ali
2
*****
1
Light
Manu-facturer’s number
0.000
Enter password and confirm by pressing N.
The password need only be entered once. The configuration level
can then be accessed until such time as the device is switched off
and back on again.
Select menu item cl. Ali using the T and P keys and confirm (if the alibi memory does not exist, set.Ali appears).
Clear (remove) alibi
memory
Password
Possible settings
74979
Enter password and confirm.
The alibi memory is cleared and the next menu level is displayed.
Exit menu with the M key.
Indication of the weight.
The alibi memory has now been cleared and is no longer active. It can, however, be set up again.
Change data record type
It is not possible to change the data record type from Typ:Max to Typ:Min or vice versa. To do this,
the alibi memory would have to be cleared completely and then re-created with the desired data
record. When the alibi memory is cleared, all the records in it are lost.
Chapter 24 Alibi memory
101
24.4 Managing the alibi memory
The menu for managing the alibi memory appears only if the alibi memory has been set up. If the
alibi memory has not been set up or has been cleared, this menu level is not displayed.
The menu levels that are accessible without a password are described in detail in the operating
manual and are not included here again.
24.4.1 Menu structure
Tw
tAlibi
Itdisply
Display of an alibi memory entry
itprint
Output of alibi memory entries on an output device
itstatus
Information on the alibi memory
iitFre.mem
Indication of free memory space in %
iitMax.mem
Indication of the maximum number of entries
iittime
Set data retention period (password required)
iilauto
Set mode (password required)
iLclear
Clear stored values (password required)
tw
24.4.2 Menu table
Set data retention period
i
This setting is available only if data record Typ:Max has been selected.
The retention period specifies how long the entries in the alibi memory have to be retained.
Menu text
Default
Enter menu with the M key.
Select Alibi using the T and P keys and confirm.
Alibi
Alibi memory
1
Status
Status
Select menu item Status using the T and P keys and confirm.
2
time
Select menu item time using the T and P keys and confirm.
2
*****
3
90
2
Auto
Retention period
74979
Enter password and confirm.
90
Retention period for alibi memory records. The period is entered in
days and must be selected in accordance with the applicable regulations or terms of business of the user.
Confirm the period entered.
Password
0.000
102
Possible settings
82comfort • Service Guide
Exit menu with the M key.
Indication of the weight.
Overwrite entries
This setting is available only if data record Typ:Max has been selected.
i
This option determines how entries that are older than the set retention period are to be handled
if the alibi memory is full. If the entries are not overwritten automatically, they must be erased manually if the alibi memory is full.
Menu text
Default
Possible settings
Enter menu with the M key.
Select Alibi using the T and P keys and confirm.
Alibi
Alibi memory
1
Status
Status
Select menu item Status using the T and P keys and confirm.
2
Auto
Select menu item auto using the T and P keys and confirm.
2
*****
Overwrite
automatically
3 overwrite old
entries
Overwrite old
entries
yes
No
2
74979
Enter password and confirm.
yes
Ticker text "Overwrite old entries" followed by Yes/No prompt.
If there is no available space in the alibi memory, entries that are
older than the set retention period can be overwritten.
On selection and confirmation of yes, older entries are overwritten
automatically.
On selection and confirmation of No, older entries are not overwritten.
No new alibi memory entries can be added. The alibi memory entries are to be erased on being secured (printout).
Password
Fre.mem
0.000
Exit menu with the M key.
Indication of the weight.
Chapter 24 Alibi memory
103
Delete entries
The delete operation creates memory space for new entries. If the alibi memory is optimally configured this operation is not usually necessary. Entries that are older than the set retention period
are overwritten automatically.
If the alibi memory still contains data that needs to be secured, its contents must first be output
(e.g. printed out) in accordance with the regulations applicable to verification. The respective
prompt appears automatically.
Menu text
Default
Enter menu with the M key.
Select Alibi using the T and P keys and confirm.
Alibi
Alibi memory
1
clear
2
All
Possible settings
Select menu item Clear using the T and P keys and confirm.
Clear
all
All
old
Select function using the T and P keys and confirm.
All = all entries in the alibi memory are deleted.
old = only entries that are older than the set retention period are
deleted.
Old
If no such entries are found in the alibi memory on confirmation of
the selection, ticker text no entries appears.
2
*****
74979
Password
3 inter.1
3
--
Select the interface at which the data is to be output before being
deleted.
Data is output at the selected interface.
3 printout ok
Ticker text "Printout OK" followed by Yes/No prompt.
If the output is not OK, select No and confirm.
The entries are not deleted and the operation can be repeated.
If the output is OK, select yes and confirm.
The entries are deleted.
2
Exit menu with the M key.
Printout OK
All
0.000
104
Enter password and confirm.
82comfort • Service Guide
Indication of the weight.
25 Battery operation
25.1 Overview
Power can be supplied to the device by a standard or rechargeable battery. A subsequent modification from mains to battery operation is possible.
To obtain a long operating time in battery mode, power consumption can be reduced automatically
when the device is not in use or the device can be shut down completely.
Standby: When the weighing instrument is not being used (indication stable and keypad not
being operated), the display background light is switched off after the set time. This reduces the
current drain. As soon as the weight value changes or a key is pressed, the background light switches back on again.
Power off: If the device is not used for a long time, it switches off automatically. As no power is
used when the device is switched off, the battery does not discharge. To continue weighing, switch
the device back on using the E key.
Undervoltage: If the device detects an undervoltage, the background light is switched off automatically. The device remains in weighing mode. The message BAT (battery) briefly appears on
the display approx. every ten seconds.
If the undervoltage condition persists, the device switches itself off after a few minutes. If the voltage increases again, the background light is switched on automatically. If the voltage falls again,
the device switches itself off automatically.
25.2 Menu structure
Password protection settings are made on menu level Passwd in the device configuration menu.
tw
td.confg
Itw
ItBat.
Battery mode
IitActive
Activate battery mode
IiitNo
Battery mode inactive
Iiilyes
Battery mode active
IitSt.time
Standby time
Iiil120
120 seconds
Iilsh.time
Shutdown time
Ii
1,800 seconds
l1800
Itw
tw
Chapter 25 Battery operation
105
25.3 Menu table
Menu text
Default
Enter menu with the M key.
Select d.confg using the T and P keys and confirm.
d.confg
Device configuration
******
Password
1
Manu-facturer’s number
Bat.
Active
3
no
Enter password and confirm by pressing N.
The password need only be entered once. The configuration level
can then be accessed until such time as the device is switched off
and back on again.
Select menu item Bat. and confirm.
Battery mode
2
Explanation
Activate battery mode.
Confirm the display.
Active
No
yes
Select either yes or No using the T and P keys and confirm.
If No is selected: battery mode inactive.
If yes is selected: battery mode active.
The next menu items St.time and sh.time are displayed only
if yes (battery mode active) has been selected.
106
2
St.time
3
120
2
sh.time
3
1800
2
Active
Set standby time.
Standby time
120
Enter the time in seconds and confirm.
Value range between 10 and 999999.
When not in use, the device switches off the display background
light after the set time.
Set shutdown time.
Shutdown time
1800
Active
82comfort • Service Guide
Enter the time in seconds and confirm.
Value range between 0 and 999999.
When not in use, the device switches off after the set time. If the
shutdown time selected is smaller than or equal to the standby
time, the device remains in standby mode instead of switching off.
Exit menu with the M key.
26 Display background light
26.1 Function
The background light provides good display legibility even in poor lighting conditions. To reduce
device power consumption in conjunction with portable, battery-operated weighing systems, the
background light can be switched off. This increases the battery operating time.
26.2 Menu structure
tw
td.confg
Device configuration
itw
itLight
Display background light
iItyes
Background light is on
iIlNo
Background light is off
itw
tw
26.3 Menu table
Menu text
Default
Enter menu with the M key.
Select d.confg using the T and P keys and confirm.
d.confg
Device configuration
******
Password
Manufacturer’s
number
1 Light
No
1 Light
Light
Enter password and confirm by pressing N.
The password need only be entered once. The configuration level
can then be accessed until such time as the device is switched off
and back on again.
Select menu item Light and confirm.
Light
2 yes
Explanation
yes
If yes is selected: background light ON.
If No is selected: background light OFF.
Exit the menu by pressing the menu key M.
Chapter 26 Display background light
107
108
82comfort • Service Guide
27 Key lock
27.1 Overview
The KEY LOCK function allows individual keys or groups of keys to be locked. The user can then
no longer access the functions. Pressing a locked key will not produce a response from the device.
Locked keys required for menu operation are enabled automatically on accessing the menu to
permit navigation in the menu. Only the basic function of the key in weighing mode is disabled.
27.2 Keys and groups
The following keys can be locked individually or in groups:
ON/OFF
Print
Tare
Zero
Numpad
C/AC
Co
un
t
Ac
cu
mu
lat
Pr
e
es
et
t ar
e
Info
Chapter 27 Key lock
109
27.3 Menu structure
Key lock settings are made in the device configuration menu.
tw
td.confg
Device configuration
Itw
Itkeylok
Key lock
IitOn.key
ON/OFF key
Iiiton/off key active
ON/OFF key active
Iiityes
ON/OFF key is active
IiilNo
ON/OFF key is not active (locked)
IitAll.key
All keys
Iiitkeylock active
Key lock active
IiitNo
No keys are locked
Iiilyes
All keys are locked
Iilind,key
Individual keys
Ii
tpress key
Press key
Ii
t
Press key(s) to be locked
Ii
lOK
- - -
Itw
tw
110
82comfort • Service Guide
Finally, confirm by pressing B
27.4 Menu table
Menu text
Default
Enter menu with the M key.
Select d.confg using the T and P keys and confirm.
d.confg
Device configuration
******
Password
1
Manu-facturer’s number
keylok
On.key
3
on/off key
Active
Enter password and confirm by pressing N.
The password need only be entered once. The configuration level
can then be accessed until such time as the device is switched off
and back on again.
Select menu item keylok and confirm.
Key lock
2
Explanation
Lock ON/OFF key
ON/OFF key
Ticker text "ON/OFF key active" followed by YES/NO prompt.
ON/OFF key
active
3
yes
yes
If yes is selected: ON/OFF key active.
No
If No is selected: ON/OFF key inactive (locked).
The device can be switched on using the ON/OFF key, but no longer switched off.
2
All.key
Lock all keys.
3
key lock
Active
All keys
Ticker text "Key lock active" followed by YES/NO prompt.
Key lock active
3
no
No
If No is selected: no keys are locked.
If yes is selected: all keys are locked.
yes
2
ind.key
3
press key
3
3
Individual keys
Press key
- - -
OK
OK
2
ind.key
Individual keys
Lock individual keys.
Ticker text "Press key"
Press keys to be locked one after the other. If a key is pressed
again, the key lock is cancelled. The current key status is displayed
briefly when the key is pressed:
key is locked (Key is locked)
key is active (Key is active)
(The ON/OFF key cannot be locked here; this can be done only in
menu item On.key )
To end, confirm by pressing B.
OK appears briefly on the display.
Exit menu with the M key.
Chapter 27 Key lock
111
27.5 Disable all key locks
If individual keys have been locked, the key lock for all these keys can be disabled by way of menu
item All.key (All keys).
Menu text
Default
Enter menu with the M key.
Select d.confg using the T and P keys and confirm.
d.confg
Device configuration
******
Password
1
Manu-facturer’s number
key.lok
All.key
3
key lock
Active
Enter password and confirm by pressing N.
The password need only be entered once. The configuration level
can then be accessed until such time as the device is switched off
and back on again.
Select menu item key.lok and confirm.
Key lock
2
Explanation
Select menu item All.key and confirm.
All keys
Ticker text "Key lock active" followed by YES/NO prompt.
Key lock active
3
No
No
If No is selected: no keys are locked.
If yes is selected: all keys are locked.
yes
Select No and confirm.
2
112
ind.key
Individual keys
82comfort • Service Guide
Exit menu with the M key.
28 Device clock options
28.1 Setting the clock
Depending on the features available, the indicator has an integral clock. The clock is factory set.
The settings for properties such as automatic summer/winter changeover and calibration factor
are made here.
28.2 Menu structure
tw
Td.confg
Itw
Itclock
Clock
IiTDate
Date
IIiL15.10.06
Enter the date (DD.MM.YY)
Iittime
Time
IiiL10.25.06
Enter the time (HH.MM.SS)
IitAut.S/W
Automatic summer/winter changeover
iIITyes
Yes (auto summer/winter changeover)
iIILNo
No (no auto summer/winter changeover)
IIlcalibr
Calibration factor
iI
Enter calibration factor
L000
Itw
tw
If the menu item clock does not appear, the device is not equipped with a clock.
28.3 Calculating the calibration factor
Any clock drift due to tolerances of the electronic components in use are compensated for by the
calibration factor. Values between -31 and +31 can be selected as the calibration factor. The default factory setting is 0.
1 step between +1 and +31 corresponds to a correction of +10.7 seconds per month.
1 step between -1 and -31 corresponds to a correction of -5.35 seconds per month.
Example
The clock loses 30 seconds a month.
The clock has to be speeded up by calibration.
Calibration factor = deviation ÷ correction coefficient = 30 s/Month : 10.7 s/Month = +2.8 (~ +3)
Enter +3 as the calibration factor.
Chapter 28 Device clock options
113
28.4 Menu table
Menu text
Default
Enter menu with the M key.
Select d.conf using the T and P keys and confirm.
d.confg
Device configuration
******
Password
Manu-facturer’s number
Enter password and confirm by pressing N.
The password need only be entered once. The configuration level
can then be accessed until such time as the device is switched off
and back on again.
1 clock
Select menu item clock and confirm.
2 Date
To set the date, confirm with N.
3 23.10.06
The entry position flashes and the value can be changed using the
arrows.
Confirm each value selected by pressing N.
On confirmation of the year the setting is complete and the next menu
level is displayed.
2 time
To set the time, confirm with N.
2 09.35.18
The entry position flashes and the value can be changed using the
arrows.
Confirm each value selected by pressing N.
On confirmation of the seconds the setting is complete and the next
menu level is displayed.
2 Aut.S/W
To set the automatic summer/winter changeover, confirm with N.
Clock
Date
DD.MM.YY
Time
HH.MM.SS
Auto summer/
winter
changeover
3 yes
yes
No
2 calibr
3
000
The summer time function applies for the CET zone.
On the last Sunday in March the clock is moved forward from 2 am
to 3 am.
On the last Sunday in October the clock is moved back from 3 am to
2 am.
yes : Automatic summer/winter changeover.
No : No automatic summer/winter changeover.
To set the calibration factor, confirm with N.
Calibration factor
00
2 Date
Date
114
Explanation
82comfort • Service Guide
Use the T and P keys to set the calibration factor. Value range
between -31 and +31. For information on calculating the calibration
factor, see 28.3 “Calculating the calibration factor“ on page 113.
Confirm the value entered by pressing N.
Exit the menu by pressing the menu key M.
29 Password protection
29.1 Overview
Access to the device settings (device configuration), the verification seal and the adjustment data
is password protected. The password can be changed and the scope of protection selected.
The device is shipped with the manufacturer's number as the password. The six-digit manufacturer's number is indicated on the indicator data plate and is also displayed on device power up. All
six digits of the manufacturer's number must be entered as the password.
As soon as the correct password has been entered once it does not usually have to be re-entered.
Access to the protected areas is granted. Access does not become password protected again until
the indicator is switched off and back on.
29.2 Menu structure
Password protection settings are made on menu level Passwd in the device configuration menu.
tw
td.confg
Itw
ItPasswd
Password protection
IitActive
Activate password protection
Iiityes
Password protection active
IiilNo
Password protection inactive
IitNew
Set new password
Iiitxxxxxx
Enter new password
Iiitrepeat entry
Enter again
Iiilxxxxxx
Enter password again
Iilpas.pos
Set prompt point (protection level)
Ii
tconfig
Device configuration
Ii
tMenu
Menu
Ii
lSeal
Verification seal
Itw
tw
Chapter 29 Password protection
115
29.3 Menu table
Menu text
Default
Enter menu with the M key.
Select d.confg using the T and P keys and confirm.
d.confg
Device configuration
******
Password
1
Manu-facturer’s number
Passwd
Active
3
yes
Enter password and confirm by pressing N.
The password need only be entered once. The configuration level
can then be accessed until such time as the device is switched off
and back on again.
Select menu item Passwd and confirm.
Password
2
Explanation
Activate password protection.
Confirm the display.
Active
yes
No
Select either yes or No using the T and P keys and confirm.
If yes is selected: password protection active.
If No is selected: password protection inactive, and the password
is reset to the default password (manufacturer's number). The
password is always prompted when destroying the verification seal
and on some menu levels.
2
New
New
Enter new password.
Confirm the display.
3
xxxxxx
Enter new password and confirm.
3
repeat
entry
Ticker text "Repaet entry".
Enter new password again and confirm.
Repeat entry
xxxxxx
2
pas.pos
3
config
Set prompt point.
Password
position
config
Device
configuration
Menu
Menu
Seal
Verification seal
2
pas.pos
Password
position
Select prompt point and confirm.
The scope of protection can be set on three levels by specification
of the password prompt point.
The password is always prompted when destroying the verification
seal and on some menu levels.
config: Password prompt on entering the device configuration
menu
(medium protection).
Menu:
Password prompt on pressing the menu key.
(high protection)
Seal:
Password prompt only when destroying the verification seal.
(low protection)
Exit menu with the M key.
If the default password is changed, the new password should be kept in a safe place.
!
116
If the password is unknown, not all levels of the device configuration or adjustment menus will be
accessible, depending on the password prompt point. In this case, only the customer service team
can reset the password protection level to the default password.
82comfort • Service Guide