1
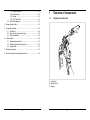
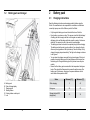
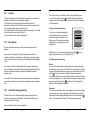
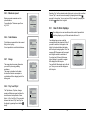
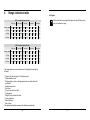
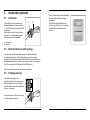
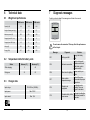
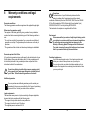
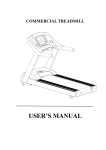
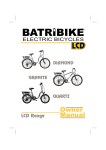
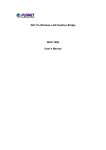
User's Manual
Table of contents
1 Overview of components..................................................................... 37
1.1 Display and control unit........................................................... 37
1.2 Battery pack and charger........................................................ 38
2 Battery pack......................................................................................... 39
2.1 Charging instructions.............................................................. 39
2.2 Charging the battery pack....................................................... 41
2.3 Installing the battery pack....................................................... 41
2.4 Removing the battery pack .................................................... 42
2.5Security................................................................................... 42
2.6 Diagnosis message................................................................. 43
2.7Lights....................................................................................... 43
3Display.................................................................................................. 44
3.1 Removing and fastening.......................................................... 44
3.2Adjustment.............................................................................. 44
3.3 Overview of buttons and indications....................................... 45
3.3.1Display.......................................................................... 45
3.3.2 Control unit................................................................... 45
3.4 Switching on display................................................................ 45
3.5 Setting power assistance........................................................ 46
3.6 Menu overview........................................................................ 47
3.7 Notes on menu overview......................................................... 48
3.7.1 Extra information.......................................................... 48
3.7.2 Indicator Average speed............................................... 49
3.7.3Lighting......................................................................... 50
3.7.4 Beep Signals................................................................. 50
3.7.5 Automatic Charging (optional)...................................... 50
3.7.6Calibration..................................................................... 52
3.8 Explanation of display options................................................. 53
3.8.1Time/Temperature........................................................ 53
3.8.2 Trip distance................................................................. 53
3.8.3 Trip time........................................................................ 53
3.8.4 Average speed.............................................................. 53
35
3.8.5 Maximum speed...........................................................54
3.8.6 Total distance................................................................ 54
3.8.7Range...........................................................................54
3.8.8 Trip 1 and Trip 2............................................................54
3.9 Use of other displays............................................................... 55
4 Range indication table.......................................................................... 56
1
Overview of components
1.1
Display and control unit
5 Accelerator (optional)........................................................................... 58
5.1Accelerator.............................................................................. 58
5.2 Boost function (use while cycling)........................................... 58
5.3 Parking assistance ................................................................. 58
6 Technical data...................................................................................... 60
6.1 Weight and performance......................................................... 60
6.2 Temperature limits for battery cells......................................... 60
6.3 Charger data........................................................................... 60
7 Diagnosis messages............................................................................ 61
C
A
M
B
8 Warranty conditions and legal requirements........................................ 64
A C
ontrol unit
B D
isplay holder
C D
isplay
36
37
1.2
Battery pack and charger
2
Battery pack
2.1
Charging instructions
Read the following instructions and warnings carefully before using the
E-bike. The manufacturer is not responsible for accidents or malfunctions
caused by improper use of the E-bike or parts of the E-bike:
• Fully charge the battery pack once before the first use of the bike.
• Every battery runs down over time. This process is called ‘self-discharge’.
A battery pack that is empty and that is not charged can reach deep
discharge due to self-discharge within two months, causing it to become
defective. The warranty is void in the event of deep discharge.
• The battery pack does not need to be completely empty before charging.
The battery pack will remain in good condition if you charge the bicycle
after every use (regardless of the trip distance). Once the battery is fully
charged, charging stops automatically. The light on the charger continues
to be lit green.
• You can leave the charger connected for long-term storage. If this is not
possible, charge the battery pack fully and disconnect the charger from
the battery pack. Charge the battery pack fully at least once every two
months.
• Ensure that the battery pack remains within the temperature limits given
below. This extends the lifespan and increases the performance of the
battery pack. Furthermore, charging or the power assistance will not
work outside the temperature limits.
Status
A
B
C
D
E
F
B
attery pack
State of charge display
Charging point
Docking station
Docking station contact point
Lock
38
Minimum [°C]
Maximum [°C]
0
45
During use
-15
60
Storage (at least 80%
charge level)
-10
35
While charging
39
• A
lways charge the battery pack using the charger delivered with
the bicycle. Do not use any other charger. The colour of the plug
must match the colour of the socket.
• N
o not connect the charger to the mains voltage when it is not
used.
• T
he charging time dependents on the charger type.
• Disconnect the charger from the battery before you start cycling.
• M
ake sure that the charger does not get wet.
• D
o not damage the charger.
• D
o not charge the battery pack in direct sunlight.
• D
o not drop the battery pack. This can damage the battery pack.
• R
emember that your bike produces less power assistance at
lower temperatures (below 10°C) and that the battery pack will
run empty more quickly. Charging also takes longer at high or low
temperatures.
• Large temperature changes can cause major differences in the
battery charge indication, especially at low temperatures and with
a low charge on the battery pack.
2.2
Charging the battery pack
1. Check that the power cable is
properly connected to the charger.
2. Open the rubber cover cap.
3. Connect the charger to the mains
voltage.
4. Connect the plug of the charger to
the contact point (B).
5. The green indicator (A) will light up.
6. Remove the charger before you
start cycling.
7. Close the rubber cover cap.
2.3
Installing the battery
pack
1. Remove the key from the lock of the
docking station (A).
2. Drop the battery pack (B) carefully
into the slot and press it slightly so
that it locks (C).
3. Make sure that the cover (D) of the
charging plug is closed.
4. Make sure the battery pack is locked
by pulling it backwards.
40
41
2.4
Removing the battery pack
1. Insert the key in the lock (A) (this key
is the same as the key for the bicycle
lock).
2.6
Diagnosis message
If all LEDs flash on the battery pack,
first check whether the battery pack
has been correctly connected to the
docking station (A). The LEDs (B) are
located on the battery pack next to
the charging point.
If the LEDs continue to flash, contact
your dealer.
2. Grip the battery pack by the rubber grips (B) and carefully pull it upwards.
• T
hen remove the battery pack. Always use two hands to prevent
the battery pack from falling.
• Remove the battery pack from the frame when transporting the
bicycle by car. For protection, place the plastic cover cap in the
bicycle in the same position as the battery pack.
2.5
2.7
Security
The battery pack can only be used on the bicycle on which it has been
installed. A code in the software makes sure that it cannot be used
on another bicycle, that is to say, there will be no peddling assistance
(protection against theft). A second battery pack can in many cases be
purchased for your E-bike. Contact your dealer for more information.
42
Lights
The lights (both at the front and rear) are supplied with electricity by the
battery pack and will, therefore, only work when the battery pack has been
installed in the E-bike. The motor will work as a dynamo when the battery
pack is flat.
If the rear light needs to be replaced, we recommend contacting your
certified E-bike dealer.
For more information, also refer to paragraph 3.7.3.
43
3
Display
3.3
3.1
Removing and fastening
3.3.1 Display
Removing: Press the button (A) on the
bottom side and remove the display (B)
from the display holder (C).
B
A
C
J
K
L
M
N
Loosen the screws (A) and twist the
display holder.
Remove the display when
storing and transporting the
bicycle.
44
C
D
I
H
G
50%
18 . 0
B
1
km/h
2
F
E
xxxxxxxxxxxxx
21°C
13.82km
3.3.2 Control unit
Adjustment
To ensure that the E-bike works
correctly, make sure the interface
between the display and the
display holder is free of dirt and
moisture. If necessary, clean it
with a clean, dry cloth.
A
A Present speed
B Peddling assistance level
C Battery pack charge level
D Lighting indicator
E Variable indicator
F Variable indictor description
GTemperature/Time
H View Trip 1/Trip 2
I Average speed indicator
Fixing in place: Position the display (B)
obliquely on the display holder (C) and
click it in place in the lock.
3.2
Overview of buttons and indications
Lighting button
Up button – variable application
Set – variable application
Down button – variable application
Mode button – variable application
3.4
A
J
K
L
M
N
Switching on display
If the up arrow on the lighting button is pressed,
the reading will be displayed.
When the E-bike is not in use, the power
assistance and lighting will switch off
automatically after five minutes. Fifteen minutes
later, the display will automatically switch to
sleep mode and no longer show an image. To
get the display out of sleep mode, press on
or or put the E-bike into motion.
45
90%
0.0
km/h
21°C
0.00km
3.5
Setting power assistance
3.6
Menu overview
Settings
Press the up (K) or down (M) button to set the support (B).
General
Time
24hours/12hours
Contrast
..(set: -10 - +10)
Backlight
..(set:10-100)
3sec
Ride programme:
1. ECO
2. CRUISE
3. TOUR
4. SPORT
5. POWER
K
B
hh:mm (set)
Back
1sec
100%
0.0
1
km/h
21°C
0 . 0 0 km
View
Language
English
Nederlands
Controlunit
Deutsch
M
Francais
Distance
Kilometers
Temperature
Celcius
Miles
Fahrenheit
Extra info
Time
Temperature
see §3.7.1
Off
Avg. speed
Indicator off
see §3.7.2
Indicator on
Functions
Lighting
Auto
see §3.7.3
Manual
Beeper
On
On alerts
see §3.7.4
Off
Auto charge
Off
Manual
see §3.7.5
Auto
Maintenance
View options
Calibration
1sec
Trip1/Trip2 view
see §3.8.8
1sec
Reset Trip
Trip 1 will aso be automatically reset after 2 hours of inactivity.
2sec
46
see §3.7.6
Service info
47
Temperature/Time
see §3.8.1
Trip distance
see §3.8.2
Trip time
see §3.8.3
Average speed
see §3.8.4
Maximum speed
see §3.8.5
Total distance
see §3.8.6
Range
see §3.8.7
3.7
Notes on menu overview
3.7.2 Indicator Average speed
3.7.1 Extra information
With this option you can indicate whether
you want to see extra information in the
display. The chosen option is shown as a
standard at the bottom left of the display.
If you select Time, the time will be
displayed on the left at the bottom of the
display as standard. Temperature is then
shown under display options.
If you select Temperature, the temperature
will be displayed on the left at the bottom of
the display as standard. Time is then shown
under display options.
100%
20.0
k m/h
14. 14
Tem perat ure
8°C
Arrow upwards means:
current speed is above the average speed
of the ride.
100%
100%
Ave ra g e sp e e d
14. 12
18. 0k m / h
100%
17 . 0
km /h
1
3
20 . 0
km /h
1
Arrow downwards means:
current speed is below the average speed
of the ride.
Ave ra g e sp e e d
14. 12
18. 0k m / h
20.0
k m/h
Time
14.14
8°C
When you select Off, the room at the
bottom left of the display remains empty.
Both Time and Temperature will then be
shown under display options.
3
The indicator for average speed indicates,
when cycling, whether the current speed is
above or below the average speed of the
ride.
Block means:
current speed is almost the same as the
average speed of the ride.
100%
100%
18 . 0
km /h
1
Trip d ist a n ce
14. 12
0. 22k m
3
20.0
k m/h
Ti m e
14.14
With the option Average Speed you indicate whether you want to show the
indicator in the display or not.
48
49
3.7.3 Lighting
You can set whether you wish the lights to be switched on automatically or
whether you wish to do this manually under Lighting.
If you select Auto, the bicycle lighting will be switched on and off
automatically. A light sensor will continuously measure the quantity of light
and will switch the lights on and off based on this.
If you select Manual, the bicycle lighting will only be switched on or off when
you use the lights button on the control unit.
For more information, also refer to paragraph 2.7.
3.7.4 Beep Signals
You can set whether and when you wish to hear beep signals under
Beepers.
If you select On, the display will emit five long beeps when there is a
message on the display. In addition, you will also hear a short beep signal
when you press the control unit buttons, after calibrating and after resetting
a ride.
If you select On alerts, the display will emit five long beep signals when
there is a message. Your display will not emit beep signals with this setting
when the control unit buttons are pressed, after calibrating and after
resetting a ride.
If you select Off, the display will not issue beep signals when operating the
control unit nor when there are alerts, after calibrating and after resetting a
ride.
3.7.5 Automatic Charging (optional)
With this function, the E-bike automatically generates energy when no
pressure is being exerted on the pedals. This allows the battery pack to
recharge while you are cycling.
To use the function, you first have to switch it on via the display menu.
to activate or deactivate automatic
You can then use the set button
charging. Automatic charging works up to about 80% capacity, depending
on the temperature.
Turning on automatic charging
You can turn on automatic charging by
selecting (in this order) Functions, Auto
Charge and Manual or Automatic in the
display menu. The selected menu setting
will apply until you change it again in the
display menu.
NB: When you turn on automatic charging, the set button
toggle function between Trip 1 and Trip 2 (see 3.8.8).
loses its
Activating automatic charging
Manual
If you select the Manual option via the display menu, automatic charging
will be inactive when you turn on the E-bike. You can activate the automatic
charging, when pedal assistance is engaged, by pressing briefly on the set
button
. The message "Auto Charge on" will appear temporarily.
The function will then remain active until the E-bike is switched off (and the
brand logo disappears). If you want to deactivate automatic charging during
the journey, press the set button
briefly again. The message "Auto
Charge off" will then appear temporarily.
Automatic
If you select the Automatic option via the display menu, automatic charging
will be active as soon as you engage the pedal assistance. If you want to
deactivate automatic charging during the journey, press the set button
briefly. The message "Auto Charge off" will then appear temporarily.
Ask your dealer about the terms and conditions.
50
A U TO C H A R G E
O ff
Manual
Auto
51
3.8
50%
50%
20 . 0
km/ h
1
By briefly pressing the MODE button, you decide what you want to show
at the bottom right of the display. All possible display options are briefly
explained below.
20.0
km/h
1
A ut o char ge on
14:22
2 0 . 0 km / h
Explanation of display options
Auto c harge off
14:22
2 0 . 0k m / h
3.8.1 Time/Temperature
When automatic charging is activated and no pressure is being exerted on
the pedals, the battery pack will be recharged automatically. When charging
takes place, you will feel a slight resistance against the motor. The message
"Charging…" and a plus-sign or two arrows will appear in the battery icon
(depending on the type of display).
20.0
km/h
1 6 : 11
3.8.2 Trip distance
The trip distance measured from the
moment that you start cycling.
For resetting the “Trip distance” see § 3.8.8.
51%
1
With menu settings you can select whether want to see Time, Temperature
or nothing as a standard at the bottom left of the display (see § 3.7.1). The
non-selected option(s) will then be placed automatically under display
options.
100%
20 . 0
3
km/h
Trip d ist a n ce
23 ° C
0. 35k m
Charging...
20.0km/h
3.8.3 Trip time
The trip time measured from the moment that
you start cycling.
For resetting the “Trip time” see§ 3.8.8.
3.7.6 Calibration
If the peddling assistance is reduced in
due course, the electronics may have to
be calibrated.
1. Stand next to the bicycle.
2. Do not exert force on the pedals.
3. Switch off the lights (H).
4. Keep the lights button pressed for at
least two seconds until the message
is issued that the calibration has been
completed.
For continued comfortable pedal assistance,we advise you to
calibrate the E-bike once per month.
52
100%
20 . 0
km /h
14. 14
Trip t im e
00: 13
H
3.8.4 Average speed
Average speed measured over the cycled
distance.
For resetting the “Average speed” in § 3.8.8.
53
100%
20.0
km/h
Ave ra g e sp e e d
14. 12
25.0k m/ h
3.8.5 Maximum speed
Maximum speed measured over the
cycled distance.
For resetting the “Maximum speed” see
in § 3.8.8.
100%
20.0
k m/h
M ax i m um s peed
14.13
25.9km/h
Resetting Trip 1 will be automatic when the bicycle is not used for more than
2 hours. Trip 1 can also be reset manually by keeping the set button
pressed for a long time. You can only reset Trip 2 manually by keeping the
set button
pressed for a long time.
3.9
Use of other displays
Your display acts as an immobiliser, which makes it impossible to
install any display on your E-bike and make full use of it.
3.8.6 Total distance
Total distance measured from the moment
that you start cycling.
It is not possible to reset the total distance.
100%
20.0
3
k m/h
Tot al di s t anc e
23 ° C
30km
3.8.7 Range
The range shows how many kilometres
you can still cycle using peddling
assistance.
The range is calculated on the basis
of actual and historic consumption in
combination with the charging level of the
battery pack.
100%
20.0
3
k m/h
14.13
Your display has a unique code that
corresponds with the respective E-bike. If
you want to switch on the support or the
lights, it is checked whether the display
and the bicycle belong together. If not, the
message E0014 appears and the support
and the lights cannot be switched on.
If you have two E-bikes with the same
type of display, it is possible to register
both displays for both bicycles.
Your certified E-bike dealer can do this for
you. Then you can use both displays on
both bicycles.
R ange
3 9 km
3.8.8 Trip 1 and Trip 2
The Trip distance, Trip time, Average
speed and Maximum speed are linked to
each other and are kept track of twice,
that is, in Trip 1 and Trip 2. You can select
between the view of Trip 1 and Trip 2 on
the display by pressing the set button
briefly.
54
100%
20.0
k m/h
2
Tr ip dis t anc e
16:30
0 . 0 5 km
55
0%
E-0014
4
Range indication table
Shift gears
XHPL rear wheel motor (40 Nm)
Eco (km)
Cruise (km)
Tour (km)
Sport (km)
Power (km)
Battery pack
min
max
min
max
min
max
min
max
min
max
317 Wh
70
135
50
100
35
70
30
55
25
50
418 Wh
90
175
70
130
45
90
40
75
35
70
490 Wh
110
205
80
155
55
105
45
90
40
80
If the bicycle has been equipped with gears, timely shift the gears in
order to increase the range.
XHP rear wheel motor (50 Nm)
Eco (km)
Cruise (km)
Tour (km)
Sport (km)
Power (km)
Battery pack
min
max
min
max
min
max
min
max
min
max
317 Wh
70
135
50
100
35
70
30
55
25
50
418 Wh
90
175
70
130
50
95
40
75
35
70
490 Wh
110
205
80
155
60
110
45
90
45
80
The range depends on various factors and is strongly influenced by the
following:
* C
apacity (Ah) and voltage (V) of the battery pack;
* Pedal assistance level;
* Pedal assistance mode or riding program, ask your dealer about the
possibilities;
* A
mbient temperature;
* Wind force;
* Tyre pressure (at least 4 bar);
* Cycling speed;
* Weight of the cyclist and the load;
* Cycling behaviour;
* Road conditions;
* Use of gears.
The range will perceptibly decrease as the battery pack gets older.
56
57
5
Accelerator (optional)
5.1
Accelerator
A
The throttle (B) can be used when the
peddling assistance has been switched
on. You ‘throttle up’ by turning the throttle
towards you.
When using the throttle for the first time,
carefully try it out to familiarise yourself
with the power the throttle delivers.
1
3
2
B
6 7 8
4 5
Once you have set the parking assistance,
you can use the throttle by turning it
towards you.
Note: When using the throttle for the
first time, carefully try it out to familiarise
yourself with the power the throttle
delivers.
A Control unit
BThrottle
5.2
Boost function (use while cycling)
You can use the boost function while cycling. The throttle will provide
an additional push during cycling. Handy when you wish to accelerate
temporarily, for example, to overtake. The boost function is connected to the
peddling assistance levels. The effect of the throttle can be felt the most in
the ECO mode while it is felt the least in the POWER mode.
Note: the boost function will only work when you pedal too.
5.3
Parking assistance
The throttle offers support up to
approximately 3 km/hour when you are
walking alongside your bicycle. Handy
when the E-bike needs to be fetched from
the shed or basement.
Use the arrow keys on the control unit (A)
to set the parking assistance.
58
A
1
2
3
6 7 8
4 5
59
100%
3.0
P
km/h
Pa rk a ssi st
14.14
30km
6
Technical data
7
6.1
Weight and performance
Contact your dealer shop if the message is not listed in the manual.
300Wh series
400Wh series
500Wh series
Capacity (Ah)
8.8
11.6
14.5
Weight of battery pack (kg)
2,7
2,7
2,7
Maximum power (W)
250
250
250
Charging time 80% (hrs)
3.5
5
6
Charging time 100% (hrs)
4.5
6
7.5
Voltage (V)
36V
36V
36V
Energy (Wh)
317
418
522
6.2
Status
Minimum [°C]
Maximum [°C]
0
45
-15
60
While charging
During use
6.3
Charger data
Input voltage
100-240 Vac (50-60Hz)
Input power
Max. 150 W
Input current
Max. 1,5 A
60
0%
E-0014
Do not remove the rear wheel. This may affect the performance
of the bicycle.
Message
E01
Temperature limits for battery cells
Diagnosis messages
Diagnosis
Battery pack flat
Solution
Charge the battery
pack.
E05
Bad motor connection
Switch on the pedal
assistance and check
if the battery pack is
placed correctly.
E06
Short circuit in lighting
Please contact your
dealer.
E07
Motor outside
temperature range
Wait until the motor
has reached the proper
temperature.
E14
Display is not
recognised
The display needs
resetting. Take your
bicycle to the dealer.
E16
Constant activity of the
power sensor
Calibrate by holding the
light button pressed for
5 seconds.
61
Message
Diagnosis
Solution
E19
Battery pack outside
the temperature range
Wait until the battery
pack is within the
temperature range.
The charging will then
automatically continue.
E20
Service needed
Please contact your
dealer.
E21
Motor current regulator
The assistance is
adjusted by heavy use.
Problems while
charging
Turn the lights on/
off and wait for 10
seconds.
Reconnect the battery
charger.
Go to the dealer if the
message reappears.
E22
E23
Serial number motor
incorrect
Diagnosis
E30
E32
Battery electronics are
too warm.
Let the battery pack
cool down and switch
on the pedal assistance
again.
E34
Control unit does not
support accessories
Please contact your
dealer.
Solution
E35
Check whether the plug
of the throttle is placed
No communication with
well in the control unit
throttle
and place the display
again.
E39
Wrong charger
connected
Connect the correct
charger.
E45
Max temperature
of motor controller
reached
Allow the motor
controller to cool before
switching on support
again.
This battery pack has
not been installed on
the bicycle. If this is
not the case, please
contact your dealer.
Turn on the pedal
No communication with assistance and check
torque sensor
if the battery pack is
placed correctly.
62
Message
63
8
Warranty conditions and legal
requirements
Guarantee conditions
The following guarantee conditions supplement the applicable legal rights.
When does the guarantee apply?
The supplier of the battery pack will give a guarantee for any material or
construction faults concerning the battery pack if the following condition is
met:
* You only have a right to the guarantee if you can provide a certificate of
guarantee or a receipt. The guarantee period commences on the day of
purchase.
* The guarantee will be null and void when deep discharge is established.
Guarantee period of the E-bike
A 2-year factory guarantee is given with regard to the electrical parts of your
E-bike (display, drive system and battery pack). For the guarantee period
for the other parts refer to the guarantee provisions as specified in the
instruction booklet of the manufacturer.
Do not clean the bicycle with a high-pressure spraying pistol.
A too powerful jet of water may damage the electrical parts of
your E-bike. This will make the guarantee null and void.
Compliance
The manufacturer of your E-bike hereby declares that the
product complies with all requirements and other relevant
conditions of Machinery Directive 2004/108/EC, EMC Directive 2006/42/
EC, the EN standards for EPACs (Electrically Power Assisted Cycle)
EN15194:2009+A1:2011 and city trekking EN14764:2005.
The declaration of compliance is supplied with the E-bike.
Environment
We recommend that you return a faulty bicycle battery pack to
your dealer in accordance with the environmental regulations
for collecting and processing batteries drawn up by the
Ministry of Housing, Spatial Planning and the Environment.
The dealer is required to accept the battery and must ensure
that it is processed further by the manufacturer.
Periodical maintenance
Your E-bike needs regular service. Your dealer can advise and
inform you on how to make optimum use of your bicycle.
You can also contact your dealer for software updates or for an
analysis of the diagnosis form containing the exact details of how
you use your bicycle.
Additional guarantee
You can purchase an additional guarantee period to extend your
guarantee for three more years within the first 2 years of purchasing
your new E-bike. Contact your dealer for the conditions.
Legal requirements
The described conveyance is a bicycle according to European legislation,
because the bicycle complies with the following rules:
* The support is only active when the user peddles too.
* The support is active for up to 25 km/hour.
* The supplied power is maximum 250 W.
64
65
66
04/2015