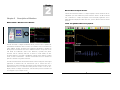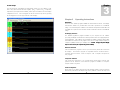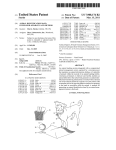
1
Table of Contents Vmed Technology Table of Contents ..................................................................................................... 1 Chapter 1 Installation and Setup .......................................................................... 3 Installing the PC-Display Application software ............................................................................................... 3 PC-Display Computer Video Resolution ........................................................................................................................ 7 Wireless Monitoring Software Installing Bluetooth..................................................................................................................................... 7 Bluetooth Installation and Discovery, Windows XP Service Pack 2 or 3 ........................................................... 8 Bluetooth Installation and Discovery, Windows 7 and Vista (SP2) ...................................................... 11 Bluetooth Installation and Discovery, Windows 8.1 ............................................................................. 15 Configuring PC-Display for Internal Bluetooth ..................................................................................... 17 Setting PC-Display Defaults ...................................................................................................................... 20 Customization of the Patient Information List....................................................................................... 37 Interfacing With Practice Management Software ................................................................................. 39 Setup Vet/Clinic Information (USA and Canada) ......................................................................................... 40 Setup Vet/Clinic Information (International) ................................................................................................. 41 Using Your Clinic Logo on Printed Reports ................................................................................................. 42 Chapter 2 Description of Monitors ...................................................................... 46 BP-AccuGard™ Blood Pressure Monitor ............................................................................................. 46 PC-VetChek ECG Screening and Recovery Monitor ........................................................................... 49 PC-VetGard+ Wireless Surgical Monitor .............................................................................................. 52 Chapter 3 Operating Instructions........................................................................ 55 Software ............................................................................................................................................... 55 Wireless Connection ................................................................................................................................ 56 Setup Patient Information ......................................................................................................................... 59 Sweep and Scale .................................................................................................................................... 60 Toolbar Buttons and Functions.................................................................................................................. 60 Alarms and Sounds .............................................................................................................................. 63 Recording Monitoring Information ........................................................................................................ 65 Printing ................................................................................................................................................. 66 PC-Display Keyboard Shortcuts ........................................................................................................... 69 Chapter 4 Reviewer Program ............................................................................. 71 Description.............................................................................................................................................. 71 For all Vmed Wireless Monitors Modes of Monitor Recording ................................................................................................................ 71 Using the Reviewer Program ............................................................................................................... 72 Reviewer Toolbar ................................................................................................................................. 75 Reviewer Configuration ........................................................................................................................ 76 Printing ................................................................................................................................................. 78 Help Menu ............................................................................................................................................ 81 Installation, Setup and User Instructions Version 2.5 Chapter 5 Support and Troubleshooting............................................................. 84 Service and Support ................................................................................................................................ 84 1 Troubleshooting PC-Display ..................................................................................................................... 85 Appendix A Appendix B Appendix C Chapter Computer Requirements and Specifications.................................... 86 Software License............................................................................. 87 Discontinued Monitors..................................................................... 89 1 Chapter 1 Installation and Setup NOTE: This printed manual covers Bluetooth installation on Windows 7, Vista and Windows XP with Service Pack 2 or 3 (SP2 or SP3) computers only. Refer to the manuals included on the Vmed Installation CD or to the included installation installation tutorial videos to setup Bluetooth with anything other than the Microsoft Windows Bluetooth drivers. Installing the PC-Display Application software 1. Put the Vmed Software Installation CD into the computer’s CD-ROM drive. The installation program should automatically start and the window below will appear: NOTE: You may at first wish to click the “Play suggested installation 2 3 tutorial video” text in order to view a tutorial video of how to install Bluetooth and discover your Vmed wireless device device on your computer. 1. Click “Install PC-Display”. When the following screen appears, click “Next”. 3. Select which icon(s) you wish to be installed on your desktop (both icons will still appear in the Start Menu regardless of your selection here). Then click “Next”. 2. Read the license agreement; choose “I Agree” and then “Next”. 4 5 4. Choose “Everyone” and then “Next”. Continue installing any other programs such as the ECG Interpreter and then remove the installation CD. NOTE: Shortcuts to the PCPC-Display and/or and/or PCPC-Display DEMO programs will be placed on the Windows desktop and in the Programs folder of the Start menu. It is now recommended that you use PCPCDisplay to connect to all Vmed wireless remotes. 5. Then, click “Next” to begin the installation of files. Computer Video Resolution PC-Display works best when the video resolution on your computer display is set to at least 1024 x 768 so that the entire PC-Display screen is easily viewable. Select Start > Settings > Control Panel > Display > Settings for Windows XP computers. Refer to software help menu for Windows 7 and Vista operating systems. Installing Bluetooth REFER TO THE APPROPRIATE SECTION BELOW FOR THE BLUETOOTH INSTRUCTIONS THAT APPLY TO YOUR OPERATING SYSTEM. IF YOUR COMPUTER HAS A PREPRE-INSTALLED OR INTERNAL BLUETOOTH DEVICE, CONTACT YOUR VMED VENDOR FOR TECHNICAL ASSISTANCE. 6. The files will be installed and then you may click “Close” to finish. 6 IF YOU HAVE PREVIOUSLY INSTALLED ANY BLUETOOTH SOFTWARE, CALL THE VENDOR FROM WHOM YOU BOUGHT THIS PRODUCT FOR TECHNICAL ASSISTANCE. 7 5. The following window should appear: Bluetooth Installation and Discovery, Windows XP Service Pack 2 or 3 1. Plug the Bluetooth USB adaptor (Dongle) into a USB port on your computer. 2. Windows should automatically detect the device and respond with an audio prompt. A note confirming detection of the device should appear in the lower right hand corner of the display. 3. Double click the “Bluetooth Devices” icon on your desktop or select “Bluetooth Devices” from the “Control Panel” or from the “Start” menu. 4. After the following “Bluetooth Devices” window appears click on the button marked “Add”. 6. Turn on your Vmed wireless remote by depressing the red button on the module’s keypad. 7. Wait for the “Status”, “Connection” or “Computer” light on the wireless remote to turn amber and then put a check mark next to “My device is set up and ready to be found.” on the Add Bluetooth Device Wizard window. 8. Click “Next” and your computer will search for the wireless remote. When the remote device has been discovered, a window similar to the one below will appear. The ID number following “Vmed-” will be the same as the ID number that is printed on the back label of the wireless remote (the below example uses a PC-VetGard+ with ID: VG20149, but the method is the same for all Vmed wireless remotes). 8 9 9. Highlight the identified Vmed wireless remote and click “Next”, which will open the following window: NOTE: There should be two COM (Communications) ports listed on this window. They may be different for different discoveries and you should not have to remember them but you should verify that there are two listed. Bluetooth Installation and Discovery, Windows 7 and Vista (SP2) 1. Plug the Bluetooth USB Adaptor (dongle) into an available USB port of your computer. 2. Windows should automatically detect the device and respond with an audio prompt. A note confirming detection of the device should appear in the lower right hand corner of the display. 10. Select the “Let me choose my own passkey” option and then enter “default” into the text entry box beside this. Then, click “Next”. When the window below opens, click “Finish”. 10 11 3. Once Windows has finished establishing the Bluetooth drivers for this adaptor double click the “Bluetooth Devices” icon in the bottom right portion of your desktop or select “Bluetooth Devices from the “Control Panel” through the “Start” menu (or select “Devices and Printers” from the “Start” menu if you are using Windows 7). 4. Turn on your Vmed wireless remote by depressing the red power button on the remote module’s keypad. 7. On the following screen, choose the middle option, “Enter the device’s pairing code”. 5. In the resulting devices window click the button marked “Add a device”. 6. The devices window will display new devices as they are found. Select your Vmed remote device (in this example it is a PC-VetGard+ with the ID: VG20123, but the process is the same for all Vmed wireless devices). Once selected, click the Next button. 12 13 8. Then, enter the following pairing code: “default”. Click “Next” to proceed. Bluetooth Installation and Discovery, Windows 8.1 1. If your computer doesn’t have built-in or internal Bluetooth then plug the Bluetooth USB Adaptor (dongle) into an available USB port of your computer. Otherwise, skip to step 3. 2. Windows should automatically detect the device and respond with an audio prompt. A note confirming detection of the device should appear in the lower right hand corner of the display. 3. Turn on your Vmed wireless remote at this time by depressing the red power button on the remote module’s keypad. The “Status”, “Connection Status” or “Connection” light, depending upon your remote type, will initially turn red and then change to an amber color. 9. This will begin the pairing of your Bluetooth device. Once the pairing process is complete then you will see a “Close” button. At this point, you may press this button to finish the pairing process. 4. Double-click the “Bluetooth Devices” icon in the System Tray at the bottom right portion of your desktop. 10. You may also see a notification bubble verifying that the pairing process is complete. 14 5. The Windows 8 Settings app should open to the “Manage Bluetooth devices” screen. It will automatically begin searching for available Bluetooth devices. Wait until your wireless remote appears in this list (its name will start with “Vmed-”). 15 8. Once you have done this then the pairing process is essentially complete. Configuring PC-Display for Internal Bluetooth If your computer has internal Bluetooth then you may need to configure PC-Display for the specific COM ports that were added when you paired your remote. Proceed with these instructions if you are using Windows 7 or Windows 8.1. 1. Right-click the Bluetooth Devices icon in your System Tray at the bottom right of the screen and then choose “Open Settings”. 6. Select your Vmed remote. Then, click the “Pair” button. 2. Click the “COM Ports” tab of the Bluetooth Settings window and locate the line that lists your Vmed wireless remote under the “Name” column and the word “Outgoing” under the “Direction” column. Note the number shown on this line next to “COM” under the “Port” column. In this example it is “COM3”. 7. When asked for a passcode, enter the word “default” (this is casesensitive). 16 17 3. Double-click the PC-Display icon from the Desktop to open PC-Display. It should show the following error message. Click “Cancel”. 7. In the Configure Vmed Remotes window first select the remote type at the top left that corresponds to your Vmed wireless remote. Then, enter a name that will help you to later identify this remote such as its ID number. Finally, in the box at the right enter the COM port number that you noted in step 2. 4. Choose “Edit Default Configuration” from the Tools menu of PC-Display. 5. In the upper left corner of the Product Configuration window put a check mark in the box next to “Specify Com Port Number?”. Then, in the text box to the right of “Wireless Remote Com” enter a positive number. 8. Click the OK button followed by “Yes” to save these values. 9. You are now ready to click “Connect” to start the connection process with your wireless remote. Then, click the OK button and close PC-Display. Repeat steps 1-2 and 6-9 for any additional Vmed wireless remotes that you have paired with this computer. 6. Now, open PC-Display once more and when you see the “Vmed Remote Switcher” window click the “Configure” button. 18 19 Setting PC-Display Defaults This section describes the procedure to change the default settings that will apply each time the PC-Display program is opened. Default settings such as TONE, ALARM, ON/OFF, GRID, etc. may be overridden by clicking the “Edit Current Configuration” icon on the upper toolbar only if the remote is connected to your computer. NOTE: The “Edit Default Configuration” will set the defaults for each time a PC-Display. If you wish to quickly make wireless monitor is connected to PC only,, you can click on the “Edit changes for the currently connected session only Current Configuration” toolbar button on the Windows display (Icon looks like a gear). However, whatever changes you make using the Current Configuration will only be effective for the current connection and not change the “Default” settings. 2. Click the “Cancel” button on the “Select Wireless Remote Connection” window. 3. Click the “File” menu and confirm that there is no check mark next to the “Connect Wireless Remote…” option. NOTE: This allows access to the “Tools” menu. 4. Click “Tools” followed by “Edit Default Configuration…” and the following dialog box will open: Figure 1: Edit Current Configuration Icon on PCPC-Display upper toolbar To set PCPC-Display Defaults: 1. Double click the PC-Display icon on your desktop. The following window will open: Figure 2: “Edit Default Configuration” menu. Some selections in the Default Configuration menu apply only to certain wireless remote types. Each selection listing below will show which type of wireless remote can use it by including any of the following images next to it. 20 21 wish to appear on the screen (from 1-4). How many waveforms actually appear is equal to this number minus the number of other waveforms (SpO2, Respiration/CO2, O2) that are also currently available and enabled. FACTORY PC-Vet DEFAULT: 4 PC-VetGard Weight Unit Set the default unit of weight measurement to appear in the Patient Information screen. The available options are “kgs”, “lbs”, “g” and “oz”. FACTORY DEFAULT: “LBS” PC-VetGard+ PC-VetChek Print Report BP-AccuGard Choose the desired number of pages for the print report. Select two pages to display both waveforms. FACTORY DEFAULT: 1 PAGE Alarm Settings General Tab Specify COM Port Number Should NOT be checked in most situations. The appropriate COM port number should be entered here only in situations where Bluetooth software other than the Microsoft Windows Bluetooth driver is used. Please call Vmed for support if you are unsure whether you need this option. FACTORY DEFAULT: UNCHECKED Sound Alarm Tones If checked, this will allow the alarm tone to sound whenever an alarm is tripped. FACTORY DEFAULT: CHECKED Display Alarms If checked, all the designated alarm limits will be evaluated for an alarm event and the alarm tone (if enabled). If left unchecked, no alarm events or alarm tones will sound. FACTORY DEFAULT: CHECKED Check For Updates If a checkmark is in the box next to “Check for Updates” then PC-Display will periodically check to see if a later version has been released. If an update is available PC-Display present you with the option to download it. There is also an option under the Help menu that will allow you to manually perform this check. NOTE: Requires an active Internet connection to the computer where PC-Display resides. FACTORY DEFAULT: CHECKED Species Select the most common species of patient that is seen. This will be the default for each new patient. FACTORY DEFAULT: CANINE Maximum ECG Waveforms Choose the maximum number of continuous Lead II ECG waveforms that you 22 Tone and Background Color Profile If you are connecting to multiple wireless remotes on the same computer then you can choose individual profiles for the Alarm Beats and Tones to more easily differentiate the sounds and monitoring screens from each remote. Each of the four profiles has a unique sound for each of the following: heart beat from ECG, heart beat from SpO2 and breath tone. This setting will be the default each time PC-Display is started. Additionally, each profile also as a background color for the waveform areas associated with it as well. Profiles 0–3 use the following background colors, respectively: black, navy, forest green and plum. To select a different profile for each remote simply open the Current Configuration window on the PC-Display upper tool bar after this remote has connected to PC-Display. FACTORY DEFAULT: 0 23 always 5 mm. FACTORY DEFAULT: UNCHECKED Alarm Tone Snooze Set an automatic “snooze” on the alarm tone whenever it is silenced so that it will re-enable itself once the preset time has elapsed. The time options are 10 seconds, 30 seconds, 1 minute, 5 minutes, 10 minutes and 30 minutes. To turn off the alarm tones simply click the alarm tone toolbar button once more. FACTORY DEFAULT: OFF QRS Tone Checking this will enable a specific tone to sound with each beat. The tone will be different depending upon whether the heart rate is retrieved from ECG or from SpO2. Each of these tones will be different within each Beat Tone Profile. FACTORY DEFAULT: CHECKED ECG Sweep Rate Select the desired sweep rate (Chart speed) as desired. Use a sweep speed of 50 mm/sec. for diagnostics and 25 mm/sec for surgery. This applies only to ECG and SpO2 waveforms. FACTORY DEFAULT: 25 MM/SEC RR/CO2/O2 Sweep Rate Select the desired sweep rate for the respiration, CO2 and O2 waveform areas. FACTORY DEFAULT: 12.5 MM/SEC Heart Rates > 400 BPM PC-Display has the ability to calculate heart rates greater than 400 BPM for exotic animals. For veterinary use on canine/feline patients leave the “Heart Rates >400 BPM box unchecked. FACTORY DEFAULT: UNCHECKED Episode Reviewer Waveforms Select which Vmed software will open recorded episodes directly from the PC-Display toolbar: ECG Reviewer or ECG Interpreter. This depends upon which is installed. If neither is installed then this option is grayed out or invisible. FACTORY DEFAULT: ECG REVIEWER CHECKED; O2 UNCHECKED Select which of the three waveforms (other than ECG) you would prefer to have automatically displayed upon startup. The BP-AccuGard makes use of the RR and O2 waveforms by default. FACTORY DEFAULT: SPO2, RR Automatic Trend Graph Display ECG Notch Filter Choose the time interval of how often the trend graph will display automatically and momentarily throughout the procedure. FACTORY The default ECG notch filter is used to filter AC line interference. For Domestic use (North America) choose 60 Hz. For international use choose 50 Hz. FACTORY DEFAULT: 60 HZ DEFAULT: OFF ECG Features Features ECG Low Pass Filter R-Wave Markers Checking this will display the white inverted triangles that appear above each beat in the ECG waveform area. Markers are helpful in detecting double-counting of beats. FACTORY DEFAULT: CHECKED Some instances of noise on the ECG signal can be reduced by selecting one of these filter types. FACTORY DEFAULT: LOW Patient Episode Recording Mode AutoSave 5mm Reference Grid Checking this will display a reference grid behind the ECG and respiration/CO2/O2 waveform areas. The vertical scale of each rectangle in this grid is determined by the gain marker to the left of each waveform window, while the horizontal scale of each rectangle is 24 Auto Save is the default setting. A check mark in the “Auto Save” box enables automatic saving of all patient data upon connection to a remote device without manually pressing the green record button on the PC-Display upper tool bar. Selecting Auto Save enables the default recording mode selection: 25 either “Continuous Waveforms; Periodic Vital Signs” or “Periodic Vital Signs Only”. Continuous Recording mode will save both ECG and/or CO2 waveforms and vital signs. Selecting Periodic Vital Signs Only will record vital signs and monitoring events without any waveform data. FACTORY DEFAULT: CHECKED; CONTINUOUS RECORDING mode. Checking this will cause PC-Display to save the vital signs each time a blood pressure measurement is complete. This will show up as a “vitals” event. FACTORY DEFAULT: CHECKED NOTE: The BPBP-AccuGard cannot record any waveform data no matter which option is selected. Vital Signs Logging Interval The following table shows how to manage what is recorded. Save All BP Measurements This selection determines how often vital signs are automatically recorded to provide a record of the surgery. Intervals of 1, 3, 5, 10 and 15 minutes are possible as long as patient recording is enabled. A time reference stamp is also recorded. FACTORY DEFAULT: 5 MINUTES Configuration Options Operation Actions Data Recorded Auto Save Vital SIgns Only Continuous Recording Record Button Print Command OFF X X OFF NO Nothing OFF X X OFF YES 24 sec. of ECG waveform and any events during that time including Print event OFF X X ON NO Waveform(s) and Events 24 sec. of ECG waveform and any events during that time including Print event Patient Episode Directory OFF X X ON YES ON ON OFF OFF NO Nothing YES 24 sec. of ECG waveform and any events during that time including Print event ON ON OFF OFF ON ON OFF ON NO Events Only ON ON OFF ON YES Events only (no print event) ON OFF ON OFF NO ON OFF ON OFF YES Nothing 24 sec. of ECG waveform and any events during that time including Print event ON OFF ON ON NO Waveform(s) and Events YES 24 sec. of all waveforms and any events during that time including Print event ON OFF ON ON This is the location where your patient data recorded files (referred to as “patient episodes”) are stored from this computer. Click the “Select Directory…” button if you wish to change this location. FACTORY DEFAULT: <LOCAL USER DIRECTORY>\MY DOCUMENTS\VMED_PATIENT_EPISODES ECG, Temperature Tab Single Instance Checking this will make it possible for only one instance of PCDisplay to be open at a time on this computer. Selecting Multiple Instances allows multiple wireless remotes to be connected to this computer simultaneously. FACTORY DEFAULT: UNCHECKED CO2 Save Checking this will allow the CO2 waveform, or capnograph, to be saved in addition to the ECG waveform whenever Continuous Recording is selected. FACTORY DEFAULT: CHECKED 26 27 SpO2, Respiration Tab Heart Rate and Temperature Alarm Limits “High” and “Low” limits show the default values at which the alarm will be triggered for both heart rate and temperature. Additionally, each limit can be enabled or disabled individually. The below table shows the FACTORY DEFAULTS for these values: HR Low Temp* High Temp* Low 140 80 103.0 95.0 200 100 103.0 95.0 160 40 103.0 95.0 103.0 95.0 Species HR High Canine Feline Equine Other 240 40 * Temperature values here are shown in Fahrenheit ECG Gain The default ECG gain can now be set per species type so that this gain value will automatically be active when a patient of that species is selected for monitoring. FACTORY DEFAULT: x1.0 (10mm/1mV) [for each species] Temperature Units The default temperature units can be selected here between Fahrenheit and Celsius. Alarm limits will automatically adjust to the temperature scale. FACTORY DEFAULT: FAHRENHEIT SpO2 Alarm Limits The “High” and “Low” limits here show the default values at which the alarm will be triggered for SpO2 on each species type. Each limit can be enabled or disabled individually. The below table shows the FACTORY DEFAULTS for these values: Species SpO2 High SpO2 Low Canine Feline Equine Other 100 100 100 100 92 92 92 92 Respiration Alarm Limits The “High” and “Low” limits here show the default values at which the alarm will be triggered for “RR” (respiration) on each species type. Additionally, each limit can be enabled or disabled individually. The below table shows the FACTORY DEFAULTS for these values: 28 29 Species RR High Canine Feline Equine Other RR Low 120 120 120 120 Measurement Time Interval 6 6 6 6 Determines how often blood pressure measurements will be taken automatically. Intervals of 1, 2, 3, 5, 10, 15, 30 and 60 minutes are available. FACTORY DEFAULT: 5 MINUTES Blood Pressure Tab Initial Cuff Inflation Pressure This value is the initial cuff pressure peak of the cuff inflation cycle, given in mmHg. This pressure should be 30 mm Hg over the expected systolic pressure. FACTORY DEFAULT: 160 Measurement Complete Tone This tone is intended to sound at the completion of each blood pressure measurement. It is currently not functional. FACTORY DEFAULT: CHECKED Apnea Tab Blood Pressure Alarm Limits The “High” and “Low” limits here show the default values at which the alarm will be triggered for the blood pressure values on each species type. Each limit can be enabled or disabled individually. The below table shows the FACTORY DEFAULTS for these values: Species Cuff Size Sys High Sys Low Dia High Dia Low MAP High MAP Low Canine Feline Equine Other NEONATE 3 NEONATE 3 190 160 160 160 80 80 80 80 100 100 100 100 50 50 50 50 120 120 120 120 60 60 60 60 NEONATE 3 NEONATE 3 30 The “High” and “Low” apnea limits show are the default values at which the alarm will be triggered for when breathing stops for the time in seconds on each species type. The range for this time is 20 to 60 seconds. Each limit can be enabled or disabled individually. The below table shows the FACTORY DEFAULTS for these values: 31 Species Apnea Time Enabled Canine 20 seconds Yes Feline 20 seconds Yes Equine 20 seconds Yes Other 20 seconds Yes Species Insp. High Insp. Low Exp. High Exp. Low 2.3 2.3 2.3 2.3 40.3 40.3 40.3 40.3 28.9 28.9 28.9 28.9 Canine 7.6 Feline 7.6 Equine 7.6 Other 7.6 Units here are mmHg CO2 Units The units shown in the alarm limit boxes are determined by which option is selected either – mmHg (Partial Pressure) or % (Volume Percent). If you enter numbers in one unit and then select the other then they will be automatically converted for you. FACTORY DEFAULT: mmHg CO2 Tab Enable Breath Tones If checked, this option will sound a particular tone each time a patient’s breath is detected by the CO2 sensor. This tone will be different according to which sound profile is selected from the General tab. FACTORY DEFAULT: CHECKED CO2 Waveform Full Scale The Full Scale setting will determine the highest values that can be displayed on the CO2 waveform graph (capnograph). For expected expired CO2 values above 40 mmHg (5%) the 100 mmHg (12%) setting should be chosen. FACTORY DEFAULT: 12.5% or 100 mmHg Expected O2 Environment This setting should only be needed with gas probes that do not measure O2 directly. This will set the expected O2 for the environment so that the gas probe can calculate its measured gas concentrations appropriately. FACTORY DEFAULT: 70% - 100% O2 Tab CO2 Alarm Limits The “High” and “Low” limits show the default values at which the alarm will be triggered for CO2 inspired (FiCO2) and expired (ETCO2) values on each species type. Each limit can be enabled or disabled individually. The below table shows the FACTORY DEFAULTS for these values: 32 This menu allows you to set default inspired (I) and expired (E) alarm limits for oxygen as measured with a mainstream gas sensor that is equipped with an O2 plug sensor. 33 Agent Tabs This menu allows you to set default inspired (I) and expired (E) alarm limits for the anesthesia agents that your PC-VetGard+ is equipped with. Select the tab that applies to your agent sensor. These values apply to the following gas types: N2O, Halothane, Enflurane, Isoflurane, Sevoflurane (pictured below) and Desflurane. per-cent (%) volume. Be NOTE: Agent units display in mm HG or per sure to check “Enable Display” where it applies. O2 Units The units shown in the alarm limit boxes are determined by which option is selected either – mmHg (Partial Pressure) or % (Volume Percent). If you enter numbers in one unit and then select the other then they will be automatically converted for you. FACTORY DEFAULT: % Volume O2 Alarm Limits The “High” and “Low” limits show the default values at which the alarm will be triggered for O2 inspired and expired values on each species type. Each limit can be enabled or disabled individually. The below table shows the FACTORY DEFAULTS for these values: Species Insp. High Canine 99.9 Feline 99.9 Equine 99.9 Other 99.9 Units here are volume percent (%) 34 Insp. Low Exp. High Exp. Low 21.0 21.0 21.0 21.0 99.9 99.9 99.9 99.9 18.0 18.0 18.0 18.0 Agent Units The units shown in the alarm limit boxes are determined by which option is selected either – mmHg (Partial Pressure) or % (Volume Percent). If you enter numbers in one unit and then select the other then they will be automatically converted for you. FACTORY DEFAULT: % Volume. 35 Agent Alarm Limits The “High” and “Low” limits show the default values at which the alarm will be triggered for each agent inspired and expired values on each species type. Each limit can be enabled or disabled individually. The below table shows the FACTORY DEFAULTS for these values: Agent* Insp. High Insp. Low Exp. High Exp. Low N2O 99.9 1.0 99.9 1.0 Halothane 5.0 1.0 5.0 1.0 Enflurane 5.0 1.0 5.0 1.0 Isoflurane 5.0 1.0 5.0 1.0 Sevoflurane 8.0 1.0 8.0 1.0 Desflurane 18.0 1.0 18.0 1.0 Units here are volume percent (%) * These default values are set the same for all listed species types. Please use professional judgment to determine if these values correspond with current veterinary practice standards for each species type. Practice Mgmt Software Tab Select the “Practice Mgmt Software” tab to set PC-Display to interact with certain practice management software. NOTE: Currently, PC-Display only interacts with AVImark practice management software. Additional programs may be added in the future. Put a checkmark in the box next to “Auto Populate New Patient Information from AVImark” in order to enable the automatic population of the PCDisplay patient information fields each time a new patient is selected within PC-Display. NOTE: AVImark software must be open and logged in and its COM Object feature enabled for this function to work. Customization of the Patient Information List Species and Breeds available in the dropdown menu of the Patient Information window are user customizable using the following procedure (the use of Microsoft Excel is recommended for best results): NOTE: The following exercise should be performed from the the computer’s administrative user account. 1. Verify that your computer has Microsoft Excel installed properly. 2. Click on the desktop ‘My Computer’ icon and navigate to the installation directory for PC-Display. For most users this will be ‘C:\Program Files\Vmed Technology\PC-Display’. 3. Select the file ‘Species&Breeds.xls’ and then right click the mouse and select “Copy”, then right click again in the white space of the window and select “Paste” 4. A file called ‘Copy of Species&Breeds.xls’ will be created. Right click on this new file and choose ‘Rename’ then rename the file to ‘CustomSpecies&Breeds.xls’ 5. Double click on “CustomSpecies&Breeds.xls”. Excel should open it as shown below: 36 37 Interfacing With Practice Management Software PC-Display now allows the user to interact with certain kinds of practice management software (only AVImark at the present time) for the purpose of automatically fetching patient information for use in saving patient episodes. The following shows how to accomplish this. A V I MA RK 1. Make sure that AVImark (version 2008.2 or higher) is running and logged in on the same computer that you are using with PC-Display and that the desired patient is shown in the AVImark CID. 2. The “Auto Populate New Patient Information from AVImark” setting must be selected within the “Practice Mgmt Software” tab of the Default Configuration screen (see previous section). 3. Each time the “New Patient” option is chosen within PC-Display the available patient information will automatically be fetched and then filled in to the fields of the Patient Information screen. This also happens when first connecting to a remote. 6. The spreadsheet can be edited to add species and breeds as desired. The following restrictions apply: Entry A1 must remain “Species” and B1 “Breed”. The total number of characters per spreadsheet line (Species and Breed) must be less than 60 There can be no more than 25 different kinds of species There can be no more than 500 breeds per species. There can be no more than 2000 total entries in the spreadsheet. Do not enter data in any columns except A and B 7. Save the edited spreadsheet. 8. Use Excel’s “Save As” feature to save the spreadsheet as tab delimited text. The saved filename should be “CustomSpecies&Breeds.txt”. This file is read by PC-Display to generate the species and breeds dropdown menus in the patient information dialog. 38 39 Setup Vet/Clinic Information (USA and Canada) 1. Click the “Tools” menu on the upper tool bar of the PC-Display and then “Edit Vet Information” and the following window will appear: Setup Vet/Clinic Information (International) The “Edit Vet Information” box as shown below has a pull down menu selection for state. All U.S. and Canadian States and Territories should be listed. If your clinic is not within one of these state selections, then select the entry which shows a blank. Use the other available entry boxes to fill in the specifics of your address. 1. Click the “Tools” menu on the upper tool bar of the Windows display and then “Edit Vet Information” and the following window will appear: 2. Type in your vet/clinic information as above. NOTE: Your entries will be remembered each time the program is started and contains text that will be printed on all Reviewer generated reports. 3. Press OK. NOTE: Refer to the instructions later if you wish to add your clinic logo to the report heading. 2. Type in your vet/clinic information as above. NOTE: Your entries will be remembered each time the program is started and contains text that will be printed on the ECG print report and all Reviewer generated reports. 3. Press OK. NOTE: Refer to the instructions below if you wish to add your clinic logo to the report heading 40 41 Using Your Clinic Logo on Printed Reports The default logo provided in the ECG report printout is shown below; NOTE: You may need to turn on the file extensions first by clicking on the “Tools” menu of this Explorer window and then selecting “Folder Options…”. Choose the “View” tab from the Folder Options window and then remove the checkmark next to “Hide extensions for known file types” within the Advanced settings box. To customize a logo specific to your clinic NOTE: Make sure that you perform this from the computer’s administrative user account. 1. Click on the desktop ‘My Computer’ icon and navigate to the installation directory for PC-Display. For most users this will be, ‘C:\Program Files\Vmed Technology\PC-Display’. A screen similar to the one below will appear: 2. Select the file ‘logo.bmp’ and then right click the mouse and select “Copy”, then right click again and select “Paste”. 3. A file called ‘Copy of logo.bmp’ will be created. Right click on this new file and choose ‘Rename’ then rename the file to ‘customlogo.bmp’. 4. The image in this file will now appear on the printouts from PC-Display. Edit the file to create your own custom logo. The following constraints must be observed. 42 43 The file must be named ‘customlogo.bmp’ Any size image can be used, but it will be stretched or compressed to 1024 by 512 pixels in the printout. Best results are achieved when image file is 1024 by 512. NOTE: The image must be in .bmp format 24 bit color. Any photo editor can be used to create a custom logo. Most computers will at least have Windows Paint. If you have a logo as part of the header in a Word document it can be cut and then pasted into Windows Paint, resized and then saved. Vmed software upgrades will overwrite the original ‘logo.bmp’ file but will leave the ‘customlogo.bmp’ file untouched. Software upgrades should not affect the new logo. Figure 3 Sample print reports with customized clinic logo. logo NOTE: Veterinary information changed by using the “Tools”> ‘Edit Vet Information…’ menu. PC-Display can be used to see NOTE: The ‘Print Preview’ function in PC logo how the new log o will look on the printout. An example is shown below. 44 45 Chapter 2 Chapter 2 Description of Monitors BP-AccuGard™ Blood Pressure Monitor BP-AccuGard Computer Screen The BP-AccuGard when linked to a computer displays real time waveforms for the cuff inflation cycle and oscillometric pressure waveform. Refer to the BP-AccuGard user’s manual for a complete description of the PC-Display application screen. Digital information displayed includes heart rate, systolic, diastolic and mean arterial pressures. NOTE: NonNon-applicable toolbar icons are grayed out. The BP-AccuGard is a digital oscillometric blood pressure monitor optimized for small animals. Oscillometric devices measure the oscillation of the vessel wall as the cuff is deflated. The BP- AccuGard uses sophisticated algorithms to calculate the blood pressure measurements from these oscillations based on the pressure in the cuff. While all oscillometric devices have limitations, especially with patient movement and the relatively small size of arteries in small animals, the BPAccuGard software is successful in significantly reducing motion artifacts, resulting in fast, accurate measurements. Accurate measurements have been obtained on patients as small as 1.5 kg under anesthesia. The BP-AccuGard includes manual and automatic modes for diagnostic and surgical applications. In manual mode, the measurement cycle is started each time a measurement is desired. Automatic mode allows repeat measurements taken at user defined intervals. Use as a stand-alone blood pressure monitor or use the PCDisplay software to display measurements, real-time blood pressure waveforms and a trend graph on your computer screen. 46 47 Trend Graph PC-VetChek ECG Screening and Recovery Monitor A trend graph may periodically and momentarily appear over the display to plot Mean Arterial Pressure (MAP) and Pulse Rate trends if this option is enabled in the PC-Display configuration screen. The trend graph can also be viewed at any time by pressing the trend graph icon on the upper toolbar of PC-Display. The PC-VetChek includes ECG leg clips, ECG chest sensor and a temperature probe. Commands can be activated from the remote keypad or the PC-Display upper toolbar on the computer. PC-Display toolbar icons and selector buttons on the PC-VetChek are active only if a wireless connection between the PC-VetChek and the computer is established. The PC-VetChek is designed to control some computer and ECG functions from the remote. Some commands, including the print command, can be activated from the remote keypad, however data that must be entered with a keyboard such as clinic and patient information cannot be entered from the remote key pad. The PC-VetChek can track ECG heart rates to 800 BPM. Power is supplied by two AA batteries. Batteries will last for about 42 hours of continuous use. Battery life increases markedly by substituting long-life type AA batteries. Rechargeable AA batteries may also be used however a charger is not available through Vmed. Refer to the PC-VetChek user’s manual for a complete description and use of the PC-Display software and PC-VetChek hardware. 48 49 PC-VetChek Computer Screen The computer screen displays digital heart rate, respiration rate (from ECG) and temperature. Note “R” wave markers and respiration waveform. Temperature is available from the temperature probe included or from optional ECG and temperature esophageal probes available in three sizes. Several upper toolbar icons are duplicated on the PC-VetChek remote control from the patients’ side. 50 Trend Graph A trend graph may periodically and momentarily appear over the display to plot heart rate, temperature and respiration trends if this option is enabled in the PCDisplay configuration screen. The trend graph can also be viewed at any time by pressing the trend graph icon on the upper tool bar of PC-Display. 51 PC-VetGard+ Wireless Surgical Monitor The PC-VetGard+ is a multi-parameter surgical monitor capable of monitoring and displaying ECG, heart rate, SpO2, respiration (from ECG or mainstream gas sensors), temperature, non-invasive blood pressure (systolic, diastolic and MAP), CO2, O2 and five anesthesia agents. The PC-VetGard+ is modular, meaning that after the basic unit including ECG, temperature and SpO2 is purchased, NIBP and gas sensors may be added without making the basic unit obsolete. Digital information, real-time waveforms and trending are displayed through a wireless link on a Windows based computer monitor. Computer Screen O2 The screen below represents the display of the most complete PC-VetGard+ including and anesthesia agent information. Several upper toolbar icons are duplicated on the PC-VetGard+ remote unit making them accessible from the patients’ side. 52 53 Trend Graph Chapter A trend graph may periodically and momentarily appear over the display to plot heart rate, Mean Arterial Pressure (MAP), SpO2 , expired CO2 , respiration, temperature [and expired O2 if available] if this option is enabled in the PC-Display configuration screen. The trend graph can also be viewed at any time by pressing the trend graph icon on the upper tool bar of PC-Display. 3 Chapter 3 Operating Instructions Software There are three software programs available for Vmed wireless monitors. PC-Display and Reviewer software are provided with each monitor purchased at no additional charge. The Vmed Interpreter software is for automatic interpretation of ECG files and is available as an option for PC-VetGard+ and PC-VetCheck monitors at an additional charge. PC-Display Software The Windows application program installed on your computer for the software processing and display of real time ECG and temperature (when an esophageal probe is used) information. This software can be installed on multiple computers without limit and simultaneous instances of the program can be run on a single computer subject to computer capability and the type of display used. NOTE: A large, flat panel display may be connected to your computer for greater visibility. Reviewer Software The Vmed Reviewer program is used to open and review patient files saved from PC-Display. The Reviewer program is compatible with PC-VetChek and PCVetGard+ patient monitors. Refer to Chapter 4 for a complete description of this program. Interpreter Software The Vmed ECG Interpreter is an optional ECG interpretation program that performs all the functions of the Reviewer program in addition to computer analysis of ECG complexes. Software Updates Ensure that you are always using the latest PC-Display software version. Doing this will increase performance and may fix some of the problems or issues that may occur. 54 55 PC-Display software will prompt you to check for updates periodically. You may also check for updates from the ”Help” menu or by accessing www.vmedtech.com. The latest software install CDs are also available at a $15 charge by phoning (800) 926-9622. Wireless Connection PROCEED ONLY AFTER YOU YOU HAVE SUCCESSFULLY INSTALLED THE SOFTWARE SOFTWARE AND AND HAVE COMPLETED THE BLUETOOTH BLUETOOTH DISCOVERY PROCESS PROCESS (CHAPTER 1). 1) 1. Prepare the monitor (wireless remote) being used. 2. Double-click the PC-Display icon on your desktop to start the program. This will open the PC-Display application and present you with the Connection window. 5. Input patient information (Vmed recommends at least entering information into the Patient Name field) and then click the “OK” button. 3. Turn on the remote by briefly depressing and releasing the red power key on the keypad (Do not hold the power key down). The “CONNECTION” or “COMPUTER” light will turn red and then amber. 4. Select the remote to be used from the list in the Connection drop-down menu and then click the “Connect” button on the menu. 56 Alternately, if you wish to enter patient information for a patient for whom you have entered this information recently then you may select it from the “Recent Data Entries” combo box at the top of this window and this will automatically populate all associated fields. Once you have done this then you may click the “OK” button to begin the connection process. 57 Green: Magenta: White: Yellow: Good ECG signal* ECG Leads Off or poor ECG signal quality (DIGITS ONLY): Temperature Respiration from ECG *A magenta ECG sweep represents a Leads Off condition and may occur even if a waveform is present, however the computer will not recognize a valid ECG and the digital heart rate display will not appear. Reposition ECG sensor and check for adequate moisture at contact. Setup Patient Information NOTE: You may elect to enter patient information after completing the monitoring procedure if desired. This information may also be edited in the Reviewer Program. Vmed recommends at least entering a patient’s name name or ID in the “Patient Name” box prior to monitoring in order to make it easier to locate later on. 1. Select the “Tools” on the upper tool bar and then “Edit Patient Information”. The following window will appear: 6. Wait for the “CONNECTION” or “COMPUTER” light on the remote to turn from amber to flashing green. The process may take as long as 30 seconds to complete the first time after initial discovery. 7. When the remote status light begins blinking green, the notation in the STATUS box on the screen will change to “CONNECTED” and the notation at the lower right corner of the screen will change to: “Remote Connected” on a green background. NOTE: To preserve battery life, the remote will shut off automatically if connection to the computer is not established within 3 minutes of powering on the remote. 2. Type in desired information and press OK. When connection is complete, the ECG sweep appears on the display as a flat magenta colored line moving left to right at the selected sweep speed. Upon acquisition of a satisfactory ECG signal, the waveform will appear and the trace will change to a color corresponding to the sensor: 58 NOTE: This window will automatically appear when connecting to a wireless remote or after selecting “New Patient…” from the File menu. 59 Sweep and Scale Sweep: Sweep moves across the display from left to right at the selected sweep speed (chart speed). Default sweep speed is 25 mm/sec, which is preferred for surgical monitoring. A sweep speed of 50 mm/sec should be used for diagnostic ECGs. The sweep color is magenta if leads off or with poor electrode-patient contact and green with good electrode-patient contact. If the sweep is magenta, an ECG waveform may appear however a heart rate will not be displayed. Vertical Scale: The vertical scale of the display and the print report measures signal amplitude. When gain is set at 1, the signal amplitude of 1mV has a vertical scale deflection of 10 mm by convention. A 1mV reference mark appears on the display and print report. Vertical scale deflection increases by a multiple of the gain and the 1mV reference mark also increases proportionately. CAUTION: Grid spacing does not change with change in gain setting. Use amplitude reference marker (1mV) to estimate amplitude of ECG signals on the screen. Horizontal Scale: Time is measured on the horizontal scale with hash marks on the display and print report every second. Toolbar Buttons and Functions The PC-Display Toolbar provides quick, easy access to several common functions within the PC-Display software. The following table will describe each button and its associated function within PC-Display. The Grid Enable button is a toggle button that will overlay a wireframe grid over both the ECG and CO2 waveforms (when connected to a BP-AccuGard this will put a grid over both the cuff and oscillometric waveforms). The height of each rectangle within the grid is directly associated with the vertical scale marker at the bottom left of each waveform window. The Sweep Rate cycle button will allow the user to change the sweep rate of the ECG and SpO2 waveforms by cycling through each of the available rates: 25 mm/sec, 50 mm/sec, 100 mm/sec or 200 mm/sec.. The current sweep rate will be denoted at the bottom of the ECG digital readout box. The ECG Gain cycle button will allow the user to change the gain (vertical scale factor) of the ECG waveform by cycling through each of the available gain settings: x0.5, x1.0, x2.0, x3.0 and x4.0. The current ECG gain setting will be denoted in perenthesis at the bottom of the ECG digital readout box. The R-wave Enable button is a toggle button that, if enabled, will place a white inverted triangle (R-wave marker) above each recognized beat in the ECG waveform area. This can be useful for determining whether the monitor is double-counting beats. The ECG Tone Enable button is a toggle button that will produce a tone whenever a heart beat is encountered during the monitoring session – from either ECG or SpO2, depending upon which it is set to. It will usually default to the ECG, but if no Leads On ECG signal exists then it will revert to SpO2 for both the heart rate and beat tone. The Waveform Selection button will bring up another window that gives the user the choice of which waveforms to display in the main monitoring screen at that time. For all available remotes it will always include the ECG waveform, but may also give the option for the SpO2, CO2 and O2 waveforms, depending upon what is available with the current remote. The Current Configuration button allows quick access to the configuration of the current session. Any values that are modified here will return to the default values upon exiting PC-Display. More information about all of the configuration options is provided in Chapter 1. The Silence Alarms button is a toggle button whose factory default is to be enabled, meaning that any tripped alarm will sound the alarm tone. When disabled the alarm sound will cease regardless of how many parameters are out of range. 60 61 The Monitor Alarms button is also a toggle button that is enabled by factory default. When enabled, this will show the alarm limits beside each digital value and provide a recorded alarm event and the audible alarm tone if those options are enabled as well. However, even if those options are still enabled they will not happen if this button is disabled. The Marker button allows one to quickly record a vital signs event (“marker” event) if an episode is being recorded. The Trend Graph button, when clicked, will open the Trend Graph window to show the values that are monitored for trends. Each different remote type will show trend information for different parameters, based upon that particular remote type. See the Chapter 2 for more information about the Trend Graph window. The Gas Selection icon allows the user to select the Primary and Secondary agents to monitor if the associated gas sensor is connected to the PC-VetGard+. The Record Episode button is a toggle button that is by factory default enabled. When enabled, this button will record a patient episode file. When disabled then no parameters will be recorded unless the Print function is taken. See a later section of this chapter for more details. The Patient Information button will allow the user to change the patient information for the current recording session by opening the Patient Information window. This is the same window that appears when connecting to the wireless remote. The Print button will allow the user to print either 1 or 2 pages of ECG waveform information along with any patient information that has already been input so far in this monitoring session. Each time this button is pressed it will include one page’s worth of ECG waveform prior to the point in time when the button was pressed. See a later section of this chapter for more details. This option is not available for the BP-AccuGard. The Review Episode button allows the user to open any of the recorded patient episode files that have been recorded in the current session directly into the Vmed reviewing software selected within the configuration window. See a later section of this chapter for more details. The Stop/Start button is a toggle button that by default is disabled (play). When it is clicked/enabled it will freeze the waveforms on the screen (pause) for easier viewing. To disable it again simply click it once more. Clicking on this button will not pause any recorded measurements that are in progress – only what is viewed on the screen. The BP Measurement button is also a toggle button that is disabled by default. Once clicked to enable, it will initiate the automatic measurement process once a cuff size has been selected from the resulting window. This option is only available for remotes with blood pressure capability (PC-VetGard+ and BP-AccuGard). 62 The Info button allows quick access to version information for PCDisplay as well as any connected wireless remote. This button may only be necessary when speaking to a support representative. It is important to note that some of these Toolbar icons with toggle functionality have either a green check mark or a red ‘x’ at the base of the icon as shown below. This is to denote whether the function this icon represents is currently enabled or disabled, respectively. Additionally, the buttons that show they are enabled will usually also have a recessed look to make this concept clearer. Alarms and Sounds PC-Display has several sounds that are useful for monitoring a patient when not always looking at the screen. There are primarily 3 different kinds of sounds within PCDisplay that help to serve this purpose. Alarm Tone The alarm tone is a continuous sound of two rapidly alternating tones for as long as its function is active. The alarm tone can only be active if the following conditions are met: a. b. c. The Monitor Alarms button is enabled The Silence Alarms button is enabled (disabled would mean that the alarm is silenced) An alarm is tripped (one of the parameters with an alarm limit has exceeded that limit) 63 If a parameter’s alarm limit has been exceeded while the alarms are enabled then for as long as this parameter is out of its normal range the alarm tone will be active (it will continuously play). However, if the user disables the Silence Alarm button and then re-enables that button then the alarm tone will no longer be active until that parameter changes to another value that is out of range. Additionally, if a parameter is out of range then the same alarm tone will sound no matter which parameter is out of range. To give the user a visual cue as to which parameter has gone out of range, the numbered alarm limit next to each vital signs parameter will change to black digits on a red background. Alarm upper limit exceeded Heart Rate Tone For each remote type that produces a heart rate or pulse rate from ECG or SpO2, PCDisplay will provide a heart rate tone consistent with the current heart rate or pulse rate shown. If the remote in use has a Leads On ECG signal (green tracing) then the heart rate and its associated tone will come from the ECG measurement. However, in the PC-VetGard(I) and PC-VetGard+ remotes where SpO2 can be used, the pulse rate will default to what is measured from SpO2 and the tone will change accordingly. The heart rate tone can easily be enabled or disabled from the ECG Tone Enable button of the toolbar. There are two kinds of heart rate tones: from ECG and from SpO2. These tones are different in order to provide the user an audible cue that the heart rate is coming from one source over another. This can be helpful if, for example, the heart rate was coming from ECG and then suddenly switched to SpO2. The user would take note that the most probable reason is that the ECG is now Leads Off, which would prompt the user to investigate and correct this sooner rather than had no audible cue alerted them to this. 64 Breath Tone For the PC-VetGard+ with a gas probe connected, PC-Display also provides a breath tone each time the patient takes a breath. This tone is altogether different from the heart rate or alarm tones in order to give the user yet another audible cue to one of the patient’s vital signs – in this case, the respiration rate. This tone will sound only if enabled in the Configuration window under the CO2 tab. In addition, PC-Display now makes 4 sets of tones available for each monitoring session. Each set is referred to as a profile. Each profile includes two heart rate tones (ECG and SpO2) and a breath tone. These profiles exist for the purpose of differentiating which remote and patient each sound is coming from if more than one remote is being used in the same location. Recording Monitoring Information The default setting for recording (save to file) information through PC-Display varies with each monitor. In general, “Continuous Recording waveforms; Periodic Vital Signs is the default setting for PC-VetChek (and PC-Vet) and the PCVetGard+. Waveforms and vital signs are recorded in this mode. “Periodic Vital Signs” is the default setting for the BP-AccuGard. The “Periodic Vital Signs” mode will record vital signs at the interval selected as well as vital signs when an alarm is tripped or a marker or print command are initiated. Unless “Auto Save” is checked on the Default Configuration screen, manually pressing the Record Episode button on the “Tools” selection on the PC-Display toolbar will initiate the recording command. Clicking once on this button will place a checkmark in the bottom right corner of the button itself to show that it is enabled. Clicking it again will disable this recording mode and close the episode file that was just recorded. Toggle Continuous ECG Button (Disabled and Enabled) If “Auto Save” is checked, recording will begin automatically upon connection to the computer and a check mark will appear within the Record Episode button on the upper tool bar. 65 NOTE: The Record Episode button should not be disabled until the monitoring episode is complete. The Reviewer/Interpreter icon is activated after the file is saved upon disabling the Record Episode button, which disables the recording function. The saved file can be opened by clicking the yellow icon on the device control panel or the PCDisplay toolbar and selecting the desired episode. Sweep Rate 25 mm/sec 50 mm/sec 100 mm/sec 200 mm/sec Waveform Seconds Per Page 24 12 6 3 Additionally, if using the PC-VetGard+ with CO2 then the printout will also include the CO2 waveform just below the ECG waveform. Example of the Print dialog box and a sample waveform print report follow. Printing Printing a waveform report can be done from the PC-Display toolbar or the remote keypad (if connected to the computer), however only the waveform report will be printed by this method. To obtain a complete print report, the report must be printed from the Reviewer/Interpreter program. (See Chapter 4 for instructions to print from these programs.) TO PRINT A WAVEFORM REPORT 1. 2. 3. 4. From the remote keypad: Press the Print key, or… From the PC-Display upper tool bar: Click the print button, or… From “File” choose print. Select “Scale to fit” or “shrink to fit” on the printer setup dialog box. NOTE: Printing from the screen requires wireless connection between the remote and the computer. Printing from saved and recalled files in Reviewer or Interpreter does not require a wireless connection. A color printer is required reproduce roduce the colored grid. Files may also be printed to PDF using Adobe to rep or PrimoPDF. PC-Display offers 2 choices for printing: 1 page or 2 pages. Each page includes 600 millimeters (200 per line) of ECG waveform data. This means that when the user chooses the Print option, then the printed page will include a waveform from the time the Print option was chosen backward. Each page will have the number of seconds of waveform according to the current ECG sweep rate at the time of printing. The following table will describe this further. 66 67 PC-Display Keyboard Shortcuts PC-Display has several keystroke combinations that can be used to quickly access certain functions using the computer’s keyboard. Most of these keystrokes involve a combination of keys being pressed at the same time. For instance, “Alt+H” denotes that the “Alt” key and the “H” key should be pressed at the same time to achieve the desired results. Likewise, “Cntl” denotes the Control key. Keystroke Sample print report [Note signal amplitude (1 mV) reference scale and time reference points on horizontal axis]. 68 Action Description Alt+C Connect Wireless Remote Toggles between PC-Display trying to connect to a remote or not. NOTE: When PC-Display is not trying to connect the “Edit Default Configuration” option is enabled beneath the “Tools” menu. Cntl+I Edit Patient Information Opens the window allowing the user to edit the current patient’s name or ID, client name, species, breed, age, sex and weight. If the session is being recorded then this recorded episode will reflect any changed values. Cntl+N New Patient Opens the window allowing the user to input the next patient’s name or ID, client name, species, breed, age, sex and weight. This will begin a new episode if the current session is already recording. Cntl+P Print Opens the print dialog window allowing the user to print the last 30 seconds of the current ECG strip (this same strip will be recorded into an episode as well). Cntl+G Show Grid Toggles the grid behind the ECG waveforms on or off. Cntl+M Show R-Wave Marker Toggles the triangular R-Wave markers that appear above each detected R-Wave of the ECG waveform on and off. Cntl+T Show Trend Graph Opens the Trend Graph window. Alt+S Set ECG Sweep Speed Allows the user to select which sweep speed to use for the ECG waveform. Alt+G Set ECG Gain Allows the user to select which gain to use for the ECG waveform. Cntl+E Edit Current Configuration Opens the configuration window allowing the user to edit many of the parameters of PC-Display’s current session without disconnecting the remote. Cntl+Q Enable QRS Tone Toggles on or off the tone made for each heart beat. Cntl+A Enable Alarm Tones Toggles on or off the tones made when an alarm limit has been exceeded. This can essentially act as a “silence alarm” feature. 69 Keystroke Action Description Alt+A Enable Alarms Toggles on or off the alarm limits for all values. Alt+R Review Stored Episode If a complete episode has been recorded in the current session then this will open the “Wireless Remote Review Episode” window. Cntl+R Record Patient Data Toggles on or off the recording of patient data to a stored episode. Alt+P Play/Halt Toggles on or off the progression of waveforms on the screen (similar to freezing or unfreezing the current display). Alt+M Mark Event Places an orange triangular mark at that moment on the ECG waveform for later reference. Additionally, if an episode is not already being recorded this will record a brief episode with the mark listed as an event. Cntl+H About PC-Display and Remote Opens the About window for PC-Display. If a remote is connected at the time then this window will also display the built-in parameters of this remote. ? View Manual Opens an online version of the user’s manual in a web browser. Chapter 4 Chapter 4 Reviewer Program Description NOTE: Files may also be opened with the optional Vmed Interpreter program if installed. Select the program you wish to open files while not connected to a PC-Display default configuration option under the wireless remote from the PC “Tools” menu. The Vmed Reviewer program is included with each Vmed wireless monitoring product and is also available free to any interested person in order to facilitate ECG interpretation by third party consultants. The Reviewer program performs the following functions: o Displays the recorded patient files where information recorded from Vmed wireless monitoring products may be stored automatically. o Allows archived ECG sweep, patient and episode data to be recalled for review, editing, measurement and printing. o Provides for the electronic measurement of ECG complexes. o Allows real-time playback of previously recorded ECG sweep data. o Makes available, through the Help menu, a table of normal ECG measurements for cats and dogs and guidelines for measuring ECG complexes. o Provides an easy method of summarizing and storing ECG measurements, vital signs and diagnostic notes. o Provides and easy way of sending email transmission of stored reports. o Displays the automatically recorded vital signs measurements. Modes of Monitor Recording ECG and related data are stored automatically in one of three available modes. Record modes are selected in the PC-Display Configuration window (with Auto Save checked). 70 71 1.. Continuous Recording Waveforms; Periodic Vial Signs (typically used in surgery monitoring or in exams) o Happens automatically upon wireless connection to the remote device. o Records vital signs periodically or upon initiation of an event (Print command, Alarm activation, or Marker event). o Continuous recording of ECG and CO2 waveforms for the duration of the monitoring session. 2. Periodic Vital Signs (typically used in surgery monitoring or recovery) o Happens automatically upon wireless connection to the remote device. o Records vital signs periodically or upon initiation of an event (Print command, Alarm activation, or marker event). o No waveforms recorded. 3. Manual Recording (Typically used in in exam room monitoring) o Activated with the Record Episode button on the PC-Display toolbar or on the remote keypad. o Will record vital signs only on event as long as “Periodic Vital Signs Only” is selected in the PC-Display default configuration. o Will record vital signs and ECG sweep (as well as CO2 waveform if enabled) if “Continuous Recording” is selected in the PC-Display default configuration. Using the Reviewer Program 1. Double-click the Reviewer icon on the desktop and the Reviewer window will open. 2. Click “File” then “Open Patient Episode…” on the upper toolbar and the window below will open: 72 pre-identified, patient files are stored numerically NOTE: If a patient is not pre by year, month and day. Patient data can be entered prior to, during, or after the monitoring procedure and edited within the Reviewer. Episodes are identified by date and time of the event. When “ECG “ECG ECG”” follows the episode ID, this indicates that an ECG/CO2 waveform is present rather than just vital signs. 3. Highlight the patient of interest and then the episode of interest for that patient as shown above and press OK. The next screen will appear: 73 2. Left click the mouse at the beginning point of your measurement, then drag the mouse to the right and up if amplitude is to be included (you can measure both time and amplitude by measuring at a diagonal). Note the red line stretching from the blue crosshairs in the above illustration. Place the blue crosshair at the end of the interval and the top of the amplitude and release the mouse button. The one step measurement will result in an interval and amplitude calculation if appropriate for that complex. NOTE: For best accuracy, increase the gain of the signal before beginning the measurement procedure. 3. Repeat the procedure in step 2 for each type of measurement. 4. Click the “Copy to Diagnostic Notes” button to drop your measurements into the diagnostics notes section of the report. Reviewer Toolbar 4 2 8 6 10 12 14 16 18 20 NOTE: This screen summarizes the patient file for the episode selected along with cursor measurement of the QRS complex. The measurements selected have been dropped into the diagnostics notes and comments box. Note the “red rubber band” vector and the measurement crosshairs above. Using the electronic cursor measurement feature 1 3 22 1. First click on the complex you wish to measure in the “Measurements” box at the top of the screen. Note: For a description of each complex, click on the “Help” menu in the upper toolbar. 9 7 24 11 13 25 Icon Descriptions 1. 2. 3. 4. 5. 6. 7. 8. 9. 10. 74 5 23 Open episode Save episode Save copy of episode Email episode Configure Reviewer Cut Copy Paste Print Shift ECG baseline up 5mm 75 15 17 19 21 11. 12. 13. 14. Shift ECG baseline down 5mm Reset baseline View “R” wave markers Play ECG view Reviewer Configuration Menu Description 14-19 allow you to scroll the entire recorded file to (NOTE: Video controls 14 the segment of interest.) 15. 16. 17. 18. 19. 20. 21. 22. 23. 24. 25. Patient Episode Directory: Select the directory where patient files are stored as recorded in PC-Display. This location must be the same as that selected in PC-Display. NOTE: Default location is “My Documents”. Pause ECG view Skip to beginning of ECG trace Skip ECG view backward Skip ECG view forward Skip to end of ECG trace View vitals events only About Reviewer Select waveforms to display Select chart speed Select gain Episode time Reviewer Configuration To configure different options within the Reviewer software, click on the “Configure Reviewer” toolbar button or select “Configure Vmed Reviewer…” from the Tools menu. The following window will appear: Saved Episode Directory: Patient Episode files by default will be saved in this directory when the “Save copy of episode” option is chosen. This can be very helpful if you prefer to frequently save episode copies into the directory of a network computer. Default ECG Strip Grid Color: You can change the color of the grid on the Reviewer screen. This also changes the color of the print report grid. Set Reviewer as the default episode viewer: Allows PC-Display to associate Vmed patient episode files with the Reviewer software (instead of the Interpreter software – only necessary if the Interpreter software is installed and Reviewer is preferred). Default Veterinarian Information: Used (for printing) the vet clinic information entered here instead of what was recorded with the original episode. Select Edit Default Veterinarian Information to change. Default CO2 Waveform Scale: Used for PC-VetGard+ only. Use 2% where capnograph amplitude is large. NOTE: Default setting is 1%. Manage Patient Episodes Directory Selecting this option opens the screen below: 76 77 The “Manage Patient Episodes” screen allows you to remove unwanted patients and episode files. To delete a patient, highlight the patient and press the “Delete Patient” button. To delete an episode, highlight that episode and press the “Delete Episode” button. NOTE: To delete episodes, you must first highlight a patient and then highlight the episodes to be deleted. Printing In order to print an episode either select “Print…” from the File menu or click the printer button on the toolbar. An ECG waveform will print to a single page. The length of ECG waveform depends on the selected sweep speed (i.e., 24 seconds of data at 25 mm/sec, 12 seconds of data at 50 mm/sec, etc.). The following window will open when the print command is initiated allowing you to make your selection: Figure 4 Default ECG Waveform Report includes hospital and patient information followed by twelve seconds of ECG waveform. Below is a sample printout where the first page is the ECG Waveform Report and the second page is the Event Summary Report. 78 79 Help Menu The following selections are available under the “Help” menu: • Internet Support Website: Hyperlinks to the Vmed service website. • Background on ECG Waveform Measurements (shown below) Instructions for measuring ECG complexes from the “Help” menu Figure 5 Default Event Summary Report includes vital vital signs, measurements and clinical comments. 80 81 • Display Canine ECG Normal Measurements • Display Feline ECG Normal Measurements Table of Normal ECG measurements for feline patients from the “Help” menu Figure 6 Table of Normal ECG measurements for canine patients from the “Help” menu. 82 Information in Figures 13, 14 and 15 are from Electrocardiography for the Small Animal Practitioner, Larry P. Tilley, DVM, DACVIM (Internal Medicine), Naomi L. Burtnick, MT (ASCP). “Made Easy Series”, Teton New Media. 83 Chapter 5 Chapter 5 Troubleshooting PC-Display SITUATION POSSIBLE CAUSE Cannot make Bluetooth connection with computer. • Weak batteries in wireless device • Improper Bluetooth discovery. • Bluetooth USB adapter not inserted into computer’s USB port. Bluetooth connection has range <50ft. • Low Batteries. • Signal must pass through high attenuation barrier such as concrete floor/walls or heavy metal objects. • Using built-n Bluetooth adapter with only 10 meter range. • Wireless device out of range of computer or behind signal attenuator. • Wireless device lost power. • Bluetooth device loose in USB port. • Computer turned off or PC-Display closed. Support and Troubleshooting Service and Support If you purchased directly from Vmed: Phone: FAX: Email: WEB: 800-926-9622 425-585-0231 [email protected] www.vmedtech.com Lost wireless connection with computer If you purchased from DVM Solutions: Phone: FAX: WEB: 866-373-9627 830-438-7041 www.dvmsolutions.com Cannot turn wireless device unit back on. Software Updates • Batteries are totally discharged. • User is pressing and holding power button. PC-Display can prompt users to check online for software updates if that feature is enabled in the Default Configuration. Access to the Vmed software download site is also available through the help menu on the upper toolbar. Users may also update all software programs by accessing www.vmedtech.com and navigating to “Downloads/Support”. There is no charge for software updates unless an install CD is required where there is a $15 charge. 84 85 CORRECTIVE ACTION • Check battery status on remote. • Re-initiate discovery procedure. • Verify that USB Bluetooth adapter is plugged into computer. • Determine if the Windows XP Service Pack 2 method of Bluetooth should be used over Bluetooth drivers that came with Bluetooth adapter. (See Chapter 1) • Update PC-Display software • Check battery status on remote. • Clear signal path. • Disable computer’s built-in Bluetooth and use the Bluetooth device provided with wireless product. • Update PC-Display software • Move toward computer or clear attenuating obstacle. • Cycle wireless device power switch • Recharge /Replace Batteries • Check Bluetooth device/USB connection. • Restart PC-Display program. • Update PC-Display software • Replace/recharge batteries. • Press and immediately release the power button to turn on. Appendix B Appendix A Appendix B Appendix A Computer Requirements and Specifications Computer Minimum Requirements Windows XP (Service Pack 2 or 3) • • • • • • • • CPU: 1 GHz. PC desktop, laptop or tablet computer MEMORY: 1 GB RAM (for 1-2 concurrent monitoring sessions) VIDEO: Minimum 64 MB Graphics Memory VIDEO RESOLUTION: 1024 x 768 Spare USB 1.1 port (for Bluetooth USB adapter, unless computer has built-in Bluetooth) CD Rom Drive or Internet Access 60 MB available hard disk space for program, plus approximately 100 Kbytes per file stored MAPI compliant E-Mail system such as Windows Live Mail, Microsoft Outlook or Outlook Express (for direct email feature of ECG Reviewer/Interpreter software). • .NET Framework 2.0. Windows Vista, Vista, Windows 7 or Windows 8.1: 8.1: • • • • • • • • CPU: 1 GHz. PC desktop, laptop or tablet computer MEMORY: 1.5 GB (for 1-2 concurrent monitoring sessions) VIDEO: 128 MB graphics memory VIDEO RESOLUTION: 1024 x 768 Spare USB 1.1 port (for Bluetooth USB adapter, unless computer has built-in Bluetooth) CD Rom Drive or Internet Access 60 MB available hard disk space for program, plus approximately 100 Kbytes per file stored MAPI compliant E-Mail system such as Windows Live Mail, Microsoft Outlook or Outlook Express (for direct email feature of ECG Reviewer/Interpreter software). • .NET Framework 2.0. Both 32-bit and 64-bit versions of Windows Vista, Windows 7 and Windows 8.1 are acceptable. 86 Software License SOFTWARE LICENSE AGREEMENT PLEASE READ THIS SOFTWARE LICENSE AGREEMENT CAREFULLY BEFORE DOWNLOADING OR USING THE SOFTWARE. BY CLICKING ON THE "I AGREE" AND THEN "NEXT >" BUTTONS, OPENING THE PACKAGE, INSTALLING THE PRODUCT, OR USING THE EQUIPMENT THAT CONTAINS THIS PRODUCT, YOU ARE CONSENTING TO BE BOUND BY THIS AGREEMENT. IF YOU DO NOT AGREE TO ALL OF THE TERMS OF THIS AGREEMENT, CLICK THE "DO NOT AGREE" AND "CANCEL" BUTTONS AND THE INSTALLATION PROCESS WILL NOT CONTINUE, RETURN THE PRODUCT TO THE PLACE OF PURCHASE FOR A FULL REFUND, OR DO NOT INSTALL THE PRODUCT. EXCEPT AS EXPRESSLY AUTHORIZED ABOVE, CUSTOMER SHALL NOT: COPY, IN WHOLE OR IN PART, SOFTWARE OR DOCUMENTATION; MODIFY THE SOFTWARE; REVERSE COMPILE OR REVERSE ASSEMBLE ALL OR ANY PORTION OF THE SOFTWARE; OR RENT, LEASE, DISTRIBUTE, SELL, OR CREATE DERIVATIVE WORKS OF THE SOFTWARE. Multiple-Users License Grant: Vmed Technology ("Vmed") and its suppliers grant to Customer ("Customer") a nonexclusive and nontransferable license to use the Vmed software ("Software") in object code form for installation onto a hard disk or other storage device on: (i) an unlimited number of computers in the Customer’s facility; or (ii) a single local area network in the Customer’s facility for either of the following purposes: (a) for use exclusively with Vmed wireless monitors; or (b) use of the Software by consultants and contractors of the Customer for purposes of aiding the customer in the interpretation of clinical information in patient files transferred by the Customer to said consultants or contractors for the purpose of aiding in medical diagnosis. Customer may only use the programs contained in the Software (i) in accordance with paragraph (a) above; or in the case of an evaluation or demonstration copies, those programs Customer is authorized to evaluate. EXCEPT AS EXPRESSLY AUTHORIZED ABOVE, CUSTOMER SHALL NOT: COPY, IN WHOLE OR IN PART, SOFTWARE OR DOCUMENTATION; MODIFY THE SOFTWARE; REVERSE COMPILE OR REVERSE ASSEMBLE ALL OR ANY PORTION OF THE SOFTWARE; OR RENT, LEASE, DISTRIBUTE, SELL, OR CREATE DERIVATIVE WORKS OF THE SOFTWARE. Customer agrees that aspects of the licensed materials, including the specific design and structure of individual programs, constitute trade secrets and/or copyrighted material of Vmed. Customer agrees not to disclose, provide, or otherwise make available such trade secrets or copyrighted material in any form to any third party without the prior written consent of Vmed. Customer agrees to implement reasonable security measures to protect such trade secrets and copyrighted material. Title to Software and documentation shall remain solely with Vmed. LIMITED WARRANTY. Vmed warrants that for a period of ninety (90) days from the date of shipment from Vmed or its distributor: (i) the media on which the Software is furnished will be free of defects in materials and workmanship under normal use; and (ii) the Software substantially conforms to its published specifications. Except for the foregoing, the Software is provided AS IS. This limited warranty extends only to Customer as the original licensee. Customer's exclusive remedy and the entire liability of Vmed and its suppliers under this limited warranty will be, at Vmed or its service center's option, repair, replacement, or refund of the Software if reported (or, upon request, returned) to the party supplying the Software to Customer. In no event does Vmed warrant that the Software is error free or that Customer will be able to operate the Software without problems or interruptions. 87 This warranty does not apply if the software (a) has been altered, except by Vmed, (b) has not been installed, operated, repaired, or maintained in accordance with instructions supplied by Vmed, (c) has been subjected to abnormal physical or electrical stress, misuse, negligence, or accident, or (d) is used in hazardous activities. DISCLAIMER. EXCEPT AS SPECIFIED IN THIS WARRANTY, ALL EXPRESS OR IMPLIED CONDITIONS, REPRESENTATIONS, AND WARRANTIES INCLUDING, WITHOUT LIMITATION, ANY IMPLIED WARRANTY OF MERCHANTABILITY, FITNESS FOR A PARTICULAR PURPOSE, NONINFRINGEMENT OR ARISING FROM A COURSE OF DEALING, USAGE, OR TRADE PRACTICE, ARE HEREBY EXCLUDED TO THE EXTENT ALLOWED BY APPLICABLE LAW. IN NO EVENT WILL VMED OR ITS SUPPLIERS BE LIABLE FOR ANY LOST REVENUE, PROFIT, OR DATA, OR FOR SPECIAL, INDIRECT, CONSEQUENTIAL, INCIDENTAL, OR PUNITIVE DAMAGES HOWEVER CAUSED AND REGARDLESS OF THE THEORY OF LIABILITY ARISING OUT OF THE USE OF OR INABILITY TO USE THE SOFTWARE EVEN IF VMED OR ITS SUPPLIERS HAVE BEEN ADVISED OF THE POSSIBILITY OF SUCH DAMAGES. In no event shall Vmed's or its suppliers' liability to Customer, whether in contract, tort (including negligence), or otherwise, exceed the price paid by Customer of the Software or wireless monitors. The foregoing limitations shall apply even if the above-stated warranty fails of its essential purpose. SOME STATES DO NOT ALLOW LIMITATION OR EXCLUSION OF LIABILITY FOR CONSEQUENTIAL OR INCIDENTAL DAMAGES. The above warranty DOES NOT apply to any beta software, any software made available for testing or demonstration purposes or any temporary software modules. All such software products are provided AS IS without any warranty whatsoever. This License is effective until terminated. Customer may terminate this License at any time by destroying all copies of Software including any documentation. This License will terminate immediately without notice from Vmed if Customer fails to comply with any provision of this License. Upon termination, Customer must destroy all copies of Software. Software, including technical data, is subject to U.S. export control laws, including the U.S. Export Administration Act and its associated regulations, and may be subject to export or import regulations in other countries. Customer agrees to comply strictly with all such regulations and acknowledges that it has the responsibility to obtain licenses to export, re-export, or import Software. Appendix C Appendix C Discontinued Monitors Vmed has discontinued two monitors but still supports both. The PC-Vet ECG monitor and the PC-VetGard(I) ECG/SpO2 monitor are no longer manufactured. Later versions of the PC-Vet ECG monitor are compatible with PC-Display, however earlier versions may require the original application software called “PC-Vet” which has fewer capabilities. Owners of the PC-Vet can return the device to Vmed to be updated and made compatible with PC-Display. The original PC-Vet software can be downloaded from www.vmedtech.com (you may need to contact customer support for assistance). The original VetGard is fully compatible with PC-Display. For questions regarding compatibility, telephone Vmed customer support at 800-2967763. This License shall be governed by and construed in accordance with the laws of the State of Washington, United States of America, as if performed wholly within the state and without giving effect to the principles of conflict of law. If any portion hereof is found to be void or unenforceable, the remaining provisions of this License shall remain in full force and effect. This License constitutes the entire License between the parties with respect to the use of the Software. PC-Vet 88 PC-VetGard (I) 89 Installation, Setup and User Instructions PC-Display Version 2.5 PC-Display Wireless Monitoring Software Vmed Technology 914 164th Street SE Mill Creek, WA 98012 Phone 800-926-9622 • Fax 425-585-0231 [email protected] www.vmedtech.com 90 91