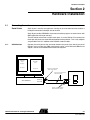
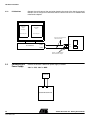
1
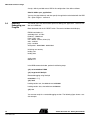
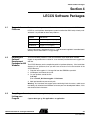
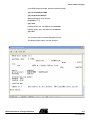
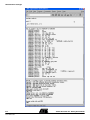
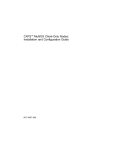
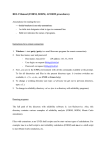
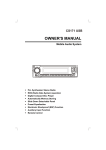
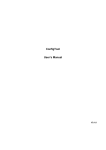
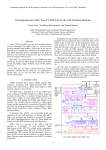
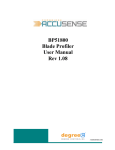
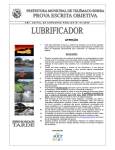
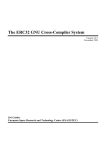
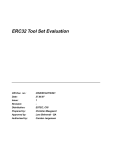
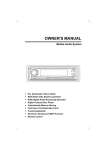
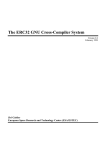
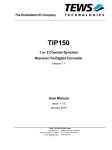
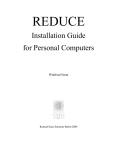
TSC695 Evaluation Kit .............................................................................................. Getting Started Guide -2 7831A–AERO–04/09 TSC695 Evaluation Kit - Getting Started Guide -4 7831A–AERO–04/09 TSC695 Evaluation Kit - Getting Started Guide Table of Contents Getting Started...................................................................................... 1-1 1.1 1.2 1.3 1.4 TSC695 Evaluation kit contents ................................................................1-1 CDROM contents ......................................................................................1-1 Minimum hardware configuration ..............................................................1-2 Getting started with the evaluation kit .......................................................1-2 Hardware Installation ............................................................................ 1-3 2.1 2.2 Connecting the serial links ........................................................................1-3 Connecting the power supply....................................................................1-4 Software Configuration ......................................................................... 1-5 3.1 3.2 3.3 3.4 3.5 3.6 Supported platforms..................................................................................1-5 Installing the software development package ...........................................1-5 Compiling and linking your program..........................................................1-5 Opening the application terminal window..................................................1-5 Transfering the executable file to the board RAM.....................................1-5 Remote debugging your program .............................................................1-6 Using the TSC695 VHDL Model ........................................................... 1-9 Where to go from here ........................................................................ 1-11 TSC695 Evaluation Kit - Getting Started Guide i 7831A–AERO–04/09 -ii 7831A–AERO–04/09 TSC695 Evaluation Kit - Getting Started Guide Getting Started Section 1 Getting Started 1.1 TSC695 Evaluation Kit Contents The TSC695 starter kit contains the following parts: Evaluation board equipped with: – TSC695 processor – 512Kbytes FLASH containing the rdbmon monitor program – 4Mbytes RAM Cables and adapters – RS232C standard serial straight thru cables DB9/DB9 – Null-modem adpaters DB9/DB9 – RS232C serial adapters DB9/DB25 – DC power cable TSC695 Starter-kit’s CD-ROM Documentation – This Getting Started Guide 1.2 CD-ROM Contents Launch “welcome.htm” file to have a graphic overview of CD-ROM contents. The CDROM is organized as follows: /bsdl : contains the TSC695 BSDL file /code_example : contains the code source of a short application displaying an “hello word” string /doc : contains datasheets, specifications and user’s guides in pdf format /erc32ccs : contains the software packages of ERC32 GNU Cross-Compiler System /graf : contains images files /html : contains html files /leccs : contains the software packges of LEON/ERC32 GNU Cross-Compiler System /patches : contains files to patch the CCS packages /vhdl : contains the TSC695 VHDL model and related files TSC695 Evaluation Kit - Getting Started Guide 1-1 7831A–AERO–04/09 Getting Started CD-ROM updates may be downloaded from : https://www.atmel-nantes.fr/aedos/ It’s necessary to get a User login and Password to access this web site. They can be requested through our hotlines, by sending an email providing the following requester’s data : - First name - Last name - Company name - Email address - Starter-kit name or reference The hotlines adresses are available from URL : http://www.atmel.com/products/radhard/ 1.3 Minimum Hardware Configuration The following hardware must be provided by the user to have a complete working configuration : - A SUN or PC machine with 2 available serial ports. USB / RS232C dongles can be used on PC platforms to get additionnal COM ports. - A 5V DC power supply capable of supplying at least a current of 1A 1.4 Getting Started with the Evaluation Kit To get the software running on the TSC695 evaluation board, you will need to follow the steps below (detailed in the next paragraphs) : 1. Connect the evaluation board serial connectors A and B to the host machine serial ports. 2. Connect the evaluation board to the DC power supply. 3. Install the software development package from the CDROM on your machine. 4. Compile and link your program. 5. Transfer your program executable file to the evaluation board RAM. 6. Debug/Run your program on board with GDB and its graphical user interface DDD. 1-2 7831A–AERO–04/09 TSC695 Evaluation Kit - Getting Started Guide Hardware Installation Section 2 Hardware Installation 2.1 Connecting the Serial Links The evaluation board provides two serial ports. Serial A port is used by the application running on the evaluation board to establish a full-duplex connection and output data to the host. Serial B port enables RDBMON, the on-board monitor program, to communicate with GDB application running on the host. The host needs to have two available serial ports. It can be SUN or PC machines, but the shape and pinout are rather different between those platforms. This is why adapters are provided in this kit in addition to the RS232C standard cables. 2.1.1 SUN Machines Connect the serial ports of the evaluation board to the ports of the host by means of RS232C serial straight thru DB9 male/female cables, serial DB9 male/DB25 male adpater, and serial null-modem DB9 male/female adpaters. application output messages uses port A DDD/GDB window uses port B RS232C serial DB9 male / DB25 female adpater RS232C serial straight thru DB9 male/female TSC695 Evaluation Kit TSC695 SUN Machines Serial A J10 Serial B J11 RDBMON RS232C serial null-modem DB9 male/female adapters TSC695 Evaluation Kit - Getting Started Guide 2-3 7831A–AERO–04/09 Hardware Installation 2.1.2 PC Machines Connect the serial ports of the evaluation board to the ports of the host by means of RS232C serial straight thru DB9 male/female cables and serial null-modem DB9 male/female adapters application DDD/GDB window output messages uses Com1 port uses Com2 port RS232C serial straight thru DB9 male/female TSC695 Evaluation Kit TSC695 PC Platform Com1 J10 Com2 J11 RDBMON RS232C serial null-modem DB9 male/female adapters 2.2 Connecting the Power Supply Connect the board to a 5V-2A DC power supply as follows: J28-C to VCC, J20-C to GND. 5V-2A DC + - J28 J20 TSC695 Evaluation Kit 2-4 7831A–AERO–04/09 TSC695 Evaluation Kit - Getting Started Guide ERC32CCS Software Package Section 3 ERC32CCS Software Package 3.1 Supported Platforms The Software Package is available from \erc32ccs folder of the starter-kit CD-ROM ERC32CCS is a set of tools supporting two host platforms : – SPARC Solaris 2.5.1(or higher) – x86 linux (libc5). Further information is provided in erc32ccs-2.0.7.pdf document supplied in \erc32\doc\ directory of erc32ccs-2.0.7-linux.tar.gz package 3.2 Installing the Software Development Package for Solaris The ERC32CCS directory tree is compiled to reside in /opt/gnu on Solaris platforms. If the installation directory is not /opt/gnu, then you will have to create a link to the location of the ERC32CCS directory after installation. 1. Copy the erc32ccs-2.0.6-solaris.tar.gz file from the CDROM to your disk. 2. Uncompress and extract the tar file. 3. On your platform, create the link: Solaris1>cd /opt/gnu Solaris1>ln -s <install_dir>/erc32ccs-2.0.6-solaris/erc32 4. Add /opt/gnu/erc32/bin to your search path. 3.3 3.4 Compiling and Linking your Program Compile and link your application program as follows: Solaris1>sparc-rtems-gcc -g -O3 application.c -o application Opening the You must open a terminal window on the Solaris platform so that your application can display results. You do this with the command: Application Terminal Window Solaris1>xterm -e tip -19200 /dev/ttya & 3.5 Transfering the Executable File to the Board RAM You may load and debug your application through GDB only, but working with GDB through DDD is much more easier. To start DDD with the debugger, use: Solaris1>ddd --debugger sparc-rtems-gdb --no-data-window --attach-source-window <your_application> TSC695 Evaluation Kit - Getting Started Guide 3-5 7831A–AERO–04/09 ERC32CCS Software Package A script, dddx is provided to start DDD in this configuration. Use dddx as follows: Solaris1>dddx <your_application> You may also type dddx only and then specify the application to be loaded with the DDD File > Open Program... command. 3.6 Remotely Debugging your Program You should now have two windows opened to debug your application: a terminal window and a DDD one. Reset the board with the S1 RESET switch. The terminal window should display: ERC32 boot loader v1.1 watchdog clock : 3.7 Mhz Baudrate : 19200 baud Prom : 512K, 4 ws ram : 4069 K, 2 banks, 00 ws (r/w) edac : enabled parity : enabled write-protect : 0x023f9000 - 0x023fadc0 initialising ram memory loading .text loading .data starting mon rdbmon v1.1 In the DDD command window, perform the following steps: (gdb) set remotebaud 19200 (gdb) target erc32 /dev/ttyb Remote debugging using /dev/ttyb 0x2000000 in ?? () (gdb) load Loading section .text, size 0x69a0 vma 0x2000000 Loading section .data, size 0x530 vma 0x20069a0 (gdb) run You are now ready for a remote debugging session. The following figure shows a session example: 3-6 7831A–AERO–04/09 TSC695 Evaluation Kit - Getting Started Guide ERC32CCS Software Package TSC695 Evaluation Kit - Getting Started Guide 3-7 7831A–AERO–04/09 ERC32CCS Software Package 3-8 7831A–AERO–04/09 TSC695 Evaluation Kit - Getting Started Guide LECCS Software Packages Section 4 LECCS Software Packages 4.1 Supported Platforms The Software Packages are available from \leccs folder of the starter-kit CD-ROM LECCS is a multi-platform development system based on the GNU family of freely available tools. It is provided for three host platforms : Platform OS Version Linux / x86 Linux-2.2.x, glibc-2.2 (or higher) Solaris solaris-2.7 (or higher), gunzip MS Windows Cygwin-1.1.7 (or higher) Further information is provided in leccs-1.1.1.pdf document supplied in \rtems\doc\tools\ directoty of leccs-docs-tools-1.1.tar.gz package 4.2 Installing the Software Development Packages for MS Windows To run on Windows platforms, Cywin unix emulation layer needs to be installed. Cygwin is not provided in this starter-kit. It can be freely installed from www.cygwin.com web site. The LECCS directory tree is compiled to reside in /opt/rtems directory . If the installation directory is not /opt/rtems, then you will have to create a link to the location of the LECCS directory. 1. Copy the leccs-cygwin-1.1.5.3.tar.gz file from the CDROM to your disk. 2. Uncompress and extract the tar file. 3. On your platform, create the link: $ cd /opt $ ln -s <install_dir>/leccs-cygwin-1.1.5.3/rtems 4. Add /opt/rtems/bin to your search path. Warning : As Linux does not support paths containing blank characters, avoid to use the Home path inherited from Windows to locate your own development folders, if this one contains blank characters. 4.3 Compiling and Linking your Program Compile and link your application program as follows: $ sparc-rtems-gcc -g -O3 application.c -o application TSC695 Evaluation Kit - Getting Started Guide 4-9 7831A–AERO–04/09 LECCS Software Packages 4.4 Opening the You must open an Hyperterminal Window so that your application can display results. Application After launching Hyperterminal, select the appropriate COM port number and use the folTerminal Window lowing port settings : - Bits per second : 19200 - Data bits : 8 - Parity : None - Stop bits : 1 - Flow control : None 4.5 Transfering the Executable File to the Board RAM You may load and debug your application through GDB only, but working with GDB through DDD is much more easier. To start DDD with the debugger, use: $ ddd --debugger sparc-rtems-gdb --attach-window <your_application> You may also type only : $ ddd --debugger sparc-rtems-gdb --attach-window and then specify the application to be loaded with the DDD File > Open Program... command. 4.6 Remotely Debugging your Program You should now have two windows opened to debug your application: a terminal window and a DDD one. Reset the board with the S1 RESET switch. The terminal window should display: ERC32 boot loader v1.1 watchdog clock : 3.7 Mhz Baudrate : 19200 baud Prom : 512K, 4 ws ram : 4069 K, 2 banks, 00 ws (r/w) edac : enabled parity : enabled write-protect : 0x023f9000 - 0x023fadc0 initialising ram memory loading .text loading .data starting mon rdbmon v1.1 4-10 7831A–AERO–04/09 TSC695 Evaluation Kit - Getting Started Guide LECCS Software Packages In the DDD command window, perform the following steps: (gdb) set remotebaud 19200 (gdb) target erc32 /dev/ttyb Remote debugging using /dev/ttyb 0x2000000 in ?? () (gdb) load Loading section .text, size 0x69a0 vma 0x2000000 Loading section .data, size 0x530 vma 0x20069a0 (gdb) cont You are now ready for a remote debugging session. The following figure shows a session example : TSC695 Evaluation Kit - Getting Started Guide 4-11 7831A–AERO–04/09 LECCS Software Packages 4-12 7831A–AERO–04/09 TSC695 Evaluation Kit - Getting Started Guide Using the TSC695 VHDL Model Section 5 Using the TSC695 VHDL Model The starter kit contains a precompiled VHDL model of the TSC695 device. The model has been compiled for use with the ModelSim V5.2e VHDL simulator. The model is already back-annotated by a SDF file in typical conditions (5V, 25C). Before using the model, you must copy the VITAL libraries and the modelsim.ini file from the CDROM; then, modify the modelsim.ini file so that it fits with the libraries installation directory path. For the VHDL model to operate properly, you must force some internal nets for a few cycles. A bus called D_INIT (33 bits wide) is declared in the model entity. This bus is for the TSC695 VHDL model initialization purpose only. There is no D_INIT bus on the device. When writing your VHDL test bench or the VHDL description of the TSC695 hardware environment, you must declare a S_D_INIT 33-bit wide std_logic_vector signal that you will connect to the D_INIT one in the instanciation part of your VHDL design. You then add the following three lines to your startup.do file, or you keep them in a standalone file that you load on demand (but always at the very beginning of the simulation session). force -freeze /<test_bench_entity>/S_D_INIT 16#0 run <10 cycles periods> force -freeze /<test_bench_entity>/S_D_INIT 16#Z If the system clock period is 100ns, the run statement is: run 1000ns. S_D_INIT is a suggestion for the signal name. You may use any other signal name. TSC695 Evaluation Kit - Getting Started Guide 5-13 7831A–AERO–04/09 Using the TSC695 VHDL Model 5-14 7831A–AERO–04/09 TSC695 Evaluation Kit - Getting Started Guide Where to go from here Section 6 Where to go from here The /opt/.../doc folders contains getting started guides and the DDD, GDB and GCC manuals in pdf format. You should also read the TSC695 User’s Manual and Data Sheet as well as the evaluation board User’s Manual which describes the numerous capabilities of the evaluation hardware. TSC695 Evaluation Kit - Getting Started Guide 6-15 7831A–AERO–04/09 Where to go from here 6-16 7831A–AERO–04/09 TSC695 Evaluation Kit - Getting Started Guide Atmel Corporation 2325 Orchard Parkway San Jose, CA 95131, USA Tel: 1(408) 441-0311 Fax: 1(408) 487-2600 Regional Headquarters Europe Atmel Sarl Route des Arsenaux 41 Case Postale 80 CH-1705 Fribourg Switzerland Tel: (41) 26-426-5555 Fax: (41) 26-426-5500 Asia Room 1219 Chinachem Golden Plaza 77 Mody Road Tsimshatsui East Kowloon Hong Kong Tel: (852) 2721-9778 Fax: (852) 2722-1369 Japan 9F, Tonetsu Shinkawa Bldg. 1-24-8 Shinkawa Chuo-ku, Tokyo 104-0033 Japan Tel: (81) 3-3523-3551 Fax: (81) 3-3523-7581 Atmel Operations Memory 2325 Orchard Parkway San Jose, CA 95131, USA Tel: 1(408) 441-0311 Fax: 1(408) 436-4314 Microcontrollers 2325 Orchard Parkway San Jose, CA 95131, USA Tel: 1(408) 441-0311 Fax: 1(408) 436-4314 La Chantrerie BP 70602 44306 Nantes Cedex 3, France Tel: (33) 2-40-18-18-18 Fax: (33) 2-40-18-19-60 ASIC/ASSP/Smart Cards Zone Industrielle 13106 Rousset Cedex, France Tel: (33) 4-42-53-60-00 Fax: (33) 4-42-53-60-01 RF/Automotive Theresienstrasse 2 Postfach 3535 74025 Heilbronn, Germany Tel: (49) 71-31-67-0 Fax: (49) 71-31-67-2340 1150 East Cheyenne Mtn. Blvd. Colorado Springs, CO 80906, USA Tel: 1(719) 576-3300 Fax: 1(719) 540-1759 Biometrics/Imaging/Hi‐Rel MPU/ High Speed Converters/RF Datacom Avenue de Rochepleine BP 123 38521 Saint-Egreve Cedex, France Tel: (33) 4-76-58-30-00 Fax: (33) 4-76-58-34-80 1150 East Cheyenne Mtn. Blvd. Colorado Springs, CO 80906, USA Tel: 1(719) 576-3300 Fax: 1(719) 540-1759 Scottish Enterprise Technology Park Maxwell Building East Kilbride G75 0QR, Scotland Tel: (44) 1355-803-000 Fax: (44) 1355-242-743 Literature Requests www.atmel.com/literature Disclaimer: Atmel Corporation makes no warranty for the use of its products, other than those expressly contained in the Company’s standard warranty which is detailed in Atmel’s Terms and Conditions located on the Company’s web site. The Company assumes no responsibility for any errors which may appear in this document, reserves the right to change devices or specifications detailed herein at any time without notice, and does not make any commitment to update the information contained herein. No licenses to patents or other intellectual property of Atmel are granted by the Company in connection with the sale of Atmel products, expressly or by implication. Atmel’s products are not authorized for use as critical components in life support devices or systems. © Atmel Corporation 2003. All rights reserved. Atmel ® and combinations thereof, aaa ®, bbb ® and ccc ® are the registered trademarks, and aaa ™, bbb ™ and ccc ™ are the trademarks of Atmel Corporation or its subsidiaries. aaa ®, bbb ® and ccc ® are the registered trademarks, and aaa ™, bbb ™ and ccc ™ are the trademarks of xxxx Company. Other terms and product names may be the trademarks of others. Printed on recycled paper. 7831A–AERO–04/09 /xM -2 7831A–AERO–04/09 TSC695 Evaluation Kit - Getting Started Guide