1
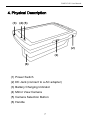
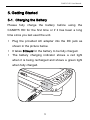
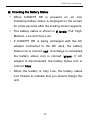
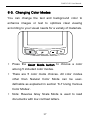
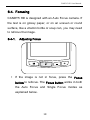
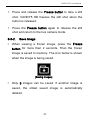
Table of Contents 1. What is CANDY5 HD? .......................................... 4 2. Safety Precautions ................................................ 5 3. What’s in the Box? ................................................ 6 4. Physical Description.............................................. 7 5. Getting Started ..................................................... 9 5-1. Charging the Battery ...................................... 9 5-2. Removing the Screen Protection Film ............ 10 5-3. How to Use the Handle .................................10 5-4. How to Use the Leg ...................................... 11 5-5. How to Use the Reading Stand ..................... 12 5-6. How to Connect the Wrist Strap .................... 13 6. How to Use CANDY5 HD ..................................... 14 6-1. Power On/Off ................................................ 14 6-2. Zoom Up/Down ............................................. 16 6-3. Changing Color Modes .................................17 6-4. Focusing ....................................................... 18 6-4-1. Adjusting Focus ..................................18 6-4-2. Changing Focus Modes ....................... 19 6-5. Freeze/Save Image ....................................... 20 6-5-1. Freeze Image ...................................... 20 6-5-2. Save Image......................................... 21 6-5-3. Viewing Saved Images ........................ 22 6-6. Mirror View ................................................... 23 6-7. Using Various Color Modes ........................... 24 6-7-1. Setting the Color Modes ...................... 25 6-7-2. Changing the Color ............................. 26 6-7-3. Deactivating Color Modes.................... 27 6-7-4. Reactivating Color Modes.................... 29 6-8. Clock ............................................................ 30 6-8-1. Checking the Time .............................. 30 6-8-2. Setting the Time ..................................30 6-9. Other Functions ............................................ 32 6-9-1. Controlling LCD Brightness.................. 32 6-9-2. LED Light Setting ................................ 33 6-9-3. Power Saving Mode ............................ 34 6-9-4. Turning Beep Tones On/Off ................. 36 6-9-5. Initialization ......................................... 37 7. Trouble Shooting ................................................. 38 8. Warranty.............................................................. 42 CANDY5 HD User Manual 1. What is CANDY5 HD? CANDY5 HD is a handheld electronic video magnifier that helps people with low vision to read printed materials like personal mail, magazines, newspapers, restaurant menus, product catalogs, medicine bottles, grocery items and much more. In addition to magnifying, CANDY5 HD can change the text and background color to enhance the image contrast for a more comfortable reading. You can select among 5 color modes. The continuous digital zoom magnification feature allows you to change the magnification level from 1.0x to 22x. The Auto Focus feature helps to keep a sharp image while moving the camera across the line of print. CANDY5 HD’s ergonomic three-position handle is designed to be held comfortably by either right-handed or left-handed users. Hold the handle in the center position or at a 45-degree angle. 4 CANDY5 HD User Manual 2. Safety Precautions Protect yourself and CANDY5 HD by observing the following precautions. Do not plug the AC adapter into a faulty electrical outlet. Doing so may cause electrical shock or fire. Do not touch the AC adapter with wet hands. Only use the AC adapter provided with CANDY5 HD. Using another AC adapter may damage the device. Do not use the CANDY5 HD in a moisture-rich environment such as a bathroom or shower. This is to prevent damage caused by moisture getting into the device. Do not press down on the screen or lay heavy objects on CANDY5 HD. This may cause damage to the CANDY5 HD, particularly, the LCD. Do not attempt to disassemble or repair the CANDY5 HD yourself. Serious damage may occur to the device and the warranty will be voided. 5 CANDY5 HD User Manual The battery is consumable and its life may be reduced after 6 months of use. Do not use CANDY5 HD under direct sunlight or in a very hot or cold environment, as the image may not be displayed accurately on the LCD screen. Do not use this device below 0°C or above 40°C. 3. What’s in the Box? (1) CANDY5 HD (2) AC Adapter (3) Carrying Case (4) Reading Stand (5) Wrist Strap (6) Screen Cleaning Cloth (7) User Manual 6 CANDY5 HD User Manual 4. Physical Description (3) (4) (5) (2) (1) (6) (1) Power Switch (2) DC Jack (connect to a AC adapter) (3) Battery Charging Indicator (4) Mirror View Camera (5) Camera Selection Button (6) Handle 7 CANDY5 HD User Manual (11) (7) (8) (9) (10) (12) (13) (14) (7) Color Mode Button (11) Freeze Button (8) Focus Button (12) LED Lights (9) Zoom Down Button (13) Leg (10) Zoom Up Button (14) Main Camera 8 CANDY5 HD User Manual 5. Getting Started 5-1. Charging the Battery Please fully charge the battery before using the CANDY5 HD for the first time or if it has been a long time since you last used the unit. Plug the provided AC adapter into the DC jack as shown in the picture below. It takes 3 hours for the battery to be fully charged. The battery charging indicator shows a red light when it is being recharged and shows a green light when fully charged. 9 CANDY5 HD User Manual 5-2. Removing the Screen Protection Film When the CANDY5 HD is shipped, a protective film covers the LCD screen to prevent scratch or damage during transit. Remove this film before using CANDY5 HD. 5-3. How to Use the Handle CANDY5 HD is ergonomically-designed with three handle positions so it can be comfortably held by both lefthanded and right-handed users. Hold the unit with one hand while rotating the handle with your other hand. See the diagram above. You can feel the handle “click” into each of the three positions. See the diagram next page. 10 CANDY5 HD User Manual 5-4. How to Use the Leg CANDY5 HD has a foldable leg on its underside, on the edge opposite of the handle. Unfold the leg to read books or newspapers more comfortably. 11 CANDY5 HD User Manual 5-5. How to Use the Reading Stand CANDY5 HD can be laid on the reading stand to read books or newspapers more comfortably. Place the CANDY5 HD on the reading stand so that the folding handle lies down in the open rectangular space in the reading stand. When CANDY5 HD is laid on the reading stand, the magnification level is from 2.5x to 10x. ※ If the material is glossy, you may experience a glare and partial distortion of the image on parts of the screen. 12 CANDY5 HD User Manual 5-6. How to Connect the Wrist Strap There are two holes as shown in the diagram below. If you are right handed, connect the wrist strap to the hole under the Color Mode button. If you are left handed, connect the wrist strap to the hole under the Zoom Up button. 13 CANDY5 HD User Manual 6. How to Use CANDY5 HD 6-1. Power On/Off To power on, slide the Power switch to the right. The magnified image is displayed in about 3 seconds. To power off, slide the Power switch to the right again. 14 CANDY5 HD User Manual ※ Checking the Battery Status When CANDY5 HD is powered on, an icon indicating battery status is displayed on the screen for a few seconds after the loading screen appears. The battery status is shown in 5 levels: Full, High, Medium, Low and Very Low. If CANDY5 HD is being recharged with the AC adapter connected to the DC Jack, the battery status icon is colored ‘red’. If recharge is completed, the battery status icon is colored ‘green’. If AC adapter is disconnected, the battery status icon is colored ‘blue’ When the battery is Very Low, the battery status icon flickers to indicate that you should charge the unit. 15 CANDY5 HD User Manual 6-2. Zoom Up/Down You can change the magnification level to suit your visual needs and comfort. Press the Zoom Up button to increase the magnification level. Press the Zoom Down button to decrease the magnification level. 16 CANDY5 HD User Manual 6-3. Changing Color Modes You can change the text and background color to enhance images or text to optimize clear viewing according to your visual needs for a variety of materials. Press the Color Mode button to choose a color among 5 included color modes. There are 5 color mode choices. All color modes other than Natural Color Mode can be userdefinable as explained in section ‘6-7 Using Various Color Modes’. Note: Reverse Gray Scale Mode is used to read documents with low contrast letters. 17 CANDY5 HD User Manual 6-4. Focusing CANDY5 HD is designed with an Auto Focus camera. If the text is on glossy paper, or on an uneven or round surface, like a vitamin bottle or soup can, you may need to refocus the image. 6-4-1. Adjusting Focus If the image is not in focus, press the Focus button to refocus. The Focus button works in both the Auto Focus and Single Focus modes as explained below. 18 CANDY5 HD User Manual 6-4-2. Changing Focus Modes You can switch to the Single Focus Mode if you want to try manually focusing on the image or switch to the Auto Focus Mode if you want CANDY5 HD to focus automatically. Single Focus Mode While in Auto Focus Mode, press the Focus button while holding the Freeze [Single Focus] button, to activate the Single Focus Mode. While in Single Focus Mode, the CANDY5 HD will focus only when you press the Focus button. 19 CANDY5 HD User Manual Auto Focus Mode While in Single Focus Mode, press the Focus button while holding the Freeze [Auto Focus] button, to activate the Auto Focus Mode. While in Auto Focus Mode, the CANDY5 HD will focus on the image automatically. Note: The default setting is Auto Focus Mode. 6-5. Freeze/Save Image 6-5-1. Freeze Image There are two Freeze buttons: one on the side of the LCD screen and the other on the handle. 20 CANDY5 HD User Manual Press and release the Freeze button to take a still shot. CANDY5 HD freezes the still shot when the button is released. Press the Freeze button again to release the still shot and return to the live camera mode. 6-5-2. Save Image When viewing a frozen image, press the Freeze button for more than 2 seconds. Then the frozen image is saved to memory. The icon below is shown when the image is being saved. [Saving Images] Only 5 images can be saved. If another image is saved, the oldest saved image is automatically deleted. 21 CANDY5 HD User Manual 6-5-3. Viewing Saved Images Press the Color Mode button and Focus button together to view the saved images. If you then continually press the Focus button, you can cycle through the saved images in the order in which they were saved. If there are no saved images, a “No Saved Images” icon is displayed. [No Saved Images] While viewing a saved image, you can magnify it by pressing the Zoom Up button. To close viewing of saved images, press the Color Mode button and Focus button together once again. 22 CANDY5 HD User Manual 6-6. Mirror View CANDY5 HD offers a unique Mirror View camera. Press the Camera Selection button to switch the camera from the reading camera to the Mirror View camera. The icon below is shown for 1 second before switching the cameras. [Camera switched] When you switch to the Mirror View camera, only the Zoom Up, Zoom Down, Freeze, and Power switch may still be used. However, the image will be a reflection 23 CANDY5 HD User Manual rather than what is underneath the camera when viewing text or photos. To switch back to the reading camera, press the Camera Selection button again. 6-7. Using Various Color Modes You can select the color combination that best meets your visual needs. You can also delete color modes which are not useful for you. There are 5 color modes included by default. - Natural Color Mode - (Selection 1) White on Black - (Selection 2) Black on White - (Selection 3) Reverse Grayscale - (Selection 4) Yellow on Black To cycle through the color modes, press the Color Mode button. 24 CANDY5 HD User Manual 6-7-1. Setting the Color Modes All color modes can be modified except for Natural Color Mode. Press the Color Mode button for more than 3 seconds and the “Set Color Mode Window” appears. In this window, you can perform the following functions. Next mode Previous mode Mode to change Cancel setting [Set Color Mode Window] Move to the mode you want to select by using the Zoom Up button and Zoom Down button. The number displayed on the screen indicates the number of the currently selected mode in the list of 25 CANDY5 HD User Manual available modes. Press the Color Mode button to select the mode to change or press the Camera Selection button to get back to the live camera mode. 6-7-2. Changing the Color The “Color Setting Window” appears when the mode to change is selected. Deactivate Change background color Change text color Save setting Cancel setting Press the [Color Setting Window] Zoom Up button to change the background color. Press the Zoom Down button to change the text color. You can choose among 10 colors: Black, White, 26 CANDY5 HD User Manual Yellow, Blue, Green, Red, Magenta, Cyan, Gray scale, Reverse Gray scale. The background color and text color cannot be the same. If they are the same, they are not displayed on the screen. Press the Color Mode button when your desired color combination is displayed. Your adjustment is then saved as a selectable color mode. And you are returned to the “Set Color Mode Window”. 6-7-3. Deactivating Color Modes Deactivate color modes which are not useful to you, and leave only those you frequently use. Press the Color Mode button for more than 3 seconds. The “Set Color Mode Window” appears. Use the Zoom Up or Zoom Down button to navigate to the color mode you wish to deactivate and press the Color Mode button. Note: Color mode number 1 is always activated. Press the Freeze button to deactivate the selected 27 CANDY5 HD User Manual color mode. You are returned to the “Set Color Mode Window”. Deactivation is displayed as shown in the below picture. Press the Camera Selection button to get back to the live camera mode. 28 CANDY5 HD User Manual 6-7-4. Reactivating Color Modes Reactivate color modes which you need to use again. Press and hold the Color Mode button for more than 3 seconds. Use Zoom Up button or Zoom Down button to navigate to the mode you wish to reactivate. Press the Color Mode button to select it. Press the Color Mode button again to reactivate the deactivated mode. Press the Camera Selection button to get back to the live camera mode. 29 CANDY5 HD User Manual 6-8. Clock CANDY5 HD has a clearly visible clock for checking the time. 6-8-1. Checking the Time Press the Camera Selection button while holding the Freeze button. The time is displayed for 3 seconds on the screen 6-8-2. Setting the Time To set the time, press the Camera Selection button while holding the Freeze button and the clock appears. Repeat this action, and the time currently being displayed begins blinking. Press the Camera Selection button to change the 30 CANDY5 HD User Manual ‘hour’. It changes from 01 to 12 in order. Press the Focus button to change the ‘minute’. It changes from 00 to 59 in order. To save and exit the time setting, press the Color Mode button. 31 CANDY5 HD User Manual 6-9. Other Functions 6-9-1. Controlling LCD Brightness You may change the brightness level of the LCD to accommodate your visual needs and preferences. Change the brightness level by pressing the Zoom Up button while holding the Freeze button. Pressing the Zoom Up button while holding the Freeze button circulates through 3 brightness levels. [Level 1] [Level 2] 32 [Level 3] CANDY5 HD User Manual 6-9-2. LED Light Setting Press the Zoom down button while holding the Freeze button to change the LED light setting. The LED lights may be set in 3 different configurations: [Auto LED] [LED Off] [LED On] In the Auto LED mode, if you lift the unit away from the reading material, the lights will automatically turn off. The lights will turn on when 33 CANDY5 HD User Manual CANDY5 HD gets closer to the reading material. This function prevents you from unintentionally shining the LED lights into someone’s eyes. When you power off the unit, CANDY5 HD resets automatically to the default setting of LED On mode’. 6-9-3. Power Saving Mode The CANDY5 HD features a power saving mode to conserve the battery. If you don’t move the unit or press any buttons for more than 2 minutes, the LCD screen will turn off. This is power saving mode. When Power Saving Mode is set, battery charging indicator flickers and is red in color. If you move the unit or press any buttons when the power saving mode is activated, the LCD screen will turn on automatically. 34 CANDY5 HD User Manual If you don’t move the unit or press any buttons for more than 3 minutes after the power saving mode is activated, the unit will power off automatically. ※ Power Saving Mode On/Off To toggle the Power Saving Mode On/Off, slide the Power switch for 2 seconds to the right while holding the Zoom Up button and the Zoom Down button when power is off. An icon showing the status of Power Saving Mode appears on the left corner of the screen. When Power Saving Mode is turned on, the icon is 35 CANDY5 HD User Manual green in color. If Power Saving Mode is turned off, the icon is colored red. 6-9-4. Turning Beep Tones On/Off Each button is designed with an assigned beep tone to confirm the button has been pressed. The beep tones may be turned on or off. To toggle the beep tones On/Off, press the Color Mode button while holding the Freeze button. [Beep On] [Beep Off] 36 CANDY5 HD User Manual 6-9-5. Initialization If you find that the CANDY5 HD is not displaying as you would like, but you are not sure which setting has been changed, you may wish to restore the unit back to its factory defaults. When the unit is powered off, slide the Power switch to the right for 2 seconds while holding the Focus button. CANDY5 HD is powered on with the default settings restored. Note: All saved images are deleted when initializing the unit to the default settings. 37 CANDY5 HD User Manual 7. Trouble Shooting 7-1. CANDY5 HD does not power on If the battery is totally discharged, power does not turn on. It may make CANDY5 HD seem out of order. Please connect the AC adapter to the DC jack and charge the battery for at least 3 hours. 7-2. CANDY5 HD power is on, but no image is seen on the LCD screen It is possible that the Freeze button may have inadvertently been pressed and the image is frozen, thus making it seem that the CANDY5 HD is out of order. If the Freeze function is activated, you can deactivate it by pressing the Freeze button once again. If the CANDY5 HD is powered on, but has not been used for over 2 minutes, CANDY5 HD goes into power saving mode. Move CANDY5 HD or press any button to deactivate Power Saving Mode. 38 CANDY5 HD User Manual 7-3. Auto Focus does not work Check the Focus Mode. If the Focus Mode is set to Single Focus Mode, the camera focuses only when you press the Focus button. Press the Focus button while holding the Freeze button to set Auto Focus Mode. 7-4. The LCD screen appears dirty even though the screen has been cleaned If there is dust on the camera lens, the image does not look like it is in focus and Auto Focus does not work properly. You may clean the camera with the LCD screen cleaning cloth provided. 7-5. Turning off the beep tones By default, when you press any button, you hear the beep sounds. If you do not want to hear these sounds as you adjust settings, press the Color Mode button while holding the Freeze button to turn off the beep tones. 39 CANDY5 HD User Manual 7-6. The image is too dark or too bright Press the Zoom Up button while holding the Freeze button to control the brightness of the screen. There are 3 levels of brightness. The higher the level, the brighter the screen. The image may also be too dark if the LED is turned off. You may turn on the LED by pressing the Zoom Down button while holding the Freeze button 7-7. LCD screen turns off suddenly CANDY5 HD goes into Power Saving Mode when it has not been used for over 2 minutes. Move CANDY5 HD or press any button to deactivate Power Saving Mode. If CANDY5 HD remains inactive for more than 3 minutes, power is shut completely off and you must power the unit on before using it again. If the battery is totally discharged, the unit powers off. Connect the power adaptor to the DC Jack and charge it around 3 hours then try again to use it. 40 CANDY5 HD User Manual 7-8. The battery has been fully charged for a long time, but the unit will only operate for a very short time The battery life may shorten over time. The longer the battery has been used, the shorter the battery’s run time. If the battery life becomes shortened, the battery can be replaced. If the battery is more than six months old, the battery must be replaced at the cost of the user. Discharging the battery completely on a regular basis will directly cause the life of the battery to be reduced. To preserve the life of your battery, please recharge it frequently rather than using the battery until it is completely discharged. 41 CANDY5 HD User Manual 8. Warranty CANDY5 HD is eligible for free repair service for two years from the date of purchase to correct any manufacturer defects. The warranty for the battery is 6 months. Damage caused by the user, including damage caused by dropping the unit, placing heavy objects on the unit or damage caused by introducing liquid in to the unit, is not covered under the warranty and will be repaired at the cost of the user. ※Note: the warranty may differ by country. 42