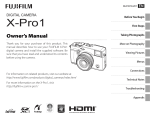
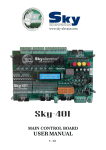
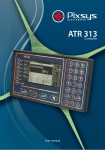
1
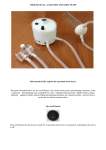
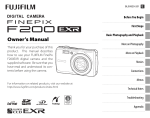
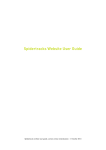
User Manual
PL300
Thank you for purchasing the A-100 of Goodwill Display Co., Ltd.
Customer support is through the website.
Provia through the online services for the product to get support and other benefits.
The website (www.provia.co.kr) from time to time by updating our product data is always up to date.
- Product upgrades and announcements site
- Viewer program download
Notice
• Shown in this manual, including pictures and drawings to help you understand the user's
different from the real thing, and are subject to change without notice.
• Contained in this manual is product of the specification or feature performance and for
quality improvement, the is subject to change without notice.
• The content of the manual of the device S/W version or operators may vary depending on
the circumstances, and are subject to change without notice.
0
Contents
1. Product Overview
Product overview . .............................................................1
2. Precautions
Precautions ....................................................................2
3. Preparation of before use
Basic components...............................................................3
Names of parts ..... ............................................................3
4. To understand how it works
.................................4
4-1 How to use
4-2 Check operation and SD Memory Usage
4-3 Product status LED actions guidance
4-4 How to use parking and normal recording mode
4-5 Built-in high sensitive microphone
4-6 Select the voice recording function
4-7 Video Memory function
4-8 Manual recording function
4-9 Memory Format Function
4-10 Changing of setting function by viewer
0
Contents
5. How to Installation
Installation ... .......... ....................... ........................ ........5
6. Replay to recording pictures
View recorded video on your PC by connecting........................6
7. Remarks
Specification & Features........................................................7
1
Product Overview
Product Overview
- Connect the power supply after 8 seconds to start video recording is a advanced video black box.
- This product is powered on at the time of the first continuous video recording is possible, through
the regular power supply for more than 48 hours video recording, please be careful the risk of
discharging the vehicle battery.
- This product is built-in super capacitor even when the power supply is not possible to store images
securely.
- Super capacitor to maintain the stability of the product in high temperature.
- GWD Co., LTD. All rights in the Program on the display, and is protected by copyright.
- The information contained in this manual in order to improve the quality of the product are subject
to change without information
2
Precautions
Precautions
Cautions parking records
Please be careful used regular power supply, the vehicle battery may be
discharged.
Carefully operate high temperature and low temperature.
(Operating Temperature : -10 ~ 60℃)
Extreme temperatures in summer and winter parking in place for a long time,
if more than one available immediately after the operation behavior. The
vehicle's interior temperature reaches the proper temperature before use.
.
Be careful not to let any foreign materials.
Immersion, shock, fire, due to the body or the records are stored on the SD
card is lost when camera may not be stored recorded files. By the
manufacturer of the above shall not be liable.
Do not disassemble, repair or modification by yourself.
Please do not disassemble the product and modifications. It may cause fire,
electric shock or a problem with the product. Please contact an authorized service
center repair is required. You will not be able to receive the service free of charge
with respect to the defects that occurred if the user disassemble and repair.
2
Precautions
Precautions
Do not place metal objects.
GPS antenna is attached to the metal part of placing the goods received GPS
data can degrade performance
GPS reception may take some time.
Started Car for receiving GPS satellite requires a certain amount of time to
the weather and can vary depending on the circumstances.
Abnormality, do not use in the situation.
Smell the presence of such abnormal symptoms continue to be the cause of
the fire as you can. Turn off the power, then Please consult by headquarters
or A / S center.
Absolute do not remove the SD card during working of product.
Black box is operating do not remove the SD card. That’s why Product
malfunction is likely to cause and SD card may be damaged.
2
Precautions
Please keep stored important data to other storage devices (HDD, CD, and
removable disks).
Normal Recording, event recording and parking recording at a ratio of 55:15:15
recording has been allocated. This is primarily a record store to buy the 8G capacity
by emergency recording 116 minutes(Over 2.0 hours) after the auto overwrite
feature documentary may be cleared. Significant accident record in the fastest time,
please check and transferred to PC.
Deleted by user’s fault, the manufacturer shall not be liable.
At least twice a month and the data at least once a week in order to
determine, please be a formatting the SD card for the product is in proper
operating condition.
SD memory card is a consumable item replaced every six months and
recommended formatting 1 times a month. Please prolonged use, you may
not be able to save the new data that you use to buy a new memory card,
because life itself. Beyond the warranty period, deleting data used for a long
period of time due to the problems caused due to the SD card, we cannot be
held responsible for any Thank you for your understanding
Incase without Power “ON”
Make sure that the SD card is properly connected to the cigarette lighter fuse
terminal has been disconnected, please try things.
Deleted by user’s fault, the manufacturer shall not be liable.
Check the status of the LED mounted on the main unit to verify that the
power supply is normal, If applicable.
3
Before Use
Product component
Main
Rear
Unit
Camera
Car Mounts
Power adaptor
& cable
Micro SD Memory
User Manual
3
Before Use
Parts of name
DC Power
Rear Cam.& A/V out
GPS
Camera Lens
Power LED
Mount
Operating
LED
SD Card Socket
REC. Button
Menu Button
4
Operating
Install & Operating
4-1. How to Use
1) Power ON/OFF
And the input power (Start ON) 8 seconds after the normal recording mode, the system automatically starts.
(Front blue LED lights, the rear red LED lights, the rear blue LED lights up after starting 12 seconds)
When sensing the shock the vehicle work front and rear blue LED for 15 seconds together.
Impact from the time before / after 30 seconds, including continuous recording and re-recording mode(blue LED
ON) .
Vehicle to discharge a regular power supply during cold winter there are a lot of risks, Please turn off the power
when vehicle is not driving a long time.
2) Information Date occurs, position information display
This product time and location information is stored along with the image of the above information can be checked
easily.
The above information is provided as a service to download from the website of the program, but only the viewer
can check, and if you want to see only the images that are provided free of charge to the other Viewer
4
Operating
4-2 Check operation and SD Memory Usage
1) Check the status of the rear LED lamps
RED LED ON ----- Check power connection [always turns on when power is connected. ]
BLUE LED ON ----- Normal recording mode
BLUE LED Blinking ----- Event recording model, Manual recording mode
BLUE LED OFF ----- Parking recording mode
GREEN LED ON ----- GPS connected
2) Check video by PC
You can found video file on the dedicated viewer or pubic viewer from SD card connected to the PC.
4
Operating
3) Save the file description in SD Memory
The making to save file name is “Mode name / year / month / day / hour / minute /
second” to adopt that you want to easily record the video you can see the time zone.
※ Folder & File Name
File Name : Mode name_Year_Month_Day_Hour_Minute_Second_1ch/2ch.avi
Normal Record File
ex) Black Box\rec\2013_01_20_06_01\REC_2013_01_20_06_01_56_D.avi
Event Record File
ex) Black Box\Event\2013_01_20_06_01\EVT_2013_01_20_06_01_56_D.avi
Manual Record File
ex) Black Box\Manual\2013_01_20_06_01\MAN_2013_01_20_06_01_56_D.avi
4
Operating
4) SD Memory Storage
Record Mode
8GB
16GB
32GB
Capacitive
Capacitive
Capacitive
Recording Time
Normal
60 sec.
4GB
8GB
16GB
Parking
30 sec.
2GB
4GB
8GB
Event
30 sec.
1GB
2GB
4GB
Manual
30 sec.
0.5GB
1GB
2GB
Snap shot
-
200 pcs
200 pcs
200 pcs
u Parking recording is full Frame recording to stored in one-minute increments.
u Normal recording does not occur by event.
uThe number of files stored in the image size may vary.
4
Operating
4-3 Product status Rear LED operating guidance
MODE
LED STATUS
Front
REMARK
Rear
Booting
BLUE ON
RED ON
BLUE ON
GREEN OFF
Normal Recording
BLUE ON
RED ON
BLUE ON
GREEN OFF
Manual Recording
BLUE ON
RED ON
BLUE Blink(10sec.)
GREEN OFF
Event Recording
BLUE ON
RED ON
BLUE Blink(3sec.)
GREEN OFF
Parking Recording
BLUE ON
RED ON
BLUE ON
GREEN OFF
Without SD Card
BLUE ON
RED ON
BLUE ON(3sec.)
GREEN OFF
4
Operating
4-4. How to use parking and normal recording mode
When using the normal recording after parking(Regular power supply)
※ This product is powered on at the time of the first continuous video recording is possible, through the
regular power supply for more than 48 hours video recording, please be careful the risk of discharging
the vehicle battery.
※ SD memory card is a consumable item replaced every six months and recommended formatting 1 times
a month. Please prolonged use, you may not be able to save the new data that you use to buy a new
memory card, because life itself. Beyond the warranty period, deleting data used for a long period of time
due to the problems caused due to the SD card, we cannot be held responsible for any Thank you for your
understanding
4-5 . Built-in high sensitive microphone
This product is built-in high sensitivity microphone recording the actual incident and the exact site conditions
will be heard vividly .(Can check voice recording by Viewer)
4-6 . Select the voice recording function
If you want to make a voice recording by pressing the button on the back of the product is not a voice recording.
(The Ability to protect the privacy)
4
Operating
4-7. Video Memory Function
This product automatically saved as 30 frames when vehicle crash, contact an accident, sudden stop,
the road surface irregularities detected at the time of the impact of the event before and after the shock
image. The product images with impact shock time, and velocity data at the same time to save.
4-8. Manual Recording function
The record button on the back of the product for more than 3 seconds, the current image up to 100
in increments of 1 minute are stored force. Recording file not creation over 100 files, after 100 files will
overwritten first recorded file.
(Manual recording file name : Black Box\Manual\2013_01_20_06_01\MAN_2013_01_20_06_01_56_D.avi )
Please download “PC Viewer program” as below followings,
※This product Normal, Events, Parking recording automatically AUTO OVER WRITE function (automatically
overwrite) the built-in SD memory card with a capacity of the FULL sequentially from the oldest data when
the record is deleted are taking the way.(Normal record : 55% , Event record : 15%, Manual record : 15%,
Parking record : 5%)
4
Operating
4-9. Memory Format Function
1. Press the Voice button & Recording button at the same time
for the 5 sec. after following the voice guidance press the
Recording button again to formats are in progress.
2. We recommend connect to the PC for formatting the
memory card.
Press the Voice button and the
Record button at the same time
3. Formatting the memory card every two weeks should be
done on a regular basis, more stable and can be
recorded and stored.
* Warning
- Please save important file to other storage device before
formatting the memory card. Because when processing the
formatting the memory card will be delete all file in memory
card.
4
Operating
4-10. Change the setting function by viewer
Shock sensitivity can be set up to step 5 is programmed by the user can be set to the desired level.
Function
Setting
Parameter
Remark
Default
Voice Rec.
Set to voice rec.
ON/OFF
ON
Announce
Set to announcement
ON/OFF
ON
Acceleration
Sensitivity
Set to shock level
Sensitivity
1~10
Motion Sensitivity
Set motion sensitivity
1~5
Volume
Set volume of
announcement
1~5
Parking Mode
Set to parking mode
Time
Synchronization
Time recording / set to
booting
Summer Time
Set to summer time
ON/OFF
Local Time
Set to country
-11~+12
Lower is high
sensitivity
Lower is high
sensitivity
High is Max.
volume
ON/OFF
3
3
5
ON
Not used
/+1min./+10min.
OFF
Seoul +9
+9
5
How to Installation
Installation
1. To be attached to the product and foreign objects attached to wipe clean
2. The mounting position is recommended, preferably near the rearview mirror the driver's field of view does not cover
the rearview mirror affect the operation. To avoid tinted part the upper part of the windshield of the car tinted
because the GPS receiver sensitivity degradation
3. Remove the plastic holder of the double-sided tape to center align the front glass is firmly attached.
4. Connecting to the power connection jack by cigar jack adaptor.
Please connect before connect to cigar jack cable if using the video out cable, may be power off.
5. Power and video cables through the ceiling and pillars should be installed by sliding it invisible.
6. Regular power supply connection, depending on the state of the vehicle and the surrounding environment during the
regular power supply connection, it may cause a malfunction, please use the specialized mounting points.
Vehicle to discharge a regular power supply during cold winter there are a lot of risks.
Please turn off the power when vehicle is not driving a long time.
※ Shall not be liable for injury and damage caused by willful damage or improper use and operate of this product.
Should not used for any other purpose in accordance with the Privacy Act and related laws, and for the purpose of installing
this product, or tamper and not record voice of someone else the law is the responsibility of the user accordingly.
GWD is not responsible for the profit and loss(pecuniary loss, loss of business and indirect damages) caused
the accident.
5
How to Installation
Installation(with Pictures)
1. Remove double side tape
4. To fix and adjust the angle
2. Connect to Mounter
5. Connect to Cigar jack power
3. Mounted side or behind of mirror
(※
※ careful tinted part of the windshield)
6. Finished Install
6
Replay to recording pictures
View recorded video on your PC by connecting
① ②
⑬
1. Minimize button
⑮
- Hide PC Player screen.
2. Exit button
- Exit PC Player.
3. Record video playback screen
- Recorded video is played.
4. Record List screen.
- Renewable displays a list of the recorded video file.
④
⑤
③
- Currently playing recorded video is displayed in white.
5. Display the recording date.
- Record date information stored on recorded images are displayed.
6. G-Sensor information
①
⑭
- G-Sensor information is stored in recorded video is displayed in a graph.
- Each of the actual value of the graph X, Y, Z are displayed on the item.
7. Recorded video play controller
- Change the location of the recorded video playback.
- Playback position corresponding to the location to display the graph G-Sensor.
⑦
8. Previous file play button
- Recorded video file from the list displayed on the currently playing video to play.
9. Play / Pause button
- Recorded video file is play or pause.
10. Stop button
⑫
⑩
⑧
⑨
⑪
- Recorded video file is stop.
11. Next file play button
- Recorded video from the list shown below the currently playing video files.
12. Recording Folder button
- Recorded video to find the folder where you saved the 'Browse for Folder' dialog box is running.
13. Select to front or rear camera
14. Map View
15. Select recording mode(Normal Mode, Event Mode, Motion Mode, Manual Mode)
⑥
7
Remarks
Specification
Lens
CMOS
Illumination
1.0 LUX
Angle/Pixels
120〫 / HD 720P
Type
MPEG4
Resolution
1280 x 720
1Ch Frame
30 frames
2Ch Frame(Main/Rear Camera)
20fps/15fps
Acceleration sensor
3 axis sensor
Memory
SD CARD
2GB~32GB
Battery
Super Cap.
5F/5V
POWER
DC 12V~24V
GPS
Option
Temperatures
-10℃ ∼ 60℃
Camera
Recording
Others