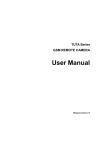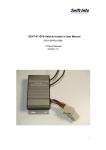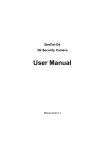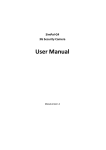
1
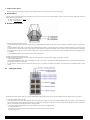
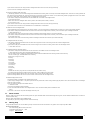
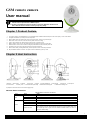
GSM remote camera
User manual
1. The GSM SIM card for GSM camera should be PIN code de-activated, and it needs to
activate caller ID presentation & MMS functions.
2. Be sure to remember and keep the product’s password, SIM card number secret.
Don’t disclose them to others to ensure your privacy safety.
Chapter 1 Product Feature
1.
This product needs to use GSM SIM card. It can send MMS images to MMS enabled mobile phone with a color display or to an e-mail address.
2.
Intergrated PIR detector to provide precise and timely alarm.
3.
Built-in CMOS camera and infrared LED. Even in dark environment, camera can get clear images.
4.
SMS remote control: User can control the camera by SMS command or calling.
5.
Listen in the monitoring area: Call the device number to listen in monitoring area.
6.
Build in speaker: User’s voice can be broadcasted via build-in speaker to scare the unvited vistor.
7.
Multimode alarm: Camera can send alarm messages by SMS, MMS, E-mail or standard phone-call.
8.
Schedule monitor: User can set the camera working as the preset schedule.
9.
Built-in Lithium battery: Rechargeable battery ensures operation in case of external power failure.
10. Easy installation: Wireless connection. The product can be installed at any place you want.
Chapter 2 Host Instruction
1.Reset key
2.Base board
10. Power switch
3.Speaker
11. Battery cover
4.Light sensor
5.Camera
12. Power Interface (Mini USB)
6.Infrared lights(8 pcs)
7. Indicator light
13.Base board conneting slot
8. PIR sensor
9. Microphone
14.Base board installing hole
Tip: Keep the camera lens clean to insure best imaging quality.
Indicator Status Instruction
Indicator Status Instruction as follower:
Color
Red
Action
Status
Flash slowly
Searching the network.
Flash quickly
Infrared body detect alarm
Constant Light
Not installed SIM card, or the remote camera damaged.
Constant Light
Defense status. Activating the auto-alarm function.
Flash slowly
Cancel defense status. Canceling the auto-alarm function.
Flash quickly
Processing data.
Green
Successfully resume to factory setting.
Light two seconds
Note: Swith on the camera, after the indicator light flash red, press the RESET button until
the indicator light turns to green, and then release the RESET button. The device is
resumed to default setting.
Note:
1
1. Slow flash is defined as indicator flash 1 time per second, quick flash is defined as 2 times per second.
2. Under normal condition, press the RESET button of camera for more than 10 seconds to close or open the host indicator.This can also be
done by sms command from mobile.
Chapter3 Quick Start
About the SMS Command:
1) All the SMS commands are composed with symbol # and Arabic numerals.
2) Master & family SMS command format: #code#content#.
3) Guest SMS command format: #code#password#content#.
4) Password is a four-digit number. The default is 1234.
5) The maximum digit of the phone number is 16.
6) When camera receives the SMS command, it will automatically reply.
Note:
1.
2.
3.
The symbol “#” in SMS command can not be ignored. No space character can be included within the commands.
Two SMS commands or more can be sent in one SMS at the same time. Different SMS commands must be apart with semicolon in English.
The max length of SMS parameters is 50 characters or digits.
1. Start the camera
The device should be bind with Master phone mobile for the first use or after resuming to factory settings. After binding with master mobile phone, the device can automatically sends
alarm SMS to master once alarm triggered.
Method 1: Call the device with your mobile. The call will be hung up after connected, which indicate that your mobile number has been recognized as master.
Method 2: Edit and send the following SMS to camera: #00#
After setting, the device will send the following SMS to your mobile: “Welcome! Password: 1234”.
2. Network parameter setting
The user sends following SMS message in order to:
Set MMS center:
#124#MMScenter#
• The MMScenter should be the MMS center address of GSM provider. For example: #124#http://mmsc.monternet.com#
Set APN parameters:
#125#GatewayIP#WAPGatewayPort# HTTPGatewayPort#APN#APNusername#APNpassword#
For example: #125#10.0.0.172#9201#80# cmwap#wap#wap#
Successful SMS reply : Para:*********************.
Set sending MMS message via WAP:
#148#0#
Sending MMS message via HTTP:
#148#1#
3. Switch the camera defense status
Arm the camera is to activate the alarm function of remote camera. In this status, the infrared body detector is in work status. Disarm the camera is to deactivate the alarm function of
the device. The connected PIR detector will not work. The device will not automatically alarm.
There are three methods to switch the defense status.
Method 1:
Edit and send following text message to arm the camera: #01#
The device will reply you that arm the camera successfully with SMS content “Armed successfully!” the device indicator flash still green.
Edit and send following text message to disarm the camera: #02#
Device will reply you that disarm the camera successfully with SMS content “Disarmed successfully!” and the camera indicator flash slow green.
Method 2: Call the device through master number or family number. Hang up in 5 seconds after hearing the ringing tone.
Method 3: Press “RESET” button for 5 seconds to arm/disarm the device.
Note: If you reset the defense state repeatly, the device will reply to notify you that the device is armed or disarmed already.
4. Timing arm the camera
Timing arm the camera: The camera can set on defense automatically according to the preset time schedule.
To set timing arm the camera, you can do as following:
Set on timing arm the camera: #128#1#. You will get reply SMS “Arming scheduler activated”
Set off timing arm the camera:#128#0#. You will get reply SMS “Arming scheduler deactivated”
5. Capture image
Method 1:Master number or family number call the device and hand up within 5-20 seconds after hearing the ringing tone. The device will reply SMS “Your request has been
received. The device is sending image(s) now.” And the caller can receive the MMS image later.
Method 2:Send following SMS command to camera:
For master number
and families number: #03# image quantity #
For guest number:#03#password# image quantity #
The camera will reply “Image capturing request received.
The camera is busy sending the MMS image.” And the caller will receive the MMS image later.
Note: When the image size is set as 160×128 or 320×240, the device can only send max 8 images one time. So the image quantity number should be in the range of 1-8. When the
image size is set as 640×480, the device can send up to 2 images and the image quantity number should be 1 or 2.
6. Alarm setting
If the built-in PIR detector is triggered, the camera will alarm by sending SMS notify, MMS image and making a call. If you set sending SMS, MMS and calling as the default alarm way
at the same time, once alarm triggered, the camera will send SMS, MMS, and then calling. Each alarm way will be carried once each time. For calling alarm way, the device will dial the
master number and family number. If there is no answer, it will quit the dialing mode after repeated calling three times.
2
7. Listen in live voice
Master or family numbers call the device. It will answer the call automatically. Then you can listen in live voice of monitoring area.
8. Check status
If the user wants to know the present setting and work status of the device, just needs to send one of following SMS to camera and the camera will reply a MMS image including all
settings (Not including the password.).
For master user and family user :#07#
For guest: #07#password#
9. Audible Visual Alarms
9.1 Bind wireless Audible Visual Alarms to host
1) ON the Audible Visual Alarms: Disconnect the power supply of wireless Audible Visual Alarms first,then push the switch to PANEL, 2 seconds later and then connect the power
supply
2) Press the REMOTE button,which is on the bottom of the wireless Audible Visual Alarms , A indicator light flash fast, it means the Audible Visual Alarms is in the Learning status.
3) At the send time, sending an SMS or phone to switch host arm / disarm status (see 3, Quick Start 2, deployed 3, disarm), after the success of the host status switch, the Audible
Visual alarm will have a "tick" sound, then switch the host status again , the audible visual alarm have a "tick" sound , this means the audible visual alarms have binded to the host
a successfully.
4) Press the REMOTE button to save the received code and exit the learning status.
9.2 Disbind wireless Audible Visual Alarms to host
To disband the Audible Visual Alarms to host, MUST reset the the audible Visual Alarm to restore the factory settings , the operation is as follows:
1) Off the Audible Visual Alarmss;
2) Press SENSOR or REMOTE button, then turn the audible visual alarm . After 3 seconds ,the audible visual alarm light RED light, it means the audible visual alarms has been
restored factory settings, then release button;
3) At the same time, switch the host arm / disarm alarm status, there are no any actions of the audible visual alarm,it means the disbinding of audible visual alarm to host is
success.
10.
Intelligent switch
This GSM remote camera supports control up to 3 general 315M Wireless Intelligent switch, sockets, etc. Now we have intelligent switch HLD-002 show above for instructions.
10.1 Learning of intelligent switch always ON
1) The following instruction of how to let the intelligent switch always ON the learning status. For example, the HLD-002 intelligent switch, when channel 1 working indicator OFF
and channel 2/3 working indicator ON, Press and hold channel 1 manual switch, and red light of the channel 1 is on, till the coding indicator (red light) flash twice, then release the
channel 1 switch button, and the intelligent switch is on the learning status.
2) Use master‘s mobile phone send SMS to the host, set ALWAYS ON control code on the intelligent switch.
# 190 # Switch Name # 1 #
"switch name" refers to the intelligent switch named by master, cab be letters (case sensitive) or numbers,
such as # 190 # TV # 1 #
3
3) After received control code, the coding indicator of intelligent switch flash one time,it means, learning successfully.
4) The host can save 3 Intelligent switch name only
.
10.2 Learning of intelligent switch always OFF
1) The following instruction of how to let the intelligent switch ALWAYS OFF the learning status. For example, the HLD-002 intelligent switch, when channel 1 working indicator ON
and channel 2/3 working indicator OFF, Press and hold channel 1 manual switch, and light of the channel 1 is OFF, till the coding indicator (red light) flash one time , then release
the channel 1 switch button, and the intelligent switch is in ALWAYS OFF learning status.
2) Use master‘s mobile phone send SMS to the host, set ALWAYS OFF control code on the intelligent switch..
# 190 # switch name # 0 #
"Switch name" refers to the intelligent switch named by master, cab be letters (case sensitive) or numbers,
such as # 190 # TV # 0 #
3) After received control code, the coding indicator of intelligent switch flash one time,it means, learning successfully.
4) The switch name must be same on the “ALWAYS ON ” and “ALWAYS OFF” command SMS
10.3 Real-time control of Intelligent Switch
1) After ALWAYS ON / OFF learning finished , shut down the channel 1 ,2 and 3 manual switch on intelligent switch, then Channel 1,2 and 3 working indicator light OFF ;
2) Use master‘s mobile phone send SMS to the host, let host send control code to intelligent switch, in this way, user can control the power of intelligent switch ON
# 190 # Switch Name # 1 #
After received control code, all channel working indicators of intelligent switch ON at the same time, (the socket outlets ON).
3) Use master‘s mobile phone send SMS to the host, let host send control code to intelligent switch, in this way, user can control the power of intelligent switch OFF
# 190 # switch name # 0 #
After received control code, all channel working indicators of intelligent switch OFF at the same time, (the socket outlets OFF).
10.4 Intelligent switch ON / OFF timing
1) Use master‘s mobile phone send SMS to the host, Active the Timing function of host to send Timing control code to ON the intelligent switch..
# 191 # switch name # 1#
2) Use master‘s mobile phone send SMS to the host, Active the Timing function of host to send Timing control code to OFF the intelligent switch.
# 191 # switch name # 0 #
10.5 Intelligent switch timer parameter settings:
1) Use master‘s mobile phone send SMS to the host, set host’s time of send “ON/OFF control code of intelligent switch”
# 192 # Switch Name # working days # ALWAYS ON #ALWAYS OFF #
Note: The setting must be a working day; ALWAYS ON time should be after the ALWAYS OFF time and timing should be at the same day.
The value of working day , ALWAYS ON/OFF time as following
Working days: (on digit, from 0 to 8)
0 for daily;
8 for Mon-Fri
1 for Monday
2 for Tuesday
3 for Wednesday
4 for Thursday
5 for Friday;
6 for Saturday
7 for Sun;
ALWAYS ON / OFF time: (4 digit, 24-hour, for example: 0000 for 0:00, 2359 for 23:59)
Once timing parameters setting of intelligent switch is successful, it will send SMS to the master number
2) When the setting ALWAYS ON time comes, the host sends control code and ON the intelligent switch
3) When the setting ALWAYS OFF time comes, the host sends control code and OFF the intelligent switch
10.6 Disbind intelligent switch to host
The following operation is to disbind the the intelligent switch to host:
1) Clear coding of intelligent switch : In any status, press and hold any switch button, until the coding indicator light (red) flashes 3 times, then release the button, and intelligent
switch clear code successfully
2) Also, use master‘s mobile phone send SMS to the host
# 193# switch name#
Host removes the intelligent switch successfully
3) If user want to delete all information of the intelligent switch on host, use master‘s mobile phone send SMS to the host
# 193 #
4) From then on, the host can not operate the intelligent switch any more.
11.
Reset camera
Method 1: Swith on the camera, after the indicator light flash red, press the RESET button until the indicator light turns to green, and then release the RESET button. The device is
resumed to default setting.
Method 2: Master sends SMS to camera: #08#password#
The reply SMS you get “Factory settings have been restored successfully”
12.
Getting help
If forget the SMS command, user can send SMS to get help. The device will send the command list or user guide to user’s cell phone by SMS or MMS.
Get normal command help:
User sends following SMS command to the device:
For master user and family user: #09#
For guest: #09#password#
4
Chapter 4 Maintenance
1. Store and use the device in suitable temperature. Too high or too low temperature will likely to damage the device.
2. Try to keep the host and all its accessories dry. Do not store and use it in the bathroom, or other place with high humidity. Do not allow pour water or other liquids into the device,
otherwise, it might cause malfunctions.
3. Do not store and use the device in dusty.
4. Do not use alcohol, acetone and other similar solvents to clean it. Wipe it with soft-wet cloth.
5. Do not attempt to open it except as instructed. If the device does not work normally, try to resolve it as the guide of the "general troubleshooting". For the problem can not be solved,
contact with the dealer immediately.
6. To prolong the life-span of the battery, connect the device to the power supply to charge the built-in Lithium battery for 4 hours every 3 months if the camera does not use for long
time. Charge the battery at least 12 hours at the first time use to achieve the full performance of the battery.
Chapter 5 General Troubleshooting
No.
General Trouble
1
Possible Reason
Indicator light does not work
Can’t
2
start
device
(Indicator
4
Already binded master user for the camera.
Recover to factory default setting.
Caller ID presentation or MMS functions of the SIM
Contact network provider to active SIM card function. Pay for
works normally)
card are not actived, insufficient fee of the SIM card.
the card.
Indicator light is still green
Can’t find or identify the SIM card.
The device doesn’t respond to
5
to open the indicator light.
All functions disable (Indicator
works normally)
3
Solution
Press the RESET button for 10 seconds or send text message
The indicator light is closed
SIM card was not installed properly: Power off the camera and
check it again.
Device work abnormally.
any operation.
Switch off the power, check SIM card, or reset factory setting.
Place the camera at other place with strong signal and try
Network signal is weak or network is busy.
again.
After starting the device, indicator
6
7
flashs in red color and can not
SIM card PIN code is actived.
Close the PIN code.
turn to green.
SIM card invalid.
Contact with local network operator to check of it.
Do not bind a master user to the device
Bind a master user to the device
Battery runs out of power.
Connect the camera to external AC power and charge for at
Can’t start the device after long
time supply with the battery.
least one hour, then restart device.
Note: If the problem can’t be solved with above guidelines, contact to your local distributor or the factory.
Appendix: SMS command list
Only guest user needs add password 1234 in the SMS command, after changing the password, please change the command accordingly.
User
Function
Master
Start the device
Master and family
SMS Command
#00#
Refer to Chapter 3. Quick start, 1.Start the camera.
Arm the device
#01#
Refer to Chapter 3. Quick start, 3. Switch the camera defense status.
Disarm the device
#02#
Refer to Chapter 3. Quick start, 3. Switch the camera defense status.
Mater/family / guest
Capture MMS Image
#03#password#image quantity#
Master
Change the password
#04#old password#new password#
Master
Add family number
#06#family number#
Master/family/ guest
Check the statues
#07#
Master
Resume to default setting
Master/family / guest
Master/family
Master/family
Master/family
Get Usual command list
Disable
SMS notification when alarm
#11#1#
Disable MMS image when alarm
#12#0#
Send MMS image notification when alarm (default)
#12#1#
Disable calling when alarm (Default)
#13#0#
Set Calling when alarm
#13#1#
Change master number
Master/family/ guest
Send MMS image to appointed mobile phone
Master/family
#09#password#
Refer to Chapter 3, Quick start, 8 Check statues
The password is 4 digits
#09#password#1#
Refer to Chapter 3 Quick start, 12 Getting help
#11#0#
Send SMS notification when alarm (default)
Master
You are allowed to add up to 10 different family numbers.
#07#password#
#08#password#
Refer to Chapter 3, Quick start, 5.Capture images.
#14#new master number#
The number should be less than 16 digits
#30#password#mobile number#image quantity#
Deactivate infrared detector
#31#0#
Activate infrared detector
#31#1#
5
User
Function
Master/family
Change auto alarm image size
Master/family
Change auto alarm image quantity
Master/family
Set image brightness
Master/family
Set Image direction
#35#value#
Master/family
Set Image contrast
#38#value#
The value should be 1,2,3,4,5, default value is 4.
Master/family
Set interval of auto capturing image
#103#time#
Interval time should be 3-10, unit is 0.1 second, default value is 5.
Master/family
Master/family
#34#value#
The value should be: 1,2,3,4,5(1 is darkest,5 is brightest),default value is 4.
The value 1 means up down, 2: left, right; 3: normal.
#109#Email address#
Delete family user
3:640×480(VGA)
#33#quantity# The quantity range: 2-8, default is 5. If image size is 640×480, the quantity is 1 or 2.
Delete E-mail
(Default)
2:320×240(QVGA default)
For example: #32#1# means auto alarm image size is 160*128.
# 108#Email address#
Send MMS image to E-mail when alarm
Master/family
Value 1:160×128
Add or modify E-mail address.
Disable sending MMS image to E-mail when alarm
Master/family
SMS Command
#32#value#
You can only set one email.
#110#0#
#110#1#
#113#family user#
Note: Specify the family user you want to detele, for #113# means delete all the family users.
Set timing send MMS image
#115#1#
Disable timing send MMS iamge
#115#0#
#116#work day#period1 start time#period1 end time#period1 interval#period2 start
time#period2 end time#period 2 interval#period3 start time#period3 end time#period3
interval#.
For example,#116#1#0800#1200#1430#1630#30# means during 8 AM to 12 AM and
Master/family
Set time period of auto send MMS image
2:30 PM to 4:30 PM of every Monday, the device will auto send out a MMS image in
every 30 minutes.
Work day: (one digit, 0-8)
0 for everyday; 8 means from Monday to Friday;
1 for
Monday;
2 for Tuesday; 3 for Wednesday; 4 for Thursday; 5 for Friday; 6 for Saturday; 7 for Sunday.
Start time-end time: (4 digits, 24 hours, such as 0000 means 00:00AM, 2359 means 11.59 PM)).
Interval time: (1-3 digits, 1-480, means sending MMS image interval ) 1-480 minutes interval.
#117#value 1#value 2#value 3#
Master
Lock camera and SIM card
Value 1 can be choose from 0 and 1, 0 means not lock sim card, 1 means lock sim card.
Value 2 can be choose from 0 and 1, 0 means not lock camera, 1 means lock camera.
Value 3 can be choose from 0 and 1, 0 means not lock operator
Master/family
Activate infrared body detector
#118#1#
Deactivate infrared body detector
#118#0#
Master/family
Set MMS center
#124#MMS center#
Master/family
Set APN parameter
Master/family
Change language
#127#value#
0 means Chinese , 1 means English
Master/family
Timing arm the device
#128#value#
Refer to Chapter 3, Quick start, 3.Timing arm the camera.
Master/family
Set timing arm the device schedule
#125#gateway IP#wap port#http port#APN#APN user name#APN password#
Note: Don’t omit the symbol # even when the APN user and APN password are blank.
#129#work day#period 1 arm time#period 1 disarm time#period 2 arm time#period 2 disarm
time#period 3 arm time#period 3 disarm time#
Please find instruction of work day, arm time and disarm time in “Set time period of auto send MMS”
Master/family
Master/family
Close/ Open indicator
#143#value#
The value can be 0 or 1, 0 means close the indicator, 1 means open the indicator, default setting is 1.
Disable SMS notification when the power changed
#144#0#
Send SMS notification when the power changed
#144#1#
Master/ family
Set MMS sending way
#148#value#
Value 1 means MMS sent by Http way;
Master/ family
PIR activate delay time (seconds)
#150#value#
Value is number from 0-10 (seconds)
Master/ family
Regulate device time
Master/ family
Close/open the speaker
#164#value#
Value 0 means close, value 1 means open.
Master/ family
Alarm sound On / Off
#166#value#
Value 0 means off , value 1 means on, default is 0
Master
Sending control code of intelligent switch
Master
Sending control code of
intelligent switch (timing)
Master
Sending intelligent switch control switch timing peried
Master
Delete intelligent switch
#152#number#
Value 0 means MMS sent by WAP way.
Number is the device SIM number. This command is used to regulate device time.
#190#switch name#value#
value 0 means always off, value 1 means on
#191#switch name#value#
value 0 means OFF, value 1 means ON
#192#switch name#working day#Always ON time#Always OFF time#
#193#switch name#
6