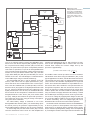
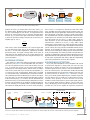
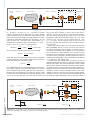
1
PROJECT: Proximity Card Access Control LOCATION: United States PAGE: 34 INSIGHT: Determine a Design’s Failure Rate LOCATION: Canada PAGE: 64 INNOVATE: Power-Up with Heat LOCATION: United States PAGE: 68 NO 269 CIRCUIT CELLAR THE WoRLD’S SoURCE foR EMBEDDED ELECTRonICS EnGInEERInG InfoRMaTIon The World’s Source for Embedded Electronics Engineering Information PROGRAMMABLE LOGIC MCU-Based Bike Computer Inside Arduino’s Power Supply Linux & Concurrency DECEMBER 2012 PROGRAMMABLE LOGIC Synchronous Detection Explained Electrically Actuated Sound Effects PLUS Green Energy Design Innovative RL78-Based Projects // Electrostatic Cleaning Robot // Solar-Powered Water Heater // Portable Power Quality Meter www.circuitcellar.com DECEMBER 2012 ISSUE 269 Now N ow w wi wit with ith th 32MB 32 3 2M MB Flash Fllas ash h and and 64MB 64M 4MB MB B RAM! RAM! MOD54415 Core Module 32-bit 250 MHz processor 64MB DDR2 RAM 32MB flash 10/100 Mbps Ethernet $ 00 44 general purpose I/O Qty. Qty. 100 Eight UARTs Five I2C Two CAN 3 SPI 1-Wire® 5 pulse width modulators (PWM) SSI MicroSD flash card 8 analog to digital converters (ADC) Two digital to analog converters (DAC) 69 NANO54415 8900 $ MOD54415 Q Qty. ty. 100 NANO54415 Core Module 32-bit 250 MHz processor 64MB DDR2 RAM 8MB flash 10/100 Mbps Ethernet 30 general purpose I/O Eight UARTs Four I2C Two CAN 3 SPI 1-Wire® 8 pulse width modulators (PWM) SSI MicroSD flash card ready 6 analog to digital converters (ADC) Two digital to analog converters (DAC) Quickly create and deploy applications from your Mac or Windows PC Low cost NetBurner development kits are available to customize any aspect of operation including web pages, data filtering, or custom network applications. The kit includes platform hardware, ANSI C/C++ compiler, TCP/IP stack, web server, e-mail protocols, RTOS, flash file system, Eclipse IDE, debugger, and cables. The kit enables you to communicate with peripherals that use SD/MMC Flash Card (including SDHC), SPI, I2C, or the general purpose digital I/O interface. The NetBurner security suite option includes SSH v1, v2 and SSL support. Information and Sales | [email protected] Web | www.netburner.com Telephone | 1-800-695-6828 Development Kit for MOD54415 Part No. NNDK-MOD54415-KIT $99.00 for a limited time Development Kit for NANO54415 Part No. NNDK-NANO54415-KIT $99.00 DESIGN DESIGNSPARK NEW. FREE. DESIGNSPARK PCB VERSION 4 COMPREHENSIVE NEW LIBRARIES. EASIER COMPONENT SELECTION & QUOTATION. NEW PCB PROTOTYPING SUPPORT. Discover today at www.designspark.com UNIQUE RESOURCES BY T ASK MANAGER THE WORLD’S SOURCE FOR EMBEDDED ELECTRONICS ENGINEERING INFORMATION Before I introduce the articles in this issue, I want to take the opportunity to thank Steve Ciarcia for bringing the electrical engineering community 25 years of innovative projects, essential content, and industry insight. Since 1988, he’s devoted himself to the pursuit of EE innovation and publishing excellence, and we’re all better off for it. I encourage you to read Steve’s final “Priority Interrupt” editorial on page 80. I’m sure you’ll agree that there’s no better way to begin the next 25 years of innovation than by taking a moment to understand and celebrate our past. Thanks, Steve. Break Through Designer’s Block December 2012 – Issue 269 A 2 re you experiencing designer’s block? Having a hard time starting a new project? You aren’t alone. After more than 11 months of designing and programming (which invariably involved numerous successes and failures), many engineers are simply spent. But don’t worry. Just like every other year, new projects are just around the corner. Sooner or later you’ll regain your energy and find yourself back in action. Plus, we’re here to give you a boost. This issue is packed with projects that are sure to inspire your next flurry of innovation. Turn to page 16 to learn how Dan Karmann built the “EBikeMeter” MCU-based bicycle computer. He details the hardware and firmware, as well as the assembly process. Another interesting project is Joe Pfeiffer’s bell ringer system (p. 26). Although the design is intended for generating sound effects in a theater, you can build a similar system for any number of other uses. You probably don’t have to be coerced into getting excited about a home control project. Most engineers love them. Check out Scott Weber’s garage door control system (p. 34). He built it around a PIC18F2221 and a 125-kHz proximity card and reader. Once considered a hobby part, Arduino is now implemented in countless innovative ways by professional engineers like Ed Nisley. Read Ed’s article before you start your next Arduino-related project (p. 44). He covers the essential, but often overlooked, topic of the Arduino’s built-in power supply. Need to extract a signal in a noisy environment? Consider a lock-in amplifier. On page 50, Robert Lacoste describes synchronous detection, which is a useful way to extract a signal. This month, Bob Japenga continues his series, “Concurrency in Embedded Systems” (p. 58). He covers “the mechanisms to create concurrently in your software through processes and threads.” On page 64, George Novacek presents the second article in his series, “Product Reliability.” He explains the importance of failure rate data and how to use the information. Jeff Bachiochi wraps up the issue with a article about using heat to power up electronic devices (p. 68). Fire and a Peltier device can save the day when you need to charge a cell phone! Lastly, be sure to set aside time to carefully study the prizewinning projects from the Reneas RL78 Green Energy Challenge (p. 30). Among the noteworthy designs are an electrostatic cleaning robot and a solar energy-harvesting system. [email protected] I ssUE 270 January 271 february 272 March 273 April 274 May 275 June 276 July 277 August 278 september 279 October 280 November 281 December Analog Techniques: Projects and components dealing with analog signal acquisition and generation (e.g., EMI/RF reduction, high-speed signal integrity, signal conditioning, A/D and D/A converters, and analog programmable logic) Communications: Projects that deal with computer networking, human-tohuman interaction, human-to-computer interaction, and electronic information sharing (e.g., speech recognition, data transmission, Ethernet, USB, I2C, and SPI) Data Acquisition: Projects, technologies, and algorithms for real-world data gathering and monitoring (e.g., peripheral interfaces, sensors, sensor networks, signal conditioning, ADCs/DACs, data analysis, and post-processing) Embedded Applications: Projects that feature embedded controllers and MCU-based system design (e.g., automotive applications, test equipment, simulators, consumer electronics, real-time control, and low-power techniques) Embedded Development: Tools and techniques used to develop new hardware or software (e.g., prototyping and simulation, emulators, development tools, programming languages, HDL, RTOSes, debugging tools, and useful tips) Embedded Programming: The software used in embedded applications (e.g., programming languages, RTOSes, file systems, protocols, embedded Linux, and algorithms) Internet & Connectivity: Applications that deal with connectivity and Internet-enabled systems (e.g., networking chips, protocol stacks, device servers, and physical layer interfaces) Measurement & sensors: Projects and technologies that deal with sensors, interfaces, and actuators (e.g., one-wire sensors, MEMS sensors, and sensor interface techniques) Programmable Logic: Projects that utilize FPGAs, PLDs, and other programmable logic chips (e.g., dynamic reconfiguration, memory, and HDLs) Robotics: Projects about robot systems, devices capable of repeating motion sequences, and MCU-based motor control designs (e.g., mobile robots, motor drives, proximity sensing, power control, navigation, and accelerometers) signal Processing: Projects and technology related to the real-time processing of signals (e.g., DSP chips, signal conditioning, ADCs/DACs, filters, and comparisons of RISC, DSP, VLIW, etc.) Wireless Communications: Technology and methods for going wireless (e.g., radio modems, Wi-Fi/IEEE 802.11x, Bluetooth, ZigBee/IEEE 802.15.4, cellular, infrared/IrDA, and MCU-based wireless security applications) UPCOMING IN CIRCUIT CELLAR fEATUREs Build a function Generator, by Larry Cicchinelli MCU-Based Model Helicopter Controller, by Akshay Dhawan and Sergio Biagioni Open-source Hardware Development, by John Vaughn, Tomas Carvalho e Silva, and Josh Davis Control Center software Design, by Scott Weber COLUMNs Web-Based Tools for Home-Energy Efficiency, by Jeff Bachiochi failure Mode and Criticality Analysis, by George Novacek Embedded Authentication, by Patrick Schaumont CIRCUIT CELLAR® 2 Issue 194 September 2006 EDITORIAL CALENDAR T HEME Embedded Applications Wireless Communications Robotics Embedded Programming Measurement & sensors Communications Internet & Connectivity Embedded Development Data Acquisition signal Processing Analog Techniques Programmable Logic CIRCUIT CELLAR® • www.circuitcellar.com INSIDE ISSUE 269 December 2012 16 • Programmable Logic Green Energy Design Projects Build an MCU-Based Bicycle Computer Dan Karmann 26 Electrically Actuated Sound Effects A Circuit and Firmware to Ring a Phone Bell Joe Pfeiffer 30 RL78 Green Energy Challenge Winners 34 Controlling Access with a Proximity Card Open the Door to Manchester Encoding Scott Weber Manchester-Encoded RFID Reader p. 34 Electrostatic Cleaning Robot The “Sun Chaser” Energy-Harvesting System Arduino Board’s Built-In Power Supply p. 44 Solar-Powered “Meteo Sensor” p. 30 44 ABOVE THE GROUND PLANE Arduino Survival Guide Power Supply Ed Nisley 50 THE DARKER SIDE Locked In Synchronous Detection Explained Robert Lacoste p. 30 December 2012 – Issue 269 58 4 EMBEDDED IN THIN SLICES Concurrency in Embedded Systems (Part 4) Introducing Linux and Concurrency Bob Japenga 64 THE CONSUMMATE ENGINEER Product Reliability (Part 2) The Meaning of Failure Rate George Novacek 68 FROM THE BENCH Energy Extraction Powering Up with Heat Transfer Jeff Bachiochi TASK MANAGER Break Through Designer’s Block C. J. Abate 2 NEW PRODUCT NEWS 10 MEMBER PROFILE 14 TEST yOUR Eq SOLUTIONS 15 qUESTIONS & ANSWERS 42 Engineering Innovation, Experimentation, & Explanation An Interview with Stuart Ball Nan Price CROSSWORD 76 PRIORITy INTERRUPT Onward and Upward Steve Ciarcia 80 CIRCUIT CELLAR® • www.circuitcellar.com mouser.com Distributing semiconductors and electronic components for design engineers. Authorized Distributor .6 ORE. mouser.com The widest selection of the newest products. The Newest Products for Your Newest Designs® Mouser and Mouser Electronics are registered trademarks of Mouser Electronics, Inc. The team Founder/EDITORIAL DIRECTOR: Steve Ciarcia PROJECT EDITORS: Ken Davidson, David Tweed EDITOR-IN-CHIEF: C. J. Abate PUBLISHER: Hugo Van haecke ASSOCIATE EDITOR:Nan Price Associate publisher: Shannon Barraclough CONTRIBUTING EDITORS: Jeff Bachiochi, Bob Japenga, ART DIRECTOR: KC Prescott Robert Lacoste, George Martin, CONTROLLER: Jeff Yanco Ed Nisley, George Novacek, CUSTOMER SERVICE:Debbie Lavoie Patrick Schaumont ADVERTISING COORDINATOR: The Kim Hopkins network THE WORLD’S SOURCE FOR EMBEDDED ELECTRONICS ENGINEERING INFORMATION Tech the Future explores the solutions for a sustainable future provided by technology, creativity and science. Our international teams United Kingdom Spain India USA Italy Russia Germany Sweden Turkey France Brazil South Africa Netherlands Portugal China Wisse Hettinga +31 (0)46 4389428 [email protected] Eduardo Corral +34 91 101 93 85 [email protected] Hugo Van haecke +1 860 875 2199 [email protected] Maurizio del Corso +39 2.66504755 [email protected] Ferdinand te Walvaart +49 (0)241 88 909-0 [email protected] Nataliya Melnikova 8 10 7 (965) 395 33 36 [email protected] Wisse Hettinga +31 (0)46 4389428 [email protected] Denis Meyer +31 (0)46 4389435 [email protected] Zeynep Köksal +90 532 277 48 26 [email protected] João Martins +351214131600 [email protected] Harry Baggen +31 (0)46 4389429 [email protected] Issue 269 December 2012 Sunil D. Malekar +91 9833168815 [email protected] Johan Dijk +27 78 2330 694 / +31 6 109 31 926 [email protected] Cees Baay +86 (0)21 6445 2811 [email protected] João Martins +351214131600 [email protected] ISSN 1528-0608 CIRCUIT CELLAR® (ISSN 1528-0608) is published monthly by Circuit Cellar Incorporated, 4 Park Street, Vernon, CT 06066. Periodical rates paid at Vernon, CT and additional offices. One-year (12 issues) subscription rate USA and possessions $50, Canada $65, Foreign/ROW $75. All subscription orders payable in U.S. funds only via Visa, MasterCard, international postal money order, or check drawn on U.S. bank. Cover photography by Chris Rakoczy—www.rakoczyphoto.com Subscriptions US Advertising Circuit Cellar, P.O. Box 462256, Escondido, CA 92046 E-mail: [email protected] Phone: 800.269.6301, Internet: www.circuitcellar.com Address Changes/Problems: [email protected] Strategic Media Marketing, Inc. 2 Main Street, Gloucester, MA 01930 USA Phone: 978.281.7708, Fax: 978.281.7706, E-mail: [email protected] Internet: www.circuitcellar.com Advertising rates and terms available on request. Postmaster: Send address changes to Circuit Cellar, P.O. Box 462256, Escondido, CA 92046. New Products: New Products, Circuit Cellar, 4 Park Street, Vernon, CT 06066, E-mail: [email protected] Membership counter We now have 264660 83 members in countries. Not a member yet? Sign up at www.circuitcellar.com Supporting companies 2013 International CES . . . . . . . . . . . . . . . 55 Elsevier, Inc. . . . . . . . . . . . . . . . . . . . . . . . 15 MCC, Micro Computer Control . . . . . . . . . . . 77 All Electronics Corp. . . . . . . . . . . . . . . . . . 78 EMAC, Inc. . . . . . . . . . . . . . . . . . . . . . . . . 71 Microchip Technology, Inc. . . . . . . . . . . . . . 19 AP Circuits . . . . . . . . . . . . . . . . . . . . . . . . 60 ExpressPCB. . . . . . . . . . . . . . . . . . . . . . . . 66 Microengineering Labs, Inc. . . . . . . . . . . . . 78 ARM. . . . . . . . . . . . . . . . . . . . . . . . . . . . . 47 FTDI Chip. . . . . . . . . . . . . . . . . . . . . . . . . C3 Mosaic Industries, Inc. . . . . . . . . . . . . . . . 78 Beta Layout, Ltd. . . . . . . . . . . . . . . . . . . . 65 Grid Connect, Inc. . . . . . . . . . . . . . . . . . . . 29 Mouser Electronics, Inc. . . . . . . . . . . . . . . . . 5 BusBoard Prototype Systems . . . . . . . . . . . 79 Hannoware . . . . . . . . . . . . . . . . . . . . . . . . 78 NetBurner . . . . . . . . . . . . . . . . . . . . . . . . C2 Butterfly Network, Inc. . . . . . . . . . . . . . . . 29 Holtek Semiconductor, Inc. . . . . . . . . . . . . . 37 Newark element14 . . . . . . . . . . . . . . . . . . 21 Circuit Cellar 25th Anniversary USB . . . . . . . 53 Humandata, Ltd. . . . . . . . . . . . . . . . . . . . . 13 Pololu Corp. . . . . . . . . . . . . . . . . . . . . . . . 25 Cleverscope . . . . . . . . . . . . . . . . . . . . . . . 65 Imagineering, Inc. . . . . . . . . . . . . . . . . . . C4 Reach Technology, Inc. . . . . . . . . . . . . . . . 77 Comfile Technology . . . . . . . . . . . . . . . . . . 49 Ironwood Electronics . . . . . . . . . . . . . . . . . 77 Saelig Co., Inc. . . . . . . . . . . . . . . . . . . . . Custom Computer Services . . . . . . . . . . . . 79 Jameco Electronics . . . . . . . . . . . . . . . . . . 11 Technologic Systems . . . . . . . . . . . . . . . . 8, 9 DesignSpark . . . . . . . . . . . . . . . . . . . . . . . . 1 Jeffrey Kerr, LLC . . . . . . . . . . . . . . . . . . . . 78 Tern, Inc. . . . . . . . . . . . . . . . . . . . . . . . . . 77 Elektor . . . . . . . . . . . . . . . . . . . . . . . . 62, 63 JK microsystems, Inc. . . . . . . . . . . . . . . . Triangle Research International, Inc. . . . . . . 79 Elektor . . . . . . . . . . . . . . . . . . . . . . . . 74, 75 Labcenter Electronics . . . . . . . . . . . . . . . . . . 3 Elprotronic, Inc. . . . . . . . . . . . . . . . . . . . . 71 MaxBotix, Inc. . . . . . . . . . . . . . . . . . . . . . 79 77 48 Not a supporting company yet? Contact Peter Wostrel ([email protected], Phone 978.281.7708, Fax 978.281.7706) to reserve your own space for the next issue of our member's magazine. Head Office Disclaimer Circuit Cellar, Inc. 4 Park Street, Vernon, CT 06066, Phone: 860.875.2199 Circuit Cellar® makes no warranties and assumes no responsibility or liability of any kind for errors in these programs or schematics or for the consequences of any such errors. Furthermore, because of possible variation in the quality and condition of materials and workmanship of reader-assembled projects, Circuit Cellar® disclaims any responsibility for the safe and proper function of reader-assembled projects based upon or from plans, descriptions, or information published by Circuit Cellar®. Copyright Notice Entire contents copyright © 2012 by Circuit Cellar, Inc. All rights reserved. Circuit Cellar is a registered trademark of Circuit Cellar, Inc. Reproduction of this publication in whole or in part without written consent from Circuit Cellar Inc. is prohibited. The information provided by Circuit Cellar® is for educational purposes. Circuit Cellar® makes no claims or warrants that readers have a right to build things based upon these ideas under patent or other relevant intellectual property law in their jurisdiction, or that readers have a right to construct or operate any of the devices described herein under the relevant patent or other intellectual property law of the reader’s jurisdiction. The reader assumes any risk of infringement liability for constructing or operating such devices. © Circuit Cellar 2012 Printed in the United States ZUmo shIeLD FoR aRDUIno The Zumo shield is an Arduino shield with a Zumo-tracked chassis. The shield includes dual-motor drivers, a buzzer to play simple sounds and music, and a three-axis accelerometer and compass. It mounts directly onto the Zumo chassis with the Arduino plugged face-down into the shield. The Zumo Shield’s battery voltage powers the Arduino. It breaks out the Arduino reset button, user LED, and I/O lines for convenient accessibility and to accommodate additional sensors. Using a Zumo Shield and an Arduino Uno or an Arduino Leonardo, the Zumo Chassis becomes a low-profile, Arduino-controlled, tracked robot that is less than 10 cm on each side (i.e., small enough to qualify for Mini-Sumo competitions). The Zumo Shield works with a variety of micro-metal gearmotors, enabling a customizable combination of torque and speed. An optional stainless-steel Zumo Blade can be used for applications involving pushing other objects. Arduino libraries and sample sketches are available to help quickly get a Zumo robot up and running. A Zumo Robot Kit for Arduino, which includes a Zumo Shield, a Zumo Chassis Kit, and a Zumo Blade, costs $42.95. With typical motor selection, the combination costs $74.95. Sold separately to those with a Zumo Chassis, the shield costs $24.95. Pololu Corp. www.pololu.com RFID PCB IDentIFICatIon system December 2012 – Issue 269 The maGIC-PCB is an RFID PCB identification system that can be used to embed RFID chips into a PCB. The chips are embedded during the initial production steps to enable identification and traceability. The RFID chips function within the UHF frequency bands (860 to 960 MHz) and can be globally operated. The MAGIC-PCB consumes less space on the PCB than barcodes or dot matrix codes. RFID chips can be embedded in PCBs or surface mounted. Because it doesn’t require an antenna, the system doesn’t take up space on the PCB’s front or rear. The MAGIC-PCB performs fast data acquisition (i.e., a very short read time) and is capable of simultaneously reading more than 100 tags per second. The MAGIC-PCB identification system features a high reading accuracy with a wide reading angle and a low number of manual operations. The system does not require optical contact. It reads through enclosures and packaging. Additional user memory (e.g., for software version, maintenance information, etc.) is also available. Contact Beta LAYOUT for pricing. 10 Beta LayoUt www.beta-layout.com N S W E N CT DU R O EW P CIRCUIT CELLAR® • www.circuitcellar.com two-way wireleSS m-buS meter reaDing moDule The rc1700hp-mbuS4 is a 169-MHz wireless M-Bus module for long-range automatic meter reading (AMR). The module is capable of secure two-way communication between a meter and a concentrator. It contains the Wireless M-Bus stack, supporting all physical layers, MAC layers and frame formats, transport, and security layers. The module handles all critical timing for twoway communication, along with very lowpower features for extended battery lifetime. The RC1700HP-MBUS4 module includes an extended feature set to meet time-critical requirements in two-way communication. It can detect and receive both frame formats in parallel and support encryption on the extended link layer and the application layer. The RF module can be used in the meter side, at the concentrator side, or as a standalone repeater. The small module saves space in size-critical applications. When used at the meter side, the RC1700HP-MBUS4 provides low current consumption in all operating modes (e.g., sleep, transmit, and receive). The module automatically handles reception time windows and automatically enters Sleep mode for low power consumption. When used at the concentrator side, the RC1700HP-MBUS4 can handle 256 meters internally storing individual encryption keys, and several thousand meters by using an external host controller for expanded key memory. The module automatically detects and checks ELL and APL encryption. An automatic message generator helps streamline the two-way communication with the meters, enabling the module to communicate with thousands of meters from one concentrator. Contact Radiocrafts for pricing. radiocrafts www.radiocrafts.com Development toolchain compatible with many oSes December 2012 – Issue 269 The multicore Jamaicavm is a development toolchain and runtime compatible with QNX Software Systems’s QNX real-time operating system (RTOS), Wind River Systems’s VxWorks RTOS, and the Linux operating system (OS). The toolchain combines a global real-time thread scheduler with aicas’s parallel and concurrent, fully preemptive, thread-distributed garbage collector. QNX, VxWorks, and Linux developers can use Multicore JamaicaVM to develop hard real-time applications on multicore CPU architectures using the Java programming language. Applications can be scaled from single-core CPUs to large multicore CPU architectures without recompiling Java language source code. For scalability and performance, the QNX, VxWorks, or Linux OSes can be used with JamaicaVWM’s embedded optimizing compiler, the Realtime Specification for Java API, and multicore runtime. Contact aicas for pricing. 12 aicas www.aicas.com NPN CIRCUIT CELLAR® • www.circuitcellar.com [email protected] ) D[ (PDLO www.hdl.co.jp/CC/ FPGA / CPLD Boards from JAPAN SAVING COST=TIME with readily available FPGA boards ■ ■ ■ ■ ■ ■ ■ ■ ■ %DVLFDQGVLPSOHIHDWXUHVVLQJOHSRZHUVXSSO\RSHUDWLRQ 4XDOLW\DQGUHOLDELOLW\LVSURYLGHGE\\HDUVRIVDOHV 6DPHERDUGVL]HDQGFRQQHFWRUOD\RXW²$&0;&0VHULHV $OOVWRFNHGLWHPVDUHUHDG\WREHVKLSSHGLPPHGLDWHO\ 2YHUYDULHWLHVRI)3*$&3/'ERDUGVDUHDYDLODEOH &XVWRPL]LQJVSHHGJUDGHDQGRUDQ\IHDWXUHVDUHSRVVLEOH )UHHGRZQORDGWHFKQLFDOGRFXPHQWVEHIRUHSXUFKDVLQJ +LJKTXDOLW\DQGKLJKO\UHOLDEOH)3*A &3/'ERDUGVIURP-DSDQ $OPRVWDOOSURGXFWVDUH5R+6FRPSOLDQFH FPGA/CPLD Stamp Module PLCC68 Series Easy and Quickly Mountable Module FPGA Module IC socket mountable ,2V(([WHUQDOFORFNLQSXWV DUHDYDLODEOH) 9VLQJOHSRZHUVXSSO\ RSHUDWLRn(9ROWDJHFRQYHUWHUVIRUDX[LOLDU\ SRZHUVXSSO\DUHEXLOWLQ) 6HSDUDWHGVXSSO\LQSXWV&RUH,2GULYHUV -7$*VLJQDO $OO3/&&VHULHVKDYHFRPPRQSLQ DVVLJQPHQW 9HU\VPDOOVL]H[>PP@) 5R+6FRPSOLDQFH 0$'(,1-$3$1 ALTERA FPGA Board XILINX FPGA Board XILINX PLCC68 Series Cyclone IV E F780 FPGA board ACM-204 series Spartan-6 FGG484 FPGA board XCM-018/018Z series Spartan-6 PLCC68 FPGA Module XP68-03 EP4CE30F29C8N EP4CE40F29C8N EP4CE115F29C8N Credit card size (86 x 54 mm) XC6SLX45-2FGG484C XC6SLX75-2FGG484C XC6SLX100-2FGG484C XC6SLX150-2FGG484C Credit card size (86 x 54 mm) RoHS compliant XC6SLX45-2CSG324C 3.3V single power supply operation On-board oscillator, 50MHz RoHS compliant RoHS compliant Arria II GX F572 FPGA board ACM-025 series EP2AGX45DF25C6N EP2AGX65DF25C6N EP2AGX95DF25C6N EP2AGX125DF25C6N Credit card size (86 x 54 mm) Spartan-6 FGG484 FPGA board XCM-110/110Z series XC6SLX45-2FGG484C XC6SLX75-2FGG484C XC6SLX100-2FGG484C XC6SLX150-2FGG484C Compact size (43 x 54 mm) RoHS compliant Cyclone IV E F484 FPGA board ACM-107 series Virtex-5 LXT FFG665 FPGA board XCM-017 series XC5VLX30T-1FFG665C XC5VLX50T-1FFG665C Credit card size (86 x 54 mm) RoHS compliant Cyclone III PLCC68 FPGA Module AP68-04 EP3C25U256C8N 3.3V single power supply operation On-board oscillator, 50MHz RoHS compliant Cyclone III PLCC68 FPGA Module AP68-03 RoHS compliant RoHS compliant EP4CE55F23C8N EP4CE75F23C8N EP4CE115F23C8N Compact size (43 x 54 mm) Virtex-5 FFG676 FPGA board XCM-011 series XC5VLX30-1FFG676C XC5VLX50-1FFG676C XC5VLX85-1FFG676C XC5VLX110-1FFG676C Credit card size (86 x 54 mm) EP4CGX50CF23C8N EP4CGX75CF23C8N EP4CGX110CF23C8N EP4CGX150CF23C7N Credit card size (86 x 54 mm) XC3S200AN-4FTG256C FPGA internal configuration ROM Two User LEDs RoHS compliant ALTERA PLCC68 Series RoHS compliant CycloneIV GX F484 FPGA board ACM-024 series Spartan-3AN PLCC68 FPGA Module XP68-02 EP3C10U256C8N 4Mbit Configuration Device Two User LEDs One User Switch(Slide) RoHS compliant MAX V PLCC68 CPLD Module AP68-02 5M570ZF256C5N External Clock inputs On-board Voltage regulator RoHS compliant RoHS compliant See all our products, A/D D/A conversion board, boards with USB chip from FTDI and accessories at : www.hdl.co.jp/CC/ MEMBER PROFILE: D e v G u a l t i e r i was inexpensive, and a great way to show family photos.” Member Name: Dev Gualtieri Location: Northern New Jersey Education: BS in Physics and a PhD in Solid-State Science and Technology Occupation: Embedded Firmware Engineer Member Status: He has been a subscriber “since the first day!” Technical Interests: Dev enjoys analog and embedded design. He writes a science and technology blog (www.tikalon. com/blog/blog.php) and he published two science-fiction novels, which are available from Amazon and other sources. Most Recent Embedded Tech-Related Purchase: Dev bought a color Nook book reader and hacked it into an Android tablet computer, which he said was much easier than it sounds. “The touch screen is resistive, not capacitive,” he explained, “so it’s not as responsive as other tablets, but it Current Projects: Dev used a Microchip Technology PIC microcontroller to build a Morse code flasher in a baby bottle for his newborn grandson. “It does an LED light show and flashes the alphabet and numbers in Morse code,” he explained. “I’m working on a steampunk-style digital clock and I’ve breadboarded an inexpensive digital balance that could be used by students in their school science projects,” he added. Thoughts on the Future of Embedded Technology: Dev said he thinks electronics have become inexpensive, but designers need development systems that make their jobs easier. “Things such as the Raspberry Pi—which packs Linux into an inexpensive PC board with loads of peripheral connections—will accelerate development of some powerful embedded projects,” Dev said. “I think the days of Assembly language programming are over.” I @editor_cc #microcontroller#circuit#embedded#FPGA#electricity#EEPROM #tech#volts#ADC#analog#DSP#WiFi#robotics#programming #RFID#code#schematic#logic#PWM#electronics#debug#bit#MCU #RTOS#ohm#byte#sensor#engineering#PCB#signal#processor #RAM#servo#CPLD#encoder Pitch ideas for articles Stay informed with valuable product announcements Learn about upcoming industry events, conferences, and more December 2012 – Issue 269 Follow us on Twitter Keep in touch and interact with the Circuit Cellar editorial department @audioXP_editor 14 CIRCUIT CELLAR® • www.circuitcellar.com EQ Test Your ANSWERS for Issue 268 Edited by David Tweed /* every pair of ones in the new word represents * a string of ones in the original word. Remove * them two at a time and keep count. */ while (x) { /* remove the lowest set bit from x; this * represents the start of a string of ones. */ x &= ~(x & -x); ++result; Answer 1—Assuming you connect the windings in-phase, you’ll have double the number of turns, so the resulting inductance will be about four times the inductance of one winding alone. If you hook them up out of phase, the inductance will cancel out and you’ll be left with the resistance of the wire and a lot of parasitic interwinding capacitance. Answer 2—With the two windings connected in-phase and in parallel, the inductance will be exactly the same as the single-winding case. But the resulting inductor will be able to handle twice the current, as long as the core itself doesn’t saturate. /* remove the next set bit from x; this * represents the end of that string of ones. */ x &= ~(x & -x); Answer 3—Here’s a solution that iterates over the number of strings, rather than the number of bits in the word: int nstrings (unsigned long int x) { int result = 0; /* convert x into a word that has a '1' for every * transition from 0 to 1 or 1 to 0 in the original * word. */ x ^= (x << 1); What’s your EQ?—The answers are posted at www.circuitcellar.com/eq/ } } return result; Answer 4—The term “process” in this case refers to the manufacturing process at the plant where the FPGA is made. It’s a measure of the statistical variability of the physical characteristics from chip to chip as they come off the line. This includes everything from mask alignment to etching times to doping levels. These things affect electrical parameters (e.g., sheet and contact resistance, actual transistor gains, and thresholds and parasitic capacitances). These kinds of variations are unavoidable, and the P in PVT is an attempt to account for their effects in the timing analysis. The idea is to make the analysis conservative enough so your design will work reliably despite these variations. Contributed by David Tweed December 2012 – Issue 269 You may contact the quizmasters at [email protected] www.circuitcellar.com • CIRCUIT CELLAR® 15 F EATURE ARTICLE by Dan Karmann (USA) Build an MCU-Based Bicycle Computer The EBikeMeter is a microcontroller-based bicycle computer that displays a variety of data. The design continuously stores the data on an on-board SD memory card and features a firmware file system that supports a PC-compatible, FAT-based file format. A friend of mine recently upgraded his home-built recumbent bicycle with an electricassist hub motor to ease his work commute. He asked me if I could design a monitoring/logging system and bicycle computer to display and help characterize the bicycle’s operation. The result is the EBikeMeter, an Atmel ATmega328Pbased bicycle computer (see Photo 1). This article provides a system overview and high-level descriptions of the hardware and the operating firmware. It also includes information about choosing and modifying the SD card file system, assembling the EBikeMeter, mounting the computer on a bicycle, and configuring and operating the unit. December 2012 – Issue 269 SYSTEM OVERVIEW 16 The EBikeMeter’s system requirements include displaying and monitoring the real-time speed, trip duration, elapsed trip mileage, temperature, motor current draw, battery voltage, and power consumption on a backlit four-line by 20-character LCD. The system continuously logs all those items as well as the minimum battery voltage, the maximum current draw, the maximum wattage, the watt hours, the amp hours, the average trip speed, the maximum trip speed, and the odometer readings to a removable onboard SD memory card. The EBikeMeter’s system also controls the LCD, monitors user push buttons for the user interface, and provides a control output for speed/current/voltage-controlled throttle override. Additionally, a serial interface is provided for system configuration and firmware upgrades. Figure 1 shows a block diagram of the EBikeMeter. An Atmel ATmega328P microcontroller is at the heart of the system. To measure speed and distance traveled, it receives pulse inputs from the speed sensor, which is mounted on the bicycle’s front fork. The ADC inputs to the ATmega328P are used to monitor the battery voltage and motor current. The system’s user interface is via a backlit 4 × 20 LCD with temperature-compensated contrast and two push buttons. A standard SD memory card socket is connected to the ATmega328P’s serial peripheral interface (SPI) bus. The throttle override signal is an ATmega328P PWM output. The system is powered from the 48-V battery associated with the electric motor and motor controller. I used a 5-Vonly LCD and a 3-V-only SD card. Therefore, I used a 48-to-5-V converter along with a 3.3-V regulator to provide the required voltages. I used a reset supervisor to receive early notification of system shutdown so appropriate logging and EEPROM storage can be completed before power is lost. THE HARDWARE Photo 1—The EBikeMeter is mounted on an electric-assisted recumbent bicycle’s handlebar. Figure 2 is the EBikeMeter’s schematic. Most of the parts came from my electronics stockpile. The SD card socket was salvaged from an old digital camera. The ATmega328P (IC1) controls the EBikeMeter’s operation and uses every pin. The internal 8-MHz internal RC oscillator is CIRCUIT CELLAR® • www.circuitcellar.com 4 × 20 LCD Contrast VDD Back light 48 to 5 V 5 to 3.3 V Digital potentiometer PWM LCD VCC SD Card SPI GND Power fail Figure 1—An Atmel ATmega328P microcontroller is at the heart of the EBikeMeter. The EBikeMeter’s main components and the interfaces to the speed sensor, battery, motor controller, and throttle are also shown. PF-INT VOLTS 1-WIRE 48 V RS + − AMPS ATmega328P − Temperature + RESET TXRX Motor controller Serial TH Hub M Motor L R LEFT THROTTLE OVERRIDE RIGHT Throttle SPEED Speed sensor www.circuitcellar.com • CIRCUIT CELLAR® scaled by IC2 and filtered by R4, C3, and C5 before it is monitored on the ATmega328P’s ADC 0 channel. With a 2.5-mΩ external shunt resistor, the current’s voltage seen by the processor is approximately: ( 2.5 mΩ 3.3 V × motor current × 20) + 2 This enables a motor current up to about 33 A to be monitored. Jeff Bachiochi wrote about using the MAX4081T (IC2) in this type of application in his article, “Electric Movement and Control” (Circuit Cellar 199, 2007). Note: The eight-pin MAX4081T device (IC2) is shown in the schematic superimposed on a six-pin DIP outline. This is because the MAX4081T is only available as a surface-mount device and is soldered to a six-pin DIP socket as a through-hole component. Also note: IC2 has two sources of VCC power, one from the 5-V supply and one from the current shunt resistor’s positive side. This was needed for initial testing when using an external 5-V supply without the 48-V battery. I noticed the IC2 REF1A pin was acting as a short circuit to ground without an IC2 VCC voltage. By supplying both voltages via D10 and D11, if the 48-V battery voltage is ever lost (due to a blown fuse or broken connection), the 3.3-V voltage supply will not be affected and the rest of the circuit will continue operation. The throttle override mechanism’s intent is for the EBikeMeter to act as a governor to limit operation of the bicycle electricassist motor to a maximum speed, maximum motor current, and/or minimum operating battery voltage. This is accomplished by overriding the throttle control signal from the throttle to the December 2012 – Issue 269 used, so no external crystal is required. The EBikeMeter operates at 3.3 V from the low dropout (LDO) regulator (IC4) from the 5-V power from the voltage converter (VM1) from the 48-V battery. The speed sensor input (from a magnetically activated reed switch or equivalent) is input to the ATmega328P’s INT0 input. General-purpose input/output (GPIO) pins PC2 and PC3 monitor the user push-button switches SW1 (left) and SW2 (right). Other GPIO pins (PB6, PB7, and PD4-PD7) are used to interface to the LCD. The LCD backlight is controlled with the Timer2 PWM output using an external transistor Q1. The ATmega328P SPI bus is used to interface to the SD memory card socket and the digital potentiometer (IC6), which controls the LCD contrast based on the current temperature. Note the heartbeat LED (on GPIO pin PB0) is also the SPI slave-select (SS) signal for the digital potentiometer’s SPI bus. So, whenever SPI-based accesses are happening to the digital potentiometer or the SD card, the heartbeat LED must first be turned off! The temperature is obtained from a Maxim Integrated Products 1-Wire device (IC5) from another GPIO pin (PC5). GPIO pin PC4 monitors the power-fail input from a reset supervisor device (IC3) using pin-change interrupts for early power-down notification. The scaled battery voltage is monitored on one of the ATmega328P’s ADC channels (ADC1). The scaled voltage (from R1 and R2) seen by the processor is approximately VBATT/20, which enables a battery voltage of up to 66 V to be monitored. An external high-side, low-ohm shunt resistor (RS) is used to sense the electric drive motor current. It is then amplified and 17 Figure 2—The complete EBikeMeter schematic depicts the off-board interfaces to the push-button switches, an SD card, a speed sensor, a battery, a motor controller, a throttle, and a serial console/bootloader interface. Application SD Card API DPot Screens stdio Config SD Raw Driver Display December 2012 – Issue 269 Peripheral 18 Hardware LCD CmdLine T2 SPI ADC T0 PCINT1 INT0 T1 UART T2 PWM SPI ADC T0 Pin Chg Int Ext Int T1 PWM UART Speed TOV Serial Digital pot Temp Partition /FAT SD Card Volts Amps L&R PB Pwr Fail OWI High OWI Bit EEPROM EEPROM DS1820 Figure 3—The EBikeMeter includes many firmware and hardware layers. CIRCUIT CELLAR® • www.circuitcellar.com BBroadest roadest FFamily amily of of H High-Performance igh-Performance 88-bit -bit M MCUs CUs The PIC18 KK--series is the broadest portfolio of high performance low-power 8-bit MCUs. This family off ffer ers easy migration with code and pin compatibility as well as extremely low power in Active and Sleep modes. eeXtreme Xtreme Low Low Power Power Ŷ As low as 20 nA in Sleep Mode Ŷ Down to 75 µA/MHz in Run Mode ith H igh PPerformance er formance Broad Broad Family Family w with High Ŷ 20 -80 pin packages Ŷ 8-128 KB Flash Ŷ Up to 16 MIPS with C compiler optimized architec ture or OOptimal ptimal Integration Flexible Flexible Peripherals Peripherals ffor Integration Ŷ mTouch™ capacitive touch sensing Ŷ Multiple PWMs and communication channels Ŷ Include options with segmented LCD display drivers, full-speed USB, CAN or 12-bit ADC IT’S IT’S EASY EASY TO TO GET GET STARTED! STARTED! Visit w www.microchip.com/8bit ww.microchip.com/8bit for: 1. More than 280 8-bit MCUs widely available 2. Datasheets and application notes to help with your designs 3. Low cost tools and demo boards PPIC18 IC18 EExplorer xplorer DDevelopment evelopment BBoard oard (DM183032) (DM183032) The Microchip name and logo, the Microchip logo, dsPIC, MPLAB and PIC are registered trademarks of Microchip TTechnolog echnology Incorporated in the U.S.A. and other countries. All other trademarks are the proper ty of their registered owners. ©2012 Microchip TTechnolog echnology Inc. All rights reser ved. 03/12 throttle, preventing it from “Although the motor controller controlling the motor controller. cannot increase the bicycle speed, This is a one-way override signal (i.e., it can only cause the the user can still pedal faster to motor controller to slow down, increase the speed without electric not speed up). If there is a motor assistance. If there is a speed control override, the motor current control override, bicycle speed should be limited the motor current draw should be to a certain maximum value limited to extend the battery’s with electric assistance. operating range, forcing the user Although the motor conto run slower or pedal harder.” troller cannot increase the bicycle speed, the user can still pedal faster to increase the speed without electric motor Additional schematic detail information assistance. If there is a motor cur- can be found in section 7.2 of the Reset rent control override, the motor EBikeMeter Reference Manual, which is current draw should be limited to available on Circuit Cellar’s FTP site. extend the battery’s operating Initialize I/O Enable interrupts range, forcing the user to run THE FIRMWARE Load config from EEPROM Initialize file system slower or pedal harder. If there is The EBikeMeter firmware development a battery voltage override, the was done in C using the Atmel AVR Y electric motor assist operation Studio 4 development environment with New prompt? Emit serial prompt should be limited if the battery the WinAVR C compiler. The EBikeMeter N voltage is too low. This condition firmware periodically monitors an elecY Select Main screen Sub-screen timeout? can cause battery failure. tric bicycle’s battery voltage, motor curN The processor’s UART is con- rent, ambient temperature, and bicycle Y nected to an external serial inter- speed. Various measured and calculated Screen update time? Update current screen on LCD N face to facilitate upgrading statistics from this monitored data are Y firmware and configuring the displayed on a 4 × 20 backlit LCD and Rotating items time? Update rotating item on LCD EBikeMeter configuration settings. some of the monitored data items are N To initiate the processor’s on- maintained in EEPROM. The LCD is Y Speedometer input? Process speed/distance board bootloader for firmware organized as five screens selectable with N upgrades, the serial DTR signal is two momentary push buttons. For nightY Start ADC for volts Sample volts/amps time? used to reset the processor. The time operation, a push button can be N EBikeMeter’s serial interface’s elec- used to enable the display’s LED backY trical interface is 3.3-V TTL level light. When the bicycle is moving, variADC Interrupt? Process volts/amps signals. To connect to a PC COM ous measured and calculated statistics N port, an external TTL-to-RS-232 are continuously logged on an SD card Y Pwr-fail/PB Interrupt? Process pin change converter is required (e.g., a using a PC-compatible file system. AddiN MAX3232-style converter device). tionally, based on user-configured setY Process push button If it’s needed, the 3.3-V power tings, the EBikeMeter firmware can limit PB Processing? N line is also supplied on the serial the electric motor controller’s throttle connector to power the external input to limit bicycle speed, motor curY Read temp time? Read temperature TTL-to-RS-232 converter. The rent draw, and/or minimum operating N required RS-232 signals needed battery voltage. An external serial interY Data logging time? Log data to SD card are TxD, RxD, Gnd, and DTR. DTR face is also provided for firmware N is only needed for firmware upgrades and EBikeMeter configuration. Y Throttle override time? upgrades via a MCS Electronics Layered hardware/firmware architecture Process throttle override N BootLoader, which I used because is used to structure the EBikeMeter I first started programming AVRs firmware as a classic small embedded Process serial input using the BASCOM-AVR BASIC system with a foreground main loop and environment, which included the background interrupt processing (see Y Heartbeat LED update? Update heartbeat LED MCS BootLoader capability. I use Figure 3). N the same firmware bootloader, After reset, the various processor I/O even in the WinAVR C develop- modules are initialized, the configuraFigure 4—Here is the EBikeMeter firmware’s start-up and ment environment, using a stand- tion items are loaded from EEPROM, main processing loop. An expanded view of the chart’s alone host bootloader application. interrupts are enabled, and the main highlighted section is available on Circuit Cellar’s FTP site. December 2012 – Issue 269 motor controller. The typical control signal from the throttle control is a 1-to-4-V analog voltage, with the highest voltage indicating full throttle. The circuitry that implements the throttle override signal is a PWM/GPIO output from the processor to diode D2 via Q2, R10, and R15 along with a currentlimiting resistor added to the connection between the throttle and the motor controller to protect the throttle’s circuitry. When a set speed, current, or voltage limit is reached, the throttle override signal overrides the control signal from the 20 CIRCUIT CELLAR® • www.circuitcellar.com COMPLETE ENGINEERING SOLUTIONS Start here. "The navigation and ordering process are easy to work. Thanks." – Richard, Newark element14 customer HOW MAY WE HELP YOU TODAY? COMMUNITY: element14.com WEBSITE: newark.com PHONE: 1.800.463.9275 LEARN MORE: newark.com/together At Newark element14, all your engineering needs come together in one source—vast product range from world-class brands, fast online search, seamless purchasing tools, resources and services, one-on-one support, and a community of experts. Here, you’ll find simpler, smarter and faster ways to do business. a) b) c) d) e) December 2012 – Issue 269 Photo 2—The EBikeMeter’s LCD screens in sequence are: Main (a), Power (b), Speed/ Distance (c), Throttle Override (d), and Recent Log Files List (e). 22 from EEPROM. When initializing the on-board file system, the SD card’s first partition is opened and checked for supported partition type and the file allocation table (FAT) system is opened and checked for supported FAT type. Because of the ATmega328P’s limited code space, the EBikeMeter’s file system is restricted to a FAT-12 or FAT-16 file system. Newer FAT-32 (and SDHC card) file systems are not supported. Due to the limited amount of files that can be stored in a FAT-based file system’s root directory, all EBikeMeter log files are stored in the “LOGS” subdirectory. There are five available screens (see Photo 2). Each time through the main loop, the LCD screen timer is checked to see if the currently displayed screen needs updating (using customized “BIG numbers” for speed on the Main screen), if the Main screen needs to be redisplayed, and if the rotating items on the Main screen need to be changed. (More information about using “BIG numbers” can be found at the Arduino Forum, see the Resources section.) The speedometer input value is checked and the bicycle speed, trip duration, maximum speed, and average speed are calculated. Also, voltage and current values are accumulated and watts, watt hours, and amp hours are calculated. The power-fail input and user push buttons are checked and acted upon. If a power-fail event occurs, all nonvolatile items stored in EEPROM are updated and further processing stops until power is restored. User pushbutton inputs are run through a finite state machine (FSM) to debounce the push-button signals and determine which event action should be taken. Three types of push-button events are recognized: single-button pressed, dualbutton pressed, and single-button hold. The temperature is periodically read and a digital potentiometer is used to adjust the LCD contrast based on this value. The accumulated statistics data is continuously logged to the SD memory card’s log file, but only if the bicycle is moving. All logging is suspended when the bicycle stops. Another periodic activity is determining if the throttle-limiting control needs to be changed based on the current speed, motor current, or battery voltage value and the associated configured limits. Finally, the serial interface is checked to determine if any commands have been received for processing. These commands are used for the various EBikeMeter configuration settings and basic SD card file management. Additional firmware detail information, including application programming interfaces (APIs), device driver access, and source file organization can be found in section 8 of the EBikeMeter Reference Manual with the manual and the full source code, which are available on Circuit Cellar’s FTP site. FILE SYSTEM SELECTION/ loop is entered, as shown in Figure 4. MODIFICATION Interrupts are used to monitor the The EBikeMeter firmware file system speedometer input, power-fail input, needs to support a PC-compatible FATuser push-button input, general timerbased file format. I found several FATbased event timing, UART transmit and type file system firmware packages receive operation, and ADC voltage and online, but most were too large to fit in current input monitoring. the available flash memory space along The EBikeMeter configuration and nonwith the rest of the application code. volatile statistics data loaded from the Some firmware packages were too processor’s EEPROM at start-up include: large to fit even without any application speedometer wheel size, LCD backcode. I found a Roland Riegel light timeout, LCD subscreen timeMMC/SD/SDHC card library that out, LCD backlight brightness, LCD was small enough to do the job, “The EBikeMeter configuration and contrast correction minimum tembut it had one drawback: it only nonvolatile statistics data loaded from perature and digital potentiometer supported FAT-16 for SD cards the processor’s EEPROM at start-up adjustment, speed throttle override from 32 MB to 2 GB. I had a surinclude: speedometer wheel size, LCD speed, motor current throttle overplus of FAT-12-based 8- and 16-MB backlight timeout, LCD subscreen ride current, and minimum battery SD cards I preferred to use in timeout, LCD backlight brightness, throttle override voltage. The nonthis application. After studying LCD contrast correction minimum volatile statistics items include: the Roland Riegel MMC/SD/SDHC temperature and digital potentiometer minimum operating voltage, peak card library code, I found I could adjustment, speed throttle override motor current, amp hours, peak add FAT-12 support to it for these speed, motor current throttle override watts, watt hours, maximum trip smaller SD cards and it would current, and minimum battery throttle speed, trip distance, trip duration, still fit into the available flash and odometer mileage. The current memory (barely!) with the applioverride voltage.” log file number is also retrieved cation code. CIRCUIT CELLAR® • www.circuitcellar.com 250 mA 5 24 3 1 8 6 7 ON / OFF +R −S 50 A 48 V 250 mA DIN Front view 250 mA LCD 5 2 4 3 1 8 6 7 P5 DIN Back view P3 Spare P2 P4 P1 470 Speedo EBikeMeter Blk Front view X + Speed sensor − Motor CTLR TH Panasonic SD Card socket HUB Motor TTL RXD 3 Mini-DIN 5 TXD X GND DTR +3.3 V 5 6 4 2 1 Mini-DIN 4 5 3 2 1 2 1 Serial 3.3 V Grn Gry Yel 6 5 2 1 5 2 1 X Lock Closed when card partially inserted. Open when card fully inserted and card locked. Detect closed when card fully inserted RS-232 VCC Orn X Blu 6 DAT1 (8) DAT0 (7) GND (6) CLK (5) VDD (4) GND (3) CMD (2) CD (1) DAT2 (9) GND MAX3232 RXD TXD DTR GND 1 6 EBikEMEtEr ASSEMBLY The EBikeMeter circuitry was assembled on a modified Protostack PB-MC-AVR28 28-pin AVR full-size development board, which was sandwiched with the LCD board. This was placed in a small project box with the push buttons mounted on the left and right sides. The box had a custom cutout and window on its front for the LCD and featured a machined aluminum rear plate where the SD card socket and I/O connections for power, speedometer, serial port, and mounting brackets for the bicycle handlebar cross member were made. I used the FreePCB open-source PCB editor to help optimize the component layout for the point-to-point wiring. This tool was also used to design a couple of proposed layouts for PCBs, one for the LCD mounted on the PCB’s component side and one for the LCD mounted on the PCB’s noncomponent side, but neither have been fabricated into an actual board. More details (e.g., photos) of this assembly and layout are available at my DLK Engineering website (http://dlkeng. cwahi.net/EBikeMeter.htm). iNStALLAtiON, CONFiGUrAtiON, & OPErAtiON Figure 5 shows how the EBikeMeter is wired with the bicycle’s electric-assist motor controller, battery, throttle, and the speedometer sensor. The EBikeMeter was mounted on the www.circuitcellar.com • CIRCUIT CELLAR® handlebar cross brace and the speedometer sensor was attached to the front fork with a companion magnet attached to a front wheel spoke. The speedometer’s wiring was routed from the front fork to the handlebar-mounted EBikeMeter. The power and throttle control signal wires were routed from the handlebar-mounted EBikeMeter along the bicycle frame, under the rider’s seat to behind the rider, where a small box was placed that contained the voltage, current, and throttle control connections to the battery and motor controller. Before using the EBikeMeter, several items need to be configured to the bicycle on which it is installed. This configuration can be accomplished using a serial connection to a PC at 19,200 bps using your favorite terminal emulation software. As I previously stated in the Hardware section, the EBikeMeter’s serial interface is not RS-232, but is typically called a TTL interface. It requires an RS-232-to-TTL converter, or possibly a USB-to-TTL converter, such as those from FTDI. (Note that most FTDI converters do not supply the DTR signal, so they will work for configuration but not firmware upgrade.) The most important configuration item is the wheel’s circumference on which the speedometer sensor is installed. This controls the accuracy of the speed, trip distance, and odometer readings. Other configuration settings include: the initial odometer setting, the LCD backlight timeout and brightness, the LCD contrast adjustment base temperature value, the LCD December 2012 – Issue 269 Figure 5—This detailed wiring diagram shows the connectors, speed sensor, voltage supply, current shunt, associated protective fuses, and throttle-control modifications. I also included a schematic of the Panasonic SD card, connections, and cables used for the serial interface adapter. 23 1 Toggle Backlight Set speed override Left Main screen Right Hold left 2 Clear power items Set Amps override Left and right Power screen (Sub-screen timeout) Right Hold left TIME TO RIDE 3 Clear trip items Left and Speed/distance right screen (Sub-screen timeout) Right 4 Toggle backlight Throttle override Right screen (Sub-screen timeout) Left Left and right 5 Toggle backlight Left Recent log files screen (Sub-screen timeout) Right December 2012 – Issue 269 Figure 6—This diagram shows how the user push button EBikeMeter LCD screens navigation and function selection works. 24 button will select the next screen in the sequence: Main, Power, Speed/Distance, Throttle Override, and (optionally) Recent Log Files List. When on the Main screen, the Throttle Override screen, or the Recent Log Files List screen, the left user push button toggles the LCD backlight’s state. When on the Power screen, the Speed/Distance screen, or the Throttle Override screen, the left and right user push buttons control clearing power statistics, clearing the trip statistics, and modifying the throttle override settings. Additional configuration and operating information can be found in the EBikeMeter User’s Manual and the EBikeMeter Reference Manual, which are available on Circuit Cellar’s FTP site. subscreen timeout, and the throttle override control values. The LCD backlight is normally off. One of the push buttons can be used to turn it on. When the LCD backlight is turned on and the bicycle is moving, it will stay on, but when the bicycle stops moving, the LCD backlight will turn off after a configured timeout period. The LCD backlight brightness is adjustable for nighttime operation and should be unnecessary for daytime operation. The LCD contrast is temperature sensitive and requires temperature-based adjustment to remain visible at various temperatures. The configuration setting sets the temperature at which the adjustment begins. At every 0.5°C above this temperature, the on-board digital potentiometer is adjusted one step to change the contrast setting. Of the five LCD screens (shown in Photo 2), only the Main screen (with the speedometer display) can be indefinitely displayed, all the other screens have a timeout after which the display reverts back to the Main screen. The throttle override configuration control values limit the throttle for the maximum speed, the maximum motor current draw, and the minimum battery voltage. The EBikeMeter operation is fairly simple. When it is powered on, a sign-on screen is shown for a few seconds then the Main screen appears. As shown in Figure 6, the right user push button is primarily used to navigate to other subscreens (see Photo 2). The Main screen is the primary screen needed as a bicycle computer, but pressing the right push This has been an interesting project and I have learned some new things. SD card interfacing and FAT file systems are no longer mysterious. Unfortunately, the biggest hurdle with this project was the lack of the AVR’s available code space. It is completely full! This prevented me from making the code as robust as I would have liked, as many error conditions are not handled as well as they could be. I started with the ATmega168 (16-KB flash memory) and quickly moved to the ATmega328P (32-KB flash memory) once I realized how much code a FAT file system uses. I could have easily used a nonexistent larger drop-in replacement AVR part (e.g., ATmega648 with 64-KB flash memory). For those interested, the source code available on Circuit Cellar’s FTP site contains additional development and debugging commands from the serial interface. These can be used by turning some of the commands on and turning some of the other functionality off to fit into flash memory (SD card support and temperature support are two ideal candidates) from the defines.h header file. Additional information about this project is available on my EBikeMeter website. I Dan Karmann ([email protected]) is a semi-retired embedded systems developer. He spent 27 years at AT&T Bell Labs/American Bell/AT&T Information Systems/Lucent Technologies Bell Labs/Avaya Labs. Prior to that, Dan worked as a CB radio repair technician while earning a BSEET (magna cum laude) from the University of Nebraska, Omaha. Dan spent six years as an Electronic Warfare technician in the U.S. Navy. He enjoys reverse engineering and documenting electronic device hardware and firmware from the 1980s and 1990s. He is a charter subscriber who has every issue of Circuit Cellar magazine and has been reading Steve Ciarcia’s “Circuit Cellar” articles since the late 1970s. Dan’s website is at http://dlkeng.cwahi.net. PROJECT FILES To download the code, go to ftp://ftp.circuitcellar.com/ pub/Circuit_Cellar/2012/269. RESOURCES Arduino Forum, “BIG Numbers from a Little LCD,” 2008, http://arduino.cc/forum/index.php/topic,7245.0.html. CIRCUIT CELLAR® • www.circuitcellar.com Atmel Corp., “Studio Archive,” www.atmel.com/tools/ STUDIOARCHIVE.aspx. ———, “AVR103: Using the EEPROM Programming Modes,” 2005, www.atmel.com/images/doc2578.pdf. ———, “AVR318: Dallas 1-Wire Master,” 2004, www.atmel. com/images/doc2579.pdf. J. Bachiochi, “Electric Movement and Control,” Circuit Cellar 199, 2007. ConhisMotor Technology Co., Ltd., “Standard Controller 48 V 1,000 W,” www.conhismotor.com/ProductShow.asp? id=49. FreePCB, www.freepcb.com. Future Technology Devices International, Ltd. (FTDI), “USB TTL Serial Cables,” www.ftdichip.com/Products/ Cables/USBTTLSerial.htm. Grin Technologies, “Homepage of the Cycle Analyst,” www.ebikes.ca/drainbrain.shtml. D. Karmann, DLK Engineering, http://dlkeng.cwahi.net/ EBikeMeter.htm. MCS Electronics, “MCS BootLoader,” Application Note 143, www.mcselec.com/index.php?option=com_content&task =view&id=159&Itemid=57. Roland Riegel, “MMC/SD/SDHC Card Library,” www.rolandriegel.de/sd-reader/index.html. SourceForge, WinAVR, http://sourceforge.net/projects/ winavr. SOURCES ATmega328P Microcontroller Atmel Corp. | www.atmel.com OAR-3 Open-air sense resistors IRC | www.irctt.com DS18S20 1-Wire digital thermometer and MAX4080/ MAX4081 amplifiers Maxim Integrated Products, Inc. | www.maxim-ic.com BootLoader Windows application MCS Electronics |www.mcselec.com MC34064 Undervoltage sensing circuit ON Semiconductor | www.onsemi.com PB-MC-AVR28 28-Pin AVR development board Protostack | www.protostack.com TMR 4811 DC/DC Converters TRACO ELECTRONIC | www.tracopower.com www.circuitcellar.com • CIRCUIT CELLAR® December 2012 – Issue 269 MCP414x/416x/424x/426x 7/8-Bit single/dual SPI digital potentiometer Microchip Technology, Inc. | www.microchip.com 25 F EATURE ARTICLE by Joe Pfeiffer (USA) Electrically Actuated Sound Effects A Circuit and Firmware to Ring a Phone Bell Integrating modern technology and old-school equipment can lead to exciting results. This article details the development of microcontroller-based circuitry and firmware that’s used to ring a retro telephone bell during a theatrical production. December 2012 – Issue 269 I 26 have been interested in live theatre for many years. I act, I direct, I work backstage, I serve on the Board of Directors of the Las Cruces Community Theatre (LCCT) as vice president for membership, and I wrote the computer program LCCT uses to play sound cues during performances. Like most live theatres, LCCT’s sound effects are ordinarily produced by playing recorded sound samples. Most theatres use a CD player and some use commercial computer programs. LCCT uses a program I wrote that runs on a computer in the theatre’s light and sound booth. When an LCCT patron hears the sounds of a thunderclap, a doorbell, a telephone, or someone falling down a staircase, what they’re really hearing is a recording played by a computer running my software. In fall 2010, the theatre took on a new challenge: recreating a 1940s radio show live on stage. The play was Vintage Hitchcock, written by Joe Landry and directed by Les Boyse. For this production, most of the sound effects needed to be produced on stage using technology that at least looked like it was from the 1940s. Les asked me to design the sound effects for the production, build the hardware for the effects, and act as stage manager and sound effects technician during performances. I was only too happy to oblige! Fortunately, I’d recently retired, so I had time. The majority of the sound effects needed were completely mechanical (e.g., a “rain drum” passing dried peas over nails to create the sound of rain, “clapboards” slapped together to mimic gun shots, orchestral chimes—loaned to us by New Mexico State University’s Department of Music—for clock bells, etc.). We also used a few sampled sound effects. Incidental music was “played” by an organ on stage. This a) music was recorded (by cast member Robert Senecal) and played from a laptop hidden in the organ console using the same sound effects software we normally used from the light booth. Finally, there were a few effects that were electrically actuated: some alarm bells, a car horn, a “tick tock” to mimic a clock running at several different speeds, and a telephone bell. This last sound effect is the subject of this article. Photo 1a is my microcontrollerbased bell ringer. Photo 1b shows the design mounted in the theatre. b) Photo 1a—Here is the completed phone bell ringer with the cover removed. The bell is exposed to show the audience that this is the sound source and to make the sounds easier to hear. The power, ground, and input connections are on the bottom of the box. b—The design is mounted and ready for use. CIRCUIT CELLAR® • www.circuitcellar.com www.circuitcellar.com • CIRCUIT CELLAR® December 2012 – Issue 269 of PICs available in different configurations and with different capabilities, all at a low cost. In a lot of ways, the PIC can be regarded as a generalpurpose IC that can be made to do whatever you want, as long as a microsecond response time is acceptable. That was certainly the case with this project! While it would have been possible to replace the 555s with a PIC, it also seemed reasonable to further reduce the parts count using an L293 dual H-bridge in place of the output transistor. The transistor would have required an input resistor and a snubber diode to protect it from its highly inductive load, while the L293 could be driven directly from the microcontroller and has internal snubber diodes. Using a single-output transistor also only Figure 1—A Microchip Technology PIC16F505 microcontroller is at the heart of the produces a 12-VPP signal to drive the transformer, phone bell ringer’s circuit. while the L293 can reverse the output’s polarity and provide 24 V. This ends up providing a stronger signal BUILDING THE BELL RINGER You’ve got to hand it to the engineers who designed the orig- to the bell. I needed a single-user input and three outputs to control inal telephone system. Using only two wires, they were able to provide power to the handset, detect when the handset was on the L293: one for the chip enable and one for each of the two and off the hook, provide full-duplex voice communication, H-bridge halves to analyze the necessary control signals. A decode pulse dialing, and ring a phone bell—all with tubes and fourth pin was also used for a “blinkenlight” for debugging relays! One result of combining all these capabilities is that a and status reporting. Using a PIC and enabling in-circuit protelephone bell is not rung by a simple low-voltage DC current, gramming also required pins for power and ground, and three as you may expect. Instead, the phone bell requires a 20-Hz pins for programming with a Microchip PICkit 2 programmer. alternating current at 90 VRMS. (This is in North America, bells A 14-pin PIC could accomplish all this with pins to spare, so in other countries have other standards.)[1] Many people have I used a PIC16F505 (see Figure 1). The bell is scavenged from an old telephone (see Photo 1). taken on the challenge of ringing a phone bell for many purposes. As a result, there are many circuits available to ring the The power supply runs from a 12-V source. Since several of bell. Some are made entirely from discrete parts, while most the other effects (e.g., the alarm bells and car horn) required use one or more 555 timers to generate the ring tone itself, as a 12-V supply, it seemed reasonable to use a 12-V standard well as the ring cadence (i.e., how long the bell rings and the for all the electrically actuated effects. The PIC16F505 microcontroller generates all the timing signals. Half an L293 is time between rings). As I was starting to breadboard a circuit I found (based on used to drive a 12.6-V filament transformer, which is wired a single 555 timer and a power transistor), it occurred to me backward to produce the bell’s required voltage. A 20-Ω resisthat it had a high parts count for what it accomplished. I tor limits current to the L293’s 600-mA maximum. Finally, two thought it should be possible to significantly reduce the count LEDs (not visible to the audience!) provide status for debugby using a microcontroller to generate the signal, rather than ging. One LED is directly connected to the power supply and using the 555 timer and its associated resistors and capaci- shows that power is being provided to the circuit. The other is tors. With a microcontroller, I could also use a single compo- controlled by the microcontroller. A standard programming nent to manage all the timings (i.e., ring cadence as well as header, for use with the PICkit 2 programmer, was also on the the ring itself). Cadence adjustment could be accomplished board. The circuit was laid out on a small piece of Veroboard entirely in software without adjusting any external compo- and encased in a metal utility case. The ringer circuit and the nents. With this in mind, I started designing a microcon- phone bell itself were attached to a piece of plywood, so the unit could be easily installed on the set. troller-based ringer circuit. This same basic circuit could be used in a variety of projI’ve used Microchip Technology PIC processors in similar projects. Low-pin-count PICs are well suited to this sort of ects requiring control of a relatively low current load. There thing since they have simple (and flexible) power require- are enough pins leftover on the PIC to wire up both halves of ments and can generate their required clocks without exter- the L293, and it could be used as the “brain” for a mobile nal components. They can also configure their input pins to robot with bumpers to detect collisions. Using a PIC with anahave internal weak pull-up resistors, further reducing the log inputs also enables you to use the circuit for a line-followparts count. They are capable of easy in-circuit programming ing robot. I made several design decisions based on obtaining parts in by simply putting a male header on the board. Finally, their instruction set is well optimized to control the input and out- a short time frame. An eight-pin PIC (e.g., a PIC12F508) would put pins, with the capability of reading from or writing to a also have been suitable if I’d wanted to share pins between the single pin in a single instruction. There are literally hundreds in-circuit programming and my I/O, but the PIC16F505 is a 27 December 2012 – Issue 269 28 blinkenlight somewhere. part I keep on hand (for that The ability to turn on a light matter, I have no doubt that to tell you the firmware has other microcontroller famireached some point in the lies would have worked just code is unbelievably helpas well as a PIC). Likewise, ful! The PIC instruction set the careful reader will note also makes it easy to use a the circuit calls for a 20-Ω, single instruction to turn 5-W resistor, but the actual the LED on or off, so insertprototype used two 10-Ω, ing the debugging code has 10-W resistors—that’s what minimal impact on the the electronics store had in firmware. In this case, stock that day! Finally, and when the circuit was first most importantly, designing Photo 2—A performance of Vintage Hitchcock was captured from a video taken assembled, I turned the a custom PCB would have by Patrick McKinley. The sound bench is on the right. The wall of electrically actuated effects is below the “On Air” and “Applause” signs. The phone bell LED on immediately after provided a much nicer result ringer is directly below the red alarm bell. startup so I knew whether than any prototyping sysor not the microcontroller tem. I designed my circuit using tools from the open-source gEDA electronics design suite was running. Later, when the bell wasn’t ringing as planned, I turned the LED on at the same time as the L293 chip under Linux. enable. (The problem turned out to be a poor solder joint to one of the bell wires.) Once the debugging was complete, it FIRMWARE, STATE VARIABLE, & COUNTERS The firmware is also quite simple. The input pin is config- was programmed to flash five times per second whenever the ured to be internally tied to a weak pull-up, so grounding the input pin was grounded. This was useful to isolate and quickly pin with a switch on the control panel is used to signal a ring resolve problems with the power supply and signal inputs while (all the other electrical effects used are also actuated by the effects were being installed on stage. The power LED indigrounding an input). The microcontroller’s unused pins were cated the circuit was live, while the software-controlled LED configured as outputs, so I wouldn’t need to worry about pull- indicated the input was active. While an oscilloscope or a voltmeter could have been used for this purpose, the flashing ups or pull-downs on those pins. The PIC’s internal watchdog timer (WDT) has an 18-ms light was a valuable self-diagnostic aid. The cadence was adjusted by modifying program constants nominal period, which I used for my time base. The motor driver output is reversed on every watchdog interrupt, and reprogramming the microcontroller. If this had been resulting in an approximately 28-Hz output frequency. A designed as a commercial product, some other way of config20-Hz output frequency would have been ideal, but this uring the cadence would have been needed. There are a number of ways to accomplish this, but they all need more was well within the bell’s tolerance. A state variable is used to track whether or not the button is capable PICs than the one used in this project. If I’d used a currently being pressed. If the button is being pressed, the PIC with an analog input, I could have used potentiometers state variable also tracks whether or not the bell is currently to set the times. Alternatively, if I’d used a PIC with on-board ringing. Counters are used to control the ring cadence and the EEPROM, it would have been possible to capture button blinkenlight’s flash rate. On each processor reset (caused by presses from a user, which could be used to configure the either powering up the circuit or a WDT interrupt), the input pin cadence. (The latter probably would have been the better is sampled. If the button isn’t being pressed, the H-bridge is option.) Since I was designing the circuit, writing the disabled, its control inputs are set to a known state, and all the firmware, and designing the sound, simply modifying the counters are initialized to known values. If the button is being constant was the easiest approach! The firmware was written pressed, the state variables and counters are checked to deter- and programmed into the PIC using tools from Linux’s openmine what action (if any) should be taken, whether or not the source gputils tool suite. ringer’s state should be changed, and whether or not the blinkenlight’s state should be changed. SHOWTIME A counter is used to control the ring cadence. While the Photo 2 shows the set for Vintage Hitchcock, which ran for cadence actually used in North America is 2 s on and 4 s off, nine performances over three weekends in October 2010. I this seemed very slow when on stage. The times used in this operated the effects with assistance from Karen Buerdsell, project are closer to 2 s on followed by 2 s off. When the but- and everything worked flawlessly. ton is first pressed, the counter is initialized and it is decreAfter one of the performances, I was approached by Ron mented on each WDT interrupt. When it reaches zero, the Szatkowski, who would be directing It's a Wonderful Life motor driver is disabled and the counter is used to count (another live radio show written by Joe Landry) for the El down the off time. Paso Playhouse during the 2010 holiday season. He asked if A second counter determines when the blinkenlight LED’s I’d be willing to loan his production some of the equipment state should be changed. I’m a firm believer that any embed- I’d built. Of course I agreed, and I also made several trips to ded microcontroller project requires a software-controlled El Paso to help with the installation. Their production was also CIRCUIT CELLAR® • www.circuitcellar.com successful, and the effects equipment performed well. It was especially gratifying to learn, after the end of their season, that they had given me their award for “Best Sound Design” for the 2010–2011 season! The main point, though, is how much easier it was to use a microcontroller and an integrated motor driver to design and program this circuit than it would have been with one or more 555s or 556s and a bunch of discrete parts. All the hardware design required was simply hooking the 16F505 to the L293. Everything else could be done by tweaking firmware. No matter how much we love the smell of solder in the morning, burning a new version of some firmware is a whole lot easier! I Author’s note: I thank the Las Cruces Community Theatre and Les Boyse for giving me the opportunity to work on this project. Joseph J. Pfeiffer, Jr. earned a BS in Computer Science and Physics in 1979, and a PhD in Computer Science in 1986, both from the University of Washington in Seattle. He is an Emeritus Professor, having retired from the New Mexico State University Department of Computer Science in 2010. Some of his interests include all aspects of theatre, embedded design and programming, old cars, dog obedience training, model rocketry, and shooting. Joe is currently constructing a shop oven, which will be capable of solder reflow for surface-mount components and more general heating, such as the type required for powder-coating small parts. REFERENCE [1] R. Brown, Non-Continuous Events in the Telephone Outside Plant, Telecommunication Industry Association TR-30.3/99-04-620, 1999. RESOURCES gplEDA, www.gpleda.org. gputils, GNU PIC Utilities, http://gputils.sourceforge.net. Microchip Technology, Inc., “PIC12F508/509/16F505 Data Sheet: 8/14-Pin, 8-Bit Flash Microcontrollers,” 2009, ww1.microchip.com/downloads/en/devicedoc/41236e.pdf. ———, “PICkit. 2 Programmer/Debugger User’s Guide,” 2008, ww1.microchip.com/downloads/en/devicedoc/ 51553e.pdf. STMicroelectronics, “L293D L293DD: Push-Pull Four Channel Driver With Diodes,” 2003, www.st.com/internet/ com/TECHNICAL_RESOURCES/TECHNICAL_LITERATURE/ DATASHEET/CD00000059.pdf. SOURCES PIC16F505 Microcontroller and PICkit 2 Development programmer/debugger Microchip Technology, Inc. | www.microchip.com L293D Push-pull four-channel drivers with diodes STMicroelectronics | www.st.com GOD-LIKE G O D - L I K E ENGINEERS E N G I N E E R S & PROGRAMMERS: ROGRAMMERS: BUILD B U I L D A 23 2 3 RD C CENTURY E N T U R Y MEDICAL E D I C A L DEVICE EVICE $10 .00 each (Qty 100) The gridARM™ System on a Chip (SOC) is a high performance, low cost, low power, highly integrated single chip with 10 / 100 / 1000 Mbps Ethernet, USB, CAN, Serial, SRAM Memory, SPI, I2C, RTC and internal peripherals designed to provide a complete solution for embedded applications. %XWWHUÀ\1HWZRUNLVDIXOO\IXQGHGVWDUWXSEDFNHG E\ HQWUHSUHQHXUV ZKR KDYH DOUHDG\ VKDSHG RXU IXWXUH %H DW WKH LQWHUVHFWLRQ RI &RPSXWHU 6FLHQFH(OHFWULFDO(QJLQHHULQJDQG0HGLFLQHDV ZH GHYHORS DGYDQFHG GLDJQRVLV DQG WUHDWPHQW WHFKQRORJLHVWKDWZLOOWUDQVIRUPPHGLFLQH WANT WA W NT T TO OC CHANGE HANGE THE HE WORLD? WORLD? JOIN JOIN US. US. 800.975.4743 USA • 1 630.245.1445 gridconnect.com/gridarm.html Leaders in the embedded and networking marketplace providing network hardware, high quality software and services )3*$DQG(PEHGGHG'HVLJQ(QJLQHHU '9LVXDOL]DWLRQ&RPSXWHU6FLHQWLVW 'HYLFH'ULYHUDQG6RIWZDUH(QJLQHHU 6LJQDODQG,PDJH3URFHVVLQJ6SHFLDOLVW (OHFWULFDO(QJLQHHURU$SSOLHG3K\VLFLVW [email protected] info@butterf nffo@buttterrflynetinc ynetinc.com com | www.butterflynetinc.com ww w www ww.butt .butterf tterrflynetinc.com ynetinc.com www.circuitcellar.com • CIRCUIT CELLAR® December 2012 – Issue 269 T H E N E T WO R K I N G E X P E RTS 29 The RL78 Green Energy Challenge The RL78 Green Energy Challenge set forth to revolutionize the way engineers approach new designs in a world where low-power consumption, high efficiency, and renewable resources are integral parts of daily life. Participants from over 67 countries were invited to showcase their skills in developing green energy designs for applications—such as energy harvesting, metering, low power, and control systems—using Renesas’s RL78 microcontrollers and a robust software environment, powered by Renesas and its alliance partners. Thank you for everyone’s participation and congratulations to the winners! First Prize Electrostatic Cleaning Robot Solar tracking mirrors, called heliostats, are an integral part of Concentrating Solar Power (CSP) plants. They must be kept clean to help maximize the production of steam, which generates power. Using an RL78, the innovative Electrostatic Cleaning Robot provides a reliable cleaning solution that’s powered entirely by photovoltaic cells. The robot traverses the surface of the mirror and uses a high voltage AC electric field to sweep away dust and debris. Scott Potter United States [email protected] Electrostatic Cleaning Robot The RL78 Green Energy Challenge Second Prize Cloud Electrofusion Machine Using approximately 400 times less energy than commercial electrofusion machines, the Cloud Electrofusion Machine is designed for welding 0.5˝ to 2˝ polyethylene fittings. The RL78controlled machine is designed to read a barcode on the fitting which determines fusion parameters and traceability. Along with the barcode data, the system logs GPS location to an SD card, if present, and transmits the data for each fusion to a cloud database for tracking purposes and quality control. Cloud Electrofusion Machine Third Prize The Sun Chaser: A GPS Reference Station Michael Hamilton United States [email protected] The Sun Chaser is a well-designed, solar-based energy harvesting system that automatically recalculates the direction of a solar panel to ensure it is always facing the sun. Mounted on a rotating disc, solar panel’s orientation is calculated using the registered GPS position. With an external compass, the internal accelerometer, a DC motor and stepper motor, you can determine the solar panel’s exact position. The system uses the Renesas RDKRL78G13 evaluation board running the Micrium µC/OS-III real-time kernel. Sjoerd Brandsma Netherlands [email protected] The Sun Chaser: A GPS Reference Station www.circuitcellar.com/RenesasRL78Challenge The RL78 Green Energy Challenge Honorable Mention Water Heater by Solar Concentration This solar water heater is powered by the RL78 evaluation board and designed to deflect concentrated amounts of sunlight onto a water pipe for continual heating. The deflector, armed with a counterweight for easy tilting, automatically adjusts the angle of reflection for maximum solar energy using the lowest power consumption possible. Pierre Berquin France Water Heater by Solar Concentration Honorable Mention Air Quality Mapper Air Quality Mapper Want to make sure the air along your daily walking path is clean? The Air Quality Mapper is a portable device designed to track levels of CO2 and CO gasses for constructing “Smog Maps” to determine the healthiest routes. Constructed with an RDKRL78G13, the Mapper receives location data from its GPS module, takes readings of the CO2 and CO concentrations along a specific route and stores the data in an SD card. Using a PC, you can parse the SD card data, plot it, and upload it automatically to an online MySQL database that presents the data in a Google map. Raul Alvarez Torrico Bolivia [email protected] www.circuitcellar.com/RenesasRL78Challenge The RL78 Green Energy Challenge High-Altitude Low-Cost Experimental Glider (HALO) Honorable Mention High-Altitude Low-Cost Experimental Glider (HALO) The “HALO” experimental glider project consists of three main parts. A weather balloon is the carrier section. A glider (the payload of the balloon) is the return section. A ground base section is used for communication and display telemetry data (not part of the contest project). Using the REFLEX flight simulator for testing, the glider has its own micro-GPS receiver, sensors and low-power MCU unit. It can take off, climb to pre-programmed altitude and return to a given coordinate. Honorable Mention Honorable Mention Wireless Remote SolarPowered “Meteo Sensor” Portable Power Quality Meter You can easily measure meteorological parameters with the “Meteo Sensor.” The RL78 MCU-based design takes cyclical measurements of temperature, humidity, atmospheric pressure, and supply voltage, and shares them using digital radio transceivers. Receivers are configured for listening of incoming data on the same radio channel. It simplifies the way weather data is gathered and eases construction of local measurement networks while being optimized for low energy usage and long battery life. Monitoring electrical usage is becoming increasingly popular in modern homes. The Portable Power Quality Meter uses an RL78 MCU to read power factor, total harmonic distortion, line frequency, voltage, and electrical consumption information and stores the data for analysis. Andrè Barbosa Brazil [email protected] Grzegorz Kaczmarek Poland [email protected] Wireless Remote Solar-Powered “Meteo Sensor” Portable Power Quality Meter Jens Altenburg Germany [email protected] www.circuitcellar.com/RenesasRL78Challenge F EATURE ARTICLE by Scott Weber (USA) Controlling Access with a Proximity Card Open the Door to Manchester Encoding A radio frequency proximity card and reader can be used to control access to many things. This article explains how the data is Manchester encoded on the card, how to find the bitstream’s beginning, and how you can use the data and clock lines to bit bang the waveforms into a microcontroller. December 2012 – Issue 269 P 34 reviously, I wrote about the accomplished by bit banging the clock HARDWARE & ASSEMBLY RS-485 network I wired through and data lines. This article describes Figure 1 shows the circuit’s schematic. my home. I interconnected exterior light how this is done. As it is installed today, The unit connects to the network controllers and a device that broadcasts the microcontroller that controls the through J1, obtaining power and comtime, which it extracts from a GPS receiv- doors is in place and the code works munication via the differential signal. er (“MCU-Based Light Control: Longer well. However, I have not settled on an The power is fused for protection and filSerial Communication on Differential adequate weatherproof enclosure for tered with C1 to clean up any noise. The Wires,” Circuit Cellar 265, 2012). I the reader. differential signal is bounded by D1 and thought, if I can design a unit that controls and monitors my exterior lights, why not design units that can do the same thing with my garage doors? And if I can do that, I can probably put in some nifty access, as well. So I went looking for something “nifty.” I used a 125-kHz radio frequency (RF) proximity card and reader. The reader triggers the door to open or close by closing a relay for a second. I used a MikroElektronika RFid reader board and a credit card-sized access card. The card reader outputs a clock signal and a Manchester-encoded data signal. I used the device’s UART to communicate on the RS-485 network. The signal decoding and Figure 1—A Microchip Technology PIC18F2221 microcontroller controls my garage doors. The differential driver interfacing to the card reader is section around U2 is identical to devices I have used for other projects. The proximity card reader attaches to J3. CIRCUIT CELLAR® • www.circuitcellar.com a) b) D2 (a pair of back-to-back Zener diodes to prevent overvoltage) and is fed to the DS 1487 differential driver, where it is translated to a 5-V serial signal and supplied to a Microchip Technology PIC18F2221’s UART. The microcontroller’s output RA2 is used to switch the driver between transmit and receive. The system normally remains in Receive mode and is switched to Transmit mode when it needs to reply to another device on the network. Receive enable (RE) and output enable (~OE) are tied together on the DS 1487. When the unit needs to enter Transmit mode, the receiver becomes disabled. This prevents half-duplex echo, where the UART picks up its own transmissions. The interface that monitors whether the door is opened or closed is connected to J4 and uses an external pull-up resistor to maintain a high state Photo 3—The two boards, one for each garage door, are mounted on opposite sides of the case. The RS-485 harness, the position sensors, and the door-opened contact are terminated on the barrier strip at the rear. This location also represents the end of one side of the RS-485 line, so the termination resistor is also on the barrier strip. www.circuitcellar.com • CIRCUIT CELLAR® Photo 2a—The reader is connected to a breadboard that reads the data and clock signals. I used two chips—the Microchip 28-pin PIC and the eight-pin DS 1487 driver shown above it—to connect it to the network for testing. b— The numeric values encoded in the RFID are preprinted on the card. The 5 bytes I read from the card in hexadecimal are 34 00 9E 73 04. The 34 is the manufacturer ID. Of the remaining 4 bytes, 93 is 134 in decimal, followed by 73 04 or 29444 in decimal. Alternately, 9E 73 04 is 10384132 in decimal, both of which match the card’s preprinted values. when the door contact is open. Almost any resistance will suffice, as the contact will ground the input line when the door is closed. I used heavy-duty garage door alarm contacts that screw into the concrete and have an armored wire harness (see Photo 1). Interface to the proximity card reader is done through five lines on J3, two of which supply power to the reader device. The remaining lines are connected to the microcontroller’s RB port to take advantage of the separate interrupt 0 and interrupt 1 feature. I can monitor the data signal to determine when a card becomes present and track the clock signal to decode the datastream. The data is processed by bit banging the data line and the clock lines in software. Photo 2 shows the prototype breadboarding of the proximity card reader to the PIC microcontroller. The J2 connector is simply a dry contact relay that is connected across the garage door’s Activate button. The microcontroller will activate the relay for approximately 1 s. The relay is driven by a simple 2N2222 transistor with a base resistor intended to keep the microcontroller’s drive current less than 1 mA. The relay coil has a Zener diode across it to keep spikes out of the power supply rails. Finally, J5 is used to accommodate the in-circuit programmer used to program the controller’s flash memory. I mounted two of the circuit boards in an industrial enclosure and placed it on the wall between my two garage doors. Photo 3 shows the final unit. The RS-485 bus terminates on the barrier strip at the rear and includes the termination resistor at this end. The magnetic and relay contacts plug directly into the header on the boards, which enables the units to determine the door’s state and trigger the garage door to open or close. December 2012 – Issue 269 Photo 1—These heavy-duty alarm contacts determine whether the garage doors are open or closed. 35 Wait for SCH SCH Arrived Message processed Not our address Any UART error Read address Buffer filled up Our address Read next byte ETX Arrived Message arrived flag Figure 2—The ISR’s state machine reads incoming messages from the RS-485 network. December 2012 – Issue 269 CODE 36 (ISR) is where the program Back determines what external up 16 Collect 64 clocks event occurred and what to do samples Switch about it. All the code is coninterrupt to LHB = RHB tained in the interrupt.c file. CLK Determine phase The ISR first determines the Wait for data reason for the interrupt then line 64 bits all branches to the code that correct Failed decides what to do about each Process failed one. In the case of the UART, Finding 9 1s Set Card the handling is shown in a Find read preamble flag state diagram (see Figure 2). Collect In the case of an interrupt 5 bytes from port B, the cause would be from the proximity card reader, which is shown in Figure 3—This is the state machine that decodes the Manchester datastream from the proximity card reader. The detection another state diagram and begins when the data line becomes active. will be described later (see Figure 3). When the interrupt is from the UART, When the main program loop processes the incoming character is examined for an an incoming message, an empty reply SOH value. If the character isn’t SOH, the buffer is created in case a response is ISR returns. Once found, the second needed. The response message buffer is character received is compared to the simply built by swapping the source and device’s address. If there is no match, the destination addresses and placing a senstate returns to the condition of waiting tinel value in the fourth position. After for an SOH. Otherwise, subsequent char- the incoming message is acted upon, if a acters are placed in the receive buffer and response is needed, the fourth byte is an index is incremented. If the buffer examined to see if it contains an outgobecomes full before it sees an EOT, the ing message rather than the sentinel entire buffer is discarded and the state value. If so, the RS-485 driver is returns to the condition of watching for an switched to Transmit mode and the mesSOH. When an EOT is received, I know an sage is fed to the UART. The UART is then entire message has been received and monitored for a busy status and, when the state is set to indicate a message has the last byte is sent, the RS-485 driver is arrived. From there, the main processing switched back to receive. loop examines the message and reacts accordingly. Once the message is PROXIMITY CARD READER processed, the main loop sets the state The RFid proximity card reader board back to wait for another SOH. is based on an EM Microelectronic The main program loop simply clears EM4095 RFID reader chip with a built-in the watchdog timer and tests to see if a antenna and the interface broken out in a new message has arrived from the nice header. In addition to a proximity UART. When that occurs, it will examine card, all I needed to get data pouring out the command byte and take the appro- of it was five pins: VCC, Gnd, Enable, priate action. I previously discussed the Data, and Clock. The data signal is typibasic commands in my article about the cally low and goes high when a card is RS-485 network. The specialized com- brought close to the antenna. This is mands the unit understands are shown used to trigger an interrupt. However, in Table 1. once the data line is active, I switch the I used the demo version of Microchip’s MPLAB C18 C compiler. The compiler integrates perfectly with Microchip’s MPLAB integrated development environment (IDE) and is well equipped with libraries that enable use of the device’s EEPROM, UART, interrupts, timers, and other features I didn’t need. The project uses only two source code files. One handles the mainline code, the other handles any of the interrupt routines from the UART or the card reader. The code is available on Circuit Cellar’s FTP site. The source file main.c contains the startup code. The peripherals are disabled and port A2 is configured as an input to monitor the garage door’s condition. The Microchip C18 library provides the functions to configure the UART. Following the setup, the microcontroller reset cause is determined and recorded into EEPROM. I used this technique in my other project. It enables the reset reasons to be later investigated to determine the unit’s stability. This is primarily to track watchdog resets to help determine the program’s solidity. Finally, the interCommand Payload Purpose rupts are enabled and the mainline goes into a loop waiting for an indiO none Commands the device to open the door if it is not already open cation that a card read has occurred C none Commands the device to close the door if it is not already closed or a message was received from the A 5-byte card ID Adds a new proximity card number to the EEPROM RS-485 network. The interrupt service routine Table 1—These are some additional communication messages understood by the garage controller. CIRCUIT CELLAR® • www.circuitcellar.com December 2012 – Issue 269 38 knowing is to determine the location of the bit boundaries to the bits—and I conveniently left nibble 2 bit 5 bit 6 bit 7 bit 8 row parity them off the diagram. So, there nibble 3 bit 9 bit 10 bit 11 bit 12 row parity is no way to determine if a bitnibble 4 bit 13 bit 14 bit 15 bit 16 row parity stream like this is all 1s or all 0s. nibble 5 bit 17 bit 18 bit 19 bit 20 row parity Of course, if the bitstream was nibble 6 bit 21 bit 22 bit 23 bit 24 row parity only 1s or 0s and never nibble 7 bit 25 bit 26 bit 27 bit 28 row parity changed, there wouldn’t be nibble 8 bit 29 bit 30 bit 31 bit 32 row parity much value in it anyway. At nibble 9 bit 33 bit 34 bit 35 bit 36 row parity some point, the level will nibble 10 bit 37 bit 38 bit 39 bit 40 row parity change, so I will take advantage parity column parity column parity column parity column parity “0” of that. Remember, because of the Table 2—Here is a breakdown of all 64 bits in the RFID card’s bitstream. The bits are received left to right, top to bottom. parity bit, there will never be more than four 1 bits in a row. interrupt to occur with each clock cycle bits for the previous nibbles. If you’ve However, there can be more than four and sample the data line. The interrupt been counting, that adds up to 64 bits. 0 bits. In fact, a proximity card with nothwill be set back to the data line at the Table 2 provides a breakdown of all ing on it can have 55 0 bits in a row. end. If the data was corrupted, the 64 bits read from the card. Data is out- Although I can be certain there is a tranprocess starts over. However, the clock put serially from the reader in 4-bit sition in the middle of every bit, there runs at approximately 125 kHz as long as groups followed by a parity bit. Because may not be a transition from one bit to the module is enabled. There are 64 clock the pattern includes an even parity bit another. I know when the bit changes cycles per bit streamed from the reader. after 4 regular bits, it is impossible to from a 1 to 0, or the other way around, The data encoded in proximity cards is get five “1” bits in a row, unless it is the there is no transition at the bit boundary 64 bits in total, which are encoded as five preamble. This means once you can because the next bit has to transition in 8-bit bytes, with nine “1” bits of preamble detect the nine “1s,” you are certain to the other direction. If this isn’t clear, go and a collection of even parity bits tossed have found the preamble. Sounds easy, back and take another look at Figure 4. in for good measure. Each parity bit doesn’t it? Not so fast. In the middle of the image the bit appears after 4 data bits, so 10 bits are changes from a 0 to a 1. Results in the used to represent 1 data byte. Finally, MANCHESTER “UNTIED” level do not change at the boundary. So, there is a nibble that contains the parity Robert Lacoste provides a good expla- if I can locate where there is no transination of Manchester encoding in tion, I have found the bit boundary. his article “Line-Coding Techniques” (Circuit Cellar 255, a) 2011), but I will provide a brief description here. Manchester 0 0 1 1 0 b) encoding uses an NRZ that relies on a transition in the middle of each bit. Figure 4a shows a simple bitstream with a datastream. Figure 4a—This is a sample of a Manchester-encoded Figure 4b shows it’s a not-todatastream. b—This is a clock stream (not to scale). scale clock. There are two common encoding schemes. The first is referred to as G. E. Thomas encoding, in which a low-to-high transition is encoded as a “0” and Figure 5 —Here is a stream of all 1s. Or is it all 0s? a high-to-low transition is encoded as a “1.” The other encoding is LHB IEEE 802.3, which is exactly the opposite.[1] It took some investiRHB gation, but I was able to deter64 mine that the proximity cards used G. E. Thomas encoding. Take a look at Figure 5. If I Figure 6—The bit can be thought of as a left-hand bit and asked whether this was a string of Photo 4—I recorded a segment of the waveform a right-hand bit, each one divided into 32 clock cycles. The 1s or 0s, which would be the cor- coming from the card reader. The entire video is longer pulse in the center does not have a transition, and rect answer? The only way of available at Circuit Cellar’s FTP site. is, therefore, a bit boundary. Nine Preamble 1s 1 nibble 1 bit 1 1 1 bit 2 1 1 bit 3 1 1 bit 4 1 1 row parity CIRCUIT CELLAR® • www.circuitcellar.com /* DATA LINE ON INT 0 CLOCK LINE ON INT 1 */ #pragma interrupt ProcessInterrupt void ProcessInterrupt() { if (PIR1bits.RCIF) { goto SERVICE_UART; } /* When the data line INT 0 goes HIGH, it’s maybe a START... */ if ((INTCON & 0x12) == 0x12) { /* Shut down the data line and start the clock (INT1) */ INTCONbits.INT0IF = 0; INTCONbits.INT0IE = 0; INTCON3bits.INT1F = 0; INTCON3bits.INT1E = 1; clockCount = 0; totalBits = 0; preamble = 0; state = STATE_FIND_PHASE; /* And start at state 0 */ return; } /* CLOCK INTERRUPT - Used to sample the PORTB input */ if ((INTCON3 & 0x09) == 0x09) { INTCON3bits.INT1F = 0; /* Clear the interrupt */ clockCount++; /* Increment the count */ if (clockCount == 16) { lhb = PORTBbits.RB0; /* Get the left side */ goto INT_DONE; } if (clockCount == 48) { rhb = PORTBbits.RB0; /* get the right side */ if (lhb == rhb) { /* if they match, then is not */ clockCount = 16; /* the correct phase, so we try again */ goto INT_DONE; } } if (clockCount != 64) { goto INT_DONE; } /* Now we are ready to examine the bit */ clockCount = 0; switch (state) { /* What are we doing with this bit we found...? */ case STATE_FIND_PHASE : totalBits++; if (totalBits == 64) { /* if we found 64 good ones, we are in phase */ totalBits = 0; state = STATE_FIND_PREAMBLE; } goto INT_DONE; case STATE_FIND_PREAMBLE : totalBits++; if (lhb) { preamble++; if (preamble == 9) { /* If it’s 9th... */ state = STATE_COLLECT_BITS; cardBits = 0; cardByte = 4; bits = 0; reader[cardByte] = 0; } goto INT_DONE; } preamble = 0; /* otherwise, start over */ if (totalBits == 64) { /* if we didn’t ever find one */ state = STATE_START_OVER; // bail break; } goto INT_DONE; case STATE_COLLECT_BITS : cardBits++; if (cardBits == 5) { /* After 4 we skip parity */ break; www.circuitcellar.com • CIRCUIT CELLAR® Here is where I take advantage of the clock output. This clock is 64 pulses per bit, so there are 32 pulses before the transition and 32 pulses after the transition. I start counting clocks when the data line becomes active. After 16 clocks, I should be in the middle of the left-hand side of the bit (LHB). After 32 more clocks (i.e., 48 total), I should be at the right-hand side of a bit (RHB). After 64 clocks, the bit is over (see Figure 6). If, after 48 clock cycles, I test the LHB value and find it’s the same as the RHB value, I must conclude that there is no transition and I am out of phase by 32 clock cycles. I set the clock counter to 16 and start over (because I was already at 48 counts). Once I establish that I am in the correct phase, I continue checking for 64 total bits in a row to verify that the LHB doesn’t match the RHB every time. This encompasses the entire card’s bitstream. Once I verify the entire bitstream is in phase, I can start hunting for the nine 1s that make up the preamble. The simplicity of this is that the LHB is the actual bit value I want. To further validate the datastream, the nibbles’s parity bits can be tested, as well as the column parity bits (see Table 2). However, I have not implemented this in the code that is available on Circuit Cellar’s FTP site. Figure 3 shows the basic state diagram. Listing 1 shows the code for both state machines, which contains the ISR for both the proximity card and the UART. To verify this process by hand, I use my oscilloscope to make a video recording of the bitstream and play it back, pausing frequently to hand draw the waveform. Photo 4 shows a single screen capture. The entire movie is available on Circuit Cellar’s FTP site. I then manually decode the pattern and compute the bytes. They match exactly the values shown on the card (see Photo 2b). Within the program’s main loop, a test is performed to determine if a card has been accurately read—exactly like the test for a UART’s message. If a clean read has occurred, the card bytes are compared to the values stored in the EEPROM to verify access permission. The command protocol enables me to update the card byte values in EEPROM so I can add or change cards at will. December 2012 – Issue 269 Listing 1—This is the entire ISR that handles bytes from the UART and interrupts from the card reader. The top portion initially responds to a change in the data line by switching to interrupting on the clock line. The code’s lower portion collects UART bytes into an incoming message. Both segments set a flag so the main loop knows something arrived. (Note: Listing continued on p. 40) 39 ROOM TO GROW Listing 1—Continued from p. 39 } if (cardBits == 10) { cardBits = 0; break; } } if (lhb) { /* Is it one? */ reader[cardByte] |= (0x80 >> bits); } bits++; /* Next bit */ if (bits == 8) { /* after 8 we skip parity */ bits = 0; /* and start over at */ cardByte—; /* the next byte */ reader[cardByte] = 0; } if (cardByte == 0xff) { /* 64 - 9 (start) - 1 (end) state = STATE_MSG_COMPLETE; } break; if (state == STATE_START_OVER) { INTCONbits.INT0IF = 0; /* Back to INT 0 */ INTCONbits.INT0IE = 1; INTCON3bits.INT1E = 0; /* And stop the INT 1’s } } goto INT_DONE; December 2012 – Issue 269 SERVICE_UART: if (RCSTAbits.FERR) { PIR1bits.RCIF = 0; cmd_state = CMD_WAITING; ch = RCREG;; goto INT_DONE; } if (RCSTAbits.OERR) { RCSTAbits.CREN = 0; RCSTAbits.CREN = 1; PIR1bits.RCIF = 0; cmd_state = CMD_WAITING; ch = RCREG; goto INT_DONE; } ch = RCREG; 40 switch (cmd_state) { case CMD_WAITING : if (ch == 0x01) cmd_state = CMD_READ_ADDR; break; case CMD_READ_ADDR : if (ch == gaddr) { cmd_state = CMD_READ_CMD; msgbyte = 0; } else { cmd_state = CMD_WAITING; } break; case CMD_READ_CMD : if (ch == 0x04) { cmd_state = CMD_COMPLETE; } else { command[msgbyte] = ch; msgbyte++; if (msgbyte > 10) cmd_state = CMD_WAITING; } break; } PIR1bits.RCIF = 0; INT_DONE: return; } */ */ Obviously, there are many applications for decoding proximity cards this way, and the code I provided should be easy to migrate to other microcontrollers. There is also room for other enhancements (e.g., forwarding card access activity to a dedicated recorder), which would enable tracking of entrances, and by whom. I would also like to place a unit by the regular house doors and connect it to a magnetic door striker. This would enable keyless entry to the house. When I started this project, my goal was to design an external reader I could use to open my garage doors. This goal required finding an effective way to decode the Manchester bitstream, which I have described here. I hope you found it insightful. I After working in software development for 20 years, Scott Weber (scotty42@ csweber.com) is tired of the direction the PC software world is taking. He is now striving to complete his Electrical Engineering degree at the University of Texas Arlington. PROJECT FILES To download the code, go to ftp://ftp.circuitcellar.com/pub/ Circuit_Cellar/2012/269. REFERENCE [1] Wikipedia, “Manchester Code,” 2012, http://en.wikipedia.org/ wiki/Manchester_code. RESOURCES R. Lacoste, “Line-Coding Techniques,” Circuit Cellar 255, 2011. S. Weber, “MCU-Based Light Control: Longer Serial Communication on Differential Wires,” Circuit Cellar 265, 2012. SOURCES EM4095 RFID Reader chip EM Microelectronic | www.emmicro electronic.com PIC18F2221 Microcontroller, MPLAB C18 C compiler, and MPLAB IDE Microchip Technology, Inc. | www.microchip.com RFid Reader board MikroElektronika | www.mikroe.com CIRCUIT CELLAR® • www.circuitcellar.com Microprocessor Design Using Verilog HDL With the right tools, such as this new book, designing a microprocessor can be easy. Okay, maybe not easy, but certainly less complicated. Monte Dalrymple has taken his years of experience designing embedded architecture and microprocessors and compiled his knowledge into one comprehensive guide to processor design in the real world. Yours for just $ Monte demonstrates how Verilog hardware description language (HDL) enables you to depict, simulate, and synthesize an electronic design so you can reduce your workload and increase productivity. Microprocessor Design Using Verilog HDL will provide you with information about: UÊ6iÀ}ÊÊ,iÛiÜ UÊ6iÀ}Ê `}Ê-ÌÞi UÊiÃ}Ê7À UÊVÀ>ÀV ÌiVÌÕÀi UÊ7ÀÌ}ÊÊ6iÀ} UÊÊiLÕ}}}]Ê6iÀwÊV>Ì]Ê >`Ê/iÃÌ} UÊ*ÃÌÊ-Õ>ÌÊ>`ÊÀit www.cc-webshop.com 45.00 QUESTIONS & ANSWERS Engineering Innovation, Experimentation, & Explanation An Interview with Stuart Ball Beginning with his early fascination with electronics, Stuart Ball has always nurtured his curiosity, figured out how things work, and designed useful projects. We recently discussed some of his early microprocessor designs, his interest with Atmel’s AVR C coding, and his dream project, which involves enabling future engineers to learn through experimentation.—Nan Price, Associate Editor December 2012 – Issue 269 NAN: Where are you located? 42 NAN: You’ve written 19 articles for Circuit Cellar since 1995. Several of them focus on Atmel AVR architecture or devices. What is your fascination with AVR? C coding. And, I just like the way it works. I tend to stick with things that work, STUART: I live in Longmont, CO. as long as they fit the application. Some years ago, I introduced DSPs to the NAN: How did you become interested engineering organization where I was in electronics? STUART: I tend to write about what working. At that time, I was using AnaSTUART: I knew I would do something interests me—something I want to do log Devices’s parts, but I was using in the sciences ever since grade or sometimes something that I will find them as very fast microcontrollers school. I was always drawn to things useful myself. I have liked the AVR instead of as DSP blocks. I designed a lot of hardware using those related to science. At about parts, some of which they are age 12, I read a copy of Walstill using now, after 15 years. ter Tompkin’s book SOS at “I tend to stick with things that work, Like a lot of engineers, I can Midnight and knew I wanted as long as they fit the application. get really focused on someto work in electronics. I tinSome years ago, I introduced DSPs to thing. Once I decide to do a kered with electronics all the engineering organization. At that project, I tend to pursue it to through high school and completion, even if it takes earned a BSEE from the Unitime, I was using Analog Devices’s multiple approaches. versity of Missouri, Columbia. parts, but I was using them as very fast I also have an MBA from microcontrollers instead of as DSP NAN: Your article “Inside a Regis University. blocks. I designed a lot of hardware Digital Joystick” (Circuit Cellar 139, 2002) describes NAN: Tell us about your curusing those parts, some of which they how you designed a potenrent occupation. are still using now, after 15 years.” tiometer-free joystick. Tell us a little about the design. STUART: I have been an Do you still use the joystick? engineering manager, but made the switch back to engineering a few architecture ever since I started using years ago. I have found over the years it. In some ways, Microchip Technolo- STUART: At the time, I was just experithat, while outside projects aren’t gy’s architecture has advantages, espe- menting with contactless joystick ideas always directly applicable to my work, cially in the area of the timer/counter and got focused on the idea of a joystick the principles in firmware, hardware, blocks. But the AVR has a very orthog- that did not use potentiometers but also and analog design are applicable. onal architecture and lends itself well to didn’t require any complicated fabricated CIRCUIT CELLAR® • www.circuitcellar.com NAN: In “Connect with USBLab” (Circuit Cellar 178, 2005), you describe your Atmel ATmega8515 microprocessor-based solution to using a parallel printer port. Tell us how you developed the USBLab and how the ATmega8515 factors into the project design. STUART: This was actually a larger project that was too specific for a magazine article. So I built a more general-purpose, scaled-down version of the project specifically for the article. I no longer use the original project, although I have used the same AVR-USB interface numerous times for specialized things. NAN: Tell us what inspired you to write “Voltage Solutions: Harness the Power of Voltage Converters” (Circuit Cellar 198, 2007)? Was it a specific design requiring high voltage? STUART: This was a collection of circuit ideas more than a specific project. At the time, I was looking at some high-voltage generation ideas for a commercial project. I dug into the various ways of generating those voltages, and I have since used those techniques a few times. NAN: You’ve written several books about microprocessor-based designs: Analog Interfacing to Embedded Microprocessor Systems, Embedded Microprocessor Systems: Real World Design, and Debugging Embedded Microprocessor Systems. You also collaborated with other authors to write Test and Measurement: Know www.circuitcellar.com • CIRCUIT CELLAR® the entire thing can be shrunk to a single 6” × 8” perfboard. But right now, it’s just an idea and I don’t even know if I’ll do it. I’m not sure I want to prove this concept badly enough to write and debug another CP/M BIOS. Other than that, I don’t have any specific projects planned. I tend to write about whatever has intrigued me enough to actually build it. I definitely have less time for this than I used to. I do tend to lean more toward simpler projects now, rather than the very complex projects I used to build. But most of that is just due to time limitations. “My first computers were Z80-based systems running CP/M-80, and wired on perfboard. I later built my first IBM PC clone the same way. I’ve toyed with the idea of building a Z80 computer using modern parts to see if the entire thing can be shrunk to a single 6” × 8” perfboard.” It All. What do you enjoy most about writing and explaining microprocessor design? Do you plan to write any future books? STUART: I don’t have any actual plans to write additional books, although I’ve thought about a couple of concepts. With the move to surface-mount technology (SMT) parts, it is hard for future electrical engineers to do anything hands-on for experimenting. So, I’ve considered a book of projects that would be designed around some simple offthe-shelf parts that are still readily available, do something useful, and demonstrate important electronics concepts. Projects you can do without $2,000 in SMT assembly tools. I think I can summarize what I enjoy about writing this way: Book editors at technical companies tend to be more editorial than technical. They usually have to edit books for more than one technical field, so they can’t really be experts in all of them. So, when my first book was in process, the senior editor called me and said an assistant editor took the manuscript to read through it, and then came back very excited and said “I understood this.” NAN: Are you currently working on or planning any microprocessorbased projects? STUART: Many years ago, I used to hand-wire computers. My first computers were Z80-based systems running CP/M-80 and wired on perfboard. In fact, my first magazine articles were written on those systems. I later built my first IBM PC clone the same way. I’ve toyed with the idea of building a Z80 computer using modern parts to see if NAN: Last question. Let’s say you had a full year and a nice budget to work on any embedded design project you wanted. Call it your “dream project.” What would it be? STUART: I’ve done a lot of the things I want to do and I’m budgeting my time differently now than I used to. But, if I was going to spend my days working on something like this—if I was going to quit my job and spend eight hours a day on it—then I might work on things that let the next generation of engineers experiment with electronics so they can get into the field in a practical way. For example, when I wrote Analog Interfacing to Embedded Microprocessor Systems, I created a demonstrator for control systems that used a tiny light bulb coupled to a phototransistor. It enabled me to demonstrate various control techniques without a lot of complicated hardware and in a way that was easy to understand and explain. The light bulb introduces delay because the filament has to heat up before producing light, it demonstrates all kinds of properties of real loads in real control systems. It was controlled from a PC using an off-the-shelf USB module, the plots were done in Excel, and the software was done in Python. It was really cheap and easy to set up. Developing that sort of thing interests me, provided that I see a path where it can actually be used. Doing things just to do them doesn’t interest me as much as it used to. I December 2012 – Issue 269 parts, like molded plastic reflectors or precision bearings. I experimented with optical approaches, but decided the magnetic approach was the most usable from a DIY perspective. I don’t use the joystick anymore, although I do still have it. Most modern PCs don’t have game port inputs for joysticks, they use USBs. And I really don’t play video games, either on the computer or on anything else. Honestly, they bore me silly. 43 A BOVE THE GROUND PLANE by Ed Nisley (USA) Arduino Survival Guide Power Supply Arduino boards appear in many projects that call for a microcontroller, because they’re easy to use and program. In this column, Ed explores the often-overlooked Arduino power supply, shows why Arduino projects sometimes exhibit difficult-to-debug problems, and describes how to keep your Arduino project running smoothly. December 2012 – Issue 269 A 44 rduino microcontroller boards make a great deal of sense for small projects that need a dash of intelligence: a short program twiddling a few I/O pins. Unfortunately, the casual “jam LEDs in the headers, clip on a battery, download a sketch, and watch it blink” approach tends to produce baffling problems that have little to do with software errors and everything to do with hardware problems. It’s so easy to get a simple project running that newcomers generally believe more complex circuits should Just Work. You’ve seen Arduino microcontrollers in this column since early 2009, where I’ve often used them for analog data collection and linear control. While they’re not an ideal platform for analog hardware designs, they’re cheap, readily available, and perform well enough for the job. Along the way, I’ve figured out how to avoid some of the quirks and gotchas that can afflict projects ranging from LED blinkers to low-level analog sensors. In this column, I’ll explore the Arduino board’s built-in power supply, arguably the least-appreciated and most important part of the circuitry, and explain how to keep it happy. In fact, when confronted with a misbehaving Arduino project, I always verify the power supply first. THE SOURCE OF ALL POWER Photo 1 shows the power supply components on an Arduino UNO board. Input power can come from any of four different sources: • • • • coaxial DC jack (center +) USB jack Vin header socket 5V header socket When you plug in both DC power and a USB cable, the circuitry automatically draws power from the higher voltage source. The small FET just to the left of the 16 MHz crystal isolates the USB cable from the Arduino power supply to prevent backfeeding the PC’s USB port. A series diode prevents reverse polarity on the DC jack from destroying the circuitry. Photo 1—The power section of an Arduino UNO board automatically selects the higher input voltage. Thermal vias around the voltage regulator conduct heat to a copper area on the bottom of the board. (Photo adapted from http://arduino. cc/en/uploads/Main/ArduinoUno_R3_Front.jpg) CIRCUIT CELLAR® • www.circuitcellar.com Microcontroller ATmega328 Operating Voltage 5V Input Voltage (recommended) 7 – 12 V Input Voltage (limits) 6 – 20 V Digital I/O Pins 14 (6 PWM) Analog Input Pins 6 DC Current per I/O Pin 40 mA DC Current for 3.3 V Pin 50 mA Figure 1—The Arduino UNO board specification summary gives you the broad outlines, but you must dig into the datasheets and hardware layout to keep your project within the actual limits. The Arduino headers include three power outputs: The Vin header socket connects directly to input of the 5 V regulator that feeds the 5V header socket and the rest of the Arduino, as I’ll describe below. The USB interface chip, which is an Atmel ATmega16U2 on the UNO board and an FTDI FT232RL on earlier versions, includes a small 3.3 V regulator. Because Vin connects downstream of the reverse-polarity protection diode at the coaxial DC jack, reversing the GND and Vin connections will destroy the Arduino board. All of the circuit ground pins in the jacks and headers connect to the same copper areas on the PCB, although the PCB routing introduces some serpentine traces with many vias. The UNO board provides much better grounding than earlier Arduino boards and can produce fewer problems with low-level analog circuitry, although, as we’ll see later, you must always treat the ground connections with care. The rightmost 47 µF electrolytic capacitor in the lower center of the board provides bulk energy storage for power arriving through the DC jack. Although the UNO specifications in Figure 1 list the maximum power input as 20 V, the capacitor case shows a 16 V limit. Electrolytic capacitors tend to fail catastrophically when pushed beyond their specifications and the output of unregulated DC wall warts can exceed their nominal rating at low currents, so be careful with external supplies. Two older Arduino Duemilanove boards in my collection have capacitors rated at 25 V and 35 V, both in packages of about the same size. Photo 2 shows the power section of an EKitsZone UNO, a competitive board loosely based on the Arduino schematic, with through-hole 100 µF electrolytic capacitors rated at 25 V. All those capacitors will operate comfortably at the board’s 20 V maximum voltage specification. As always, pay attention to both the formal specifications and the actual hardware in hand: any mismatches will rarely be in your favor! THE LIMITS OF POWER The Arduino UNO has an ON Semiconductor NCP1117 +5 V regulator in a SOT-223 www.circuitcellar.com • CIRCUIT CELLAR® Photo 2—An EKitsZone UNO board uses 100 µF 25 V through-hole capacitors in the power supply section. The small copper pour around the +5 V regulator lacks the thermal vias appearing in Photos 1 and 3. surface-mount package, shown just above the DC power jack in Photo 1. The regulator datasheet specifies a +20 V absolute maximum input, which certainly accounts for that bullet item in the Arduino feature list; as you just saw, the input capacitor may also restrict the maximum voltage. The regulator dropout voltage runs about 1 V at moderate load currents, which requires a DC input over 6.5 V to ensure 5 V out. The Arduino specs suggest 6 to 20 V with a recommended range of 7 to 20 V. Most users expect, quite reasonably, that the board will operate correctly from any power supply within those limits. Unfortunately, there’s another limit that the Arduino specs mention only in passing: If using more than 12 V, the voltage regulator may overheat and damage the board. In fact, the regulator has internal over-temperature protection and will shut down when the junction temperature exceeds 175 °C = 350 °F. It will resume operation after the temperature drops, producing baffling periodic failures as the microcontroller restarts. The NCP1117 is a linear regulator, basically a transistor acting as a variable resistance, so the device power dissipation equals the input-to-output voltage difference times the load current. The junction temperature TJ increases (almost) linearly as a function of the power dissipation P: Photo 3—The Arduino UNO PCB layout shows many thermal vias around the NCP1117 linear regulator. The total copper area remains fairly small and the regulator runs hot for seemingly small load currents. TJ = P × θJA + TA The datasheet gives the junction-to-ambient thermal resistance coefficient θJA = 160 °C/W with a minimum copper area under the SOT223 package. Increasing the copper area decreases θJA, but it exceeds 75 °C/W for a square about 15 mm on each side. A close look at Photo 1 shows that the Arduino UNO board includes several thermal vias that connect the top and bottom copper planes December 2012 – Issue 269 • Vin raw DC • 5V regulated • 3.3V regulated 45 Photo 4—The Arduino Pro Mini board uses a voltage regulator in a minuscule SOT23-5 package that cannot dissipate more than a few hundred milliwatts and will overheat when supplying very small load currents. together. Photo 3, taken from the Arduino UNO R3 Eagle PCB layout file, gives a better view of the top and bottom copper layers around the regulator and the thermal vias connecting the two layers. My rule of thumb for ordinary electronics is that if you can’t compel yourself to hold your thumb on it for more than a few seconds, it’s too hot. That translates to about 65 °C = 150 °F, which is far less aggressive than most industrial design limits. On the other hand, an Arduino isn’t intended for long-term, high-temperature industrial applications: no component on the board should raise an instant blister on an errant finger. The NCP1117 datasheet sets θJC, the thermal coefficient between the junction and the case, at 15 °C/W. Subtracting the two thermal coefficients gives a (very!) rough estimate of θCA, the case-to-ambient thermal coefficient: 0CA = 0JA − 0JC = 75 °C/W − 15 °C/W = 50 °C/W It will actually be somewhat lower due to heat loss through the epoxy case, but that’s close enough. My rule of thumb limits the case temperature to 65 °C, and the ambient temperature won’t be much more than 40 °C. That temperature difference limits the maximum power dissipation in the NCP1117 to about: P= 65 °C − 40 °C = 500 mW 50 °C/W Knowing the DC supply voltage at the regulator, which you can measure at the Vin pin, and the regulator power dissipation, it’s easy to find the maximum regulator current: December 2012 – Issue 269 IMAX = 46 Bonus: attach a thermocouple bead to the central tab on the NCP1117 package and record the actual temperature. Vary the load current, plot temperature vs. power dissipation, and derive the thermal coefficient. The Arduino UNO is the most recent addition to a family of microcontroller boards ranging from the tiny Pro Mini in Photo 4 to the much larger MEGA board in Photo 5. Each Arduino PCB has a different DC regulator, copper foil layout, and thermal behavior, so they’re not direct physical replacements even though they’re (almost) software compatible. Pop Quiz: The Arduino Pro Mini shown in Photo 4 has a Micrel MIC5205 linear regulator in a tiny SOT23-5 package with θJA = 220 °C/W. Find the maximum load current for 6, 9, 12, and 16 V DC inputs, given a 5 V output. Because the Arduino project applies Open Hardware licenses to their designs, other manufacturers can duplicate or adapt the boards. This can introduce unexpected differences between PCBs bearing almost the same names. For example, the EKitsZone UNO PCB in Photo 2 does not include thermal vias, so its regulator will (probably) run hotter than the one on the Arduino UNO PCB. It also draws about 65 mA while running Blink, quite a bit more than you’d expect from the datasheet estimates I used. Voltage regulator power dissipation will pose a problem for all but the smallest projects. For example, driving a single LED with 20 mA from a digital output burns another 140 mW in a regulator dropping 7 V from a 12 V supply. Even if you run the regulator hotter than I do, just a few LEDs can heat it up and shut it down. The same restrictions apply to the 3.3 V regulator in the ATmega16U3 or FTDI USB interface chip. It’s powered from the regulated 5 V supply and drops only 1.7 V, but chip’s θJA limits the current available at the 3.3V output. Homework: Figure out the maximum current available for your 3.3 V logic. Hint: also consider the additional power dissipation in the 5 V regulator. KEEPING IT COOL I epoxied the finned DIP-style heatsink to the regulator on the MEGA board in Photo 5 to reduce its case temperature. Even with the thermal vias visible on either side of the heatsink, the regulator still ran too warm for my thumb. Adding a heatsink to P 500 mW = E VIN − 5 V For a 12 V supply, that works out to about 70 mA. If that seems oddly low, you’re right! In round numbers, the ATmega328 microcontroller will draw 10 mA when running at 16 MHz with a 5 V supply, the ATmega16U2 USB interface draws another 15 mA, and the other circuitry and LEDs add up to 10 mA or so, for a total of 30 to 40 mA. Under my restrictive thermal rule, the regulator can supply barely enough current for the Arduino UNO board itself, without any power for your circuitry, from a 12 V wall wart. Homework: plug a 12 V supply into an Arduino and run the Blink sketch. If the regulator becomes surprisingly warm, then the numbers I used aren’t far from the truth. It won’t hit 65 °C, because those numbers are pessimistic. Photo 5—A heatsink epoxied atop the linear regulator on this Arduino MEGA board helped reduce the operating temperature to a comfortable level. This is certainly not recommended engineering practice, but it’s an acceptable hack. CIRCUIT CELLAR® • www.circuitcellar.com www.circuitcellar.com • CIRCUIT CELLAR® entire Arduino board, you know it’s time for a different solution. CURRENT LIMITS Photo 6—An LM7808 linear regulator in a TO220 case with a heatsink reduces the load on the Arduino’s tiny SMD regulator by supplying a constant 8 V. Figure 1 includes a frequently ignored specification: the DC current at any microcontroller pin must not exceed 40 mA. The maximum current for a typical 5 mm LED is 20 mA: one Arduino digital output pin can drive only two LEDs in parallel to full brightness. Even a small mechanical relay may require more current than one pin can safely deliver. The microcontroller’s output pin drivers do not include current limiters, which means the external circuit must limit its current to no more than 40 mA from a lowimpedance 5 V source. New users may connect a bare LED directly to a digital output pin and depend on the Arduino to limit its current, a technique that makes an LED shine very brightly while the microcontroller dissipates far more heat than it should. You must always use a current-limiting resistor with any low-impedance load to protect the microcontroller’s circuitry. The pin current going to the load comes from the Arduino’s power supply regulator, ! %##"'%# % $ $%#'#'+$" #% (& ''%+ #)% &"& " ' , #%'*- $$ '#"& ''$ !#% December 2012 – Issue 269 the epoxy case isn’t the best practice, but it was the only practical way to retrofit slightly more cooling into the existing board design. The thermal coefficient from the regulator chip junctions through the case to my heat sink isn’t specified, for good reason: the epoxy case makes an excellent insulator compared to the metal leads and tabs soldered to the PCB. That heatsink will cool the case, but it’s not an effective way to control the junction temperature and isn’t recommended in any datasheet you’ll ever read. Similarly, although I could add a discrete heatsink on the bottom of the board, the limited number of thermal vias and small copper foil area severely restricts the thermal transfer from the chip. I’ve seen PCBs with active cooling applied below chips with extremely high power dissipation, a technique that doesn’t apply to an Arduino board. Fortunately, there’s a another, more practical, approach that directly reduces the chip temperature. Most of my projects require power supplies for the analog circuitry, often including a +12 V supply that would produce far too much dissipation in the Arduino’s regulator. Rather than drive the Arduino board directly from that supply, I insert another regulator that produces a lower voltage at the Arduino’s DC input. I use a simple linear regulator attached to a heatsink, because an efficient step-down switching supply doesn’t make sense for the projects you see here. Photo 6 shows one of the power supply terminal blocks on the MOSFET tester I presented in my June, August, and October 2012 columns. An external switching supply provides ±12 V for the op amps and +5 V for the logic, with an LM7808 regulator on the heatsink reducing the +12 V supply to +8 V at the Arduino board’s Vin pin. That LM7808 regulator has the advantage of being easy to use, but it was the last one in my parts heap. A less expensive LM317 adjustable regulator with two resistors would produce +7 V to keep the Arduino regulator even cooler. Depending on the circuit load, you can set the pre-regulator voltage even lower. The regulator’s dropout voltage makes no difference here, because there’s plenty of margin. Hint: When the power supply becomes more expensive and intricate than the 47 which, as you just saw, can barely handle the on-board circuitry. A single 20 mA LED adds 140 mW to the regulator’s power dissipation when it operates from a 12 V supply; a few cheerful LEDs can push the regulator into thermal shutdown. The specs in Figure 1 do not mention that the current through the chip’s VCC and ground pins must not exceed 200 mA, probably because there’s no easy way to measure that value. You can work around the VCC limit by powering LEDs and other loads from an off-board 5 V regulator, but the return current through the digital pins adds to the microcontroller’s ground pin current. In fact, a project with just 10 full-brightness LEDs can exceed the ground pin current limit. I’ll have more to say about I/O pin characteristics in upcoming columns. Until then, pay attention to both the regulator power limits and the chip current limits. MAKING CONNECTIONS Everyone, myself included, has poked round hookup wires into those square header sockets, even though that’s a very, very bad idea. The tuning-fork contacts within the sockets firmly grip 25 mil (0.64 mm) square header pins and work best with pin strips firmly soldered into PCBs. Typical 24 AWG solid hookup wire fits loosely, because it’s only 20 mil (0.51 mm) in diameter and doesn’t provide flat contact surfaces. If you must use hookup wire, find some 22 AWG solid wire: its 25 mil diameter fits much more securely. Even better, solder 22 or 24 AWG stranded wire to a header pin, reinforce the joint with heat shrink tubing, and get a much more reliable connection with flexible wire that won’t break in normal use. Never poke stranded hookup wire into the header sockets, even if you’ve soldered the loose ends together, because tuning-fork contacts simply can’t grip an irregular surface covered with flux residue. Much worse, a single errant strand can (that’s pronounced “will”) touch other pins or components and instantly destroy the microcontroller. A few minutes devoted to preparing good wire terminations will pay off in more reliable prototypes and a much longer life for your Arduino board. CONTACT RELEASE I don’t have an Arduino UNO board in hand, so I’m relying on the specifications and illustrations on their website; the actual hardware may be somewhat different. As always, verify what you read in product descriptions against the chip manufacturer’s datasheets, then apply good engineering judgment to your designs. I Ed Nisley is an EE and author in Poughkeepsie, NY. Contact him at [email protected] with “Circuit Cellar” in the subject to avoid spam filters. RESOURCES Arduino products from Sparkfun, www.sparkfun.com. Electronic Kits Zone, www.ekitszone.com (also available at eBay, www.ebay. com/sch/ekitszone). E. Nisley, “Solar Data Logger Part 1: PCB Layout, Inductor Saturation, and Other Troubles,” Circuit Cellar 225, 2009. ———, “Solar Data Logger Part 2: Data Points,” Circuit Cellar 227, 2009. December 2012 – Issue 269 SOURCES 48 Arduino MEGA, Arduino Pro Mini, and Arduino UNO Arduino | http://arduino.cc/en/Main/ArduinoBoardMega2560 | http://arduino. cc/en/Main/ArduinoBoardProMini | http://arduino.cc/en/Main/ArduinoBoardUno ATmega16U3, ATmega16U3, and ATmega328 Microcontrollers Atmel Corp. | www.atmel.com MIC5205 regulator Micrel, Inc. | www.micrel.com/page.do?page=/product-info/products/mic5205.shtml NCP1117 Regulator ON Semiconductor | www.onsemi.com/PowerSolutions/product.do?id=NCP1117 CIRCUIT CELLAR® • www.circuitcellar.com T HE DARKER SIDE by Robert Lacoste (France) Locked In Synchronous Detection Explained At some point in your electronics engineering career, you’ll need to extract a signal in a noisy environment. When the time comes, consider a lock-in amplifier. You’ll find the information in this article about lock-in amps and synchronous detection invaluable when you need to measure a small and noisy signal’s amplitude or phase. W elcome back to the Darker Side column. Fifteen years ago, I attended a training session on the first 3G wireless standards. As an ice breaker, the trainer asked every participant to try speaking in English to someone at the other end of the room at the same time. Of course, the noise level escalated and nobody could understand anything said. We were instructed to continue while two people spoke in French, still from one side of the room to the other. Magically, they were able to understand each other without any problem, even with the high noise level. This exercise was meant to illustrate code division multiple access (CDMA). In a nutshell, knowing the type of signal you are expecting helps you filter out the noise. This month, I present a more simple but powerful way to extract a signal from the noise: synchronous detection. This technique is the key building block of so-called “lock-in amplifiers,” which, December 2012 – Issue 269 DC Power source 50 10 VDC Transmitter High-loss medium 1 Attenuation 100,000 added noise 10 mV (noise DC to 1 MHz) according to Wikipedia, were invented by Princeton physicist Robert H. Dicke in 1962.[1] A lock-in amplifier enables precise signal measurement, even if it is a thousand times lower than the noise! I’ll start with the basics. HOUSTON, WE HAVE A PROBLEM Imagine you need to detect a slowly rotating wheel’s position without coming close to it or using a physical rotation sensor. One solution is using a light beam, which will be alternatively cut by the wheel depending on its position. Figure 1 shows an example of your first attempt, which is simple. You hook up a light transmitter to a continuous 10-V source at one side and a light detector at the other side. You design a preamplifier to multiply the detected voltage by a factor of 100 and you display it on a voltmeter. Unfortunately, you soon discover that it doesn’t work as expected. The output voltage stays around 1 V whatever the wheel’s Receiver Preamplifier Measurement × 100 V Signal 0.1 mV Noise 10 mV Signal 10 mV Noise 1 V Figure 1— You can use a constant light beam to detect a wheel’s rotation. Unfortunately, in this example, the ambient light causes a noise 100 times higher than the useful signal. CIRCUIT CELLAR® • www.circuitcellar.com AC Power source Transmitter High-loss medium Receiver Preamplifier 1 Attenuation 100,000 added noise 10 mV (noise DC to 1 MHz) 10 VAC 100 kHz Band-pass filter 100 kHz Q = 100 (1 kHz) Measurement × 100 Signal 0.1 mV Noise 10 mV V Signal 10 mV Noise 1 V Signal 10 mV Noise 32 mV Figure 2—Using a modulated light source drastically improves the signal-over-noise ratio, thanks to a band-pass filter on the receiver side. However, here the noise is still far too high due to the filter’s limited quality factor. position. Of course, you suspect this is due to the “noise,” (i.e., the ambient light). Nighttime testing shows the design is working. The received signal is close to zero, as expected when the beam is cut, but increases to only 10 mV when the light shines through. So, you deduce the light transmission’s attenuation, in terms of equivalent voltage, and take into account the preamplifier gain of 100, is: 10 V 10 mV 100 That means, before preamplification, the received signal was 0.1 mV, whereas the noise was 10 mV, providing 10 mV of signal and 1 V of noise after amplification, respectively. Normally that doesn’t work. The signal is deeply hidden in the noise, at least during the day. What should you do, except explain to your customer that your design only works at night and maybe during a total eclipse? FILTERING OPTIONS One option is to replace the continuous light with a modulated light source (see Figure 2). On the transmitter side, the continuous source is replaced by an AC source with the same 10-V level (e.g., a 100-kHz sine source). As the source peak voltage is unchanged, the useful signal and the ambient noise are still the same on the receiver side if you use the same preamplifier (i.e., 1-V noise plus 10-mV of useful signal). But this time, the signal is a 100-kHz fast carrier, modulated by the wheel’s slow rotation. This modulation provides an efficient way to improve the signalover-noise ratio. You can add a simple band-pass filter centered at the carrier frequency (i.e., 100 kHz). Since an ideal band-pass filter doesn’t exist, you will need to design a sharp filter to remove as much noise as possible. If you design an analog band-pass filter, then achieving a 100 quality factor is already challenging. This means the band-pass will be 0.01 of the center frequency, here 1 kHz (i.e., 100 kHz/100). Assume the noise was a white noise, spreading in an uniform way from DC to maybe 1 MHz. The band-pass filter will not significantly attenuate the useful signal, but it will damper out the noise, except in a small 1-kHz window. The associated noise reduction is proportional to the filter bandwidth’s square root. Therefore, the noise will be reduced by a factor of the square root of 1,000 (i.e., 1 MHz/1 kHz), which provides around 32. So, the noise voltage after preamplification is reduced from 1 V down to 31 mV (i.e., 1 V/32). That’s a great achievement, and it explains why nearly all light-beam systems use modulated carriers. For example, the ubiquitous infrared RC4 remote controls are using a 38-kHz modulated infrared stream. However, in the example, the noise is 31 mV. This is still higher than the 10-mV useful signal, making a precise measurement difficult, if not impossible. You could try to build a narrower filter, for example, by digitizing the received signal and designing a precise digital filter. But this will significantly increase the project’s budget and power requirements and make it difficult to significantly improve the performance. Are there other options? SYNCHRONOUS DETECTION As you may have anticipated, a lock-in amplifier built around a synchronous detection is exactly what you need. The idea behind such a detector is simple. As we have generated the excitation signal ourselves—here the 100-kHz modulation—we know its exact frequency. This information enables the building of a band-pass filter as in the previous example, but it can now be built as narrowly as desired. Figure 3 shows the concept. Here, the received signal multiplied by the excitation signal and low-pass filtered. This is exactly like a radio-frequency downconverter—more precisely a zero-IF converter—as the local oscillator is at the same frequency as the input signal. Remember my article “Radio Frequency Mixers” (Circuit Cellar 263, 2012)? Multiplying two sine signals of frequencies f1 and f2 provides the sum of two signals at respective frequencies Synchronous detector 10 VAC 100 kHz Transmitter High-loss medium Receiver 1 Attenuation 100,000 added noise 10 mV (noise DC to 1 MHz) Preamplifier × 100 Signal 0.1 mV Noise 10 mV Signal 10 mV Noise 1 V Multiplier Low-pass filter 1 Hz Measurement V Signal 10 mV Noise 1 mV Figure 3—A synchronous detector uses the excitation signal and multiplies it to the received signal. This translates the desired signal down to 0 Hz and enables the use of a low-pass filter for better noise rejection. The signal is now 10 times higher than the noise, which enables the measurement of its amplitude. www.circuitcellar.com • CIRCUIT CELLAR® December 2012 – Issue 269 AC Power source 51 Synchronous detector AC Power source Transmitter High-loss medium 10 VAC 100 kHz Receiver Known phrase shift Preamplifier Multiplier Low-pass filter 1 Hz Measurement V × 100 Phrase shift Figure 4—A manual-phase shifter could be added in the reference path to compensate and measure the phase shift between the excitation and the receiver. f1 – f2 and f1 + f2. Here, f1 = f2 = 100 kHz, so the two output frequencies are 0 Hz and 200 kHz, the latter of which is later cancelled by the low-pass filter. Some formulas may make it more clear. Assuming the received signal has an amplitude B and a phase shift noted Dph, then: Excitation = A × cos (2πft), received = B × cos(2πft + Dph), and multiplied = A × cos(2pift) xB × cos(2pift + Dph). Or, remember, 2 × cos(a) × cos(b) = cos(a – b) + cos(a + b) which provides: Multiplied = A × B A × B cos ( Dph ) + cos (4πft + Dph ) 2 2 The low-pass filter selects only the first term, providing: Detected = A × B cos (Dph ) 2 If the delay due to the light transmission and the preamplifier is small compared to the excitation signal frequency, then the phase shift will be zero, which will provide: Detected = A × B 2 The detected signal is then simply proportional to the excitation voltage A and the received signal voltage B. The beauty of this method is that the band-pass filter was replaced by a low-pass filter, and designing a low-pass filter with a cut-off frequency as low as desired doesn’t cause any problem. Why not use a 1-Hz low-pass filter? This won’t be a problem as long as the wheel rotation is slower than a turn accomplished in a couple of seconds. As in the previous example, the noise will be reduced by the square root of the noise bandwidth (1 MHz) divided by filter width, here 1 Hz, which provides 1,000. The noise will be reduced down to 1 mV (i.e., 1 V/1,000). Then the signal, which is still 10 mV, can be easily detected and measured as the remaining noise is 10 times lower! If the noise is still too large, you could reduce the low-pass filter’s bandwidth down to 0.1 Hz or even lower. The noise will be reduced accordingly at the expense of a longer measurement time, which may not be a problem if you are looking at slow phenomena. Mathematically, this detector works because we know the signal to be detected is a sine wave at a precise frequency and phase. All other signals and noise are nullified when multiplied by a sine signal and low-pass filtered (i.e., integrated), over enough time. A caution here: this method works well because it uses the excitation signal itself as a reference, fed to the multiplier along with the noisy signal. This means the detector is using a signal with the same continuous frequency and phase as the signal to be detected, which is required for this method. Imagine you design the same detector but with a locally generated 100-kHz oscillator to replace using the excitation source. Even if this oscillator is precise, it will never stay exactly in phase with the excitation source for a long time, which would drastically limit the detected signal’s performance. This is why this method is Synchronous I/Q detector Multiplier Low-pass filter I AC Power source Transmitter High-loss medium 10 VAC 100 kHz Receiver Known phrase shift Preamplifier × 100 90° December 2012 – Issue 269 Q 52 Q Amplitude = √ I2 + Q2 I Phrase = tan −1( I ) Q Figure 5—This is the architecture of the ubiquitous I/Q synchronous demodulator. Using two detectors fed by two signals in quadrature, it is possible to use simple math to simultaneously measure the received signals’ amplitude and phase. CIRCUIT CELLAR® • www.circuitcellar.com Synchronous I/Q detector Multiplier Low-pass filter I AC Power source Transmitter Medium-loss medium Receiver Preamplifier 90° 10 VAC 100 kHz Moderate attenuation and noise (Unknown phase shift) × 100 Q PLL VCO Figure 6—A phase-locked loop (PLL) can be used when there is no way to directly use the excitation signal as a reference. Such a PLL regenerates a local oscillator, which is in phase with the excitation but requires a signal strong enough to lock. called synchronous detection. It works, but only if the receiver is kept exactly in phase with the excitation source, which was not a problem here. IMPROVEMENTS In the previous discussion, I assumed the phase shift between the excitation source and the receiver is null. What about situations where this phase shift can’t be neglected? With the solution shown in Figure 3, the measured value will be reduced by the phase shift’s cosine. The higher the shift, the more erroneous the result. As shown in Figure 4, the first solution is simply to add a manual phase shifter in the reference path. The measurement will be exact if this phase shift compensates the system phase shift, and will be lower in all other cases due to the cosine term. The manual phase shifter must be gently increased until it produces a maximum measured value. You will have canceled out the measurement channel’s phase December 2012 – Issue 269 a) 54 shift. Moreover, you can measure this phase shift if the manual phase shifter is calibrated. However, a variable and precise phase shifter is not easy to design, so the actual lock-in amplifiers prefer to use a so-called IQ synchronous demodulator (see Figure 5). The idea is to implement two synchronous detectors, one using the reference and one using the reference shifted by a fixed 90°. These two channels enable you to measure the signal’s in-phase I and the quadrature Q components. If the phase shift is zero, then I will be the signal amplitude and Q will be zero. It will be the opposite if the phase shift is 90°, but all other values will provide some signal on both outputs. A simple vector calculation enables the deduction of both the signal amplitude and phase shift. The amplitude is the magnitude of the resulting vector, which is the square root of I squared plus Q squared, thanks to the Pythagorean theorem. Similarly, the phase can be calculated as the inverse tangent of Q divided by I. Efficient, isn’t it? What else can be improved? As discussed, one last difficulty with synchronous detectors—either simple or IQ—is that they require access to the excitation signal. This is not a problem in my example, but may be more problematic if the transmitter is on the moon and the receiver is on earth: the wire will be long. Can you still use a synchronous detector? The answer is yes, but in that case, you will need to locally regenerate a signal with the exact the same frequency and phase as the excitation signal. This is how a phase-locked loop (PLL) works (see Figure 6). In fact, this last diagram is more or less the full block diagram of nearly all commercial lock-in amplifiers. However, the PLL approach’s disadvantage is that the signal strength must be high enough for the PLL to lock, which reduces the overall performance compared to an external excitation signal. b) Figure 7—This is an example of an analog lock-in amplifier, extracted from Analog Devices’s AD630 synchronous demodulator datasheet. The chip, which is used as an analog multiplier, enables a signal recovery even after 100 dB of attenuation. CIRCUIT CELLAR® • www.circuitcellar.com LP Sallen Key filter dsPIC33FJ256GP710 Buffer R-2R RG12 RG13 Load cell RG14 RG15 LP Filter Amplifier AN8 Figure 8—This example, extracted from a Microchip Technology application note, shows the simplicity of a digital lock-in amplifier’s hardware. Here four GPIOs are used as a DAC and generate a wheatstone bridge’s sine excitation signal, thanks to the firmware. The detected signal is fed back the on-chip ADC, and the microcontroller takes care of the multiplication and low-pass filtering stages. You must know this is possible. It will be easier to directly use the excitation signal. December 2012 – Issue 269 IMPLEMENTATIONS 56 At this stage, you may want to try implementing a lock-in amplifier in your next project, but how would you start? First, decide if you prefer an analog or a digital approach. Both are possible for a lock-in amplifier (which existed years before the first digital signal processor was invented). The analog solution is simply built around an analog signal multiplier, or mixer, and a low-pass filter. Analog Devices has several chips that will work (e.g., the AD630 balanced modulator/demodulator). Figure 7, which is extracted from the AD630’s datasheet, shows an example of an analog lock-in amplifier. Analog lock-in amplifiers are great and are still used today in numerous applications, but you may prefer trying a digital amplifier. The key advantage of the ones and zeros solution is the implementation’s stability and the digital low-pass filter’s flexibility. You can easily build a configurable digital filter with a cut-off frequency ranging from tens or hundreds of kilohertz down to millihertz, or even less. This would enable the optimization of the detection performances either for fast systems or for slow but highly noisy ones. Depending on the required performances, you can build a digital lock-in amplifier using anything ranging from a high-end digital signal processor or FPGA down to a low-cost 8-bit microcontroller. As an example, Microchip Technology’s Darren Wenn published “AN1115: Implementing Digital Lock-In Amplifiers Using the dsPIC DS,” which explains how to build a lock-in based weight scale measurement device around a dsPIC33F microcontroller. All that’s needed is a 4-bit homemade DAC and some operational amplifiers (see Figure 8). Lastly, you may want to use a lab-class lock-in amplifier for your scientific applications. There are several products on the market, such as the impressive devices built by Stanford Research Systems. As an example, its DSP-based SR830 provides more than 100 dB of dynamic reserve and works from 1 mHz to more than 100 kHz (see Photo 1). This type of device can be configured either as the excitation signal’s generator or can lock on an externally supplied signal, as explained. By the way, this company’s website features some interesting publications about lock-in amplifiers. Photo 1—SRS’s SR830 is an example of a lab-grade lock-in amplifier. WRAPPING UP I can’t guarantee lock-in amplifiers will be adequate for all your projects, but this technique should be included in every electronic designer’s bags of tricks. You will most likely need it, at some point. Lock-in amplifiers are invaluable each time you must measure a small and noisy signal’s amplitude and/or phase, and especially if you can control the excitation source. The examples are numerous (e.g., small signal captors such as weight scales or force sensors, optoelectronic devices, scientific instruments, ultrasound, etc.). I hope this article helps you to think of using them! I Robert Lacoste lives near Paris, France. He has 24 years of experience working on embedded systems, analog designs, and wireless telecommunications. He has won prizes in more than 15 international design contests. In 2003, Robert started a consulting company, ALCIOM, to share his passion for innovative mixed-signal designs. You can reach him at [email protected]. Don’t forget to write “Darker Side” in the subject line to bypass his spam filters. REFERENcE [1] Wikipedia, “Lock-in Amplifier,” http://en.wikipedia.org/ wiki/Lock-in_amplifier. RESOURcES Analog Devices, Inc., “Balanced Modulator/Demodulator,” AD630, 2004, www.analog.com/static/imported-files/ data_sheets/AD630.pdf. R. Lacoste, “Radio Frequency Mixers,” Circuit Cellar 263, 2012. Stanford Research Systems, Inc., “About Lock-In Amplifiers: Application Note #3,” www.thinksrs.com/downloads/ PDFs/ApplicationNotes/AboutLIAs.pdf. D. Wenn, Microchip Technology, Inc., “AN1115: Implementing Digital Lock-In Amplifiers Using the dsPIC DSC,” 2007, www.microchip.com/stellent/idcplg?IdcService=SS _GET_PAGE&nodeId=1824&appnote=en532447. SOURcES AD360 Balanced modulator/demodulator Analog Devices, Inc. | www.analog.com dsPIc33FJ256GP710 Microcontroller Microchip Technology, Inc. | www.microchip.com SR830 Lock-in amplifier Stanford Research Systems, Inc. | www.thinksrs.com/ products/SR810830.htm CIRCUIT CELLAR® • www.circuitcellar.com ADuC841 Microcontroller Design Manual: From Microcontroller Theory to Design Projects If you’ve ever wanted to design and program with the ADuC841 microcontroller, or other microcontrollers in the 8051 family, this is the book for you. With introductory and advanced labs, you’ll soon master the many ways to use a microcontroller. Perfect for academics! Now Just $35.00 Buy it today! www.cc-webshop.com E MBEDDED IN THIN SLICES by Bob Japenga (USA) Concurrency in Embedded Systems (Part 4) Introducing Linux and Concurrency This is the fourth article in a multi-part series about concurrency in embedded systems. Here you learn how embedded Linux provides the mechanisms to design robust systems with concurrency. M y previous articles examined common pitfalls in systems with concurrency and discussed in general terms how to deal with these pitfalls. The next several articles will discuss the embedded Linux features available to implement a well-designed system with concurrency. Hardware and software concurrency issues were considered in previous articles. This and upcoming articles will strictly examine software. This article discusses the mechanisms to create concurrency in your software through processes and threads. Upcoming articles will show how semaphores, pipes, mutexes, first-in, first outs (FIFOs), sockets, shared memory, and message queues can be used with these concurrent threads and processes. Keep in mind; we are taking this in thin slices. To learn more, a great resource is Michael Kerrisk’s The Linux Programming Interface. I’ll introduce the features and you can dig deeper with this and other books. December 2012 – Issue 269 PROCESSES & THREADS 58 The first concurrent operating system (OS) I used was Digital Equipment Corporation’s RSX-11. (You might be interested to know that the second instantiation of Windows NT is a descendent of RSX-11). In RSX-11, concurrent operations were called “tasks.” Later, when I wrote my own realtime multitasking OSes (thank goodness those days are over) we always used the word “tasks” to describe the separately executable programs that concurrently ran. When I first started using Linux (actually QNX was my first exposure to a Unix/Linux-like architecture), I needed to learn a new set of terms: processes and threads. For this article, when I use the word “task” I am talking about either a process or a thread. I’ll start by defining terms and looking at the differences and similarities. DEFINITIONS Processes and threads fall under my old definition of tasks. A task can be defined as an instance of a software program that utilizes CPU resources to accomplish some purpose. These resources include memory, I/O, the file system(s), and networking. In Linux, a process is a task that obtains these resources from the kernel. All processes have their own memory allocated to them. These consist of: program memory (sometimes called the “text” or code segment), data memory (where variables are kept), heap (i.e., dynamic memory), and the stack. The kernel’s memory manager prevents processes from having any access to other processes’ memory. This encapsulation is an extremely valuable feature that enables us to isolate the process from problems created by hardware or software memory corruption. If one process goes amuck, there is no chance of corrupting memory in other processes. If hardware or software never failed, this separation would be unnecessary. Figure 1 shows how a process with multiple threads uses virtual memory. Here is where things get a little tricky. A process can create a separate process called a “child process.” The creating process is called the “parent process.” The child process inherits copies of all the parent’s data, stack, and heap segments. However, the program memory is shared by the parent and child and is set to read only by the kernel’s memory manager. Think of the program CIRCUIT CELLAR® • www.circuitcellar.com www.circuitcellar.com • CIRCUIT CELLAR® December 2012 – Issue 269 memory as the read-only DNA inherited Remember, this is in thin slices, there is Argv and environment variables from the parent and think of data, stack, and much more I could say about this. If there Stack for starting heap as life’s experiences. You are stuck (for is interest, I can write a future article about main process (can grow) better or worse) with what you get for DNA, my company’s experience using real-time Virtual address space but your life experiences are your own and extensions. A lot of work is being done in can be shaped independently of your parLinux in this area—in particular for real-time ent’s experience. A child process is free to embedded systems—so you need to know Stack for Thread 3 modify variables and use resources however what is supported by your particular version Stack for Thread 2 it wishes, with no possibility of interfering of Linux. Stack for Thread 1 with the parent’s memory and resources. With child processes, similar tasks that use a PROCESSES VS. THREADS Dynamic (shared) libraries common code base can maintain data indeFor the software system’s designer, the pendence and still share the same code. question arises as to when to use processes Each process (parent or child) can create and when to use threads. This choice separate execution threads. These threads depends on the differences between the share the same code base as the child two and the associated advantages and processes do with their parents in a readdisadvantages. only memory segment, but they also share Data isolation. One cannot speak highly Heap (dynamic memory) all memory except the stack and thankfully enough about the advantages of eliminating Uninitialized data “errno” (i.e., the global variable that indicates shared data space in creating robust sysInitialized data Main process the type of error that occurs with certain tems. But, the advantages quickly disappear Thread 1 Program and function calls). Thus, one thread of the same if you design separate processes that require static libraries Thread 2 process can stomp all over another thread’s a lot of shared memory. Even with all the Thread 3 heap and data variables. Or, to put it nicely, isolation processes provide, you can still they can share each others’ data. Initial (i.e., Figure 1—Memory allocation is a multipledeclare certain memory as a shared minimum) stack sizes can be separately set thread process. resource across processes. If your concurfor each process and thread. Think of rent task design requires a lot of shared threads as old-time multitasking with some useful additions. memory, you should use threads. We recently profiled one of our designs that used a lot of shared memory between processes and found that (on an ARM AM3517 running at 600 MHz), each SCHEDULING Any time you use multitasking, you must know how the ker- shared variable access cost 50 µs. Advantage: Processes, unless nel performs scheduling. The kernel does not make a distinction you need shared memory. Context switching times. Any time the kernel switches from between processes and threads with regard to scheduling. In Linux, a single-thread process is treated the same as all other one task to another, we call that a “context switch.” This can threads. Linux gives the designer significant flexibility by happen when a task’s allotted time runs out, when the task enabling a number of options for the scheduling type when a releases control to the kernel, or when a higher-priority task process is created. Out of the box, the default scheduling algo- preempts another. When the kernel’s scheduler switches from rithm used for a process is round-robin time slicing one thread to another within the same process, the virtual (SCHED_OTHER). In round-robin time slicing, every task gets an memory space remains the same. During the context switch equal real-time slice. Each task either runs for its allotted time between processes, all virtual memory must be switched out. or until it relinquishes control. Although there are priorities, they An additional cost that is more difficult to measure but can be are more like suggestions to the kernel (i.e., telling children to significant, is that a context switch for processes affects the “play nice”). Appropriately, these are called “nice values.” In CPU’s caching mechanism. When a context switch happens, addition, there is Round Robin with real priorities (SCHED_RR); the cache’s memory addresses are no longer useful. This adds First-In, First-Out (SCHED_FIFO), which eliminates the time slice an indeterminate amount of time to the context switch. Pub(i.e., each task runs until it blocks or terminates); Batch Mode lished benchmarks on this are sketchy and not helpful. Some scheduling (SCHED_BATCH), which tells the kernel this process provide a 10-to-15% advantage to threads. If context-switchis “not nice” and gives it less favor when scheduling; and Idle ing time is critical, you may need to rapid prototype your archimode (SCHED_IDLE), which is the same as SCHED_OTHER, but tecture and see what actually happens for your application. Slight advantage: Threads. with a nice value so low, it never has to run. Resources. Since each process uses its own instance of memIn addition, Linux now provides the ability to create a group of processes that uses what is called “real-time extensions.” Each ory for program and data (child processes are different), a group can be assigned a specific amount of time it can run with- thread can use significantly less virtual memory than a process. in a given time period. Any time not allocated to the real-time In addition, semaphores, timers, and file handles are all shared group will be allocated to the other processes in the standard between the same process threads. Advantage: Threads. Libraries. Linux enables you to use static or dynamic libraries. round-robin fashion. After the kernel is built to support this, the software can dynamically set the scheduling period and a global A static library is linked into your code space and everything I have said concerning your code space (i.e., “text” segment) limit as to how much time real-time scheduling it can use. 59 applies to any static library. For dynamic or shared libraries, all threads share the same dynamic library in their virtual address space. Dynamic libraries add an additional requirement for the designer concerning a library function’s “thread safety.” With processes, you don’t need to be concerned about whether or not the library is “thread safe” since you have a completely separate library instantiation. Resource-wise advantage: Threads. Ease of use advantage: Processes. Dynamic starting and stopping. Many times, a design has a requirement to start and stop a task. The overhead for stopping and starting a process is significantly greater (i.e., a factor of 10) than starting and stopping a thread. Advantage: Threads. What about profiling tools? Tools are available for profiling both threads and processes, so I see no clear advantage of either. From the command line, processes are a little easier to profile than threads. Slight advantage: Processes. Software updates. Since processes are separate executables that can be separately updated, there is some advantage to making every task a process. Slight advantage: Processes. What about multiprocessing? Some time in the near future, I expect to design our first embedded system with a multicore processor. But, to date, it is only a feature we appreciate on our desktops and servers. One huge advantage of using Linux for embedded systems is that the Linux community is getting the kinks out of this OS feature on desktops and servers. When I am ready to incorporate it into my first embedded design, it will have had years of experience. The OS can run any thread on any core (of course, under careful guidance). No advantage. questions & answers Since I’m not usually afraid to go where angels fear to tread, I’ll share my opinion concerning processes and threads in embedded real-time systems. I think you need to start with some questions. How important is keeping the data isolated? There are some designs where this is absolutely critical. Processes are the way to go, in that case. End of discussion. I have experienced few problems in systems caused by errant pointers that need the kind of memory protection processes provide. The data sharing threads permit, when rightly designed, is more efficient in the kind of systems we design. What do you do when a thread crashes? Unlike a server or even a desktop use of Linux, our embedded systems usually cannot tolerate any task failing. On a desktop, if your browser locks up, you just restart the browser. What you don’t want is for the browser failure to bring down the whole system. In an embedded system, if one task were to crash, should the rest of the system keep working? Would you want to design the system to restart just the failed process or thread? My opinion, which we have implemented wherever possible, is to force a restart of the entire system in the case of a single thread failure. Recently, some code we wrote got passed off to a customer who modified it in an attempt to restart a failed thread. This was done in the watchdog logic. We immediately jumped all over the unsuspecting code maintainer (nicely, of course) about the risks of doing this. In our case, all processes were talking over queues that did not recover well from a restarted process. But, more importantly, when something unexpected happens that causes a process or thread to crash, why risk restarting the processes when the system is in an unknown state? Which to choose? For these reasons, I find that a design with a few processes and many threads is better than a design with many single-threaded processes. We use a sophisticated watchdog mechanism to force a complete reboot rather than restarting an individual process. I use processes when development needs (e.g., software updates or number of project designers) make them easier to use. DesiGninG ConCurrent sYsteMs December 2012 – Issue 269 Embedded Linux provides system designers with an arsenal of weapons to design a system with concurrency. The mature kernel and tasking model gives most designers more than they need. Next month, I’ll examine additional tools to make your tasks “play nice.” I 60 Bob Japenga has been designing embedded systems since 1973. In 1988, along with his best friend, he started MicroTools, which specializes in creating a variety of real-time embedded systems. With a combined embedded systems experience base of more than 200 years, they love to tackle impossible problems together. Bob has been awarded 11 patents in many areas of embedded systems and motion control. You can reach him at [email protected]. resourCe M. Kerisk, The Linux Programming Interface: A Linux and UNIX System Programming Handbook, No Starch Press, 2010. CIRCUIT CELLAR® • www.circuitcellar.com CONNECT WITH Circuit Cellar For people who are passionate about hardware and software design, embedded development, and computer applications. Awesome projects, tutorials, industry news, design challenges, and more! Connect. Follow us on Twitter. Like us on Facebook. www.circuitcellar.com @CircuitCellar @editor_cc circuitcellarmagazine BOARDS, BOOKS, DVDs AND MORE AT WWW.ELEKTOR.COM/SHOP Elektor Shop The world of electronics at your fingertips! Bestseller! LabWorX 2: Straight from the Lab to your Brain NE W! Mastering Surface Mount Technology This book takes you on a crash course in techniques, tips and knowhow to successfully introduce Surface Mount Technology in your workflow. Besides explaining methodology and equipment, attention is given to parts technology and soldering technique. Several projects introduce you step by step to handling surface mounted parts and the required technique to successfully build SMT assemblies. Many practical tips and tricks are disclosed that bring surface mounted technology into everyone’s reach without breaking the bank. 282 pages • ISBN 978-1-907920-12-7 • $47.60 ore This book and m are available at m/books www.elektor.co FFree SSoftware ft CD CD-ROM ROM iincluded l d d Elementary Course Books BASCOM-AVR The world’s first book with NFC technology integrated inside Catch the Sun The Atmel AVR family of microcontrollers are The oldest known contactless connectivity technology dates back 2000 years to the Han dynasty magazine already produced a wealth of special in China. In that era, the Kongming lantern was invented: a small hot air balloon used primarily for applications and circuit boards based on transmitting military signals. The Kongming balloons have today been replaced by chips. Near ATmega and ATtiny controllers. The majority of Field Communication, or NFC, provides wireless connectivity over short distances based on these projects perform a particular function. In semiconductor technology. This book links both technologies together. Catch the Sun is the this book however the programming of these world’s first book with NFC semiconductor technology integrated inside, while the content of controllers is the foremost concern. Using lots this high-tech book is about the beautiful magic of low-tech ballooning. The book has multiple of practical examples we show how, using NFC chips inside that allow the book to connect to the internet, simply by touching an NFC- BASCOM, you can quickly get your own design hotspot in the book with your NFC-enabled smartphone or tablet. ideas up and running in silicon. 128 pages • ISBN 978-9-07545-861-9 • $57.50 224 pages • ISBN 978-1-907920-11-0 • $56.40 Prices and item descriptions subject to change. E. & O.E extremely versatile and widely used. Elektor CD/DVD-ROMs Bestseller! More than 75,000 components Presented by Menno van der Veen DVD Masterclass Modern Valve Electronics CD Elektor’s Components Database 7 USB Isolator l This CD-ROM gives you easy access to design If your USB device ever suffers from noise This filmed seminar (165 mins. video and data for over 11,100 ICs, 37,000 transistors, caused by an earth loop or if you want to more) starts with a short discussion of the FETs, thyristors and triacs, 25,100 diodes and protect your PC against external voltages classic approach using valve load line graphs, 2,000 optocouplers. The program package then you need a USB isolator. The circuit follo-wed by current sources and current consists of eight databanks covering ICs, tran- described in Elektor’s October 2012 edition foldback techniques. Next, the negative effect sistors, diodes and optocouplers. A further offers an optimal electrical isolation of of cathode electrolytics is covered as well eleven applications cover the calculation of, both the data lines as well as the supply as reducing supply voltage interference. With for example, zener diode series resistors, lines between the PC and the USB device. the help of state of the art measurement voltage regulators, voltage dividers and techniques the (in)correctness of feedback AMV’s. A colour band decoder is included Populated and tested Board is proven, while also clarifying what’s happen- for determining resistor and inductor values. Art.# 120291-91• $101.40 ing deep within the core of the output trans- All databank applications are fully interactive, former. allowing the user to add, edit and complete component data. This CD-ROM is a must-have ISBN 978-1-907920-10-3 • $40.20 for all electronics enthusiasts! ISBN 978-90-5381-298-3 • $40.20 Circuits, ideas, tips and tricks from Elektor CD 1001 Circuits This CD-ROM contains more than 1000 circuits, ideas, tips and tricks from the Summer Circuits Elektor is more than just your favorite electronics magazine. It’s your one-stop shop for Elektor Books, CDs, DVDs, Kits & Modules and much more! various other small projects, including all circuit www.elektor.com/shop Embedded Linux Made Easy Today Linux can be found running on all sorts of devices, even coffee machines. Many electronics enthusiasts will be keen to use Linux as the basis of a new microcontroller project, but the apparent complexity of the operating system and the high price of development boards has been a diagrams, descriptions, component lists and full- hurdle. Here Elektor solves both these problems, sized layouts. The articles are grouped alpha- with a beginners’ course accompanied by a betically in nine different sections: audio & compact and inexpensive populated and tested video, computer & microcontroller, hobby & circuit board. This board includes everything ne- modelling, home & garden, high frequency, cessary for a modern embedded project: a USB power supply, robotics, test & measurement and of course a section miscellaneous for everything that didn’t fit in one of the other sections. Texts and component lists may be searched with the search function of Adobe Reader. ISBN 978-1-907920-06-6 • $55.70 inter face, an SD card connection and various Elektor USA 4 Park Street Vernon, CT 06066 USA Phone: 860-875-2199 Fax: 860-871-0411 E-mail: [email protected] other expansion options. It is also easy to hook the board up to an Ethernet network. Populated and tested Elektor Linux Board Art.# 120026-91 • $93.30 Kits & Modules issues 2001-2010 of Elektor, supplemented with Bestseller! T HE CONSUMMATE ENGINEER by George Novacek (Canada) Product Reliability (Part 2) The Meaning of Failure Rate Now that you know various calculations for determining a product’s failure rate, it’s time to investigate how the numbers figure into your design. A successful product designer must understand the concept of reliability and know how to make smart decisions about components based on failure rate data. L ast month, I discussed calculating product failure rate, λ. This month, I’ll continue to see how those numbers affect your design. Reliability should always be kept in mind, from the moment you begin the preliminary design. You should keep updating it concurrently with the design progress. Your obvious concern is whether or not you can meet the customer’s required mean time between failures (MTBF), but there is a lot more to it than that. To begin, you should plot the failure rates of all individual components (see Figure 1). Notice that the ordinate uses logarithmic scale and, therefore, each gridline represents one order of magnitude or difference. A, B, C, and so forth plotted on the abscissa represent individual components of the same type, under the same stress. For example, RLR 0.25-W resistors with 50% derating (i.e., operating at no more than 50% of their maximum rating) are represented by category A, 0.1-µF/50-V capacitors exposed to no more than 12 VDC are represented by B, and so forth. ANALYZING FAILURE 1.00E+01 1.00E+00 December 2012 – Issue 269 1.00E−01 64 1.00E−02 1.00E−03 1.00E−04 A B C D E F G H Figure 1—This graph shows individual components’ failure rates. I J K L Depending on your design, you may decide components with λ below, say, 1 × 10⁻² have no significant impact on the overall failure rate and can be ignored. This reduces the number of components to plot and analyze, leaving you with only components E through K plus M. Those are the components on which you want to concentrate. If the total failure rate is too high to satisfy the specification, they are the first to review. But, even if the target failure rate is not a problem, you should examine the components with high λ and see if they are optimally used, because they are the most likely to fail. You may be able to reduce their λ (e.g., increase their derating, cool them with a heatsink, etc.). Or, you may want to choose a different component. Even if their λ is satisfactory, you should also review complex and expensive components. There be better, less expensive alternamay M tives. In other words, analyzing components’ selection will help you balance CIRCUIT CELLAR® • www.circuitcellar.com your design’s cost/performance ratio. In the same way as is shown in Figure 1, you should analyze the entire design where A, B, C, and so forth stand for functional blocks. Your reliability may suffer because you have too many unnecessary components with otherwise low λ. Or, one functional block may exhibit a large failure rate and be designed such that the time to repair or replace it may be unacceptably long, thus reducing the system availability. Then, you may want to modify the architecture and spread the failures among several blocks. This is an iterative process. If there is a design change, the analyses must be updated and reviewed. Your reliability prediction only becomes final when the product is finished and released for production. It’s risky to wait until the end of the design to calculate the failure rate, but this is often done to meet contract requirements. You may get lucky and meet the specified requirements without design modifications or obtaining a waiver, but you probably won’t have a robust design. MTBF, MTTR, & MTTF MTBF is the reciprocal of the failure rate, λ. It is a convenient, easy to understand reliability measurement. You may also encounter a percentage of failures per million hours, failures per cycles, or a unit called FITS, which is equivalent to one failure per billion hours. These units are conventions often specific to different industries and can easily be converted from one to another. Fundamentally, MTBF is meant for repairable products, expressing the expected time between two successive failures, while the product is repaired after each of those. It can be determined by a test, where: MTBF = All devices' total operating time Number of failures (1) The total operating time should include the repair time. The mean time to repair (MTTR) must be established by a test that measures how long it takes to fix the various failures. Then, MTBF = mean time to failure (MTTF) + MTTR, and the system (or product) availability can be expressed as: Availability = MTTF MTTF = MTBF ( MTTF + MTTR ) (2) MTTF is often used instead of the MTBF when the product is not repairable (e.g., light bulbs, space vehicles, weapons, etc.). Under some circumstances MTTF = MTBF. Alternatively, MTBF is redefined by some companies as mean time before failure. This can be confusing. It is highly advisable to clarify the terminology before starting work. Besides the most popular exponential failure distribution, other distributions (e.g., Weibull) are used. This is because a failure rate can be a function of the product’s or system’s age. With some repairable products, the time to the first failure can be longer than the time to subsequent failures. Assume, for example, a device’s calculated failure rate λ = 20. Therefore, the MTBF is 50,000 h. This doesn’t mean the product will last 50,000 h without a failure! The MTBF, once again, is a calculated statistical average. Therefore, 10 devices will exhibit the ! ! FREE Stencil with every prototype order ! ! EAGLE order button " " # # Call Tyler: 1 707 447 7744 [email protected] PCB-POOL® is a registered trademark of www.pcb-pool.com www.circuitcellar.com • CIRCUIT CELLAR® December 2012 – Issue 269 pcb-pool.com/download-button f f! 20% o on your first order 65 probability of one failure every 5,000 h per formula, as shown in Equation 1. The probability of the device operating without failure during time t can be calculated: −T R ( t ) = e MTBF (3) Therefore, if a device is fault free at the beginning of a 3-h mission, the mission has a 99.994% probability of success no matter how many hours the device already operated (see my article, “Diode ORing,” Circuit Cellar 263, 2012). Substituting t = MTBF, the probability of a device surviving its entire MTBF in continuous operation without failure is merely 36.8%. RELIABILITY & ACCURACY Reliability is statistics. The calculated results can be 100% accurate for an infinitely large population of products only. The failures during the useful life (i.e., after infant mortality and before wear out), are random and unavoidable. The only way to reduce the probability of those failures is to reduce the λ and to ensure the device operates well away from the infant mortality and wear-out regions. It is important to understand reliability to plan product support, warranty costs, spare parts availability, and so forth. System availability can be established by estimating MTTR by performing and timing various repairs. This is also a balancing act. The shorter the MTTR, the more expensive its achievability usually becomes. If availability and MTTR are a part of the specification, as they often are, you may have to go back and modify the design either to meet the availability requirements or, if there is sufficient margin, to reduce costs. The iterative design process is the only way to achieve the best performance at the lowest cost. To put it bluntly, no designer can be truly successful without understanding and applying reliability concepts. I George Novacek ([email protected]) is a professional engineer with a degree in Cybernetics and Closed-Loop Control. Now retired, he was most recently president of a multinational manufacturer for embedded control systems for aerospace applications. George wrote 26 feature articles for Circuit Cellar between 1999 and 2004. RESOURCES Advanced Logistics Development, “Free MTBF calculator,” www.ald service.com/en/reliability-software/ free-mtbf-calculator.html. I. Bazovsky, Reliability Theory and Practice, Prentice-Hall, 1961. G. Novacek, “Diode ORing,” Circuit Cellar 263, 2012. ———, “Environmental Stress Screening,” Circuit Cellar 255, 2011. December 2012 – Issue 269 Quanterion Solutions, Inc., “MILHDBK-217F: What is MIL-HDBK217F?,” http://quanterion.com/ Publications/MIL-HDBK-217/ index.asp. 66 The Reliability Information Analysis Center (RIAC), “217Plus: RIAC’s Reliability Prediction Methodology,” www.theriac.org/productsandservices/ products/217plus. SoHaR, Inc., “Free MTBF Calculator,” www.sohar.com/reliability-software/ free_mtbf.html. P. Tobias and D. Trindade, Applied Reliability, Third Edition, Chapman and Hall/CRC, 2011. CIRCUIT CELLAR® • www.circuitcellar.com ĘĘĊĒćđĞĆēČĚĆČĊ ĘĘ ĘĊĒćđđĞĆē ēČĚĆČ ČĊ ĘĘĊēęĎĆđĘ ĘĘ ĊēęĎĆ ĆđĘ Circuit Cellar’s first book, Assembly Language Essentials, is a matterof-fact guide to Assembly that will introduce you to the most fundamental programming language of a processor. Author Larry Cicchinelli provides readers with: $ Q L Q W U R G X F W L R Q W R $ V V H P E O \ O D Q J X D J H L W V IXQFWLRQDOLW\ ( V V H Q W L D O W H U P L Q R O R J \ S H U W D L Q L Q J W R K L J K H U O H Y H O SURJUDPPLQJODQJXDJHVFRPSXWHUDUFKLWHFWXUH ,PSRUWDQWDOJRULWKPVWKDWPD\EHEXLOWLQWRKLJK O H Y H O O D Q J X D J H V ² P X O W L S O L F D W L R Q G L Y L V L R Q D Q G SRO\QRPLDOHYDOXDWLRQ 2 Y H U Y L H Z R I , Q W H U U X S W 6 H U Y L F H 5 R X W L Q H V ) U H H G R Z Q O R D G D E O H $ V V H P E O H U S U R J U D P « and more! On Sale NOW! $47.50 777 7 7 7 # ) 2 # 5 ) 4 # % , , ! 2 # / - s s 7 7 7 # # 7 % " 33(( / 0 # #/ /- THE WORLD’S SOURCE FOR EMBEDDED ELECTRONICS ENGINEERING INFORMATION F ROM THE BENCH by Jeff Bachiochi (USA) Energy Extraction Powering Up with Heat Transfer If you can generate the right amount of heat, you can produce electricity for a variety of purposes. Here you learn how to use fire, a Peltier device, and little ingenuity to power up small devices. E very time I had a propane tank delivery the pilot light went out on my gas-fired hot water heater. To relight this small gas flame (and keep it lit) the thermocouple, which protrudes into the center of the pilot light’s flame, had to be hot. As a safety feature, if this thermocouple wasn’t hot, the gas valve would cut off the gas flow. Thermocouples produce a small voltage when heated. This signal tells the valve it can keep the gas flowing. A homeowner who doesn’t understand this requirement may be frustrated. December 2012 – Issue 269 ThERmoELEcTRIcITy 68 In 1821, physicist Thomas Seebeck discovered that a continuous current is generated in a circuit composed of two wires of dissimilar metals joined at both ends when one end is heated. Today, thermocouple probes are standardized by the alloys used in fabrication. When attempting to measure a thermocouple’s output, any dissimilar metal used in the measurement leads will, in effect, become a thermal couple junction and destroy the measurement’s integrity. Special compensation is needed to derive the temperature of interest using either hardware or software compensation. The Seebeck voltage, or µV/C°, isn’t linear with temperature, and look-up tables are often used to ensure accuracy. Now let’s switch gears a bit. My PC does not use any extraordinary means to get rid of CPU-generated heat, unless you consider a heatsink-mounted fan extraordinary. Initially, no cooling devices were used on the CPU, although the power supply had a built-in fan. Circuitry requires more power while a signal is transitioning through its linear region. The more transitions the more heat is generated. While this can be reduced by running the core at lower voltages, it’s just about reached its limit and must, therefore, deal with the extra heat. It’s standard operating procedure to use CPU fans to help keep the CPU from overheating. Some manufacturers go to extremes to cool CPUs. You may have seen liquid-cooled CPUs or even thermoelectric cooling. The liquid-cooling method uses a liquid to absorb heat and carry it away from the processor, where it can be more easily radiated. Thermoelectric cooling uses electricity to produce a heat-absorbing surface. In 1834, Jean Peltier discovered the inverse of the Seebeck effect, now known as the Peltier effect. Applying a voltage to a thermocouple creates a temperature differential between two dissimilar metals. This results in an effective—but extremely inefficient—heat pump. PELTIER A Peltier device is actually a solid-state cooler and heater. It transfers heat from one side of the device to the other through electrical energy consumption. On the plus side, a Peltier cooler has no moving parts or circulating liquid, is relatively small in size, and can be manufactured in a variety of shapes. While it is not efficient, if you have a surplus of heat, it can generate electricity from that heat. Let’s take a closer look at the thermocooling device’s construction. In semiconductors, doping is used to change silicon’s conduction properties. Silicon by itself is not a good conductor as its four valence (i.e., outer shell) electrons are shared with neighboring silicon atoms creating a stable crystalline structure. When doped (i.e., infused) with a material that has five CIRCUIT CELLAR® • www.circuitcellar.com This creates a safety margin so the device will never reach the solder melting temperature, for obvious reasons. N P N P Large heatsink masses can prevent hot P N Thermal spots from forming, which, if allowed to flow exceed this temperature, will most + − likely ruin the thermoelectric device. Electron current Hot side Electron current The differential temperature, ΔT is the Figure 1—N- and P-type materials are used in pairs to create an electrical path where current flows difference between THOT, the temperafrom the hot side to the cold side in N material and from cold to the hot in a P material. On the other ture measured at the device’s hot side, hand, heat flows from the hot side to the cold side in both materials via the majority carriers, which are electrons in the N material and holes in the P material. and TCOLD, the temperature measured at the device’s cold side. The cooler the cold side can be kept, the greater ΔT will be, and valance electrons (e.g., arsenic), this extra electron doesn’t have anywhere to fit into the crystalline structure. The extra electron the more energy can be extracted. The trick is to get as much is pushed about by a voltage potential becoming the “charge heat as possible from the hot side to the cold side. In Figure 2 carrier” of current in this N-type material. Note: Copper, a good you can see that as the heat transfer is increased (going up the conductor, has one valence electron and could be considered an graph’s lower left side) the current increases (in the graph’s lower N-type material. Likewise, when silicon is doped with a material section) and the voltage also increases (in the graph’s upper secthat has three valence electrons (i.e., indium), there is an elec- tion). The currents and voltages are also proportional to ΔT tron missing in the stable crystalline structure and electrons are (along the graph’s bottom). The graph shows the energy input constantly being borrowed by neighboring atoms to fill in the needed to create a temperature difference between a thermo“hole.” In this case, the hole becomes the “charge carrier” mov- electric device’s two sides when it’s used for cooling (or heating). The same relationships are in force when used to transform heat ing in opposition to the current in this P-type material. Similar to the way a magnetic field can force electrons (i.e., into electricity. charge carriers) to flow in a copper wire, heat conduction will affect the flow of electrons. This process in a copper wire (i.e., maximum Power N-type material) moves electrons (i.e., charge carriers) from the In my article “Charging with PV Cells” (Circuit Cellar 265, hotter end toward the cooler end. Note: In a P-type material, 2012), I talked about maximum power point (MPP) when using holes (i.e., charge carriers) move from the hotter end toward the solar arrays. A Peltier device has similar qualities in that its MPP cooler end. You can’t measure this in a material unless you com- will vary with conditions, so the load must be varied for maxiplete the circuit path. When you can measure it, the currents mum efficiency. I used an STMicroelectronics SPV1040 battery through the two similar materials cancel. You need to use two charger to obtain MPP from a varying solar cell/array. With a dissimilar materials so the heat flow-to-current capabilities are 5.5-V maximum input voltage, the SPV1040 isn’t as powerful as different. In fact, N- and P-type material is optimal. As I previ- the CP85 Peltier device, which has a 16-V plus input voltage. ously mentioned, while heat flow and charge carriers move in However, the SPV1020 is a similar device that can handle inputs the same direction, current flow moves toward electrons but up to 40 V. Figure 3 is a block diagram of the STMicroelectronics away from holes. A voltage will be produced across an N- and a device. Its SPI can be used to retrieve the device’s voltage and P-type material when the junction of the two materials is current data. Note that this diagram shows only one of the fourheated. Multiple pairs in series can be used to create higher volt- phase interleaved switching converters that are used to elimiages (see Figure 1). nate the need for output electrolytics. The construction technique for fabricating thermoelectric I used an STMicroelectronics STEVAL-ISV009, which is based devices using Peltier and Seebeck technology uses alternating N- on the SPV1020, to make a Peltier-to-13.5-V supply. I used this and P-type materials in a zig-zag of rows to produce a hot- supply to charge 12-V lead-acid batteries. These types of lead side/cold-side sandwich as shown in the unassembled module in acid cells (even the small ones) are great for recharging cell Photo 1. While the alternating N- and P-type material may look phones and operating other electronic equipment, for example, like diode junctions, the materials are separate (i.e., not dif- when you lose power for extended periods of time or when you fused) and don’t act like diodes. In fact, reversing the heat flow need the convenience of technology while backpacking and/or direction also reverses the current flow direction. The amount of heat that moves from one side to the other is dependent on the temperature differential between the two sides. If both sides are at an ambient temperature, no heat/current flows. If one side is heated and the other side is somehow kept at an ambient temperature, then a stable differential temperature is maintained. The larger the differential temperature, the more heat (i.e., watts) will be transferred from the hotter side to the cooler side. When using a thermoelectic device to generate energy, it is Photo 1—To create this series string of N- and P-type elements, Peltier devices are manufactured in a matrix of vertical connections on one surface important to note the device’s maximum temperature. On the and horizontal connections on the other surface. (Photo courtesy of Steve J. CUI CP85 I purchased, this is 80°C (the melting point is 138°C). Knole, 2003) www.circuitcellar.com • CIRCUIT CELLAR® Cool side Electron current December 2012 – Issue 269 Electron current 69 Input voltage (V) Figure 2—A device such as CUI’s CP85 was designed to cool a CPU. This graph shows the high currents necessary to support a constant flow of heat away from the CPU. Note the tradeoff between the amount of heat drawn away and the differential temperature between the Peltier device’s two sides. 8.5 A 16 6.8 A 5.1 A 3.4 A 8 1.7 A 0 80 Heat pumped (W) 8.5 A 6.8 A 60 5.1 A 3.4 A 40 20 1.7 A 0 70 60 50 40 ∆T = Th – Tc (°C) 30 20 10 0 CB LX PV Cell string i VOUT VIN_SNS VOUT_SNS PGND PGND VIN_SNS_M VIN VB VREG A/D Converter VIN A/D Converter MPPT Ctrl SPI_DATA_OUT A/D Converter XCS SPI DATA IN + - 200 mV SPI_CLK + - + Fault Ctrl December 2012 – Issue 269 1.05 V 70 OSC IN 1.0 V PZ_OUT + - + + - SGND Figure 3—This block diagram of a STMicroelectronics SPV1020 shows one of the four phases that are combined to dynamically change the load presented to the input device to maximize the power collected from it. Its output is regulated to a set point determined by the output resistor divider. CIRCUIT CELLAR® • www.circuitcellar.com camping. Even though using technology while camping defeats the whole purpose, having a cell phone for personal safety cannot be overemphasized. TEMPERATURE IS A KILLER My heat source is a campfire, which could be made from charcoal or wood. Temperatures are often hundreds of degrees Fahrenheit around the fire. The temperature depends on the wood type and its moisture content. Standing dead wood is often best, as it is drier than wood that has been on the ground. A wood fire is difficult to cook on as its temperature is quite hot and difficult to control. For cooking, you want to burn wood until you can pull out a nice bed of coals and use this as your cooking source. With wood fire temperatures being so erratic and Peltier devices having maximum temperature issues, I think it would be a good idea to monitor temperatures on both sides of the Peltier device. To do so, I’ll use a microcontroller to measure two temperatures, communicate with the SPV1020 using a SPI channel to extract voltage and current measurements, and display those results. In addition, I’ll add a cooling fan control and piezoelectric beeper as an auditory warning device. The SPV1020 uses two references. On the input side, the VOC (i.e., open circuit) must be scaled using a resistor divider for the VIN_SNS input where: R1 V = OC − 1 R 2 1.25 A second resistor divider is used to scale down the output voltage VMAXOUT for input VOUT_SNS where: R3 V = MAXOUT − 1 R4 1 The SPV1020’s evaluation board is set up for a VOC of about 38 V and a regulated VOUT of about 36 V, so I need to modify the resistor values to use a 16-V VOC and a 13.5-V VOUT using these formulas. A constant 13.5-V supply can keep a 12-V gel cell battery charged without causing long-term overcharging. To monitor the Peltier device and run a 12-V fan to ensure proper device cooling, you must start with a charged battery. I’m not sure I can depend on the Peltier device to begin producing sufficient power without sustaining any damage if it is not being actively cooled. And, in my case, that’s with the 12-V fan. Referring to the schematic in Figure 4, the fan is controlled by a simple transistor from the microcontroller’s PWM output. At this stage, I’m not using the PWM for fan speed control, but that option is available. Honeywell TD5A temperature-dependant resistors (TDRs) are used to sense the hot- and cold-side temperatures. Using a simple voltage divider, these have a fairly linear temperature versus resistance characteristic in the –40°C-to-150°C range. I used two A/D inputs to read the resulting voltages. I had a small two-line by eight-character LCD laying around that displays temperatures, voltage, and currents. It happens to be a 3.3-V model, which means I’ll be running the microcontroller on 3.3 V as well. I used other parts including a 12-V fan and associated heatsink from a discarded (I mean, recycled!) PC. Had I purchased this stuff new, I would have used a 5-V fan and LCD, which would have made things simpler. Atom D525 Touch PC NEW: PPC-080T-525 ŸIntel Atom D525 Dual core 1.8 Ghz Ÿ2GB DDR3 800MHz SODIMM RAM Ÿ16GB SATA SSD Hard Drive Ÿ8" Color LCD Screen - 800 x 600 ŸAnalog Resistive Touchscreen Ÿ10/100/1000 Base-T Ethernet ŸWireless 802.11 b/g/n Ÿ4 External USB 2.0 Ports ŸExternal ESATA Port ŸExternal RS 232 Port ŸExternal VGA Port ŸAudio Line In & Line Out Ÿ2W Stereo Internal Speakers Ÿ12V DC in ŸDimensions: 8.5" x 7.20" x 1.77" The PPC-080T-525 Touch PC comes ready to run with the Operating System installed on Flash Disk. Just apply power and watch either EMAC OE Linux or Windows Embedded appear on the vivid 8” color resistive touch screen. Suitable for use in a variety of work environments the PPC-080T-525 uses a robust aluminum housing and has no moving parts. Quantity 1 pricing begins at $795. www.emacinc.com/panel_pc/ppc_080t_d525.htm Since 1985 OVER 27 YEARS OF SINGLE BOARD SOLUTIONS EQUIPMENT MONITOR AND CONTROL Phone: ( 618) 529-4525 · Fax: (618) 457-0110 · Web: www.emacinc.com www.circuitcellar.com • CIRCUIT CELLAR® December 2012 – Issue 269 2.6 KERNEL 71 be 2.012 V, which converts to a 625 count. A change in 150° causes a change of 132 counts. By reducing this by a factor of 2, I can remain within the 16-bit arithmetic, resulting in this formula: Temperature = Figure 4—This project’s circuit will monitor temperatures on the hot and cold side of the Peltier device under test. The SPV1020 serves as a voltage and current measuring device the project can tap into and display along with the temperatures. Fan operation is based on either sensor’s temperature. CHART THE COURSE Once you know where you are and where you want to go, it’s a simple matter of connecting the dots, right? Not always, but it’s a good place to start. Figure 5 shows the flowchart I used to connect my dots. The SPV1020’s internal registers can be interrogated via a SPI to gather status information. I’ve chosen to display both the voltage and current readings on the first of two LCD screens. I used 16-bit integer arithmetic to calculate the voltage and current from the register values using the following formulas: Volts = register × 1.25 R1 + R2 × 1, 023 R2 and: Current (A) = register × 1.25 × 7.2 1, 023 which I’ve simplified to: register × 10 Volts = 54 December 2012 – Issue 269 and: 72 Temperature sensor monitoring is done via an interrupt routine that saves the present channel’s 10-bit sample conversion count and increments the A/D channel before beginning the next conversion. After a short delay for the first LCD screen each temperature count must be translated into a corresponding temperature. The count is based on the fact that at 0°C the TDR will measure 1,854 Ω. Using a 2,000-Ω series resistor across 3.3 V, that translates into a 1.587-V drop across the TDR. Reading the TDR with a 10-bit A/D will result in a 493 count (i.e., approximately 0.003 mV/bit.) When raised to 150°C, the TDR will measure 3,128 Ω. Now, the drop across the TDR will − 493) × 75 (132) × 75 = 150 = 66 66 I plan to use the old CPU heatsink/fan assembly to cool the Peltier device’s cold side. The fan blows ambient air into the top of the heatsink fins drawing heat from the sink as it passes through the fins and out its sides. This one is rated at about 1.2°C/W approximately, given some standard airflow rate in linear feet per minute (LFM). This means for every watt it throws off, its temperature will rise 1.2°C above the ambient temperature. Without forced air flow, the thermal performance will be more than 10 times less efficient. So, it is important to run the fan anytime the temperature exceeds some normal ambient temperature, I’ll use 33°C (i.e., 90°F). Any time either of the temperature sensors registers above 33°C, I’ll turn on the fan. It will remain on until both sensors fall below 33°C. As a precaution, I’m adding a piezoelectric transducer that can beep if either temperature sensor exceeds 80°C (i.e., 176°F). That’s the hot side’s maximum-rated temperature (with the solder melting point approximately 138°C). IT’S ON FIRE I built a fire to test the circuitry, which I mounted behind a thin wall of foam insulation. I covered that with a thin aluminum sheet hoping it would reflect the heat back toward the fire. The only thing exposed through the insulation was a number of thin aluminum fins I wedged into a ball-grid array (BGA) heatsink I used as a heat collector. The Peltier device was mounted between the BGA heatsink and the fan/heatsink, which stuck out from the back of the insulation just above the circuitry. When the circuitry was powered up, the LCD displayed ambient Initialization Read registers from the SPV1020 using SPI Calculate volts and display on LCD “xx VIN” register Current (mA) = 11 (count A/D Interrupt Read present A/D channel and store result Increment channel number Calculate current and display on LCD “xx.x IIN” Calculate temp T1 and display on LCD Return Timer1 interrupt “Hot xxxC” Calculate temp T2 and display on LCD “ColdxxxC” Turn the fan ON if T1 or T2 > 33°C Turn the warning ON if T1 or T2 > 81°C Decrement tick if not already zero Return Figure 5—Most of the work to constantly display data is done within the main loop. The SPV1020 provides voltage and current information while the TD5A temperature sensors read the Peltier device’s hot and cold sides. Temperature data is continually available thanks to the A/D interrupt. Warnings are audible via a piezoelectic transducer. CIRCUIT CELLAR® • www.circuitcellar.com beeping. This meant the temperature was approaching 80°C, so I moved the fixture away from the fire. With the circuitry pulled from the Peltier device, I connected a voltmeter to its leads. When I brought the fixture back to the fire and watched the temperatures and the voltmeter, the output rose to about 1 V with a 25°C differential temperature, which seemed like about 4 V for every 100°C. I couldn’t heat it high enough to achieve the SPV1020’s 6.5-V miniPhoto 2—The project circuitry is mounted behind the insulated surface, which will keep the fire’s radiation mum without exceeding the solderfrom cooking the components. The heat-collection sink melting temperature. is facing the fire I’ve built in a portable fire pit. I went back to my project boxes temperature for the Peltier device’s hot and and pulled out the SPV1040 from my MPP cold sides. With the fire roaring, I faced the project. This device begins operating with heat collector toward the fire just a few feet about 0.5 V. After attaching the Peltier away from the flames (see Photo 2). I felt device and setting the SPV1040’s output the surrounding air already getting warmer for 3.3 V, I connected my circuit and (if that’s possible). Back behind the insula- applied the heat. The circuit was powered tion, the LCD showed a rise in hot-side up from the heat. The 12-V fan was still temperature and the fan suddenly turned connected to the 12-V battery and not on (see Photo 3). However, the volts and from the 3.3 V generated from the heat, current both showed zero! I added more but at least I hadn’t struck out! I’ve got to fuel to the fire, and after a few more min- look into Peltier devices made to withstand utes, the piezoelectric transducer began hotter temperatures, which also means Photo 3—The LCD shows a rise in hot-side temperature. The fan kicked in and is keeping the cold side close to ambient temperature. measuring temperatures using thermocouples. What goes around comes around. recharging This summer, I received two backlogged items I’d ordered: a Raspberry Pi, which I can’t wait to play with, and a BioLite CampStove. This couldn’t have come at a more opportune moment, since the BioLite CampStove is wood-fueled with a built-in Peltier device that produces a charging current for electronic devices (e.g., cell phones). Photo 4 shows the Get PUBLISHED. Get NOTICED. Get PAID. Circuit Cellar feature articles are contributed by professional engineers, academics, and students from around the globe. Each month, the editorial staff reviews dozens of article proposals and submissions. Only the best make it into the pages of this internationally respected magazine. Do you have what it takes? Contact C. J. Abate, Editor-in-Chief, today to discuss the embedded design projects and programming applications you’ve been working on and in an upcoming issue of Circuit Cellar magazine. [email protected] www.circuitcellar.com • CIRCUIT CELLAR® December 2012 – Issue 269 your article could be featured 73 Photo 4—BioLite CampStove is a wood-fired personal camping stove that can be used to not only prepare meals, but also to recharge any electronic device (i.e., cell phone) plugged into its USB (power only) port. Here I have a stoked unit powering a USB LED lamp I’ve plugged in. stainless steel firebox stocked with wood with a plastic housing hanging off the side. A second perforated stainless outer shield maintains a 0.5” air space around the firebox to provide some insulation. The housing contains a small circuit board, a lithium-polymer battery, fan, and a Peltier device. The fan serves two purposes: It blows air over the heatsink’s cold side and it directs the air through a connector into the bottom of the firebox. This is like constantly blowing on the fire to give it extra oxygen and enable the fuel to burn clean and hot. As always, I dissected my new toy before I operated it. The orange housing is stored inside the firebox as the two halves simply detach. The protruding 0.5” copper rod is an integral part of the hot-side plate used to transfer heat to the Peltier device. Photo 5 shows the Peltier device sandwiched between the hot-side heat pipe and the cold-side finned heatsink. Note the insulating blanket that keeps the heat away from the plastic parts. As any camper knows, collecting small, dry tinder and kindling is the most important part of starting a wood fire. If you don’t spend enough time gathering the right essential elements, the only thing you’ll ever light is a match. If it’s a damp or rainy day, look for some Birch bark (from a fallen tree) as this can be lit even when it’s wet. Because the firebox is deep and narrow, the hardest part about using this stove is getting the tinder started. Don’t try and light a bit of tinder in the bottom of the firebox, instead, fill it to the top with small, dry Photo 5—Here you can see the Peltier device I’ve pulled from inside the BioLite CampStove’s orange plastic housing. The device has a finned heatsink attached to the cold side that dissipates heat assisted by an electric fan. On the device’s hot side is a heat spreader plate with a 0.5” copper rod used to transfer the heat from inside the firebox. Note the sheet of insulation material to prevent any flames from escaping the firebox. tinder. If you pile the tinder to one side at the top, you can use a match to light the tinder closest to top. Once a few pieces have become inflamed, you can press the BioLite CampStove’s On button to start the fan, providing a constant oxygen flow to the spreading flames. The 3”-diameter firebox limits the wood size you can stoke, which means the fuel will need constant replenishment every 5 min. or so. Once sufficient heat is Fascinated by technology’s impact on the future? Check out Tech the Future! December 2012 – Issue 269 Computing power and global interconnectivity are pushing tech innovation into overdrive. Pioneering technologies and creative workarounds affect even the couch potato 24/7. Tech the Future reports on technology strides that shape the future — yours included. 74 www.techthefuture.com Follow Tech the Future CIRCUIT CELLAR® • www.circuitcellar.com being transferred via the copper rod exposed to the flames, generated current charges the internal battery. While fully charged, the BioLite CampStove can recharge any external device via a (power only) USB connector mounted on the front. A green LED signals its readiness to recharge your device. AIN’T NO SUNSHINE While the BioLite CampStove can be used to cook meals (using wood fuel) and keep devices charged, it is heavier and less efficient than a small solar panel. On the other hand, the BioLite CampStove can be used on days when there is no sun, and it replaces the liquid-fuel stoves so many backpackers are used to, so it might catch on with those needing to remain connected while being totally isolated for extended periods. The BioLite website touts “2 W @ 5 V” (i.e., 200 mA), and while the heat energy can be as high as 5 kW, that’s less than 0.1% efficiency. This brings to mind a project for the future: a dynamic load that can be used to measure power-producing devices’ outputs. My present circuit wastes more than half its precious power using a linear regulator for 3.3 and 5 V (i.e., system power). I need to change to switchers for better efficiency. So many cool toys, so little time. I Jeff Bachiochi (pronounced BAH-key-AH-key) has been writing for Circuit Cellar since 1988. His background includes product design and manufacturing. You can reach him at [email protected] or at www.imaginethatnow.com. RESOURCES J. Bachiochi, “Charging with PV Cells,” Circuit Cellar 265, 2012. BioLite, www.biolitestove.com. CUI, Inc., “Series: CP85, Description: 8.5 A Peltier Module,” 2012, www.cui.com/ Product/Resource/PDF/CP85.pdf. Omega Engineering, Inc., “Reference Temperatures,” www.omega.com/ temperature/Z/pdf/z021-032.pdf. STMicroelectronics, “SPV1020: Interleaved DC-DC Boost Converter with Built-In MPPT Algorithm,” 2012, www.st.com/internet/com/TECHNICAL_RESOURCES/ TECHNICAL_LITERATURE/DATASHEET/CD00275733.pdf. Tellurex Corp., “Frequently Asked Questions About Our Power Generation Technology,” 2010, www.tellurex.com/pdf/seebeck-faq.pdf. SOURCES CP85438 8.5-A Peltier module CUI, Inc. | www.cui.com SPV1040 Battery charger, STEVAL-ISV009 demonstration board and SPV1020 Boost converter STMicroelectronics | www.st.com Create complex electronic systems in minutes using Flowcode 5 Flowcode is one of the World’s most advanced graphical programming languages for microcontrollers (PIC, AVR, ARM and dsPIC/PIC24). The great advantage of Flowcode is that it allows those with little experience to create complex electronic systems in minutes. Flowcode’s graphical development interface allows users to construct a complete electronic system on-screen, develop a program based on standard flow charts, simulate the system and then produce hex code for PIC AVR, ARM and dsPIC/PIC24 microcontrollers. www.circuitcellar.com • CIRCUIT CELLAR® NEW! Flowcode 5 for PIC Convince yourself. Demo version, further information and ordering at www.elektor.com/flowcode December 2012 – Issue 269 Design – Simulate – Download 75 1 2 3 4 5 6 7 8 9 10 11 12 13 14 15 16 17 18 19 Across 1. 5. 9. 10. December 2012 – Issue 269 12. 76 14. 16. 18. 19. Down According to Ed Nisley in his Circuit Cellar 265, 2012 article, this 2. Cryptographer known as the “father of information type of tester characterizes a transistor’s behavior by computing theory” the drain resistance at each combination of measured voltage 3. Does not rely on human interaction [two words] and current 4. Represents a system’s gain and phase as a Type of force on a charged particle caused by electromagnetic frequency function [two words] fields 6. Commonly used for PCB design Tests your engineering know-how in every issue of Circuit 7. A device that can determine RPM Cellar 8. These types of projects utilize FPGAs, PLDs, and In last month’s “Task Manager,” Circuit Cellar Editor-in-Chief other chips [two words] C. J. Abate mentioned this was one of the hottest topics in 11. Type of cooling that relies on the Peltier effect to the magazine’s earliest issues [two words] alter heat between two types of materials In his article in this issue, Bob Japenga defines this as an 13. Used to measure magnetic fields’ strength and instance of a software program that utilizes CPU resources to intensity accomplish some purpose 15. Focus of Renesas’s 2012 design challenge [two Swiss computer scientist who designed the Pascal programming words] language 17. Available for a limited time An LED’s purpose Enables a lower-level software layer to request a higher-leveldefined subroutine German physicist Georg Ohm 1789–1854 first introduced this The answers are posted at www.circuitcellar.com/crossword concept [two words] and will be available in the next issue. CIRCUIT CELLAR® • www.circuitcellar.com I DEA BOX THE DIRECTORY OF PRODUCTS AND SERVICES AD FORMAT: Advertisers must furnish digital files that meet our specifications (www.circuitcellar.com/advertise). ALL TEXT AND OTHER ELEMENTS MUST FIT WITHIN A 2" x 3" FORMAT. E-mail [email protected] with your file or send it to IDEA BOX, Circuit Cellar, 4 Park Street, Vernon, CT 06066. For current rates, deadlines, and more information contact Peter Wostrel at 978.281.7708 or [email protected]. The Vendor Directory at www.circuitcellar.com/vendor is your guide to a variety of engineering products and services. ! "# *" # * % $ # + % ' ( !)%" #!) % &% %& " Low cost, USB powered data logger Over 2M bytes per second ADC data to USB 24-bit ADCs, ±10V 16-bit ADC (AD7606), DACs CompactFlash, and 20+ I/Os 3.6" x 3.0" C/C++ programmable 100+ Low Cost Controllers with ADC, DAC, UARTs, 300 I/Os, solenoid, relays, CompactFlash, LCD, Ethernet, USB, motion control. Custom board design. Save time and money. www.circuitcellar.com • CIRCUIT CELLAR® December 2012 – Issue 269 & 77 PDQ BoardTM - A Fast I/O-Rich Single Board Computer $159/100s ● ● ● ● ● ● ● Low cost 2.5”x4” C-programmable computer 16-bit HCS12 processor clocked at 40 MHz 8 PWM, 8 counter/timer, and 8 digital I/O 16 10-bit A/D inputs Dual RS232/485 ports, SPI and I2C ports 512K on-chip Flash, 512K RAM with Flash backup Plug-in I/O expansion, including Ethernet, Wi-Fi, GPS, 24-bit data acquisition, UART, USB, Compact Flash card, relays, and more ... Mosaic Industries Inc. tel: 510-790-1255 fax: 510-790-0925 www.mosaic-industries.com microEngineering Labs, Inc. www.melabs.com www .melabs.com 888-316-1753 Programmers for Microchip PIC® Microcontrollers PC-Tethered PC-Tethered USB M Model odel (shown) (shown): December 2012 – Issue 269 tt4UBOEBMPOFTPGUXBSF 4UBOEBMPOFTPGUXBSF tt$PNNBOEMJOFPQFSBUJPO $PNNBOEMJOFPQFSBUJPO tt)JEF(6*GPSBVUPNBUFEVTF )JEF(6*GPSBVUPNBUFEVTF tt0WFSSJEFDPOGJHVSBUJPOXJUIESPQEPXOT 0WFSSJEFDPOGJHVSBUJPOXJUIESPQEPXOT 78 SStand-Alone tand-Alone FField ield P Programmer: rogrammer: Starting at $79.95 t1PXFSGSPNUBSHFUEFWJDFPSBEBQUFS t1PXFSGSPNUBSHFUEFWJDFPSBEBQUFS tt1SPHSBNGJMFTUPSFEPO4%$"3% 1SPHSBNGJMFTUPSFEPO4%$"3% tt1SPHSBNNJOHPQUJPOTTUPSFEJOGJMF 1SPHSBNNJOHPQUJPOTTUPSFEJOGJMF tt4JOHMFCVUUPOPQFSBUJPO 4JOHMFCVUUPOPQFSBUJPO Program in-circuit or use adapters for unmounted chips. Zero-Insertion-Force Adapters DIP, TQFP, rs available for DIP P,, SOIC, SSOP, SSOP P,, TQFP P,, and more. P PIC is a registered registered trademark trademark of Microchip Microchip Te Technology echnology Inc. Inc. in the USA and other countries. countries. CIRCUIT CELLAR® • www.circuitcellar.com LISTEN TO YOUR MACHINES Ethernet PLCs for OEMs FMD88 -10 and FMD1616 -10 Integrated Features : - ETHERNET / Modbus TCP/IP 16 or 32 digital I/Os 10 analog I/Os RS232 and RS485 LCD Display Port I/O Expansion Port Ladder + BASIC Programming $229 and $295 before OEM Qty Discount Connect With Design Engineers From Around The Globe. Compilers w IIDE w/ DE DE C omp pileers rs 4.129 better vversion eerrrsion on 44. 129 1299 orr be bett bet b ett tter t r www.ccsinfo.com/ccide ww w ww.c .cc ccsinf nffo.co com/c om/ m/cc /ccid de Reserve advertising space in Circuit Cellar and CC News Notes today! tEliminat Eliminate te a diag diagn nostic ostic ser eriial al por portt aand nd save sa ve money money oney b byy str streeaming aming da dattaa thr through ough the he IICSP CSP iin nterfa terface face t44FU FUTTFSJB FSJBBMMT TBBOE OEDDBMJCSBUJPO BMJCSBUJPOWWBMVFT BMVFTJO JO product pr oduction t tel : 1 877 TRI-PLCS web : www.tri-plc.com/cci.htm TRIANGLE RESEARCH INTERNATIONAL t3 3FWJFX FWJFXMMPH PHE EBUB BUBJJO OUUIF IFö öFME FME Strategic Media Marketing 978.281.7708 [email protected] www.smmarketing.us [email protected] ale a es@ @ccsinf nffo.com com 262-522-6500 eext. xt. 35 PIC® MCU, dsPIC and MPLAB are registered tradmarks of Microchip Technology, Technology, Inc. CROSSWORD ANSWERS from Issue 268 www.circuitcellar.com • CIRCUIT CELLAR® Down 1. ROUNDKEYS—In his article “Hardware-Accelerated Encryption” (Circuit Cellar 266, 2012) Patrick Schaumont said AES encryption’s real secrecy comes from the periodic additions of these 3. OILCAN—A type of planar tube, similar to the lighthouse tube, which has cooling fins 4. VECTORGRAPHICS—In the 1970s, Circuit Cellar founder Steve Ciarcia wrote his first article for BYTE about this topic 5. VOLTAGECONTROLLED—An oscillator controlled by voltage input; there are usually two types: harmonic and relaxation [two words] 6. TEMPEST—Describes compromising emanations 8. ACQUISITIONTIME—In a communications system, the time interval required to attain synchronism [two words] 9. INTEL—Company credited with making the first single-chip microprocessor 10. HANDSHAKING—How one device communicates with one or more other devices, at a predetermined speed 15. VARACTOR—Used as a capacitor to control voltage 16. SALLENKEY—Active filer, two-pole [two words] 1 R 2 3 F L O W C O D E 4 O V I E 5 U 6 7 T N E D V 8 9 L A P L A C E C T C I O N L T T 10 Q K M H O A 11 P E U E Y I R N R A C E W A Y L G G N R D E L A N D S C 12 S E N S O R S 13 I T 14 O T T I P H I H A V N S O I K A T A N C I R R N G T O N S N A O G C L T L B I 15 16 17 D A R L I I L 18 M W A F E R 19 N D I E L E C T R I R K 20 T H E R M O P L A S T I Y C C O R E C D December 2012 – Issue 269 Across 2. FLOWCODE—Columnist Jeff Bachiochi taught readers how to use this graphical programming language in his recent article about flowcharting (Circuit Cellar 266, 2012) 7. LAPLACE—This type of transform is similar to Fourier, but expresses functions into moments as opposed of vibration 11. RACEWAY—Channel to hold wires, cables, and so forth 12. SENSORS—Circuit Cellar’s 250th issue (2011) focused on Measurement and this other topic 13. LANDS—A metallic contact area 14. BITTI—Interviewee (Circuit Cellar 253, 2011) who designed the “Witness Camera,” a selfrecording surveillance camera 17. DARLINGTON—This type of pair can be produced using individual transistors or purchased as a single device, as in a 2N6301 18. WAFER—A slice of semiconductor material upon which monolithic ICs are produced 19. DIELECTRICCORE—The insulating material that makes up the center of the cable through which the conductors are run [two words] 20. THERMOPLASTIC—A synthetic, flexible mixture of rosins used as an insulting material 79 P INTERRUPT RIORITY by Steve Ciarcia, Founder and Editorial Director December 2012 – Issue 269 A 80 Onward and Upward t the end of our conversations, longtime Circuit Cellar columnist Ed Nisley always says, “Onward and upward.” To this day, I’m not quite sure what that means, but it seems like a useful exit line. Of course, leaving a conversation and leaving a career are two completely different things. Both involve some strategy. With a conversation, one expects you’ll talk later and not everything has to be resolved by the conversation’s end. With a career, there is more finality. You want to know you have accomplished some goals, left the world a better place, and placed your legacy in the hands of people who will properly transition it. These days, I’m not sure whether to laugh or cringe when I get an e-mail or meet a Circuit Cellar reader who starts a conversation by saying they have been reading my stuff and following me since BYTE magazine. Certainly, I take it as a compliment, but it also means we are both over the proverbial hill. True, the BYTE days and the seeds that generated Circuit Cellar magazine began 35 years ago. That’s a long time for any of us. When you read the 25th Anniversary issue, you’ll find my article describing the history of how this all started. I’d like to say I had a grand plan from the very beginning, but my career path had a far simpler strategy: To create a product that would be in demand for a long time, to stay under the radar (away from lawyers and competitive vultures), and find good people with similar beliefs who would help me accomplish these goals. I’d like to say I intuitively knew what to do as a boss, but remember, I was trained as an engineer, not an MBA. A wise person once told me there were two ways to learn things in life: through trial and error or through someone telling you. I just took to heart a business article I read in college and religiously applied it to my career path. It said the majority of small businesses fail for one of four reasons: Too little business, too much business, insufficient capital, or no plan for succession. Since I wasn’t having much fun in corporate America back then (five jobs in five years), succeeding in business had more of a “do or die” imperative than the average job. Let me warn any budding entrepreneurs that these four events test your gambling tactics more than your business acumen. In my case, Ciarcia’s Circuit Cellar was the product 30 years ago, along with the supporting manufacturing company. It grew quickly and afforded certain luxuries (e.g., Porsches, BMWs, Ferraris, etc.) typically necessary in our culture to designate achievement. Too little business was not an issue. The “too much business” event happened right after the introduction of the IBM PC. Circuit Cellar was the third company in the country to market an IBM PC clone. I thought it was a good idea. Everybody who couldn’t get a real IBM PC started banging on our door for an MPX-16. We got $1 million in orders in just a few weeks! What was I supposed to do? Certainly not what 99% of you would have done—I stopped taking orders! Remember, I didn’t want to work for anybody and I don’t like doing “reports.” Delivering thousands of PCs might have made us into another Apple, but it also meant using lots of outside money, no more BYTE magazine, and no more fun monthly projects. It really meant venture capitalists and lawyers, ugh. Was it the right decision? You decide. Circuit Cellar is still here, and every early PC clone maker from back then is gone. In 1988 we started Circuit Cellar magazine. While our money came from manufacturing projects and kits, we knew the real product was Circuit Cellar itself. It was time to launch the magazine as a unique product. Back in 1988, it typically cost about $2 million for a big publisher to start a magazine like Circuit Cellar. We pulled that off without any other sources. Finally, there comes the toughest decision for any entrepreneur—when to hang it up. I have to admit, I wasn’t quite sure about this one. It’s not because I planned to hang in until the bitter end. It was because I didn’t immediately see any company that would appreciate Circuit Cellar enough to properly continue it. Over the years, the four major U.S. technical trade publishers had sniffed around Circuit Cellar with acquisition in mind. I never got a good feeling about them, and I’m sure they knew I wasn’t going to be a happy indentured servant in any deal they proposed. Why it takes a European publisher to appreciate an American magazine and its readers, I’ll never know. From day one, I felt Elektor would treat Circuit Cellar properly. It’s been three years since that transition, and I feel I made the correct decision. The collective benefits of being part of a larger publishing company will prolong Circuit Cellar’s existence and enable it to expand into new markets I was too complacent to tackle. The loyal Circuit Cellar employees deserve a career path beyond my short-term ambitions, and now they have it. As for me, I plan on spending time stringing more wires for my HCS and I’m ecstatic about having zero responsibilities anymore. I’m around if needed, but plan on taking a four-wheel drive out to the beach to find me. So, until then, I’ll just close with “onward and upward,” and see where that takes me. [email protected] CIRCUIT CELLAR® • www.circuitcellar.com