1
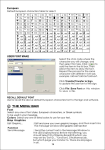
USER INSTRUCTION
MANUAL
Unpacking: Thank you for purchasing the AZTEC LED Display Full Color
Indoor / Outdoor by AZTECELECTRONIC®. Every AZTEC LED Display
Indoor / Outdoor has been thoroughly tested and has been shipped in
perfect operating condition. Carefully check the shipping carton for damage
that may have occurred during shipping. If the carton appears to be
damaged, carefully inspect your fixture for any damage and be sure all
accessories necessary to operate the unit has arrived intact. In the case
damage has been found or parts are missing, please contact our toll free
customer support number for further instructions. Do not return this unit to
your dealer without first contacting customer support.
Introduction: The AZTEC LED Display Screen Indoor / Outdoor Full Color
RGB is part of AZTEC-ELECTRONIC’’s continuing pursuit for creating best
quality resolution and displays to perfection in LED Displays. Our products
quality uses the best LED Quality Chip from the recommended European
manufacturer giving the security in the long lifetime and durability. The
quality of color synchronization and with AZTEC IC powered driving IC’s will
ensure the highest possible refresh rate suitable for any environment of:
promotions, events, broadcast, advertising and many other suitable projects
solutions.
Customer Support: AZTEC-ELECTRONICS provides a toll free customer
support line, to provide set up help and to answer any question should you
encounter problems during your set up or initial operation. You may also visit
us on the web at www.aztec-electronics.com for any comments or
suggestions. Service Hours are Monday through Friday 9:00 a.m. to 5:00
p.m. Pacific Standard Time. E-mail:
[email protected]
Warning! To prevent or reduce the risk of electrical shock or fire, do not
expose this unit to rain or moisture.
Caution! There are no user serviceable parts inside this unit. Do not attempt
any repairs yourself, doing so will void your manufactures warranty. In the
unlikely event your unit may require service please contact AZTECELECTRONIC DEALER / DISTRIBUTOR.
PLEASE recycle the shipping carton when ever possible.
Unpacking & Inspection Procedure
This section describes the procedure and notice during unpacking inspection.
The customer representative and engineering supervisor should
should be on site during unpacking
inspection. Otherwise the side
e who opens packing boxes alone should take the responsibility of any
missing or damage of goods.
The goods should be checked according to packing list as followings:
1). Checking of packing list
2). Checking if there is any damage on goods box, and checking
checking the goods have been
dispatched to right site for installation.
3). Unpacking goods box and checking whether goods match packing list.
4). Any problem such as lacking of goods, wrong goods, or any damage of goods,
desquamation of element should be feed back to supplier on time for fast processing.
5). If there is no any problem of the goods, customer representative and engineering supervisor
should sign on report of Unpacking Inspection Report .
6). Both sides keep one Unpacking Inspection Report , and engineering supervisor is required to
send Unpacking Inspection Report back to supplier for pigeonholing.
《
《
》
《
《
》
》
》
【Notice】
1). LED display screen is an expensive equipment, good packing and water proof method is
necessary during
g transportation, shockproof sign should be marked on packing box and
exposing to sunshine or rain is not allowed.
2). It should take us at least 30 minutes to wait to open the box when the equipment is moved
from a relative low temperature and dry place tto
o hot and high moisture place, otherwise the
equipment will be damaged due to agglomeration of moisture on to the surface of equipment
Hardware Installations
Note the display installation:
1. Before the installation of LED display, need to check the place whether level is off and firm
installation positions.
2. Installation should be strictly according to design specifications, do not to change the connection
mode and connector model fitting.
3. Installation should be strictly according to the construction requirements and the flatness
tolerance range.
4. All electrical connection wire according to the requirements of the drawings, connected correctly
correct
and check confirmed.
5. The installation location should consider the local environmental factors and the actual situation
and by professional staff responsible for the design and construction.
6. Outdoor LED displays need to consider the display of waterproof and dustproof, corrosion
protection and lightning protection measures.
7. The LED display installation needs to consider the local temperature changes, and to maintain the
display cooling and ventilation.
Computer hardware installation steps are as follows:
1. Put the Graphic card into the PCI-E slot on the main board, install the graphics drivers;
2. Put the AZTEC Sending card to the main board PCI slot and fixed over;
3. Connect the Graphics DVI output and AZTEC Sending card DVI inputs together by DVI cable;
4. Connect the AZTEC Sending card and computer’s USB by control cable;
5. Connect the AZTEC Sending card and AZTEC receive card using CAT-5 cable, (the specific number
and connection mode according to the engineering drawings);
6. Start setting or electric debugging after checking the connection is correct.
LED Display Cabinet Testing Sequence
Please Test each unit of LED Display cabinet to check whether it can work well before full screen
installation.
Please follow procedure as follow for testing Cabinet AZTEC LED Display:
1. Before connecting power on to unit cabinet, please check each power supply as Image
4-3, Image 4-4, Image 4-5 to avoid short-circuit. If ok, go next step.
2. Once the Power Supply to the unit cabinet which has been checked as step 1.
3. Press reset button on the receiving card as Image 4-1, Image 4-2 to check whether the unit
cabinet is working well as it should be, (Image 4-6).
4. Or to connect the LED Display cabinet with control systems & computer to test
5. Please contact our Local Distributor for installation assistance.
CABLING INFORMATION:
There are 2 types of Cables involved in our AZTEC LED Display Installations
Installations:
1. Power cables Connections: All power cables connected inside the unit cabinet is ready installed
before goods delivery; All you need to do is to connect the power supply cables between
be
each unit
cabinet outside as the cad drawing or picture diagram we provided.
2. Signal cabling: All Signal cable connected inside the unit cabinet is ready installed before goods
delivery; All you need to do is to connect the signal cable between each unit cabinet outside as the
cad drawing or picture diagram we provided.
Optional Software installation
Optional Software Installation steps are as follows:
1. The graphics card driver installation
Put the graphics driver CD into the CD-ROM
CD
drive, and then it will automatically installed into the
state, please follow the instructions.
First install the DirectX9.0; then install drive program; finally install the control panel.
2. LED Studio Software
Install the large screen special playback and set the software, or othe
otherr screen control system with
control software;
Put the software CD of led display into the CD-ROM
CD ROM drive, copy or install all the programs to the
computer.
Recommended Operational Standard Operating Procedure ((SOP)
1. Firstly TURN ON: the computer, and then TURN ON: the AZTEC Led Display
isplay.
Upon Powering On the equipment, please make sure the input voltage is to meet the product
requirements.
Once Computer is turned ON,, please make sure that the graphics settings are correct and
configured. An incorrectly configured display will not sh
shows
ows any pictures or LED Display shows as
Blank Screen.
Then, Turn ON the AZTEC LED display ((AZTEC Led Display will start up for a moment. It is commont
to have its regional flicker, it also shows AZTEC Led Display has been Powered
owered ON);
Next, From the PC (Optional) Open the Control Software, using Pixel Size
ize basic and display regional
settings (this setting does not affect the LED display’s pictures display);
Or, from the LED Processor (Optional),
(Optional), please select the INPUT Mode and it will shows the INPUT
signal directly to the AZTEC LED Display Screen.
2. For Software settings please refer to the control system specification
ation of the AZTEC LED display
user manual or contact our service representative
representative;
3. Turning off Display: Firstly Please Turn
T
Off the LED display power, then you can now Turn
T
OFF the
control software / processor,, and lastly
last TURN off the computer / PC & other devices if exists.
Troubleshooting
1. Please Check the Connections Wiring
W
whether it has been connected properly,
properly including the
Neutrik power connector,
2. Then please check and make sure that the signal is properly connected, mainly the connections
need to be maintained to & from the AZTEC Control System, the cascade direction is properly
connected with the AZTEC Receiving
eceiving Card program.
Check the system is properly connected (please read the system connection instructions)
omputer software is Install properly and completed, including All Graphics
Please make sure If Computer
Settings and Software Installation
nstallation procedure.
Important Notice
IMPORTANT NOTICE: customers and users need to know how to maintain and safety standard
procedure in using of our products, and need to provide a clear understand information for
reference while extending the life of the display.
1. Please Follow the "User Manual" in step by steps;
2. Please ensure of the Moisture, humidity Maximum Availability: Standard AZTEC LED display
should be lesss than relative humidity 92% when working under the maximum operating
temperature;
3. We recommend of the Proper Equipment Usage Temperature are as follows:
Outdoor use: -20°C≤t≤80°C
≤t≤80°C
Indoor use: -10°C≤t≤60°C
0°C
Storage use: -40°C≤t≤60°C
≤t≤60°C
4. Please make sure for the Power supply to meet the Minimum requirements:
LED display power supply: Standard: 220V-240V±10%, 50HZ/60HZ±5% ;
Ensure All Display Installation is added protection grounding when installation of wire need
to ensure the firm contact with the earth; the main power supply cable needs a direct
connection with the main Distribution Cabinet , while avoiding shared with other power
distribution equipment cabinet to reduce interference caused by these devices on display .
5. AZTEC LED display switching sequence:
A: Turn on the control computer so that it can run properly and then turn on the LED display
B: Turn offer LED display, and then turn off the computer.
6. If the LED display is not used more than 3 days , requires the use of preheat lights lit the way
every time; 30 % -50 % brightness of the first warm-up for 1-2 hours , and then adjusted to
normal brightness ( 80% -100% ); thereby exclude moisture , so that when used without
exception;
If the LED display is not used more than 7 days , requires the use of preheat lights lit the way
every time; 30 % -50 % brightness of the first warm-up for 5 hours , and then adjusted to
normal brightness ( 80% -100% ); thereby exclude moisture , so that when used without
exception;
7. Do not switch the display too frequently , Recommendation of Switching Display Mode shall
be more than 1 minute;
8. AZTEC LED display be powered after getting the green light flashing from AZTEC Sending
Card;
9. Required to designate a person to operate, save and backup the software and data;
10. Strictly forbid to plug the data cable and other connectors on power; Strictly forbid to
maintenance and repair on power;
11. Regularly check cabinet inside to see if the fan is working properly, the line for damage. If
the fan is not working should be promptly replaced , the line is damaged to be repaired or
replaced;
12. Outdoor use requires periodic inspection for leaks;
13. For a clean module surface, use a soft brush and gently brushed. Prohibit the use of any
liquid substance to clean the surface of LED modules; otherwise it may damage the SMD-LED.
Maintenance
◆ We will provide free training for our customers, and provide online training support, pictures and
files as required for Maintenance and Ensuring Quality Sets All the screen > 100,000 hours life time.
◆ As we promise, we provide standard ONE / TWO year warranty to our customer for LED display.
Note. Our Warranty Structure can be Upgraded to 5 YEARS full Service & Spareparts.
◆ During the warranty period, we will repair the equipment units free of charge
Unconditionally, if the deficiency caused by product quality problem or installation. We take no
responsibility if the failure coursed by disobeying operation regulations of the clients or under
the irrevocable exterior factors stipulated.
◆ We promise a follow-up service for the life time of the equipment. When the warranty
expires, we can continue to provide maintenance service for whole life of the equipment, and
certain service fee will be charged.
◆ We can give the quick response for unit repairing and promise to complete repairing within
5 days after we receive the units. We can also dispatch engineer to site to support serious
system deficiency on the request of the customer.
◆ After our customer purchases our AZTEC LED Full Color Display, we will also provide our
customer with the service of software upgrading free of charge. Our customer can download the
new version from our website or by e-mail.