1
Oracle AutoVue Integration SDK
Installation and Configuration Guide
September 2013
Copyright © 1998, 2013, Oracle and/or its affiliates. All rights reserved.
The Programs (which include both the software and documentation) contain proprietary information; they are provided under a
license agreement containing restrictions on use and disclosure and are also protected by copyright, patent, and other intellectual
and industrial property laws. Reverse engineering, disassembly, or decompilation of the Programs, except to the extent required to
obtain interoperability with other independently created software or as specified by law, is prohibited.
The information contained in this document is subject to change without notice. If you find any problems in the documentation,
please report them to us in writing. This document is not warranted to be error-free. Except as may be expressly permitted in your
license agreement for these Programs, no part of these Programs may be reproduced or transmitted in any form or by any means,
electronic or mechanical, for any purpose.
If the Programs are delivered to the United States Government or anyone licensing or using the Programs on behalf of the United
States Government, the following notice is applicable:
U.S. GOVERNMENT RIGHTS Programs, software, databases, and related documentation and technical data delivered to U.S.
Government customers are "commercial computer software" or "commercial technical data" pursuant to the applicable Federal
Acquisition Regulation and agency-specific supplemental regulations. As such, use, duplication, disclosure, modification, and
adaptation of the Programs, including documentation and technical data, shall be subject to the licensing restrictions set forth in the
applicable Oracle license agreement, and, to the extent applicable, the additional rights set forth in FAR 52.227-19, Commercial
Computer Software-Restricted Rights (June 1987). Oracle Corporation, 500 Oracle Parkway, Redwood City, CA 94065.
The Programs are not intended for use in any nuclear, aviation, mass transit, medical, or other inherently dangerous applications. It
shall be the licensee's responsibility to take all appropriate fail-safe, backup, redundancy, and other measures to ensure the safe use
of such applications if the Programs are used for such purposes, and we disclaim liability for any damages caused by such use of
the Programs.
The Programs may provide links to Web sites and access to content, products, and services from third parties. Oracle is not responsible for the availability of, or any content provided on, third-party Web sites. You bear all risks associated with the use of such
content. If you choose to purchase any products or services from a third party, the relationship is directly between you and the third
party. Oracle is not responsible for: (a) the quality of third-party products or services; or (b) fulfilling any of the terms of the agreement with the third party, including delivery of products or services and warranty obligations related to purchased products or services. Oracle is not responsible for any loss or damage of any sort that you may incur from dealing with any third party.
Oracle is a registered trademark of Oracle Corporation and/or its affiliates. Other names may be trademarks of their respective
owners.
September 2013
Installation and Configuration Guide
3
CONTENTS
PREFACE.......................................................................................................................................5
Related Documents.................................................................................................................................5
Conventions.............................................................................................................................................5
INTRODUCTION..........................................................................................................................6
SYSTEM REQUIREMENTS .......................................................................................................7
Required Software..................................................................................................................................7
Server.......................................................................................................................................................7
Windows...........................................................................................................................................7
Linux.................................................................................................................................................7
Client........................................................................................................................................................7
Application Servers ................................................................................................................................7
Development Tools .................................................................................................................................7
INSTALLATION PREREQUISITES .........................................................................................8
Downloading Required Software ..........................................................................................................8
Oracle JDeveloper 11gR1.................................................................................................................8
Oracle Enterprise Pack for Eclipse 11gR1 .......................................................................................8
Oracle AutoVue ................................................................................................................................8
WebLogic Server ..............................................................................................................................8
INSTALLING AND CONFIGURING ........................................................................................9
Installing ISDK .......................................................................................................................................9
Creating a Server Runtime Environment on IDE.............................................................................10
Create Default Runtime Environment on IDE ...............................................................................10
Create Server Runtime on Eclipse..................................................................................................10
Creating Projects on IDE.....................................................................................................................11
Projects on JDeveloper ...................................................................................................................11
Projects on Eclipse..........................................................................................................................12
Configuring ISDK Components..........................................................................................................13
Configuring the ISDK Skeleton .....................................................................................................13
Configuring the Web Services Client .............................................................................................15
CONFIGURING SAMPLE PROJECTS...................................................................................17
Sample Integration for Filesys DMS...................................................................................................17
Step 1: Copy the AutoVue Jar Files ...............................................................................................17
Step 2: Configure the AutoVue Server...........................................................................................17
Step 3: Configure log4j.properties for Debugging .........................................................................18
Step 4: Configure RootDir for the Filesys Repository ...................................................................19
Step 5: Configure for an Embedded or Pop-Up Window (Optional) .............................................19
Step 6: Configure the Markup Policy (Optional) ...........................................................................19
Step 7: Configuring User Control...................................................................................................20
Step 8: Configure the Picklist.........................................................................................................20
Step 9: Configure the Thumbnail Display ......................................................................................20
Step 10: Configure for Redirection ................................................................................................21
Step 11: Configure the Real-Time Collaboration (RTC) Demo.....................................................22
Step 12: Configure the Oracle Enterprise Visualization Framework (OEVF) ...............................23
Step 13: Configure New Sample Data............................................................................................24
Step 14: Run the Filesys Project.....................................................................................................24
ISDK Web Services Sample Server ....................................................................................................25
Method 1: Use an Existing Project Template .................................................................................25
4
Installation and Configuration Guide
Method 2: Create a Project Manually.............................................................................................26
FEEDBACK .................................................................................................................................28
General AutoVue Information ............................................................................................................28
Oracle Customer Support....................................................................................................................28
My Oracle Support AutoVue Community .........................................................................................28
Sales Inquiries.......................................................................................................................................28
Installation and Configuration Guide
Preface
The AutoVue Integration SDK and Sample Integration for Filesys DMS Installation Guide describes the procedure
for building and running ISDK samples on IDEs that support Java EE 5 and Web applications.
For the most up-to-date version of this document, go to the AutoVue Documentation Web site on the Oracle
Technology Network (OTN) at http://www.oracle.com/technetwork/documentation/autovue-091442.html.
Related Documents
For more information, see the following documents in the Integration SDK documentation library:
•
•
•
•
•
•
•
Overview
Design Guide
User Guide
Technical Guide
Release Notes
Java Docs
Security Guide
Conventions
The following text conventions are used in this document:
Convention
Meaning
boldface
Boldface type indicates graphical user interface elements associated with an action, or
terms defined in the text.
italic
Italic type indicates book titles, emphasis, or placeholder variables for which you supply particular values.
monospace
Monospace type indicates commands within a paragraph, URLs, code in examples,
text that appears on the screen, or text that you enter.
5
Installation and Configuration Guide
Introduction
This document describes the procedure for building and running a dynamic Web project in JDeveloper and Eclipse
IDEs for Oracle AutoVue.
6
7
Installation and Configuration Guide
System Requirements
The recommended system hardware configuration is:
•
•
A system supporting the JDK/JRE version 6 with at least 2GB of main memory.
At least 100MB of free disk space to install the software components and examples.
Required Software
•
Oracle AutoVue 20.2.2
Server
The following operating systems have been certified with the Integration SDK:
Windows
•
•
•
•
•
Windows 2003 32-bit
Windows 2003 64-bit (AutoVue running in 32-bit mode)
Windows 2008 32-bit
Windows 2008 64-bit (AutoVue running in 32-bit mode)
Windows 2008 R2 64-bit (AutoVue running in 32-bit mode)
Linux
•
•
Redhat Enterprise Linux 5.6 (and up) and 6.X (x86) 32-bit and 64-bit
Oracle Linux 5.6 (and up) and 6.X (x86) 32-bit and 64-bit
Client
•
•
The following Java Virtual Machines have been certified with the Integration SDK:
• Java JDK 1.6 update 41 and Java JDK 1.7 update 15 for Filesys Sample, Skeleton and Web Services Client
Web browsers supported by Oracle AutoVue 20.2.2
Application Servers
The following application servers are compatible with the Integration SDK:
•
•
Oracle WebLogic Server 11gR1 (10.3.5)
Any other application server that supports Servlet 2.5 may work but are not certified by Oracle
Development Tools
The following IDEs are compatible with the ISDK:
•
•
•
Oracle Enterprise Pack for Eclipse llgR1 (11.1.1.7.3) for Eclipse 3.6.2 Helios Edition
Oracle JDeveloper 11gR1 (11.1.1.x)
Microsoft Visual Studio 2008
Installation and Configuration Guide
8
Installation Prerequisites
This manual assumes you are familiar with Java development and with basic Web application development concepts,
such as deployment descriptors and WAR archives. Understanding XML language is beneficial, but not mandatory.
The software products listed in the System Requirements must be installed and configured on your system
according to the manufacturer's instructions.
Downloading Required Software
Oracle JDeveloper 11gR1
You can download Oracle JDeveloper Studio Edition from http://www.oracle.com/technology/software/products/
jdev/htdocs/soft11.html.
Oracle Enterprise Pack for Eclipse 11gR1
Oracle Enterprise Pack for Eclipse (OEPE) is a free set of certified plug-ins, enabling WebLogic developers to
support Java EE and Web Service standards. The Oracle Enterprise Pack for Eclipse All-In-One installer includes a
preconfigured version of Eclipse and the OEPE plug-ins. You can download the Eclipse 3.6 (Galileo) Edition for your
desired platform from http://www.oracle.com/technology/software/products/oepe/oepe_11gR1.html. If you
download Eclipse IDE for Java EE Developers from the Eclipse Web site, you must download the Oracle WebLogic
Server plug-in separately when creating the server.
Oracle AutoVue
Oracle AutoVue 20.2.2 is available from http://edelivery.oracle.com. The description name is Oracle AutoVue 20.2.2.
Select a Media Pack for your desired platform.
WebLogic Server
You can download WebLogic Server from the following location: http://www.oracle.com/technology/software/
products/ias/htdocs/wls_main.html.
9
Installation and Configuration Guide
Installing and Configuring
This chapter describes the installation and configuration steps for the ISDK.
Note: If you are planning on deploying the ISDK in a secured environment, you should read the Oracle AutoVue
Integration Software Development Toolkit (ISDK) Security Guide before installing the ISDK.
To install, run the installer to extract all necessary files. You must then create a server runtime environment on IDE
and create a project. At this point you must manually configure ISDK components such as the ISDK Skeleton and
Web Service Client.
Once these steps are complete, if installed, you can configure the sample projects. Refer to section "Configuring
Sample Projects" for more information.
The following bullets link to the relevant sections:
1
"Installing ISDK"
2
"Creating a Server Runtime Environment on IDE"
3
"Creating Projects on IDE"
4
"Configuring ISDK Components"
Installing ISDK
There are two folders included in the Oracle AutoVue SDK Media Pack: win32 and linux. Each of these folders
contains the installer of the ISDK for the corresponding platform:
1
For Windows (2008 or 2003), go to the win32 folder and launch the setupwin32.exe file.
For Linux (Redhat Linux Enterprise 5), go to the linux folder and launch the setuplinux.bin file.
The Installer dialog appears.
2
Click Next.
3
Enter the location and directory name for the AutoVue Integration SDK. The default location and name for
Windows is C:\Oracle\AutoVueIntegrationSDK. Click Next.
4
Select the components to install. By default, the ISDK Skeleton and Web Service Client are selected. To install
the sample projects, select Sample Integration (filesys and Web Services Sample Server).
5
Click Next.
The installation summary page appears.
6
Click Next to begin installation.
The files are extracted to the location specified in step 3. Note that the ISDK is installed by default with Secure
Sockets Layer (SSL) enabled.
7
Click Finish to complete the installation.
Note: If the Linux installer is unable to run in graphical mode, install the libXp package.
After running the installer, all the required files are created under your AutoVueIntegrationSDK installation directory
with the following structure:
•
•
The /docs folder contains javadocs. All other ISDK documentation can be found on the Oracle AutoVue
Documentation OTN site at http://www.oracle.com/technetwork/documentation/autovue-091442.html.
The /FileSys folder contains four subfolders:
• The /Repository folder contains filesysRepository.zip which contains sample files used by the Sample
Integration for Filesys.
• The /OEVF folder contains two GUI files used for the OEVF demo.
• The /WebApplication folder contains a filesys.war file and a /filesys folder. The content in the /filesys folder
is the unzipped version of the filesys.war file. The filesys.war can be imported into JDeveloper or Eclipse
Installation and Configuration Guide
•
•
•
10
workspace to demo the Sample Integration for Filesys and to demo RTC & OEVF functionalities. The project
contains source code for sample integration, AutoVue client and third party libraries required by the
integration.
• The /ESAPI_Resources folder contains the OWASP Enterprise Security API properties files:
ESAPI.properties and validation.properties.
The /ISDKSkeleton folder contains two subfolders:
• The /WebApplication folder contains an isdk_skeleton.war file and a /isdk_skeleton folder. The content in the
/isdk_skeleton folder is the unzipped version of the isdk_skeleton.war file. The isdk_skeleton.war can be
imported into JDeveloper or Eclipse workspace to create the Integration SDK Skeleton project. Your
integration with Java-based backend systems will be developed based on this skeleton project and fulfill the
TODO comments in this project.
• The /ESAPI_Resources folder contains the OWASP Enterprise Security API properties files:
ESAPI.properties and validation.properties.
The /WebServicesIntegration folder contains three subfolders:
• The WebServiceClient folder contains the /ESAPI_resources and /WebApplication folders. The /
ESAPI_Resources folder contains the OWASP Enterprise Security API properties files: ESAPI.properties and
validation.properties. The /WebApplication folder contains the wsclient.war and a /wslcient folder which is
the unzipped version of the WAR file.
• The /WSDL folder contains the BluePrint WSDL file and the XSD file that accompanies it.
• The /WebServicesSampleServer folder contains a /C# folder. The /C# folder contains the Service1.asmx.cs
file and the zipped project template wsserver_VisualStudio2008_ProjectTemplate.zip. The Service1.asmx.cs
file is used when creating an ISDK Web Services project manually.
The /etc folder contains a list of files and folders structure contained in this ISDK, and folders containing
licenses of third-party software used by the ISDK.
• The /_jvm and /_uninst folders for uninstalling the ISDK.
Note: The ESAPI.properties and validation.properties files are placed in the folder based on the configuration
settings defined by the user. If there is no path defined in the application, the library looks for them inside the esapi
folder of the user's home directory.
The following sections describe how to configure the ISDK Skeleton and Web Services Client.
Creating a Server Runtime Environment on IDE
Create Default Runtime Environment on IDE
JDeveloper has an integrated WebLogic Server (IntegratedWebLogicServer) configured. As a result, you can skip this
step if using JDeveloper.
Create Server Runtime on Eclipse
You can create a server to identify the runtime environment that you want to use in Eclipse. To create the WebLogic
Server, complete the following steps. Please notice that your Oracle WebLogic Server domain needs to be created in
development mode in order to create the server successfully in Eclipse.
You can create a server to identify the runtime environment that you want to use to test your Oracle AutoVue project.
1
From the File menu, select New, and then select Other.
2
Expand the Server folder, then select Server.
3
Click Next.
11
Installation and Configuration Guide
The Define a New Server wizard opens. This wizard lets you define a new server that contains information
required to point to a specific runtime environment for local or remote testing, or for publishing to an application
server.
Note: If you installed Eclipse using Oracle Enterprise Pack for Eclipse Galileo Edition, Oracle WebLogic
Server (11gR1) is listed in the New Server wizard under Oracle server type. If you downloaded Eclipse 3.6.2
directly from Apache Web site, you need to click Download Additional Server Adapters and download Oracle
WebLogic Server adapter from the Internet yourself.
4
Select Oracle WebLogic Sever 11gR1, click Next, and then perform the following steps:
Note: These steps also apply for Oracle WebLogic Server on Linux.
a. First you need to input WebLogic Home, for example, C:\bea\wlserver_11.1 on Windows and /home/my/bea/
wlserver_11.1on Linux, at the Define WebLogic Runtime dialog and then provide the domain directory at
Define a WebLogic Server dialog.
b. If you do not have the WebLogic domain available yet or you want to create a different one, click Click Here
to launch Configuration Wizard to create a new domain. Write down the Domain Location for your
created domain, for example, C:\bea\user_projects\domains\base_domain.
c. Now suppose you already have a domain directory available. You can input or browse to get it on your
machine and click Next.
5
Select the projects from the available projects list in the Add and Remove dialog and then click Add to add them
to the configured projects list. Click Finish.
Then Oracle WebLogic Server 11gR1 appears in the Servers view. You can start and stop the Server from this
view.
6
Open the Server view to verify that the server has been created. You can click Servers
from the menu bar, then Show View and Servers to display the Server view.
or click on Window
Creating Projects on IDE
This section describes how to create a project on JDeveloper and Eclipse IDEs.
Projects on JDeveloper
1
Create an application if you do not have one yet. You can create an application by clicking on File from the
menu, then select New.
The New Gallery dialog appears.
2
Select Applications under the General category from the left panel and then select Custom Application from
the right panel.
3
Click OK.
The Create Application dialog appears.
4
Complete the Create Application dialog to create an application with the Application Package Prefix field left
empty. Click Finish to the create the project.
5
Click File and then Import.
The Import dialog appears.
6
Select WAR File and then click OK.
The Create Project from WAR File dialog appears.
7
Browse to the ISDK component folder or sample projects folder and then select a WAR file.
8
In the following Create Project from WAR file dialogs perform the following:
• Enter your project name.
• Choose a directory to put your project.
Installation and Configuration Guide
12
• Select the WAR file to import. For example, filesys.war.
• Verify the location for Root Directory for Web Module.
9
Click Finish to finish the creation of your project.
10 In the Project view, browse to verify that your project has been created successfully.
11 Click on Build to make your project. There should be no compilation error.
12 Check Libraries and Classpath:
a. Right-click the project and select Project Properties to bring out the Project Properties dialog
b. Click on Libraries and Classpath in the left panel.
c. Check the JSP Runtime and JSF 1.2 are available under the Classpath Entries. If there are not available, you
can add them manually in the following steps:
• Click Add Library in the right panel.
• Select JSP Runtime under Extension from the pop-up window.
• If you are going to deploy the project later to an external WebLogic Server instead of using the
IntegratedWebLogicServer, you also need to add JSF 1.2 under Extension from the pop-up window.
• Click OK.
13 This step is for the ISDK Web Service Sample project for WebLogic when the
“WeblogicUserNameTokenHandler.java” (Username token profile security for WebLogic) is needed.
a. WeblogicUserNameTokenHandler.java.excluded needs to be renamed to
WeblogicUserNameTokenHandler.java.
b. Add weblogic.jar to the project's build path if you see compilation error for
WeblogicUserNameTokenHandler.java. The steps are:
• Right-click the project and select Project Properties to bring out the Project Properties dialog.
• Click on Libraries and Classpath in the left panel
• Click on Add JAR/Directory in the right panel
• In Add Archive or Directory dialog, browse to WebLogic Server's lib folder to select weblogic.jar and
click on Select.
Weblogic.jar appears in the Classpath Entries.
• Click OK to exit the Project Properties dialog.
• Rebuild your project and there should be no compilation error.
14 To start the WebLogic Server. You can click on Run from menu bar and then click Start Server Instance to start
or click On from the toolbar.
Projects on Eclipse
1
In the File menu select Import. The Import dialog appears.
2
In the Import dialog, expand Web and select WAR file and then click Next to bring out the WAR Import dialog.
3
To import the sample WAR files, click Browse.
4
Browse to the ISDK component folder or sample projects folder and then select a WAR file.
5
Provide a name for your Web project.
If you have already configured Oracle WebLogic Server runtime, Oracle WebLogic Server 11gR1 is shown as
Target runtime. If you have not created it yet, you can create one now by clicking on New. Please refer to
"Creating a Server Runtime Environment on IDE".
6
Click Next.
7
Accept the default at the WAR Import: Web libraries dialog and click on Finish to populate the Web project.
8
Click Yes if Eclipse asks you to open J2EE perspective for this project.
9
This step is for the ISDK Web Service Sample project for WebLogic when the
“WeblogicUserNameTokenHandler.java” (Username token profile security for WebLogic) is needed.
13
Installation and Configuration Guide
a. WeblogicUserNameTokenHandler.java.excluded needs to be renamed to
WeblogicUserNameTokenHandler.java.
b. Add weblogic.jar to the project's build path if you see compilation error for
WeblogicUserNameTokenHandler.java. The steps are:
• Right-click the project and select Build Path, then select Configure Build Path to open the Project's
Properties dialog.
• Click on the Add Library tab and click on Server Runtime, and then click Next.
• If WebLogic appears, you can select and add.
• If you cannot find the WebLogic runtime, then click on Add External JAR from the previous dialog to
open the JAR Selection dialog. Browse to WebLogic Server's lib folder to select weblogic.jar and then
click Open.
• Weblogic.jar should appear in the Classpath Entries panel.
• Click on OK to exit the Properties dialog.
• Recompile the project and there should be no compilation error
10 After completing all these steps, there should be no compilation error about java code in your project.
Configuring ISDK Components
Configuring the ISDK Skeleton
The AutoVue Integration SDK Skeleton provides a basic framework for the you to build your own integration.
After you complete the steps outlined in "Creating Projects on IDE", you must configure the ISDK Skeleton as
described in the following steps.
Step 1: Copy the AutoVue Jar Files
Copy the following files from the directory <AutoVue Installation directory>\bin to your project's WebContent\applet
folder (for Eclipse) or public_html\jvue folder (for JDeveloper):
•
•
•
jvue.jar
jogl.jar
gluegen-rt.jar
Copy the file vueservlet.jar from the directory <AutoVue Installation directory>\bin to your project's
WebContent\WEB-INF\lib folder (for Eclipse) or public_html\WEB-INF\lib folder (for JDeveloper
Step 2: Configure the AutoVue Server
1
From the WEB-INF folder of your project, open the web.xml file in a text editor.
Installation and Configuration Guide
2
14
Locate the following block.
<servlet id="csi_servlet_2">
<servlet-name>VueServlet</servlet-name>
<servlet-class>com.cimmetry.servlet.VueServlet</servlet-class>
<init-param>
<param-name>JVueServer</param-name>
<param-value>localhost:5099</param-value>
</init-param>
<init-param>
3
Update the default location of JVueServer "localhost:5099". You must replace localhost with the host name/IP
address of the machine that is running the AutoVue server, and replace 5099 with the socket port number that the
AutoVue server is listening to (default is 5099).
4
Save your changes.
Step 3: Configure log4j.properties for Debugging
The location of log4j.properties file is defined in web.xml. By default, it is located at <ISDK Installation
Directory>\ISDKSkeleton\WebApplication\isdk_skeleton\WEB-INF\lib folder.
<init-param>
<param-name>log4jInitFile</param-name>
<param-value>/WEB-INF/lib/log4j.properties</param-value>
</init-param>
To configure log4j.properties for debugging, do the following:
1
Open the log4j.properties file with a text editor.
2
Set the location and the filename of your log4j logging file, for example, C:/tmp/filesys.log.
# setting the logging file
log4j.appender.R.File=<Your logs directory>/<logfile>.log
3
You can change the level and location of output by modifying this file, for example,
log4j.logger.com.cimmetry.vuelink=DEBUG.
15
Installation and Configuration Guide
The following table shows the different levels of logging available.
: No
: Yes
•
•
•
If you set Logger Level to FATAL, then only output messages of level FATAL are logged in log4j file.
If you set Logger Level to ERROR, then only output messages of level ERROR or FATAL are logged in log4j
file.
If you set Logger Level to DEBUG, then output messages of any level are logged in log4j file.]
4
Save your changes.
For more information on log4j capabilities, refer to log4j documentation.
Configuring the Web Services Client
The AutoVue Integration SDK Web Services Client (WSC) is a package built on top of ISDK Skeleton. It is
developed based on Java API for XML Web Services (JAX-WS) and is designed to communicate out of the box with
any Web Service provider that implements the BluePrint.wsdl file bundled with this AutoVue Integration SDK
distribution.
The WSC must be configured before using it with your integration. To do so, you must perform the following steps.
Step 1: Copy the AutoVue Jar files
Copy the following files from the directory <AutoVue Installation directory>\bin to your project's WebContent\applet
folder (for Eclipse) or public_html\jvue folder (for JDeveloper):
•
•
•
jvue.jar
jogl.jar
gluegen-rt.jar
Copy the file vueservlet.jar from the directory <AutoVue Installation directory>\bin to your project's
WebContent\WEB-INF\lib folder (for Eclipse) or public_html\WEB-INF\lib folder (for JDeveloper
Step 2: Configure the AutoVue Server
Configuring the AutoVue Server for the ISDK Web Service client project follows the same steps as "Configuring the
ISDK Skeleton".
Step 3: Configure log4j.properties for Debugging
Configuring the log4j.properties for the ISDK Web Service client project debugging follows the same steps as
"Configuring the ISDK Skeleton" (page 13).
Installation and Configuration Guide
16
Step 4: Configure the SOAP Handler
1
Locate and uncomment the following block in web.xml and update the param-value for param
wsclient.WSHanlder.
<!-- the SOAP handler class must extend
com.cimmetry.vuelink.wsclient.backend.WSHandler -->
<init-param>
<param-name>wsclient.WSHanlder</param-name>
<param-value>com.cimmetry.vuelink.wsclient.backend.UserNameTokenHandler</paramvalue>
</init-param>
2
Replace the param-value for wsclient.WSHanlder with your desired handler.
Here is a list of handlers delivered with Filesys Sample inside the com.cimmetry.vuelink.wsclient.backend
package.
Handler Name
Usage
WSHandler
No security implementation.
HTTPBasicHandler
HTTP basic authentication.
UserNameTokenHandler
Generic username token profile security.
WeblogicUserNameTokenHa
ndler
Username token profile security for WebLogic.
Use this one if the generic UserNameTokenHandler does not
work on Oracle WebLogic Server. You need to rename the
source code named
"WeblogicUserNameTokenHandler.java.excluded" to
"WeblogicUserNameTokenHandler.java" and add "weblogic.jar"
to the project's class path.
Step 5: Define the Location of BluePrint WSDL
Locate the following block in web.xml and update the <param-value> for param WSDL.
<!-- Define the location of BluePrint WSDL -->
<init-param>
<param-name>WSDL</param-name>
<param-value>…. </param-value>
</init-param>
<load-on-startup>1</load-on-startup>
</servlet>
A sample param-value for WSDL is:
http://mymachine:7001/WSClient/BluePrint?wsdl
17
Installation and Configuration Guide
Configuring Sample Projects
The sample projects included with the ISDK provide a good introduction to the many uses of the ISDK. You can take
the information provided and apply it to your own integration.
Note: These projects are not installed by default. During ISDK installation, you must select the Sample Project
check box to install. Refer to section "Installing ISDK" for more information.
The following sections detail the configuration steps for these sample projects:
•
•
"Sample Integration for Filesys DMS"
"ISDK Web Services Sample Server"
Sample Integration for Filesys DMS
This section describes the steps required to run the Sample Integration for Filesys DMS. This project is located in the
<ISDK Installation Directory>\AutoVueIntegrationSDK\FileSys folder.
Step 1: Copy the AutoVue Jar Files
Copy the following files from the directory <AutoVue Installation directory>\bin to your project's WebContent\jvue
folder (for Eclipse) or public_html\jvue folder (for JDeveloper):
•
•
•
jvue.jar
jogl.jar
gluegen-rt.jar
Copy the file vueservlet.jar from the directory <AutoVue Installation directory>\bin to your project's
WebContent\WEB-INF\lib folder (for Eclipse) or public_html\WEB-INF\lib folder (for JDeveloper).
Step 2: Configure the AutoVue Server
1
From the WEB-INF folder of your project, open the web.xml file in a text editor.
2
Locate the following block.
<servlet id="csi_servlet_2">
<servlet-name>VueServlet</servlet-name>
<servlet-class>com.cimmetry.servlet.VueServlet</servlet-class>
<init-param>
<param-name>JVueServer</param-name>
<param-value>localhost:5099</param-value>
</init-param>
<init-param>
3
Update the default location of JVueServer "localhost:5099". You must replace localhost with the host name/IP
address of the machine that is running the AutoVue server, and replace 5099 with the socket port number that the
AutoVue server is listening to (default is 5099).
4
Save your changes.
Installation and Configuration Guide
18
Step 3: Configure log4j.properties for Debugging
The location of log4j.properties file is defined in web.xml. By default, it is located at WEB-INF/lib folder.
<init-param>
<param-name>log4jInitFile</param-name>
<param-value>/WEB-INF/lib/log4j.properties</param-value>
</init-param>
To configure log4j.properties for debugging, do the following:
1
Open the log4j.properties file with a text editor.
2
Set the location and the filename of your log4j logging file, for example, C:/tmp/filesys.log.
# setting the logging file
log4j.appender.R.File=<Your logs directory>/<logfile>.log
3
You can change the level and location of output by modifying this file, for example,
log4j.logger.com.cimmetry.vuelink=DEBUG.
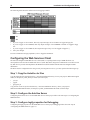
The following table shows the different levels of logging available.
: No
: Yes
•
•
•
If you set Logger Level to FATAL, then only output messages of level FATAL are logged in log4j file.
If you set Logger Level to ERROR, then only output messages of level ERROR or FATAL are logged in log4j
file.
If you set Logger Level to DEBUG, then output messages of any level are logged in log4j file.]
4
Save your changes.
For more information on log4j capabilities, refer to log4j documentation.
19
Installation and Configuration Guide
Step 4: Configure RootDir for the Filesys Repository
1
From the public_html\WEB-INF folder of your project, open the web.xml file in a text editor.
2
Replace the param-value for "RootDir". For example, if you have unzipped the Filesys Repository to folder
c:\tmp on Windows, the param-value for RootDir will be c:\tmp\filesysRepository.
<!--
context parameters are available to all servlets -->
<context-param>
<param-name>RootDir</param-name>
<param-value>Put path to repository here:</param-value>
</context-param>
3
Save your changes.
Step 5: Configure for an Embedded or Pop-Up Window
(Optional)
AutoVue applet can be launched in a pop-up window or embedded inside the caller's browser window.
By default, the Filesys demo uses embedded mode and the RTC demo uses pop-up mode.
For the OEVF demo, you can select the mode by providing embedded=0 or embedded=1 request parameter in the
launching url. See jvue/OEVFDemo.html.
To change the mode in Filesys demo:
1
Open jvue/frmApplet.jsp
2
Change the line
boolean embedded = true;
to
boolean embedded = false;
To change the mode in RTC demo:
1
Open jvue/RTCDemo_init.jsp and jvue/RTCDemo_join.jsp
2
Change the line
boolean embedded = false;
to
boolean embedded = true;
Step 6: Configure the Markup Policy (Optional)
The location of MarkupPolicy.xml file is defined in web.xml that controls markup operation. By default, it is located
at WEB-INF/lib folder.
<init-param>
<param-name>CSI_MarkupPolicyDefLocation</param-name>
<param-value>/WEB-INF/lib/MarkupPolicy.xml</param-value>
</init-param>
Installation and Configuration Guide
20
If you need to update the Markup Policy file, please refer to the Oracle AutoVue User’s Manual. On Windows, the
link is http://localhost/jVue/help/en/AutoVueOnLineHelp.html. If the link does not work, check whether there is a
virtual directory "jVue" with IIS. It is created during AutoVue server installation.
Step 7: Configuring User Control
By default, the Sample Integration for Filesys bundles a file called credential.txt that contains valid user information
for authentication. The location of credential.txt file is defined in web.xml.
<init-param>
<param-name>CredentialInfoLocation</param-name>
<param-value>/WEB-INF/lib/credential.txt</param-value>
</init-param>
To add new users or modify existing user name or password, update credential.txt. Each line of the file contains an
entry for a user and its password. The field separator is colon ":".
Step 8: Configure the Picklist
This list is for controlling the content of a picklist for Stamp (formerly called Intellstamp) DMS properties. You can
remove/modify existing values or add new values for the <Status> and <RelatedInfo> elements in WEB-INF/lib/
picklist.xml, but you are not supposed to delete these two elements or add new elements directly under <Data>
element.
Step 9: Configure the Thumbnail Display
If you want to show thumbnails based on bmp renditions when browsing the Filesys Repository, you can do the
following configuration.
1
For Windows operating systems, create a virtual directory on Internet Information Services (IIS) for the Filesys
repository. For example, if you have unzipped the Filesys repository to folder c:\tmp on Windows, you can create
a virtual directory with alias filesysRepository and the location path c:\tmp\filesysRepository. Suppose IIS is
available at the default port 80.
2
For Linux system, if Apache Server is available, do the following configuration.
•
•
•
•
Open Apache's httpd.conf file.
Locate the line: DocumentRoot "/var/www/html".
Copy this line and comment out the original one.
Change the copied line to, for example
DocumentRoot
"/home/ucm/tmp"
Suppose your Filesys repository is upzipped to /home/ucm/tmp folder and your /home/ucm/tmp/
filesysReposity folder allow executing file as program. If your DocumentRoot has already been used, you
need to put your Filesys repository under the existing DocumentRoot folder in order to preview thumbnails.
• Save the file and restart Apache Server.
3
Replace the param-value for RootURL in web.xml. This URL is mainly used for thumbnail displaying. But you
need to put a URL (for example, http://localhost) there even if thumbnail displaying is not intended. With the
21
Installation and Configuration Guide
configuration sample in Step 1, the param-value for RootURL will be http://localhost/filesysRepository. Pay
attention to the case sensitivity of IIS.
<!-- This URL is only needed to construct thumbnail URLs -->
<context-param>
<param-name>RootURL</param-name>
<param-value>http://localhost/filesysRepository </param-value>
</context-param>
Step 10: Configure for Redirection
To test the redirection functionality in Filesys, you need to install IDE and deploy the Filesys sample project on two
machines—a main server and a remote server—and complete the generic configuration and other configurations
based on your needs. You must then perform the following configurations for redirection:
1
On the main server machine, change the folder permission for the filesys repository to Full Control for all users.
2
On the remote server machine, create a network mapping drive to the Filesys repository directory on the main
server machine. In Filesys demo, both remote server and the main server use the same Filesys repository data.
3
On the main server, modify web.xml to comment out the blocks RemoteVueLink, RemotejVueServer and
RemoteVueServlet. Specify the param-values for these three parameters.
Param-name
Description and param-value
RemoteVueLink
URL to the remote VueLink.
The param-value is
http://host:port/context/servlet/FilesysVuelink
where host is the remote host name or IP address, port is the
remote IDE's server runtime port number, context is the Filesys
project name on the remote IDE.
RemotejVueServer
Hostname or IP address of the remote AutoVue server.
The remote server can use another AutoVue server instead of the
one running on the main server.
RemoteVueServlet
URL to the remote VueServlet.
The param-value is
http://host:port/context/servlet/VueServlet
Installation and Configuration Guide
22
For Example:
<context-param>
<param-name>RemoteVuelink</param-name>
<param-value> http://sremote:7001/ISDK_Remote/servlet/FilesysVuelink</param-value>
</context-param>
<context-param>
<param-name>RemotejVueServer</param-name>
<param-value>sremote</param-value>
</context-param>
<context-param>
<param-name>RemoteVueServlet</param-name>
<param-value>http://sremote:7001/ISDK_Remote/servlet/VueServlet</param-value>
</context-param>
Step 11: Configure the Real-Time Collaboration (RTC) Demo
Verify the RTC Demo
Make sure the WEB-INF/lib/credential.txt has an entry for user "rtc" and “rtc1”. Although every valid user can
initiate and join a meeting, by default the meeting is initiated as user "rtc" and joined by user “rtc1” and the AutoVue
applet is named after the username.
Prior to running the demo, you must do the following:
•
•
Uncomment the two users (rtc and rtc1) from the WEB-INF/lib/credential.txt file and change the default
passwords.
Update the password parameter in the jvue\RTCDemo_init.jsp file for user rtc:
request.getSession().setAttribute("password", "rtc");
Update the password parameter in the jvue\RTCDemo_join.jsp file for user rtc1:
request.getSession().setAttribute("password", "rtc1");
Updating these parameters avoids an Authentication dialog when initializing or joining a RTC meeting when
using the ISDK 20.2.1 RTC demo.
Create or Update the meetingfiles.txt
Verify that the meetingfiles.txt file under your <Filesys repository>/Meeting folder exists. If this file does not exist,
you need to create it manually.
If you want to change the files shown in the Meeting File drop down list when initiating a RTC meeting from
RTCDemo_init.jsp page similar to the following figure, then you need to update the meetingfiles.txt file.
23
Installation and Configuration Guide
Each entry in the meetingfiles.txt file represents one meeting file; it starts with "/" and reflects one viewable
document file in the Filesys repository.
To select another file to collaborate on during a meeting, form the AutoVue menu bar, the meeting controller can click
File, Open URL, and then DMS Browse. The Meeting folder shows files already defined in meetingfiles.txt. The
new collaborated file is appended to meetingfiles.txt.
After the host closes a RTC meeting by clicking Collaboration and then Close Collaboration Session, the chat
transcript is saved to the Meeting folder.
Step 12: Configure the Oracle Enterprise Visualization
Framework (OEVF)
Define OEVFInfoLocation in web.xml
By default, ISDK filesys bundles a file called oevf.xml which defines the mapping of document IDs with assetIDs
and workflowIDs. The default location of oevf.xml is under the folder WEB-INF/lib. If you move the file to another
location, then you need to specify the full path for the parameter OEVFInfoLocation in web.xml.:
<!-# the location of xml file which contains all the info about assetIDs, workflowIDs
# and full path of the latest revision in FileSys DMS
-->
<init-param>
<param-name>OEVFInfoLocation</param-name>
<param-value>/WEB-INF/lib/oevf.xml</param-value>
</init-param>
Update oevf.xml
This step is required if you want to establish new or update existing mappings of document IDs with assetIDs and
workflowIDs.
The root element of the oevf.xml file is <data>. The direct elements under <data> are <file> elements that
contain the definition for files. Each <file> element represents one file. If you want to add mapping relationships
for a new file, then you need to add a new <file> entry.
A <file> element can include multiple <revision> elements that represent the multiple revisions of the file. If you
want to add a new revision section to an existing file, then you must add one new <revision> entry.
Each <version> element includes a <docID>, <assetIDs>, <workflowIDs> and <version> elements. The
value for <version> element is the revision number. The value for <docID> element is the relative path to a file in
the Filesys data repository. It starts with "/". For example, /2D/MicroStation.dgn/MicroStation.dgn(2)/
MicroStation.dgn.
The <assetID> elements can contain multiple <assetID> elements and the <workflowID> elements can contain
multiple <workflowID> elements. You can add or delete an assetID that is associated with one revision of a file by
adding or deleting element a <assetID> element. You can add or delete a workflowID. that is associated with one
revision of a file by adding or deleting a <workflowID> element.
Installation and Configuration Guide
24
Update OEVFDemo.html
This step is needed to add new or modify existing test cases for OEVF.
The launching OEVF URL defined inside <a> tag calls "…/jvue/frmApplet.jsp" page combined with some of the
following parameters.
URL Request Parameter
Value and Description
aID
A Value defined for <assetID> element in oevf.xml.
docID
A value defined for <docID> element in oevf.xml.
wID
A value defined for <workflowID> element in oevf.xml.
embedded
0 or new such parameter: AutoVue applet appears in a new
window.
1: AutoVue applet is embedded in the caller’s browser
window.
goBack
Work together with embedded=0.
0 or no such parameter: The caller’s browser displays an
empty page with the launching OEVF URL.
1: The caller’s browser displays the OEVFDemo.html page.
guiFile
Name of the AutoVue GUI to be used.
You can pass in only aID, only wID, aID with wID, aID with dID, wID with dID, aID with wID and dID in addition
with embedded or goBack or guiFile param. Refer to OEVFDemo.html for the meaning of different combinations.
Copy the OEVF GUI files to AutoVue
Copy assetView.gui and assetEdit.gui files from inside the ISDK installation AutoVueIntegrationSDK/FileSys/OEVF
folder to the folder <AutoVue Installation Directory>/bin/Profiles folder. If the Profiles folder does not exist, create
one before copying.
Step 13: Configure New Sample Data
You can add new data to the existing sample Filesys repository. It is recommended not to rename the folder name or
file name, or delete existing data, because the sample data is preconfigured to demonstrate certain functionalities (for
example, for RTC Demo and OEVF demo).
Refer to the section “Add new data to the document repository” in the User Guide for information on how to
manually, or using JDeveloper or Eclipse, add new data after you create the Filesys project.
Step 14: Run the Filesys Project
The following steps describe how to run the Sample Integration for Filesys project.
1
Run the AutoVue Server.
2
Deploy project and start WebLogic server on Eclipse:
a. Go to the Servers view by clicking Servers .
b. Right-click on the Oracle WebLogic Server and then click Add and Remove. In the Add and Remove dialog,
select your project from the left panel, click Add to add the project to the right panel, and then click Finish to
exit.
25
Installation and Configuration Guide
c. Click
3
to start the server.
Start WebLogic server and deploy project on JDeveloper:
a. From menu bar select Run and then select Start Server Instance (IntegratedWeblogicServer) to start the
WebLogic Server.
b. Right-click the project, click Deploy and click your project's name. The Deploy dialog appears.
c. In the Deploy dialog, select Deploy on Application Server, click Next, then select
IntegratedWeblogicServer.
d. Accept the default setting and click Next.
e. At the last page, click Finish.
f. Note down the host IP and port number from the server's Deployment log. For example, the following may
appear in the log: <Channel "Default" is now listening on 10.10.1.1:7101 for
protocols...>
In this case, note down 10.10.1.1:7101.
4
Launch a Web browser and enter the URL address http://<localhost:port>/<context> to launch the home page
for ISDK Demo. For example:
• For Eclipse, the URL can be http://<localhost>:7001/filesys.
• for JDeveloper, the URL can be http://10.10.1.1:7101/ISDKSamples-filesys-context-root.
5
If you run into an issue when launching the project, verify that the FilesysVueLink and VueServlet servlets are
running properly using the following URLs:
• http://<host:port>/context/servlet/FilesysVuelink
• http://<host:port>/context/servlet/VueServlet
Replace the <host:port> using your own host name, WebLogic server’s port.
Replace context with the context for Filesys project on IDE.
If VueLink and VueServlet are running properly, the URLs load and display their respective version and build
information, and in the case of the VueServlet, whether the connection state is OK. If you do not get a successful
response, perform the following verifications:
•
•
•
•
Verify that the AutoVue server is running.
Verify that your project is installed deployed correctly.
Verify that web.xml is configured properly.
Verify that your application server is running and functioning properly.
ISDK Web Services Sample Server
The ISDK Web Services Sample Server project can be created by either basing it on an existing project or by creating
a new project manually. The following sections discuss both methods.
Note: The SOAP Message Transmission Optimization Mechanism (MTOM) is not supported in this release of
Sample Web Services Server.
In the event you have updated the BluePrint WSDL file, it is recommended that you create the project manually by
following the steps described in "Method 2: Create a Project Manually".
Method 1: Use an Existing Project Template
The following steps describe how to create an ASP.NET Web Services Server project using Microsoft Visual Studio
2008 based on an existing project template.
Installation and Configuration Guide
1
Copy the template wsserver_VisualStudio2008.zip from the <ISDK Installation
Root>\WebServicesIntegration\WebServicesSampleServer\C# directory to the <User home
directory>\Templates\ProjectTemplates\Visual C# directory.
2
Select New and then select Project.
3
From the left panel select Other Languages and then select Visual C#.
4
From My Templates select wsserver_VisualStudio2008.
5
In the Name field change it to wsserver_VisualStudio2008.
6
Click OK.
7
Open Service1.asmx.cs file.
8
Locate the following lines and verify that the filepaths mentioned are available.
26
// Path to the filesys repository sample data. You might need to update it.
private static string filesysRepositoryRoot = "c:\\Oracle\\filesysRepository\\";
// Path to the Stamp files (dmstamps.ini and stampimage.bmp) and
// MarkupPolicy.xml. You might need to update it.
private static string definitionPath = "C:\\Oracle\\definition\\";
Note: After the ISDK default installation on Window OSes, the Filesys repository sample data is available in a
compressed format (*.zip) at C:\Oracle\AutoVueIntegrationSDK\FileSys\Repository\filesysRepository.zip. You
must extract the contents of the file to the filesysRepositoryRoot location as defined in the
Service1.asmx.cs file.
The definition files are available from the
C:\Oracle\AutoVueIntegrationSDK\FileSys\WebApplication\filesys\WEB-INF\lib directory. You must copy
these files file to definitionPath as defined in the Sevice1.asmx.cs file.
9
Verify that the project compiles without error.
10 Run the project.
Method 2: Create a Project Manually
The following steps describe how to create an ASP.NET Web Services Server project manually using Microsoft
Visual Studio 2008.
1
Generate the ASP.NET Web Services code from the ISDK 20.2.1 Web Services WSDL file. To do so:
a. Open Visual Studio Command Prompt.
b. Run the following command from the temp folder:
wsdl.exe /Language:CS
/si wsdl_location xsd_location
Note: After the ISDK default installation on Windows, the ISDK Web Services WSDL file is located at
C:\Oracle\AutoVueIntegrationSDK\WebServiceClient\WSDL\BluePrint.wsdl and the ISDK Web Services XSD
file is located at C:\Oracle\AutoVueIntegrationSDK\WebServiceClient\WSDL\BluePrint.xsd.
c. A BluePrintInterfaces.cs file is generated in the temp folder.
2
Create the ASP.NET Web Services project using Microsoft Visual Studio 2008:
a.
b.
c.
d.
3
Select New and then select Project.
Select Visual C# and then select Web.
Select ASP.NET Web Services Application.
Enter the project name and then click OK.
Update the ASP.NET Web Services project:
27
Installation and Configuration Guide
a.
b.
c.
d.
Right-click the project you just created and then select Add and then select Existing Item.
Browse to the temp folder and then select BluePrintInterfaces.cs.
Click Add.
Open the BluePrintInterfaces.cs file and locate the following line:
[System.Web.Services.WebServiceBindingAttribute(Name="BluePrintBinding",
Namespace="artifact.wsclient.vuelink.cimmetry.com")]
e. Change the Name to BluePrint.
f. Open the Service1.asmx.cs file and locate the following lines:
[WebService(Namespace = "http://tempuri.org/")]
[WebServiceBinding(ConformsTo = WsiProfiles.BasicProfile1_1)]
[ToolboxItem(false)]
g. Replace these lines with the following:
[WebService(Name = "BluePrint", Namespace =
"artifact.wsclient.vuelink.cimmetry.com")]
[System.Web.Services.Protocols.SoapDocumentService(RoutingStyle =
SoapServiceRoutingStyle.RequestElement)]
h. Replace the implementation code for the Service class with those available in the Service1.asmx.cs file.
i. Locate the following lines:
//Path to the filesys repository sample data. You might need to update it.
private static string filesysRepositoryRoot = "c:\\Oracle\\filesysRepository\\";
//Path to the Stamp files (dmstamps.ini and stampimage.bmp) and
//MarkupPolicy.xml. You might need to update it.
private static string definitionPath = "C:\\Oracle\\definition\\";
Note: After the ISDK default installation on Window OSes, the Filesys repository sample data is available in a
compressed format (*.zip) at C:\Oracle\AutoVueIntegrationSDK\FileSys\Repository\filesysRepository.zip. You
must extract the contents of the file to the filesysRepositoryRoot location as defined in the
Service1.asmx.cs file.
The definition files are available from the
C:\Oracle\AutoVueIntegrationSDK\FileSys\WebApplication\filesys\WEB-INF\lib directory. You must copy
these files file to definitionPath as defined in the Sevice1.asmx.cs file.
4
Verify the project compiles without error.
5
Run the project.
Installation and Configuration Guide
Feedback
If you have any questions or require support for AutoVue please contact your system administrator.
If at any time you have questions or concerns regarding AutoVue, please contact us.
General AutoVue Information
Web Site:
http://www.oracle.com/us/products/applications/autovue/index.html
Blog:
http://blogs.oracle.com/enterprisevisualization/
Oracle Customer Support
Web Site:
http://www.oracle.com/support/index.html
My Oracle Support AutoVue Community
Web Site:
https://communities.oracle.com/portal/server.pt
Sales Inquiries
E-mail:
[email protected]
28
29
Installation and Configuration Guide